Embed Size (px)
Citation preview

1. Remove all components from the box.
4. Attach the larger back wheels into the frame of the stroller by pushing the wheel in until it clicks. To remove the wheels, lift the back of the trailer up and push the buttons located on the axle. Pull out the wheels
7. Fasten hitch arm onto rear axle of your bike. Wrap the safety strap around the chainstay of the bike. Snap the hook into the D-ring attaching the trailer arm.
1. Insert the Flagpole into the Extension Sta�.
5. Lift front of stroller up and remove the hitch arm-locking pin from the back hole in the hitch arm bracket. Fold hitch arm out until it is parallel with the base frame. Lock the hitch arm into place by reinserting the safety pin through the front hole of the hitch arm bracket and secure with the wrap spring clip.
2. Lift both side bars to an upright position.
Please note: The above steps must be completed within the canvas covering.
TO USE AS A BIKE ATTACHMENT
Attaching Cross-Trainer Pet Stroller to Bicycle. Flag Attachment
3. Insert the safety pin into the hole on the crossbar to secure the side bars. Ensure that the safety pin is secured with the wrap spring clip.
PARTS(A) Stroller Body (1)(B) Back Wheel (2)(C) Front Wheel (1)(D) Handle (1)
(E) Flag (1)(F) Extension Sta� (2)
6. Fully assembled Stroller
A
D
B
C
E F
2. Insert the Extension Sta� into the sheathe on the side of the stroller.
Cross-Trainer Pet Stroller
Care and MaintenanceWipe frame and fabric clean with a damp cloth using a mild soap and water. Let air dry. Store in a clean, dry place.
USE INSTRUCTIONS: PLEASE READ CAREFULLYDesigned for use with pets only. Recommended for use with one pet only. Do not overload stroller. Maximum weight of pet should not exceed 40 lbs. Use of a safety harness or similar restraint is recommended. Do not leave pet unsupervised in stroller. Do not use stroller on escalators or stairs. Fold stroller and carry. Check that frame is locked in place and stroller body secure before placing pet inside. Do not hang heavy items from handles as this may make the stroller unstable. Do not carry additional items in stroller that may cause it to exceed its maximum load capacity.
LIMITED WARRANTYThis Guardian Gear® Cross-Trainer Pet Stroller Warranty covers any defects in parts, materials, and workmanship. Any Guardian Gear® product that is determined to be defective in material or workmanship will be replaced without cost to the purchaser for parts or labor. Shipping charges are not included in warranty returns. Please contact PetEdge Customer Service at 1-800-638-5754 regarding any defective product. PetEdge will not be liable under this warranty for any defect, failure or malfunction of this product caused by normal wear, abuse, misuse, unauthorized adjustments or repairs. PetEdge will not be liable for any incidental or consequential damages of any type. Warranty is void if product has been modi�ed in any manner, repaired by anyone other than PetEdge or has been subject to unreasonable use. Warranty is valid in the United States.
Date Purchased:________________Model #:___________________
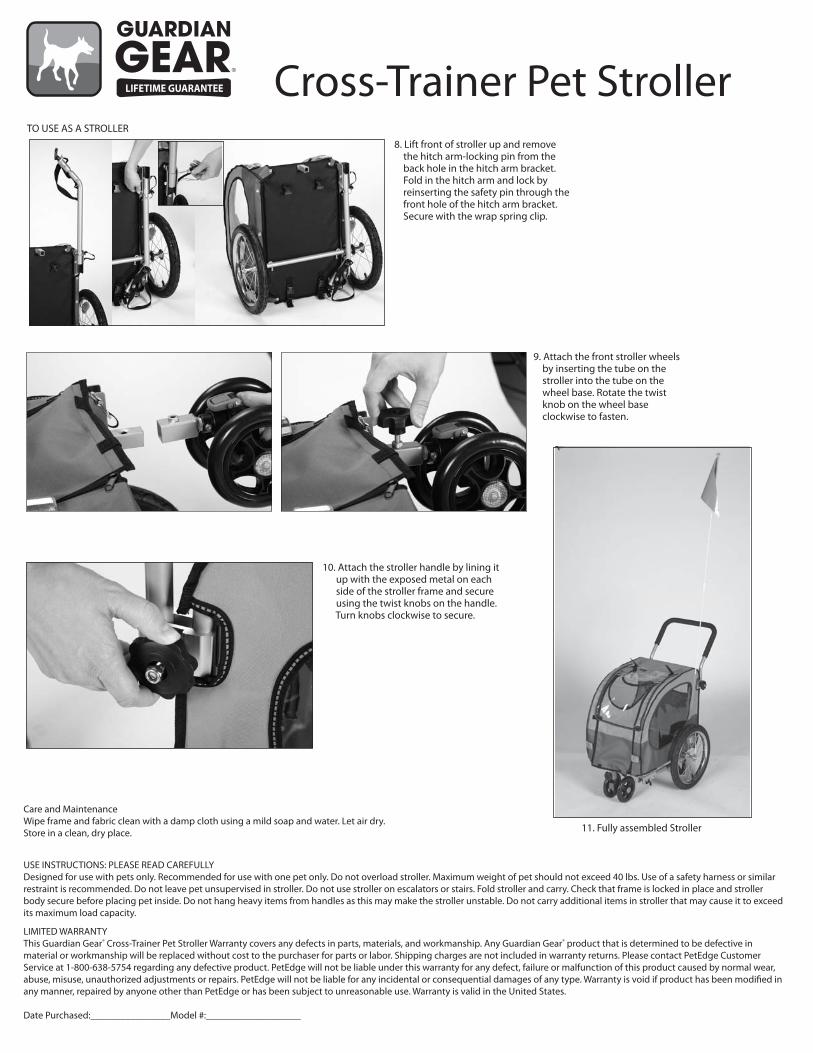
TO USE AS A STROLLER 8. Lift front of stroller up and remove the hitch arm-locking pin from the back hole in the hitch arm bracket. Fold in the hitch arm and lock by reinserting the safety pin through the front hole of the hitch arm bracket. Secure with the wrap spring clip.
9. Attach the front stroller wheels by inserting the tube on the stroller into the tube on the wheel base. Rotate the twist knob on the wheel base clockwise to fasten.
10. Attach the stroller handle by lining it up with the exposed metal on each side of the stroller frame and secure using the twist knobs on the handle. Turn knobs clockwise to secure.
11. Fully assembled Stroller
Cross-Trainer Pet Stroller