Embed Size (px)
Citation preview
Date: May 4th, 2017
Using Rapise® with Selenium®
Cross-Browser Testing Using Rapise & Selenium Together
Inflectra Corporation
Page 1 of 21 © Copyright 2006-2017, Inflectra Corporation This document contains Inflectra proprietary information
Contents
Introduction ......................................... 1
1. Setting up Selenium ....................... 2
2. Playing & Recording Tests ............ 9
3. Using Native Selenium Code ....... 14
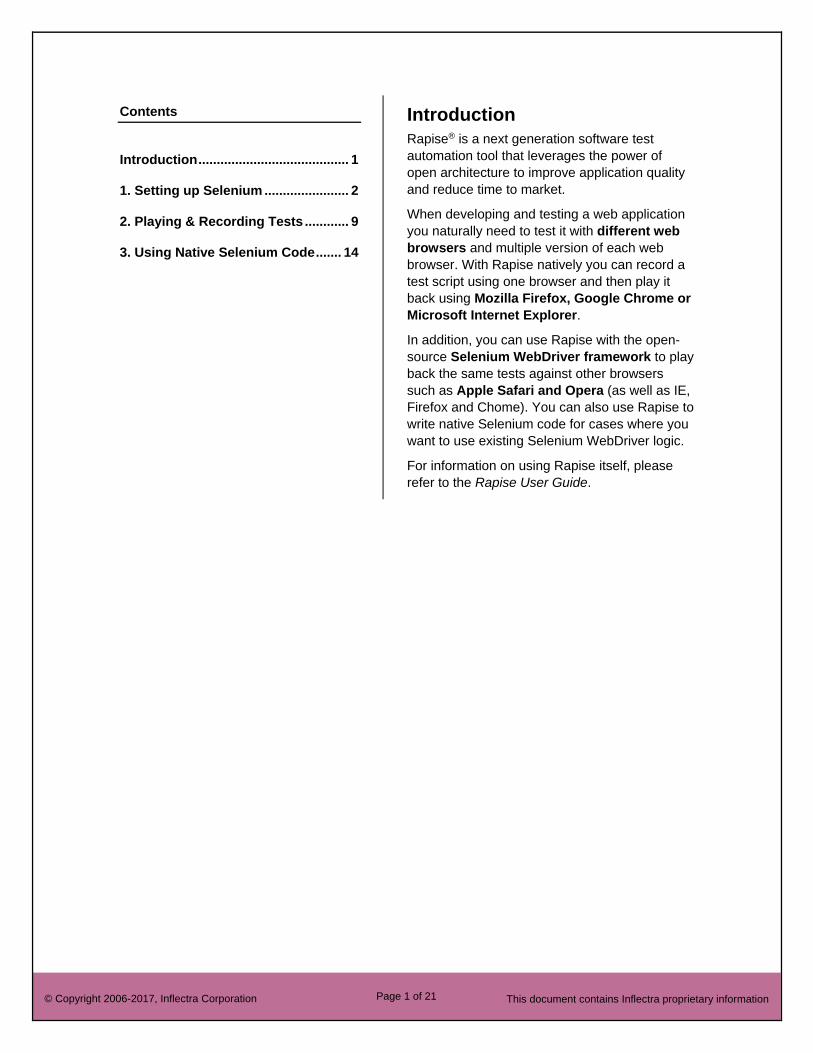
Introduction
Rapise® is a next generation software test
automation tool that leverages the power of
open architecture to improve application quality
and reduce time to market.
When developing and testing a web application
you naturally need to test it with different web
browsers and multiple version of each web
browser. With Rapise natively you can record a
test script using one browser and then play it
back using Mozilla Firefox, Google Chrome or
Microsoft Internet Explorer.
In addition, you can use Rapise with the open-
source Selenium WebDriver framework to play
back the same tests against other browsers
such as Apple Safari and Opera (as well as IE,
Firefox and Chome). You can also use Rapise to
write native Selenium code for cases where you
want to use existing Selenium WebDriver logic.
For information on using Rapise itself, please
refer to the Rapise User Guide.
Page 2 of 21 © Copyright 2006-2017, Inflectra Corporation This document contains Inflectra proprietary information
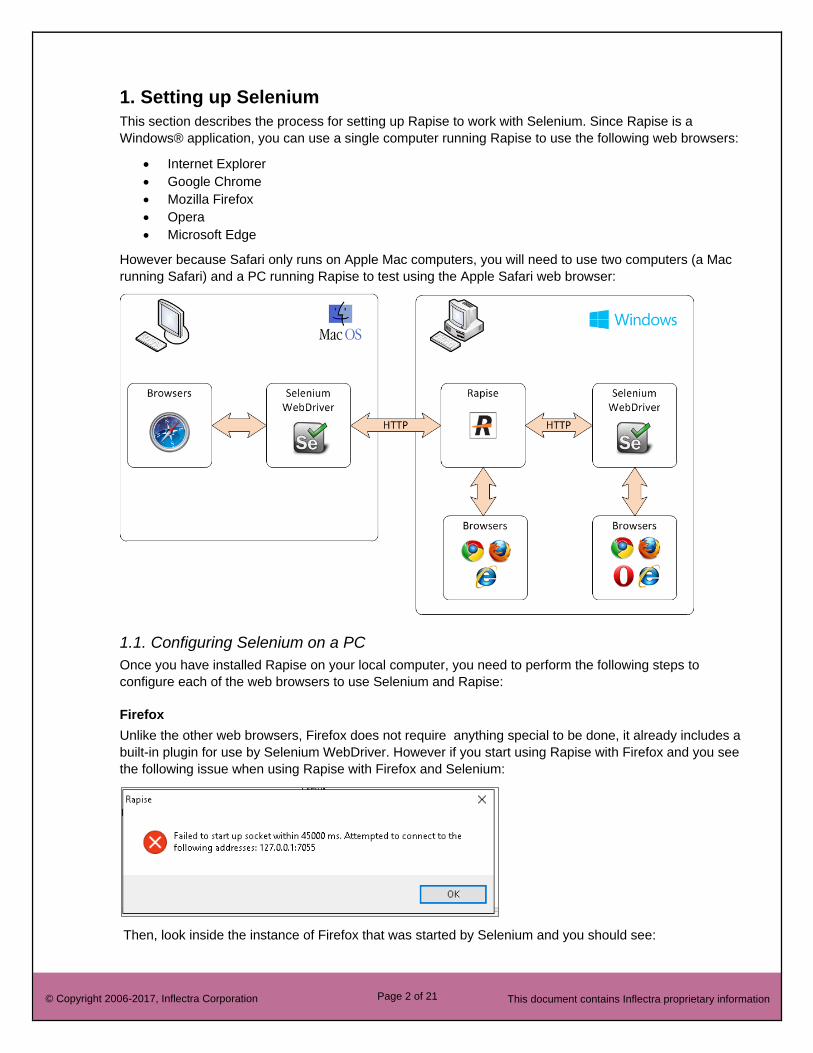
1. Setting up Selenium
This section describes the process for setting up Rapise to work with Selenium. Since Rapise is a
Windows® application, you can use a single computer running Rapise to use the following web browsers:
• Internet Explorer
• Google Chrome
• Mozilla Firefox
• Opera
• Microsoft Edge
However because Safari only runs on Apple Mac computers, you will need to use two computers (a Mac
running Safari) and a PC running Rapise to test using the Apple Safari web browser:
1.1. Configuring Selenium on a PC
Once you have installed Rapise on your local computer, you need to perform the following steps to
configure each of the web browsers to use Selenium and Rapise:
Firefox
Unlike the other web browsers, Firefox does not require anything special to be done, it already includes a
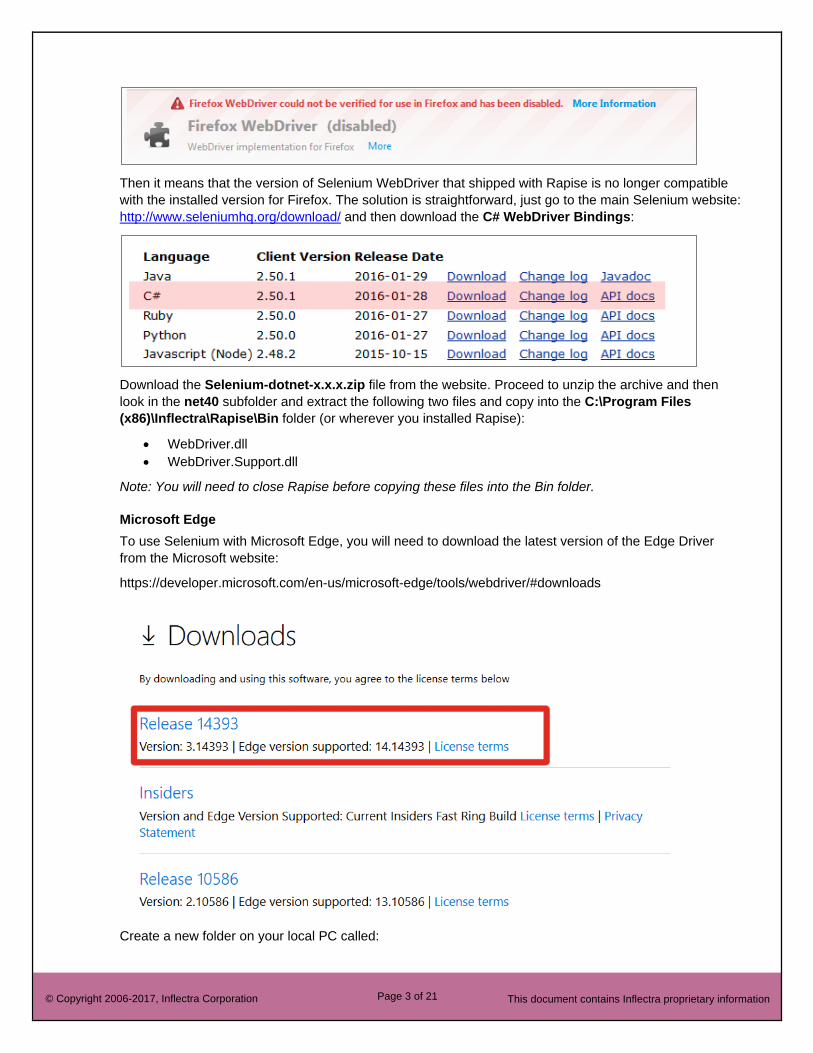
built-in plugin for use by Selenium WebDriver. However if you start using Rapise with Firefox and you see
the following issue when using Rapise with Firefox and Selenium:
Then, look inside the instance of Firefox that was started by Selenium and you should see:
Page 3 of 21 © Copyright 2006-2017, Inflectra Corporation This document contains Inflectra proprietary information
Then it means that the version of Selenium WebDriver that shipped with Rapise is no longer compatible
with the installed version for Firefox. The solution is straightforward, just go to the main Selenium website:
http://www.seleniumhq.org/download/ and then download the C# WebDriver Bindings:
Download the Selenium-dotnet-x.x.x.zip file from the website. Proceed to unzip the archive and then
look in the net40 subfolder and extract the following two files and copy into the C:\Program Files
(x86)\Inflectra\Rapise\Bin folder (or wherever you installed Rapise):
• WebDriver.dll
• WebDriver.Support.dll
Note: You will need to close Rapise before copying these files into the Bin folder.
Microsoft Edge
To use Selenium with Microsoft Edge, you will need to download the latest version of the Edge Driver
from the Microsoft website:
https://developer.microsoft.com/en-us/microsoft-edge/tools/webdriver/#downloads
Create a new folder on your local PC called:
Page 4 of 21 © Copyright 2006-2017, Inflectra Corporation This document contains Inflectra proprietary information
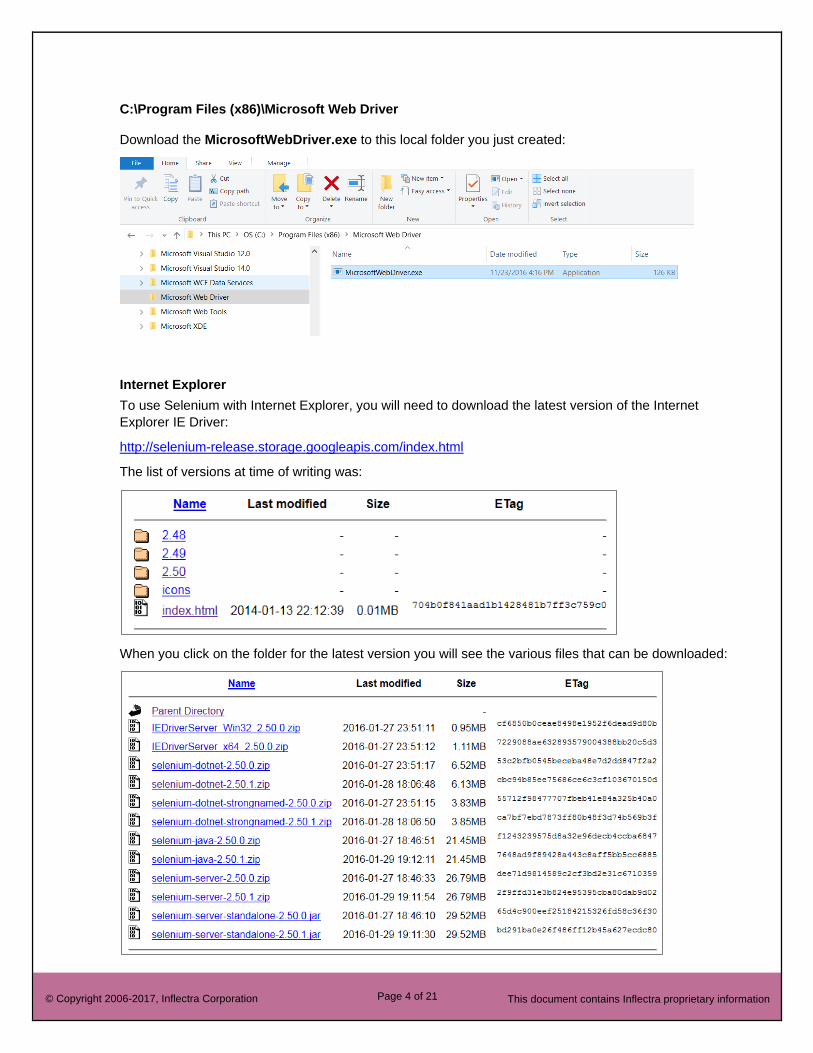
C:\Program Files (x86)\Microsoft Web Driver Download the MicrosoftWebDriver.exe to this local folder you just created:
Internet Explorer
To use Selenium with Internet Explorer, you will need to download the latest version of the Internet
Explorer IE Driver:
http://selenium-release.storage.googleapis.com/index.html
The list of versions at time of writing was:
When you click on the folder for the latest version you will see the various files that can be downloaded:
Page 5 of 21 © Copyright 2006-2017, Inflectra Corporation This document contains Inflectra proprietary information
Download the IEDriverServer_XXXX_X.X.X.zip to your local PC:
• IEDriverServer_Win32_X.X.X.zip (for 32-bit Internet Explorer)
• IEDriverServer_x64_X.X.X.zip (for 64-bit Internet Explorer)
The file inside the zip archive is called IEDriverServer.exe and you need to copy it into the C:\Program
Files (x86)\Inflectra\Rapise\Bin folder (or wherever you installed Rapise).
Chrome
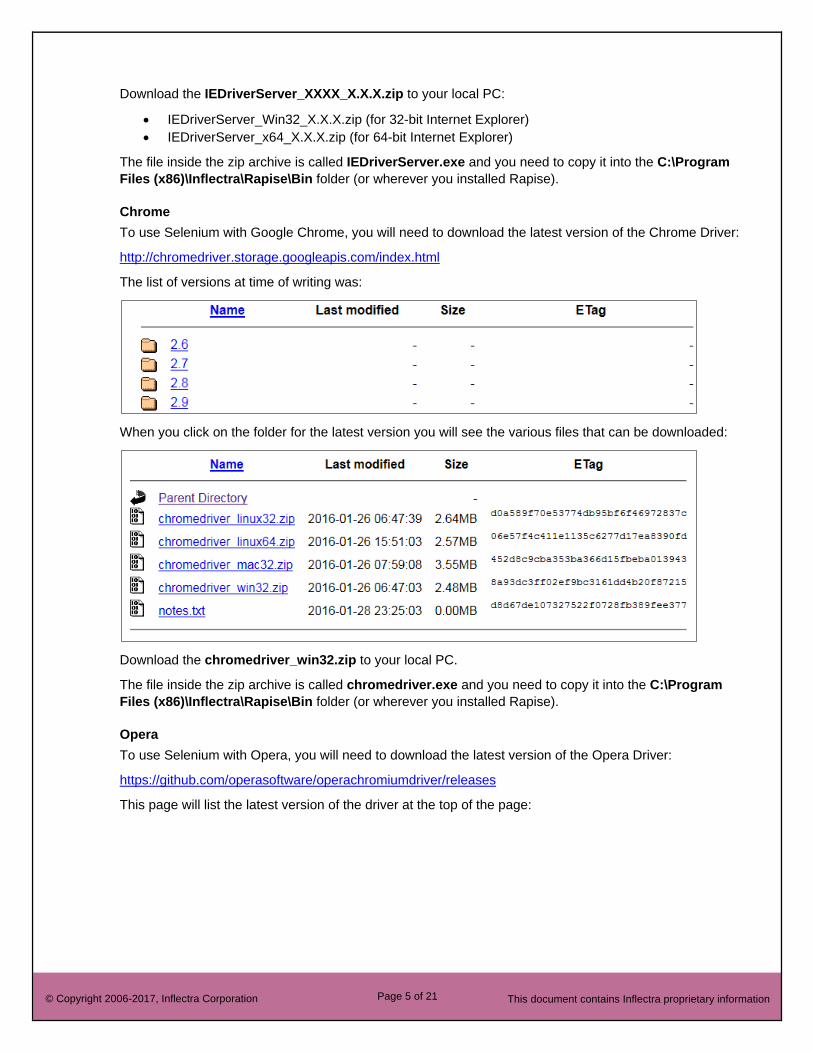
To use Selenium with Google Chrome, you will need to download the latest version of the Chrome Driver:
http://chromedriver.storage.googleapis.com/index.html
The list of versions at time of writing was:
When you click on the folder for the latest version you will see the various files that can be downloaded:
Download the chromedriver_win32.zip to your local PC.
The file inside the zip archive is called chromedriver.exe and you need to copy it into the C:\Program
Files (x86)\Inflectra\Rapise\Bin folder (or wherever you installed Rapise).
Opera
To use Selenium with Opera, you will need to download the latest version of the Opera Driver:
https://github.com/operasoftware/operachromiumdriver/releases
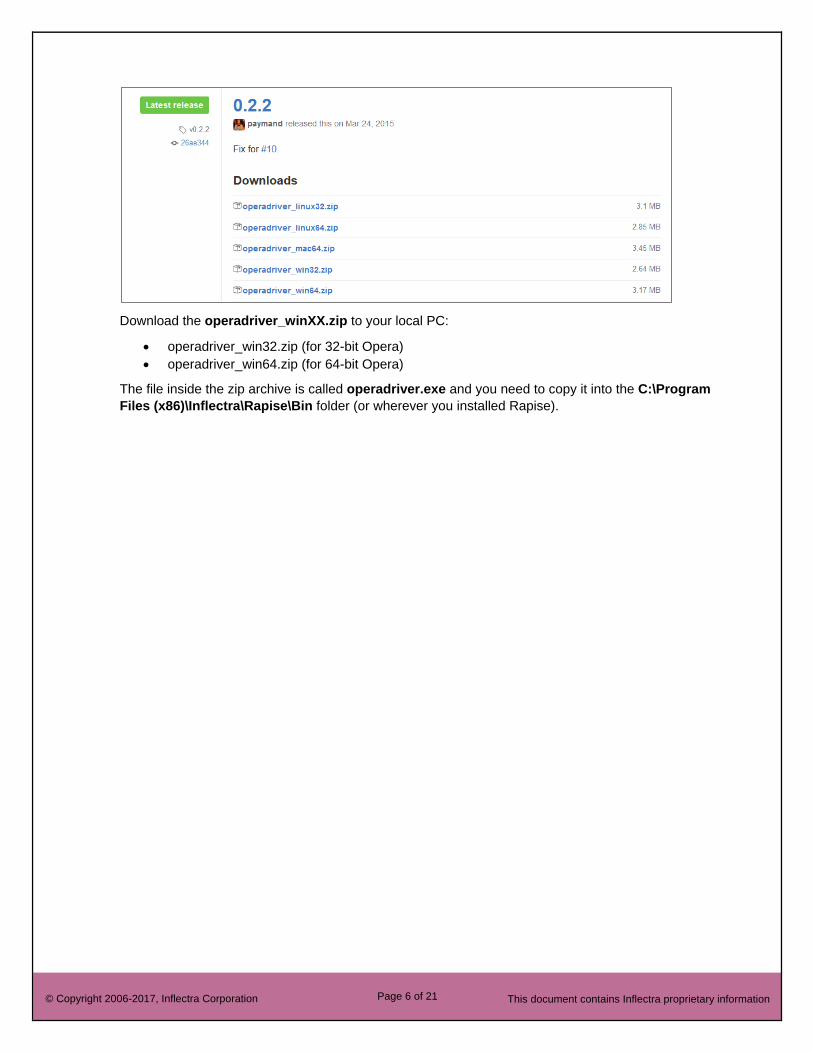
This page will list the latest version of the driver at the top of the page:
Page 6 of 21 © Copyright 2006-2017, Inflectra Corporation This document contains Inflectra proprietary information
Download the operadriver_winXX.zip to your local PC:
• operadriver_win32.zip (for 32-bit Opera)
• operadriver_win64.zip (for 64-bit Opera)
The file inside the zip archive is called operadriver.exe and you need to copy it into the C:\Program
Files (x86)\Inflectra\Rapise\Bin folder (or wherever you installed Rapise).
Page 7 of 21 © Copyright 2006-2017, Inflectra Corporation This document contains Inflectra proprietary information
1.2. Installing Selenium on a Mac
The reason for using Selenium running on a Mac is to be able to execute tests against the Safari web
browser. So although you can also use the Mac to test with Firefox, Opera and Chrome, we do not
recommend this as it adds needless complexity.
Safari
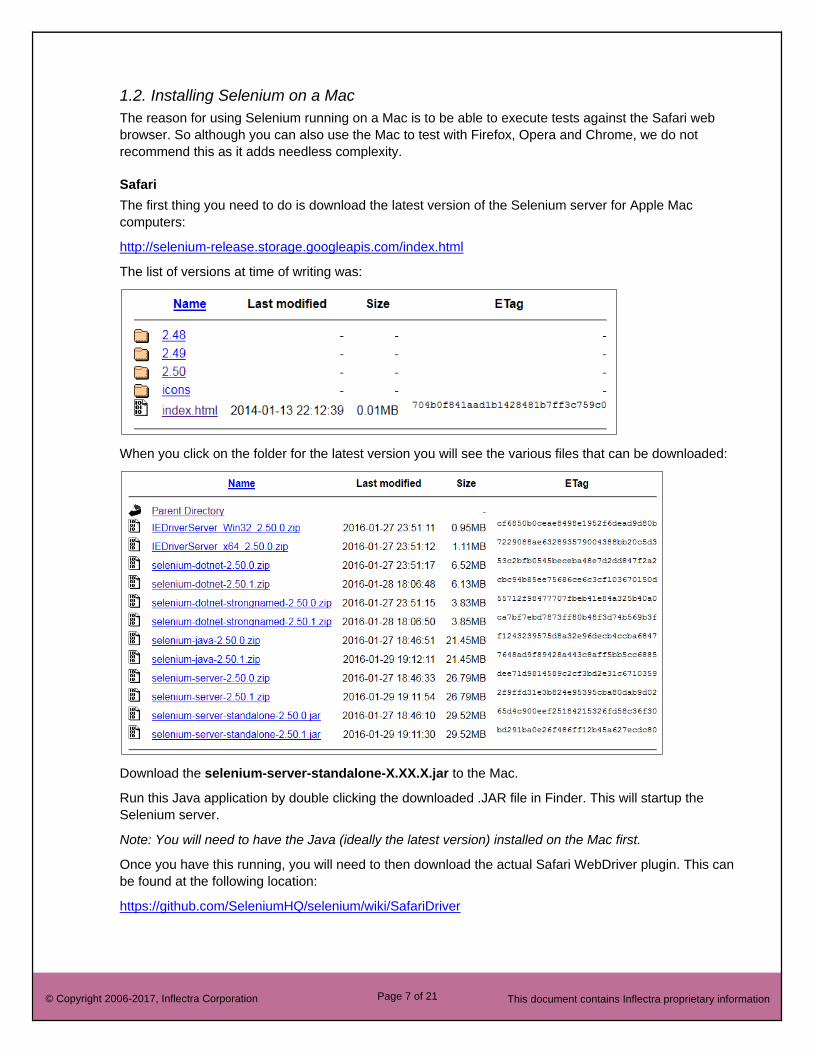
The first thing you need to do is download the latest version of the Selenium server for Apple Mac
computers:
http://selenium-release.storage.googleapis.com/index.html
The list of versions at time of writing was:
When you click on the folder for the latest version you will see the various files that can be downloaded:
Download the selenium-server-standalone-X.XX.X.jar to the Mac.
Run this Java application by double clicking the downloaded .JAR file in Finder. This will startup the
Selenium server.
Note: You will need to have the Java (ideally the latest version) installed on the Mac first.
Once you have this running, you will need to then download the actual Safari WebDriver plugin. This can
be found at the following location:
https://github.com/SeleniumHQ/selenium/wiki/SafariDriver
Page 8 of 21 © Copyright 2006-2017, Inflectra Corporation This document contains Inflectra proprietary information
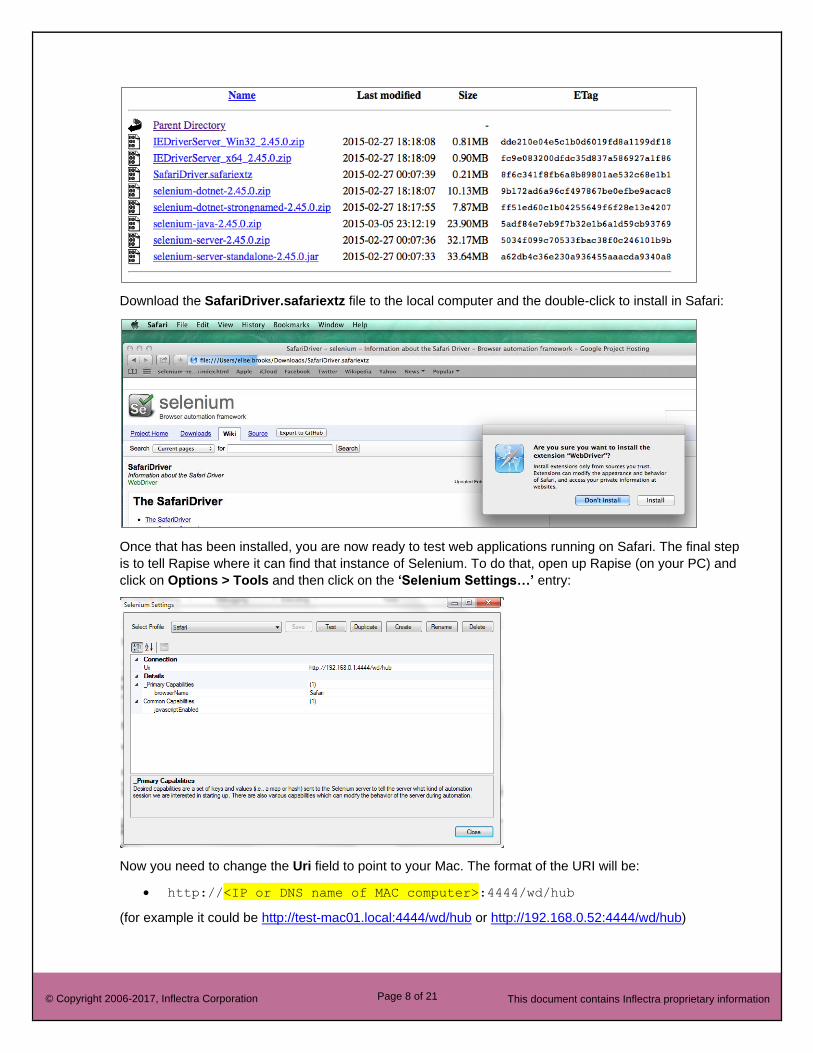
Download the SafariDriver.safariextz file to the local computer and the double-click to install in Safari:
Once that has been installed, you are now ready to test web applications running on Safari. The final step
is to tell Rapise where it can find that instance of Selenium. To do that, open up Rapise (on your PC) and
click on Options > Tools and then click on the ‘Selenium Settings…’ entry:
Now you need to change the Uri field to point to your Mac. The format of the URI will be:
• http://<IP or DNS name of MAC computer>:4444/wd/hub
(for example it could be http://test-mac01.local:4444/wd/hub or http://192.168.0.52:4444/wd/hub)
Page 9 of 21 © Copyright 2006-2017, Inflectra Corporation This document contains Inflectra proprietary information
2. Playing & Recording Tests
Now that you have installed and configured the integration between Rapise and Selenium, we shall
discuss how to use Selenium with Rapise to record and play tests.
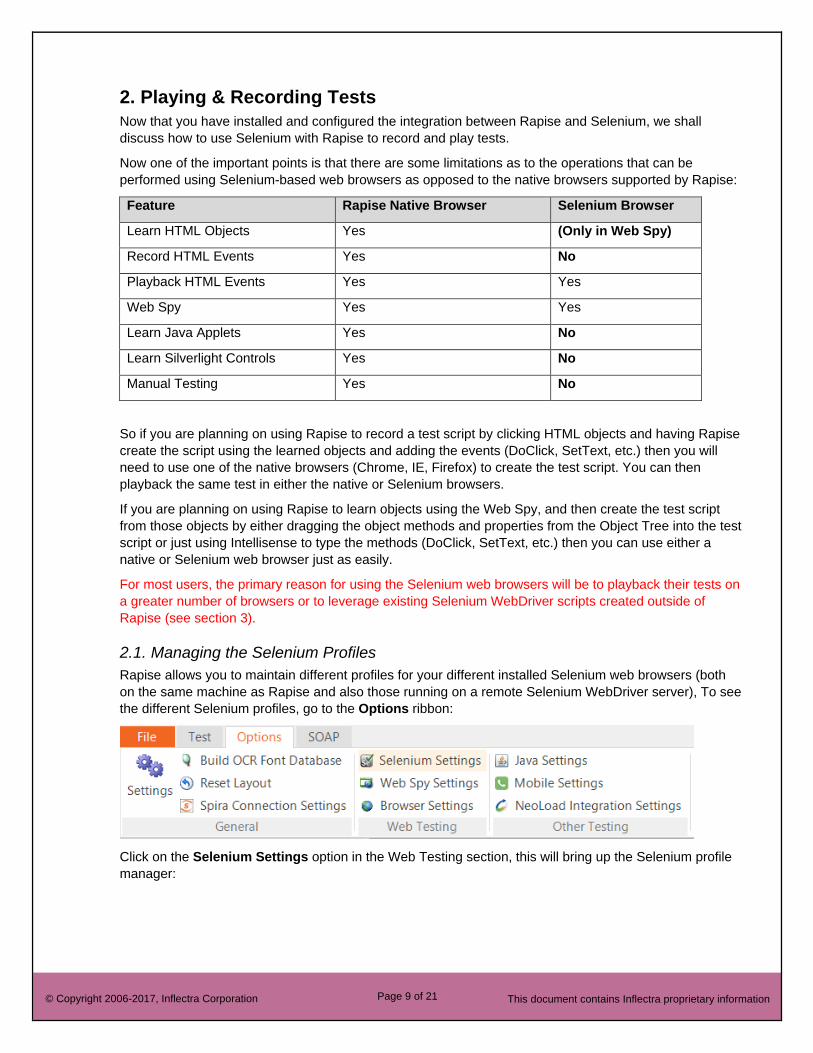
Now one of the important points is that there are some limitations as to the operations that can be
performed using Selenium-based web browsers as opposed to the native browsers supported by Rapise:
Feature Rapise Native Browser Selenium Browser
Learn HTML Objects Yes (Only in Web Spy)
Record HTML Events Yes No
Playback HTML Events Yes Yes
Web Spy Yes Yes
Learn Java Applets Yes No
Learn Silverlight Controls Yes No
Manual Testing Yes No
So if you are planning on using Rapise to record a test script by clicking HTML objects and having Rapise
create the script using the learned objects and adding the events (DoClick, SetText, etc.) then you will
need to use one of the native browsers (Chrome, IE, Firefox) to create the test script. You can then
playback the same test in either the native or Selenium browsers.
If you are planning on using Rapise to learn objects using the Web Spy, and then create the test script
from those objects by either dragging the object methods and properties from the Object Tree into the test
script or just using Intellisense to type the methods (DoClick, SetText, etc.) then you can use either a
native or Selenium web browser just as easily.
For most users, the primary reason for using the Selenium web browsers will be to playback their tests on
a greater number of browsers or to leverage existing Selenium WebDriver scripts created outside of
Rapise (see section 3).
2.1. Managing the Selenium Profiles
Rapise allows you to maintain different profiles for your different installed Selenium web browsers (both
on the same machine as Rapise and also those running on a remote Selenium WebDriver server), To see
the different Selenium profiles, go to the Options ribbon:
Click on the Selenium Settings option in the Web Testing section, this will bring up the Selenium profile
manager:
Page 10 of 21 © Copyright 2006-2017, Inflectra Corporation This document contains Inflectra proprietary information
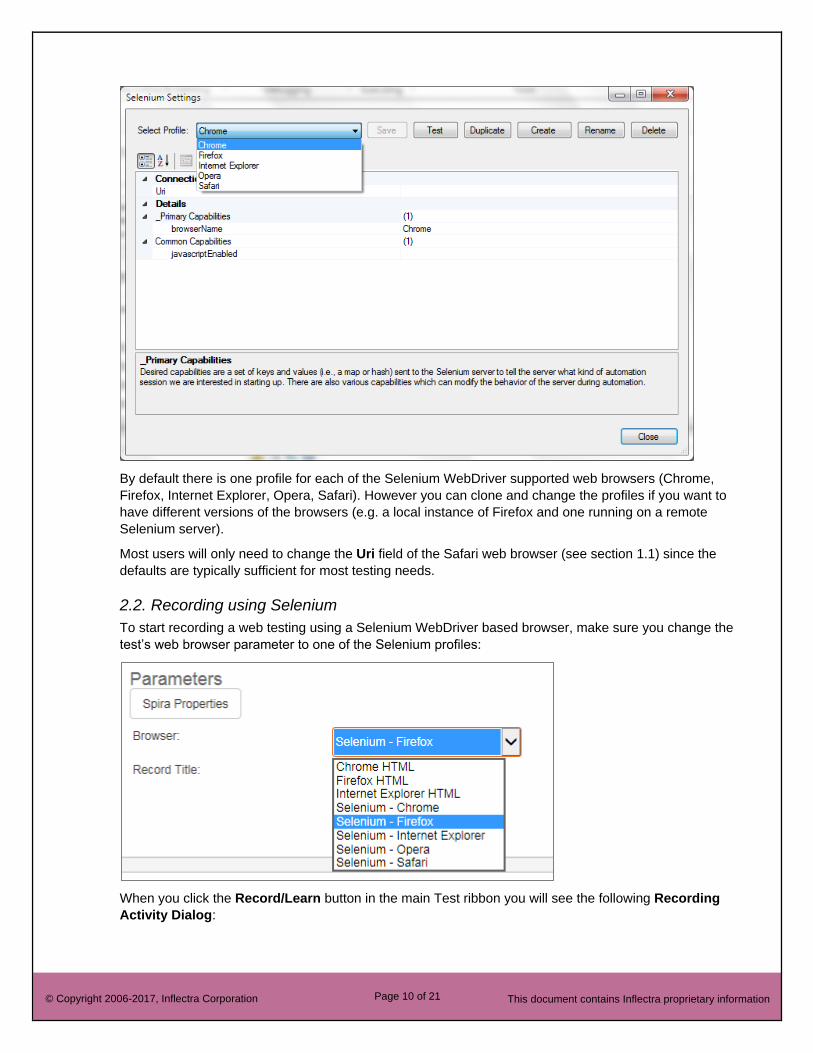
By default there is one profile for each of the Selenium WebDriver supported web browsers (Chrome,
Firefox, Internet Explorer, Opera, Safari). However you can clone and change the profiles if you want to
have different versions of the browsers (e.g. a local instance of Firefox and one running on a remote
Selenium server).
Most users will only need to change the Uri field of the Safari web browser (see section 1.1) since the
defaults are typically sufficient for most testing needs.
2.2. Recording using Selenium
To start recording a web testing using a Selenium WebDriver based browser, make sure you change the
test’s web browser parameter to one of the Selenium profiles:
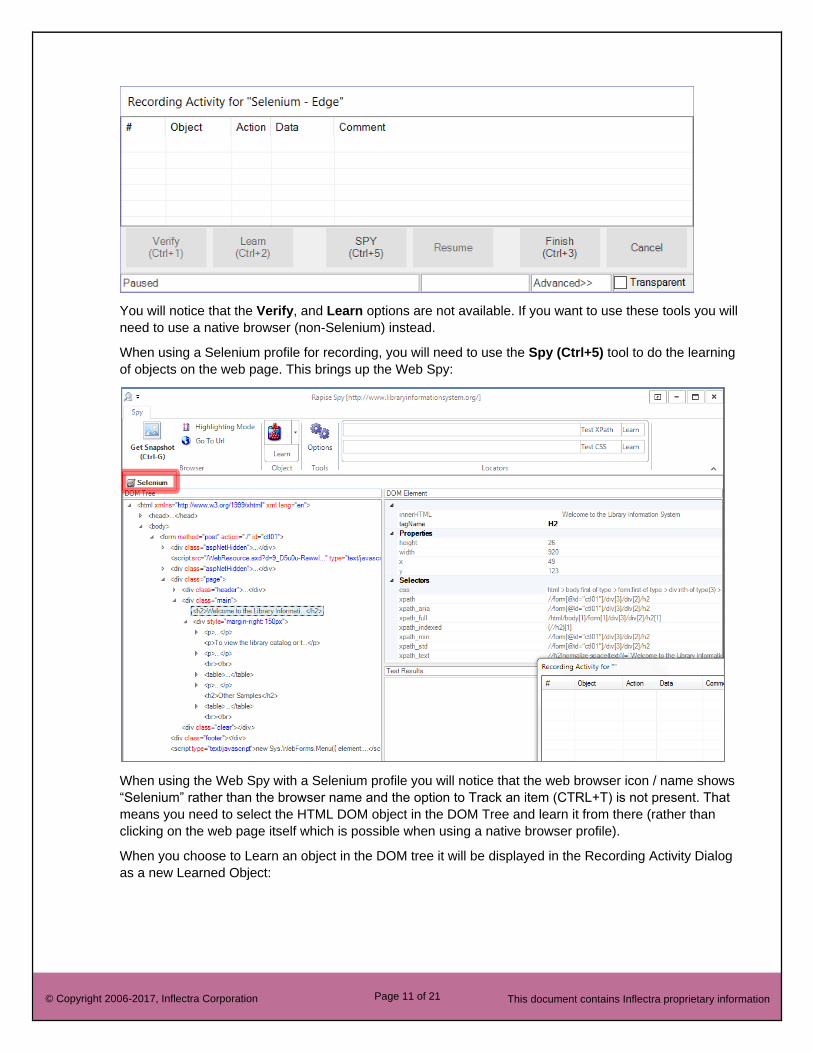
When you click the Record/Learn button in the main Test ribbon you will see the following Recording
Activity Dialog:
Page 11 of 21 © Copyright 2006-2017, Inflectra Corporation This document contains Inflectra proprietary information
You will notice that the Verify, and Learn options are not available. If you want to use these tools you will
need to use a native browser (non-Selenium) instead.
When using a Selenium profile for recording, you will need to use the Spy (Ctrl+5) tool to do the learning
of objects on the web page. This brings up the Web Spy:
When using the Web Spy with a Selenium profile you will notice that the web browser icon / name shows
“Selenium” rather than the browser name and the option to Track an item (CTRL+T) is not present. That
means you need to select the HTML DOM object in the DOM Tree and learn it from there (rather than
clicking on the web page itself which is possible when using a native browser profile).
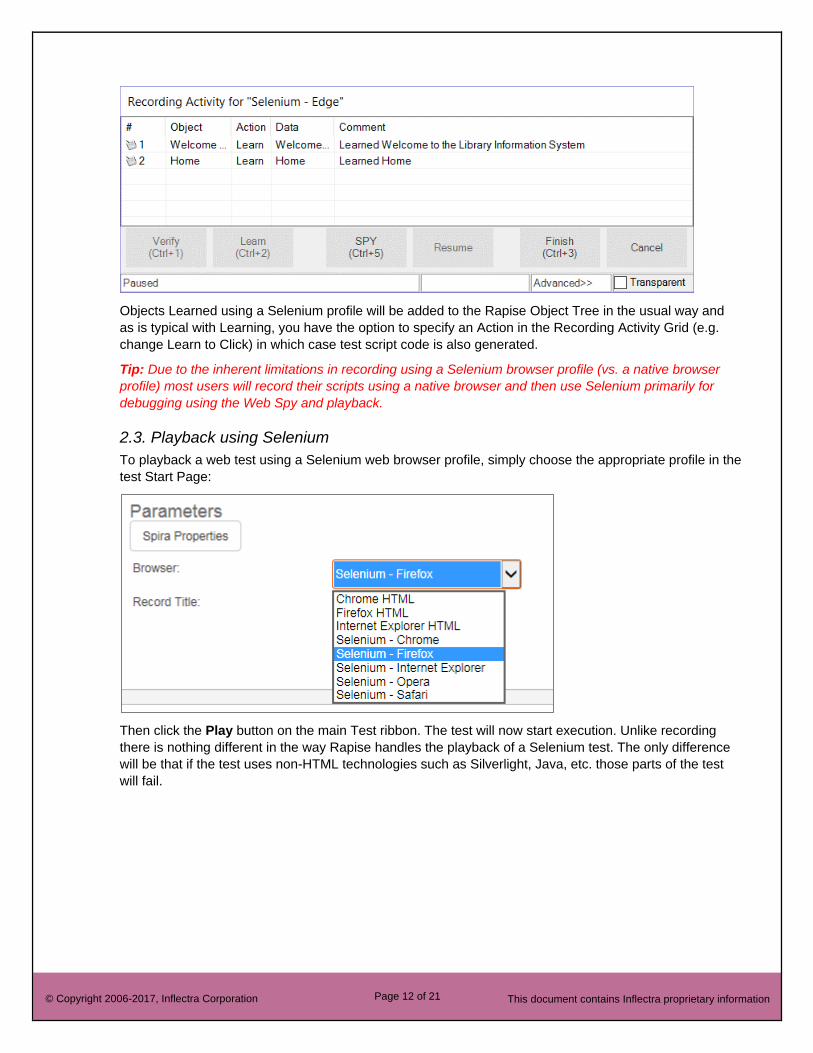
When you choose to Learn an object in the DOM tree it will be displayed in the Recording Activity Dialog
as a new Learned Object:
Page 12 of 21 © Copyright 2006-2017, Inflectra Corporation This document contains Inflectra proprietary information
Objects Learned using a Selenium profile will be added to the Rapise Object Tree in the usual way and
as is typical with Learning, you have the option to specify an Action in the Recording Activity Grid (e.g.
change Learn to Click) in which case test script code is also generated.
Tip: Due to the inherent limitations in recording using a Selenium browser profile (vs. a native browser
profile) most users will record their scripts using a native browser and then use Selenium primarily for
debugging using the Web Spy and playback.
2.3. Playback using Selenium
To playback a web test using a Selenium web browser profile, simply choose the appropriate profile in the
test Start Page:
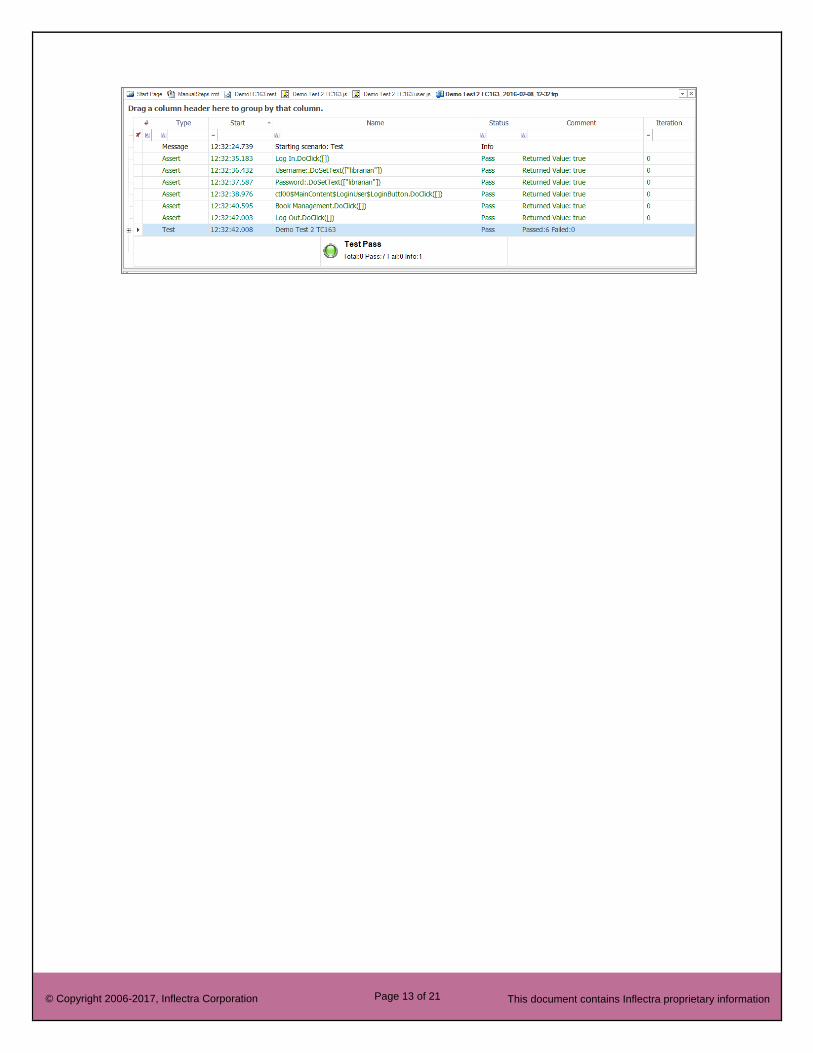
Then click the Play button on the main Test ribbon. The test will now start execution. Unlike recording
there is nothing different in the way Rapise handles the playback of a Selenium test. The only difference
will be that if the test uses non-HTML technologies such as Silverlight, Java, etc. those parts of the test
will fail.
Page 13 of 21 © Copyright 2006-2017, Inflectra Corporation This document contains Inflectra proprietary information
Page 14 of 21 © Copyright 2006-2017, Inflectra Corporation This document contains Inflectra proprietary information
3. Using Native Selenium Code
When using the standard Rapise Record, Learn, and Web Spy tools you can create your web tests using
the Rapise built-in Object Tree. This lets you design your tests using a higher level of abstraction than
working directly with Selenium WebDriver.
For example, you can learn an object SeS("EditButton") that points to a dynamic XPATH or CSS
query that the automation engineer knows will be accurate even if the data on the page changes (for
example). The QA analyst can then simply drag and drop these Rapise objects from the Object Tree into
the test script (e.g. SeS("EditButton").DoClick()) to perform the desired action.
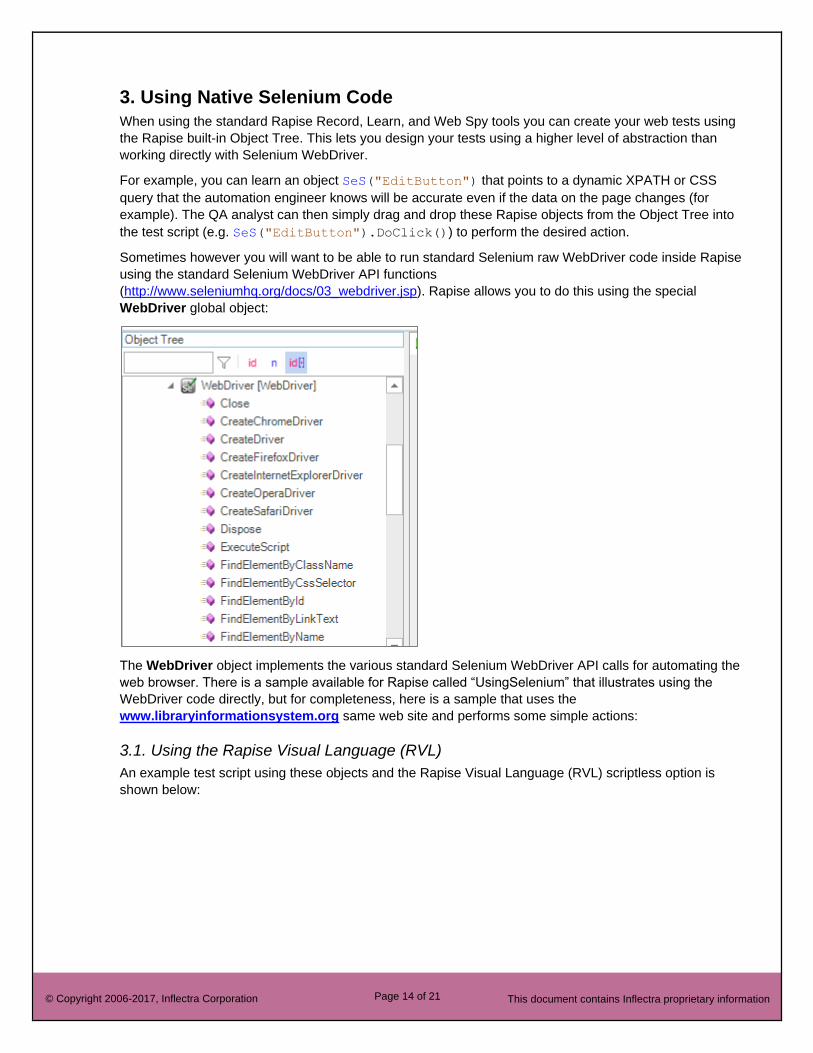
Sometimes however you will want to be able to run standard Selenium raw WebDriver code inside Rapise
using the standard Selenium WebDriver API functions
(http://www.seleniumhq.org/docs/03_webdriver.jsp). Rapise allows you to do this using the special
WebDriver global object:
The WebDriver object implements the various standard Selenium WebDriver API calls for automating the
web browser. There is a sample available for Rapise called “UsingSelenium” that illustrates using the
WebDriver code directly, but for completeness, here is a sample that uses the
www.libraryinformationsystem.org same web site and performs some simple actions:
3.1. Using the Rapise Visual Language (RVL)
An example test script using these objects and the Rapise Visual Language (RVL) scriptless option is
shown below:
Page 15 of 21 © Copyright 2006-2017, Inflectra Corporation This document contains Inflectra proprietary information
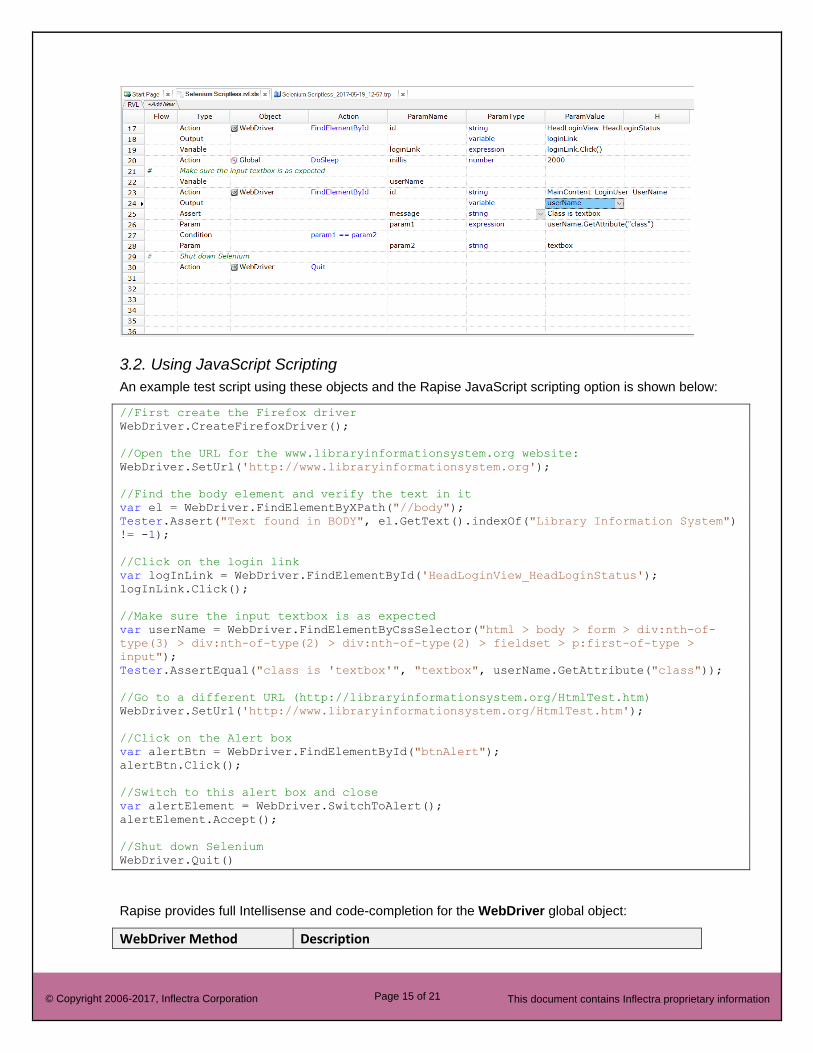
3.2. Using JavaScript Scripting
An example test script using these objects and the Rapise JavaScript scripting option is shown below:
//First create the Firefox driver
WebDriver.CreateFirefoxDriver();
//Open the URL for the www.libraryinformationsystem.org website:
WebDriver.SetUrl('http://www.libraryinformationsystem.org');
//Find the body element and verify the text in it
var el = WebDriver.FindElementByXPath("//body");
Tester.Assert("Text found in BODY", el.GetText().indexOf("Library Information System")
!= -1);
//Click on the login link
var logInLink = WebDriver.FindElementById('HeadLoginView_HeadLoginStatus');
logInLink.Click();
//Make sure the input textbox is as expected
var userName = WebDriver.FindElementByCssSelector("html > body > form > div:nth-of-
type(3) > div:nth-of-type(2) > div:nth-of-type(2) > fieldset > p:first-of-type >
input");
Tester.AssertEqual("class is 'textbox'", "textbox", userName.GetAttribute("class"));
//Go to a different URL (http://libraryinformationsystem.org/HtmlTest.htm)
WebDriver.SetUrl('http://www.libraryinformationsystem.org/HtmlTest.htm');
//Click on the Alert box
var alertBtn = WebDriver.FindElementById("btnAlert");
alertBtn.Click();
//Switch to this alert box and close
var alertElement = WebDriver.SwitchToAlert();
alertElement.Accept();
//Shut down Selenium
WebDriver.Quit()
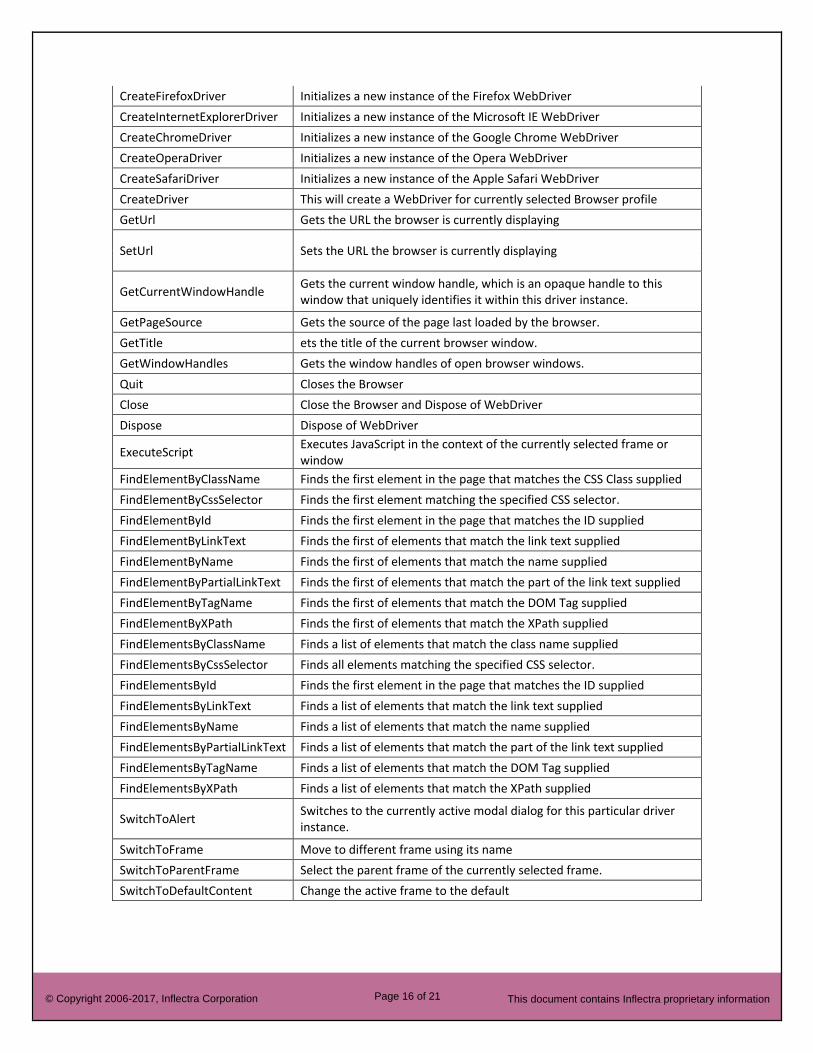
Rapise provides full Intellisense and code-completion for the WebDriver global object:
WebDriver Method Description
Page 16 of 21 © Copyright 2006-2017, Inflectra Corporation This document contains Inflectra proprietary information
CreateFirefoxDriver Initializes a new instance of the Firefox WebDriver
CreateInternetExplorerDriver Initializes a new instance of the Microsoft IE WebDriver
CreateChromeDriver Initializes a new instance of the Google Chrome WebDriver
CreateOperaDriver Initializes a new instance of the Opera WebDriver
CreateSafariDriver Initializes a new instance of the Apple Safari WebDriver
CreateDriver This will create a WebDriver for currently selected Browser profile
GetUrl Gets the URL the browser is currently displaying
SetUrl Sets the URL the browser is currently displaying
GetCurrentWindowHandle Gets the current window handle, which is an opaque handle to this window that uniquely identifies it within this driver instance.
GetPageSource Gets the source of the page last loaded by the browser.
GetTitle ets the title of the current browser window.
GetWindowHandles Gets the window handles of open browser windows.
Quit Closes the Browser
Close Close the Browser and Dispose of WebDriver
Dispose Dispose of WebDriver
ExecuteScript Executes JavaScript in the context of the currently selected frame or window
FindElementByClassName Finds the first element in the page that matches the CSS Class supplied
FindElementByCssSelector Finds the first element matching the specified CSS selector.
FindElementById Finds the first element in the page that matches the ID supplied
FindElementByLinkText Finds the first of elements that match the link text supplied
FindElementByName Finds the first of elements that match the name supplied
FindElementByPartialLinkText Finds the first of elements that match the part of the link text supplied
FindElementByTagName Finds the first of elements that match the DOM Tag supplied
FindElementByXPath Finds the first of elements that match the XPath supplied
FindElementsByClassName Finds a list of elements that match the class name supplied
FindElementsByCssSelector Finds all elements matching the specified CSS selector.
FindElementsById Finds the first element in the page that matches the ID supplied
FindElementsByLinkText Finds a list of elements that match the link text supplied
FindElementsByName Finds a list of elements that match the name supplied
FindElementsByPartialLinkText Finds a list of elements that match the part of the link text supplied
FindElementsByTagName Finds a list of elements that match the DOM Tag supplied
FindElementsByXPath Finds a list of elements that match the XPath supplied
SwitchToAlert Switches to the currently active modal dialog for this particular driver instance.
SwitchToFrame Move to different frame using its name
SwitchToParentFrame Select the parent frame of the currently selected frame.
SwitchToDefaultContent Change the active frame to the default
Page 17 of 21 © Copyright 2006-2017, Inflectra Corporation This document contains Inflectra proprietary information
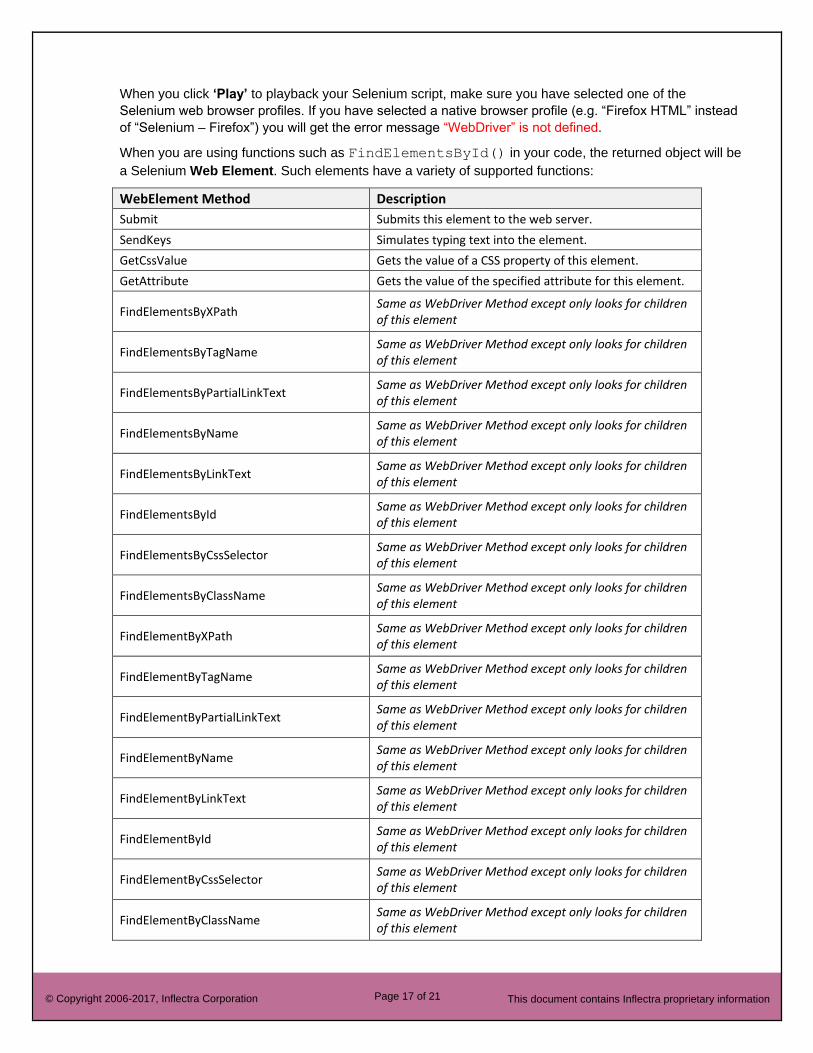
When you click ‘Play’ to playback your Selenium script, make sure you have selected one of the
Selenium web browser profiles. If you have selected a native browser profile (e.g. “Firefox HTML” instead
of “Selenium – Firefox”) you will get the error message “WebDriver” is not defined.
When you are using functions such as FindElementsById() in your code, the returned object will be
a Selenium Web Element. Such elements have a variety of supported functions:
WebElement Method Description
Submit Submits this element to the web server.
SendKeys Simulates typing text into the element.
GetCssValue Gets the value of a CSS property of this element.
GetAttribute Gets the value of the specified attribute for this element.
FindElementsByXPath Same as WebDriver Method except only looks for children of this element
FindElementsByTagName Same as WebDriver Method except only looks for children of this element
FindElementsByPartialLinkText Same as WebDriver Method except only looks for children of this element
FindElementsByName Same as WebDriver Method except only looks for children of this element
FindElementsByLinkText Same as WebDriver Method except only looks for children of this element
FindElementsById Same as WebDriver Method except only looks for children of this element
FindElementsByCssSelector Same as WebDriver Method except only looks for children of this element
FindElementsByClassName Same as WebDriver Method except only looks for children of this element
FindElementByXPath Same as WebDriver Method except only looks for children of this element
FindElementByTagName Same as WebDriver Method except only looks for children of this element
FindElementByPartialLinkText Same as WebDriver Method except only looks for children of this element
FindElementByName Same as WebDriver Method except only looks for children of this element
FindElementByLinkText Same as WebDriver Method except only looks for children of this element
FindElementById Same as WebDriver Method except only looks for children of this element
FindElementByCssSelector Same as WebDriver Method except only looks for children of this element
FindElementByClassName Same as WebDriver Method except only looks for children of this element
Page 18 of 21 © Copyright 2006-2017, Inflectra Corporation This document contains Inflectra proprietary information
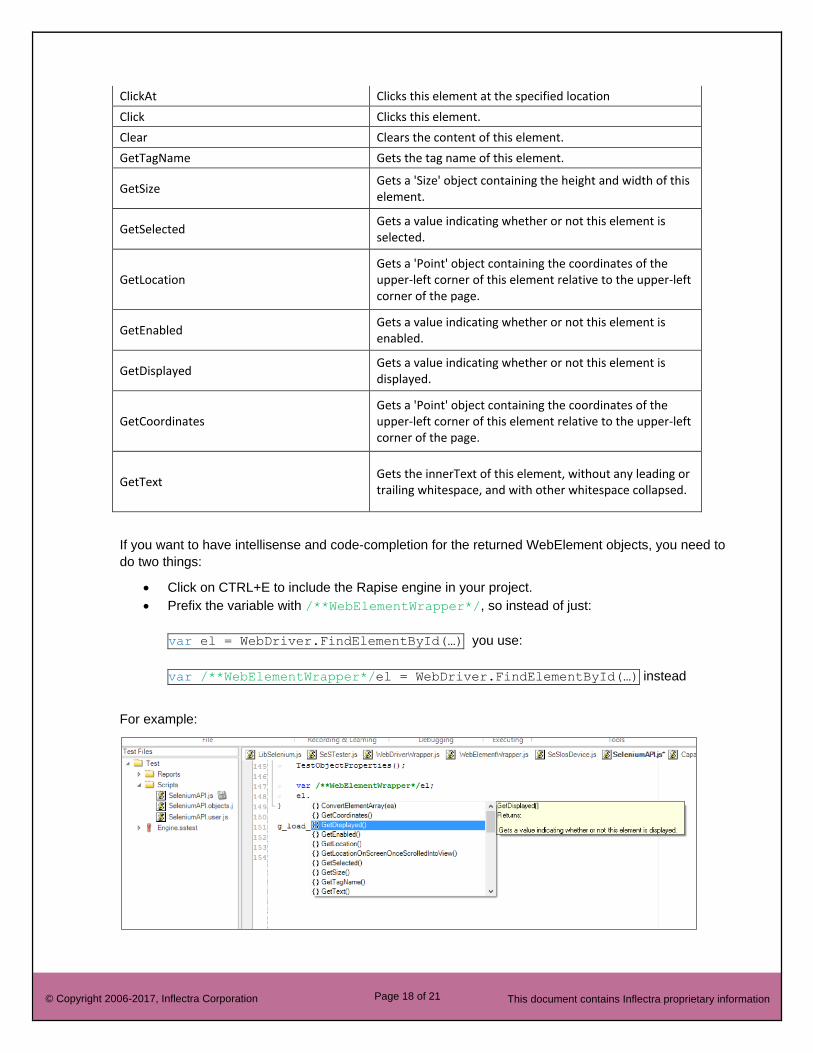
ClickAt Clicks this element at the specified location
Click Clicks this element.
Clear Clears the content of this element.
GetTagName Gets the tag name of this element.
GetSize Gets a 'Size' object containing the height and width of this element.
GetSelected Gets a value indicating whether or not this element is selected.
GetLocation Gets a 'Point' object containing the coordinates of the upper-left corner of this element relative to the upper-left corner of the page.
GetEnabled Gets a value indicating whether or not this element is enabled.
GetDisplayed Gets a value indicating whether or not this element is displayed.
GetCoordinates Gets a 'Point' object containing the coordinates of the upper-left corner of this element relative to the upper-left corner of the page.
GetText Gets the innerText of this element, without any leading or trailing whitespace, and with other whitespace collapsed.
If you want to have intellisense and code-completion for the returned WebElement objects, you need to
do two things:
• Click on CTRL+E to include the Rapise engine in your project.
• Prefix the variable with /**WebElementWrapper*/, so instead of just:
var el = WebDriver.FindElementById(…) you use:
var /**WebElementWrapper*/el = WebDriver.FindElementById(…) instead
For example:
Page 19 of 21 © Copyright 2006-2017, Inflectra Corporation This document contains Inflectra proprietary information
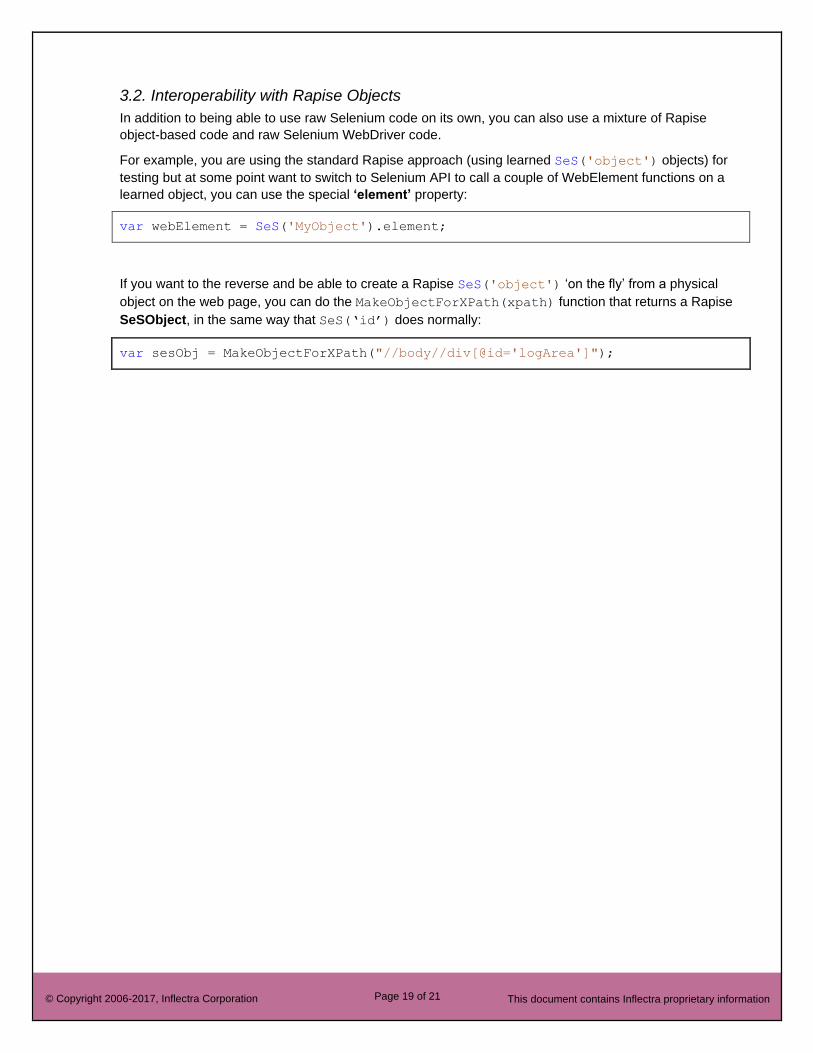
3.2. Interoperability with Rapise Objects
In addition to being able to use raw Selenium code on its own, you can also use a mixture of Rapise
object-based code and raw Selenium WebDriver code.
For example, you are using the standard Rapise approach (using learned SeS('object') objects) for
testing but at some point want to switch to Selenium API to call a couple of WebElement functions on a
learned object, you can use the special ‘element’ property:
var webElement = SeS('MyObject').element;
If you want to the reverse and be able to create a Rapise SeS('object') ‘on the fly’ from a physical
object on the web page, you can do the MakeObjectForXPath(xpath) function that returns a Rapise
SeSObject, in the same way that SeS(‘id’) does normally:
var sesObj = MakeObjectForXPath("//body//div[@id='logArea']");
Page 20 of 21 © Copyright 2006-2017, Inflectra Corporation This document contains Inflectra proprietary information
Legal Notices
This publication is provided as is without warranty of any kind, either express or implied, including, but not
limited to, the implied warranties of merchantability, fitness for a particular purpose, or non-infringement.
This publication could include technical inaccuracies or typographical errors. Changes are periodically
added to the information contained herein; these changes will be incorporated in new editions of the
publication. Inflectra Corporation may make improvements and/or changes in the product(s) and/or
program(s) and/or service(s) described in this publication at any time.
The sections in this guide that discuss internet web security are provided as suggestions and guidelines.
Internet security is constantly evolving field, and our suggestions are no substitute for an up-to-date
understanding of the vulnerabilities inherent in deploying internet or web applications, and Inflectra cannot
be held liable for any losses due to breaches of security, compromise of data or other cyber-attacks that
may result from following our recommendations.
SpiraTest®, SpiraPlan®, SpiraTeam®, Rapise® and Inflectra® are registered trademarks of Inflectra
Corporation in the United States of America and other countries. Microsoft®, Windows®, Explorer® and
Microsoft Project® are registered trademarks of Microsoft Corporation. All other trademarks and product
names are property of their respective holders.
Please send comments and questions to:
Technical Publications
Inflectra Corporation
8121 Georgia Ave, Suite 504
Silver Spring, MD 20910-4957
U.S.A.