Embed Size (px)
Citation preview

Crop establishment
These resources were produced with the financial support of ELWa
Crop Establishment Table of Contents
Chapter 1: Crop physiology .............................................................................4 Seeds ...........................................................................................................4
The structure of monocotyledons..............................................................4 The structure of dicotyledons....................................................................4
Plant systems...............................................................................................6 Photosynthesis .........................................................................................6 Respiration................................................................................................6 Nutrient and water uptake.........................................................................7 Transpiration.............................................................................................7 Translocation ............................................................................................8
Plant Growth.................................................................................................9 Germination and initial growth ..................................................................9 Key stages of plant growth......................................................................10
Reproduction..............................................................................................11 Sexual reproduction................................................................................11 Asexual reproduction ..............................................................................11
Chapter 2: Soil science and condition............................................................12 Soil components.........................................................................................12
Solids......................................................................................................12 Liquids ....................................................................................................13 Gases .....................................................................................................13 Living organisms.....................................................................................13
Soil types....................................................................................................15 Clay soils ................................................................................................15 Sandy soils .............................................................................................15 Silts.........................................................................................................16 Loams.....................................................................................................16 Calcareous soils .....................................................................................18 Peaty soils ..............................................................................................18
Soil Classification .......................................................................................19 Soil Fertility.................................................................................................20
Natural make-up .....................................................................................20 Current soil condition ..............................................................................20 Maintaining soil fertility............................................................................20
Chapter 3: Preparing and cultivating land for planting ...................................23 Cultivation equipment.................................................................................23
Subsoiler.................................................................................................23 The plough..............................................................................................24 Cultivators...............................................................................................25 Harrows ..................................................................................................25 Rollers ....................................................................................................27
Land preparation ........................................................................................29 Winter cereal...........................................................................................29 Spring cereal...........................................................................................29 Root crops ..............................................................................................30
2
Potatoes .................................................................................................30 Oil seeds.................................................................................................30
Chapter 4: Nutrient in seedbeds ....................................................................32 Plant nutrients ............................................................................................32
Major elements .......................................................................................32 Trace elements .......................................................................................33
Soil sampling and analysis .........................................................................34 Taking a soil sample ...............................................................................34 Analysing the soil sample .......................................................................35
Maintaining nutrient levels in the soil..........................................................36 Manures..................................................................................................36 Inorganic fertilisers..................................................................................37 Organic fertilisers....................................................................................38
Fertiliser handling and storage ...................................................................40 Solids......................................................................................................40 Fluid........................................................................................................40
Liming.........................................................................................................41 Lime requirements ..................................................................................42
Chapter 5: Planting crops ..............................................................................43 Planning and recording ..............................................................................43 Choosing the right seed variety ..................................................................43 Planting equipment.....................................................................................44
Broadcasters...........................................................................................44 Drills........................................................................................................44 Planters ..................................................................................................45
Sowing requirements..................................................................................48 Spring cereal...........................................................................................48 Winter cereal...........................................................................................50 Forage Maize..........................................................................................52 Potatoes .................................................................................................52
Bibliography ...................................................................................................53
3
Chapter 1: Crop physiology
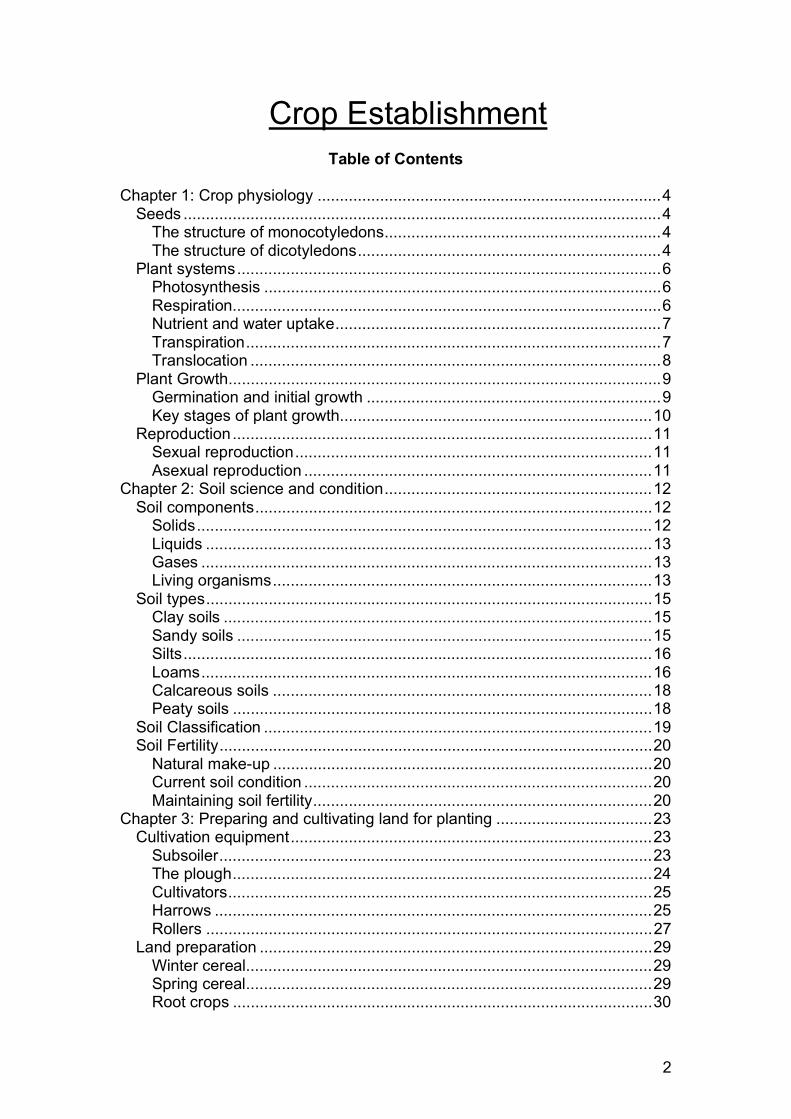
Seeds A seed consists of a tough coat which is called the ‘testa’ which protects the seed from fungi, bacteria and insects, within the ‘testa’ is the ‘embryo’, which contain the:-
Plumule – that develops into the leafy part of the plant Radicle – that develops into a root system One or two cotyledons – that contain food reserves that are used in germination
Plants are classified as either monocotyledons (one cotyledon in the seed) or dicotyledons (two cotyledons in the seed)
The structure of monocotyledons Cereal and grass seeds are monocotyledons (contain one cotyledon). Wheat grain is a typical example:
Figure 1. 1 Wheat grain cross section (Ioan Rhys Williams)
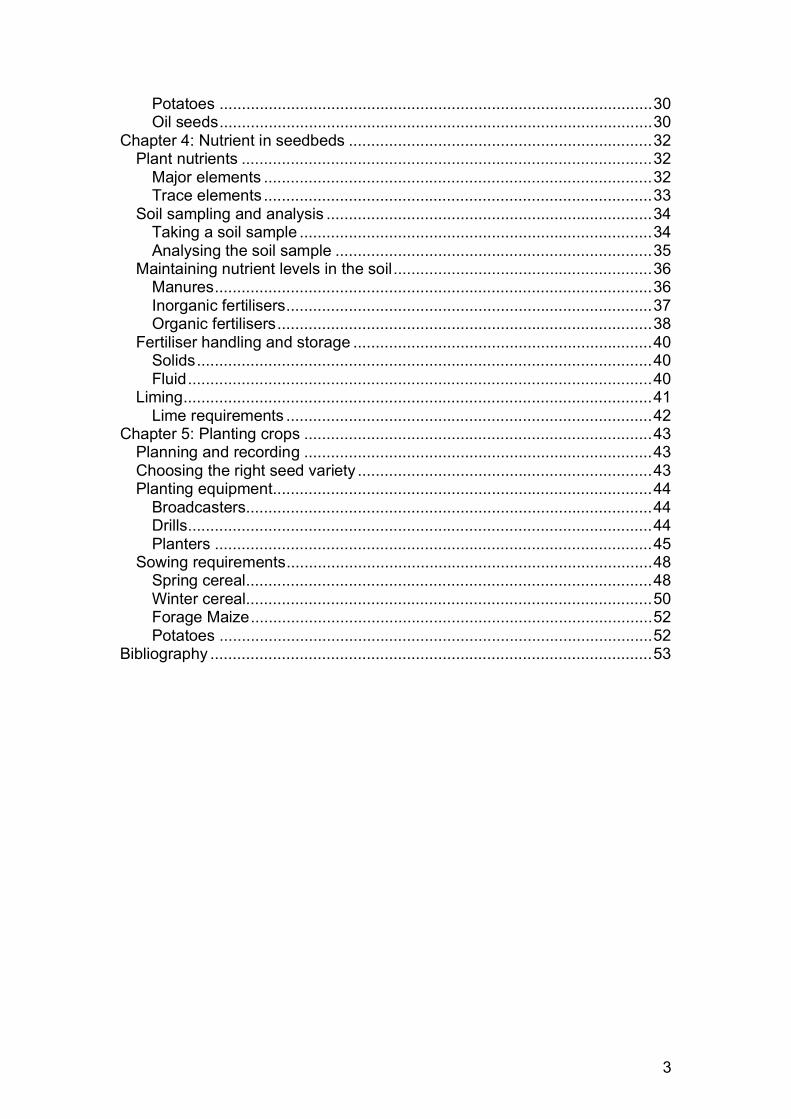
The structure of dicotyledons
The broad bean is a typical example of a dicotyledon (contain two cotyledons):
Figure 1. 2 Broad bean cross section (Ioan Rhys Williams)
4
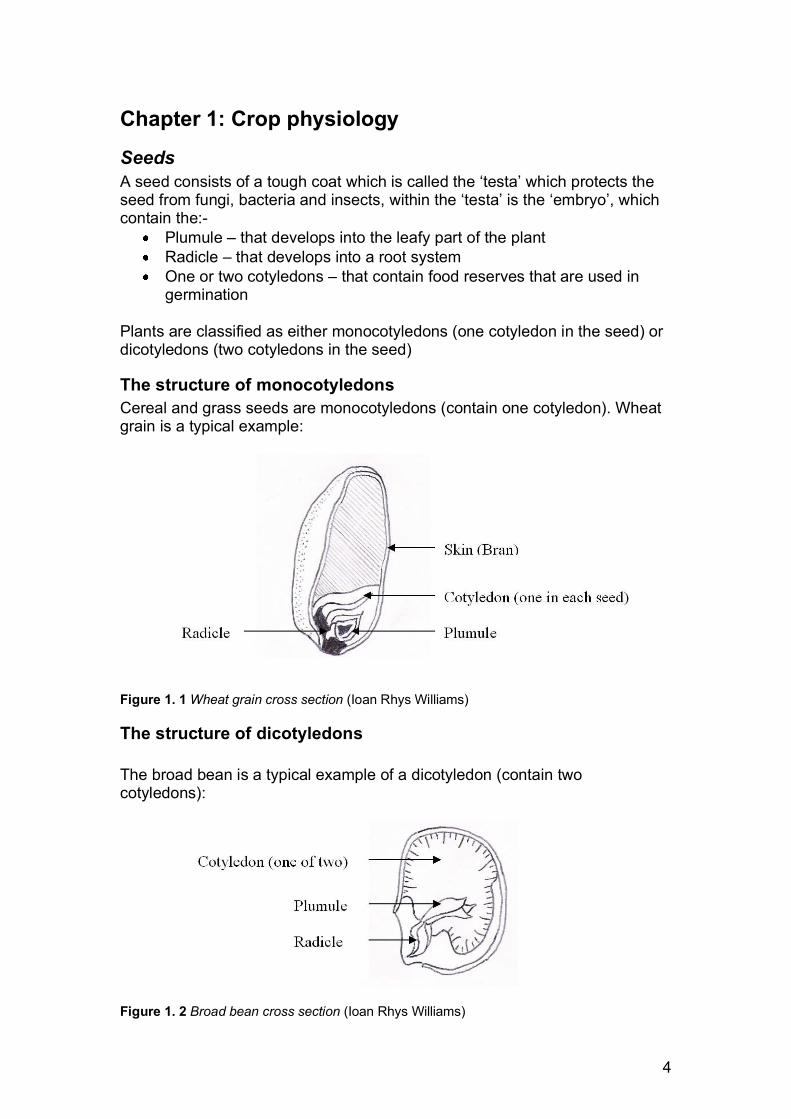
The differences between monocotyledons and dicotyledons are shown in Table 1.1.
Monocotyledons Dicotyledons Embryo has one seed leaf A primary root system is developed but is then replaced by an adventitious root system Usually narrow leaved plants, e.g. cereals and grasses
Embryo has two seed leaf A primary root system is developed and persists Usually broad leaved plants, e.g. clovers, cabbage and potatoes
Table 1.1 Difference between monocotyledons and dicotyledons (Ioan Rhys Williams)
5
Plant systems
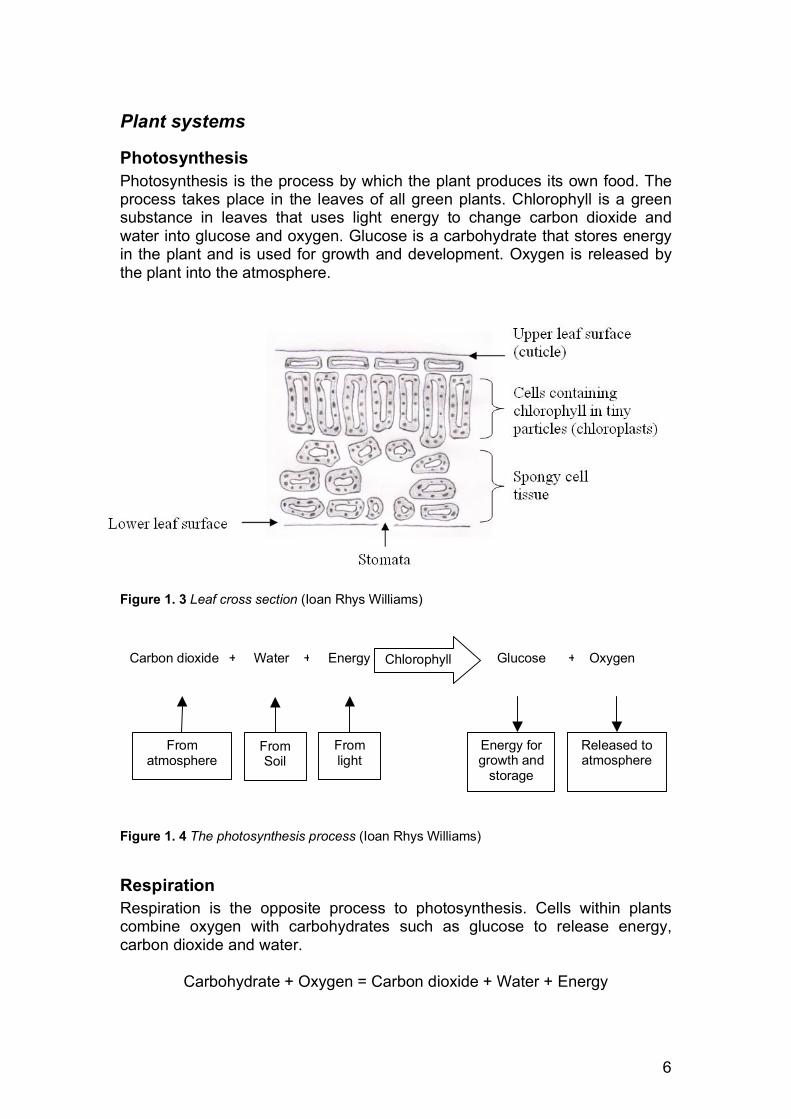
Photosynthesis Photosynthesis is the process by which the plant produces its own food. The process takes place in the leaves of all green plants. Chlorophyll is a green substance in leaves that uses light energy to change carbon dioxide and water into glucose and oxygen. Glucose is a carbohydrate that stores energy in the plant and is used for growth and development. Oxygen is released by the plant into the atmosphere.
Figure 1. 3 Leaf cross section (Ioan Rhys Williams)
Carbon dioxide + Water + Energy Glucose + Oxygen Chlorophyll
Energy for growth and
storage
Released to atmosphere
From atmosphere
From light
From Soil
Figure 1. 4 The photosynthesis process (Ioan Rhys Williams)
Respiration Respiration is the opposite process to photosynthesis. Cells within plants combine oxygen with carbohydrates such as glucose to release energy, carbon dioxide and water.
Carbohydrate + Oxygen = Carbon dioxide + Water + Energy
6
Energy produced by respiration is essential for life and environmental factors such as water logging that reduce the available oxygen can affect plant viability.
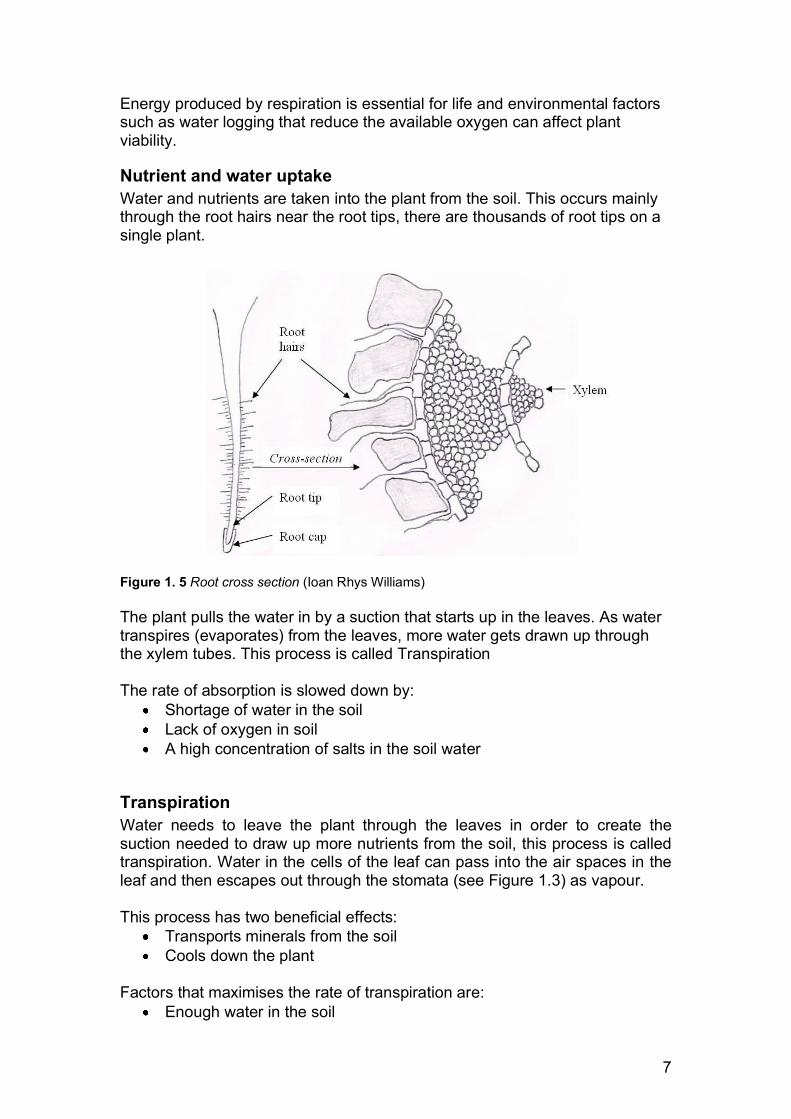
Nutrient and water uptake Water and nutrients are taken into the plant from the soil. This occurs mainly through the root hairs near the root tips, there are thousands of root tips on a single plant.
Figure 1. 5 Root cross section (Ioan Rhys Williams)
The plant pulls the water in by a suction that starts up in the leaves. As water transpires (evaporates) from the leaves, more water gets drawn up through the xylem tubes. This process is called Transpiration
The rate of absorption is slowed down by: Shortage of water in the soil Lack of oxygen in soil A high concentration of salts in the soil water
Transpiration Water needs to leave the plant through the leaves in order to create the suction needed to draw up more nutrients from the soil, this process is called transpiration. Water in the cells of the leaf can pass into the air spaces in the leaf and then escapes out through the stomata (see Figure 1.3) as vapour.
This process has two beneficial effects: Transports minerals from the soil Cools down the plant
Factors that maximises the rate of transpiration are: Enough water in the soil
7
Large amount of sunlight High temperatures Lots of air movement
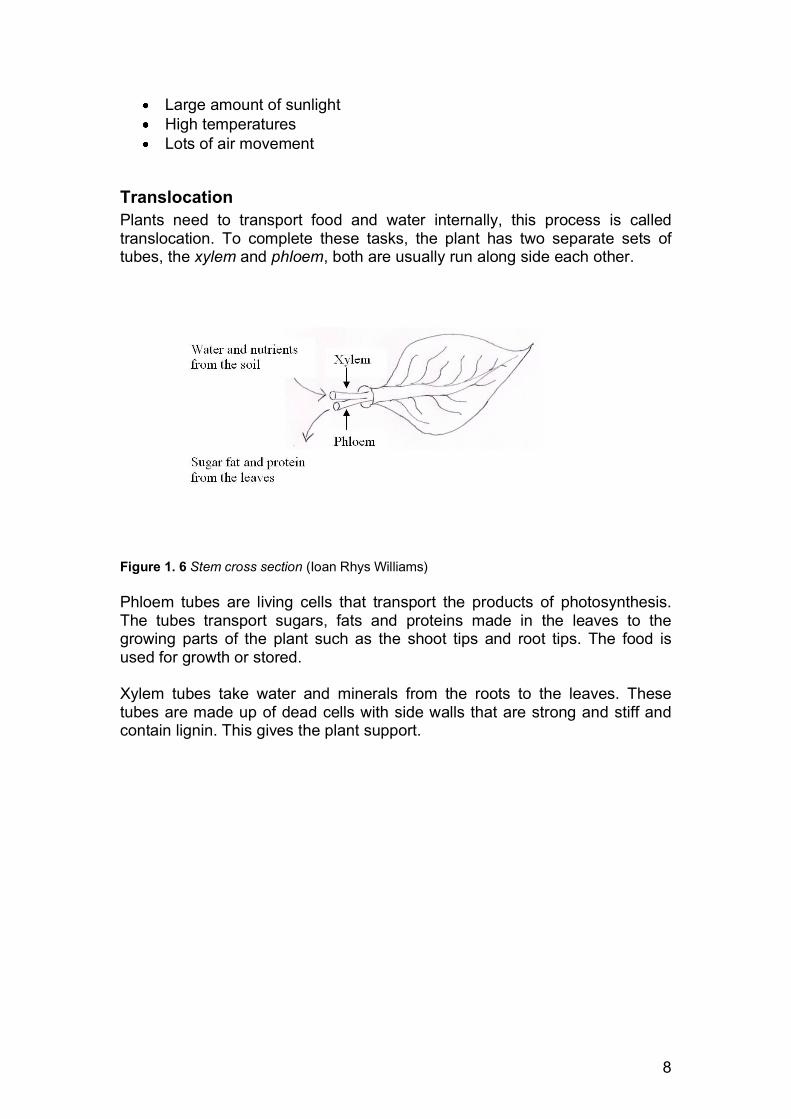
Translocation Plants need to transport food and water internally, this process is called translocation. To complete these tasks, the plant has two separate sets of tubes, the xylem and phloem, both are usually run along side each other.
Figure 1. 6 Stem cross section (Ioan Rhys Williams)
Phloem tubes are living cells that transport the products of photosynthesis. The tubes transport sugars, fats and proteins made in the leaves to the growing parts of the plant such as the shoot tips and root tips. The food is used for growth or stored.
Xylem tubes take water and minerals from the roots to the leaves. These tubes are made up of dead cells with side walls that are strong and stiff and contain lignin. This gives the plant support.
8
Plant Growth
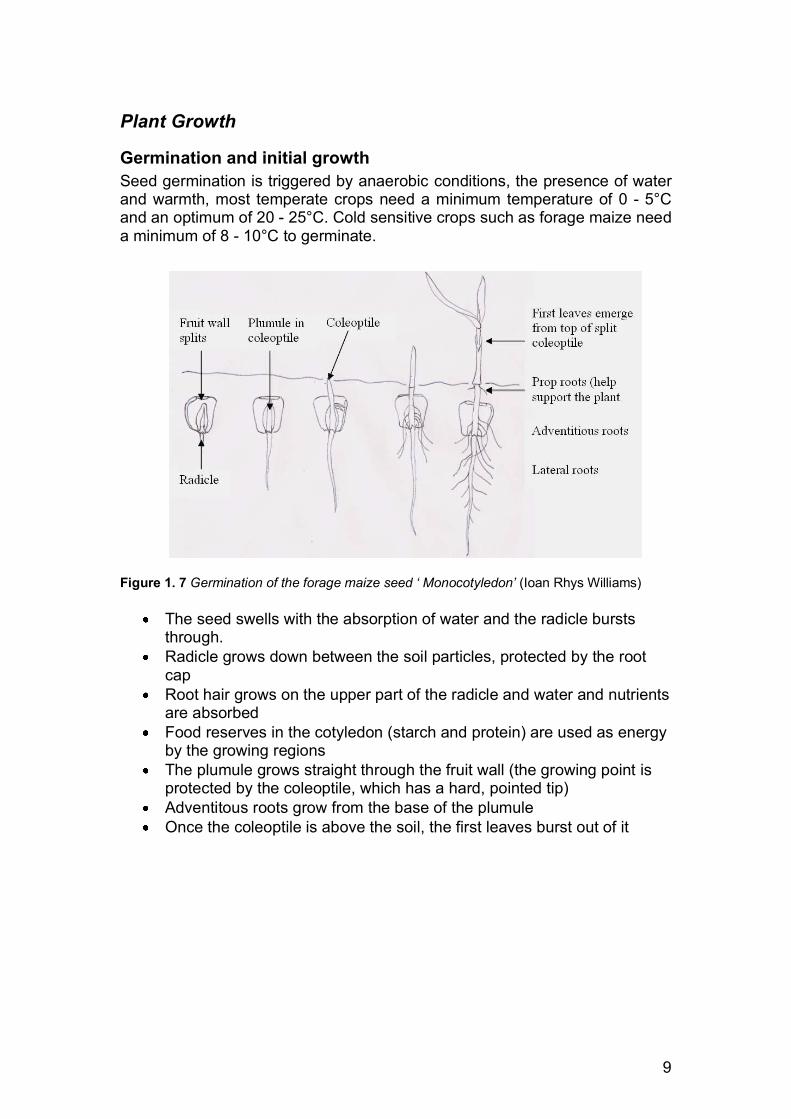
Germination and initial growth Seed germination is triggered by anaerobic conditions, the presence of water and warmth, most temperate crops need a minimum temperature of 0 - 5°C and an optimum of 20 - 25°C. Cold sensitive crops such as forage maize need a minimum of 8 - 10°C to germinate.
Figure 1. 7 Germination of the forage maize seed ‘ Monocotyledon’ (Ioan Rhys Williams)
The seed swells with the absorption of water and the radicle bursts through. Radicle grows down between the soil particles, protected by the root cap Root hair grows on the upper part of the radicle and water and nutrients are absorbed Food reserves in the cotyledon (starch and protein) are used as energy by the growing regions The plumule grows straight through the fruit wall (the growing point is protected by the coleoptile, which has a hard, pointed tip) Adventitous roots grow from the base of the plumule Once the coleoptile is above the soil, the first leaves burst out of it
9
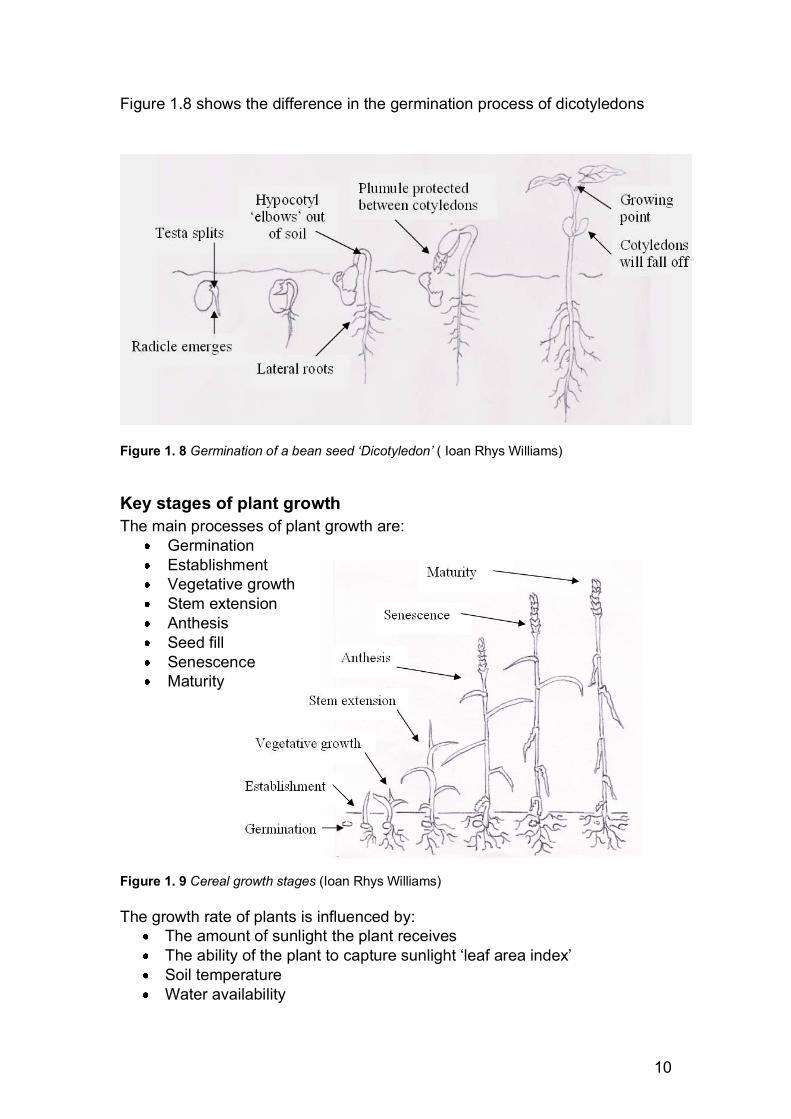
Figure 1.8 shows the difference in the germination process of dicotyledons
Figure 1. 8 Germination of a bean seed ‘Dicotyledon’ ( Ioan Rhys Williams)
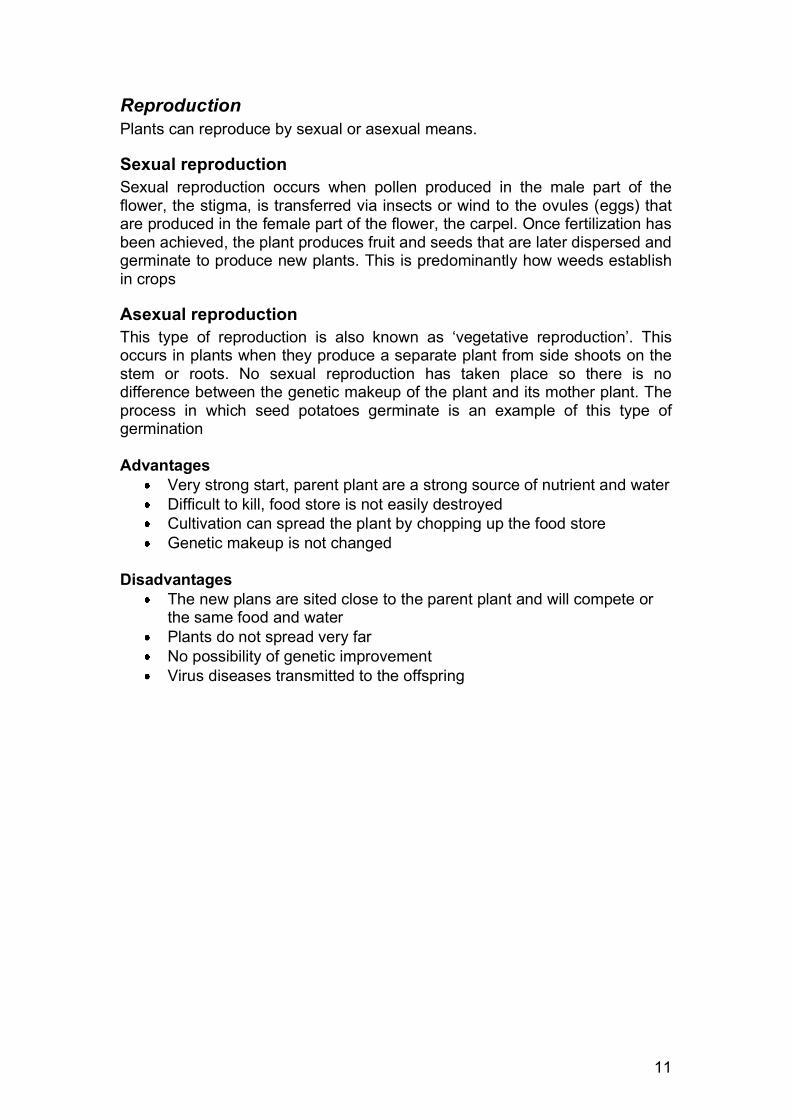
Key stages of plant growth The main processes of plant growth are:
Germination Establishment Vegetative growth Stem extension Anthesis Seed fill Senescence Maturity
Figure 1. 9 Cereal growth stages (Ioan Rhys Williams)
The growth rate of plants is influenced by: The amount of sunlight the plant receives The ability of the plant to capture sunlight ‘leaf area index’ Soil temperature Water availability
10
Reproduction Plants can reproduce by sexual or asexual means.
Sexual reproduction Sexual reproduction occurs when pollen produced in the male part of the flower, the stigma, is transferred via insects or wind to the ovules (eggs) that are produced in the female part of the flower, the carpel. Once fertilization has been achieved, the plant produces fruit and seeds that are later dispersed and germinate to produce new plants. This is predominantly how weeds establish in crops
Asexual reproduction This type of reproduction is also known as ‘vegetative reproduction’. This occurs in plants when they produce a separate plant from side shoots on the stem or roots. No sexual reproduction has taken place so there is no difference between the genetic makeup of the plant and its mother plant. The process in which seed potatoes germinate is an example of this type of germination
Advantages Very strong start, parent plant are a strong source of nutrient and water Difficult to kill, food store is not easily destroyed Cultivation can spread the plant by chopping up the food store Genetic makeup is not changed
Disadvantages The new plans are sited close to the parent plant and will compete or the same food and water Plants do not spread very far No possibility of genetic improvement Virus diseases transmitted to the offspring
11
Chapter 2: Soil science and condition
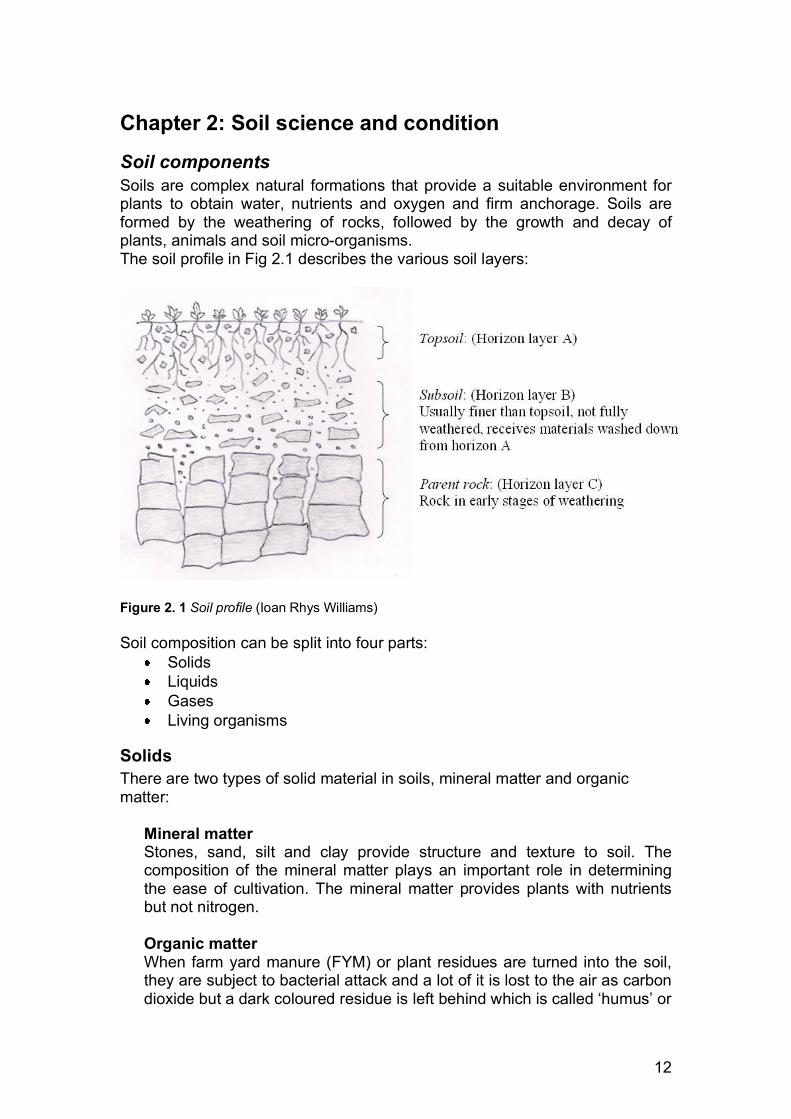
Soil components Soils are complex natural formations that provide a suitable environment for plants to obtain water, nutrients and oxygen and firm anchorage. Soils are formed by the weathering of rocks, followed by the growth and decay of plants, animals and soil micro-organisms. The soil profile in Fig 2.1 describes the various soil layers:
Figure 2. 1 Soil profile (Ioan Rhys Williams)
Soil composition can be split into four parts: Solids Liquids Gases Living organisms
Solids There are two types of solid material in soils, mineral matter and organic matter:
Mineral matter Stones, sand, silt and clay provide structure and texture to soil. The composition of the mineral matter plays an important role in determining the ease of cultivation. The mineral matter provides plants with nutrients but not nitrogen.
Organic matter When farm yard manure (FYM) or plant residues are turned into the soil, they are subject to bacterial attack and a lot of it is lost to the air as carbon dioxide but a dark coloured residue is left behind which is called ‘humus’ or
12
‘soil organic matter’. The soil organic matter is very rich in plant nutrients, it enhances stability in unstable soils and improves the workability of heavy soils.
Liquids Water is an essential part of fertile soils which vary in their capacity to hold water. The spaces between particles in the soil are called ‘pore spaces’ which may be filled with air, water or both. If the pore spaces are only filled with air, there is no water available for the plants. If the pore spaces are completely filled with water, the soil is waterlogged and there is no oxygen for the plants. Therefore, ideally there should be equal amounts of air and water in the soil. The amount of water that soils hold is dependent on the size of mineral matter particles in the soil. Sand particles are larger than silt particles which in turn are larger than clay particles. Smaller particles create more pore spaces therefore clay can hold more water than silt which can hold more water than sand. The most fertile soils are those which drain freely but can retain large quantities of water during a drought.
Gases Air competes with water for the pore spaces between soil particles. Plant roots as well as soil animals and micro-organisms require oxygen for respiration and expel carbon dioxide. The air found in soil is atmospheric air that has been changed by these activities, therefore it contains less oxygen and more carbon dioxide. Good aeration is needed for effective plant production, this is the replacement of the used air with fresh air. This process occurs mainly with the movement of water in and out of the soil e.g. rain water pushes the old air out of the pore spaces, then as the water is used or drained away, fresh air takes its place.
Aeration is assisted by: Changes in temperature Good drainage Cultivation Open soil structure
Living organisms There are two types of living material in soils, micro-organisms and animals:
Soil micro-organisms There are millions of very small micro-organisms in every gram of fertile soil, the most numerous being bacteria. Most bacteria feed on and break down organic matter, they obtain energy from starches in the soil and release carbon dioxide. Some micro-organisms use nitrogen needed by the plants from the soil to build protein but some bacteria have the ability to fix nitrogen from the air which is advantageous to the plants. Other micro-organisms found in the soil are ‘fungi’, ‘algae’ and ‘protozoa’, the activity of all micro-organisms improve the productivity of the soil.
13

Soil animals The most prominent soil animal is the earthworm. It is generally believed that they have a beneficial effect on soil fertility particularly with grassland.. They live in holes in the soil and eat organic matter. They benefit the soil by carrying fallen leaves, straw and similar material down into the soil, make many holes that allow water to enter and drain from the soil, and draw fresh air in. The earthworm is the main food source of moles which do so much damage by burrowing and throwing up heaps of soil. Other soil living organisms include slugs, snails, millipedes, ants, beetles and larvae, the farmer is only concerned with those which directly damage the crop.
14
Soil types The structure and texture of soils differ from one type to another:
Structure This is the arrangement of the soil particles. It can be altered by weather conditions, penetration of plant roots and cultivation. It is not possible to measure soil structure but with experience, it’s possible to assess the quality by the appearance and ‘feel’. Texture Soil texture is determined by the amount of clay, silt, sand and organic matter that the soil contains. It’s possible to measure soil texture by a mechanical analysis of a sample which measures the particle sizes. It’s very difficult to alter soil texture.
There are wide variations in the types of soil found on farms, they can be grouped according to texture and the amount of clay, silt, sand and organic matter that are found in them.
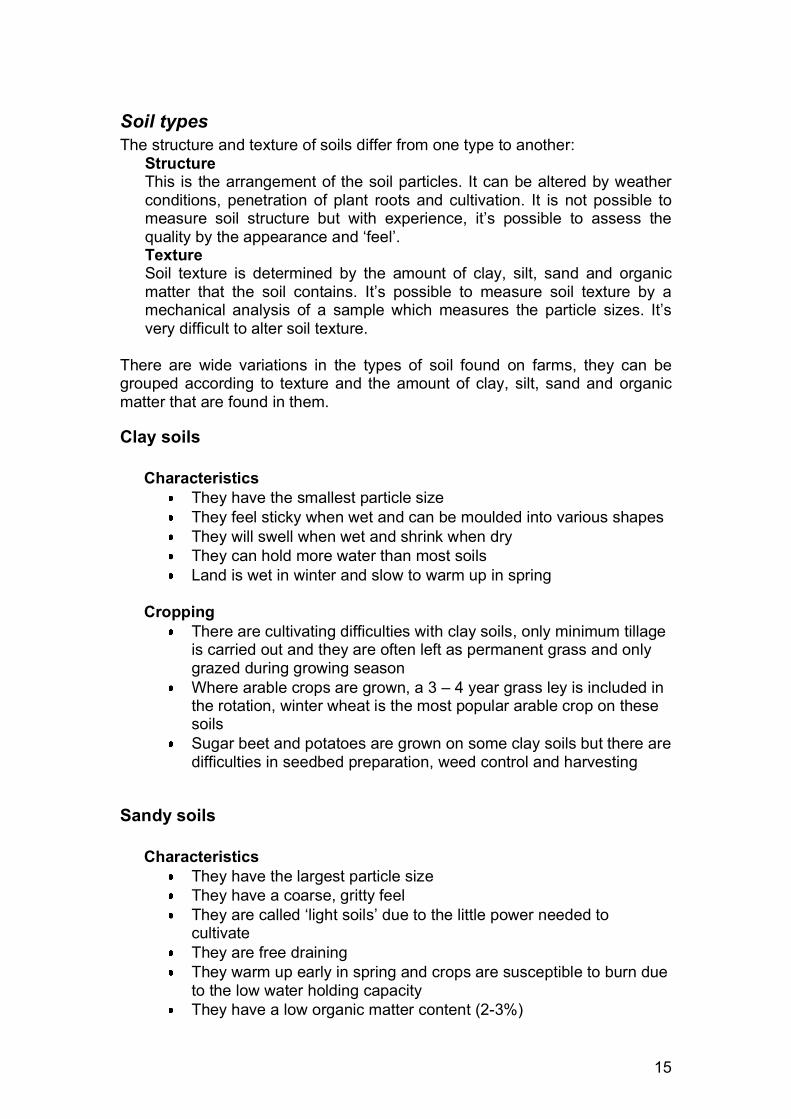
Clay soils
Characteristics They have the smallest particle size They feel sticky when wet and can be moulded into various shapes They will swell when wet and shrink when dry They can hold more water than most soils Land is wet in winter and slow to warm up in spring
Cropping There are cultivating difficulties with clay soils, only minimum tillage is carried out and they are often left as permanent grass and only grazed during growing season Where arable crops are grown, a 3 – 4 year grass ley is included in the rotation, winter wheat is the most popular arable crop on these soils Sugar beet and potatoes are grown on some clay soils but there are difficulties in seedbed preparation, weed control and harvesting
Sandy soils
Characteristics They have the largest particle size They have a coarse, gritty feel They are called ‘light soils’ due to the little power needed to cultivate They are free draining They warm up early in spring and crops are susceptible to burn due to the low water holding capacity They have a low organic matter content (2-3%)
15
Cropping A wide range of crops can be grown on this type of soil but yields are dependent on a good supply of water and fertilizer Due to the low fertility and water holding capacity levels of these soils, irrigation systems and frequent manure and fertilizer applications are needed, this is made easier due to the fact that the soils are early and easily worked On the light sandy soils where irrigation isn’t possible, carrots, rye and sugar beet are grown On the more fertile sandy soils where there is water supply, the main arable crops are barley, peas, potatoes, carrots and sugar beet Stock can be out wintered on these soils without the risk of poaching
Silts
Characteristics Pure silt has a silky, buttery feel and is difficult to drain and manage The slits containing fine sand are one of the most fertile soils in the country
Cropping In the west of the U.K. grass and cereals are the main crops on these types of soil In the east of the U.K. wheat, potatoes, sugar beet, peas, onions, seed production for root crops and bulbs are grown on these types of soils
Loams
Characteristics They have an intermediate texture between clay and sandy soils They have most of the advantages and a few of the disadvantages of the clay and sandy soils They warm up reasonably early in spring and are fairly resistant to drought
Cropping These soils are regarded as the best all-round soils because they are naturally fertile and can be used to grow any crop provided the soil depth is sufficient These types of soils are ideal for mixed farming. Cereals, potatoes and sugar beet are the main arable crops while grass lays provide grazing and winter bulk food for dairy and beef cattle and sheep
16

17
Calcareous soils
Characteristics Derived from chalk and limestone and contain various amounts of calcium carbonate Ease of working depends on the amount of clay and chalk or limestone present Free draining and shallow soil, can be prone to drought Sharp stones and chalk formations can effect sowing and harvesting and hard wearing on machinery Contain low levels of some major nutrients, the alkaline conditions can also cause trace elements to be unavailable pH usually > 7.0
Cropping Cereals are a suitable crop for this type of soil Root crops on the deeper calcareous soils
Peaty soils
Characteristics Pure peat contain 50 – 90% organic matter but the peaty soils contain 20 – 25 % organic matter These have been formed in waterlogged areas where mosses, heather and rushes grew and the dead material was only partly broken down These are rich in Nitrogen but have low levels of phosphates and potash pH range from 4-6
Cropping Good grass and clover lays can be established on these types of soils but they must not be overgrazed or poached in wet weather or rushes and weed grasses will quickly re-establish With good cultivation, most arable crops can be grown but potatoes and oats are the most suitable
18
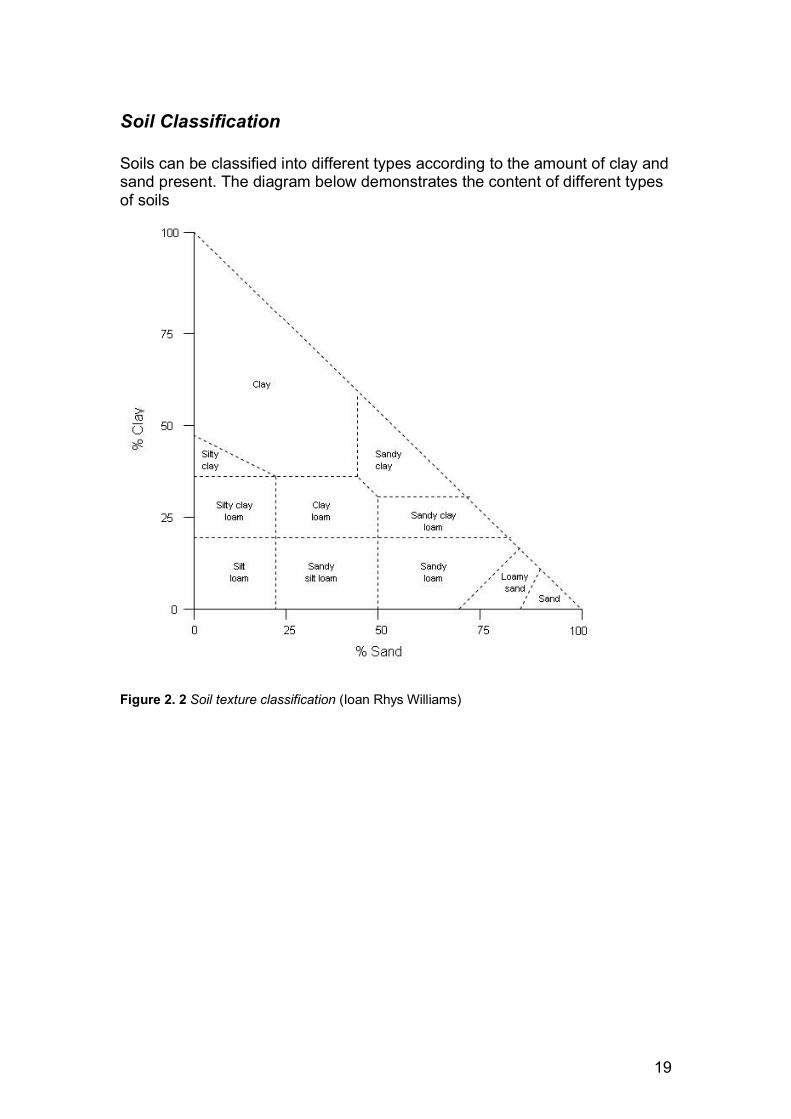
Soil Classification
Soils can be classified into different types according to the amount of clay and sand present. The diagram below demonstrates the content of different types of soils
Figure 2. 2 Soil texture classification (Ioan Rhys Williams)
19
Soil Fertility
A fertile soil provides a plant with all the nutrients and water it requires for growth. At any one point in time soil fertility is dependent on the natural make- up and condition of the soil. Farmers will always aim to maintain soil fertility through appropriate husbandry techniques.
Natural make-up
Factors that influence natural makeup are:
Texture and chemical composition of the soil The topography (slope), this effects drainage, temperature and workability of the soil Climate and local weather
These have a significant influence on the rental and sale value of land.
Current soil condition
This is dependent on the management of the soil recent times, it can be built up by good husbandry but if high standard isn’t maintained, it will soon return to its natural fertility level
Maintaining soil fertility
Many management factors contribute to the maintenance of soil fertility:
Maintaining or increasing organic matter Ploughing in straw and similar crop residues, FYM and composts. The roots and stubble of crops are sufficient in maintaining organic matter (humus) levels in some cases e.g. growing cereals continuously Increasing the organic matter content of a soil is the best way of increasing its water holding capacity.
Drainage Measures to assist soil drainage are frequently practiced by farmers particularly with heavy clay soils susceptible to waterlogging.
The benefits of drainage include: Minimizing excess water - Waterlogged conditions will deprive plants of oxygen and stop
plant respiration resulting in stunted roots that prevent plants from absorbing water during drier periods
Improving soil workability - Reduction in water content improves soil strength
20
- Low water content in the topsoil increases cultivating opportunities
Increasing soil temperature - This can lead to more rapid seed germination More efficient fertilizer use - More aerobic, warmer soil conditions make more efficient use of
fertilizer, especially nitrogen Beneficial to grassland - Drainage will extend the growing season and alter the
composition of the sward, increasing the proportion of productive grasses at the expense of weeds
Beneficial to livestock - Drainage will increase the number of days that livestock can
graze in the year without damaging the soil structure by poaching
- Animal liveweight gain is improved - Reduces the incidence of liver fluke and foot problems
Available drainage methods:
Ditches and open drains - These are normally located along boundaries, they may be
adequate to drain areas by themselves but are usually outlets for underground drains.
Pipe drainage - This is where plastic pipes are permanently installed underneath
ploughing depth to carry water away. Distance between pipes depends on soil texture e.g. pipes need to be closer together in heavy, clay soils.
Mole drainage - In heavy soils where a lot of drains are needed, it becomes
uneconomical to lay permanent drains at regular intervals, therefore a mole plough will create temporary channels underneath ploughing depth 2 – 3 meters apart, these will lead into a ditch or over a permanent drain pipe.
Crop rotation A rotation is a cropping system in which two or more crops are grown in a fixed sequence.
An example of a six year rotation on an arable farm would be: 1. Wheat 2. Wheat 3. Beans 4. Wheat 5. Barley 6. Oil seed rape An example of a rotation on a mixed farm would be a 2-3 year grass ley, then a fodder crop such as forage maize.
21

The main reason for rotating crops is that it maintains soil fertility, the reasons for this is:
Nutrient needs of different crops are different therefore there isn’t a strain on that particular nutrient each year. Manure can be applied to the soil, providing nutrients and organic matter Effective cultivations improve fertility
Other reasons for rotating crops include Weed control Encourage biodiversity Make good use of natural resources
22
Chapter 3: Preparing and cultivating land for planting
Cultivation equipment Soils need to be in a condition suitable for establishing a crop. The main objectives of soil cultivation are :
Burying trash (previous crop remains) Reducing compaction Producing a suitable seedbed Shaping the soil for the next crop (e.g. furrowing for potatoes) Improving harvesting conditions
The cultivation process is split into the primary and secondary cultivation. Primary cultivations break up the soil while secondary cultivations refine the topsoil to produce the required soil particle size, firmness and surface shape for seed germination and plant growth. Particular equipment is used for particular cultivation.
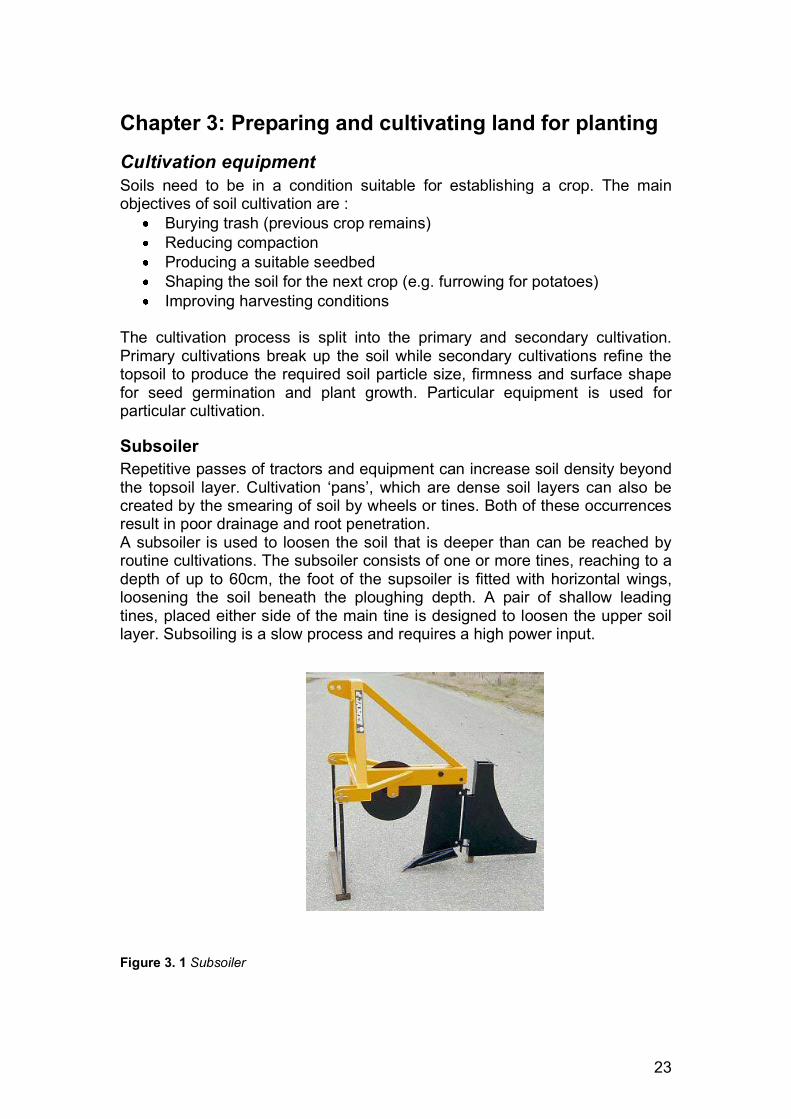
Subsoiler Repetitive passes of tractors and equipment can increase soil density beyond the topsoil layer. Cultivation ‘pans’, which are dense soil layers can also be created by the smearing of soil by wheels or tines. Both of these occurrences result in poor drainage and root penetration. A subsoiler is used to loosen the soil that is deeper than can be reached by routine cultivations. The subsoiler consists of one or more tines, reaching to a depth of up to 60cm, the foot of the supsoiler is fitted with horizontal wings, loosening the soil beneath the ploughing depth. A pair of shallow leading tines, placed either side of the main tine is designed to loosen the upper soil layer. Subsoiling is a slow process and requires a high power input.
Figure 3. 1 Subsoiler
23
The plough Ploughing is the first process in seedbed preparation in most cases. It’s an excellent method of:
Separating soil particles Disintegrating large colds Inverting the topsoil to bury weeds, crop remains and potential diseases Setting up the soil for frost penetration
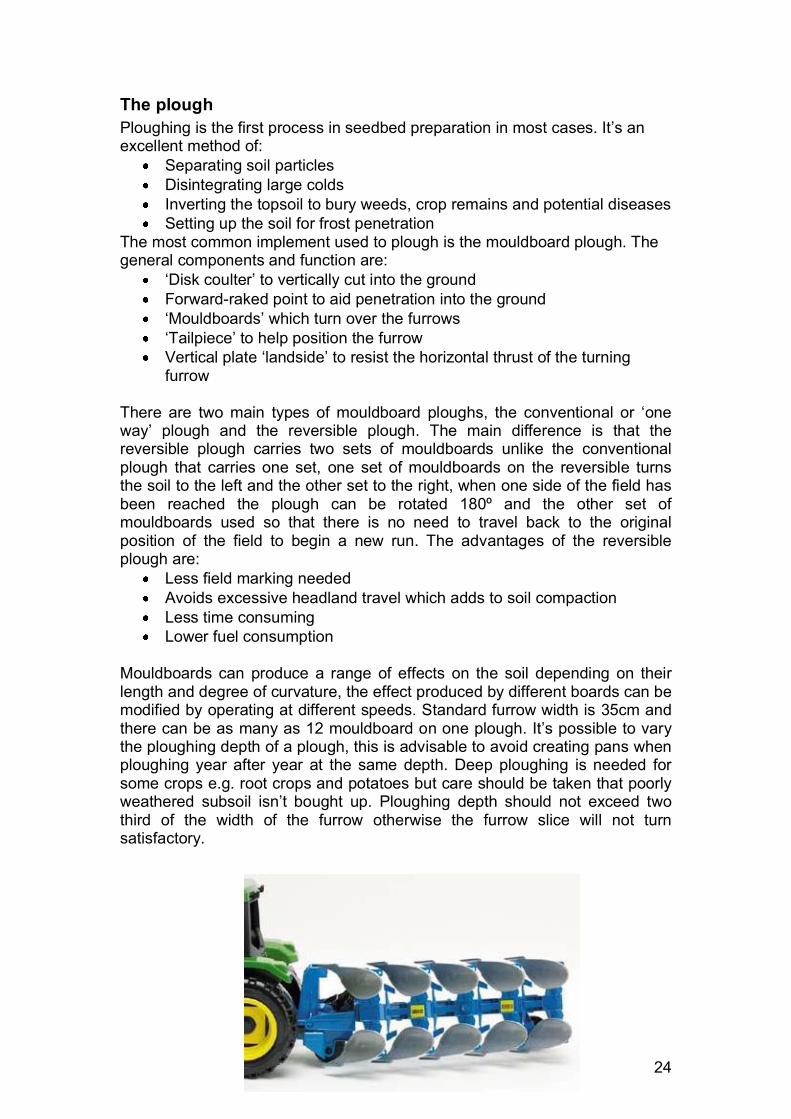
The most common implement used to plough is the mouldboard plough. The general components and function are:
‘Disk coulter’ to vertically cut into the ground Forward-raked point to aid penetration into the ground ‘Mouldboards’ which turn over the furrows ‘Tailpiece’ to help position the furrow Vertical plate ‘landside’ to resist the horizontal thrust of the turning furrow
There are two main types of mouldboard ploughs, the conventional or ‘one way’ plough and the reversible plough. The main difference is that the reversible plough carries two sets of mouldboards unlike the conventional plough that carries one set, one set of mouldboards on the reversible turns the soil to the left and the other set to the right, when one side of the field has been reached the plough can be rotated 180º and the other set of mouldboards used so that there is no need to travel back to the original position of the field to begin a new run. The advantages of the reversible plough are:
Less field marking needed Avoids excessive headland travel which adds to soil compaction Less time consuming Lower fuel consumption
Mouldboards can produce a range of effects on the soil depending on their length and degree of curvature, the effect produced by different boards can be modified by operating at different speeds. Standard furrow width is 35cm and there can be as many as 12 mouldboard on one plough. It’s possible to vary the ploughing depth of a plough, this is advisable to avoid creating pans when ploughing year after year at the same depth. Deep ploughing is needed for some crops e.g. root crops and potatoes but care should be taken that poorly weathered subsoil isn’t bought up. Ploughing depth should not exceed two third of the width of the furrow otherwise the furrow slice will not turn satisfactory.
24
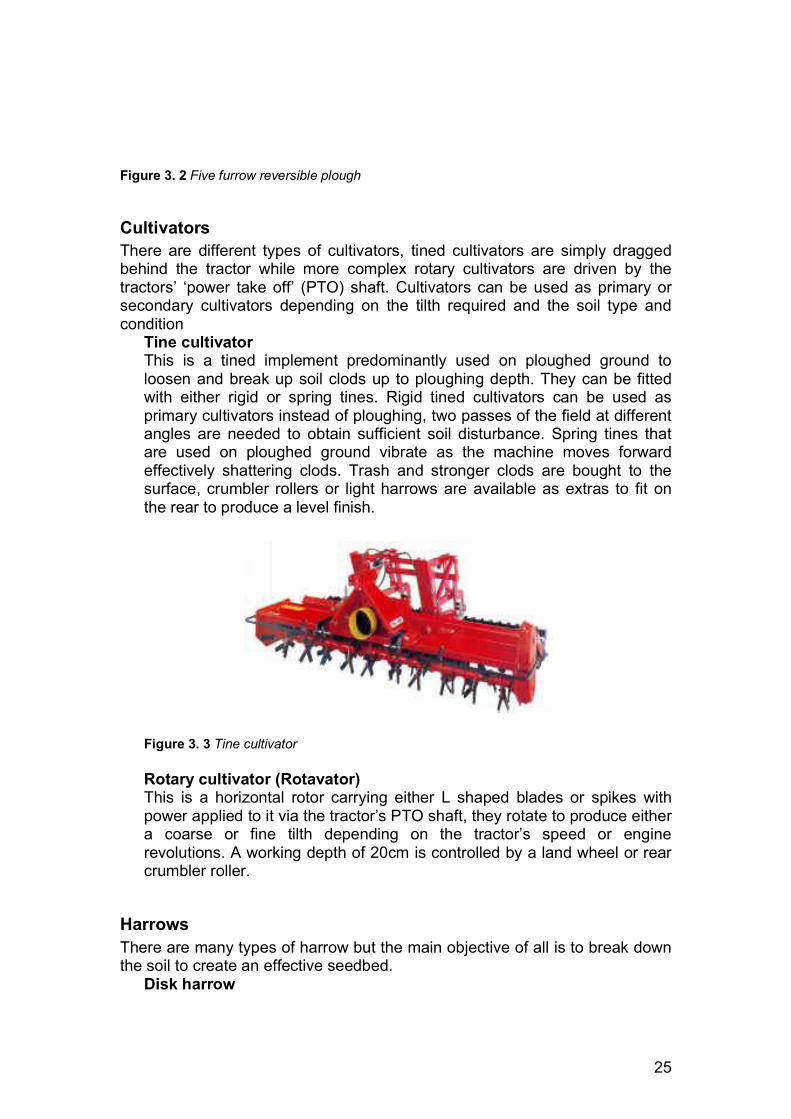
Figure 3. 2 Five furrow reversible plough
Cultivators There are different types of cultivators, tined cultivators are simply dragged behind the tractor while more complex rotary cultivators are driven by the tractors’ ‘power take off’ (PTO) shaft. Cultivators can be used as primary or secondary cultivators depending on the tilth required and the soil type and condition
Tine cultivator This is a tined implement predominantly used on ploughed ground to loosen and break up soil clods up to ploughing depth. They can be fitted with either rigid or spring tines. Rigid tined cultivators can be used as primary cultivators instead of ploughing, two passes of the field at different angles are needed to obtain sufficient soil disturbance. Spring tines that are used on ploughed ground vibrate as the machine moves forward effectively shattering clods. Trash and stronger clods are bought to the surface, crumbler rollers or light harrows are available as extras to fit on the rear to produce a level finish.
Figure 3. 3 Tine cultivator
Rotary cultivator (Rotavator) This is a horizontal rotor carrying either L shaped blades or spikes with power applied to it via the tractor’s PTO shaft, they rotate to produce either a coarse or fine tilth depending on the tractor’s speed or engine revolutions. A working depth of 20cm is controlled by a land wheel or rear crumbler roller.
Harrows There are many types of harrow but the main objective of all is to break down the soil to create an effective seedbed.
Disk harrow
25
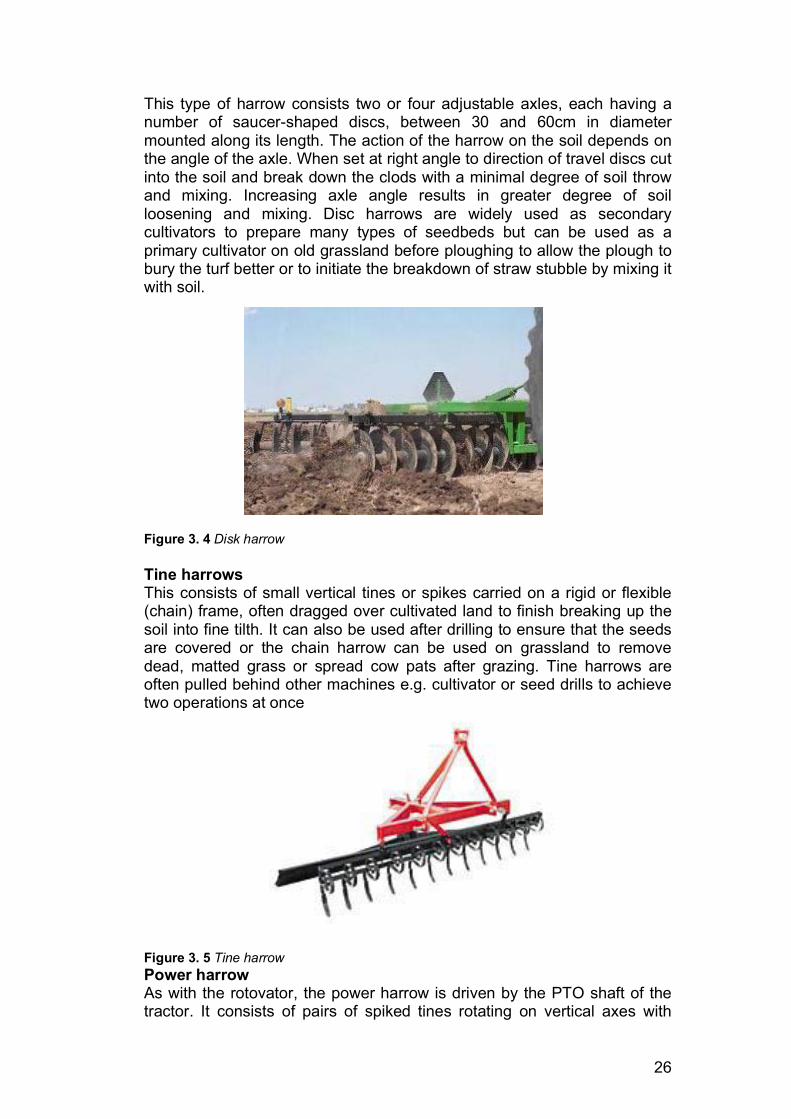
This type of harrow consists two or four adjustable axles, each having a number of saucer-shaped discs, between 30 and 60cm in diameter mounted along its length. The action of the harrow on the soil depends on the angle of the axle. When set at right angle to direction of travel discs cut into the soil and break down the clods with a minimal degree of soil throw and mixing. Increasing axle angle results in greater degree of soil loosening and mixing. Disc harrows are widely used as secondary cultivators to prepare many types of seedbeds but can be used as a primary cultivator on old grassland before ploughing to allow the plough to bury the turf better or to initiate the breakdown of straw stubble by mixing it with soil.
Figure 3. 4 Disk harrow
Tine harrows This consists of small vertical tines or spikes carried on a rigid or flexible (chain) frame, often dragged over cultivated land to finish breaking up the soil into fine tilth. It can also be used after drilling to ensure that the seeds are covered or the chain harrow can be used on grassland to remove dead, matted grass or spread cow pats after grazing. Tine harrows are often pulled behind other machines e.g. cultivator or seed drills to achieve two operations at once
Figure 3. 5 Tine harrow Power harrow As with the rotovator, the power harrow is driven by the PTO shaft of the tractor. It consists of pairs of spiked tines rotating on vertical axes with
26
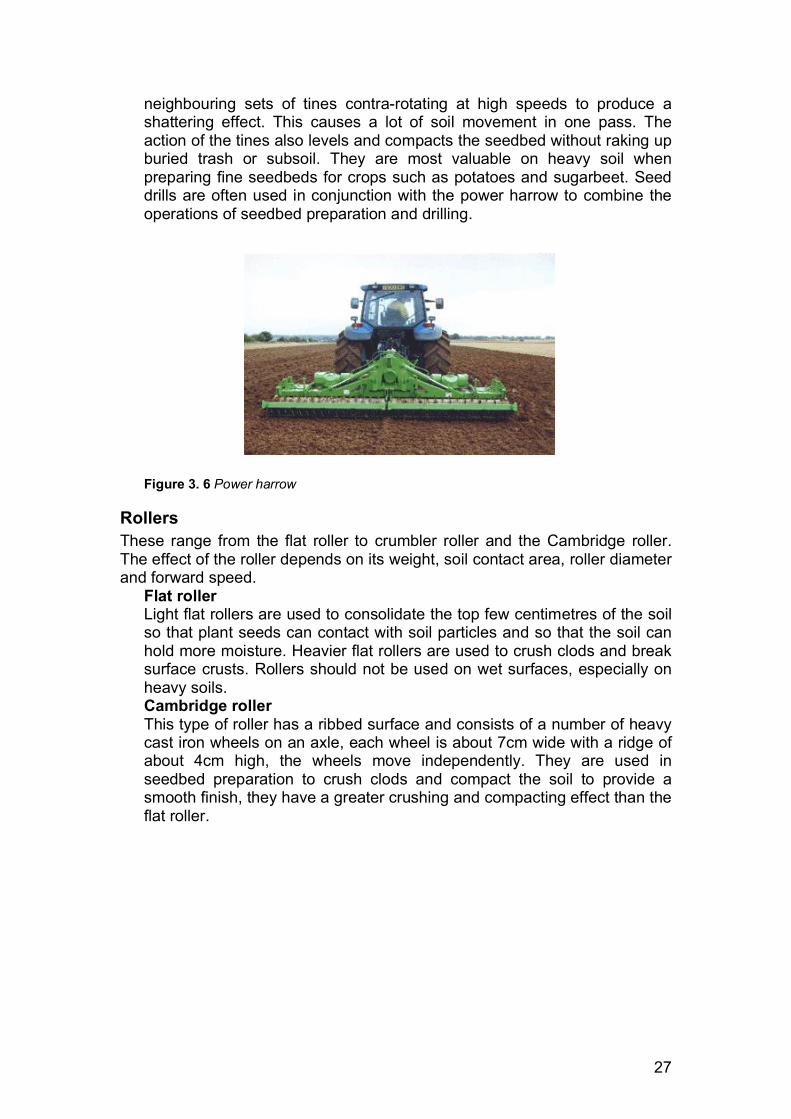
neighbouring sets of tines contra-rotating at high speeds to produce a shattering effect. This causes a lot of soil movement in one pass. The action of the tines also levels and compacts the seedbed without raking up buried trash or subsoil. They are most valuable on heavy soil when preparing fine seedbeds for crops such as potatoes and sugarbeet. Seed drills are often used in conjunction with the power harrow to combine the operations of seedbed preparation and drilling.
Figure 3. 6 Power harrow
Rollers These range from the flat roller to crumbler roller and the Cambridge roller. The effect of the roller depends on its weight, soil contact area, roller diameter and forward speed.
Flat roller Light flat rollers are used to consolidate the top few centimetres of the soil so that plant seeds can contact with soil particles and so that the soil can hold more moisture. Heavier flat rollers are used to crush clods and break surface crusts. Rollers should not be used on wet surfaces, especially on heavy soils. Cambridge roller This type of roller has a ribbed surface and consists of a number of heavy cast iron wheels on an axle, each wheel is about 7cm wide with a ridge of about 4cm high, the wheels move independently. They are used in seedbed preparation to crush clods and compact the soil to provide a smooth finish, they have a greater crushing and compacting effect than the flat roller.
27
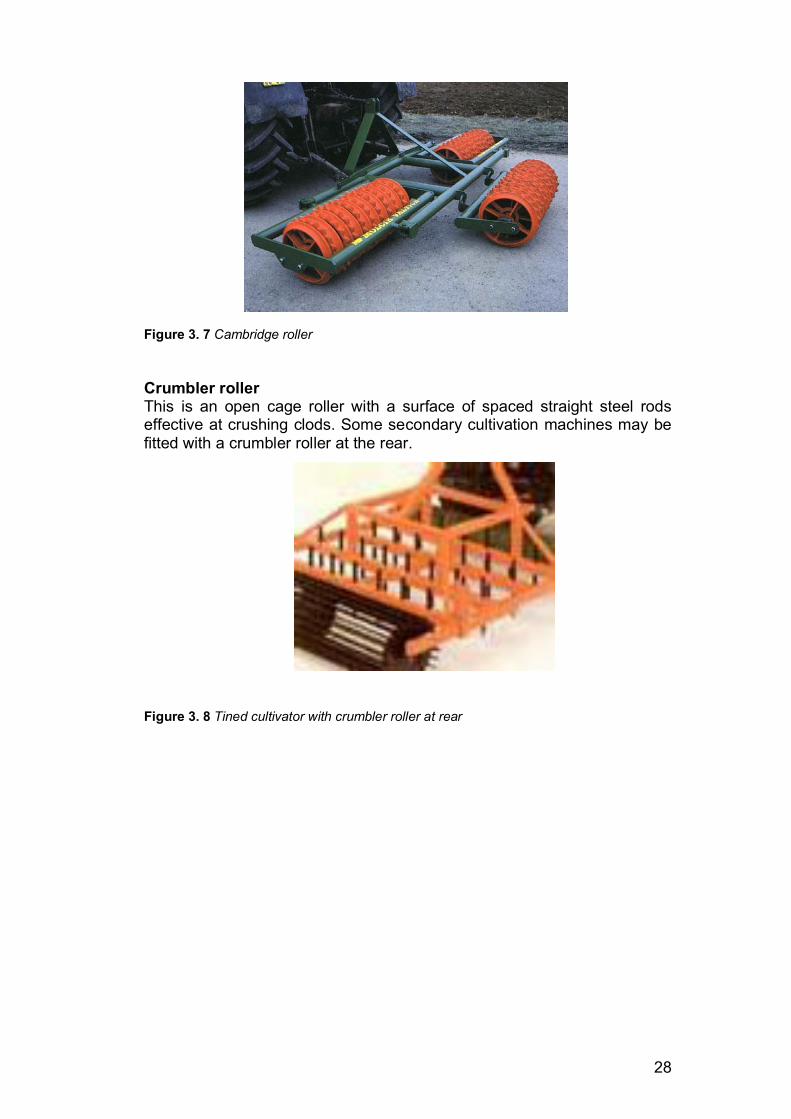
Figure 3. 7 Cambridge roller
Crumbler roller This is an open cage roller with a surface of spaced straight steel rods effective at crushing clods. Some secondary cultivation machines may be fitted with a crumbler roller at the rear.
Figure 3. 8 Tined cultivator with crumbler roller at rear
28
Land preparation Preparing a site for sowing a crop depends on factors that include:
Climate Weather Ground condition Previous treatment
One of the biggest factors that influences preparation of the seed bed is the intended crop.
Winter cereal Cereals generally perform better in the eastern parts of the UK due to drier harvest and more flexible drilling conditions. In terms of yield and quality, wheat is favoured in heavier soils and barley does relatively better on light soils. The objective of cereal seedbed preparation is to create a tilth (seedbed condition) consisting of fine material and egg-sized lumps. These conditions should allow the seeds to be drilled and easily covered with the surface remaining rough after planting. The advantages of the lumps on the surface are:
Preventing siltier soils from ‘capping’ in wet winters Protecting base of cereal from the effects of cold winds
Larger clods of soil make it easier for slugs to move through the soil and damage seeds and seedlings. The conventional process for seedbed preparation is:
Primary cultivation - Subsoiling (if soil is compacted) - Ploughing Secondary cultivation - Spring tined cultivation - Power harrow
Light harrowing and/or rolling may be carried out in the spring to break up a soil cap which may have formed, this will also firm the soil around the plant which have been raised by frost action. If conditions are favourable, minimal cultivation is possible i.e. surface cultivation without ploughing. In some cases no preparation may be needed where seeds can be directly drilled into stubble of previous crop.
Spring cereal The climate and soil type requirements of spring cereals are the same as winter cereals. The main difference is seedbed preparation as the tilth needs to be finer (very fine if grass and clovers are to be undersown). As the growing season is short this makes rapid crop establishment easier. Other requirements are:
Firm base at seed depth Level surface Warmth and moisture
These conditions may not be possible in some soils and conditions.
29
To achieve a finer tilth, more work should be undertaken in secondary cultivation if needed i.e. more work with the power harrow.
Root crops Root crops are predominantly grown in the arable areas along the east coast of the UK where lower rainfall allows for late autumn harvest. As plant species which are physiologically different from cereals, they are used as break crops in predominately cereal rotations. They can be grown in a variety of soil types, all with different advantages and disadvantages. Root crops such as sugar beet, swedes and carrots have small seeds that often have to be placed in a pellet for sowing. The ideal seedbed conditions for these crops are fine, level, firm and moist seed beds that give good seed contact for rapid germination. This is especially important when direct drilling or when low seed rates are used. Good early ploughing with uniform, well packed furrows will reduce secondary cultivation work in spring. Deep cultivations should be avoided to keep frost mould on top and leaving the unweatherd soil beneath the surface. There should be no soil compaction below the seeds so that root can penetrate easily to exploit the soils’ potential and so that water can drain easily.
Potatoes An ideal climate in which to grow potatoes will provide:
Dry spring for good seedbed preparation Enough sunshine and moisture during the growing season
Potatoes are usually grown in ridges or beds therefore deep cultivation is needed but care should be taken not to bring unweathered soil and clods to the surface. The aim is to produce a tilth free from clods and stones. The presence of clods and stones in the ridge slows down harvesting through having to manually separate the stones from the crop, it can also cause the potatoes (tubers) to be misshaped, decreasing the marketable yield. Stone and clod separation techniques are increasingly used, this leaves the stones and clods between the ridges, minimising their effect on the crop. A fairly rough, damp seedbed is usually preferred to a fine, dry tilth which has been worked too much.
Oil seeds Both oilseed rape and linseed need fine soil particle size to ensure good soil contact with the small seeds for rapid germination since successful establishment is key to a high yielding crop. A fine tilth also improves the efficiency of soil acting herbicides
Winter oilseed Winter oilseed rape is sown in late August and moisture conservation at this dry hot period is of essential, a firm seedbed will aid in conserving moisture. Care should be taken to avoid soil compaction that reduces yields by limiting root development and subsequent water and nutrients uptake,. Minimum cultivations are usually carried out. The tilth also needs to be free from trash which would interfere with drilling operations.
30
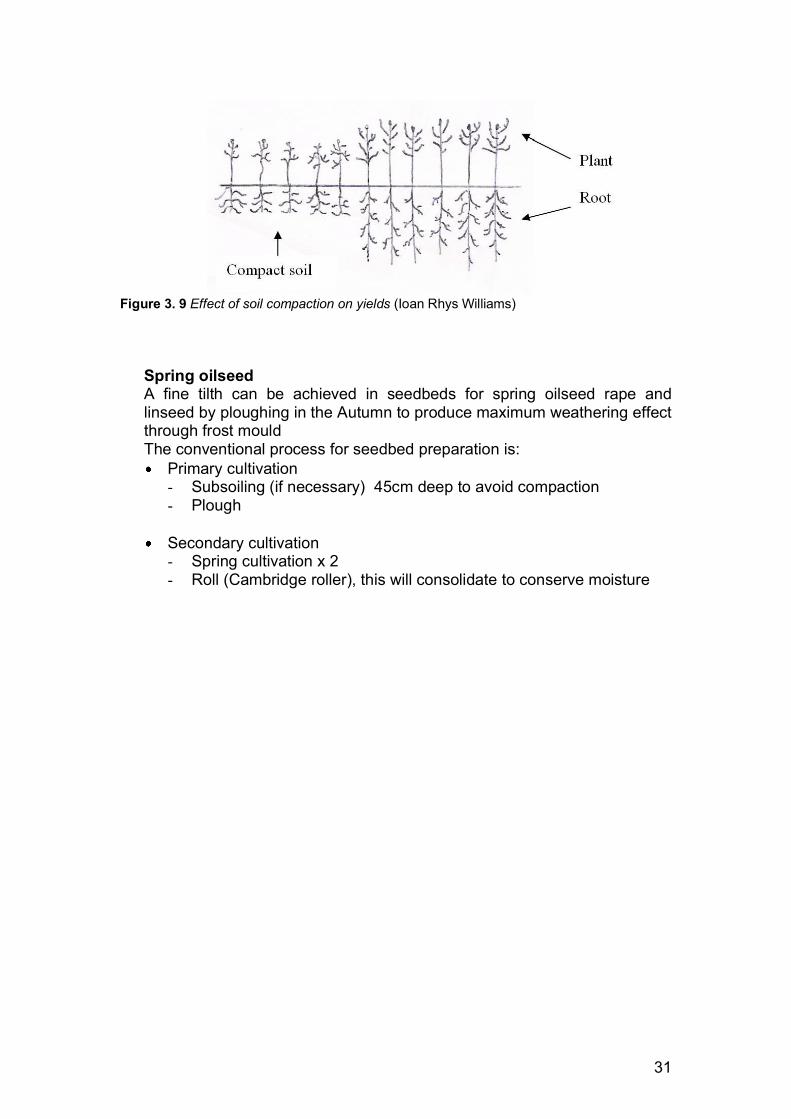
Figure 3. 9 Effect of soil compaction on yields (Ioan Rhys Williams)
Spring oilseed A fine tilth can be achieved in seedbeds for spring oilseed rape and linseed by ploughing in the Autumn to produce maximum weathering effect through frost mould The conventional process for seedbed preparation is:
Primary cultivation - Subsoiling (if necessary) 45cm deep to avoid compaction - Plough
Secondary cultivation - Spring cultivation x 2 - Roll (Cambridge roller), this will consolidate to conserve moisture
31
Chapter 4: Nutrient in seedbeds
Plant nutrients When crops are harvested, the nutrients that have been absorbed are removed therefore it is important that the nutrients are replaced and are readily available for the next crop. This can be achieved by the application of chemical (inorganic) fertilisers, organic fertilisers or with organic manures such as FYM and slurry.
The nutrients required by crops can be split into major elements and trace elements:
Major elements Trace elements Nitrogen Phosphate Potassium Sulphur Magnesium Calcium Sodium
Boron Copper Iron Manganese Molybdenum Zinc Cobalt
Major elements
Nitrogen This nutrient is supplied by fertilisers and organic manures. Farmers can use legumes e.g. clovers, peas and beans as a free source of nitrogen because they contain ‘nodule rhizobium bacteria’ that fix nitrogen from the atmosphere to the soil. Nitrogen is also produced naturally by a bacterium which decompose organic matter. Nitrogen is lost from the soil through denitirification by another type of bacteria.. Nitrogen can also be lost by ‘leaching’ where nitrogen is washed away by water. Phosphate This nutrient can be supplied by fertilisers and organic matter from manures or plant debris. Soluble phosphate fertiliser e.g. inorganic fertiliser can be instantly used by the plant but insoluble phosphate fertiliser needs to be broken down by bacteria and weak acid in the soil before it can be used. Potassium This nutrient can be supplied by fertilisers, manures and plant debris. In some areas mineralization of the underlying rock releases potassium to the soil. Sulphur This nutrient can be supplied by fertilisers, manures and from rainfall (acid rain). Improved pollution control at coal fired power stations has made rainfall a less reliable source of sulphur and consequently more fertilizer sulphur is now being applied.
32
Sgiliaith
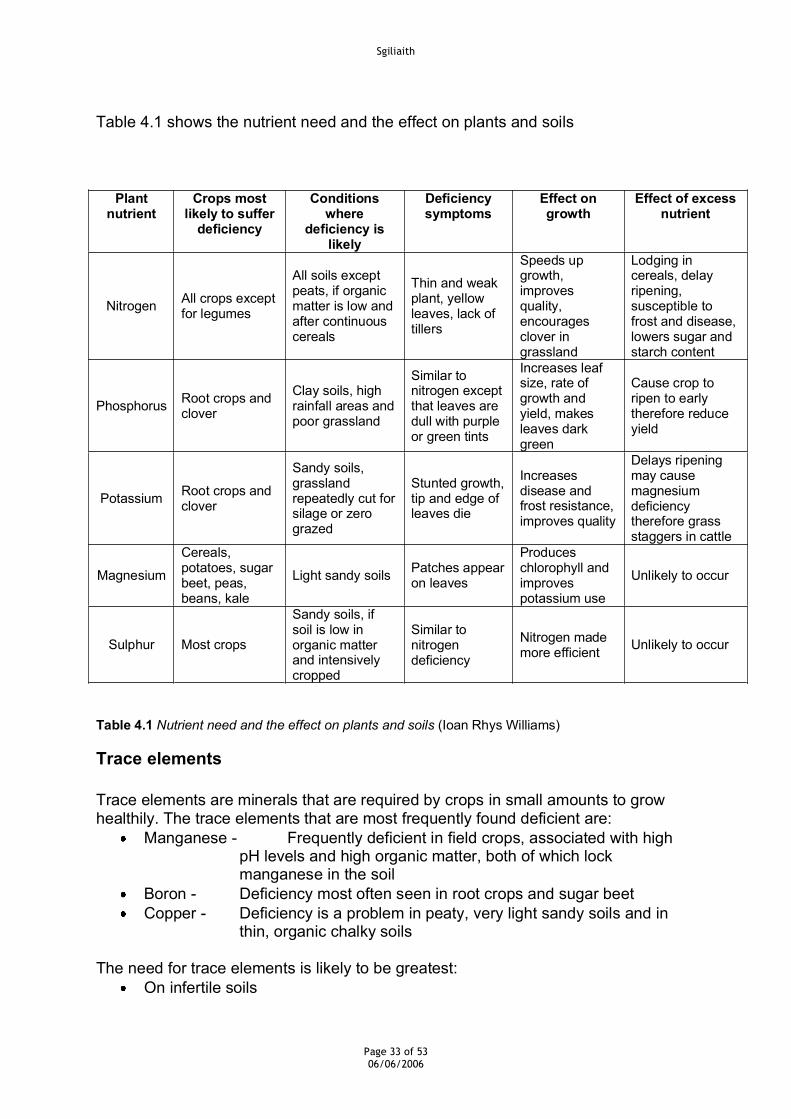
Table 4.1 shows the nutrient need and the effect on plants and soils
Plant nutrient
Crops most likely to suffer
deficiency
Conditions where
deficiency is likely
Deficiency symptoms
Effect on growth
Effect of excess nutrient
Nitrogen All crops except for legumes
All soils except peats, if organic matter is low and after continuous cereals
Thin and weak plant, yellow leaves, lack of tillers
Speeds up growth, improves quality, encourages clover in grassland
Lodging in cereals, delay ripening, susceptible to frost and disease, lowers sugar and starch content
Phosphorus Root crops and clover
Clay soils, high rainfall areas and poor grassland
Similar to nitrogen except that leaves are dull with purple or green tints
Increases leaf size, rate of growth and yield, makes leaves dark green
Cause crop to ripen to early therefore reduce yield
Potassium Root crops and clover
Sandy soils, grassland repeatedly cut for silage or zero grazed
Stunted growth, tip and edge of leaves die
Increases disease and frost resistance, improves quality
Delays ripening may cause magnesium deficiency therefore grass staggers in cattle
Magnesium
Cereals, potatoes, sugar beet, peas, beans, kale
Light sandy soils Patches appear on leaves
Produces chlorophyll and improves potassium use
Unlikely to occur
Sulphur Most crops
Sandy soils, if soil is low in organic matter and intensively cropped
Similar to nitrogen deficiency
Nitrogen made more efficient Unlikely to occur
Table 4.1 Nutrient need and the effect on plants and soils (Ioan Rhys Williams)
Trace elements
Trace elements are minerals that are required by crops in small amounts to grow healthily. The trace elements that are most frequently found deficient are:
Manganese - Frequently deficient in field crops, associated with high pH levels and high organic matter, both of which lock manganese in the soil
Boron - Deficiency most often seen in root crops and sugar beet Copper - Deficiency is a problem in peaty, very light sandy soils and in
thin, organic chalky soils
The need for trace elements is likely to be greatest: On infertile soils
Page 33 of 53 06/06/2006
Sgiliaith
Where soil conditions high or low pH, and very high soil organic matter make them unavailable On intensively farmed land where large amounts of trace elements are extracted by crops Where manures such as FYM and slurry are not used to recycle trace elements
Soil chemical analysis is important before applying trace elements. This identifies which trace elements are deficient and ultimately saves on cost. Poor crop growth may be due to other factors such as poor drainage, drought, frost, mechanical damage, viral or fungal disease.
Too high an application rate of trace elements can damage or even kill the crop. Trace elements can be applied to the land as:
Chelates, which are water-soluble complexes of the trace element Foliar sprays, sometimes as a supplement with compound fertiliser ‘Frits’, which is glass containing the element, broken into small particles to be distributed to the soil
Soil sampling and analysis A sample of soil should be analysed from a particular field every 3-4 years, this is an important procedure that should be carried out with care and precision because the productivity of the land is dependent on the farmer ensuring that the land has the correct nutrient level. Being aware of the soil chemical composition will allow the farmer to adjust the composition to meet the production potential.
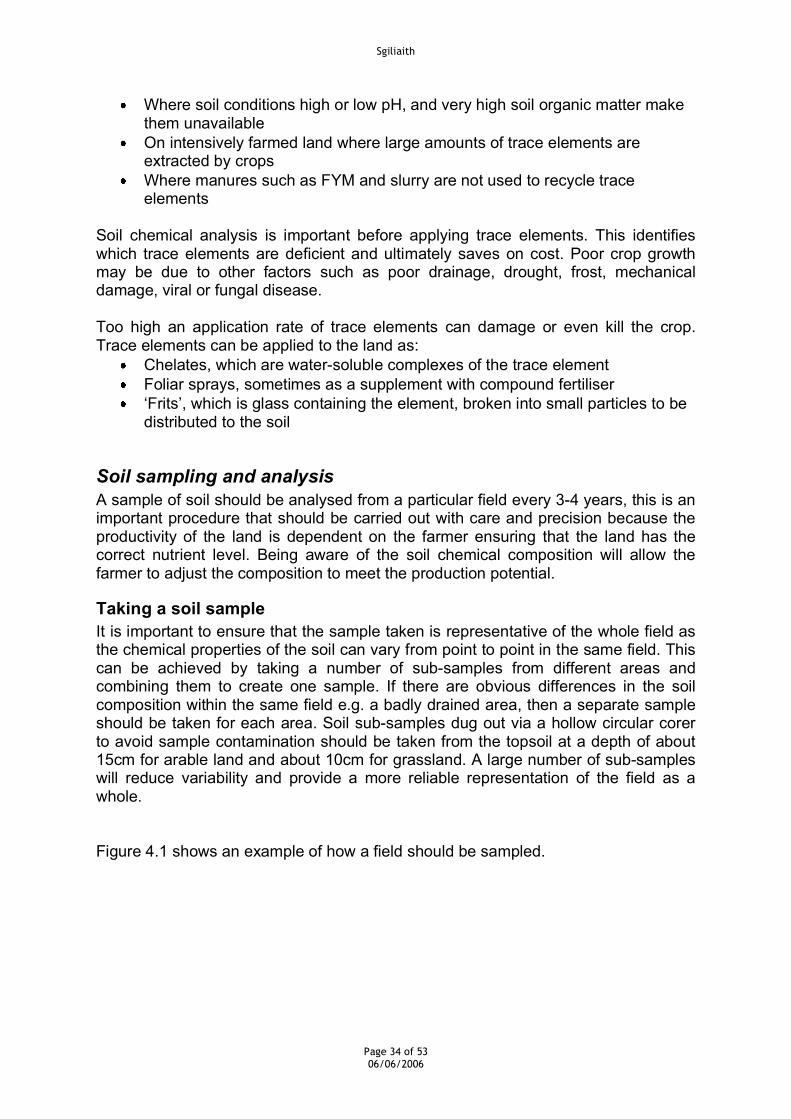
Taking a soil sample It is important to ensure that the sample taken is representative of the whole field as the chemical properties of the soil can vary from point to point in the same field. This can be achieved by taking a number of sub-samples from different areas and combining them to create one sample. If there are obvious differences in the soil composition within the same field e.g. a badly drained area, then a separate sample should be taken for each area. Soil sub-samples dug out via a hollow circular corer to avoid sample contamination should be taken from the topsoil at a depth of about 15cm for arable land and about 10cm for grassland. A large number of sub-samples will reduce variability and provide a more reliable representation of the field as a whole.
Figure 4.1 shows an example of how a field should be sampled.
Page 34 of 53 06/06/2006
Sgiliaith
Fig 4.1 Example of a field soil sampling pattern (Ioan Rhys Williams)
Analysing the soil sample A sample is taken to a laboratory to be analysed. It is air-dried, crushed (not breaking the stones) and then passed through a 2mm sieve. The analysis is carried out on the ‘fine earth’ fraction to determine the following:
Concentration of nutrients available to plants Organic matter content pH Soil texture
Page 35 of 53 06/06/2006
Sgiliaith
Maintaining nutrient levels in the soil
Manures Manure is applied on agricultural land as a means of disposing of animal waste accumulated during housing, it has the added benefit of introducing organic matter to the land and being a cheap source of nutrients such as Nitrogen (N), Phosphate (P), Potassium (K) and Sulphur (S). Manures can be split into three types:
Farm Yard Manure (FYM) Usually contains bedding material such as straw thereby giving it a high Dry Matter (DM) and organic matter content (ODM), It is a by-product of housing dairy cattle, beef cattle, sheep, pig and poultry. Slurry A mixture of urine and manure of a low DM giving it a liquid texture. It is a by- product of pig and cattle housing in cubicles or on slats where bedding is not mixed with manure. It is the product of feeding dairy cattle on low DM silage. Dirty water Water used to wash areas where animals have deposited waste. This is predominantly a by-product of dairy cattle e.g. parlour washings, and is usually stored and applied to the land mixed with slurry.
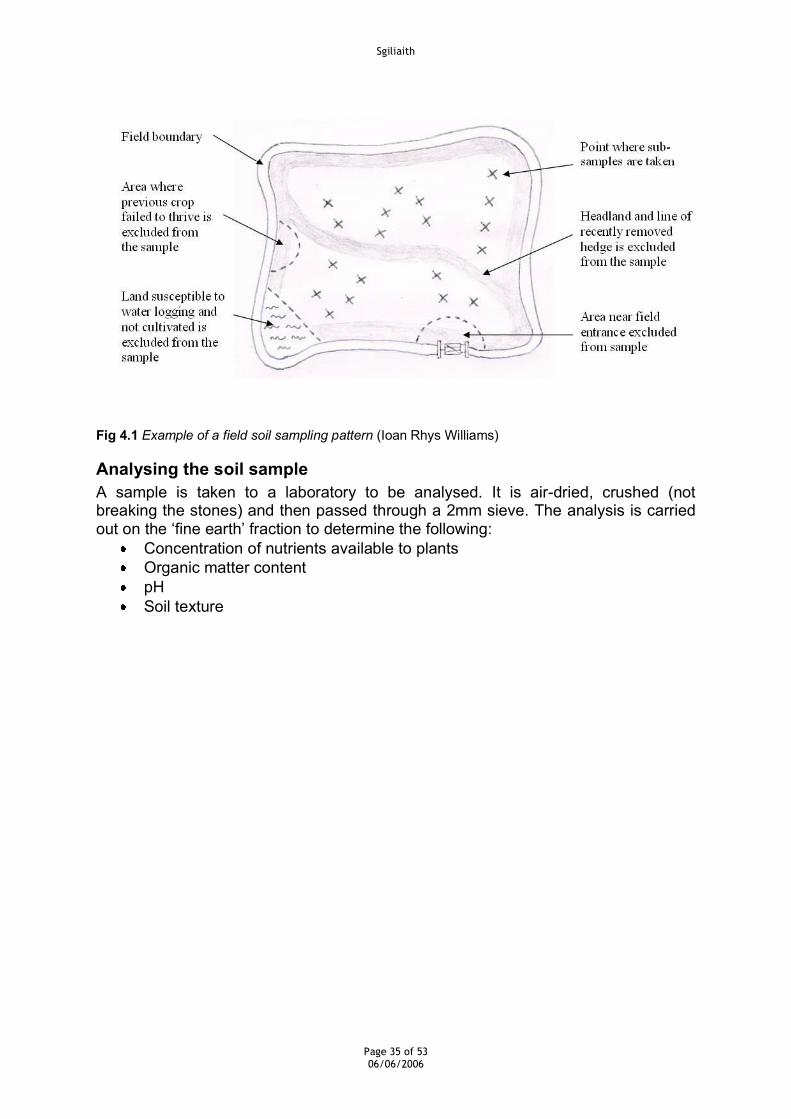
The nutrient content of different types of manures varies according to animal type, diet and storage method e.g. dairy cattle fed on high protein diet produce manure with a higher N content than beef cattle manure. Poultry produce manure with a very high N content. Table 4.2 approximates the manure production and its manure content for livestock.
Livestock Body weight (kg)
Housing period
(days per year)
Undiluted excreta (m 3 or
tonnes)
Nitrogen (kg)
Phosphate (kg)
Potash (kg)
Dairy cattle 550 183 9.6 48 19 48
Beef cattle 400 240 6.2 31 12 31
Pig 200 365 4 20 20 16
Poultry (1000 hens) 2200 365 41 660 545 360
Sheep 65 30 0.1 0.8 0.2 0.4
Table 4.2 Quantities of nutrients produced by livestock during housing (Ioan Rhys Williams)
There are two environmental hazards associated with the use of manures Water pollution This is a result of poor storage or field spreading procedures. Manures have a high bio-chemical oxygen demand that depletes water of oxygen if they find their way into rivers and water courses they will starve aquatic life such as plants and fish of oxygen. Ammonia and odour pollution
Page 36 of 53 06/06/2006
Sgiliaith
Farm buildings and spreading procedures are sources of ammonia and odour pollution. Manures release ammonia to the atmosphere that can cause acidification and nitrogen enrichment leading to a decline in specie diversity. Odour pollution represents a nuisance factor to the public.
Inorganic fertilisers These are chemical fertilisers that are purchased and applied to the land to increase available nutrients. They can be purchased as ‘straights’ or ‘compounds’.
Straights These have a single main chemical ingredient, therefore when applied to the land they will only supply that particular nutrient. Compounds Many crops need more than one of the three main nutrients (N, P and K), therefore it’s convenient to apply all the nutrients at the same time, for this purpose, manufacturers have produced a range of compound fertilisers which is many nutrients in one fertiliser. Compound fertilisers are more expensive than straights but the extra cost can be justified if more than one nutrient is needed since there would be an extra cost of spreading or mixing and difficulty in getting an effective spread.
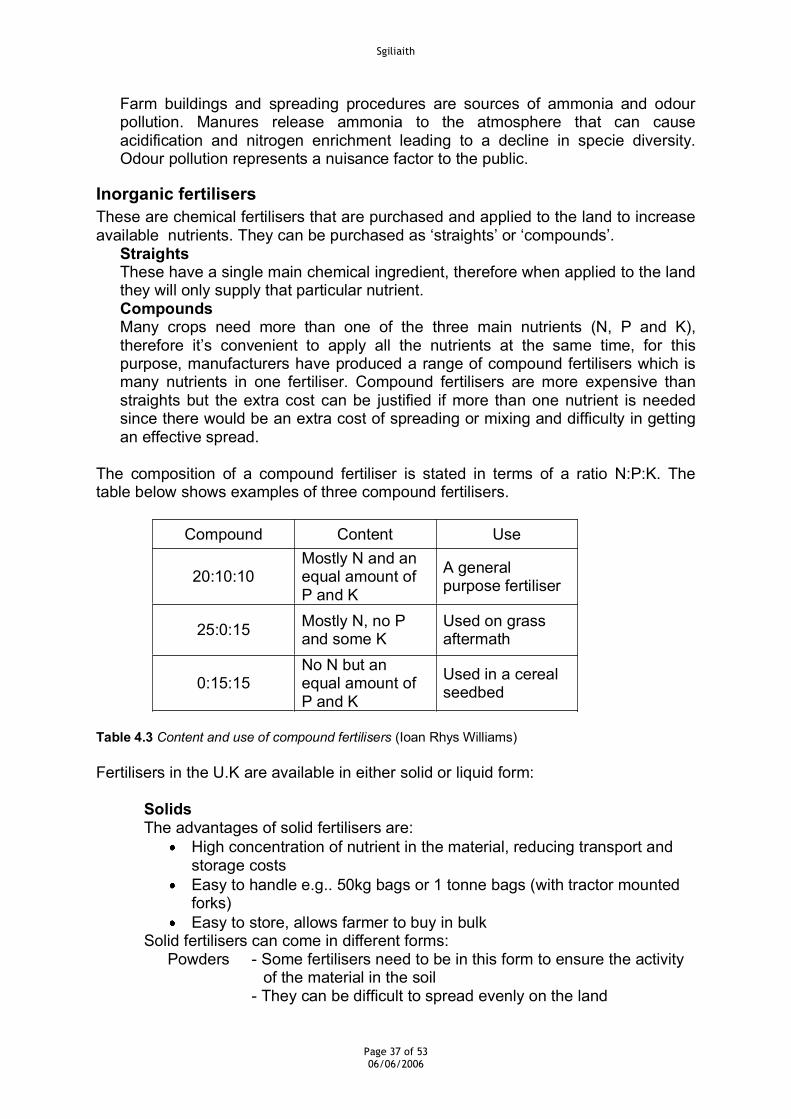
The composition of a compound fertiliser is stated in terms of a ratio N:P:K. The table below shows examples of three compound fertilisers.
Compound Content Use
20:10:10 Mostly N and an equal amount of P and K
A general purpose fertiliser
25:0:15 Mostly N, no P and some K
Used on grass aftermath
0:15:15 No N but an equal amount of P and K
Used in a cereal seedbed
Table 4.3 Content and use of compound fertilisers (Ioan Rhys Williams)
Fertilisers in the U.K are available in either solid or liquid form:
Solids The advantages of solid fertilisers are:
High concentration of nutrient in the material, reducing transport and storage costs Easy to handle e.g.. 50kg bags or 1 tonne bags (with tractor mounted forks) Easy to store, allows farmer to buy in bulk
Solid fertilisers can come in different forms: Powders - Some fertilisers need to be in this form to ensure the activity
of the material in the soil - They can be difficult to spread evenly on the land
Page 37 of 53 06/06/2006
Sgiliaith
Granules - They break down quickly to release the nutrients - Their size and texture will have an effect on the sowing rate
and width Prills - Similar to granules but have a smooth surface and flow more
freely Fragments - Made by coarse grinding of solid material, they behave in a
similar way to granules
Liquid Some fertilisers need to be in liquid form because they do not exist as solids e.g. urea. Liquid fertilisers hold a fairly small share of the fertiliser market, these are some of their main features:
Easy to handle because they can be pumped in and out of stores and spread with sprayers but storage tanks are needed which can be expensive Relatively low concentration of nutrients Possible to mix with herbicide to reduce spreading costs Specialist equipment is required
Organic fertilisers
Organic fertilisers are derived from either plant or animal material and they have the following features:
They are not immediately soluble to water therefore are not as susceptible to leaching as inorganic fertilisers They have to break down to become soluble therefore are a slow-release source of plant nutrient Unlike inorganic fertilisers, they can be applied at heavy rates without risk of injury to roots or germinating leaves They can stimulate microbial activity They are more costly than inorganic fertilisers A number of the ‘available nutrient’ organic fertilisers have a restriction on their use and approval needs to be granted before use Regulations have come into place since the BSE crisis that restrict the use of animal products in fertilisers in order to minimise the risk of BSE transfer to animals
Page 38 of 53 06/06/2006
Sgiliaith
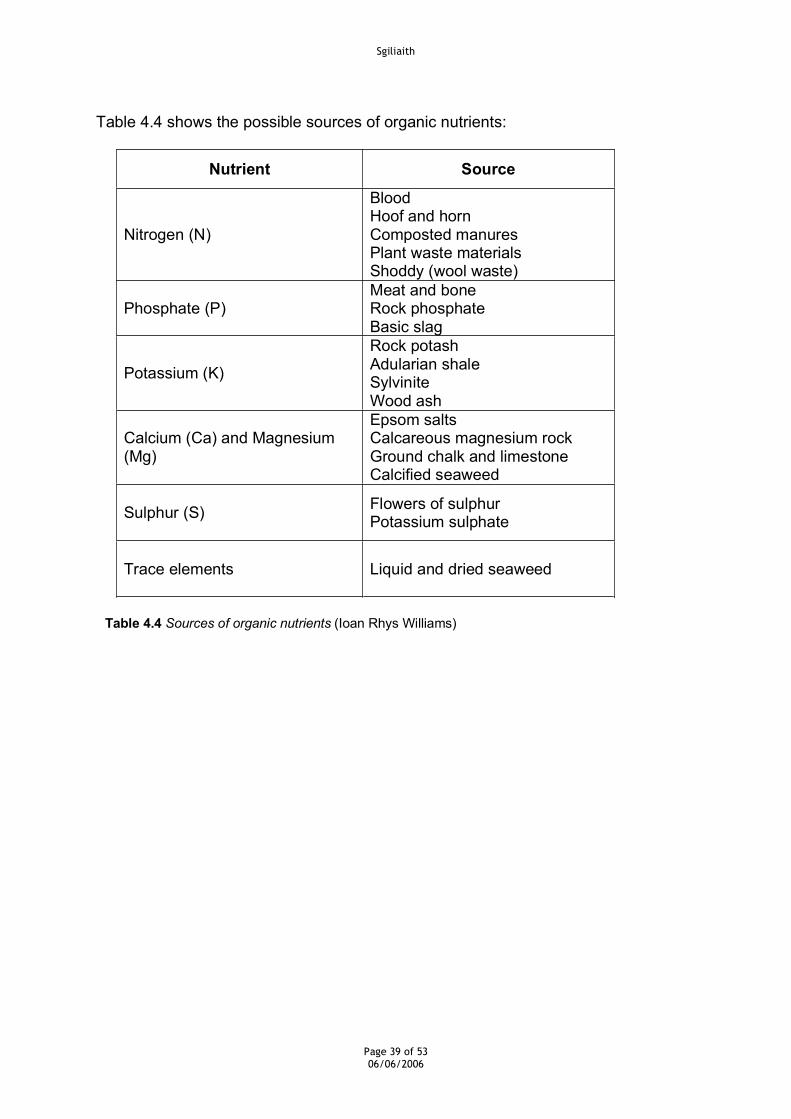
Table 4.4 shows the possible sources of organic nutrients:
Nutrient Source
Nitrogen (N)
Blood Hoof and horn Composted manures Plant waste materials Shoddy (wool waste)
Phosphate (P) Meat and bone Rock phosphate Basic slag
Potassium (K)
Rock potash Adularian shale Sylvinite Wood ash
Calcium (Ca) and Magnesium (Mg)
Epsom salts Calcareous magnesium rock Ground chalk and limestone Calcified seaweed
Sulphur (S) Flowers of sulphur Potassium sulphate
Trace elements Liquid and dried seaweed
Table 4.4 Sources of organic nutrients (Ioan Rhys Williams)
Page 39 of 53 06/06/2006
Sgiliaith
Fertiliser handling and storage Inorganic fertilisers can be purchaser as solids in 50kg, 500kg or 1000kg bags or loose bulk. The small 50kg bags are normally delivered on 30 bag pallets, special fork-lift equipment is required since manhandling is slow and can be dangerous. The big bags have a top-lift hook facility to allow easy loading into spreaders but they are difficult to stack. Fertiliser can also be purchased in fluid form, it is vitally important that all fertilisers are handled and stored correctly for environmental and health and safety reasons as well as to minimise waste.
Solids Permanent stores
Locate away from heat sources to minimise fire risk Site away from combustible material Ensure sites are level and not prone to flooding Ensure indoor storage is at least 0.5m from walls and elevated at least 0.15m above ground on boards or pallets which are on smooth, firm, dry, impermeable concrete floor Avoid prolonged outdoor storage but where unavoidable, ensure it is protected from rain and sunlight with wrapping and sheeting Keep storage areas clean and rodent free Handle bags with care, e.g. fit pipes on sharp forklift tines Re-bag damaged bags immediately Sweep up spillages and dispose in slurry pit or spread thinly on growing crops Do not use sawdust as an absorbent
Temporary field storage Do not store within 10m of ditch, watercourses or land drains Return unused bags to permanent store as soon as possible
Fluid Permanent store
Conduct an environmental risk assessment before using the store Construct secondary containment when risk is high, provision should be made for at least 110% of tank capacity Tank should be on solid concrete base to take the full tank weight Ensure tanks, pipe-work and valves are fit for purpose and resistant to corrosion Ensure tank fittings are waterproof Close and lock valves when not in use Check tank has sufficient capacity before delivery to avoid overfilling Have tank, pipe-work and valves inspected internally and externally for damage and corrosion annually by a suitably qualified technician and keep a maintenance record Drain down and flush all pipe-work at the end of each season
Temporary storage
Page 40 of 53 06/06/2006
Sgiliaith
Suitable site should be selected since a temporary store can pose a significant threat to watercourses Ensure that the transport route around the farm can withstand the weight Provide sufficient support beneath to prevent from sinking or being unstable
Liming The pH scale is used to measure the acidity or alkalinity of soil. pH 7 is neutral, a pH value less than 7 is acidic and pH values higher than 7 are alkaline. Optimum bacterial and crop growth occurs at a pH of 6.3-6.8. Significant leaching in high rainfall areas creates an acidic (sour) soil where crops will not grow satisfactory. Calcareous soils are naturally alkaline and peaty soils naturally acidic.
Most cultivated soils have a pH level of between 4.5 and 8. Maintaining the optimum pH 6.5 will optimise the availability of soil nutrients. Where there is a tendency for soils to become acid then lime that contains calcium carbonate is applied to neutralise the acidity.
Lime is removed by the soil by: Drainage – Removed in the water that leaves Fertilisers and manures – Sulphate and ammonia remove calcium carbonate
from the soil Crops – e.g. 7kg of calcium carbonate is lost with every tonne
of straw Stock – e.g. a 500kg bullock removes 16kg of calcium
carbonate in his bones, 18kg of calcium carbonate leaves the farm with every 5000 litres of milk.
Indications that the soil needs liming are: Crops failing in patches, especially acid sensitive ones such as barley and sugar beet On grassland, the emergence of poor types of grasses such as bents and a mat of undecayed vegetation On arable land, weeds such as ‘sheep’s sorrel’ and ‘spurrey’ are common A soil analysis showing a pH <6.5
The main benefits of liming are: It improves the availability of other plant nutrients (over liming can make some nutrients unavailable) It neutralizes the acidity It supplies calcium for plant nutrition It improves soil structure
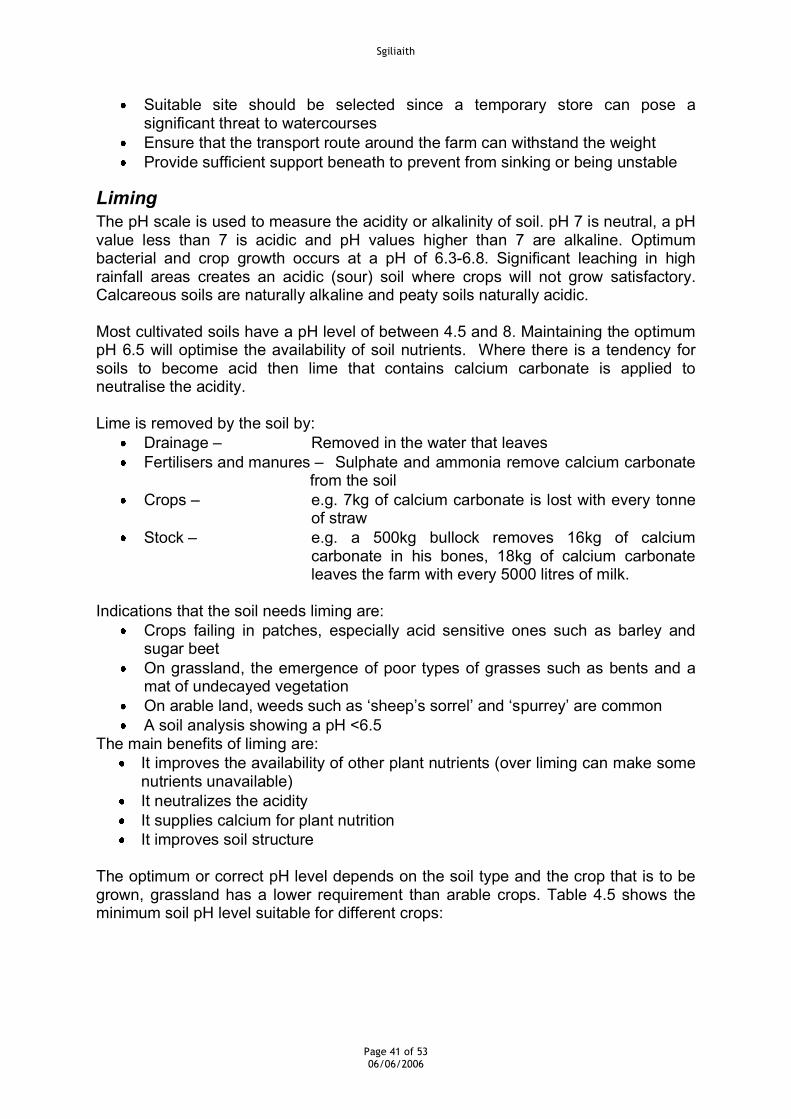
The optimum or correct pH level depends on the soil type and the crop that is to be grown, grassland has a lower requirement than arable crops. Table 4.5 shows the minimum soil pH level suitable for different crops:
Page 41 of 53 06/06/2006
Sgiliaith
Crop Minimum soil pH level Barley, sugar beet, beans, peas and lucerne 6.5
Maize, oilseed rape, oats, wheat, cabbage and carrots 6.0
Potatoes and rye 5.5
Ryegrass and fescues 5.0
Table 4.5 Minimum soil pH requirements of crops (Ioan Rhys Williams)
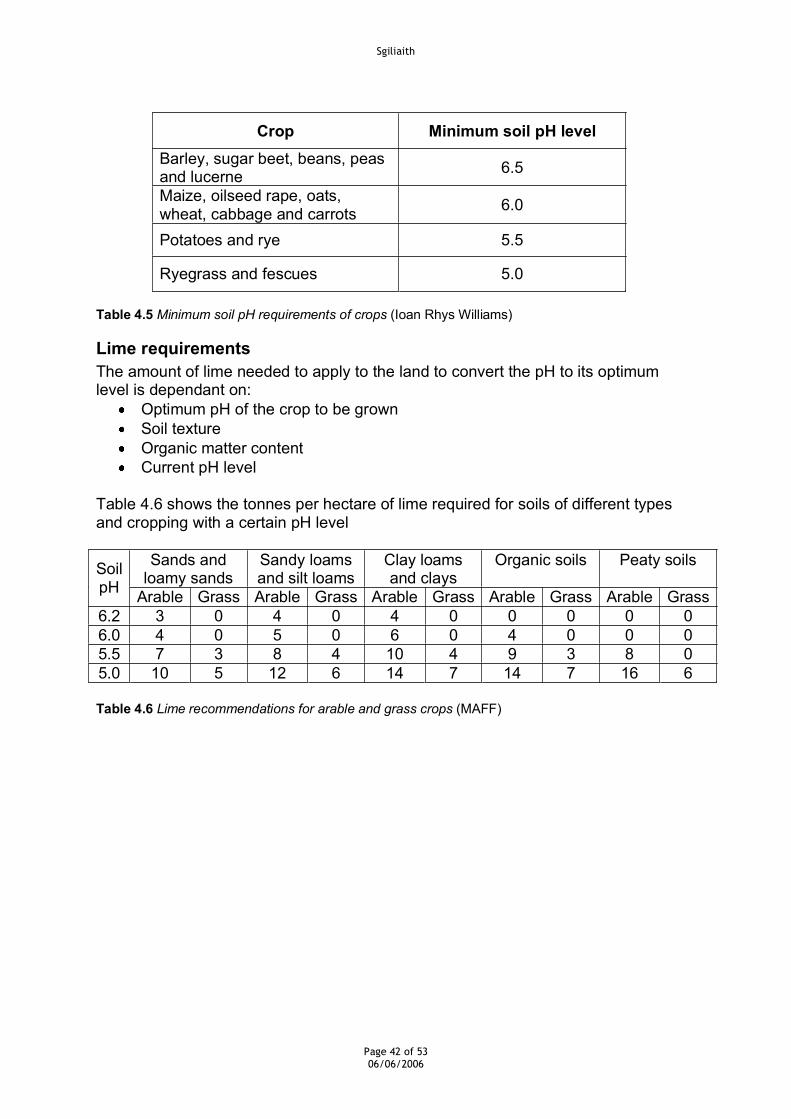
Lime requirements The amount of lime needed to apply to the land to convert the pH to its optimum level is dependant on:
Optimum pH of the crop to be grown Soil texture Organic matter content Current pH level
Table 4.6 shows the tonnes per hectare of lime required for soils of different types and cropping with a certain pH level
Sands and loamy sands
Sandy loams and silt loams
Clay loams and clays
Organic soils Peaty soils Soil pH Arable Grass Arable Grass Arable Grass Arable Grass Arable Grass 6.2 3 0 4 0 4 0 0 0 0 0 6.0 4 0 5 0 6 0 4 0 0 0 5.5 7 3 8 4 10 4 9 3 8 0 5.0 10 5 12 6 14 7 14 7 16 6
Table 4.6 Lime recommendations for arable and grass crops (MAFF)
Page 42 of 53 06/06/2006
Sgiliaith
Chapter 5: Planting crops
Planning and recording Before planting a crop the viability of the enterprise should be assessed as part of the overall business plan. It is important to assess and predict:
Labour Equipment Input requirements
Effective enterprise management should be based on effective recording of field characteristics, dates of operations and inputs. The advantages include:
Accurate timing of operations Traceability for - Quality assurance schemes
- Codes of practice - Legislation
Used as future reference
Choosing the right seed variety There are a number of different seed varieties available for all crops, all with different characteristics. Some characteristics are of more importance to one crop than the other but are usually related to the following:
Yield Quality Resistance to disease Time of maturity Crop size
All seeds sold in the UK are rigorously tested under the ‘National List of Varieties’ regulations, therefore it’s possible to guarantee its performance potential. There is also a recommended varieties list for commercial production produced annually by the ‘National Institute of Agriculture Botany’ (NIAB), only the best performing varieties in recent years gain entry to this list. When choosing varieties, producers need to assess their strength and weaknesses and consider important factors such as:
Target market or use Region where it’s being grown i.e. climate Soil type Farming system Field history i.e. pest, disease and weed problems
Purchased seed are not expected to contain weed seeds, seeds of other varieties or crop specie or other materials such as stones and dirt, they should be stored in a dry damp free environment until use.
Page 43 of 53 06/06/2006
Sgiliaith
Planting equipment A wide range of crops are grown in the UK, all with various characteristics and requirements. There are a range of sowing and planting equipment available to satisfy the planting and sowing needs of all crops. These equipments can be categorised into three different types:
Broadcasters Drills Planters
The equipment must have: Accurate metering to ensure the required plant population is achieved The ability to sow the seeds/plant into a range of soil conditions The ability to handle a range seed/plant sizes A range of easily adjustable sowing rates to suit a range of crops Uniform sowing/planting depth Sufficient hopper capacity to maintain output
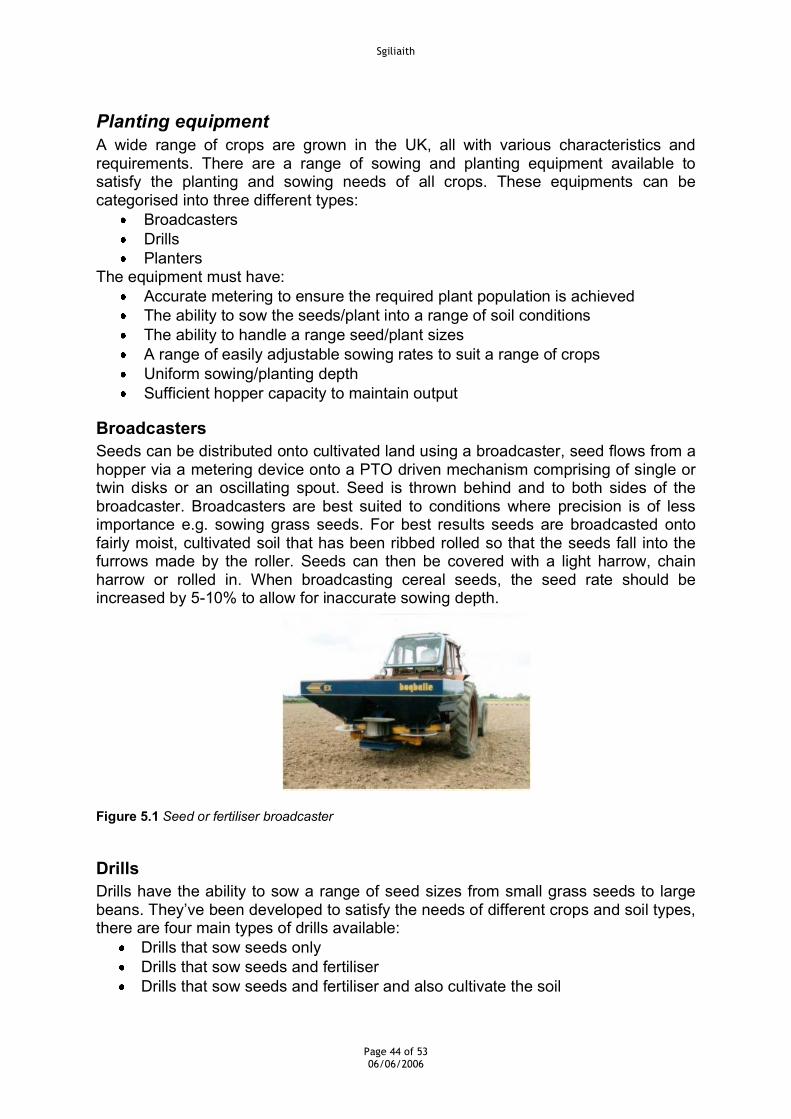
Broadcasters Seeds can be distributed onto cultivated land using a broadcaster, seed flows from a hopper via a metering device onto a PTO driven mechanism comprising of single or twin disks or an oscillating spout. Seed is thrown behind and to both sides of the broadcaster. Broadcasters are best suited to conditions where precision is of less importance e.g. sowing grass seeds. For best results seeds are broadcasted onto fairly moist, cultivated soil that has been ribbed rolled so that the seeds fall into the furrows made by the roller. Seeds can then be covered with a light harrow, chain harrow or rolled in. When broadcasting cereal seeds, the seed rate should be increased by 5-10% to allow for inaccurate sowing depth.
Figure 5.1 Seed or fertiliser broadcaster
Drills Drills have the ability to sow a range of seed sizes from small grass seeds to large beans. They’ve been developed to satisfy the needs of different crops and soil types, there are four main types of drills available:
Drills that sow seeds only Drills that sow seeds and fertiliser Drills that sow seeds and fertiliser and also cultivate the soil
Page 44 of 53 06/06/2006
Sgiliaith
Drills that sow seeds directly into uncultivated soil
The main components of a drill are: Seed hopper – where the seeds are carried on the machine Seed metering device – regulates where the seeds are placed Coulter – creates a groove to open the soil, places the seed and covers with soil
Seeds can be placed in the coulter to be sown either with gravity or by an air- conveying system
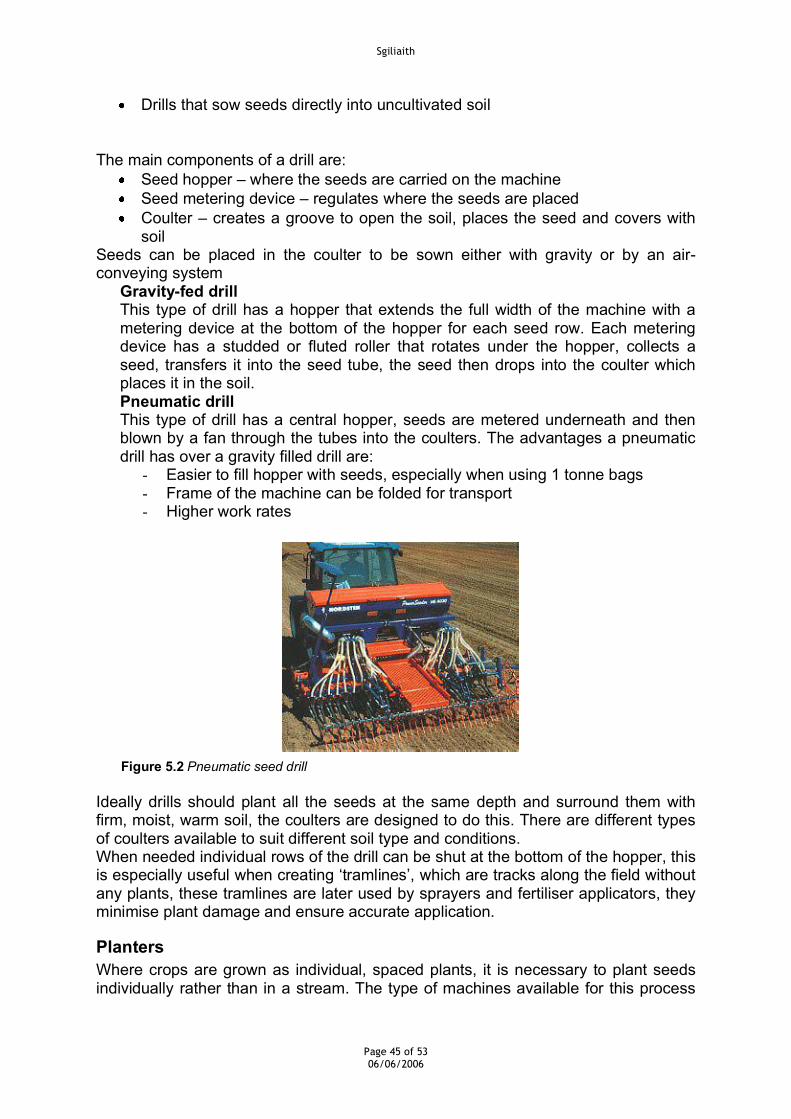
Gravity-fed drill This type of drill has a hopper that extends the full width of the machine with a metering device at the bottom of the hopper for each seed row. Each metering device has a studded or fluted roller that rotates under the hopper, collects a seed, transfers it into the seed tube, the seed then drops into the coulter which places it in the soil. Pneumatic drill This type of drill has a central hopper, seeds are metered underneath and then blown by a fan through the tubes into the coulters. The advantages a pneumatic drill has over a gravity filled drill are:
- Easier to fill hopper with seeds, especially when using 1 tonne bags - Frame of the machine can be folded for transport - Higher work rates
Figure 5.2 Pneumatic seed drill
Ideally drills should plant all the seeds at the same depth and surround them with firm, moist, warm soil, the coulters are designed to do this. There are different types of coulters available to suit different soil type and conditions. When needed individual rows of the drill can be shut at the bottom of the hopper, this is especially useful when creating ‘tramlines’, which are tracks along the field without any plants, these tramlines are later used by sprayers and fertiliser applicators, they minimise plant damage and ensure accurate application.
Planters Where crops are grown as individual, spaced plants, it is necessary to plant seeds individually rather than in a stream. The type of machines available for this process
Page 45 of 53 06/06/2006
Sgiliaith
varies, largely due to the size of the material that needs to be planted. Individual seeds can be planted with a precision seeder but larger material, such as potatoes need specialized machines.
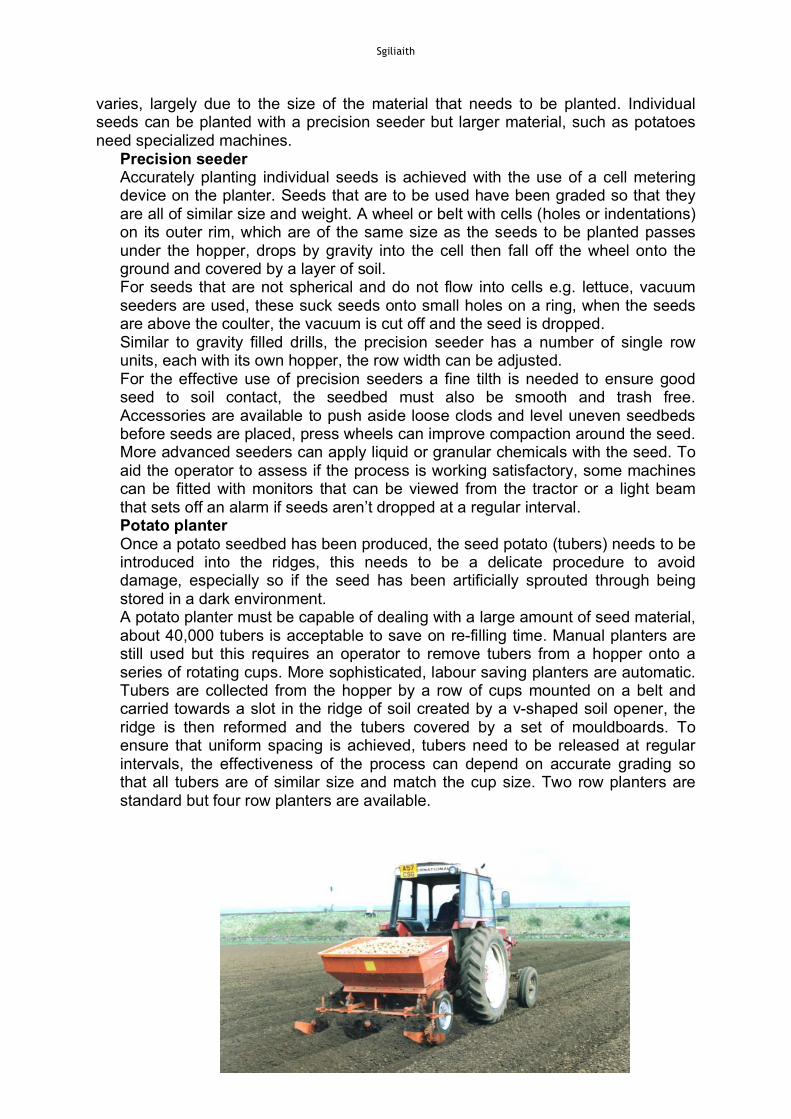
Precision seeder Accurately planting individual seeds is achieved with the use of a cell metering device on the planter. Seeds that are to be used have been graded so that they are all of similar size and weight. A wheel or belt with cells (holes or indentations) on its outer rim, which are of the same size as the seeds to be planted passes under the hopper, drops by gravity into the cell then fall off the wheel onto the ground and covered by a layer of soil. For seeds that are not spherical and do not flow into cells e.g. lettuce, vacuum seeders are used, these suck seeds onto small holes on a ring, when the seeds are above the coulter, the vacuum is cut off and the seed is dropped. Similar to gravity filled drills, the precision seeder has a number of single row units, each with its own hopper, the row width can be adjusted. For the effective use of precision seeders a fine tilth is needed to ensure good seed to soil contact, the seedbed must also be smooth and trash free. Accessories are available to push aside loose clods and level uneven seedbeds before seeds are placed, press wheels can improve compaction around the seed. More advanced seeders can apply liquid or granular chemicals with the seed. To aid the operator to assess if the process is working satisfactory, some machines can be fitted with monitors that can be viewed from the tractor or a light beam that sets off an alarm if seeds aren’t dropped at a regular interval. Potato planter Once a potato seedbed has been produced, the seed potato (tubers) needs to be introduced into the ridges, this needs to be a delicate procedure to avoid damage, especially so if the seed has been artificially sprouted through being stored in a dark environment. A potato planter must be capable of dealing with a large amount of seed material, about 40,000 tubers is acceptable to save on re-filling time. Manual planters are still used but this requires an operator to remove tubers from a hopper onto a series of rotating cups. More sophisticated, labour saving planters are automatic. Tubers are collected from the hopper by a row of cups mounted on a belt and carried towards a slot in the ridge of soil created by a v-shaped soil opener, the ridge is then reformed and the tubers covered by a set of mouldboards. To ensure that uniform spacing is achieved, tubers need to be released at regular intervals, the effectiveness of the process can depend on accurate grading so that all tubers are of similar size and match the cup size. Two row planters are standard but four row planters are available.
Page 46 of 53 06/06/2006

Sgiliaith
Figure 5.3 Potato planter
Page 47 of 53 06/06/2006

Sgiliaith
Sowing requirements For a successful crop establishment and production, seeds need to be sown at the correct rate and depth and have an efficient density. Conditions need to be favourable therefore timing also is important. These factors vary with the type of crop that is grown.
Spring cereal Sowing date An early start is very beneficial to encourage a longer growing season and higher yields but conditions may not always allow this. Early sowing is more probable on light soils since they are workable early in the year, early establishment is of advantage on such soils to resist the drought that it may be susceptible to later in the year. Heavy soil farms find it difficult to produce an early seedbed, therefore they generally avoid spring cereals. Autumn ploughing heavy land is essential to allow winter weather to produce a ‘frost mould’. Accurate timing of spring cereals can be difficult due to poor germination conditions if sown too early (wet and cold) or to late (dry and poor seedbeds) Population Spring cereals have little time to develop strong tillers; to compensate for this a high plant population is needed (see Table 5.1) Seed rate The seed rate (kg seed per hectare) is determined by three factors
The desired plant population The seed weight (1000 grain weight) The expected establishment percentage
Of these factors, the expected establishment percentage is the most difficult to determine due to the external factors affecting it such as:
Soil type Weather conditions
The farmer should use his knowledge, experience and history of a particular field to estimate the expected establishment percentage for each field, an establishment guide would be:
Good drilling condition at the optimum drilling date – 85% Moderate conditions – 70% Poor conditions – 55%
Estimated seed rates are shown in Table 5.1 Sowing depth The relatively large seed of a cereal has a good carbohydrate store enabling it to germinate from relatively deep sowings, deeply sown cereals will show low early vigour and have a hooped appearance. Shallow sown seeds can suffer from an inadequate root system which is susceptible to frost damage. Table 5.1 shows sowing depths. Seed dressing Most purchased cereal seed have been dressed by the supplier to protect against pests and germination and establishment diseases. Fungicides can also be applied to seeds which can be especially beneficial to protect spring cereal against early mildew infection.
Page 48 of 53 06/06/2006

Sgiliaith
Page 49 of 53 06/06/2006
Sgiliaith
Winter cereal Sowing date Winter cereals have higher yield potential and a higher germination rate and a greater tillering capacity if sown at the end of September to early October. A disadvantage of early sowing is that there is a greater risk of disease infection and pest infestation, especially aphids carrying barley yellow dwarf virus (BYDV). Winter varieties, especially wheat need to experience a period of cold in order to flower and produce grain. Population Winter cereal will tiller sufficiently to give an adequate crop density from a plant population of 100 plants/m 2 , but higher populations of 250 -30 plants/m 2 are recommended to:
Give a safety margin for losses Give a more uniform crop Suppress early weeds
Populations over 350 plants/m 2 are wasteful and can lead to lodging Seed rate The basic theory behind seed rate for spring cereal also apply for winter cereal but rates do vary. One factor that has a greater affect on winter cereals is soil temperature, this deteriorates rapidly after min-October, therefore it is advised that seed rates are raised substantially for November sowings, see Table 5.1 Sowing depth Sowing depth doesn’t need to vary significantly between spring and winter cereals but the colder autumn soils, the risk of frost damage and the fact that winter cereals have more time to establish mean that a slightly greater depth is beneficial for winter cereals.
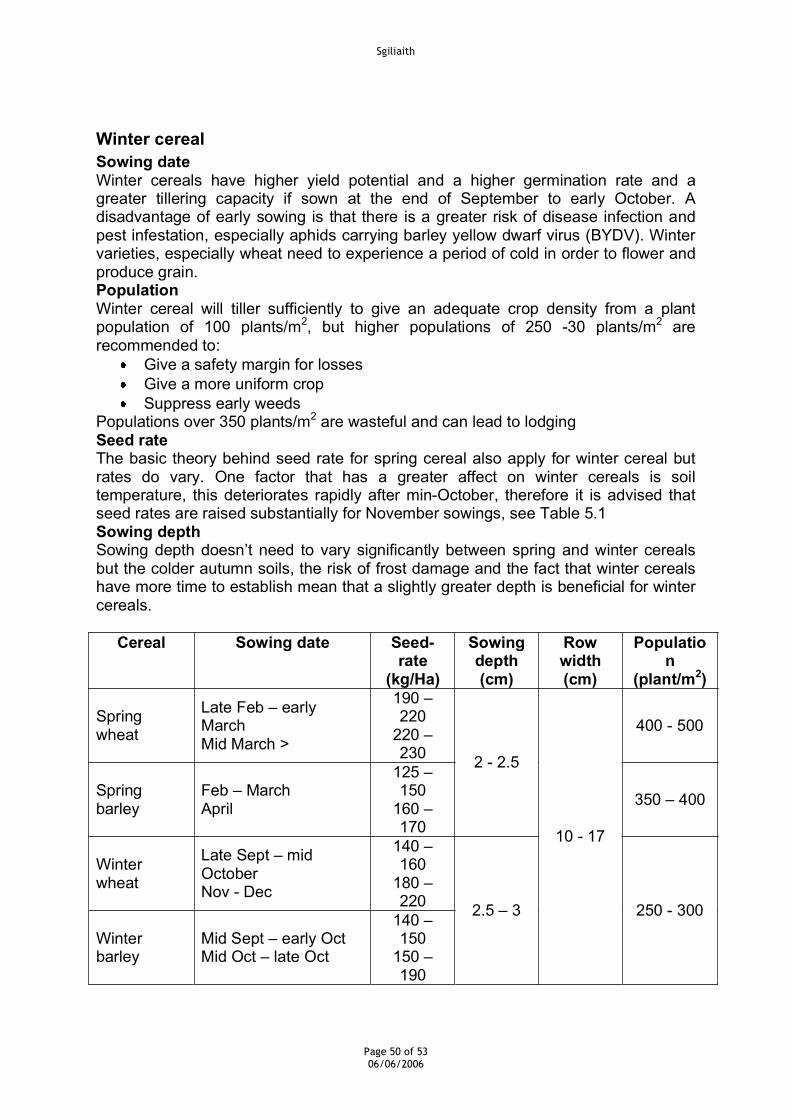
Cereal Sowing date Seed- rate
(kg/Ha)
Sowing depth (cm)
Row width (cm)
Populatio n
(plant/m 2 )
Spring wheat
Late Feb – early March Mid March >
190 – 220
220 – 230
400 - 500
Spring barley
Feb – March April
125 – 150
160 – 170
2 - 2.5
350 – 400
Winter wheat
Late Sept – mid October Nov - Dec
140 – 160
180 – 220
Winter barley
Mid Sept – early Oct Mid Oct – late Oct
140 – 150
150 – 190
2.5 – 3
10 - 17
250 - 300
Page 50 of 53 06/06/2006

Sgiliaith
Table 5.1 Cereal sowing details (Ioan Rhys Williams)
Page 51 of 53 06/06/2006
Sgiliaith
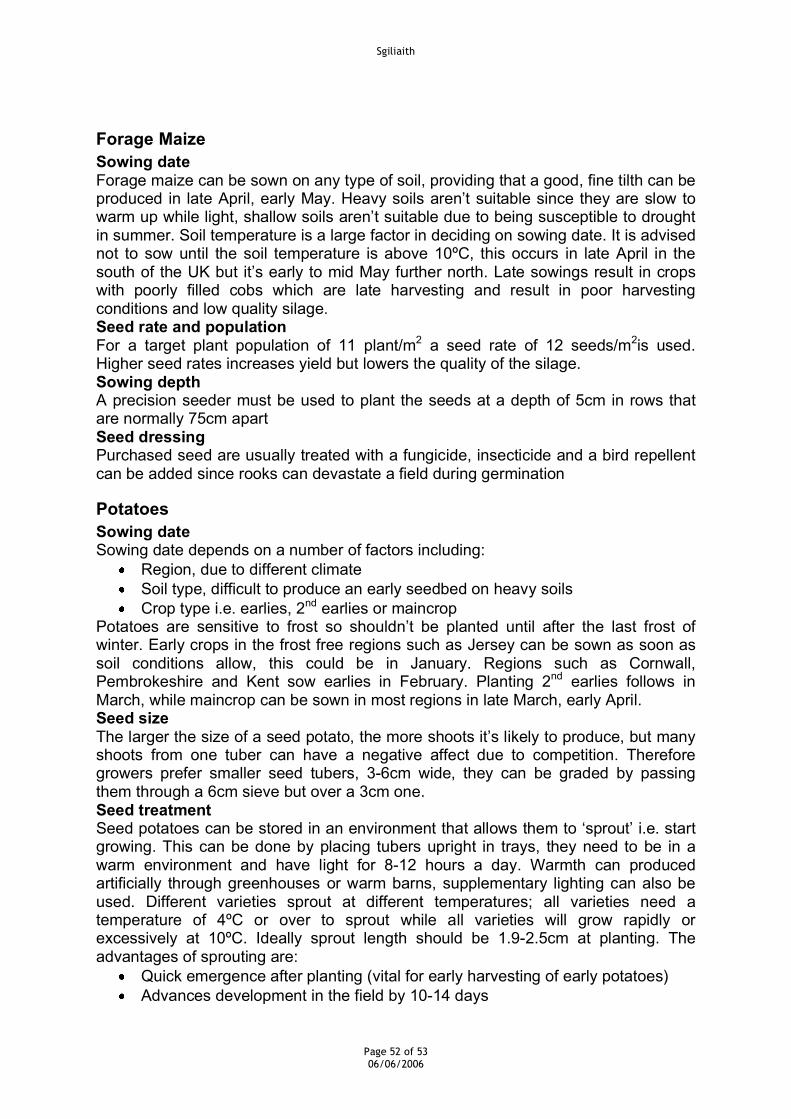
Forage Maize Sowing date Forage maize can be sown on any type of soil, providing that a good, fine tilth can be produced in late April, early May. Heavy soils aren’t suitable since they are slow to warm up while light, shallow soils aren’t suitable due to being susceptible to drought in summer. Soil temperature is a large factor in deciding on sowing date. It is advised not to sow until the soil temperature is above 10ºC, this occurs in late April in the south of the UK but it’s early to mid May further north. Late sowings result in crops with poorly filled cobs which are late harvesting and result in poor harvesting conditions and low quality silage. Seed rate and population For a target plant population of 11 plant/m 2 a seed rate of 12 seeds/m 2 is used. Higher seed rates increases yield but lowers the quality of the silage. Sowing depth A precision seeder must be used to plant the seeds at a depth of 5cm in rows that are normally 75cm apart Seed dressing Purchased seed are usually treated with a fungicide, insecticide and a bird repellent can be added since rooks can devastate a field during germination
Potatoes Sowing date Sowing date depends on a number of factors including:
Region, due to different climate Soil type, difficult to produce an early seedbed on heavy soils Crop type i.e. earlies, 2 nd earlies or maincrop
Potatoes are sensitive to frost so shouldn’t be planted until after the last frost of winter. Early crops in the frost free regions such as Jersey can be sown as soon as soil conditions allow, this could be in January. Regions such as Cornwall, Pembrokeshire and Kent sow earlies in February. Planting 2 nd earlies follows in March, while maincrop can be sown in most regions in late March, early April. Seed size The larger the size of a seed potato, the more shoots it’s likely to produce, but many shoots from one tuber can have a negative affect due to competition. Therefore growers prefer smaller seed tubers, 3-6cm wide, they can be graded by passing them through a 6cm sieve but over a 3cm one. Seed treatment Seed potatoes can be stored in an environment that allows them to ‘sprout’ i.e. start growing. This can be done by placing tubers upright in trays, they need to be in a warm environment and have light for 8-12 hours a day. Warmth can produced artificially through greenhouses or warm barns, supplementary lighting can also be used. Different varieties sprout at different temperatures; all varieties need a temperature of 4ºC or over to sprout while all varieties will grow rapidly or excessively at 10ºC. Ideally sprout length should be 1.9-2.5cm at planting. The advantages of sprouting are:
Quick emergence after planting (vital for early harvesting of early potatoes) Advances development in the field by 10-14 days
Page 52 of 53 06/06/2006
Sgiliaith
Page 53 of 53 06/06/2006
Early leaf canopy Maincrop yield can increase by 3-5t/ha
Care should be taken when planting sprouted tubers since sprout is susceptible to damage, this is why seeds are still planted by hand in very early areas such as Jersey. Seed rate The amount of seed potato in weight to be planted to the hectare depends on a number of factors:
The average weight of the seed tuber The number of tubers to be planted per hectare Potato variety Target market
For varieties producing large tubers e.g. ‘Desiree’, the seed rate is commonly 2.5-4.5 tonnes/hectare, while for small tuber varieties such as ‘King Edward’, the seed rate is lower, between 1.8 and 2.4 tonnes/hectare.
Bibliography
H.J.S. FINCH, A.M. SAMUEL and G. P. F. LANE (2002) Lockhart and Wiseman’s Crop Husbandry
R. J. SOFFE (2003) The Agricultural Notebook
B. DAVIES, D. EAGLE and B. FINNEY (1993) Soil Management
J. ARCHER (1985) Crop Nutrition and Fertiliser Use
K. SIMPSON (1986) Fertilisers and Manures