Embed Size (px)
Citation preview
7/28/2019 CROCHET - Kim Guzman - St. Petersburg Coat
http://slidepdf.com/reader/full/crochet-kim-guzman-st-petersburg-coat 1/6
12/7/09 3:aturallyCaron.com :: St. Petersburg Coat
Page ttp://www.naturallycaron.com/projects/st_petersburg/st_petersburg_1.html
Subscribe to Caron Connections, our free eNews
Enter your e-mail address
subscr
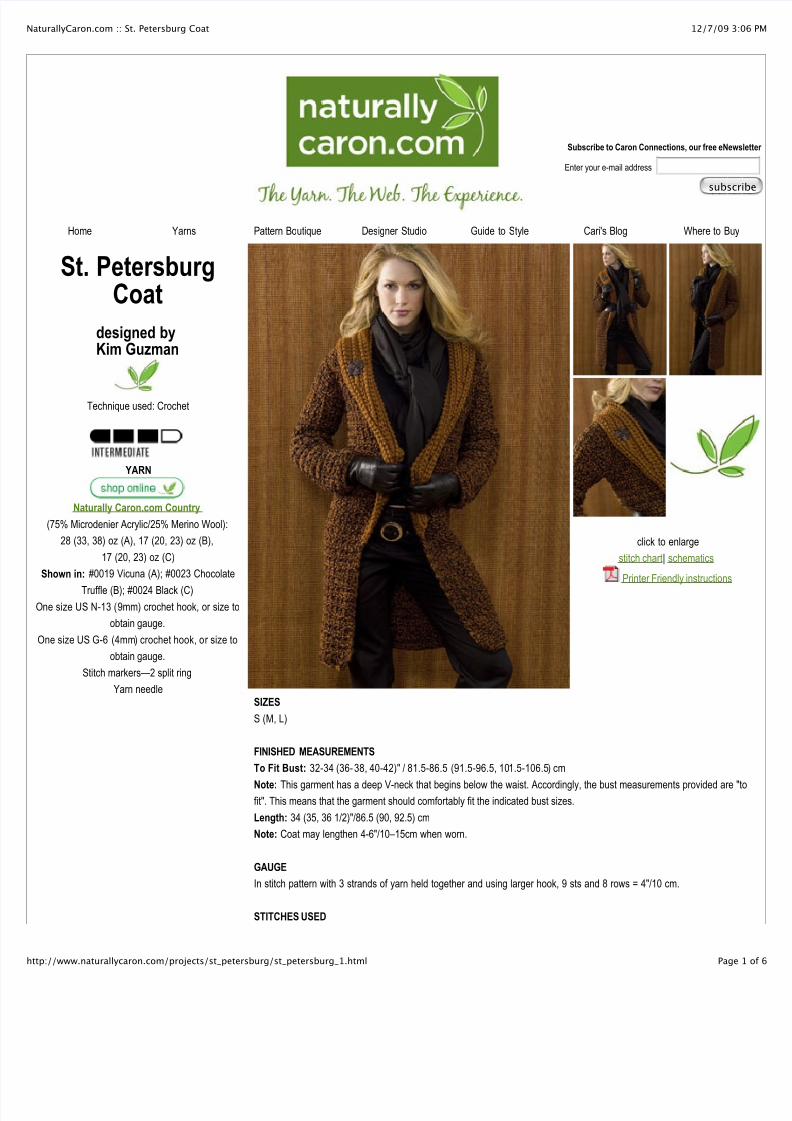
St. PetersburgCoat
designed byKim Guzman
Technique used: Crochet
YARN
Naturally Caron.com Country
(75% Microdenier Acrylic/25% Merino Wool):
28 (33, 38) oz (A), 17 (20, 23) oz (B),
17 (20, 23) oz (C)
Shown in: #0019 Vicuna (A); #0023 Chocolate
Truffle (B); #0024 Black (C)One size US N-13 (9mm) crochet hook, or size to
obtain gauge.
One size US G-6 (4mm) crochet hook, or size to
obtain gauge.
Stitch markers—2 split ring
Yarn needle
click to enlarge
stitch chart| schematics
Printer Friendly instructions
SIZES
S (M, L)
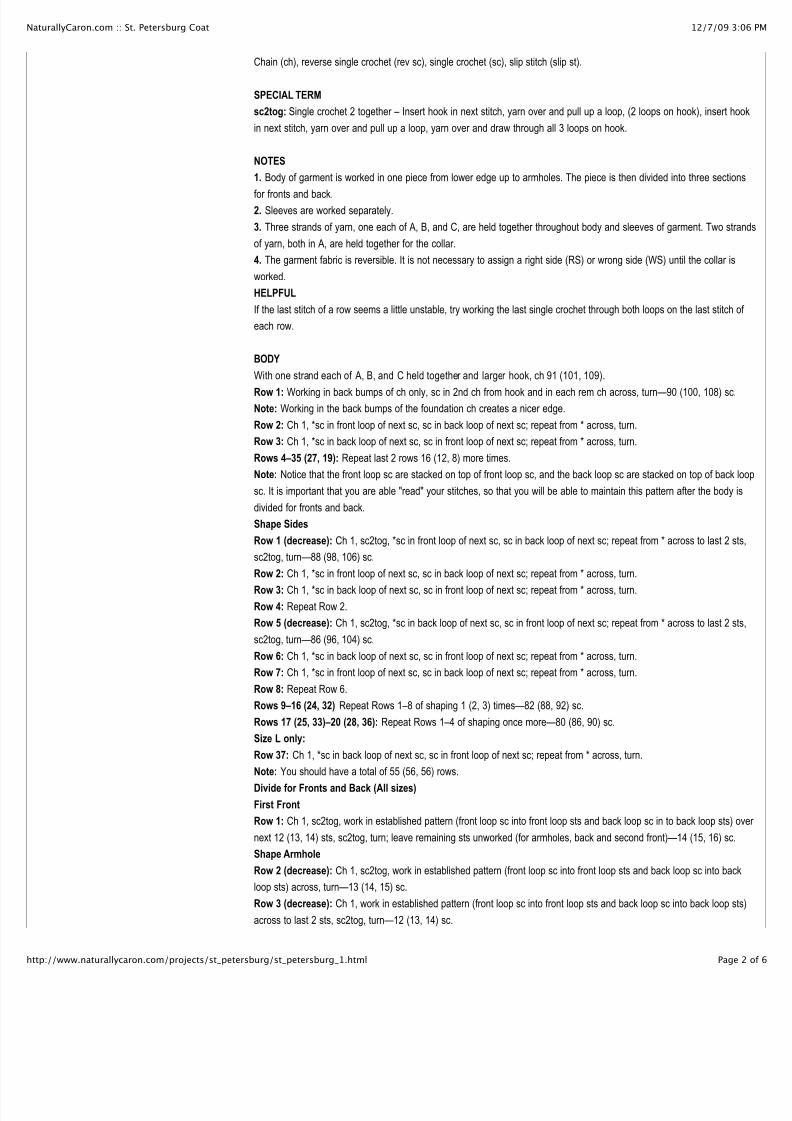
FINISHED MEASUREMENTS
To Fit Bust: 32-34 (36-38, 40-42)" / 81.5-86.5 (91.5-96.5, 101.5-106.5) cm
Note: This garment has a deep V-neck that begins below the waist. Accordingly, the bust measurements provided are "fit". This means that the garment should comfortably fit the indicated bust sizes.
Length: 34 (35, 36 1/2)"/86.5 (90, 92.5) cm
Note: Coat may lengthen 4-6"/10–15cm when worn.
GAUGE
In stitch pattern with 3 strands of yarn held together and using larger hook, 9 sts and 8 rows = 4"/10 cm.
STITCHES USED
Home Yarns Pattern Boutique Designer Studio Guide to Style Cari's Blog Where to Buy
7/28/2019 CROCHET - Kim Guzman - St. Petersburg Coat
http://slidepdf.com/reader/full/crochet-kim-guzman-st-petersburg-coat 2/6
12/7/09 3:aturallyCaron.com :: St. Petersburg Coat
Page ttp://www.naturallycaron.com/projects/st_petersburg/st_petersburg_1.html
Chain (ch), reverse single crochet (rev sc), single crochet (sc), slip stitch (slip st).
SPECIAL TERM
sc2tog: Single crochet 2 together – Insert hook in next stitch, yarn over and pull up a loop, (2 loops on hook), insert ho
in next stitch, yarn over and pull up a loop, yarn over and draw through all 3 loops on hook.
NOTES
1. Body of garment is worked in one piece from lower edge up to armholes. The piece is then divided into three section
for fronts and back.2. Sleeves are worked separately.
3. Three strands of yarn, one each of A, B, and C, are held together throughout body and sleeves of garment. Two stra
of yarn, both in A, are held together for the collar.
4. The garment fabric is reversible. It is not necessary to assign a right side (RS) or wrong side (WS) until the collar is
worked.
HELPFUL
If the last stitch of a row seems a little unstable, try working the last single crochet through both loops on the last stitch o
each row.
BODY
With one strand each of A, B, and C held together and larger hook, ch 91 (101, 109).
Row 1: Working in back bumps of ch only, sc in 2nd ch from hook and in each rem ch across, turn—90 (100, 108) sc.Note: Working in the back bumps of the foundation ch creates a nicer edge.
Row 2: Ch 1, *sc in front loop of next sc, sc in back loop of next sc; repeat from * across, turn.
Row 3: Ch 1, *sc in back loop of next sc, sc in front loop of next sc; repeat from * across, turn.
Rows 4–35 (27, 19): Repeat last 2 rows 16 (12, 8) more times.
Note: Notice that the front loop sc are stacked on top of front loop sc, and the back loop sc are stacked on top of back l
sc. It is important that you are able "read" your stitches, so that you will be able to maintain this pattern after the body i
divided for fronts and back.
Shape Sides
Row 1 (decrease): Ch 1, sc2tog, *sc in front loop of next sc, sc in back loop of next sc; repeat from * across to last 2 st
sc2tog, turn—88 (98, 106) sc.
Row 2: Ch 1, *sc in front loop of next sc, sc in back loop of next sc; repeat from * across, turn.
Row 3: Ch 1, *sc in back loop of next sc, sc in front loop of next sc; repeat from * across, turn.Row 4: Repeat Row 2.
Row 5 (decrease): Ch 1, sc2tog, *sc in back loop of next sc, sc in front loop of next sc; repeat from * across to last 2 st
sc2tog, turn—86 (96, 104) sc.
Row 6: Ch 1, *sc in back loop of next sc, sc in front loop of next sc; repeat from * across, turn.
Row 7: Ch 1, *sc in front loop of next sc, sc in back loop of next sc; repeat from * across, turn.
Row 8: Repeat Row 6.
Rows 9–16 (24, 32) Repeat Rows 1–8 of shaping 1 (2, 3) times—82 (88, 92) sc.
Rows 17 (25, 33)–20 (28, 36): Repeat Rows 1–4 of shaping once more—80 (86, 90) sc.
Size L only:
Row 37: Ch 1, *sc in back loop of next sc, sc in front loop of next sc; repeat from * across, turn.
Note: You should have a total of 55 (56, 56) rows.
Divide for Fronts and Back (All sizes)
First Front
Row 1: Ch 1, sc2tog, work in established pattern (front loop sc into front loop sts and back loop sc in to back loop sts) o
next 12 (13, 14) sts, sc2tog, turn; leave remaining sts unworked (for armholes, back and second front)—14 (15, 16) sc.
Shape Armhole
Row 2 (decrease): Ch 1, sc2tog, work in established pattern (front loop sc into front loop sts and back loop sc into back
loop sts) across, turn—13 (14, 15) sc.
Row 3 (decrease): Ch 1, work in established pattern (front loop sc into front loop sts and back loop sc into back loop st
across to last 2 sts, sc2tog, turn—12 (13, 14) sc.

7/28/2019 CROCHET - Kim Guzman - St. Petersburg Coat
http://slidepdf.com/reader/full/crochet-kim-guzman-st-petersburg-coat 3/6
12/7/09 3:aturallyCaron.com :: St. Petersburg Coat
Page ttp://www.naturallycaron.com/projects/st_petersburg/st_petersburg_1.html
Row 4: Repeat Row 2—11 (12, 13) sc.
Shape Armhole and Front Edge
Row 5 (decrease): Ch 1, sc2tog, work in established pattern across to last 2 sts, sc2tog, turn—9 (10, 11) sc.
Rows 6–8: Ch 1, work in established pattern across, turn.
Row 9: Rep Row 2—8 (9, 10) sc.
Rows 10–13 (14, 17): Repeat Rows 6–9, 1 (1, 2) time(s), then repeat Row 6, 0 (1, 0) more time(s)—7 (8, 8) sc.
Fasten off.
Note: You should have a total of 68 (70, 73) rows.
BackNote: Continue working with 1 strand each of A, B, and C held together throughout.
Skip 6 unworked sts following first front, join yarn with sl st in next sc.
Row 1: Beginning in same sc as join, sc2tog, work in established pattern over next 32 (36, 38) sc, sc2tog, turn; leave
remaining sts unworked (for armhole and second front)—34 (38, 40) sc.
Rows 2–3 (4, 4) (decrease): Ch 1, sc2tog, work in established pattern across to last 2 sts, sc2tog, turn—30 (32, 34) sc
Rows 5–11 (12, 15): Ch 1, work in established pattern across, turn.
Note: You should have a total of 66 (68, 71) rows.
Shape First Shoulder
Row 12 (13, 16): Ch 1, work in established pattern over first 7 (8, 8) sc, turn; leave remaining sts unworked (for neck an
second shoulder)—7 (8, 8) sc.
Row 13 (14, 17): Ch 1, work in established pattern across.
Fasten off.Shape Second Shoulder
Skip 16 (16, 18) unworked sc following first shoulder, join yarn with sl st in next sc.
Row 1: Beginning in same sc as join, work in established pattern across, turn—7 (8, 8) sc.
Row 2: Ch 1, work in established pattern across.
Fasten off.
Second Front
Skip 6 unworked sts following back, join yarn with sl st in next sc.
Row 1: Beginning in same sc as join, sc2tog, work in established pattern over next 12 (13, 14) sc, sc2tog, turn—14 (15,
sc.
Shape Armhole
Row 2 (decrease): Ch 1, work in established pattern across to last 2 sts, sc2tog, turn—13 (14, 15) sc.
Row 3 (decrease): Ch 1, sc2tog, work in established pattern across, turn—12 (13, 14) sc.Row 4: Repeat Row 2—11 (12, 13) sc.
Shape Armhole and Front Edge
Row 5 (decrease): Ch 1, sc2tog, work in established pattern across to last 2 sts, sc2tog, turn—9 (10, 11) sc.
Rows 6–8: Ch 1, work in established pattern across, turn.
Row 9: Rep Row 2—8 (9, 10) sc.
Rows 10–13 (14, 17): Repeat Rows 6–9, 1 (1, 2) time(s), then repeat Row 6, 0 (1, 0) more time(s)—7 (8, 8) sc.
Fasten off.
Note: You should have a total of 68 (70, 73) rows.
SLEEVE (make 2)
With one strand each of A, B, and C held together and larger hook, ch 25 (27, 29).
Row 1: Working in back bumps of ch only, sc in 2nd ch from hook and in each rem ch across, turn—24 (26, 28) sc.
Row 2: Ch 1, *sc in front loop of next sc, sc in back loop of next sc; repeat from * across, turn.
Row 3 (increase): Ch 1, 2 sc in first sc, *sc in front loop of next sc, sc in back loop of next sc; repeat from * across to la
sc, 2 sc in last sc, turn—26 (28, 30) sc.
Row 4: Ch 1, *sc in back loop of next sc, sc in front loop of next sc; repeat from * across, turn.
Row 5: Ch 1, *sc in front loop of next sc, sc in back loop of next sc; repeat from * across, turn.
Row 6: Ch 1, *sc in back loop of next sc, sc in front loop of next sc; repeat from * across, turn.
Rows 7 and 8: Repeat Rows 5 and 6.
Row 9 (increase): Ch 1, 2 sc in first sc, *sc in back loop of next sc, sc in front loop of next sc; repeat from * across to la

7/28/2019 CROCHET - Kim Guzman - St. Petersburg Coat
http://slidepdf.com/reader/full/crochet-kim-guzman-st-petersburg-coat 4/6
12/7/09 3:aturallyCaron.com :: St. Petersburg Coat
Page ttp://www.naturallycaron.com/projects/st_petersburg/st_petersburg_1.html
sc, 2 sc in last sc, turn—28 (30, 32) sc.
Row 10: Ch 1, *sc in front loop of next sc, sc in back loop of next sc; repeat from * across, turn.
Row 11: Ch 1, *sc in back loop of next sc, sc in front loop of next sc; repeat from * across, turn.
Row 12: Repeat Row 10.
Rows 13 and 14: Repeat Rows 11 and 12.
Rows 15–26: Repeat Rows 3–14—32 (34, 36) sc.
Rows 27–33 (33, 34): Repeat Rows 3–9 (9, 10)—36 (38, 40) sc.
Shape Cap
Row 34 (34, 35): Sl st across first 3 sc, ch 1, work in established pattern across to last 3 sc, turn; leave last 3 sc unwork—30 (32, 34) sc.
Rows 35 (35, 36)–40 (41, 43): Ch 1, sc2tog, work in established pattern across to last 2 sc, sc2tog, turn—18 (18, 18) sc
Fasten off.
FINISHING
Note: Due to the weight of the garment and the thickness of the fabric, the designer recommends joining seams with sli
stitches, using the smaller hook and one strand of A.
Seam shoulders.
Note: For best results, before setting in the sleeves, hang the body of the garment for about 15 minutes.
Set in sleeves and seam sleeves.
COLLARBeginning at lower edge, count 28 (29, 31) rows and place a stitch marker on each front edge. Assign RS and WS of
garment (e.g. assign RS to the best looking side of the fabric).
With WS facing, larger hook and 2 strands of A held together, join yarn with sl st in front edge at stitch marker.
Row 1 (WS): Ch 1, work 108 (110, 112) sc evenly spaced along front edge, back neck, and down opposite front edge to
other stitch marker, turn—108 (110, 112) sc. Remove markers.
Place 2 stitch markers along back neck spaced about 4"/10cm apart. Move markers up as work progresses.
Row 2 (RS): Sl st across first 4 sc, ch 1, working in front loops only, [sc in each sc to increase marker, 2 sc in marked s
twice, sc in each sc across last 4 sc, turn; leave remaining sts unworked—102 (104, 106) sc.
Row 3 (WS): Repeat Row 2, do not turn at end of row—96 (98, 100) sc.
Row 4 (WS): Ch 1, working in front loops only, rev sc in each sc across, do not turn.
Row 5 (WS): Ch 1, working in unworked back loops of previous row, sc in each sc across, turn.
Rows 6 (RS) and 7 (WS): Repeat Row 2 twice, do not turn at end of Row 7—84 (86, 88) sc.Rows 8–11: Repeat Rows 4–7 two more times—72 (74, 76) sc.
Rows 12–14: Repeat Rows 4–6 once more—66 (68, 70) sc.
Fasten off.
With RS of collar facing, larger hook and 2 strands of A held together, join yarn with sl st in front edge just below end o
first row of collar.
Next Row: Ch 1, working across outer edge of collar, sc evenly across working last sc in front edge just below beginnin
first row of collar, do not turn.
Next Row: Ch 1, sk first sc, working in front loops only, rev sc across (do not skip last sc), do not turn.
Next Row: Ch 1, working in unworked back loops of previous row, sc2tog, sc in each sc across to last 2 sc, sc2tog, do
turn.
Repeat last 2 rows once more. Fasten off.
Weave in ends.

7/28/2019 CROCHET - Kim Guzman - St. Petersburg Coat
http://slidepdf.com/reader/full/crochet-kim-guzman-st-petersburg-coat 5/6
12/7/09 3:aturallyCaron.com :: St. Petersburg Coat
Page ttp://www.naturallycaron.com/projects/st_petersburg/st_petersburg_1.html
7/28/2019 CROCHET - Kim Guzman - St. Petersburg Coat
http://slidepdf.com/reader/full/crochet-kim-guzman-st-petersburg-coat 6/6
12/7/09 3:aturallyCaron.com :: St. Petersburg Coat
Page ttp://www.naturallycaron.com/projects/st_petersburg/st_petersburg_1.html
Visit Bond America online Visit Caron International o
©2009 Caron International
![CROCHET KANGAROO HOODIE | CROCHET · CROCHET KANGAROO HOODIE | CROCHET 1 of 3 CROCHET KANGAROO HOODIE | CROCHET SIZES To fit chest measurement 6 mos 17" [43 cm] 12 mos 18" [45.5 cm]](https://img.pdfslide.us/doc/110x75/6004c9a1eb2ebd00790d3c49/crochet-kangaroo-hoodie-crochet-crochet-kangaroo-hoodie-crochet-1-of-3-crochet.jpg)


![CROCHET GRANITE STITCH FLOOR CUSHION | CROCHET · CROCHET GRANITE STITCH FLOOR CUSHION | CROCHET 1 of 2 CROCHET GRANITE STITCH FLOOR CUSHION | CROCHET MEASUREMENT Approx 30" [76 cm]](https://img.pdfslide.us/doc/110x75/5f4ef9737c22e42f6e265245/crochet-granite-stitch-floor-cushion-crochet-crochet-granite-stitch-floor-cushion.jpg)