Embed Size (px)
Citation preview
Crisis Screening and Assessment Tip Sheet
This Tip Sheet is meant for Crisis Program Staff who have attended Crisis CWS
Training. The Tip Sheet will walk users through the Crisis Screening and Assessment
form. This Tip Sheet may change as our trainings and systems are updated. Please
visit our website https://dhs.saccounty.gov/BHS/Avatar/Pages/Avatar.aspx for the
most updated version. If any additional help is needed you can contact us at
Documentation:
Quality Management provides Documentation Training which will provide
information as to what would be appropriate to enter into the form. The content
below is meant for navigational purposes.
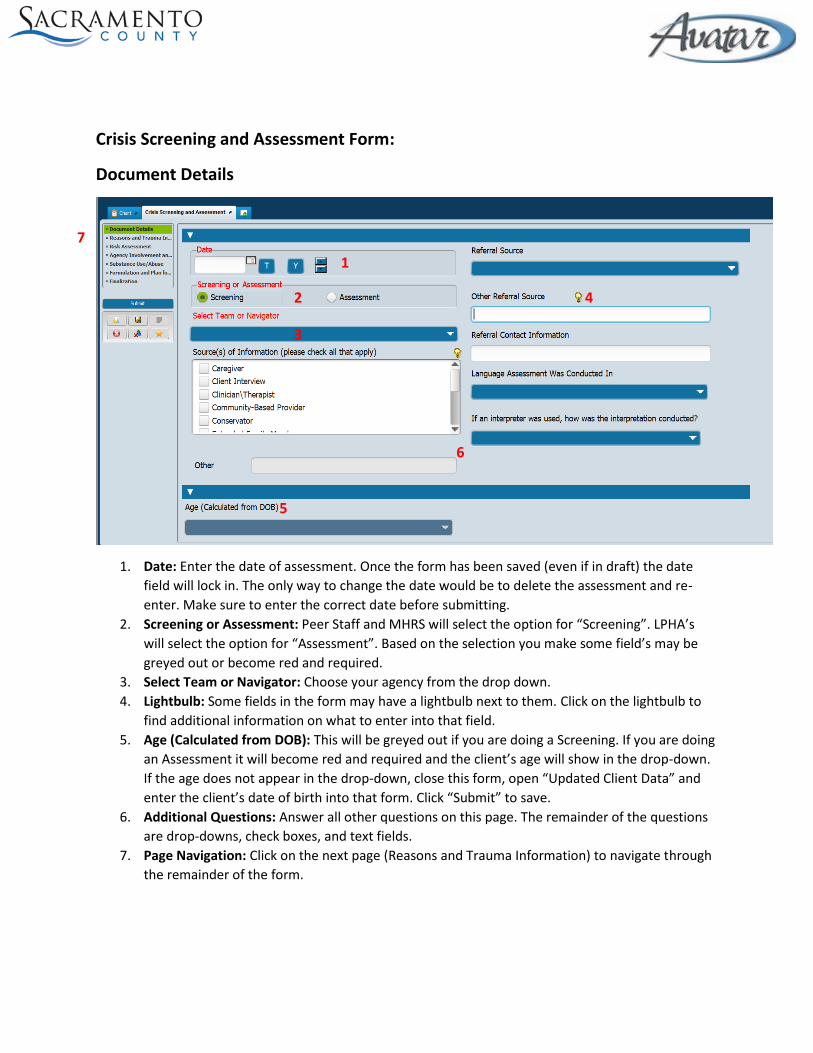
Crisis Screening and Assessment Form:
Document Details
1. Date: Enter the date of assessment. Once the form has been saved (even if in draft) the date
field will lock in. The only way to change the date would be to delete the assessment and re-
enter. Make sure to enter the correct date before submitting.
2. Screening or Assessment: Peer Staff and MHRS will select the option for “Screening”. LPHA’s
will select the option for “Assessment”. Based on the selection you make some field’s may be
greyed out or become red and required.
3. Select Team or Navigator: Choose your agency from the drop down.
4. Lightbulb: Some fields in the form may have a lightbulb next to them. Click on the lightbulb to
find additional information on what to enter into that field.
5. Age (Calculated from DOB): This will be greyed out if you are doing a Screening. If you are doing
an Assessment it will become red and required and the client’s age will show in the drop-down.
If the age does not appear in the drop-down, close this form, open “Updated Client Data” and
enter the client’s date of birth into that form. Click “Submit” to save.
6. Additional Questions: Answer all other questions on this page. The remainder of the questions
are drop-downs, check boxes, and text fields.
7. Page Navigation: Click on the next page (Reasons and Trauma Information) to navigate through
the remainder of the form.
1
2
3
4
5
6
7
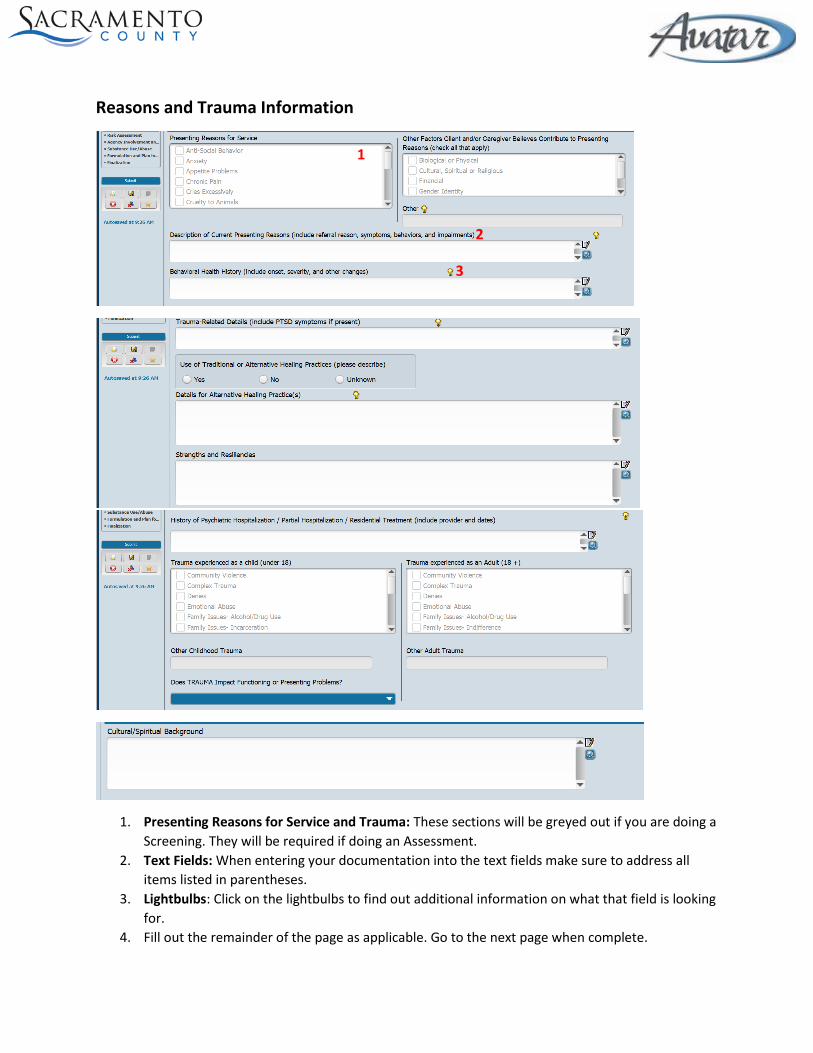
Reasons and Trauma Information
1. Presenting Reasons for Service and Trauma: These sections will be greyed out if you are doing a
Screening. They will be required if doing an Assessment.
2. Text Fields: When entering your documentation into the text fields make sure to address all
items listed in parentheses.
3. Lightbulbs: Click on the lightbulbs to find out additional information on what that field is looking
for.
4. Fill out the remainder of the page as applicable. Go to the next page when complete.
1
2
3
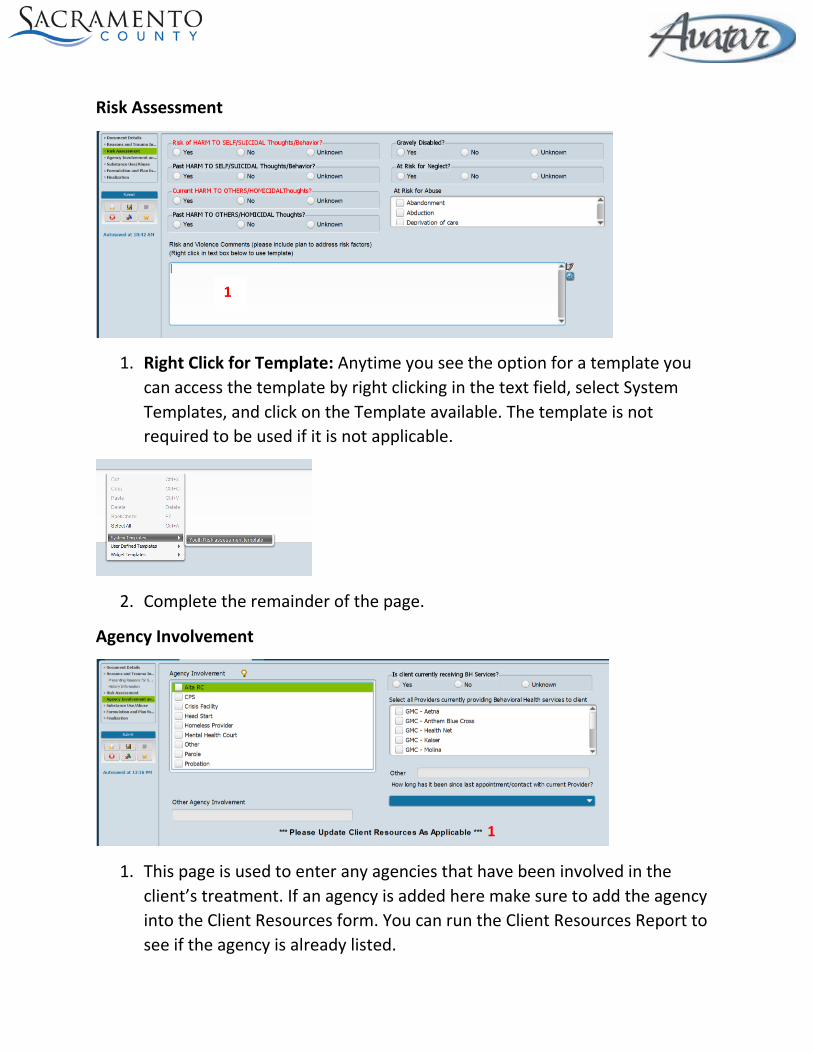
Risk Assessment
1. Right Click for Template: Anytime you see the option for a template you
can access the template by right clicking in the text field, select System
Templates, and click on the Template available. The template is not
required to be used if it is not applicable.
2. Complete the remainder of the page.
Agency Involvement
1. This page is used to enter any agencies that have been involved in the
client’s treatment. If an agency is added here make sure to add the agency
into the Client Resources form. You can run the Client Resources Report to
see if the agency is already listed.
1
1
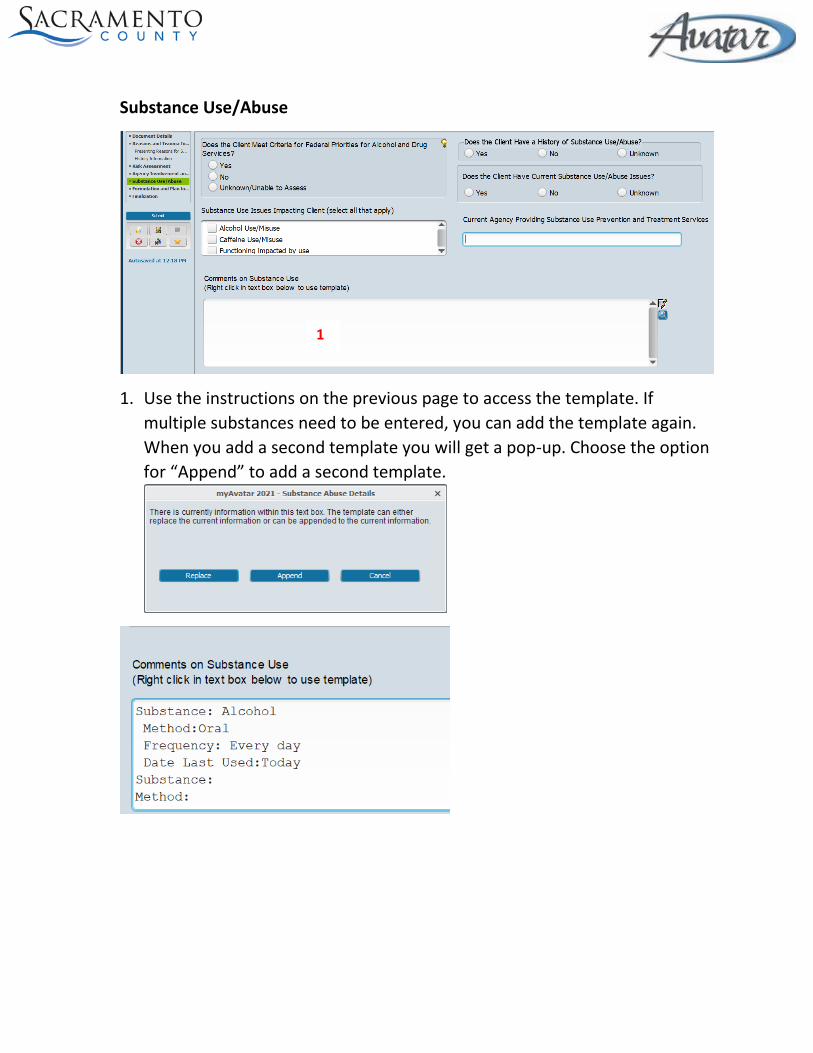
Substance Use/Abuse
1. Use the instructions on the previous page to access the template. If
multiple substances need to be entered, you can add the template again.
When you add a second template you will get a pop-up. Choose the option
for “Append” to add a second template.
1
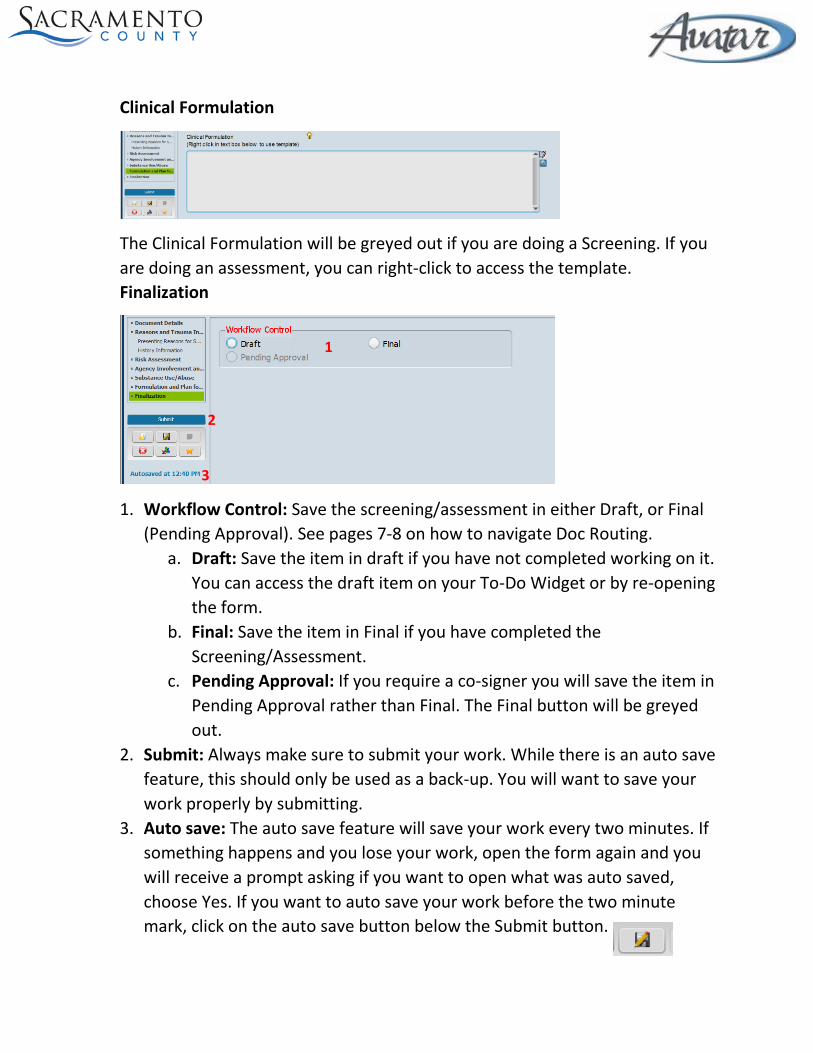
Clinical Formulation
The Clinical Formulation will be greyed out if you are doing a Screening. If you
are doing an assessment, you can right-click to access the template.
Finalization
1. Workflow Control: Save the screening/assessment in either Draft, or Final
(Pending Approval). See pages 7-8 on how to navigate Doc Routing.
a. Draft: Save the item in draft if you have not completed working on it.
You can access the draft item on your To-Do Widget or by re-opening
the form.
b. Final: Save the item in Final if you have completed the
Screening/Assessment.
c. Pending Approval: If you require a co-signer you will save the item in
Pending Approval rather than Final. The Final button will be greyed
out.
2. Submit: Always make sure to submit your work. While there is an auto save
feature, this should only be used as a back-up. You will want to save your
work properly by submitting.
3. Auto save: The auto save feature will save your work every two minutes. If
something happens and you lose your work, open the form again and you
will receive a prompt asking if you want to open what was auto saved,
choose Yes. If you want to auto save your work before the two minute
mark, click on the auto save button below the Submit button.
1
2
3
Document Routing
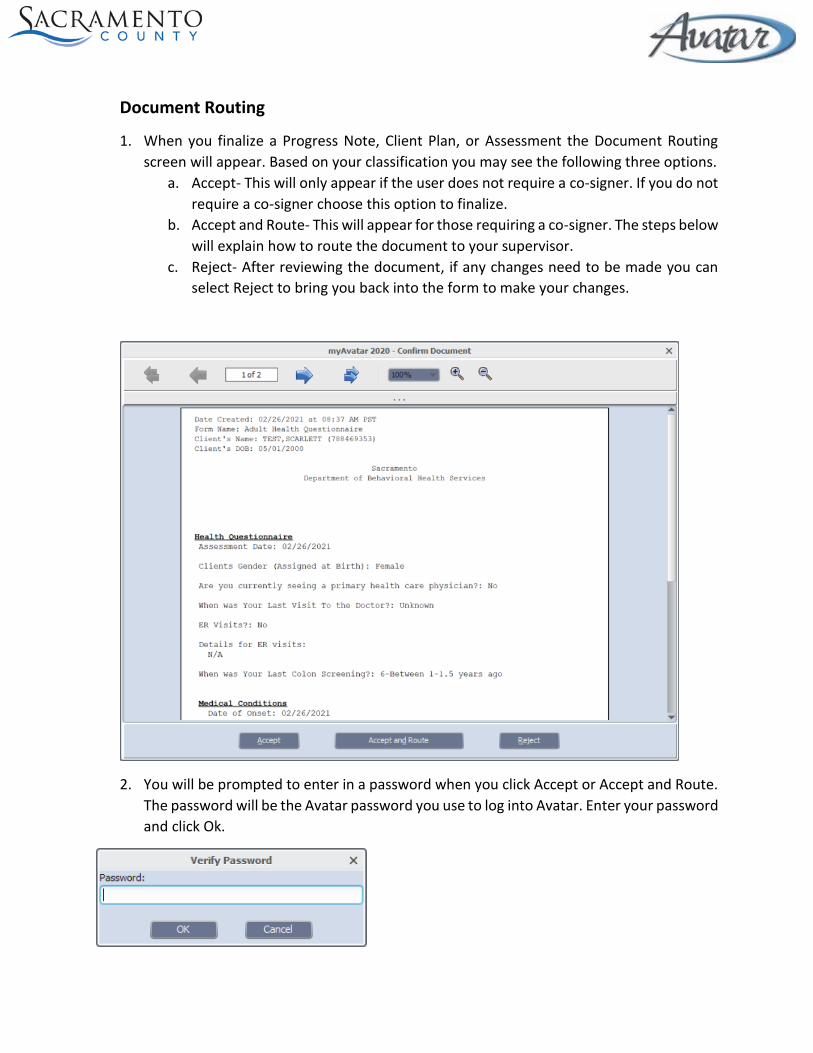
1. When you finalize a Progress Note, Client Plan, or Assessment the Document Routing
screen will appear. Based on your classification you may see the following three options.
a. Accept- This will only appear if the user does not require a co-signer. If you do not
require a co-signer choose this option to finalize.
b. Accept and Route- This will appear for those requiring a co-signer. The steps below
will explain how to route the document to your supervisor.
c. Reject- After reviewing the document, if any changes need to be made you can
select Reject to bring you back into the form to make your changes.
2. You will be prompted to enter in a password when you click Accept or Accept and Route.
The password will be the Avatar password you use to log into Avatar. Enter your password
and click Ok.
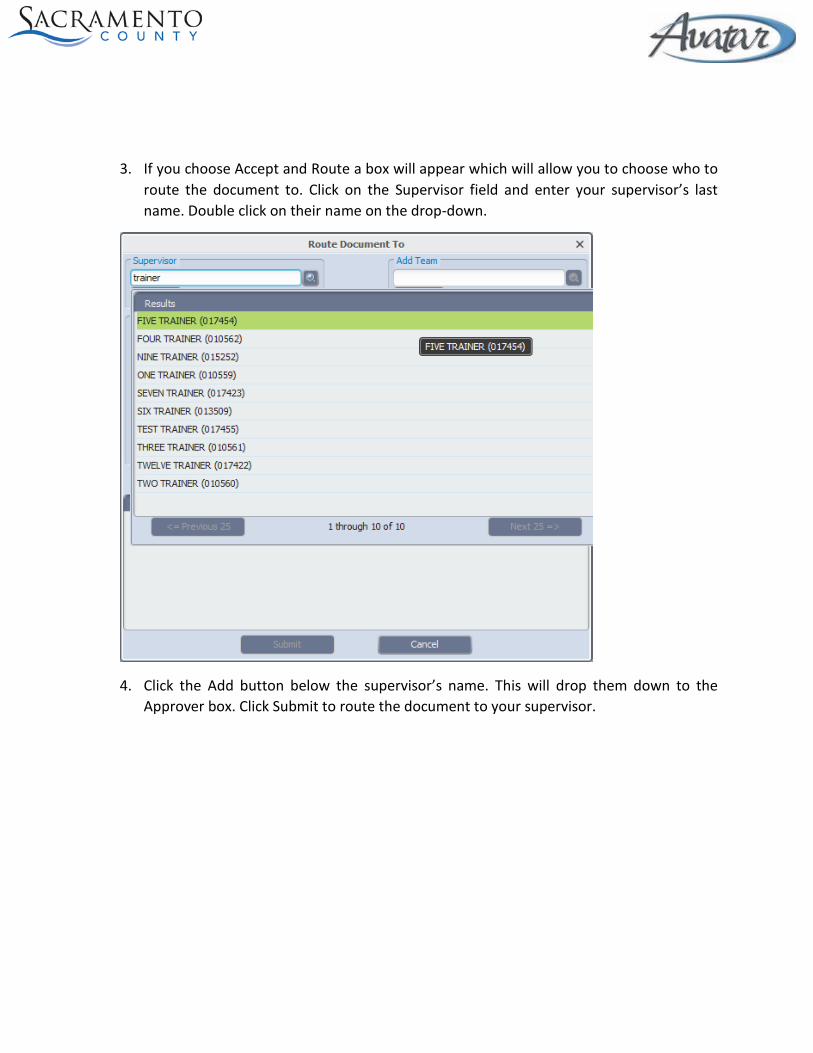
3. If you choose Accept and Route a box will appear which will allow you to choose who to
route the document to. Click on the Supervisor field and enter your supervisor’s last
name. Double click on their name on the drop-down.
4. Click the Add button below the supervisor’s name. This will drop them down to the
Approver box. Click Submit to route the document to your supervisor.