Embed Size (px)
Citation preview

Vendormate, a GHX Company Credential Manager User Guide 1
Credential Manager User Guide
Contents The Dashboard........................................................................................................................................................................ 2
The Vendors Tab .................................................................................................................................................................... 5
Vendor Profile ...................................................................................................................................................................... 6
Vendor Score Cards .......................................................................................................................................................... 10
The Reps Tab........................................................................................................................................................................ 11
Rep Profile ......................................................................................................................................................................... 12
Rep Score Cards ............................................................................................................................................................... 14
The Manage Users Tab ........................................................................................................................................................ 16
The Reports Tab ................................................................................................................................................................... 17
The Sign In History Tab ........................................................................................................................................................ 19
Appointments ........................................................................................................................................................................ 21
Creating an Appointment ................................................................................................................................................... 21
Editing an Appointment ..................................................................................................................................................... 23
Configuring Appointment Requests ................................................................................................................................... 25
Managing Appointment Permissions ................................................................................................................................. 26
Managing Appointment Requests ..................................................................................................................................... 27
Signing In a Vendor ............................................................................................................................................................... 28
The Resource Center ............................................................................................................................................................ 29
Configuring a Sign In Computer ............................................................................................................................................ 30
The Support Center ............................................................................................................................................................... 32

Vendormate, a GHX Company Credential Manager User Guide 2
The Dashboard
When you log in to Credential Manager, you will arrive at the Home Page, also known as the Dashboard. From here, you can access all Credential Manager capabilities with just a few clicks.
You’ll also find useful information, such as a list of the most recent visitors and any vendor companies who recently registered for your Credential Manager program.

Vendormate, a GHX Company Credential Manager User Guide 3
The Dashboard (cont.)
The following images identify key elements of the Dashboard and what they do. Don’t hesitate to spend some time exploring the links and discovering the capabilities you have at your command. Note that, as a user, you cannot change this data.
At the top right, there are links to the Vendormate Home and the Support Center. Vendormate Home is the page from which you can
navigate to other solutions.
1. This drop-down provides links to your profile, a fast way to change your password or log out.
2. Search. Enter a company name, rep name or email to conduct a macro search of your entire Credential Manager database.
3. Actions. Enables you to configure a sign-in computer, create a new appointment or invite a vendor representative to register via
email.
4. Compliance Metrics. These numbers provide a quick insight into the participation in your program. Click on the links to review
complete listings. Hover to view additional details.
5. News & Information. These links take you to material that may be of interest. They might include available training, vendor
information, reports, etc.
Vendormate, a GHX Company Credential Manager User Guide 4
The Dashboard (cont.)
1. Navigation Tabs. Access the module you need by clicking the appropriate tab. Note: The Manage Users tab is only visible to Administrators.
2. Recent Visitors. By default, you’ll see the last five visitors to your health system. Use the drop-down to change the number of visitors listed or click the link to go to the Sign In History page. (Click the Sign In History tab to filter to your facility’s access log.) Click the Rep or Vendor Name to view their profile.
3. Recent Company Registrations. Here, you’ll find the most recent vendors that have registered for your Credential Manager program.
4. My Appointments. If your health system is utilizing the appointments capability, you’ll see appointments you have scheduled at a glance. Click the link to access the Credential Manager Appointment Module.
Click this symbol to refresh the data. Hover to see the most recent refresh date/time.

Vendormate, a GHX Company Credential Manager User Guide 5
The Vendors Tab Credentialing concerns more than just the rep. The Vendors tab enables you to identify companies who may not be in compliance with all necessary regulations and documentation requirements. It also enables you to score vendors. The scorecard results can be valuable for certain audits carried out by CMS and the Joint Commission.
Login to your profile at https://login.vendormate.com.
1. Click the Vendors tab.
2. Search for vendors using the text boxes (Contains) and/or filter the data using any of the available drop-downs.
3. Results can be downloaded in CSV, Excel or XML formats.
4. Click the Company or Doing Business As link to view the vendor profile.
5. Click Vendor to create a scorecard for a specific vendor.
6. Use the Actions drop-downs to add an appointment with a specific representative.

Vendormate, a GHX Company Credential Manager User Guide 6
Vendor Profile
The Vendor Profile is a single source for critical information regarding any registered vendor. You can review compliance alerts at a glance, check for expired or missing documents, complete a score card or see past results and much more.
Log in at https://login.vendormate.com.
You may search for a specific vendor using the general search function, or the text boxes (Contains) at the top of each column under the Vendors tab.
1. Click the vendor’s company or DBA name to open their profile.
The Vendor Profile Details page displays key data and current compliance status information at a glance.
1. Contact information
2. Risk profile (level of credentialing performed by Vendormate)
3. Click on a tab to review detailed information on specific topics.
4. Compliance Alert Details
5. Company Details
6. Vendor provided diversity information

Vendormate, a GHX Company Credential Manager User Guide 7
Vendor Profile (cont.)
1. Click the Documents tab to review the status of required policy acknowledgements, required documents and optional documents for the selected vendor.
2. A green “” means the required material has been provided.
3. A yellow “!” warns that a document provided has been verified as an alternate. Examples of alternate documents include vaccine declination forms or vaccine series in progress.
4. A red “X” alerts you to missing, expired or rejected documents.
5. Click on the document Name to view more information regarding the document, including a link to the document itself.
Click the Score Card tab to create a review for the vendor, or view the combined results from previous score cards.
Score Card results can be viewed by all Credential Manager users within your health system, but vendor representatives cannot see their score.

Vendormate, a GHX Company Credential Manager User Guide 8
Vendor Profile (cont.)
1. Click the Principals tab to view a list of the key corporate contacts, including senior management.
2. This column shows Sanction Lists that are monitored for this individual.
3. This column shows whether they are clear of sanctions.
4. Click Show Sanction Details to view information on any failed listings.
1. Click the Contacts tab to view additional, non-rep contacts on file for this vendor.
2. Click the contact’s Email address to send a message using your default email application.

Vendormate, a GHX Company Credential Manager User Guide 9
Vendor Profile (cont.)
1. Click the Reps tab to see a list of reps from the current vendor.
2. Click on the Rep Name to see their profile.
3. Click on the Email address to send an email using your default email application.
4. These columns provide a Pass or Fail result for each rep’s Documents and Sanctions status. There is a rep profile view which can be accessed from this screen by clicking on the rep’s name. See Rep Profile for more information.
Note: If one company rep has a failing status, the vendor company as a whole will be given a failing status.

Vendormate, a GHX Company Credential Manager User Guide 10
Vendor Score Cards
Score Cards are an easy way to gather vendor and rep performance information to help meet CMS and Joint Commission guidelines. They also provide valuable data during contract negotiations and when determining which vendors provide the most value. Score Cards are easily accessed from the Home Page, Reps Page and Vendors Page. Anyone with Credential Manager access can score a rep or vendor. Ratings are maintained in the rep / vendor history and averaged to assign an overall score. Score Card results are visible to Credential Manager users at your health system, but not to vendors. Score Card reports can be created to aggregate scoring data for review.
Log in at https://login.vendormate.com.
1. Locate the vendor you wish to score using Search, or via the Vendor tab.
2. Click the vendor’s name to open their profile.
3. Choose the Score Card tab.
4. For each question, rate the vendor or rep from 1 to 10, with 10 being the highest.
5. If you wish, add specific Notes about the vendor or rep.
6. Click Save Score.
7. You may view existing notes here.
See The Reports Tab for detailed instructions on how to pull Scorecard reports. Look for the Scorecard report category.

Vendormate, a GHX Company Credential Manager User Guide 11
The Reps Tab
The Reps Tab enables you to identify individual representatives who may not be in compliance with all necessary regulations and documentation requirements. It also enables you to score reps. Score card results are important for internal quality control and for certain audits carried out by CMS and the Joint Commission.
Login to your profile at https://login.vendormate.com.
1. Click the Reps tab.
2. Search for reps using the text boxes (Contains) and/or filter the data using any of the available text boxes or drop-downs. Click Filter or press Enter on your keyboard to apply the filter criteria.
3. Search/filter results can be downloaded in CSV, Excel or XML formats.
4. Click the Company link to view the vendor profile. (See Vendor Profile for details)
5. Click First Name or Last Name to go to the rep’s profile.
6. Click Rep to create a scorecard for a specific rep. Click Vendor to create a scorecard for a specific vendor. (See Vendor Score Cards or Rep Score Cards for more information.)
7. Click on the email address to send an email message to the rep using your preferred email application.
8. Use the Actions drop-downs to add an appointment with a specific representative. (See Appointments)
Vendormate, a GHX Company Credential Manager User Guide 12
Rep Profile
The Representative Profile is a single source for critical information regarding any vendor rep. You can review compliance alerts at a glance, check for expired or missing documents, complete a score card, see past results and much more.
Log in at https://login.vendormate.com.
You may search for a specific rep using the general search function, or the text boxes (Contains) at the top of each column under the Reps tab.
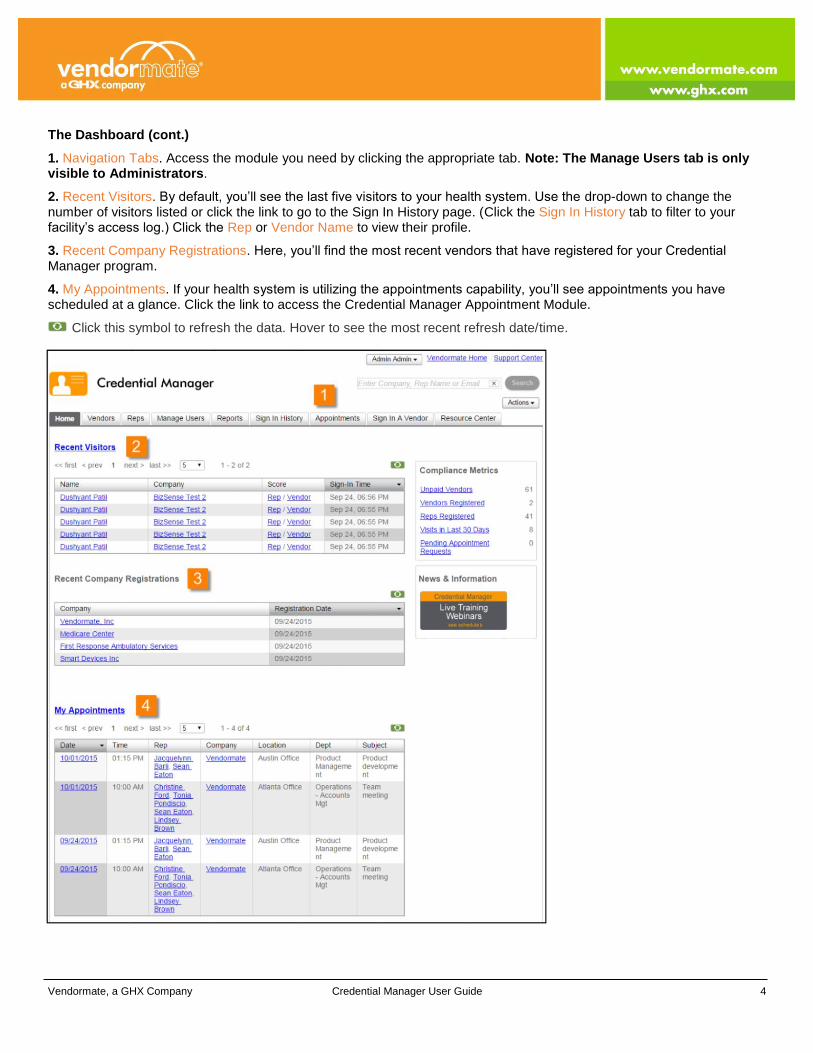
1. Click the Rep’s First or Last Name to open their profile.
The Rep Details Main Page displays key data and current compliance status information at a glance.
1. Contact information
2. Score Card results and references
3. Click on a tab to review detailed information on specific topics.
4. Compliance alerts
5. Rep’s Sales Territory
6. Supervisor information (if provided)
7. Rep-specific sign in/out history
8. User notes

Vendormate, a GHX Company Credential Manager User Guide 13
Rep Profile (cont.)
1. Click the Documents tab to review the status of required acknowledgements, required documents and optional documents for the selected representative.
2. A green “” means the required material is available.
3. A red “X” alerts you to missing, rejected or expired documents.
4. A yellow “!” warns that a document provided has been verified as an alternate. Examples of alternate documents include vaccine declination forms or vaccine series in progress.
5. Click on the document name to view more information regarding the document, including a link to the document itself.
Click the Score Card tab to create a review for the representative, or view the combined results from previous score cards. (See Rep Score Cards for detailed information.)
Score Card results can be viewed by all Credential Manager users, but the rep cannot see their score.
Click the Products tab to see a list of products provided by the vendor.

Vendormate, a GHX Company Credential Manager User Guide 14
Rep Score Cards
Score Cards are an easy way to gather rep performance information to help meet CMS and Joint Commission guidelines. They also provide valuable data during contract negotiations and when determining which vendors provide the most value. Score Cards are easily accessed from the Home Page, Rep Page and Vendor Page. Anyone at your health system with Credential Manager access can score a rep. Ratings are maintained in the rep history and averaged to assign an overall score. Score Card results are visible to Credential Manager users, but not to vendor representatives.
Log in at https://login.vendormate.com.
Locate the rep you wish to score using Search, or via the Reps tab.
1. Click the Rep’s Name to open their profile.

Vendormate, a GHX Company Credential Manager User Guide 15
Rep Score Cards (cont.)
2. For each question, rate the rep from 1 to 10, with 10 being the highest.
3. If you wish, add specific notes about the rep.
4. Click Save Score.
See The Reports Tab for detailed instructions on how to pull Scorecard reports. Look for the Scorecard report category.

Vendormate, a GHX Company Credential Manager User Guide 16
The Manage Users Tab
Note: The Manage Users tab is available to administrators only. Non-administrators, will not see this tab.
The Manage Users tab makes it easy for Administrators to view, edit, add and inactivate Credential Manager users.
1. Select Active or Inactive users to view.
2. When viewing active users, use the Actions drop-down to Inactivate or Edit a user. When viewing inactive users, use the Actions drop-down to Activate.
3. Enter search terms in text boxes (Contains) to find specific users.
4. Click Filter to execute a search.
5. Click Clear to remove the filter and return to the complete user list.
6. Click Create New User to add a user.
7. Provide details on new user. Required fields are marked with an asterisk and outlined in orange.
8. Click Save. An email is automatically sent to the new user with their first time login information.

Vendormate, a GHX Company Credential Manager User Guide 17
The Reports Tab
Credential Manager provides powerful reporting capabilities to help you better understand and control vendor rep activity. Reports can be created with a few clicks and you can download the results for review and further processing in Excel (XLSX, XLS, CVS), Word (RTF) and Adobe Acrobat (PDF) file formats.
Log in at https://login.vendormate.com.
1. Open the Reports tab. You will see a list of report categories.
2. Hover over a category name to view a description. Click on a category to see the reports associated with that classification.
3. Hover over a report name to view a description.
Running a report:
1. Click on the name of the report.

Vendormate, a GHX Company Credential Manager User Guide 18
The Reports Tab (cont.)
2. On the right side of the screen you’ll see any applicable filters. (Not all reports have filters.) Select the desired filters.
3. Select the preferred file format from the Export Type drop-down.
4. Click the Download Report button.
Filter and File Format Tips:
Select more than one option in a filter category by holding the “ctrl” key on your keyboard while making your selection
Export Type file options: o To generate a Microsoft Excel worksheet file, select: XLSX, XLS, or CSV o To generate a file for Adobe Reader or Adobe Acrobat, select PDF o To generate a file for Microsoft Word, select RTF

Vendormate, a GHX Company Credential Manager User Guide 19
The Sign In History Tab
The Sign In History tab tracks and stores sign-in and sign-out data on every rep who attempts to print a badge. It is a powerful tool for determining who is currently in your facility. This historical entry and exit data can be invaluable for certain audits. Powerful search capabilities make it easy to locate the precise data you seek.
Log in to your profile at https://login.vendormate.com.
1. Click Sign In History.
2. Search/filter results can be downloaded in CSV, Excel or XML formats.
3. Every column can be filtered, by entering a date range, choosing from a drop-down menu, or typing search text in a box labeled Contains.
4. Click Sign In, Sign Out or Message to view the event details.
5. Hover over the Message to read the complete text. (See the example below.*)
6. Click the rep’s Name to see the rep profile. (See Rep Profile for more information)
7. Click the Company name to view the vendor profile. (See Vendor Profile for more information)
8. Click the Email Address to send an email message to the rep using your default email application.
9. Scroll to the right to view additional information that you can sort or filter.

Vendormate, a GHX Company Credential Manager User Guide 20
The Sign In History Tab (cont.)
* Hover over a Message to read the complete text.
Sign In History Tips and Tricks:
The data export limit is 1,000 lines. If you need more data, see the Badge Station Activity Log report under the Reports tab.
By default, the last three days of onsite activity appear on screen. You can look further back by adjusting the date range in the first column, labeled Sign In.
The best way to search for a particular rep is using their email address in the text box (Contains) of the User Information column.
If you’re part of a multi-facility health system, filter for your location by typing the name of your site in the Sign In Location column. You’ll find the Sign In Location column by scrolling to the right.
If you are using remote badge printing, select Printed remotely from the Event Type drop-down to view off site sign in events.

Vendormate, a GHX Company Credential Manager User Guide 21
Appointments
Creating an Appointment
Credential Manager makes it easy to schedule appointments with vendor representatives and staff. Health systems can enhance on-site control by denying badges to reps who arrive at your facility without a scheduled appointment. Contact your Vendormate representative to change your appointment badge rules. Hospital staff who will create or be invited to appointments must be Credential Manager users. See the Manage Users Tab for details on adding users.
Follow these steps to create an appointment.
Login to your profile at https://login.vendormate.com.
1. Go to the Reps tab.
2. Find the rep, then select Add Appointment from the drop-down menu in the Actions column.
Add Appointment Details:
1. Frequency: Choose One Time Appointment or Recurring Appointment. If it is a recurring appointment, a pop-up window will appear to select the recurrence pattern.
2. Time and Place: Select Location and Department as well as Start and End time.
3. Additional Details: Enter a Subject and Description. The Subject will appear on the rep’s badge at the time of their visit. This info will be included in the invitation sent to attendees if the email option is checked.

Vendormate, a GHX Company Credential Manager User Guide 22
Creating an Appointment (cont.)
1. Who is invited: Use the text boxes (Contains) to find additional meeting attendees, whether they are other reps or members of staff.
2. Select the check-boxes next to the appropriate names to add invitees.
3. Checking the Receive email of appointment box will only send you a calendar invitation. Checking Send email of appointment to invitees will also send invitations to the staff and reps you have invited.
4. Click Save Appointment.
If a rep is not compliant and has used up all of their warning badges, they will not be allowed to access the hospital even if they have a valid appointment. See FAQ below.
Notes:
Staff members must have a Credential Manager User account to be invited. See the Manage Users Tab for details on how to add new users. Note that only administrators can add, edit or inactivate users.
Reps must be registered before an appointment can be scheduled.
Reps can print badges two hours before and one hour after the appointment start time, and up to one hour after the appointment end time.
Appointments FAQs:
Where can appointments be enforced? Appointments can be enforced at the overall health system level, the specific location level and by individual departments. Contact your Vendormate representative to change your appointment badge rules.
Will a non-compliant rep still be able to print a badge just because they have an appointment? No. Reps with appointments are still checked against current badge rules to determine access. If a rep is not compliant and has used up all of their warning badges, they will not be allowed to access the hospital even if they have a valid appointment. You can determine the number of warning badges reps receive before being denied access. You may wish to check the rep for compliance before creating an appointment.
Can printed badges be customized to display whether or not a rep has an appointment? Yes. There are several different ways to display the appointment start and end time on both paper and label style badges. To configure this capability, ask your Vendormate support representative.
Does Credential Manager capture responses to my appointment invitations? No. Although appointment invitations are sent from Credential Manager, responses cannot be automatically posted to Credential Manager.
Vendormate, a GHX Company Credential Manager User Guide 23
Editing an Appointment
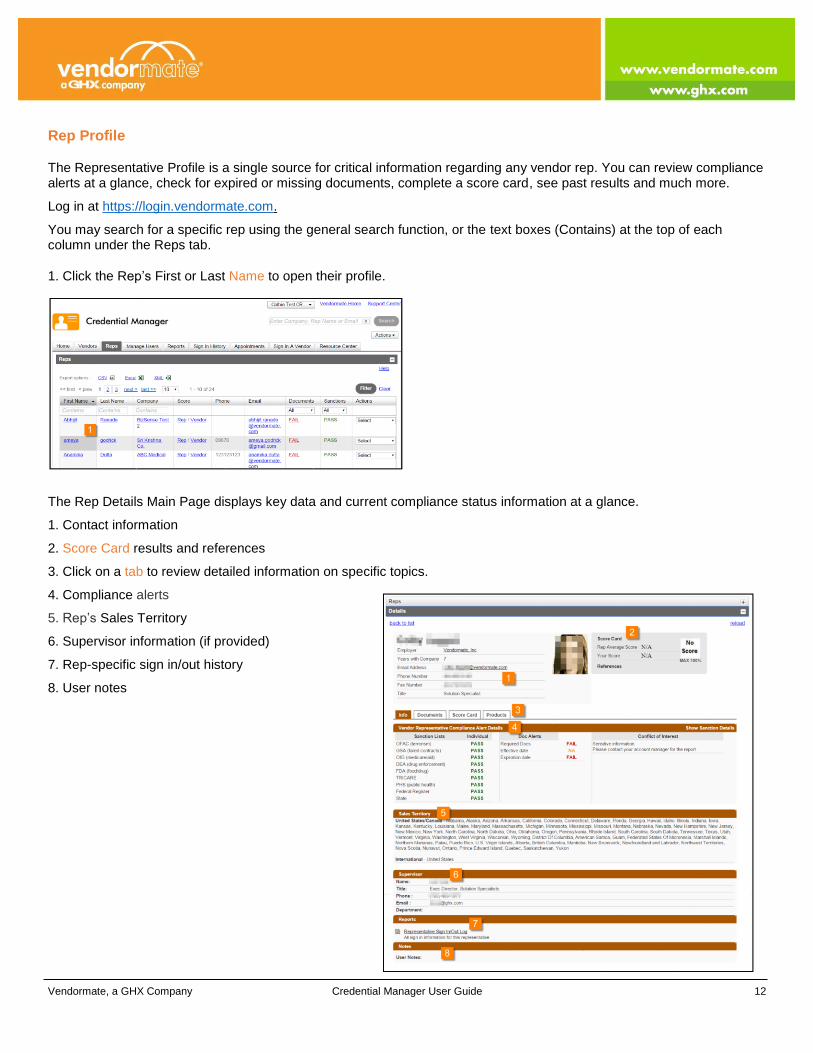
There are two rules for editing appointments:
Only the health system staff member who created the appointment can modify or delete it.
Appointments cannot be modified or deleted within two hours of the start time.
Log in to your profile at https://login.vendormate.com.
1. Click the Appointments tab.
2. Adjust the search criteria (e.g., User or Start Date/Time) and then click Filter to find the appointment you wish to modify/delete.
3. Once you’ve identified the appointment, click on the appropriate action from the drop-down list found in the Actions column.

Vendormate, a GHX Company Credential Manager User Guide 24
Edit Appointment Details:
If you select Edit from the Actions drop-down (see above), the Edit Appointment screen will open. This is similar to the screen on which you created the appointment. Make all necessary changes and be sure to click Save Appointment (1) when you are finished.
For Recurring Appointments, you have the option to modify only the appointment you’ve selected, or all future appointments in the series.
Notes:
A recurring appointment refers to a series of meetings that happen at a regular interval. For example, you may have a rep who stops by every Tuesday at 3:00 pm.
If you are not sure of the exact timing for an appointment, set aside a block of time that encompasses when your meeting is likely to occur. Remember, reps may print their badge beginning two hours before their appointment time and up to one hour after the end time.

Vendormate, a GHX Company Credential Manager User Guide 25
Configuring Appointment Requests
These settings enable you to tell the system whether you will allow reps to request appointments with you through the Credential Manager system and how to proceed when requests are received. Note, the rep initiated appointment feature will need to be configured by Vendormate in order for you to use this functionality. Contact your Vendormate representative if you do not see the appointment options outlined below when editing your profile.
Login to your profile at https://login.vendormate.com.
1. Click your name in the top right corner and select My Profile.
2. Select the Edit tab under Contact & Personal Information.
3. Available for Appointment: This will allow reps to request appointments with you. Only your name will be displayed to reps.
4. Auto Accept Appointment: If you do not want to review appointment requests, you can allow your requests to be accepted automatically. Note: Appointments must be made 48 hours in advance to be accepted automatically. You can manually accept the appointment at any time.
5. Receive Email Upon on Appointment Request: The system will send you an email with details of the requested appointment.
6. Receive Email Upon Appointment Sign In: The system will send you an email when a rep prints their badge for an appointment.
7. Be sure all required fields (outlined in orange) are completed, then click Save.
Vendormate, a GHX Company Credential Manager User Guide 26
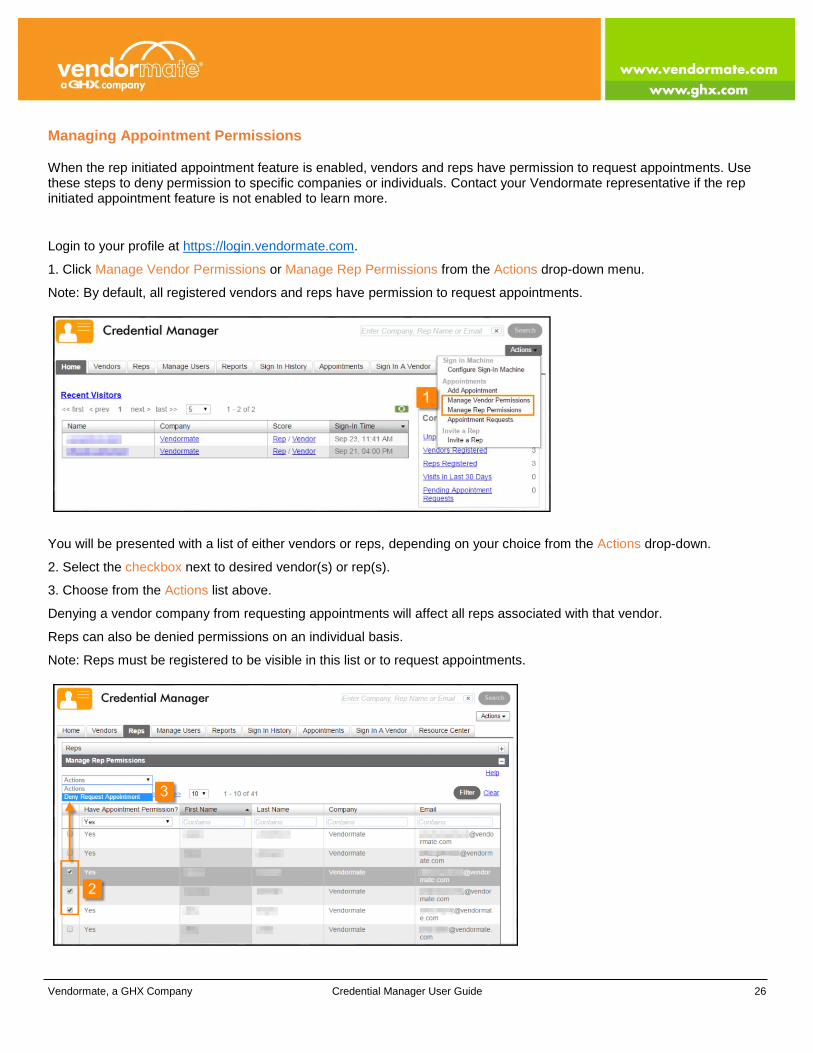
Managing Appointment Permissions
When the rep initiated appointment feature is enabled, vendors and reps have permission to request appointments. Use these steps to deny permission to specific companies or individuals. Contact your Vendormate representative if the rep initiated appointment feature is not enabled to learn more.
Login to your profile at https://login.vendormate.com.
1. Click Manage Vendor Permissions or Manage Rep Permissions from the Actions drop-down menu.
Note: By default, all registered vendors and reps have permission to request appointments.
You will be presented with a list of either vendors or reps, depending on your choice from the Actions drop-down.
2. Select the checkbox next to desired vendor(s) or rep(s).
3. Choose from the Actions list above.
Denying a vendor company from requesting appointments will affect all reps associated with that vendor.
Reps can also be denied permissions on an individual basis.
Note: Reps must be registered to be visible in this list or to request appointments.

Vendormate, a GHX Company Credential Manager User Guide 27
Managing Appointment Requests
When you receive an appointment request via email, you need to respond through Credential Manager as shown below.
Log in to your profile at https://login.vendormate.com.
1. Click Appointment Requests from the Actions drop-down menu.
You will be taken to the Appointments tab, showing Pending appointment requests.
2. Check the appointment(s) you wish to review.
3. Select from the Actions drop-down list.
Accept: The appointment(s) will be scheduled in the system and the requestor is notified via email. If compliant, the rep will be able to sign in at a badge station within two hours of the appointment.
Decline: The appointment(s) will not be scheduled and the requestor is notified via email. Previously declined appointments can be found by filtering Status on the Appointments tab.
Edit: Allows the appointment to be altered before being scheduled in the system. Once the appointment is saved, the reps associated with the appointment request will be notified via email. The rep will be able to sign in at a badge station within two hours of the appointment.

Vendormate, a GHX Company Credential Manager User Guide 28
Signing In a Vendor
If a rep needs assistance signing in for an on-site visit, you can handle the task for them. This may occur if the rep is not
familiar with the process, or if they are not registered or compliant at your facility with Vendormate. In most cases, reps
should use the sign-in computer(s). When assistance is required, here is how you should proceed:
Log in at https://login.vendormate.com.
1. Select the Sign In A Vendor tab.
2. In the Corporate Email field, type the rep’s email address, click “Find Vendor Information”
3. If the rep is found, they are registered and the Name, Phone and Company fields will auto-populate. If the rep is not found, they are not registered and you must type in their Name, Phone and Company.
4. Complete the Purpose of Visit section. Required fields are marked with an asterisk (*).
5. Leave the Enforce Badge Rules box checked to ensure your access restrictions are enforced. To override the badge rules*, uncheck the box and provide a detailed explanation as to why you are overriding. This will be captured in the Sign In History report.
6. Click Print Badge.
7. When the rep leaves, enter the badge number and click Sign Out. Reps can also sign out using the free Vendormate mobile app.
*If the rep is not in compliance with the policies established through your credentialing program, his or her badge may not print. Speak to your manager to determine if you are allowed to override the policies to print a badge. See The Rep Profile for information on how to view compliance details.
Note: Do not include patient information in any field.

Vendormate, a GHX Company Credential Manager User Guide 29
The Resource Center
The Resource Center is a place for Vendormate and health systems to make important information available to Credential
Manager users. Documents such as user guides, FAQs and credentialing reminders are available with a single click.
Administrative information, including new software capabilities, are viewable by administrators only.
Viewing Resource Center information.
1. Click the Resource Center tab.
Headings include:
Global Admin Resources – Provided by Vendormate, this information is for Admins only.
Global User Resources – Includes links to product guides, technical information and much more.
Healthcare System Admin Resources – Information for Admins provided by the health system.
Health System Policies – Links to policy documents related to the health system.
2. Click on the plus (+) symbol at the right of the category heading you are interested in to view links to available
documents.
3. Hover over a link for a brief description.
If you are interested in adding content to the Resource Center for your organization, please send your request to the
Vendormate Customer Success team at [email protected]. We will upload the material to your
repository and place a link under the appropriate heading on your Resource Center page.

Vendormate, a GHX Company Credential Manager User Guide 30
Configuring a Sign In Computer
Allowing reps to sign themselves in and out enhances productivity and makes it easier to adhere to your credentialing and badging guidelines. To do so, you need a dedicated computer with an attached printer at each entry point in your facility. Setting up a sign-in computer – or kiosk – is fast and easy. If you have questions or concerns, contact Vendormate support for assistance.
Log in to your profile at https://kiosk.vendormate.com.
Select the Location and Entry Point from the drop-down menus.
Drag the Vendormate Sign-in link to your desktop to create a shortcut
-OR-
Click Go to Sign-in Page.
If neither of these options work, click Copy Vendormate Sign-in Link to Clipboard and paste the URL into your browser’s address field.

Vendormate, a GHX Company Credential Manager User Guide 31
Configuring a Sign In Computer (cont.)
You have successfully configured the computer as a badge station.
Troubleshooting:
To ensure proper operation, be certain the following are true:
Only one browser window is open.
The computer is able to access the Internet.
MS Internet Explorer (7.0 or higher) is installed.
Adobe Reader (7.0 or higher) is installed.
Cookies are enabled on the computer and that your IT department does not delete cookies from this computer.
The computer is set up with and connected to the correct default printer.
The badges will print on the default printer. To determine which printer is set as the default, go to the Start Menu>Control Panel>Printers and Faxes. The printer with a checkmark next to its name is the default printer. If you need to change the default printer, right click on the name of the desired default printer and choose “Set as Default.”
Note: Your IT department should configure the computer to avoid unauthorized use for any other purpose.

Vendormate, a GHX Company Credential Manager User Guide 32
The Support Center
When you’re working in Credential Manager, help is always at hand. At the upper right of each screen is a link entitled
Support Center. Click the link and you’ll find the help you need, whether it’s a video demo, FAQs or contact with a
Vendormate product specialist.
You’ll also find useful information aimed specifically at healthcare providers and vendors.
1. Click healthcare provider support.

Vendormate, a GHX Company Credential Manager User Guide 33
The Support Center (cont.)
The images and callouts below identify healthcare provider educational and support materials available in the Support
Center.
2. Tutorials – Demonstrations of how to use Credential Manager.
3. Vendor Experience - Information on what your reps have to do to sign up for and use your credentialing program.
4. Registration & Passwords - Answers to your questions on basic Credential Manager functions.
5. Sign in & Badging - Valuable insights on how to handle the process in your facility.
6. Submit Support Request - Contact Vendormate for specific questions.
7. Complete the online form and click Submit.