Embed Size (px)
Citation preview
7/28/2019 Creating Your First Flash Professional CS5 Document
http://slidepdf.com/reader/full/creating-your-first-flash-professional-cs5-document 1/16
Creating your first Flash Professional CS5 documentby Adobe
Content
Creating a FLA file and adding graphic elements
Creating a symbol and adding animation
Publishing SWF files
Adding a replay button to restart the animation
Where to go from here
Modified
22 December 2010
Page tools
Share on Facebook
Share on Twitter
Share on LinkedIn
animationFLAFlash ProfessionalSWF
Was this helpful?
Yes No Requirements
Prerequisite knowledge
Prior experience working with Flash Professional CS5 is not required. This introductory article provides all the steps you need to get started.
Although this sample project includes some ActionScript code, previous knowledge of programming is not necessary.
Note: If desired, you can download the sample files to review a working version of the completed project. Otherwise, just follow along with the
instructions provided below to create the sample project from scratch.
User level
Beginning
Required products
Flash Professional (Download trial)
Sample files
SimpleFlash.zip (423 KB)
o Note: For information on how to create your first Flash Professional CS6 document, refer to this article.
Adobe Flash Professional CS5 is an authoring tool that you can use to create presentations, applications, and other content that
responds to user interaction. Flash projects can include simple animations, video content, complex user interfaces, applications,
and everything in between. In general, individual projects created with Flash Professional are called applications (or SWF
applications), even though they might only contain basic animation. You can make media-rich applications by including
pictures, sound, video, and special effects.
The SWF format is extremely well suited for delivery over the web because SWF files are very small and take little time to
download. Flash projects often include extensive use of vector graphics. Vector graphics require significantly less memory and
storage space than bitmap graphics because they are represented by mathematical formulas instead of large data sets. Using
bitmap graphics in Flash projects results in larger file sizes because each individual pixel in the image requires a separate piece
of data to represent it. Additionally, Flash allows you to select graphic elements and convert them tosymbols — making them
easier to reuse and further improving performance when SWF files are viewed online.
Creating a FLA file and adding graphic elements
7/28/2019 Creating Your First Flash Professional CS5 Document
http://slidepdf.com/reader/full/creating-your-first-flash-professional-cs5-document 2/16
To build an application in Flash Professional CS5, you create vector graphics and design elements with the drawing tools and
import additional media elements such as audio, video, and images into your document. Next, you use the Timeline and the
Stage to position the elements and define how and when they appear. Using Adobe ActionScript (a scripting language) you
create functions to specify how the objects in the application behave.
When you author content in Flash Professional (by choosing File > New), you work with the master document, which is called a
FLA file. FLA files use the file extension .fla (FLA). While editing a FLA file in the Flash authoring environment, you'll notice
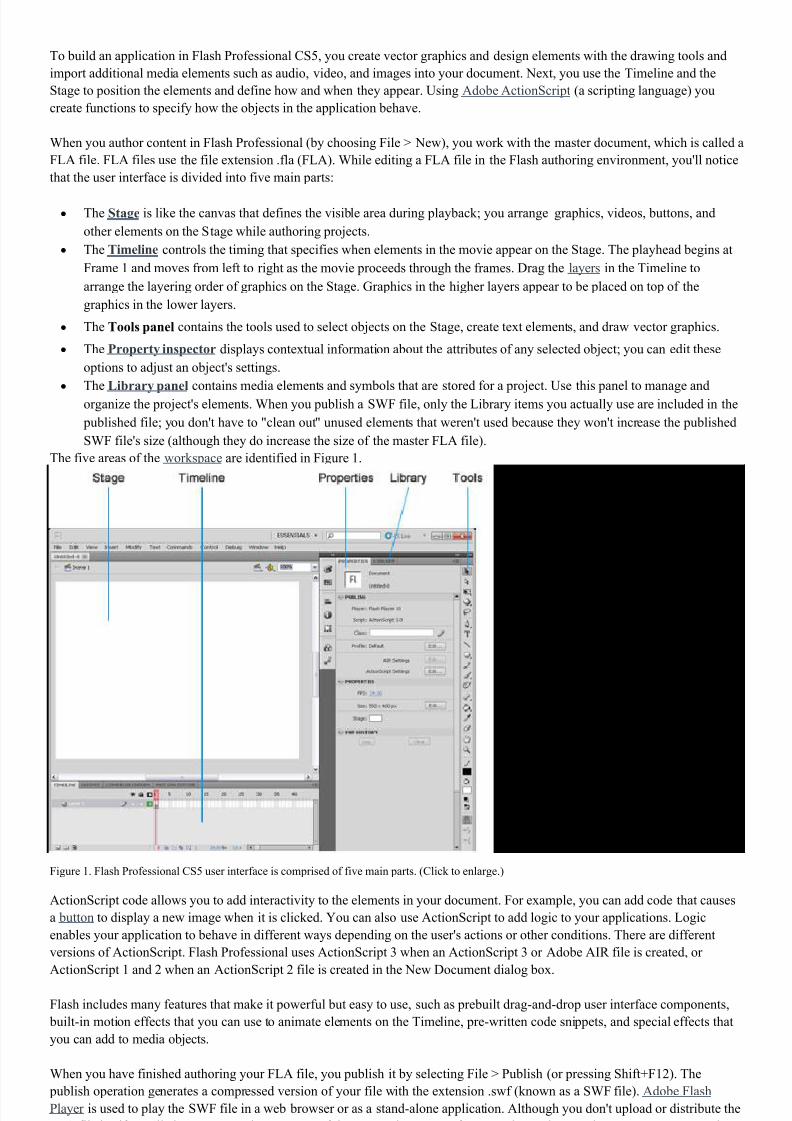
that the user interface is divided into five main parts:
The Stage is like the canvas that defines the visible area during playback; you arrange graphics, videos, buttons, and
other elements on the Stage while authoring projects.
The Timeline controls the timing that specifies when elements in the movie appear on the Stage. The playhead begins at
Frame 1 and moves from left to right as the movie proceeds through the frames. Drag the layers in the Timeline to
arrange the layering order of graphics on the Stage. Graphics in the higher layers appear to be placed on top of the
graphics in the lower layers.
The Tools panel contains the tools used to select objects on the Stage, create text elements, and draw vector graphics.
The Property inspector displays contextual information about the attributes of any selected object; you can edit these
options to adjust an object's settings.
The Library panel
contains media elements and symbols that are stored for a project. Use this panel to manage and
organize the project's elements. When you publish a SWF file, only the Library items you actually use are included in the
published file; you don't have to "clean out" unused elements that weren't used because they won't increase the published
SWF file's size (although they do increase the size of the master FLA file).
The five areas of the workspace are identified in Figure 1.
Figure 1. Flash Professional CS5 user interface is comprised of five main parts. (Click to enlarge.)
ActionScript code allows you to add interactivity to the elements in your document. For example, you can add code that causes
a button to display a new image when it is clicked. You can also use ActionScript to add logic to your applications. Logic
enables your application to behave in different ways depending on the user's actions or other conditions. There are different
versions of ActionScript. Flash Professional uses ActionScript 3 when an ActionScript 3 or Adobe AIR file is created, or
ActionScript 1 and 2 when an ActionScript 2 file is created in the New Document dialog box.
Flash includes many features that make it powerful but easy to use, such as prebuilt drag-and-drop user interface components,
built-in motion effects that you can use to animate elements on the Timeline, pre-written code snippets, and special effects that
you can add to media objects.
When you have finished authoring your FLA file, you publish it by selecting File > Publish (or pressing Shift+F12). The
publish operation generates a compressed version of your file with the extension .swf (known as a SWF file). Adobe Flash
Player is used to play the SWF file in a web browser or as a stand-alone application. Although you don't upload or distribute the
FLA file itself, you'll always want to keep a copy of the master document. If you need to make any changes, you can open the
FLA file in Flash, edit it, and then publish an updated SWF file.

7/28/2019 Creating Your First Flash Professional CS5 Document
http://slidepdf.com/reader/full/creating-your-first-flash-professional-cs5-document 3/16
Creating a simple FLA file
This tutorial guides you through the process of creating a basic FLA document. You'll use this workflow when authoring
projects in Flash Professional. The first step involves creating a new document:
1. Choose File > New.
2. In the New Document dialog box, the ActionScript 3.0 file type is selected by default (see Figure 2). If ActionScript 3.0
is not selected, select it now. Click OK.
Figure 2. The New Document dialog box displays the file types you can create in Flash Professional.
3. Use the workspace drop-down menu located on the upper right of the screen to select the Essentials workspace layout
option (see Figure 3). This step ensures that the layout of the panels in Flash Professional match the arrangement of the
panels displayed in the screen shots for this tutorial.
Note: Later, you can create a preset of your own custom workspace by positioning the panels in any way that you prefer.
Choose the New Workspace option and enter a name to save your personal configuration. Once it's saved, you can reset the
workspace by choosing its name from the workspace menu.
Figure 3. Select the Essentials option to see the workspace layout used for this tutorial.
4. Click the Properties tab in the upper right side of the user interface to view the Property inspector, which displays the
Stage properties for the file when no other objects are selected.
5. By default, the Property inspector is vertically aligned along the right side of the workspace. The Size section displays the
current Stage size setting as 550 × 400 pixels (see Figure 4). The Stage background color swatch is set to white. You can
change the color of the Stage by clicking the swatch and selecting a different color in the color picker that appears.

7/28/2019 Creating Your First Flash Professional CS5 Document
http://slidepdf.com/reader/full/creating-your-first-flash-professional-cs5-document 4/16
Figure 4. The Property inspector displays the Stage size and the background color.
Tip: You can set the background color of the Stage in the Flash movie by choosing Modify > Document or by selecting the
Stage and then modifying the Stage color swatch in the Property inspector. There's no need to draw a rectangle to define the
background color. When you publish your movie, Flash sets the background color of the published HTML page to the same
color as the Stage background color (if you choose to generate an HTML file).
6. Choose File > Save.
7. Select the location to save the FLA file on your hard disk. Name it SimpleFlash.fla and then click Save. Make a note of
the location where you save the FLA file because you'll need to find this directory at the end of this tutorial.
Drawing a circle on the Stage
After you've created your Flash document, you are ready to add some artwork to the project. Drawing shapes is a common task
in Flash. When you use the drawing tools in the Tools panel, the vector graphics you create can be edited at any time. The
following steps describe how to create a circle; later, you'll use this circle to create some basic animation. Follow these steps:
1. Select the Oval tool from the Tools panel (see Figure 5).

7/28/2019 Creating Your First Flash Professional CS5 Document
http://slidepdf.com/reader/full/creating-your-first-flash-professional-cs5-document 5/16
Figure 5. Tools with a triangle in the bottom left corner contain more than one option; click and hold the shape tool icon to select the Oval tool from
the list that appears in the Tools panel.
2. Use the stroke color swatch in the Property inspector to select the No Color option (red diagonal stripe) from the Stroke
Color Picker (see Figure 6).
Figure 6. The universal "no" symbol (red diagonal stripe) indicates that the color swatch is set to the No Color option in the Stroke color picker.
3. Select a color of your choice from the Fill color picker, located directly below the Stroke color picker. Choose a fill color
that contrasts well with the Stage color. In this example, an oval with a blue fill color is displayed on top of a red Stage
color.4. Whenever you draw a vector shape, you have the option of selecting two drawing modes: Merge drawing
mode andObject drawing mode. For the purposes of this tutorial, click the drawing mode button to select the Object
drawing mode at the very bottom of the Tools panel. When the Object drawing mode is selected, the button will appear
darker and selected, as shown in Figure 7.

7/28/2019 Creating Your First Flash Professional CS5 Document
http://slidepdf.com/reader/full/creating-your-first-flash-professional-cs5-document 6/16
Figure 7. The Drawing mode button is a toggle that alternates between modes; choose Object drawing mode by clicking the button to make its
background appear darker.
To learn more about the two drawing mode options, see the Drawing modes section of the Flash Professional onlinedocumentation.
5. While the Oval tool still selected, press and hold the Shift key. Draw a circle on the Stage by Shift-dragging on the Stage
(see Figure 8). The Shift key is a modifier key; when you press and hold the Shift key while drawing or transforming a
shape with the Oval tool, Flash constrains the Oval tool shape to a circle that is perfectly symmetrical.
Note: The Shift key works similarly with other auto shapes; when you press and hold Shift while drawing a shape with the
Rectangle tool, you'll create a perfect square.
Figure 8. Press and hold the Shift key while using the Oval tool to draw a circle on the Stage.
Tip: If you're drawing your circle and you see only an outline of the shape instead of a fill color, first check to ensure that the
stroke and fill options are set correctly in the Property inspector while the circle is selected. If the fill color swatch is set to a
color and the stroke is set to No Color, the settings are correct. Next, make sure that the option to Show Outlines isnot selected
in the layers area of the Timeline. (There are three icons to the right of the layer names: eyeball icon, lock icon, and outlines
icon. Double-check that the outlines icon displays a solid fill and not just a square outline. If you are not sure if the Show
Outlines option is enabled, click the icon repeatedly to toggle the visual state between normal view and outline view.)
7/28/2019 Creating Your First Flash Professional CS5 Document
http://slidepdf.com/reader/full/creating-your-first-flash-professional-cs5-document 7/16
Creating a symbol and adding animation
After drawing some artwork, you can turn it into a reusable asset by converting it to a symbol. A symbol is a media asset that
can be reused anywhere in your document without the need to re-create it. Symbols can contain bitmap and vector images and
animations, along with other types of content.
It is common to use symbols to create tweened animations. You can also use symbols to store graphic content (as described in
the next set of steps). As you become more familiar with Flash Professional, you'll use symbols to structure applications and
interactivity using multiple timelines. Symbols are useful for compartmentalizing parts of a project to make it easier for you toedit specific sections later. Follow these steps to create a symbol:
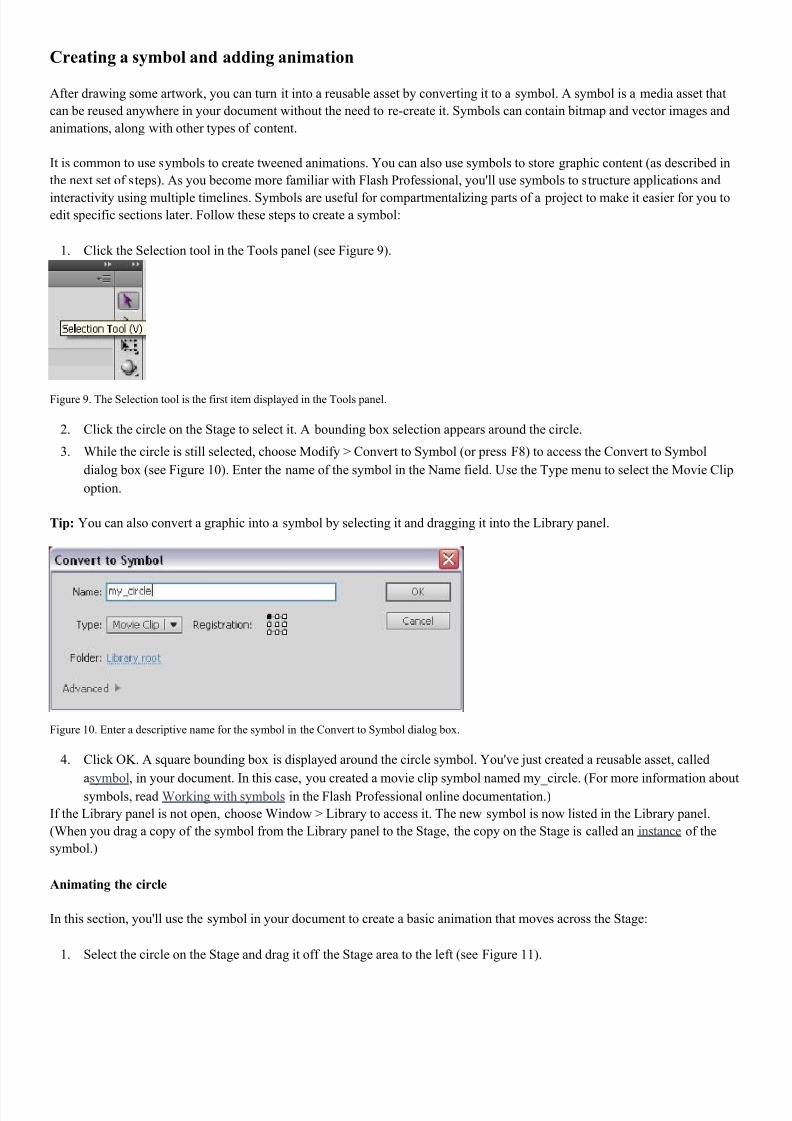
1. Click the Selection tool in the Tools panel (see Figure 9).
Figure 9. The Selection tool is the first item displayed in the Tools panel.
2. Click the circle on the Stage to select it. A bounding box selection appears around the circle.
3. While the circle is still selected, choose Modify > Convert to Symbol (or press F8) to access the Convert to Symbol
dialog box (see Figure 10). Enter the name of the symbol in the Name field. Use the Type menu to select the Movie Clip
option.
Tip: You can also convert a graphic into a symbol by selecting it and dragging it into the Library panel.
Figure 10. Enter a descriptive name for the symbol in the Convert to Symbol dialog box.
4. Click OK. A square bounding box is displayed around the circle symbol. You've just created a reusable asset, called
asymbol, in your document. In this case, you created a movie clip symbol named my_circle. (For more information about
symbols, read Working with symbols in the Flash Professional online documentation.)
If the Library panel is not open, choose Window > Library to access it. The new symbol is now listed in the Library panel.
(When you drag a copy of the symbol from the Library panel to the Stage, the copy on the Stage is called an instance of the
symbol.)
Animating the circle
In this section, you'll use the symbol in your document to create a basic animation that moves across the Stage:
1. Select the circle on the Stage and drag it off the Stage area to the left (see Figure 11).

7/28/2019 Creating Your First Flash Professional CS5 Document
http://slidepdf.com/reader/full/creating-your-first-flash-professional-cs5-document 8/16
Figure 11. Reposition the instance of the my_circle symbol to the left of the Stage area.
2. Right-click the circle instance on the Stage and choose the option to Create Motion Tween in the menu that appears.
Notice that the Timeline is automatically extended to Frame 24 and the red marker (the current frame indicator, also
known as the playhead) moves to Frame 24 (see Figure 12). This indicates that the Timeline is prepared for you to edit
the ending location of the symbol and create a one-second animation — assuming that you haven't changed default frame
rate for the project from 24 fps in the Property inspector. A span of 24 frames is the equivalent of one second at a rate of
24 fps. (For more information about the Timeline, read Working with timelines in the Flash Professional onlinedocumentation.)
Figure 12. The Create Motion Tween operation automatically extends the frames in the Timeline and places the playhead on Frame 24.
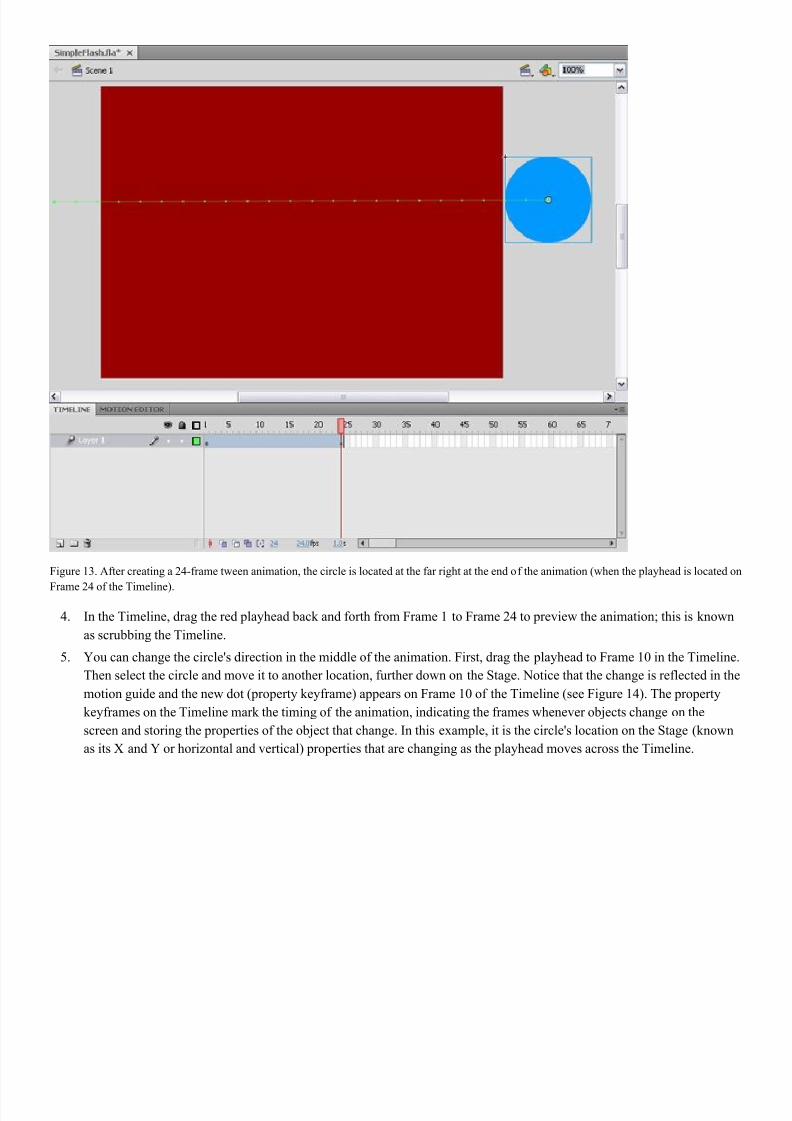
3. While the playhead is still on Frame 24 of the Timeline, select the circle instance on the Stage and drag it to the right, just
past the Stage area. This step of relocating the instance creates a tweened animation. On Frame 24, notice the diamond-
shaped dot (known as a property keyframe) that appears. On the Stage, also notice the motion guide that indicates the
circle's path of motion between Frame 1 and Frame 24 (see Figure 13).
7/28/2019 Creating Your First Flash Professional CS5 Document
http://slidepdf.com/reader/full/creating-your-first-flash-professional-cs5-document 9/16
Figure 13. After creating a 24-frame tween animation, the circle is located at the far right at the end of the animation (when the playhead is located on
Frame 24 of the Timeline).
4. In the Timeline, drag the red playhead back and forth from Frame 1 to Frame 24 to preview the animation; this is known
as scrubbing the Timeline.
5. You can change the circle's direction in the middle of the animation. First, drag the playhead to Frame 10 in the Timeline.
Then select the circle and move it to another location, further down on the Stage. Notice that the change is reflected in the
motion guide and the new dot (property keyframe) appears on Frame 10 of the Timeline (see Figure 14). The property
keyframes on the Timeline mark the timing of the animation, indicating the frames whenever objects change on the
screen and storing the properties of the object that change. In this example, it is the circle's location on the Stage (known
as its X and Y or horizontal and vertical) properties that are changing as the playhead moves across the Timeline.

7/28/2019 Creating Your First Flash Professional CS5 Document
http://slidepdf.com/reader/full/creating-your-first-flash-professional-cs5-document 10/16
Figure 14. After placing the playhead on Frame 10 and dragging the circle instance down on the Stage, the motion guide of the tweened animation
and the property keyframe in the Timeline reflect the location change of the animated circle.
6. Experiment with editing the animation by changing the shape of the motion guide path. Click the Selection tool in the
Tools panel and then click a section of the motion guide line. Drag it to bend the line shape (see Figure 15). When you
bend the motion path, you cause the animation to follow along a smooth curved line instead of a rigid straight line.

7/28/2019 Creating Your First Flash Professional CS5 Document
http://slidepdf.com/reader/full/creating-your-first-flash-professional-cs5-document 11/16
Figure 15. Use the Selection tool to adjust the tweened animation's motion path; rather than a straight line the edited motion guide line is now curved.
7. Choose Control > Test Movie to test the FLA file and watch the animation play back in Flash Player.
8. The movie loops automatically, so you can watch the circle move across the window repeatedly. When you are finished,
close the Test Movie window.
Using a stop action to stop the Timeline from looping
When you tested the movie, the animation loops by default as the movie plays in Flash Player. This occurs automatically
because in Flash Professional, the Timeline is set up to loop back to Frame 1 after exiting the last frame — unless you instruct
the movie to do otherwise. When you want to add a command that controls the Timeline, you'll add ActionScript code to a
keyframe (indicated by a dot symbol) on the Timeline. This is known as adding a frame script.
Tip: Keyframes are used to place ActionScript and assets on specific frames in the Timeline. When you review the Timeline of a FLA file, you can locate scripts and content by looking for the keyframe dots. Keyframes that have frame scripts display a
lower case "a" symbol.
Follow the steps below to add ActionScript code to your FLA file. You'll add one of the most common Timeline commands,
which is called the stop action:
1. It's always a good idea to name your layers if you have more than one. A large project can quickly become unmanageable
if its layers are not descriptively named. Double-click the name to rename Layer 1. In the field that appears, enter the new
name: animation.
2. Click the New Layer button (page icon) in the lower left of the Timeline panel. In an ActionScript 3 file, the ActionScript
code must be added to the Timeline. It's considered best practice to create a layer named actions at the top of the layer stack, dedicated to holding the ActionScript code. Rename the new layer you just created to:actions. Make sure it is
located above the animation layer. Now that you've created a layer to place your scripts, you can add keyframes to the
actions layer to associate the ActionScript code with specific frames.
3. Move the playhead to Frame 24. Click the actions layer at Frame 24 (to highlight the last frame on the actions layer).
Insert a keyframe on Frame 24 of the actions layer by choosing Insert > Timeline > Keyframe (or pressing F6). Notice
that an empty, blank keyframe appears (you can tell that the new keyframe doesn't contain any graphics because the dot
icon for the keyframe is hollow, rather than displaying a solid color).

7/28/2019 Creating Your First Flash Professional CS5 Document
http://slidepdf.com/reader/full/creating-your-first-flash-professional-cs5-document 12/16
4. Select the new keyframe with the Selection tool. Open the Actions panel (Window > Actions). The Actions panelcontains
the Script window, which is a large text field you'll use to type or paste ActionScript code directly into your FLA file.
Place your cursor in the text area next to the number 1 (line 1) and type in the following action:
stop();
Note: This step assumes that you're using the default mode of the Actions panel. If the Actions panel is in Script Assist mode, it
won't allow you to type directly into to the text area. To return to the default mode, uncheck the magic wand icon in the upper
right corner of the Actions panel.
5. After typing the line of ActionScript code in the Script window, you'll notice that a little "a" icon appears above the
keyframe in the actions layer of the Timeline. This indicates that the keyframe contains a frame script (also known as
an action). At this point, your Timeline should look similar to Figure 16. Close the Actions panel. If you need to edit the
code, you can always select the keyframe in the Timeline and then open the Actions panel again.
6. Choose Control > Test Movie to test the FLA file and watch it play in Flash Player. Notice that this time, the
animationdoesn't loop. You can return to Flash and test the movie again to watch the movie play again.
Figure 16. Add the stop action frame script to Frame 24 of the actions layer.
7. When you are finished previewing the animation, close the Test Movie window.
8. Back in Flash, save the FLA file.
Publishing SWF files
When you are finished creating your FLA file, and you've tested it repeatedly, you are ready to publish it. The files that you
output when publishing can be uploaded to a host server so that the project can be viewed in a browser. When you publish the
file, Flash Professional compresses the data in the FLA file and generates a much smaller, more compact (and non-editable)
SWF file. It's important to note that the FLA is your master, authoring file. Always keep the FLA file handy in case you need to
make changes to the project. The SWF file that is generated by Flash when you publish a project is the file that you'll embed in
a web page. If you are familiar with Adobe Photoshop, you can think of the FLA file as the equivalent of a master PSD file, and
the SWF file as the equivalent of the exported JPEG file that will be inserted on a web page.
While you can choose to edit the publish settings and only publish the SWF file (and then use Adobe Dreamweaver or another HTML editor to insert the SWF file in a page) the Publish command makes things even easier. You can set the publish settings
to automatically generate an HTML file that contains the code to embed the SWF file for you.
Follow these steps to publish the FLA file and output the SWF file with the HTML file, so that you can view the published
project in a browser:
1. Choose File > Publish Settings.
2. In the Publish Settings dialog box, select the Formats tab. Verify that only the Flash and HTML options are selected (see
Figure 17). This selection causes Flash to publish only the SWF file and an HTML file with the embed code. The HTML
file is used to display the SWF file in a web browser. (The web browser then calls Flash Player, an installed plug-in, to
render the contents of the SWF file onscreen).

7/28/2019 Creating Your First Flash Professional CS5 Document
http://slidepdf.com/reader/full/creating-your-first-flash-professional-cs5-document 13/16
Figure 17. Select the Flash and HTML options in the Formats tab of the Publish Settings dialog box.
3. In the Publish Settings dialog box, select the HTML tab and verify that Flash Only is selected in the Template pop-up
menu (see Figure 18). This template creates a simple HTML file that contains only your SWF file when previewed in a
browser.

7/28/2019 Creating Your First Flash Professional CS5 Document
http://slidepdf.com/reader/full/creating-your-first-flash-professional-cs5-document 14/16
Figure 18. Select Flash Only from the Template menu in the HTML tab of the Publish Settings dialog box.
4. Click OK.
5. Choose File > Publish to export the web-ready SWF and HTML files from Flash.
6. Open your web browser. Choose File > Open. Navigate to the folder where you saved your FLA file. The
SimpleFlash.swf and SimpleFlash.html files have been saved there. (By default, Flash always saves the published files inthe same folder alongside the FLA master file.) Select the file named SimpleFlash.html.
7. Click Open. The SWF file embedded in the HTML page now appears in the browser window (see Figure 19).
Figure 19. The file SimpleFlash.swf is an example of a basic Flash animation, which appears in the browser after publishing the file. (Click the
button to replay the movie.)
You've successfully completed your first FLA file. To learn more about publishing your document, read the Publishing and
Exporting section in the Flash Professional online documentation.
Adding a replay button to restart the animation
In an earlier section, you stopped the animation from looping by adding a
stop() action to the last frame of the Timeline.
When the playhead reaches the last frame, it is instructed to stop, which prevents it from looping back to Frame 1.
In this set of instructions, you'll learn how to add a Replay button. When a user clicks the button, it causes the playhead to begin
playing from Frame 1 again. This is the behavior of the example shown in Figure 19.
Flash is extremely flexible. There are many strategies that you could use to create a Replay button, including restarting the
playhead when a user presses a key on their keyboard, or when they click on the Stage, or when they click a button. To achieve
any of these options, you'll add some ActionScript code that responds to the user interactivity at runtime (while the SWF file is
playing). This section is a little more advanced than the previous sections — it covers some new concepts that you'll use to
control the behavior of your Flash movies with programming.

7/28/2019 Creating Your First Flash Professional CS5 Document
http://slidepdf.com/reader/full/creating-your-first-flash-professional-cs5-document 15/16
Follow these steps to add a Replay button and the corresponding ActionScript to your file:
1. In Flash, it is a best practice to create a new layer for each element in the project (with the exception of ActionScript
code, which can be placed on any frame on the top-level actions layer). Click the New Layer button (page icon) in the
Timeline to create a new layer for the button graphic. Double-click the default layer name and rename it:Button.
2. Open the Components panel (Window > Components) and drag a button component from the UI Components folder to
the Stage. Position the button in the lower middle of the Stage area, or any desired location.
3.
While the Button component still selected, open the Property inspector and locate the text field at the top named<Instance Name>. Enter the name for the button instance: replay_btn. This is an important step. By naming the button
instance, you'll be able to reference it by name using the ActionScript you'll add to the project. If the button instance's
name does not exactly match the button's name specified in the code, the behavior won't function as expected.
Note: One of the most common mistakes is to enter the name of a frame label, rather than entering the instance name of
an object on the Stage. Be very careful to always select the object on the Stage first. Then you can access the Property
inspector to check that the panel refers to the selected symbol and indicates that an instance is selected. Verify that the
field says "<Instance Name>" before you type the name of the instance. If the Property inspector refers to a frame, it
means you've accidentally clicked the Timeline. Naming instances can be confusing until you are familiar with the
options presented for selected symbol instances and selected keyframes. One thing to check: If you accidentally enter a
name in the Property inspector while a keyframe is selected (instead of an object on the Stage), you'll see a red flag iconappear in the Timeline on the keyframe. Frame labels can be very helpful when creating navigation that jumps to different
frames in the Timeline; for this example, however, it is critical that you select the button on the Stage and enter the
instance name of the button in the button layer as replay_btn. Also make sure there are no typos; otherwise the script will
not work.
4. To update the text label of the button that is displayed on the Stage, enter the text Replay into the label field in the
Component Parameters area in the Properties panel. This label helps users understand what the button will do. It is purely
visual and does not affect the performance of the code. If you'd prefer that the button display a different label, you could
enter Rewind, Again, or a different label of your choosing.
5. Select the keyframe on Frame 1 of the actions layer. Open the Actions panel (Window > Actions). Copy the code snippet
below and paste it into the Script window:
import flash.events.MouseEvent;
function onClick(event:MouseEvent):void
{
gotoAndPlay(1);
}
replay_btn.addEventListener(MouseEvent.CLICK, onClick);
6. Take a few moments to read through the code. Notice that the second line begins by declaring a function
namedonClick. The last line of code uses the addEventListener method, which registers the function as an "event
listener" for the button's "click" event. The translation of this code essentially says: "When a user clicks the button named
replay_btn, run the function named onClick. When the onClick function runs, it instructs the playhead to jump toFrame 1 of the Timeline and begin playing the frames."
This is the standard format used when writing ActionScript 3; one section checks for user interactivity (such as a mouse
click) and that triggers another function to respond to timing cues from objects in Flash Player. In this case, the event
handler function instructs Flash Player to return to Frame 1 and start playing the Timeline again. (You'll use a similar
syntax of creating an event handler function and assigning it to a button instance any time you create an interactive button
in Flash.)
Tip: You can use the Code Snippets panel as a shortcut when adding events to buttons.
7. Choose Control > Test Movie to test the FLA file. The animation plays once and then stops. Click the Replay button to
restart the animation and watch the circle move across the Stage again.
8. Close the Test Movie window and save your FLA file.
Where to go from here
There are many online resources you can use to learn more about working with Flash Professional:
The Getting Started section in the Flash Developer Center outlines where to go next, depending on your interests and
goals.

7/28/2019 Creating Your First Flash Professional CS5 Document
http://slidepdf.com/reader/full/creating-your-first-flash-professional-cs5-document 16/16
The Learn Flash Professional show on Adobe TV provides an entire set of video tutorials that illustrate what you can do
with Flash.
The Flash Professional online documentation includes the instructions on how to use the features and includes links to
related videos and tutorials to achieve specific tasks.
The Flash community forum is helpful for researching questions and learning techniques from other Flash developers;
always search before submitting new posts, because there is a wealth of posted information that you can use to find
solutions to common questions.