Embed Size (px)
Citation preview

Creating Web Services using HATS 1
Creating Web Services using IBM Rational HATS
For IBM System z (3270)

Creating Web Services using HATS 2
Lab instructions
This lab teaches you how to use IBM Rational HATS to create web services that expose logic contained in a System z 3270 application. You will learn how to create a HATS project, record a macro to navigate through the screens of the transaction, generate a Java bean wrapper for the macro, and to create SOAP-based web services and RESTful web services using the tooling provided in the Rational Software Development Platform. Once the web services are built, you will learn how to test those services.
Please report any issues or problems with this lab to Jude Hung ([email protected]).
Learning objectives
♦ Use the HATS Toolkit to create a web project capable of containing the web services
♦ Use the HATS Host Terminal to record a macro
♦ Use the Visual Macro Editor to enhance a macro
♦ Create an Integration Object Java class that drives the macro
♦ Create SOAP-based web services that calls the Integration Object
♦ Test SOAP-based web service
♦ Create RESTful web services that calls the Integration Object
♦ Test RESTful web services
Total time: 120 minutes
Skill level
Introductory
Audience
Programmer
Requirements
♦ IBM Rational Application Developer v8.0 (or above)
♦ IBM Rational Host Access Transformation Services (HATS) v8.0
♦ Mozilla Firefox v3.0 or above
♦ Internet connection
Prerequisites
♦ Basic IDE skills
♦ Basic understanding of terminal applications
Conventions used in this lab

Creating Web Services using HATS 3
♦ Bold font for user interface controls ♦ Mono-spaced font for user input and code blocks ♦ Italic font for variable names and glossary terms
Glossary
Macro - automates interactions with the host. Macros can send commands to the host, enter data into entry fields, extract data from the host, and be used to navigate screens on behalf of the user. Macros are created in either the HATS Host Terminal or the Visual Macro Editor.
Integration Object - a Java bean that encapsulates an interaction with a host screen or a series of host screens. Integration Objects are constructed from macros and can be included in web services or HATS EJB projects.
Web service – an operation that can be published, located, and invoked programmatically over the web. A HATS web service drives a HATS Integration Object, which invokes a HATS macro.
Creating a HATS project and macro
This module will teach you how to create a HATS project and macro. From within the Host Access Transformation Services perspective, you can launch the wizard to create a new project. You will use the Host Terminal to record the initial “main path” macro. In the next module, you will use the Visual Macro Editor to enhance the macro.
Starting HATS
1. From your desktop click Start > Programs > IBM Software Delivery Platform > IBM Rational HATS V8.0 > HATS Toolkit.
A dialog appears asking you for the workspace location. The workspace contains your projects and files. You can accept the default or use different workspace for this tutorial (such as C:\MyHatsLab). You can always start with a new workspace later, if you don’t want to mix this tutorial with your real work.
2. Click OK.

Creating Web Services using HATS 4
After a few moments of loading, the workbench opens, and the HATS welcome page appears.
Creating the project
1. Click the New HATS Project link on the HATS Projects view to launch the new project wizard.

Creating Web Services using HATS 5
2. In the Name field, type the name HATS3270SOA. 3. Select the Web deployment radio button since HATS web services are hosted in a web project. 4. Select WebSphere Application Server v8.0 from the Target server drop-down.
Note: if WebSphere Application Server v8.0 is not listed, you may select any other WebSphere server type.
5. In the Enterprise application project field, type the name HATS3270SOA_EAR8. This will ensure there are no conflicts when you deploy your application to the server later.
Your panel will look like this:

Creating Web Services using HATS 6
6. Click Next to display the Connection Settings panel.
The Connection Settings panel enables you to setup the connection to your 3270 or 5250 system. Your web service will use this connection to communicate with the host application.
7. In the Host name field, type zserveros.demos.ibm.com 8. Select 3270E from the Type field 9. Specify 22 for the Port field and accept the default values for the Code page, and Screen size.
Your panel will look like this:
10. Click Next for the next two pages to accept the default values, and Finish to create the project.
After a few minutes, the new project will appear in the HATS Projects view and the Project Settings editor for the project will open.
Note: Before proceeding, please check with your lab instructor (if applicable) for updated connection settings, or refer to Setting up a secure connection in HATS Toolkit for the connection information.
For the user name and password, see IBM Host Integration Demos.

Creating Web Services using HATS 7
Lesson checkpoint
In this section, you learned how to:
♦ Start the HATS toolkit
♦ Create a new HATS project
Creating the macro
A macro is a script that defines a flow through screens in your application. Typically a macro is responsible for performing a very specific task. For example, you might record a macro that collects information about a customer based on a supplied customer identification number (this happens to be the scenario described in later steps of this tutorial). Macros can be input only, output only, input and output, or purely navigational. The input and output you define in a macro will be the input and output of your eventual web service.
For this tutorial, you will create a macro that signs in, navigates to a customer account application, and retrieves information about a customer.
This tutorial describes using the HATS Host Terminal to record the macro. Macros can also be created using the HATS Visual Macro Editor, or VME, but the Host Terminal allows you to more quickly create the main flow of your macro. Later in this tutorial you will use the VME to add error handling to your macro.
1. In the HATS Projects view, right-click on your project’s folder and select Open HATS Host Terminal then select the Main host connection. This will open an emulator session to your system.
You will see the welcome screen:

Creating Web Services using HATS 8
2. To start recording the macro, click the Record Macro button on the toolbar.
3. In the Name field, type getCustomerInformation. Macro names should reflect the operation being performed.
4. Check the Create screen captures automatically while recording checkbox. When this option is enabled, HATS takes a capture of each screen while recording the macro and saves it in your project. This makes it easy to tweak screen recognition criteria or add new screen actions when using the Visual Macro Editor.
Your panel will look like this:

Creating Web Services using HATS 9
5. Click Finish.
For the first screen in a macro, HATS asks you to define its screen recognition. You should see this panel:

Creating Web Services using HATS 10
6. In the Screen name field, type Welcome. This will make it easier to understand the flow of your macro later when you edit it in the Visual Macro Editor.
7. Accept the default selections on this panel and click Finish.
The Host Terminal is now in record mode. This means that every keystroke you make (in the terminal area) is recorded in the macro.
8. In the Selection field, type CICSA (your cursor should already be positioned in this field). 9. Press the ENTER key.
Notice HATS has recorded your keystrokes and shows the structure of your macro at the left side of the terminal window:
You will see the Signon to CICS screen.

Creating Web Services using HATS 11
10. On the Signon to CICS screen, click the Define Screen Recognition Criteria button on the toolbar to name the screen and defines its recognition criteria.
11. In the Screen name field, Signon.
The default screen recognition region is sufficient.
12. Click Finish. 13. In the Userid field, type atdemo. Tab twice to get to the password field and type demo4you. 14. Press the ENTER key to navigate the host terminal to the Sign-on is complete screen.
You should now be at the Sign-on is complete screen.
15. Click the Define Screen Recognition Criteria button to supply a new name for the screen. 16. In the Screen Name field, type SignOnComplete. 17. Rope off the text “DFHCE3549 Sign-on is complete (Language ENU).” at the bottom left of the
screen. This tells HATS to identify this screen using this text. 18. Select the At a specified position option (this tells HATS to look for the selected text within the
roped off area.)
19. Click Finish.

Creating Web Services using HATS 12
20. At the top of the screen, type menu and press the ENTER key.
You should now be at the OPERATOR INSTRUCTIONS screen:
21. Click the Define Screen Recognition Criteria button to supply a new name for the screen. 22. In the Screen Name field, type OperatorInstructions and click Finish.
Because the purpose of this macro is to gather customer information based on a supplied customer number, you will use the INQY transaction.
23. In the TRANSACTION field, type INQY.
Note that HATS is still recording every keystroke you make and is showing a representation of your macro on the left side of the terminal window.
Your cursor should now be at the beginning of the NUMBER field.
A prompt action is responsible for populating a field from a value supplied by a user (or by a caller of the macro). Think of a prompt as an input variable into a macro. For this macro, the prompt value will be the customer number, and will be supplied via an input parameter to the web service.
24. Click the Add Prompt Action button on the toolbar.

Creating Web Services using HATS 13
25. In the Name field, type customerNumber since this prompt value will reflect some customer number supplied by the user.
Your panel should look like this:
26. Most of the other settings on this panel do not apply when building a macro for a web service. Click OK to add the prompt. The prompt action will appear in the Macro Navigator tree on the left side of the terminal window:
In order for HATS to continue recording the macro after adding a prompt, HATS will prompt you for a value for the prompt action and fill the value you supply into the field.
27. In the Enter a value field, type the value 100000 (this is a valid customer number) and click OK.
You will notice this value is inserted into the Custom inquiry field.
28. Press the ENTER key to submit the customer number to the application.
You should now be at the File Inquiry screen.
29. Click the Define Screen Recognition Criteria button to supply a new name for the screen. 30. In the Screen Name field, type FileInquiry. 31. Rope off the text “FILE INQUIRY” in the top of the screen. This tells HATS to identify this screen
using this text. 32. Select the At a specified position option (this tells HATS to look for the selected text within the
roped off area.) 33. Click Finish.
Extract actions are responsible for pulling data from fields on the screen and exposing the data as outputs on the web service. Although we could add extract actions for each of the important fields on this screen using the Host Terminal, we will only add one extract action now and add the rest using the Visual Macro Editor later.
Use your mouse to rope off the Customer Name field:

Creating Web Services using HATS 14
34. Click the Add Extract Action button on the Host Terminal toolbar to open the Add Extract dialog.
35. In the Name field, type customerName.
36. The values in the position group should match the values shown in the screen shot above. Make any necessary changes and click Finish.
You now have an extract action that will, when the macro is played, pull the contents of the customer name field into a variable.
You will now exit out of the application, sign off, and return to the Welcome screen. In general, it is recommended to name each screen in your macro. In order to save time, however, you will not be instructed to do this for each screen.
37. Press the ENTER key on the File Inquiry screen. 38. Press the ESC key on the OPERATOR INSTRUCTIONS screen. 39. Type cesf logoff on the blank screen
You should now be back at the Welcome screen.

Creating Web Services using HATS 15
40. Click the Stop Macro button on the Host Terminal to stop recording. If prompted to define exit screen criteria for the macro, accept the defaults and click Finish.
41. Click the Save Macro button on the Host Terminal to save the macro.
You have created a macro that signs on, navigates to a customer information application, populates the customer number field with a supplied prompt value, navigates to the customer detail screen and extracts the contents of the name field into a variable, and then navigates back to the sign on screen.
Lesson checkpoint
In this section, you learned how to:
♦ Use the HATS Host Terminal to record a macro
♦ Define the screen recognition and name for a screen in the macro
♦ Add a prompt action in order to fill in a host input field
♦ Add an extract action in order to extract the contents of a field
Testing the macro
To confirm the macro works as expected, you will play it back using the Host Terminal. You should already be at the Sign On screen of the system.
1. Click the Play Macro button on the Host Terminal toolbar.
HATS will display a dialog asking you to supply values for all prompt actions defined in the macro. Since you only added one prompt action (for the customer number), you will only be asked to supply one value:

Creating Web Services using HATS 16
2. In the Value column, type 100000 and click OK. Later in the tutorial you will learn how to handle the scenario where an invalid customer number is supplied.
HATS will navigate the screens using the keystrokes you previously recorded and will populate the customer number field with the value you supplied. On the customer detail screen, the extract action you created previously will extract the data from the customer name field. HATS will show the extracted data and continue playing the macro.
The Extract Results window will show “M. ADAMS” (since this is the name of the customer with the number 100000). The terminal, which is beneath the Extract Results window, should be on the Welcome screen.
3. Close the Extract Results window by clicking the X in the upper right corner. 4. Click the Disconnect button on the Host Terminal to disconnect the session.
5. Click the X at the upper right corner of the window to close the terminal window.
Enhancing the macro using the Visual Macro Editor
The HATS Visual Macro Editor, or VME, is a graphical tool for creating new macros from scratch or enhancing macros recorded with the HATS Host Terminal. With the VME, you can add new screens, flows, and actions to your macros. For this tutorial you will record an alternate flow for the scenario where an invalid, or non-existent, customer number is supplied. You will also use the VME to easily add multiple extract actions for fields on the customer details screen.
Creating Web Services using HATS 17
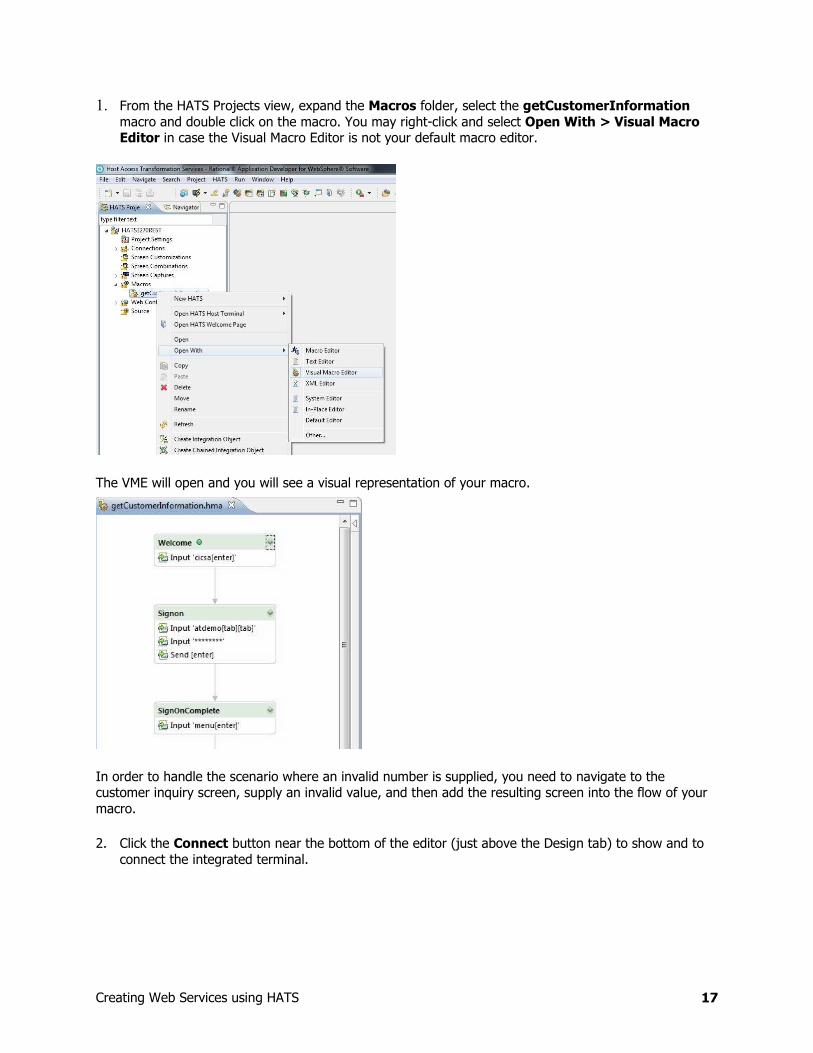
1. From the HATS Projects view, expand the Macros folder, select the getCustomerInformation macro and double click on the macro. You may right-click and select Open With > Visual Macro Editor in case the Visual Macro Editor is not your default macro editor.
The VME will open and you will see a visual representation of your macro.
In order to handle the scenario where an invalid number is supplied, you need to navigate to the customer inquiry screen, supply an invalid value, and then add the resulting screen into the flow of your macro.
2. Click the Connect button near the bottom of the editor (just above the Design tab) to show and to connect the integrated terminal.

Creating Web Services using HATS 18
Unless your monitor is set to a high screen resolution, you may want to double-click the getCustomerInformation.hma editor tab at the top of the workbench window to maximize the editor. Your display will look like this:
3. Click the Play button on the integrated terminal toolbar to play the macro. 4. Just like in the Host Terminal, HATS will prompt you to supply a value for the customerNumber
prompt. Supply an invalid value, such as 5 and click OK.
HATS will play the macro and supply the customer number into the appropriate field, but the macro will stall because it’s waiting for the FILE INQUIRY screen to appear after the OPERATOR INSTRUCTIONS screen. Notice the error message in the middle of the screen. You will add this screen into the flow of the macro in order to handle this error scenario.

Creating Web Services using HATS 19
Note: if you wait for 60 seconds, HATS will show a Macro Play Error messages because the Customer Detail screen never appears (and your macro expects this screen after the Customer Inquiry screen).
5. If the macro is still playing (well, waiting), click the Stop button on the toolbar to stop the playback.
You will now update the macro to handle the case where this error screen appears on the Customer Inquiry screen. This screen only appears if an invalid number is supplied.
6. While on the screen with the error message, click the Add Screen button on the integrated terminal toolbar to open the Add Screen wizard.
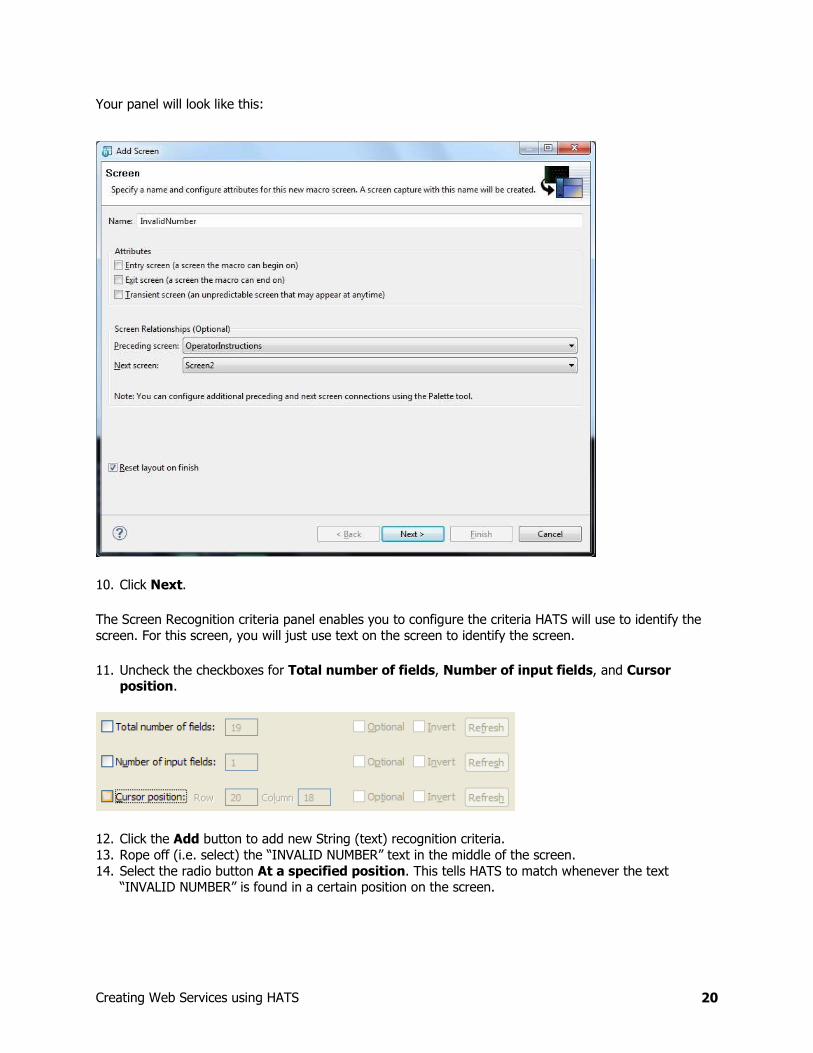
7. In the Name field, type InvalidNumber. 8. From the Preceding screen drop-down, select the OperatorInstructions screen. This tells the
HATS to wire this new screen as a possible option after ENTER is sent on the OPERATOR INSTRUCTIONS screen.
9. From the Next screen drop-down, select the Screen2 screen.
Creating Web Services using HATS 20
Your panel will look like this:
10. Click Next.
The Screen Recognition criteria panel enables you to configure the criteria HATS will use to identify the screen. For this screen, you will just use text on the screen to identify the screen.
11. Uncheck the checkboxes for Total number of fields, Number of input fields, and Cursor position.
12. Click the Add button to add new String (text) recognition criteria. 13. Rope off (i.e. select) the “INVALID NUMBER” text in the middle of the screen. 14. Select the radio button At a specified position. This tells HATS to match whenever the text
“INVALID NUMBER” is found in a certain position on the screen.

Creating Web Services using HATS 21
15. Click OK.
Your panel should look like this:
16. Click Next to show the Actions panel.
The actions panel enables you to control what HATS does when this screen is encountered. When recording the macro in the Host Terminal, HATS created Input actions for all sequences of keystrokes. You also manually added Prompt and Extract actions. For this screen you will extract the error message and make it available as an output variable on the web service, and send CLEAR to the host to exit the transaction.
17. Click the Add button. 18. Select the Extract action option.

Creating Web Services using HATS 22
19. Click Next. 20. In the Name field, type errorMessage. 21. Rope off the error message on row 11.
22. Click Finish to add the action.

Creating Web Services using HATS 23
In order to properly exit the application and return on the sign on screen, we need to also send [CLEAR] command to the host.
23. Click the Add button. 24. Select the Input action option. 25. On the Input panel, tab to the String input field, click the drop down, and choose [clear].
26. Click Finish to add the action.
You should see this panel:
This indicates that a single extract action will be performed when this screen is encountered and that the [clear] command will be sent.
27. Click Finish to add the screen.

Creating Web Services using HATS 24
Notice how the VME has wired the new screen, InvalidNumber, as a possible path after the OperatorInstructions screen and as a preceding screen of Screen2, which will allow the macro to properly exit the application and sign off.
In the design area, click the OperatorInstructions screen.
Notice a “1” and “2” appear above the lines connecting the two possible next screens after the OperatorInstructions screen. These numbers indicate the order in which HATS will evaluate the recognition criteria defined in these screens when playing the macro. Since the FileInquiry screen has a higher priority number (1 vs. 2), HATS will first look to see if this screen appears after ENTER is pressed on the OPERATOR INSTRUCTIONS screen. If it doesn’t appear, HATS will look to see if InvalidNumber (i.e. a screen with “not found” on it) appears. In this case, the ordering of the next screens isn’t terribly important because both possible next screens are unique and quite different from each other. But, in other situations, the ordering of the next screens can be very important.
28. Save the macro by clicking File > Save. 29. On the integrated terminal, press the ESC key on your keyboard to send CLEAR to the host and exit
the menu transaction.

Creating Web Services using HATS 25
30. Type cesf logoff on the blank screen to log off.
You should now be back on the Welcome screen.
31. Press the Play button again to test the new flow.
You will be prompted to supply a customer number.
32. In the Value column, type 5 (or any invalid customer number).
33. Click OK.
Notice the Extract Results window shows the extracted error message. Also notice the path of the macro is highlighted in the design area of the VME. This shows you the path the macro took as it played. Also notice that the macro correctly completed exiting the host application and returning to the sign on screen.
In order to demonstrate another feature of the VME, you will learn how to add additional actions to a screen.
34. Find the FileInquiry screen in the design area, right-click it and select Properties.

Creating Web Services using HATS 26
You will see the properties dialog for the screen. This dialog enables you to change the basic properties of the screen, including its associated screen capture, screen recognition criteria, and actions.
35. Click the Actions section on the left side of the window to show the screen’s actions.
At this point you should see two actions – an extract action (to extract the customer’s name) and an input action to send the ENTER command.
You will now add additional extract actions for each of the other important fields on the FILE INQUIRY screen. Instead of manually adding each individual action, you will use the Extract all action type to add multiple actions at the same time.
36. Click the Add button. 37. Select the Extract all action type and click Next.
You will see a panel like this:

Creating Web Services using HATS 27
Notice each field on the screen is represented in the table. Default names have been generated for each extract action. Also notice the value of the field is shown in the table.
38. Check the Exclude empty protected fields and Exclude input fields checkboxes (this will limit the number of fields in the table and make it easier to find the important fields).
39. Click the Deselect all button (this will allow you to just select the fields you want to include).
You will see a panel like this:
Creating Web Services using HATS 28
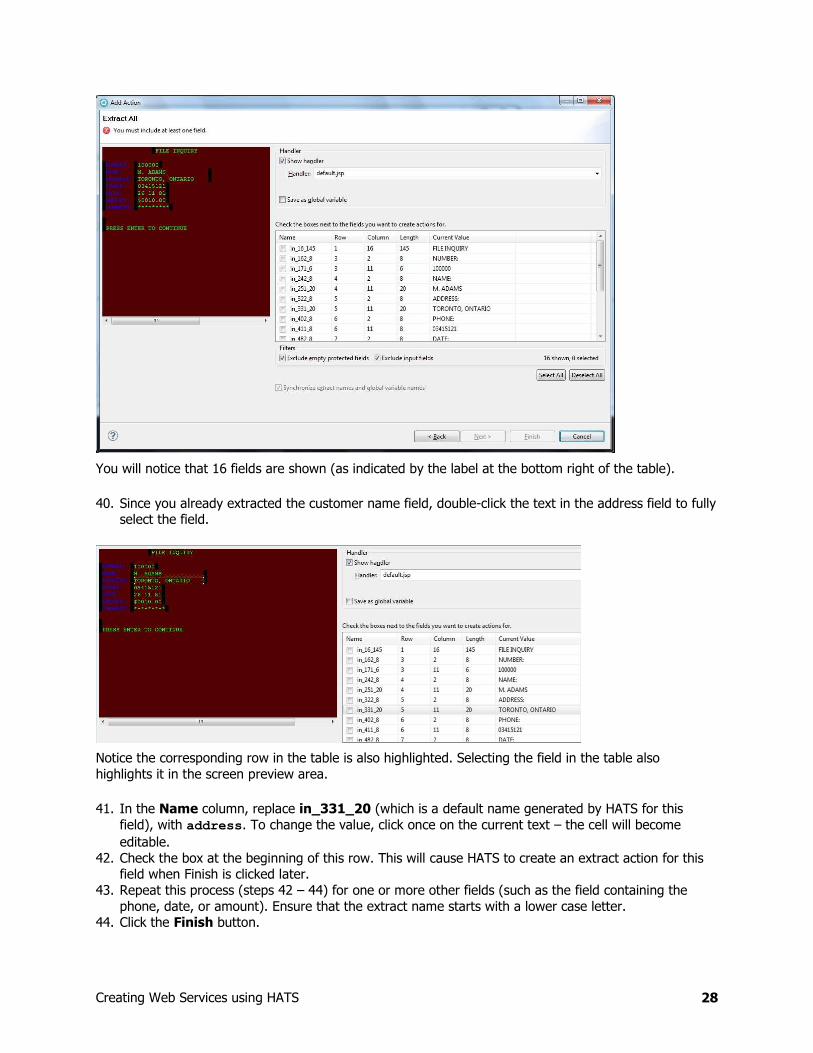
You will notice that 16 fields are shown (as indicated by the label at the bottom right of the table).
40. Since you already extracted the customer name field, double-click the text in the address field to fully select the field.
Notice the corresponding row in the table is also highlighted. Selecting the field in the table also highlights it in the screen preview area.
41. In the Name column, replace in_331_20 (which is a default name generated by HATS for this field), with address. To change the value, click once on the current text – the cell will become editable.
42. Check the box at the beginning of this row. This will cause HATS to create an extract action for this field when Finish is clicked later.
43. Repeat this process (steps 42 – 44) for one or more other fields (such as the field containing the phone, date, or amount). Ensure that the extract name starts with a lower case letter.
44. Click the Finish button.

Creating Web Services using HATS 29
HATS will ask you to confirm that you want to add X number of extract actions.
45. Click Yes.
Notice the new actions are listed in the actions table for the screen:
46. With the two actions still highlighted (selected), click the Up button to move the actions above the Input action (you want the extraction to take place before the ENTER key is pressed).
47. Click OK.
Notice the two actions are now shown in the design area:
48. Save the macro by clicking File > Save.
Optionally, you can navigate back to the sign on screen in the integrated terminal and play the macro. You will be prompted for a customer number, but, once the macro is finished, the Extract Results window will show data for each of the fields you extracted in the previous few steps. You will also have the opportunity to see the extracted data later when you test the macro in the Web Services Explorer tool.
Lesson checkpoint
In this section, you learned how to:
♦ Use the Next Screen Connection tool on the palette to draw a flow between two macro screens
♦ Use the integrated terminal to play a macro
♦ Handle an alternate flow / error condition

Creating Web Services using HATS 30
♦ Quickly extract data for multiple fields on the screen
Creating the Integration Object
A HATS Integration Object is a Java class that encapsulates a programmed interaction with a host application. Integration Objects can be used in multiple ways to integrate interaction with a host application into new Java or Web based programs. One use of an Integration Object is to provide the interaction with a host application for a Web service.
The web services you are building in this tutorial include a SOAP-based web service and a RESTful web service. Both of these Web services are intended to gather customer information from the host system based on a customer number submitted by the web service client.
You have just finished creating the macro that collects this information. Now all you need to do is tell HATS to create an Integration Object from your macro and then create web services from the Integration Object.
Creating the Integration Object
1. From the HATS Projects view, expand the Macros folder, right-click on your macro, getCustomerInformation, and select Create Integration Object.
HATS will generate the Integration Object Java class and some support files and place them in the IntegrationObject package under your Source folder.
2. Expand the Source and IntegrationObjects folders in the HATS Projects view. Look for your Integration Object now. Notice it has the same name as the macro used to create it (except the first letter has been converted to uppercase in order to maintain Java naming conventions).

Creating Web Services using HATS 31
Lesson checkpoint
In the previous sections, you learned how to:
♦ Create an Integration Object from a HATS macro
Creating the SOAP-based web service
Creating the web service support files for a SOAP-based web service
Now you will use the Integration Object to create the web service support files for the SOAP-based web service. If you would like to create RESTful web service, jump to the next section Creating RESTful web services.
Before you create the SOAP-based web service, you must first create web service support files. Web service support files are Java class files that describe methods contained in the Integration Object.
3. To create web service support files, from the HATS Projects view, right-click on your Integration Object and select Create Web Service Support Files.

Creating Web Services using HATS 32
4. In the Project field, select HATS3270SOA. 5. In the Name field, type CustomerServices. Because a web service can contain multiple
operations, the name of the service should reflect the collection of services it might contain.
Your wizard panel will look like this:
6. Click Next. 7. Ensure your Integration Object, GetCustomerInformation, is checked and click Finish. If your
project contained other Integration Objects, you could include them in the same web service. Each would be exposed as a different operation on the service.
HATS will generate the support files necessary for creating a web service using the IBM Rational Software Delivery Platform tools. Notice the new Java classes, including CustomerServices, in the webserviceclasses folder under your Source folder:
Lesson checkpoint
In the previous sections, you learned how to:
♦ Create web service support files, which are needed to create the SOAP-based web service
Creating the SOAP-based web service
You are now ready to create the SOAP-based web service, including the WSDL (Web Services Description Language). A WSDL describes a web service and its operations, including its inputs and outputs. The caller of the web service will consume this WSDL file in order to know what operations are available and inputs required for each (if applicable).
8. Select the CustomerServices file, right-click and select Web Services > Create Web service.

Creating Web Services using HATS 33
The Web Service wizard will appear. This wizard enables you to generate the actual WSDL and to select whether or not to deploy and start the service on the server. The wizard also enables you to create a sample client. For this tutorial, you will not generate a sample client since you have the ability to test the service using the Web Services Explorer.
9. Ensure the Web service type field says Bottom up Java bean Web Service. This means the Web service will be constructed from an existing Java class. Also ensure the Service implementation field says webserviceclasses.CustomerServices.
10. Ensure the first section says Start service. If not, use the slider on the left side to select Start. This section controls whether the service is just built, built and installed, or built, installed, and started.
11. Ensure the second section indicates No client since you do not need to build an actual client at this time (you will use the Web Services Explorer later to test the service).
Creating Web Services using HATS 34
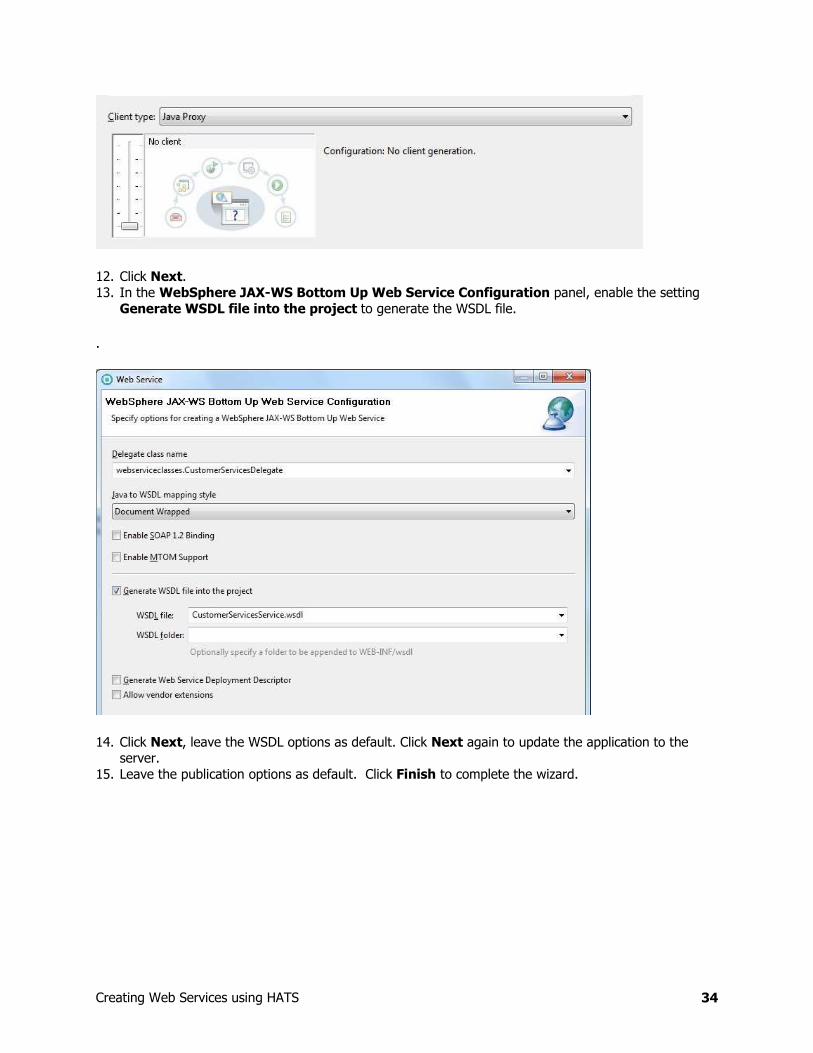
12. Click Next. 13. In the WebSphere JAX-WS Bottom Up Web Service Configuration panel, enable the setting
Generate WSDL file into the project to generate the WSDL file.
.
14. Click Next, leave the WSDL options as default. Click Next again to update the application to the server.
15. Leave the publication options as default. Click Finish to complete the wizard.

Creating Web Services using HATS 35
Your web service has been created and is installed on your local WebSphere Application Server. The next step is to test the service to confirm it works properly.
Testing the SOAP-based web service
The IBM Rational Software Delivery Platform provides the Web Services Explorer tool to test web services. In this section, you will learn how to test your web service using this tool.
16. To launch the Web Services Explorer, expand the Web Content > /WEB-INF/Web Service Definitions folder, select CustomerServices, right-click and select Web Services > Test with Web Services Explorer.

Creating Web Services using HATS 36
After a few moments, the Web Services Explorer browser window will open. You should see your getCustomerInformationProcessWS method listed.

Creating Web Services using HATS 37
17. Click the getCustomerInformationProcessWS link. In the body section, click the Add link next to arg0 to add input parameters.
18. Find the customerNumber parameter. Recall this is the name of the prompt action you added to the macro earlier. Click the Add link next to customerNumber to create the input field.
19. In the customerNumber field, supply a valid value such as 1 and click the Go button.
When the operation is called, HATS will initiate a new connection to the host system and play the macro. Prompt actions will be filled from values supplied by the caller and extract actions will collect data. Results are then displayed in the Status area.
20. In the Web Services Explorer, notice the outputs in the Status panel. Remember these are the macro extracts you created in your macro. For example, notice customerName shows the name of the customer with the supplied customer number.
Now scroll up and switch to the Source view.
21. In the Source view, notice the SOAP Request Envelope and SOAP Response Envelope. This is the actual XML that was sent and received during the operation.

Creating Web Services using HATS 38
You will now test the web service operation with an invalid customer number. Recall how you created an alternate flow for this scenario in your macro using the Visual Macro Editor.
22. Switch back to the Actions area, find the customerNumber field, type an invalid value such as 5, and click Go.
23. Switch back to the Status area, click the Form link near the top to switch to the Form view, and scroll down and find the errorMessage output parameter. Notice it shows the extracted error message.
The caller of the web service can use this information to determine what step to take next. For example, the caller might display the message to a user.

Creating Web Services using HATS 39
Lesson checkpoint
In the previous sections, you learned how to:
♦ Create a SOAP-based web service and deploy it to the server
♦ Test the web service using the Web Services Explorer
Creating RESTful web service
The Integration Object can also be used to create RESTful web services. Next, you will use the Integration Object to create RESTful web services. There are different HTTP methods and parameters that you can use to create the services. Which one you choose depends upon your specific needs. For example, if you want to expose a service to the caller for getting data, a web service using the HTTP GET method would be a good idea. In the other hand, when submitting the sensitive information to the service provider, the HTTP POST method may be more suitable. In the next section, we will create four different RESTful services using the HTTP GET method with the query/path parameter and the HTTP POST method with the entity/form parameter. You may choose your preferred section to create the service; completion of all sections is not required.
Create the RESTful web service using the HTTP GET method with the query parameter
The HTTP GET method is typically used to list the collection of resources and perhaps other details of the collection's members. Now you will learn how to create a service using the HTTP method with the query parameter. A query string is appended to the request URL with a leading "?" and then name/value pairs. To create the service, right-click on your Integration Object and select Create RESTful Service Files.
1. In the Name field, type GetCustInfoService1.
Your wizard panel will look like this:
2. Click Next. 3. In the URI Suffix field, enter the URI suffix to which you want to map the resource class. Type
get_cust_info_1.
You will see the panel like this:

Creating Web Services using HATS 40
4. Click the Add button to add a HTTP method for the service. 5. In the HTTP Method field, select GET.
6. Click Next twice to go to the Configure JAX-RS resource method panel.
You will see this panel:

Creating Web Services using HATS 41
7. Notice that QueryParameter is chosen by default. Click Finish to return to the Configure Jax-RS Resource class panel.
8. Click Finish to create the service class files.
Now you have created a service that uses HTTP GET method with the query parameter. The query parameter specified will be used as the input in the Integration Object. The web service client may use an URL similar to the sample as below to access the service:
http://your.host.name:9080/HATS3270SOA/rest/get_cust_info_1?customerNumber=100000
You may go on to next sections to create another service or jump to �Testing RESTful web services
�
to test your service.
Create the RESTful web service using the HTTP GET method with the path parameter
9. You may also create the service using the HTTP method with the path parameter. When using path parameters, you specify parameters in the request URL. To create the service, right-click on your Integration Object and select Create RESTful Service Files.
10. In the Name field, type GetCustInfoService2.
Your wizard panel will look like this:

Creating Web Services using HATS 42
11. Click Next. 12. In the URI Suffix field, type get_cust_info_2.
You will see the panel like this:
13. Click the Add button to add a HTTP method for the service. 14. In the HTTP Method field, select GET.
15. Click Next twice to go to the Configure JAX-RS resource method panel. 16. In the URI Suffix field, enter the suffix you want to add to the URI for mapping this method to your
JAX-RS resource. Type {customerNumber}. 17. Edit the method parameter customerNumber then select the parameter type to PathParam. 18. Click OK.

Creating Web Services using HATS 43
You will see the panel like this:
19. Click Finish to return to the Configure Jax-RS Resource class panel. 20. Click Finish to create the service class files.
Now you’ve created a service that uses HTTP GET method with the path parameter. The path parameter specified will be used as the input in the Integration Object. The web service client may use an URL similar to the sample as below to access the service:
http://your.host.name:9080/HATS3270SOA/rest/get_cust_info_2/100000
You may go on to next sections to create another service or jump to �Testing RESTful web services
�
to test your service.
Create the RESTful web service using HTTP POST method with the entity parameter
21. The HTTP POST method is typically used to create a new entry in the collection. The new entry's URL is assigned automatically and is usually returned by the operation. In addition, the HTTP POST requests may be used in the service and include parameters in the POST body when passing sensitive information or long/complex parameters to the server. There are two types of parameter that you can use in the service using the HTTP POST method: the entity parameter and the form parameter. Now you will learn how to create the service using HTTP POST method with the entity prarmeter. To create the service using HTTP POST method with the entity prarmeter, right-click on your Integration Object and select Create RESTful Service Files.
22. In the Name field, type GetCustInfoService3.

Creating Web Services using HATS 44
Your wizard panel will look like this:
23. Click Next. 24. In the URI Suffix field, type get_cust_info_3.
You will see the panel like this:
25. Click the Add button to add a HTTP method for the service. 26. In the HTTP Method field, select POST.
27. Click Next twice to go to the Configure JAX-RS resource method panel. 28. If the resource is using HTTP POST method (or PUT method) in the service, you can specify the
content type of request message in the Consumes field. You may specify multiple formats with a comma, such as application/xml, application/json. In this tutorial, keep the default value in the field.
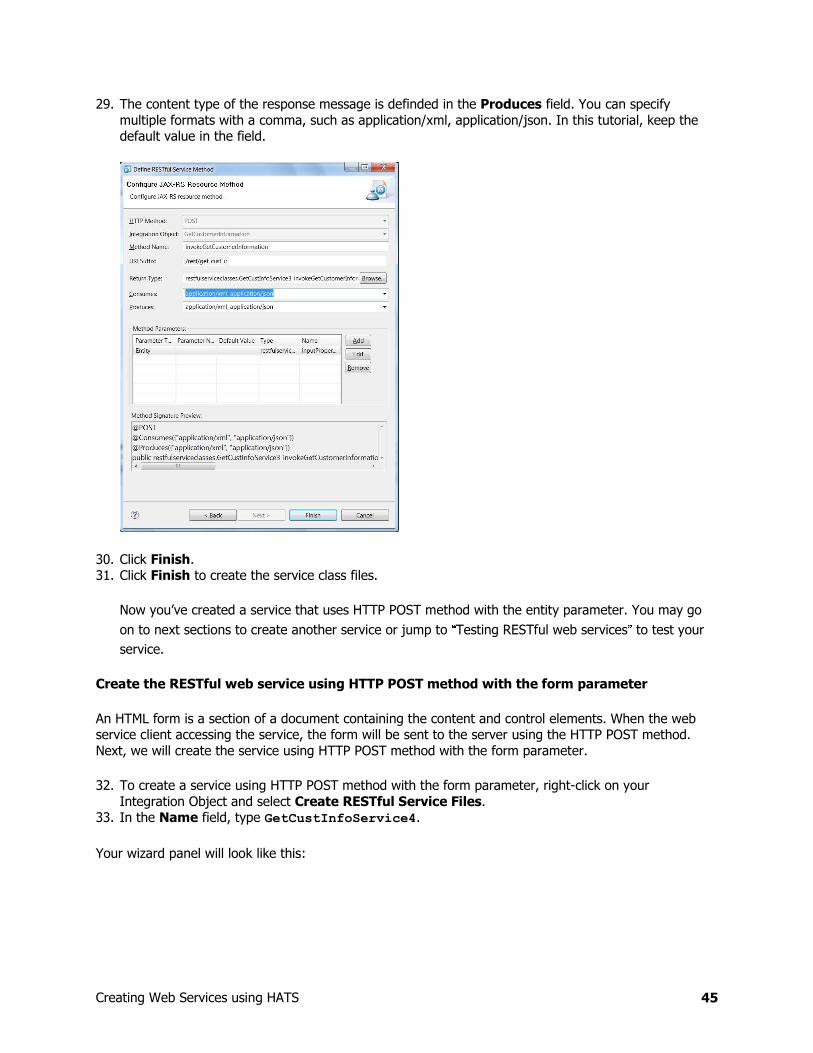
Creating Web Services using HATS 45
29. The content type of the response message is definded in the Produces field. You can specify multiple formats with a comma, such as application/xml, application/json. In this tutorial, keep the default value in the field.
30. Click Finish. 31. Click Finish to create the service class files.
Now you’ve created a service that uses HTTP POST method with the entity parameter. You may go
on to next sections to create another service or jump to �Testing RESTful web services
� to test your
service.
Create the RESTful web service using HTTP POST method with the form parameter
An HTML form is a section of a document containing the content and control elements. When the web service client accessing the service, the form will be sent to the server using the HTTP POST method. Next, we will create the service using HTTP POST method with the form parameter.
32. To create a service using HTTP POST method with the form parameter, right-click on your Integration Object and select Create RESTful Service Files.
33. In the Name field, type GetCustInfoService4.
Your wizard panel will look like this:

Creating Web Services using HATS 46
34. Click Next. 35. In the URI Suffix field, type get_cust_info_4.
You will see the panel like this:
36. Click the Add button to add a HTTP method for the service. 37. In the HTTP Method field, select POST.
38. Click Next twice to go to the Configure JAX-RS resource method panel. 39. In the Consumes field, type application/x-www-form-urlencoded. 40. Click the entity parameter, then the Edit button.
You will see this panel:

Creating Web Services using HATS 47
41. In the Parameter Type drop-down, select FormParam. 42. In the Parameter Name field, type customerNumber. 43. In the Type field, click Browser button. 44. In the Choose a type field, type java.lang.string.
You will see the panel like this:
45. Select String – java.lang, click OK. 46. In the Name field, type customerNumber.

Creating Web Services using HATS 48
47. Click OK. 48. Click Finish to create the service class files.
Now you’ve created a service that uses HTTP POST method with the form parameter.
Lesson checkpoint
In the previous sections, you learned how to:
♦ Create RESTful web services using HTTP GET method with the query parameter and path parameter.
♦ Create RESTful web services using HTTP POST method with the entity parameter and form parameter
Testing the RESTful web services
Now you are ready to test your RESTful web service.
To test RESTful web services, there are numbers of tools available for you, such as Poster (a Firefox Add-on), rest-client from Google, or Eclipse plugin RestClient Tool, etc. In this section, you will learn how to use the Firefox web browser and the Firefox Add-on Poster to test your RESTful web services.
49. Before testing the web service, you need to download and install the Poster. To do this, launch your Firefox web browser. Go to Add-ons Manager by clicking on Tools > Add-ons.
50. In Search all add-ons field, type poster, press the ENTER key. 51. Find the Add-on Poster from the search result and click Install to install the add-on. 52. Restart the Firefox web browser as requested. 53. To launch Poster, click on Open AddPoster button on the Firefox Add-on bar.

Creating Web Services using HATS 49
You will see the Poster panel like this:
Now you will learn how to test your web services. You may jump to the appropriate section to test the service that you have been created.
Test the RESTful web service that uses HTTP GET method with the query parameter
54. To test the service get_cust_info_1, type http://your.host.name:9080/HATS3270SOA/rest/get_cust_info_1 in the Poster main window.
55. Assum that the customer number you are going to query is 100000. Move to the Parameter tab, type customerNumber in the Name field and 100000 in the Value field. Click Add/Change button to add the parameter.

Creating Web Services using HATS 50
Your panel should look like this:
56. Click on the Get button in the Actions section to submit the request.
You will see the progress window like this:
Once the server responds, you will receive the output in the Response window including the customer information in it:

Creating Web Services using HATS 51
57. Alternatively, you may paste the URL in the URL Address Bar in the Poster main window and submit the request. The URL of the request looks like:
http://your.host.name:9080/HATS3270SOA/rest/get_cust_info_1?customerNumber=100000
After you submit the request, the output will look like the following:
Now you have learned how to test your service that uses HTTP GET method with query parameter. You may jump to the lesson checkpoint if you have completed all tests for your service(s).
Test the RESTful web service that uses HTTP GET method with the path parameter

Creating Web Services using HATS 52
Next, you will test the service get_cust_info_2 that uses HTTP GET method with the path parameter. When using the path parameter, you specify the parameters in your request URL and submit. You specified the URI suffix in the Configure JAX-RS Resource Method wizard when creating this service previously. Now you will enter the path parameter for the customer number 100000 in the request URL. To do this, type http://your.host.name:9080/HATS3270SOA/rest/get_cust_info_2/100000 in the URL Address Bar in the Firefox browser and press the ENTER key.
The output will look like the following:
58. Next, you will test the service with an invalid customer number 5. To do this, type http://your.host.name:9080/HATS3270SOA/rest/get_cust_info_2/5 to the URL Address bar and press the ENTER key.
The invalid customer number 5 will result an invalid number error from host system like:

Creating Web Services using HATS 53
Now you’ve learned how to test your service that uses the HTTP GET method with the path parameter. You may jump to the lesson checkpoint if you have completed all tests for your service(s).
Test the RESTful web service that uses HTTP POST method with the entity parameter
Next, you will test the service get_cust_info_3 that uses HTTP POST method with the entity parameter. To do this, type http://you.host.name:9080/HATS3270SOA/rest/get_cust_info_3 in the Poster main window.
59. Move to the Content to Send tab. 60. In the Content Type field, type application/json to specify the content type to JSON type. 61. In the text area, type the content to send in JSON format:
{"input":{"customerNumber":"100000"}}
Your panel should look like this:
Note: You may also input the content to send in XML format. To do this, specify the content type to application/xml in the step 61 and enter the content in XML format as shown below:
<input> <customerNumber>100000</customerNumber> </input>
Your panel should look like this:

Creating Web Services using HATS 54
62. The content type of the response message that you specified in the Produces field is application/xml, application/json. The response message will be in XML format if you don’t specify the content type when calling the service:
63. To specify the content type of the response message to JSON type, move to the Headers tab. 64. In the Name field, type Accept. 65. In the Value field, type application/json. Click Add/Change button to add the header.

Creating Web Services using HATS 55
Your panel will look like this:
Note: If you want the output data to be in in XML format, you may specify the content type to application/xml here.
66. Click the POST button to invoke the request.
You will see the progress window:
67. Once the server responds, you will receive the output in the Response window including the customer information in it:

Creating Web Services using HATS 56
Now you have learned how to test your service that uses the HTTP POST method with the entity parameter. You may jump to the lesson checkpoint if you have completed all tests for your service(s).
Test the RESTful web service that uses HTTP POST method with the form parameter
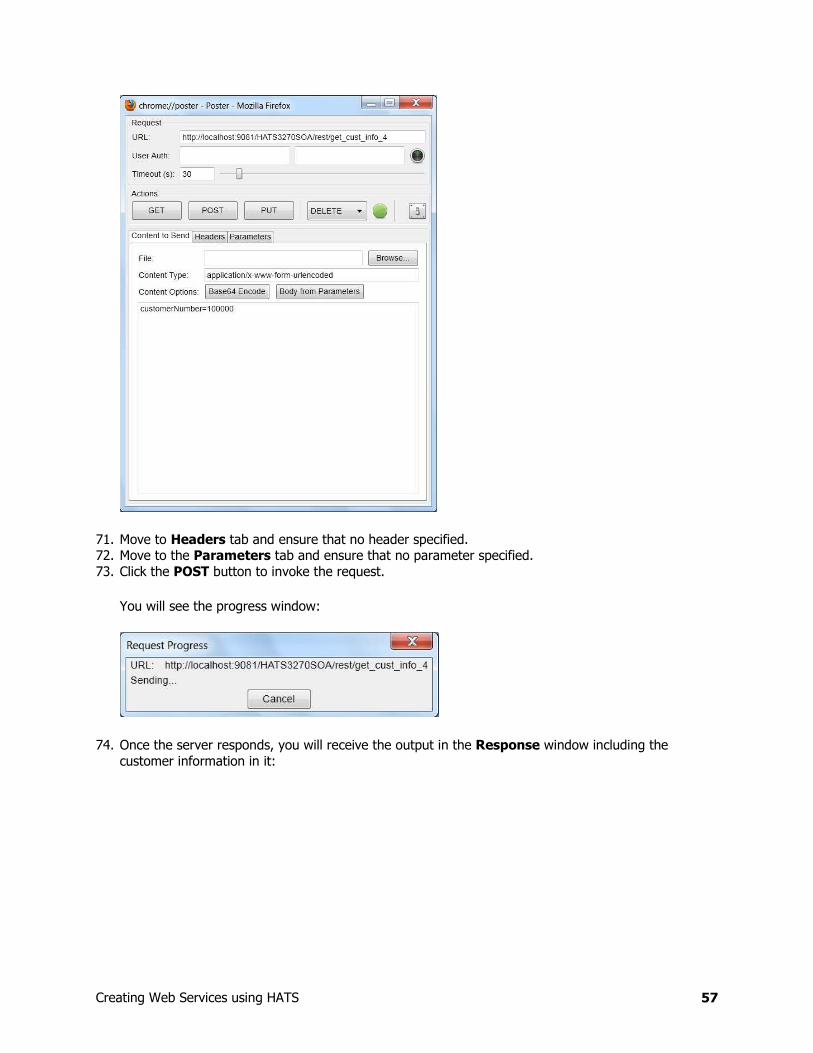
68. And finally, you will test the service get_cust_info_4 that uses HTTP POST method with the form parameter. To do this, type http://your.host.name:9080/HATS3270SOA/rest/get_cust_info_4 in the Poster main window.
69. Move to the Content to Send tab. Specify the content type to application/x-www-form-urlencoded in the Content Type field.
70. In the text box, type customerNumber=100000.
Your panel should look like this:
Creating Web Services using HATS 57
71. Move to Headers tab and ensure that no header specified. 72. Move to the Parameters tab and ensure that no parameter specified. 73. Click the POST button to invoke the request.
You will see the progress window:
74. Once the server responds, you will receive the output in the Response window including the customer information in it:

Creating Web Services using HATS 58
Now you have learned how to test your service that uses HTTP POST method with the form parameter.
Lesson checkpoint
In the previous sections, you learned how to:
♦ Test RESTful web services using the web browser and Poster.
Conclusion
This concludes the tutorial on creating a web service using IBM Rational Host Access Transformation Services (HATS). This tutorial has shown the tools available to a HATS developer to create web services that provide access to proven, critical green screen application processes and data. These services can be hosted on WebSphere Application Server and safely exposed and accessed by external partners or internal organizations.
Please report any errors in this tutorial to Jude Hung ([email protected]).