Embed Size (px)
Citation preview
Creating Mobile Apps with Sencha Touch 2
John Earl Clark Bryan P. Johnson
Chapter No. 1 "A Simple Task List"
In this package, you will find: A Biography of the authors of the book
A preview chapter from the book, Chapter NO.1 "A Simple Task List"
A synopsis of the book’s content
Information on where to buy this book
About the Authors John Earl Clark holds a Master's degree in Human Computer Interaction from Georgia Tech and an undergraduate degree in Music Engineering from Georgia State University. John and his co-author, Bryan P. Johnson, worked together at MindSpring and later EarthLink, starting out in technical support and documentation, before moving into application development, and finally management of a small development team. After leaving EarthLink in 2002, John began working independently as a consultant and programmer, before starting Twelve Foot Guru, LLC with Bryan in 2005.
John has been working with Sencha Touch since the first early beta releases. He has also worked with Sencha's ExtJS since the early days when it was still known as YUI-Ext. John has also written a previous book with Bryan Johnson called Sencha Touch Mobile JavaScript Framework by Packt Publishing.
When he is not buried in code, John spends his time woodworking, playing the guitar, and brewing his own beer.
I would like to thank my family for all of their love and support. I would also like to thank Bryan for his help, his patience, and his continued faith in our efforts.
For More Information: www.packtpub.com/creating-mobile-apps-with-sencha-touch-2/book
Bryan P. Johnson is a graduate of the University of Georgia. Bryan went on to work for MindSpring Enterprises in late 1995, where he met his co-author John Clark.
At MindSpring, and later EarthLink, for over seven years, Bryan served in multiple positions, including Director of System Administration and Director of Internal Application Development. After leaving EarthLink, Bryan took some time off to travel before joining John in starting Twelve Foot Guru.
Bryan has worked with Sencha's products since the early days of YUI-EXT, and has used Sencha Touch since its first betas. Last year, he and John wrote their first Sencha Touch book, Sencha Touch Mobile JavaScript Framework by Packt Publishing.
I would like to thank my friends and family for their support and my co-author John for his patience during the creation of this book.
For More Information: www.packtpub.com/creating-mobile-apps-with-sencha-touch-2/book
Creating Mobile Apps with Sencha Touch 2 Welcome to Creating Mobile Apps with Sencha Touch 2. The goal of this book is to help you learn the Sencha Touch mobile development platform by guiding you through a series of complete applications. Each application will focus on a different aspect of the language and show off many of the capabilities of Sencha Touch.
The Sencha Touch language is an HTML5 framework that uses JavaScript and CSS to create powerful and flexible mobile applications. These applications can be hosted like a regular website, or compiled into apps (applications) which can be sold on the Apple or Android app stores.
What This Book Covers Chapter 1, A Simple Task List, walks you through the use of Sencha Architect, a graphical application development tool for the Sencha Touch framework.
Chapter 2, A Feed Reader, continues our exploration of Sencha Architect and explores using external data in your application, as well as creating complex layouts with xTemplates.
Chapter 3, Going Command Line, we step away from Sencha Architect and explore the power of the Sencha Cmd tool for creating applications. We also cover compiling a basic application so we can use additional features of your mobile device.
Chapter 4, Weight Weight, is an exercise and weight tracking application that uses the powerful Sencha Charts package to create visual displays for our data.
Chapter 5, On Deck: Using Sencha.io, explores the use of the Sencha.io framework to store data on a remote server.
Chapter 6, Catalog Application and API, builds on our use of APIs in the previous chapter to show how we might design and build our own custom API.
For More Information: www.packtpub.com/creating-mobile-apps-with-sencha-touch-2/book
Chapter 7, The Decider: External APIs, covers the use of multiple external APIs (Google Maps and FourSquare) to create a single application.
Chapter 8, Evolver: Using Profiles, uses the Sencha Touch profiles to create a unique interface based on the mobile device you are using. It also covers pulling in data from WordPress to create a mobile version of your traditional website.
Chapter 9, Workbook: Using the Camera, shows you how to use the camera on your mobile device from inside the Sencha Touch Framework.
Chapter 10, Game On, shows you how to create a simple turn-based game. This can be used as a basis for creating your own turn-based games.
For More Information: www.packtpub.com/creating-mobile-apps-with-sencha-touch-2/book
A Simple Task ListAt its core, most programming tasks fall into three categories: data display, data entry, and data storage. We will start our fi rst project with the goal of covering how Sencha Touch handles each of these three basic categories. To do this, we will create a common programming application, the to-do list, or task list.
In this application, we will use the local storage available in HTML5 to store tasks including a name, description, creation date, completing date, and priority. We will then create a task list for displaying the current tasks as well as our completed tasks. We will discuss ways to test your display and to manage errors. We will then create the forms for entering in new tasks, editing existing tasks, and marking a task as complete.
Finally, we will explore some of the possible additional features for this type of application in our Extra Credit section.
A brief overview of Sencha ArchitectSencha Architect is a cross-platform visual development tool for Sencha Touch and Ext JS. Sencha Architect is available for Mac, Windows, and Linux, and it can be downloaded at the following link:
http://www.sencha.com/products/architect
For most of the chapters in this book we will be using a combination of Sencha Architect and standard coding to create our projects. This will give you an idea of some of the powerful advantages of the designer, while not hiding any of the actual code.
For More Information: www.packtpub.com/creating-mobile-apps-with-sencha-touch-2/book
A Simple Task List
[ 8 ]
This is actually one of the key benefi ts of Sencha Architect; while it allows you to rapidly create interfaces and test them, behind the scenes the designer is generating standard JavaScript fi les, which you can edit with any text editor. This advantage allows you to quickly assemble the basic elements of your application, while maintaining the ability to tweak the code by hand as needed. We will cover this a bit more later on, but for now let's take a look at how Sencha Architect is set up.
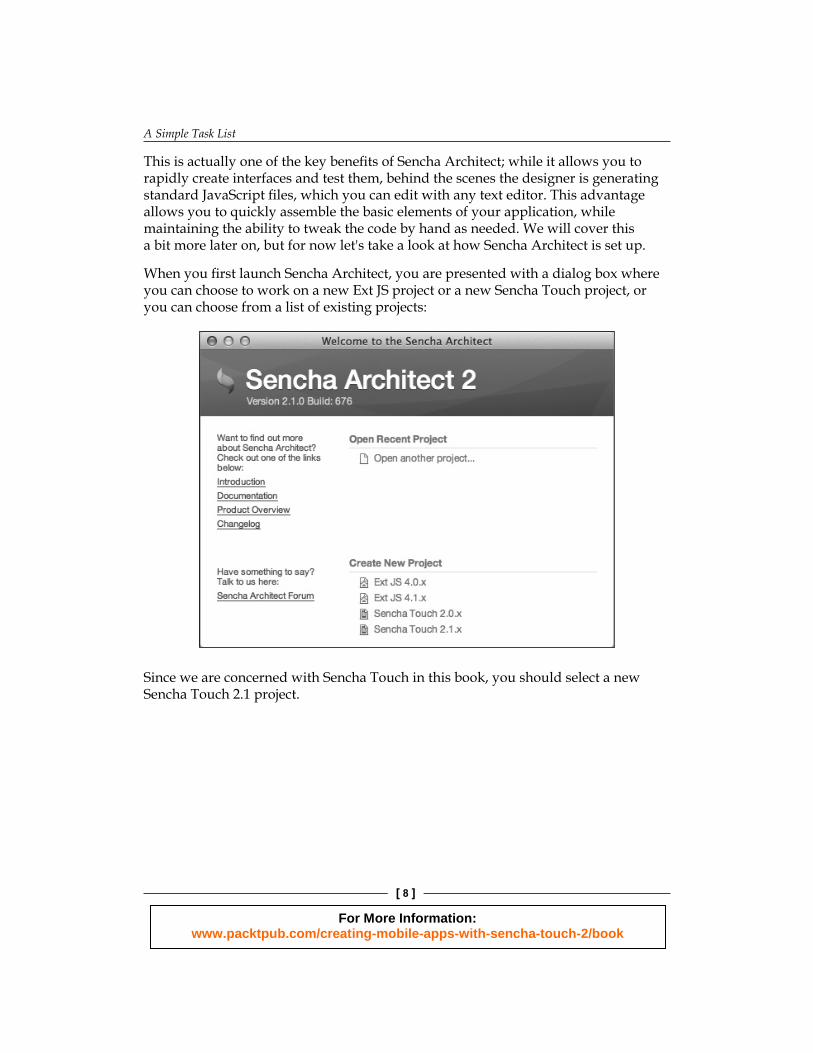
When you fi rst launch Sencha Architect, you are presented with a dialog box where you can choose to work on a new Ext JS project or a new Sencha Touch project, or you can choose from a list of existing projects:
Since we are concerned with Sencha Touch in this book, you should select a new Sencha Touch 2.1 project.
For More Information: www.packtpub.com/creating-mobile-apps-with-sencha-touch-2/book
Chapter 1
[ 9 ]
The difference between Ext JS and Sencha TouchBoth ExtJ S and Sencha Touch are products created by the company Sencha Inc. Where Sencha Touch is used to develop mobile applications for various devices, Ext JS is used to create web applications for desktop browsers such as Firefox, Chrome, or Internet Explorer. For this book, we'll stick with Sencha Touch.
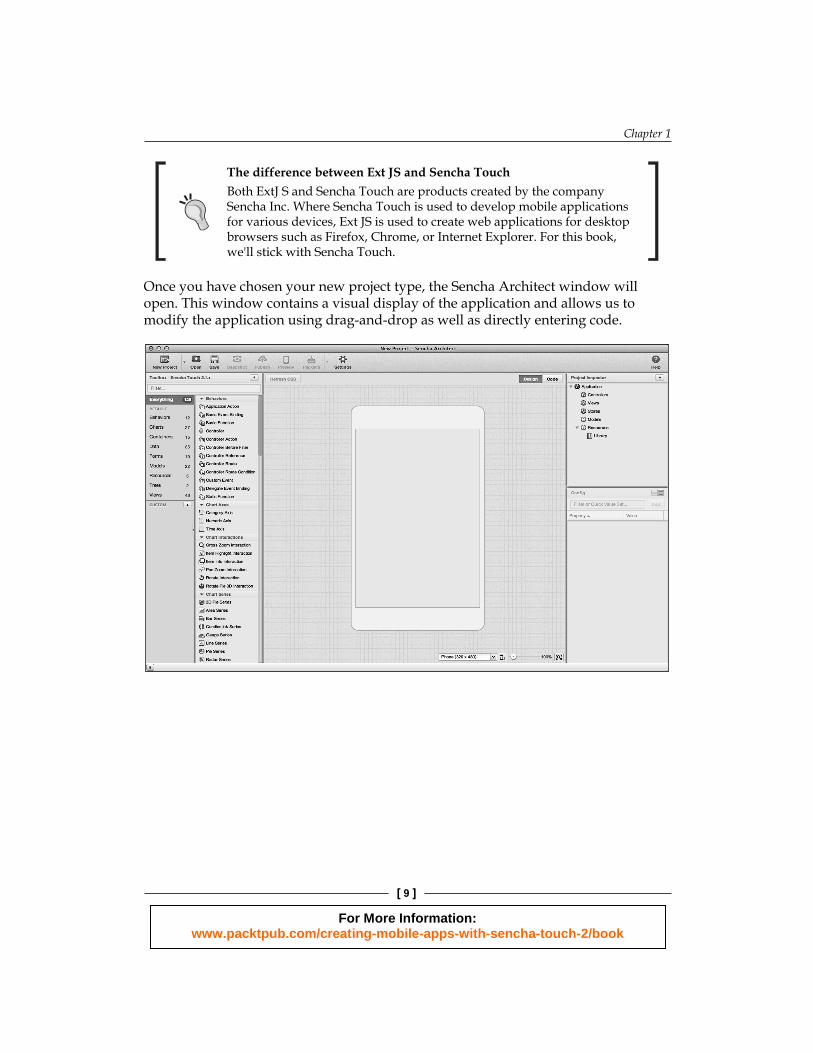
Once you have chosen your new project type, the Sencha Architect window will open. This window contains a visual display of the application and allows us to modify the application using drag-and-drop as well as directly entering code.
For More Information: www.packtpub.com/creating-mobile-apps-with-sencha-touch-2/book
A Simple Task List
[ 10 ]
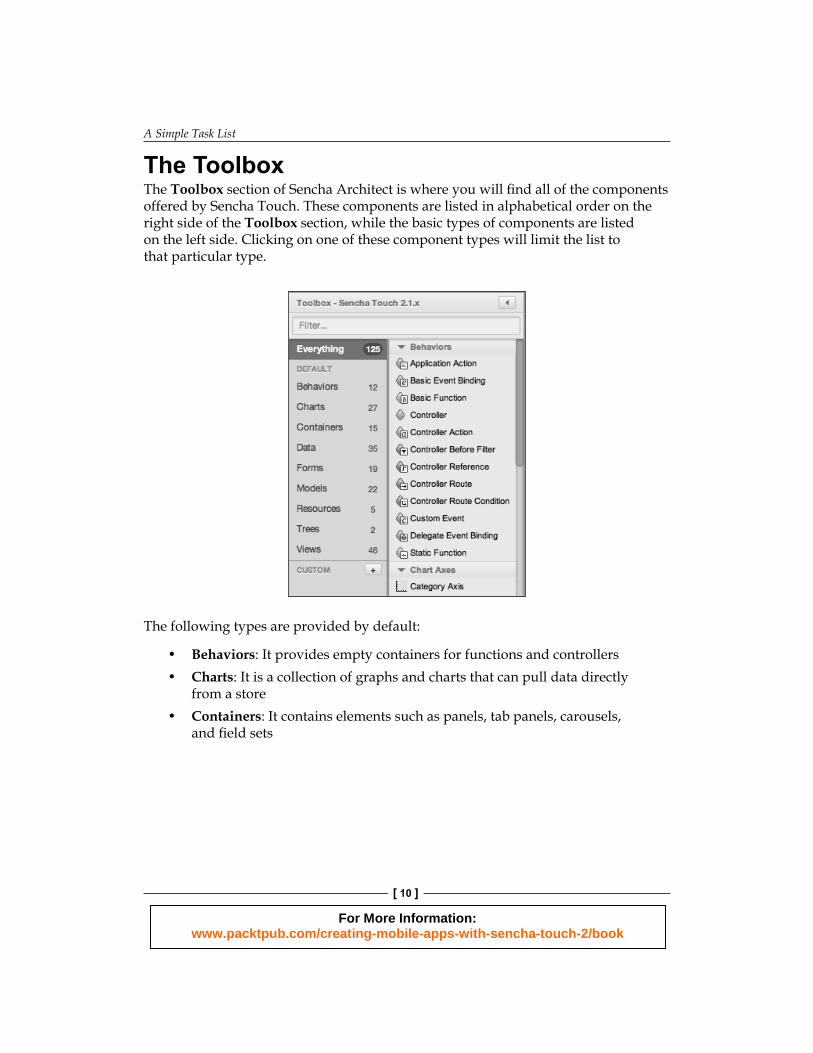
The ToolboxThe Toolbox section of Sencha Architect is where you will fi nd all of the components offered by Sencha Touch. These components are listed in alphabetical order on the right side of the Toolbox section, while the basic types of components are listed on the left side. Clicking on one of these component types will limit the list to that particular type.
The following types are provided by default:
• Behaviors: It provides empty containers for functions and controllers• Charts: It is a collection of graphs and charts that can pull data directly
from a store• Containers: It contains elements such as panels, tab panels, carousels,
and fi eld sets
For More Information: www.packtpub.com/creating-mobile-apps-with-sencha-touch-2/book
Chapter 1
[ 11 ]
• Data: It contains data-driven pieces such as stores, proxies, readers, writers, and fi lters
• Forms: It contains basic form elements such as text fi elds, radio buttons, select fi elds, and buttons
• Models: It includes the basic data model, validations, fi elds, proxies, readers, and writers
• Resources: It allows you to add external fi les for JavaScript and CSS, as well as packaging fi les for compiled applications
• Trees: Trees are the store types needed for nested tree components• Views: It contains all of the basic viewable components in Sencha Touch
such as containers, form fi elds, media, pickers, toolbars, lists, and buttons
There is also the Everything option to show all the types in the list.
You can also use the + button in the CUSTOM section to add your own custom types for limiting the list. This is very helpful for frequently used components, or simply for customizing the lists to fi t your own personal habits.
Once a custom type is created, you can just drag components over from the list on the right, and drop them into your custom type.
Components can also be searched directly by name using the Filter... fi eld at the top of the toolbox area.
The help sectionWhen any component is selected from the toolbox the help section directly below it will display information for the component.
There is also a blue link at the bottom of the help area that says See Class Documentation. Clicking on this link will take you to the Sencha website documentation for the specifi c component that you have selected. This documentation is an invaluable source of information and you should familiarize yourself with it as quickly as possible.
For More Information: www.packtpub.com/creating-mobile-apps-with-sencha-touch-2/book
A Simple Task List
[ 12 ]
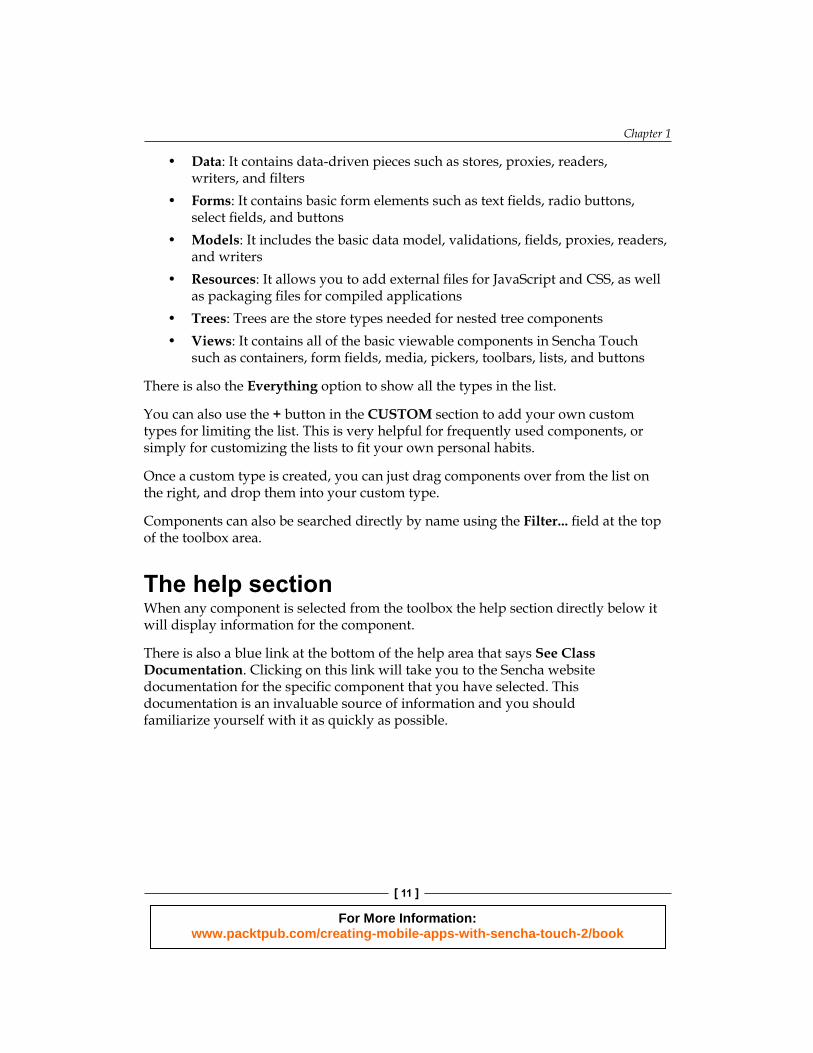
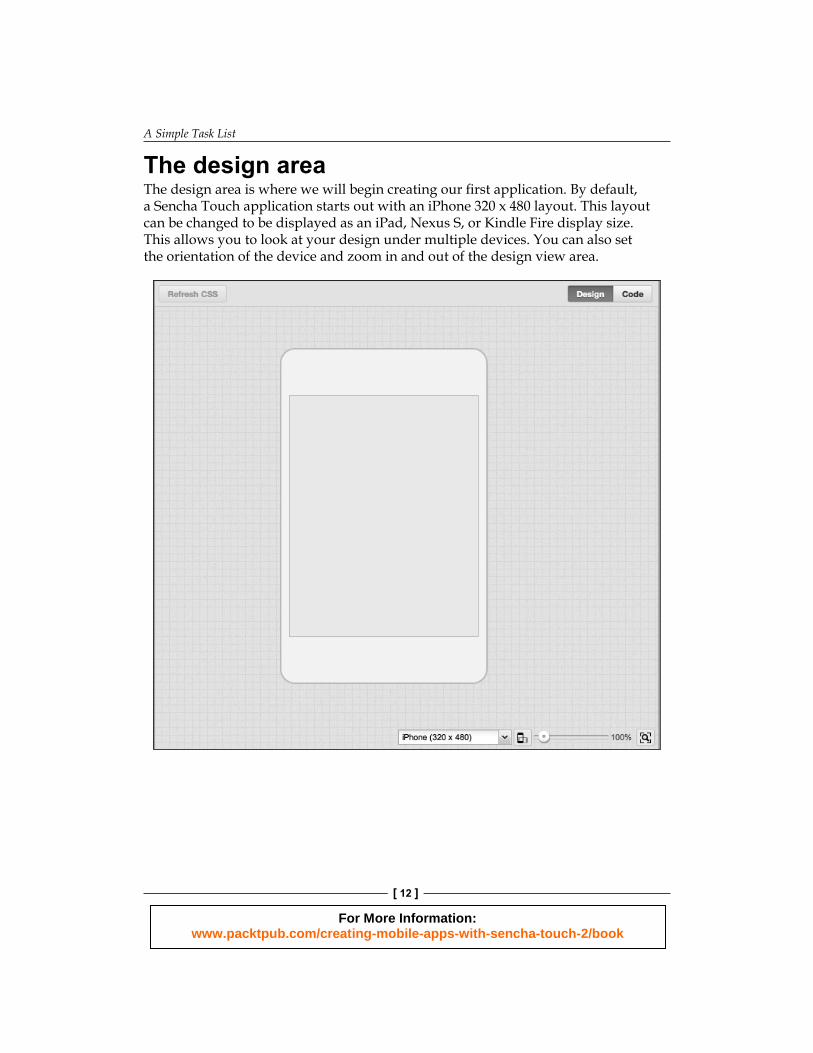
The design areaThe design area is where we will begin creating our fi rst application. By default, a Sencha Touch application starts out with an iPhone 320 x 480 layout. This layout can be changed to be displayed as an iPad, Nexus S, or Kindle Fire display size. This allows you to look at your design under multiple devices. You can also set the orientation of the device and zoom in and out of the design view area.
For More Information: www.packtpub.com/creating-mobile-apps-with-sencha-touch-2/book
Chapter 1
[ 13 ]
The design area also offers an option to view and work with the code behind the design. This is a great learning tool if you're just getting into mobile programming. By switching between the Design and Code view, you can examine complex layouts and see exactly how the JavaScript code is used to create them.
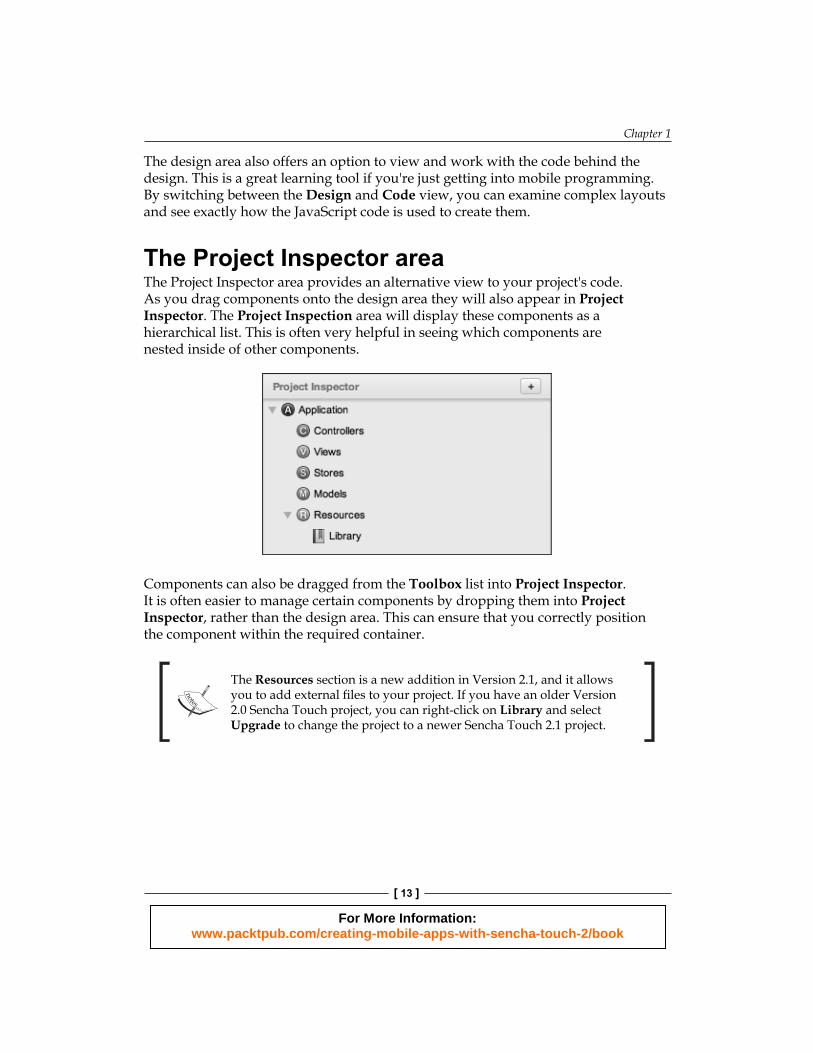
The Project Inspector areaThe Project Inspector area provides an alternative view to your project's code. As you drag components onto the design area they will also appear in Project Inspector. The Project Inspection area will display these components as a hierarchical list. This is often very helpful in seeing which components are nested inside of other components.
Components can also be dragged from the Toolbox list into Project Inspector. It is often easier to manage certain components by dropping them into Project Inspector, rather than the design area. This can ensure that you correctly position the component within the required container.
The Resources section is a new addition in Version 2.1, and it allows you to add external fi les to your project. If you have an older Version 2.0 Sencha Touch project, you can right-click on Library and select Upgrade to change the project to a newer Sencha Touch 2.1 project.
For More Information: www.packtpub.com/creating-mobile-apps-with-sencha-touch-2/book
A Simple Task List
[ 14 ]
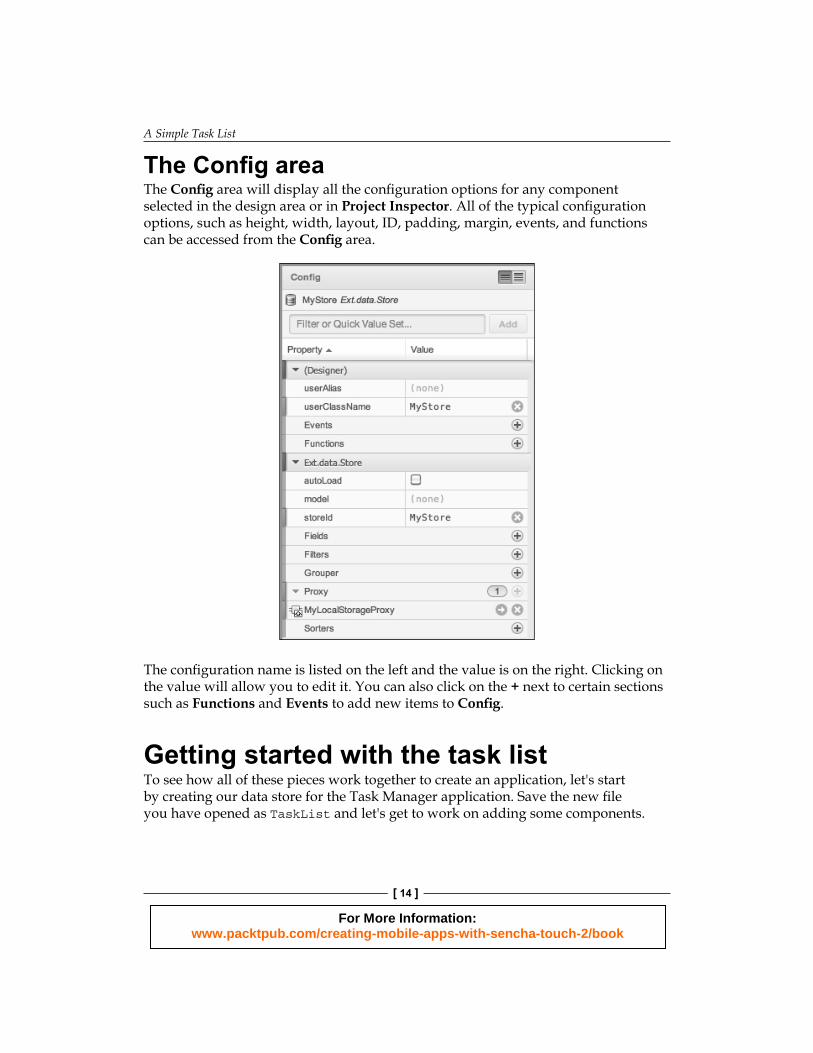
The Confi g areaThe Confi g area will display all the confi guration options for any component selected in the design area or in Project Inspector. All of the typical confi guration options, such as height, width, layout, ID, padding, margin, events, and functions can be accessed from the Confi g area.
The confi guration name is listed on the left and the value is on the right. Clicking on the value will allow you to edit it. You can also click on the + next to certain sections such as Functions and Events to add new items to Confi g.
Getting started with the task listTo see how all of these pieces work together to create an application, let's start by creating our data store for the Task Manager application. Save the new fi le you have opened as TaskList and let's get to work on adding some components.
For More Information: www.packtpub.com/creating-mobile-apps-with-sencha-touch-2/book
Chapter 1
[ 15 ]
Creating the data storeTo add a component to the project, we need to drag the component from the toolbox and drop it on the project or onto the proper section of the project inspector. For our fi rst component, let's choose a plain data store.
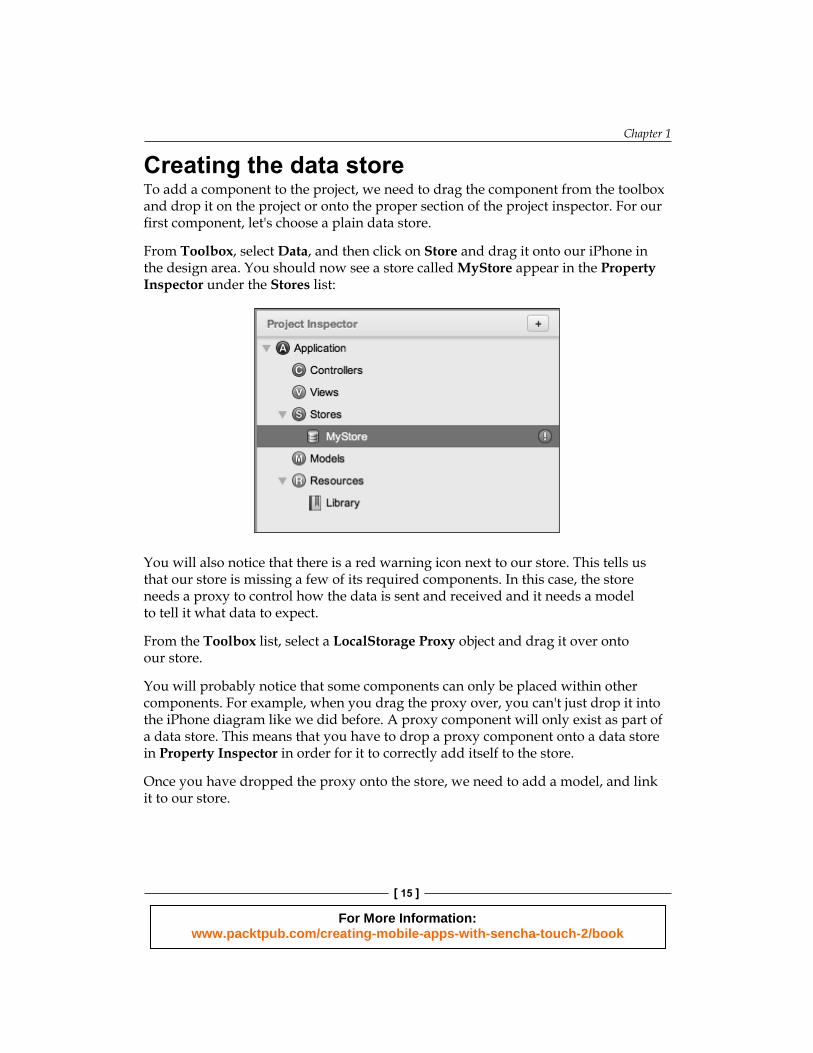
From Toolbox, select Data, and then click on Store and drag it onto our iPhone in the design area. You should now see a store called MyStore appear in the Property Inspector under the Stores list:
You will also notice that there is a red warning icon next to our store. This tells us that our store is missing a few of its required components. In this case, the store needs a proxy to control how the data is sent and received and it needs a model to tell it what data to expect.
From the Toolbox list, select a LocalStorage Proxy object and drag it over onto our store.
You will probably notice that some components can only be placed within other components. For example, when you drag the proxy over, you can't just drop it into the iPhone diagram like we did before. A proxy component will only exist as part of a data store. This means that you have to drop a proxy component onto a data store in Property Inspector in order for it to correctly add itself to the store.
Once you have dropped the proxy onto the store, we need to add a model, and link it to our store.
For More Information: www.packtpub.com/creating-mobile-apps-with-sencha-touch-2/book
A Simple Task List
[ 16 ]
Adding a Model, Fields, and Field TypesIn the Data section of our Toolbox, scroll up to fi nd the listing for Model. Drag the Model object over to the Models section of our Project Inspector. This will create a new model called MyModel.
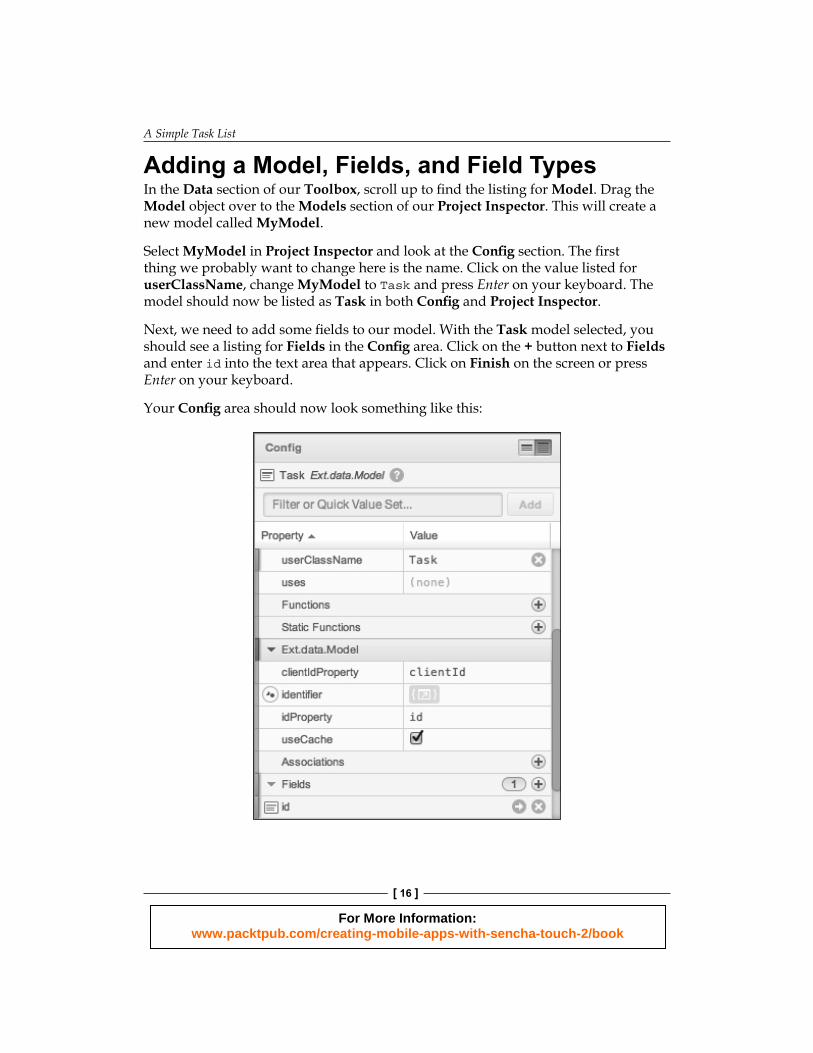
Select MyModel in Project Inspector and look at the Confi g section. The fi rst thing we probably want to change here is the name. Click on the value listed for userClassName, change MyModel to Task and press Enter on your keyboard. The model should now be listed as Task in both Confi g and Project Inspector.
Next, we need to add some fi elds to our model. With the Task model selected, you should see a listing for Fields in the Confi g area. Click on the + button next to Fields and enter id into the text area that appears. Click on Finish on the screen or press Enter on your keyboard.
Your Confi g area should now look something like this:
For More Information: www.packtpub.com/creating-mobile-apps-with-sencha-touch-2/book
Chapter 1
[ 17 ]
Repeat the previous steps to add the following fi elds to the task model:
• name• description• create• completed• priority• isCompleted
Now that you have all of your fi elds, we need to defi ne the data types for each fi eld.
In Project Inspector, click on the fi eld called id. This will open the confi guration for that fi eld and you should see that there is currently no value listed for type. Click on the value next to type. A drop-down menu will appear and you can select int from the list.
Now we need to do the same thing for our other fi elds. Select each fi eld in turn and set them as follows:
• name: Set it as string• description: Set it as string• create: Set it as date• completed: Set it as date• priority: Set it as int• isCompleted: Set it as boolean
Now that you have all of the model fi elds and types defi ned, we need to add the model to the store.
Adding the model to the storeClick on MyStore in Project Inspector. As we did with our model, we probably want to change the name of the store to make it easier to refer to and keep track of in our code. Click on the values next to userClassName and storeID and change both to say taskStore.
For More Information: www.packtpub.com/creating-mobile-apps-with-sencha-touch-2/book
A Simple Task List
[ 18 ]
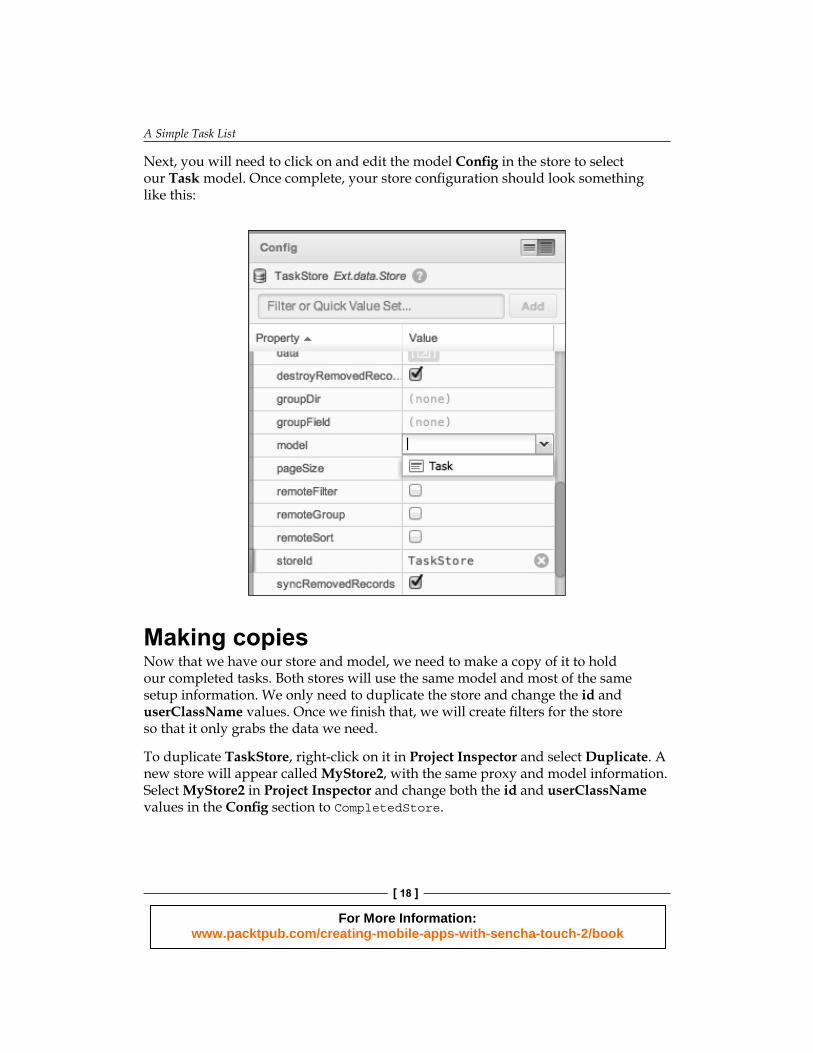
Next, you will need to click on and edit the model Confi g in the store to select our Task model. Once complete, your store confi guration should look something like this:
Making copiesNow that we have our store and model, we need to make a copy of it to hold our completed tasks. Both stores will use the same model and most of the same setup information. We only need to duplicate the store and change the id and userClassName values. Once we fi nish that, we will create fi lters for the store so that it only grabs the data we need.
To duplicate TaskStore, right-click on it in Project Inspector and select Duplicate. A new store will appear called MyStore2, with the same proxy and model information. Select MyStore2 in Project Inspector and change both the id and userClassName values in the Confi g section to CompletedStore.
For More Information: www.packtpub.com/creating-mobile-apps-with-sencha-touch-2/book
Chapter 1
[ 19 ]
Adding fi ltersNow that we have our two stores, we need to set some fi lters to make sure that TaskStore only loads current tasks and CompletedStore only loads completed tasks.
You can add fi lters in the Confi g section for each of our stores. First, select TaskStore and then click on the + button next to Filters in the Confi g section. This will add a new fi lter called MyFilter. Click on the arrow next to MyFilter to reveal its Confi g options.
We need to add a function to this fi lter in order to tell it what records to grab. Click on the + button next to fi lterFn to add a new fi lter function. Up in the Project Inspector area, fi lterFn should appear beneath MyFilter. Click on fi lterFn in Property Inspector to bring up the code editor for the function.
The editor should appear with the following code:
filterFn: function(item) {
}
This sets up the basic function for the fi lter and passes us each record in the store as item. If our function returns true, the record is included in the store and if it returns false, the record is ignored.
Our model has a Boolean value called isComplete. We can check this value in our function like this:
return !item.data.isComplete;
This takes the record we were passed as item, and checks the record's data for isComplete. If a task record is complete this will be true, so we put the ! character in front to grab only the records where isComplete is false. The fi lter is now complete.
Take the same steps to add a fi lter to CompletedStore:
1. Add a fi lter to CompletedStore.2. Add a function to the fi lter using filterFn.3. Add the code for the fi lter function.
In this case, our function just needs to look for tasks where isComplete is true (just drop the ! character this time):
return item.data.isComplete;
For More Information: www.packtpub.com/creating-mobile-apps-with-sencha-touch-2/book
A Simple Task List
[ 20 ]
Both stores will now correctly fi lter the tasks based on completion.
While we have been moving these components around on screen, Sencha Architect has been doing a bit of heavy lifting for us on the backend. Let's take a peek behind the curtain and see what's going on with the actual code.
Pay attention to the man behind the curtainThe fi rst thing to look at is on your hard drive where you saved the Task Manager project fi le. You will notice that the designer has created a number of fi les here: app.html, app.js, and TaskManager.xds. We also have folders for app and metadata.
Sencha Architect uses both TaskManager.xds and the metadata folder. The TaskManager.xds fi le is the main project fi le you are currently working in and the metadata folder contains resources for that project fi le. We can ignore those fi les for now because the interesting stuff is in the other fi les.
Let's start with our app.html fi le. If you open this fi le in your favorite code editor, you should see something like this:
<!DOCTYPE html>
<!-- Auto Generated with Sencha Architect --><!-- Modifications to this file will be overwritten. --><html><head> <meta http-equiv="Content-Type" content="text/html; charset=utf-8" /> <title>Chapter1</title> <link rel="stylesheet" type="text/css" href="http://extjs.cachefly.net/touch/sencha-touch-2.1.0/resources/css/sencha-touch.css"/> <script type="text/javascript" src="http://extjs.cachefly.net/touch/sencha-touch-2.1.0/sencha-touch-all-debug.js"></script> <script type="text/javascript" src="app.js"></script> <script type="text/javascript"> if (!Ext.browser.is.WebKit) { alert("The current browser is unsupported.\n\nSupported browsers:\n" + "Google Chrome\n" + "Apple Safari\n" + "Mobile Safari (iOS)\n" +
For More Information: www.packtpub.com/creating-mobile-apps-with-sencha-touch-2/book

Chapter 1
[ 21 ]
"Android Browser\n" + "BlackBerry Browser" ); } </script></head><body></body></html>
This should look pretty familiar to anyone who is used to dealing with HTML and JavaScript. The fi le creates a basic HTML page, includes the JavaScript and CSS fi les for Sencha Touch, and also includes our app.js fi le (which we will get to in a second).
The fi le then sets up some browser detection so that if the user attempts to access the application with a non-WebKit browser, they will be told that their browser is incompatible and will be given a list of compatible browsers.
Chrome and Safari are WebKit browsers and are available for Windows and Mac. Chrome is also available on Linux. In this book we will be using Safari for our testing, but the examples will work in Chrome as well.
One other thing to note is the message in the comments at the top of app.html. This particular fi le is autogenerated each time you save the TaskManager project. If you make changes to it in your code editor, they will be overwritten the next time you save.
A word about CacheFlyCacheFly is a CDN (Content Delivery Network). They have computers all over the world, and can send fi les to your users from a server that's close to them, so that the fi les take less time to travel across the Internet, and therefore less time to load. That also means that you save on your own server bandwidth by not serving those fi les yourself.
Next, let's take a look at our app.js fi le:
/* * File: app.js * * This file was generated by Sencha Architect version 2.0.0. * http://www.sencha.com/products/designer/ *
For More Information: www.packtpub.com/creating-mobile-apps-with-sencha-touch-2/book
A Simple Task List
[ 22 ]
* This file requires use of the Sencha Touch 2.0.x library, under independent license. * License of Sencha Architect does not include license for Sencha Touch 2.1.x. For more * details see http://www.sencha.com/license or contact [email protected]. * * This file will be auto-generated each and every time you save your project. * * Do NOT hand edit this file. */
Ext.Loader.setConfig({ enabled: true});
Ext.application({ models: [ 'Task' ], stores: [ 'TaskStore', 'CompletedStore' ], name: 'MyApp'});
Like our HTML fi le, we start out with a stern warning at the top about hand editing the fi le.
A word about hand editingSencha Architect does a lot of work for you, but that means that it can also accidentally overwrite code that you've written by hand. Your best bet is to wait to add any code yourself until you've fully laid out and confi gured all of the components for your application with the Architect fi rst.
If we skip down past that section, we have a setup function for the Ext.Loader followed by a defi nition of our application. This includes links to all of our models and stores, as well as the name of our application (which we should probably change once we fi nish snooping around in the code).
For More Information: www.packtpub.com/creating-mobile-apps-with-sencha-touch-2/book
Chapter 1
[ 23 ]
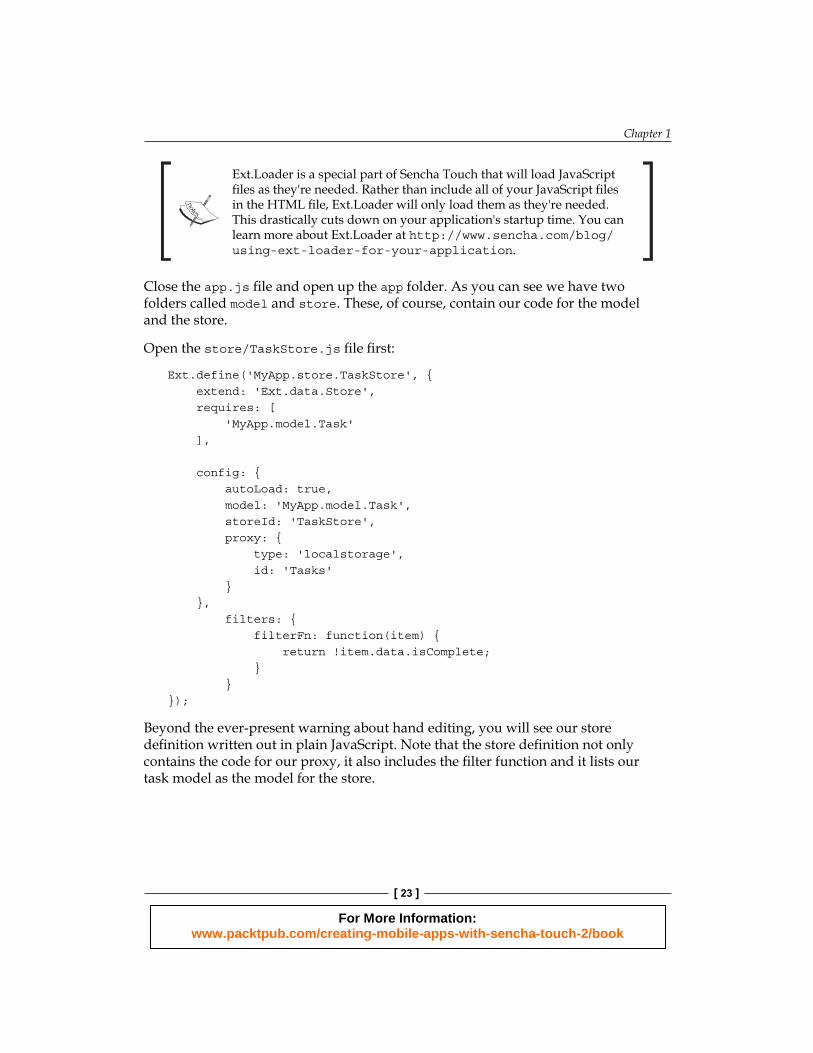
Ext.Loader is a special part of Sencha Touch that will load JavaScript fi les as they're needed. Rather than include all of your JavaScript fi les in the HTML fi le, Ext.Loader will only load them as they're needed. This drastically cuts down on your application's startup time. You can learn more about Ext.Loader at http://www.sencha.com/blog/using-ext-loader-for-your-application.
Close the app.js fi le and open up the app folder. As you can see we have two folders called model and store. These, of course, contain our code for the model and the store.
Open the store/TaskStore.js fi le fi rst:
Ext.define('MyApp.store.TaskStore', { extend: 'Ext.data.Store', requires: [ 'MyApp.model.Task' ],
config: { autoLoad: true, model: 'MyApp.model.Task', storeId: 'TaskStore', proxy: { type: 'localstorage', id: 'Tasks' } }, filters: { filterFn: function(item) { return !item.data.isComplete; } }});
Beyond the ever-present warning about hand editing, you will see our store defi nition written out in plain JavaScript. Note that the store defi nition not only contains the code for our proxy, it also includes the fi lter function and it lists our task model as the model for the store.
For More Information: www.packtpub.com/creating-mobile-apps-with-sencha-touch-2/book
A Simple Task List
[ 24 ]
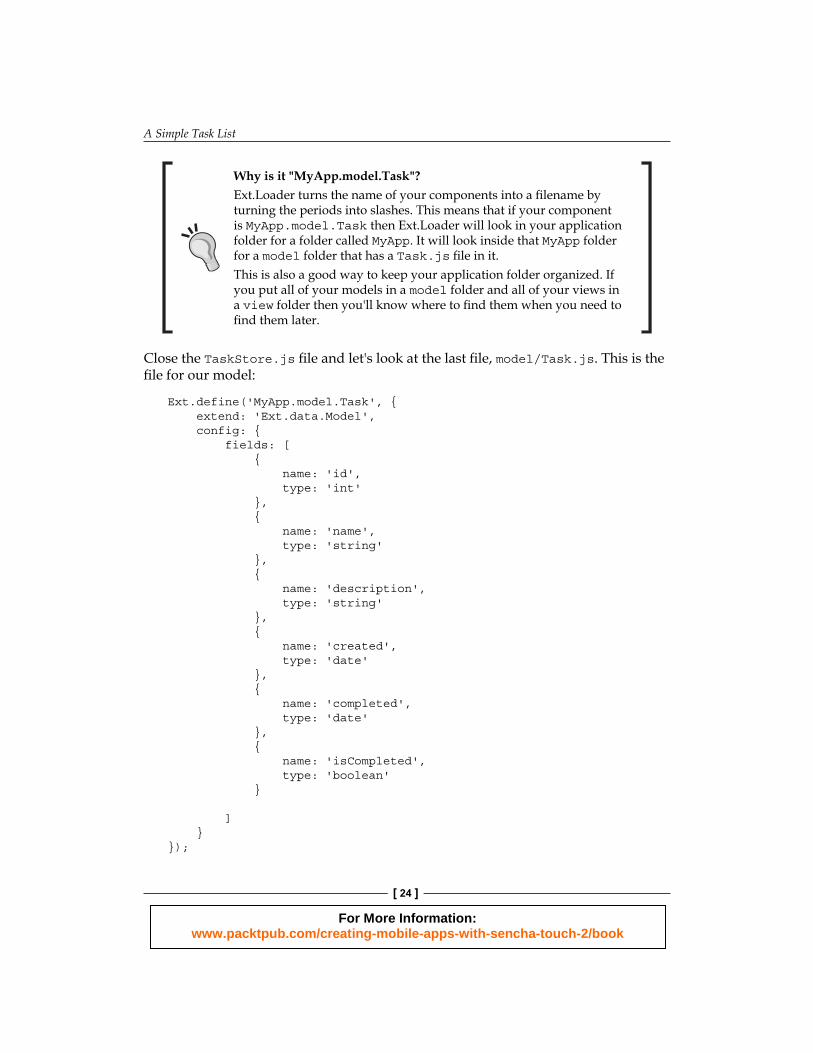
Why is it "MyApp.model.Task"?Ext.Loader turns the name of your components into a fi lename by turning the periods into slashes. This means that if your component is MyApp.model.Task then Ext.Loader will look in your application folder for a folder called MyApp. It will look inside that MyApp folder for a model folder that has a Task.js fi le in it.This is also a good way to keep your application folder organized. If you put all of your models in a model folder and all of your views in a view folder then you'll know where to fi nd them when you need to fi nd them later.
Close the TaskStore.js fi le and let's look at the last fi le, model/Task.js. This is the fi le for our model:
Ext.define('MyApp.model.Task', { extend: 'Ext.data.Model', config: { fields: [ { name: 'id', type: 'int' }, { name: 'name', type: 'string' }, { name: 'description', type: 'string' }, { name: 'created', type: 'date' }, { name: 'completed', type: 'date' }, { name: 'isCompleted', type: 'boolean' } ] }});
For More Information: www.packtpub.com/creating-mobile-apps-with-sencha-touch-2/book
Chapter 1
[ 25 ]
Notice that there is a fair amount of overlap between what's in the store and what's in the model. This duplication allows the model and store to act independently of each other while still maintaining consistency for the data itself. We will look closer at that when we deal with the forms for our application.
Architect versus coding by handAs you can see, Sencha Architect generates code for us, but we could also choose to create this exact same code by hand. Sencha Architect offers benefi ts to the novice coder by allowing applications to be built visually and allowing the coder to explore the code as needed. The designer also generates code according to Sencha Touch best practices. This keeps the novice user from learning bad habits and encourages cleaner code when the coder needs to begin programming by hand.
For the seasoned coder, Sencha Touch offers ways to rapidly prototype interfaces and create mockups for clients. The code behind these mockups can then be used outside the designer to create complex applications that might be problematic if not impossible for Sencha Architect to accomplish.
By using a combination of Sencha Architect and traditional text-based coding, we hope that this book will offer additional benefi ts to the reader both in terms of speed and consistency.
Creating the viewsSo far, none of our code has actually created anything on the screen. Now we need to create some visual components for the user to interact with, starting with the main panel that will contain our application.
Drag a Tab Panel object out of the Toolbox list on the left and drop it onto the iPhone screen in the designer. A Panel option will now appear in Project Inspector. Select Tab Panel and add the following information to the Confi g area:
• Make sure the initialView checkbox is checked• Change userClassName from myTabPanel to mainView• Delete the third tab by right-clicking on it and choosing Delete
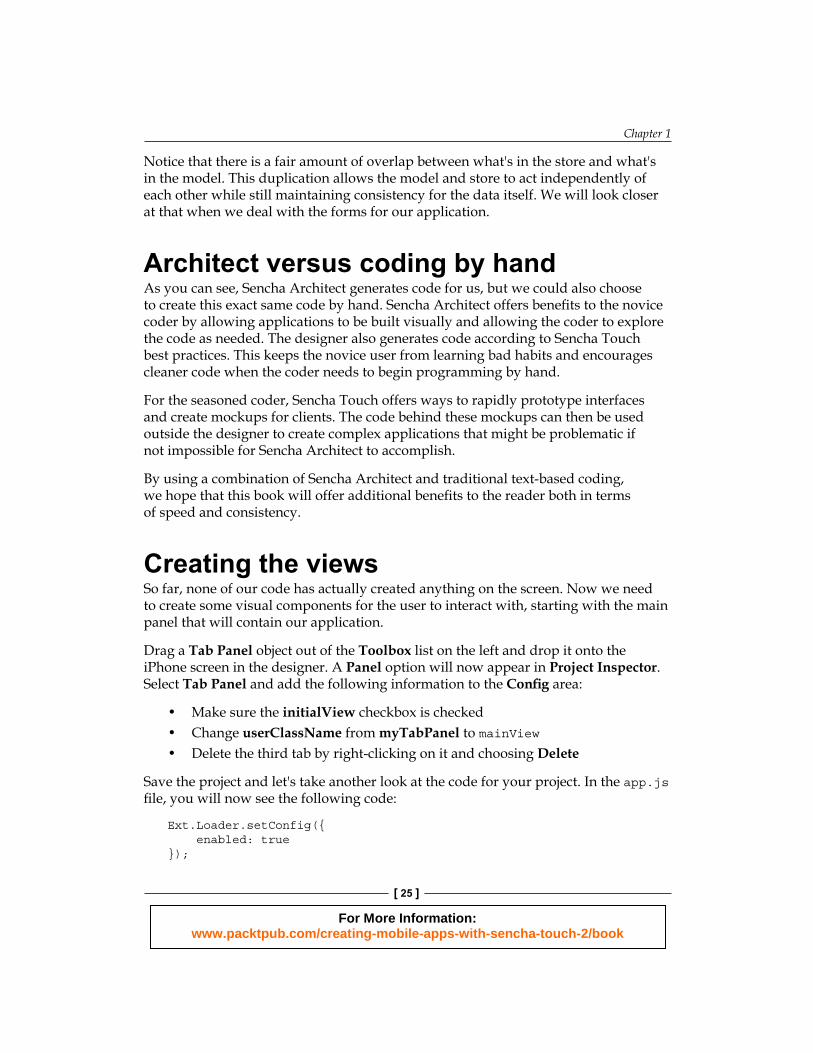
Save the project and let's take another look at the code for your project. In the app.js fi le, you will now see the following code:
Ext.Loader.setConfig({ enabled: true});
For More Information: www.packtpub.com/creating-mobile-apps-with-sencha-touch-2/book
A Simple Task List
[ 26 ]
Ext.application({ models: [ 'Task' ], stores: [ 'TaskStore' ], views: [ 'MainView' ], name: 'MyApp', launch: function() { Ext.create('MyApp.view.MainView', {fullscreen: true}); }});
The designer has now added a launch function that creates an instance of our MainView panel and sets it to fullscreen.
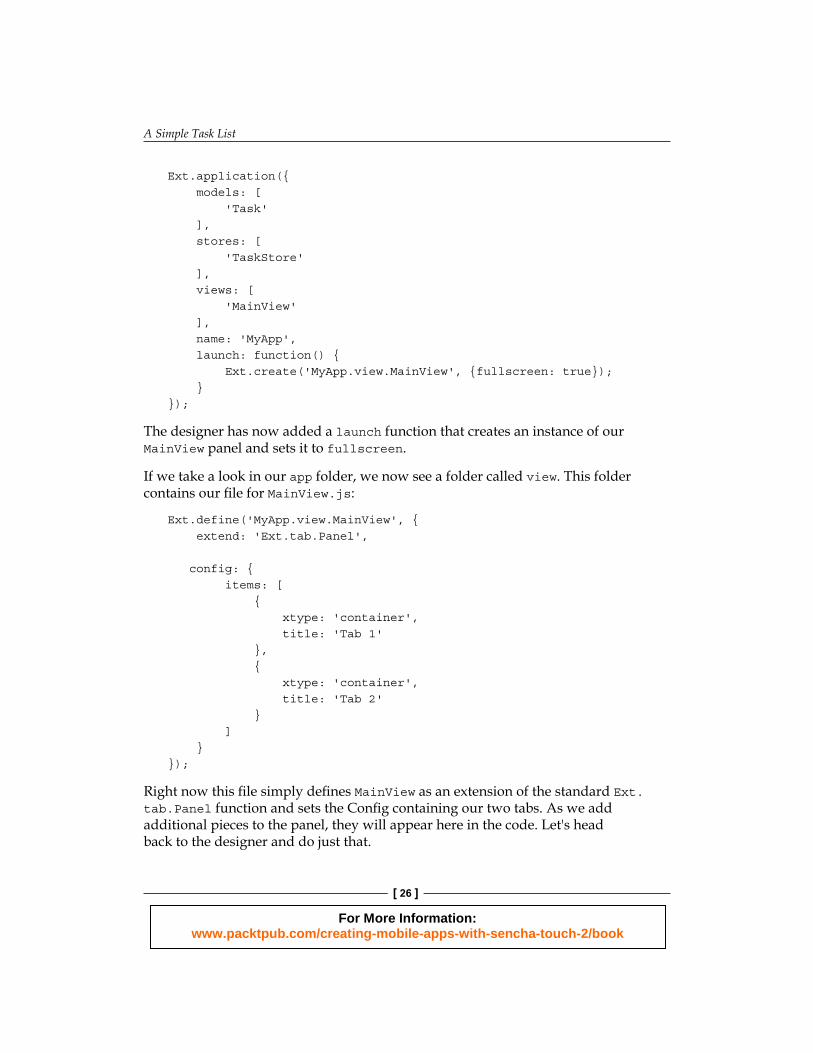
If we take a look in our app folder, we now see a folder called view. This folder contains our fi le for MainView.js:
Ext.define('MyApp.view.MainView', { extend: 'Ext.tab.Panel',
config: { items: [ { xtype: 'container', title: 'Tab 1' }, { xtype: 'container', title: 'Tab 2' } ] }});
Right now this fi le simply defi nes MainView as an extension of the standard Ext.tab.Panel function and sets the Confi g containing our two tabs. As we add additional pieces to the panel, they will appear here in the code. Let's head back to the designer and do just that.
For More Information: www.packtpub.com/creating-mobile-apps-with-sencha-touch-2/book
Chapter 1
[ 27 ]
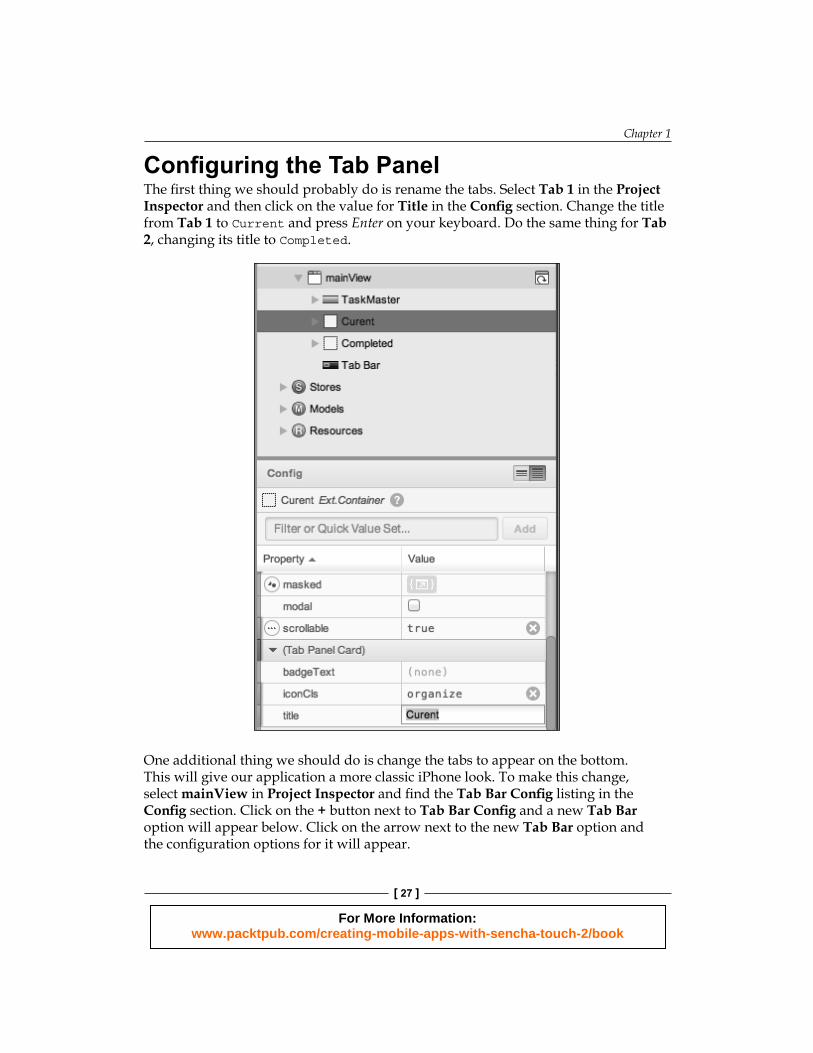
Confi guring the Tab PanelThe fi rst thing we should probably do is rename the tabs. Select Tab 1 in the Project Inspector and then click on the value for Title in the Confi g section. Change the title from Tab 1 to Current and press Enter on your keyboard. Do the same thing for Tab 2, changing its title to Completed.
One additional thing we should do is change the tabs to appear on the bottom. This will give our application a more classic iPhone look. To make this change, select mainView in Project Inspector and fi nd the Tab Bar Confi g listing in the Confi g section. Click on the + button next to Tab Bar Confi g and a new Tab Bar option will appear below. Click on the arrow next to the new Tab Bar option and the confi guration options for it will appear.
For More Information: www.packtpub.com/creating-mobile-apps-with-sencha-touch-2/book
A Simple Task List
[ 28 ]
Locate the docked Confi g area and change it from top to bottom. The tabs should drop down to the bottom and give us the large icons familiar to most iPhone users. You can change these icons by clicking on the Current or Completed tab in Project Inspector and changing the Confi g value for iconCls. Select the icons you like and save the project (I chose organize for the Current tab and delete for the Completed tab).
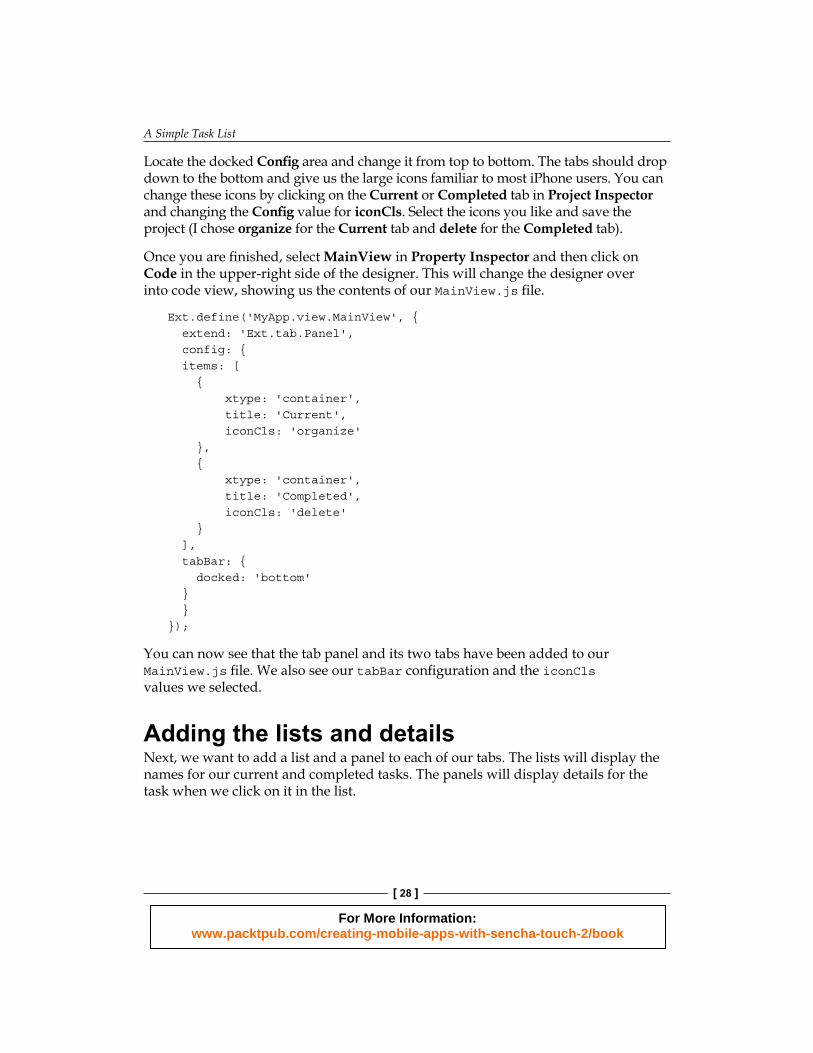
Once you are fi nished, select MainView in Property Inspector and then click on Code in the upper-right side of the designer. This will change the designer over into code view, showing us the contents of our MainView.js fi le.
Ext.define('MyApp.view.MainView', { extend: 'Ext.tab.Panel', config: { items: [ { xtype: 'container', title: 'Current', iconCls: 'organize' }, { xtype: 'container', title: 'Completed', iconCls: 'delete' } ], tabBar: { docked: 'bottom' } }});
You can now see that the tab panel and its two tabs have been added to our MainView.js fi le. We also see our tabBar confi guration and the iconCls values we selected.
Adding the lists and detailsNext, we want to add a list and a panel to each of our tabs. The lists will display the names for our current and completed tasks. The panels will display details for the task when we click on it in the list.
For More Information: www.packtpub.com/creating-mobile-apps-with-sencha-touch-2/book
Chapter 1
[ 29 ]
Let's start by selecting each tab and setting the layout property in Confi g to card. This will let us easily switch between the List and Details sections for each tab.
Next, take a List component from the Toolbox list and drop one on each tab in Property Inspector.
Dropping items in Property InspectorWhile most components can be dropped directly onto the design area, it is often better to drop components into Project Inspector. It's much easier to ensure that you are putting the component within the correct container using Property Inspector.
Next you will need to take a panel from Toolbox and drop one onto each tab, just like we did with the list. This panel will be our details container and it will not appear in the design view because the list is in front. We will create some code later on to swap the list and the container when the user clicks on a task in the list.
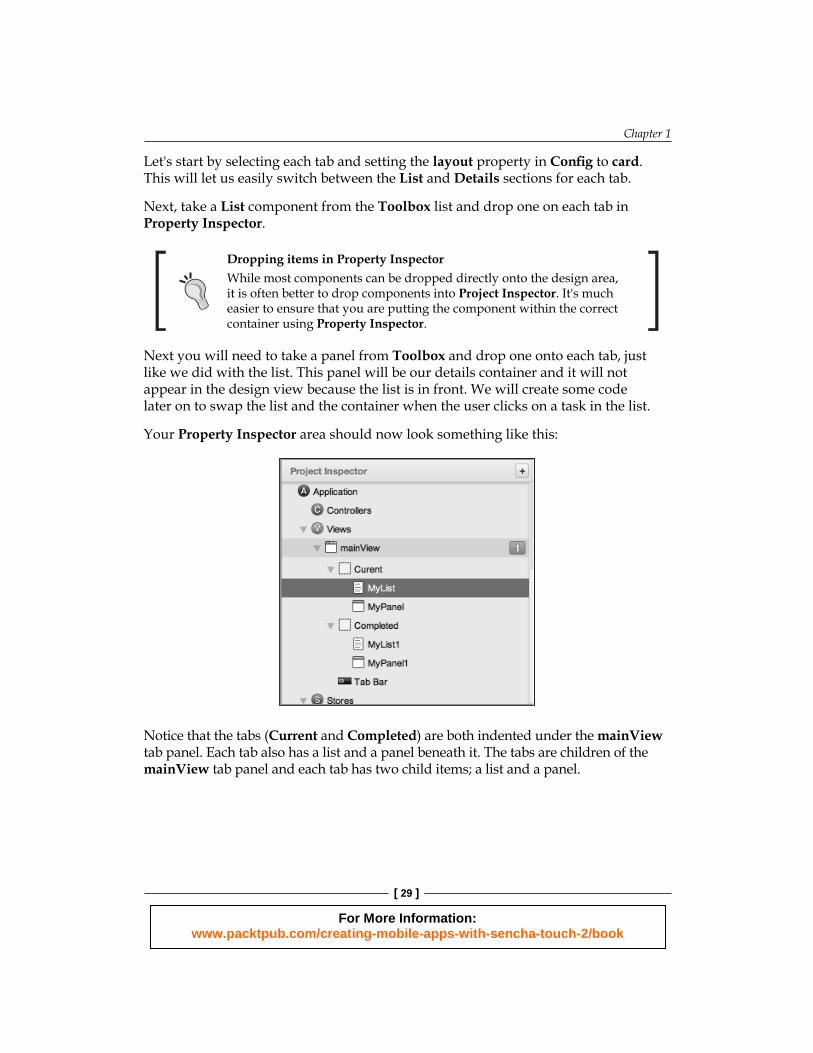
Your Property Inspector area should now look something like this:
Notice that the tabs (Current and Completed) are both indented under the mainView tab panel. Each tab also has a list and a panel beneath it. The tabs are children of the mainView tab panel and each tab has two child items; a list and a panel.
For More Information: www.packtpub.com/creating-mobile-apps-with-sencha-touch-2/book
A Simple Task List
[ 30 ]
Since we will need to address the lists and the panels in our code, we should probably name them something a bit more descriptive than MyList and MyPanel. In order to do this, you will need to select each of these items and change the id property in Confi g. Let's rename them as follows:
In the Current tab, we will call them CurrentList and CurrentDetails and in the Completed tab, we will call them CompletedList and CompletedDetails.
Setting up the templatesNext we need to set up the templates (called itemTpl in the Confi g area) for our lists and our details. These templates control how our data will be laid out on the screen. Remember that we have the following data items:
• id• name• description• created• completed• priority
We can use any of these values by including them in our template by placing them in curly braces like so:
<div>{name}</div>
We can also use any HTML styling or tags as part of our template. This gives us a great deal of fl exibility in controlling the layout of our application.
To edit the template for our CurrentList component, select it in Project Inspector and a gear icon will appear next to the list in our Design view. Click on the gear and you will see a pop-up window with a few confi guration options including Edit Template at the bottom of the pop-up window.
When you click on Edit Template, a text area will appear over the list with the following text:
<div>List Item {string}</div>
Change this text to:
<div class="priority_{priority}">{name}</div>
For More Information: www.packtpub.com/creating-mobile-apps-with-sencha-touch-2/book
Chapter 1
[ 31 ]
Click on Done Editing when you are fi nished. The list items will appear empty for now, but we will fi x that a bit later.
Next, click on the CurrentDetails panel in Project Inspector and edit the template the same way you did for CurrentList. Set the template for the CurrentDetails to:
<div class="taskName">{name}</div> <div class="taskDescription">{description}</div> <div class="taskCreated">Created: {created}</div>
Click on Done Editing when you are fi nished.
When you are fi nished with the CurrentDetails, we want to follow the same steps for CompletedList and CompletedDetails. You can keep the list template the same but we should include the completed date on our details page like so:
<div class="taskName">{name}</div> <div class="taskDescription">{description}</div> <div class="taskCreated">Created: {created}</div><div class="taskCompleted">Completed: {completed}</div>
Testing with starter dataYou will notice that since we have no records, we have nothing to display. This can make testing our application diffi cult, so we are going to add a few test records to our application using the launch method.
Select Application in Project Inspector and then locate launch down in the Confi g section. Click on the + button next to launch to add a new launch function, and then click on the arrow next to our new launch function to open it. This will open the code editor with:
launch: function() {
}
Add the following code inside the launch function:
var TaskStore = Ext.data.StoreManager.lookup('TaskStore');var CompletedStore = Ext.data.StoreManager.lookup('CompletedStore');if(CompletedStore.getCount()+TaskStore.getCount() === 0) { console.log('we have no records'); TaskStore.add({name: 'Here Is A Task', description: 'You can mark the task complete by clicking the Completed button below.', priority: 1, created: Date.now(), completed: '', isComplete: false});
For More Information: www.packtpub.com/creating-mobile-apps-with-sencha-touch-2/book
A Simple Task List
[ 32 ]
TaskStore.add({name: 'How To Edit A Task', description: 'You can edit the task by clicking the Edit button below.', priority: 2, created: Date.now(), completed: '', isCompleted: false}); TaskStore.add({name: 'How To Add A Task', description: 'Add a task by clicking the Add button in the upper right corner.', priority: 3, created: Date.now(), completed: '', isComplete: false}); TaskStore.sync();} else { console.log('we have records');}
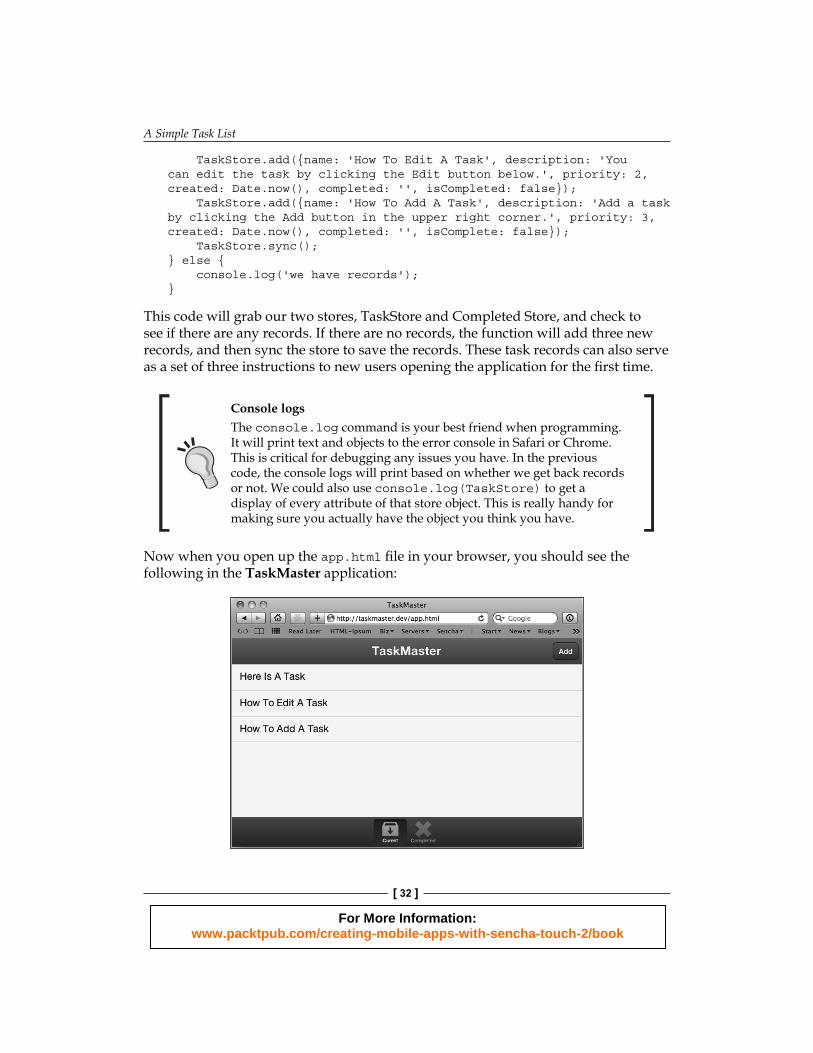
This code will grab our two stores, TaskStore and Completed Store, and check to see if there are any records. If there are no records, the function will add three new records, and then sync the store to save the records. These task records can also serve as a set of three instructions to new users opening the application for the fi rst time.
Console logsThe console.log command is your best friend when programming. It will print text and objects to the error console in Safari or Chrome. This is critical for debugging any issues you have. In the previous code, the console logs will print based on whether we get back records or not. We could also use console.log(TaskStore) to get a display of every attribute of that store object. This is really handy for making sure you actually have the object you think you have.
Now when you open up the app.html fi le in your browser, you should see the following in the TaskMaster application:
For More Information: www.packtpub.com/creating-mobile-apps-with-sencha-touch-2/book
Chapter 1
[ 33 ]
We now have tasks to view, but we still can't get to the details. We need to add a function to switch the view between our list and our details.
Back in Sencha Architect, click on CurrentList in Project Inspector and then look for Events at the top of the Confi g section. Click on the + button next to Events to add a new event listener. Use the menu that appears to choose the select event. Click on the arrow next the new select event to edit the code. The code editor will appear with the following code:
onCurrentListSelect: function(dataview, record, options) {
}
Add the following code to the select event:
var currentTab = this.getActiveItem(); var currentDetails = currentTab.down('panel'); currentDetails.setRecord(record); currentTab.setActiveItem(currentDetails);
The fi rst line grabs our Current tab and the second grabs our CurrentDetails panel. We then set the record on the details panel to the record we are passed as part of the select function (the record from our list). Finally, we switch the card layout of our current tab to the CurrentDetails panel, hiding CurrentList.
We need to do the same thing with our CompletedList component. Add the new select event and set the code to:
var completedTab = this.getActiveItem();
var completedDetails = completedTab.down('panel');
completedDetails.setRecord(record);completedTab.setActiveItem(completedDetails);
If we test this in the browser we should be able to see our details panel when we click on an item in the list. This also brings us to our next challenge; we need a way to get back to our list.
In this chapter, we will create the back button manually and in the next chapter we will highlight a different approach to this same problem. For now, let's add a new button to our toolbar.
For More Information: www.packtpub.com/creating-mobile-apps-with-sencha-touch-2/book
A Simple Task List
[ 34 ]
Adding the back buttonGrab a toolbar object from Toolbox and drag it over onto the mainView tab panel. Grab a button object from Toolbox and drag it onto the new toolbar panel.
Next, we want to give our toolbar a title. Let's select the toolbar and change the title in the Confi g section to TaskMaster.
Next we need to change a few things with our button. Select the Button object and make the following changes to its Confi g section:
• Change text to Back• Change the id to backButton• Change the ui to back (this will make it look like a typical back button)• Check the box next to the hidden property (we want the button hidden
by default)
I can't fi nd one of the Confi g optionsIf you are unable to fi nd some of these properties, you may need to toggle the Confi g section between Show Common Confi gs and Show All Confi gs using the two buttons in the upper-right corner of the Confi g section.
Now that we have a back button, we need to make it do something. Add a tap listener by clicking on the + button next to events in the button's Confi g section. Select tap and then click on the arrow next to the tap event that appears.
Edit the back button code to look like this:
onBackButtonTap: function(button, e, options) { var currentTab = this.getActiveItem(); currentTab.setActiveItem(0); button.hide();}
By grabbing this.getActiveItem() we grab the active tab in our MainView tab panel, which makes sure that the button will work correctly for both of our lists. We set the active item to the fi rst item in the active tab. Finally, we hide the button so that it does not show up in our list view.
The last part we need to take care of is showing the button when we click an item in the list. Click on the select event for our current panel and add the following to our select function:
For More Information: www.packtpub.com/creating-mobile-apps-with-sencha-touch-2/book
Chapter 1
[ 35 ]
var backButton = Ext.getCmp('backButton');backButton.show();
You will want to add the exact same button code to our select event in the CompletedList component. Just copy, open the select event for CompletedList,and paste.
Our lists and details are now complete. Now we need to be able to add, edit, and mark tasks as complete.
Creating the formsBefore we start creating forms we need to add a button to our MainView toolbar that will display the form for adding new tasks.
Drag a Button object out from the Toolbox list and drop it on the TaskMaster toolbar. The new button should appear next to backButton. We probably want to move that over to the other side of our title, so we need to drag a Spacer out of Toolbox and drop it between our new button and backButton. Spacer will push the new button to the right side of the screen.
Next we need to change the following Confi g properties for the new button:
• Set text to Add• Set itemId to addButton
We will come back and add a tap function once we complete our forms.
Add Task formTo create our Add Task form we will add a new form panel to the Current tab. Drag a Form Panel from the toolbox and drop it on our Current tab. The panel should appear below our CurrentList and CurrentDetails panels.
Next we need to drag some fi elds into our form so let's start with dropping a Text Field object on the MyFormPanel panel and changing the following Confi g properties:
• Set name to name• Set label to Name
For More Information: www.packtpub.com/creating-mobile-apps-with-sencha-touch-2/book
A Simple Task List
[ 36 ]
• Set id to name• Set margin to 3
Next, add a Text Area object to our MyFormPanel panel and set the following Confi g properties:
• Set name to description• Set label to Description• Set id to description• Set margin to 3
Now, we need to add a Select Field object to MyFormPanel and set the following Confi g properties:
• Set name to priority• Set label to Priority• Set id to priority• Set margin to 3
We also need to add some options for Select Field. Locate Options in the Confi g properties and click to edit. The Options property expects an object as its value, in this case an array of name-value pairs like this:
[{text: 'High', value: 1},{text: 'Medium', value: 2},{text: 'Low', value: 3}]
By default, the Select Field uses text for display and value for the submitted value. You can change this by editing the displayField and valueFields in the Confi g properties, but we can leave these as the defaults for our application.
We can save ourselves a lot of work if we use this form for both adding new tasks and editing existing ones. To do this we also need to add a hidden fi eld to hold the ID value of any existing tasks that we edit.
Add a Hidden Field object to MyFormPanel and set the properties for id and name to id in the Confi g section. We will use this later when saving the form.
The last thing we need in our form is two buttons; one for save and one for cancel. Add the buttons and make the following changes:
• Set text for button 1 to Save• Set itemID for button 1 to SaveButton
For More Information: www.packtpub.com/creating-mobile-apps-with-sencha-touch-2/book
Chapter 1
[ 37 ]
• Set margin for button 1 to 10• Set text for button 2 to Cancel• Set itemID for button 2 to CancelButton• Set margin for button 2 to 10
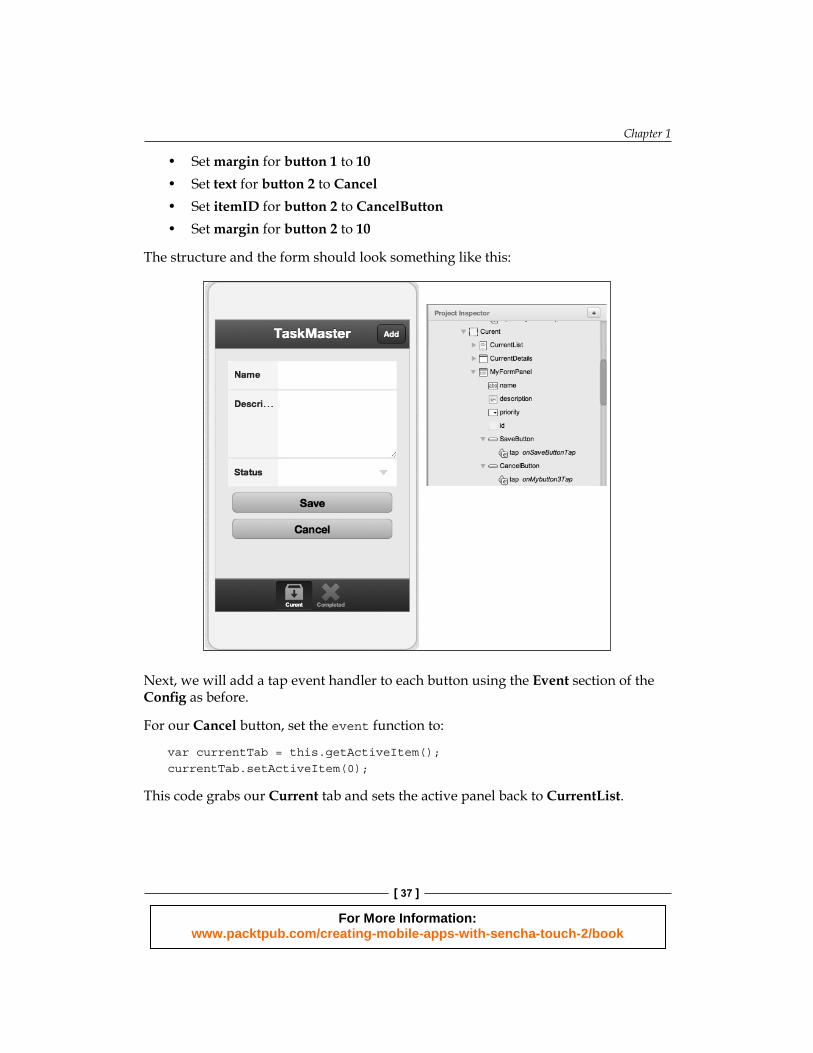
The structure and the form should look something like this:
Next, we will add a tap event handler to each button using the Event section of the Confi g as before.
For our Cancel button, set the event function to:
var currentTab = this.getActiveItem(); currentTab.setActiveItem(0);
This code grabs our Current tab and sets the active panel back to CurrentList.
For More Information: www.packtpub.com/creating-mobile-apps-with-sencha-touch-2/book
A Simple Task List
[ 38 ]
The Save button is a bit more complex. As we mentioned earlier, we want to use this form for both adding new tasks and editing existing ones. This means we need to check to see if the Hidden Field value of our form is set and save the task correctly.
Add the following code to the SaveButton tap event function:
var currentTab = this.getActiveItem();var formPanel = currentTab.getActiveItem();
var values = formPanel.getValues();
var store = Ext.data.StoreManager.lookup('TaskStore');
if(values.id === null) { var record = Ext.ModelMgr.create(values, 'MyApp.model.Task'); record.set('created', new Date()); store.add(record);} else { var record = store.getById(values.id); record.set('name', values.name); record.set('description', values.description); record.set('priority', values.priority);}
store.sync();formPanel.reset();currentTab.setActiveItem(0);
Our fi rst two lines grab currentTab and formPanel. We then get the values from formPanel and store that we need to save our data to.
We check the value of our hidden fi eld to see if it has been set. This will be true if we are editing, but not if we are adding a new task.
If we are adding a new task, we create a new record option using the values form in the form fi eld, we set a create date, and add record to store.
If we are editing an existing record, we use the id value from our store to get the record from the store. We then set the name, description, and priority values of record from our form values.
Finally, we sync our store to save the record, clear out our form values and close the form by setting the active item back to our CurrentList view (0).
For More Information: www.packtpub.com/creating-mobile-apps-with-sencha-touch-2/book
Chapter 1
[ 39 ]
Editing and completing a taskFor editing a task, we are going to use the form we just created, but we need to load it up with the currently selected record. For completing a task, we just need a button.
To do this we will add a toolbar with two buttons to our CurrentDetails panel. We should probably add a Spacer object between the two buttons like we did with our previous toolbar.
Each button also needs a tap event added to it in the Confi g section, under Events.
For the Edit button, set the tap function to:
var currentTab = this.getActiveItem();var DetailsPanel = currentTab.getActiveItem();
currentTab.setActiveItem(2);var formPanel = currentTab.getActiveItem();formPanel.setRecord(DetailsPanel.getRecord());
this.setActiveItem(currentTab);
var backButton = Ext.getCmp('backButton');backButton.hide();
This code grabs record from the DetailsPanel panel and loads this into formPanel. Setting this record on the form also sets the value of our hidden fi eld to the correct id value for our record. We then display the form as before and hide the Back button.
For our Complete Task button, we need to get record from DetailsPanel and set the values for completed (a date) and isCompleted (a Boolean). We do that by setting the tap event function to this:
var currentTab = this.getActiveItem();var detailsPanel = currentTab.getActiveItem();
var record = detailsPanel.getRecord();
record.set('completed', new Date());record.set('isComplete', true);
var store = Ext.data.StoreManager.lookup('TaskStore');store.sync();
this.setActiveItem(1);var completedList = this.getActiveItem();var completedStore = completedList.getActiveItem().getStore();
For More Information: www.packtpub.com/creating-mobile-apps-with-sencha-touch-2/book
A Simple Task List
[ 40 ]
completedStore.add(record);completedList.getActiveItem().refresh();
currentTab.setActiveItem(0);
var backButton = Ext.getCmp('backButton');backButton.hide();
This gets our record as before, sets our two values, and syncs TaskStore. This sync will also cause the fi lter on TaskStore to prevent the record from displaying in our Current list.
Next we add the record to CompletedStore and refresh the view for our completed list. We fi nish up by returning the user to the Current list and hiding the Back button.
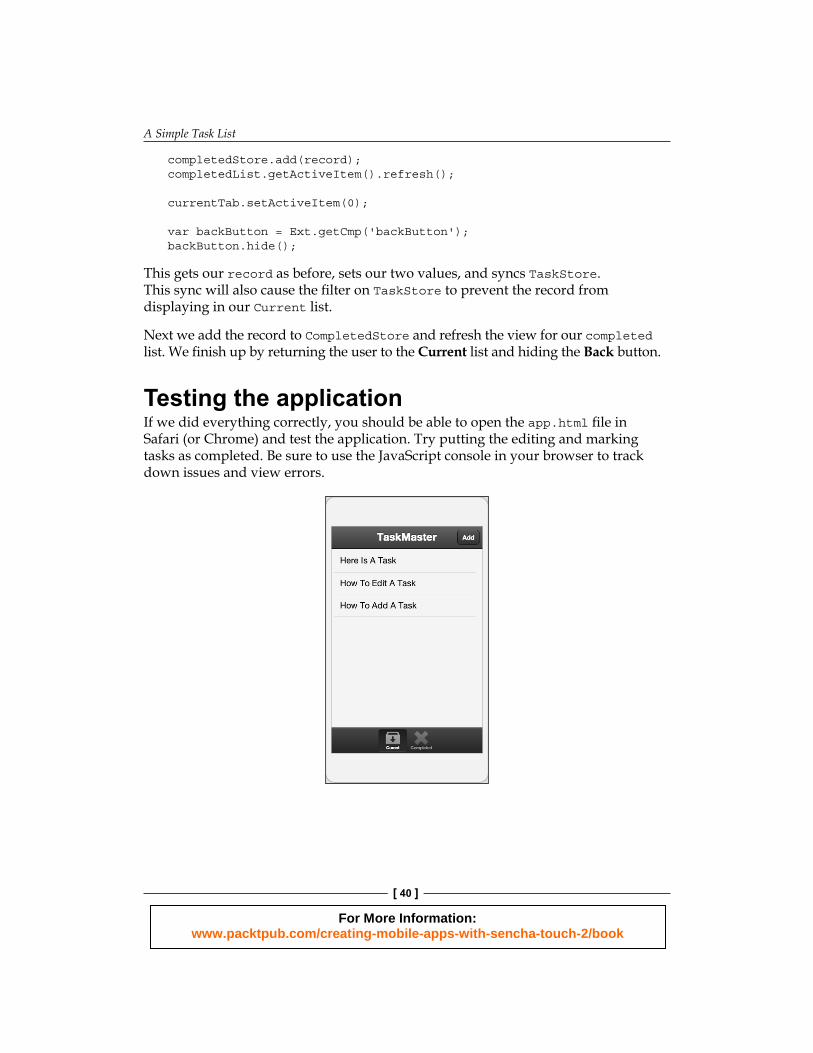
Testing the applicationIf we did everything correctly, you should be able to open the app.html fi le in Safari (or Chrome) and test the application. Try putting the editing and marking tasks as completed. Be sure to use the JavaScript console in your browser to track down issues and view errors.
For More Information: www.packtpub.com/creating-mobile-apps-with-sencha-touch-2/book
Chapter 1
[ 41 ]
Extra creditTask managing applications come in a variety of designs, with a wide variety of features. Everyone seems to have their own preference for tracking tasks. You can use this application as a base for your own personal task management application. These are a few ideas for taking the application to the next level:
• Add styles in the CSS fi le based on the priority of the tasks in the list and details
• Add a way to sort the tasks by date and priority• Customize the CurrentDetails and CompletedDetails templates
to add icons for priority
SummaryIn this chapter we discussed the basic setup for an application using local storage, including:
• The basics of the Sencha Architect application• Creating data stores to use local storage and a task model• Creating lists and details for our data stores to use• Creating events to switch between the List and Details views• Creating buttons to control navigation and launch our forms• Creating forms for editing and adding new tasks
In the next chapter we will take a look at using layouts and templates to create a more complex and visually appealing application.
For More Information: www.packtpub.com/creating-mobile-apps-with-sencha-touch-2/book

Where to buy this book You can buy Creating Mobile Apps with Sencha Touch 2 from the Packt Publishing website: http://www.packtpub.com/creating-mobile-apps-with-sencha-touch-2/book. Free shipping to the US, UK, Europe and selected Asian countries. For more information, please read our shipping policy.
Alternatively, you can buy the book from Amazon, BN.com, Computer Manuals and most internet book retailers.
www.PacktPub.com
For More Information: www.packtpub.com/creating-mobile-apps-with-sencha-touch-2/book