Embed Size (px)
Citation preview

www.zoner.com
Manage Edit Share
Creating Black-and-White Pictures
This tutorial is fully applicable for Zoner Photo Studio 12 Professional only.
If you are a Zoner Photo Studio 12 Home user, you can still test out HDR by temporarily switching to a trial of the Professional version. To do so, use the License… item in the Help menu. If you use an earlier version and have not yet used the version 12 trial, you can download and install the trial version, and use it 30 days for free.
People have been enjoying the beauty of black-and-white photography for decades, and digital photography hasn’t made it obsolete—in fact, it’s just broadened the possibilities! Now you no longer need a darkroom, filters, and a refrigerator full of film rolls with different ISOs. All you need is a color photograph and a program like Zoner Photo Studio.
• See All Tutorials
One close relative of black and white (grayscale) photography is monochromatic photography, where shades of a color are used instead of shades of white. We’re just noting its existence for now; a “how-to” will come in a later tutorial. The best starting point for black-and-white is actually color: a RAW- or TIFF-format color photo. Even though today’s digital cameras often let you shoot to grayscale directly, there is no point in denying yourself the wide range of options that you can have for
converting the picture’s colors to grayscale, and for simulating color filters as well. What’s more, you can easily make a color photo black and white, but not the opposite.

www.zoner.com
Manage Edit Share
The foundation for a good black-and-white picture is a good conversion from color to grayscale. This is because a bad conversion can make color pairs that normally contrast well melt together into a single shade of gray. Desaturation (removal of the color element) is a classic technique, but it gives disastrous results for e.g. a picture of an autumn forest by a green meadow. The two practically flow together, leaving a picture that’s bland and short on contrast. Zoner Photo Studio does of course offer Desaturation, but it offers other methods too. To choose among them, use the Grayscale window: Effects > Grayscale… (Ctrl+G). The method simply named Grayscale is good for automatic or quick conversions, since it’s based on how the human eye sees light. The Advanced method does more to take into account the picture’s gamma (its brightness element). One useful grayscale conversion option offered is work with color channels.

www.zoner.com
Manage Edit Share
Channel-by-channel Conversion
The photographic data captured by a digital camera sensor contains three independent color elements—red, green, and blue. These are the photo’s color channels. During conversion to black and white, you can work with the individual color channels separately. This kind of approach can bring superb results. There are several possibilities here—you can use the minimum, maximum, or average of all channels, restrict conversion to one channel, or percentually set how much each channel contributes. For this last type, you should in theory make the three channels add up to 100% (you can use the Normalize checkbox to force this), but you can get some interesting results even without this restriction. The more a given channel is represented, the lighter the output. Thus for example when converting over the red channel, the red parts of the photo will be anywhere from light gray all the way to white. The equivalent in film photography would be using a red filter. And by mixing channels, you can simulate various filter colors.
www.zoner.com
Manage Edit Share
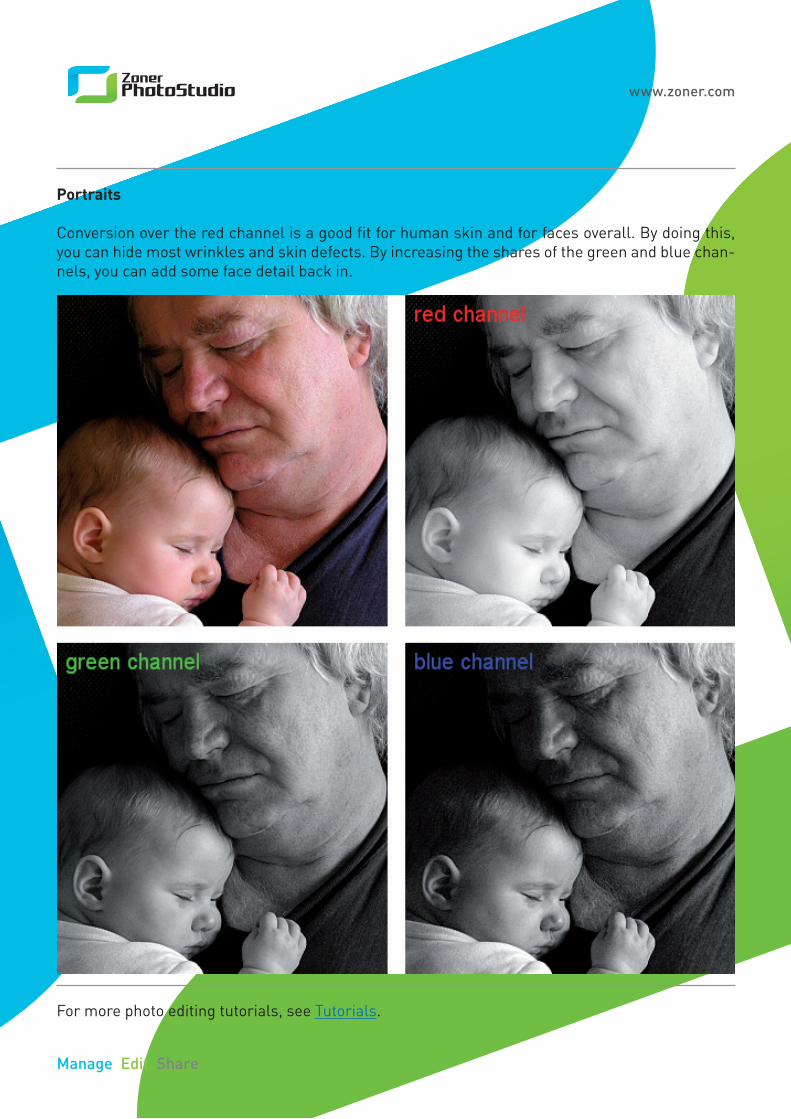
Portraits
Conversion over the red channel is a good fit for human skin and for faces overall. By doing this, you can hide most wrinkles and skin defects. By increasing the shares of the green and blue chan-nels, you can add some face detail back in.
For more photo editing tutorials, see Tutorials.