Embed Size (px)
Citation preview
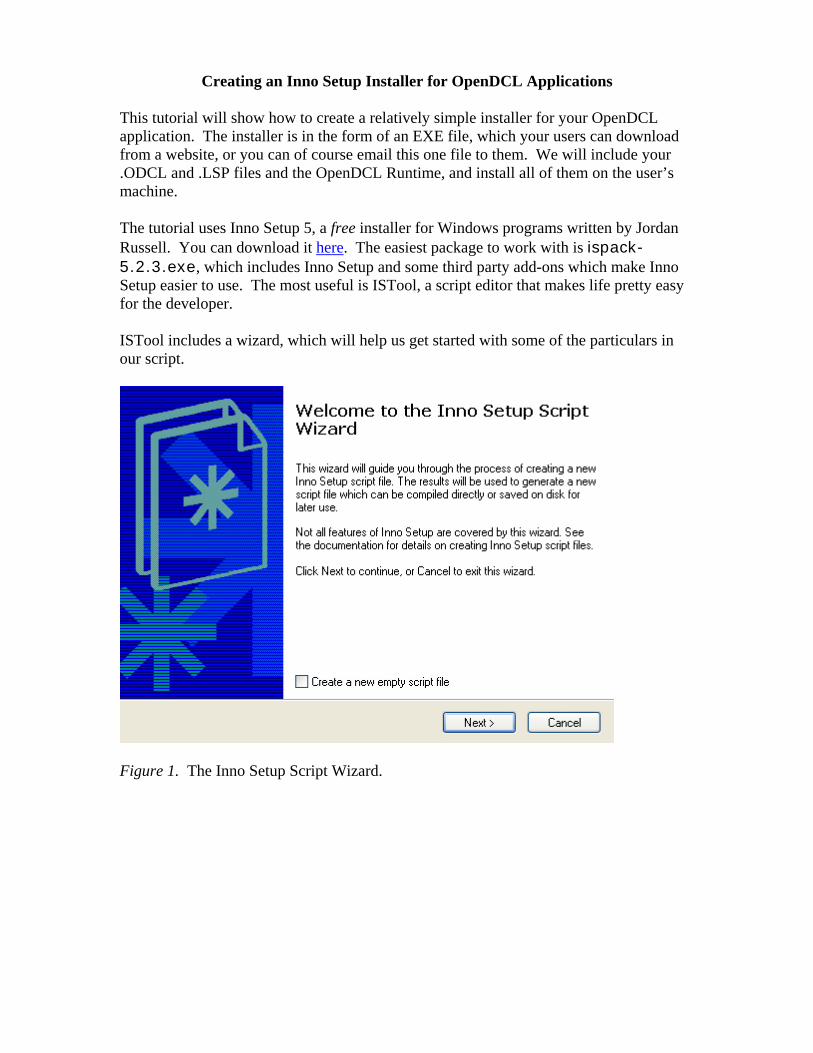
Creating an Inno Setup Installer for OpenDCL Applications This tutorial will show how to create a relatively simple installer for your OpenDCL application. The installer is in the form of an EXE file, which your users can download from a website, or you can of course email this one file to them. We will include your .ODCL and .LSP files and the OpenDCL Runtime, and install all of them on the user’s machine. The tutorial uses Inno Setup 5, a free installer for Windows programs written by Jordan Russell. You can download it here. The easiest package to work with is ispack-5.2.3.exe, which includes Inno Setup and some third party add-ons which make Inno Setup easier to use. The most useful is ISTool, a script editor that makes life pretty easy for the developer. ISTool includes a wizard, which will help us get started with some of the particulars in our script.
Figure 1. The Inno Setup Script Wizard.

Figure 2. This information will be displayed when the Setup program runs.
Figure 3. Here you decide where your program will go on the user’s computer.
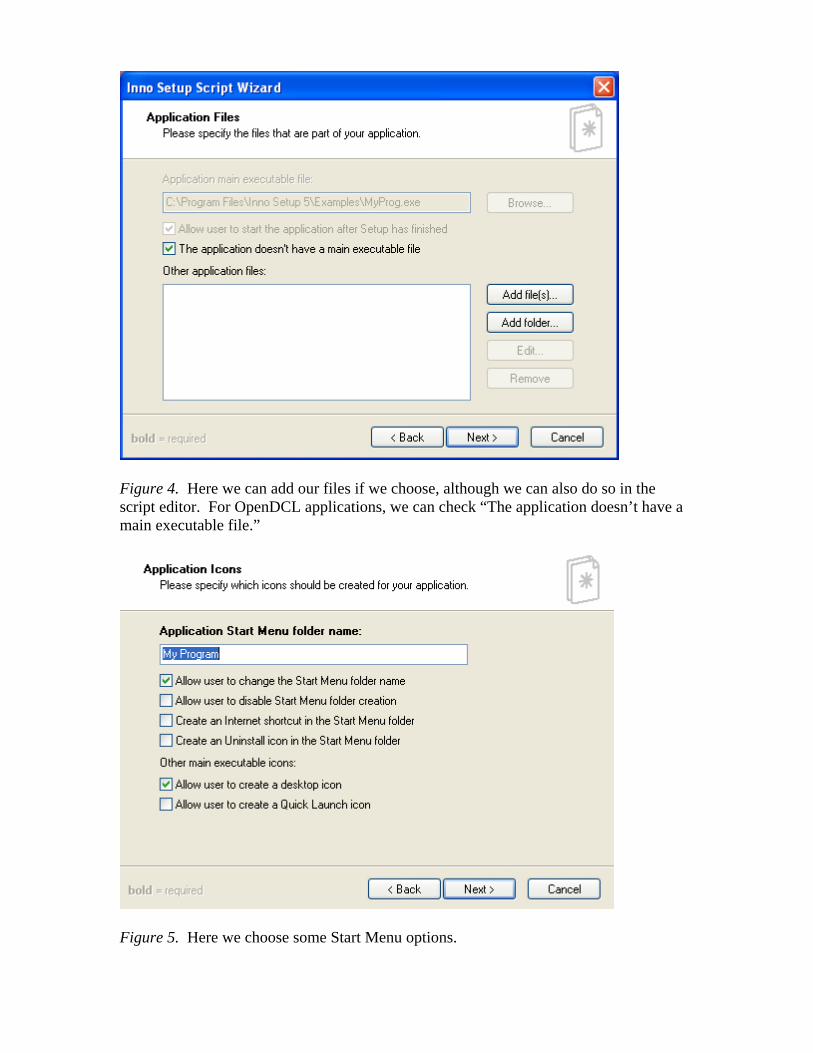
Figure 4. Here we can add our files if we choose, although we can also do so in the script editor. For OpenDCL applications, we can check “The application doesn’t have a main executable file.”
Figure 5. Here we choose some Start Menu options.
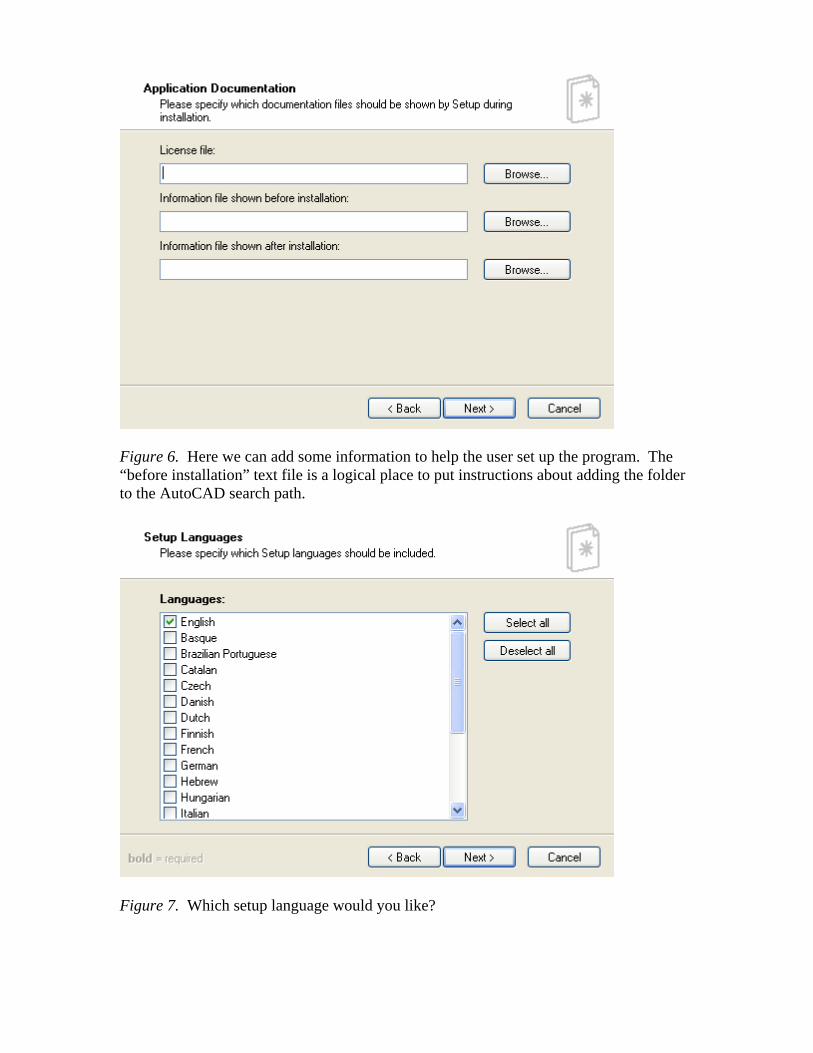
Figure 6. Here we can add some information to help the user set up the program. The “before installation” text file is a logical place to put instructions about adding the folder to the AutoCAD search path.
Figure 7. Which setup language would you like?
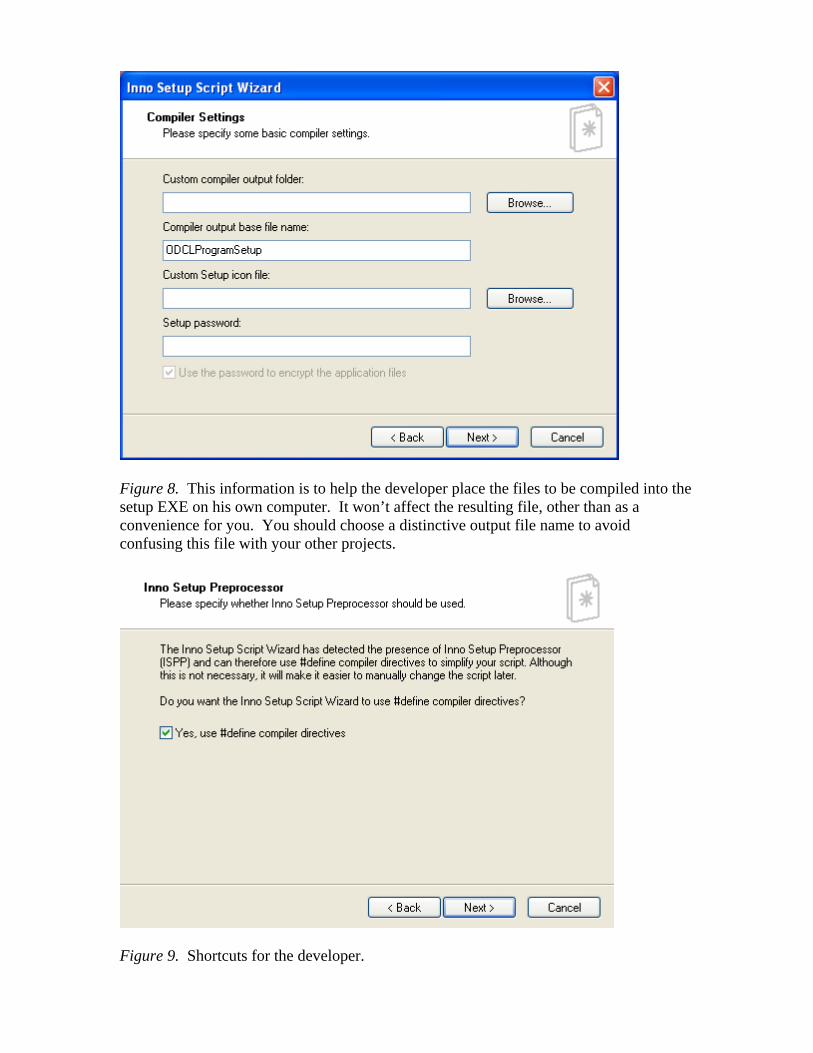
Figure 8. This information is to help the developer place the files to be compiled into the setup EXE on his own computer. It won’t affect the resulting file, other than as a convenience for you. You should choose a distinctive output file name to avoid confusing this file with your other projects.
Figure 9. Shortcuts for the developer.
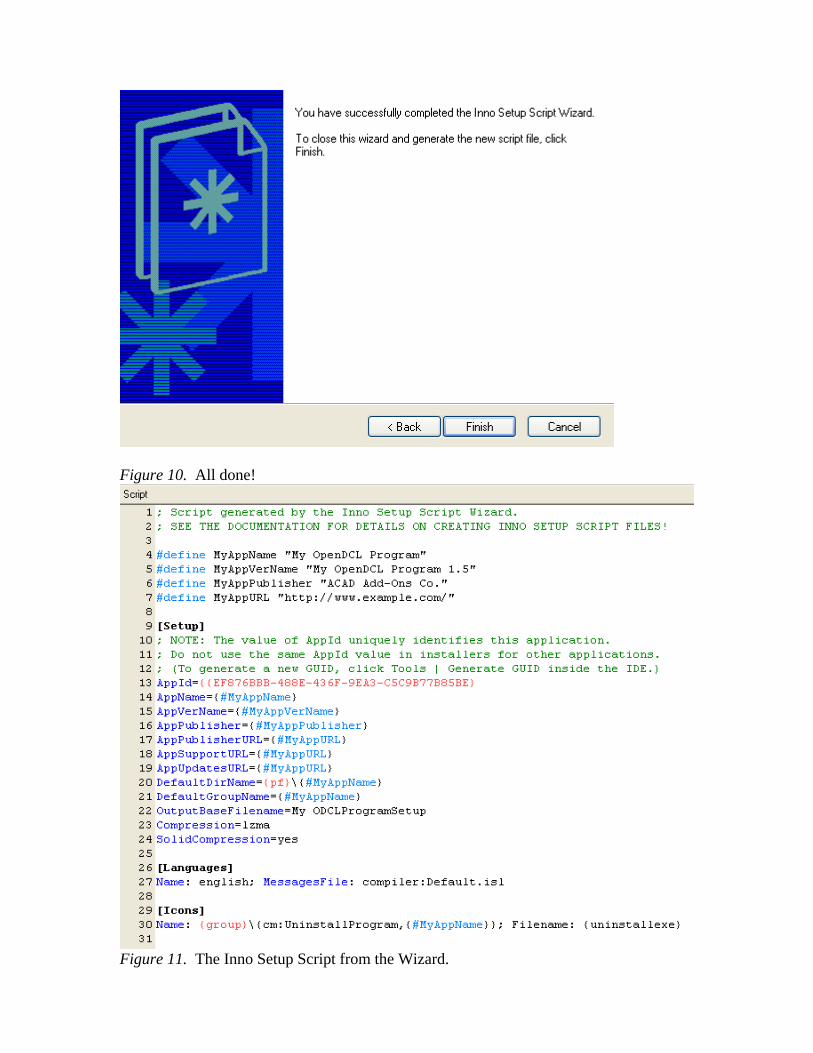
Figure 10. All done!
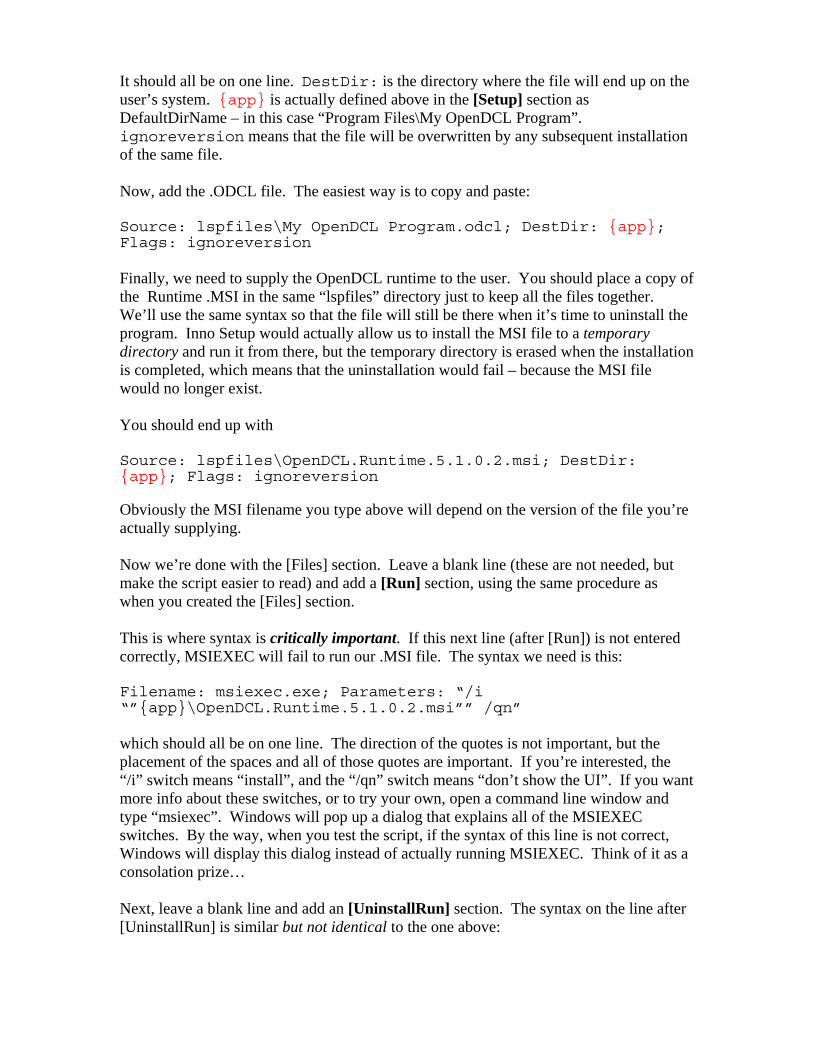
Figure 11. The Inno Setup Script from the Wizard.
Figure 11 shows exactly what the wizard has placed into our script. Actually at this point, because our applications contain very few files, we’re almost finished! We need to add a few lines between the “[Languages]” and “[Icons]” sections. Here are a few notes on the workings of Inno Setup:
• You don’t need to enter the full path name to your files if you place the script you’re writing in the Input folder under “C:\Program Files\ISTool”. You can use relative paths to save some typing. In other words, if you create a folder called “lspfiles” beneath “C:\Program Files\ISTool\Input”, you can simply refer to it as “lspfiles” in the sections we’re about to create.
• The sections we’re creating have special names which must not be
changed. You’ll know you’ve done them correctly because they will turn bold automatically after you type them – you don’t need to do this manually.
• The [Files] section contains the special terms “Source:”, “DestDir:” and
“Flags:”. Again these must be used as written here for the compiler to recognize them. There are other terms, but we’re not going to use them in this example.
• In the [Run] and [UninstallRun] sections, we use quotation marks to
enter the parameters that we need to pass to MSIEXEC.EXE. Inno Setup requires us to use double quotes (“) around the entire string of parameters. Because of the way Inno Setup deals with spaces in filenames, we must use double double quotes (“”) around filenames that may contain spaces! Since our application directory, referred to by the special name “{app}”, contains the string “Program Files”, we need to use three double quotes in our parameter string. If we fail to do this string just right, it will fail to run MSIEXEC when we ask.
OK, let’s finish the code with the above in mind. After the line about the English (or whichever language you chose in the Wizard) language file, leave a blank line, and then type in “[Files]”. This should turn bold if it’s typed correctly. Start a new line, and begin it with “Source:”. Now leave a space, and type in your relative path below the installer script you’re editing, and your first file name. In this example I’m going to use the .LSP file and .ODCL file that make up your project, though if you follow the OpenDCL Tutorial recommendations and create a .VLX file (that includes both of these files) instead, you’ll only need to put that one file here instead of the .LSP and .ODCL files. You should end up with this: Source: lspfiles\My OpenDCL Program.lsp; DestDir: {app}; Flags: ignoreversion
It should all be on one line. DestDir: is the directory where the file will end up on the user’s system. {app} is actually defined above in the [Setup] section as DefaultDirName – in this case “Program Files\My OpenDCL Program”. ignoreversion means that the file will be overwritten by any subsequent installation of the same file. Now, add the .ODCL file. The easiest way is to copy and paste: Source: lspfiles\My OpenDCL Program.odcl; DestDir: {app}; Flags: ignoreversion Finally, we need to supply the OpenDCL runtime to the user. You should place a copy of the Runtime .MSI in the same “lspfiles” directory just to keep all the files together. We’ll use the same syntax so that the file will still be there when it’s time to uninstall the program. Inno Setup would actually allow us to install the MSI file to a temporary directory and run it from there, but the temporary directory is erased when the installation is completed, which means that the uninstallation would fail – because the MSI file would no longer exist. You should end up with Source: lspfiles\OpenDCL.Runtime.5.1.0.2.msi; DestDir: {app}; Flags: ignoreversion Obviously the MSI filename you type above will depend on the version of the file you’re actually supplying. Now we’re done with the [Files] section. Leave a blank line (these are not needed, but make the script easier to read) and add a [Run] section, using the same procedure as when you created the [Files] section. This is where syntax is critically important. If this next line (after [Run]) is not entered correctly, MSIEXEC will fail to run our .MSI file. The syntax we need is this: Filename: msiexec.exe; Parameters: “/i “”{app}\OpenDCL.Runtime.5.1.0.2.msi”” /qn” which should all be on one line. The direction of the quotes is not important, but the placement of the spaces and all of those quotes are important. If you’re interested, the “/i” switch means “install”, and the “/qn” switch means “don’t show the UI”. If you want more info about these switches, or to try your own, open a command line window and type “msiexec”. Windows will pop up a dialog that explains all of the MSIEXEC switches. By the way, when you test the script, if the syntax of this line is not correct, Windows will display this dialog instead of actually running MSIEXEC. Think of it as a consolation prize… Next, leave a blank line and add an [UninstallRun] section. The syntax on the line after [UninstallRun] is similar but not identical to the one above:
Filename: msiexec.exe; Parameters: “/x “”{app}\OpenDCL.Runtime.5.1.0.2.msi””” Here, when the uninstaller runs, we need to tell MSIEXEC that we want to uninstall the MSI file, and that’s what “/x” does. The “/dn” switch is not recognized when we are uninstalling, so we simply leave it out. The script file should now look like this:
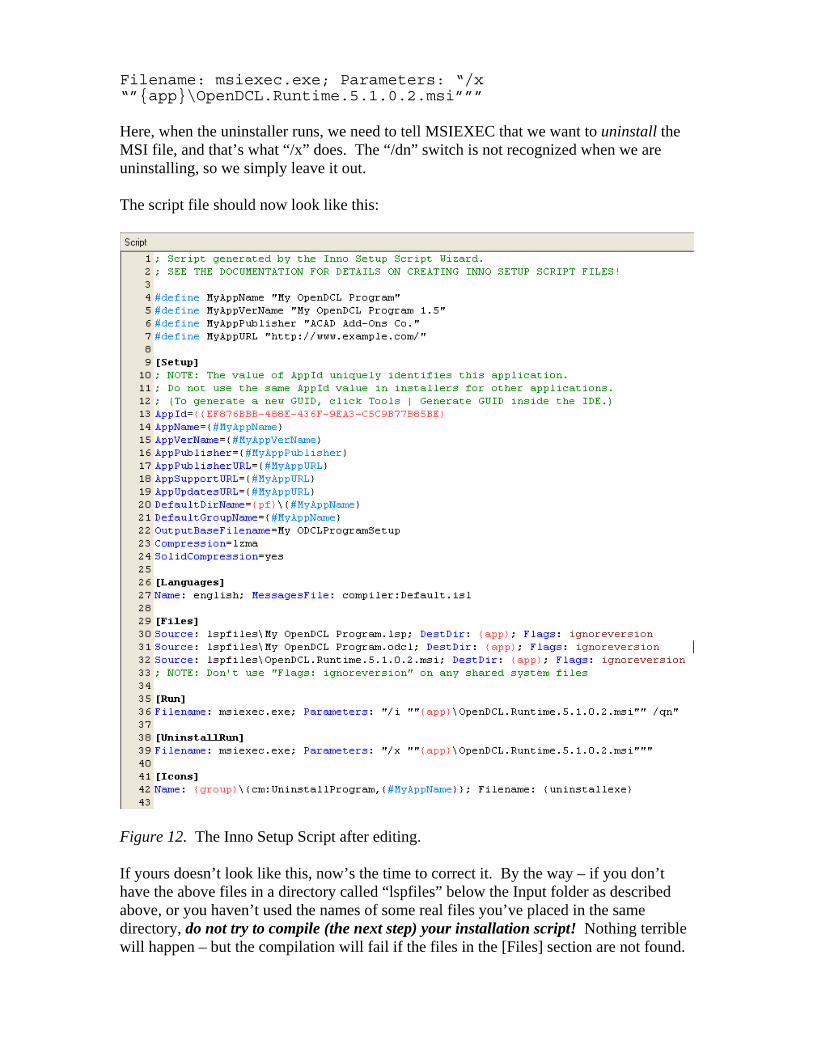
Figure 12. The Inno Setup Script after editing. If yours doesn’t look like this, now’s the time to correct it. By the way – if you don’t have the above files in a directory called “lspfiles” below the Input folder as described above, or you haven’t used the names of some real files you’ve placed in the same directory, do not try to compile (the next step) your installation script! Nothing terrible will happen – but the compilation will fail if the files in the [Files] section are not found.
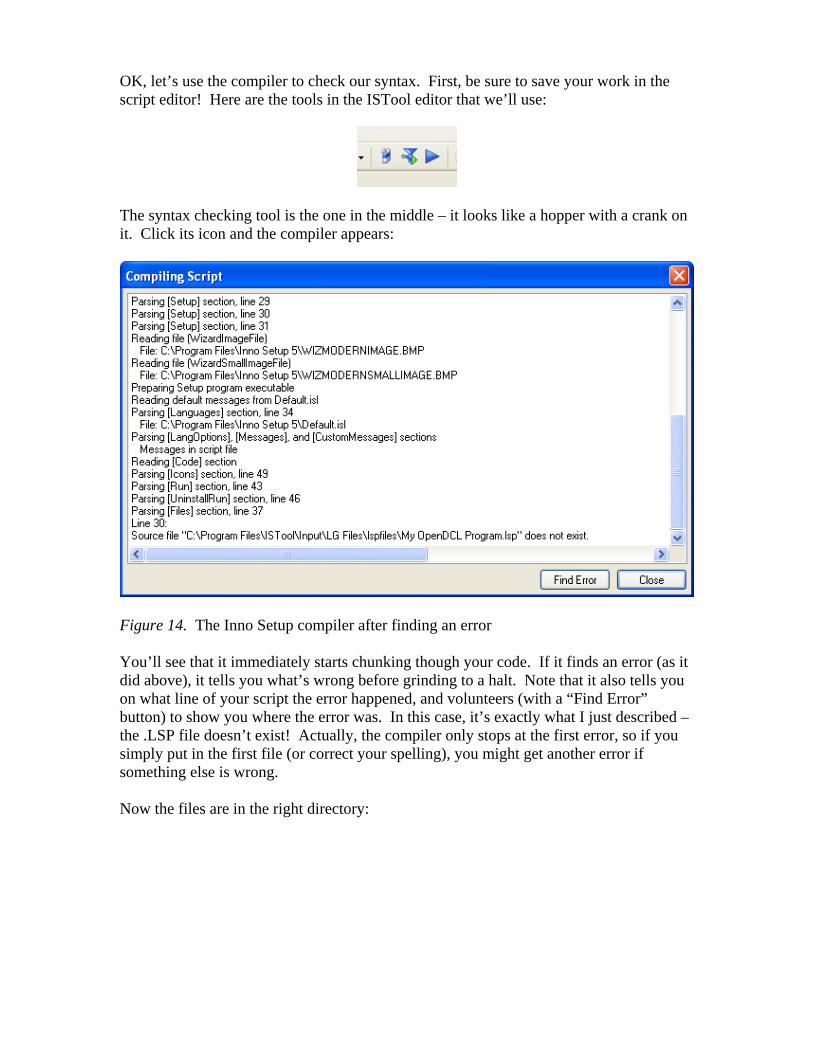
OK, let’s use the compiler to check our syntax. First, be sure to save your work in the script editor! Here are the tools in the ISTool editor that we’ll use:
The syntax checking tool is the one in the middle – it looks like a hopper with a crank on it. Click its icon and the compiler appears:
Figure 14. The Inno Setup compiler after finding an error You’ll see that it immediately starts chunking though your code. If it finds an error (as it did above), it tells you what’s wrong before grinding to a halt. Note that it also tells you on what line of your script the error happened, and volunteers (with a “Find Error” button) to show you where the error was. In this case, it’s exactly what I just described – the .LSP file doesn’t exist! Actually, the compiler only stops at the first error, so if you simply put in the first file (or correct your spelling), you might get another error if something else is wrong. Now the files are in the right directory:
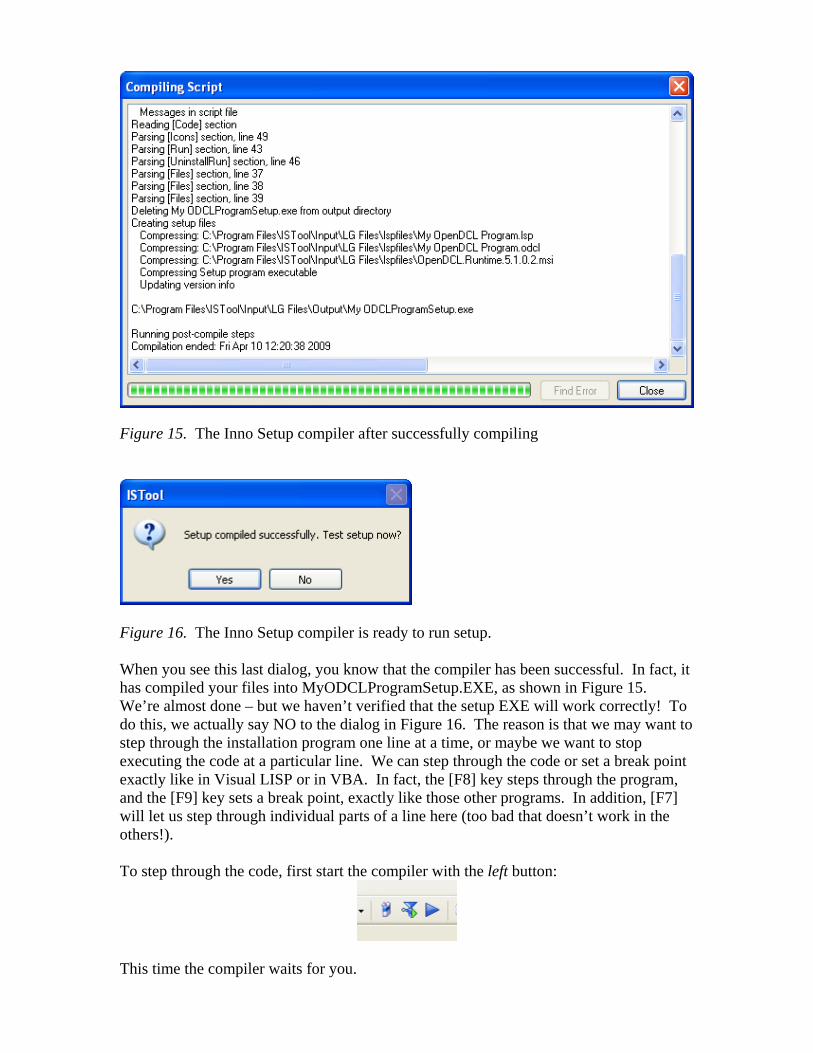
Figure 15. The Inno Setup compiler after successfully compiling
Figure 16. The Inno Setup compiler is ready to run setup. When you see this last dialog, you know that the compiler has been successful. In fact, it has compiled your files into MyODCLProgramSetup.EXE, as shown in Figure 15. We’re almost done – but we haven’t verified that the setup EXE will work correctly! To do this, we actually say NO to the dialog in Figure 16. The reason is that we may want to step through the installation program one line at a time, or maybe we want to stop executing the code at a particular line. We can step through the code or set a break point exactly like in Visual LISP or in VBA. In fact, the [F8] key steps through the program, and the [F9] key sets a break point, exactly like those other programs. In addition, [F7] will let us step through individual parts of a line here (too bad that doesn’t work in the others!). To step through the code, first start the compiler with the left button:
This time the compiler waits for you.
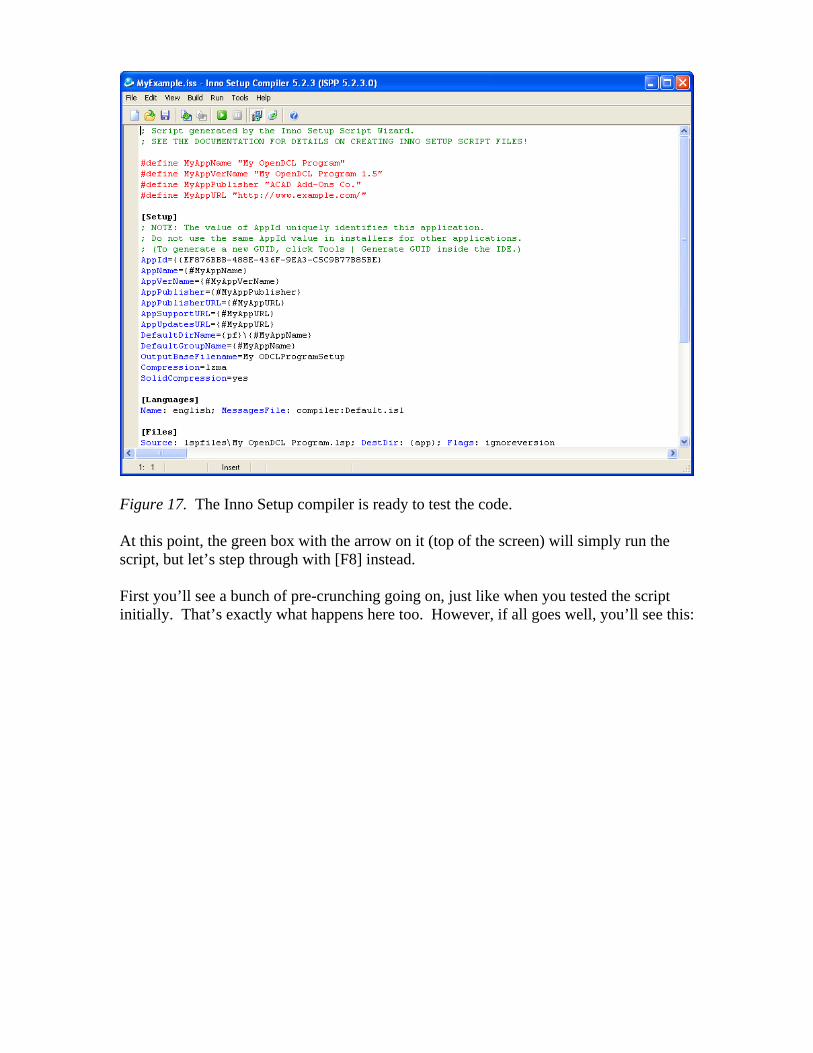
Figure 17. The Inno Setup compiler is ready to test the code. At this point, the green box with the arrow on it (top of the screen) will simply run the script, but let’s step through with [F8] instead. First you’ll see a bunch of pre-crunching going on, just like when you tested the script initially. That’s exactly what happens here too. However, if all goes well, you’ll see this:
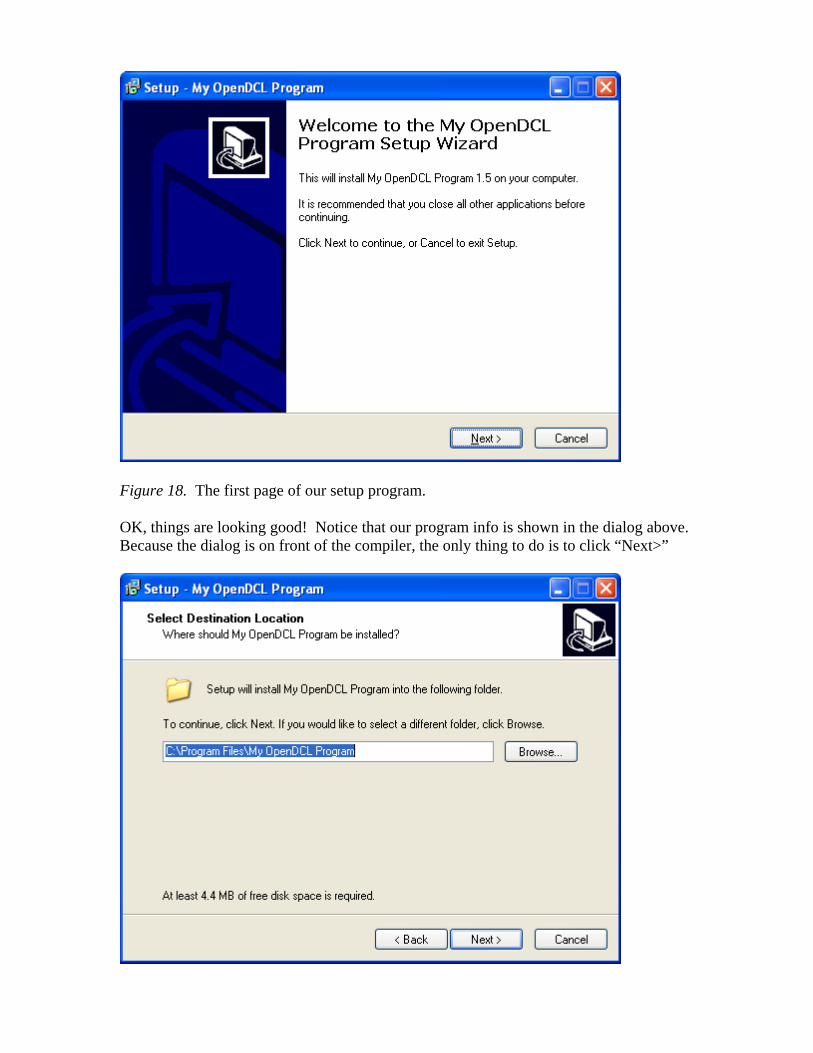
Figure 18. The first page of our setup program. OK, things are looking good! Notice that our program info is shown in the dialog above. Because the dialog is on front of the compiler, the only thing to do is to click “Next>”
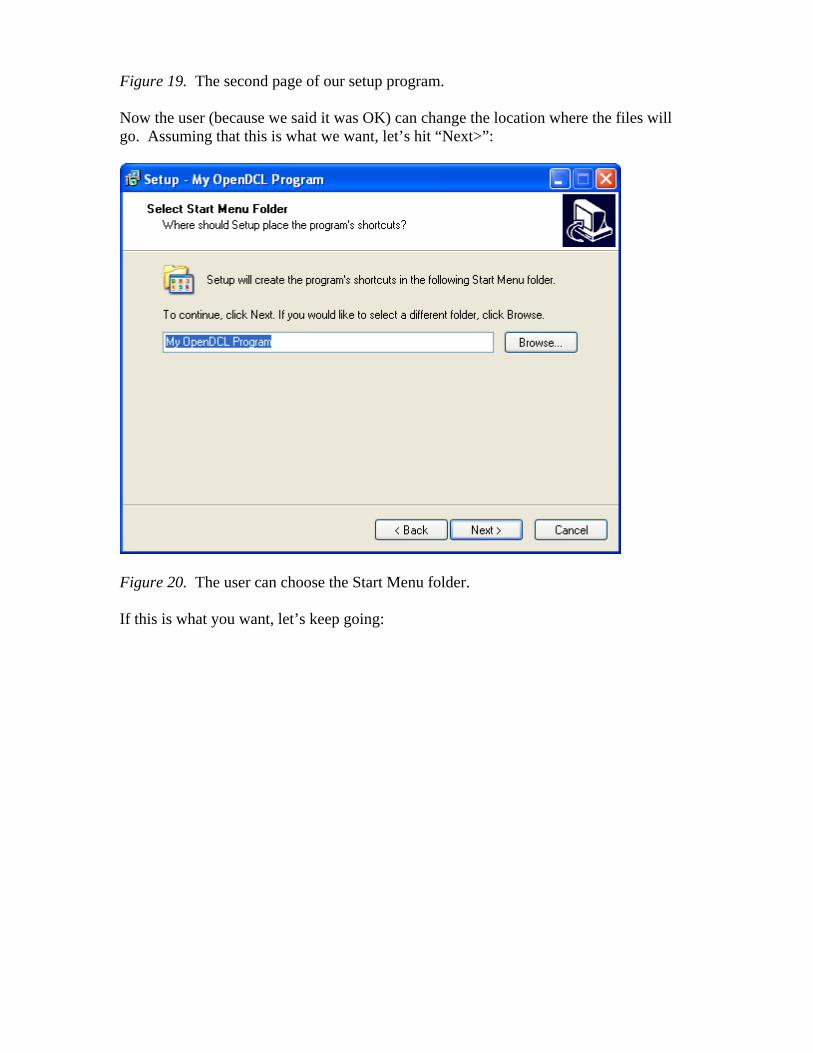
Figure 19. The second page of our setup program. Now the user (because we said it was OK) can change the location where the files will go. Assuming that this is what we want, let’s hit “Next>”:
Figure 20. The user can choose the Start Menu folder. If this is what you want, let’s keep going:
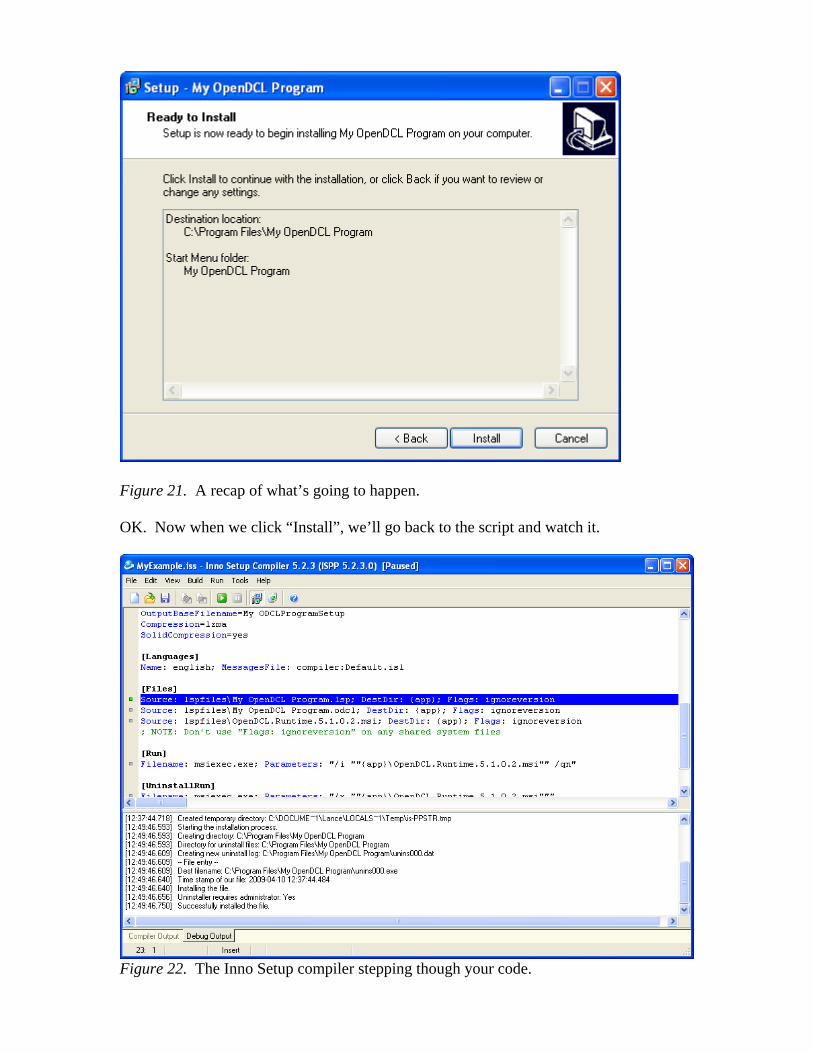
Figure 21. A recap of what’s going to happen. OK. Now when we click “Install”, we’ll go back to the script and watch it.
Figure 22. The Inno Setup compiler stepping though your code.
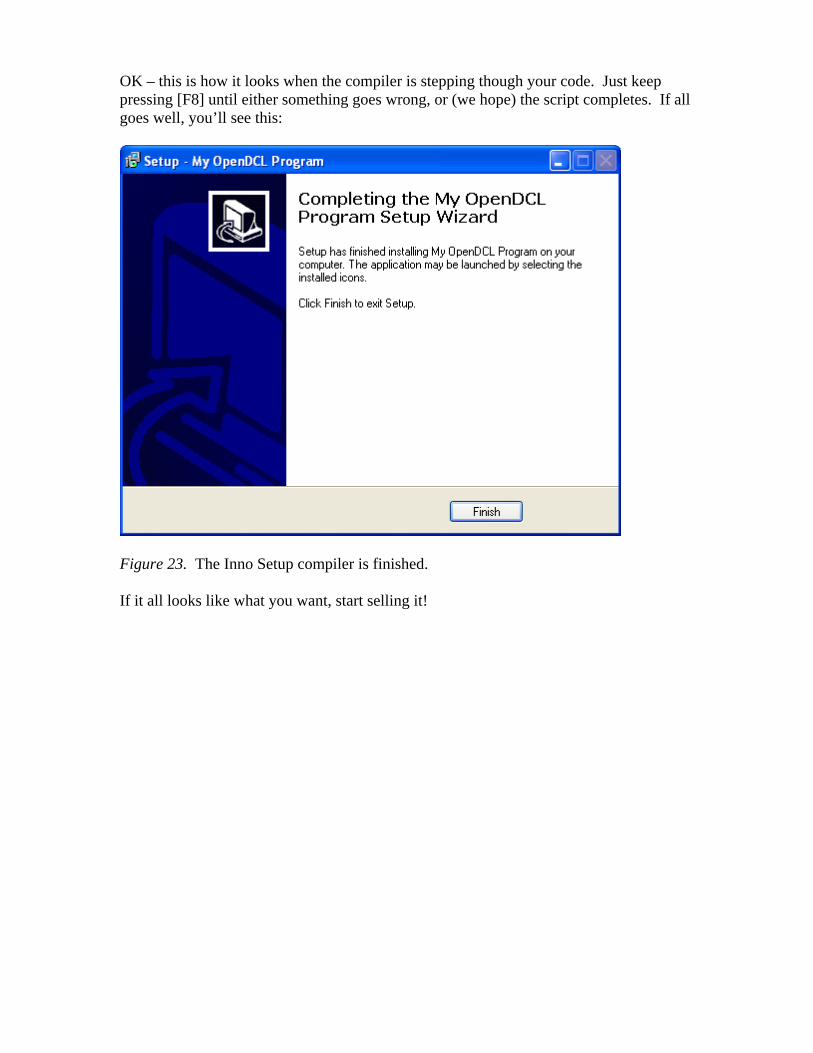
OK – this is how it looks when the compiler is stepping though your code. Just keep pressing [F8] until either something goes wrong, or (we hope) the script completes. If all goes well, you’ll see this:
Figure 23. The Inno Setup compiler is finished. If it all looks like what you want, start selling it!