Embed Size (px)
Citation preview

Q U O T E S
v07.01.13 1 Quotes
Quotes Creating a Quote ....................................................... 1
Quote Page Layout and Navigation .......................... 4 Sections ................................................................. 4 Integrated Help ...................................................... 4 Dynamic Interface .................................................. 5
Copy an Existing Quote ............................................ 5 General Information Section ..................................... 6 Community Information Section ............................... 7
Manual Entry of Community and Flood Zone ......... 8 Building Information Section ..................................... 9
Elevation Certificate Details ................................. 11 LFE Calculator ..................................................... 12 Part II Information ................................................ 14 Preferred Risk Policy Eligibility ............................. 14
Coverage & Rates Information Section .................. 15 Standard .............................................................. 15 Preferred Risk ...................................................... 16 Error List .............................................................. 17
Rate Information Section ........................................ 18 Rate Information (Standard) ................................. 18 Rate Information (Preferred Risk) ......................... 18 Action Buttons ...................................................... 19
Working with Existing Quotes ................................ 20 Copying a Quote .................................................... 22 Converting a Quote to an Application ..................... 22
The Quote module is designed to gather the minimum amount of information to allow a property to be rated. Information from a quote can easily be converted to an application just by the click of a button so there is no redundant entry.
This document covers how to generate a new quote and the different sections that make up the quote. It also addresses how to work with existing quotes, copy a quote to create a new quote, and convert a quote to an application.
Creating a Quote You begin a quote on the Main Portal page.
Click the Create Quote hyperlink from the menu on the left side of the page.
Q U O T E S
v07.01.13 2 Quotes
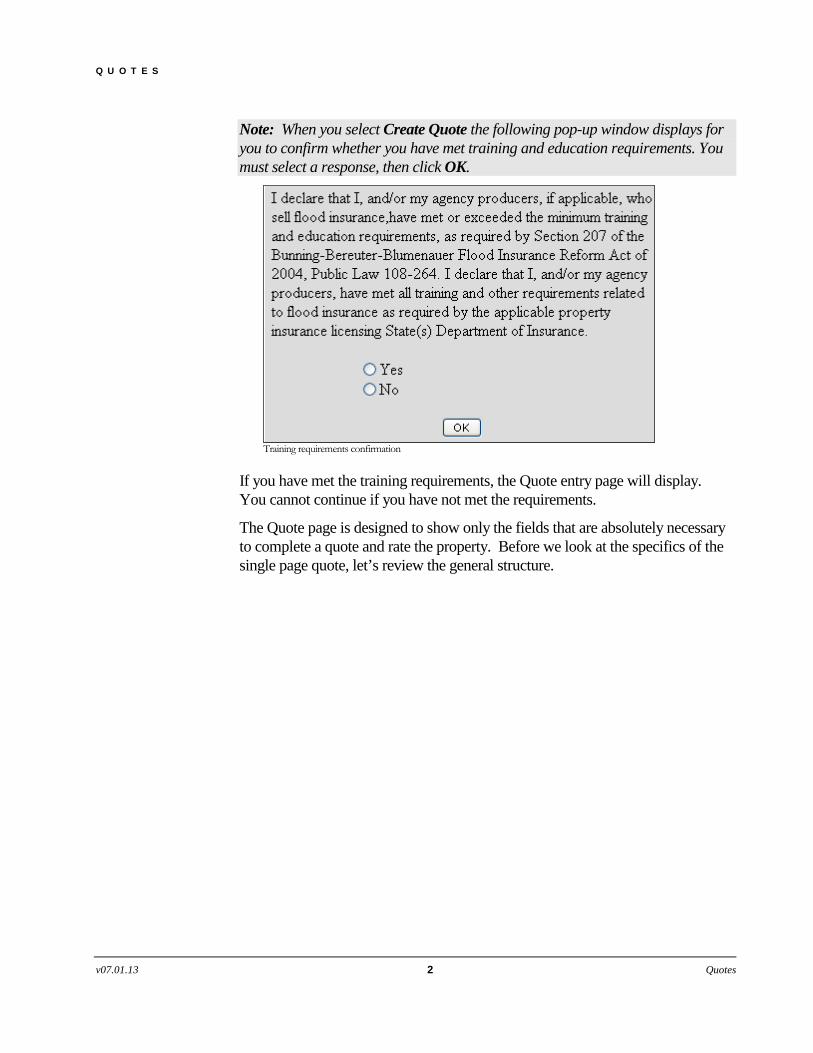
Note: When you select Create Quote the following pop-up window displays for you to confirm whether you have met training and education requirements. You must select a response, then click OK.
Training requirements confirmation
If you have met the training requirements, the Quote entry page will display. You cannot continue if you have not met the requirements.
The Quote page is designed to show only the fields that are absolutely necessary to complete a quote and rate the property. Before we look at the specifics of the single page quote, let’s review the general structure.

Q U O T E S
v07.01.13 3 Quotes
Quote entry page
You won’t be able to see the entire page at one time on your computer screen so you will need to scroll down in order to see some of the fields near the bottom of the page (or use the section hyperlinks as discussed on the next page).
Fields that have a * symbol next to them are always required, regardless of policy type. You must complete all required fields in order to complete the quote. If you don’t enter them, you will receive an error message when you try to calculate the premium.
Required fields are denoted by the red asterisk
Click a hyperlink to go to that section of the quote.
Use these buttons to move among the different sections of the quote.
Click the question mark to view help specific to a field or button.
For fields requesting a date, click the calendar icon to help you locate and enter the correct date.
A Quote ID is not assigned until premium is calculated or the quote is saved or copied.

Q U O T E S
v07.01.13 4 Quotes
Quote Page Layout and Navigation
Sections The page is divided into several main sections. These sections are listed at the top of the Quote page (as shown below) and are linked to their respective areas on the page.
Clicking one of the section hyperlinks will move the page directly to that area of the quote. This process saves you time and prevents unnecessary scrolling.
Each section has a header that looks something like this:
When you are in a specific section, you can navigate from it using the buttons provided on the right side of the section header instead of scrolling.
Click to go to the top of the page.
Click to move to the section above the one you’re currently viewing.
Click to move from one section to the next one below it.
Click to go to the bottom of the page where the action buttons are.
Integrated Help Clicking the Help button in the section header displays a help topic for that section of the quote. The help displays in a separate window:
Help window for a section
Additionally, when you see the Help question mark icon next to a field, for example , it means specific field-level help is available. Click the icon to view the help topic.
Click the Close button [x] to close the Help window.

Q U O T E S
v07.01.13 5 Quotes
Dynamic Interface One of the most important features of the Quote page is its dynamic interface. The page actually updates its appearance as you enter information and make selections. That way, you only see the fields you need to enter. Many entry fields and other controls only display if they directly apply to the property you’re working with.
For example, the system will prompt you to indicate whether or not the property is a condominium. You would specify Yes or No using option buttons.
Condominium question
If the building were not a condominium, you would simply leave the selection as No and continue to enter your quote. However, if the quote were for a condominium, you would see additional fields when you selected Yes.
Condominium question with expanded area
The additional fields only display when you indicate the building is a condominium. As you enter more information about the property, you will see more entry fields display, if appropriate. You only see the fields you need in order to complete the quote.
Now let’s look a little closer at each part of the quote entry page.
Copy an Existing Quote When you are creating a new quote and you want to create the quote by copying an existing quote (for example, you’ve already created a quote for a similar property), enter the ID number of the existing quote in the Existing Quote ID field and click Copy. The information from the other quote will be copied and filled in for you. If you do not know the ID, click Search to find it. Once you select it from the search results, the information will be copied and filled in.
Copy Quote area
The page displays more or fewer fields interactively based on your answers.

Q U O T E S
v07.01.13 6 Quotes
General Information Section This section shows the first part of the quote process.
General Information section
The General Information section includes the following required fields:
1 NFIP Policy Type – From the drop-down list, select the type of policy you want. Click the Help icon if you need assistance.
2 Requested Effective Date – Enter the date when you want the policy to go into effect (mm/dd/yy). Click the calendar icon if you want to select the date.
3 Insured Name – Enter the name of the person who is getting the insurance. Use upper and lower case letters as appropriate. Click either Person or Organization to indicate whether the insured is a person or organization. Basically, selecting Person saves the name in “last name, first name” order. Selecting Organization saves the name as entered. This is important to know when performing a search and viewing search results.
4 Property Address – Enter the property address. The first field is required. It is intended for the address number and street name. The second field is available for additional information, such as suite or apartment number.
5 City/State/Zip – Identify the property location’s city, state, and postal code in the appropriate fields: enter the city name in the first field, select the state from the drop-down list, and enter the postal code in the third field.
NOTE: The address that you enter will be checked against a comprehensive postal database when you click either the Calculate Premium button or the Order New Zone Certificate button. This will ensure that the address entered is an accurate, valid address. If the address cannot be validated, the property cannot be rated.
1
2
3
4
5
7
6

Q U O T E S
v07.01.13 7 Quotes
You will be alerted if the address you entered is not found as a valid address. The address will need to be corrected before you can continue (or marked as a descriptive address). If possible matches exist in the database, a “View possible addresses” link displays next to the Property Address field. Click the link to view the addresses. If the one you want is listed you can select it and it will be inserted for you.
6 Descriptive Address – If the address under Property Location Address is a descriptive location rather than a specific address, select this check box. As a result, the property address won’t be verified against the database.
7 Check if the mailing address is the SAME as property address – This check box is selected as the default. If the mailing address is different from the property location address, click the check box to clear it. Additional fields will then display for the mailing address. You can enter the address using the same guidelines used for the Property Address.
Community Information Section When you are creating a quote, you will need to provide community and zone information before the property can be rated.
Community Information section
When you are creating a new quote, the Community, FIRM Zone, Suffix and Panel ID fields are blank (unless you copied an existing quote that had this information). You can access flood zone determinations directly through the system to certify community information or you can manually enter the zone and community information.
1 Order New Zone Certificate – Click the Order New Zone Certificate button to request an automatic zone determination. Refer to the Zone Determination reference document for more information about this process.
2 Use Previously Ordered Certificate – Click the Use Previously Ordered Certificate button if a zone determination has already been ordered for this property and it has not yet been associated with a quote or application. Refer to the Zone Determination reference document for more information.
3 Enter Community Information – Click the Enter Community Information button when you want to manually enter the community and zone information. The Community and Flood Zone Information dialog box will display. Refer to the next section.
Mailing Address entry fields only display if you specify that the mailing address is different from the property address.
1 2
3
Q U O T E S
v07.01.13 8 Quotes
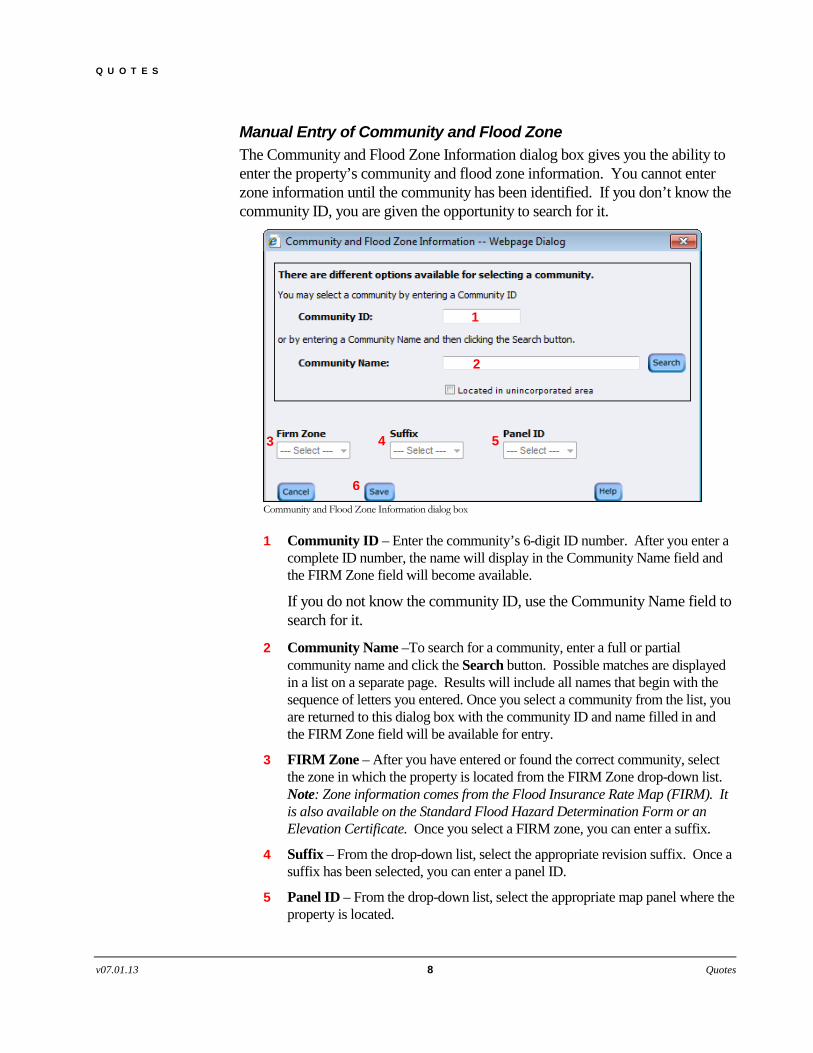
Manual Entry of Community and Flood Zone The Community and Flood Zone Information dialog box gives you the ability to enter the property’s community and flood zone information. You cannot enter zone information until the community has been identified. If you don’t know the community ID, you are given the opportunity to search for it.
Community and Flood Zone Information dialog box
1 Community ID – Enter the community’s 6-digit ID number. After you enter a complete ID number, the name will display in the Community Name field and the FIRM Zone field will become available.
If you do not know the community ID, use the Community Name field to search for it.
2 Community Name –To search for a community, enter a full or partial community name and click the Search button. Possible matches are displayed in a list on a separate page. Results will include all names that begin with the sequence of letters you entered. Once you select a community from the list, you are returned to this dialog box with the community ID and name filled in and the FIRM Zone field will be available for entry.
3 FIRM Zone – After you have entered or found the correct community, select the zone in which the property is located from the FIRM Zone drop-down list. Note: Zone information comes from the Flood Insurance Rate Map (FIRM). It is also available on the Standard Flood Hazard Determination Form or an Elevation Certificate. Once you select a FIRM zone, you can enter a suffix.
4 Suffix – From the drop-down list, select the appropriate revision suffix. Once a suffix has been selected, you can enter a panel ID.
5 Panel ID – From the drop-down list, select the appropriate map panel where the property is located.
1
2
3 4 5
6

Q U O T E S
v07.01.13 9 Quotes
6 Save – Click the Save button when you have finished entering all community and zone information. You’ll return to the Quote entry page with the Community Information section filled in.
Building Information Section Building Information is the largest section of the quote. It is also the most interactive – some of the data you have supplied in the previous sections (such as policy type) determine whether some of the Building Information fields and options are presented. Furthermore, the data you enter about the building’s construction and characteristics will determine which additional fields display for you to specify more information. This dynamic interface makes it easier for you to enter the precise amount of building information needed to determine rates.
When creating a new quote, the Building Information section will look something like this:
Building Information section for Standard Flood quote
Whenever possible, the system provides you with mutually exclusive option buttons in situations where only a limited number of answers are acceptable. That way, you know the answer you provide is valid.
The information requested is fairly straightforward. A few of the fields are highlighted below:
1 Occupancy Type – Specify an occupancy type that applies to the building. Note: The options displayed vary depending on whether the quote is for a preferred rate or standard rate policy. Depending on the Occupancy Type you
4 5
6
7
1
2
3

Q U O T E S
v07.01.13 10 Quotes
select, you may be required to enter the Number of Occupancies and a short Building Use Description.
2 Building Type – Click one of the options to indicate the building type or number of floors in the entire building, including the basement/enclosed area if applicable. Options shown are based on the building occupancy information you entered. Note: For Residential Condo Assn (RCBAP’s), an enclosure counts as a floor for rating purposes, but does not count as a floor when determining High Rise/Low Rise. Click the Help icon if you need assistance.
3 Is the building under construction? – Click either Yes or No. Note: If you indicate that the building is under construction, you will need to enter the Building Permit Date.
4 Construction/(other) date – Enter the date of construction or other date (such as date of significant improvements) by typing the date (mm/dd/yy) or clicking the icon and selecting a date from the calendar. This date is required for all but MPPP policy types. This field does not show if you indicated the building is under construction.
The date of construction determines whether or not the building is Pre-FIRM or Post-FIRM. If the building was constructed or substantially improved on or before December 31, 1974, or before the effective date of the initial Flood Insurance Rate Map (FIRM) for the community, the building is considered Pre-FIRM. Otherwise, the building is considered Post-FIRM.
5 Type of Date – If you entered a date other than the construction date, select another choice from the drop-down list. This field does not show if you indicated the building is under construction.
6 Building Diagram Number – From the drop-down list, select the diagram number that best represents the building structure. If you need assistance, you can view the actual diagram illustrations for the eight building types by clicking the Select Diagram button. The diagrams display in a separate window. You can click directly on a diagram and the choice will be inserted in the field for you.
7 Building Elevation Certificate – Select the appropriate option that indicates whether or not there is an Elevation Certificate for the building. Note: If you indicate that the building has an Elevation Certificate, additional fields will display for you to enter details from it. Refer to the next section, Elevation Certificate Details.

Q U O T E S
v07.01.13 11 Quotes
Elevation Certificate Details These fields display under the Building Information section when you indicate there is an Elevation Certificate (either with or without BFE). Note: Fields related to flood proofing (not shown in the sample screen below) will only display if applicable.
Elevation Certificate details
1 Elevation Certificate Form – Indicate which Elevation Certificate form was used.
2 Elevation Certification Date – Enter the date of the Elevation Certificate (mm/dd/yyyy).
3 Base Flood Elevation (BFE) – Enter the base flood elevation. This information is located in section B9 of the building’s Elevation Certificate.
4 Lowest Floor Elevation (LFE) – Enter the lowest floor elevation for the building. Refer to the Lowest Floor Guide chapter of the most current NFIP Flood Insurance Manual for more information about determining a building’s lowest floor or use the LFE Calculator if available.
5 LFE Calculator button – The LFE Calculator feature is available when the answer to Elevation Certificate Form is Form 81-31/Form 086-0-33 and the building is not in zones B, C, or X. Click the LFE Calculator button to display the LFE Calculator (in a separate window), which will help you determine the lowest floor elevation. Refer to the next section, LFE Calculator, for more information.
6 Lowest Adjacent Grade (LAG) – Enter the lowest adjacent grade. This information is located in section C2(f) of the building’s Elevation Certificate.
7 Highest Adjacent Grade (HAG) – Enter the highest adjacent grade. This information is also located in section C2(g) of the building’s Elevation Certificate.
1
2
3
4 5
6 7
8

Q U O T E S
v07.01.13 12 Quotes
8 Top of Next Higher Floor – Enter the number of feet of elevation for the top of the next higher floor of the building, located in section C2b of the building's Elevation Certificate.
LFE Calculator The information requested in the LFE Calculator is based on information you previously entered in the quote. For example, if the building were elevated, you would see some fields and questions that would not show for a non-elevated building.
NOTE: Some of the factors that determine which items are shown in the LFE Calculator include: FIRM Zone/Suffix/Panel ID, Building Diagram Number, and Building Type.
LFE Calculator - sample
Enter elevation information and measurements from the Elevation Certificate. The system can then calculate the correct lowest floor elevation based on those values.
1
2
3
4

Q U O T E S
v07.01.13 13 Quotes
1 Building Diagram Number – Verify the appropriate Building Diagram Number is selected (located in section A7 of the Elevation Certificate). To change it, choose a different diagram from the drop-down list or click the Select Diagram button and select from the diagrams shown.
2 Verify the responses in the Part II section and make changes as needed.
3 Using the information provided in the Elevation Certificate, fill in the requested data. Different sections (A, B, C, and E) and items within the sections appear based on a variety of criteria. For example, sections C and E will never display together (the zone determines which section appears).
4 Calculate LFE button – After entering as much information as possible, click Calculate LFE at the bottom of the screen.
o If the system cannot calculate the LFE, an error message(s) displays. Review the page and verify that all information has been entered correctly. Make changes as needed. Click Calculate LFE again. If the system still cannot calculate the LFE, you should contact an underwriter for assistance. Click Cancel to close the LFE Calculator; you will be asked whether you want to save what you have entered.
o If the system successfully calculates LFE, it will be displayed in the Lowest Flood Elevation field and the Continue button becomes available (see sample screen below).
o If additional changes are made after successful calculation, you must click Calculate LFE again before being able to continue.
Bottom of LFE Calculator with calculated Lowest Floor Elevation and Continue button
5 Continue button – To accept the calculated LFE, click the Continue button. The value is inserted in the Lowest Flood Elevation (LFE) field in the Quote entry page. Other values entered in the LFE Calculator are also inserted, such as BFE, and LAG and HAG if applicable.
5

Q U O T E S
v07.01.13 14 Quotes
Part II Information The Part II subsection displays when determined by the system. You are asked to provided the lowest elevation (in feet) of the machinery and/or equipment servicing the building.
Part II subsection
Preferred Risk Policy Eligibility The Preferred Risk Policy Eligibility section appears when you have indicated you are generating a quote for a preferred risk policy. It presents a series of questions to determine whether the building is eligible for preferred rates.
Preferred Risk Policy Eligibility section
By default, the answers to the questions are all “No”. If this is not correct, change the answer(s) where appropriate.

Q U O T E S
v07.01.13 15 Quotes
Coverage & Rates Information Section The Coverage & Rates section gathers the coverage and deductible information to be used during rate calculation. Its appearance differs depending on the type of policy quote you are creating.
Standard
Coverage & Rates Information section (Standard)
1 Building: Coverages – Enter the amount of coverage requested for the building.
2 Building: Deductibles – From the drop-down list, select the deductible requested for the building.
3 Contents: Coverages – Enter the amount of coverage requested for the contents.
4 Contents: Deductibles – From the drop-down list, select the deductible requested for the contents.
5 Replacement Cost – Specify the amount it would cost to rebuild the building. Do not include allowance for depreciation. The final coverage amount for the building cannot be more than the replacement cost. This field appears after the building coverage amount has been entered.
6 Contents Location – Specify the location of the contents. Options offered under Contents Location are determined by the construction of the building that you specified in the Building Information section. This field only displays if a contents coverage amount has been entered.
7 Quit button – Click Quit at any time if you want to stop at that point. You will be prompted to indicate whether or not you want to save what you have entered. If you save it you will be able to return and work with the quote later. A Quote ID number will be assigned, unless you have already calculated premium or created this quote from another quote.
8 Calculate Premium button – After entering all quote information, click this button to calculate the rate information. The Quote ID number is assigned at this time, unless you created this quote from another quote (then it is already there) or you have calculated premium for this quote before.
3 1
4 2
5
6
8 7

Q U O T E S
v07.01.13 16 Quotes
Preferred Risk
Coverage & Rates Information section (Preferred Risk)
1 Building/Contents Coverages – From the drop-down list, select the amount of coverage requested for the building and contents. Only pre-established coverage combinations are allowed.
2 Building/Contents Deductibles – From the drop-down list, select the deductible requested for the building and contents. Only pre-established deductible combinations are allowed.
3 Replacement Cost – Enter the replacement cost.
4 Contents Location – Specify the location of the contents. Options offered under Contents Location are determined by the construction of the building that you specified in the Building Information section.
Preferred Risk quotes only allow pre-approved coverage combinations.
1 2
3
4

Q U O T E S
v07.01.13 17 Quotes
Error List After clicking the Calculate Premium button, if any required information was not entered or was entered incorrectly you will see an error log alerting you of the fields in question. You may also receive errors if you are attempting to quit and save and have not entered basic, vital information (such as insured name).
Error List
1 Error grid – This grid lists the information that was missing or incorrect when the quote was entered. The property cannot be rated until these are corrected. Note: When you view the Quote page, the fields in error will be marked with a red arrow on the left side of the page.
2 Close Window – Click the Close Window button to close the Error List dialog box.
1
2

Q U O T E S
v07.01.13 18 Quotes
Rate Information Section If the premium is calculated successfully, the rates will be displayed in a grid at the bottom of the page. Rate information will display slightly differently from one quote to another, depending on the type of quote you are creating.
Rate Information (Standard)
Rate Information (Standard)
The grid displays all the rate information for the quote you just entered. Review the rate information for the building and its contents. Additional fees and refunds are calculated in the column on the right. The Total Prepaid Amount displays in the lower right corner of the grid.
Additional action buttons are available at the bottom of the page once you’ve successfully rated the property. Refer to the Action Buttons section on the next page for more information.
Rate Information (Preferred Risk) Rate information displays differently for preferred risk policies.
Rate Information (Preferred Risk)

Q U O T E S
v07.01.13 19 Quotes
Action Buttons Use the buttons at the bottom of the Quote page to take the desired actions. Some of the buttons appear only after rates have been successfully calculated.
Quote page Action buttons
1 Calculate Premium – If you make changes to any part of the quote, click the Calculate Premium button to recalculate the amounts.
2 Finish – When the quote is finished and you are ready to move on to another task, click the Finish button. The Quote page closes and the quote is saved.
3 Create Log Note – Click the Create Log Note button if you want to enter notes about this quote. If there are log notes associated with a quote, there will be a View Log Notes link at the top of the page (next to the Quote ID). Click the link to view the notes.
4 Print Quote – Click the Print Quote button to display the quote in a PDF form in a separate window. You can select to print or save the PDF version of the quote.
5 Convert to Application – Clicking the Convert to Application button will change the status from a quote to an application. More questions and fields will appear on the page for you to complete in order to move forward with the application process. Refer to the Applications reference document for more information about completing an application.
1 2 3 4 5

Q U O T E S
v07.01.13 20 Quotes
Working with Existing Quotes To work with an existing quote, you'll first need to find it in the system.
Use the Search option from the navigation menu on the Main Portal page. On the Search page, enter the Quote ID or use the advanced search fields to locate the quote. Refer to the Search reference document for more information about using the Search function to locate an existing quote.
Once you are on the View Quote Information page (shown below), there are hyperlinks available to update the quote, upload documents, and create a log note.
View Quote Information
1 New Business Quote History – Each time you calculate premium for the quote, the system takes a PDF snapshot of the quote to capture all information entered, including calculated premium and rate information .
• Click the document icon to view the most recent snapshot.
• Click the New Business Quote History link and a list of all the images taken related to the quote will be displayed so you can select which one you want to view.
2 Action links – Click the link that corresponds to the action you want to take.
• Click Upload Documents if you want to electronically submit supporting documentation associated with this quote. Refer to the Upload Documents reference document for more information.
• Click the Update Quote link to open the quote. It will display in the same format as when you created the quote, with all the same functionality (as shown below).
1 2

Q U O T E S
v07.01.13 21 Quotes
Quote page (existing quote)
The existing quote displays all previously entered information, except for the calculated rate information. You can update or add information for specific sections in exactly the same manner as when you entered the quote.
After making additional entries or changes to the quote, click the Calculate Premium button at the bottom of the page to update the rate information.
Click the View Log Notes link to display log notes that you have entered related to this quote. If this link is not visible, it means no log notes have been entered for this quote.
To create a new quote based off of this quote, click the Copy this quote to a new quote link.

Q U O T E S
v07.01.13 22 Quotes
Copying a Quote Once a quote has a Quote ID assigned, you can use it to create a new quote.
If you are working with an existing quote and want to create a new quote based on it (for example, you need to prepare a quote for a similar property), click the Copy this quote to a new quote link at the top of the page. The Quote page will redisplay with a new Quote ID and will contain all the data from the previous quote (except an attached zone certificate and calculated rate information). You can then make changes to the information as needed.
Converting a Quote to an Application As mentioned previously, once a quote has been successfully rated you can easily convert it to an application. Go to the bottom of the Quote entry page.
NOTE: If the Convert to Application button is not there, click Calculate Premium, then the Convert to Application button should be available.
Clicking the Convert to Application button will redisplay the page and change the status from quote to application. It will now have an Application ID instead of a Quote ID. More questions and fields appear on the page for you to complete in order to move forward with the application process. More information is required in order for you to calculate premium. Refer to the Applications reference document for more information about completing an application.