Embed Size (px)
Citation preview

Creating a Final Transition Plan (FT Plan)
Knowledge Base Article

Creating a Final Transition Plan (FT Plan)
Page 2 of 24 Last Revised: 07/26/2016
Table of Contents
Overview ............................................................................................................................. 3
Creating a Final Transition Plan ....................................................................................... 4
Navigating to the Final Transition Plan Screen ........................................................... 4
Completing the Youth Information Tab ........................................................................ 5
Completing the Resources Tab ..................................................................................... 8
Completing the Necessary Documents Tab ............................................................... 12
Completing the Contact Directory Tab ....................................................................... 14
Completing the FT Plan Signatures Tab ..................................................................... 22

Creating a Final Transition Plan (FT Plan)
Page 3 of 24 Last Revised: 07/26/2016
Overview
This article describes how to complete the following in SACWIS:
Create a Final Transition Plan (FT Plan) for a youth who is within 90 days of Emancipating from agency custody.
Please see Creating an Independent Living Plan (IL Plan) Knowledgebase Article for details on how to enter this type of plan for youth 14 years old or older who are in agency custody.
Please see Creating an Emancipated Youth Plan (EY Plan) Knowledgebase Article for details on how to enter this type of plan for post-emancipated youth who are between their 18th and 21st birthdays and are no longer in agency custody, but have requested services and/or supports from the agency.
Please see Recording Credit Reports Knowledgebase Article for details on how to enter Credit Reports requested by the agency from the three main credit reporting agencies for youth age 14 or older and in agency custody. Prior to Build 3.06, credit reports were recorded within the Case Review and Semiannual Administrative Review/SAR.

Creating a Final Transition Plan (FT Plan)
Page 4 of 24 Last Revised: 07/26/2016
Creating a Final Transition Plan
Navigating to the Final Transition Plan Screen
1. Navigate to the Independent Living Records screen as described previously.
In the Independent Living Records section:
1. In the Plan Type field, select Final Transition Plan from the drop-down list.
(Required)
2. In the Youth Name field, select the appropriate name from the drop-down list. (Required)
3. Click the Add Plan button.
The Final Transition Plan screen appears displaying several tabs. The system defaults to the Youth Information tab as shown below.

Creating a Final Transition Plan (FT Plan)
Page 5 of 24 Last Revised: 07/26/2016
Completing the Youth Information Tab
1. Select the appropriate response for the field: The Youth would like to receive post emancipation services provided or arranged by the PCSA or PCPA from which the youth emancipated. (Required)
2. Enter the Plan Developed Date. (Required)
3. The Health section (shown in blue above) displays the current Insurance Providers from the youth’s Person record (Person record > Medical link > Health Insurance tab). If needed, click the Add/Update Insurance Provider link to add or update the insurance provider(s).
The Health Care Provider section (shown in green above) displays current Health Care Providers listed on the Treatment Details for the youth (Person record > Medical link > Treatment tab).

Creating a Final Transition Plan (FT Plan)
Page 6 of 24 Last Revised: 07/26/2016
The Current Medication section lists information about current medications for the youth (Person record > Medical link > Medication tab).
4. Enter additional information in the Other health related information text box, if applicable. (Optional)
5. Complete the fields in the Education section. (Optional)
6. If you select Other in the What is the Youth’s post-secondary education or training plan? field, you must enter a description in the Describe field.
Note: You may click any of the provided hyperlinks—FAFSA Information, Department of Higher Education, and Education Training Voucher (ETV) Program—to display the related web site in a new window.

Creating a Final Transition Plan (FT Plan)
Page 7 of 24 Last Revised: 07/26/2016
7. Click the Apply button.

Creating a Final Transition Plan (FT Plan)
Page 8 of 24 Last Revised: 07/26/2016
Completing the Resources Tab
1. Click the Resources tab.
The Final Transition Resources screen appears displaying Financial Information and Housing Information sections.
2. The top portion of the Financial Information section displays the current employer(s) from the youth’s Person record (Person record > Employment link > Employment History section). If needed, click the Update Employment Information link to update the youth’s employer(s).
3. Select the appropriate values to answer the questions about the youth’s earnings, budget, checking account, and savings account (shown in blue above). (Optional)

Creating a Final Transition Plan (FT Plan)
Page 9 of 24 Last Revised: 07/26/2016
4. If you selected Yes in Step 3 for a checking account, you may enter the Bank Name and Information related to the youth’s checking account (shown in red below). (Optional)
5. If you selected Yes in Step 3 for a savings account, you may enter the Bank Name and Information related to the youth’s savings account (shown in blue below). (Optional)
6. Select the appropriate checkbox(es) to indicate the Resources available to youth (shown in gold above). (Optional)
Note: You may click the hyperlink beside the Social Security Benefit Information checkbox and the County Job and Family Services Benefits ODJFS checkbox to display the related web site in a new window.
7. If you selected the Other (please specify) checkbox in Step 7, you must enter a description in the text field (shown in gold above).

Creating a Final Transition Plan (FT Plan)
Page 10 of 24 Last Revised: 07/26/2016
The Obtaining a Credit Report field displays hyperlinks to the three main credit reporting agencies. The screen also displays a LAST PROVIDED date, which is the most recent Date Provided to Youth associated to the youth’s Credit Report for each credit reporting agency (if applicable).
8. To obtain a credit report(s) for the youth, click the appropriate credit reporting agency link(s) in the Obtaining a Credit Report field. (Optional)
9. If the youth needs to register for selective service, click the Selective Service System hyperlink in the Registering for selective service (males only) field.
Note: The Selective Service System hyperlink displays only if the youth associated to the Final Transition Plan has a Gender code of Male.

Creating a Final Transition Plan (FT Plan)
Page 11 of 24 Last Revised: 07/26/2016
10. Complete the Housing Information section. (Optional)
Note: Type of housing upon emancipation is required when ending a FT Plan (shown in green below).
11. Click the Save button.

Creating a Final Transition Plan (FT Plan)
Page 12 of 24 Last Revised: 07/26/2016
Completing the Necessary Documents Tab
1. Click the Necessary Documents tab.
The Record Information screen appears.
2. If you entered the Date Youth received Driver’s License in Step 2, you may select a value in the Does the Youth have car insurance? field. (Optional)
3. If you selected Yes in Step 3, you may enter the Name of car insurance provider. (Optional)

Creating a Final Transition Plan (FT Plan)
Page 13 of 24 Last Revised: 07/26/2016
4. Enter additional information in the Additional Comments field, if applicable. (Optional)
Note: All date fields on Necessary Documents are required when end dating the FT Plan except for Date Youth received State Identification Card and Date Youth received Driver’s License. Only one of these 2 fields needs to be entered prior to end dating the FT Plan.
Note: If a youth is AWOL (has an AWOL alert on their Person record), these date fields will not be required.
5. Click the Save button.

Creating a Final Transition Plan (FT Plan)
Page 14 of 24 Last Revised: 07/26/2016
Completing the Contact Directory Tab
To add Youth Contacts to an IL Plan, Final Transition Plan (FT Plan), Emancipated Youth Plan (EY Plan), or National Youth in Transition Database (NYTD), complete the following steps. When this information is added or changed from any of these areas, the change will be reflected in any of the other areas that are created. For example, if a youth has an IL Plan, FT Plan, and NYTD, if a Youth Contact is added on the IL Plan, the new contact will display on the FT Plan and NYTD. This information can be edited on any Active or Pending IL Plan, non-end-dated FT or EY Plan, or at any time through NYTD (even when the case is closed) as long as an account had been generated for the youth.
1. Click the Contact Directory tab from any of the above mentioned work items.
The Youth Contacts screen appears.
If a youth does not have a Permanent Adult Connection identified, this warning will display.
Creating a Final Transition Plan (FT Plan)
Page 15 of 24 Last Revised: 07/26/2016
2. If the contact is a Case Member or Associated Person on the case, select the name of the contact from the Case Members/Associated Persons drop-down list.
OR if the contact person you wish to add is not listed in the drop-down, skip to Step 9 below.
3. Click the Add button.
The person is added to the Youth Contacts grid in Active status:
Note: Youth Contacts will now have an Active or Inactive status. This is to assist in maintaining a history of a youth’s contacts while still reflecting which contacts are current. This will also update in all the existing work items mentioned above. By clicking on the Active toggle, that Youth Contact will become Inactive. When inactivating a Youth Contact, a message will pop up to verify that you want to deactivate the contact.
4. Click the Edit link beside the newly added contact.
The Contact Details screen appears displaying details for that contact from their Person record.
Creating a Final Transition Plan (FT Plan)
Page 16 of 24 Last Revised: 07/26/2016
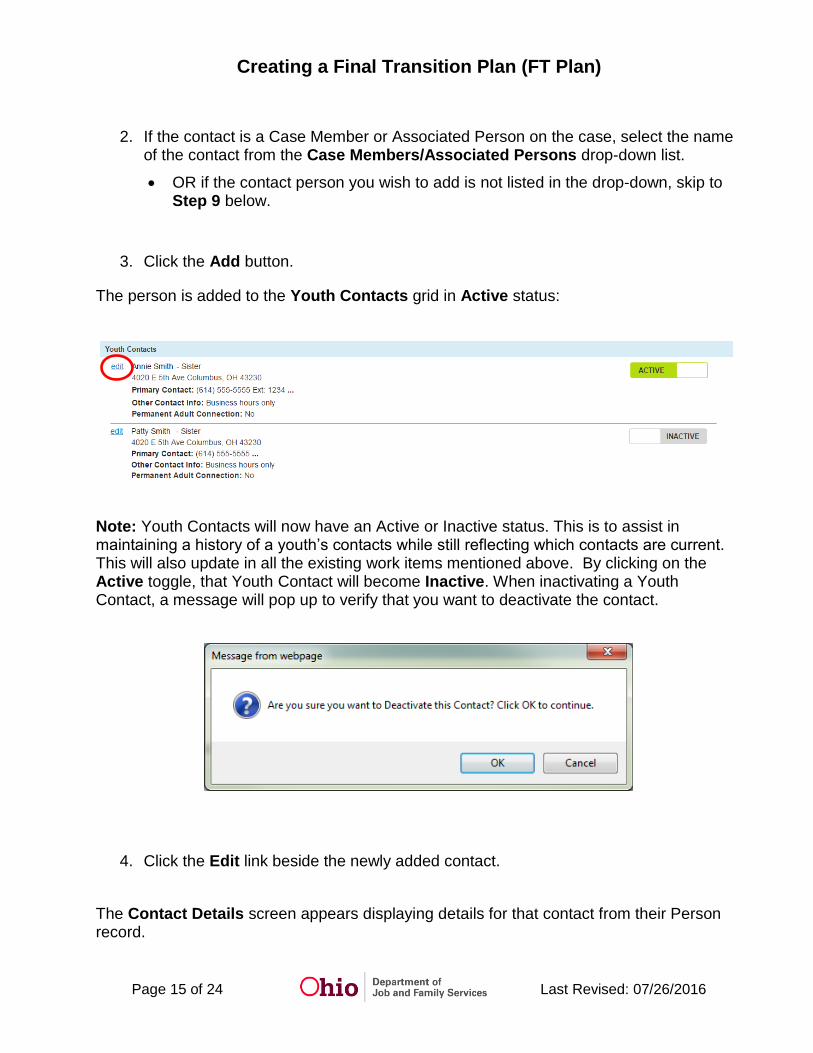
5. If this adult has a permanent connection to the youth, click the checkbox beside This contact is a permanent adult connection. (Optional)
Hint: Hover your mouse pointer over the Information icon for the definition of a permanent adult connection.
6. Enter narrative in the Other Contact Information text box, if applicable. (Optional)
7. When complete, click the Save button to return to the Youth Contacts screen.
8. Repeat these steps to add another contact, if applicable.
Note: If a Signature has not been added for this contact, you can click the Delete button to delete the contact (shown in blue above).

Creating a Final Transition Plan (FT Plan)
Page 17 of 24 Last Revised: 07/26/2016
9. If the contact you wish to add is not listed in the Case Members/Associated Persons drop-down list, click the Create New Contact button.
The Contact Details screen appears.
10. In the Contact Name field, click the Search Person button to search/select the Person OR enter the name of the person in the text box if there is not enough information to enter a new Person record. (Required)
Note: Through the Search Person, a contact can be selected that is known to SACWIS or a new person can be created.

Creating a Final Transition Plan (FT Plan)
Page 18 of 24 Last Revised: 07/26/2016

Creating a Final Transition Plan (FT Plan)
Page 19 of 24 Last Revised: 07/26/2016
If you Search and select a person, the Contact Details screen displays details for the selected person:
Note: If the selected person is not the correct contact, you can click the Clear Person button to unlink the person from this contact record and display the Search Person button again.
11. Select this person’s relationship to the youth from the Relationship to Youth drop-down list. (Required)
12. If this adult has a permanent connection to the youth, click the checkbox beside This contact is a Permanent Adult Connection. (Optional)
Hint: Hover your mouse pointer over the Information icon for the definition of a permanent adult connection.
Note: When a Person is selected, their contact information (address and phone number) will not be editable through the Contact Directory. Click on the Person Name/ ID hyperlink to edit their information.

Creating a Final Transition Plan (FT Plan)
Page 20 of 24 Last Revised: 07/26/2016
Important: At least one of the following is Required in order to save this Contact record. These fields are described in the Steps 13-15 below.
Contact Address field, and/or
Contact Type / Contact fields, and/or
Other Contact Information field.
13. The Contact Address field displays the Search Address button if you did not Search/select a person in Step 10 above. Click the Search Address button if you wish to Search and select the person’s Contact Address. (Optional)
If you Search and select an address, the Contact Address field displays the address details and a Remove Address button:
Note: If the selected address is not the correct address, you can click the Remove Address button to unlink the address from this contact record and display the Search Address button again.
14. Enter fields for Contact Type, Contact, and Ext display if you did not Search/select a person in Step 10 above. Complete these fields as described below. (Optional)
a. Select the appropriate Contact Type from the drop-down list if you are entering a phone number, email address, social media handle/account, etc.
b. In the Contact field, enter the phone number, email address, etc.
c. If you selected Phone Number as the Contact Type, enter the phone extension in the Ext field, if applicable.

Creating a Final Transition Plan (FT Plan)
Page 21 of 24 Last Revised: 07/26/2016
15. Enter contact information in the Other Contact Information text box, if applicable. (Optional)
16. Click the Save button at the bottom of the screen.
The Youth Contacts screen appears displaying the new contact in the grid.
17. Repeat the steps in this sub-section for each contact you wish to add.
18. When complete, click the Apply button at the bottom of the screen.
Important: After the Independent Living tab has been completed, at least one Goal has been added, and at least one Contact has been added, the IL Plan can be marked as Active. To do so, complete the steps in the Marking the Independent Living Plan as Active section in this Knowledge Base Article. Or, complete the remaining tabs as discussed in each sub-section.

Creating a Final Transition Plan (FT Plan)
Page 22 of 24 Last Revised: 07/26/2016
Completing the FT Plan Signatures Tab
1. To add signatures for the Final Transition Plan, click the Signatures tab.
The Signatures Captured screen appears. The screen is pre-populated with the Youth, the IL Worker assigned to the case, and the IL Worker’s Supervisor.
2. To add an agency representative’s signature, click the Add Agency Representative button.
The Available Agency Representatives screen appears. This screen displays the list of Assigned Workers and Unassigned IL Workers for the associated agency. This list does not include persons who have already been selected.
Creating a Final Transition Plan (FT Plan)
Page 23 of 24 Last Revised: 07/26/2016
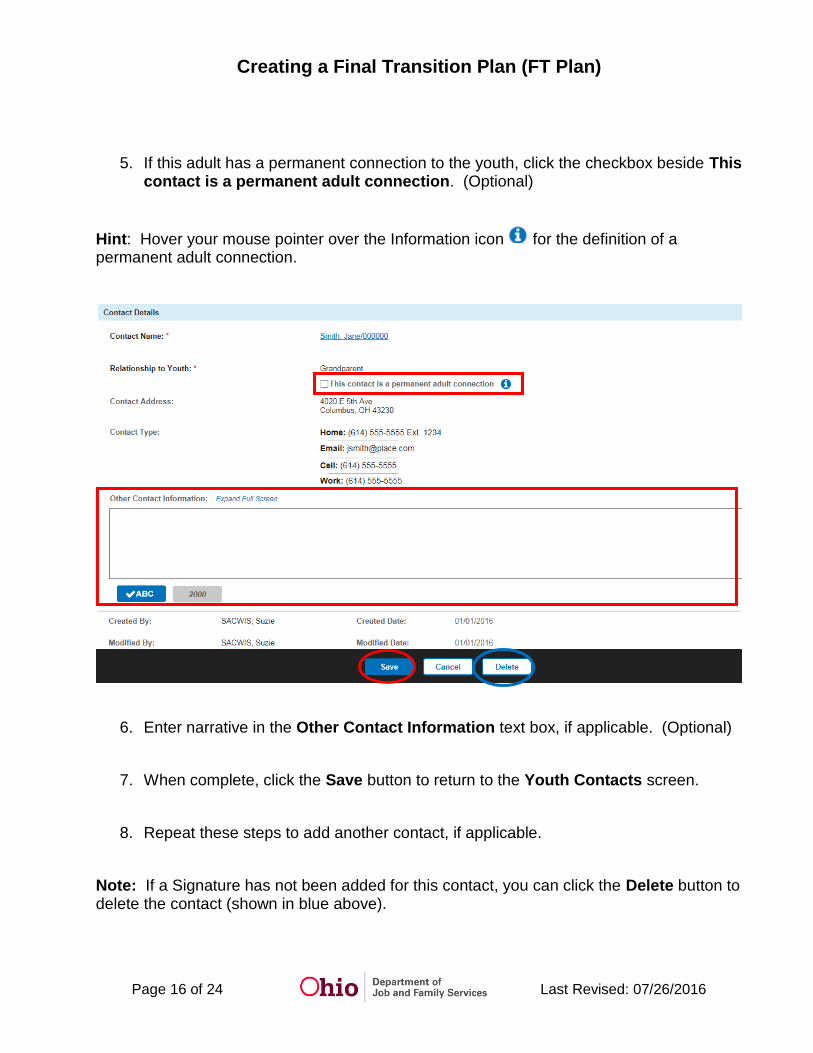
3. Click the checkbox beside each person you wish to select OR click the checkbox in the grid header to select All persons in the list.
4. Click the Save button.
5. The Signatures Captured screen appears displaying the selected person(s).
6. In the Date Signed field beside each person, enter the date the signature was recorded. (Optional)
7. If you selected an incorrect person, click the Delete icon beside the person to delete the signature entry (shown in blue above).
Note: The Youth’s signature cannot be deleted.
8. When complete, click the Save button.

Creating a Final Transition Plan (FT Plan)
Page 24 of 24 Last Revised: 07/26/2016
The Independent Living Filter Criteria screen appears displaying the Independent Living Records grid.
If you need additional information or assistance, please contact the SACWIS Help Desk.