Embed Size (px)
Citation preview

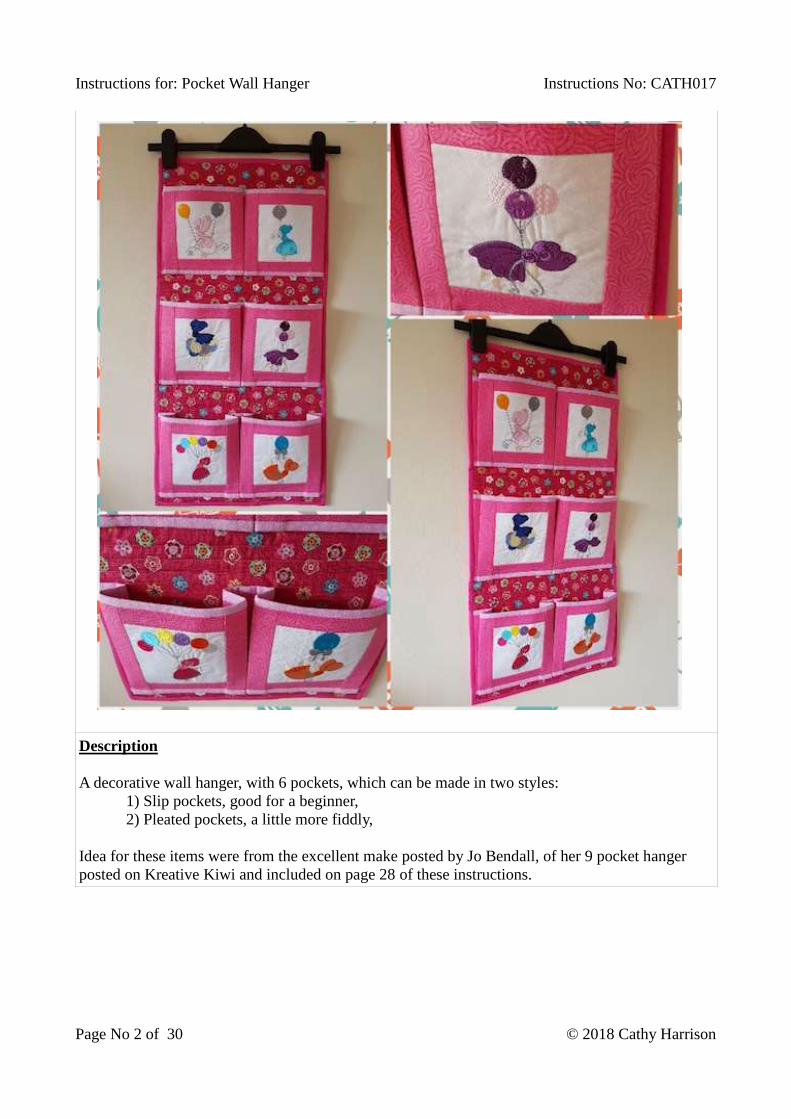
Instructions for: Pocket Wall Hanger Instructions No: CATH017
Page No 1 of 30 © 2018 Cathy Harrison
Created by Cathy
http://www.picklecreations.co.uk/
Slip Pocket Style
Pleated Pocket Style.
Instructions for: Pocket Wall Hanger Instructions No: CATH017
Page No 2 of 30 © 2018 Cathy Harrison
Description
A decorative wall hanger, with 6 pockets, which can be made in two styles:
1) Slip pockets, good for a beginner,
2) Pleated pockets, a little more fiddly,
Idea for these items were from the excellent make posted by Jo Bendall, of her 9 pocket hanger
posted on Kreative Kiwi and included on page 28 of these instructions.
Instructions for: Pocket Wall Hanger Instructions No: CATH017
Page No 3 of 30 © 2018 Cathy Harrison
Cutting List – Option 1 Slip Pockets
Number
Required
Dimensions Material Comments
6 8 ½” x 8 ½” Cotton canvas / cotton. Square pocket fronts
3 8” x 16 ½” Cotton Pocket linings
6 1 ½” x 16 ½” Cotton Binding strips, for pockets.
3 8” x 16 ½” Interfacing
1 16 ½” x 35” Cotton canvas / cotton. Back panel front
1 16 ½” x 35” Cotton Back panel, backing
1 16 ½” x 35” Wadding Back panel wadding
1 16 ½” x 4” Cotton canvas / cotton. Dowel holder, for hanging by.
Bias binding
Cutting List – Option 2 Pleated Pockets
Number
Required
Dimensions Material Comments
6 6 ½” x 11” Cotton canvas / cotton. Pocket fronts
3 6” x 21” Cotton Pocket linings
6 1 ½” x 21” Cotton Binding strips, for pockets.
3 6” x 21” Interfacing
1 12 ¾” x 29” Cotton canvas / cotton. Back panel front
1 12 ¾” x 29” Cotton Back panel, backing
1 12 ¾” x 29” Wadding Back panel wadding
1 16 ½” x 4” Cotton canvas / cotton. Dowel holder, for hanging by.
Bias binding
Note: It is advisable to cut as you progress through the instructions, rather than cut out all pieces at
the start, as some pieces are trimmed down to final size. With the pleated design especially.
Instructions for: Pocket Wall Hanger Instructions No: CATH017
Page No 4 of 30 © 2018 Cathy Harrison
Embellishment
To further enhance this project, you can additionally add appliqué embroidery designs of your
choice.
For these instructions I used designs available from https://www.kreativekiwiembroidery.co.nz/ who
have a superb range of quality designs available. I used:
“Sun Bonnet (SB) Balloons” -https://www.kreativekiwiembroidery.co.nz/product/sb-
balloons.html
Or
“Jumping Jungle” - https://www.kreativekiwiembroidery.co.nz/blog/641147
And
“Scallop Coaster”- https://www.kreativekiwiembroidery.co.nz/product/1622650
Use of Interfacing
Depending on your material it may be a good idea to add interfacing, to the pocket linings, for a
little more stiffness. I used interfacing on the type 2) Pleated, but did not on the type 1) Slip shown
in these instructions, as the combination of cotton canvas material and the appliqué together
provided enough stiffness.
Types – deciding on pocket style and size
1) Slip pockets, using “Jumping Jungle” – Pages 4 to 18,
2) Pleated pockets, using “SB Balloons” – Pages 19 to 26, of these instructions, plus some of
the steps from the Type 1).
Deciding on pocket style and how many pockets are needed.
Jo used 9 pockets, 3 rows of 3, for her hanger. For these instructions of both types I will be using 3
rows of 2. The slip pockets will be an 8” finished pocket size and the pleated pockets will be 6”
finished size.
Instructions for: Pocket Wall Hanger Instructions No: CATH017
Page No 5 of 30 © 2018 Cathy Harrison
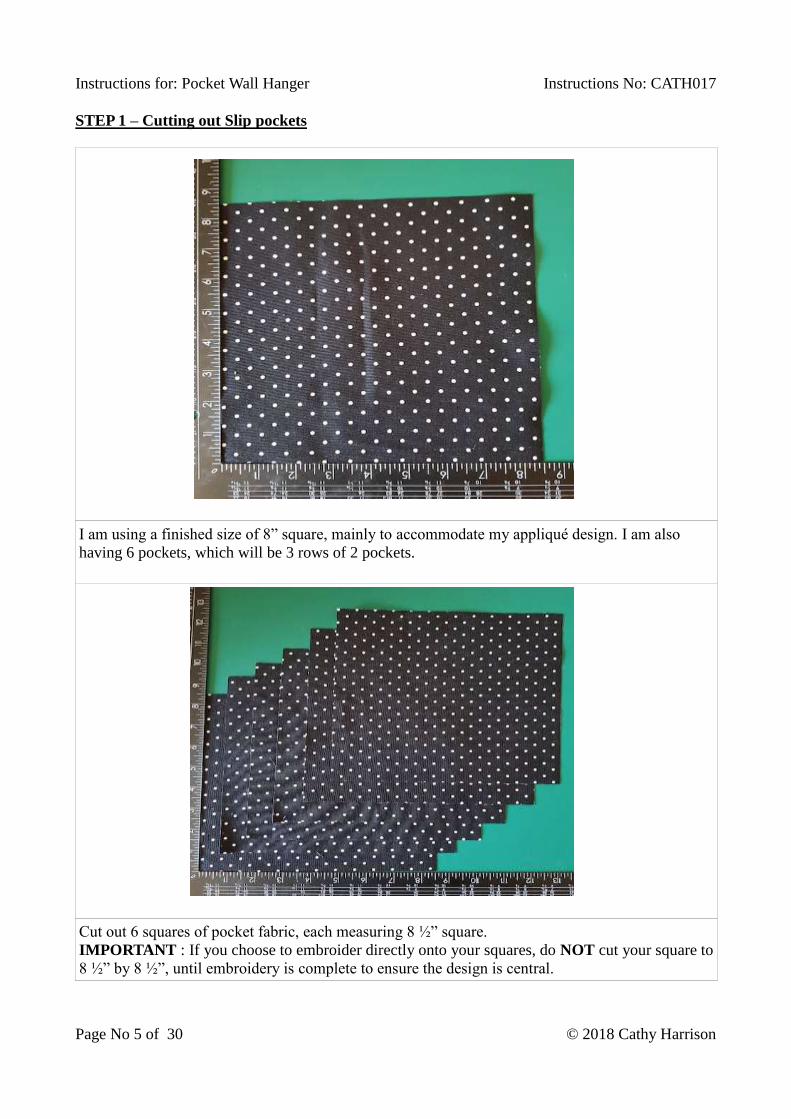
STEP 1 – Cutting out Slip pockets
I am using a finished size of 8” square, mainly to accommodate my appliqué design. I am also
having 6 pockets, which will be 3 rows of 2 pockets.
Cut out 6 squares of pocket fabric, each measuring 8 ½” square.
IMPORTANT : If you choose to embroider directly onto your squares, do NOT cut your square to
8 ½” by 8 ½”, until embroidery is complete to ensure the design is central.
Instructions for: Pocket Wall Hanger Instructions No: CATH017
Page No 6 of 30 © 2018 Cathy Harrison
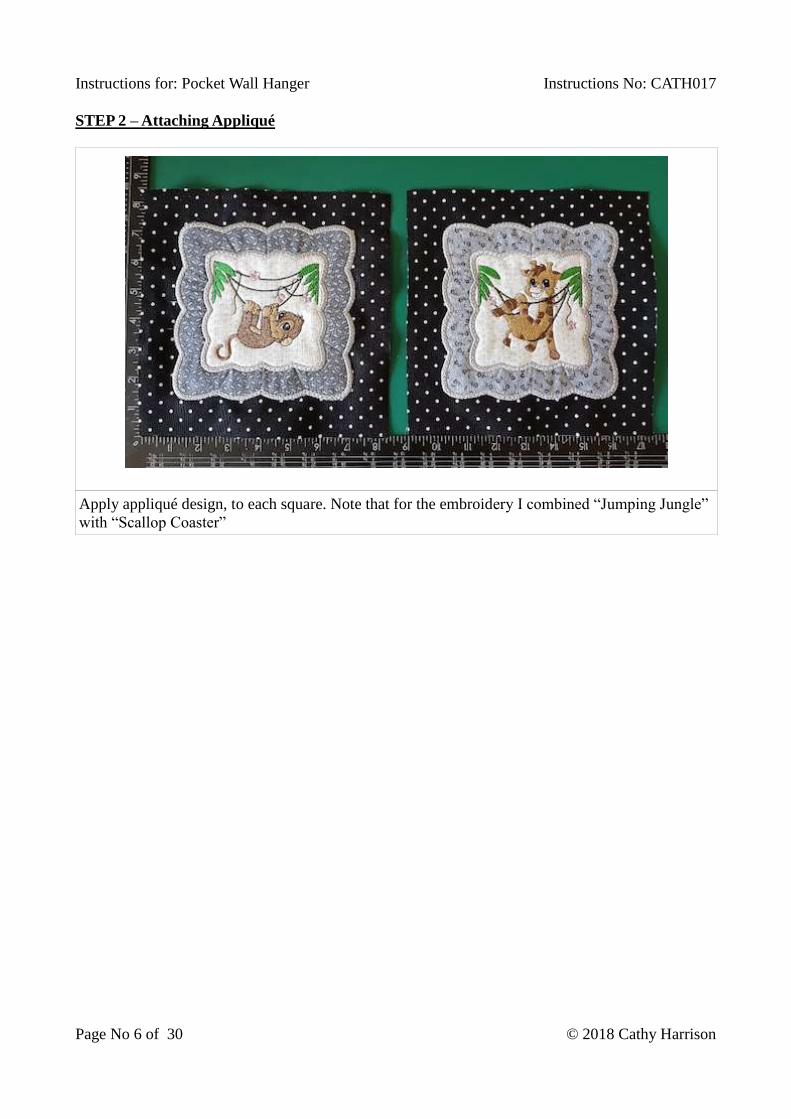
STEP 2 – Attaching Appliqué
Apply appliqué design, to each square. Note that for the embroidery I combined “Jumping Jungle”
with “Scallop Coaster”
Instructions for: Pocket Wall Hanger Instructions No: CATH017
Page No 7 of 30 © 2018 Cathy Harrison
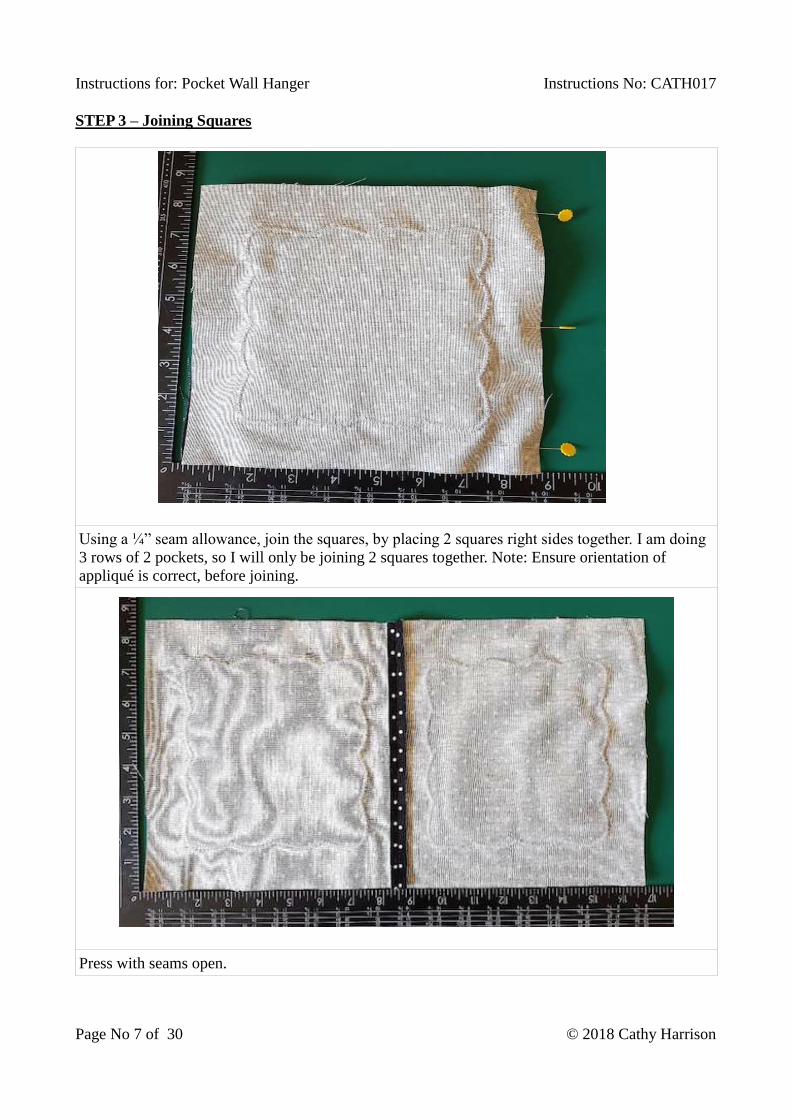
STEP 3 – Joining Squares
Using a ¼” seam allowance, join the squares, by placing 2 squares right sides together. I am doing
3 rows of 2 pockets, so I will only be joining 2 squares together. Note: Ensure orientation of
appliqué is correct, before joining.
Press with seams open.
Instructions for: Pocket Wall Hanger Instructions No: CATH017
Page No 8 of 30 © 2018 Cathy Harrison
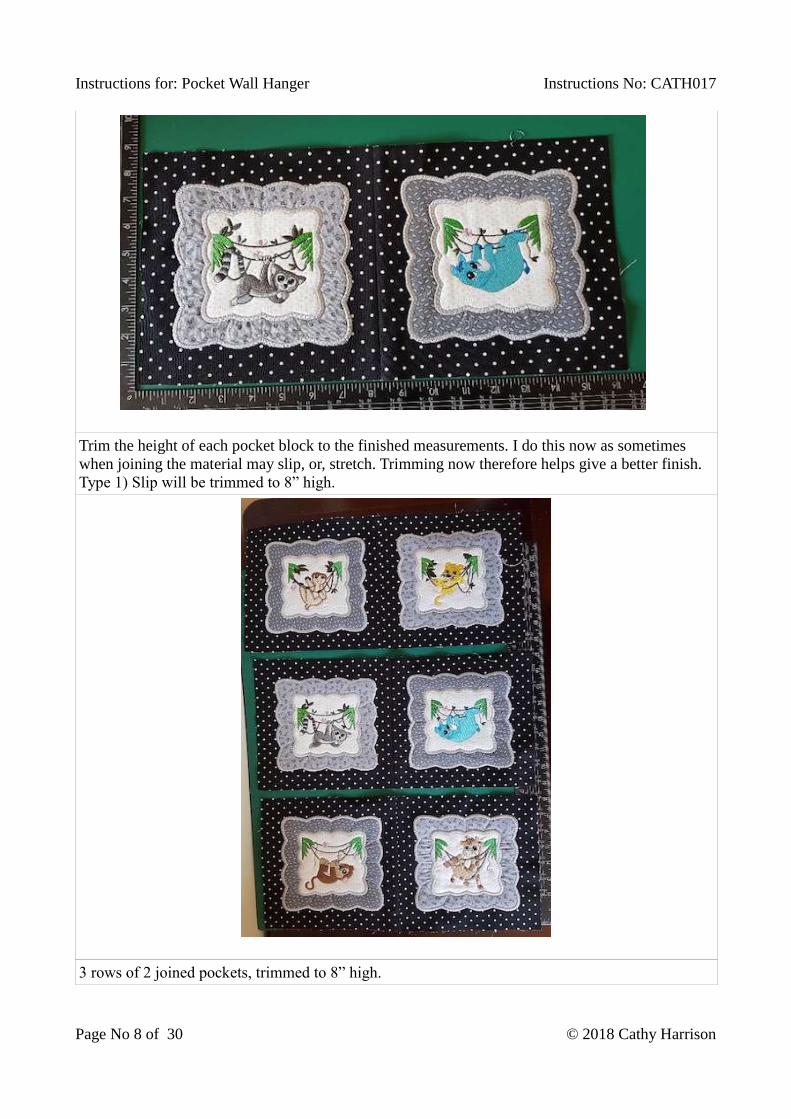
Trim the height of each pocket block to the finished measurements. I do this now as sometimes
when joining the material may slip, or, stretch. Trimming now therefore helps give a better finish.
Type 1) Slip will be trimmed to 8” high.
3 rows of 2 joined pockets, trimmed to 8” high.
Instructions for: Pocket Wall Hanger Instructions No: CATH017
Page No 9 of 30 © 2018 Cathy Harrison
STEP 4 – Making the Pockets
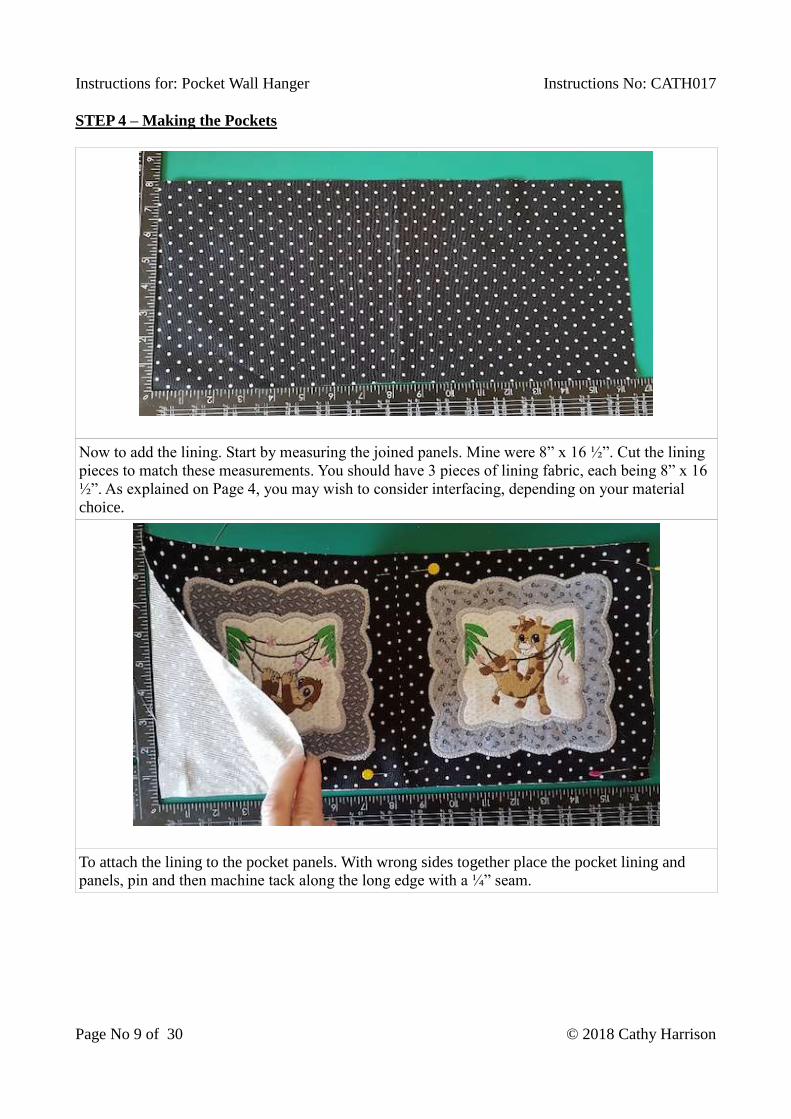
Now to add the lining. Start by measuring the joined panels. Mine were 8” x 16 ½”. Cut the lining
pieces to match these measurements. You should have 3 pieces of lining fabric, each being 8” x 16
½”. As explained on Page 4, you may wish to consider interfacing, depending on your material
choice.
To attach the lining to the pocket panels. With wrong sides together place the pocket lining and
panels, pin and then machine tack along the long edge with a ¼” seam.
Instructions for: Pocket Wall Hanger Instructions No: CATH017
Page No 10 of 30 © 2018 Cathy Harrison
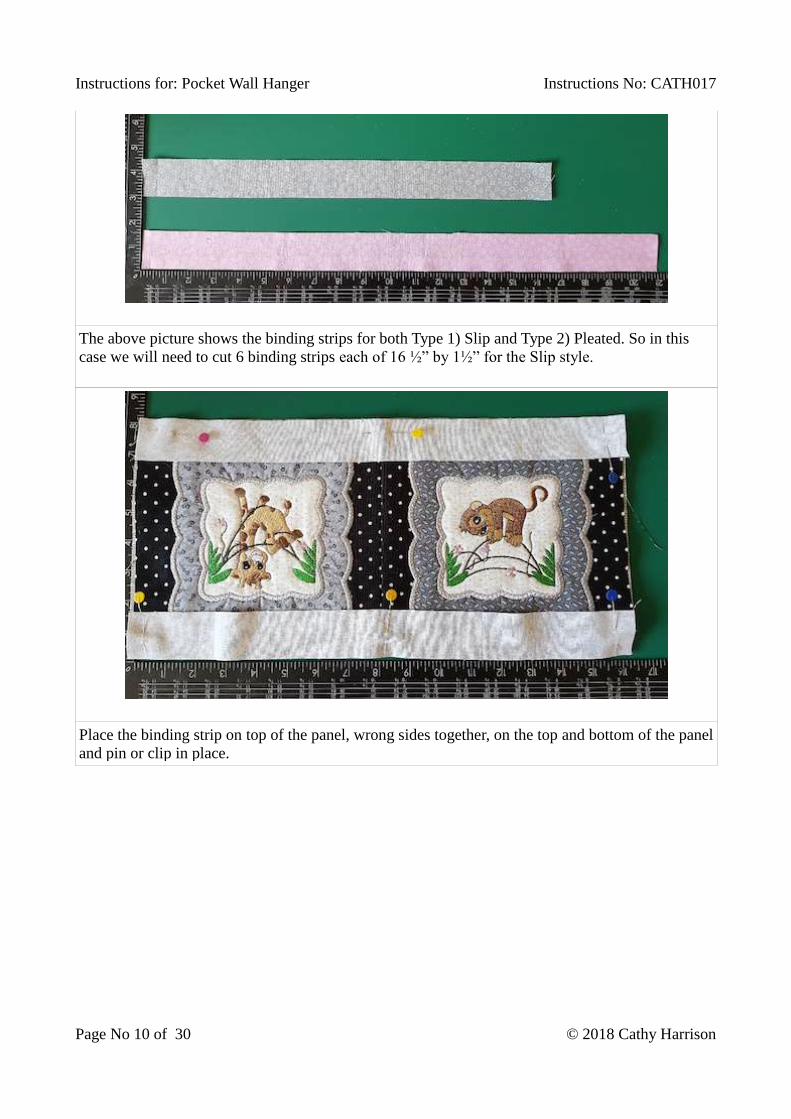
The above picture shows the binding strips for both Type 1) Slip and Type 2) Pleated. So in this
case we will need to cut 6 binding strips each of 16 ½” by 1½” for the Slip style.
Place the binding strip on top of the panel, wrong sides together, on the top and bottom of the panel
and pin or clip in place.
Instructions for: Pocket Wall Hanger Instructions No: CATH017
Page No 11 of 30 © 2018 Cathy Harrison
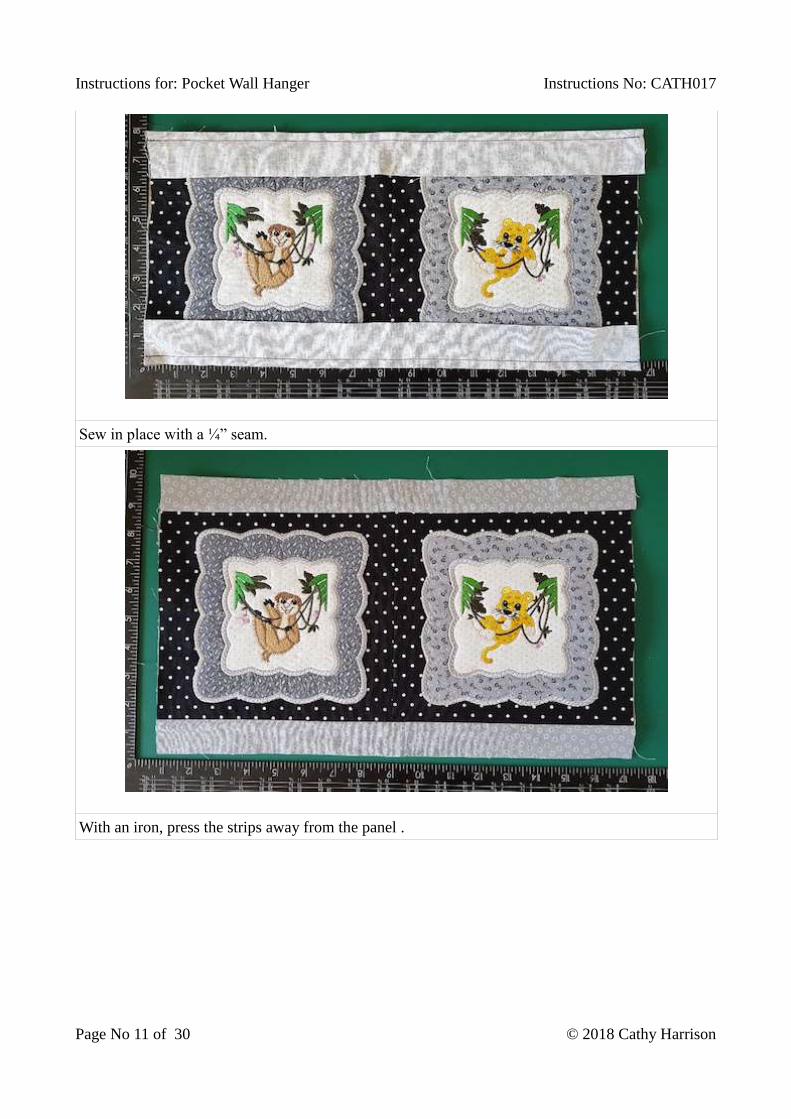
Sew in place with a ¼” seam.
With an iron, press the strips away from the panel .
Instructions for: Pocket Wall Hanger Instructions No: CATH017
Page No 12 of 30 © 2018 Cathy Harrison
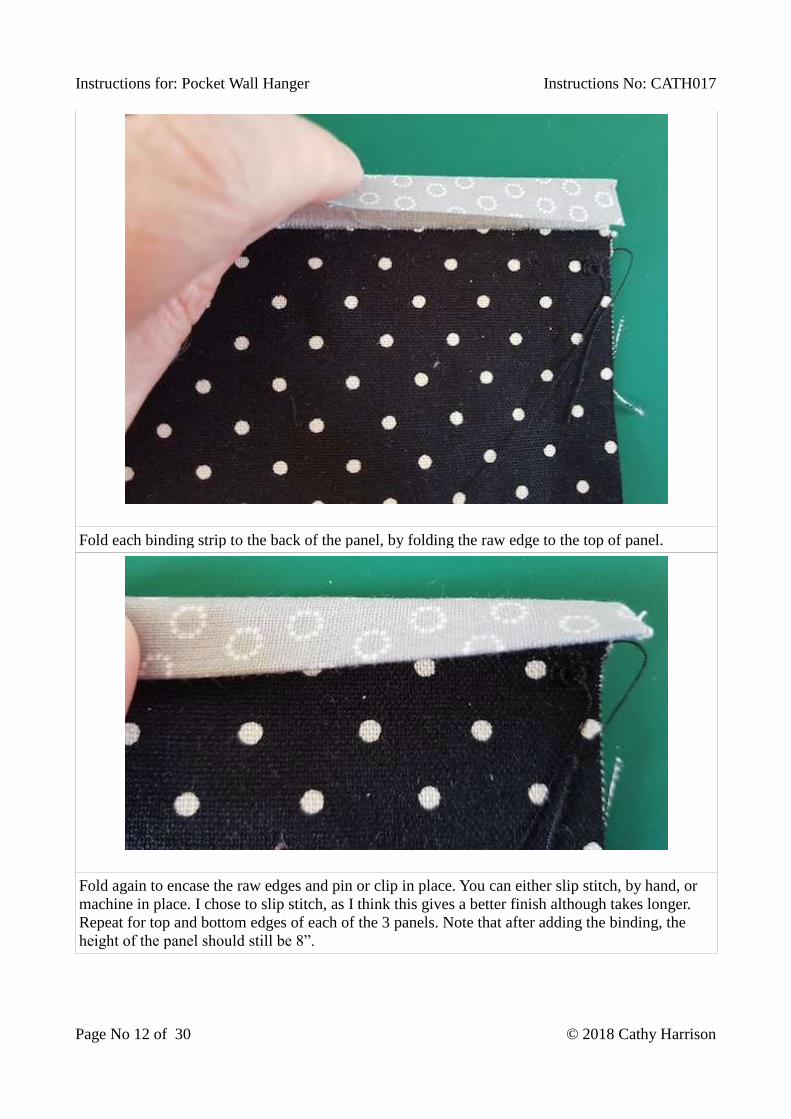
Fold each binding strip to the back of the panel, by folding the raw edge to the top of panel.
Fold again to encase the raw edges and pin or clip in place. You can either slip stitch, by hand, or
machine in place. I chose to slip stitch, as I think this gives a better finish although takes longer.
Repeat for top and bottom edges of each of the 3 panels. Note that after adding the binding, the
height of the panel should still be 8”.
Instructions for: Pocket Wall Hanger Instructions No: CATH017
Page No 13 of 30 © 2018 Cathy Harrison
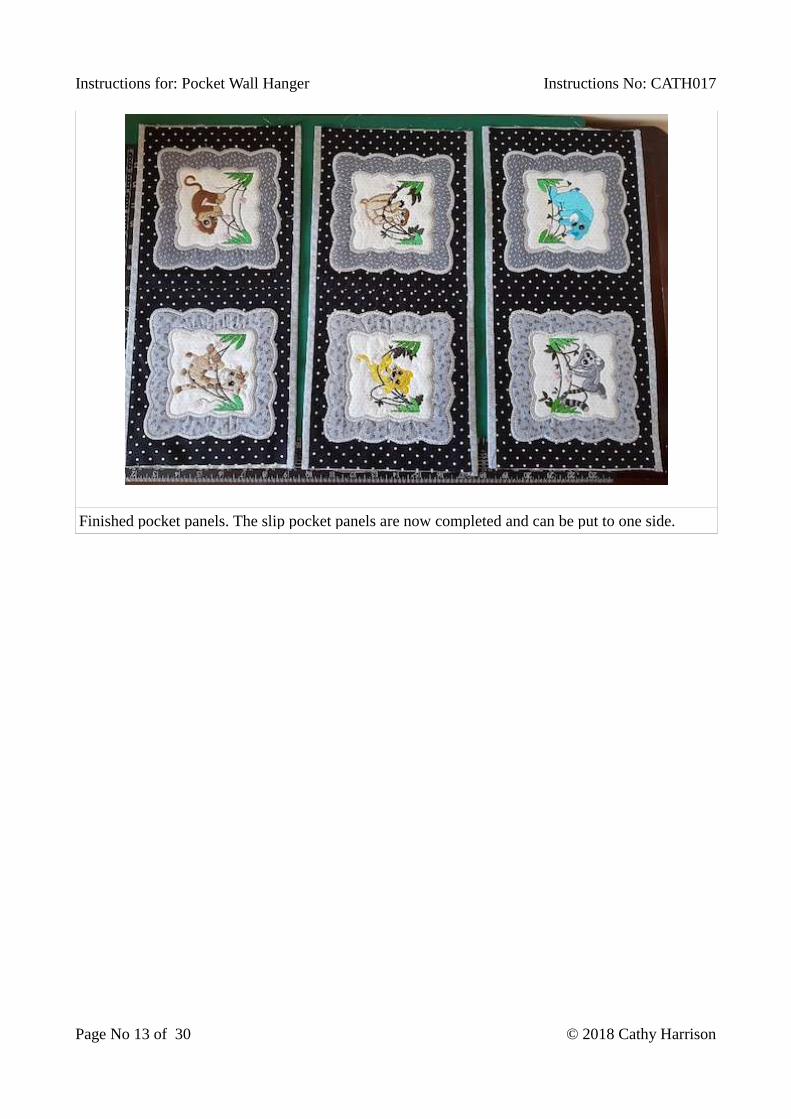
Finished pocket panels. The slip pocket panels are now completed and can be put to one side.
Instructions for: Pocket Wall Hanger Instructions No: CATH017
Page No 14 of 30 © 2018 Cathy Harrison
STEP 5 – Back Panel
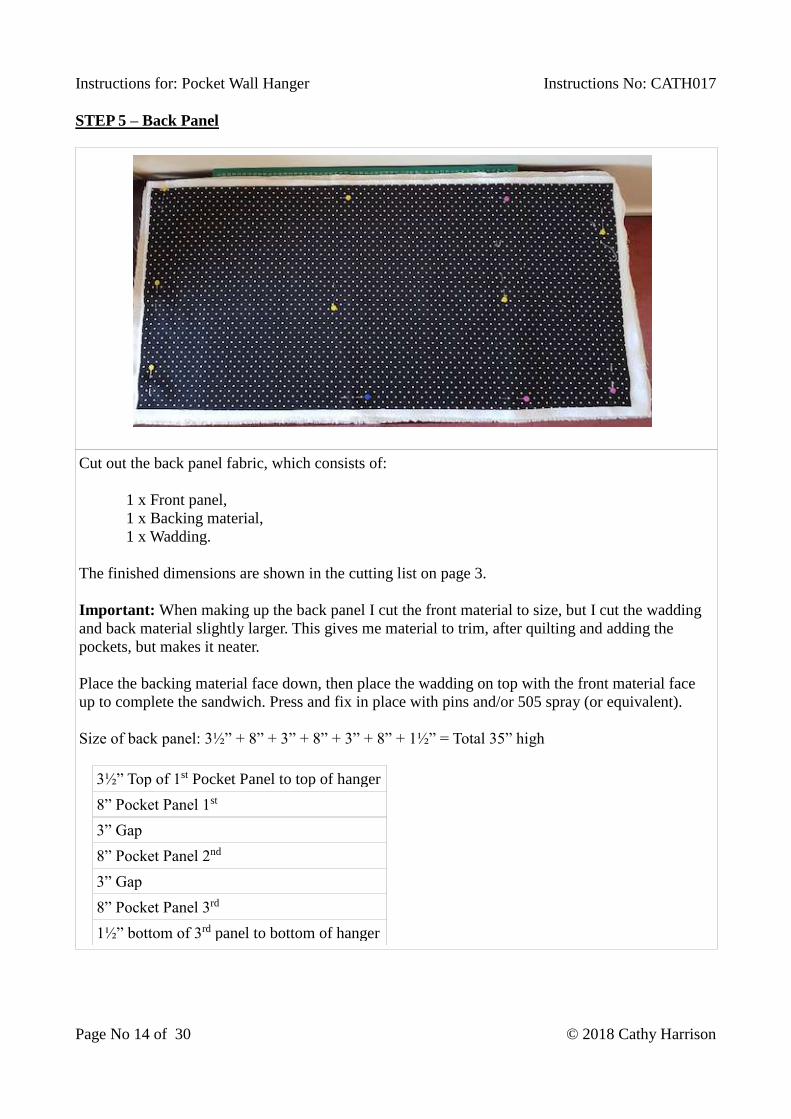
Cut out the back panel fabric, which consists of:
1 x Front panel,
1 x Backing material,
1 x Wadding.
The finished dimensions are shown in the cutting list on page 3.
Important: When making up the back panel I cut the front material to size, but I cut the wadding
and back material slightly larger. This gives me material to trim, after quilting and adding the
pockets, but makes it neater.
Place the backing material face down, then place the wadding on top with the front material face
up to complete the sandwich. Press and fix in place with pins and/or 505 spray (or equivalent).
Size of back panel: 3½” + 8” + 3” + 8” + 3” + 8” + 1½” = Total 35” high
3½” Top of 1st Pocket Panel to top of hanger
8” Pocket Panel 1st
3” Gap
8” Pocket Panel 2nd
3” Gap
8” Pocket Panel 3rd
1½” bottom of 3rd panel to bottom of hanger
Instructions for: Pocket Wall Hanger Instructions No: CATH017
Page No 15 of 30 © 2018 Cathy Harrison
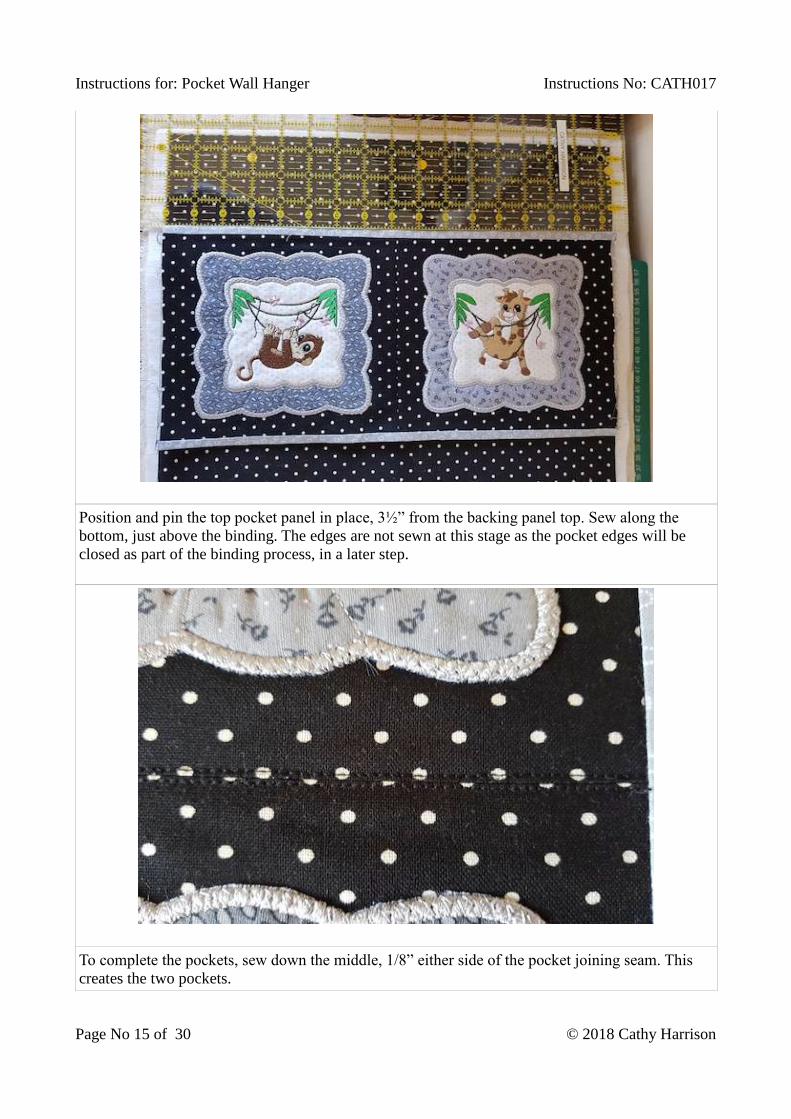
Position and pin the top pocket panel in place, 3½” from the backing panel top. Sew along the
bottom, just above the binding. The edges are not sewn at this stage as the pocket edges will be
closed as part of the binding process, in a later step.
To complete the pockets, sew down the middle, 1/8” either side of the pocket joining seam. This
creates the two pockets.
Instructions for: Pocket Wall Hanger Instructions No: CATH017
Page No 16 of 30 © 2018 Cathy Harrison
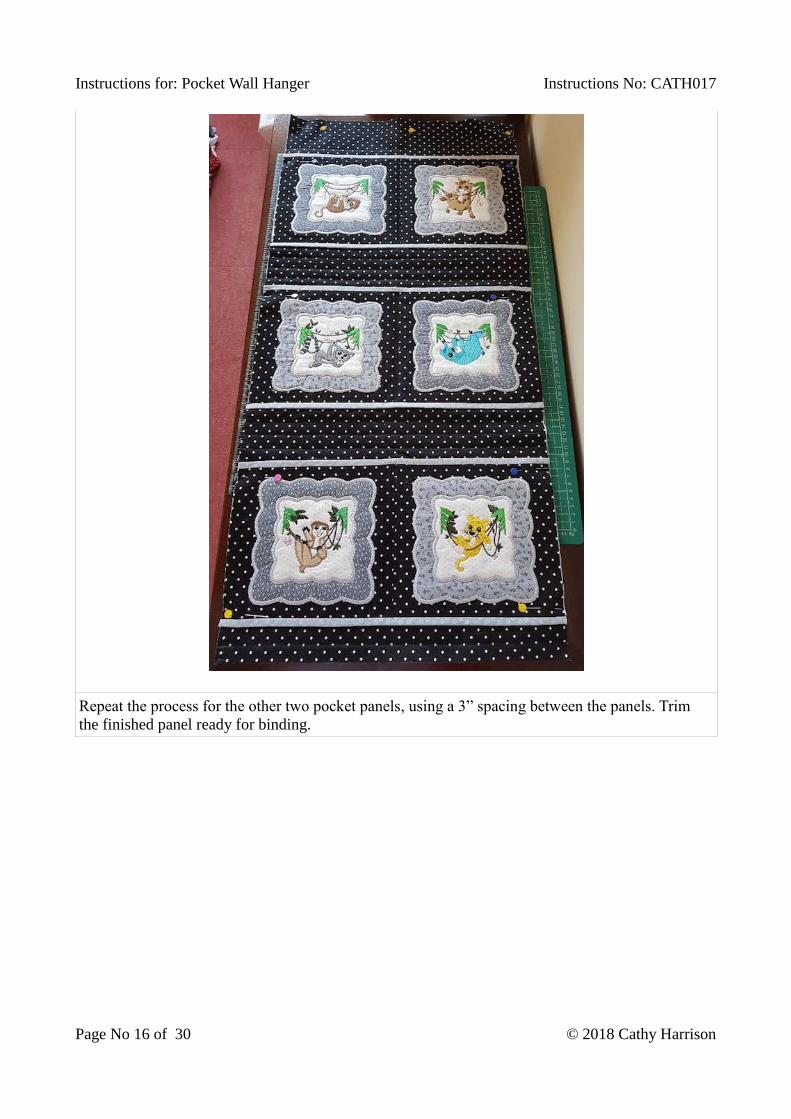
Repeat the process for the other two pocket panels, using a 3” spacing between the panels. Trim
the finished panel ready for binding.

Instructions for: Pocket Wall Hanger Instructions No: CATH017
Page No 17 of 30 © 2018 Cathy Harrison
STEP 6 – Dowling Casing
Cut a strip 16 ½” x 4
Fold, press and stitch ½” either side of the short sides
Fold in half lengthways and sew short ends together.
Now pin to the reverse of the wall hanger placing the strip (with raw edges) at the top edge. Tack
along the top, leaving the lower edge (folded) free for the moment.
Instructions for: Pocket Wall Hanger Instructions No: CATH017
Page No 18 of 30 © 2018 Cathy Harrison
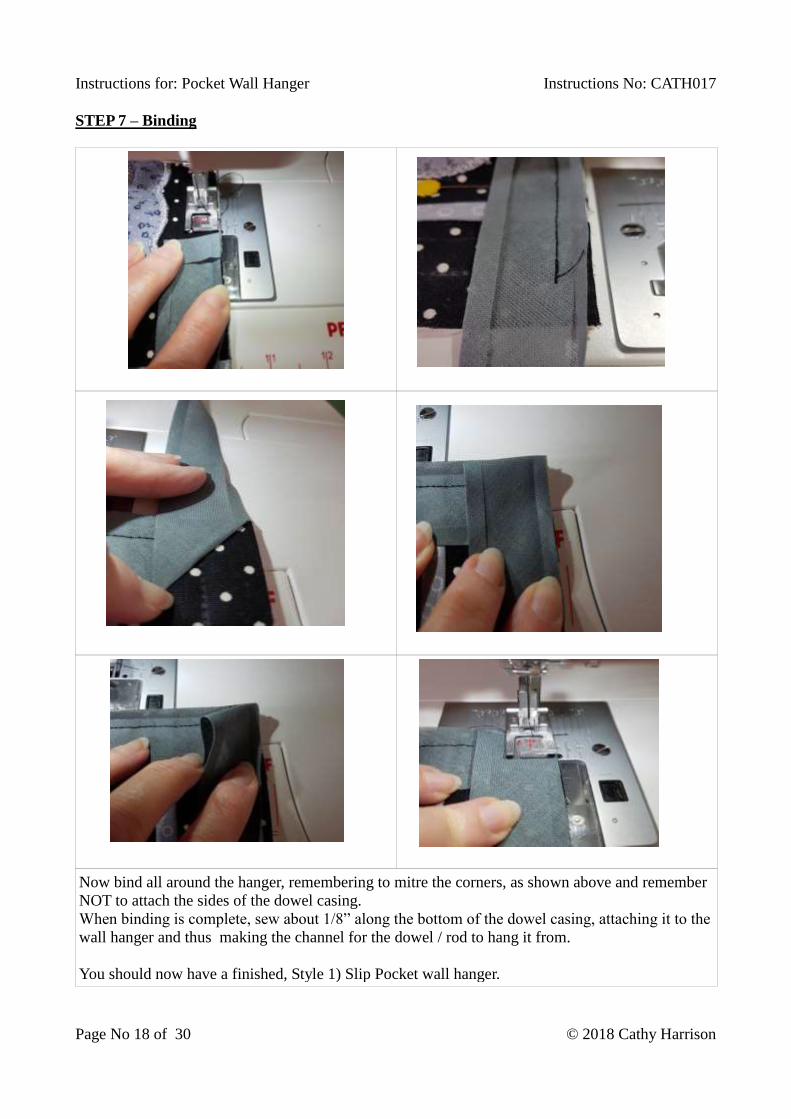
STEP 7 – Binding
Now bind all around the hanger, remembering to mitre the corners, as shown above and remember
NOT to attach the sides of the dowel casing.
When binding is complete, sew about 1/8” along the bottom of the dowel casing, attaching it to the
wall hanger and thus making the channel for the dowel / rod to hang it from.
You should now have a finished, Style 1) Slip Pocket wall hanger.
Instructions for: Pocket Wall Hanger Instructions No: CATH017
Page No 19 of 30 © 2018 Cathy Harrison
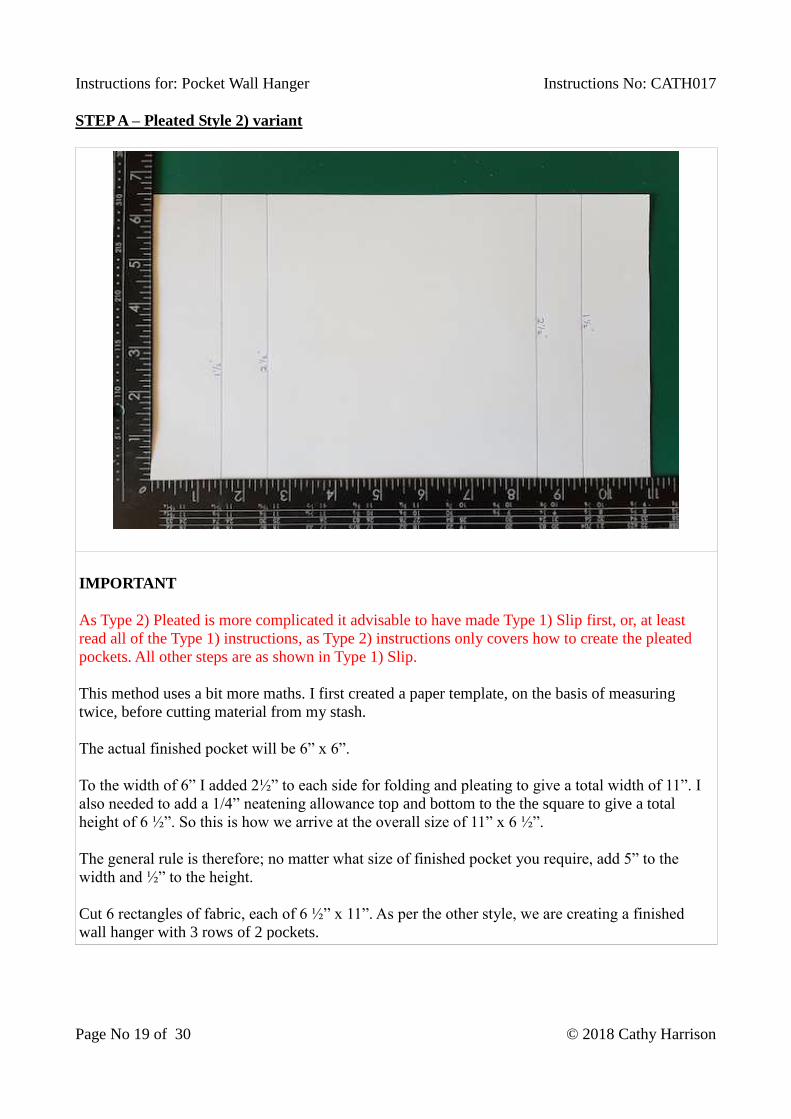
STEP A – Pleated Style 2) variant
IMPORTANT
As Type 2) Pleated is more complicated it advisable to have made Type 1) Slip first, or, at least
read all of the Type 1) instructions, as Type 2) instructions only covers how to create the pleated
pockets. All other steps are as shown in Type 1) Slip.
This method uses a bit more maths. I first created a paper template, on the basis of measuring
twice, before cutting material from my stash.
The actual finished pocket will be 6” x 6”.
To the width of 6” I added 2½” to each side for folding and pleating to give a total width of 11”. I
also needed to add a 1/4” neatening allowance top and bottom to the the square to give a total
height of 6 ½”. So this is how we arrive at the overall size of 11” x 6 ½”.
The general rule is therefore; no matter what size of finished pocket you require, add 5” to the
width and ½” to the height.
Cut 6 rectangles of fabric, each of 6 ½” x 11”. As per the other style, we are creating a finished
wall hanger with 3 rows of 2 pockets.
Instructions for: Pocket Wall Hanger Instructions No: CATH017
Page No 20 of 30 © 2018 Cathy Harrison
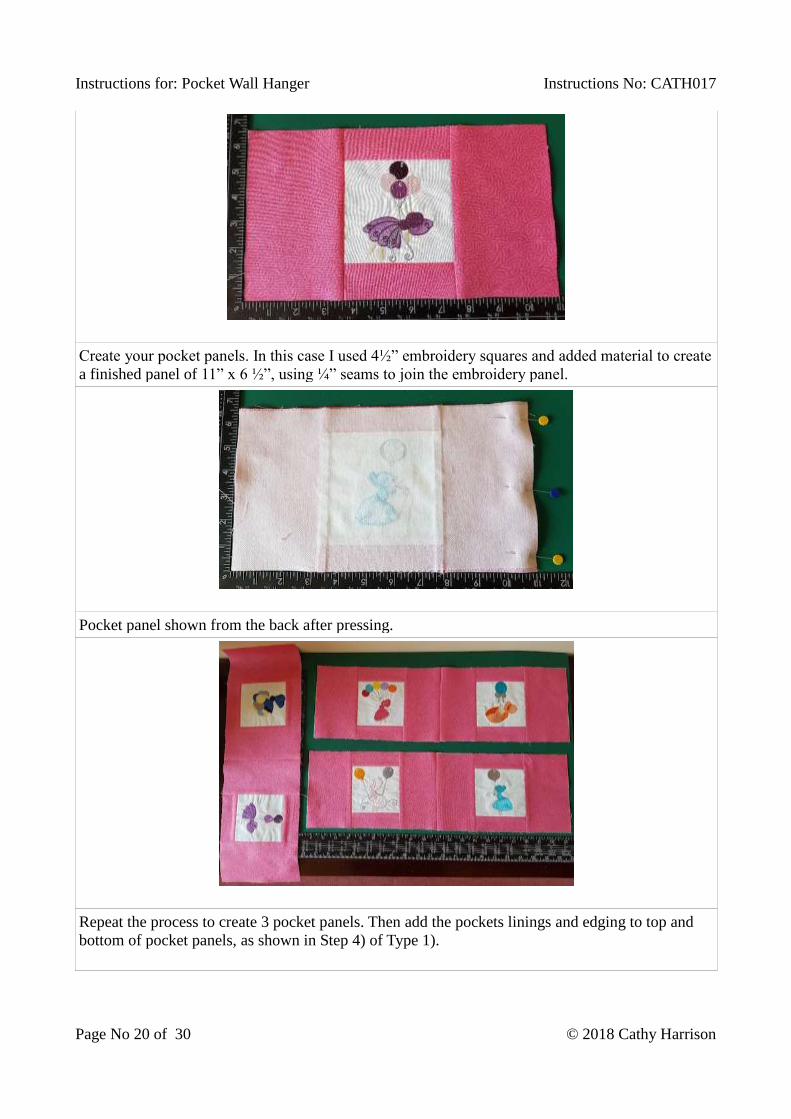
Create your pocket panels. In this case I used 4½” embroidery squares and added material to create
a finished panel of 11” x 6 ½”, using ¼” seams to join the embroidery panel.
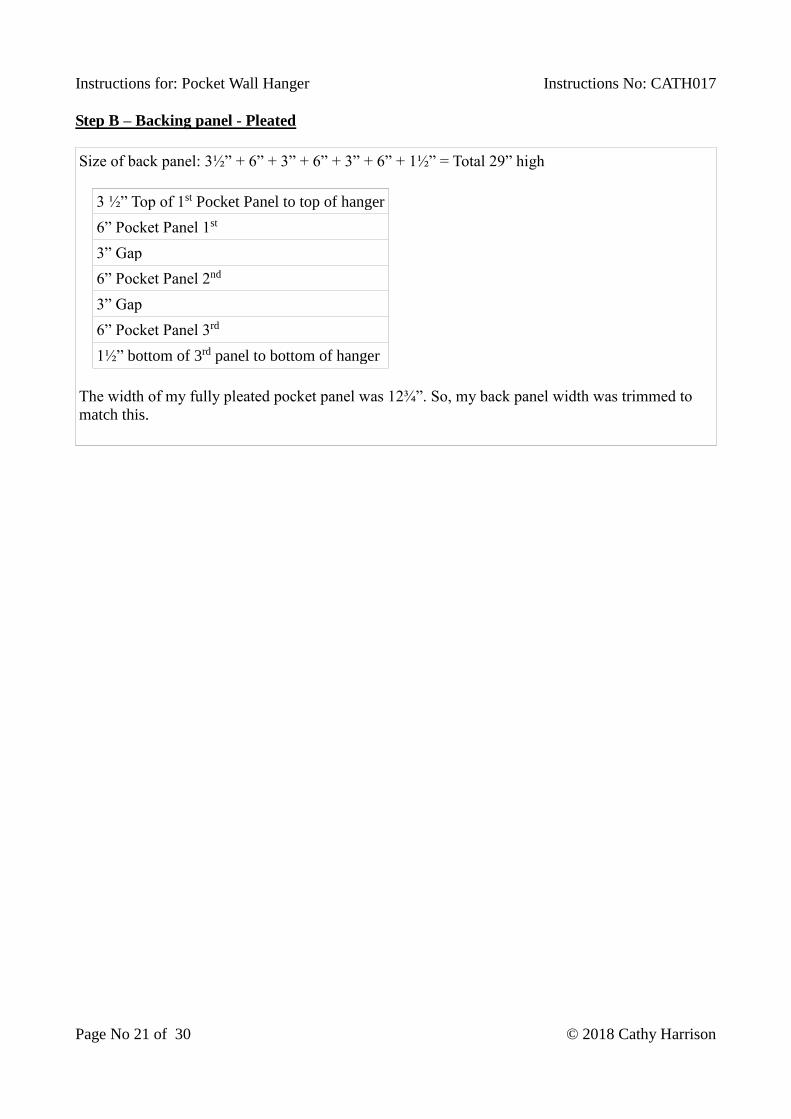
Pocket panel shown from the back after pressing.
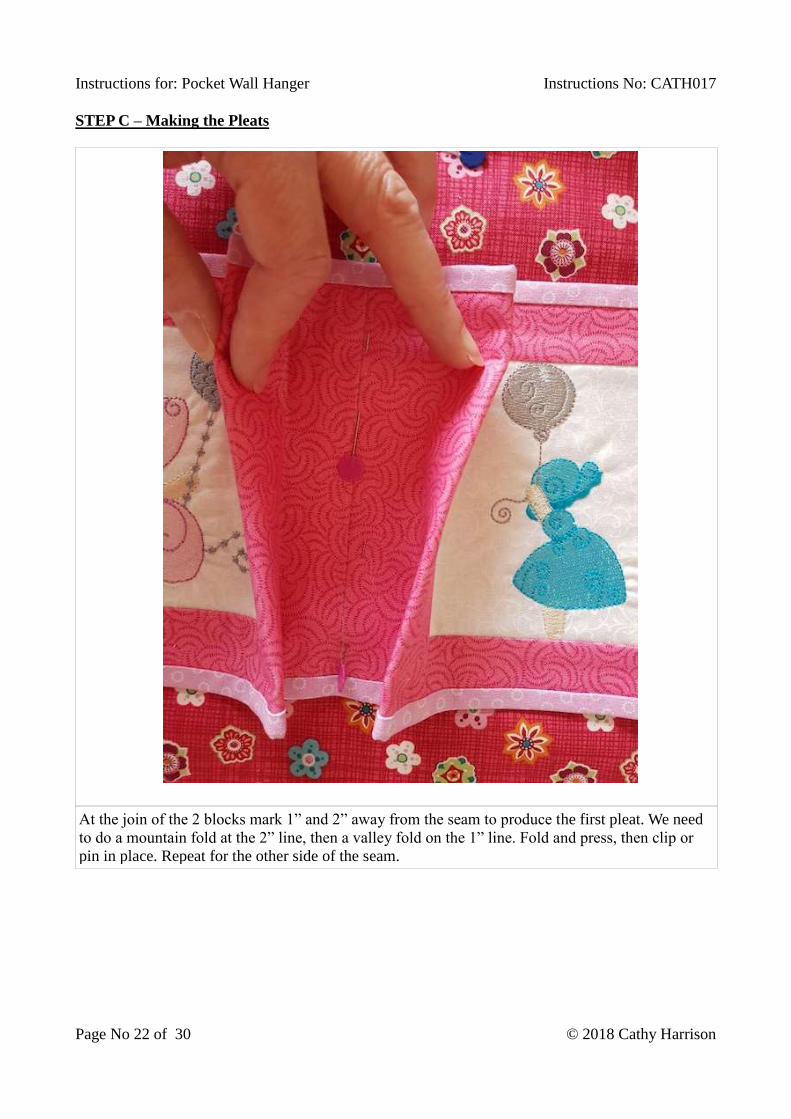
Repeat the process to create 3 pocket panels. Then add the pockets linings and edging to top and
bottom of pocket panels, as shown in Step 4) of Type 1).
Instructions for: Pocket Wall Hanger Instructions No: CATH017
Page No 21 of 30 © 2018 Cathy Harrison
Step B – Backing panel - Pleated
Size of back panel: 3½” + 6” + 3” + 6” + 3” + 6” + 1½” = Total 29” high
3 ½” Top of 1st Pocket Panel to top of hanger
6” Pocket Panel 1st
3” Gap
6” Pocket Panel 2nd
3” Gap
6” Pocket Panel 3rd
1½” bottom of 3rd panel to bottom of hanger
The width of my fully pleated pocket panel was 12¾”. So, my back panel width was trimmed to
match this.
Instructions for: Pocket Wall Hanger Instructions No: CATH017
Page No 22 of 30 © 2018 Cathy Harrison
STEP C – Making the Pleats
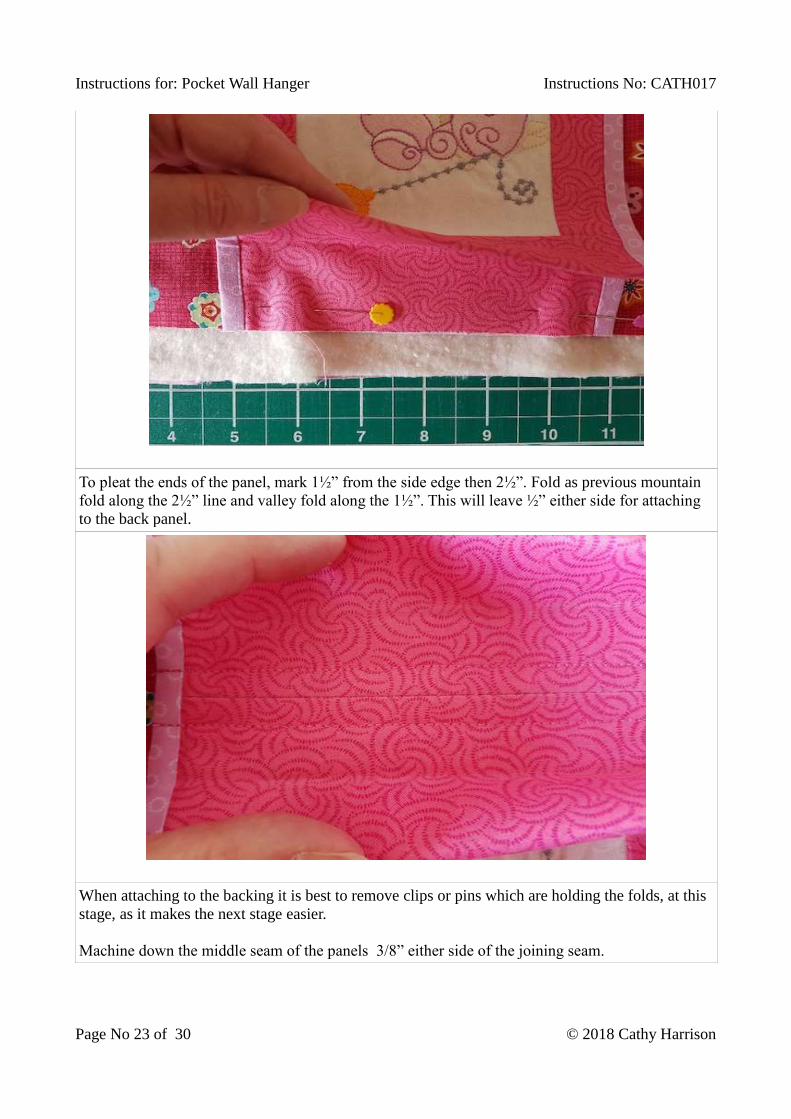
At the join of the 2 blocks mark 1” and 2” away from the seam to produce the first pleat. We need
to do a mountain fold at the 2” line, then a valley fold on the 1” line. Fold and press, then clip or
pin in place. Repeat for the other side of the seam.
Instructions for: Pocket Wall Hanger Instructions No: CATH017
Page No 23 of 30 © 2018 Cathy Harrison
To pleat the ends of the panel, mark 1½” from the side edge then 2½”. Fold as previous mountain
fold along the 2½” line and valley fold along the 1½”. This will leave ½” either side for attaching
to the back panel.
When attaching to the backing it is best to remove clips or pins which are holding the folds, at this
stage, as it makes the next stage easier.
Machine down the middle seam of the panels 3/8” either side of the joining seam.
Instructions for: Pocket Wall Hanger Instructions No: CATH017
Page No 24 of 30 © 2018 Cathy Harrison
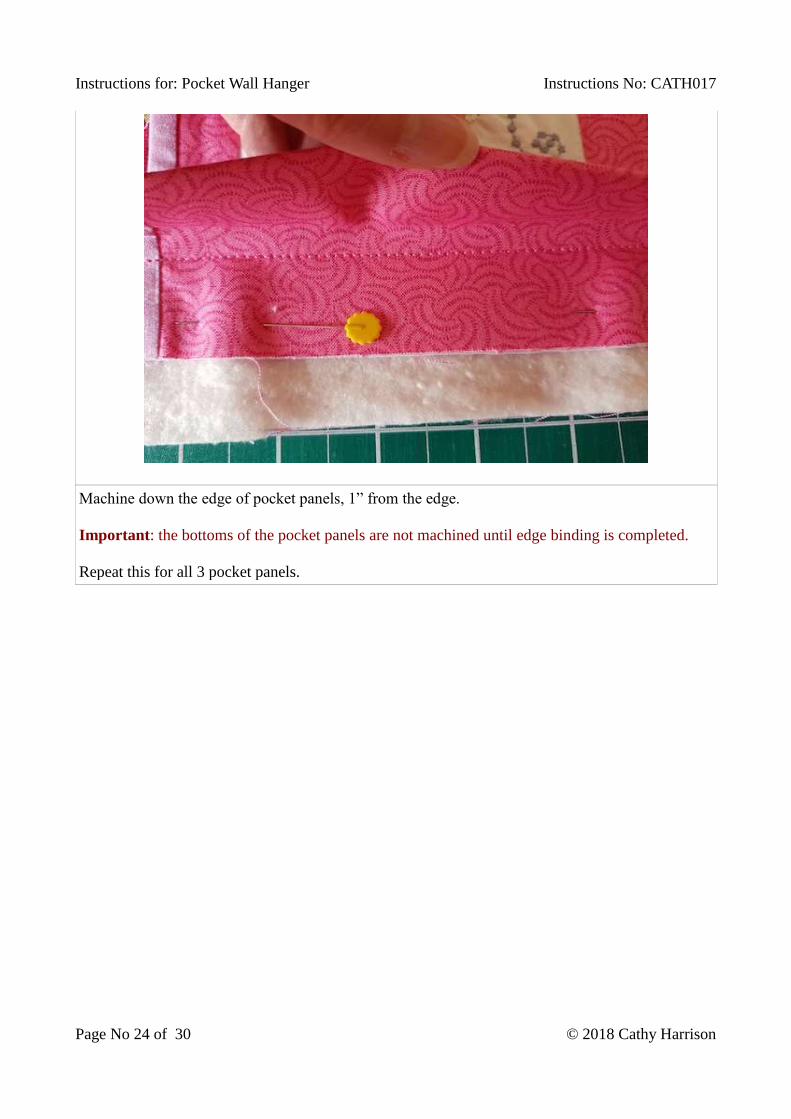
Machine down the edge of pocket panels, 1” from the edge.
Important: the bottoms of the pocket panels are not machined until edge binding is completed.
Repeat this for all 3 pocket panels.
Instructions for: Pocket Wall Hanger Instructions No: CATH017
Page No 25 of 30 © 2018 Cathy Harrison
STEP D – Pleated Style – Finishing off
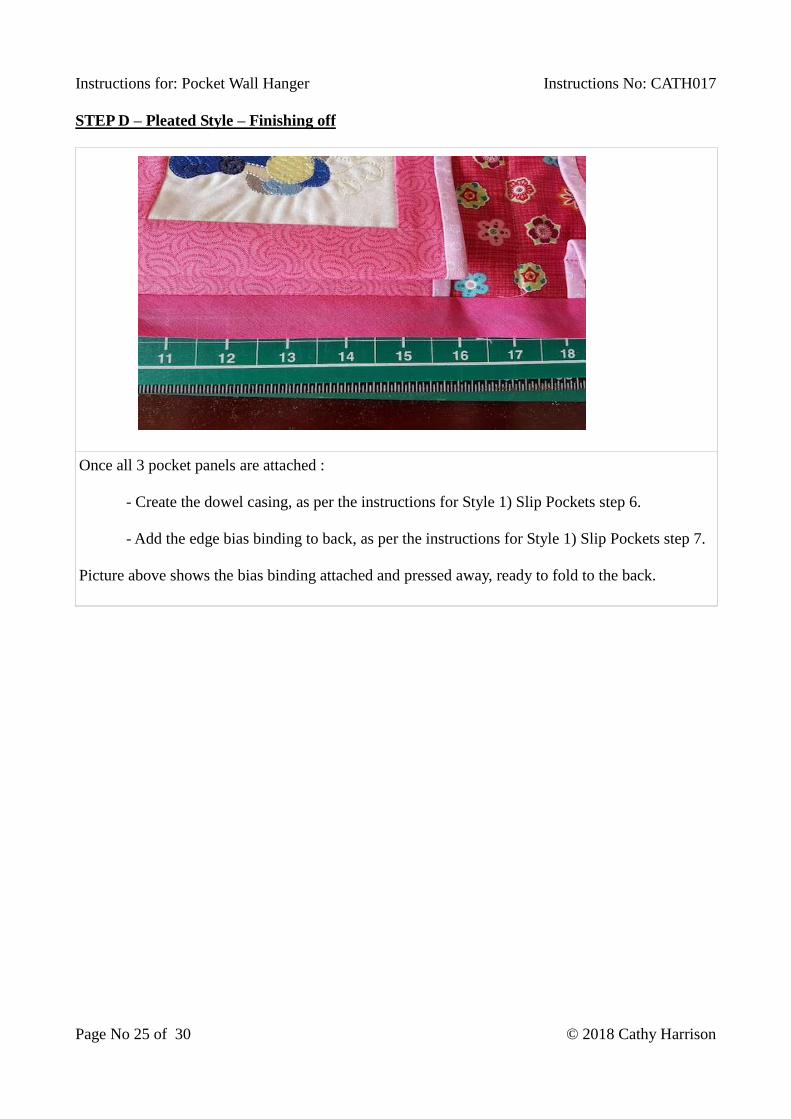
Once all 3 pocket panels are attached :
- Create the dowel casing, as per the instructions for Style 1) Slip Pockets step 6.
- Add the edge bias binding to back, as per the instructions for Style 1) Slip Pockets step 7.
Picture above shows the bias binding attached and pressed away, ready to fold to the back.

Instructions for: Pocket Wall Hanger Instructions No: CATH017
Page No 26 of 30 © 2018 Cathy Harrison
We are now going to sew along the bottom of each pocket panel, remembering to replace the folds.
Instructions for: Pocket Wall Hanger Instructions No: CATH017
Page No 27 of 30 © 2018 Cathy Harrison
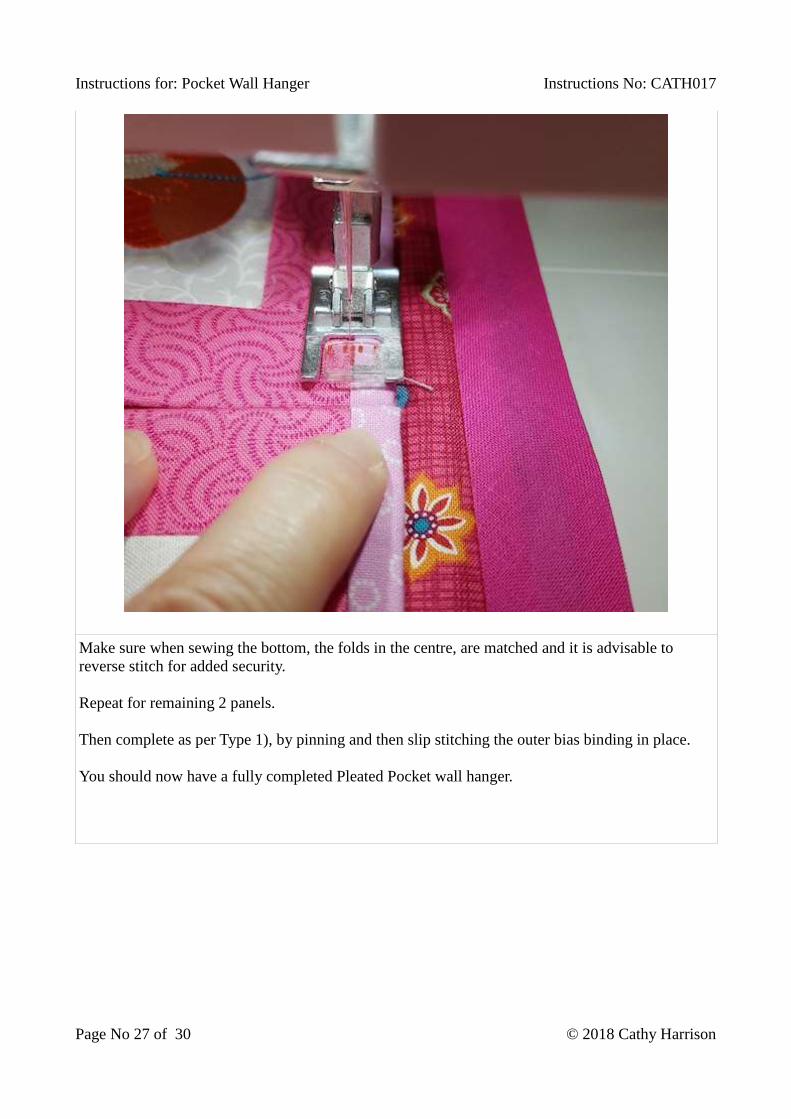
Make sure when sewing the bottom, the folds in the centre, are matched and it is advisable to
reverse stitch for added security.
Repeat for remaining 2 panels.
Then complete as per Type 1), by pinning and then slip stitching the outer bias binding in place.
You should now have a fully completed Pleated Pocket wall hanger.

Instructions for: Pocket Wall Hanger Instructions No: CATH017
Page No 28 of 30 © 2018 Cathy Harrison
Variants
The original 9 pocket wall hanger that Jo Bendall made and posted on Kreative Kiwi.
Instructions for: Pocket Wall Hanger Instructions No: CATH017
Page No 29 of 30 © 2018 Cathy Harrison
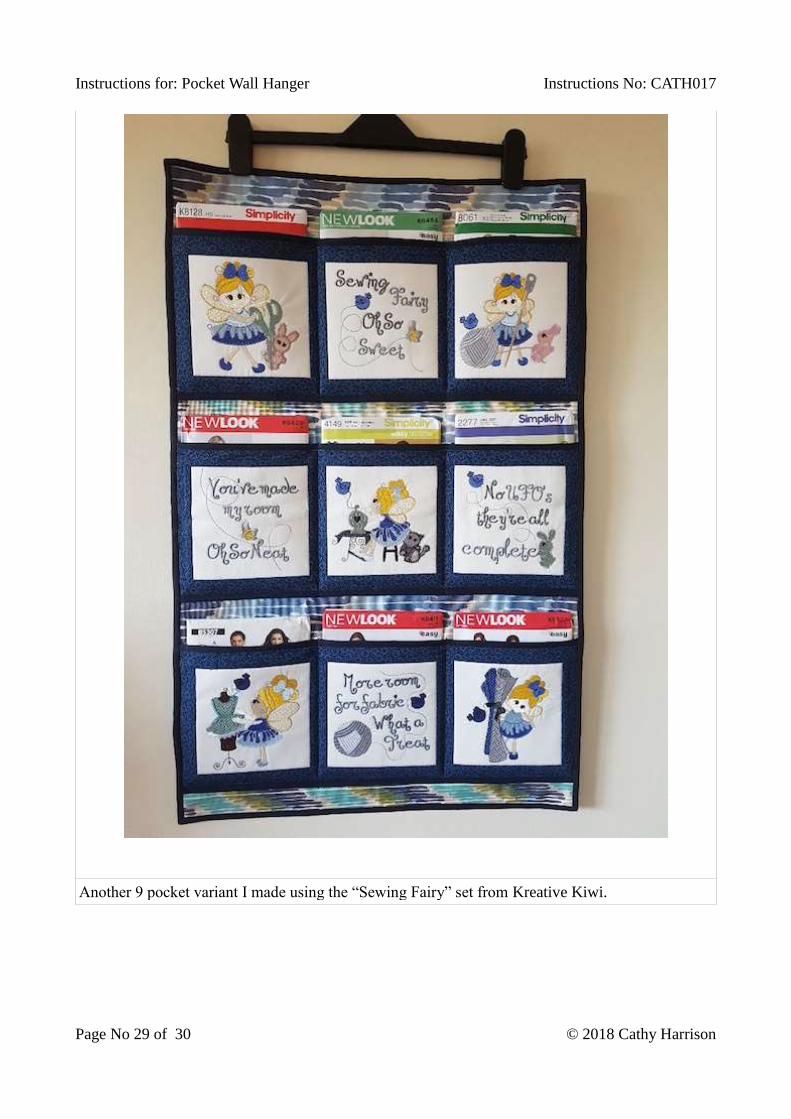
Another 9 pocket variant I made using the “Sewing Fairy” set from Kreative Kiwi.
Instructions for: Pocket Wall Hanger Instructions No: CATH017
Page No 30 of 30 © 2018 Cathy Harrison
CONTACT DETAILS
eMail: [email protected]
Website: http://picklecreations.co.uk/PickleCreations/Welcome.html
E
t
s
y
S
h
o
p
:
HYPERLINK
"
h
t
t
p
s
:
/
/
w
w
w
.
e
t
s
y
.
c
o
m
/
u
k
/
s
h
o
p
/
P
i
c
k
l
e
C