Embed Size (px)
Citation preview

Thank you for purchasing Crea WP WordPress theme! If you have any question, please, feel free to contact us via our ThemeForest user page: http://themeforest.net/user/Dream-Theme
Table of contents 1. Introduction .................................................................................................................................................... 3
2. Requirements & Compatibility ....................................................................................................................... 3
3. Crea WP installation and WordPress basic setup ........................................................................................... 3
1. Install WordPress .................................................................................................................................... 3
2. Upload theme ......................................................................................................................................... 3
3. Activate Crea WP .................................................................................................................................... 4
4. Theme options menu ..................................................................................................................................... 5
1. Appearance ............................................................................................................................................. 5
2. Social links .............................................................................................................................................. 6
3. Contact ................................................................................................................................................... 7
4. Analytics ................................................................................................................................................. 7
5. Creating posts and pages ............................................................................................................................... 7
Posts ........................................................................................................................................................... 7
Pages ........................................................................................................................................................... 8
6. How to create/display Classical portfolio ..................................................................................................... 10
Creating Portfolio Item ........................................................................................................................... 10
Displaying Portfolio ................................................................................................................................. 11
7. How to create/display Photo Albums (“2 layers” gallery) ............................................................................ 12
Create a new Album ................................................................................................................................. 12
Uploading Photos to Album ..................................................................................................................... 13
Displaying Albums List ............................................................................................................................ 13
8. How to display Classical gallery (“flat” gallery) ............................................................................................ 14
9. How to create/display Slider ........................................................................................................................ 14
Creating a Slide ......................................................................................................................................... 14
Home page setup algorithm ..................................................................................................................... 15
10. Shortcodes .................................................................................................................................................. 16
a. Multicolumn layout .............................................................................................................................. 16
b. Toggles .................................................................................................................................................. 18
c. Tooltips ................................................................................................................................................. 18
11. Contact page ............................................................................................................................................... 18
With Google Map ..................................................................................................................................... 18
With feedback form only .......................................................................................................................... 19

12. PSD-files ...................................................................................................................................................... 19
12+1. Credits ..................................................................................................................................................... 20
Graphics: ................................................................................................................................................... 20
Coding: ...................................................................................................................................................... 20
Highslide: .................................................................................................................................................. 20
Fonts: ........................................................................................................................................................ 20
14. Support ....................................................................................................................................................... 20

1. Introduction Crea WP is the perfect choice for a personal portfolio/showcase site. Also it will do fine as a small full-featured blog. Crea WP is powered by Highslide JS – one of the fastest and coolest premium lightboxes on the market. Normally single commercial license for it costs about $30, but you are getting it free as a part of Crea WP package!
It is very easy to use, and it takes only a couple of minutes to set it up.
2. Requirements & Compatibility “Crea WP” is compatible with WordPress version 3.1 and later.
Most JavaScript enabled Browser will make this theme work with no issues! PC or Mac system does not make the difference as well.
It has been tested on:
• Firefox 3.6 and later; • Safari 4 and later; • Opera 11.10 and later; • Internet Explorer 8 and later (also, it is readable in IE 7); • Google Chrome (carousel slider does not work propperly – this is known Chrome bug with incorrect
absolute positioning + zoom property).
3. Crea WP installation and WordPress basic setup 1. Install WordPress Download & Install WordPress 3.2.1 (v.3.1 is also supported)
Before proceeding, please make sure that you deactivated following plugins: - wp-pagenavi
2. Upload theme Upload “dt-crea” folder via FTP into [wordpress folder ] /wp-content/themes/ or in WordPress Admin Panel go to “Appearance > Themes > Install Theme > Upload > Install a theme in .zip format” (see fig. 3.1.).

Fig. 3.1.
Attention! After uploading theme to your hosting you mast: 1) Set CHMOD 777 to folder “your_site/wp-content/themes/dt-crea/cache” 2) Set CHMOD 777 to folder “your_site/wp-content/themes/dt-crea/cache/uploads” 3) Folder “your_site/wp-content/uploads” must be created and CHMOD set to 777
3. Activate Crea WP In “Appearance > Themes > Manage Themes > Available Themes” activate “Crea WP” by hitting appropriate “Activate” link (see fig. 3.2.).
Fig. 3.2.
After activating the Crea WP you will notice some Theme options in your WordPress admin panel (see fig. 3.3.).
Fig.3.3.
4. Theme options menu Theme option menu is called “Crea WP” (fig. 4.1). Here you can change logo, theme skin and behavior, add links to social networks, etc.
Fig. 4.1.
1. Appearance On this page you can change skins; logo; choose Cufon-font or disable/enable it; set slider timeout; made clickable or not clickable parent menu items in dropdown menus, etc.
How to create a theme skin Theme parallax skin contains of basic background color overlaid by 3 levels of background. For every level of background you may choose from preinstalled images (patterns) or upload your custom images;

enable/disable “repeat-x”, “repeat-y”, “position fixed” and “center” options (some options are available only for first level of background; see fig. 4.2.).
Note, that after uploading your images will appear in appropriate background choosing section.
Don’t forget to hit “save options”!
Fig. 4.2.
2. Social links On this page you can enter links on profiles in some social networks (fig. 4.3.).
Fig. 4.5.

3. Contact Here you can paste code of Google Maps to display it on contact page (with proper page template).
4. Analytics Here you can paste code of Google Analytics or other analytics gathering system.
5. Creating posts and pages Posts Regular posts in Crea WP can be created in usual way. The only thing that must be mentioned is importance of featured image. If you will not set it, you will get kinda ugly “no image” icon:) (see fig. 5.1.)
Fig. 5.1.
Attention! If you are cannot see “Excerpt” box (in other words, cannot insert “Read more” link), please, do following (fig. 5.2.):
a) click “Screen Options” in top right corner of post adding/editing interface; b) check “Excerpt” checkbox c) enter post excerpt in appropriate box (normally located right below main post editing WYSIWYG)

Fig. 5.2
Pages Pages can be added/edited in regular way. Attention! To hide comments on the pages go to “wp-admin -> pages” and click “quick edit” link. You will see “Allow Comments” checkbox (fig. 5.3.):
Fig. 5.3.
You can do the same in theme Adding/Editing interface. Simply check “Discussion” checkbox in the screen option. Appropriate box will appear. (See fig. 5.4):

Fig. 5.4.

6. How to create/display Classical portfolio Creating Portfolio Item You can create new portfolio record (fig. 6.1.) as easy as a new blog post.
Fig. 6.1.
In the admin panel you will notice new tabs: “Photo Albums”, “Portfolio” and “Slides”. Go to “Portfolio > Add New” interface and start creating a new post in usual way. Don’t forget to upload “Featured image” to use it as portfolio item background (in list-view) and featured illustration (in item-view) (see fig. 6.2 ).
Fig. 6.2. (Fields highlighted with red frames are required)
Also don’t forget to assign portfolio tag/tags and title (works as usual WordPress) - it will be used to define what works should be displayed on portfolio page/pages.
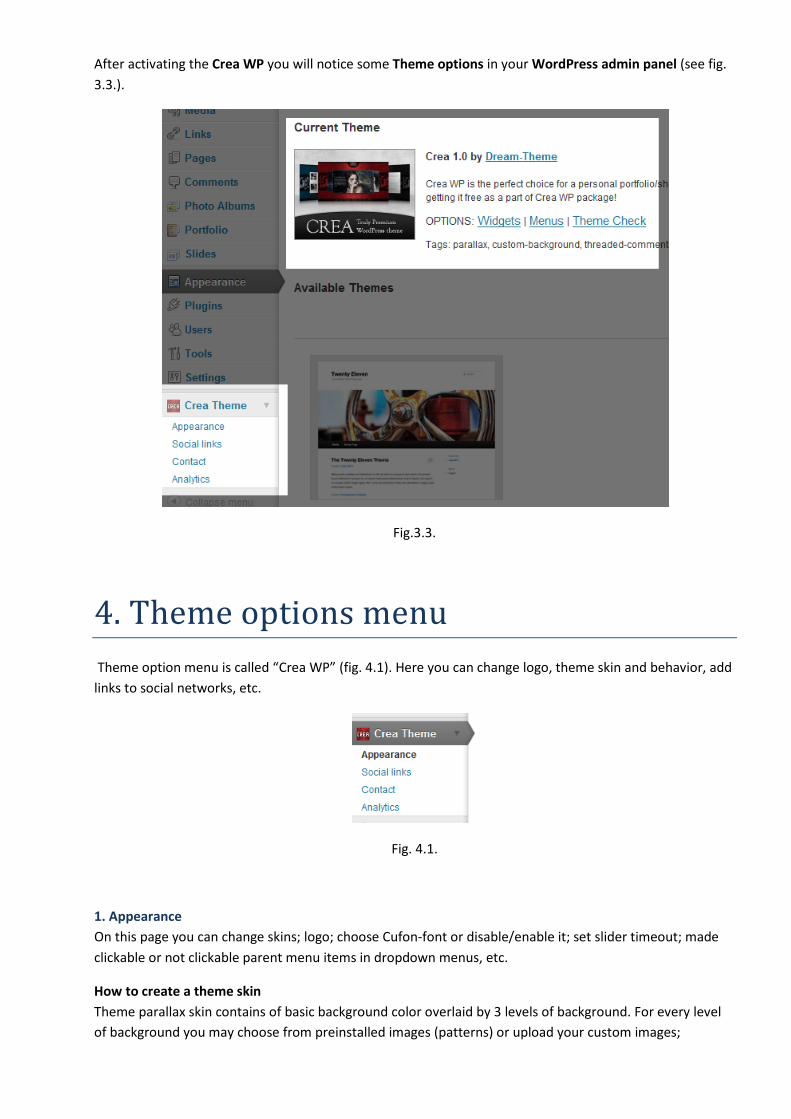
Displaying Portfolio To create page for displaying portfolio items, go to “Pages -> Add New” and start creating page in regular way. The key difference is to choose a Template called “Portfolio” (see fig. 6.3.).
After choosing this template you will see additional custom box called “Portfolio options”. Here you can define what Portfolio Items would be shown on this page.
You may choose from following options:
- All – all portfolio items will be shown on this page (even items with no Tags assigned). - Only – choose Portfolio Items by Tags to be shown on this page. - Exclude – choose which portfolio categories will be excluded from displaying on this page.
Fig. 6.3.

7. How to create/display Photo Albums (“2 layers” gallery)
Fig. 7.1.
Create a new Album To create a new Album go to “Photo Albums - > Add New”.
Album creation interface is looks much similar to regular posts (see fig. 7.2. Fields highlighted with red frames are required).
Fig. 7.2. (Fields highlighted with red frames are required)
You can add Title of album (title is required) and its Description (optional) as you do in a regular posts. “Featured image” box is used to create Album Cover image (optional; if not defined, first photo from the gallery will be displayed as an Album Cover).
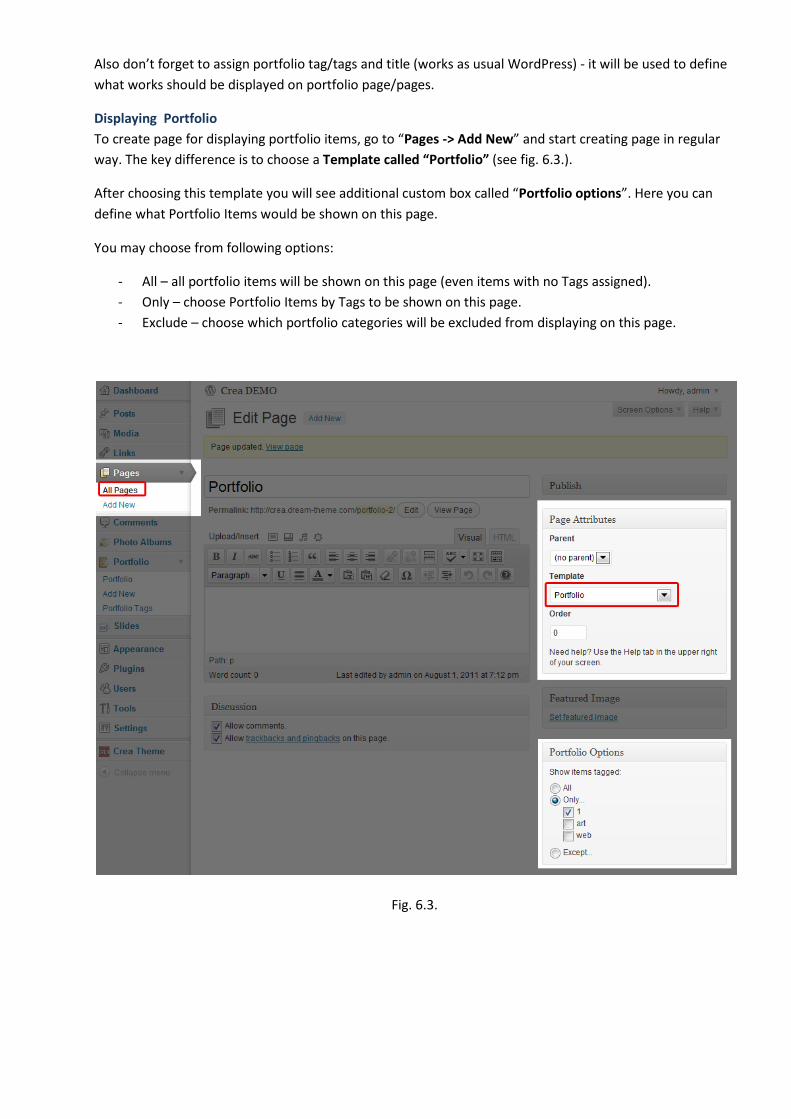
Uploading Photos to Album To upload images to the album, click “Add an Image” button above the WYSIWYG area (see fig. 7.3.).
Fig. 7.3.
Upload image/images with standard image uploading interface. When upload will be completed, you will see all images uploaded to the current Album. Hit “Save all Changes” and after that “Insert (or update) gallery” buttons (fig. 7.4.):
Fig. 7.4.
You can manage images in Album as you do in standard WordPress interface (e.g. images can be reordered by simple drag-and-drop and so on).
Displaying Albums List You can create Photo Albums page/pages from “Pages -> Add New” interface. Process is much the same as creating Portfolio Page/Pages. The only difference is to choose “Gallery (albums and photos)” template.
After choosing this template you will see additional custom box called “Photo Albums Options”. Here you can define what Albums would be shown on this page.
You may choose from following options:
- All – all Photo Albums will be shown on this page. - Only – choose Albums to be shown on this page. - Exclude – choose which Albums will be excluded from displaying on this page.
8. How to display Classical gallery (“flat” gallery) You can create Classical Gallery page/pages from “Pages -> Add New” interface. Process is much the same as creating Portfolio Page/Pages. The only difference is to choose “Gallery (only photos)” template.
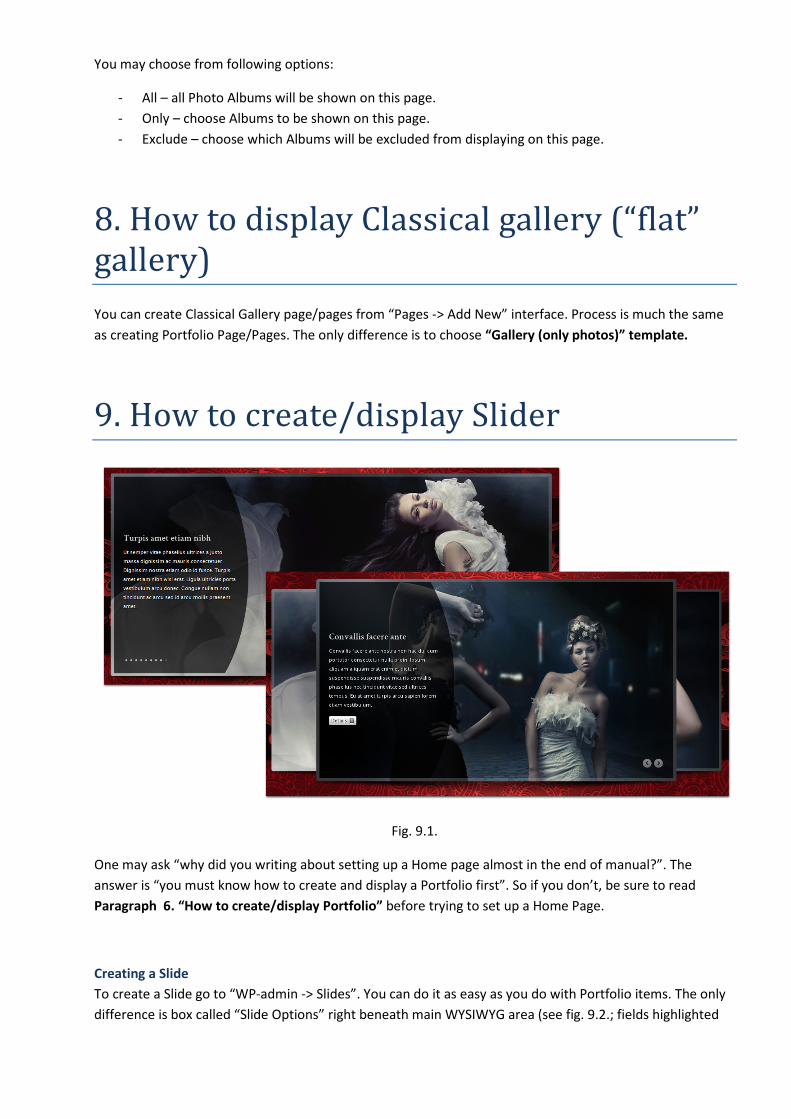
9. How to create/display Slider
Fig. 9.1.
One may ask “why did you writing about setting up a Home page almost in the end of manual?”. The answer is “you must know how to create and display a Portfolio first”. So if you don’t, be sure to read Paragraph 6. “How to create/display Portfolio” before trying to set up a Home Page.
Creating a Slide To create a Slide go to “WP-admin -> Slides”. You can do it as easy as you do with Portfolio items. The only difference is box called “Slide Options” right beneath main WYSIWYG area (see fig. 9.2.; fields highlighted

with red frames are required). In Slide Options box you can attach a link to a slider and “Details” button will appear (see fig. 9.3.)
Fig. 9.2.
Fig. 9.3.
Home page setup algorithm 1. Start to creating a page, which will be used as a Home page from “Pages - > Add New” interface. 2. Choose “Slider 1 (Fade)” or “Slider 2 (Carousel)” Template (please note, that you need to create at
least 3 slides to use Carousel Slider). 3. Set it up, like you do with a portfolio Page. 4. Save changes and go to “Settings -> Reading” section (see fig 9.4.). 5. In “Front page displays” choose “A static page (select below)” radio-button (this is important!). 6. In “Front page:” select choose page that you have created to be Home page earlier in steps 1-3
(this is important!).

7. Optional. Also you can choose which page will display your blog posts in “Posts page:” selector. You may achieve same result by selecting “Blog” page template, while creating a new page.
Fig 9.4.
10. Shortcodes There are 8 most commonly used shortcodes.
a. Multicolumn layout 1. One-half Code: [one-half] Your text [/one-half] To create a framed column, just add the appropriate attribute: Code: [one-half frame=”y”] Your text [/one-half]
2. One-third Code: [one-third] Your text [/one-third] To create a framed column, just add the appropriate attribute:

Code: [one-third frame=”y”] Your text [/one-third]
3. Two-third Code: [two-third] Your text [/two -third] To create a framed column, just add the appropriate attribute: Code: [two -third frame=”y”] Your text [/two -third]
4. One-fourth Code: [one-fourth] Your text [/one-fourth] To create a framed column, just add the appropriate attribute: Code: [one-fourth frame=”y”] Your text [/one-fourth]
5. Three-fourth Code: [three-fourth] Your text [/three-fourth] To create a framed column, just add the appropriate attribute: Code: [three-fourth frame=”y”] Your text [/three-fourth]
6. Frame This shortcode is using to create a text in frame: Code: [frame] Your text [/frame]

7. Clear Sometimes it is necessary to separate multicolumn layout of text or images. For this use shortcode [clear] or [clear /]
b. Toggles Code: [toggle title= “toggle title”] Toggle expanded text [/toggle]
c. Tooltips To create a tooltip, you can use the following shortcode: Code: [tooltip title=”Tooltip title”] Tooltip extended text [/tooltip]
Note, that extended tooltip text can contain HTML code.
11. Contact page With Google Map To create a page with a Contact form and Google map, simply switch it template to “Contact”:
Google map code can be embed in “WP-admin -> Crea Theme -> Contact” :

Social links can be embed in “WP-admin -> Crea Theme -> Social links” :
With feedback form only To create contact page without Google Map and Social links, simply select page template “Contact With Text Only”.
12. PSD-files I’ve included 4 PSD files: Carousel Slider, Portfolio, Blog and Text page. If you need PSD files for all pages you can purchase them from ThemeForest: http://themeforest.net/item/crea-html/396828
12+1. Credits Graphics: Free social icons from http://www.freesocialicons.com/25-free-social-networking-icons/ Free vector icons from
Coding: Jquery
http://www.webdesignerdepot.com/2010/07/200-exclusive-free-icons-reflection/
Jquery Easing Plugin http://jquery.com/
Jquery Cycle Plugin http://plugins.jquery.com/project/Easing
Jquery Validator Plugin http://plugins.jquery.com/project/cycle
http://www.position-absolute.com/articles/jquery-form-validator-because-form-validation-is-a-mess/ Jquery Placeholder Plugin CSS PIE
https://github.com/mudge/jquery_placeholder http://css3pie.com/
Pretty Photo Highslide
http://www.no-margin-for-errors.com/projects/prettyphoto-jquery-lightbox-clone/ http://highslide.com/
Highslide: Crea WP template is powered by highslide – one of the coolest lightbox scripts on the market. Please note, that Highslide is NOT A FREEWARE! It is distributed and can be used only as a part of Crea WP template. (This means that you cannot use it apart from Crea WP template, unless you purchased appropriate license on its official site: http://highslide.com/).
Fonts: http://www.google.com/webfonts http://www.fontsquirrel.com/
Images on theme demo: http://www.shutterstock.com/ IDs: 69062863, 63992515, 60331717, 70561195, 69062863, 26100514, 67378123, 68463703, 71936965, 67418257, 67133575, 67392103, 63092089
14. Support If you have any question or problems that are beyond the scope of this Manual, please, feel free to contact us via our Support Ticket System: http://support.dream-theme.com/
Attention! Please note, that we cannot provide technical support until you specify your Item Purchase Code. Where can you get it?
Download the manual: http://support.dream-theme.com/verify/Item_Purchase_Code.pdf or Watch the screencast: http://www.screenr.com/gHxs