Embed Size (px)
Citation preview
Crave Setup Guide v1.07
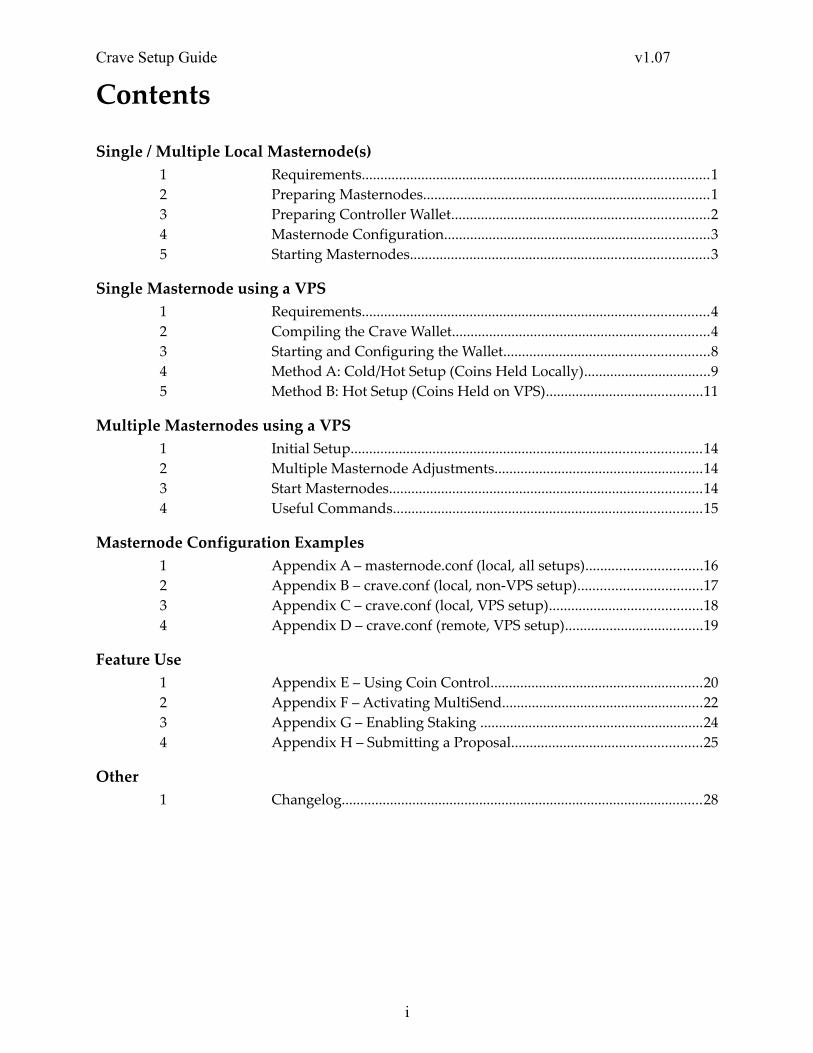
Contents
Single / Multiple Local Masternode(s)1 Requirements.............................................................................................12 Preparing Masternodes.............................................................................13 Preparing Controller Wallet.....................................................................24 Masternode Configuration.......................................................................35 Starting Masternodes................................................................................3
Single Masternode using a VPS1 Requirements.............................................................................................42 Compiling the Crave Wallet.....................................................................43 Starting and Configuring the Wallet.......................................................84 Method A: Cold/Hot Setup (Coins Held Locally)..................................95 Method B: Hot Setup (Coins Held on VPS)..........................................11
Multiple Masternodes using a VPS1 Initial Setup..............................................................................................142 Multiple Masternode Adjustments........................................................143 Start Masternodes....................................................................................144 Useful Commands...................................................................................15
Masternode Configuration Examples1 Appendix A – masternode.conf (local, all setups)...............................162 Appendix B – crave.conf (local, non-VPS setup).................................173 Appendix C – crave.conf (local, VPS setup).........................................184 Appendix D – crave.conf (remote, VPS setup).....................................19
Feature Use 1 Appendix E – Using Coin Control.........................................................202 Appendix F – Activating MultiSend......................................................223 Appendix G – Enabling Staking ............................................................244 Appendix H – Submitting a Proposal...................................................25
Other1 Changelog.................................................................................................28
i
Single / Multiple Masternodes Setup Guide
Step-by-step guide for starting multiple local masternodes (3 masternodes in this example)
If you want to set up a single masternode, follow this guide, but simply skip steps referring to multiple
Requirements
- Crave wallet running on your local computer with at least 5000 Crave for every masternode - White static IP with open ports for masternodes
STEP 1 : Preparing masternodes
1 - Choose the directory where you will hold your masternodes (you need 1.5Gb free space for every masternode)2 - Create a folder "CraveMN1" there3 - Copy file "crave-qt.exe" to folder "CraveMN1"4 - Create a new folder "data" in folder "CraveMN1" 6 - Rename "crave-qt.exe" to "crave-mn1.exe" 7 - Press Win+R and type "cmd" and press Enter8 - Now type there:
echo start crave-mn1.exe -datadir=./data > %homepath%/Desktop/startmn1.cmd
9 – Move created file "startmn1.cmd" from Desktop to the "CraveMN1" folder10 - Repeat the process from step 2 for each masternode you want to create, changing mn1 to mn2, mn311 - Run startmn1.cmd, startmn2.cmd and startmn3.cmd, wait for complete loading wallets and complete syncing with blockchain12 - Now you can exit from each running masternode wallet
1
STEP 2 : Preparing controller wallet
1 - Open your main wallet where you have your coins2 - Go to File >> Receiving Addresses3 - Press button "New" and enter "Masternode 1" in Label, followed by “OK”.4 - Send exactly 5000 Crave to this address5 - Wait for 1 confirmation of the transaction and go to Tools >> Debug Console6 - Run command "masternode genkey" and copy down generated key (this is your masternode private key)7 - Run command "masternode outputs" and copy down hexnumbers (this is your masternode tx) and digit after ":" (this is tx index)8 - Go to Tools >> Open Masternode Configuration File (masternode.conf), and open with Notepad.9 - Using one line per masternode, use the following format:
Alias IP:Port Privkey TxHash OutputIndex
10 – As "Alias", enter "MN1" (do not use spaces and special characters)11 – As "IP:Port", enter "YOUREXTERNALIP:PORT" (your external white IP and port for masternode), such as 123.456.789:4888212 – As "Privkey", enter the masternode private key you generated with "masternode genkey"13 – As "TxHash", enter the masternode tx from "masternode outputs" command14 – As "OutputIndex", enter the tx index from "masternode outputs" command15 - Now you can File >> Save and exit out.16 - Repeat the process from step 2 for MN2 and MN3, while renaming MN1 to MN2 and MN3 and changing ports
###################################################################################
When you get to step 7, running "masternode outputs" the second (and third) time you will see 2 (and 3) lines with txhash and index. You must choose the new line with txhash.
###################################################################################
17 - Press "Update Status" and you will see all three masternodes in list with status "Not in the masternode list."
###################################################################################
Steps 8-15 create the masternode.conf.
2
STEP 3 : Configuring masternodes
1 - Go to "CraveMN1/data" folder2 - Open "crave.conf" in Notepad3 - Type there:
port=PORTmasternode=1masternodeaddr=IP:PORTmasternodeprivkey=PRIVKEY
4 - Replace PORT with the port used for your Masternode 1, IP:PORT with your external white IP and the same port for your Masternode 15 - Replace PRIVKEY with the masternode private key you generated with "masternode genkey" in controller wallet for Masternode 16 - Save it and repeat process for Masternode 2 and Masternode 3.
STEP 4 : Starting masternodes
1 - Now you can start all your masternodes with "startmn1.cmd", "startmn2.cmd" and "startmn3.cmd"2 - Go to controller wallet, check that your transactions in Masternode 1, 2 and 3 addresses have at least 15 confirmations.3 - Go to the "My Masternodes" tab.4 - Press "Start All"
3
Masternode setup Guide for a VPS (LINUX OS)
The purpose of this guide is to setup a single masternode on a VPS.
You may also follow the Crave Masternode Setup Video Guide.
Requirements
- Crave wallet running on your local computer with at least 5000 Crave- The software Putty to connect and send commands through SSH - The software WinSCP to see your VPS's folders, it will ease the configuration- A VPS running a Linux distribution (Ubuntu (16.04 LTS) / Debian are recommended or Raspbian (Jessie Lite) for a Raspberry PI)
STEP 1 : Compiling the Crave wallet on your VPS
Connecting to the VPS
- Make sure SSH is enabled on your VPS.- Start Putty and enter the VPS IP address. If you are running a VPS on your local network, you need toput the local IP instead.- Enter your username and you password.
###################################################################################
If you want to skip compiling the wallet manually, you can download a script which will do everything for you, from compiling the wallet, to setting up the remote crave.conf file.
The script can be found here: Script Download (from our official Discord server)
Instructions for the script that automatically installs the wallet on a Linux machine:(Ubuntu 16.04 LTS recommended, VPS with 1GB + SWAPSPACE or 2GB minimum RAM)
- Using WinSCP, put the script file in the /home folder
- In Putty, run the following commands:
cd /homechmod +x crave-install.sh ./crave-install.sh
** To install the GUI version instead, run: ./crave-install.sh gui
- This will take a while. You will have to answer 'y' or 'Enter' to continue with a few operations. - When you get to the 'Configuring' step, you now have the option to set up your remote crave.conf. Use the following information
4
rpcuser: Enter any random string combination. You do not need to remember this.rpcpassword: Enter any random string combination. You do not need to remember this.rpcallowip: Press 'y' to use the default 127.0.0.1Wallet IP: Enter the IP address of your VPSWallet port: Enter any port number that is not being used. For example, 48882.Configure the wallet as a masternode?: Press 'y' if this is your goal.Masternode address is IP:Port?: Press 'y' to accept this configurationMasternode genkey: This is the key generated from typing 'masternode genkey' in your local wallet.
Write this key down, for the time being. You will need it again.Create a firewall exception for the port?: Press 'y' to do this.
Your wallet is now ready.
To access the src folder, type the following to start the wallet.
cd crave-ng/src./craved
You may now proceed to Method A or B, starting on Page 9. Skip all steps that are preceded by *, as you have already done these.
###################################################################################
If you don’t want to skip then lets start :
Compiling the wallet
- Perform a full update and reboot
sudo apt-get update && sudo apt-get -y upgrade && sudo reboot
- You need to git-clone the Crave repository :
cd /homesudo apt-get install gitgit clone https://github.com/Crave-Project/crave-ng.git
A crave-ng folder will be created. To make a verification, open WinSCP and check your VPS files. You'll need to know the path of your crave-ng folder for the future steps.
- Install required libraries :
sudo apt-get install build-essentialsudo apt-get install autoconf libtool pkg-config automakesudo apt-get install libboost-all-dev libssl-dev libevent-dev
5
-Get BerkeleyDB 4.8 libs
wget http://download.oracle.com/berkeley-db/db-4.8.30.NC.tar.gztar xzvf db-4.8.30.NC.tar.gzcd db-4.8.30.NC/build_unix/../dist/configure --enable-cxxmakesudo make install
Note: If you’ve already installed libdb++-dev (or libdb5.3++-dev), you’ll need to apt-get remove to proceed further, and may see the following error:
checking for Berkeley DB C++ headers… defaultconfigure: error: Found Berkeley DB other than 4.8, required for portable wallets (–with-incompatible-bdb to ignore or –disable-wallet to disable wallet functionality)
- Create symbolic links to find headers and lib files (may not be necessary)
sudo ln -s /usr/local/BerkeleyDB.4.8 /usr/include/db4.8sudo ln -s /usr/include/db4.8/include/* /usr/includesudo ln -s /usr/include/db4.8/lib/* /usr/lib
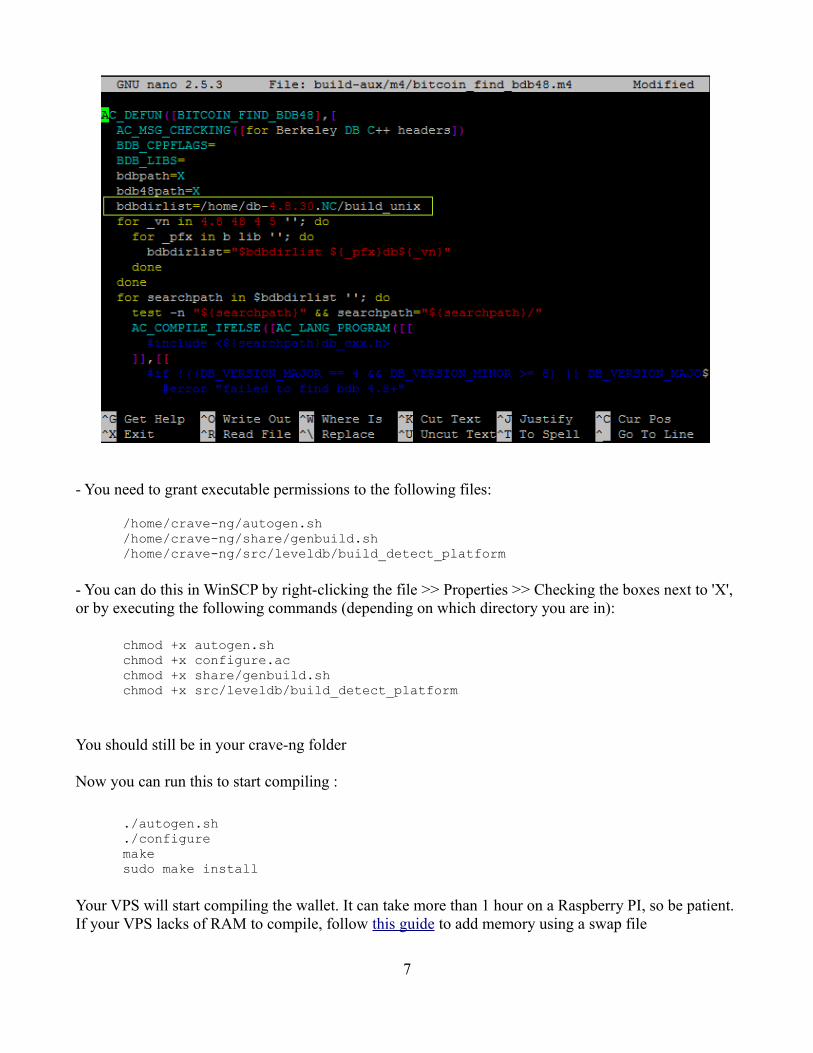
- Edit source file to find files needed for compilation
cdcd /home/crave-ngnano build-aux/m4/bitcoin_find_bdb48.m4
-To the line starting with 'bdbdirlist= ' add the path to the /build_unix folder
/home/db-4.8.30.NC/build_unix
- Save and exit: CTRL+x, Yes, <Enter>
6
- You need to grant executable permissions to the following files:
/home/crave-ng/autogen.sh/home/crave-ng/share/genbuild.sh/home/crave-ng/src/leveldb/build_detect_platform
- You can do this in WinSCP by right-clicking the file >> Properties >> Checking the boxes next to 'X', or by executing the following commands (depending on which directory you are in):
chmod +x autogen.sh chmod +x configure.ac chmod +x share/genbuild.sh chmod +x src/leveldb/build_detect_platform
You should still be in your crave-ng folder
Now you can run this to start compiling :
./autogen.sh
./configuremakesudo make install
Your VPS will start compiling the wallet. It can take more than 1 hour on a Raspberry PI, so be patient.If your VPS lacks of RAM to compile, follow this guide to add memory using a swap file
7
- If everything went well, you should have a new file in your crave-ng/src folder :
cd srcls
If there is a file named "craved", then your wallet is ready.
STEP 2 : Starting and configuring the wallet
- To start the wallet, you need to stay in the src folder and simply type :
./craved
When you start the wallet for the first time a new folder is created with the chain, the .conf file and so on. As the crave.conf file has not been set up yet, you will likely receive the follow message:
Error: To use craved, or the -server option to crave-qt, you must set an rpcpassword in the configuration file: /root/.craveng/crave.conf
- To resolve this, you need to configure your wallet. First we need to close the wallet and edit the .conf file :
./crave-cli stopcd cd /root/.cravengsudo nano crave.conf
The nano command allows you to edit the .conf file. If you are lazy, you can simply create the crave.conf on your desktop and send it in the .crave folder through WinSCP.
The file should look something like the following:
rpcuser=SomeRandomStringrpcpassword=EvenLongerRandomStringrpcallowip=127.0.0.1#----listen=1server=1daemon=1staking=0#--------------------
To save the file, press CTRL X, then YES, then ENTER to save.
- Now we restart the wallet and we wait it the get fully synced
8
cdcd /home/crave-ng/src./craved
It should take some time to sync so be patient again. To check the last block synced you can run :
./crave-cli getmininginfo
Now you have the choice between two methods of running the masternode.
Method A will allow you to control your MN remotely and will be cold wallet style. Method B shows you how the run the MN on your VPS without remote control. I recommend you to use Method A - it's easier and safer.
METHOD A : Cold/Hot Setup (Coins Held Locally) - Sending Coins & Setting up the Masternode
- *Open your Windows wallet, go into the console and type :
masternode genkey
*Copy this string in a txt file - it's your masternode priv key.
- Create a new address to receive your 5000 Crave. Type in the console :
getaccountaddress mn01
You can call it whatever you want (mn1 or 0 or abcd...). Copy the address printed in the txt file also.
- Now send exactly 5000 Crave to the address you just received and wait for 10 confirmations. You have to close the wallet now, we will reopen it later. Don't forget to backup your wallet.
- You have some time to spare so we are going to edit your crave.conf. For Windows users, the default file is located in C:\Users\your_name\AppData\Roaming\CraveNG. To see this folder you may need to make hidden folders visible. If you do not have the crave.conf file in your folder, create a txt file name "crave.txt" then change the extension to crave.conf. We need to edit this file, just copy :
rpcuser=SomeRandomStringrpcpassword=EvenLongerRandomStringrpcallowip=127.0.0.1listen=1server=1daemon=1staking=0
logtimestamps=1
9

- *Now we are going to edit your VPS .conf file again but before the VPS wallet must be closed and fresh (no transaction), the command is :
./crave-cli stop
- *Now use WinSCP to navigate through your folders. The .conf file is located in the /root/.craveng folder, mentioned earlier. You can edit directly with WinSCP. The file has to be like this :
rpcuser=SomeRandomStringrpcpassword=EvenLongerRandomStringrpcallowip=127.0.0.1listen=1server=1daemon=1staking=0logtimestamps=1port=48882masternode=1masternodeaddr=XXX.XXX.XXX.XXX:48882masternodeprivkey=XXXXXXXXXXXXXXXXXXXXXXXXXX
This one must be exactly the same as the Windows one but we added 4 more lines.Port : select an open port, I recommend you to use 48882, which is the default.masternodeaddr : you have to put your VPS ip and the port.masternodeprivkey : its the string you got from the "masternode genkey" command before.
*We can now start the VPS wallet again. If your VPS crave-ng folder path is /home/crave-ng then :
cdcd /home/crave-ng/src./craved
The server is starting. You can now close Putty and WinSCP.
- Now open your Windows wallet again - you should have your 10 confirmations now. Go into the console and type :
masternode outputs
A string will be printed, something like that : "aa7c6c173f7b691e5a070a37aeazd23557636ad1b4b43680ace39d522e1d4493" "1" . The first part is your transaction hash, the "1" is the index.
Save them in your txt file.
- Now we are going to create the masternode.conf file. In your wallet, go to Tools >> Open Masternode
10
Configuration File (masternode.conf), and open with Notepad.Using one line per masternode, use the following format:
Alias IP:Port Privkey TxHash OutputIndex
Alias : its name of your masternode, type mn01IP:Port : its the IP and the port you used in your VPS .conf file; use the same.Privkey : its your masternode privkey from the "masternode genkey" command.TxHash : its the first part of the "masternode outputs" command, in my example its aa7c6c173f7b691e5a070a37aeazd23557636ad1b4b43680ace39d522e1d4493OutputIndex : It's the last number; in this case it's 1
Save and exit this file. A new entry is created - it's your masternode. It should say that your masternodeis not on the list after pressing 'Update Status', or rebooting the wallet.
Now unlock the wallet (for 120 seconds)...
walletpassphrase YOUR_WALLET_PASSWORD 120
...And start the node.
startmasternode all lockwallet
or
startmasternode alias lockwallet mn_alias
Now you're done!
METHOD B : Hot Setup (Coins Held on VPS) - Sending Coins and Setting up the Masternode
- When your wallet is synced, you need to setup the masternode :
./crave-cli masternode genkey
You'll receive a long string of letters and numbers. Copy it in a txt file, you'll need it later.- Lets create a new receiving address :
./crave-cli getaccountaddress 0
This address will receive your coins. Save also this one in the txt file. Open your Windows wallet if it isn't yet and send exactly 5000 Crave to this address. You'll have to paya fee in addition.You now need to wait for 10 confirmations before we continue.
###################################################################################
11
- To pass time, we are going to secure your wallet :
./crave-cli encryptwallet YOUR_WALLET_PASSWORD
Don’t forget this password to unlock your wallet later. The wallet will shutdown after a few seconds.
- Before restarting the wallet, we are going to edit the .conf file again (you can do that on Windows andsend the file through WinSCP if you want to)
cd cd /root/.cravengsudo nano crave.conf
The .conf file must look like:
rpcuser=SomeRandomStringrpcpassword=EvenLongerRandomStringrpcallowip=127.0.0.1#----listen=1server=1daemon=1staking=0#--------------------masternode=1masternodeaddr=XXX.XXX.XXX.XXX:PORTmasternodeprivkey=XXXXXXXXXXXXXXXXXXXXXXXXX
Masternodeaddr is the IP and the port (default is 48882) used by your VPS. The port must be open.masternodeprivkey is the string you got from the "masternode genkey" command.
- You need to restart the wallet now :
cd ..cd crave-ng/src./craved
Every time you start your wallet, wait 1 min before sending commands to make sure it is fully loaded.
- You need to backup your wallet. I usually backup it in the home folder to avoid permission problems :
./crave-cli backupwallet /home/
Use WinSCP to copy this wallet.dat to your local machine in case something goes wrong.
###################################################################################
12
The wallet is now ready to run the masternode
- First, check if your transaction has the 10 confirmations needed with the block explorer, using your receiving address to search. Then we check if your 5000 Crave are credited into your wallet.
./crave-cli getbalance
You should get 5000.00000000
- We can now unlock the wallet for 60 seconds and start the masternode
./crave-cli walletpassphrase YOUR_WALLET_PASSWORD 60
./crave-cli startmasternode all lockwallet
You should get "Masternode successfully started". You can close Putty and let it run.
In case you want to get your 5000 coins back :
- Unlock your wallet for few seconds :
./crave-cli walletpassphrase YOUR_WALLET_PASSWORD 120
- Setting up the default fee amount :
./crave-cli settxfee 0.0001
- Sending your coins back :
./crave-cli sendfrom 0 THE_RECEIVING_ADDRESS amount
If you have 5002 Crave on your MN, the amount must be 5002-0.0001=5001.9999 (after fees)
Happy Masternoding!
Standard IPtables command (firewall):
sudo iptables -A INPUT -p tcp --dport 48882 -j ACCEPT
Allow traffic on port 48882.
13
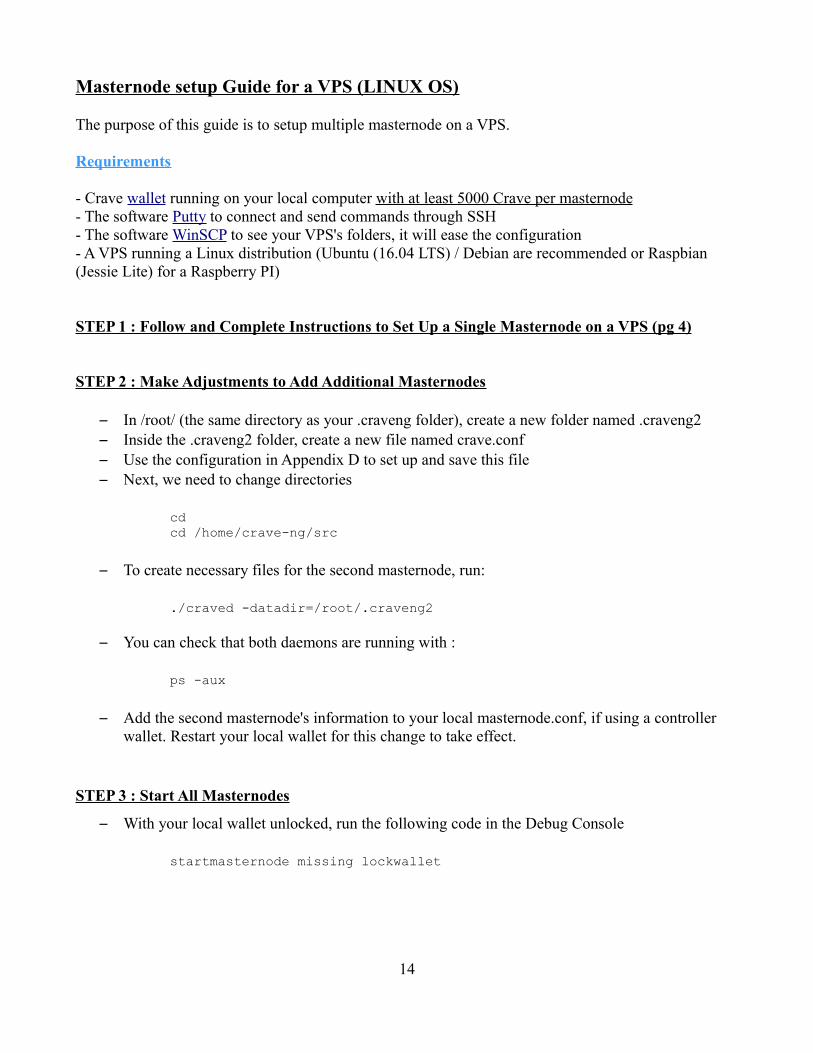
Masternode setup Guide for a VPS (LINUX OS)
The purpose of this guide is to setup multiple masternode on a VPS.
Requirements
- Crave wallet running on your local computer with at least 5000 Crave per masternode- The software Putty to connect and send commands through SSH - The software WinSCP to see your VPS's folders, it will ease the configuration- A VPS running a Linux distribution (Ubuntu (16.04 LTS) / Debian are recommended or Raspbian (Jessie Lite) for a Raspberry PI)
STEP 1 : Follow and Complete Instructions to Set Up a Single Masternode on a VPS (pg 4)
STEP 2 : Make Adjustments to Add Additional Masternodes
– In /root/ (the same directory as your .craveng folder), create a new folder named .craveng2– Inside the .craveng2 folder, create a new file named crave.conf– Use the configuration in Appendix D to set up and save this file– Next, we need to change directories
cdcd /home/crave-ng/src
– To create necessary files for the second masternode, run:
./craved -datadir=/root/.craveng2
– You can check that both daemons are running with :
ps -aux
– Add the second masternode's information to your local masternode.conf, if using a controller wallet. Restart your local wallet for this change to take effect.
STEP 3 : Start All Masternodes
– With your local wallet unlocked, run the following code in the Debug Console
startmasternode missing lockwallet
14
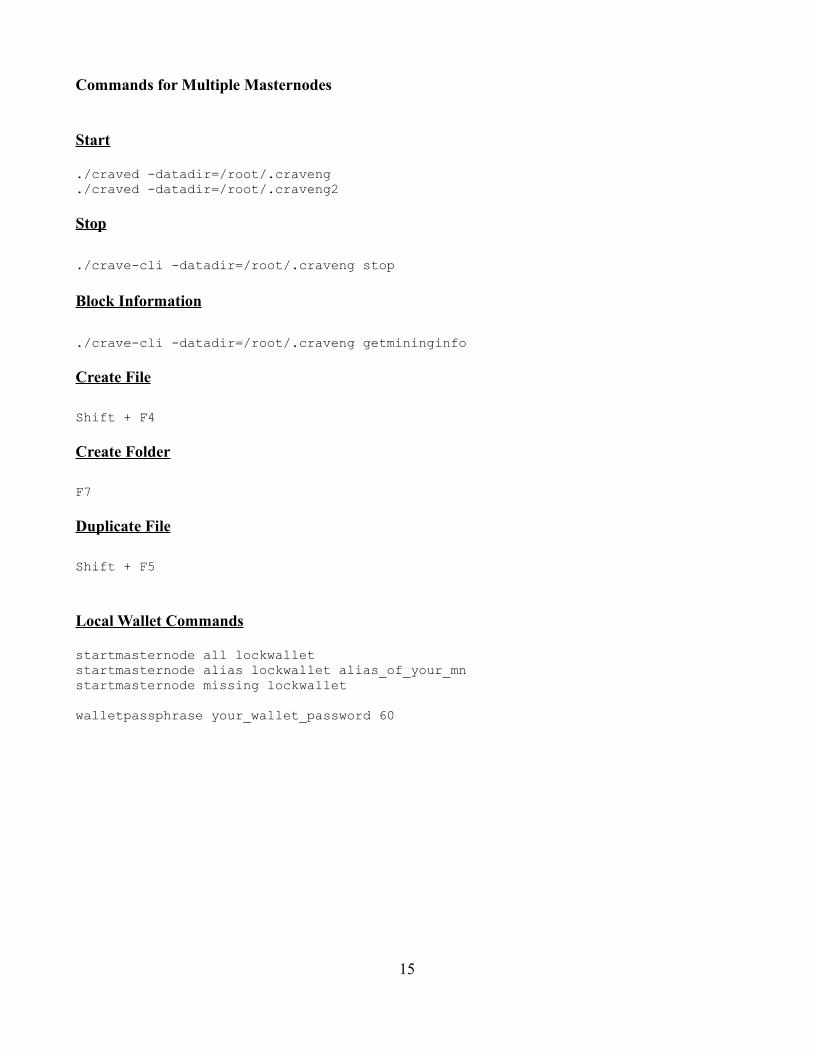
Commands for Multiple Masternodes
Start
./craved -datadir=/root/.craveng
./craved -datadir=/root/.craveng2
Stop
./crave-cli -datadir=/root/.craveng stop
Block Information
./crave-cli -datadir=/root/.craveng getmininginfo
Create File
Shift + F4
Create Folder
F7
Duplicate File
Shift + F5
Local Wallet Commands
startmasternode all lockwalletstartmasternode alias lockwallet alias_of_your_mnstartmasternode missing lockwallet
walletpassphrase your_wallet_password 60
15
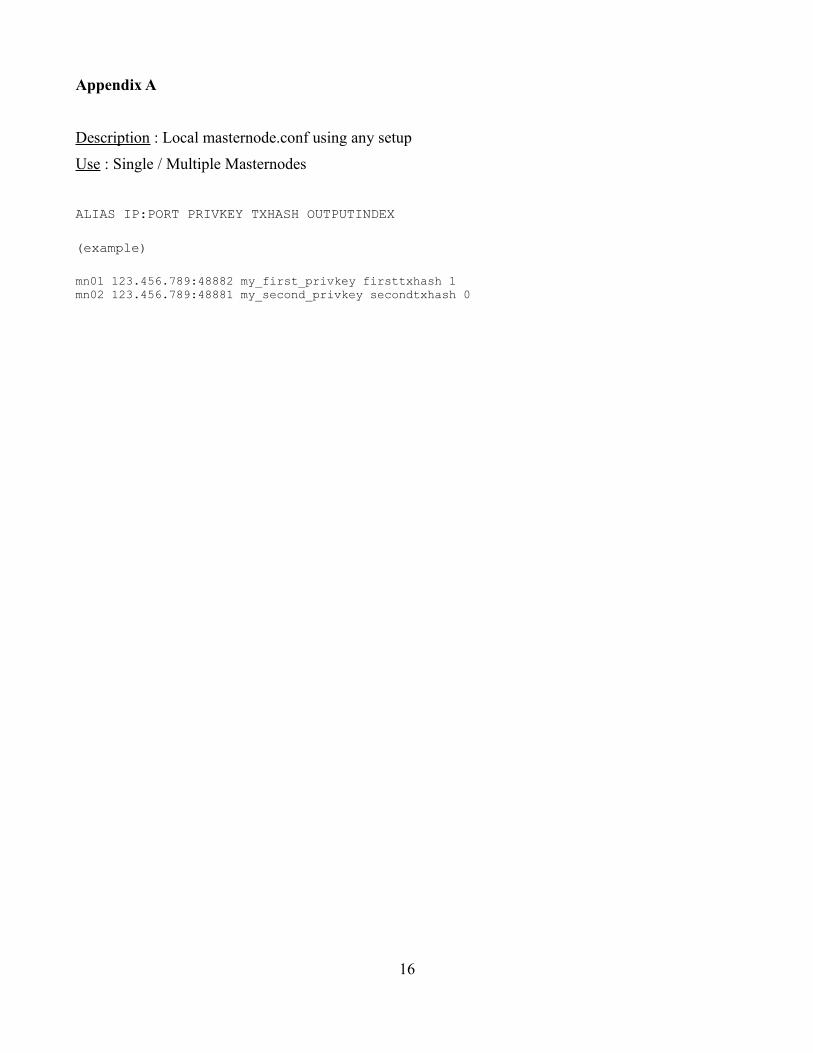
Appendix A
Description : Local masternode.conf using any setup
Use : Single / Multiple Masternodes
ALIAS IP:PORT PRIVKEY TXHASH OUTPUTINDEX
(example)
mn01 123.456.789:48882 my_first_privkey firsttxhash 1mn02 123.456.789:48881 my_second_privkey secondtxhash 0
16
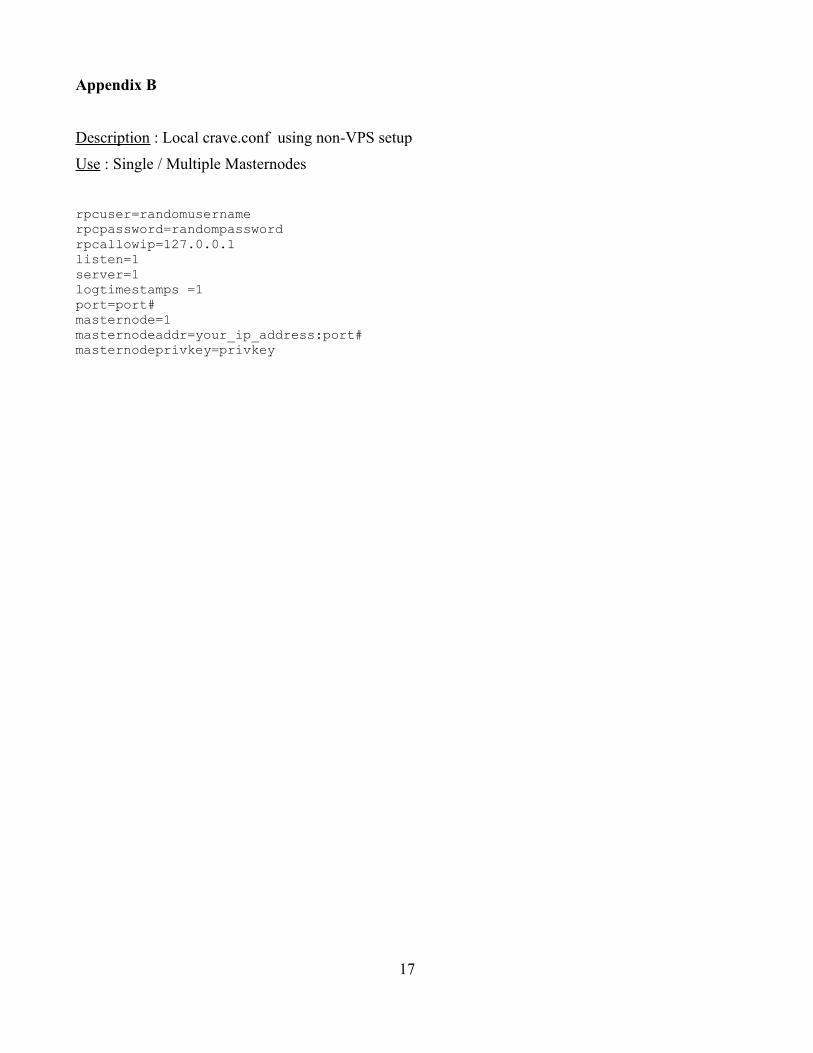
Appendix B
Description : Local crave.conf using non-VPS setup
Use : Single / Multiple Masternodes
rpcuser=randomusernamerpcpassword=randompasswordrpcallowip=127.0.0.1listen=1server=1logtimestamps =1port=port#masternode=1masternodeaddr=your_ip_address:port#masternodeprivkey=privkey
17
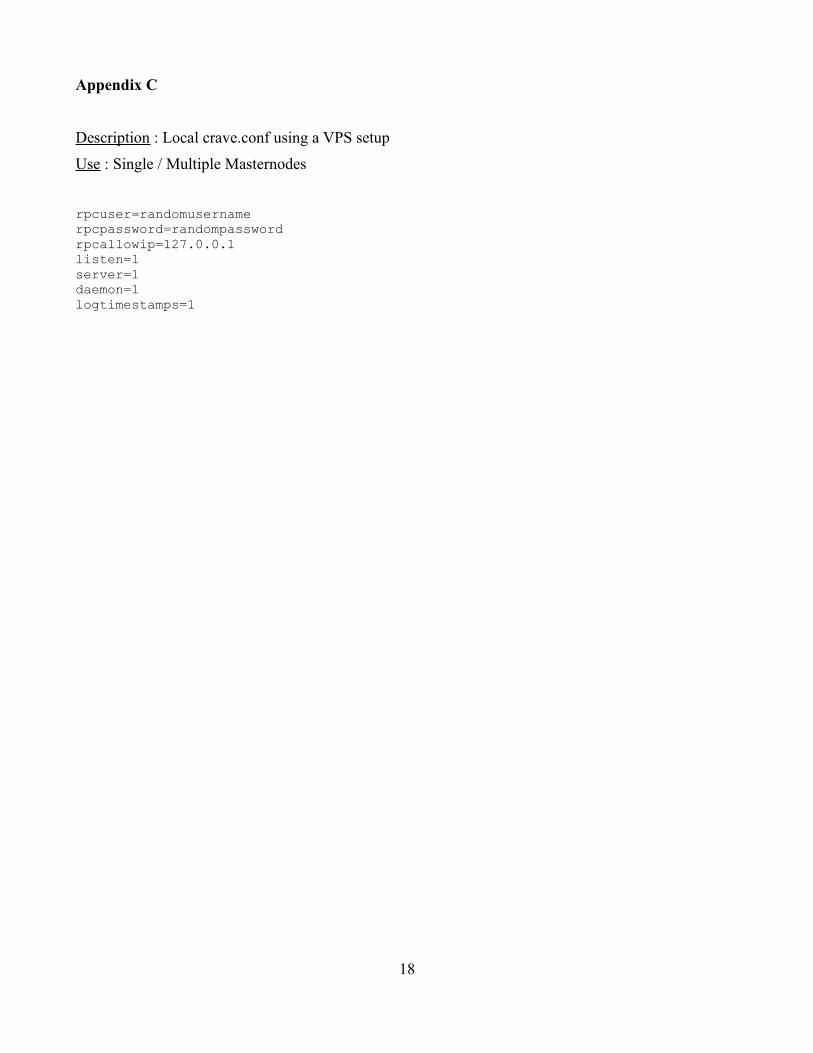
Appendix C
Description : Local crave.conf using a VPS setup
Use : Single / Multiple Masternodes
rpcuser=randomusernamerpcpassword=randompasswordrpcallowip=127.0.0.1listen=1server=1daemon=1logtimestamps=1
18

Appendix D
Description : VPS crave.conf using a VPS setup
Use : Single / Multiple Masternodes
VPS Masternode 1
rpcuser=randomusernamerpcpassword=randompasswordrpcallowip=127.0.0.1rpcport=48883listen=1server=1daemon=1staking=0logtimestamps=1port=48882masternode=1masternodeaddr=your_vps_ip_address:48882masternodeprivkey=privkey1
VPS Masternode 2
rpcuser=randomusernamerpcpassword=randompasswordrpcallowip=127.0.0.1rpcport=48884listen=1server=1daemon=1staking=0logtimestamps=1port=48881masternode=1masternodeaddr=your_vps_ip_address:48881masternodeprivkey=privkey2
** Elements in bold text are those which should change with multiple masternodes set up. **
19
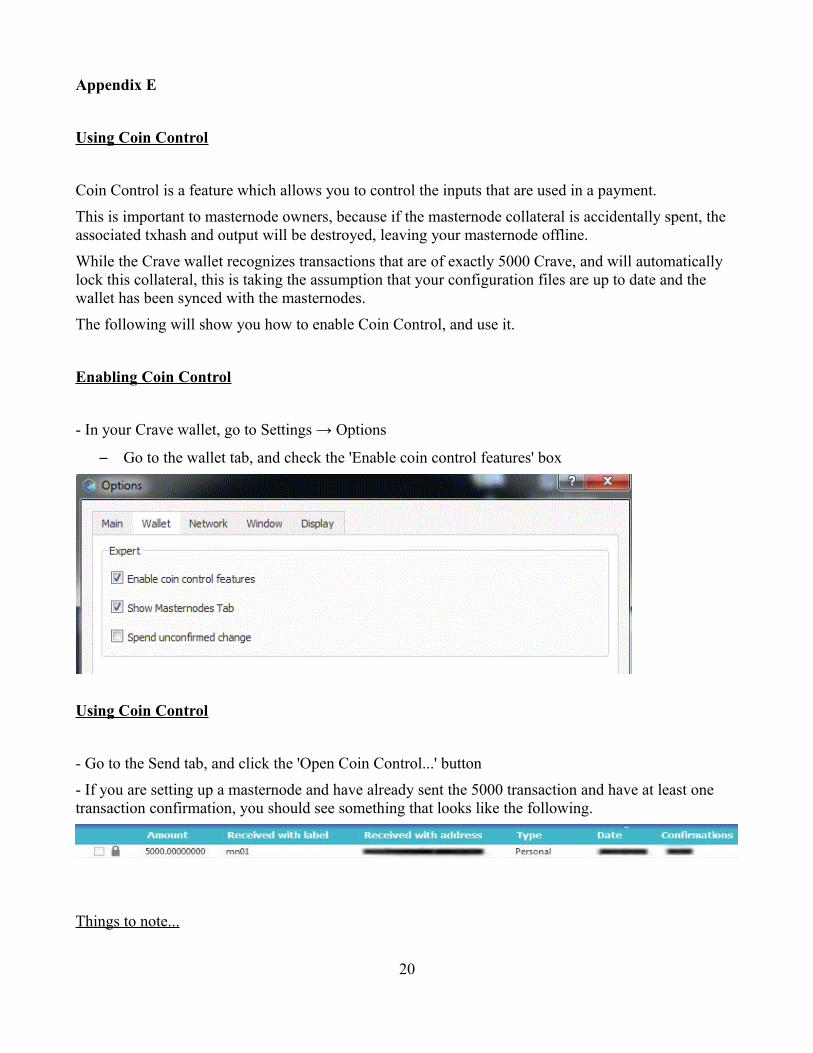
Appendix E
Using Coin Control
Coin Control is a feature which allows you to control the inputs that are used in a payment.
This is important to masternode owners, because if the masternode collateral is accidentally spent, the associated txhash and output will be destroyed, leaving your masternode offline.
While the Crave wallet recognizes transactions that are of exactly 5000 Crave, and will automatically lock this collateral, this is taking the assumption that your configuration files are up to date and the wallet has been synced with the masternodes.
The following will show you how to enable Coin Control, and use it.
Enabling Coin Control
- In your Crave wallet, go to Settings → Options
– Go to the wallet tab, and check the 'Enable coin control features' box
Using Coin Control
- Go to the Send tab, and click the 'Open Coin Control...' button
- If you are setting up a masternode and have already sent the 5000 transaction and have at least one transaction confirmation, you should see something that looks like the following.
Things to note...
20
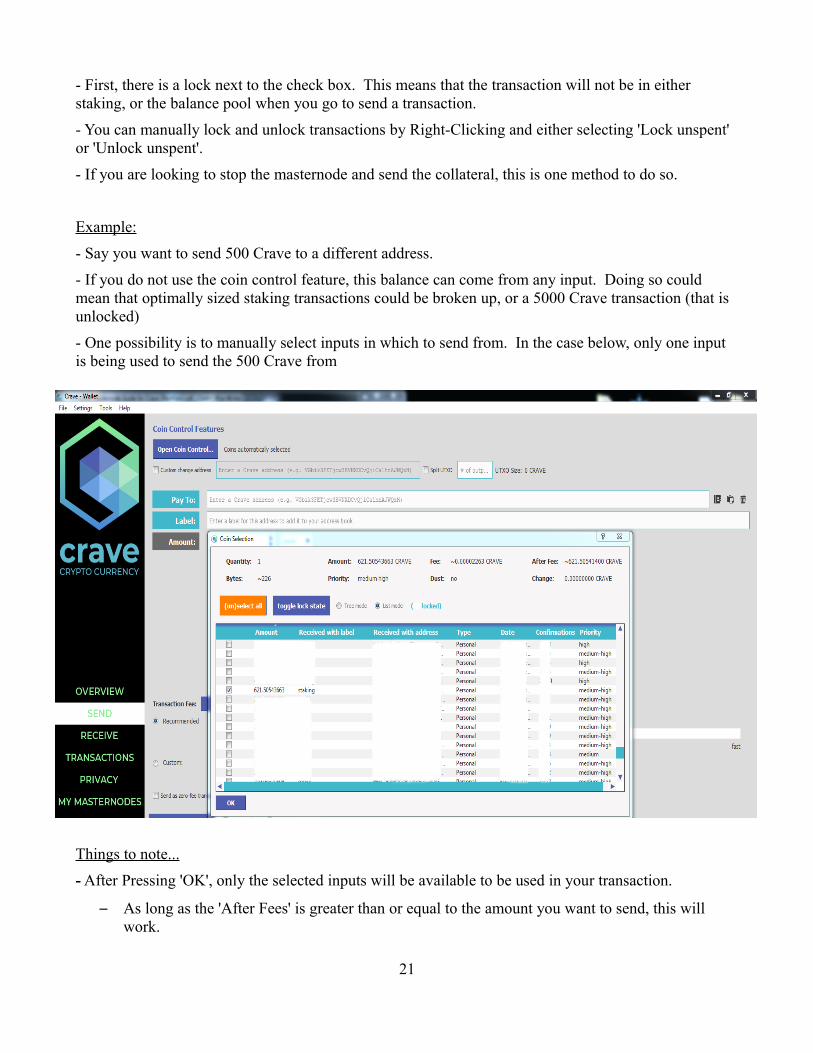
- First, there is a lock next to the check box. This means that the transaction will not be in either staking, or the balance pool when you go to send a transaction.
- You can manually lock and unlock transactions by Right-Clicking and either selecting 'Lock unspent' or 'Unlock unspent'.
- If you are looking to stop the masternode and send the collateral, this is one method to do so.
Example:
- Say you want to send 500 Crave to a different address.
- If you do not use the coin control feature, this balance can come from any input. Doing so could mean that optimally sized staking transactions could be broken up, or a 5000 Crave transaction (that is unlocked)
- One possibility is to manually select inputs in which to send from. In the case below, only one input is being used to send the 500 Crave from
Things to note...
- After Pressing 'OK', only the selected inputs will be available to be used in your transaction.
– As long as the 'After Fees' is greater than or equal to the amount you want to send, this will work.
21
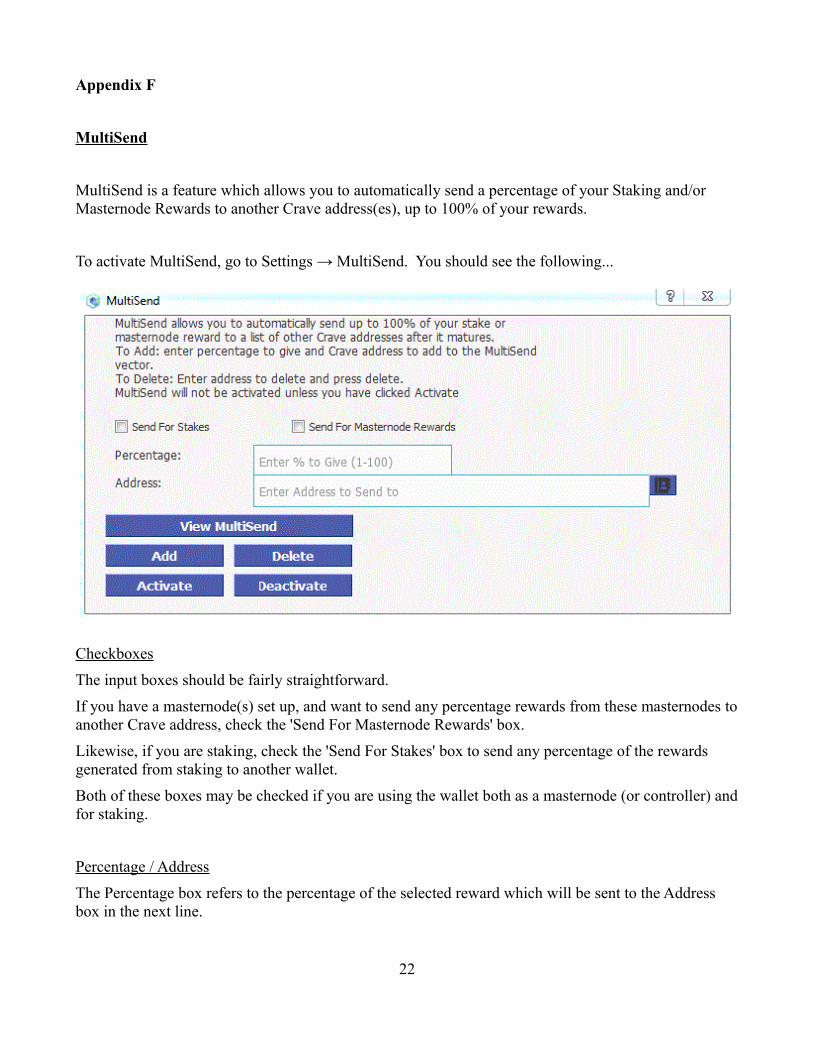
Appendix F
MultiSend
MultiSend is a feature which allows you to automatically send a percentage of your Staking and/or Masternode Rewards to another Crave address(es), up to 100% of your rewards.
To activate MultiSend, go to Settings → MultiSend. You should see the following...
Checkboxes
The input boxes should be fairly straightforward.
If you have a masternode(s) set up, and want to send any percentage rewards from these masternodes toanother Crave address, check the 'Send For Masternode Rewards' box.
Likewise, if you are staking, check the 'Send For Stakes' box to send any percentage of the rewards generated from staking to another wallet.
Both of these boxes may be checked if you are using the wallet both as a masternode (or controller) andfor staking.
Percentage / Address
The Percentage box refers to the percentage of the selected reward which will be sent to the Address box in the next line.
22
Once you fill in the desired information, click Add. If you would like to split the percentages to go to multiple different address, you can perform the 'Add' operation again with the next address. Make sure that your total percentage does not exceed 100% however.
Follow the instructions in the above image for any other operations with MultiSend.
Activation
When satisfied, click 'Activate', and 'View MultiSend' will update the current status with your inputted information. If all well, you should see that MultiSend is Active.
If no longer wish to use MultiSend, you must disable it, either with the GUI or the console command.
It may be necessary to restart your wallet for these changes to take effect.
If you are running on console, the following information may be useful...
Information From the Crave Console
WHAT IS MULTISEND?MultiSend allows a user to automatically send a percent of their stake reward to as many addresses as you would likeThe MultiSend transaction is sent when the staked coins mature (100 confirmations)****************************************************************TO CREATE OR ADD TO THE MULTISEND VECTOR:multisend <Crave Address> <percent>This will add a new address to the MultiSend vectorPercent is a whole number 1 to 100.****************************************************************MULTISEND COMMANDS (usage: multisend <command>)print - displays the current MultiSend vector clear - deletes the current MultiSend vector enablestake/activatestake - activates the current MultiSend vector to be activated on stake rewardsenablemasternode/activatemasternode - activates the current MultiSend vector to be activated on masternode rewardsdisable/deactivate - disables the current MultiSend vector delete <Address #> - deletes an address from the MultiSend vector disable <address> - prevents a specific address from sending MultiSend transactionsenableall - enables all addresses to be eligible to send MultiSend transactions****************************************************************
23
Appendix G
What is Staking?
Crave utilizes a system called Proof of Stake (PoS). Staking is the 'mining' of PoS coins, so to speak.
Staking starts by storing your coins in your wallet, which needs to be online. Once your coins reach maturity, you can begin staking by opening your wallet and unlocking it for staking. Your wallet will then start competing with other wallets for signing the next block. If you are chosen to sign a block, you will get a staking reward, which is 4 Crave. After this, the coin age of those chosen will be zeroed out, and will have to mature again.
There is no minimum amount needed to stake Crave, but having more coins staking will give you a larger weight, and therefore a higher chance to receive the staking block reward.
Enabling Staking
There are just two steps to start staking.
1) Make sure that you do not have the command staking=0 in your crave.conf file. To check this, go to Tools > Open Wallet Configuration File.
• If your crave.conf is either blank or contains staking=1, you can move on to the next step.
• If your crave.conf contains the line staking=0, you must change this to staking=1. Then, restart your wallet for this change to take effect.
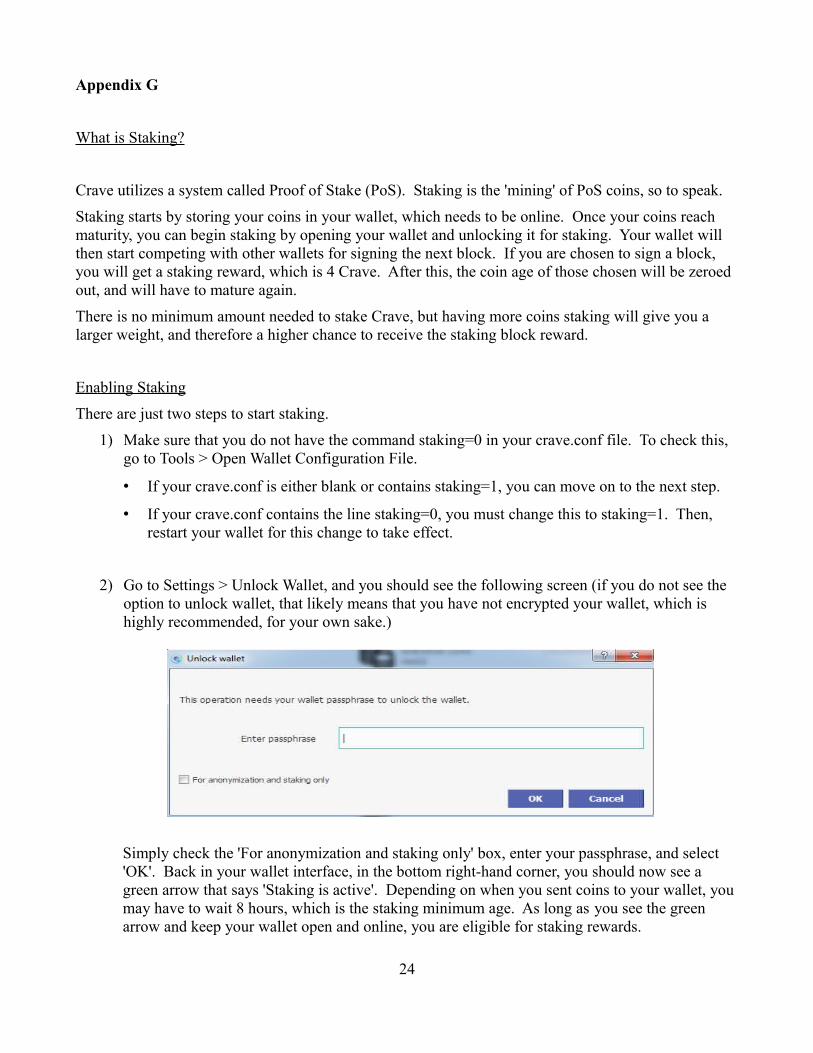
2) Go to Settings > Unlock Wallet, and you should see the following screen (if you do not see the option to unlock wallet, that likely means that you have not encrypted your wallet, which is highly recommended, for your own sake.)
Simply check the 'For anonymization and staking only' box, enter your passphrase, and select 'OK'. Back in your wallet interface, in the bottom right-hand corner, you should now see a green arrow that says 'Staking is active'. Depending on when you sent coins to your wallet, you may have to wait 8 hours, which is the staking minimum age. As long as you see the green arrow and keep your wallet open and online, you are eligible for staking rewards.
24
Appendix H
Submitting a Proposal
Please follow the steps below to submit a Crave proposal.
STEP 1: Discord Pre-Proposal Discussion
If you have an idea that you would like to possibly contribute to Crave, begin by joining our Discord server and going to the #proposal-discussion channel. Here, you can talk about the idea and get feedback from the community before submitting a final proposal to the blockchain. Plan on having a discussion on the proposal for about a week or two, which gives enough times for the community to give their input and say if this has been proposed in the past.
Following this step and gaining acceptance from the community should help increase your chances of the final proposal passing.
STEP 2: Final Proposal
This is arguably the most important step of the process.
First off, the final proposal should be posted on a platform with a permanent link, such as on our Redditpage or a Google Docs form. This allows community members to view and access the proposal without the risk of it getting lost.
The final proposal should include the following subjects:
• Title: • URL to proposal (use a URL shortening service if necessary): • Monthly payment:• Number of months / payments:• Description of who you are, your reputation, and experiences: • In-depth description of the proposal:
A recommended proposal template to use can be found here, which you can download and save to edit. You can also make a copy of the template, if you would like to keep everything on Google Docs.
The description should explain why you are asking for the payment amount listed, how long the funding is required for, and how the CRAVE community or ecosystem will improve by accepting the proposal. It should also describe every step of the planned process. The more information you include, the more likely it is that the proposal will be passed.
With the governance model, there needs to be a reasonable amount of trust that the proposed work will
25
actually be completed if the proposal is passed. If you are a brand new member, consider starting with asmall proposal first. This may help to improve your credibility and ability to deliver on time and budget.
STEP 3: Submit Proposal to the Blockchain
The submission window closes 4320 blocks (about 3 days) before the superblock. To give the masternode operators enough time to view the proposal, make a decision, and vote on it, you should submit it well in advance of the voting deadline. Remember that it is much better to wait for the next superblock than to rush it.
At this stage, there is a fee of 50 Crave required to send in a proposal – the submission fee. This is paidwhether the proposal is accepted or not, but can be included in the proposed payment amount, which will then be reimbursed upon acceptance of the proposal.
The submission fee helps to prevent the spamming of empty proposals, limiting it only to those which are well thought out and contribute to the CRAVE ecosystem.
To submit the proposal, follow the steps below:
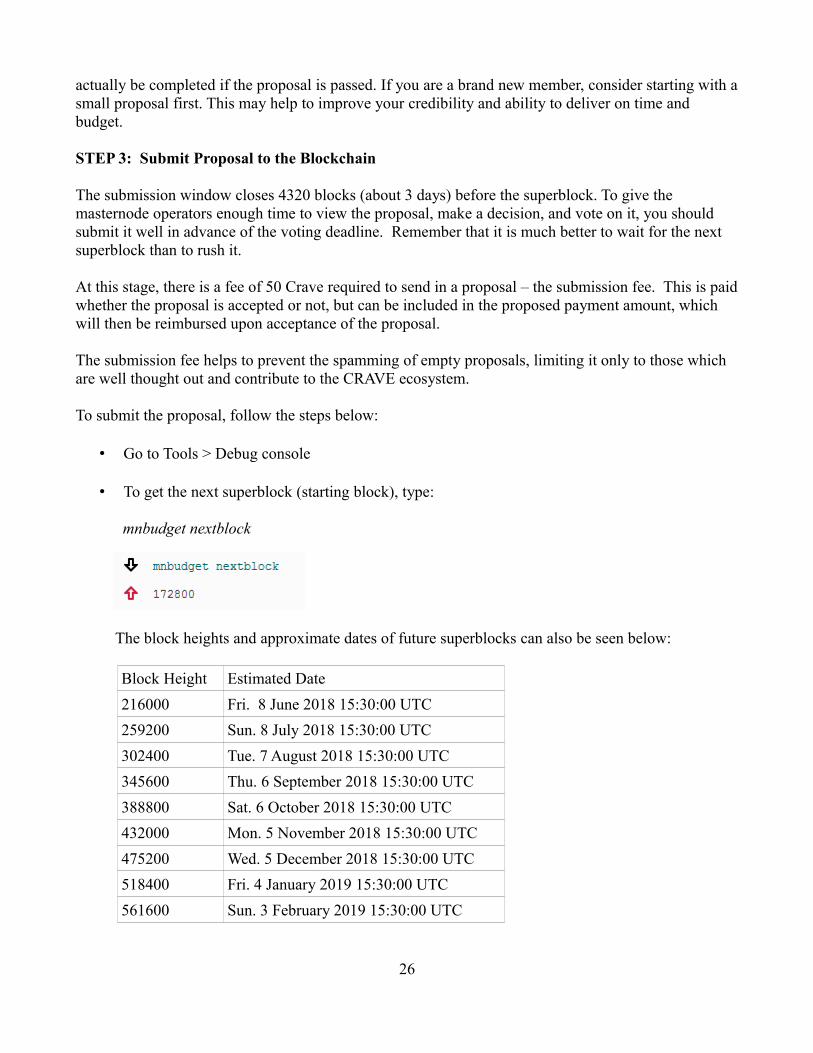
• Go to Tools > Debug console
• To get the next superblock (starting block), type:
mnbudget nextblock
The block heights and approximate dates of future superblocks can also be seen below:
Block Height Estimated Date
216000 Fri. 8 June 2018 15:30:00 UTC
259200 Sun. 8 July 2018 15:30:00 UTC
302400 Tue. 7 August 2018 15:30:00 UTC
345600 Thu. 6 September 2018 15:30:00 UTC
388800 Sat. 6 October 2018 15:30:00 UTC
432000 Mon. 5 November 2018 15:30:00 UTC
475200 Wed. 5 December 2018 15:30:00 UTC
518400 Fri. 4 January 2019 15:30:00 UTC
561600 Sun. 3 February 2019 15:30:00 UTC
26
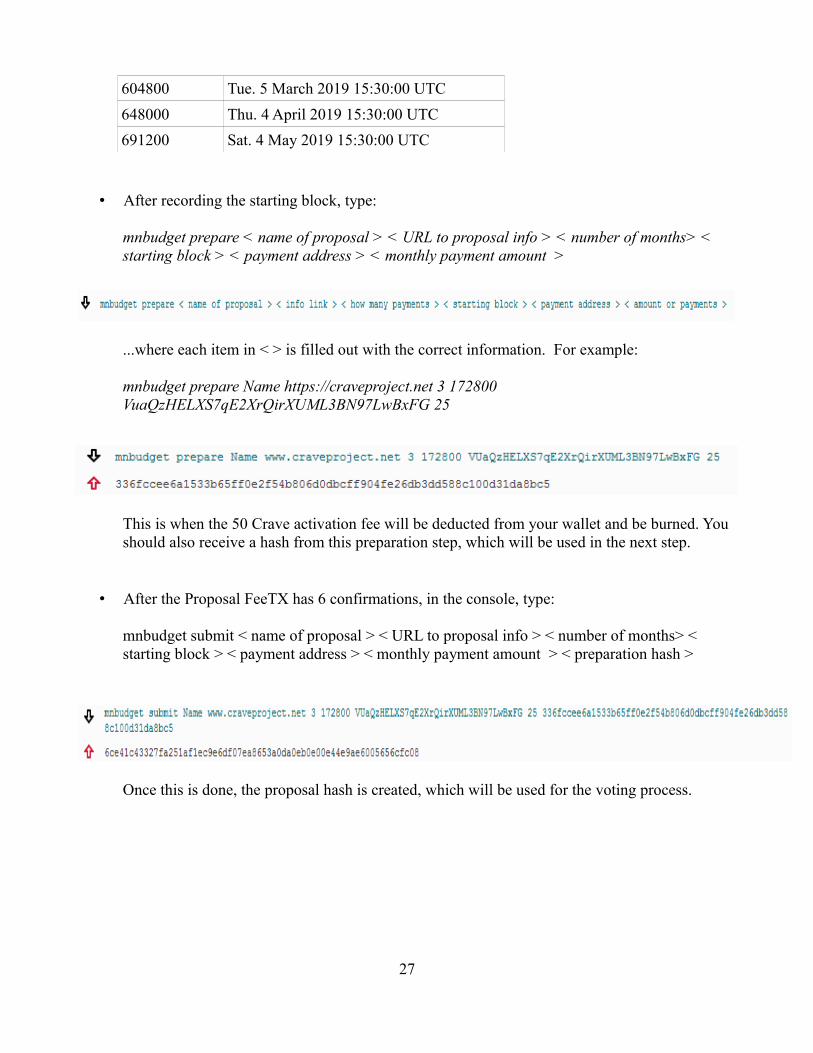
604800 Tue. 5 March 2019 15:30:00 UTC
648000 Thu. 4 April 2019 15:30:00 UTC
691200 Sat. 4 May 2019 15:30:00 UTC
• After recording the starting block, type:
mnbudget prepare < name of proposal > < URL to proposal info > < number of months> < starting block > < payment address > < monthly payment amount >
...where each item in < > is filled out with the correct information. For example:
mnbudget prepare Name https://craveproject.net 3 172800 VuaQzHELXS7qE2XrQirXUML3BN97LwBxFG 25
This is when the 50 Crave activation fee will be deducted from your wallet and be burned. You should also receive a hash from this preparation step, which will be used in the next step.
• After the Proposal FeeTX has 6 confirmations, in the console, type:
mnbudget submit < name of proposal > < URL to proposal info > < number of months> < starting block > < payment address > < monthly payment amount > < preparation hash >
Once this is done, the proposal hash is created, which will be used for the voting process.
27
STEP 4: Gather Support
Once the proposal is submitted, you can then verify it on https://craveproject.net/proposals. Informationon how to vote for each proposal can be found in the information button.
It is your job to rally the community to vote for your proposal, which includes telling people when the proposal is running, how to vote, and posting on any media to gather more votes. The CRAVE team will not help with this aspect (unless it is a team member submission), as it could be seen as unfair or biased.
The ability to pass the current and future proposals depends largely on your ability to both communicate effectively, and deliver on the proposed work. To increase your chances of success, consider linking your work to a website, adding a video, or being available on social media channels to answer any questions that others may have.
STEP 5: Wait for Voting to Finish
At this point, there is one more fee that needs to be paid – the activation fee. This fee will only be paid in the case that the proposal is accepted, but again, can be included in the payment amount for reimbursement.
The activation is paid to a developer address, which is needed to submit the proposal into the system. This fee is not a personal payment to the developer, as the 50 Crave fee is also burned upon the activation process.
Since there are a limited amount of budgeting funds set aside every month, every proposal will be competing for these funds. Even in the case that your proposal does well in the voting, there is a chance it could be outperformed by another proposal.
After making it through this process, payment will be made on the superblock(s) listed in the proposal
28
Changelog
v1.00 – 25 November 2017
• Initial Release for Crave Masternode Setup Guide
v1.01 – 10 January 2018
• Changed information to support Crave NG masternodes
v1.02 – 13 January 2018
• Error fixes
v1.03 – 27 January 2018
• Added support instructions for using the Linux wallet compilation script
• Added masternode setup video guide link
v1.04 – 31 January 2018
• Added Appendix E – Coin Control
v1.05 – 15 February 2018
• Added new Script link
• Added Appendices F, G (Activating MultiSend, Enabling Staking) and Changelog sections
v1.06 – 10 April 2018
• Updated Linux Script link
v1.07 – 10 May 2018
• Removed unnecessary information. Minor text changes
• Updated guide to reflect the new Crave design
• Added Appendix G (Submitting a Proposal)
29