Embed Size (px)
Citation preview
CPU
Copyright 2007, Samson Technologies Corp.
Printed April, 2007 v1.0Samson Technologies Corp.45 Gilpin AvenueHauppauge, New York 11788-8816Phone: 1-800-3-SAMSON (1-800-372-6766)Fax: 631-784-2201 www.samsontech.com
Table of Contents
Introduction . . . . . . . . . . . . . . . . . . . . . . . . . . . . . . . . . . . . . . . . . . . . . . . . . . . . . . . . . . . . . . 1
G Track Features . . . . . . . . . . . . . . . . . . . . . . . . . . . . . . . . . . . . . . . . . . . . . . . . . . . . . . . . . . 2
G Track Layout . . . . . . . . . . . . . . . . . . . . . . . . . . . . . . . . . . . . . . . . . . . . . . . . . . . . . . . . . . . . 3
Installing the G Track . . . . . . . . . . . . . . . . . . . . . . . . . . . . . . . . . . . . . . . . . . . . . . . . . . . 4 - 6
Getting Started with Windows XP . . . . . . . . . . . . . . . . . . . . . . . . . . . . . . . . . . . . . . . . . 6
Getting Started with MAC OS X . . . . . . . . . . . . . . . . . . . . . . . . . . . . . . . . . . . . . . . . . . . . 6
G Track Quick Start . . . . . . . . . . . . . . . . . . . . . . . . . . . . . . . . . . . . . . . . . . . . . . . . . . . . . . . . 7
Operating the G Track . . . . . . . . . . . . . . . . . . . . . . . . . . . . . . . . . . . . . . . . . . . . . . . . . 9 - 14
Application Notes . . . . . . . . . . . . . . . . . . . . . . . . . . . . . . . . . . . . . . . . . . . . . . . . . . . . . . . . 15
Using the Optional SP04 Shock-Mount . . . . . . . . . . . . . . . . . . . . . . . . . . . . . . . . . . . 16
G Track Specifications . . . . . . . . . . . . . . . . . . . . . . . . . . . . . . . . . . . . . . . . . . . . . . . . . . . 17
1
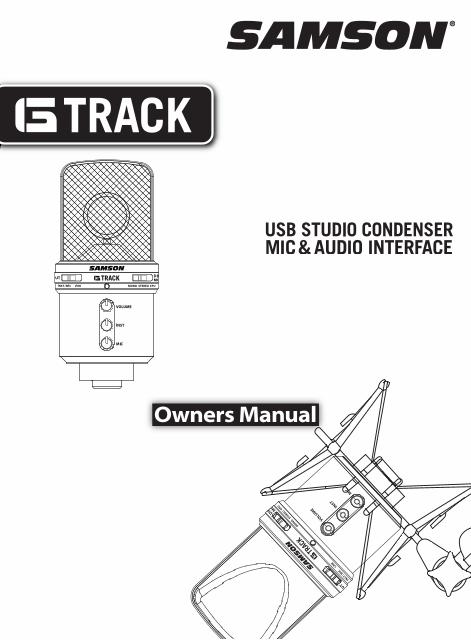
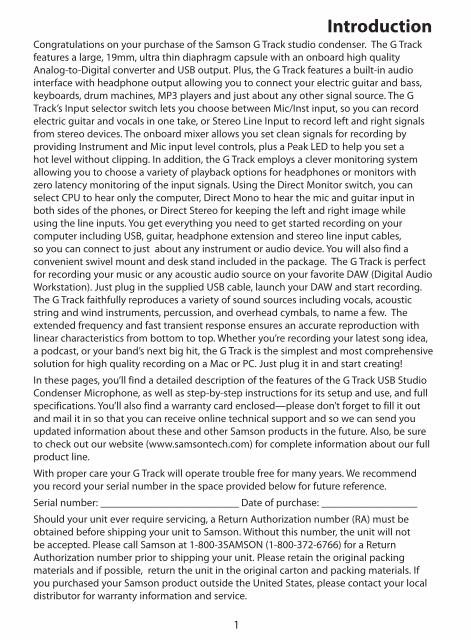
IntroductionCongratulations on your purchase of the Samson G Track studio condenser. The G Track features a large, 19mm, ultra thin diaphragm capsule with an onboard high quality Analog-to-Digital converter and USB output. Plus, the G Track features a built-in audio interface with headphone output allowing you to connect your electric guitar and bass, keyboards, drum machines, MP3 players and just about any other signal source. The G Track’s Input selector switch lets you choose between Mic/Inst input, so you can record electric guitar and vocals in one take, or Stereo Line Input to record left and right signals from stereo devices. The onboard mixer allows you set clean signals for recording by providing Instrument and Mic input level controls, plus a Peak LED to help you set a hot level without clipping. In addition, the G Track employs a clever monitoring system allowing you to choose a variety of playback options for headphones or monitors with zero latency monitoring of the input signals. Using the Direct Monitor switch, you can select CPU to hear only the computer, Direct Mono to hear the mic and guitar input in both sides of the phones, or Direct Stereo for keeping the left and right image while using the line inputs. You get everything you need to get started recording on your computer including USB, guitar, headphone extension and stereo line input cables, so you can connect to just about any instrument or audio device. You will also find a convenient swivel mount and desk stand included in the package. The G Track is perfect for recording your music or any acoustic audio source on your favorite DAW (Digital Audio Workstation). Just plug in the supplied USB cable, launch your DAW and start recording. The G Track faithfully reproduces a variety of sound sources including vocals, acoustic string and wind instruments, percussion, and overhead cymbals, to name a few. The extended frequency and fast transient response ensures an accurate reproduction with linear characteristics from bottom to top. Whether you’re recording your latest song idea, a podcast, or your band’s next big hit, the G Track is the simplest and most comprehensive solution for high quality recording on a Mac or PC. Just plug it in and start creating!
In these pages, you’ll find a detailed description of the features of the G Track USB Studio Condenser Microphone, as well as step-by-step instructions for its setup and use, and full specifications. You’ll also find a warranty card enclosed—please don’t forget to fill it out and mail it in so that you can receive online technical support and so we can send you updated information about these and other Samson products in the future. Also, be sure to check out our website (www.samsontech.com) for complete information about our full product line.
With proper care your G Track will operate trouble free for many years. We recommend you record your serial number in the space provided below for future reference.
Serial number: __________________________ Date of purchase: __________________
Should your unit ever require servicing, a Return Authorization number (RA) must be obtained before shipping your unit to Samson. Without this number, the unit will not be accepted. Please call Samson at 1-800-3SAMSON (1-800-372-6766) for a Return Authorization number prior to shipping your unit. Please retain the original packing materials and if possible, return the unit in the original carton and packing materials. If you purchased your Samson product outside the United States, please contact your local distributor for warranty information and service.
2
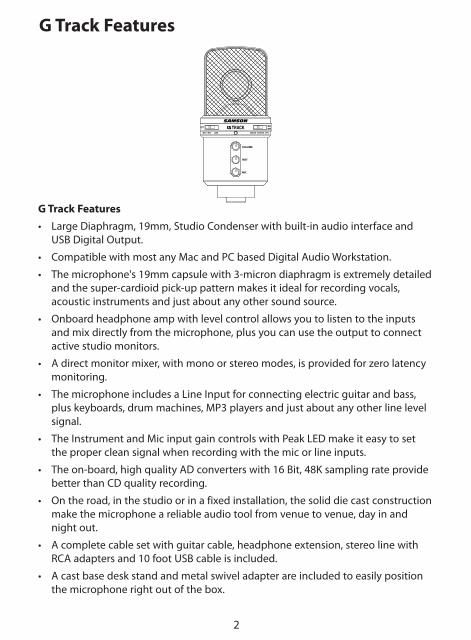
G Track Features • Large Diaphragm, 19mm, Studio Condenser with built-in audio interface and
USB Digital Output.
• Compatible with most any Mac and PC based Digital Audio Workstation.
• The microphone's 19mm capsule with 3-micron diaphragm is extremely detailed and the super-cardioid pick-up pattern makes it ideal for recording vocals, acoustic instruments and just about any other sound source.
• Onboard headphone amp with level control allows you to listen to the inputs and mix directly from the microphone, plus you can use the output to connect active studio monitors.
• A direct monitor mixer, with mono or stereo modes, is provided for zero latency monitoring.
• The microphone includes a Line Input for connecting electric guitar and bass, plus keyboards, drum machines, MP3 players and just about any other line level signal.
• The Instrument and Mic input gain controls with Peak LED make it easy to set the proper clean signal when recording with the mic or line inputs.
• The on-board, high quality AD converters with 16 Bit, 48K sampling rate provide better than CD quality recording.
• On the road, in the studio or in a fixed installation, the solid die cast construction make the microphone a reliable audio tool from venue to venue, day in and night out.
• A complete cable set with guitar cable, headphone extension, stereo line with RCA adapters and 10 foot USB cable is included.
• A cast base desk stand and metal swivel adapter are included to easily position the microphone right out of the box.
G Track Features
3
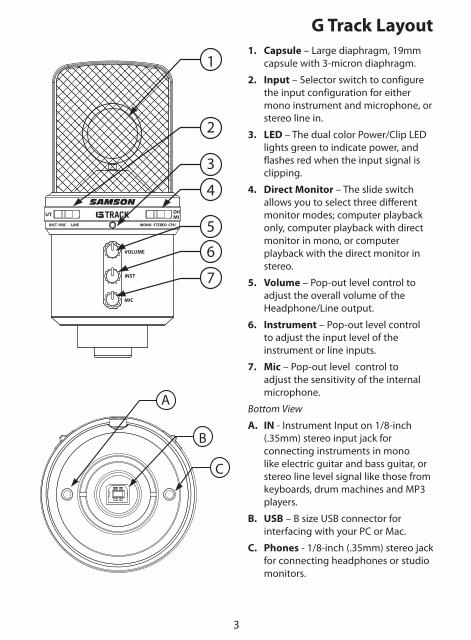
G Track Layout1. Capsule – Large diaphragm, 19mm
capsule with 3-micron diaphragm.
2. Input – Selector switch to configure the input configuration for either mono instrument and microphone, or stereo line in.
3. LED – The dual color Power/Clip LED lights green to indicate power, and flashes red when the input signal is clipping.
4. Direct Monitor – The slide switch allows you to select three different monitor modes; computer playback only, computer playback with direct monitor in mono, or computer playback with the direct monitor in stereo.
5. Volume – Pop-out level control to adjust the overall volume of the Headphone/Line output.
6. Instrument – Pop-out level control to adjust the input level of the instrument or line inputs.
7. Mic – Pop-out level control to adjust the sensitivity of the internal microphone.
Bottom View
A. IN - Instrument Input on 1/8-inch (.35mm) stereo input jack for connecting instruments in mono like electric guitar and bass guitar, or stereo line level signal like those from keyboards, drum machines and MP3 players.
B. USB – B size USB connector for interfacing with your PC or Mac.
C. Phones - 1/8-inch (.35mm) stereo jack for connecting headphones or studio monitors.
4
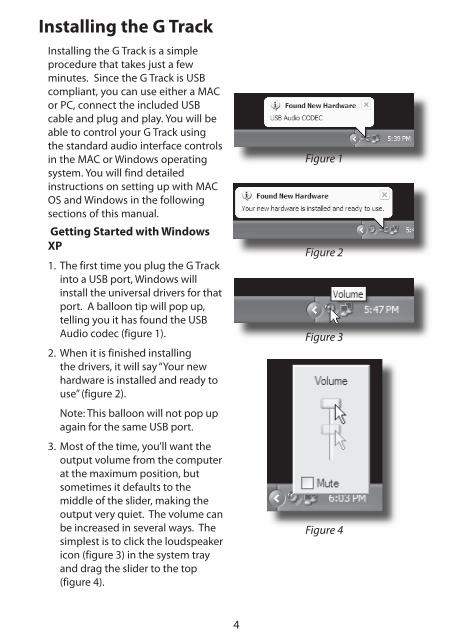
Installing the G TrackInstalling the G Track is a simple procedure that takes just a few minutes. Since the G Track is USB compliant, you can use either a MAC or PC, connect the included USB cable and plug and play. You will be able to control your G Track using the standard audio interface controls in the MAC or Windows operating system. You will find detailed instructions on setting up with MAC OS and Windows in the following sections of this manual.
Getting Started with Windows XP
1. The first time you plug the G Track into a USB port, Windows will install the universal drivers for that port. A balloon tip will pop up, telling you it has found the USB Audio codec (figure 1).
2. When it is finished installing the drivers, it will say “Your new hardware is installed and ready to use” (figure 2).
Note: This balloon will not pop up again for the same USB port.
3. Most of the time, you’ll want the output volume from the computer at the maximum position, but sometimes it defaults to the middle of the slider, making the output very quiet. The volume can be increased in several ways. The simplest is to click the loudspeaker icon (figure 3) in the system tray and drag the slider to the top (figure 4).
Figure 1
Figure 2
Figure 3
Figure 4
5
Figure 6
Figure 5
Figure 7
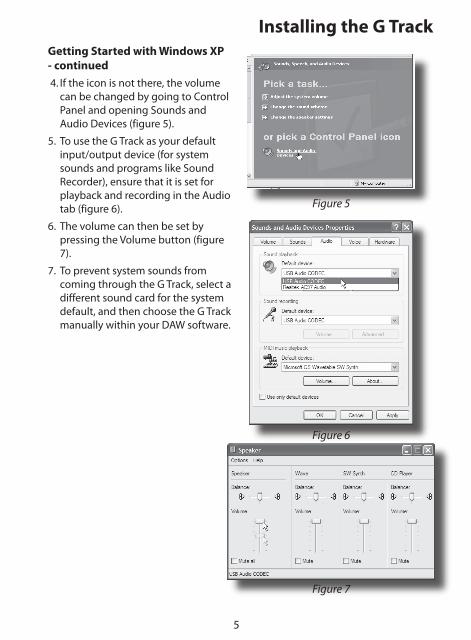
Getting Started with Windows XP - continued 4. If the icon is not there, the volume
can be changed by going to Control Panel and opening Sounds and Audio Devices (figure 5).
5. To use the G Track as your default input/output device (for system sounds and programs like Sound Recorder), ensure that it is set for playback and recording in the Audio tab (figure 6).
6. The volume can then be set by pressing the Volume button (figure 7).
7. To prevent system sounds from coming through the G Track, select a different sound card for the system default, and then choose the G Track manually within your DAW software.
Installing the G Track
6
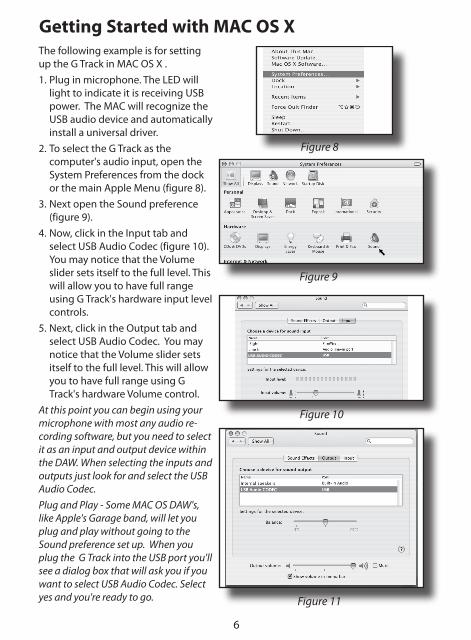
The following example is for setting up the G Track in MAC OS X . 1. Plug in microphone. The LED will
light to indicate it is receiving USB power. The MAC will recognize the USB audio device and automatically install a universal driver.
2. To select the G Track as the computer's audio input, open the System Preferences from the dock or the main Apple Menu (figure 8).
3. Next open the Sound preference (figure 9).
4. Now, click in the Input tab and select USB Audio Codec (figure 10). You may notice that the Volume slider sets itself to the full level. This will allow you to have full range using G Track's hardware input level controls.
5. Next, click in the Output tab and select USB Audio Codec. You may notice that the Volume slider sets itself to the full level. This will allow you to have full range using G Track's hardware Volume control.
At this point you can begin using your microphone with most any audio re-cording software, but you need to select it as an input and output device within the DAW. When selecting the inputs and outputs just look for and select the USB Audio Codec.Plug and Play - Some MAC OS DAW's, like Apple's Garage band, will let you plug and play without going to the Sound preference set up. When you plug the G Track into the USB port you'll see a dialog box that will ask you if you want to select USB Audio Codec. Select yes and you're ready to go.
USB AUDIO CODEC
Figure 9
Figure 8
Figure 10
Getting Started with MAC OS X
Figure 11
7
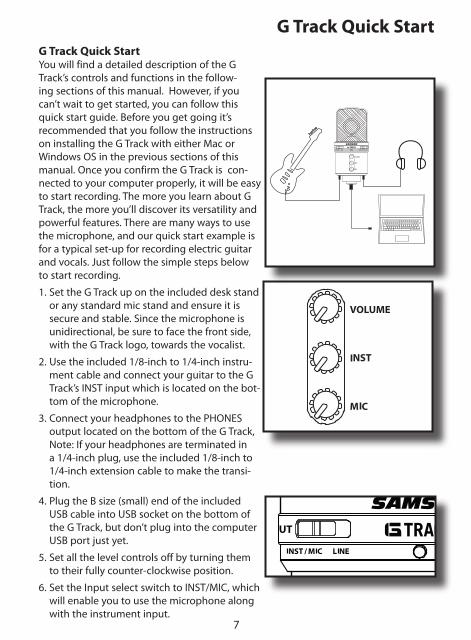
G Track Quick StartG Track Quick Start You will find a detailed description of the G Track’s controls and functions in the follow-ing sections of this manual. However, if you can’t wait to get started, you can follow this quick start guide. Before you get going it’s recommended that you follow the instructions on installing the G Track with either Mac or Windows OS in the previous sections of this manual. Once you confirm the G Track is con-nected to your computer properly, it will be easy to start recording. The more you learn about G Track, the more you’ll discover its versatility and powerful features. There are many ways to use the microphone, and our quick start example is for a typical set-up for recording electric guitar and vocals. Just follow the simple steps below to start recording.
1. Set the G Track up on the included desk stand or any standard mic stand and ensure it is secure and stable. Since the microphone is unidirectional, be sure to face the front side, with the G Track logo, towards the vocalist.
2. Use the included 1/8-inch to 1/4-inch instru-ment cable and connect your guitar to the G Track’s INST input which is located on the bot-tom of the microphone.
3. Connect your headphones to the PHONES output located on the bottom of the G Track, Note: If your headphones are terminated in a 1/4-inch plug, use the included 1/8-inch to 1/4-inch extension cable to make the transi-tion.
4. Plug the B size (small) end of the included USB cable into USB socket on the bottom of the G Track, but don’t plug into the computer USB port just yet.
5. Set all the level controls off by turning them to their fully counter-clockwise position.
6. Set the Input select switch to INST/MIC, which will enable you to use the microphone along with the instrument input.
8
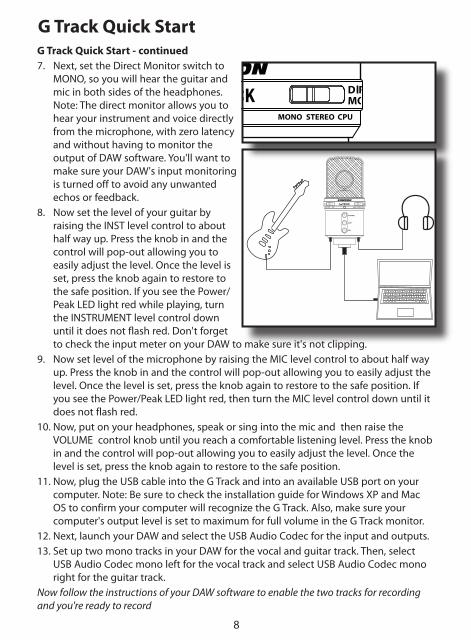
G Track Quick Start - continued 7. Next, set the Direct Monitor switch to
MONO, so you will hear the guitar and mic in both sides of the headphones. Note: The direct monitor allows you to hear your instrument and voice directly from the microphone, with zero latency and without having to monitor the output of DAW software. You'll want to make sure your DAW's input monitoring is turned off to avoid any unwanted echos or feedback.
8. Now set the level of your guitar by raising the INST level control to about half way up. Press the knob in and the control will pop-out allowing you to easily adjust the level. Once the level is set, press the knob again to restore to the safe position. If you see the Power/Peak LED light red while playing, turn the INSTRUMENT level control down until it does not flash red. Don't forget to check the input meter on your DAW to make sure it's not clipping.
9. Now set level of the microphone by raising the MIC level control to about half way up. Press the knob in and the control will pop-out allowing you to easily adjust the level. Once the level is set, press the knob again to restore to the safe position. If you see the Power/Peak LED light red, then turn the MIC level control down until it does not flash red.
10. Now, put on your headphones, speak or sing into the mic and then raise the VOLUME control knob until you reach a comfortable listening level. Press the knob in and the control will pop-out allowing you to easily adjust the level. Once the level is set, press the knob again to restore to the safe position.
11. Now, plug the USB cable into the G Track and into an available USB port on your computer. Note: Be sure to check the installation guide for Windows XP and Mac OS to confirm your computer will recognize the G Track. Also, make sure your computer's output level is set to maximum for full volume in the G Track monitor.
12. Next, launch your DAW and select the USB Audio Codec for the input and outputs. 13. Set up two mono tracks in your DAW for the vocal and guitar track. Then, select
USB Audio Codec mono left for the vocal track and select USB Audio Codec mono right for the guitar track.
Now follow the instructions of your DAW software to enable the two tracks for recording and you're ready to record
G Track Quick Start
9
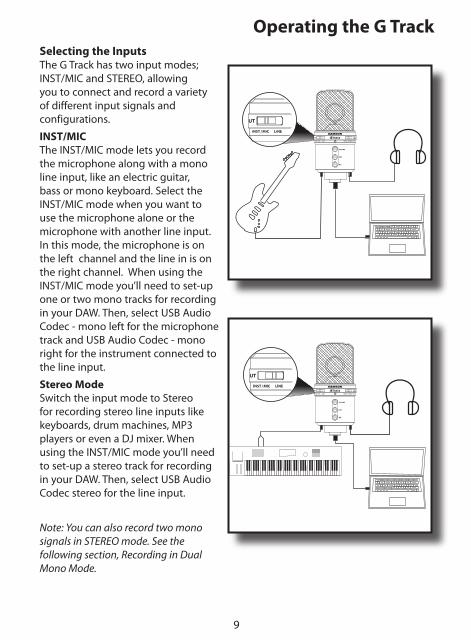
Operating the G TrackSelecting the InputsThe G Track has two input modes; INST/MIC and STEREO, allowing you to connect and record a variety of different input signals and configurations.
INST/MICThe INST/MIC mode lets you record the microphone along with a mono line input, like an electric guitar, bass or mono keyboard. Select the INST/MIC mode when you want to use the microphone alone or the microphone with another line input. In this mode, the microphone is on the left channel and the line in is on the right channel. When using the INST/MIC mode you’ll need to set-up one or two mono tracks for recording in your DAW. Then, select USB Audio Codec - mono left for the microphone track and USB Audio Codec - mono right for the instrument connected to the line input.
Stereo ModeSwitch the input mode to Stereo for recording stereo line inputs like keyboards, drum machines, MP3 players or even a DJ mixer. When using the INST/MIC mode you’ll need to set-up a stereo track for recording in your DAW. Then, select USB Audio Codec stereo for the line input.
Note: You can also record two mono signals in STEREO mode. See the following section, Recording in Dual Mono Mode.
10
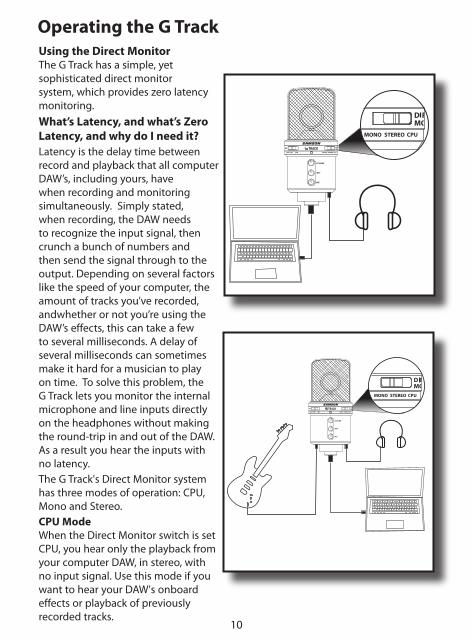
Operating the G TrackUsing the Direct MonitorThe G Track has a simple, yet sophisticated direct monitor system, which provides zero latency monitoring.What’s Latency, and what’s Zero Latency, and why do I need it?Latency is the delay time between record and playback that all computer DAW’s, including yours, have when recording and monitoring simultaneously. Simply stated, when recording, the DAW needs to recognize the input signal, then crunch a bunch of numbers and then send the signal through to the output. Depending on several factors like the speed of your computer, the amount of tracks you’ve recorded, andwhether or not you’re using the DAW’s effects, this can take a few to several milliseconds. A delay of several milliseconds can sometimes make it hard for a musician to play on time. To solve this problem, the G Track lets you monitor the internal microphone and line inputs directly on the headphones without making the round-trip in and out of the DAW. As a result you hear the inputs with no latency. The G Track's Direct Monitor system has three modes of operation: CPU, Mono and Stereo. CPU ModeWhen the Direct Monitor switch is set CPU, you hear only the playback from your computer DAW, in stereo, with no input signal. Use this mode if you want to hear your DAW's onboard effects or playback of previously recorded tracks.
11
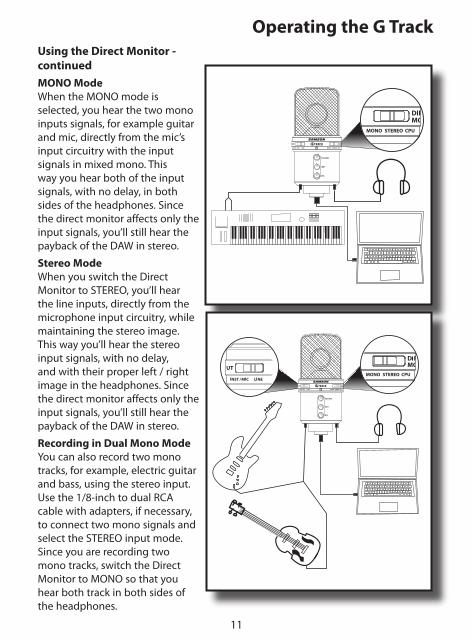
Operating the G TrackUsing the Direct Monitor - continuedMONO ModeWhen the MONO mode is selected, you hear the two mono inputs signals, for example guitar and mic, directly from the mic’s input circuitry with the input signals in mixed mono. This way you hear both of the input signals, with no delay, in both sides of the headphones. Since the direct monitor affects only the input signals, you’ll still hear the payback of the DAW in stereo.
Stereo ModeWhen you switch the Direct Monitor to STEREO, you’ll hear the line inputs, directly from the microphone input circuitry, while maintaining the stereo image. This way you’ll hear the stereo input signals, with no delay, and with their proper left / right image in the headphones. Since the direct monitor affects only the input signals, you’ll still hear the payback of the DAW in stereo.
Recording in Dual Mono ModeYou can also record two mono tracks, for example, electric guitar and bass, using the stereo input. Use the 1/8-inch to dual RCA cable with adapters, if necessary, to connect two mono signals and select the STEREO input mode. Since you are recording two mono tracks, switch the Direct Monitor to MONO so that you hear both track in both sides of the headphones.
12
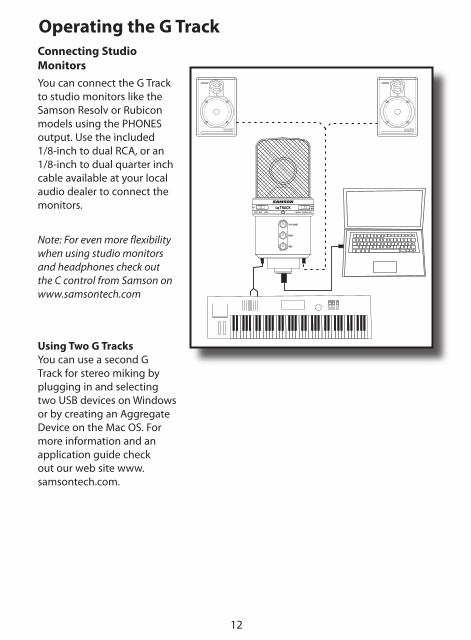
Operating the G TrackConnecting Studio MonitorsYou can connect the G Track to studio monitors like the Samson Resolv or Rubicon models using the PHONES output. Use the included 1/8-inch to dual RCA, or an 1/8-inch to dual quarter inch cable available at your local audio dealer to connect the monitors.
Note: For even more flexibility when using studio monitors and headphones check out the C control from Samson on www.samsontech.com
Using Two G TracksYou can use a second G Track for stereo miking by plugging in and selecting two USB devices on Windows or by creating an Aggregate Device on the Mac OS. For more information and an application guide check out our web site www.samsontech.com.
13
Operating the G TrackA Note on Powering the G TrackThe G Track is a condenser microphone, and like all condenser microphones, it has internal electronics that require an active power supply. Traditional studio condensers are almost always powered by a Phantom Power supply which is usually derived from the mixing console. The G Track receives its power from the USB bus. Simply connect the microphone to the computer's USB port and the microphone is ready to operate. The G Track features a power on LED, which will illuminate when USB power is present.
Setting Up the Signal LevelYou can adjust the G Track's internal analog input gain stage by using the G Track’s INSTRUMENT and MIC level control knobs. The purpose of the level, or gain, controls are to optimize the amount of good signal relative to any associated noise. A good mic or instrument pre-amplifier, like those inside G Track, will also have a PEAK indicator to show when the input signal is clipping. To set a good level on the mic, set the G Track up in front of the desired sound source and slowly raise the input trim control until you see the CLIP or Peak indicator light up. Then, turn the input trim control down until the indicator does not light any more. Repeat the same process for the instrument. Once you set the INSTRUMENT and MIC input level control you shouldn’t need to change them during recording. Use the level controls on the DAW to set the balance between the instrument mic and stereo mix from the DAW.
Stand Mounting the G TrackThe G Track can be mounted to the included desk stand or on a standard microphone stand like the Samson BT4, BL3 or SB1 using the included swivel mount adapter. If you are using a U.S. 5/8” mic stand, you will need to remove, by unscrewing, the Euro stand adapter. Simply screw the swivel adapter on to your mic stand or boom arm. Now, loosen the thumbscrew and adjust the microphone to the desired angle. Once set, tighten the thumbscrew to secure the microphone in place. You can also use the optional SP04, spider shock mount for increased isolation. For more information see the section, “Using the Optional SP04 Shockmount”, following in this manual.
Polar Pattern The most important characteristic of any microphone is its directionality or “pick-up pattern”. There are three basic categories of pick up patterns; omni, bi and unidirectional. Omni mics pick up sound from all directions, bidirectional mics pick up the sound directly in front and back of the microphone while rejecting the sound on the left and right sides, and unidirectional (cardioid) mics pick up the sound in front of the microphone.
14
Polar Pattern - continuedWhile omni and bidirectional microphones are very useful for a variety of applications, a majority of “miking” situations in recording and live sound require unidirectional or cardioid microphones. The unidirectional pick up pattern allows for better separation of instruments in the studio and more control over feedback in live sound reinforcement. The G Track’s pick-up pattern is super-cardioid, which offers even more side-to-side rejection. When positioned correctly, the super-cardioid pick-up pattern allows you to pick up more of the sound you want and less of the sound you don’t want.
Microphone PlacementIn order to maximize the sound quality, you must pay careful attention to the placement of your G Track and how it is positioned for the instrument or vocalist that you are miking. All microphones, especially unidirectional or cardioid microphones, exhibit a phenomenon known as “proximity effect.” Very simply put, proximity effect is a resulting change in the frequency response of a microphone based on the position of the mic capsule relative to the sound source. Specifically, when you point a cardioid mic directly at the sound source (on axis) you will get the best frequency response, however when you start pointing the microphone slightly away (off axis) you will notice the high frequency response dropping off and the microphone will start to sound like it has more bass and less highs.
For most vocal applications you’ll want to position the microphone directly in front of the artist. The same may be true for miking instruments, however, you can make some pretty amazing equalization adjustments by slightly changing the angle of the capsule to the sound source. This can be a very useful technique in capturing the optimum sound of drum set, acoustic guitar, piano or other instruments in a live room or sound stage. Experimentation and experience are the best teachers in getting good sounds, so plug in!
P-PoppingP-popping is that annoying pop that you can get when the microphone diaphragm gets a blast of air from a vocalist pronouncing words with the letter “P” included. There are a few ways to deal with the problem including using an external pop filter. Some famous engineers have relied on an old nylon stocking over a bent clothes hanger, which actually works very well. You can also try placing the microphone slightly off axis (on a slight angle) from the vocalist. This can often solve the problem without using an external pop filter. However, the simplest, most reliable way to reduce P-popping (without the bad smell of old nylons) is to use a pop filter attached the microphone stand like the Samson PS-01. Using a pop filter also makes it easy to maintain a good level by keeping the vocalist at a constant distance from the microphone.
Operating the G Track
15
The G Track is a great microphone choice for many instrument miking situations. Below is a brief guide on using the G Track in some typical applications:VocalsWhen using the G Track on vocals, use of an external pop filter like the Samson PS01 is strongly recommended. Position the microphone directly in front of the artist so that the microphone grill is approximately 4 to 10 inches away. You can record a group of vocalists by positioning them around the front of the microphone. Just remember that the extreme sides of the microphone pick up less with less high frequency response, so have them stand together tight, and/or move the microphone from one to two feet away from the group.Acoustic GuitarThere are a variety of ways that the G Track can be used to mic an acoustic guitar. The microphone placement will depend on the type of instrument and what kind of sound you’re looking to capture, for example the tonal quality you want to focus on, and how much finger slide or pick noise you may or may not want. When miking a standard steel string acoustic, a good place to start is with the microphone positioned pointing towards the end of the fingerboard at a distance of about 6 inches to 2 feet away from the instrument. You can experiment by moving the microphone slightly in the direction of the sound hole, which will produce more low frequencies, or move it in the direction of the fingerboard to capture more high-end or to remove any unwanted boominess. For nylon string acoustic, try positioning the microphone above the bridge to emphasize more of the attack from the sound of the finger picking, or for less, move the mic closer to the sound hole. If you have a pair of G Tracks, try one positioned at the fingerboard and the second over the sound hole. PianoYou can achieve outstanding results using the G Track on acoustic piano. Several placement approaches can be used depending on the size of the piano, and the type of sound you are looking to record. When miking a Grand Piano, (for an ambient sound like that used in a classical recital), a G Track can be positioned directly in front of the instrument. Open the lid to the full position and place the microphone five to twenty feet in front of the instrument. For a more contemporary ensemble sound, place two G Tracks in the piano, positioning one over the low strings and the other over the high strings.Overhead Drum KitBecause of its extended high frequency response and fast transient response, the G Track performs outstandingly when used as an overhead cymbal microphone. You can position one G Track on a boom mic stand directly above the kit pointing from front to back. For stereo miking, use two G Track’s placed over the drum set at a distance of three to five feet. You can experiment with the exact placement depending on the size of the room and whether you’re looking for an ambient or close-miked sound. In general, when miking a drum kit, it’s a good idea to start with the overhead mics. Even though you use the overhead mics mostly for the cymbals, try to get the entire kit to sound great in the overheads. Then it will be easier to just bring up your individual mics for more attack and thickness in the overall sound.
Application Notes
16
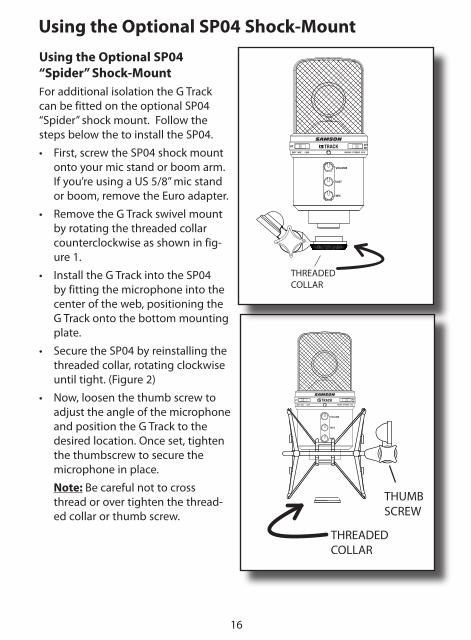
Using the Optional SP04 Shock-MountUsing the Optional SP04 “Spider” Shock-Mount For additional isolation the G Track can be fitted on the optional SP04 “Spider” shock mount. Follow the steps below the to install the SP04.
• First, screw the SP04 shock mount onto your mic stand or boom arm. If you’re using a US 5/8” mic stand or boom, remove the Euro adapter.
• Remove the G Track swivel mount by rotating the threaded collar counterclockwise as shown in fig-ure 1.
• Install the G Track into the SP04 by fitting the microphone into the center of the web, positioning the G Track onto the bottom mounting plate.
• Secure the SP04 by reinstalling the threaded collar, rotating clockwise until tight. (Figure 2)
• Now, loosen the thumb screw to adjust the angle of the microphone and position the G Track to the desired location. Once set, tighten the thumbscrew to secure the microphone in place.
Note: Be careful not to cross thread or over tighten the thread-ed collar or thumb screw.
17
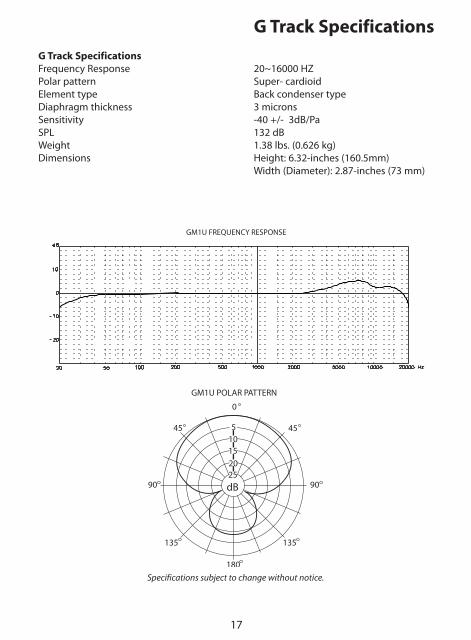
G Track Specifications Frequency Response 20~16000 HZ Polar pattern Super- cardioid Element type Back condenser type Diaphragm thickness 3 microns Sensitivity -40 +/- 3dB/Pa SPL 132 dB Weight 1.38 lbs. (0.626 kg)Dimensions Height: 6.32-inches (160.5mm) Width (Diameter): 2.87-inches (73 mm)
Specifications subject to change without notice.
G Track Specifications

Samson Technologies Corp.45 Gilpin Avenue
Hauppauge, New York 11788-8816Phone: 1-800-3-SAMSON (1-800-372-6766)
Fax: 631-784-2201 www.samsontech.com