Embed Size (px)
Citation preview

CPSM MEDITECH 5.67
Inventory Reports
Created: April 30. 2015 Revised: February 20, 2018
Page 1 of 18
Contents CPSM – Inventory Reports ................................................................................................................................................... 2
List Item Requisition Template Dictionary ....................................................................................................................... 2
Print Department 6 Period Detail Report ........................................................................................................................ 6
Print Item Requisitions ................................................................................................................................................... 10
Print Supply Catalogue ................................................................................................................................................... 14
Created: April 30. 2015 Revised: February 20, 2018
Page 2 of 18
CPSM – Inventory Reports
List Item Requisition Template Dictionary
Purpose: Use this routine to print the Item Requisition Templates Report.
NOTE: Profiles will vary between users. The first menu will be Applications followed by Role based (e.g. Nursing, Diagnostic Imaging etc.), at this point a user will select MM Inventory Requisition. The next menu will be Materials Management. The screen shots in this document show from Application menu to Materials Management Menu leaving out the Role based menu.
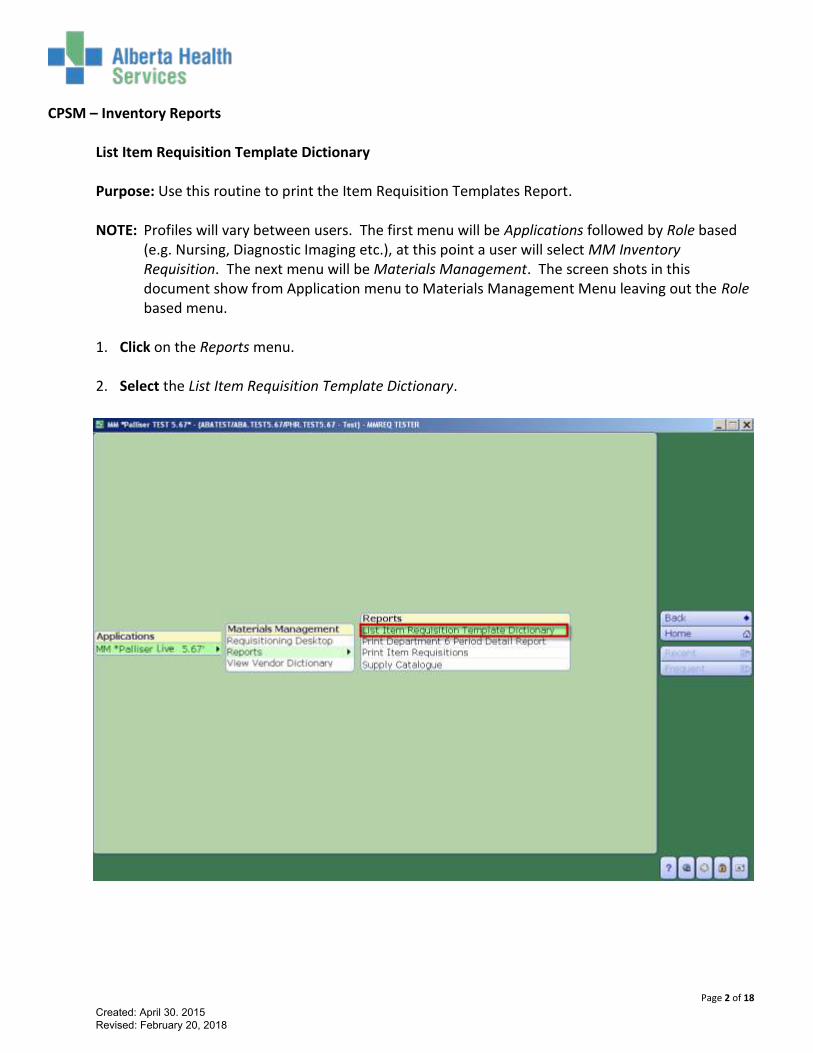
1. Click on the Reports menu.
2. Select the List Item Requisition Template Dictionary.
Created: April 30. 2015 Revised: February 20, 2018
Page 3 of 18
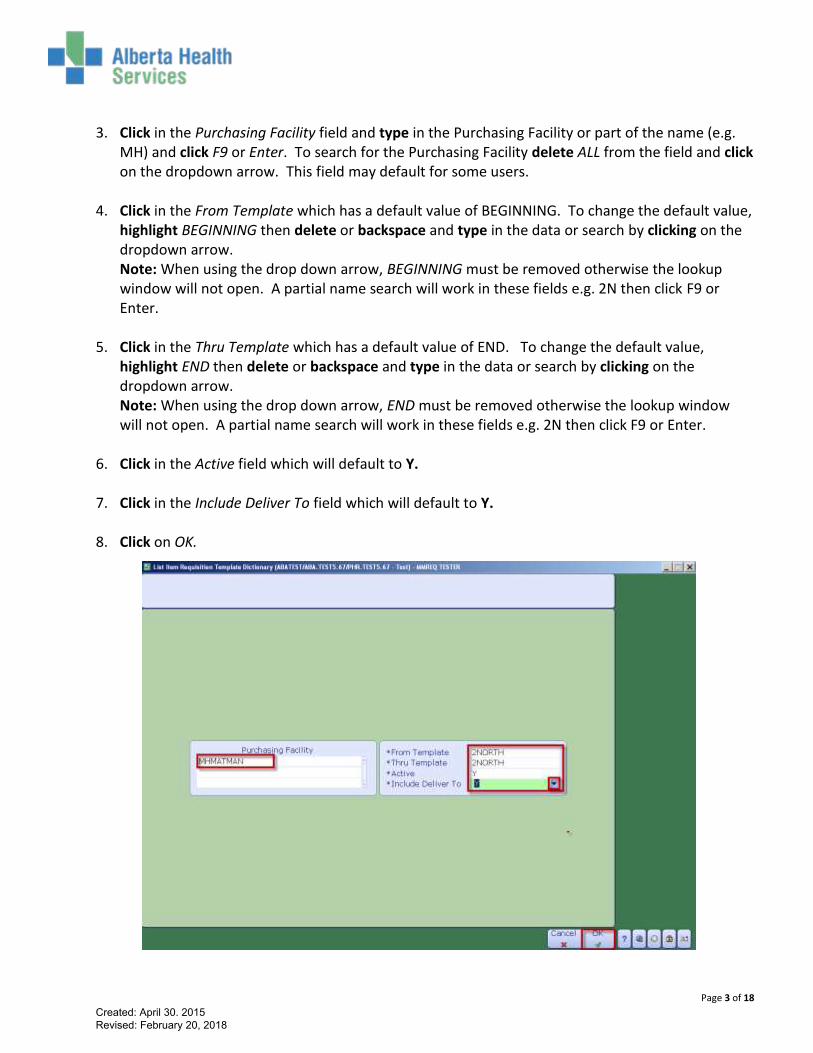
3. Click in the Purchasing Facility field and type in the Purchasing Facility or part of the name (e.g.MH) and click F9 or Enter. To search for the Purchasing Facility delete ALL from the field and clickon the dropdown arrow. This field may default for some users.
4. Click in the From Template which has a default value of BEGINNING. To change the default value,highlight BEGINNING then delete or backspace and type in the data or search by clicking on thedropdown arrow.Note: When using the drop down arrow, BEGINNING must be removed otherwise the lookupwindow will not open. A partial name search will work in these fields e.g. 2N then click F9 orEnter.
5. Click in the Thru Template which has a default value of END. To change the default value,highlight END then delete or backspace and type in the data or search by clicking on thedropdown arrow.Note: When using the drop down arrow, END must be removed otherwise the lookup windowwill not open. A partial name search will work in these fields e.g. 2N then click F9 or Enter.
6. Click in the Active field which will default to Y.
7. Click in the Include Deliver To field which will default to Y.
8. Click on OK.
Created: April 30. 2015 Revised: February 20, 2018

Page 4 of 18
The Print Destination window will be displayed.
9. Click on the Preview menu located on the right hand side.
10. Click on OK.
Created: April 30. 2015 Revised: February 20, 2018
Page 5 of 18
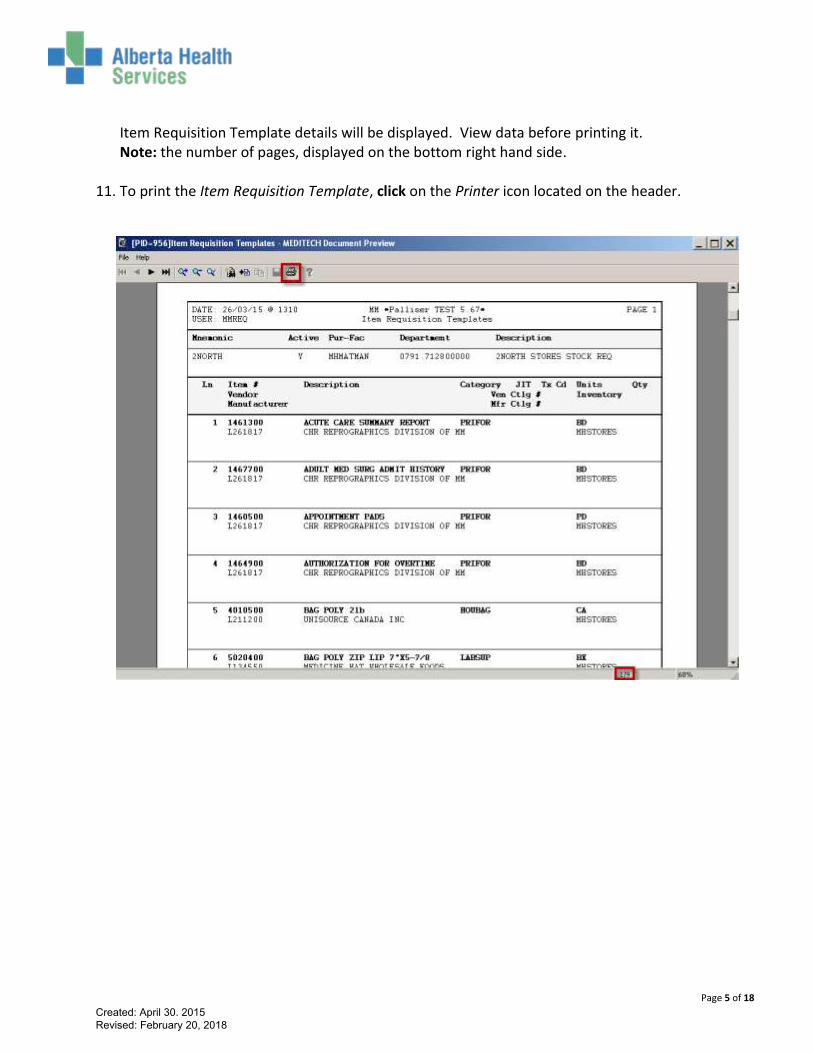
Item Requisition Template details will be displayed. View data before printing it. Note: the number of pages, displayed on the bottom right hand side.
11. To print the Item Requisition Template, click on the Printer icon located on the header.
Created: April 30. 2015 Revised: February 20, 2018
Page 6 of 18
CPSM – Inventory Reports
Print Department 6 Period Detail Report
Purpose: Use this Report to View or Print detailed department inventory statistics for six sequential inventory periods.
NOTE: Profiles will vary between users. The first menu will be Applications followed by Role based (e.g. Nursing, Diagnostic Imaging etc.), at this point a user will select MM Inventory Requisition. The next menu will be Materials Management. The screen shots in this document show from Application menu to Materials Management Menu leaving out the Role based menu.
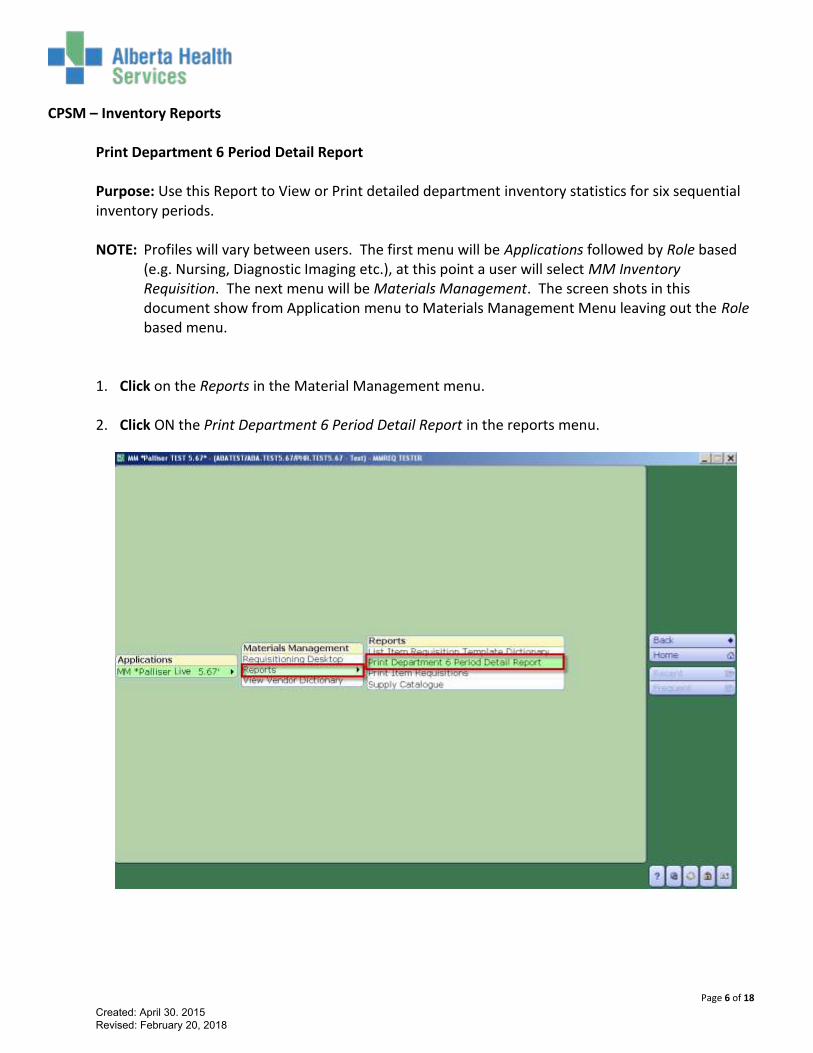
1. Click on the Reports in the Material Management menu.
2. Click ON the Print Department 6 Period Detail Report in the reports menu.
Created: April 30. 2015 Revised: February 20, 2018
Page 7 of 18
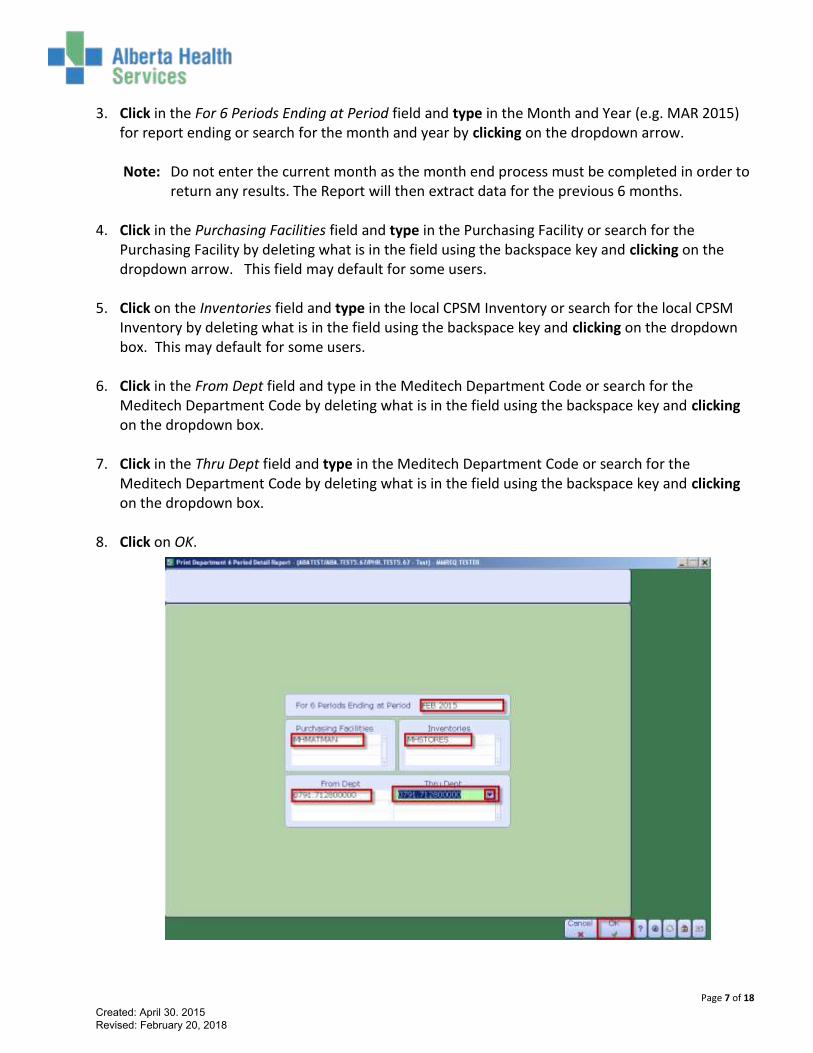
3. Click in the For 6 Periods Ending at Period field and type in the Month and Year (e.g. MAR 2015)for report ending or search for the month and year by clicking on the dropdown arrow.
Note: Do not enter the current month as the month end process must be completed in order toreturn any results. The Report will then extract data for the previous 6 months.
4. Click in the Purchasing Facilities field and type in the Purchasing Facility or search for thePurchasing Facility by deleting what is in the field using the backspace key and clicking on thedropdown arrow. This field may default for some users.
5. Click on the Inventories field and type in the local CPSM Inventory or search for the local CPSMInventory by deleting what is in the field using the backspace key and clicking on the dropdownbox. This may default for some users.
6. Click in the From Dept field and type in the Meditech Department Code or search for theMeditech Department Code by deleting what is in the field using the backspace key and clickingon the dropdown box.
7. Click in the Thru Dept field and type in the Meditech Department Code or search for theMeditech Department Code by deleting what is in the field using the backspace key and clickingon the dropdown box.
8. Click on OK.
Created: April 30. 2015 Revised: February 20, 2018
Page 8 of 18
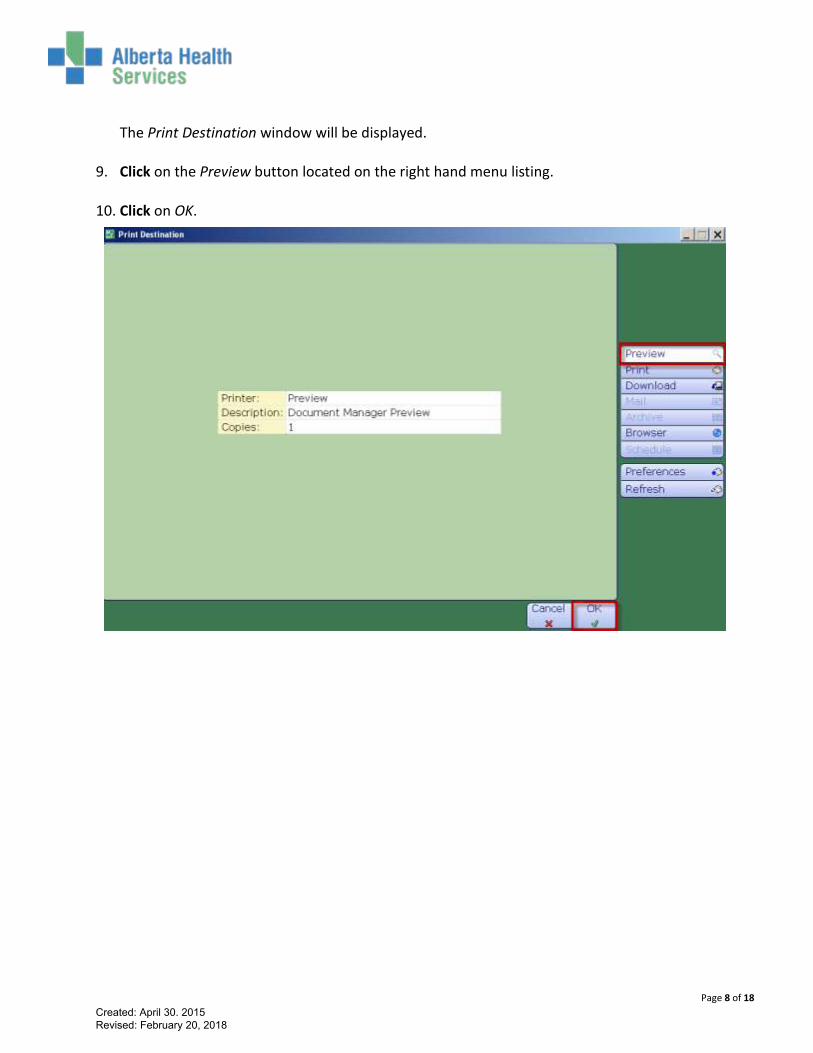
The Print Destination window will be displayed.
9. Click on the Preview button located on the right hand menu listing.
10. Click on OK.
Created: April 30. 2015 Revised: February 20, 2018
Page 9 of 18
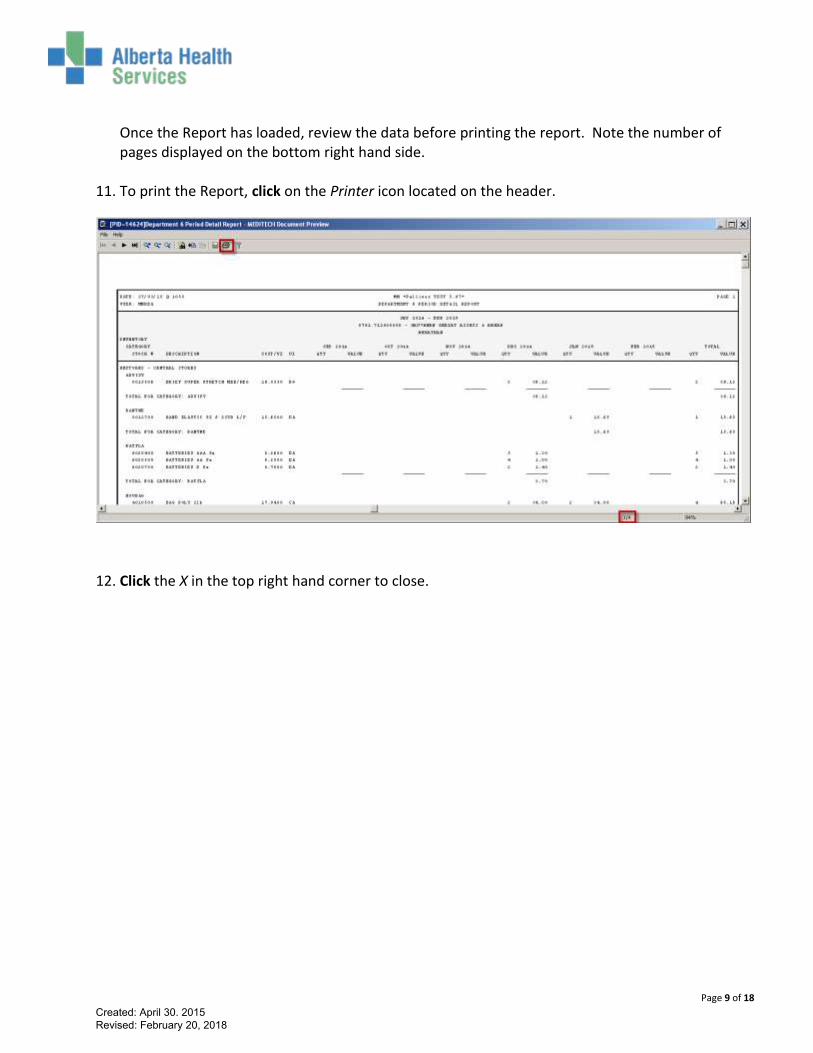
Once the Report has loaded, review the data before printing the report. Note the number of pages displayed on the bottom right hand side.
11. To print the Report, click on the Printer icon located on the header.
12. Click the X in the top right hand corner to close.
Created: April 30. 2015 Revised: February 20, 2018
Page 10 of 18
CPSM – Inventory Reports
Print Item Requisitions
Purpose: Use this routine to print the Item Requisition Report for a specific purchasing facility. This report can be limited a specific GL department as well as a specific range of item requisitions or item requisitions within a specific date range. The following can also be included: - Specific statuses- Posting details for each line item- Lines with zero quantities
NOTE: Profiles will vary between users. The first menu will be Applications followed by Role based (e.g. Nursing, Diagnostic Imaging etc.), at this point a user will select MM Inventory Requisition. The next menu will be Materials Management. The screen shots in this document show from Application menu to Materials Management Menu leaving out the Role based menu.
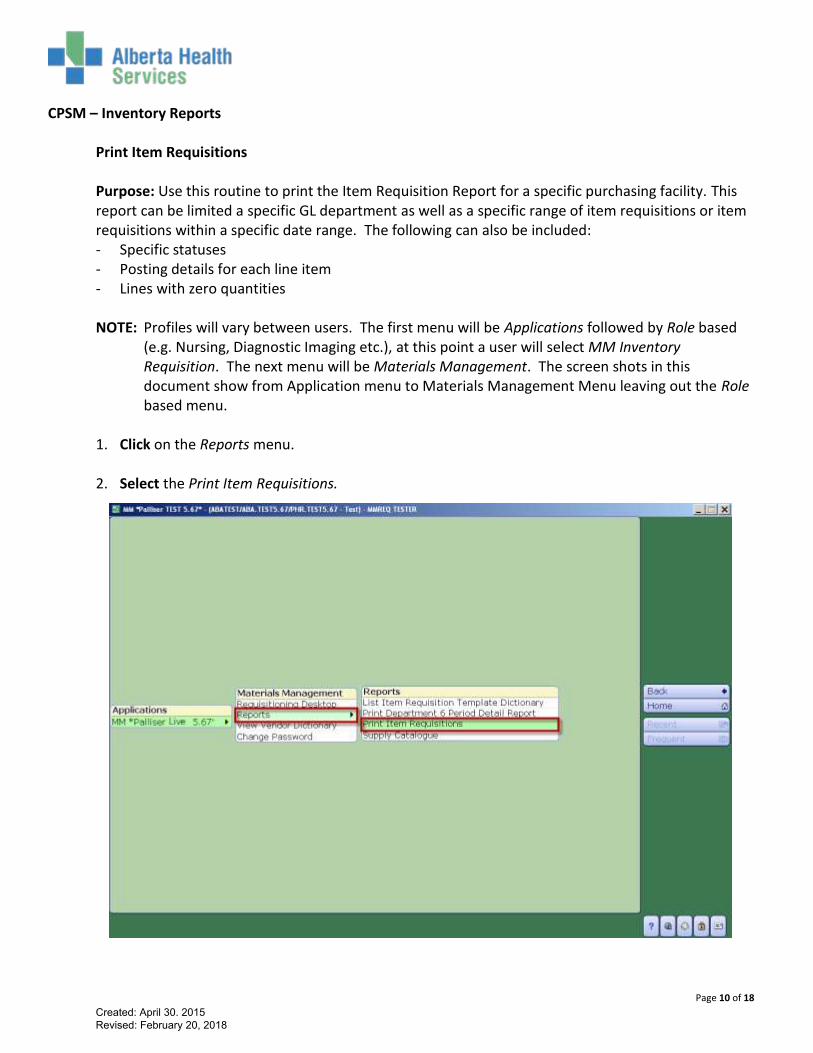
1. Click on the Reports menu.
2. Select the Print Item Requisitions.
Created: April 30. 2015 Revised: February 20, 2018
Page 11 of 18
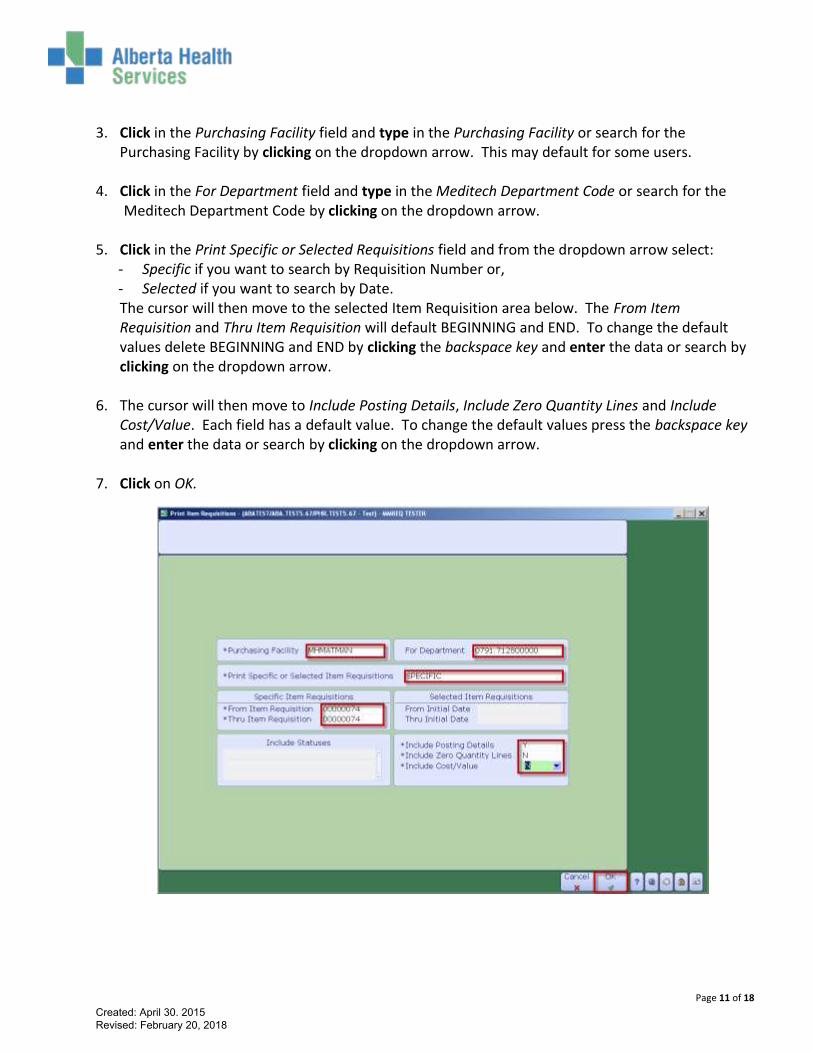
3. Click in the Purchasing Facility field and type in the Purchasing Facility or search for thePurchasing Facility by clicking on the dropdown arrow. This may default for some users.
4. Click in the For Department field and type in the Meditech Department Code or search for theMeditech Department Code by clicking on the dropdown arrow.
5. Click in the Print Specific or Selected Requisitions field and from the dropdown arrow select:- Specific if you want to search by Requisition Number or,- Selected if you want to search by Date.The cursor will then move to the selected Item Requisition area below. The From ItemRequisition and Thru Item Requisition will default BEGINNING and END. To change the defaultvalues delete BEGINNING and END by clicking the backspace key and enter the data or search byclicking on the dropdown arrow.
6. The cursor will then move to Include Posting Details, Include Zero Quantity Lines and IncludeCost/Value. Each field has a default value. To change the default values press the backspace keyand enter the data or search by clicking on the dropdown arrow.
7. Click on OK.
Created: April 30. 2015 Revised: February 20, 2018
Page 12 of 18
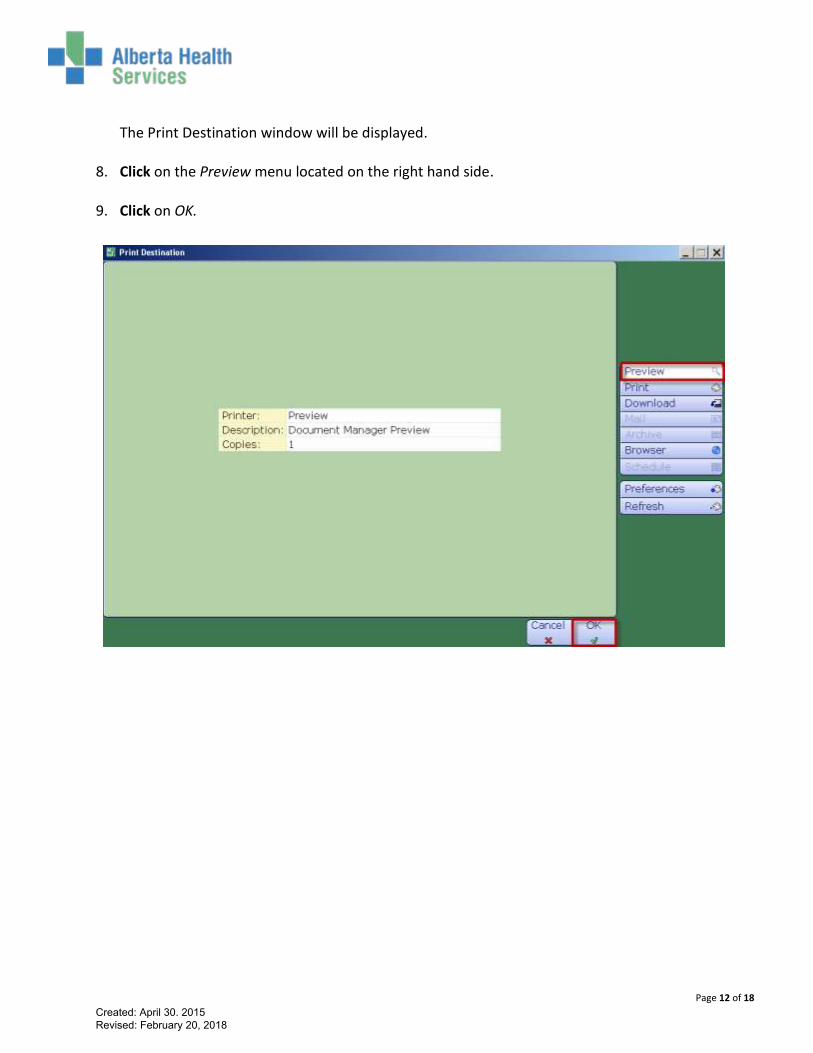
The Print Destination window will be displayed.
8. Click on the Preview menu located on the right hand side.
9. Click on OK.
Created: April 30. 2015 Revised: February 20, 2018
Page 13 of 18
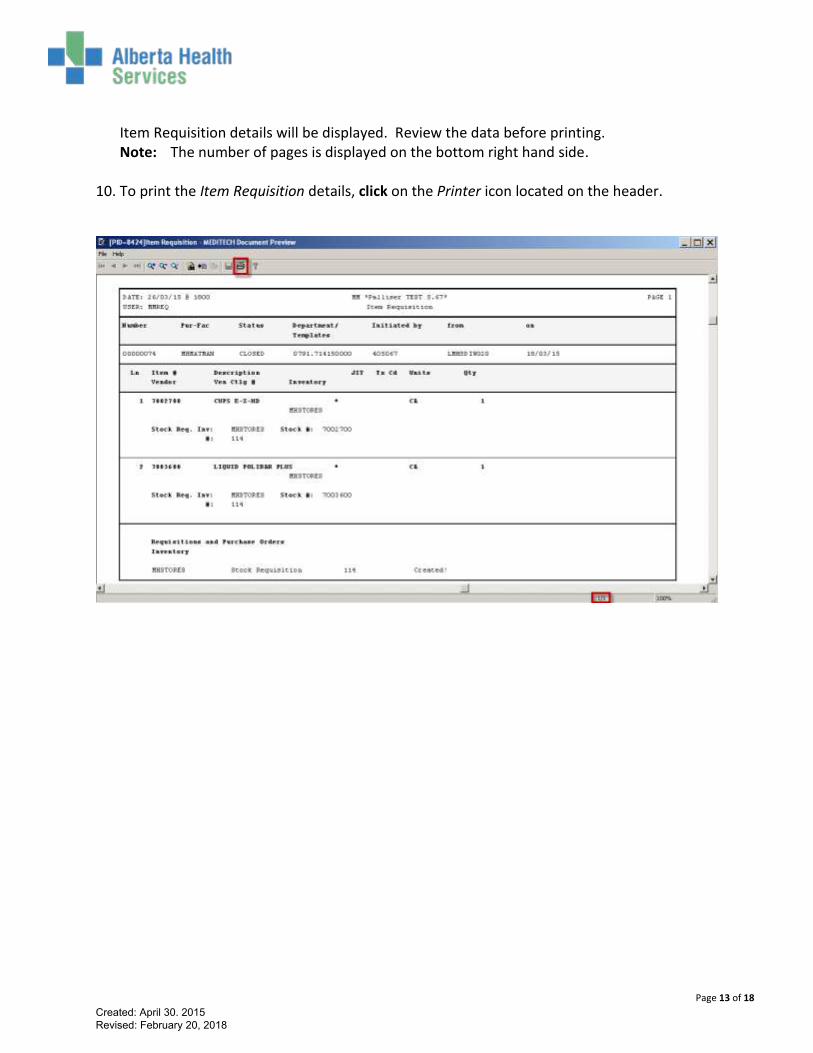
Item Requisition details will be displayed. Review the data before printing. Note: The number of pages is displayed on the bottom right hand side.
10. To print the Item Requisition details, click on the Printer icon located on the header.
Created: April 30. 2015 Revised: February 20, 2018
Page 14 of 18
CPSM – Inventory Reports
Print Supply Catalogue
Purpose: Use this report to print the list of items that are available from your local CPSM Inventory.
NOTE: Profiles will vary between users. The first menu will be Applications followed by Role based (e.g. Nursing, Diagnostic Imaging etc.), at this point a user will select MM Inventory Requisition. The next menu will be Materials Management. The screen shots in this document show from Application menu to Materials Management Menu leaving out the Role based menu.
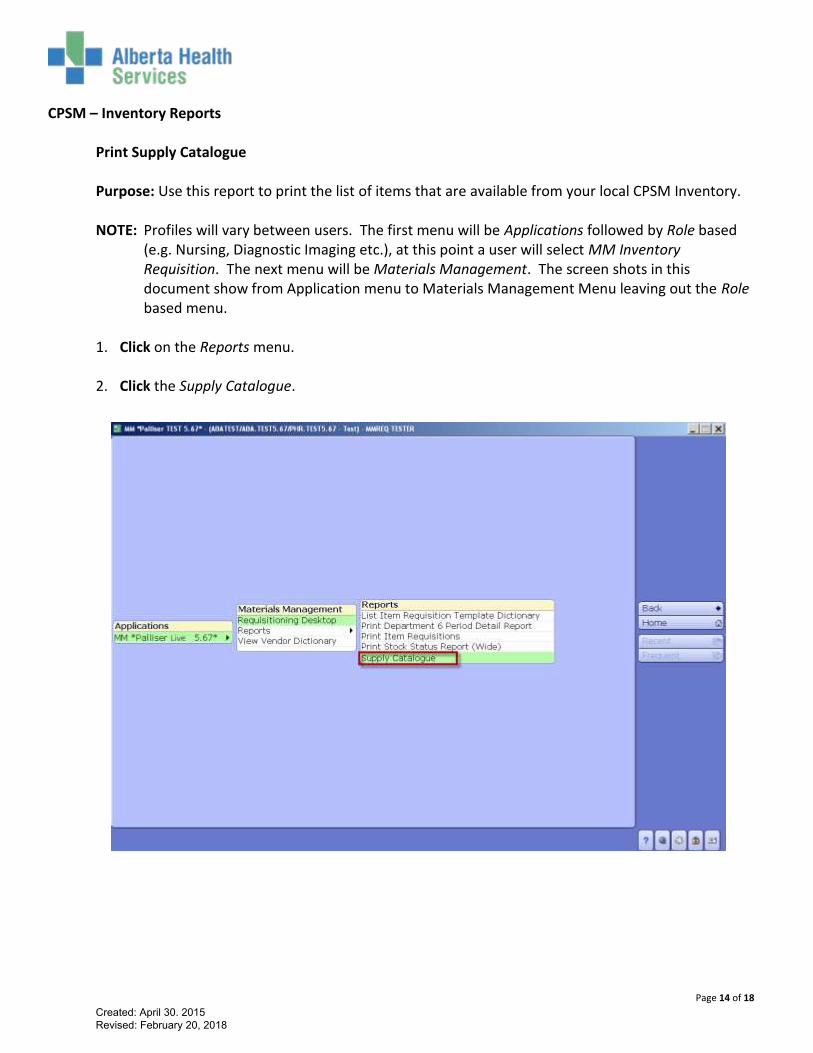
1. Click on the Reports menu.
2. Click the Supply Catalogue.
Created: April 30. 2015 Revised: February 20, 2018

Page 15 of 18
3. Click in the *For Inventories field.
4. Type in the local CPSM Inventory or search for the local CPSM Inventory by clicking on thedropdown box. This may default for some users
Created: April 30. 2015 Revised: February 20, 2018

Page 16 of 18
5. Click in the *From Stock Number: field which will default to BEGINNING.
6. Click in the *Stock Number: field which will default to END.
7. Click in the Display Locations field which will default to Y.
8. Click in the Sort By Vendor, EOC, Desc (V/E/D/) field which will default to D (for Description).
To sort the report by EOC, (Expense Object Code) enter E, and V to sort the report by Vendor.
Created: April 30. 2015 Revised: February 20, 2018
Page 17 of 18
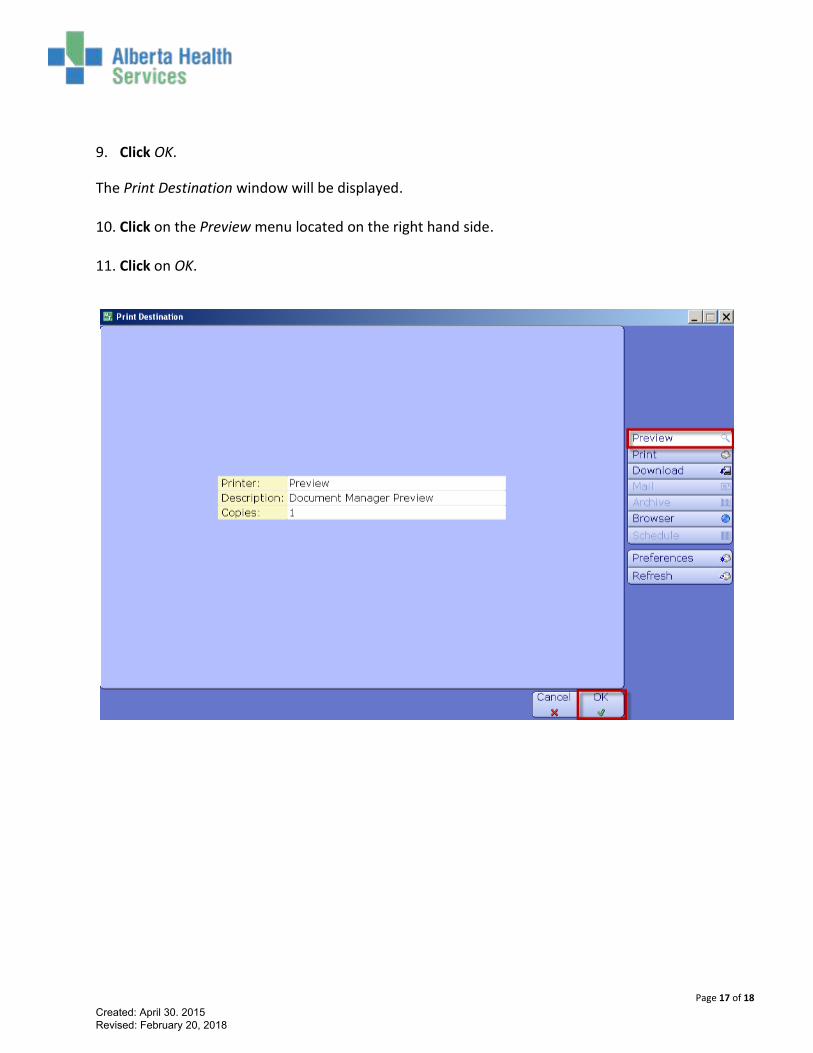
9. Click OK.
The Print Destination window will be displayed.
10. Click on the Preview menu located on the right hand side.
11. Click on OK.
Created: April 30. 2015 Revised: February 20, 2018
Page 18 of 18
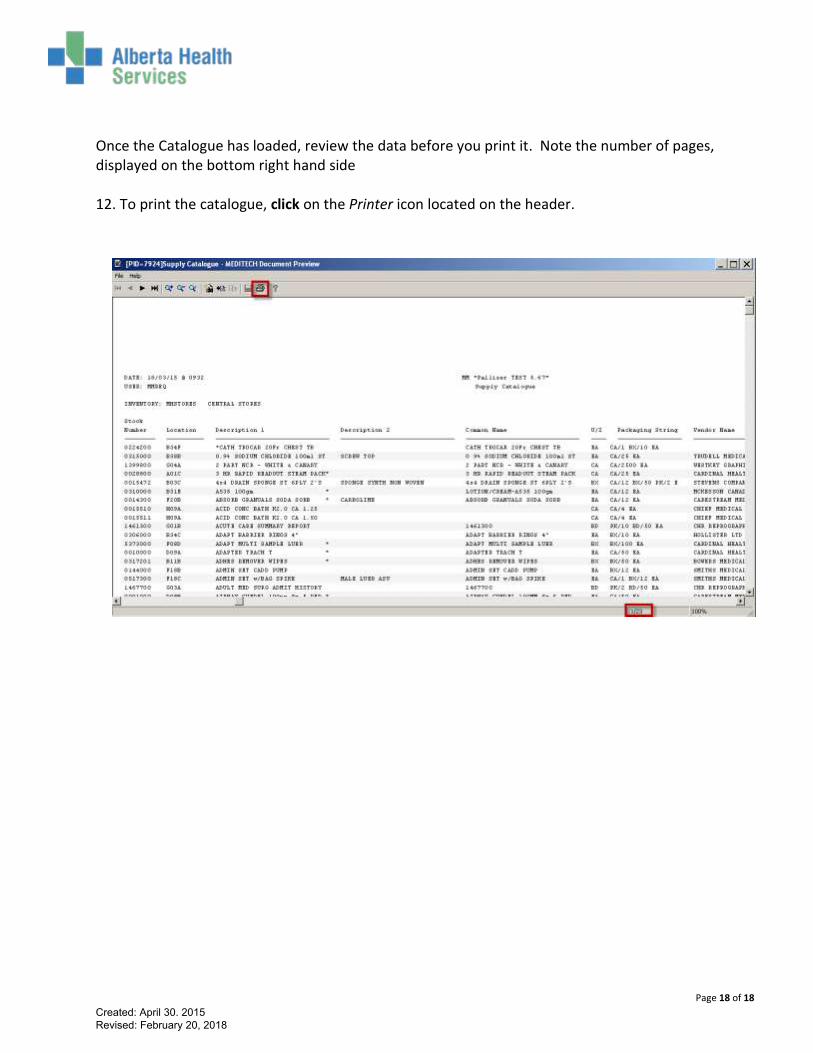
Once the Catalogue has loaded, review the data before you print it. Note the number of pages, displayed on the bottom right hand side
12. To print the catalogue, click on the Printer icon located on the header.
Created: April 30. 2015 Revised: February 20, 2018