Embed Size (px)
Citation preview

St. John Ambulance Association, Singapore
CPR+AED Training Handbook
Page 1
Foreword
Dr Teh Peng Hooi, O.St.J.
FAMS (Orthopaedic) MBBS (S’PORE), FRCS (EDIN)
Vice Chairman, National St. John Council, Singapore
Director, St John Ambulance Association, Singapore
In Singapore, heart disease is the second commonest cause of death, accounting for 22.8% of
all deaths in 2006. About 2400 new heart attacks and 980 out of hospital sudden cardiac
arrests occur yearly. The overall survival rate for pre-hospital cardiac collapses, despite the
excellent healthcare services in Singapore, is only 2.6%. There are 2 main reasons for the poor
overall survival rate in pre-hospital cardiac collapse cases namely the small number of people
trained in cardio pulmonary resuscitation or CPR and the limited effectiveness of performing
CPR only.
While the performance of CPR in cardiac arrest may save life it must be remembered that this
procedure is useful if the heart stops beating (asystole) which occur in about 20% of cases. In
the majority of cases during cardiac arrest the heart is in ventricular fibrillation and CPR done
here alone is not very effective. Defibrillation of the heart using a machine can reverse this
abnormal rhythm and correct this problem. Currently small portable machines for use outside the
hospitals are available to correct the abnormal rhythm during the cardiac arrest. Such a
machine is called Automated External Defibrillator or AED.
St John Ambulance Singapore is now launching a course – to teach not only CPR but the correct
use and handling of the AED machines to members of the public. It is hoped that such
machines will be easily and readily available in offices, shopping centres, community centres and
homes in years to come. It is also the hope of St John Ambulance Singapore that many in
Singapore will be trained in CPR and the use of AED. In this way the survival rate for those with
cardiac arrest occurring outside the hospital can improve considerably.
The CPR committee of St John Ambulance Association, Singapore is to be congratulated for
developing this course material and booklet as well as spearheading the teaching of this
programme to members of the public in Singapore.

St. John Ambulance Association, Singapore
CPR+AED Training Handbook
Page 2
Table of Contents
General instructions to participants ............................................................................. 3
Introduction of the Cardio-Pulmonary System ............................................................ 4
The heart in relation to the chest ............................................................................................ 4
Circulatory System .................................................................................................................. 5
Heart Attack ............................................................................................................................. 7
The Chain of Survival .................................................................................................. 9
One Rescuer Cardio-Pulmonary Resuscitation for Adults ......................................... 10
Automated External Defibrillator .............................................................................. 10
Generally the sequences in the use of AED ......................................................................... 18
Stop defibrillation when: ....................................................................................................... 19
Documentation: ...................................................................................................................... 20
House keeping of the AED: ................................................................................................... 20
Adult one-man CPR-AED (DR ABCD) ...................................................................... 21
CPR till AED ready .................................................................................................... 23

St. John Ambulance Association, Singapore
CPR+AED Training Handbook
Page 3
General instructions to participants
1. Participants are to arrive at least 15 minutes before the course is scheduled to
begin.
2. Participants who are late for more than half an hour from the stated starting
time will not be allowed to join the course and deemed as absent. Course fees
will not be refunded.
3. Participants are advised to be suitably attired so as to allow unhindered
movement during manikin practice. Female participants are advised to wear
pants or slacks.
4. Participants are to inform the Chief Instructor before the commencement of any
course if they are having any type of infectious disease including any upper
respiratory tract infection. This is because each training session will involve
“close physical contact” with their fellow participants especially during rescue
breathing (mouth-to-mouth).
5. Participants are to inform the Chief Instructors if they have orthopaedic or
heart problems, bronchial asthma, or a female participant is pregnant.
6. Participants are advised to read thoroughly the given notes before they come for
the course.
7. No jewellery should be worn and female participants will be required to remove
any lipstick before manikin practice.
8. Do not attempt to perform CPR unless you have gone through training, as
improper techniques could lead to injuries.
9. Participants must disinfect the manikins thoroughly using the spirit swabs
immediately after each attempted mouth-to-mouth breathing practice.
10. Participants will be required to pass a written and practical test before being
awarded a course certificate in CPR+AED.

St. John Ambulance Association, Singapore
CPR+AED Training Handbook
Page 4
Introduction of the Cardio-Pulmonary System
The heart in relation to the chest
The heart is a muscular organ, about the size of a clenched fist. It is located in the center of the chest
behind the breastbone (Sternum) and in front of the spine. The coronary arteries (not shown) are special
arteries that supply blood to the heart muscle itself.
Xiphoid process
Lower tip of the sternum
Heart
(Located between
sternum and spine)
Sternum
(Breastbone)

St. John Ambulance Association, Singapore
CPR+AED Training Handbook
Page 5
Circulatory System
The function of the heart is to pump blood to the lungs, where it picks up oxygen, and then to the rest of
the body, where it delivers the oxygen. The adult heart pumps approximately 5 liters of blood per minute.
All cells of the body require oxygen to carry out their normal functions. When the heart stops pumping
(cardiac arrest), oxygen is not circulated, and the oxygen stored in the brain and other vital organs is used
up quickly. The heartbeat is triggered by natural electrical impulses sent through the heart 60 – 100 times
per minute in the healthy, resting adult. During exercise the heart of the average person can pump up to 25
liters each minute (about 5 times at resting state). A properly performed chest compression can
produce ⅓ of the normal cardiac output. This amount of cardiac output, though not optimal, is enough
to maintain basic life support in a collapsed casualty.
Head & Arms
Right Lung
Left Lung Right Heart
Deoxygenated blood
returning from the body
is pumped through the
pulmonary artery to the
lungs where it picks up
fresh oxygen.
Left Heart
Receives oxygenated blood from
the lungs and is pumped through
the aorta to the rest of the body.
Arteries
Veins
Capillaries
Trunk & Legs

St. John Ambulance Association, Singapore
CPR+AED Training Handbook
Page 6
The lungs consist of many tiny air sacs (alveoli) surrounded by small blood vessels (capillaries). Nerve
impulses from the brain to the chest muscles and the diaphragm cause a person to breathe. With each
breath, air is carried through the airway (nose, mouth, throat, larynx, trachea and bronchi) and into the air
sacs of the lungs
At sea level, approximately 21% of air is oxygen. When the air sacs fill with this air, oxygen enters the
blood in the vessels surrounding the air sacs. The oxygenated blood returns to the heart, which pumps it
throughout the body. As oxygen is taken up from the blood by body cells, carbon dioxide is given off as a
waste product. Carbon dioxide is carried by the blood to the air sacs and is exhaled out of the body. When
air is inhaled, only one fourth of the oxygen is taken up by the blood; the rest is exhaled. This is why
mouth-to-mouth rescue breathing can provide the casualty with enough oxygen.
When breathing stops (respiratory arrest), the heart continues to pump blood for several minutes, carrying
existing stores of oxygen to the brain and the rest of the body. Early, prompt rescue efforts for the casualty
of respiratory arrest or choking (foreign body airway obstruction) can often prevent the heart from
stopping (cardiac arrest).

St. John Ambulance Association, Singapore
CPR+AED Training Handbook
Page 7
Heart Attack
Heart attack occurs when the blood vessel (called coronary artery) that supplied the heart muscle is
completely blocked. It is the end result of a gradual accumulation and built-up of fatty deposits
(cholesterol plaques) on the inner lining of the coronary artery (a process called atherosclerosis).
Initially the lumen of the blood vessel is narrowed, resulting in the reduction of blood flow that carried
oxygen and nutrient to heart muscle. When the lumen of the blood vessel is completely blocked, usually
due to formation of clot that formed on the crack or split surface of the cholesterol plaque, the affected
heart muscle is deprived of blood supply and die. This is called heart attack (or myocardial infraction). A
person suffering from a heart attack may die suddenly (sudden death) due to a very fast but irregular heart
rhythm (ventricular fibrillation), a non-functioning heart (asystole) or severe heart failure (pump failure).
Narrowing of blood
vessel due to
atherosclerosis
Blockade of coronary
artery causing heart attack

St. John Ambulance Association, Singapore
CPR+AED Training Handbook
Page 8
The symptoms of heart attack are many and varied. These include:
Severe chest discomfort or pain, usually lasting 20 minutes or longer, may be associated
with: sweating
weakness, or near fainting
shortness of breath or breathlessness
a sense of impending doom or death
nausea (feeling of wanting to vomit) or vomiting
Common causes of sudden death in adults include: o heart attack
o stroke
o trauma
o drowning
o suffocation
o electrocution
o drug overdose
o severe asthma
o severe allergic reaction
o hereditary heart illnesses
o foreign body airway obstruction
o viral infection affecting the heart
While heart attack is a common cause of collapse in an adult, respiratory arrest is a more
common cause of collapse in an infant.
Risk Factors:
Narrowing of the blood vessels usually occurs slowly over the years. However, this may occur
prematurely in the presence of certain risk factors. Important risk factors that can cause heart attack
include:
A. Risk factors that cannot be altered
(i) Age. Risk increases with advancing age.
(ii) Male gender. Males are more likely to suffer from heart attack than females
(iii) Family history of heart attack, especially if it occurs early in members of the immediate family
B. There are other risk factors that are equally important as the above ones, but they can be altered by
treatment or healthy lifestyle habits. These are
(i) Smoking
(ii) High blood pressure (hypertension)
(iii) High blood sugar level (diabetes mellitus)
(iv) High blood cholesterol level (dyslipidemia)
(v) Chronic stress
(vi) Overweight/obesity
(vii) Lack of exercise/sedentary lifestyle
In order to reduce the chances of suffering from coronary heart disease or heart attack, it is important to
have healthy lifestyle habits:
i.e.
(a) No smoking
(b) Regular exercises
(c) Stress management
(d) Eat more vegetables and fresh fruits, but less fatty or salty food
(e) Maintain ideal body weight (through regular exercises and eating healthy food)

St. John Ambulance Association, Singapore
CPR+AED Training Handbook
Page 9
First Link: First Link:
The Chain of Survival
Early Access
Recognition of early warning signs, such as chest pain and shortness of breath, that prompts a person to
call 995 before collapse, are the key components of this link.
Early CPR
CPR is a temporary intervention that attempts to restore breathing and circulation. It loses its value if the
third and fourth links are not rapidly carried out.
Early Defibrillation
Studies done have shown that early defibrillation is most likely to improve survival rates for
out-of-hospital cardiac arrest patients. This is because defibrillation is the most effective way to convert
ventricular fibrillation back into normal heart rhythm.
Early Advanced Cardiac Life Support (ACLS)
ACLS brings equipment to support ventilation, establish intravenous access, administer drugs, control
arrhythmias and prepare the patient for transport.
Any delay could be fatal or results in poor
chance of survival and should be avoided!
Second Link: Second Link:
Third Link: Third Link:
Fourth Link: Fourth Link:

St. John Ambulance Association, Singapore
CPR+AED Training Handbook
Page 10
One Rescuer Cardio-Pulmonary Resuscitation for Adults
Danger
Lookout for unsafe environment e.g. exposed electrical wires, fire, possible explosion, construction works
or poisonous gas. Remove the casualty to a safe environment, if necessary.
Responsiveness
The rescuer, upon arriving at the scene of the
collapsed casualty, quickly assesses any injury and
determines whether the casualty is conscious.
The rescuer firmly taps casualty’s shoulders and
ask loudly (Figure 1):
“Hello! Hello! Are you Okay?”
Figure 1: Determine unresponsiveness
Shout
If the casualty is unresponsive, immediately call out
loudly for help (Figure 2):
“Help! Call for ambulance, 995. Get an AED”
Even if no one is in sight, call out for help, as very often
someone within earshot will come to assist the rescuer.
If a phone is immediately available, call the emergency
number to report the incident.
Figure 2: Activate the Emergency Medical
Services (EMS)
Position the casualty
For CPR to be effective, the casualty must be lying
on a firm and flat surface.
If the casualty is suspected to have sustained head
injury or spinal injury, the rescuer should move the
casualty only if absolutely necessary.
If the casualty is lying face down, the rescuer must roll
the casualty as a unit (log roll) so that the head,
shoulder and torso move simultaneously without
twisting (Figure 3). The casualty should be flat on his
back with face up, in the position ready for CPR.
Figure 3: Turn the casualty into supine
position

St. John Ambulance Association, Singapore
CPR+AED Training Handbook
Page 11
Airway
One of the most important actions for successful
resuscitation is immediate opening of the airway. Head
tilt-chin lift manoeuvre is effective in opening the
airway (figure 4 & 5).
Steps:
1. Place one hand on the casualty’s forehead and apply
firm, backward pressure (using rescuer’s palm) to
tilt the head back.
2. Place 2 fingers of the other hand at the angle of the
jaw bone.
3. Lift the chin forward and support the angle of the
jaw, helping to tilt the head back (Head Tilt-Chin
Lift).
Precautions:
(a) The finger must not press deeply into the soft tissue
under the chin, which might obstruct the airway.
(b) The thumb should not be used for lifting the chin.
(c) The mouth should not be completely closed.
Figure 4: Blocked airway
Figure 5: Open airway
Breathing
While maintaining an open airway, the rescuer will
check the casualty’s breathing (up to 10 seconds) by
placing rescuer’s ear over the casualty’s mouth and nose,
and observe casualty’s chest (Figure 6).
LOOK - for the chest to rise & fall
LISTEN - for air inhalation and exhalation
FEEL - for the flow of air on your cheek
Figure 6: Determine respiration

St. John Ambulance Association, Singapore
CPR+AED Training Handbook
Page 12
The casualty must be lying on a firm and flat surface when performing chest compression. There
may be inadequate blood flow to the brain if the head is elevated above the heart even though chest
compression is properly performed.
Chest Compression
If there is no breathing, starts Chest Compression immediately.
Steps:
1. Kneel close to the casualty’s chest. CPR can be
performed from either side of the Casualty.
2. With the middle finger of the rescuer’s hand, he locates
one of the lowermost ribs on the side next to him
(Figure 7).
3. The fingers are then slid along the rib to the notch
where the lowermost ribs meet at the sternum
(breastbone) in the centre of the lower part of the chest.
4. With the middle finger on the notch, the index finger is
placed next to the middle finger. (Figure 8).
5. The heel of the other hand (which has been used on the
forehead to maintain head position) is then placed on
the lower half of the sternum, just next to the index
finger (figure 9).
6. The first hand is then removed from the notch, placed
on top of the hand, which is on the sternum.
Figure 7: Locating the lowermost rib
Figure 8: Slide fingers along the rib until the
middle finger feels the notch
Figure 9: Place heel of other hand next to the
index finger

St. John Ambulance Association, Singapore
CPR+AED Training Handbook
Page 13
7. The fingers may be either extended (figure 10) or
interlaced (interlocked) (figure 11) but should be kept
off the chest.
8. Rescuer’s elbows should be locked into position with
arms straightened (figure 12).
9. To achieve adequate pressure with the least effort,
rescuer should lean forward until his shoulders are
directly over his outstretched hands. The shoulders of
the rescuer should be directly over the sternum of the
casualty so that the thrust for each chest compression is
straight down on the sternum. If the thrust is not
straight down, casualty’s torso has a tendency to roll.
Thus, part of the downward force is lost and the chest
compression is less effective (Figure 12).
10. Compress with enough force to depress the sternum at
least 5 cm for normal-sized adult. This will improve
blood circulation to the lungs and thus increase oxygen
supply to maintain life (figure 12).
11. During compression, when the rescuer uses the weight
of his upper body, he will not depend on the strength of
his arms and shoulders. Instead of having to push from
his shoulders, he lets the natural weight of his body fall
forward providing the force necessary to depress the
casualty’s sternum. Keep the arms straight during each
chest compression (figure 13).
12. Then, the rescuer is to release this pressure to allow
blood to flow into the heart and lungs. If the heart and
lungs cannot be refilled, there will be insufficient blood
to carry oxygen throughout the body on the next
compression. Therefore, releasing the pressure
completely and allow the chest to return to its normal
position is important. i.e allow complete recoil of the
chest wall after each compression. The time allowed
for release should be equal to the time required for
compression. Do not pause between compressions
(figure 14).
Figure 10: Fingers’ extended position
Figure 11: Fingers’ interlaced position
Figure 12: Proper position of the rescuer
Figure 13: Depress the sternum using the natural
weight of the rescuer’s body
Figure 14: Release of compression pressure
fully without lifting the hands off
the casualty’s chest

St. John Ambulance Association, Singapore
CPR+AED Training Handbook
Page 14
13. Compression rate is at least 100 times per minute, say mnemonic:
1&2&3&4&5&
1&2&3&4&10&
1&2&3&4&15
1&2&3&4&20
1&2&3&4&25
1&2&3&4&30
14. After the 30 chest compressions, move up to the casualty’s head quickly to open the airway again.
Take a breath, pinch and close the casualty’s nostrils, seal the casualty’s mouth, then deliver 2 rescue
breaths.
15. Move back to the chest, locate correct landmarks and maintain proper hand position. Begin 30 chest
compressions at least 100 times per minute.
16. Repeat the above cycle (30:2) until help or AED arrives and takes over, or casualty starts moving.
Precautions:
1. Do not lift your hands off the chest completely or change their position in any way during
compression otherwise you may miss the exact location.
2. Bouncing compressions, jerky movements, improper hand position and leaning on the chest must be
avoided as they are less effective and also likely to cause injury to the casualty.
Perform 2 ventilations
After each 30 chest compressions, rescuer has to perform 2 ventilations to provide the casualty’s lungs
with oxygen.
Steps:
1. With rescuer’s hand resting on the casualty’s
forehead, the rescuer gently pinches the casualty’s
nostrils and closes it with his thumb and index
finger, thereby preventing air from escaping.
2. Rescuer takes a breath and places the lips around
the casualty’s mouth, creating an airtight seal.
3. Give 2 ventilations (1 second per breath).
4. On delivering each breath, the rescuer should
observe the rise of casualty’s chest wall. While the
rescuer takes a breath of fresh air, he should observe
the fall of the casualty’s chest wall. If the
casualty’s chest rises and falls, the rescuer knows
that the lungs are receiving adequate ventilation (Figure 15).
Figure 15: Mouth-to-Mouth ventilation.

St. John Ambulance Association, Singapore
CPR+AED Training Handbook
Page 15
Ventilation volume is between 400 ml to 600 ml. Just enough to see the chest rises but not too great a
volume of air which is likely to cause air to enter the stomach and result in gastric distention.
Precautions:
If the first attempt to ventilate the casualty is unsuccessful, re-position the casualty’s head and
re-attempt the ventilation. Improper chin and head position is the most common cause of difficulty with
ventilation.
Guidelines for effective ventilation
1. Open your mouth wide enough to create a good seal.
2. Don’t apply too much pressure with your mouth, or your lips may be bruised.
3. Light mouth contact is less likely to break the teeth or loosen the casualty’s dentures. Remove the
dentures only if they are loose or blocking the airway.
4. The casualty’s nostrils can be closed easily if pinched right at the nasal opening
5. Ventilate with enough pressure to cause the chest to rise.
6. Lift your mouth away just long enough to take another quick breath.
7. Mouth-to-nose ventilation may be more effective when it is impossible to ventilate through the
casualty’s mouth, e.g. injury to the mouth.
8. If the chest does not rise, check that:
a. the head is tilted back sufficiently;
b. the nostrils are completely closed;
c. you have a firm seal around the casualty’s mouth;
d. the airway is not obstructed by vomitus, blood or a foreign body.

St. John Ambulance Association, Singapore
Basic Cardiac Life Support Training Handbook
Page 16
Proper One Rescuer CPR Sequence
St. John Ambulance Association
Assessment Guide Chart
Copyright
120 secs – 130 secs
6 secs 18 secs
Property of St. John Ambulance Association
2 secs
400 – 600 ml
Compression depth at least 5cm
St. John Ambulance Association, Singapore
CPR+AED Training Handbook
Page 17
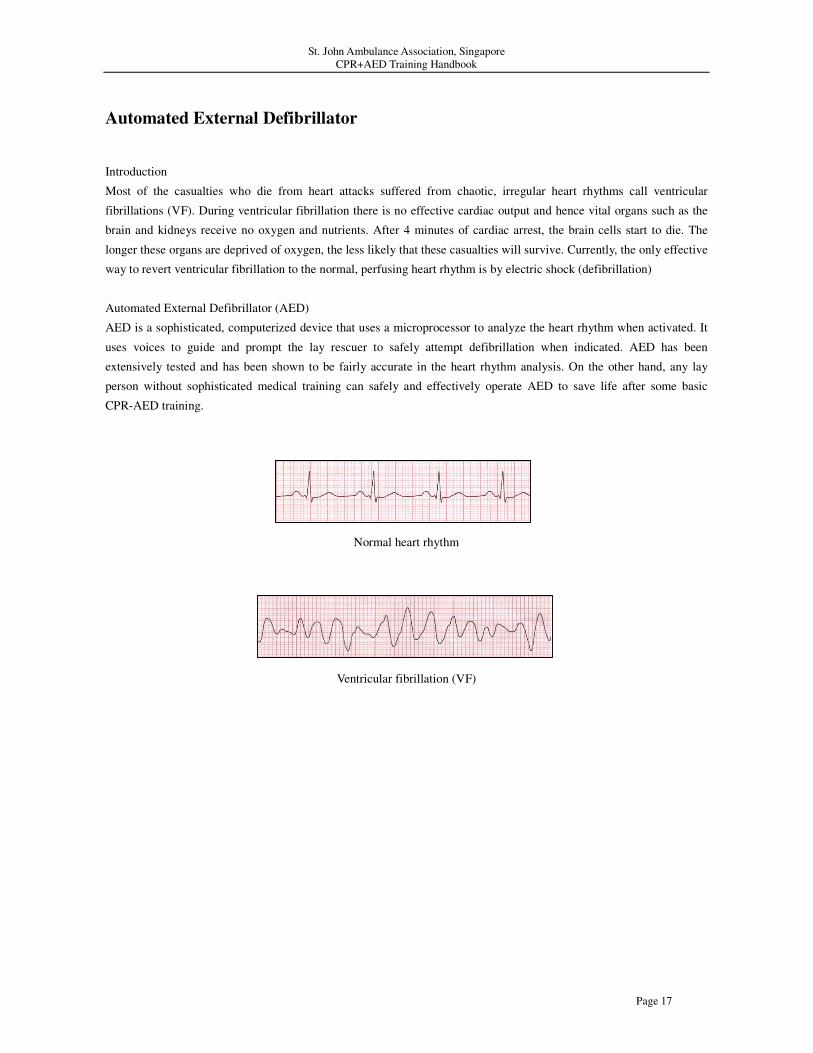
Automated External Defibrillator
Introduction
Most of the casualties who die from heart attacks suffered from chaotic, irregular heart rhythms call ventricular
fibrillations (VF). During ventricular fibrillation there is no effective cardiac output and hence vital organs such as the
brain and kidneys receive no oxygen and nutrients. After 4 minutes of cardiac arrest, the brain cells start to die. The
longer these organs are deprived of oxygen, the less likely that these casualties will survive. Currently, the only effective
way to revert ventricular fibrillation to the normal, perfusing heart rhythm is by electric shock (defibrillation)
Automated External Defibrillator (AED)
AED is a sophisticated, computerized device that uses a microprocessor to analyze the heart rhythm when activated. It
uses voices to guide and prompt the lay rescuer to safely attempt defibrillation when indicated. AED has been
extensively tested and has been shown to be fairly accurate in the heart rhythm analysis. On the other hand, any lay
person without sophisticated medical training can safely and effectively operate AED to save life after some basic
CPR-AED training.
Normal heart rhythm
Ventricular fibrillation (VF)

St. John Ambulance Association, Singapore
CPR+AED Training Handbook
Page 18
Generally the sequences in the use of AED
Chest preparation- Power on AED – Electrode pads placement – Cardiac rhythm analysis – Electric shock
1. Once the Automated External Defibrillator (AED) is available, the AED operator has to check for any potential
danger like:
WET surface;
METAL surface;
Flammable gases.
2. The AED operator will place the AED beside the patient at a site that does not interfere / obstruct CPR.
3. AED operator will prepare the chest by the following steps:
Remove or cut away the clothing from the casualty’s chest if necessary;
Place the jewellery away from the defibrillation pads (electrodes pads);
Remove any medication patches from the casualty’s chest;
May need to shave those hair away where you are going to place the defibrillation pads;
Wipe the sweat away where you are going to place the defibrillation pads;
Place the defibrillation pads at least 8 cm or 4 fingers breath away from the pacemaker, if there is one.
4. Once the chest preparation has been completed, switch on the AED and follow the instruction from the machine.
When machine sound: “Apply pads to patient’s bare chest, plug in pads’ connector next to flashing light”.
(Notes: the exact words will depend on the model of AED).
5. Place one pad to the right below the collar bone and the
other pad below the left nipple. With a female victim, do
not place it over the breast.
Note: Ensure the defibrillation pads are firmly attached by
pressing gently over center of the pad to ensure good contact
and around the edges for good adhesion.
Figure 18: Placement of the defibrillation pads
6. While the AED operator is preparing the AED, the other rescuer, if available, can still continue the CPR. When the
rescuers heard: “Analyzing heart rhythm, do not touch the patient.”, then the rescuer has to stop CPR.
7. The AED operator has to ensure that no one is touching the casualty when the AED is analyzing heart rhythm.
8. Once the AED has detected a shockable rhythm, it will sound:
“Shock advised, charging ..., stay clear of patient.”
9. The AED operator shouts: “Stand clear.”
10. Once the AED sound: “Deliver shock now, press the orange button now”, the AED operator will say: “STAND
CLEAR” then press the SHOCK button.

St. John Ambulance Association, Singapore
CPR+AED Training Handbook
Page 19
11. The AED will sound: “Shock delivered, pause..., start CPR.”
12. The rescuers will restart 30 chest compressions and 2 ventilations immediately for 1-2 minutes after the first
electric shock.
13. The AED will re-analyze heart rhythm, it will sound: “Analyzing heart rhythm, do not touch the patient,
analyzing heart rhythm” (AED operator has to ensure no one is touching the casualty or performing chest
compression when the defibrillator is analyzing heart rhythm).
14. When the AED detects non shockable rhythm,, it will sound:
“No shock advised, pause …, It is safe to touch the patient, check for signs of circulation.”
Checking for return of spontaneous breathing after AED detected non shockable rhythm
15. Check for spontaneous breathing using the LOOK-LISTEN-FEEL technique.
If breathing is present, turn victim to recovery position, maintain an open airway and monitor closely for relapse.
If breathing is absent, continue CPR.
16. Hand over the casualty to the ambulance officer when they arrive, detach the pads connector from the AED
machine but keep the defibrillation pads on the casualty’s chest.
Stop defibrillation when:
The casualty is breathing spontaneously.
The emergency medical team takes over the resuscitation.
The AED indicates that no shock is advised.

St. John Ambulance Association, Singapore
CPR+AED Training Handbook
Page 20
Documentation:
AED operator has to document the incidents and information related to the use of the AED machine.
The following information should be documented:
Name of the casualty, AED operator and the CPR operator;
The estimated timing of casualty’s collapse, how long the CPR operator has performed CPR;
Mark the time the AED was put on;
Record the number of shocks and the times of each shock;
Record the arrival of the ambulance and the name of the Paramedic;
Record which hospital that the ambulance will be conveying the casualty to.
House keeping of the AED:
AED operator has to
Check the status / life of the battery.
Replenish those disposal items in the AED kit after use.
AED kit:
Shaver (disposal)
Gloves (disposal)
A small towel (disposable)
Defibrillation pads (disposal)
A pair of scissors (can be reused after cleaning)

St. John Ambulance Association, Singapore
CPR+AED Training Handbook
Page 21
Adult one-man CPR-AED (DR ABCD)
Danger : e.g. electric current, poisonous gas, explosion, heavy traffic
Ensure that the scene is safe
Response : Call, tap and said loudly. ‘Hello! Hello! Are you OK?’
Shout : If no response >> ‘Call ambulance 995. Get an AED.’
Airway : Head tilt-chin lift
Breathing : Look, listen & feel (< 10 seconds)
If no breathing >> start CPR
Chest Compression : Correct compression landmark
Proper body and hand position
Vertical compression: at least 5cm in depth; rate is at least 100/min
Allow complete relaxation of pressure after each compression
1&2&3&4&5&
1&2&3&4&10&
1&2&3&4&15
1&2&3&4&20
1&2&3&4&25
1&2&3&4&30
perform 30 chest compressions : 2 ventilations
Give 2 ventilations (1sec/breath; volume 400-600ml/breath)
allow lung deflation between each breath
If fail during 1st attempt ventilation, to reposition the head with head tilt-chin lift,
then attempt 2nd
ventilation.
Defibrillation : Use AED as soon as available and indicated
Exclude specific AED contraindications (metal, flammable gas, water immersion),
correct position of pads, all cleared, deliver one shock,
immediately followed by 1-2 minutes of CPR
Repeat the above cycle (30:2) until healthcare professional takes over or casualty starts moving. (Conscious)

St. John Ambulance Association, Singapore
CPR+AED Training Handbook
Page 22
Summary of one-rescuer Cardiopulmonary Resuscitation Sequence
CPR Sequence Adult and Older Child
Establish unresponsiveness, activate EMS (995) Immediately
Open Airway Head Tilt-Chin Lift
Check for breathing: If casualty is breathing: place in
recovery position. If casualty is not breathing: Look-Listen-Feel
Compression Landmarks Lower half of sternum
Compression Method Heel of 1 hand, other hand on top
Compression Depth At least 5 cm
Compression Rate At least 100 per minute
Compression / Ventilation Ratio 30 : 2
IMPORTANT
If the rescuer is previously trained in CPR but is not confident or unwilling to do mouth to mouth
ventilation, then the rescuer should give hands-only CPR. The rescuer should continue
hands-only CPR until an automated external defibrillator arrives and is ready for use or
ambulance/medical personnel take over the care of the casualty.
Tips for a good and effective chest compression
a) It must be done at the rate of at least 100 compressions per minute
b) The depth of each compression should be at least 5cm
c) The rescuer should release the pressure completely from the chest wall at the end of each compression to
allow complete recoil but without losing the correct position for compression
d) The rescuer must be positioned directly above the casualty's chest (i.e. 90 degrees above the victim's chest)
and must compress vertically using his/her body weight
e) The rescuer must ensure that his hands are correctly positioned on the center of the chest wall (lower half of
the breast bone or sternum)
f) There must be minimal interruption or delay during chest compression

St. John Ambulance Association, Singapore
CPR+AED Training Handbook
Page 23
CPR till AED ready
SHOCK ADVICE ?
No Yes (all Clear)
Check Breathing Press to shock
Absent Present
CPR
(30 : 2)
Check other injury
After every 1 shock
Recovery position
AED remains connected
Monitor breathing every 5 minutes
IImmmmeeddiiaatteellyy ffoolllloowweedd bbyy 11-- 22 mmiinn CCPPRR
((3300 :: 22))
No Injury