Embed Size (px)
Citation preview
CPR + AED PROGRAMME
Institute for Medical Simulation & Education
Info
rmat
ion
corr
ect a
s at M
ay 2
011
Singapore General HospitalInstitute for Medical Simulation & Education167 Jalan Bukit Merah, Connection One Tower 5, #03-10, Singapore 150167Tel : 6326 6885Fax : 6878 0495Email : [email protected]

Notes
Table of Contents
MODULE A Cardio-Pulmonary Resuscitation (CPR)
Section 1 : Cardio-Pulmonary Resuscitation 2 - 8 1.1 Introduction 1.2 The Chain of Survival 1.3 The Heart 1.4 Heart Attack 1.5 Risk Factors of Heart Attack 1.6 Prudent Heart Living
Section 2 : Adult Cardio-Pulmonary Resuscitation (CPR) 9 – 18
Section 3 : Adult Recovery Postion 19 - 20
Section 4 : Summary of One-Man CPR 21
MODULE B Automated External Defibrillation (AED)
Section 1 : Cardiac Arrest 23 – 24 1.1 Introduction 1.2 Definition of Cardiac Arrest
Section 2 : The Importance of Early Defibrillation 25
Section 3 : Theory of Defibrillation 26 - 28 3.1 Function of AED 3.2 Indications for Use of AED 3.3 Preparation of Victim 3.4 Placement & Attachment of Electrodes 3.5 Safety Issues
Section 4 : Medical Protocol & Documentation 29 - 32 4.1 Medical Protocol 4.2 Roles & Responsibilities of the Rescuer 4.3 Documentation
Copyright © 2011Produced by Institute for Medical Simulation & Education, SGH
All rights reserved. No part of this publication may be reproduced, stored in a retrieval system or transmitted, in any form or by any means, electronic, mechanical, photocopying, recording or otherwise, without the prior permission of the copyright owner.
2 • CPR+AED Programme
MODULE ACardio-Pulmonary Resuscitation (CPR)
MODULE A
CPR+AED Programme • 3
REMEMBER:CPR can save lives.
Do it well. Do it right. And the victim gets a chance at life.
SECTION 1 CARDIO-PULMONARY RESUSCITATION (CPR)
1.1 INTRODUCTION
In Singapore, heart disease is the second commonest cause of death, being responsible for about 24% of total mortality. About 2,400 persons develop an acute heart attack in Singapore. In addition, nearly 1000 people suffer from sudden cardiac arrest in the out-of-hospital environment and another few hundred sustain sudden cardiac arrest after reaching hospital. The total survival rate for the group of pre-hospital collapses is about 2.6%.
Public education and training in Cardio-Pulmonary Resuscitation (CPR) are crucial in reducing “sudden death” because the majority of these deaths occur out of hospital. One of the most startling ideas of modern medicine is that “sudden death” can be reversed. The actions taken during the first few minutes of an “Emergency” are critical to victim survival. It can be performed by any of us, anywhere. All that is needed is our two hands.
1.2 THE CHAIN OF SURVIVAL
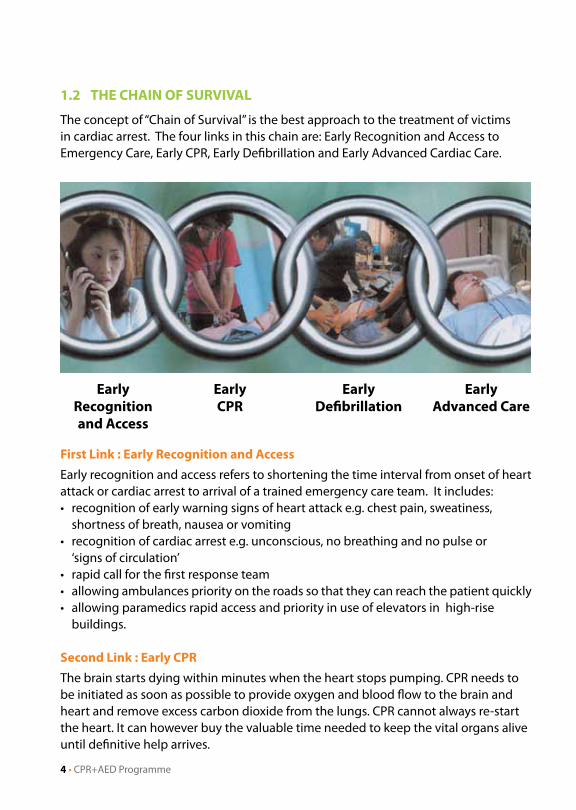
The concept of “Chain of Survival” is the best approach to the treatment of victims in cardiac arrest. The four links in this chain are: Early Recognition and Access to Emergency Care, Early CPR, Early Defibrillation and Early Advanced Cardiac Care.
Early Recognitionand Access
EarlyCPR
EarlyDefibrillation
EarlyAdvanced Care
First Link : Early Recognition and Access Early recognition and access refers to shortening the time interval from onset of heart attack or cardiac arrest to arrival of a trained emergency care team. It includes:• recognition of early warning signs of heart attack e.g. chest pain, sweatiness,
shortness of breath, nausea or vomiting• recognition of cardiac arrest e.g. unconscious, no breathing and no pulse or
‘signs of circulation’• rapid call for the first response team • allowing ambulances priority on the roads so that they can reach the patient quickly• allowing paramedics rapid access and priority in use of elevators in high-rise
buildings.
Second Link : Early CPR The brain starts dying within minutes when the heart stops pumping. CPR needs to be initiated as soon as possible to provide oxygen and blood flow to the brain and heart and remove excess carbon dioxide from the lungs. CPR cannot always re-start the heart. It can however buy the valuable time needed to keep the vital organs alive until definitive help arrives.
4 • CPR+AED Programme
MODULE A
CPR+AED Programme • 5
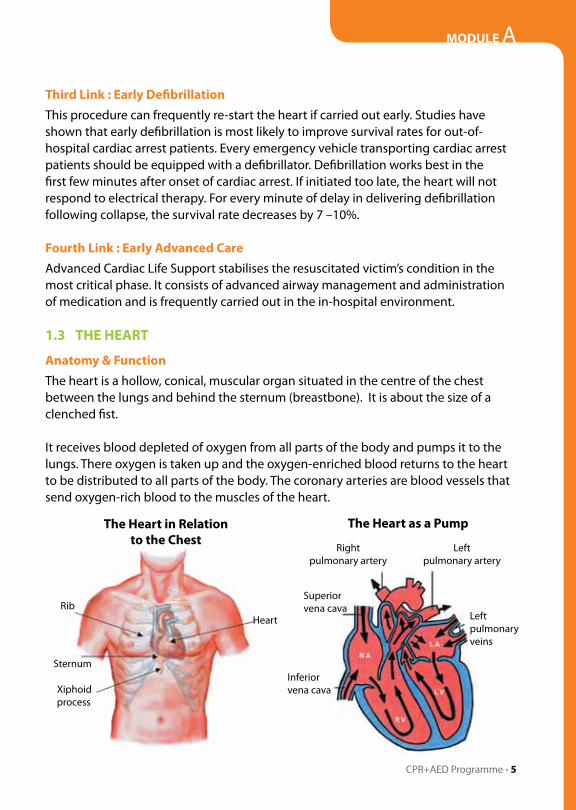
Rib
Sternum
Heart
Xiphoidprocess
The Heart as a Pump
Inferiorvena cava
Superiorvena cava
Right pulmonary artery
Left pulmonary artery
Left pulmonary veins
Third Link : Early Defibrillation This procedure can frequently re-start the heart if carried out early. Studies have shown that early defibrillation is most likely to improve survival rates for out-of-hospital cardiac arrest patients. Every emergency vehicle transporting cardiac arrest patients should be equipped with a defibrillator. Defibrillation works best in the first few minutes after onset of cardiac arrest. If initiated too late, the heart will not respond to electrical therapy. For every minute of delay in delivering defibrillation following collapse, the survival rate decreases by 7 –10%.
Fourth Link : Early Advanced CareAdvanced Cardiac Life Support stabilises the resuscitated victim’s condition in the most critical phase. It consists of advanced airway management and administration of medication and is frequently carried out in the in-hospital environment.
1.3 THE HEART
Anatomy & FunctionThe heart is a hollow, conical, muscular organ situated in the centre of the chest between the lungs and behind the sternum (breastbone). It is about the size of a clenched fist.
It receives blood depleted of oxygen from all parts of the body and pumps it to the lungs. There oxygen is taken up and the oxygen-enriched blood returns to the heart to be distributed to all parts of the body. The coronary arteries are blood vessels that send oxygen-rich blood to the muscles of the heart.
The Heart in Relation to the Chest
6 • CPR+AED Programme
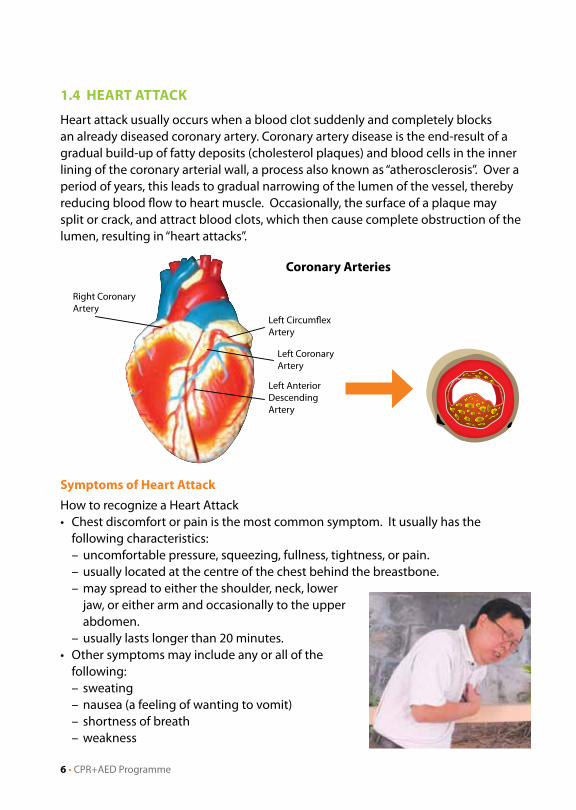
Coronary Arteries
Left Anterior Descending Artery
Left Circumflex Artery
Right Coronary Artery
Left Coronary Artery
1.4 HEART ATTACk
Heart attack usually occurs when a blood clot suddenly and completely blocks an already diseased coronary artery. Coronary artery disease is the end-result of a gradual build-up of fatty deposits (cholesterol plaques) and blood cells in the inner lining of the coronary arterial wall, a process also known as “atherosclerosis”. Over a period of years, this leads to gradual narrowing of the lumen of the vessel, thereby reducing blood flow to heart muscle. Occasionally, the surface of a plaque may split or crack, and attract blood clots, which then cause complete obstruction of the lumen, resulting in “heart attacks”.
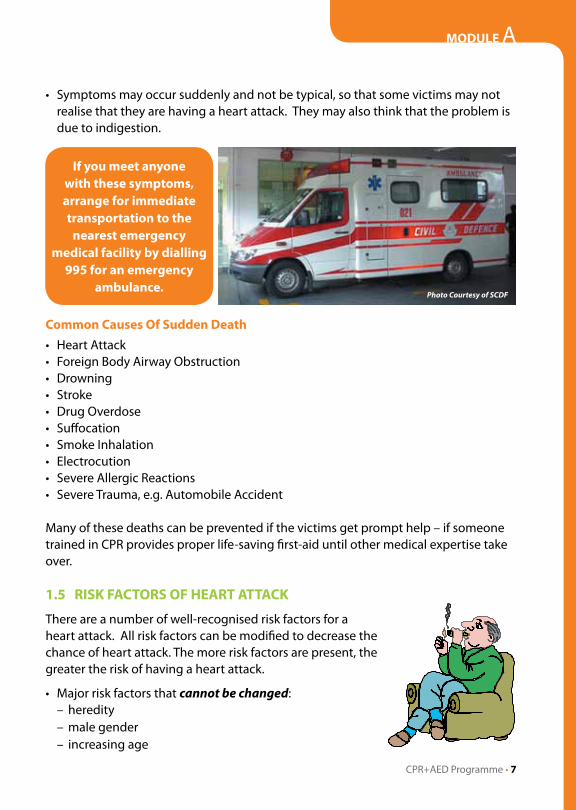
Symptoms of Heart AttackHow to recognize a Heart Attack• Chest discomfort or pain is the most common symptom. It usually has the
following characteristics:– uncomfortable pressure, squeezing, fullness, tightness, or pain.– usually located at the centre of the chest behind the breastbone. – may spread to either the shoulder, neck, lower
jaw, or either arm and occasionally to the upper abdomen.
– usually lasts longer than 20 minutes.• Other symptoms may include any or all of the
following:– sweating– nausea (a feeling of wanting to vomit)– shortness of breath– weakness
MODULE A
CPR+AED Programme • 7
Photo Courtesy of SCDF
Common Causes Of Sudden Death• Heart Attack• Foreign Body Airway Obstruction• Drowning • Stroke• Drug Overdose• Suffocation• Smoke Inhalation• Electrocution• Severe Allergic Reactions• Severe Trauma, e.g. Automobile Accident
Many of these deaths can be prevented if the victims get prompt help – if someone trained in CPR provides proper life-saving first-aid until other medical expertise take over.
1.5 RISk FACTORS OF HEART ATTACk
There are a number of well-recognised risk factors for a heart attack. All risk factors can be modified to decrease the chance of heart attack. The more risk factors are present, the greater the risk of having a heart attack.
• Major risk factors that cannot be changed:– heredity– male gender– increasing age
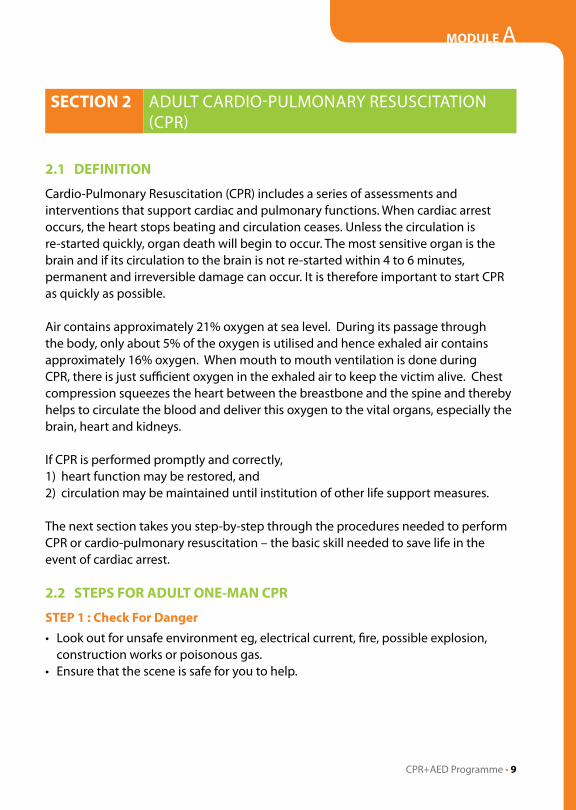
• Symptoms may occur suddenly and not be typical, so that some victims may not realise that they are having a heart attack. They may also think that the problem is due to indigestion.
If you meet anyone with these symptoms, arrange for immediate transportation to the
nearest emergency medical facility by dialling
995 for an emergency ambulance.

8 • CPR+AED Programme
• Major risk factors that can be changed:– cigarette smoking – high blood pressure– high blood cholesterol levels– diabetes mellitus
• Other risk factors that can be modified:– obesity– physical inactivity– stress
1.6 PRUDENT HEART LIVING
Prudent Heart Living includes adopting a lifestyle to help minimise the risk of a future heart attack. Reducing risk factors lowers the chance of having a heart attack or stroke.• Control high blood pressure – treatment generally includes
dietary change and medication. Take medication regularly as prescribed by your doctor.
• Quit smoking completely.• Eat wisely – reduce saturated fat and
cholesterol in the diet. Eat a Balanced diet.
• Reduce weight if you are overweight – count calories in your food intake.
• Exercise regularly – exercise tones the muscles, stimulates blood circulation, helps avoid excess weight gain and promotes a general feeling of well being.
MODULE A
CPR+AED Programme • 9
SECTION 2 ADULT CARDIO-PULMONARY RESUSCITATION (CPR)
2.1 DEFINITION
Cardio-Pulmonary Resuscitation (CPR) includes a series of assessments and interventions that support cardiac and pulmonary functions. When cardiac arrest occurs, the heart stops beating and circulation ceases. Unless the circulation is re-started quickly, organ death will begin to occur. The most sensitive organ is the brain and if its circulation to the brain is not re-started within 4 to 6 minutes, permanent and irreversible damage can occur. It is therefore important to start CPR as quickly as possible.
Air contains approximately 21% oxygen at sea level. During its passage through the body, only about 5% of the oxygen is utilised and hence exhaled air contains approximately 16% oxygen. When mouth to mouth ventilation is done during CPR, there is just sufficient oxygen in the exhaled air to keep the victim alive. Chest compression squeezes the heart between the breastbone and the spine and thereby helps to circulate the blood and deliver this oxygen to the vital organs, especially the brain, heart and kidneys.
If CPR is performed promptly and correctly, 1) heart function may be restored, and 2) circulation may be maintained until institution of other life support measures.
The next section takes you step-by-step through the procedures needed to perform CPR or cardio-pulmonary resuscitation – the basic skill needed to save life in the event of cardiac arrest.
2.2 STEPS FOR ADULT ONE-MAN CPR
STEP 1 : Check For Danger• Look out for unsafe environment eg, electrical current, fire, possible explosion,
construction works or poisonous gas.• Ensure that the scene is safe for you to help.
10 • CPR+AED Programme
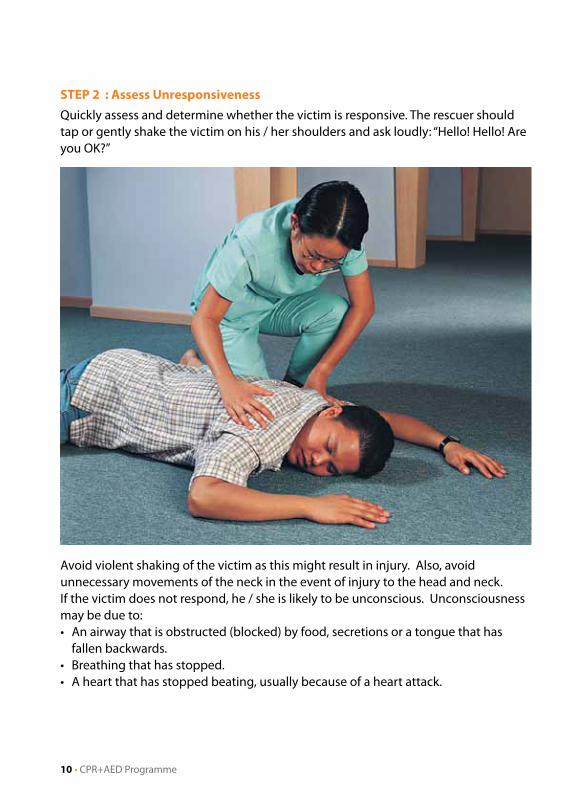
STEP 2 : Assess UnresponsivenessQuickly assess and determine whether the victim is responsive. The rescuer should tap or gently shake the victim on his / her shoulders and ask loudly: “Hello! Hello! Are you OK?”
Avoid violent shaking of the victim as this might result in injury. Also, avoid unnecessary movements of the neck in the event of injury to the head and neck.If the victim does not respond, he / she is likely to be unconscious. Unconsciousness may be due to:• An airway that is obstructed (blocked) by food, secretions or a tongue that has
fallen backwards.• Breathing that has stopped.• A heart that has stopped beating, usually because of a heart attack.
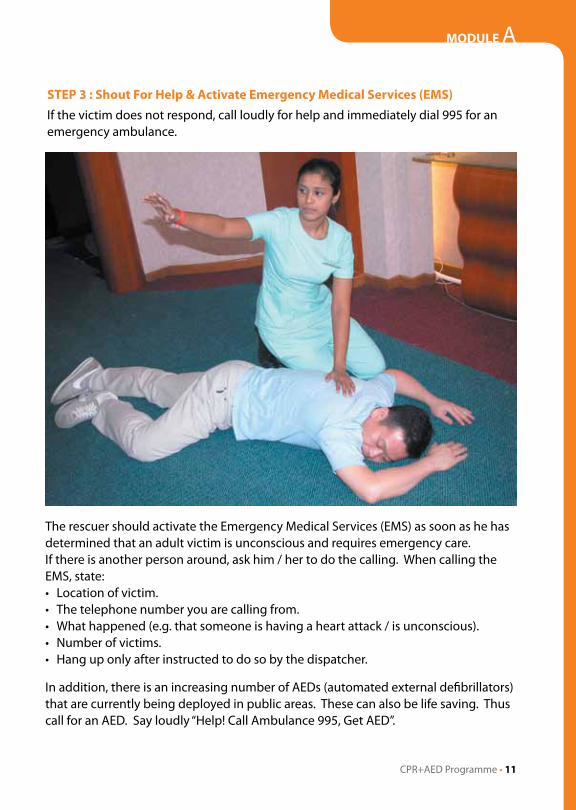
STEP 3 : Shout For Help & Activate Emergency Medical Services (EMS)If the victim does not respond, call loudly for help and immediately dial 995 for an emergency ambulance.
The rescuer should activate the Emergency Medical Services (EMS) as soon as he has determined that an adult victim is unconscious and requires emergency care. If there is another person around, ask him / her to do the calling. When calling the EMS, state:• Location of victim.• The telephone number you are calling from.• What happened (e.g. that someone is having a heart attack / is unconscious).• Number of victims.• Hang up only after instructed to do so by the dispatcher.
In addition, there is an increasing number of AEDs (automated external defibrillators) that are currently being deployed in public areas. These can also be life saving. Thus call for an AED. Say loudly “Help! Call Ambulance 995, Get AED”.
MODULE A
CPR+AED Programme • 11
12 • CPR+AED Programme
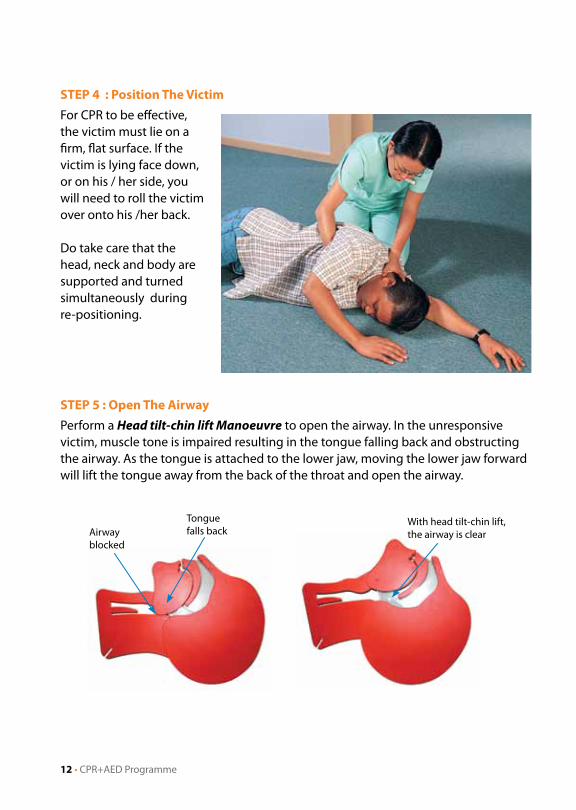
Airwayblocked
Tongue falls back
With head tilt-chin lift, the airway is clear
STEP 4 : Position The VictimFor CPR to be effective, the victim must lie on a firm, flat surface. If the victim is lying face down, or on his / her side, you will need to roll the victim over onto his /her back.
Do take care that the head, neck and body are supported and turned simultaneously during re-positioning.
STEP 5 : Open The AirwayPerform a Head tilt-chin lift Manoeuvre to open the airway. In the unresponsive victim, muscle tone is impaired resulting in the tongue falling back and obstructing the airway. As the tongue is attached to the lower jaw, moving the lower jaw forward will lift the tongue away from the back of the throat and open the airway.
MODULE A
CPR+AED Programme • 13
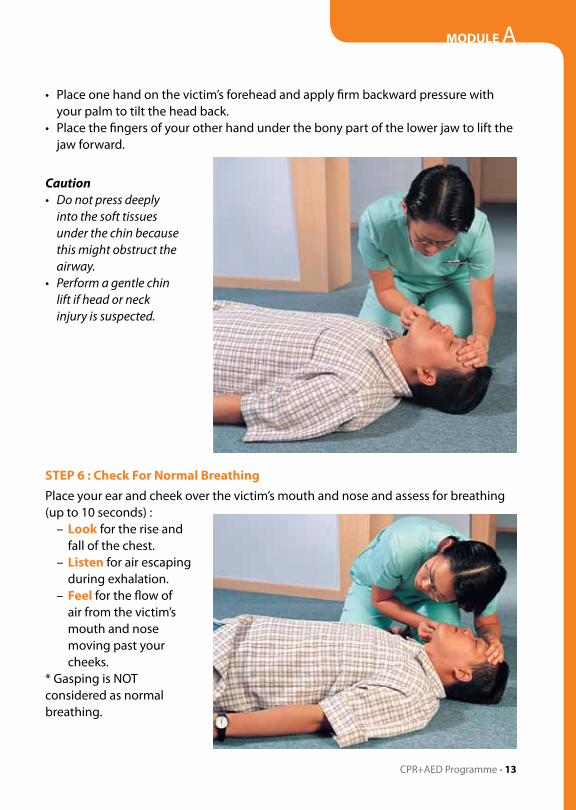
• Place one hand on the victim’s forehead and apply firm backward pressure with your palm to tilt the head back.
• Place the fingers of your other hand under the bony part of the lower jaw to lift the jaw forward.
STEP 6 : Check For Normal BreathingPlace your ear and cheek over the victim’s mouth and nose and assess for breathing (up to 10 seconds) :
– Look for the rise and fall of the chest.
– Listen for air escaping during exhalation.
– Feel for the flow of air from the victim’s mouth and nose moving past your cheeks.
* Gasping is NOT considered as normal breathing.
Caution• Donotpressdeeplyintothesofttissuesunderthechinbecausethismightobstructtheairway.
• Performagentlechinliftifheadorneckinjuryissuspected.
14 • CPR+AED Programme
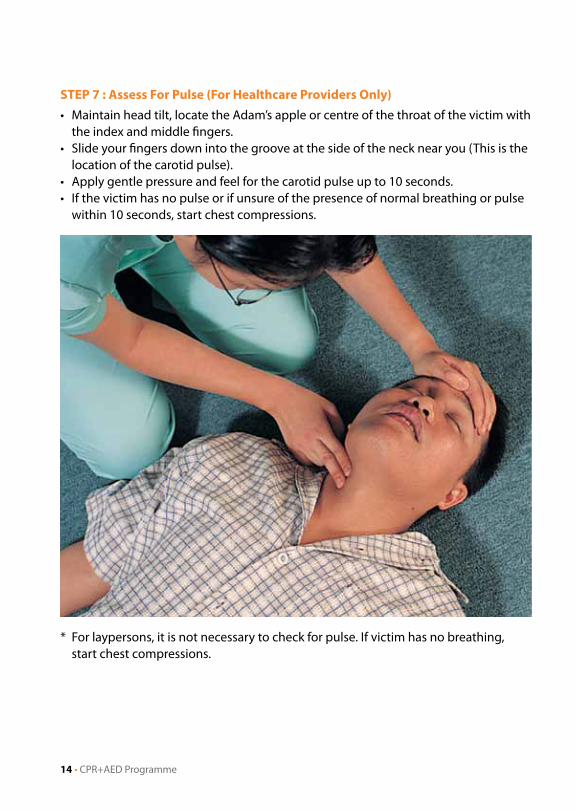
STEP 7 : Assess For Pulse (For Healthcare Providers Only)• Maintain head tilt, locate the Adam’s apple or centre of the throat of the victim with
the index and middle fingers.• Slide your fingers down into the groove at the side of the neck near you (This is the
location of the carotid pulse).• Apply gentle pressure and feel for the carotid pulse up to 10 seconds.• If the victim has no pulse or if unsure of the presence of normal breathing or pulse
within 10 seconds, start chest compressions.
* For laypersons, it is not necessary to check for pulse. If victim has no breathing, start chest compressions.

MODULE A
CPR+AED Programme • 15
Xiphi Sternum
STEP 8 : Locate Hand Position For Chest CompressionChest compression technique consists of serial, rhythmic applications of pressure over the lower half of the sternum (breastbone). To locate the correct hand position for chest compression :
• Maintain head tilt, run your middle finger from the lower margin of the victim’s rib cage till you reach the Xiphi Sternum.
• Place your index finger next to the middle finger.
• Place the heel of one hand next to the index finger.
16 • CPR+AED Programme
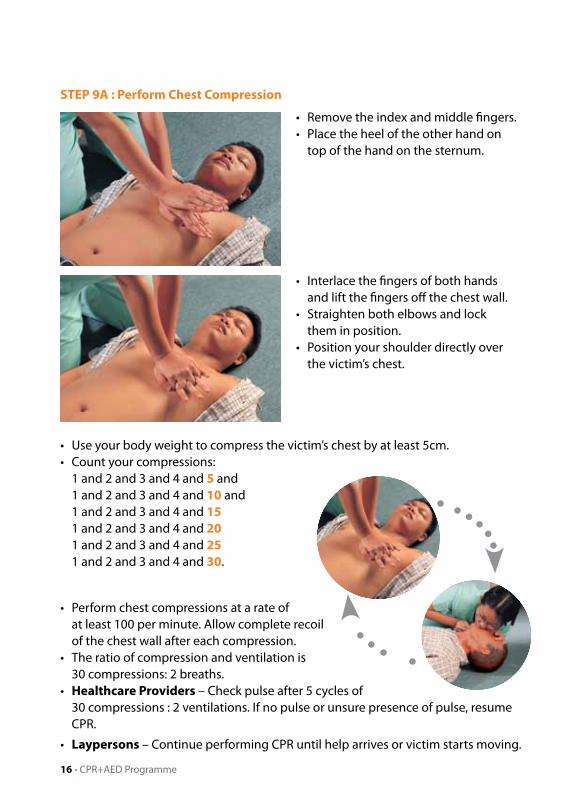
• Remove the index and middle fingers.• Place the heel of the other hand on
top of the hand on the sternum.
• Interlace the fingers of both hands and lift the fingers off the chest wall.
• Straighten both elbows and lock them in position.
• Position your shoulder directly over the victim’s chest.
STEP 9A : Perform Chest Compression
• Use your body weight to compress the victim’s chest by at least 5cm.• Count your compressions: 1 and 2 and 3 and 4 and 5 and 1 and 2 and 3 and 4 and 10 and 1 and 2 and 3 and 4 and 15 1 and 2 and 3 and 4 and 20 1 and 2 and 3 and 4 and 25 1 and 2 and 3 and 4 and 30.
• Perform chest compressions at a rate of at least 100 per minute. Allow complete recoil of the chest wall after each compression.
• The ratio of compression and ventilation is 30 compressions: 2 breaths.
• Healthcare Providers – Check pulse after 5 cycles of 30 compressions : 2 ventilations. If no pulse or unsure presence of pulse, resume CPR.
• Laypersons – Continue performing CPR until help arrives or victim starts moving.

MODULE A
CPR+AED Programme • 17
DONT’s
DO’s
STEP 9B : Mouth-To-Mouth BreathingTo perform mouth-to-mouth-breathing :• Maintain head tilt-chin lift.• Pinch the nose with your
thumb and index finger to prevent air from escaping through the victim’s nose.
• Seal your mouth over the victim’s mouth and give 2 short breaths in quick succession one after the other.
• Release the nostrils to allow exhalation after each breath.
• Each rescue breath should make the chest rise.
• The duration for each breath is 1 second.• Ventilation volume is between 400 to 600 ml.
Note : Toogreatavolumeofairislikelytocauseairtoenterthestomachandresultingastricdistension.
GUIDELINES FOR PROPER COMPRESSION
• Maintain your hands on the sternum (breastbone) during each upstroke.
• Release the pressure on the chest after each compression to allow blood to flow into the chest and heart.
• Use your body weight to perform the chest compression.• Keep the fingers off the chest wall.• Compress at rate of at least 100 per minute.
• Do not lift the hands from the sternum (breastbone), otherwise correct hand position may be lost.
• Do not bounce or jerk during compressions as these movements may cause injuries.
18 • CPR+AED Programme
CHECk DANGER
UNRESPONSIVE?Tap shoulder firmly
Ask loudly
SHOUT “HELP! CALL AMBULANCE 995,
GET AED” Activate EMS
OPEN AIRWAYHead tilt, chin lift
NOT BREATHING NORMALLY?Look, Listen, Feel
Up to10 sec
30 CHEST COMPRESSIONSCentre of chest / lower half of sternum
Depth at least 5 cmRate at least 100 per min
Allow complete chest recoil
OPEN AIRWAYHead tilt, chin lift
2 BREATHS1 sec per breath, tidal volume 400-600 ml till chest just rises
CONTINUE UNTIL PATIENT WAkES UPAED ARRIVES AND ANALYSING
HEART RHYTHM EMERGENCY TEAM TAkES OVER CPR
CHECk CAROTID PULSEFor healthcare providers only
Define pulse and normal breathing within 10 sec
No
No
No
HEALTHCARE PROVIDERS –
Check pulse after 5 cycles of
30 compressions : 2 ventilations. If No pulse or unsure of presence of pulse,
resume CPR
IF UNABLE / UNWILLING TO DO MOUTH-TO-MOUTH FOR ANY REASONDO CONTINUOUS CHEST COMPRESSIONS AT LEAST 100 / MINUTE
Adult 1-man CPRD
R
S
A
B
C
FlowchartcourtesyofNRC
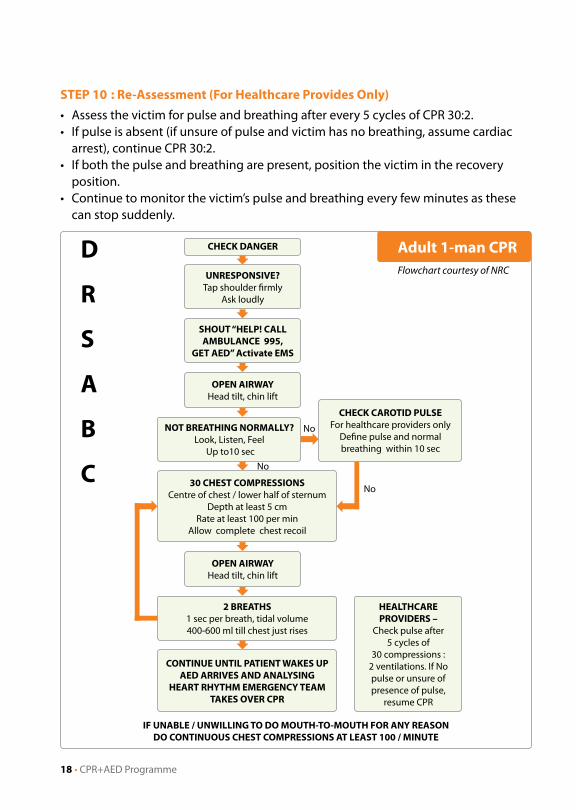
STEP 10 : Re-Assessment (For Healthcare Provides Only)• Assess the victim for pulse and breathing after every 5 cycles of CPR 30:2.• If pulse is absent (if unsure of pulse and victim has no breathing, assume cardiac
arrest), continue CPR 30:2.• If both the pulse and breathing are present, position the victim in the recovery
position. • Continue to monitor the victim’s pulse and breathing every few minutes as these
can stop suddenly.
MODULE A
CPR+AED Programme • 19
B
C
A
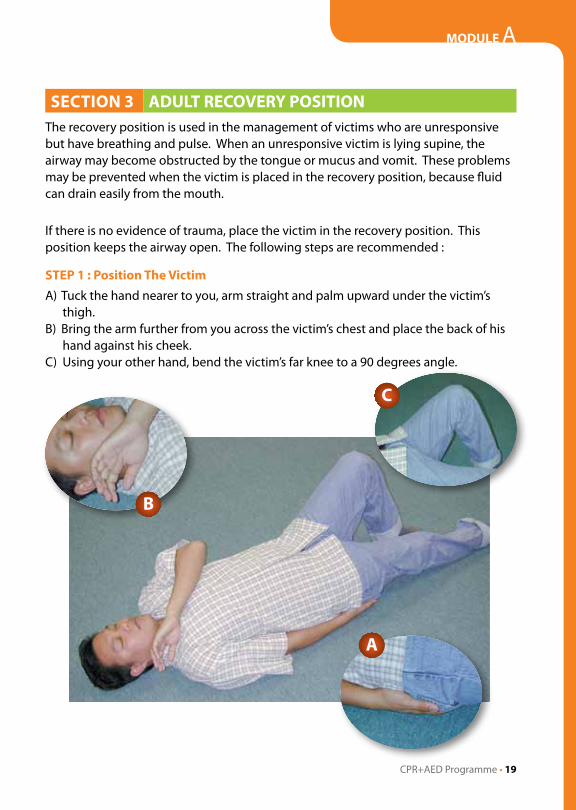
SECTION 3 ADULT RECOVERY POSITIONThe recovery position is used in the management of victims who are unresponsive but have breathing and pulse. When an unresponsive victim is lying supine, the airway may become obstructed by the tongue or mucus and vomit. These problems may be prevented when the victim is placed in the recovery position, because fluid can drain easily from the mouth.
If there is no evidence of trauma, place the victim in the recovery position. This position keeps the airway open. The following steps are recommended :
STEP 1 : Position The VictimA) Tuck the hand nearer to you, arm straight and palm upward under the victim’s
thigh.B) Bring the arm further from you across the victim’s chest and place the back of his
hand against his cheek.C) Using your other hand, bend the victim’s far knee to a 90 degrees angle.
20 • CPR+AED Programme
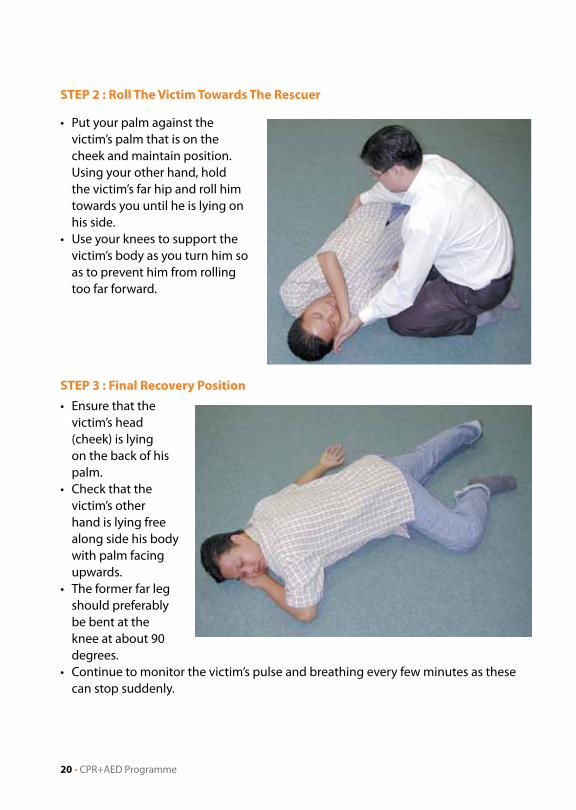
STEP 2 : Roll The Victim Towards The Rescuer
• Put your palm against the victim’s palm that is on the cheek and maintain position. Using your other hand, hold the victim’s far hip and roll him towards you until he is lying on his side.
• Use your knees to support the victim’s body as you turn him so as to prevent him from rolling too far forward.
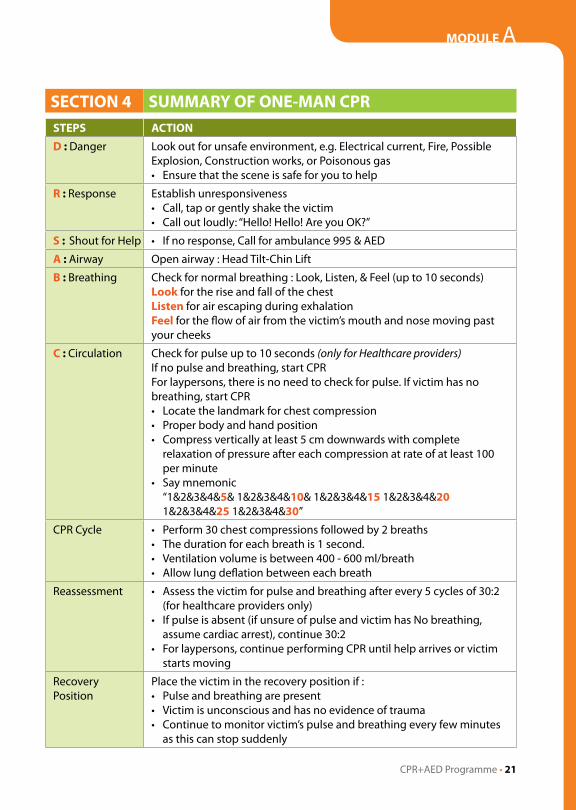
STEP 3 : Final Recovery Position• Ensure that the
victim’s head (cheek) is lying on the back of his palm.
• Check that the victim’s other hand is lying free along side his body with palm facing upwards.
• The former far leg should preferably be bent at the knee at about 90 degrees.
• Continue to monitor the victim’s pulse and breathing every few minutes as these can stop suddenly.
MODULE A
CPR+AED Programme • 21
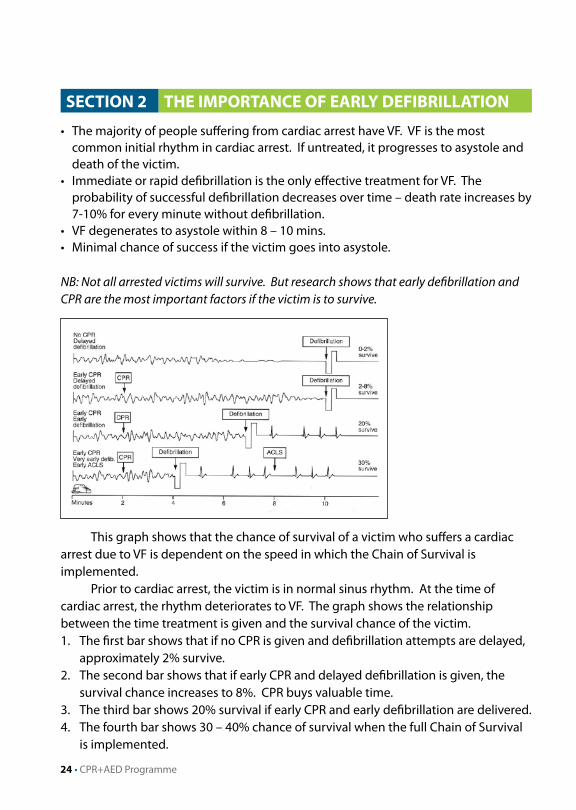
SECTION 4 SUMMARY OF ONE-MAN CPRSTEPS ACTIOND : Danger Look out for unsafe environment, e.g. Electrical current, Fire, Possible
Explosion, Construction works, or Poisonous gas• Ensure that the scene is safe for you to help
R : Response Establish unresponsiveness• Call, tap or gently shake the victim• Call out loudly: “Hello! Hello! Are you OK?”
S : Shout for Help • If no response, Call for ambulance 995 & AED
A : Airway Open airway : Head Tilt-Chin Lift
B : Breathing Check for normal breathing : Look, Listen, & Feel (up to 10 seconds)Look for the rise and fall of the chestListen for air escaping during exhalationFeel for the flow of air from the victim’s mouth and nose moving past your cheeks
C : Circulation Check for pulse up to 10 seconds (onlyforHealthcareproviders)If no pulse and breathing, start CPRFor laypersons, there is no need to check for pulse. If victim has no breathing, start CPR• Locate the landmark for chest compression• Proper body and hand position• Compress vertically at least 5 cm downwards with complete
relaxation of pressure after each compression at rate of at least 100 per minute
• Say mnemonic “1&2&3&4&5& 1&2&3&4&10& 1&2&3&4&15 1&2&3&4&20 1&2&3&4&25 1&2&3&4&30”
CPR Cycle • Perform 30 chest compressions followed by 2 breaths• The duration for each breath is 1 second.• Ventilation volume is between 400 - 600 ml/breath• Allow lung deflation between each breath
Reassessment • Assess the victim for pulse and breathing after every 5 cycles of 30:2 (for healthcare providers only)
• If pulse is absent (if unsure of pulse and victim has No breathing, assume cardiac arrest), continue 30:2
• For laypersons, continue performing CPR until help arrives or victim starts moving
Recovery Position
Place the victim in the recovery position if :• Pulse and breathing are present• Victim is unconscious and has no evidence of trauma• Continue to monitor victim’s pulse and breathing every few minutes
as this can stop suddenly

22 • CPR+AED Programme
MODULE BAUTOMATED EXTERNAL DEFIBRILLATION (AED)

MODULE B
CPR+AED Programme • 23
MODULE BAUTOMATED EXTERNAL DEFIBRILLATION (AED)
SECTION 1 CARDIAC ARREST
1.1 INTRODUCTIONIt is well known that the most important factors affecting survival in sudden cardiac arrest are external cardiac massage and time to first electrical defibrillation. Since the defibrillation technique can be easily learned and employed by any trained person, it is important that one understands the basics of this technique clearly so that its application can be appropriate and correct.
It is today well established that the initial cardiac rhythm at time of collapse is frequently an irregular,chaotic electrical rhythm. This is referred to as “Ventricular Fibrillation”. If this rhythm is not converted immediately, the victim’s chances of survival decreases. It is believed that for every minute of delay after the onset of Ventricular Fibrillation, the survival rate decreases by approximately 7-10%.
The definitive treatment for Ventricular Fibrillation is electrical cardiac defibrillation, which is the theme of this training programme.
1.2 DEFINITION OF CARDIAC ARRESTSudden cardiac arrest occurs when the heart stops pumping suddenly. When this happens, the victim immediately loses consciousness and breathing stops.
The most common heart rhythms associated with sudden cardiac arrest are :
1. Ventricular Fibrillation (VF): an uncoordinated, irregular heart rhythm resulting in no blood being pumped from the heart.
If this rhythm is not managed promptly, it will lead to the following rhythm :
2. Asystole : a flat line or a “Dead Heart”.
24 • CPR+AED Programme
SECTION 2 THE IMPORTANCE OF EARLY DEFIBRILLATION
• The majority of people suffering from cardiac arrest have VF. VF is the most common initial rhythm in cardiac arrest. If untreated, it progresses to asystole and death of the victim.
• Immediate or rapid defibrillation is the only effective treatment for VF. The probability of successful defibrillation decreases over time – death rate increases by 7-10% for every minute without defibrillation.
• VF degenerates to asystole within 8 – 10 mins. • Minimal chance of success if the victim goes into asystole.
NB:Notallarrestedvictimswillsurvive.ButresearchshowsthatearlydefibrillationandCPRarethemostimportantfactorsifthevictimistosurvive.
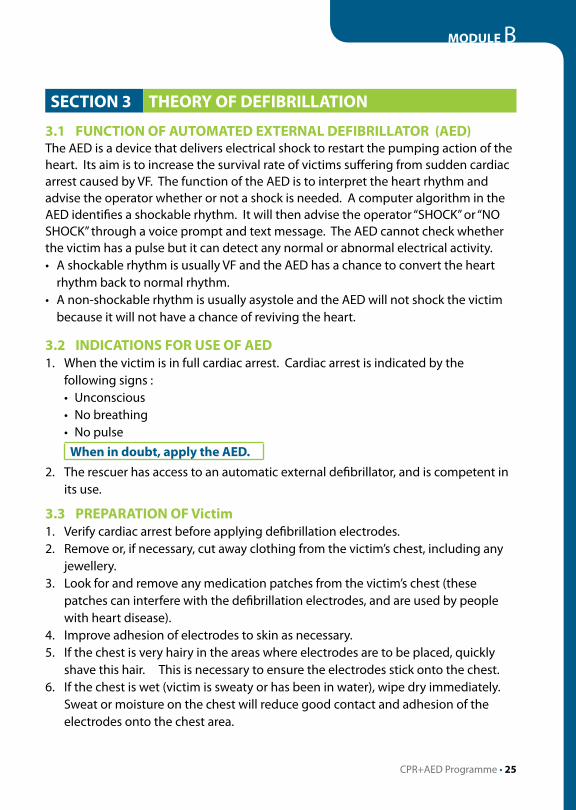
This graph shows that the chance of survival of a victim who suffers a cardiac arrest due to VF is dependent on the speed in which the Chain of Survival is implemented.
Prior to cardiac arrest, the victim is in normal sinus rhythm. At the time of cardiac arrest, the rhythm deteriorates to VF. The graph shows the relationship between the time treatment is given and the survival chance of the victim. 1. The first bar shows that if no CPR is given and defibrillation attempts are delayed,
approximately 2% survive. 2. The second bar shows that if early CPR and delayed defibrillation is given, the
survival chance increases to 8%. CPR buys valuable time. 3. The third bar shows 20% survival if early CPR and early defibrillation are delivered. 4. The fourth bar shows 30 – 40% chance of survival when the full Chain of Survival
is implemented.
MODULE B
CPR+AED Programme • 25
SECTION 3 THEORY OF DEFIBRILLATION
3.1 FUNCTION OF AUTOMATED EXTERNAL DEFIBRILLATOR (AED) The AED is a device that delivers electrical shock to restart the pumping action of the heart. Its aim is to increase the survival rate of victims suffering from sudden cardiac arrest caused by VF. The function of the AED is to interpret the heart rhythm and advise the operator whether or not a shock is needed. A computer algorithm in the AED identifies a shockable rhythm. It will then advise the operator “SHOCK” or “NO SHOCK” through a voice prompt and text message. The AED cannot check whether the victim has a pulse but it can detect any normal or abnormal electrical activity. • A shockable rhythm is usually VF and the AED has a chance to convert the heart
rhythm back to normal rhythm. • A non-shockable rhythm is usually asystole and the AED will not shock the victim
because it will not have a chance of reviving the heart.
3.2 INDICATIONS FOR USE OF AED1. When the victim is in full cardiac arrest. Cardiac arrest is indicated by the
following signs : • Unconscious • No breathing • No pulse
When in doubt, apply the AED. 2. The rescuer has access to an automatic external defibrillator, and is competent in
its use.
3.3 PREPARATION OF Victim1. Verify cardiac arrest before applying defibrillation electrodes. 2. Remove or, if necessary, cut away clothing from the victim’s chest, including any
jewellery. 3. Look for and remove any medication patches from the victim’s chest (these
patches can interfere with the defibrillation electrodes, and are used by people with heart disease).
4. Improve adhesion of electrodes to skin as necessary. 5. If the chest is very hairy in the areas where electrodes are to be placed, quickly
shave this hair. This is necessary to ensure the electrodes stick onto the chest. 6. If the chest is wet (victim is sweaty or has been in water), wipe dry immediately.
Sweat or moisture on the chest will reduce good contact and adhesion of the electrodes onto the chest area.
26 • CPR+AED Programme
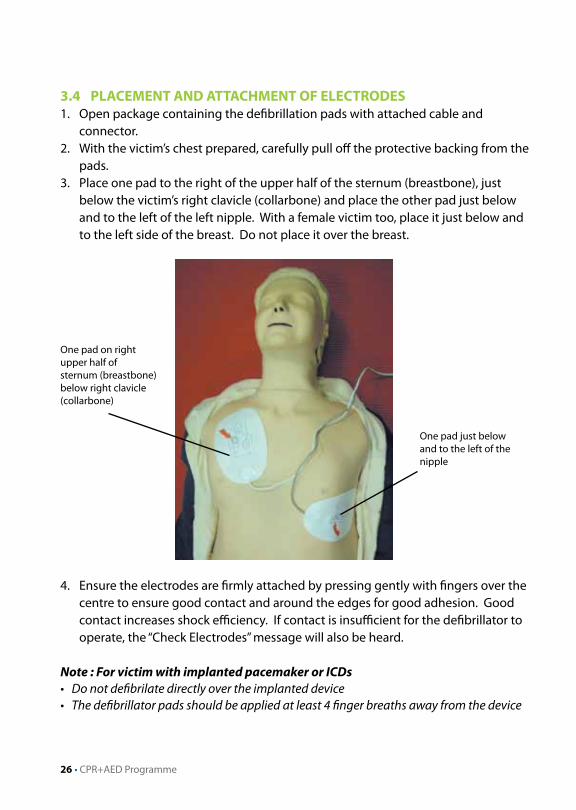
3.4 PLACEMENT AND ATTACHMENT OF ELECTRODES1. Open package containing the defibrillation pads with attached cable and
connector. 2. With the victim’s chest prepared, carefully pull off the protective backing from the
pads. 3. Place one pad to the right of the upper half of the sternum (breastbone), just
below the victim’s right clavicle (collarbone) and place the other pad just below and to the left of the left nipple. With a female victim too, place it just below and to the left side of the breast. Do not place it over the breast.
4. Ensure the electrodes are firmly attached by pressing gently with fingers over the centre to ensure good contact and around the edges for good adhesion. Good contact increases shock efficiency. If contact is insufficient for the defibrillator to operate, the “Check Electrodes” message will also be heard.
Note : For victim with implanted pacemaker or ICDs• Donotdefibrilatedirectlyovertheimplanteddevice• Thedefibrillatorpadsshouldbeappliedatleast4fingerbreathsawayfromthedevice
One pad just below and to the left of the nipple
One pad on right upper half of sternum (breastbone) below right clavicle (collarbone)
MODULE B
CPR+AED Programme • 27
3.5 SAFETY ISSUESSafety is very important for the victim, the AED operator and bystanders. Hence, AEDs must only be used by trained and authorised personnel who are able to maintain their knowledge and skills. It is the responsibility of the AED operator to ensure that the area around the victim is clear.
1. It is important not to allow anyone to come into contact with a victim during (a) Analysis : The defibrillator reads electrical activity in the heart through
electrodes. CPR activity, touching or moving the victim can interfere with the accuracy of the machine’s reading;
(b) Defibrillation : Ensure that no one is touching the victim when shock is delivered as electricity can be transmitted.
2. The victim should, preferably, not be placed on wet or metal surfaces when the AED is used on him/her as water and metal may act as good conductors of electricity. If there is water/metal between the victim and the operator/bystander, electricity can be transmitted to the bystanders. However, this is not an absolute contraindication, and in situations where delays may occur in removing a victim to a dry area, a rescuer may proceed to use the AED. If used carefully under such circumstances, the rescuer would not be likely to suffer adverse consequences. If victim is on a
(a) WET surface, remove the victim to a dry area, if available; (b) METAL surface, place blankets, if available, between the victim and the
metal contact.
3. The defibrillator should not be used in the presence of flammable gases and explosive environments.
DO NOT DEFIBRILLATE when • Victimisresponsive,breathingorhasapulse• Someoneistouchingthevictim• Thereareflammablegasesorinexplosiveenvironments
EXERCISE DUE CARE when• Victimisonawet/metalsurface
SECTION 4 MEDICAL PROTOCOL AND DOCUMENTATION
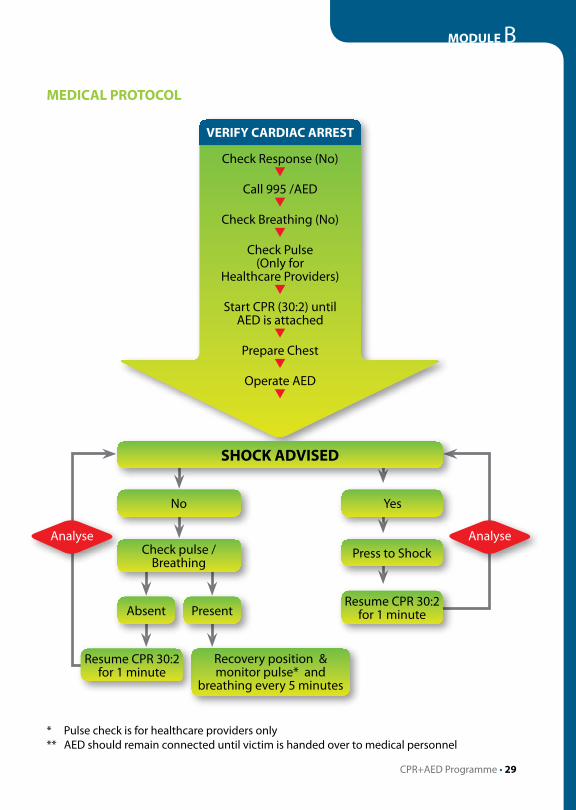
4.1 MEDICAL PROTOCOLThe AEDs are programmed according to local medical guidelines on defibrillation. 1. Verify Cardiac Arrest - No response, no breathing and no pulse. 2. Start CPR (30 compressions & 2 ventilations) while waiting for AED. 3. Prepare chest area for placement of defibrillation pad. 4. Continue CPR until AED is attached to victim. 5. If the AED detects a shockable rhythm, it will charge up according to pre-set
energy level. 6. CPR advised for 1 minute : • following every shock or • if the defibrillator detects a non-shockable rhythm and the victim has no pulse. 7. Check pulse and breathing :
• if the defibrillator detects a non-shockable rhythm.
Successful DefibrillationAt any time after a shock :1. If the pulse and breathing are present, maintain an open airway by placing victim
in the recovery position. Do not disconnect the AED but continue to monitor the victim every 5 minutes until handed over to medical personnel.
Unsuccessful Defibrillation1. It is important to note that defibrillation may not be successful in all situations,
especially if the victim has arrested for some time. 2. Check pulse and breathing if “No shock” is advised. If absent, continue CPR for
one minute before subsequent analysis by the AED or until the arrival of the ambulance.
When To Stop Defibrillation1. When prompted by the AED. 2. When a doctor directs the resuscitation to cease or when ambulance arrives3. When the victim has been successfully resuscitated.
28 • CPR+AED Programme
MODULE B
CPR+AED Programme • 29
SHOCk ADVISED
No Yes
Analyse AnalyseCheck pulse /
BreathingPress to Shock
Resume CPR 30:2 for 1 minuteAbsent Present
Resume CPR 30:2 for 1 minute
Recovery position & monitor pulse* and
breathing every 5 minutes
Check Response (No) V
Call 995 /AED V
Check Breathing (No) V
Check Pulse (Only for
Healthcare Providers) V
Start CPR (30:2) until AED is attached
V
Prepare Chest V
Operate AED V
VERIFY CARDIAC ARREST
* Pulse check is for healthcare providers only** AED should remain connected until victim is handed over to medical personnel
MEDICAL PROTOCOL
30 • CPR+AED Programme
4.2 ROLES & RESPONSIBILITES OF THE RESCUER 1. High priority of defibrillation – respond immediately when call for assistance is
heard.
2. Rapid defibrillation – verify that the victim is in cardiac arrest and set up AED.
3. Scene control – ensure all surrounding bystanders do not crowd around the victim. The importance of scene control cannot be stressed strongly enough. In the presence of the victim’s family members, friends or bystanders, the use of a defibrillator in a resuscitation situation can create stress to the AED operator and may compromise the safety of those present.
4. Ensure that medical assistance has been sought (or call 995).
5. All First Aid equipment is available.
6. Professional conduct – be confident in what you are doing. Avoid disagreeing with your colleagues.
7. Rescuers are required to minimise possible interference from bystanders and improve self-confidence by :
• Assessing the scene upon arrival. Besides the victim, the rescuer should attempt to identify significant bystanders.
• Assigning another person to record and look after those present. Allocation may promote a feeling of self-worth and value in the bystanders, such as getting someone to direct the ambulance or look after relatives/bystanders.
• Maintaining a calm and confident manner during the situation. Regular communication with significant bystanders (such as family members) is essential. The AED operator should tell them who the rescuers are, what they intend to do, how they are going to do it, what is happening about transfer to a hospital.
• Not disagreeing with colleagues. Dissent in treatment options should be presented as if a discussion of options is taking place.
• Responding to changing attitudes with the bystanders, especially if the resuscitation is not going well.
MODULE B
CPR+AED Programme • 31
• Maintaining a professional attitude at all times. The rescuers must not use derogatory terms, swearing, or language that may be adversely misconstrued.
• Giving a complete summary of the resuscitation effort to the receiving emergency service, providing comprehensive victim care and ensuring the professional standing of the rescuer.
• If a doctor or trained paramedical personnel (such as Ambulance Officers) is present, give a brief summary of what has happened and what has been done. Then continue to assist them, if necessary.
4.3 DOCUMENTATIONIt is the responsibility of the AED Operator to document all incidents and information related to the use of the AED.
The following information should be documented :• Name of victim, AED operator and bystander who helped in the CPR. • Mark the time of collapse and the time AED was put on. • Mark the number of shocks and the times of each shock. • Time of ambulance arrival and when the victim is transported back to the
ambulance by the crew.

32 • CPR+AED Programme
Notes