Embed Size (px)
Citation preview
My First Cloud/Mobile App with Autodesk® Revit Server Adam Nagy – Autodesk
CP3093 This class has two objectives: to introduce you to the Revit Server REST API and to introduce you to the cloud and mobile programming. Autodesk Revit Server is a server-based file storage system that we can use to store Revit files. It has a public API that uses simple HTTP known as REST (or Representational State Transfer). REST is a "style" for designing network applications, and it is used to communicate between the server and a client machine. REST is simple, yet powerful enough. You can use it from anywhere where HTTP programming is available: from a desktop, a mobile device or a server-side application. In this class, we will discuss what REST is, using the context of Revit Server. We then go one step further and show you how to create your own REST service in .NET. We will implement it as a notification system in the cloud and demonstrate with an Apple® iPad®/iPhone® application in Apple® iOS. A working knowledge of .NET is recommended and Xcode development experience is helpful for understanding the discussion.
Learning Objectives At the end of this class, you will be able to:
• Use HTTP requests to interact with a REST API
• Programmatically access and modify data available on Revit Server
• Create basic iOS applications in Xcode
• Create a basic REST service in .NET
• Use Apple Push Notification
About the Speaker Adam Nagy joined Autodesk back in 2005 and has been providing programming support, consulting, training and evangelism to external developers. He started his career in Budapest working for a Civil Engineering CAD software company, then worked for Autodesk in Prague for 3 years and now lives in South England, UK.
At the moment focusing on the AEC and AutoCAD® products, plus cloud and mobile related technologies.
Adam has a degree in Software Engineering and has been working in that area since even before leaving college. [email protected]
My First Cloud/Mobile App with Autodesk® Revit Server
2
At the moment most of the 3rd party developers of Autodesk are concentrating on extending the functionalities of our desktop products.
I want to show you how easy it is to extend this to the server and mobile side as well.
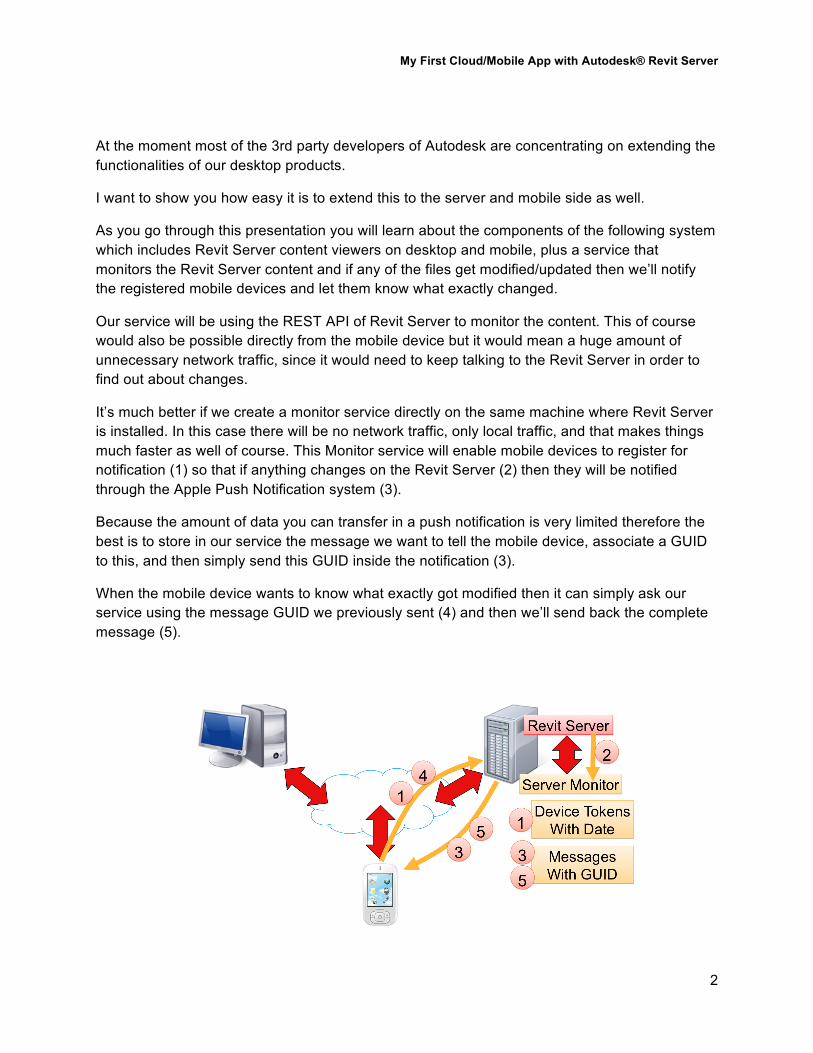
As you go through this presentation you will learn about the components of the following system which includes Revit Server content viewers on desktop and mobile, plus a service that monitors the Revit Server content and if any of the files get modified/updated then we’ll notify the registered mobile devices and let them know what exactly changed.
Our service will be using the REST API of Revit Server to monitor the content. This of course would also be possible directly from the mobile device but it would mean a huge amount of unnecessary network traffic, since it would need to keep talking to the Revit Server in order to find out about changes.
It’s much better if we create a monitor service directly on the same machine where Revit Server is installed. In this case there will be no network traffic, only local traffic, and that makes things much faster as well of course. This Monitor service will enable mobile devices to register for notification (1) so that if anything changes on the Revit Server (2) then they will be notified through the Apple Push Notification system (3).
Because the amount of data you can transfer in a push notification is very limited therefore the best is to store in our service the message we want to tell the mobile device, associate a GUID to this, and then simply send this GUID inside the notification (3).
When the mobile device wants to know what exactly got modified then it can simply ask our service using the message GUID we previously sent (4) and then we’ll send back the complete message (5).
My First Cloud/Mobile App with Autodesk® Revit Server
3
Now let’s see how we will implement the components of the above system.
Use HTTP requests to interact with a REST API There are two things we have to clarify first: what is an HTTP request and what is REST about.
What is HTTP HTTP stands for HyperText Transfer Protocol and is used for data transfer on the worldwide web (www).
The 1.1 version has 9 verbs that can be used on the resources available on the web: GET, HEAD, OPTIONS, POST, PUT, DELETE, TRACE, CONNECT, PATCH
The web is basically a web of resources which can be of various types: text files, images, zip files, etc, but most of the times you’ll see html files, which are basically text files that also contain instructions for how the contained information should be presented.
All resources on the web can be identified using URI’s (Uniform Resource Locator). URI is a superset of URL (Uniform Resource Locator), which you may be more familiar with. In the context of this presentation you can safely interchange the two.
The most obvious place where you’ll use HTTP for communication is the web browser. When you type in an address you actually provide the URL identifier of a resource (usually an html page) and based on the meta data of the resource the browser may handle the resource differently. If it’s an html page then the content will be rendered for the user, if it’s a zip file it might get downloaded to the local drive, if an image file it will be shown in the browser, etc
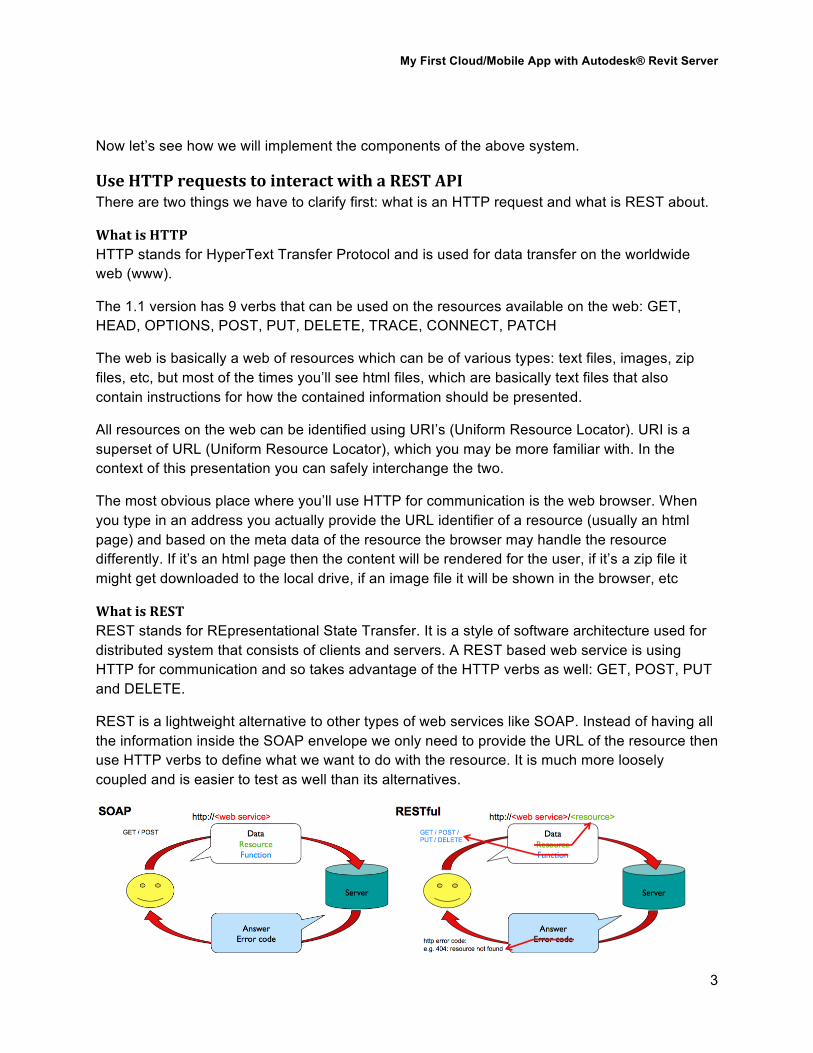
What is REST REST stands for REpresentational State Transfer. It is a style of software architecture used for distributed system that consists of clients and servers. A REST based web service is using HTTP for communication and so takes advantage of the HTTP verbs as well: GET, POST, PUT and DELETE.
REST is a lightweight alternative to other types of web services like SOAP. Instead of having all the information inside the SOAP envelope we only need to provide the URL of the resource then use HTTP verbs to define what we want to do with the resource. It is much more loosely coupled and is easier to test as well than its alternatives.
My First Cloud/Mobile App with Autodesk® Revit Server
4
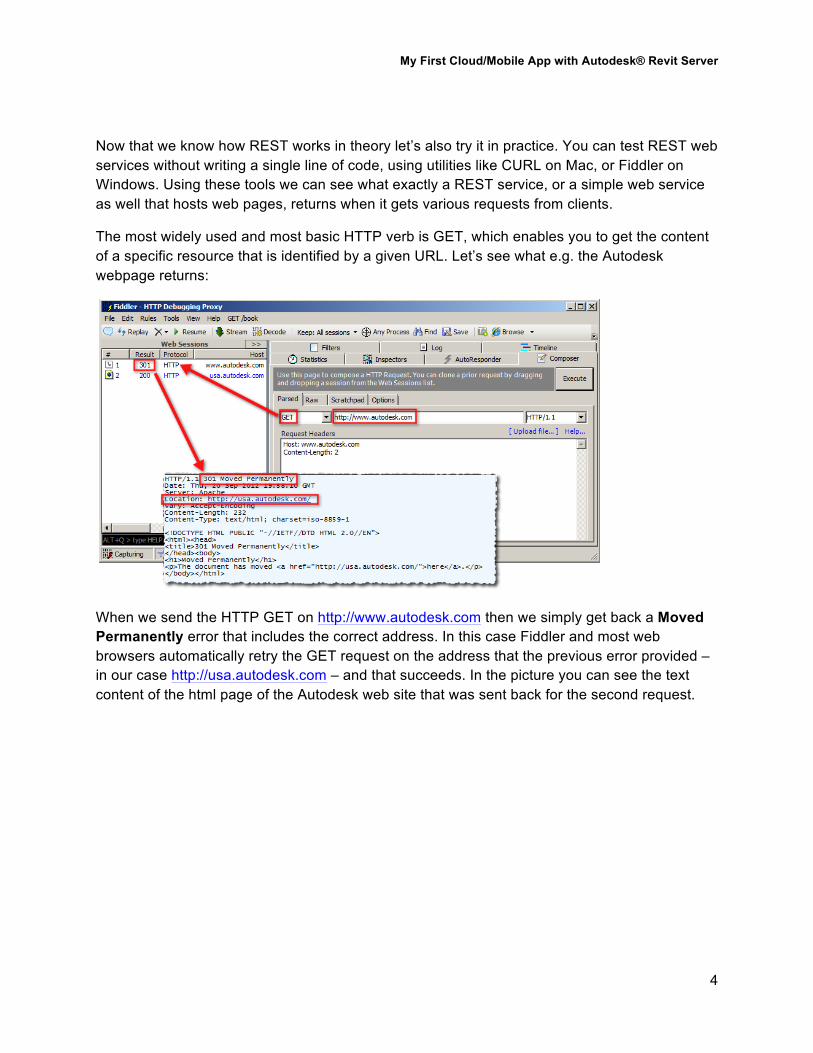
Now that we know how REST works in theory let’s also try it in practice. You can test REST web services without writing a single line of code, using utilities like CURL on Mac, or Fiddler on Windows. Using these tools we can see what exactly a REST service, or a simple web service as well that hosts web pages, returns when it gets various requests from clients.
The most widely used and most basic HTTP verb is GET, which enables you to get the content of a specific resource that is identified by a given URL. Let’s see what e.g. the Autodesk webpage returns:
When we send the HTTP GET on http://www.autodesk.com then we simply get back a Moved Permanently error that includes the correct address. In this case Fiddler and most web browsers automatically retry the GET request on the address that the previous error provided – in our case http://usa.autodesk.com – and that succeeds. In the picture you can see the text content of the html page of the Autodesk web site that was sent back for the second request.
My First Cloud/Mobile App with Autodesk® Revit Server
5
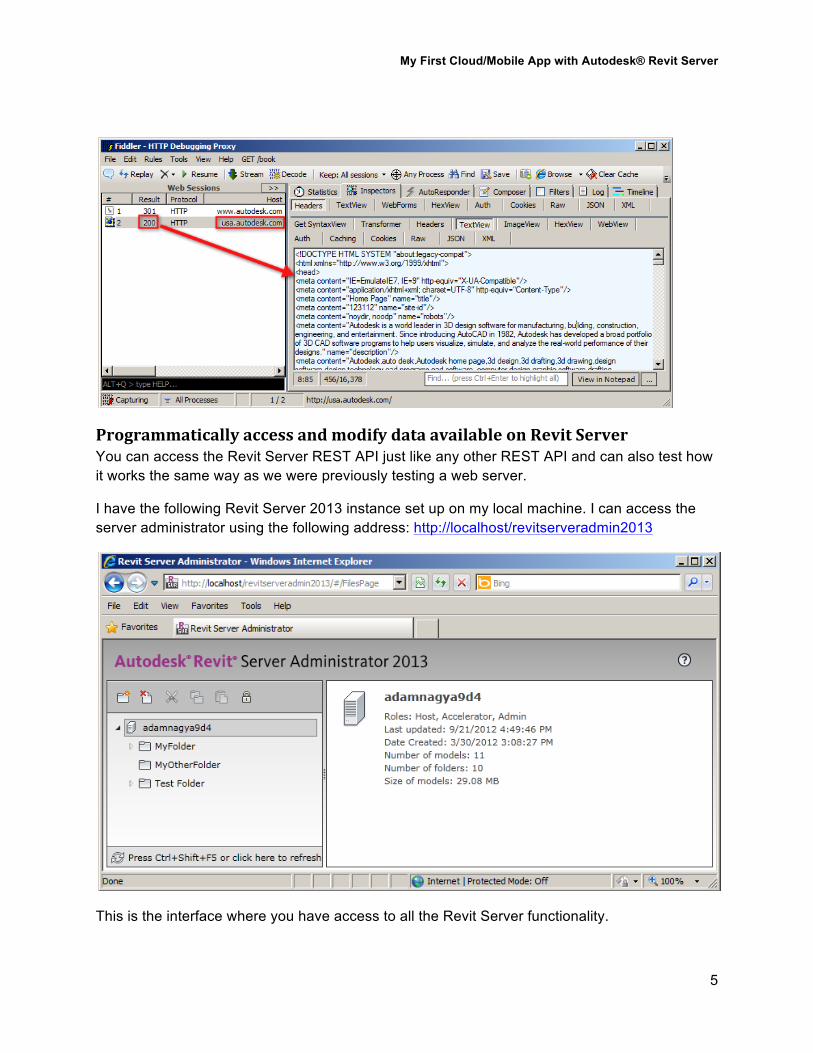
Programmatically access and modify data available on Revit Server You can access the Revit Server REST API just like any other REST API and can also test how it works the same way as we were previously testing a web server.
I have the following Revit Server 2013 instance set up on my local machine. I can access the server administrator using the following address: http://localhost/revitserveradmin2013
This is the interface where you have access to all the Revit Server functionality.

My First Cloud/Mobile App with Autodesk® Revit Server
6
If for example you’d like to get the list of root folders on the server programmatically you could just send this HTTP GET request to the servers REST service …
http://localhost/RevitServerAdminRESTService2013/AdminRESTService.svc/|/contents
… and set these message headers:
User-Name: Adam User-Machine-Name: AdamPC Operation-GUID: D2952135-99CA-4CD5-A70C-2820AF63C9CB
The header values could be anything, but the GUID needs to follow the usual GUID formatting: xxxxxxxx-xxxx-xxxx-xxxx-xxxxxxxxxxxx
In Fiddler you could do the same like this and would get back the result in Json format, which includes the 3 folder names we’ve just seen in the Revit Server user interface as well:
My First Cloud/Mobile App with Autodesk® Revit Server
7
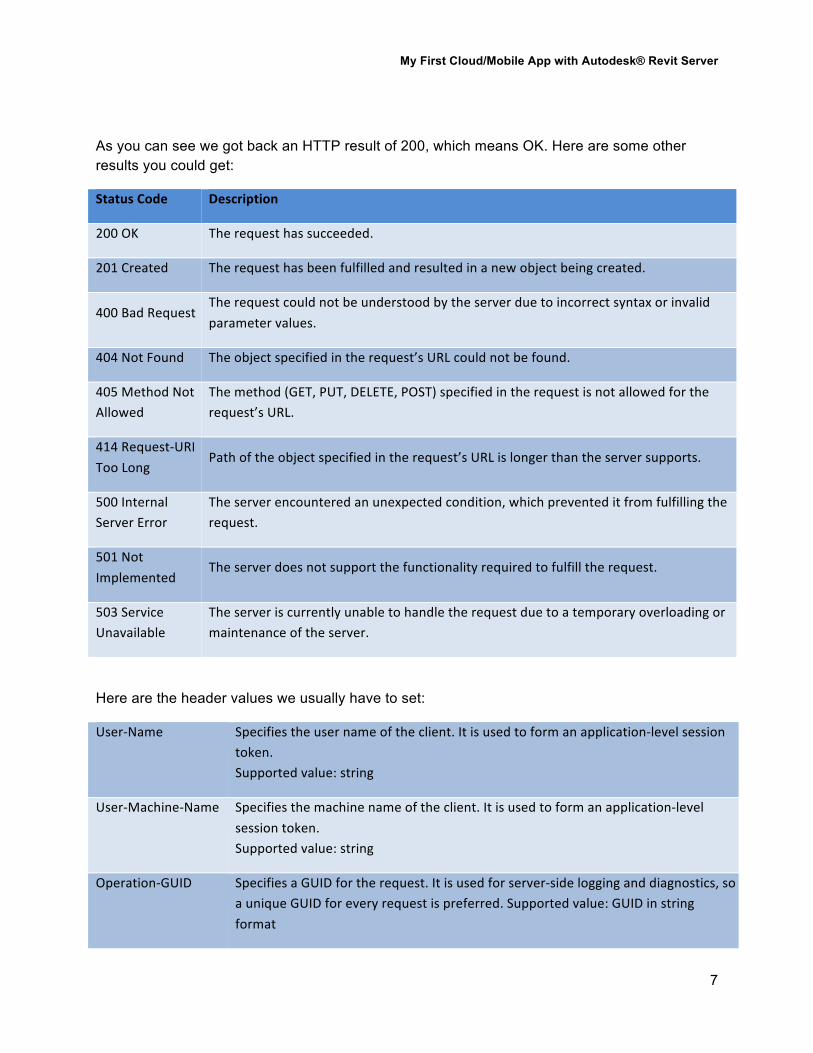
As you can see we got back an HTTP result of 200, which means OK. Here are some other results you could get:
Status Code Description
200 OK The request has succeeded.
201 Created The request has been fulfilled and resulted in a new object being created.
400 Bad Request The request could not be understood by the server due to incorrect syntax or invalid parameter values.
404 Not Found The object specified in the request’s URL could not be found.
405 Method Not Allowed
The method (GET, PUT, DELETE, POST) specified in the request is not allowed for the request’s URL.
414 Request-‐URI Too Long
Path of the object specified in the request’s URL is longer than the server supports.
500 Internal Server Error
The server encountered an unexpected condition, which prevented it from fulfilling the request.
501 Not Implemented
The server does not support the functionality required to fulfill the request.
503 Service Unavailable
The server is currently unable to handle the request due to a temporary overloading or maintenance of the server.
Here are the header values we usually have to set:
User-‐Name Specifies the user name of the client. It is used to form an application-‐level session token. Supported value: string
User-‐Machine-‐Name Specifies the machine name of the client. It is used to form an application-‐level session token. Supported value: string
Operation-‐GUID Specifies a GUID for the request. It is used for server-‐side logging and diagnostics, so a unique GUID for every request is preferred. Supported value: GUID in string format
My First Cloud/Mobile App with Autodesk® Revit Server
8
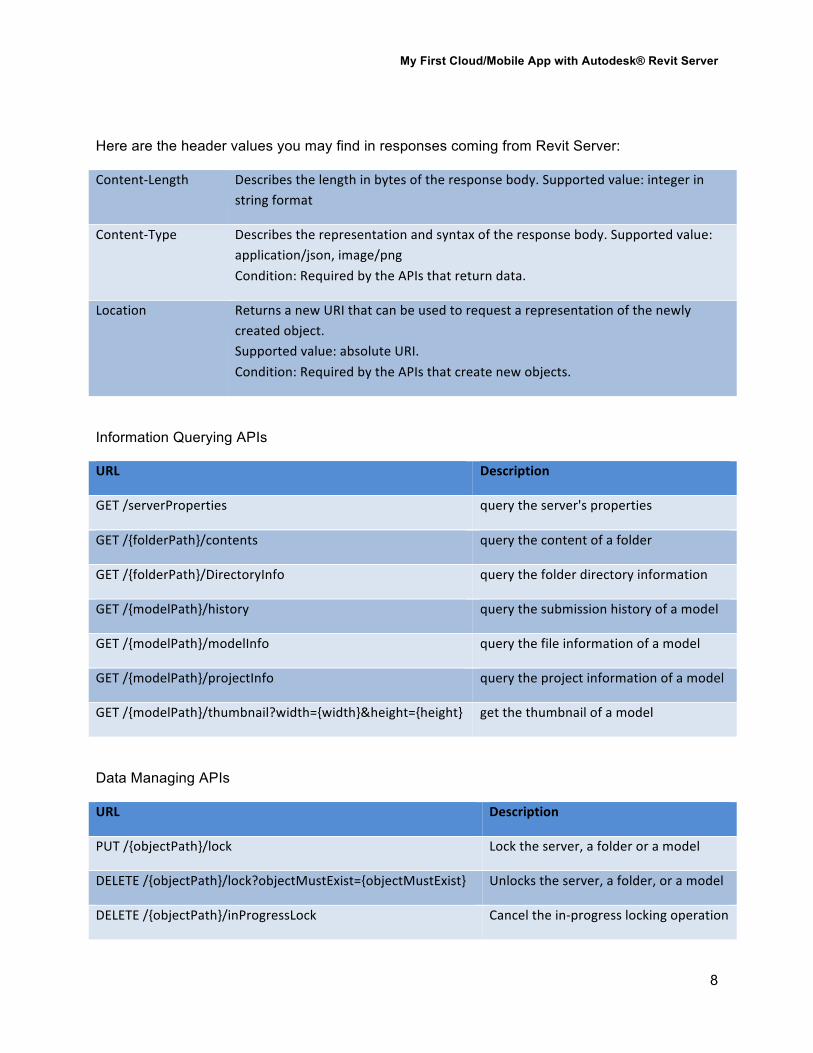
Here are the header values you may find in responses coming from Revit Server:
Content-‐Length Describes the length in bytes of the response body. Supported value: integer in string format
Content-‐Type
Describes the representation and syntax of the response body. Supported value: application/json, image/png Condition: Required by the APIs that return data.
Location Returns a new URI that can be used to request a representation of the newly created object. Supported value: absolute URI. Condition: Required by the APIs that create new objects.
Information Querying APIs
URL Description
GET /serverProperties query the server's properties
GET /{folderPath}/contents query the content of a folder
GET /{folderPath}/DirectoryInfo query the folder directory information
GET /{modelPath}/history query the submission history of a model
GET /{modelPath}/modelInfo query the file information of a model
GET /{modelPath}/projectInfo query the project information of a model
GET /{modelPath}/thumbnail?width={width}&height={height} get the thumbnail of a model
Data Managing APIs
URL Description
PUT /{objectPath}/lock Lock the server, a folder or a model
DELETE /{objectPath}/lock?objectMustExist={objectMustExist} Unlocks the server, a folder, or a model
DELETE /{objectPath}/inProgressLock Cancel the in-‐progress locking operation
My First Cloud/Mobile App with Autodesk® Revit Server
9
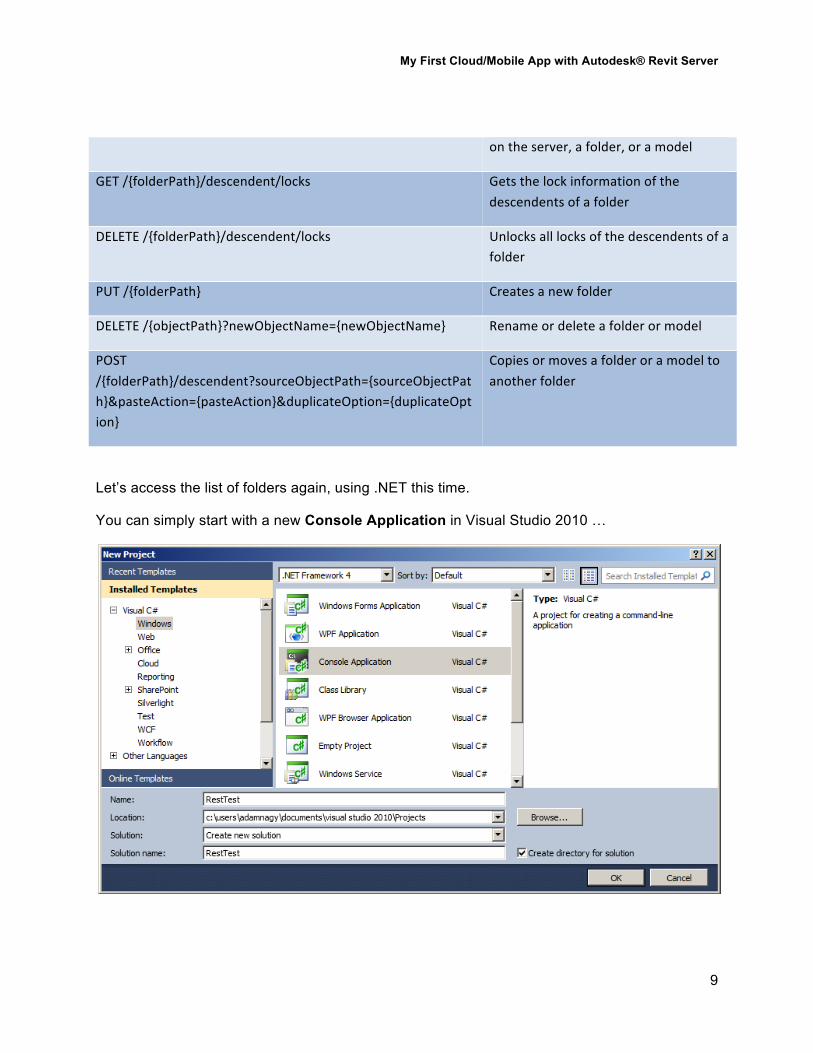
on the server, a folder, or a model
GET /{folderPath}/descendent/locks Gets the lock information of the descendents of a folder
DELETE /{folderPath}/descendent/locks Unlocks all locks of the descendents of a folder
PUT /{folderPath} Creates a new folder
DELETE /{objectPath}?newObjectName={newObjectName} Rename or delete a folder or model
POST /{folderPath}/descendent?sourceObjectPath={sourceObjectPath}&pasteAction={pasteAction}&duplicateOption={duplicateOption}
Copies or moves a folder or a model to another folder
Let’s access the list of folders again, using .NET this time.
You can simply start with a new Console Application in Visual Studio 2010 …
My First Cloud/Mobile App with Autodesk® Revit Server
10
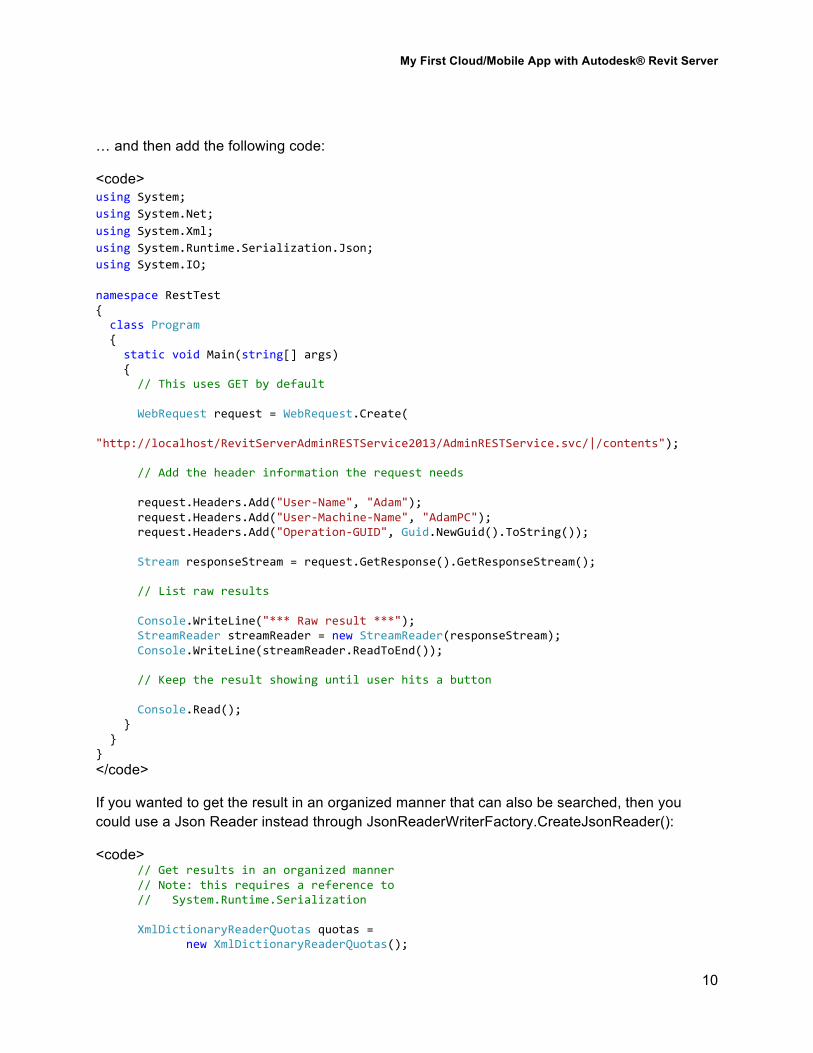
… and then add the following code:
<code> using System; using System.Net; using System.Xml; using System.Runtime.Serialization.Json; using System.IO;
namespace RestTest { class Program { static void Main(string[] args) { // This uses GET by default WebRequest request = WebRequest.Create( "http://localhost/RevitServerAdminRESTService2013/AdminRESTService.svc/|/contents"); // Add the header information the request needs request.Headers.Add("User-‐Name", "Adam"); request.Headers.Add("User-‐Machine-‐Name", "AdamPC"); request.Headers.Add("Operation-‐GUID", Guid.NewGuid().ToString()); Stream responseStream = request.GetResponse().GetResponseStream(); // List raw results Console.WriteLine("*** Raw result ***"); StreamReader streamReader = new StreamReader(responseStream); Console.WriteLine(streamReader.ReadToEnd()); // Keep the result showing until user hits a button Console.Read(); } } } </code>
If you wanted to get the result in an organized manner that can also be searched, then you could use a Json Reader instead through JsonReaderWriterFactory.CreateJsonReader():
<code> // Get results in an organized manner // Note: this requires a reference to // System.Runtime.Serialization XmlDictionaryReaderQuotas quotas = new XmlDictionaryReaderQuotas();
My First Cloud/Mobile App with Autodesk® Revit Server
11
XmlDictionaryReader jsonReader = JsonReaderWriterFactory.CreateJsonReader(responseStream, quotas); // Show the result in the Console Console.WriteLine("*** Organized result ***"); while (jsonReader.Read()) { Console.WriteLine(jsonReader.Name + " = " + jsonReader.Value); } </code>
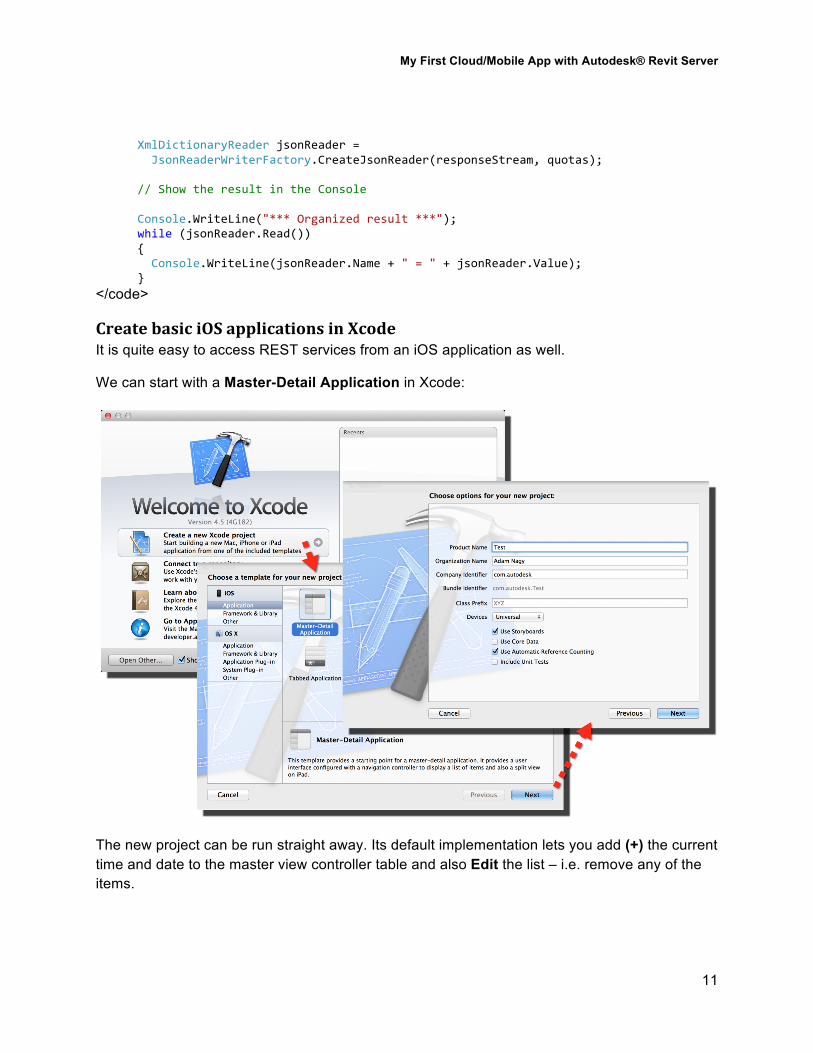
Create basic iOS applications in Xcode It is quite easy to access REST services from an iOS application as well.
We can start with a Master-Detail Application in Xcode:
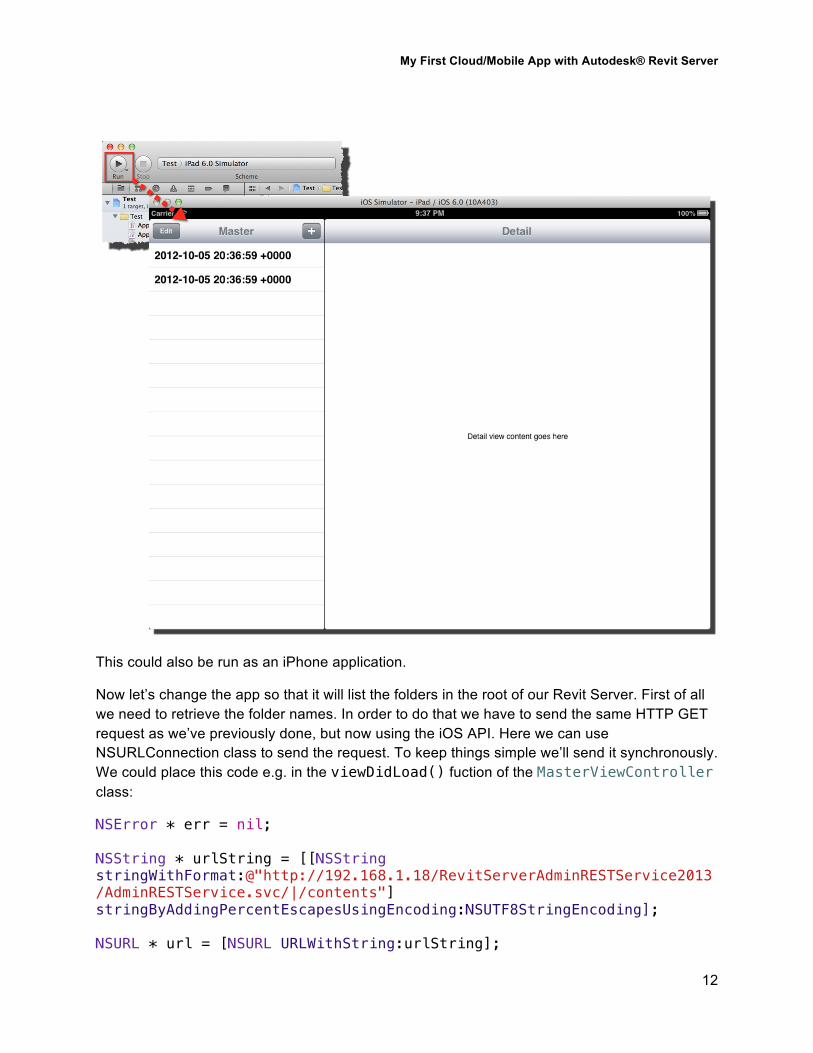
The new project can be run straight away. Its default implementation lets you add (+) the current time and date to the master view controller table and also Edit the list – i.e. remove any of the items.
My First Cloud/Mobile App with Autodesk® Revit Server
12
This could also be run as an iPhone application.
Now let’s change the app so that it will list the folders in the root of our Revit Server. First of all we need to retrieve the folder names. In order to do that we have to send the same HTTP GET request as we’ve previously done, but now using the iOS API. Here we can use NSURLConnection class to send the request. To keep things simple we’ll send it synchronously. We could place this code e.g. in the viewDidLoad() fuction of the MasterViewController class:
NSError * err = nil; NSString * urlString = [[NSString stringWithFormat:@"http://192.168.1.18/RevitServerAdminRESTService2013/AdminRESTService.svc/|/contents"] stringByAddingPercentEscapesUsingEncoding:NSUTF8StringEncoding]; NSURL * url = [NSURL URLWithString:urlString];
My First Cloud/Mobile App with Autodesk® Revit Server
13
NSMutableURLRequest * req = [NSMutableURLRequest requestWithURL:url]; [req addValue:@"Adam" forHTTPHeaderField:@"User-Name"]; [req addValue:@"AdamPC" forHTTPHeaderField:@"User-Machine-Name"]; [req addValue:@"BE5F9B98-5F74-4E85-AFF4-BD7460777207" forHTTPHeaderField:@"Operation-GUID"]; NSData * data = [NSURLConnection sendSynchronousRequest:req returningResponse:nil error:&err]; Unlike Fiddler or the .NET API, NSURL does not URL encode the path automatically. So we need to use stringByAddingPercentEscapesUsingEncoding to do it. Without that the request would fail.
Now we can turn the Json string into a tree of dictionaries so that it’s easier to iterate the content and retrieve all the folder names:
// Organize the data into a dictionary tree NSDictionary * jsonArray = [NSJSONSerialization JSONObjectWithData:data options:NSJSONReadingMutableContainers error: &err]; // Retrieve the folder names from there folders = [NSMutableArray new]; NSArray * value = [jsonArray valueForKey:@"Folders"]; for (NSDictionary * dict in value) [folders addObject:[dict objectForKey:@"Name"]];
We need to declare the folders variable outside the viewDidLoad() function, so that it will be available in the below functions as well.
Now we just have to modify the numberOfRowsInSection() and cellForRowAtIndexPath() functions so that the table view will contain the folder names.
- (NSInteger)tableView:(UITableView *)tableView numberOfRowsInSection:(NSInteger)section { return folders.count; }
- (UITableViewCell *)tableView:(UITableView *)tableView cellForRowAtIndexPath:(NSIndexPath *)indexPath { UITableViewCell * cell = [tableView
My First Cloud/Mobile App with Autodesk® Revit Server
14
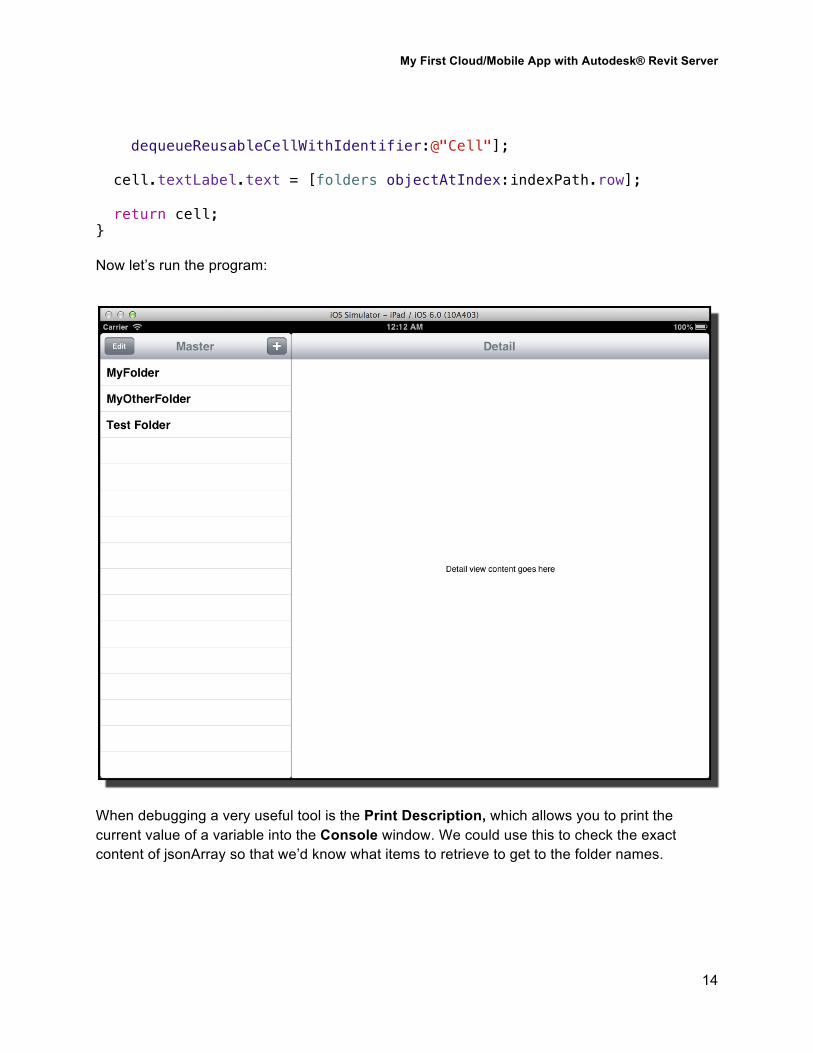
dequeueReusableCellWithIdentifier:@"Cell"]; cell.textLabel.text = [folders objectAtIndex:indexPath.row]; return cell; } Now let’s run the program:
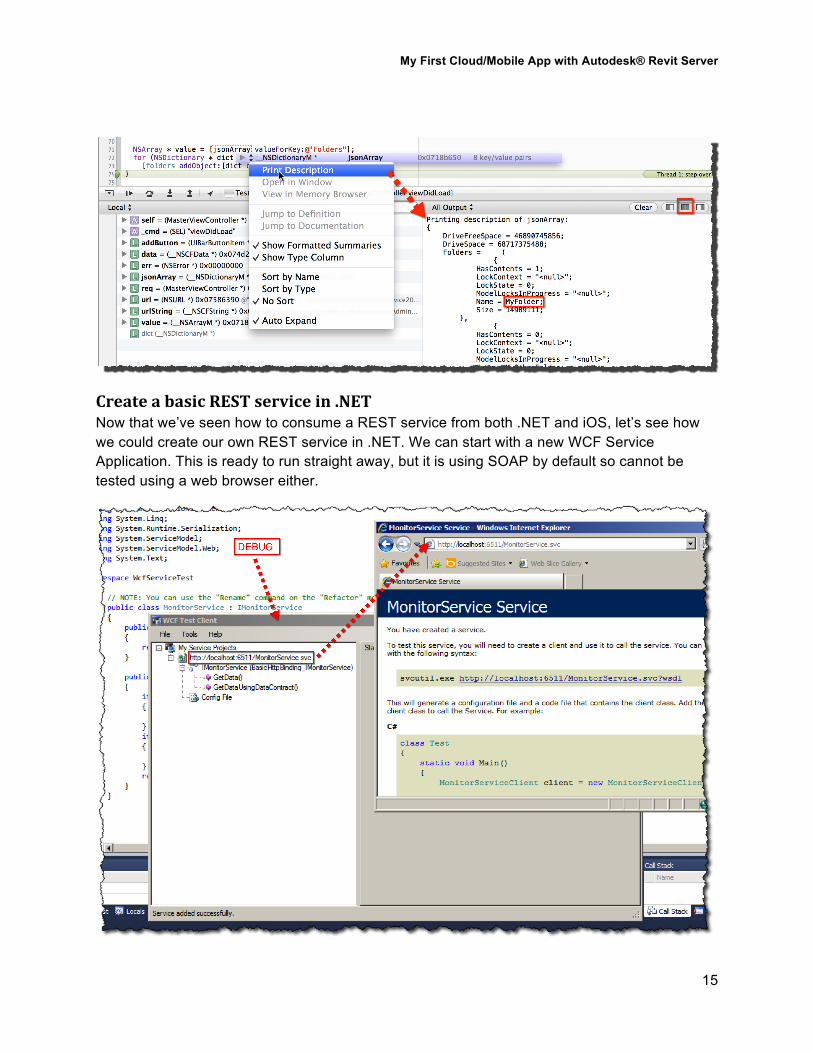
When debugging a very useful tool is the Print Description, which allows you to print the current value of a variable into the Console window. We could use this to check the exact content of jsonArray so that we’d know what items to retrieve to get to the folder names.
My First Cloud/Mobile App with Autodesk® Revit Server
15
Create a basic REST service in .NET Now that we’ve seen how to consume a REST service from both .NET and iOS, let’s see how we could create our own REST service in .NET. We can start with a new WCF Service Application. This is ready to run straight away, but it is using SOAP by default so cannot be tested using a web browser either.
My First Cloud/Mobile App with Autodesk® Revit Server
16
Also you can just copy the temporary service address into a web browser and you’ll get information about how you could use this service from a client application.
You would need to use svcutil to create the necessary files for the client application.
This process ties the server and client code tightly together, so if you change something on the server side then the client side needs to be updated as well.
Also, I this case I cannot access the functions of this service directly from a web browser.
One of the benefits of REST compared to the current solution is that the server and client are not tied tightly together. If I change something on the server side that the client is not interested in it won’t affect the client at all. Also, in that case I could also test many of my functions directly from a browser.
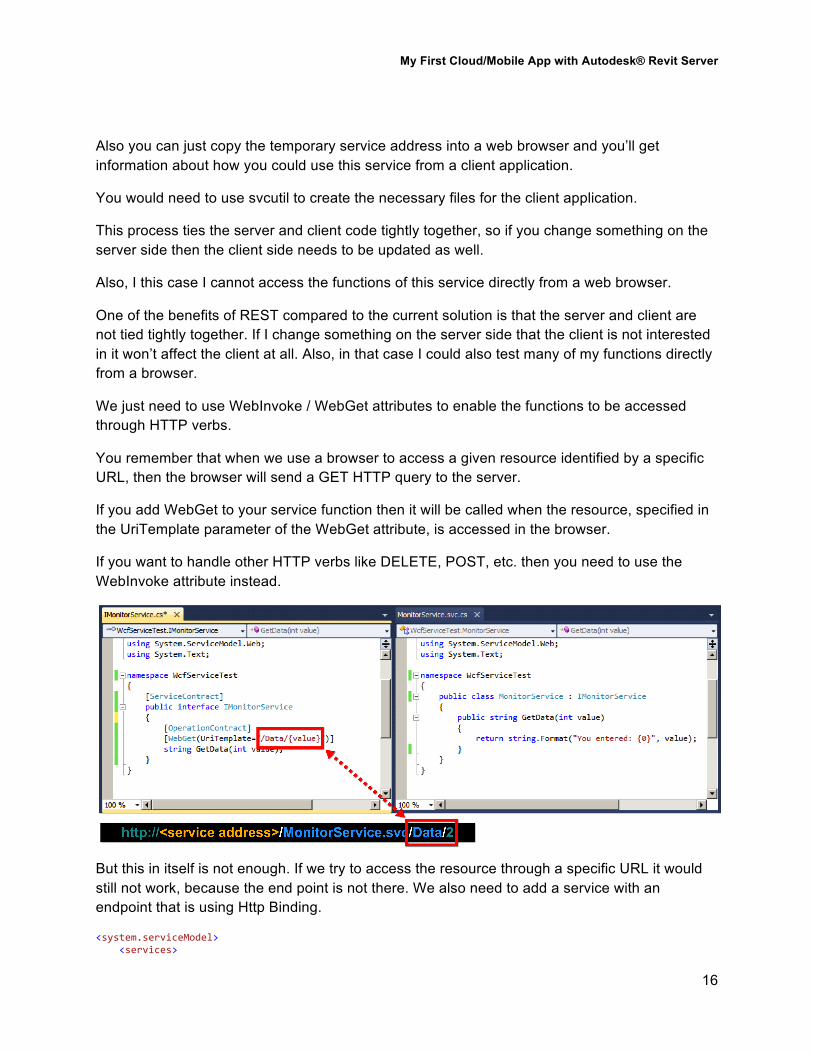
We just need to use WebInvoke / WebGet attributes to enable the functions to be accessed through HTTP verbs.
You remember that when we use a browser to access a given resource identified by a specific URL, then the browser will send a GET HTTP query to the server.
If you add WebGet to your service function then it will be called when the resource, specified in the UriTemplate parameter of the WebGet attribute, is accessed in the browser.
If you want to handle other HTTP verbs like DELETE, POST, etc. then you need to use the WebInvoke attribute instead.
But this in itself is not enough. If we try to access the resource through a specific URL it would still not work, because the end point is not there. We also need to add a service with an endpoint that is using Http Binding.
<system.serviceModel> <services>
My First Cloud/Mobile App with Autodesk® Revit Server
17
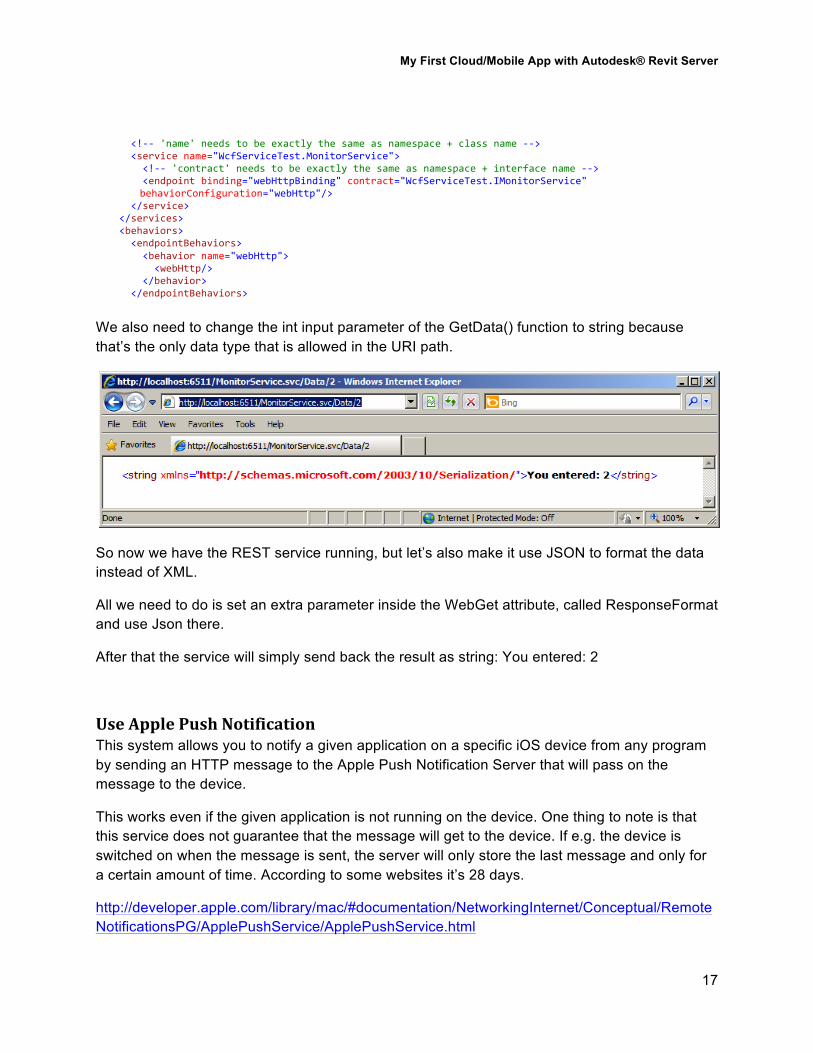
<!-‐-‐ 'name' needs to be exactly the same as namespace + class name -‐-‐> <service name="WcfServiceTest.MonitorService"> <!-‐-‐ 'contract' needs to be exactly the same as namespace + interface name -‐-‐> <endpoint binding="webHttpBinding" contract="WcfServiceTest.IMonitorService"
behaviorConfiguration="webHttp"/> </service> </services> <behaviors> <endpointBehaviors> <behavior name="webHttp"> <webHttp/> </behavior> </endpointBehaviors> We also need to change the int input parameter of the GetData() function to string because that’s the only data type that is allowed in the URI path.
So now we have the REST service running, but let’s also make it use JSON to format the data instead of XML.
All we need to do is set an extra parameter inside the WebGet attribute, called ResponseFormat and use Json there.
After that the service will simply send back the result as string: You entered: 2
Use Apple Push Notification This system allows you to notify a given application on a specific iOS device from any program by sending an HTTP message to the Apple Push Notification Server that will pass on the message to the device.
This works even if the given application is not running on the device. One thing to note is that this service does not guarantee that the message will get to the device. If e.g. the device is switched on when the message is sent, the server will only store the last message and only for a certain amount of time. According to some websites it’s 28 days.
http://developer.apple.com/library/mac/#documentation/NetworkingInternet/Conceptual/RemoteNotificationsPG/ApplePushService/ApplePushService.html
My First Cloud/Mobile App with Autodesk® Revit Server
18
In order to use APN with your application it needs an App ID that has no wild-card character (asterisk: *) in it. Then you can enable APN for that App ID.
When your app starts up you need to enable it to receive APN messages:
[[UIApplication sharedApplication] registerForRemoteNotificationTypes: UIRemoteNotificationTypeBadge | UIRemoteNotificationTypeAlert | UIRemoteNotificationTypeSound];
If the registration was successful then the following function will be called with the device token:
(void)application:(UIApplication *)app didRegisterForRemoteNotificationsWithDeviceToken:(NSData *)devToken{ NSString * str = [devToken description]; }
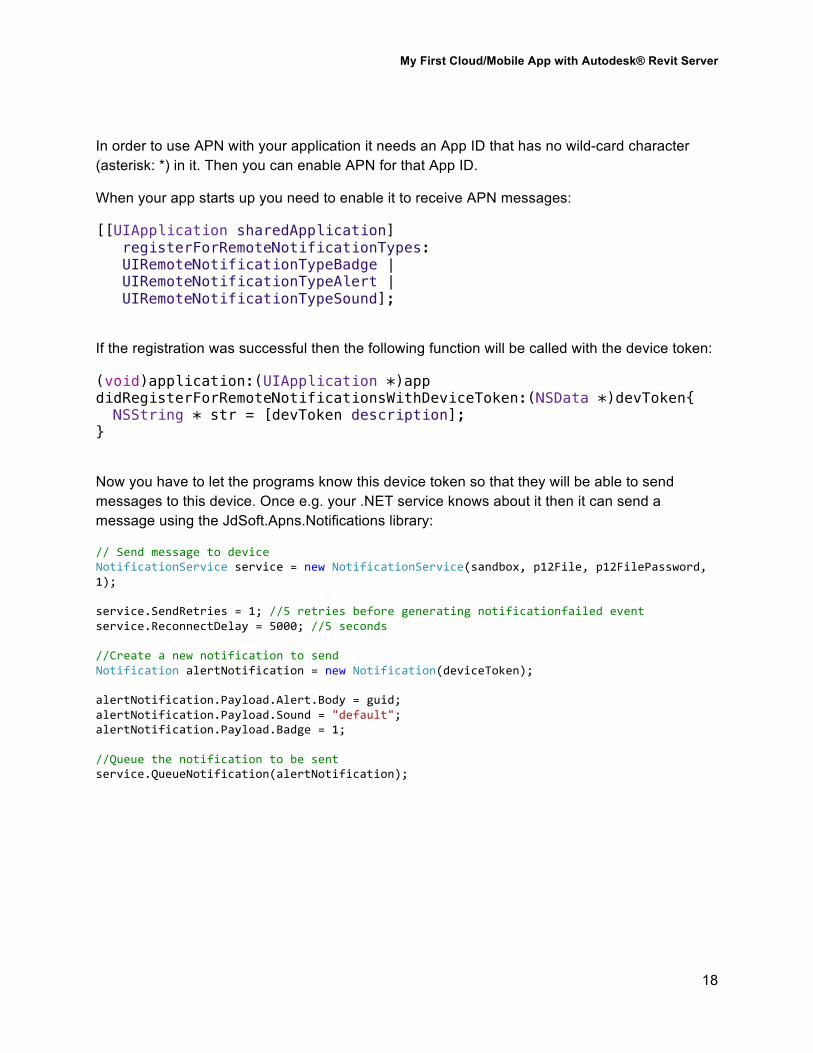
Now you have to let the programs know this device token so that they will be able to send messages to this device. Once e.g. your .NET service knows about it then it can send a message using the JdSoft.Apns.Notifications library:
// Send message to device NotificationService service = new NotificationService(sandbox, p12File, p12FilePassword, 1); service.SendRetries = 1; //5 retries before generating notificationfailed event service.ReconnectDelay = 5000; //5 seconds //Create a new notification to send Notification alertNotification = new Notification(deviceToken); alertNotification.Payload.Alert.Body = guid; alertNotification.Payload.Sound = "default"; alertNotification.Payload.Badge = 1; //Queue the notification to be sent service.QueueNotification(alertNotification);
My First Cloud/Mobile App with Autodesk® Revit Server
19
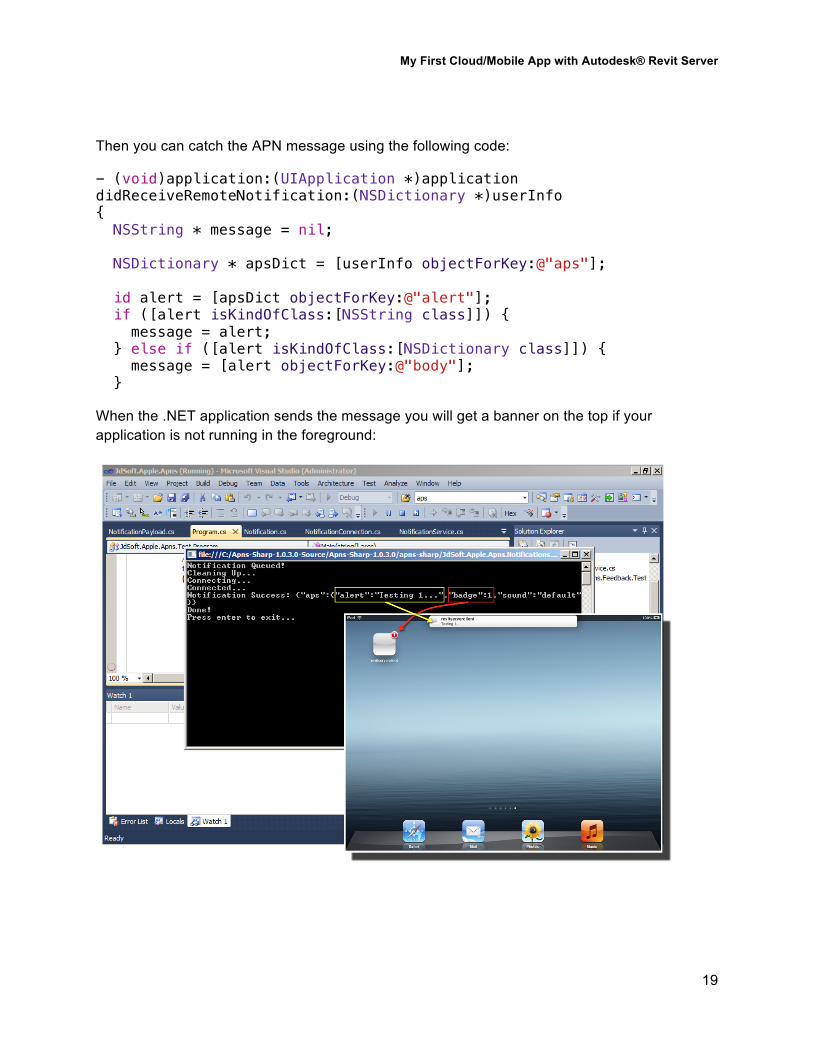
Then you can catch the APN message using the following code:
- (void)application:(UIApplication *)application didReceiveRemoteNotification:(NSDictionary *)userInfo { NSString * message = nil; NSDictionary * apsDict = [userInfo objectForKey:@"aps"]; id alert = [apsDict objectForKey:@"alert"]; if ([alert isKindOfClass:[NSString class]]) { message = alert; } else if ([alert isKindOfClass:[NSDictionary class]]) { message = [alert objectForKey:@"body"]; }
When the .NET application sends the message you will get a banner on the top if your application is not running in the foreground: