Embed Size (px)
Citation preview

USER’S GUIDEF O R T H E E 5 A N D E 5 P LU S
K N I F E S H A R P E N E RS

2
ELECTRICSHARPENER
CERAMIC HONING ROD
Edge Rollers
One Touch Programming
Belt Storage
Sharpening Guides
MicroForge
Ceramic Rod
17° Sharpening Guides
S H A P E * Click 3 Times, Quickly 90 sec Cycle
S H A R P E N Click 2 Times, Quickly 90 sec Cycle
R E F I N E Click 1 Time 45 sec Cycle
S T O P Click 1 Time Stops Cycle
TOUR YOUR SHARPENER
ONE TOUCH PROGR AMMINGThe E5 includes One Touch Programming, providing 3 stages:
*Also runs as untimed cycle with the REPAIR AND RESTORE recipe in the E5 UPGRADE KIT (sold separately).
The E5 UPGRADE KIT provides additional angle guides to maintain traditional edge geometries, if preferred:
15 ° E A S T G U I D E S — For Asian style knives.2 0° W E S T G U I D E S — For European style knives.M A S T E R B E LT K I T — For more versatility in sharpening.
E5 Upgrade Kit sold separately at retailers or worksharpculinary.com.
3
The 17° guides create an optimal edge on any straight edge knife.
SHARPEN | CLICK 2 TIMES, QUICKLY | CYCLE: 90 SECONDSFor best results, complete the full timed cycle.
HOW TO SHARPEN
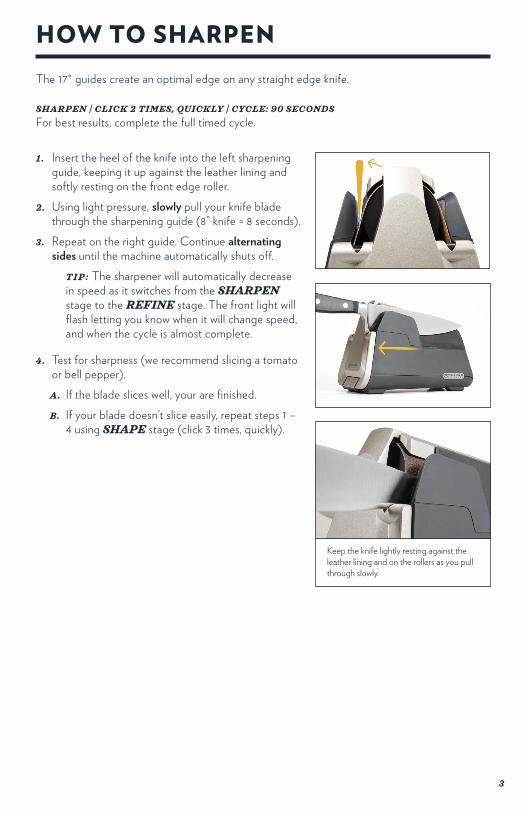
1 . Insert the heel of the knife into the left sharpening guide, keeping it up against the leather lining and softly resting on the front edge roller.
2. Using light pressure, slowly pull your knife blade through the sharpening guide (8” knife = 8 seconds).
3 . Repeat on the right guide. Continue alternating sides until the machine automatically shuts off.
T I P : The sharpener will automatically decrease in speed as it switches from the SHARPEN stage to the REFINE stage. The front light will flash letting you know when it will change speed, and when the cycle is almost complete.
4 . Test for sharpness (we recommend slicing a tomato or bell pepper).
A . If the blade slices well, your are finished.
B . If your blade doesn’t slice easily, repeat steps 1 – 4 using SHAPE stage (click 3 times, quickly).
Keep the knife lightly resting against the leather lining and on the rollers as you pull through slowly.

4
1 . Pull open the front cover of the unit. Cover is secured with magnet.
2. Press down on the tensioner, located behind the top, large pulley (wheel).
3 . Holding tensioner down, slide belt off.
4 . Lift up tensioner to find extra belt storage.
5 . To install new belt, hold tensioner down and slide belt around all 3 pulleys (wheels).
For more info about belts, see SHARPENING BELT INFORMATION section.
CHANGING/REPLACING BELTS
ON
OFF
Belts
Belt Tensioner
1 . Push back on guide from the front of the sharpener until the guide snaps out of place.
2. Lift the guide to remove.
T I P 1 : Remove guides to clean debris on the leather liner with a dry cloth or brush.
T I P 2: Remove right or left guide to access scissor guide. See sharpening scissor section for more detail.
3 . To reinstall guide, align screw with hole on sharpener.
4 . Push the guide forward toward the front of the sharpener until it snaps into place. Make sure it is flush with the sharpener.
The E5 Upgrade Kit includes expandable sharpening capabilities with 15° EAST GUIDES and 20° WEST GUIDES (sold separately).
REMOVING GUIDES
BELT STOR AGEWith the belt removed, lift the belt tensioner to reveal belt storage space.

5
The ceramic honing rod included with the E5 ELECTRIC SHARPENER was designed to work in combination with the E5 ’s 17° STANDARD GUIDES. Use the ceramic rod to further refine an edge or to quickly maintain an edge between sharpenings.
CERAMIC HONING ROD
Sharpening Guide
Sharpening Guide
MicroForge
For best results, use built-in angle guides.
1 . Insert the ceramic rod into the handle.
2. Hold the handle vertically with the rubber tip of the honing rod resting on a cutting board.
3 . Place the heel of your knife against one of the guides to establish the proper sharpening angle. While maintaining the angle established by the guide, slowly draw the entire length of blade, from heel to tip, along the full length of the ceramic rod. Use light pressure.
4 . Repeat 10 slow, alternating strokes.
T I P : Lighter pressure creates sharper results.

6
MICROFORGE
Our exclusive MicroForge feature creates an optional edge you can apply to any steel blade to create a more durable edge with superior cutting control. A MicroForged edge really shines when chopping hearty vegetables and slicing crusty breads, but is beneficial in all applications. MicroForge cold forges micro-facets along one side of the cutting edge, creating a toothier slice that cuts fibrous ingredients better, and retains its edge longer.
While knives used specifically for paper-thin slicing are best left with our standard E5-sharpened edge, most everyday chef ’s knives see improved performance and life with a MicroForge edge. The MicroForge edge can be removed at any time with the Shape stage of the E5.
1 . First sharpen your knife using the E5 sharpener.
2. Remove the CERAMIC ROD from the handle.
3 . Hold the handle vertically, resting the base on a cutting board.
4 . Place the tip of the blade into the MicroForge slot and hold the knife parallel to the cutting board.
5 . Slowly push entire length of blade through slot ONCE. Keep blade resting against handle of the honing rod as you push the knife through.
T I P : Use moderate force, (similar pressure required to cut a sweet potato, approx 4 lbs pressure).
6 . Now hone the blade by reinstalling the ceramic rod into the handle and making 10 slow, alternating strokes.
T I P : You can also hone using the REFINE stage on the electric sharpener.
Hone the MicroForged edge
See how to remove MicroForge on the FREQUENTLY ASKED QUESTIONS page on WorkSharpCulinary.com.
E 5 - S H A R P E N E D E D G E M I C RO F O RG E E D G E
Knife edges viewed through a microscope
at 50x.

7
1. First, remove the right sharpening guide to expose the scissor guide. See REMOVING GUIDES section for details.
2. Open the front cover and keep open. Single click for the REFINE stage.
3. Place the scissor blade, flat side facing up, all the way to the hinge, resting on the scissor sharpening guide as shown.
4. Using light pressure against the belt, pull blade straight along the belt (keeping it flat against the guide).
5. Flip the scissors and repeat on the other blade, flat side facing up, staying on the right side of sharpener
T I P : For left handed scissors, use left side of the sharpener.
SCISSORS/SHEARS
Sharpen ONLY the beveled side of your scissors.
BEVEL
Scissor Guide
Top View
FLAT
Most serrated and bread knives have a flat side and a serrated side on the blade.Using the CERAMIC HONING ROD, sharpen only the FLAT SIDE.
1. Hold the CERAMIC HONING ROD horizontally.
2. Lay the knife flat on the rod with the flat side of the blade resting on the rod. Pull from heel to tip across the rod for 5 strokes at a slight angle.
SERRATED KNIVES

8
ADDITIONAL GUIDES AND 4 STEP GRIT PROGRESSION:• INCLUDED WITH THE E5 PLUS• OPTIONAL WITH THE E5
The E5 Plus Sharpener comes with 17° GUIDES installed. These guides will create a high-performance edge on any straight edge knife. The UPGRADE KIT (included with the E5 Plus) provides additional angle guides to maintain traditional edge geometries on classic Western and Eastern knives, if preferred.
Sharpening Recommendations with Upgrade Kit:
15 ° E A S T E R N R E C I P E - Thin knives (Asian styles)
2 0° W E S T E R N R E C I P E - Thick knives (European styles)
See UPGRADE KIT RECIPES section for 15° Eastern and 20° Western recipes. See SHARPENING BASICS section for 17° Standard Recipe.
UPGRADE KIT INFO
Eastern style knives are made with harder steels and are designed for precision cutting. Western style knives are made with softer steels but have thicker blades, making them less brittle and a great choice for substantial cutting.
E A S T E R N K N I F E M A N U FAC T U R E R S :Shun, Tojiro, Global, Kyocera, Kasumi, Yoshihiro, MAC
W E S T E R N K N I F E M A N U FAC T U R E R S :Wüsthof, Henckels, Mercer, Victorinox, Messermeister
EASTERN (ASIAN) KNIVES VS WESTERN (EUROPEAN) KNIVESEastern and Western knives, also known as Asian and European, are different due to the manufacturing process and geometry of the blade. It is not uncommon to see a blend of the two styles (ie. an Asian knife with a European style handle, or a European knife with a lower Asian blade angle.
Asian Style Knife Western Style Knife

9
UPGRADE KIT RECIPES
15 ° E A S T E R N R E C I P EFor Asian style knives, use the 15° EAST GUIDES.
SHARPEN | CLICK 2 TIMES, QUICKLY
Install the 15° EAST GUIDES.
1 . Start with ◼GREY BELT and cycle through SHARPEN stage.
2. Change to ◼WHITE BELT and cycle through SHARPEN stage.
3 . Test knife. If not sharp, change to ◼RED BELT and repeat SHARPEN stage.
4 . Repeat steps 1-2.
MAINTAIN (ONCE OR TWICE PER WEEK)Use the ◼WHITE BELT and cycle through REFINE stage.
2 0° W E S T E R N R E C I P EFor European style knives, use the 20° WEST GUIDES.
SHAPE | CLICK 3 TIMES, QUICKLY
1 . Install the 20° WEST GUIDES.
2. Start with ◼RED BELT and cycle through SHAPE stage.
3 . Change to ◼GREY BELT and cycle through SHAPE stage.
4 . Test knife. If not sharp, move to REPAIR AND RESTORE recipe.
MAINTAIN (ONCE OR TWICE PER WEEK)Use the ◼GREY BELT and cycle through SHARPEN stage.

10
ONLY USE THE 20° WEST GUIDES WITH THIS RECIPE.
1 . Start with ◼BLUE BELT. Press and hold the power button for 3 seconds to engage the untimed SHAPE cycle.
2. Using left side of the sharpener, pull knife through sharpening guide. Staying on left side (do not alternate), make 2 more slow strokes through left sharpening guide (3 strokes total).
3 . Check for a burr.
T I P : See HOW TO FEEL FOR A BURR below.
4 . If no burr is formed, repeat another 3 slow strokes on the left side. Continue this pattern until a burr is formed along the entire length of blade.
5 . Now repeat the same number of strokes on the right side as you did on the left so you sharpen your blade evenly.
6 . Click power button once to turn off.
7. Enter SHARPEN stage (click twice, quickly) and complete cycle with ◼BLUE BELT (alternating sides).
8 . Change to ◼GREY BELT and cycle through SHARPEN stage (click twice, quickly), alternating sides.
HOW TO FEEL FOR A BURR A burr will form on the opposite side of the blade you are sharpening. A burr is a small, rolled over bit of steel that forms as you sharpen. Using your fingers, brush across and away from the knife edge. You are feeling for the material that has rolled over. You can feel a slight raise right as your fingers come to the edge of the blade. If the edge feels smooth as you brush your fingers off the edge, no burr has been raised. Be careful, exercise caution when feeling for a burr.
Burr
Cutting Edge
T I P : Check for a burr by brushing fingers across and away from the blade edge.
REPAIR AND RESTORE RECIPE

11
SHARPENING BELT INFORMATION
Our belts have been extensively tested and selected for their ability to remove material while being gentle on your knives.
ABR ASIVE BELT WEARBelt discoloration is not an indicator of wear. Our engineered belts expose new abrasive as they break down.
ADDITIONAL BELTS INCLUDED WITH THE E5 PLUS OR IN THE E5 UPGR ADE KIT (SOLD SEPAR ATELY)
C O LO R : RedD E S C R I P T I O N: MediumU S E : Shape, Sharpen, Refine
C O LO R : Blue D E S C R I P T I O N: CoarseU S E : Repair & Restore
BELTS AND ACCESSORIESUpgrade Kit ....................................................................................................................... CPAC004(Includes: 15° East guides, 20° West guides, Repair and Restore Recipe, Master Belt Kit)
Replacement Master Belt Kit ......................................................................................... CPAC005(5 belt kit includes: (1) Blue, (2) Red, (1) Grey, (1) White)
Replacement Belt Kit ...................................................................................................... CPAC006(Includes 3 Red belts)
C O LO R : Grey D E S C R I P T I O N: FineU S E : Sharpen, Refine
C O LO R : WhiteD E S C R I P T I O N: Extra-FineU S E : Refine

DAREX, LLCPO Box 730
210 E Hersey St.Ashland, OR 97520
PHONE: 1.800.418.1439
FAX: 1.541.552.1377
EMAIL: [email protected]
WEB: www.worksharpculinary.com
KITCHEN KNIFE SHARPENERS:
CP00119 Rev 3