Embed Size (px)
Citation preview

Course Scheduling
Queens College ~ Office of Converging Technologies ~ Training Group
718-997-4875 ~ [email protected] ~ I-Bldg 214
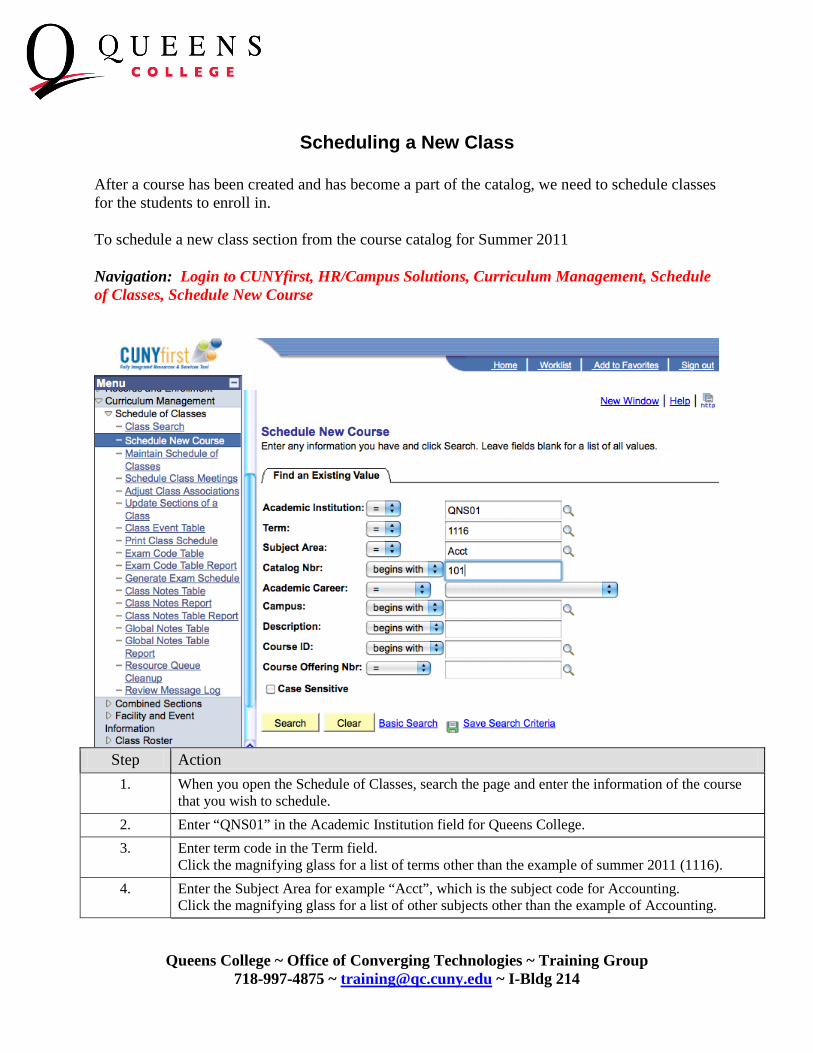
Scheduling a New Class After a course has been created and has become a part of the catalog, we need to schedule classes for the students to enroll in. To schedule a new class section from the course catalog for Summer 2011 Navigation: Login to CUNYfirst, HR/Campus Solutions, Curriculum Management, Schedule of Classes, Schedule New Course
Step Action
1. When you open the Schedule of Classes, search the page and enter the information of the course that you wish to schedule.
2. Enter “QNS01” in the Academic Institution field for Queens College. 3. Enter term code in the Term field.
Click the magnifying glass for a list of terms other than the example of summer 2011 (1116). 4. Enter the Subject Area for example “Acct”, which is the subject code for Accounting.
Click the magnifying glass for a list of other subjects other than the example of Accounting.
Queens College ~ Office of Converging Technologies ~ Training Group
718-997-4875 ~ [email protected] ~ I-Bldg 214
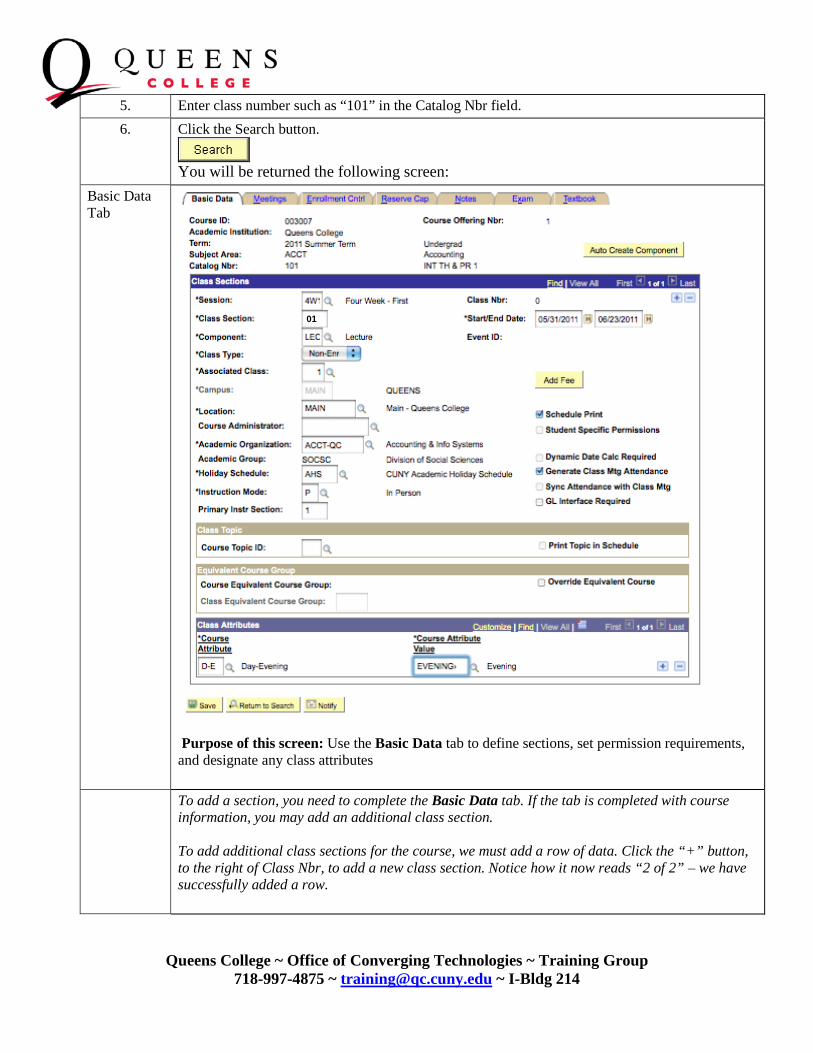
5. Enter class number such as “101” in the Catalog Nbr field. 6. Click the Search button.
You will be returned the following screen:
Basic Data Tab
Purpose of this screen: Use the Basic Data tab to define sections, set permission requirements, and designate any class attributes
To add a section, you need to complete the Basic Data tab. If the tab is completed with course information, you may add an additional class section. To add additional class sections for the course, we must add a row of data. Click the “+” button, to the right of Class Nbr, to add a new class section. Notice how it now reads “2 of 2” – we have successfully added a row.
01

Queens College ~ Office of Converging Technologies ~ Training Group
718-997-4875 ~ [email protected] ~ I-Bldg 214
Notice that many of the fields are automatically populated with information carried over from the Course Catalog (If you wish to see explanations for the fields that are automatically populated, see the last page of this document). If the class section you are creating requires different input values, override the existing values in the appropriate field(s), but the general rule of thumb is to not override any existing data.
7. The Session field represents the start and end of the semester. For Fall and Spring it will be automatically be set for the Regular Academic Session “1”. Note: In the summer semester there are 4 options (click on magnifying glass for more information): “Four Week 1, Six Week 1, Four Week 2, or Six Week 2”
8. The Class Section field represents a unique alphanumeric designator for a class section. Enter the value “01” since we are creating the 1st class section for this course. (For example, a class could have 20 sections; each would have a unique section number.)
9.
The following two sections should be left as is: The Component section should be set to LEC- Lecture. The Class Type should be set as Enrollment.
10. Associated Class: Associated Class should match Section No. If section number is 01, Associated Class is 1, Section = 02 then Associated Class = 2 etc.
11.
Use the look up key to select a Course Administrator, if necessary (depending on the class section). We can leave this field blank.
12 There are now a variety of choices for Instruction Mode: P for In-Person - (No content or assignments are online) W for Web-Enhanced- (No scheduled class meetings are replaced, but some of the course content and assignments are online) PO for Partially Online - (Some class work is online) H for Hybrid- (Between 33% to 80% of scheduled class meetings are replaced with online activities or virtual meetings) O for Online- (More than 80% of scheduled class meetings are replaced with online activities or virtual meetings) FO for Fully Online- (All the class work is online)
13.
Depending on the class section you are creating, you may need to use the checkboxes. We will select the “Schedule Print” and the “Generate Class Mtg Attendance” checkboxes.
Queens College ~ Office of Converging Technologies ~ Training Group
718-997-4875 ~ [email protected] ~ I-Bldg 214
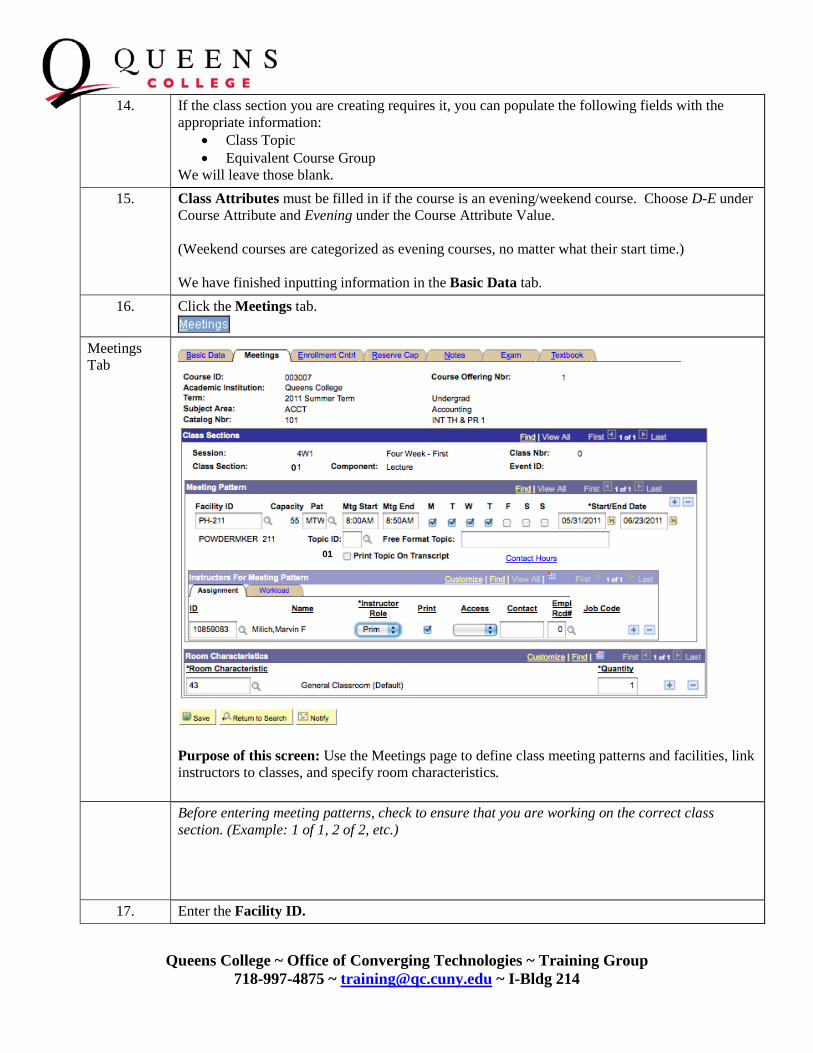
14. If the class section you are creating requires it, you can populate the following fields with the appropriate information:
• Class Topic • Equivalent Course Group
We will leave those blank. 15. Class Attributes must be filled in if the course is an evening/weekend course. Choose D-E under
Course Attribute and Evening under the Course Attribute Value. (Weekend courses are categorized as evening courses, no matter what their start time.) We have finished inputting information in the Basic Data tab.
16. Click the Meetings tab.
Meetings Tab
Purpose of this screen: Use the Meetings page to define class meeting patterns and facilities, link instructors to classes, and specify room characteristics.
Before entering meeting patterns, check to ensure that you are working on the correct class section. (Example: 1 of 1, 2 of 2, etc.)
17. Enter the Facility ID.
01
0
Queens College ~ Office of Converging Technologies ~ Training Group
718-997-4875 ~ [email protected] ~ I-Bldg 214
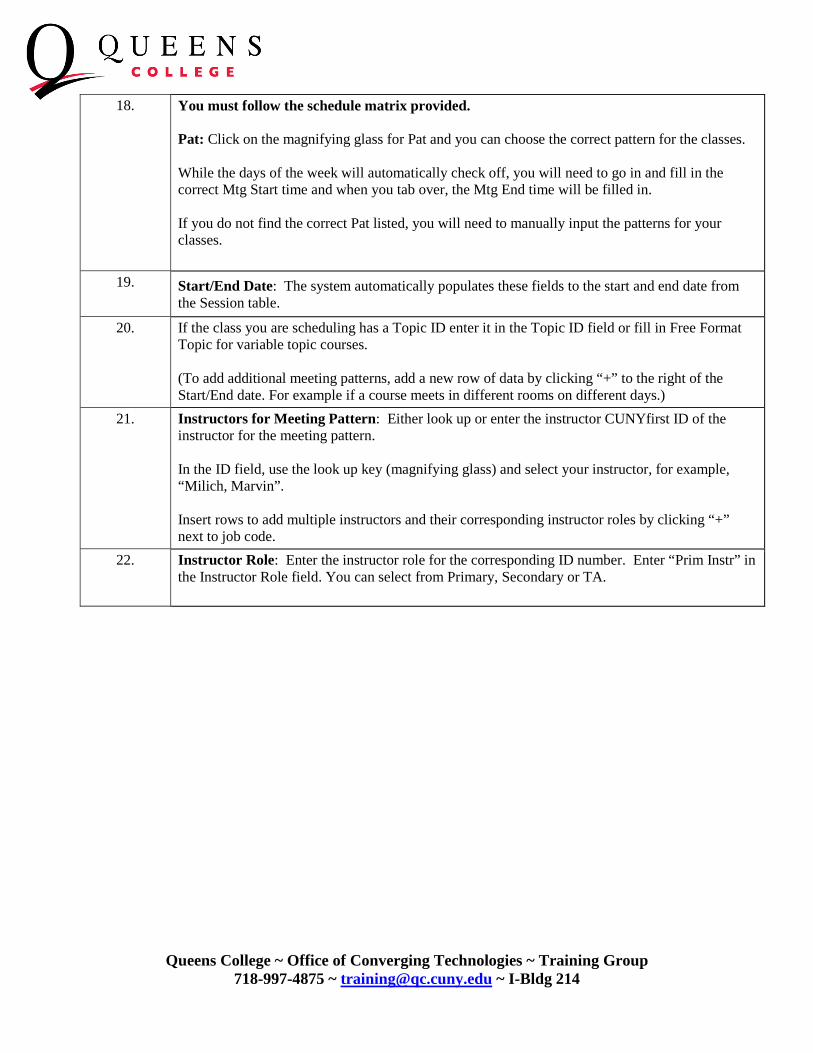
18. You must follow the schedule matrix provided. Pat: Click on the magnifying glass for Pat and you can choose the correct pattern for the classes. While the days of the week will automatically check off, you will need to go in and fill in the correct Mtg Start time and when you tab over, the Mtg End time will be filled in. If you do not find the correct Pat listed, you will need to manually input the patterns for your classes.
19. Start/End Date: The system automatically populates these fields to the start and end date from the Session table.
20. If the class you are scheduling has a Topic ID enter it in the Topic ID field or fill in Free Format Topic for variable topic courses. (To add additional meeting patterns, add a new row of data by clicking “+” to the right of the Start/End date. For example if a course meets in different rooms on different days.)
21. Instructors for Meeting Pattern: Either look up or enter the instructor CUNYfirst ID of the instructor for the meeting pattern. In the ID field, use the look up key (magnifying glass) and select your instructor, for example, “Milich, Marvin”. Insert rows to add multiple instructors and their corresponding instructor roles by clicking “+” next to job code.
22. Instructor Role: Enter the instructor role for the corresponding ID number. Enter “Prim Instr” in the Instructor Role field. You can select from Primary, Secondary or TA.

Queens College ~ Office of Converging Technologies ~ Training Group
718-997-4875 ~ [email protected] ~ I-Bldg 214
23. Access List: Enter the access for this instructor. The values work in hierarchical fashion: Approve: Instructor can enter grades and approve the grade roster. Grade: Instructor can only enter grades for the class. Post: Instructor can enter grades, approve the roster, and post the grades. (Registrar Only) For Instructors that need access to enter grades and send them to registrar, enter “Approve” in the Access List field. For Secondary or TA that need access to enter grades only
, enter “Grade” in the Access List Field.
Post is only used for Registrar. (To add additional instructors, add a new row of data) For Empl Rcd#, if the instructor is teaching an overload, or if the instructor has appointments at other CUNY colleges, please click on the magnifying glass to view available records to which the instructor’s hours can be assigned. Confirm that the record selected is for QNS01 (Queens College).
24. Click on the Workload tab just above the instructor name(s). An Assign Type of TCREG will appear, and the workload should match the number of contact hours (typically 3.0). No further entry is needed if this information is correct. If incorrect, uncheck the Autocalc box(es), which will cause the Load Factor box to be ignored. The Assign Type must be changed from TCREG to a different appropriate code. (If it is not changed, the workload will revert to its original value at a later date.) The most commonly used codes are: TTEAM (if more than one instructor) TJUMB (for jumbo classes), TLAB (for lab instruction) TTUTR (tutorials, workshops) TINST (independent study) TSUPV (thesis supervision) If the class is a combined section for which no workload hours are awarded, select TXCMB, which automatically sets the workload to zero. If none of the codes seem appropriate, use TJUMB as a default. Finally, enter the appropriate number of hours in the Workload box.
25. Room Characteristics: This field automatically populates with defaulted data. We have finished inputting information in the Meeting tab.
Queens College ~ Office of Converging Technologies ~ Training Group
718-997-4875 ~ [email protected] ~ I-Bldg 214
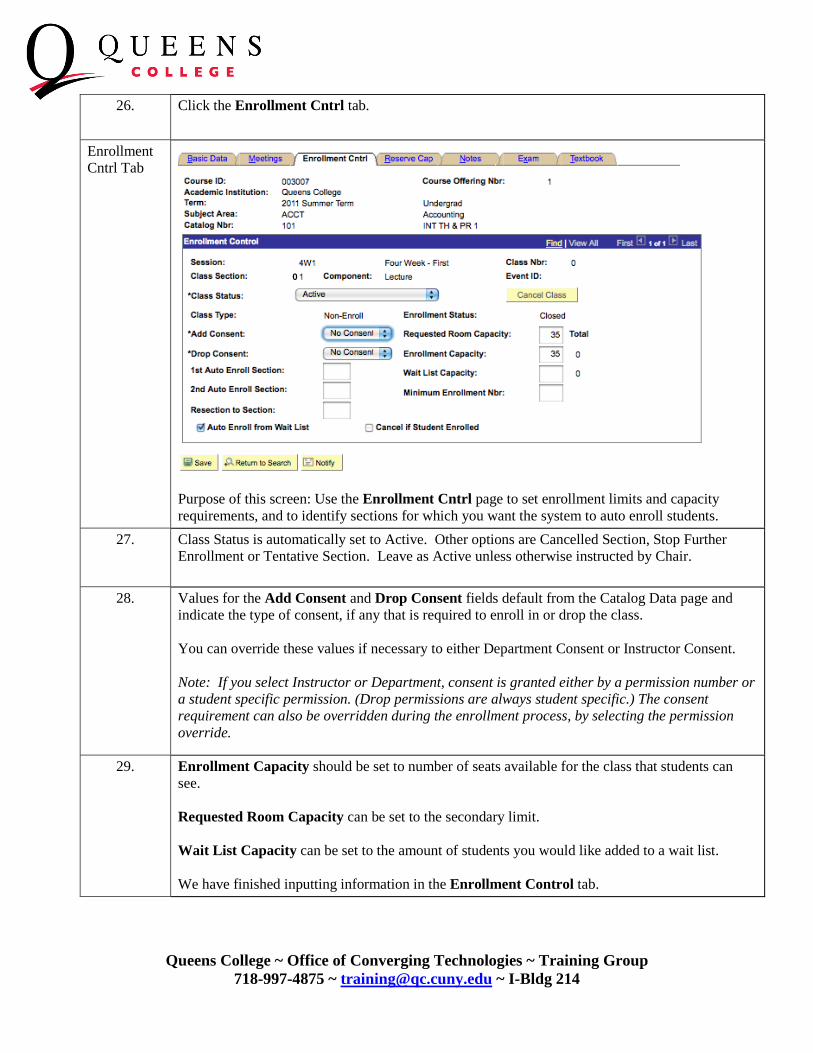
26. Click the Enrollment Cntrl tab.
Enrollment Cntrl Tab
Purpose of this screen: Use the Enrollment Cntrl page to set enrollment limits and capacity requirements, and to identify sections for which you want the system to auto enroll students.
27. Class Status is automatically set to Active. Other options are Cancelled Section, Stop Further Enrollment or Tentative Section. Leave as Active unless otherwise instructed by Chair.
28. Values for the Add Consent and Drop Consent fields default from the Catalog Data page and indicate the type of consent, if any that is required to enroll in or drop the class. You can override these values if necessary to either Department Consent or Instructor Consent. Note: If you select Instructor or Department, consent is granted either by a permission number or a student specific permission. (Drop permissions are always student specific.) The consent requirement can also be overridden during the enrollment process, by selecting the permission override.
29. Enrollment Capacity should be set to number of seats available for the class that students can see. Requested Room Capacity can be set to the secondary limit. Wait List Capacity can be set to the amount of students you would like added to a wait list. We have finished inputting information in the Enrollment Control tab.
0

Queens College ~ Office of Converging Technologies ~ Training Group
718-997-4875 ~ [email protected] ~ I-Bldg 214
30. Click the Reserve Cap tab.
Reserve Cap Tab
Purpose of this screen: Use the Reserve Cap page to assign reserve capacities for class sections.
NOTE: Reserve capacities are enrollment requirement groups that set aside a certain number of seats in a class section for students who meet certain criteria such as academic level, cumulative GPA, or number of units earned.
31. Click the Notes tab.
0

Queens College ~ Office of Converging Technologies ~ Training Group
718-997-4875 ~ [email protected] ~ I-Bldg 214
Notes Tab
Purpose of this screen: Use the Notes page to attach existing class notes or free-form text notes to class sections.
32. Enter Free Format Text with notes for students if needed. NOTE: Class notes are printed in the Schedule of Classes to provide students with information on the class, so be cautious of grammar and spelling. We have finished inputting information into the Notes tab.
33. Click the Exam tab. Exam Tab
Purpose of this screen: Use the Exam page to manually schedule exam times for the class sections.
0
0
Queens College ~ Office of Converging Technologies ~ Training Group
718-997-4875 ~ [email protected] ~ I-Bldg 214
Leave this tab blank for the time being, QC is still determining the business process for the exam schedule.
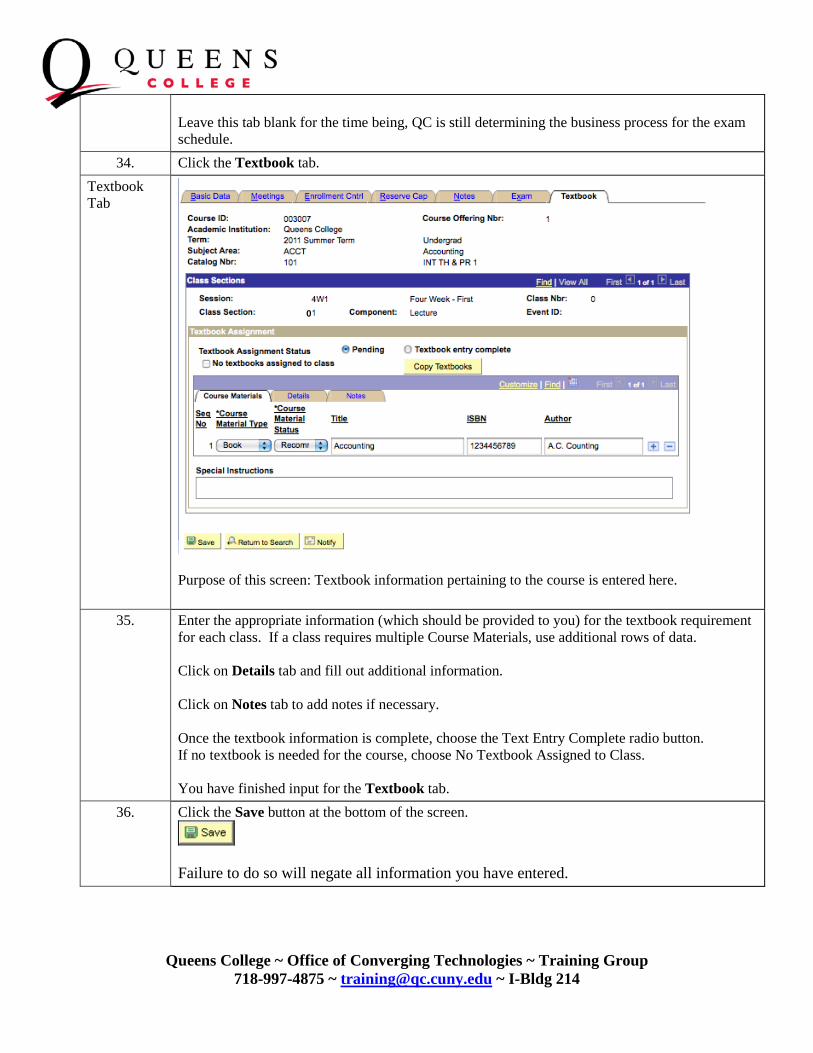
34. Click the Textbook tab. Textbook Tab
Purpose of this screen: Textbook information pertaining to the course is entered here.
35. Enter the appropriate information (which should be provided to you) for the textbook requirement for each class. If a class requires multiple Course Materials, use additional rows of data. Click on Details tab and fill out additional information. Click on Notes tab to add notes if necessary. Once the textbook information is complete, choose the Text Entry Complete radio button. If no textbook is needed for the course, choose No Textbook Assigned to Class. You have finished input for the Textbook tab.
36. Click the Save button at the bottom of the screen.
Failure to do so will negate all information you have entered.
0
Queens College ~ Office of Converging Technologies ~ Training Group
718-997-4875 ~ [email protected] ~ I-Bldg 214
Basic Data tab fields that were automatically populated from the Course Catalog:
• Component: The system populates this field by default to the graded component on the Catalog Data page (such as Lecture, Laboratory, Discussion, and so on) of the course. You can have multiple components and sections within a course offering.
• Class Type: The class type of Enrollment indicates which section is the primary section at enrollment time. The class type of Non-Enrollment is used to indicate that the section choice is the student's secondary enrollment option, or that the section is used in auto-enrollment. Within a class, only one component can possess the class type of Enrollment.
• Associated Class: You can link class sections that constitute a single course offering. For example, you can gather a certain number of lecture, lab, and discussion sections into one associated class number to indicate that the three components are related to one another. If you are scheduling a new section, the system populates the Associated Class field with 1 by default. (REFER TO APPENDIX A FOR DETAIL)
• Campus: The system populates the Campus field by default from the Course Catalog - Offerings page, indicating the campus that offers the course. You cannot revise this default. If a specific campus was not identified in the course catalog and does not default, then you can, on a section-by-section basis, schedule classes at various campuses.
• Location: Select the location of the campus. Location values are linked to campuses on the Campus Table page. A campus must be specified before you select a location.
• Academic Organization: The system populates the academic organization by default from the Course Catalog - Offerings page. The academic organization refers to the organization that offers the class. You can override this value.
• Academic Group: The system populates the academic group by default from the Course Catalog - Offerings page.
• Holiday Schedule: The system populated the holiday schedule by default from the Course Catalog – Offerings page.
• Instruction Mode: The system populates this field by default to In Person, but you can override the value.
• Start/End Date: The system populates this field by default to the start and end dates of the session. You can override the dates for an individual class.
You have completed the schedule new class procedure. Please make note of the new class number. End of Process.
NOTE: If creating an additional section for the same course number, click the Basic Data tab and click on the “+” sign next to Class Nbr.
![LIUC11 - 3b - Resource Scheduling [modalità compatibilità]my.liuc.it/MatSup/2010/N90312/LIUC11 - 3b - Resource Scheduling.pdf · RSM (“Resource Scheduling Method”) The comparison](https://img.pdfslide.us/doc/110x75/5e6960f1b56ec73fd051b5f1/liuc11-3b-resource-scheduling-modalit-compatibilitmyliucitmatsup2010n90312liuc11.jpg)