Embed Size (px)
Citation preview
1
Course Inventory Management (CIM) Helpful Hints
The following information is provided to you by the Office of the University Registrar (OUR) and Student
Information Systems (SIS). For questions, contact the OUR at [email protected].
Accessing CIM
There are three ways to access CIM.
1) Link to it from the Registrar’s website at http://registrar.missouri.edu/faculty-staff/index.php. On this
page, in the section labeled “Curriculum”, you will see a link for the “New CourseLeaf Curriculum
Forms”.
2) If you are an online catalog editor, when in the catalog at nextcatalog.missouri.edu, on any page with a
list of courses (i.e. home > Course Offerings > Accountancy, or Home > Undergraduate & Graduate >
College of Business > Accountancy > Courses), you will see a yellow pencil icon next to each course.
Click the pencil and it will open CIM with that current course displayed. You can proceed with any CIM
business from there.
3) Simply type in the url for the CIM system: https://nextcatalog.missouri.edu/courseadmin.
Technology and CIM
Not all browsers work with CIM in exactly the same way. So if you are having issues within CIM, try switching
browsers. We have found that CIM works better with Mozilla Firefox and Google Chrome than it does with IE.
You should also make sure that you have the latest, or relatively current, versions of the browsers installed on
your computer. For example, IE7 is no longer a supported browser and should be upgraded. Benefits of using
a recently upgraded browser: boxes display correctly, required fields function properly, some provide online
spell check. Drawbacks of using an outdated browser: layout of page is thrown off, required fields don’t act
as such and so you may skip them resulting in the form having to be returned to you, few have spell check.
Similarly, not all hardware works with CIM in exactly the same way. Any desktop or laptop computer should
have full access to all functionality described here. However, while iPads can be used to access the site, create
new course proposals, and edit existing courses, it cannot be used to submit them as it does not support the
functionality of browsing and attaching a document. So for iPads, do your work, save it, and come back to it
later to add attachments. Details on saving are later in this document.
Security to CIM
Any faculty or staff with a valid MU userid and password can access CIM. It is open for them to view, search,
propose a new course, deactivate a course or edit a course. The system is further secured in the workflow
process, such that as soon as a proposal is submitted for a new, edited or deactivated course, only those
individuals authorized can approve these proposals and move them forward in the online workflow approval
process.

2
Logging in to CIM
After you have navigated to CIM
using one of the 3 ways described
above, you will immediately be
directed to a UM System log in
screen. This screen should confirm
for you that you are logging into
CourseLeaf (the name of the
software behind the CIM and catalog
systems). Type in your MU assigned
userid and password to complete the
log in process.
If when you navigate to the url, you
don’t get the UM System log in
screen, and instead you immediately see the CIM screen with a red box saying
“Please Complete Log In”, it could mean that your log in from before was never
cleared, and there is a miscommunication between CIM and the secure log in
system. If you were to click on the log in box displaying, it would then give you a
screen similar to the one below. To clear this old log in information, you will
need to clear your cache on your browser. For instructions on clearing cache,
refer to the DoIT Knowledge Base at https://help.missouri.edu/portal/ss/ and search for “empty browser
cache”. The site has instructions for both pc’s and iPads.
3
Loading
Any time you are in CIM, and navigating between pages or forms, or clicking on links, if the page displays the
message of “Loading”, you should wait for the page to finish loading before clicking on anything or proceeding
with any data entry. It should not take more than 5-10 seconds for the page to finish loading, and the
message will disappear. If for some reason you have waited a minute and the page still says “Loading”, you
should close out of the page and out of CIM, clear your cache (see section above for link to instructions on
clearing your cache), and try it again. If the page still never finishes loading, contact the OUR at
Main CIM page
Once you have logged in, you will be directed to the main CIM page. Following is a description of the areas of
this page: Search for a course, Summary of a course, buttons to Propose New Course, Edit Course, and
Deactivate Course. Also on this page is a link to the Pending Curriculum Approval Report. This report is
described later in this documentation.
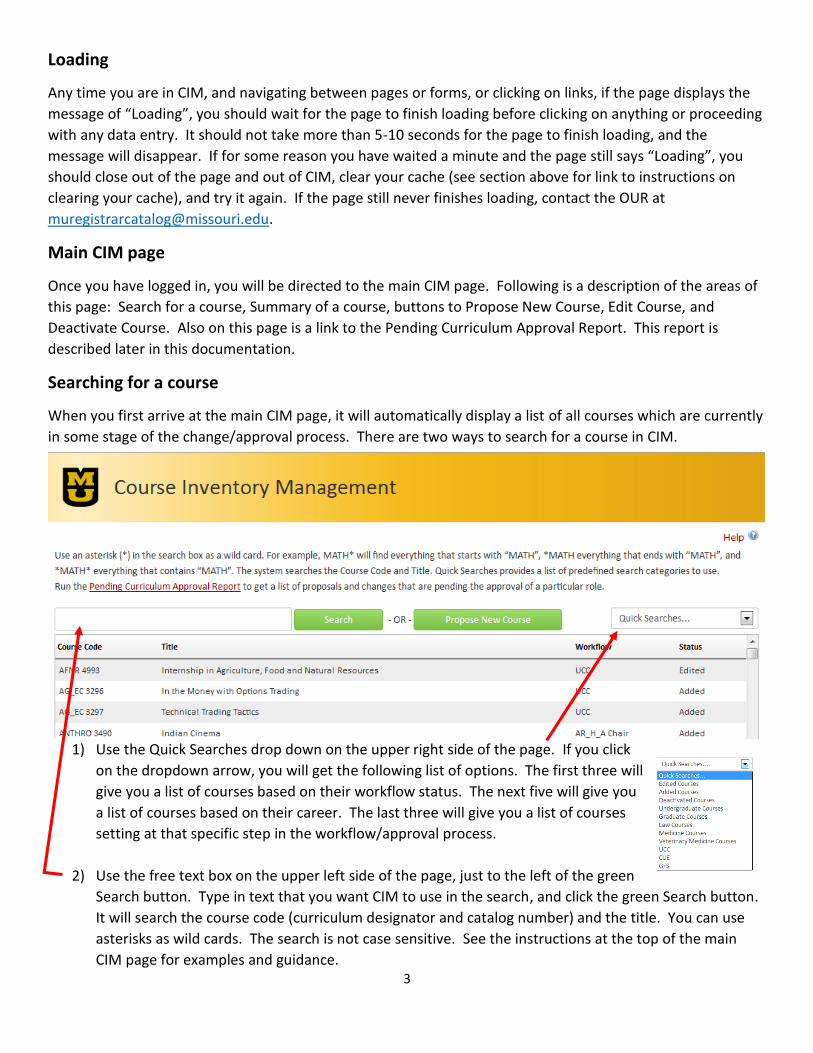
Searching for a course
When you first arrive at the main CIM page, it will automatically display a list of all courses which are currently
in some stage of the change/approval process. There are two ways to search for a course in CIM.
1) Use the Quick Searches drop down on the upper right side of the page. If you click
on the dropdown arrow, you will get the following list of options. The first three will
give you a list of courses based on their workflow status. The next five will give you
a list of courses based on their career. The last three will give you a list of courses
setting at that specific step in the workflow/approval process.
2) Use the free text box on the upper left side of the page, just to the left of the green
Search button. Type in text that you want CIM to use in the search, and click the green Search button.
It will search the course code (curriculum designator and catalog number) and the title. You can use
asterisks as wild cards. The search is not case sensitive. See the instructions at the top of the main
CIM page for examples and guidance.
4
Results of your search will display in a list below. If nothing matches your criteria, the message “No Results
Found” will display. If multiple courses match your search criteria, all will be listed in the box below. If only
one course matches your search criteria, it will display and will automatically be highlighted for you to take
further steps if you choose.
Summary of a Course
When a course is pulled through a search, select the course in the list, if it isn’t selected already, by clicking on
it one time. After a few seconds, the summary will display below. Following is a description of the sections in
this summary.
Date Submitted: lists the date and time the course was initially submitted into workflow (if it has been).
Viewing: lists the curriculum designator, catalog number and title of the course being viewed
Last edit: lists the date and time of the last time the course was edited (if it has been).
Preview Workflow or In Workflow: For any existing course that has not been edited, or for an existing course
or new course that has been edited/entered and saved in CIM but has not yet been submitted through
workflow, the summary page will display a link for “Preview Workflow”. Clicking on the link will pop up a box
displaying the steps that would be included in the workflow based on the current state of the data in the form.
The information listed includes the role name, the email address of the first person listed for the role, and the
name(s) associated with the role. Note that this is a tentative workflow. Changes made to the course (such as
adding/removing cross-listed or cross-leveled courses) could result in changes to the workflow. For courses
(existing and new) that have been submitted through workflow, “Preview Workflow” no longer displays.
Instead what displays is “In Workflow” with a list of the approval steps that this course is being sent through.
Steps showing in green have already been completed. The step showing in yellow is where the course is
currently awaiting approval. Steps in gray are what will follow. By hovering your cursor over an approval step,
the email address for the person associated with that step is displayed in the bottom left corner of the
window. Below the list of approval steps is “Approval Path” that provides details of date, time and userid for
the approvals already collected.
Course ecosystem: this section lists places where the course is referenced in the online catalog, lists other
courses referencing this course either in its course description as a prerequisite or corequisite. This gives the
user an idea of the kind of impact that any change to this course would have. Note that newly proposed
courses may not have an ecosystem, as there may not yet be impact on other existing courses or catalog
pages.
The rest of the summary covers the course form itself: Contact Information, Course Information, Credit
Restrictions and Grading, Course Requisites/Restrictions, Cross-listing and Cross-level, Course Justification,
Course Syllabus, Additional Comments. If the course has been edited, deleted information will show in red
with a strikethrough, and added information will show in green.
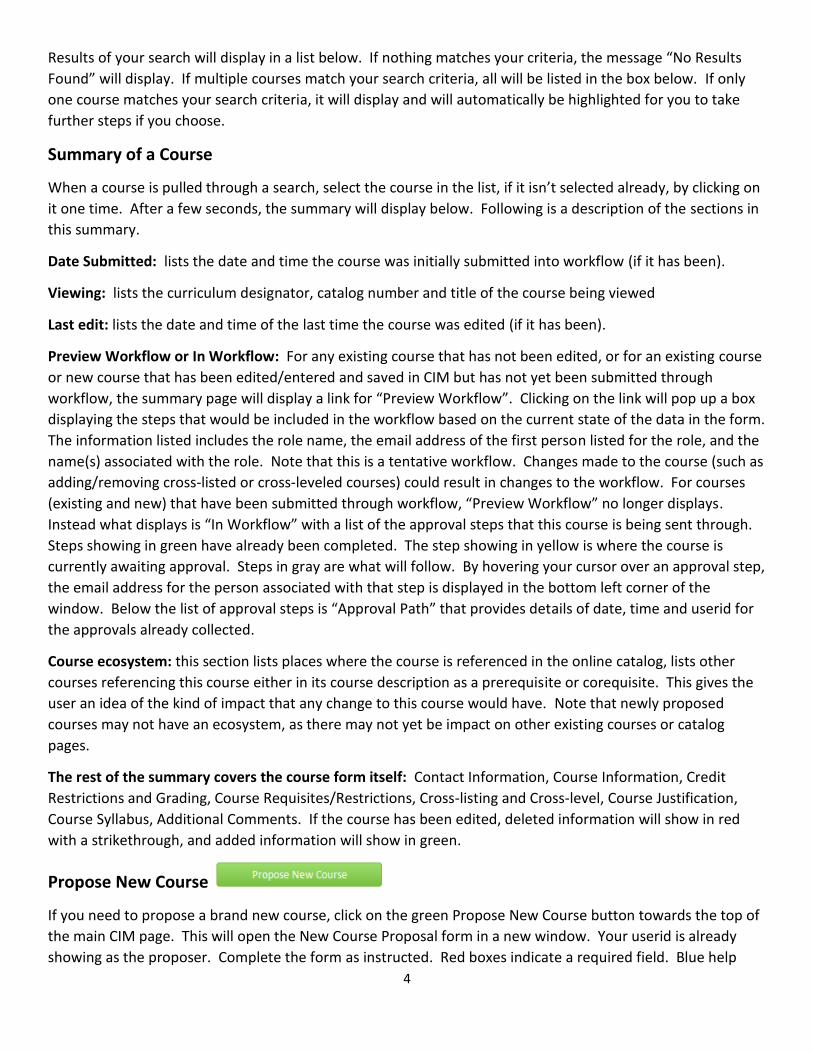
Propose New Course
If you need to propose a brand new course, click on the green Propose New Course button towards the top of
the main CIM page. This will open the New Course Proposal form in a new window. Your userid is already
showing as the proposer. Complete the form as instructed. Red boxes indicate a required field. Blue help

5
bubbles provide additional information on a specific question. Save and submit options are at the bottom of
the form (see below for instructions on these options). This form must be submitted for every new course you
are wanting to create. For example, if you are creating a course for ANTHRO 2011, and you plan to cross-list it
with another new course ENGLSH 2011, you must submit a form for ANTHRO 2011 and for ENGLSH 2011.
Edit Course
If you need to edit an existing course, once you have located the course through one of the search options,
click on that course so it is highlighted in the list and the summary for that course displays on the bottom
portion of the page. Then, click on the green Edit Course button at the top right of the summary, just below
the search results display box. This will open the Editing form in a new window. Your userid is already
showing as the proposer. Many other fields on the form are already populated with information from myZou.
Complete the form as instructed. Red boxes indicate a required field. Blue help bubbles provide additional
information on a specific question. Save and submit options are at the bottom of the form (see below for
instructions on these options).
If you are submitting a change for a course that has other courses with which it is cross-listed or cross-leveled,
you only need to submit the change once in order to have it applied to all of the courses. So for example, if
you need to submit a change for ANTHRO 1060 which is cross-listed with LINGST 1060, C_S_D 1060 and
ENGLSH 1060, then you simply need to edit ANTHRO 1060 and submit it through workflow. CIM will
automatically request approval from LINGST, C_S_D and ENGLSH, and the OUR will make the changes in
myZou to all four courses. Keep in mind that if the courses are cross-leveled, and you choose to submit the
change for both the 4000 and 7000 level course via an edit on the 4000 level course, you should remember to
include documentation to explain the impact on course requirements at both levels, as both the
Undergraduate Curriculum Committee and the Graduate Faculty Senate will have to approve the change.
If you have a course that only needs grammatical corrections (i.e. missing punctuation, misspelled word,
replacing “a” with “the”, etc), contact the OUR at [email protected] before filling out an Edit
Course form as some of these items can simply be corrected without having to use CIM and without going
through the workflow approval process.
If when you click on the Edit Course button you get an “Out of Sync”
message like the one to the right, you should close out of the form
and contact the OUR at [email protected] to report
a course that is out of sync. Be sure to include the course
information (curriculum designator and catalog number) in the
email. Do not choose one of the options provided. OUR will need
to fix the discrepancy before edits should be submitted. You will be
notified when the discrepancy has been resolved.
Deactivate
If you need to deactivate a course (also referred to as making it inactive), once you have located the course
through one of the search options, click on that course so it is highlighted in the list and the summary for that
course displays on the bottom portion of the page. Then, click on the red Deactivate button at the top left of

6
the summary, just below the search results display box. This will open the Deactivating form in a new window.
Your userid is already showing as the proposer. Simply indicate the effective term and justification. Red boxes
indicate a required field. Blue help bubbles provide additional information on a specific question. Save and
submit options are at the bottom of the form (see below for instructions on these options).
The Actual Forms
While the edit and propose new course forms themselves are fairly self-explanatory, below are some helpful
hints to guide you in their use.
Required Fields in red boxes: Any field which is required displays with a red box around it. These fields must
be completed prior to submitting the form into workflow. Most browsers will prevent you from submitting
the form with empty required fields. However, note that some older versions of browsers do not recognize
this functionality and will allow you to submit an incomplete form. Users should be aware that this will result
in the form being sent back to you for completion.
Prefilled: The fields on the Edit form are prefilled as much as possible with information from myZou. You only
need to edit the fields where changes are being made, and complete any required fields that may be blank,
such as the Effective Term, Justification, and Syllabus attachment.
Blue Help bubbles: Next to individual questions, you may notice a blue circle with a question mark inside of it.
These are referred to as help bubbles. You can either hover over the bubble, or click on it, and additional
information regarding the question and answer options will be displayed in a pop up window. If you clicked
on it, simply click the X to close the pop up window.
Logic built into form: Remember that there is logic built into the form. This logic is to help prevent errors,
and to make the form more efficient. For these reasons, it is highly recommended that you complete the form
in order, from top to bottom. Following are ways in which the logic is built into the form. First, answers to
certain questions drive the appearance or hiding of questions below. For example, if you select the career of
Undergraduate, the question on general education will display, but if you select any other career, the general
education question is hidden. Or for example, if you use a course number of 3000, you will only see the
question about cross-listed courses and the question on cross-leveled courses will be hidden because 3000
level courses cannot be cross-leveled. Second, answers to certain questions drive the answer options in
questions below. For example, if you select the career of Undergraduate, then you will see three possible
answers for the Grading Option question, but if you select Veterinary Medicine you will only see two. Third,
values for some answers are restricted, and an error message will result if you choose an invalid answer. For
example, if you select the career of Undergraduate, then the course number must be in a range of 0-4999. Or
if you propose a course using a number for an existing course, you will receive an error message indicating
“Course Number has already been used.”
Answer options do not match my needs: In multiple choice questions or drop downs, if you do not see the
answer you are needing to use, contact the OUR at [email protected]. For example, in the
Effective Term question, future terms are only listed up to a certain point in time, and will be updated on a
periodic basis. But if you are trying to submit a form for a future term that is not yet listed, contact the OUR
and that term can be added to the drop down.

7
Other form issues: For any other issues or questions regarding the form, contact the OUR at
Action Options – Cancel, Save Changes, Save & Submit
Once you are inside the form, you have three options with your work. Those are described below.
Cancel: Clicking on this button will close the form and not save any changes made in this session. So, for
example, if you were proposing a new course, and had not yet saved the form, selecting Cancel will delete the
form and leave no evidence of your work. If you had previously started a proposal form and saved it, and are
now returning to it, selecting the Cancel will only discard the work you have done in this session, and save the
form as it was the last time you saved it.
Save Changes: Clicking on this button will save all changes that have been made, and then close the form,
returning you to the main CIM page. This does NOT submit the proposed changes through workflow. You, or
another user, can come back at any time and pick up where you left off. You will be allowed to save without
having yet filled out all of the required fields.
Save & Submit: Clicking on this button will save all changes that have been made, check that all required
fields are completed, and submit the form into approval workflow. You will no longer be able to edit the form
once it has been submitted, unless you represent a step within the approval workflow. Once submitted, the
first person in the approval workflow will receive an email to notify them that they can now review the
proposal.
Shredding a Proposal
If you should happen to start a proposal, either new course or edit existing course, and realize before you Save
& Submit that you do not need this proposal for whatever reason, you should send an email to
[email protected] and ask that the proposal be shredded. Only courseleaf administrators in
the Registrar’s Office can shred a proposal. If the proposal was for a new course, shredding that proposal will
delete all evidence that it ever existed. If the proposal was for an edit on an existing course, all evidence of
the change will be deleted and the course reverts back to its unedited state.
Save or Print page
If you want to save or print a copy of a page, when
you have that page visible, right click anywhere on
the page. In the menu that pops up, select
“Convert web page to Adobe PDF”.

8
A pop up window will ask you to name the
page and choose the location where you
want the PDF saved. Click Save.
Another window will pop up to display the
progress.
As soon as it is finished, the PDF will open on
your screen. You have now saved the screen
as a PDF. To print it, simply use the print
icon on the PDF document.
Workflow (general description)
Workflow is the online automated approval process built into the CourseLeaf software. With workflow, no
more printing and hard signature collections are necessary. When a course proposal is saved and submitted
into workflow, CIM automatically assigns the workflow steps necessary to gather the required approvals.
These steps are then displayed on the course summary page, as described above. Each step is represented by
a role. Each role belongs to a person or group of people.
Once the form is submitted into workflow, and CIM has assigned the workflow steps, the person(s) in the first
step of the workflow receives an email notice that the course needs their review. This person has the option
to edit the proposal, approve the proposal, or rollback the proposal. The workflow is a linear process, in that it
must proceed one step at a time, from step 1 to step 2 to step 3, etc. The person in step 2 will not have access
to approve the proposal until step 1 has approved. And the person in step 3 will not have access to approve
the proposal until step 1 and step 2 have approved. See section below on Approval Queue for additional
details on action options.
Keep in mind that the workflow that has been set up for CIM may be different than the workflow that was
established for editing/approval of the online catalog pages, and in most cases it will be different.
MU’s Workflow
Each academic area has indicated the individuals who need to approve proposals, criteria on which proposals
they need to approve (i.e. undergraduate only), and the order in which approvals are to be collected. This

9
data has been used to set up the CIM system so that the automatically assigned workflow collects the required
electronic signatures.
If a course is being edited or proposed, and it is cross-listed or cross-leveled, the departments and colleges
corresponding to the crossed course will also have a step inserted into the assigned workflow. We refer to
this as Related Depts & Cols. The steps that are inserted for the Related Depts & Cols are the same as if the
course was theirs to begin with. These steps are inserted after the originating area’s department steps, but
before the originating area’s Dean steps.
For undergraduate courses, or graduate courses cross-leveled with an undergraduate course, the workflow
includes a step for the Undergraduate Curriculum Committee (UCC). Also, if there is a change being proposed
to a general education designator (either one is being added or removed), a step is inserted for the Committee
on Undergraduate Education (CUE).
For graduate courses, or for courses that are cross-leveled with a graduate course, the workflow includes
several steps to collect the approval of the Graduate Faculty Senate and the Graduate Dean. The steps include
the following: AAC-GFS Vote to collect the approval of the Academic Affairs Committee, AAC-GFS Chair for the
committee chair, GFS Pres for the senate president, and Grad Dean for the Dean of the Graduate School.
For all courses, the workflow includes several administrative type steps for the Office of the University
Registrar (OUR).
OUR initial review – this is the first step in every workflow. In this step, the staff in the OUR who deal
with the courses and catalog information will conduct a review of the form and the workflow. This
review will help to insure that, first, the workflow is being assigned as we expected it to be, especially
in the early use of the new system. There are also occasions where the OUR has to manually insert a
step or two into the workflow. OUR will also review the form, just to insure that all required content is
included, and that technically the form is correct. Just to clarify, the OUR is not evaluating the content
of the form in terms of its academic validity, as that is for the areas, departments and colleges to
review. If all is technically in place, the OUR will approve the proposal, moving the form forward in the
workflow.
OUR final review – this is the second to last step in every workflow. In this step, the OUR will once
again review the form, as it could have changed since the beginning of the workflow. If all is
technically in place, the OUR will then data enter the information into myZou, and approve the
proposal, moving the form to the last step in the workflow.
PeopleSoft – this is the last step in every workflow. In this step, CIM compares the current version of
the form to the latest data file it has received from myZou, to make sure all now matches. If it does,
CIM will add the final approval on the course and finish the workflow.
Note that some roles are named for the area, and do not necessarily exactly match the HR title of the person
belonging to the role. For example, the role may indicate it is for the Dean in a college, but the person actually
associated with the role may be the Associate Dean or the Dean’s Administrative Assistant.
Below is a sample email that is sent to an approver when a course is ready for them to review. (Users who are
part of a voting committee receive a slightly different email. See section below on Voting Feature.)

10
The email is addressed as “From: Catalog Editor”, and “To: <THE NAME OF THE PERSON ASSOCIATED WITH
THE ROLE>”, in this case “To: MU UNIV REGISTRAR CATALOG”. The salutation addresses this person, indicates
a pending course change needs to be reviewed, and names the course (in this example ATHTRN 3500:
Rehabilitation of Athletic Injuries). Then a link is provided to access the approval queue. The approval queue
is discussed in more detail below in this document.
Individuals in the approval process should be aware that some email notices may end up in their junk mail
folder instead of their inbox. If this happens, to prevent future emails from being routed to junk mail, the user
needs to list the catalog editor email address in the Safe Senders in Outlook.
It is also possible for individuals to be sent a notice within the workflow that is simply for informational
purposes. These email notices will not include a link to the approval queue, since no approval is required.
Instead a link is provided to CIM where the user can review the proposals in the works.
Approval Queue
Using the link provided in the email notice, approvers will be directed to a special page inside of CIM called an
Approval Queue, and will be asked to log in using their MU assigned userid and password. (Users who are part
of a voting committee receive a slightly different page display. See section below on Voting Feature.)
Once logged in, the approval queue will display, looking something like this.
11
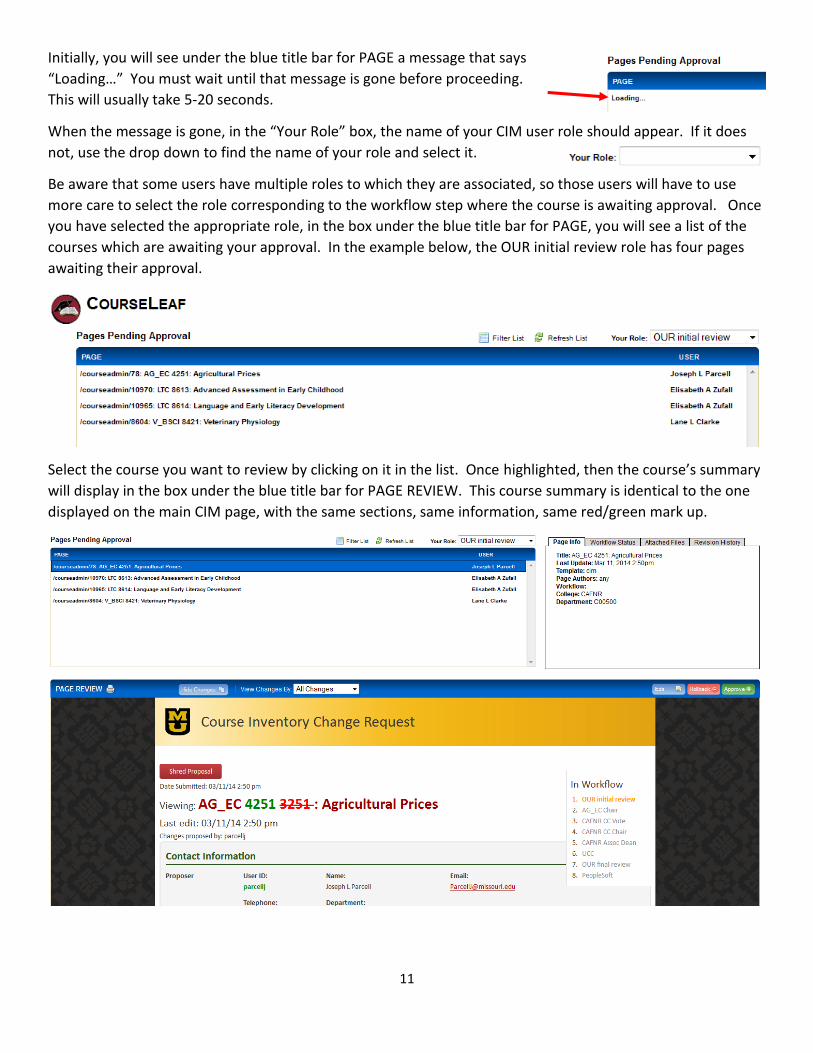
Initially, you will see under the blue title bar for PAGE a message that says
“Loading…” You must wait until that message is gone before proceeding.
This will usually take 5-20 seconds.
When the message is gone, in the “Your Role” box, the name of your CIM user role should appear. If it does
not, use the drop down to find the name of your role and select it.
Be aware that some users have multiple roles to which they are associated, so those users will have to use
more care to select the role corresponding to the workflow step where the course is awaiting approval. Once
you have selected the appropriate role, in the box under the blue title bar for PAGE, you will see a list of the
courses which are awaiting your approval. In the example below, the OUR initial review role has four pages
awaiting their approval.
Select the course you want to review by clicking on it in the list. Once highlighted, then the course’s summary
will display in the box under the blue title bar for PAGE REVIEW. This course summary is identical to the one
displayed on the main CIM page, with the same sections, same information, same red/green mark up.

12
From here, the approver has three options: Approve, Edit, or Rollback.
Approve: allows the person to “sign off” and send the proposal on to the next step in the workflow.
Once Approve is selected, that person no longer has access to the proposal; only the next person in the
workflow has access.
Edit: allows the person to make additional changes before approving. Subsequent approvers will see
this revised proposal. Note that you still have to click Approve once you are done editing.
Rollback: allows the person to roll the proposal back to any previous step in the workflow, or even
back to the original proposer. Clicking Rollback opens a pop-up window. In that window, select the
person to whom you are rolling the course back. A comment must be entered so that when the
proposal is rolled back, the person to whom it is rolled sees the comment in their email notice. These
comments are also stored as part of the Comments section on that actual course proposal form for
future reference. Once the course is rolled back, it is removed from the Approver’s list and that person
no longer has access to the proposal; only the person to whom it was rolled now has access.
Caution: While the Rollback can go back to any step in the workflow, once it reaches that person, the
workflow approval process then starts again from that step and goes forward one step at a time.
Caution: If a course is rolled back to the original proposer, that person is considered to be “pre-
workflow”, and so the course is now back to simply an “edited but not submitted” status and is actually
not in workflow any longer. At that time, any user can edit the course and re-submit it to workflow.
Any approvals, votes/comments from the initial pass of workflow are no longer visible. The only
evidence of this course being on a second or subsequent pass through workflow is the list of rollback
comments in the Comment section of the course proposal form itself.
Voting Feature
Several committees have opted to pilot a new CourseLeaf feature that involves online committee discussions
and voting. This feature is slightly different from the approval process described above.
First, instead of just one person receiving the email for a workflow step, everyone on the committee will
receive the email. Second, the email itself is worded slightly different. Below is an example. The subject
actually tells the recipient this is a vote request.
13
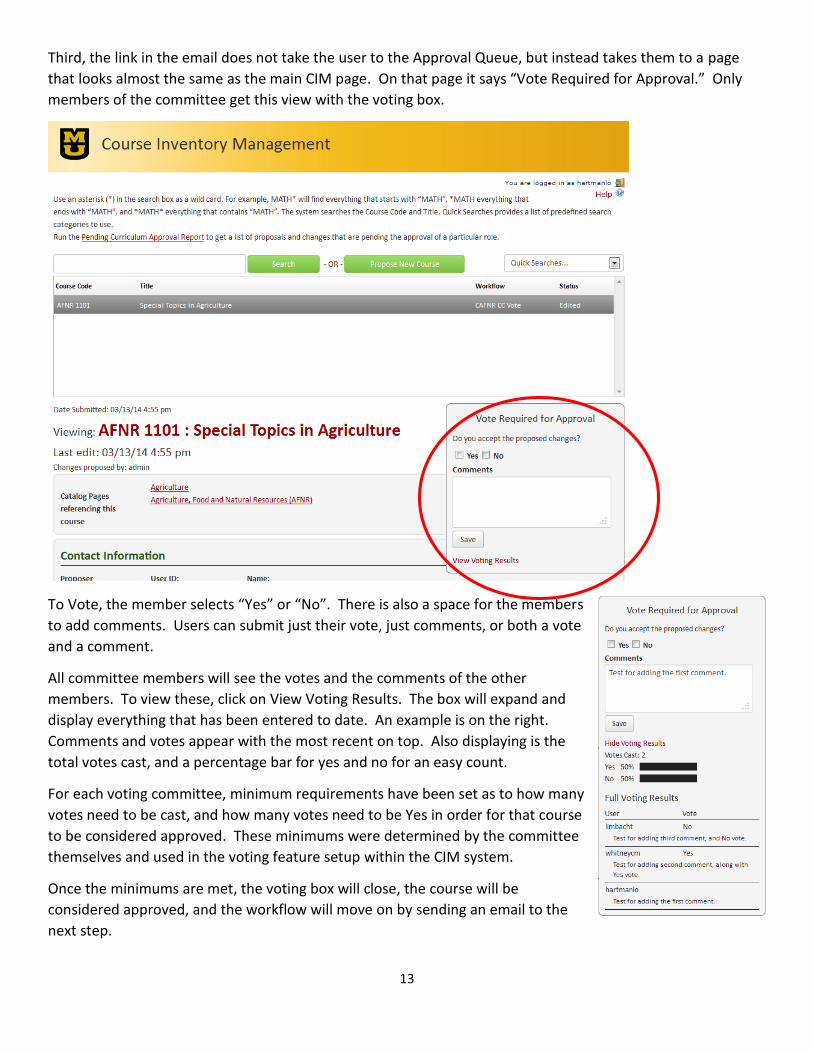
Third, the link in the email does not take the user to the Approval Queue, but instead takes them to a page
that looks almost the same as the main CIM page. On that page it says “Vote Required for Approval.” Only
members of the committee get this view with the voting box.
To Vote, the member selects “Yes” or “No”. There is also a space for the members
to add comments. Users can submit just their vote, just comments, or both a vote
and a comment.
All committee members will see the votes and the comments of the other
members. To view these, click on View Voting Results. The box will expand and
display everything that has been entered to date. An example is on the right.
Comments and votes appear with the most recent on top. Also displaying is the
total votes cast, and a percentage bar for yes and no for an easy count.
For each voting committee, minimum requirements have been set as to how many
votes need to be cast, and how many votes need to be Yes in order for that course
to be considered approved. These minimums were determined by the committee
themselves and used in the voting feature setup within the CIM system.
Once the minimums are met, the voting box will close, the course will be
considered approved, and the workflow will move on by sending an email to the
next step.

14
Pending Curriculum Approval Report
On the main CIM page, in the instruction paragraph at the top is a link to the Pending Curriculum Approval
Report. This report is accessible to all users. When run, it will provide a list of proposals (new courses and
edits) that are pending the approval of a particular role in CIM. If you click on the link, a new window will
open.
First, use the drop down next to Approval Role to select the role for which
you want to run the report. For instance, in this example, UCC is selected
as the role.
Second, select the output format. If you select HTML, you will have a
chance at a later step to save it as a PDF or an Excel document.
Click on Run Report. The results will display on your screen. Included in the
title is the date and time that the report was run, and the name of the role for which the report was run.
Below is a picture of part of a sample report.
For every current course that is being edited, you will see rows in white. For example on this report, AFNR
4993 is being edited. The report then lists only those fields which have had a change made to them.
For every new course being added, you will see a row in green that says ADDED. To see the details, use CIM.
Had the report listed the details, it would have added over 100 rows since in essence every field is being

15
changed, making the report inconveniently lengthy. In this example report, three new courses are being
proposed: AG_EC 3296, AG_EC 3297, and ARCHST 4760.
For every current course being deactivated, you will see a row in red that says DEACTIVATED. To see the
details, use CIM. In this example report, PHYSCS 1440 is being deactivated.
For Help inside of CIM
For another description of how the CIM CourseLeaf software works, from the main CIM page, click on the blue
bubble next to Help in the upper right corner of the page. This will open a new window displaying
CourseLeaf provided documentation.
When inside of a proposal, edit or deactivate form, some questions have a blue help bubble next to them. You
can either hover over the bubble or click on it to display additional details for that question and/or set of
answers.
You can always contact the OUR staff who work with the catalog and courses software by emailing them at
Last updated 11/06/2014