Embed Size (px)
Citation preview
PCTA Trail Skills College Curriculum
Instructor Planning Guide
Course 100. Intro to Trail Maintenance This introductory sampler class is for people new to trail work who want an overview. One quarter of the class covers “how trails work,” i.e. basic trail design concepts; one quarter covers trail work safety protocols; one quarter covers hands-on brushing and hand-saw clearing; and one quarter covers hands-on drainage cleaning. This sampler class does not prepare students to work independently. Instead, students will understand a range of trail work tasks and have a good idea of what they want to do under a crew leader, or what class they want to take next.
The first half of this course could be taught in the classroom or outdoors. The second half should be hands on in the field. If circumstances dictate that this course be taught entirely in the classroom, the second half could be replaced (and likely shortened) with an introduction to trail tools followed by showing slides of different kinds of trail work. Such an indoor course, with no travel time to a work site, might be compressed to five hours total.
STUDENT SKILL OUTCOMES: • A basic understanding of hillside hydrology and
how trails work.• Understanding of the importance of “Safety
Awareness” in trail work and what is required of them to be safe volunteers, especially PPE.
• A taste of basic principles for trail brushing and hand sawing.
• A taste of what it takes to identify and clean drain dips and waterbars effectively.
• An introduction to “Trail Eyes”.
KEY TERMS: Use a copy of PCTA’s “Trail Terminology”
TRAIL MAXIMS:“No job is so important that it must be done in a way that puts the worker at risk.” “Trail work is a little bit engineering, a little bit craft, ecology, user psychology, and a whole lot of labor, hopefully, labor of love.” “When in doubt, cut it out.”, “Think Like Water”
TOOLS NEEDED (PER 8 STUDENTS):Brushing: 3 loppers, 4 hand saws, 1 pole saws, 1 pulaski, 1 roll flagging tape, measuring tape. Tool numbers will depend on the clearing to be done.
Tread and Drainage: 2 fire shovels, 2 McLeods, 2 adze hoes, 1 Pulaskis, 1 pick mattock, 1 small rock bar, 1 rheinhards (if available), and/or any other tools used commonly for drainage work in your area. Tennis ball or orange.
KEY CONCEPTS:1) 1Where Do Trails Come From, and How Do
They Work:• Concept of trail design and management• Hillside hydrology and water erosion on
trails• Ideal tread surface and drainage structures
2) Safety Awareness, Documents, and Concerns:• Personal Protective Equipment (PPE), Job
Hazard Analysis (JHA), Tailgate Safety Session (TSS), Emergency Action Plan (EAP)
• Ten essentials• Go/No go
3) Brushing and Hand Saw Clearing:• Proper/ improper tool care and use
- Lopper, hand saw, pole saw, Pulaski• Develop “Trail Eyes,” visualize trail corridor
large enough for delivery truck to pass through
• Standard clearing limits and basic brushing techniques - Cut brush flush with ground, tree trunk, limb junction
- Recognize and safely remove spring poles
- Log out small blow down and limb larger blow down
4) Cleaning Drain Dips and Waterbars:• Proper/improper tool care and use
- Shovel, McLeod, adze hoe, Rheinhard, Pulaski
• Develop “Trail Eyes,” suggest hiking in rain to better understand water on trails
• Clear dip and outfall ditch of any plants,

PCTA Trail Skills College Curriculum Page 2 of 11Course 100. Intro to Trail Maintenance March 2011 Version
roots, debris• Reestablish the apron, pack soil well
– 20 – 30’ in length, 15% or greater out-slope to help self clean
• If present, keep inside ditch clear of plants, roots, debris
5) Report Work Promptly
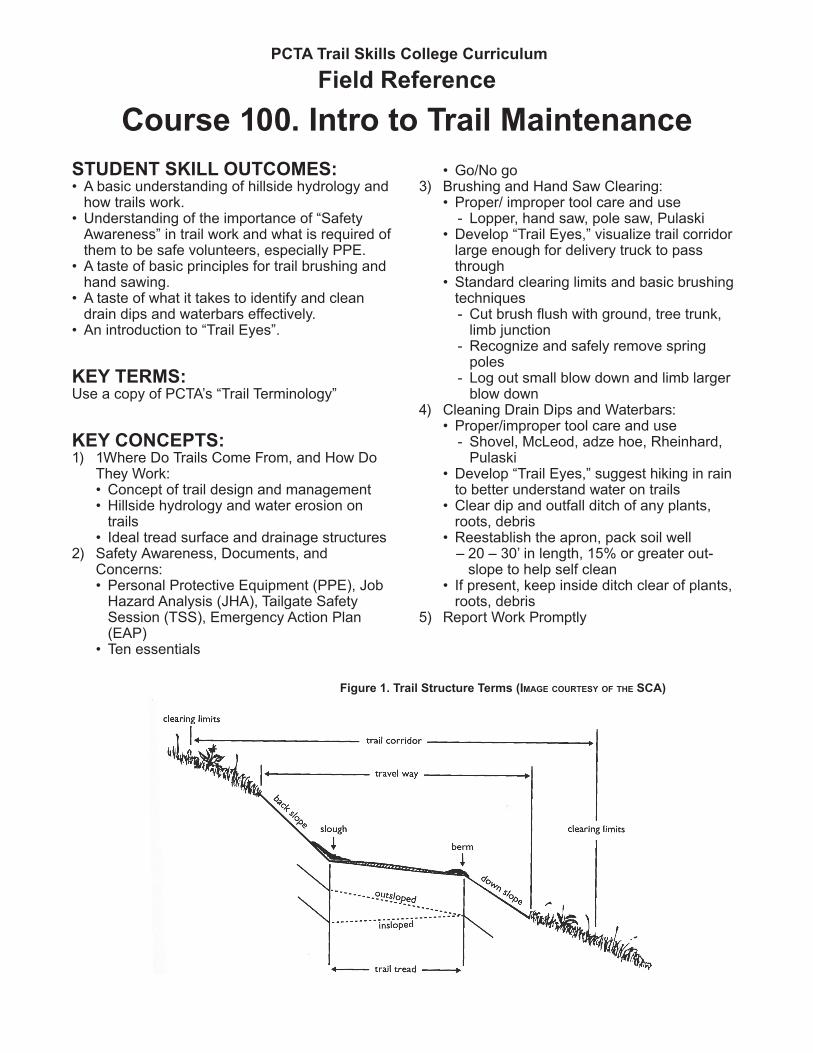
BACKGROUNDI. Where Do Trails Come From & How Do They Work? The very first trails arose long ago as faint paths created by wildlife migrating from place to place seeking food and shelter. With their arrival, Native Americans on foot and later horseback reenforced these game trails as they followed wildlife and migrated from place to place, also seeking food and shelter. In turn settlers, used some of these paths, further establishing the trails for their purposes, and in some cases making them into roads. Most of these earliest trails followed natural features such as creeks, rivers, and ridges that provided easy to follow corridors from one often visited place to another.
Beginning the late 1800s with the establishment of federal land reserves such as National Forests and National Parks, land managers began to build trails to provide access to remote areas for fire fighting and other management duties. In that same era very first recreational trails were established by enterprising outdoor enthusiasts who had founded the Sierra Club, and Appalachian Mountain Club, among others. The depression era Civilian Conservation Corps (CCC) did much more of this work in the 1930s. Some of these routes followed old existing trails and others established new direct corridors deep into the backcountry. Unfortunately, reflecting a lack of knowledge, many such trails were poorly designed, constructed, and maintained and eroded over time.
In the latter half or the 20th century, the art and science of trail design and management developed rapidly to provide quality recreation opportunities for hikers and horse riders, and later nordic skiers, mountain bikers and Off Highway Vehicles (OHV’s such as motorcycles, snowmobiles, and four-wheelers). The techniques of trail design, construction, and maintenance have been improved steadily by a growing cadre of agency, private, and volunteer trail experts. Today there are books, DVD’s, and workshops produced by professional organizations across the country to educate people about trail topics.
With the steep decline of Federal recreation budgets in the last several decades, more and more trail work has been taken on by volunteers, led by local and regional organizations such as the Pacific Crest Trails Association (PCTA). Unfortunately, at the same time unsanctioned renegade trail builders have also appeared on the scene, often building poorly designed trails and in some cases damaging archeological and ecological sites. Also, with increasing human population, many new destructive user trails arise simply from people wandering off official trails following their curiosity. Hillside Hydrology : Water from rain, melting snow and seeps poses a major threat to trails. In a perfect trail world, when water sheet flows down a hillside and encounters a trail with good outslope, it immediately crosses the trail and continues down the hillside without causing any erosion of the trail tread. In the worst case, hillside sheet flow is interrupted and follows the trail instead. As the water gains volume and speed on steep grades, it erodes a trail into a deep gully filled with rocks and roots left behind after the soil has been carried away.
This can happen all at once in a major storm event, or slowly over years due to a lack of trail maintenance. Regardless, the outcome is the same: a trail difficult to use and sediment carried downhill, often into streams causing habitat damage. Such a trail needs major reconstruction or to be abandoned. But it doesn’t need to happen, if trail workers work to prevent it.
In a more typical trail world, diverse circumstances cause tread erosion in varying amounts. Trails

PCTA Trail Skills College Curriculum Page 3 of 11Course 100. Intro to Trail Maintenance March 2011 Version
in soft soils, and especially on steep grades, are at most risk of erosion. In such conditions, trail users (hikers & horses on the PCT) loosen tread soil as they walk along. When water comes along (and to a lesser extent wind), the loosened soil is carried away leaving a concave or cupped tread. Simple compaction of soft soils exacerbates cupping.
Some of the loosened soil is displaced to the downhill side of the tread, where combined with leaves and needles, it forms a berm. Berm by itself, or combined with cupped tread, disrupts the outslope of ideal tread and prevents water from leaving the trail.
The same process that forms berm happens on the uphill side of the tread, often exacerbated by additional material falling onto the trail from the backslope, creating what is called slough.
Water moves faster on steeper trail grades, giving it more force and thus eroding more soil. Greater water volume also increases the amount of soil that can be moved. Thus to protect a trail from erosion three things need to happen: 1) reduce the amount of water running down a trail; 2) reduce the speed of the water moving down a trail; and 3) reduce the erosive force of users’ feet loosening the soil.
The best way to achieve these objectives is by good trail design and construction, whereby a new trail is built with modest grades (less than 15%), passing only through durable soils, and includes grade reversals at regular intervals that naturally shed water (www.imba.com/resources/trail_building/up_down.html). In addition, such an ideal trail is well constructed to precise standards with generous outslope on a well-compacted full bench (www.imba.com/resources/trail_building/contour.html).
Alas, because many trails had unskilled designers, poor construction, today trail volunteers often work on trails with erosion problems. To remedy such problems the two most common solutions are to construct either earthen drain dips (aka rolling grade dips) or waterbars made of rocks or a log.
It is important for students to understand that the natural aging process of trails requires vigilant maintenance. If neglected, the problems will only grow worse and require major reconstruction or abandonment. In some cases poor design, construction and maintenance have exacerbated such problems. This all adds up to trail workers facing much work to do to improve tread and prevent further erosion. But that gives us lots to do!
II. Safety AwarenessfPersonal Protective Equipment (PPE): Trail work is part of a long tradition of woods work that dates to the 1930s era of the Civilian Conservation Corps (CCC) and to earlier logging. Woods workers, because of the many hazards they face, wear standard safety gear known as PPE. While the hazards of trail work are often not as great, sometimes they are, so we get to wear the same gear.
Government agencies require their working trail crews to wear at all times: hard hat, long pants,
Figure 1. Trail Structure Terms (Image courtesy of the sca)

PCTA Trail Skills College Curriculum Page 4 of 11Course 100. Intro to Trail Maintenance March 2011 Version
long-sleeved shirt, sturdy leather boots, eye protection, and gloves. This is for a variety of reasons, most importantly to provide at least one layer of protection between sharp tools, rocks, and trees and the fragile human body. The PCTA’s lead partner agency, the U.S. Forest Service, extends to all its volunteers (including those of PCTA) both liability and workers compensation coverage, as long as they follow Forest Service safety guidelines. It is also critical that PCTA volunteers follow all prudent safety procedures to protect our organization from liability lawsuits.
While it may be safe to do some trail work tasks without a given item of PPE, circumstances can change in a moment, then requiring a particular PPE item that might not be at hand. Thus the safest practice, by far, is to wear all standard PPE at all times. While this may lead to some grumbling, whenever you catch yourself saying, “Why the heck am I wearing this ____?”, use that as a reminder to shift your focus to a more important question, “How can I carry out this task even safer?” As for the most common complaint, if the weather is hot, simply wear a light weight shirt and pants, and wear a moist bandana under the hard hat.
Tailgate Safety Session: A Tailgate Safety Session (TSS) must be carried out with each crew before they start work each day. A copy of each TSS form should be turned in by crew leaders to their PCTA contact at the end of the project. If part way through the day, a new task is introduced, be sure to go over safety concerns specific to the new task.
Emergency Action Plan and Trailhead Communications Plan: These forms must be filled out and reviewed with the crew before leaving the trailhead.
Go/No Go: All trail workers must constantly analyze whether they should proceed with a task or walk away to insure their safety. Crew leaders sometimes exercise such judgement for a group, but it is essential that every trail worker develop these critical thinking skills for when they work on their own. Such analysis evaluates all the hazards present and balances them against the skills they have. The most important thing every trail worker needs to know is that it is totally OK and they show the very best judgement when they walk away from danger.
To reiterate, the primary objective of PPE and Go/No Go analysis is to send every volunteer home healthy and ready to return to have fun doing trail work another day. Nothing we do should jeopardize that and everything we do should insure it.
III. Brushing and Hand Saw ClearingBrushing and Reporting are combined in one class because they make a well-matched and efficient combination of tasks. With expensive gas and limited trail budgets, sending someone out just to report on blow down is a lost opportunity to get other much-needed trail work done at the same time. At the very least, every trail scout should carry a small hand saw to remove a few problems along the way.
fSafety Awareness: Discuss the following: overhead hazards, spring poles, sharp brush staubs, sawdust and dirt in the eyes, branches slapping the face, sharp saws and loppers (fingers have been lost). In this very first trail class, strongly encourage students to develop a keen awareness of overhead hazards such as widow makers whenever they stop along the trail.
Trail Eyes: Students must learn to see the PCT Trail Corridor stretching out ahead as a long tunnel, large enough to accommodate a string of loaded packstock. If they have not been around pack strings it is difficult to understand just how much vegetation needs to be removed. One long-time crew leader encourages new trail workers to imagine trail corridors large enough for a delivery truck to pass through, since the dimensions of a such a truck are about 8’x10’.
Obviously, in some environments, such as above tree-line, there is less plant material to remove to create the trail corridor. Different forest types vary dramatically in the amount of brush and tree limbs
PCTA Trail Skills College Curriculum Page 5 of 11Course 100. Intro to Trail Maintenance March 2011 Version
to remove. PCT trail stewards must identify the portions of their trail section that need the most brushing and give them special attention with enough volunteers.
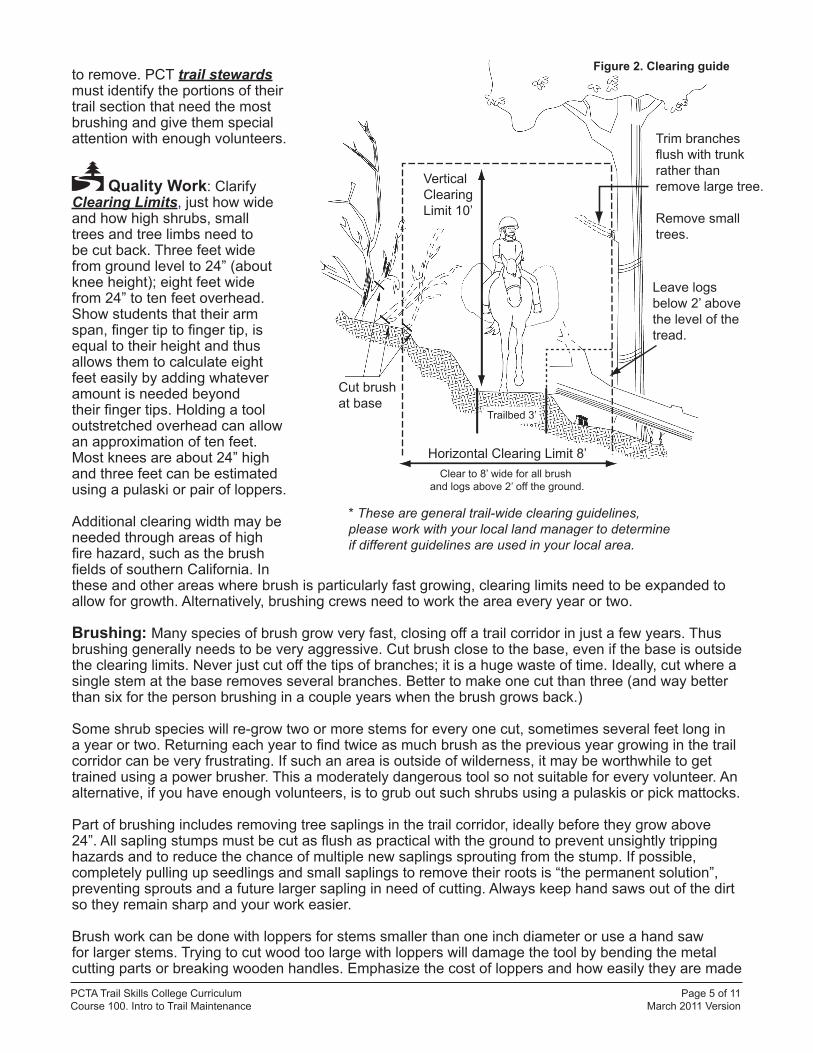
P Quality Work: Clarify Clearing Limits, just how wide and how high shrubs, small trees and tree limbs need to be cut back. Three feet wide from ground level to 24” (about knee height); eight feet wide from 24” to ten feet overhead. Show students that their arm span, finger tip to finger tip, is equal to their height and thus allows them to calculate eight feet easily by adding whatever amount is needed beyond their finger tips. Holding a tool outstretched overhead can allow an approximation of ten feet. Most knees are about 24” high and three feet can be estimated using a pulaski or pair of loppers.
Additional clearing width may be needed through areas of high fire hazard, such as the brush fields of southern California. In these and other areas where brush is particularly fast growing, clearing limits need to be expanded to allow for growth. Alternatively, brushing crews need to work the area every year or two.
Brushing: Many species of brush grow very fast, closing off a trail corridor in just a few years. Thus brushing generally needs to be very aggressive. Cut brush close to the base, even if the base is outside the clearing limits. Never just cut off the tips of branches; it is a huge waste of time. Ideally, cut where a single stem at the base removes several branches. Better to make one cut than three (and way better than six for the person brushing in a couple years when the brush grows back.)
Some shrub species will re-grow two or more stems for every one cut, sometimes several feet long in a year or two. Returning each year to find twice as much brush as the previous year growing in the trail corridor can be very frustrating. If such an area is outside of wilderness, it may be worthwhile to get trained using a power brusher. This a moderately dangerous tool so not suitable for every volunteer. An alternative, if you have enough volunteers, is to grub out such shrubs using a pulaskis or pick mattocks.
Part of brushing includes removing tree saplings in the trail corridor, ideally before they grow above 24”. All sapling stumps must be cut as flush as practical with the ground to prevent unsightly tripping hazards and to reduce the chance of multiple new saplings sprouting from the stump. If possible, completely pulling up seedlings and small saplings to remove their roots is “the permanent solution”, preventing sprouts and a future larger sapling in need of cutting. Always keep hand saws out of the dirt so they remain sharp and your work easier.
Brush work can be done with loppers for stems smaller than one inch diameter or use a hand saw for larger stems. Trying to cut wood too large with loppers will damage the tool by bending the metal cutting parts or breaking wooden handles. Emphasize the cost of loppers and how easily they are made
Cut brush at base
Trim branches flush with trunk rather than remove large tree.
Remove smalltrees.
Trailbed 3’
Leave logsbelow 2’ above the level of the tread.
Vertical Clearing Limit 10’
Horizontal Clearing Limit 8’Clear to 8’ wide for all brush
and logs above 2’ off the ground.
* These are general trail-wide clearing guidelines, please work with your local land manager to determine if different guidelines are used in your local area.
Figure 2. Clearing guide

PCTA Trail Skills College Curriculum Page 6 of 11Course 100. Intro to Trail Maintenance March 2011 Version
useless.
Cut tree limbs growing into the trail corridor with a hand saw. Cut the limb as flush with the trunk as possible to speed healing of the wound and prevent disease and rot. Loppers are not a good choice because they invariably leave staubs that catch packs, are unsightly, and put the tree at risk. On trees that have a collar at the base of limbs, cut just outside the collar--this speeds healing.
For large limbs, it is best to make a one inch deep undercut before cutting from the top. This prevents the heavy limb from ripping off bark as it falls. Instead of removing so many branches that a tree looks ridiculous, cut it out entirely--it will save time now and in future years when branches regrow into the trail.
Pole Sawing Tree limbs in the trail corridor that originate high in a tree, require a pole saw. Eye protection is essential because of drifting sawdust and a hardhat for falling limbs. Most of the cutting happens on the down stroke. Just as with lower branches, endeavor to cut as close to the bole of the tree as possible and make an undercut first.
Log Out Small hand saws are capable of cutting blow down up to six inches in diameter and thus you can make a great start on clearing a trail. Because a log out crew will follow, there is no need to try to cut larger logs, though some may be easily dragged off the trail if they are neither too heavy nor attached at the base. A complex pile up of several small trees under tension can be hazardous and should be left for a certified log out crew. Utilize Go/No Go analysis to determine if this work is beyond your safe skill level.
With loppers and a hand saw it is also possible to prepare large blow down for the log out crew by removing all the branches on the fallen log. It is important to remove all such limbs a few feet beyond the eight foot trail corridor, because as green limbs dry they often bend back into the trail corridor. Cut limbs flush so they will not catch packs and saddlebags.
Preparation for drainage work: As part of trail clearing it is absolutely essential to remove any rocks, fallen logs, branches, or saplings that obstruct the outfall ditch of drainage structures. If left in the drainage they will trap sediment and quickly render the drainage useless. Because a later crew cleaning drainages is unlikely to carry tools for cutting logs, the log out or brushing crew must take care of these when they pass along the trail.
Disperse cut brush, limbs, and saplings well out of the trail corridor, preferably out of sight and always scattered over a wide area on the ground. Do not toss brush on top of other living brush where they will turn an unsightly brown and advertise to trail users that a careless crew passed this way.
fSpring Poles: can be extremely dangerous because they look fairly innocuous and often are (as often as not they release with only a little movement). However, an unaware or inattentive trail worker can be severely injured or killed by an unexpected blow to the head or chest from a dramatically released spring pole. Under extreme tension, a large green sapling can release suddenly and ferociously with just a brief touch from a saw in the wrong place.
Figure 3. Saw branches almost flush with the trunk to avoid
leaving “hat racks.” (Image courtesy of the sca)
Figure 4. Look out for spring poles (trees or limbs that are held down by other trees.) Spring poles can
release with great force, causing serious injuries. Make a series of small cuts on the inside of the bend when
severing a spring pole. (Image courtesy of the usfs)

PCTA Trail Skills College Curriculum Page 7 of 11Course 100. Intro to Trail Maintenance March 2011 Version
If you are not trained to safely cut spring poles, study the diagram below carefully and read the text. Preferably practice with an experienced sawyer before you instruct others. A 45 degree angle from the intersection of the lines back to the spring pole indicates where to make a series of shallow relief cuts inside the arch to slowly reduce the tension in the sapling. The same process applies to large bent green limbs held down by a fallen tree. Note that the place to make the relief cuts is generally not under the center of the arch, but rather off set a little.
P IV. Cleaning DrainagesWhile there are dozens of ways to improve the tread and drainage of any given trail, the most important that new trail workers should learn first is to clean existing drain dips and water bars. There are many variations on drain dips and water bars that can be seen from trail to trail. To keep things simple for beginners, instruct them simply to clean what they find and, as time allows, to make modest improvements to move the drainages toward the PCTA standards described below.
Cleaning Drain Dips and Water bars: The contemporary water bar design favored by PCTA is a broad earthen drain dip, reinforced at the high point of the backramp with a completely buried log or line of tightly fitted large rocks. See diagrams and “Key Concepts” above for drain dip and water bar specifications.
Regardless, all excavation should be gradual so users hardly notice the drainage structure as they walk through it (see diagrams for lengths). Sculpt the apron so water exits with increasing speed by accentuating the outslope of the whole apron so it is greater than the outslope of the trail. This helps to insure that the structure is somewhat self-cleaning, thus requiring less maintenance.
Clear the outfall ditch to carry water away easily. It should be 18-24” wide and end 12” below where it leaves the tread, or however far it needs to go to keep water from returning to the trail. It is essential to remove any rocks, fallen logs, branches, or saplings that obstruct the outfall ditch. All loose dirt and debris excavated from the outfall ditch should be moved to the down hill side of the ditch to help divert water away from the trail--NOT into the path of the flowing water.
When cleaning drain dips, use any good moist dirt (not organic debris) from excavating the apron to accentuate the height and length of the back ramp, being sure to compact it well.
5% Outslope
Outfall 2’ to 5’ wide
Ramp 10’ to 20’
Apron5’
Backramp5’
5% Outslope
10-15% Outslope
Waterbar (buried rocks or log)Without bar, this is a Drain Dip
Figure 5. Diagram of modern waterbar construction
PCTA Trail Skills College Curriculum Page 8 of 11Course 100. Intro to Trail Maintenance March 2011 Version
For water bars, spread and compact excavated soil on both sides of the bar to protect it from erosion. Bury log and rock bars completely so they are just barely showing, insuring that water exits well before bar. For both drain dips and water bars, if there is excess moist dirt, look for cupped tread to fill down the trail from the drainage--never let good dirt go to waste.
Finally, to test drainages, roll a tennis ball or orange to test efficacy of the final work--it should easily leave the trail.
Note: Water bars have been built for decades and until recently were constructed so that running water was deflected off the trail by directly hitting the rock or log bar. It is still common to see such outdated drainage structures, which PCTA calls “old school” waterbars. Their design flaws include: 1) they fill with sediment rapidly; 2) the exposed bars are damaged by horses; and 3) the bars are often eroded out completely.
It is possible to convert “old school” water bars into the contemporary style, but this is likely beyond the scope of this class.
While it is possible to clean clogged drainages at any time of year, in loose dry soils that do not cohere well, it is impossible to durably restore badly degraded drainages or convert “old school” water bars. Such work must be done when there is adequate moisture in the soil so that it can be well compacted with McLeods and boots. The ideal time is just prior to winter when fall rains have moistened the ground and winter snow will further compact the work. Ideally, material is compacted so that a thumb pressed into the dirt will not penetrate more than a quarter inch--this takes persistence.
Inside ditch: These may be common in wet terrain with seeps; they must be kept clean and open, adequate to handle the flows they receive.
If asked, explain that the greater the volume and force of expected water running down the trail, determines the size and frequency of drainages needed, whether drain dips, waterbars or inside ditches.
TEACHING TIPS & TECHNIQUESI. How Trails Work: Most likely this topic, along with Safety Awareness will simply be a lecture, referring to handout diagrams. It can be taught either in a classroom or out in the field. Because some students will have difficulty paying attention to a lecture, encourage their participation by using a Socratic method of asking why they think things are as they are. For example, ask “How do you think the first trails came to be?”, rather than just telling them.
f II. Safety Awareness: One way to raise Safety Awareness is to have students share their own stories of accidents in the outdoors, or if they’ve had none, to share your own. After each story, be sure to ask students what might have been done differently to avoid the accident and/or respond to it more effectively. If you need a story or two, here are a few from my trail work career that you can consider using.
-- A volunteer trail crew near Bend, Oregon, was working vigorously on a hot day cutting dense brush along a mile of over-grown trail. As one volunteer without gloves held branches, another used loppers to cut the base of the snowbush stems. Growing hot, tired and in a rush to make progress, the loppers slipped off the branch and nearly severed the assistant’s finger.
-- While training new volunteer trail workers in the Oregon Cascades, we used a six foot long razor-sharp crosscut saw to cut wind-thrown trees. For our final project late in the day, we sawed a 500-pound section out of a huge 40-inch diameter Engelmann spruce tree to open the Winopee Lake Trail to the PCT. To move the log piece off the trail, a small group pushed it with all their might. As the chunk rolled off the trail a cheer went up and we all felt satisfied with our last work of the day. However,

PCTA Trail Skills College Curriculum Page 9 of 11Course 100. Intro to Trail Maintenance March 2011 Version
I felt a sharp pain in my left knee that later proved to be a torn medial meniscus. To this day, it limits my activities.
-- While repairing a trail bridge in Newberry National Volcanic Monument I removed my gloves to accurately split a small wooden shim. My axe slipped off the small wedge, cutting my bare finger. Profuse bleeding required evacuation and four stitches at an emergency clinic 15 miles away, causing the loss of the remainder of the day.
For each story shared, ask the students to identify all the hazards present in the scenario and how to mitigate them. Also ask them for ideas how each individual and the group as a whole can make their work safer. It is essential that every member of a group believe they have a role in keeping themselves and others safe while doing trail work. Just as “Trail Eyes” are needed to do good trail work, “Safety Awareness” is essential to bring everyone home accident free.
-- In 2008 at a PCTA trail skills training in Oregon, a student suffered a heart attack one half-mile from a trailhead which is located ten miles from the nearest small town with a volunteer rescue squad. The afflicted student, by all appearances had been the picture of fitness for a 60-year old. The course instructor before beginning the class had reviewed all standard PCTA safety protocols at the trailhead, including determining who had the most advanced first aid training and how the group would communicate with the outside world if an emergency arose. Thus, when the man collapsed, both the designated first aid leader began CPR and the leader contacted 911 immediately. The local rescue squad arrived on the scene about 45-minutes later and called for a helicopter. The helicopter evacuated the patient to the nearest trauma center, where he died the next day.
The primary intent of this story is to stress the importance of reviewing emergency protocols with a group every time you go out, including designation of roles as outlined on the PCTA Emergency Action Plan. For lesser injuries, providing prompt first aid and a quick call for help can be critical to a positive outcome. A secondary intent is to clarify that strenuous work in remote areas comes with hazards not present in urban areas. Unfortunately, in the case of a heart attack in the backcountry, the chance of survival is negligible even with the best response.
Tailgate Safety Session: For each work task covered, engage participants in brainstorming hazards and solutions by asking: what hazards will we face and how can we provide for safety? Stress that safety is everyone’s concern, not just the leader’s. Encourage them to, “Speak up if you see something unsafe!”
PPE: While it may be safe to do some trail work tasks without a given item of PPE, circumstances can change in a moment, then requiring a particular PPE item that might not be at hand. Thus the safest practice, by far, is to wear all standard PPE at all times. While this may lead to some grumbling, whenever you catch yourself saying, “Why the heck am I wearing this ____?”, use that as a reminder to shift your focus to a more important question, “How can I carry out this task even safer?” As for the most common complaint, if the weather is hot, simply wear a light weight shirt and pants, and wear a moist bandana under the hard hat to provide evaporative cooling.
Encourage participants to see PPE as incredibly cool, rather than resist it. Ideas: personalize hard hats with nicknames, tell them that wearing hardhats is a time-honored tradition of woods work, and the hard hat serves as a constant reminder to be safe. (Brims must be forward to provide intended protection). Some of the coolest trail workers acquire their own groovy safety glasses and store them scratch-free inside a case or at least an old sock.
Communication/Emergency Plan Review: Ascertain who has what first aid, radio, medevac and other relevant experience and make sure all members of group know who will be in charge of first aid and other aspects of any emergency. Designate an assistant for each task as well, in case the leader is incapacitated and to facilitate broader interest by spreading the responsibility.

PCTA Trail Skills College Curriculum Page 10 of 11Course 100. Intro to Trail Maintenance March 2011 Version
III. Opening the Trail:LTool Care: Discuss each tool and using the right tool for a given job in such a way that will not damage the tool nor injure the user or surrounding crew members. Keeping tools sharp and clean makes the work easier and safer. Also, stress keeping tools organized during the work day to prevent losing any. This can be done by designating tool collection points along the trail so they are out of the way and always easily found--demonstrate this along the trail. Proper cleaning tools at the end of the day and caching them wrapped in a tarp in a secure location if left out overnight. Utilize USFS’s “Handtools for Trail Work”.
Introduce the relevant tools for the tasks below. Demonstrate proper use and safety concerns. Make sure to get around to help everyone learn to use the tools as efficiently as possible and to minimize body strain.
Trail Eyes: A typical new trail worker has difficulty seeing the trail corridor and noticing when plants have grown inside the clearing limits. It is very common to see such a person routinely walk past branches that almost hit them, well inside the trail clearing limits. One way to help students develop trail corridor eyes before beginning brushing, is to give each person 10-20 feet of flagging tape and assign them each a section of trail that needs brushing (50-200’ depending on work density). Ask them to tie loosely a small piece of flagging to each limb, sapling, and shrub inside the clearing limits. Instruct them to tie it where they would propose to make the cut. Review their decisions as a group with each student explaining their choices. Take opportunities to discuss the finer points of where & how cuts should be made. Finally have them remove and save the flagging. If you plan to use the same section again for flagging, obviously do not cut the brush. If not, have them go ahead and make the cuts
After they complete brushing a different section of trail that has not been flagged, have them use the flagging pieces they collected and review carefully the section they cut, tying flagging on any plant inside the clearing limits, if they can find any. It is common for new trailworkers to find more to cut on a second pass.
P Quality Work: For most brushing tasks it should be sufficient to demonstrate a technique then let students practice, critiquing as necessary. Then practice, practice, practice, using a variety of tools.
Clearing Limits: Encourage students to walk along trails with their arms outstretched as a way to better notice if plants are growing inside the clearing limits.
Brushing: pass around a shrub branch and show nodes from which multiple new stems can grow after a single cut, thus emphasizing the importance of cutting at the ground or removing the bush entirely.
Spring Poles: If you do not find a good spring pole on the section of trail you are working, carefully create one using a log to hold down a large sapling. Then demonstrate the proper way to release the tension safely. If it is reasonable to do so, set up several for others to try.
IV. Trail Maintenance to Reduce Erosion: Demonstrate the proper stance and technique for each of the tools to minimize body strain. To reduce back strain bend the knees, have a powerful core, keep legs well apart, and use a rocking motion that uses the whole body.
Encourage each student to try all the tools and then decide which two they would choose, if they were to carry only two tools for a day of tread and drainage work. They should see that everyone has their own preferred tools depending on body type and other factors.
Work with them closely to be sure they maintain at least one (and preferably several) well formed drain dips &/or water bars. It is essential that they not carry forward bad habits that may not be broken for years.

PCTA Trail Skills College Curriculum Page 11 of 11Course 100. Intro to Trail Maintenance March 2011 Version
Inform students that after they gain proficiency in these skills, they will later learn how to construct new drainage structures. And, with even more experience, they will learn how to select the best locations for such structures. But first practice, practice, practice the basics of tread and drainage maintenance.
Trail Eyes: The best way for new trail workers to understand drainage issues is to walk trails on a rainy day, the rainier the better. Encourage students to get a pair of rubber boots and an umbrella, in addition to rain gear, so they can be comfortable examining closely how water interfaces with trails. Ask them to notice how water sheets off hillsides, accumulates in small rivulets and then crosses an outsloped tread, or follows one with berm, carrying loose sediment to drainage structures. The ultimate goal is by seeing water they gain the ability to “think like water” and possibly “see water running down the trail, even on sunny days.”
See discussion in curriculum overview for ideas how to help students develop their Trail Eyes. Make sure they notice all drainage structures needing to be cleaned. Nearly full drain dips are the most easily missed. A drainage treasure hunt at the end of the day would be a good final exam in addition to demonstrating the other “Student Skill Outcomes” listed above.
TRAIL FUNFor a fun wrap-up do a fast-paced “Jeopardy”-style quiz based on the KEY CONCEPTS.
REFERENCES Handtools for Trail Work. 2005. USDA Forest Service.
www.fhwa.dot.gov/environment/fspubs/05232810/toc.htm
IMBA (International Mountain Biking Association) has some excellent books and online resources. Here is a link to all of them at www.imba.com/resources/trail_building/index.html
Lightly on the Land: The SCA Trail Building and Maintenance Manual. 2005. Robert Birkby. The Student Conservation Association and Mountaineers Books. Pages 21-24 provide a concise chronology of the origin of American trails.
Natural Surface Trails by Design: Physical and Human Design Essentials of Sustainable, Enjoyable Trails by Troy Scott Parker. 2004. www.Natureshape.com
Saws that Sing. 2007. David Michael. USDA Forest Service. Pages 35-36 provide an excellent treatment of spring poles. www.fhwa.dot.gov/environment/fspubs/04232822/page16.htm#spring
Trail Construction and Maintenance Notebook. 2007. Woody Hesselbarth. USDA Forest Service.www.fhwa.dot.gov/environment/fspubs/07232806/page07.htm#clea
PCTA Trail Skills College Curriculum
Field Reference
Course 100. Intro to Trail Maintenance STUDENT SKILL OUTCOMES: • A basic understanding of hillside hydrology and
how trails work.• Understanding of the importance of “Safety
Awareness” in trail work and what is required of them to be safe volunteers, especially PPE.
• A taste of basic principles for trail brushing and hand sawing.
• A taste of what it takes to identify and clean drain dips and waterbars effectively.
• An introduction to “Trail Eyes”.
KEY TERMS: Use a copy of PCTA’s “Trail Terminology”
KEY CONCEPTS:1) 1Where Do Trails Come From, and How Do
They Work:• Concept of trail design and management• Hillside hydrology and water erosion on
trails• Ideal tread surface and drainage structures
2) Safety Awareness, Documents, and Concerns:• Personal Protective Equipment (PPE), Job
Hazard Analysis (JHA), Tailgate Safety Session (TSS), Emergency Action Plan (EAP)
• Ten essentials
• Go/No go3) Brushing and Hand Saw Clearing:
• Proper/ improper tool care and use - Lopper, hand saw, pole saw, Pulaski
• Develop “Trail Eyes,” visualize trail corridor large enough for delivery truck to pass through
• Standard clearing limits and basic brushing techniques - Cut brush flush with ground, tree trunk, limb junction
- Recognize and safely remove spring poles
- Log out small blow down and limb larger blow down
4) Cleaning Drain Dips and Waterbars:• Proper/improper tool care and use
- Shovel, McLeod, adze hoe, Rheinhard, Pulaski
• Develop “Trail Eyes,” suggest hiking in rain to better understand water on trails
• Clear dip and outfall ditch of any plants, roots, debris
• Reestablish the apron, pack soil well – 20 – 30’ in length, 15% or greater out-slope to help self clean
• If present, keep inside ditch clear of plants, roots, debris
5) Report Work Promptly
Figure 1. Trail Structure Terms (Image courtesy of the sca)

PCTA Trail Skills College Field Reference Course 100. Intro to Trail Maintenance March 2011 Version
Cut brush at base
Trim branches flush with trunk rather than remove large tree.
Remove smalltrees.
Trailbed 3’
Leave logsbelow 2’ above the level of the tread.
Vertical Clearing Limit 10’
Horizontal Clearing Limit 8’Clear to 8’ wide for all brush
and logs above 2’ off the ground.
* These are general trail-wide clearing guidelines, please work with your local land manager to determine if different guidelines are used in your local area.
Figure 2. Clearing guide
Figure 3. Saw branches almost flush with the trunk to avoid
leaving “hat racks.” (Image courtesy of the sca)
Figure 4. Look out for spring poles (trees or limbs that are held down by other trees.) Spring poles can
release with great force, causing serious injuries. Make a series of small cuts on the inside of the bend when
severing a spring pole. (Image courtesy of the usfs)

PCTA Trail Skills College Field Reference Course 100. Intro to Trail Maintenance March 2011 Version
5% Outslope
Outfall 2’ to 5’ wide
Ramp 10’ to 20’
Apron5’
Backramp5’
5% Outslope
10-15% Outslope
Waterbar (buried rocks or log)Without bar, this is a Drain Dip
Figure 5. Diagram of modern waterbar construction


![100$ A Day - My Browser Cash [Intro + Tutorial + Tips]](https://img.pdfslide.us/doc/110x75/55a848881a28abae108b475b/100-a-day-my-browser-cash-intro-tutorial-tips.jpg)