Embed Size (px)
Citation preview

DisclaimerThe information contained in this Adobe PDF file is for general information purposes only. Due to the age of the information and the difficulty in converting it to computer formats it may not be up to date or correct, we make no representations or warranties of any kind, express or implied, about the completeness, accuracy, reliability, suitability or availability with respect to the Adobe PDF or the information, products, services, or related graphics contained in the Adobe PDF document for any purpose. Any reliance you place on such information is therefore strictly at your own risk.
In no event will we be liable for any loss or damage including without limitation, indirect or consequential loss or damage, or any loss or damage whatsoever arising from loss of data or profits arising out of, or in connection with, the use of this Adobe PDF.
This document is available free from cineinformation.org.


utt~r Release. :.t '6~ , t
,\
'/ > •••••••• _ ~ ... _ • '.' __'-,. \. "';-- ''f'r.
~;: l~lIi0K1~~~tuJ~E~,~:~t~~I:'U~~f;Sf~~~~~~~~·!~ ,', "', ,: ··ikY, ,·, f.... . , . > '), _., ~ "...

Hold the camera inyour left hand and pressButton D with yourthumb. The camerawill 'open more ea,silyi,f th-e front is tilteddownwards.
1 Preset the Shutter bypressing this lever (K)downwards BEFORETAKING. EACH " PIC..TU RE. ',The 's'hutterwitJ not 'o'perate if youforget to do this.,
Be sure the' Struts arefully extende~ and lockedin position.
The camera is closed bypressing w'itH. your twothumbs on the centres of
"the Struts.Set th~s lever (E) for >'
Instantaneous Snapshots at" I " Use" T" (TimeExposures) for 'indoor pic..'~ures only (See page :8).

Open. the back of the.camera by sliding the, catch (8) in the direction of the arrow.
Take your roll of film, size 20, and place it,between the centres of the cradle 'wh'iChswings up for ease of loading.
Do not break the paper seal on the film, untilyou have replaced the cradle in position. "
Break the seal and lead the tapered end o(t,hered paper over the two rollers and into the
" longer slot of the empty spool, which should'already be engaged with the windin~ key.
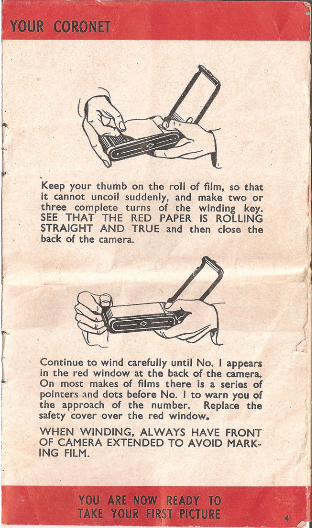
'. J Keep your thumb on the roll' of film:, so that·"it cannQt uncoil suddenly, and make, two or
thr,ee ,complete turns of the' winding key'.SEE THAT THE RED PAPER IS ROLLINGSTRAIGHT AND TRUE arid then dose the
>,'back of:the 'camera. '
Continue to wind carefully untHNo. I appearsin the red window 'at- the back Qf the camera.On most makes of fHms there IS a series ofpointers and dots before ,No.1 to warn you ofthe approach of the number. Replace ,thesafety cover over ,the red ~indow.
WHEN WINDING, ALWAYS HAVE FRONT .OF CAMERA EXTENDED TO AVOID,MARK~ING FILM. " '

Fo~- Horizontal ,pictures such as groupsof .people or views hold the camerathis way. '

· .Forupr,ight pic,tures hold' it
like·this~
Compose, you r. picture in, the'viewfinder, preset ,the shutter,then squeeze the release g;.,e-n-t-I-y
, until _you hear 'the shutter oper..' .ate. Don't jerk the shutter release ,or you will spoil your pi~ture.. Assoon as you have taken one snap-
, shot turn the film to the' next,number irr(mediately, 'BEFOREYOU CLOSE THE CAMERA.You- will then ReVer make twoexposu res on the' same n~g~tive.

SUN BEHIND CA'MERASet the Shutter Indicator (E) to is', n (1/25thseCe.).Always 'take your picture5 with good sunshineOR your subject. NOT shining into your lens.This diagram shows which are the bestpositions for the sun when taking your photograph. Always keep the sun in one of,thesepositiC?ns. '

TIME EXPOSURES
To take ·indoor shots and portraits with day:..light or artificial 'light a longer exposure. -isnecessary. ~
Firs~ set your shutter lever (E) at i." T " (brieftJme). The camera must be placed on. somefirm support such as a'table, pile of books ortripod so that it will be absolutely' still when.the photograph is taken. .
-As ~ith all. photographs first "preset '.' theshutter. After composing the picture press·the button g-e-n-t-I-y, holding the camera firm,and keep the button fully pressed in for therequired time as indicated in the followingexposu re table.
EXPOSURE TABLE
I Well lit room near a window .... 2-3 sees.,
Artificial light, two 60 watt bulbs at4 feet or less from subject ... ~ .. 5-7 sees.
Artificial· light, two 100· watt bulbsat 4 feet or less from subject ... 4..;6 sees.
Photoflood I, wi,thin 4 feet of subject I sec.
Pnowf!oo({ U, viityhh, 4 feet of.subject '. ·.J'$fi~. 2';Inside buildings, chur<:hes, .et·c~ ... 5-25 sees.
Outdoor shots in bad light, shadysurroundings, etc. ... 0 •• ... I sec•
. -~

'/'
~~ .
.~ CAMERA
UNLOADING THE,· fiLM
0 ......../:\6)
'tIGHT B'OR WHITE,REFlECTOH
SUBJECT
After youe have, taken your' last exposure,contrnue to turn the' winding key untilthe .e·nd of the backing ,paper' has passed the'red ·window.. t
the back of the camera' as described on /' 12.. Withdraw thewhldir'!g key from the ,)
spool, keep:ing ·your thumb' on the end of the ' l-
red .~:acking paper so that the, film cannot J
uncoil suddenly. .
Lift out the spool, turn under abouti inch' ofthe red paper and seal firmly with the gummed
.\' strip provide~.·\
'Reload with a, new film.

Always U preset" the shutt~r before takinga photograph. .
2 Always wind on the film immediately aftera photograph has been taken.
3 Always hold the 'camera firm and level~never tilt the camera upwards to " get in u,
the whole of a building. It will appear tobe leaning backwards if you do. Move backuntil it is seen f.,.lIy in the viewfinderholding the camera level.
4 Always keep the sun behind, never in frontof the ·camera.
5 Never load the camera in the sun, choosea shady spot or indoors.
, Do not let seaside san~ or dirt get into thecamera or the shutter. or parts may bedamaged.
7 Never oil the shutter; it will stick if you do.
8 Do not attempt to take pictures of objects,moving across the front. of the camera,because they will be blurred. Take ·movingsubjects .coming towards you or going away.

NON~
FLAMSAFETY
Forbetter
I pi