Embed Size (px)
Citation preview
CORE - online data collection system for COntinuous REcording of data on social housing lettings and sales
USER GUIDE

2
3
Contents
Chapter 1: Welcome to CORE ................................................................................... 5
An overview of the new CORE data collection system ........................................... 5
Accessing the CORE website ................................................................................. 6
This guidance ......................................................................................................... 6
Types of User ......................................................................................................... 8
Contact Priority.................................................................................................... 9
Logging onto the website ........................................................................................ 9
Password Retrieval ............................................................................................... 14
Chapter 2: Institution Management .......................................................................... 17
Institution set-up ................................................................................................... 17
Stock data ............................................................................................................. 19
Parent / Child relationships ................................................................................... 19
Chapter 3: User Management .................................................................................. 21
Add and remove managed providers .................................................................... 21
Creating a new User ............................................................................................. 23
Contact Priority.................................................................................................. 24
Saving and viewing your user changes ................................................................ 25
Changing user details and status .......................................................................... 26
User Performance reports .................................................................................... 26
Chapter 4: Submitting CORE data ........................................................................... 29
Log types .............................................................................................................. 29
Start submission ................................................................................................... 30
Manual recording of data ...................................................................................... 30
Online data validation ........................................................................................... 33
Saving and submitting logs ................................................................................... 34
4
Bulk upload ........................................................................................................... 35
Bulk upload validation ........................................................................................... 39
Valid and invalid logs ............................................................................................ 40
Editing logs ........................................................................................................... 43
Rejecting logs.................................................................................................... 44
Reassigning logs .................................................................................................. 45
Chapter 5: Management groups and schemes ........................................................ 47
Creating new management groups ....................................................................... 47
Adding new schemes to management groups ...................................................... 50
Chapter 6: Analyse CORE Data ............................................................................... 53
Local Authority Area Reports and Tables ............................................................. 53
Pre-defined pdf Local Authority area reports ........................................................ 54
Viewing national level data – interactive tool ........................................................ 54
Download published data ..................................................................................... 55
View and download your own data ....................................................................... 55
Pre-defined organisation reports ........................................................................... 57
Organisation Graphical Analysis ........................................................................... 58
5
Chapter 1: Welcome to CORE Welcome to the new CORE (COntinuous Recording of social housing lettings and sales data) online submission system hosted by the Department for Communities and Local Government (DCLG).
The new website has been developed for DCLG by Mark Logic Ltd and will start collecting CORE data during the 2015/16 reporting year.
The new in-house system will allow DCLG to have more direct engagement with data providers and better control and understanding of how the CORE data is being collected, reported and used.
DCLG has involved CORE data providers in the development and testing of the new system in order to minimise the impact that the change will have to data providers and users, and improve on the TNS system where possible.
An overview of the new CORE data collection system The new CORE website, now hosted by DCLG, has been designed to cover the same essential functionalities as the former CORE (TNS) website. Data continues to be collected and validated through online sales and lettings forms; both manual and eCORE bulk upload functions for data entry have been retained, and largely follow the same basic processes and reporting cycle as the previous system.
A change in the new system is the requirement to select a separate form for each of the four let types, and to recode let types when preparing a file for bulk upload, all of which is explained in greater depth in Manual recording of data and Bulk upload.
This manual, and the supplementary ‘Key Changes’ note, seek to highlight and detail any other subtle changes.
The new system can be used to report, view and analyse CORE data, monitor provider and institution performance and provides tools for DCLG administrators to manage the CORE system effectively.
6
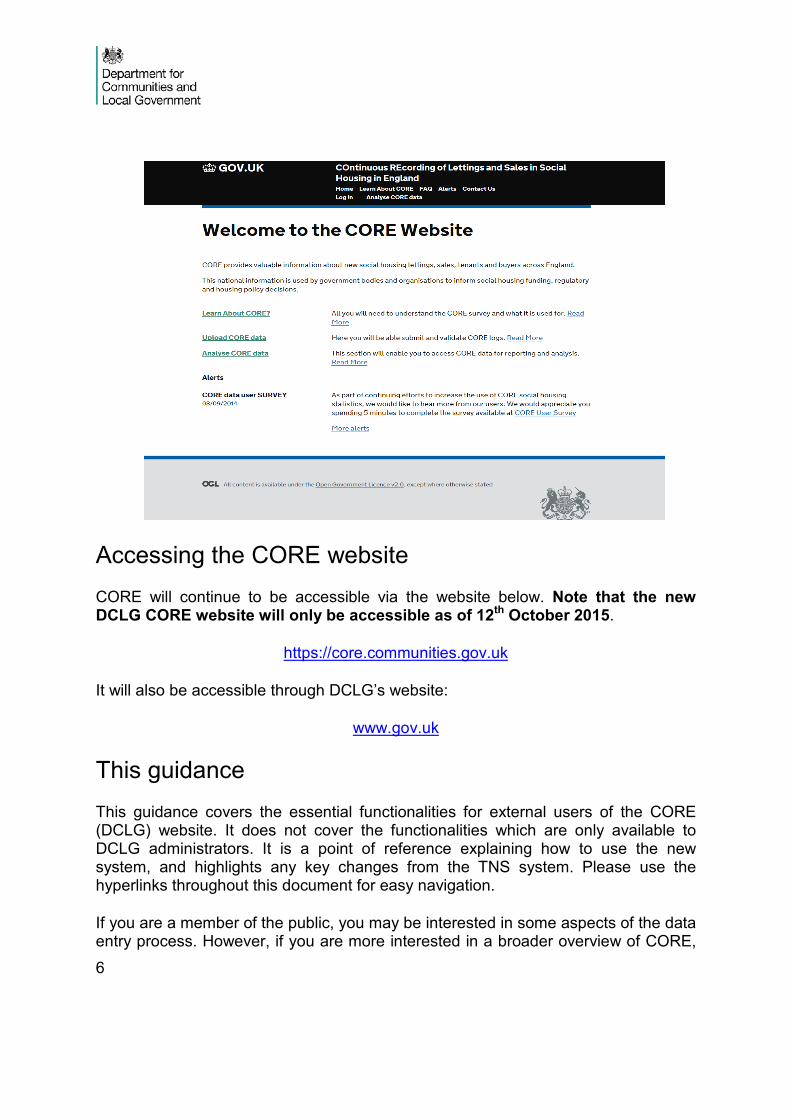
Accessing the CORE website CORE will continue to be accessible via the website below. Note that the new DCLG CORE website will only be accessible as of 12th October 2015.
https://core.communities.gov.uk
It will also be accessible through DCLG’s website:
www.gov.uk
This guidance This guidance covers the essential functionalities for external users of the CORE (DCLG) website. It does not cover the functionalities which are only available to DCLG administrators. It is a point of reference explaining how to use the new system, and highlights any key changes from the TNS system. Please use the hyperlinks throughout this document for easy navigation.
If you are a member of the public, you may be interested in some aspects of the data entry process. However, if you are more interested in a broader overview of CORE,
7
please refer to the ‘Learn about CORE’ section of the website for more suitable material.
Members of the public can view and analyse published Local Authority area level data and national level data on a quarterly and annual basis through the ‘Analyse CORE data’ section of the website. Users will not need to register to access this data (see Types of User).
If you require record level data, you will need to register as a CORE user with the UK Data Archive online:
http://ukdataservice.ac.uk/get-data/how-to-access/registration/otherukusers
8
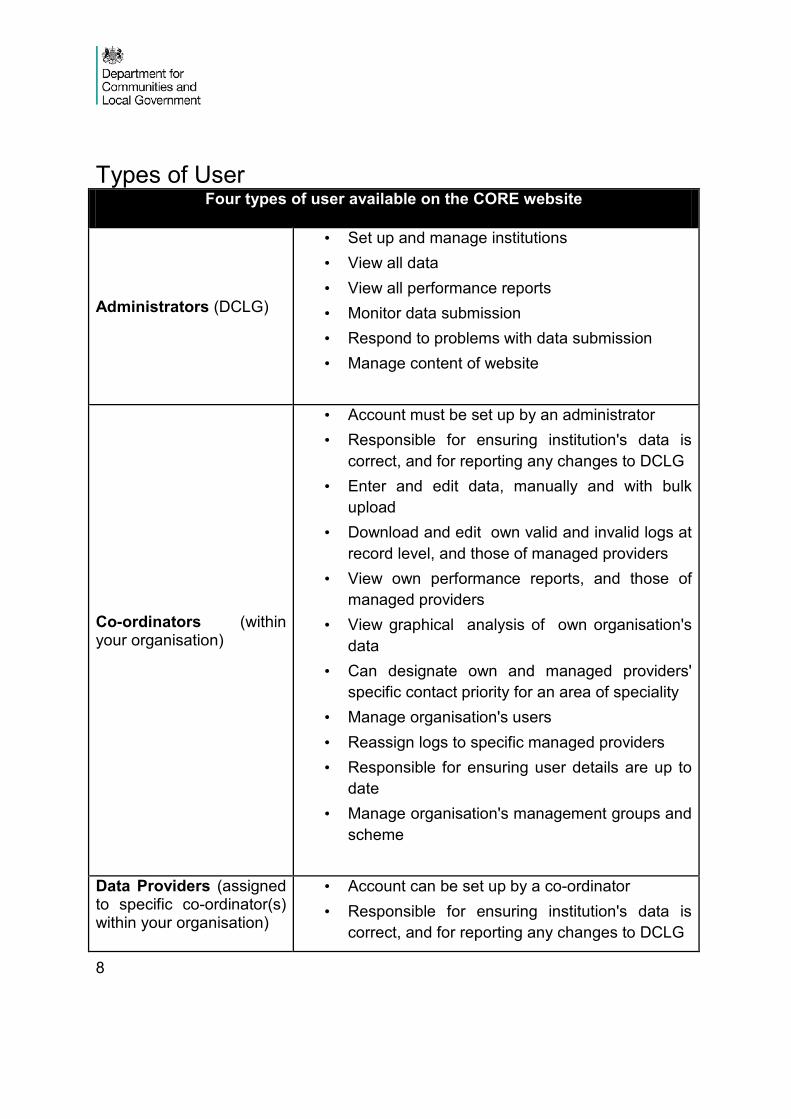
Types of User Four types of user available on the CORE website
Administrators (DCLG)
• Set up and manage institutions • View all data • View all performance reports • Monitor data submission • Respond to problems with data submission • Manage content of website
Co-ordinators (within your organisation)
• Account must be set up by an administrator • Responsible for ensuring institution's data is
correct, and for reporting any changes to DCLG • Enter and edit data, manually and with bulk
upload • Download and edit own valid and invalid logs at
record level, and those of managed providers • View own performance reports, and those of
managed providers • View graphical analysis of own organisation's
data • Can designate own and managed providers'
specific contact priority for an area of speciality • Manage organisation's users • Reassign logs to specific managed providers • Responsible for ensuring user details are up to
date • Manage organisation's management groups and
scheme
Data Providers (assigned to specific co-ordinator(s) within your organisation)
• Account can be set up by a co-ordinator • Responsible for ensuring institution's data is
correct, and for reporting any changes to DCLG
9
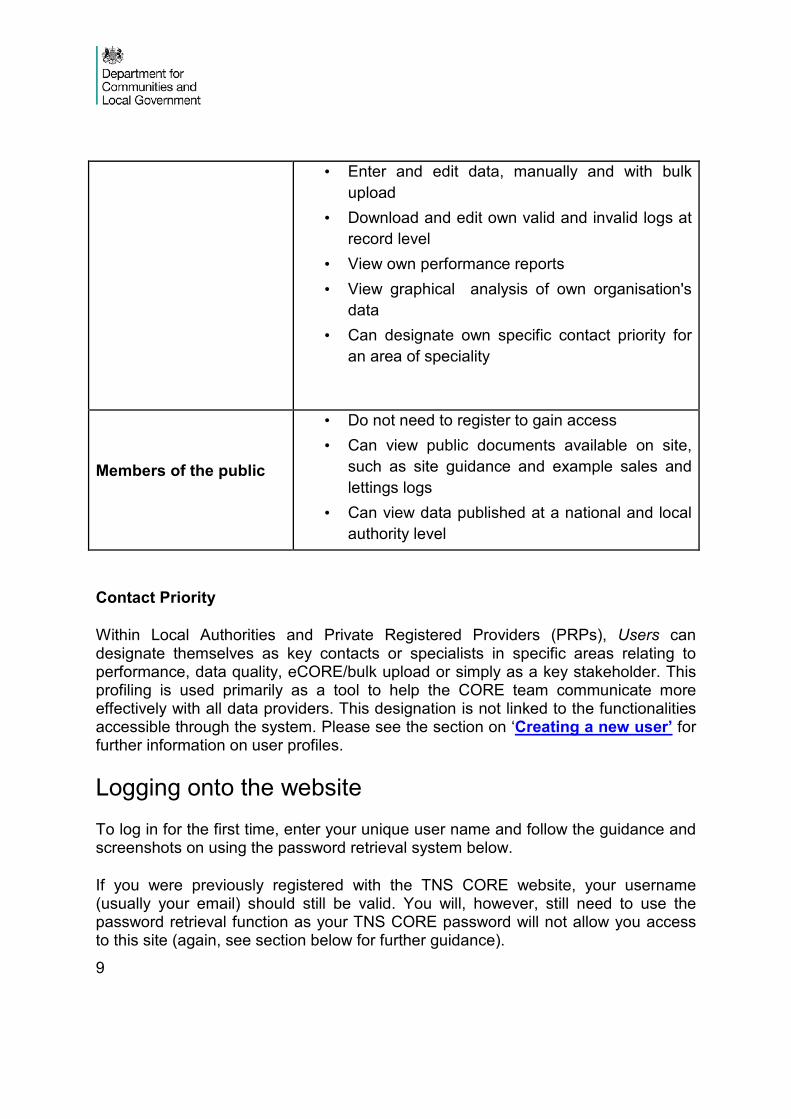
• Enter and edit data, manually and with bulk upload
• Download and edit own valid and invalid logs at record level
• View own performance reports • View graphical analysis of own organisation's
data • Can designate own specific contact priority for
an area of speciality
Members of the public
• Do not need to register to gain access • Can view public documents available on site,
such as site guidance and example sales and lettings logs
• Can view data published at a national and local authority level
Contact Priority
Within Local Authorities and Private Registered Providers (PRPs), Users can designate themselves as key contacts or specialists in specific areas relating to performance, data quality, eCORE/bulk upload or simply as a key stakeholder. This profiling is used primarily as a tool to help the CORE team communicate more effectively with all data providers. This designation is not linked to the functionalities accessible through the system. Please see the section on ‘Creating a new user’ for further information on user profiles.
Logging onto the website To log in for the first time, enter your unique user name and follow the guidance and screenshots on using the password retrieval system below.
If you were previously registered with the TNS CORE website, your username (usually your email) should still be valid. You will, however, still need to use the password retrieval function as your TNS CORE password will not allow you access to this site (again, see section below for further guidance).
10
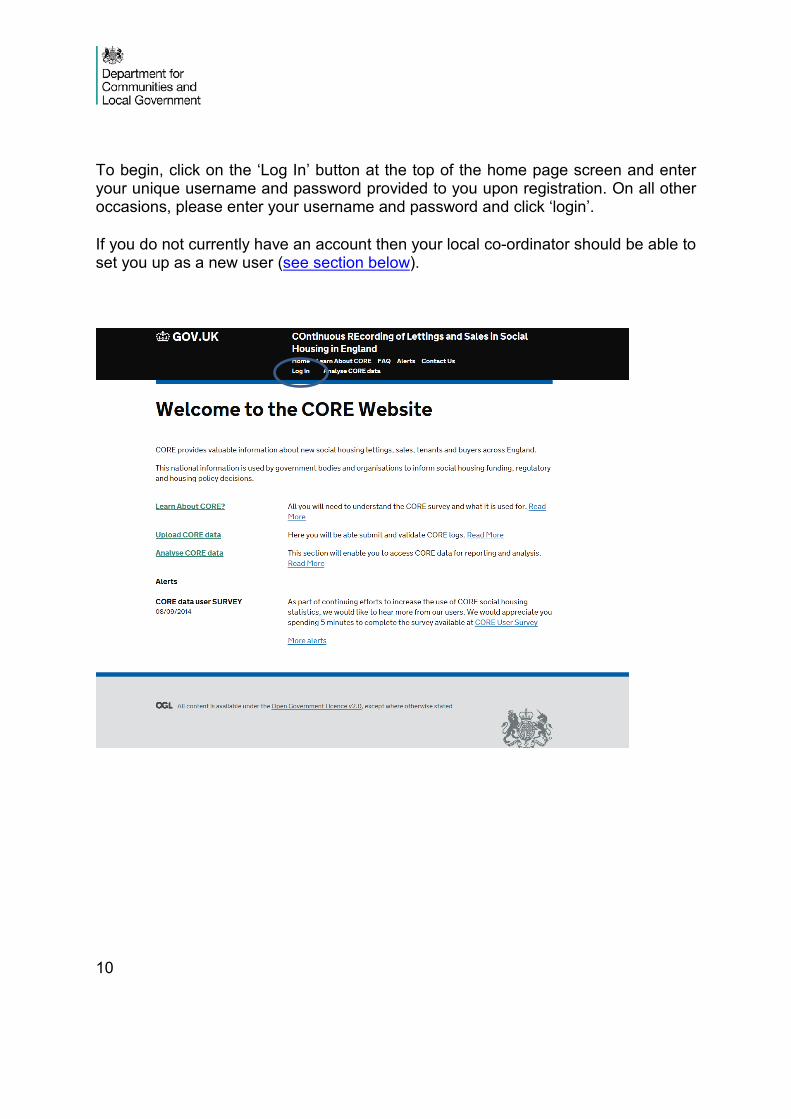
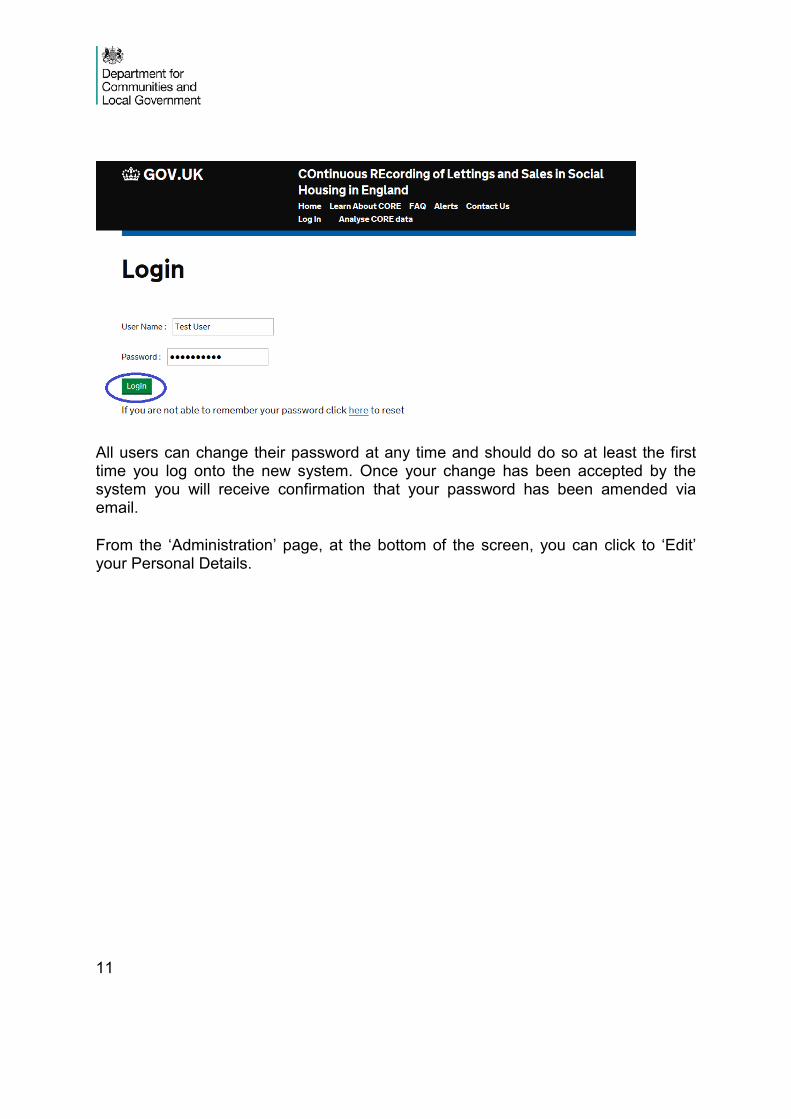
To begin, click on the ‘Log In’ button at the top of the home page screen and enter your unique username and password provided to you upon registration. On all other occasions, please enter your username and password and click ‘login’.
If you do not currently have an account then your local co-ordinator should be able to set you up as a new user (see section below).
11
All users can change their password at any time and should do so at least the first time you log onto the new system. Once your change has been accepted by the system you will receive confirmation that your password has been amended via email.
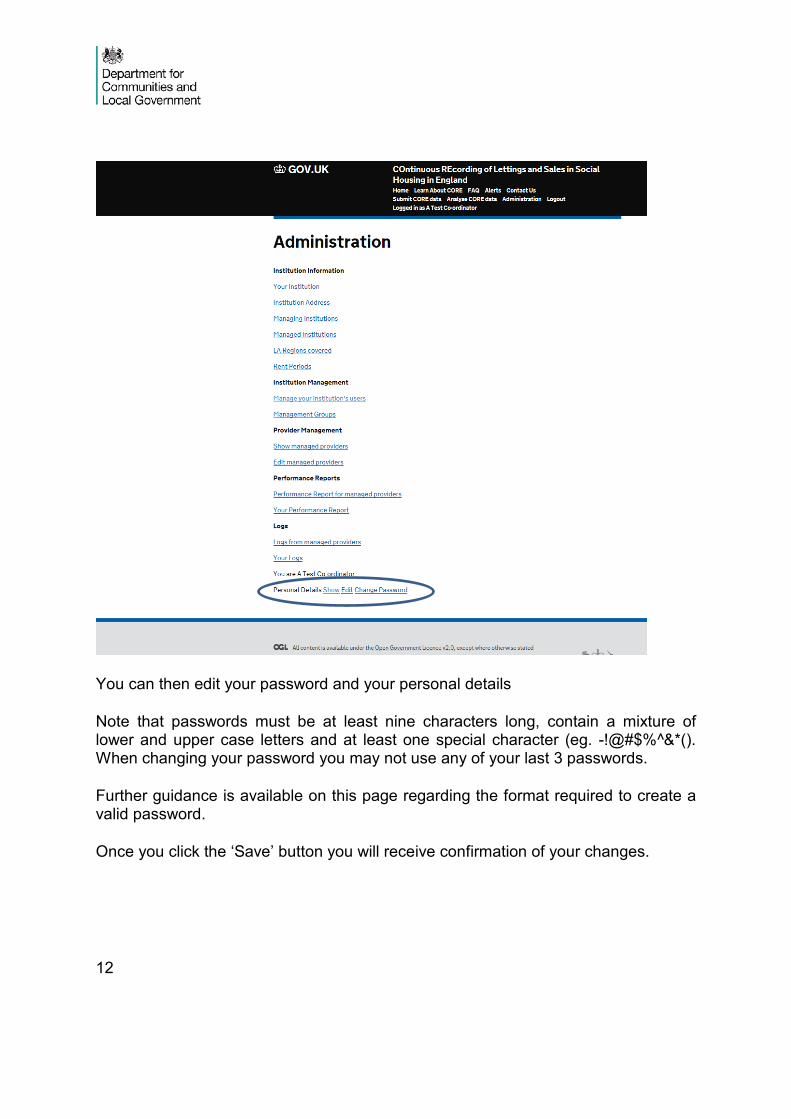
From the ‘Administration’ page, at the bottom of the screen, you can click to ‘Edit’ your Personal Details.
12
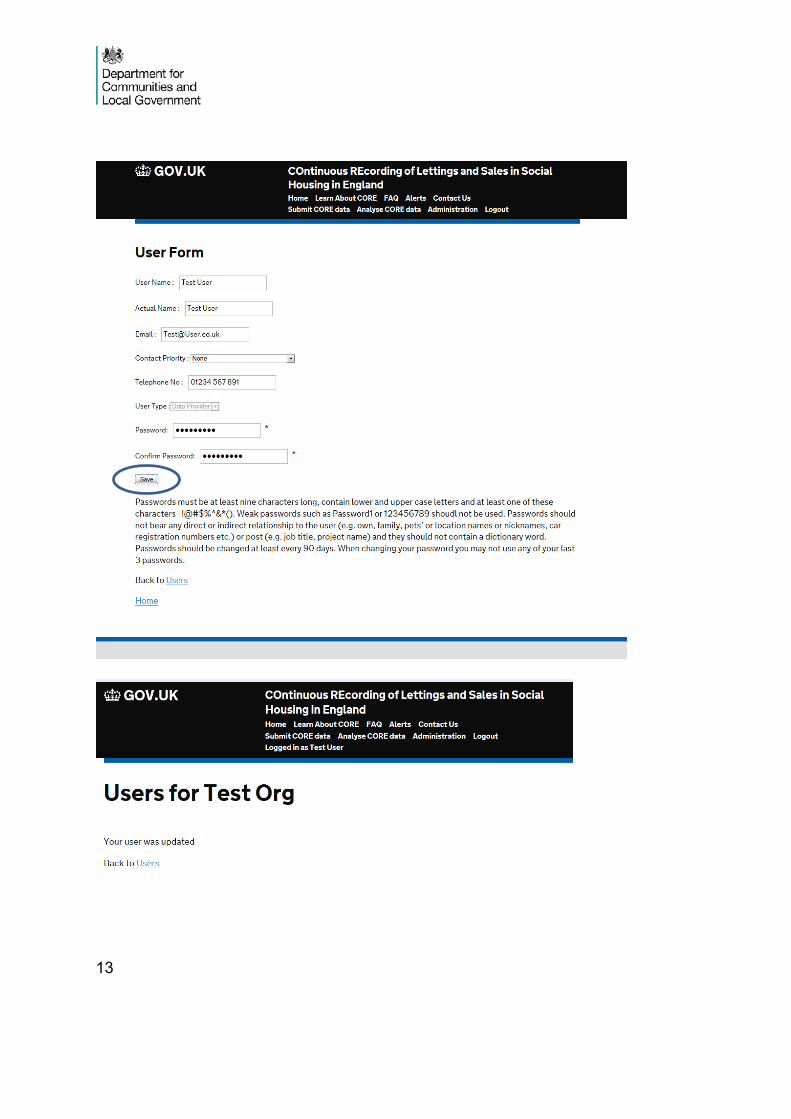
You can then edit your password and your personal details
Note that passwords must be at least nine characters long, contain a mixture of lower and upper case letters and at least one special character (eg. -!@#$%^&*(). When changing your password you may not use any of your last 3 passwords.
Further guidance is available on this page regarding the format required to create a valid password.
Once you click the ‘Save’ button you will receive confirmation of your changes.
13
14
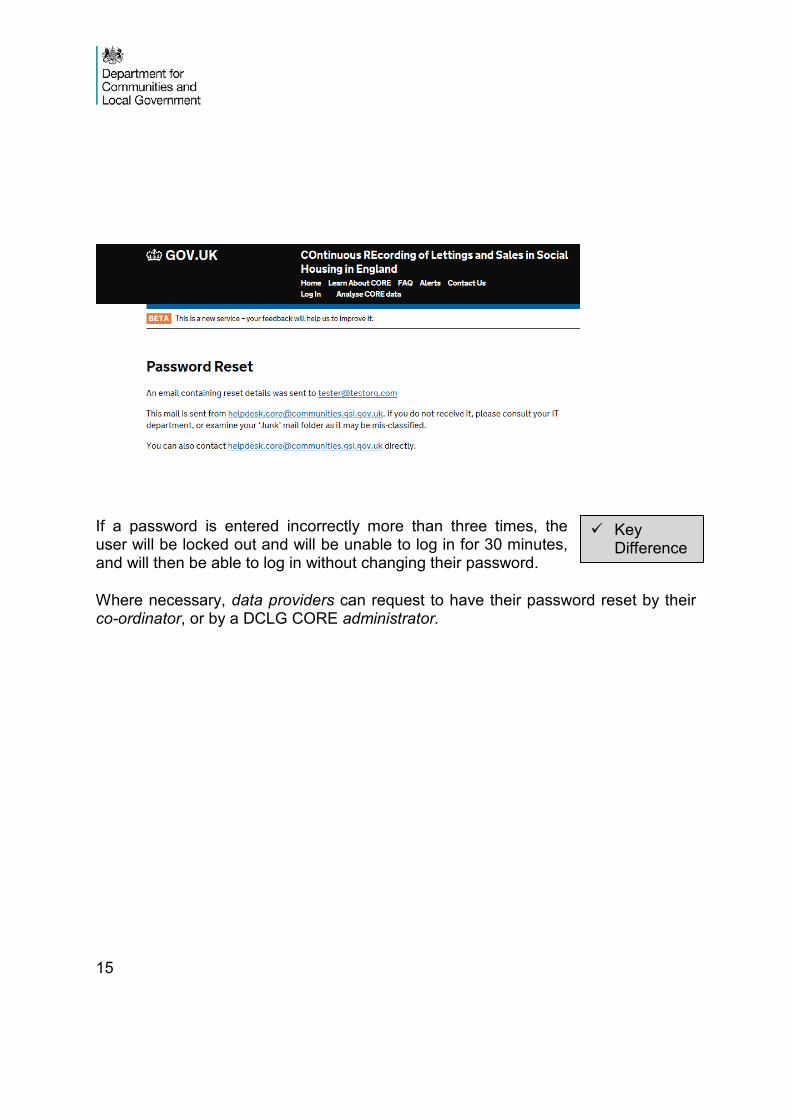
Password Retrieval
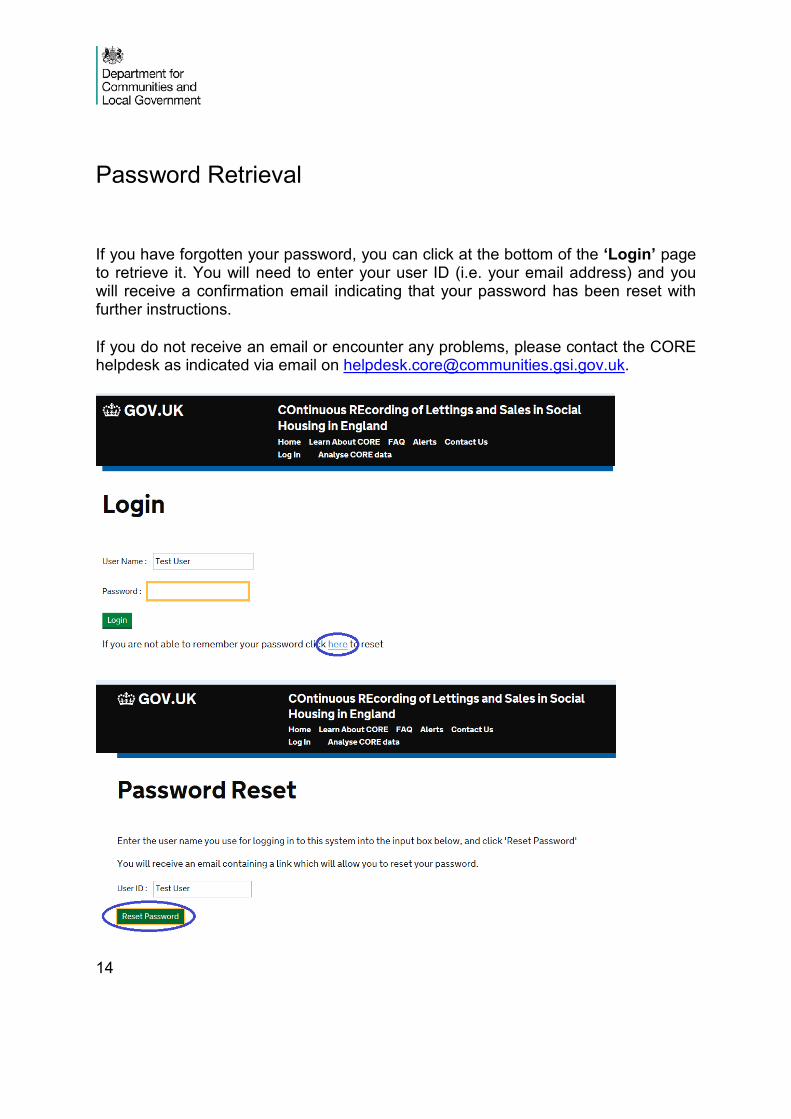
If you have forgotten your password, you can click at the bottom of the ‘Login’ page to retrieve it. You will need to enter your user ID (i.e. your email address) and you will receive a confirmation email indicating that your password has been reset with further instructions.
If you do not receive an email or encounter any problems, please contact the CORE helpdesk as indicated via email on [email protected].
15
If a password is entered incorrectly more than three times, the user will be locked out and will be unable to log in for 30 minutes, and will then be able to log in without changing their password.
Where necessary, data providers can request to have their password reset by their co-ordinator, or by a DCLG CORE administrator.
Key Difference

16
17
Chapter 2: Institution Management
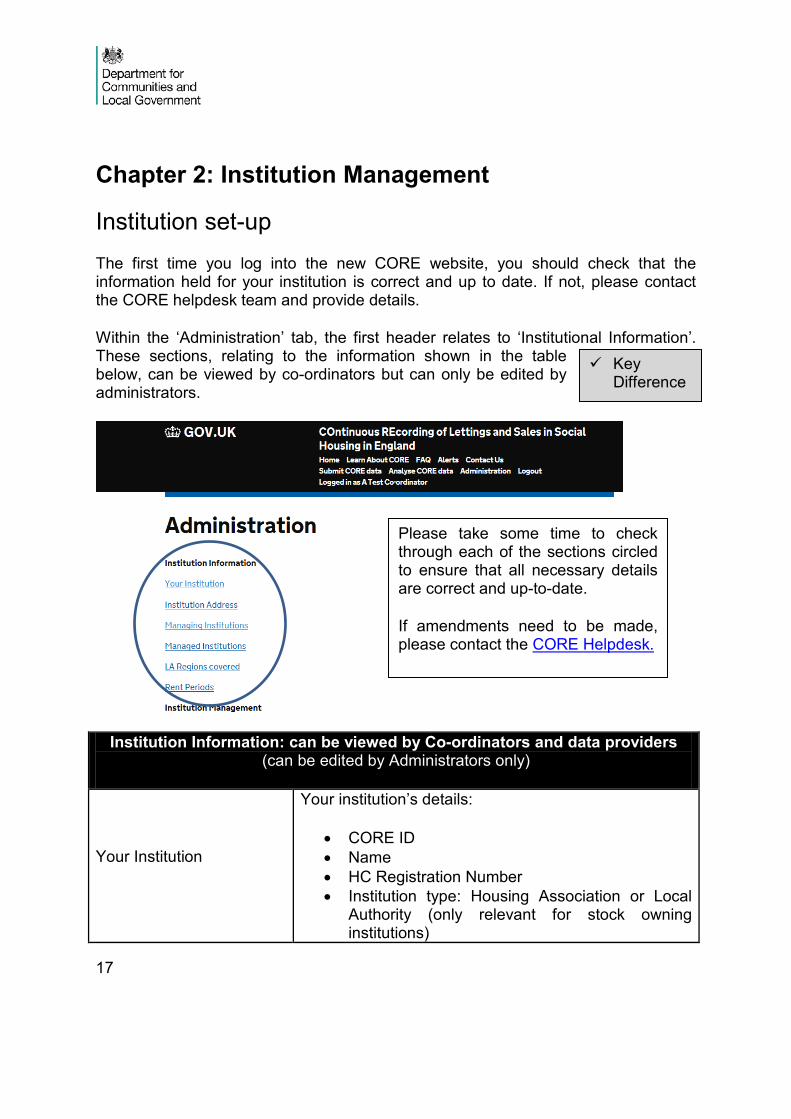
Institution set-up The first time you log into the new CORE website, you should check that the information held for your institution is correct and up to date. If not, please contact the CORE helpdesk team and provide details.
Within the ‘Administration’ tab, the first header relates to ‘Institutional Information’. These sections, relating to the information shown in the table below, can be viewed by co-ordinators but can only be edited by administrators.
Institution Information: can be viewed by Co-ordinators and data providers (can be edited by Administrators only)
Your Institution
Your institution’s details:
• CORE ID • Name • HC Registration Number • Institution type: Housing Association or Local
Authority (only relevant for stock owning institutions)
Please take some time to check through each of the sections circled to ensure that all necessary details are correct and up-to-date.
If amendments need to be made, please contact the CORE Helpdesk.
Key Difference
18
• Active (yes/no) • Telephone number • Owns affordable rent (yes/no) • Owns Almshouses Yes/No • Holds stock (yes/no) • Quantity of General Needs stock • Quantity of Supported Housing Stock • Quantity of Unspecified Stock (if not known
whether it is general needs or supported housing stock)
Institution Address Full institution address
Managing Institutions
Child institutions that provide data for stock your organisation owns.
If your organisation provides data for its own stock, it should be listed as a managing organisation, along with any other organisation that provides data on behalf of your organisation.
Managed Institutions
Stock owning parent organisations for which your organisation provides data.
If your organisation is a stock holding organisation, it should be listed as a managed organisation, along with any other organisations for which your organisation submits data.
LA Regions covered
Full list of LA regions in which your institution operates.
Data submitted will be validated against the LA regions covered by the given owning organisation (Managed Institution) (see Online data validation)
Rent Periods
Full list of Rent Periods under which your stock is being let (for stock-owning organisations) or under which you let the stock you manage (for managing organisations).
Data submitted will be validated against the LA regions covered by the given owning organisation (Managed
19
Institution) (see Online data validation)
This information feeds directly into the validations for data entry; as such, if any of this information is incorrect, please inform the CORE helpdesk immediately via ([email protected]), so that a DCLG Administrator can update it accordingly.
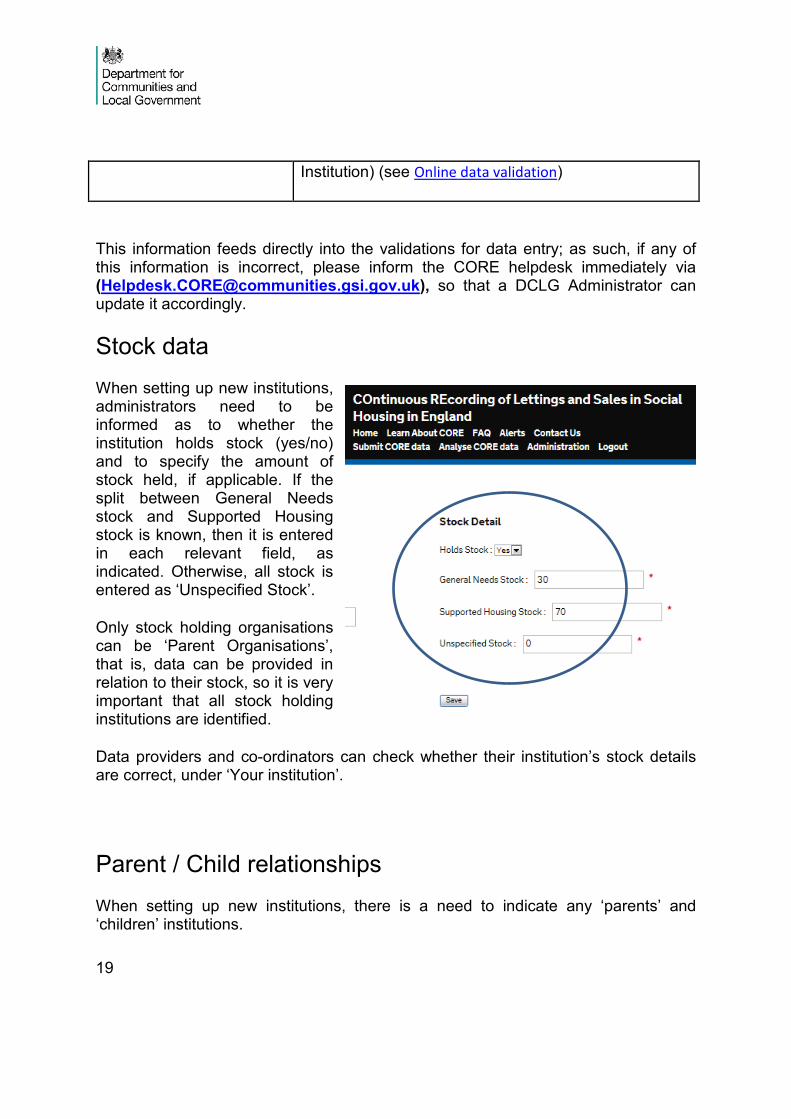
Stock data When setting up new institutions, administrators need to be informed as to whether the institution holds stock (yes/no) and to specify the amount of stock held, if applicable. If the split between General Needs stock and Supported Housing stock is known, then it is entered in each relevant field, as indicated. Otherwise, all stock is entered as ‘Unspecified Stock’.
Only stock holding organisations can be ‘Parent Organisations’, that is, data can be provided in relation to their stock, so it is very important that all stock holding institutions are identified.
Data providers and co-ordinators can check whether their institution’s stock details are correct, under ‘Your institution’.
Parent / Child relationships When setting up new institutions, there is a need to indicate any ‘parents’ and ‘children’ institutions.
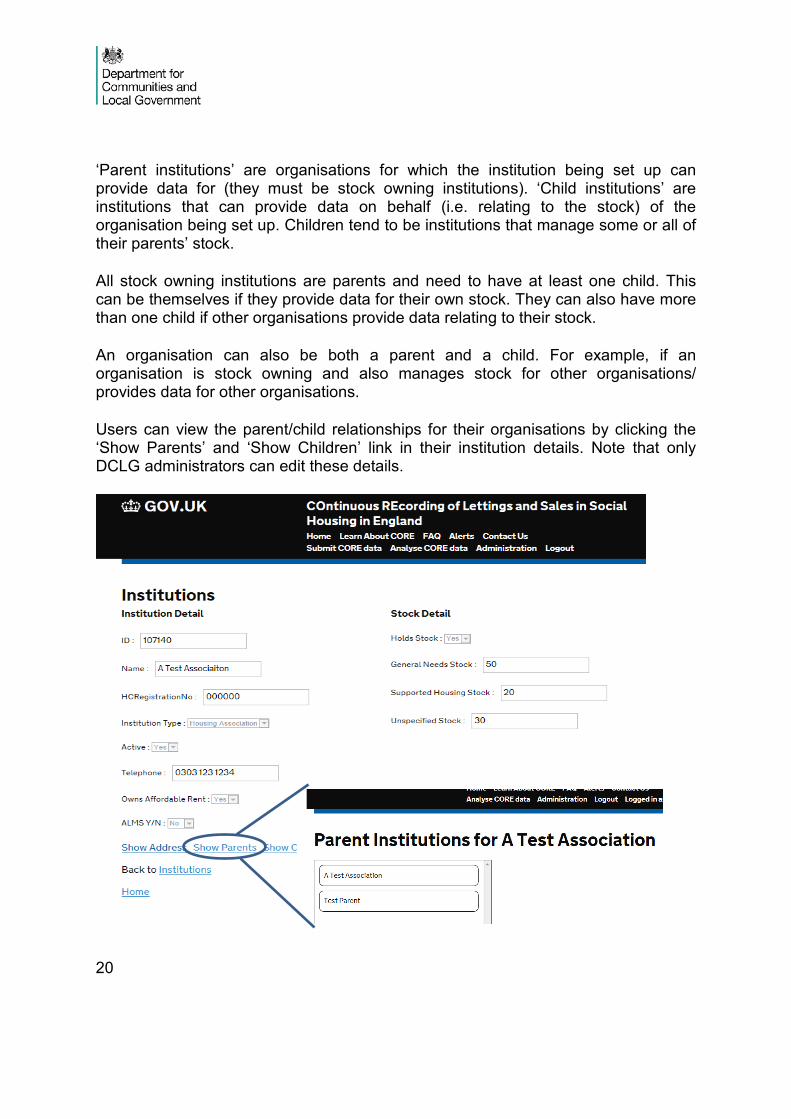
20
‘Parent institutions’ are organisations for which the institution being set up can provide data for (they must be stock owning institutions). ‘Child institutions’ are institutions that can provide data on behalf (i.e. relating to the stock) of the organisation being set up. Children tend to be institutions that manage some or all of their parents’ stock.
All stock owning institutions are parents and need to have at least one child. This can be themselves if they provide data for their own stock. They can also have more than one child if other organisations provide data relating to their stock.
An organisation can also be both a parent and a child. For example, if an organisation is stock owning and also manages stock for other organisations/ provides data for other organisations.
Users can view the parent/child relationships for their organisations by clicking the ‘Show Parents’ and ‘Show Children’ link in their institution details. Note that only DCLG administrators can edit these details.
21
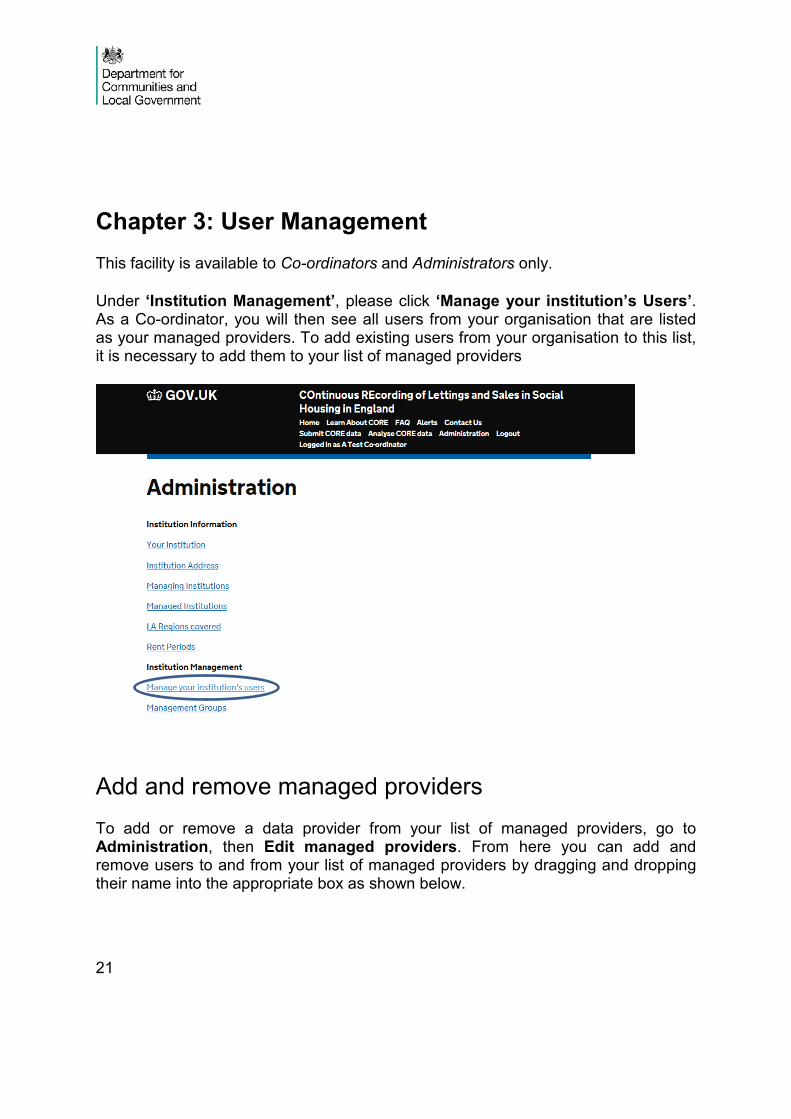
Chapter 3: User Management This facility is available to Co-ordinators and Administrators only.
Under ‘Institution Management’, please click ‘Manage your institution’s Users’. As a Co-ordinator, you will then see all users from your organisation that are listed as your managed providers. To add existing users from your organisation to this list, it is necessary to add them to your list of managed providers
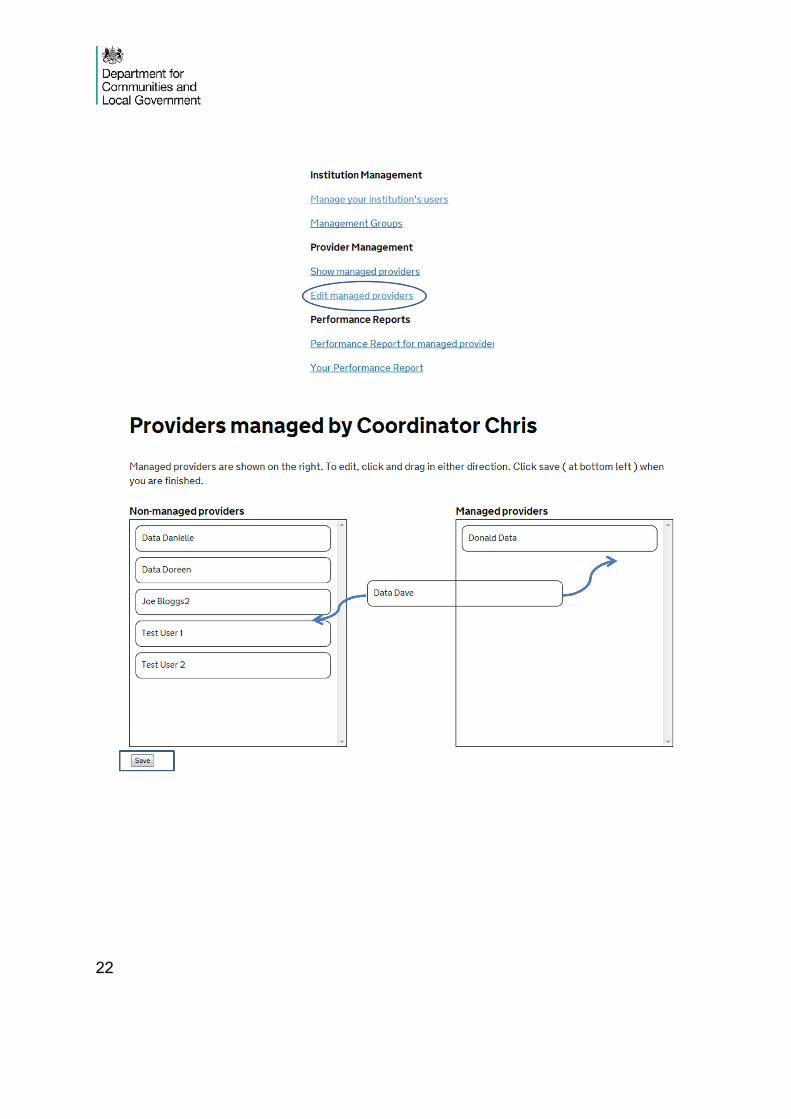
Add and remove managed providers To add or remove a data provider from your list of managed providers, go to Administration, then Edit managed providers. From here you can add and remove users to and from your list of managed providers by dragging and dropping their name into the appropriate box as shown below.
22
23
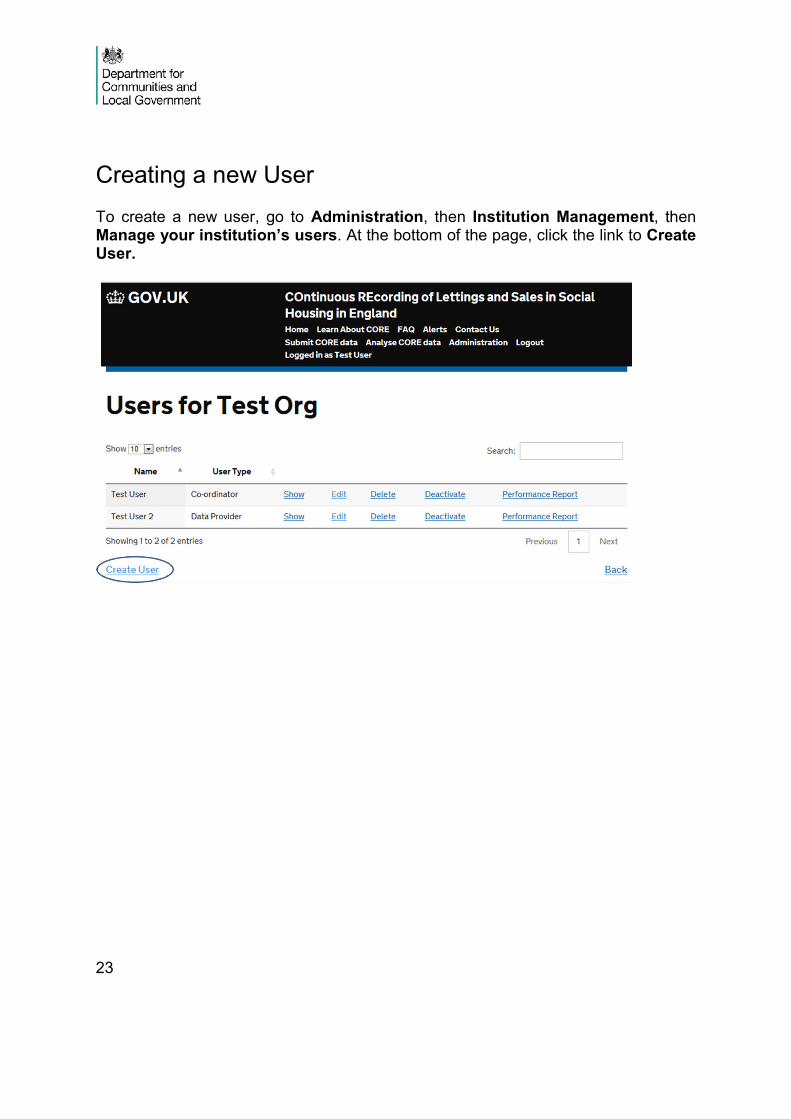
Creating a new User To create a new user, go to Administration, then Institution Management, then Manage your institution’s users. At the bottom of the page, click the link to Create User.
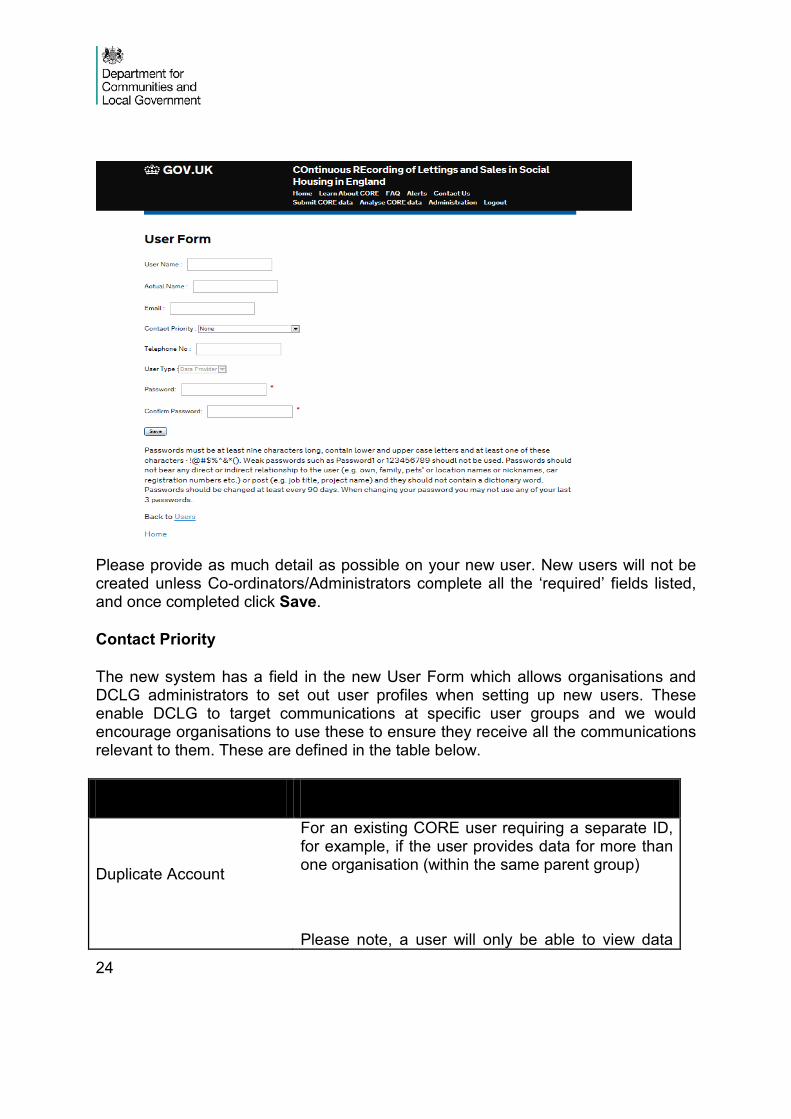
24
Please provide as much detail as possible on your new user. New users will not be created unless Co-ordinators/Administrators complete all the ‘required’ fields listed, and once completed click Save.
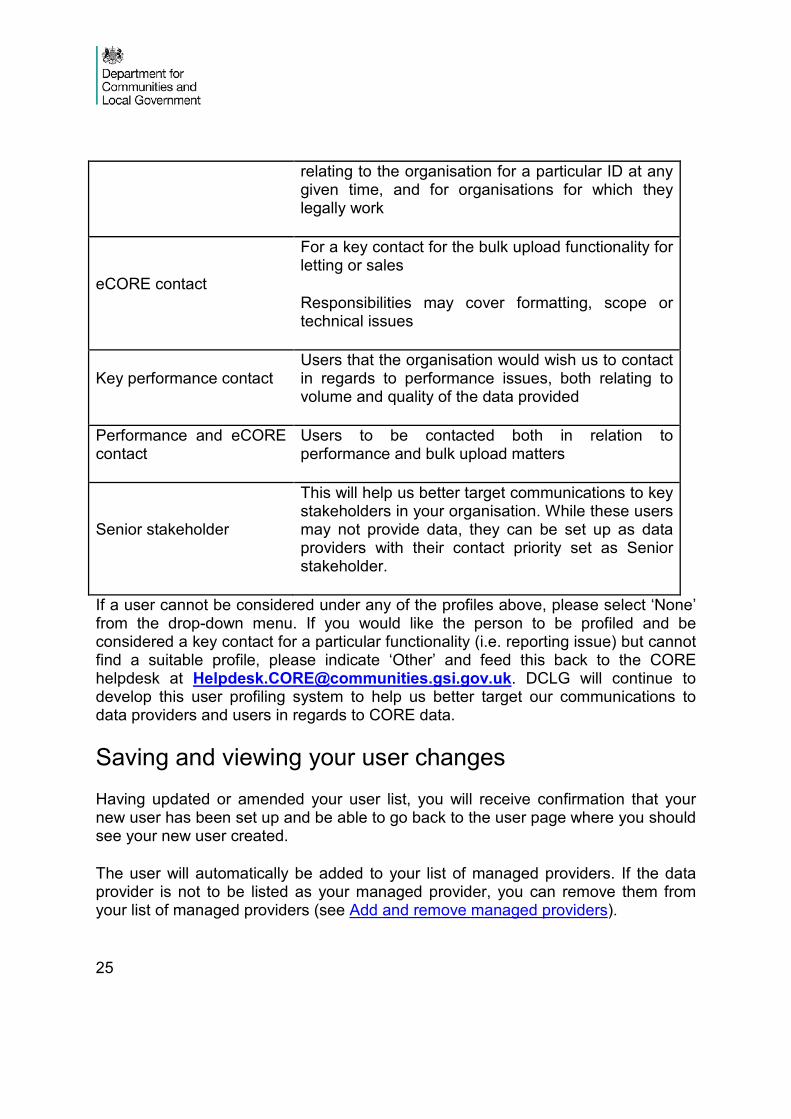
Contact Priority
The new system has a field in the new User Form which allows organisations and DCLG administrators to set out user profiles when setting up new users. These enable DCLG to target communications at specific user groups and we would encourage organisations to use these to ensure they receive all the communications relevant to them. These are defined in the table below.
Contact Priority
Duplicate Account
For an existing CORE user requiring a separate ID, for example, if the user provides data for more than one organisation (within the same parent group)
Please note, a user will only be able to view data
25
relating to the organisation for a particular ID at any given time, and for organisations for which they legally work
eCORE contact
For a key contact for the bulk upload functionality for letting or sales
Responsibilities may cover formatting, scope or technical issues
Key performance contact Users that the organisation would wish us to contact in regards to performance issues, both relating to volume and quality of the data provided
Performance and eCORE contact
Users to be contacted both in relation to performance and bulk upload matters
Senior stakeholder
This will help us better target communications to key stakeholders in your organisation. While these users may not provide data, they can be set up as data providers with their contact priority set as Senior stakeholder.
If a user cannot be considered under any of the profiles above, please select ‘None’ from the drop-down menu. If you would like the person to be profiled and be considered a key contact for a particular functionality (i.e. reporting issue) but cannot find a suitable profile, please indicate ‘Other’ and feed this back to the CORE helpdesk at [email protected]. DCLG will continue to develop this user profiling system to help us better target our communications to data providers and users in regards to CORE data.
Saving and viewing your user changes Having updated or amended your user list, you will receive confirmation that your new user has been set up and be able to go back to the user page where you should see your new user created.
The user will automatically be added to your list of managed providers. If the data provider is not to be listed as your managed provider, you can remove them from your list of managed providers (see Add and remove managed providers).
26
Changing user details and status From the user page, as a Co-ordinator, you can also view and edit details of users linked to you, activate/deactivate your registered users, and view their performance reports.
Please make sure the user details are up to date and de-activate users who are no longer providing CORE data. By default, users become ‘active’ when they are created and remain so until they are ‘de-activated’.
User Performance reports Performance reports identify for a particular period the records submitted for each type of log, and show whether these are saved, submitted valid or submitted invalid.
It also allows users to assess how long it takes to resolve queries, the percentage of errors on a log and whether records have been entered manually or via bulk upload.
The key difference between these reports and the TNS version is that these are real-time updates that you can access whenever you like.
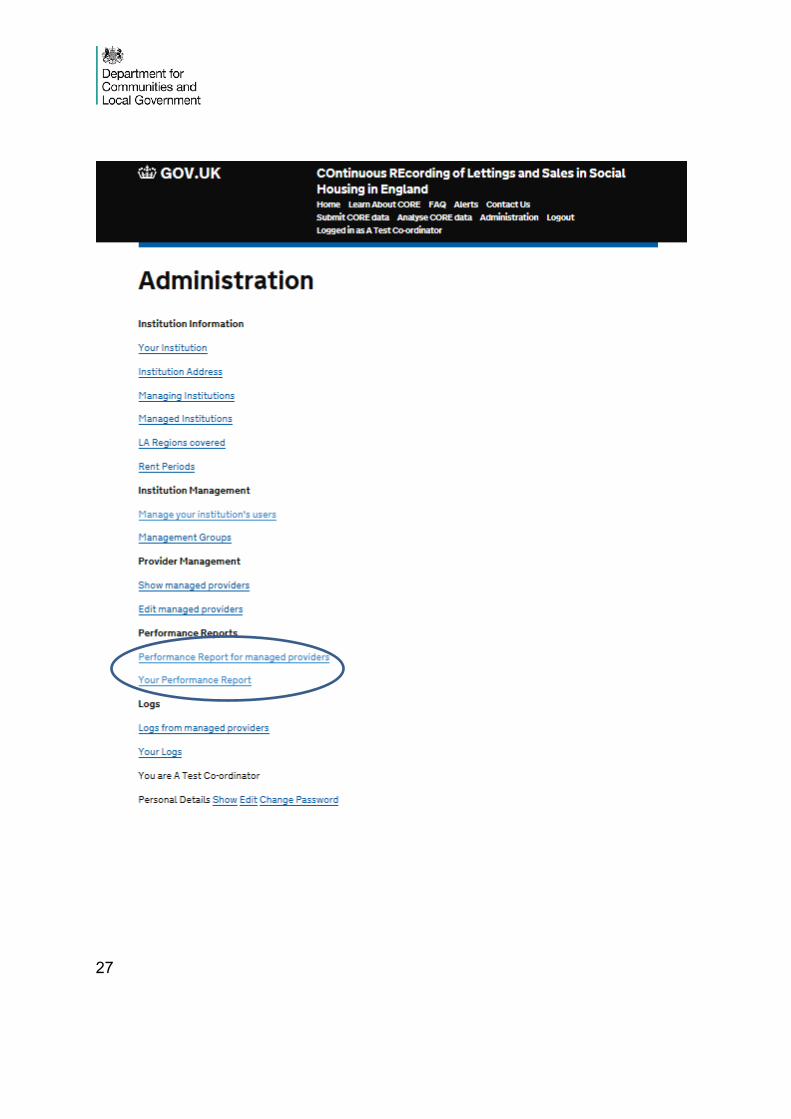
User performance reports for managed providers allow you, as a Co-ordinator, to see how many logs your linked users have submitted individually for your organisation. Individual Data Providers are able to see their own performance by clicking on Your Performance Report.
To access performance reports, select either ‘Your Performance Report’ or ‘Performance Report for managed providers’ within the ‘Administration’ area.
Key Difference
27

28
29
Chapter 4: Submitting CORE data CORE Data Providers and Co-ordinators should only submit data via the CORE on-line system. Data should not be sent directly to DCLG.
Log types There are 5 types of logs: Social Rent General Needs, Social Rent Supported Housing, Affordable Rent General Needs, Affordable Rent Supported Housing and Sales.
The system allows you to record data for any of the 5 types of logs manually or via an eCORE/bulk upload template. Each year, DCLG will make available the new templates to all users and publish them on the CORE website ahead of the data collection period. This will allow all institutions more time to make the appropriate changes to their data collection systems.
Please note that if you are new to submitting Affordable Rent logs, in order to set up the online system for your Affordable Rent submissions you will need to inform DCLG that you wish to submit Affordable Rent lettings and that the organisation owns Affordable Rent stock. An Administrator will then update your institution’s details, for validation purposes (see Institution Management).
30
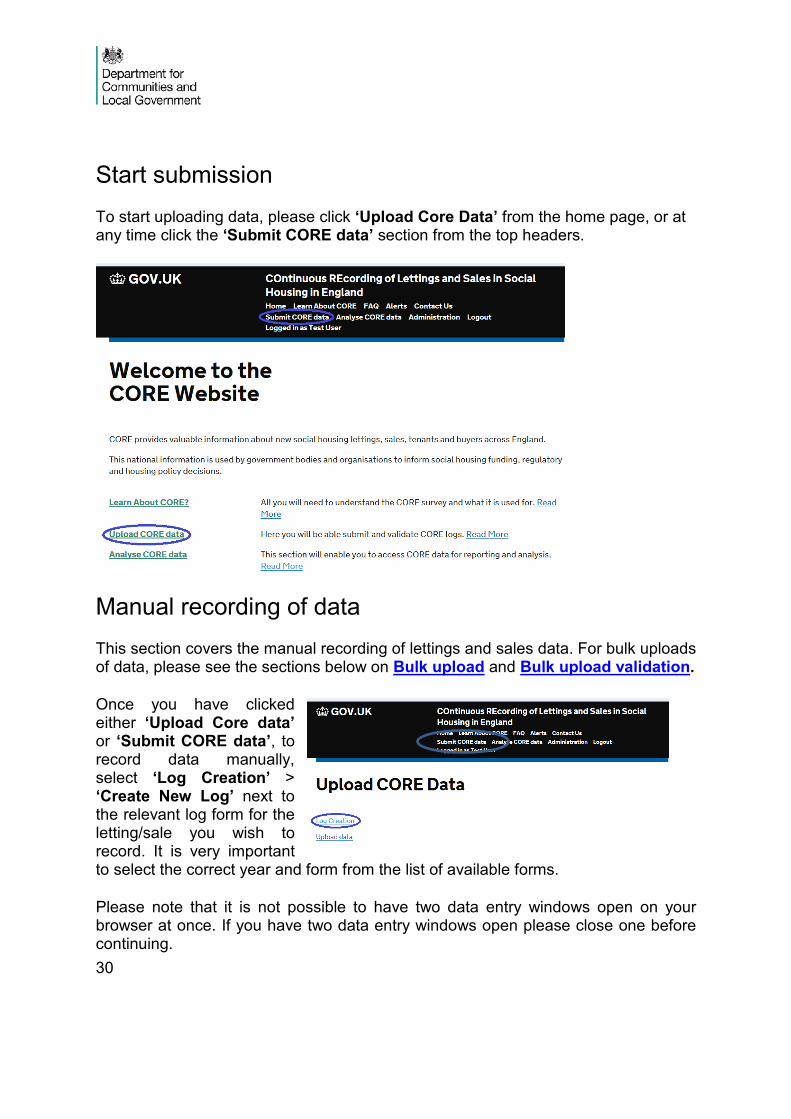
Start submission To start uploading data, please click ‘Upload Core Data’ from the home page, or at any time click the ‘Submit CORE data’ section from the top headers.
Manual recording of data This section covers the manual recording of lettings and sales data. For bulk uploads of data, please see the sections below on Bulk upload and Bulk upload validation.
Once you have clicked either ‘Upload Core data’ or ‘Submit CORE data’, to record data manually, select ‘Log Creation’ > ‘Create New Log’ next to the relevant log form for the letting/sale you wish to record. It is very important to select the correct year and form from the list of available forms.
Please note that it is not possible to have two data entry windows open on your browser at once. If you have two data entry windows open please close one before continuing.
31
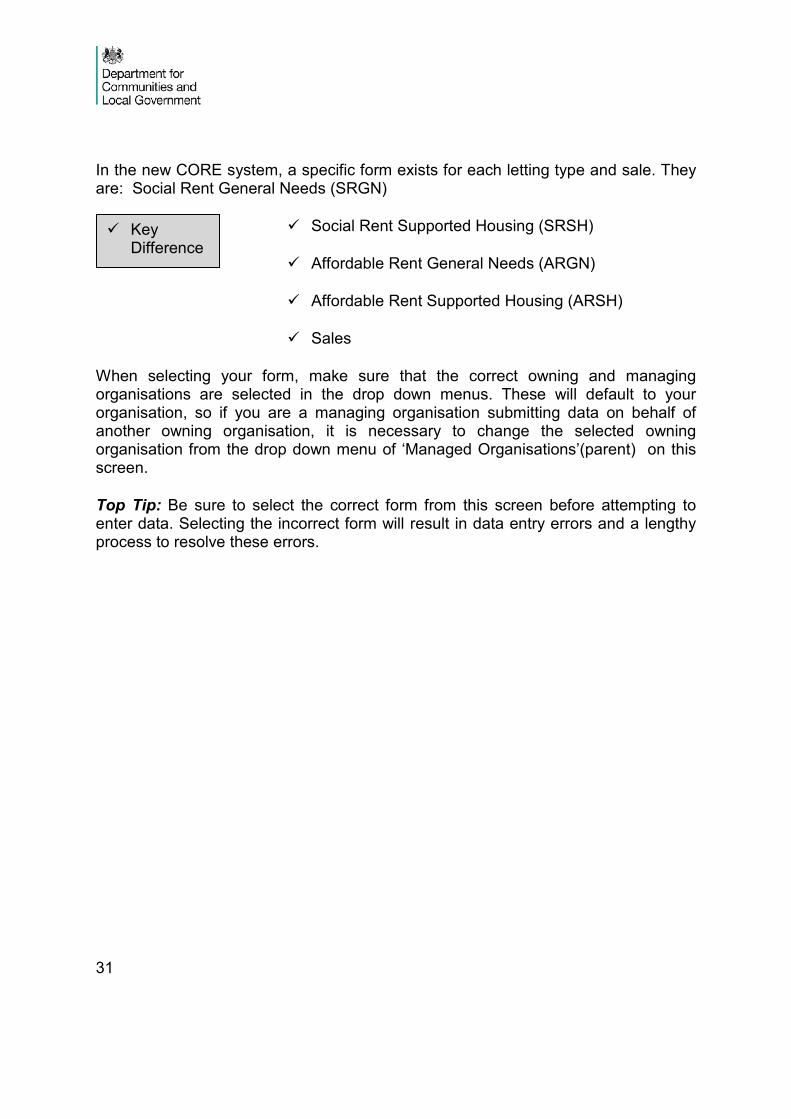
In the new CORE system, a specific form exists for each letting type and sale. They are: Social Rent General Needs (SRGN)
Social Rent Supported Housing (SRSH)
Affordable Rent General Needs (ARGN)
Affordable Rent Supported Housing (ARSH)
Sales
When selecting your form, make sure that the correct owning and managing organisations are selected in the drop down menus. These will default to your organisation, so if you are a managing organisation submitting data on behalf of another owning organisation, it is necessary to change the selected owning organisation from the drop down menu of ‘Managed Organisations’(parent) on this screen.
Top Tip: Be sure to select the correct form from this screen before attempting to enter data. Selecting the incorrect form will result in data entry errors and a lengthy process to resolve these errors.
Key Difference
32
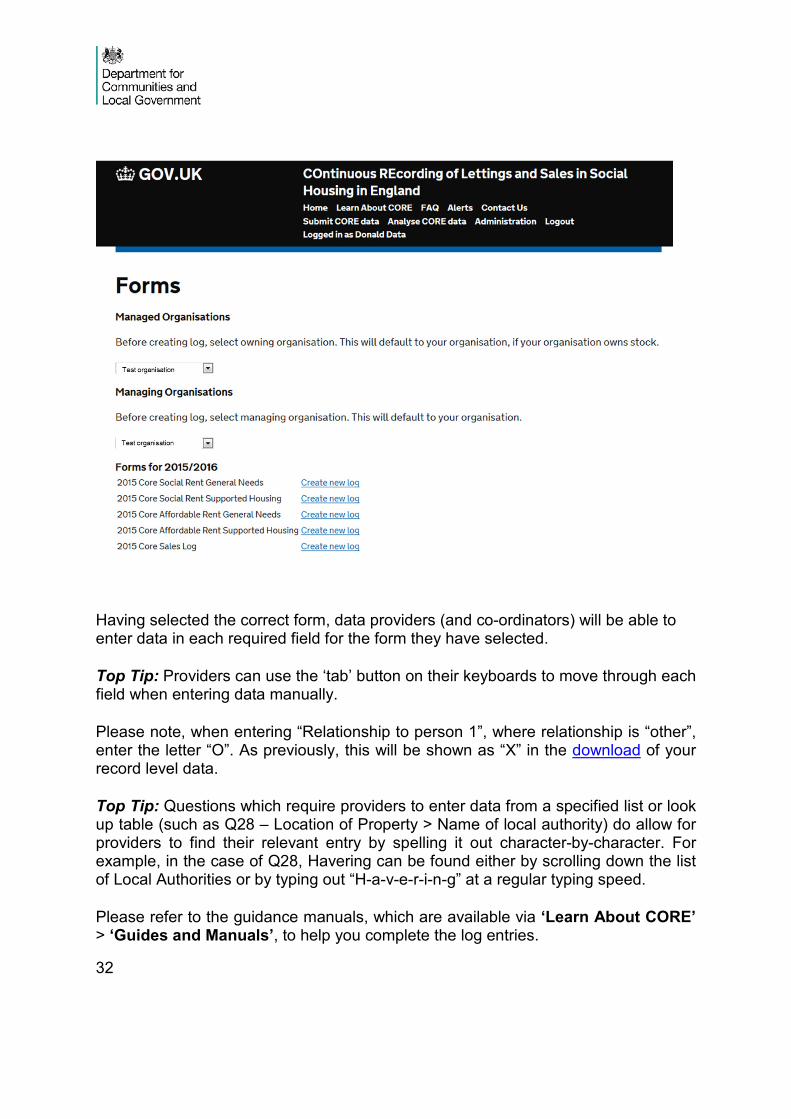
Having selected the correct form, data providers (and co-ordinators) will be able to enter data in each required field for the form they have selected.
Top Tip: Providers can use the ‘tab’ button on their keyboards to move through each field when entering data manually.
Please note, when entering “Relationship to person 1”, where relationship is “other”, enter the letter “O”. As previously, this will be shown as “X” in the download of your record level data.
Top Tip: Questions which require providers to enter data from a specified list or look up table (such as Q28 – Location of Property > Name of local authority) do allow for providers to find their relevant entry by spelling it out character-by-character. For example, in the case of Q28, Havering can be found either by scrolling down the list of Local Authorities or by typing out “H-a-v-e-r-i-n-g” at a regular typing speed.
Please refer to the guidance manuals, which are available via ‘Learn About CORE’ > ‘Guides and Manuals’, to help you complete the log entries.
33
If further assistance is required, please contact the CORE team at [email protected].
Online data validation When entering records, data is validated online following internal validation rules. These are checks to ensure that the data being entered is in the correct format, in line with pre-existing lists, within expected value ranges and consistent with other data being entered.
When data is entered that does not pass a particular test, an error message will appear. For example, if both an age and the ‘tick the age refused box’ for a person is ticked, an error message will appear indicating that a change needs to be made to the log for it to be passed valid.
“Soft errors” will also be highlighted by the validation rules. These errors highlight unusual data, such as a 70 year old whose economic status is not “Retired”. Once you have checked that the data is correct, it is possible to override such validation rules.
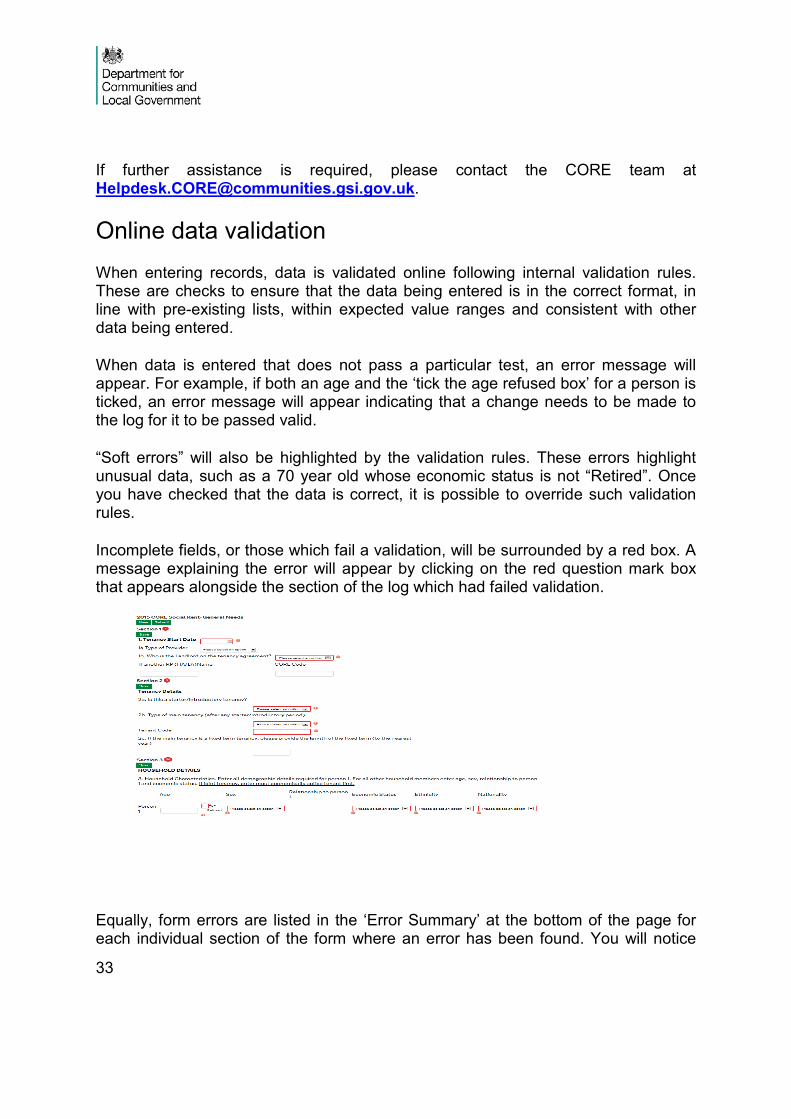
Incomplete fields, or those which fail a validation, will be surrounded by a red box. A message explaining the error will appear by clicking on the red question mark box that appears alongside the section of the log which had failed validation.
Equally, form errors are listed in the ‘Error Summary’ at the bottom of the page for each individual section of the form where an error has been found. You will notice

34
that when opening each relevant form to begin entering in data manually, all errors will be present at the bottom of the form. This is simply because the form will contain no data. As providers begin to populate fields, these errors will disappear.
Each error indicated at the bottom of the form is also linked to the relevant question above where the error has been found. Providers can quickly navigate to where the error is within the form by clicking on each error listed.
Saving and submitting logs At any point during the manual recording of records, progress can be saved by clicking the ‘Save’ button.
Top Tip: Save your entries and make use of this function as any data not saved will be lost should the system time out. Please note that you may not notice that the system has timed out until you attempt to submit or save the form.
35
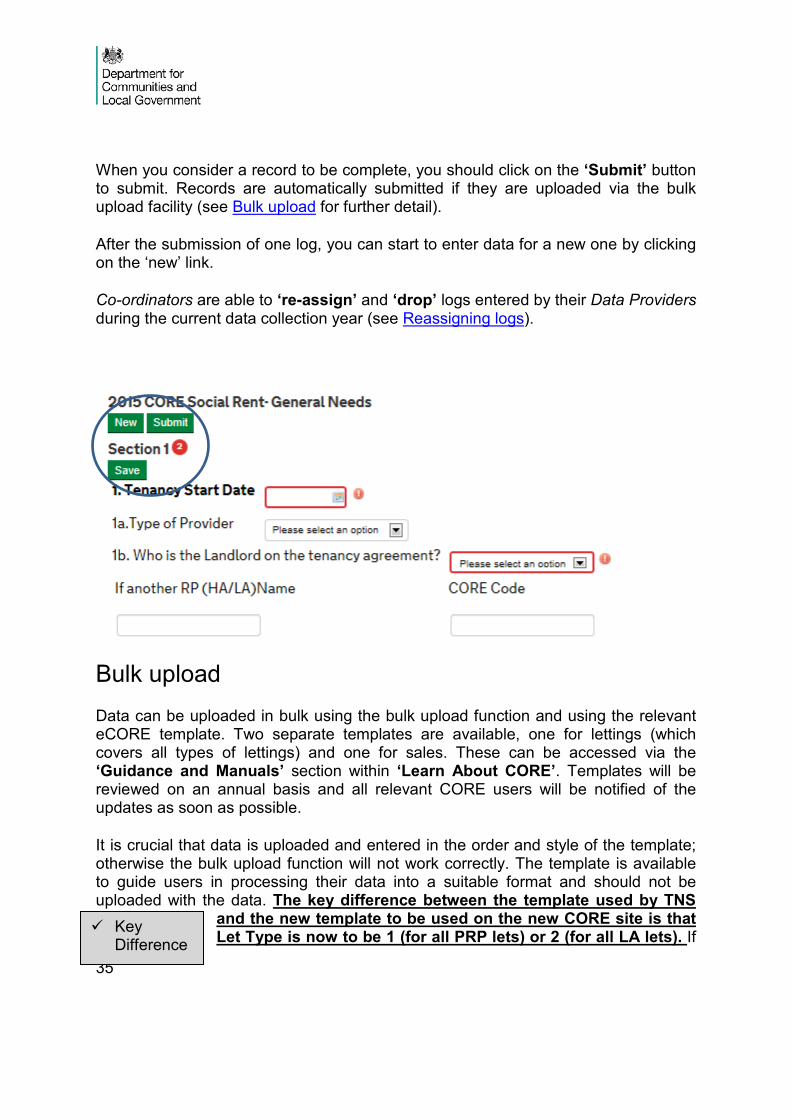
When you consider a record to be complete, you should click on the ‘Submit’ button to submit. Records are automatically submitted if they are uploaded via the bulk upload facility (see Bulk upload for further detail).
After the submission of one log, you can start to enter data for a new one by clicking on the ‘new’ link.
Co-ordinators are able to ‘re-assign’ and ‘drop’ logs entered by their Data Providers during the current data collection year (see Reassigning logs).
Bulk upload Data can be uploaded in bulk using the bulk upload function and using the relevant eCORE template. Two separate templates are available, one for lettings (which covers all types of lettings) and one for sales. These can be accessed via the ‘Guidance and Manuals’ section within ‘Learn About CORE’. Templates will be reviewed on an annual basis and all relevant CORE users will be notified of the updates as soon as possible.
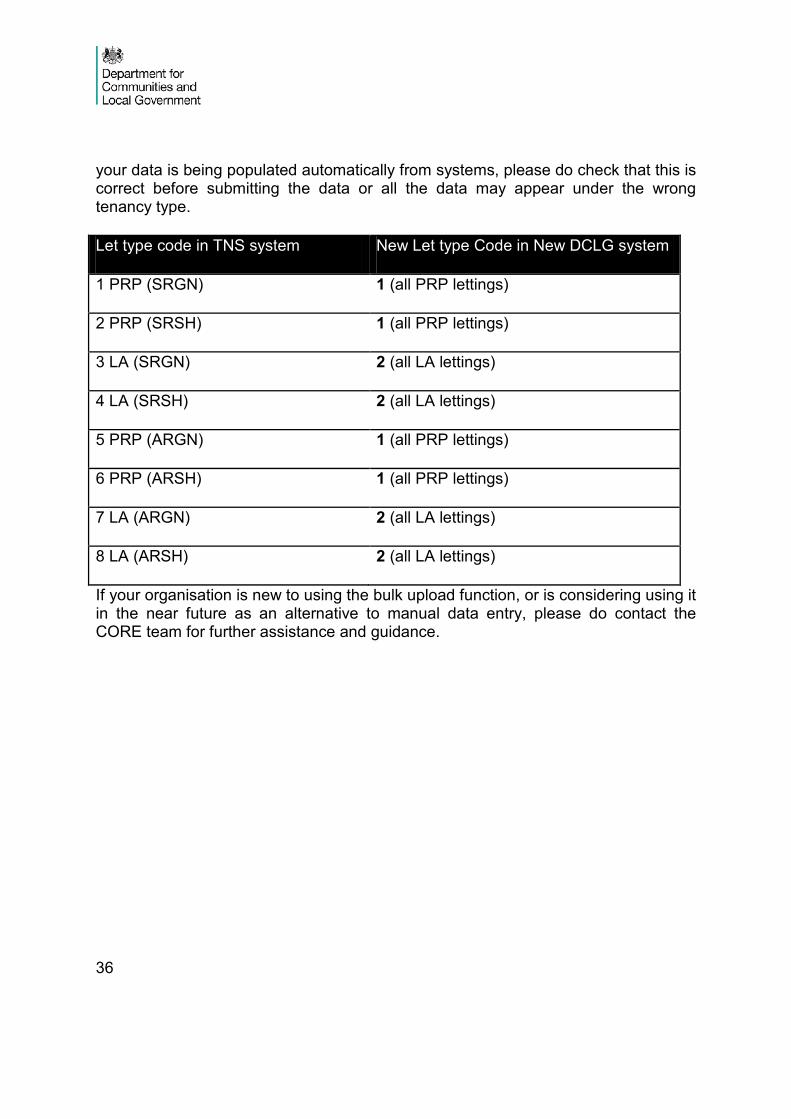
It is crucial that data is uploaded and entered in the order and style of the template; otherwise the bulk upload function will not work correctly. The template is available to guide users in processing their data into a suitable format and should not be uploaded with the data. The key difference between the template used by TNS
and the new template to be used on the new CORE site is that Let Type is now to be 1 (for all PRP lets) or 2 (for all LA lets). If Key
Difference
36
your data is being populated automatically from systems, please do check that this is correct before submitting the data or all the data may appear under the wrong tenancy type.
Let type code in TNS system New Let type Code in New DCLG system
1 PRP (SRGN) 1 (all PRP lettings)
2 PRP (SRSH) 1 (all PRP lettings)
3 LA (SRGN) 2 (all LA lettings)
4 LA (SRSH) 2 (all LA lettings)
5 PRP (ARGN) 1 (all PRP lettings)
6 PRP (ARSH) 1 (all PRP lettings)
7 LA (ARGN) 2 (all LA lettings)
8 LA (ARSH) 2 (all LA lettings)
If your organisation is new to using the bulk upload function, or is considering using it in the near future as an alternative to manual data entry, please do contact the CORE team for further assistance and guidance.
37
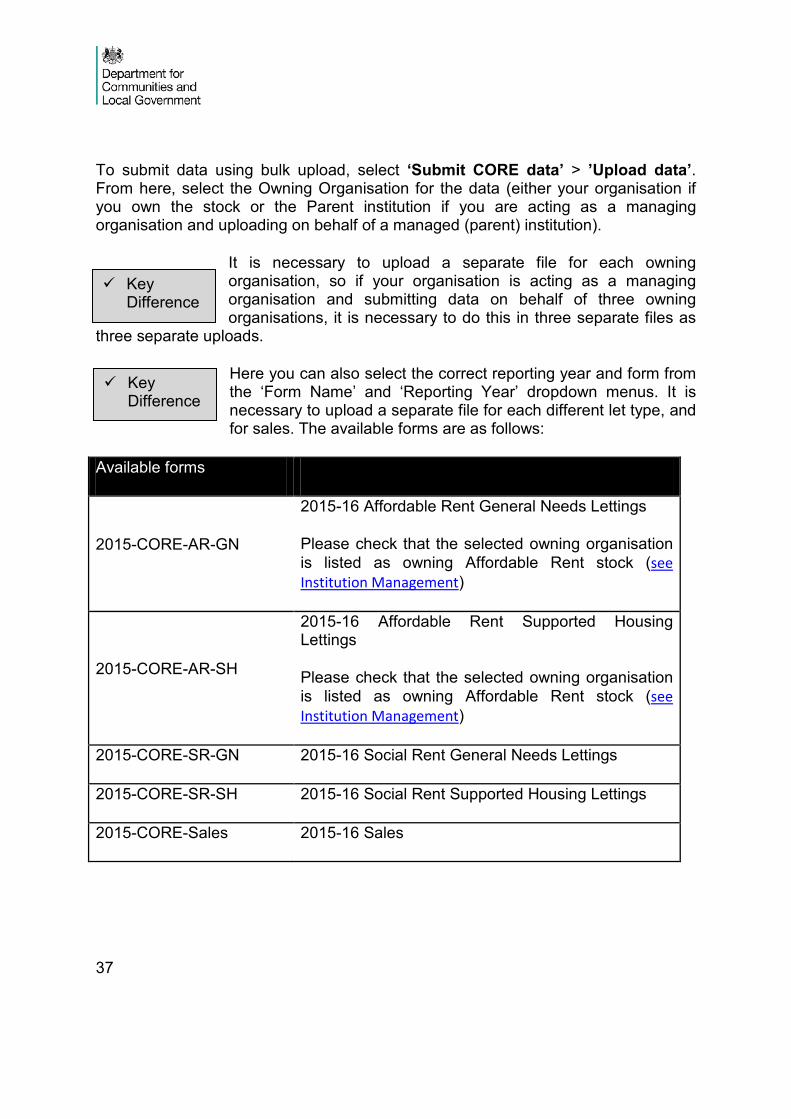
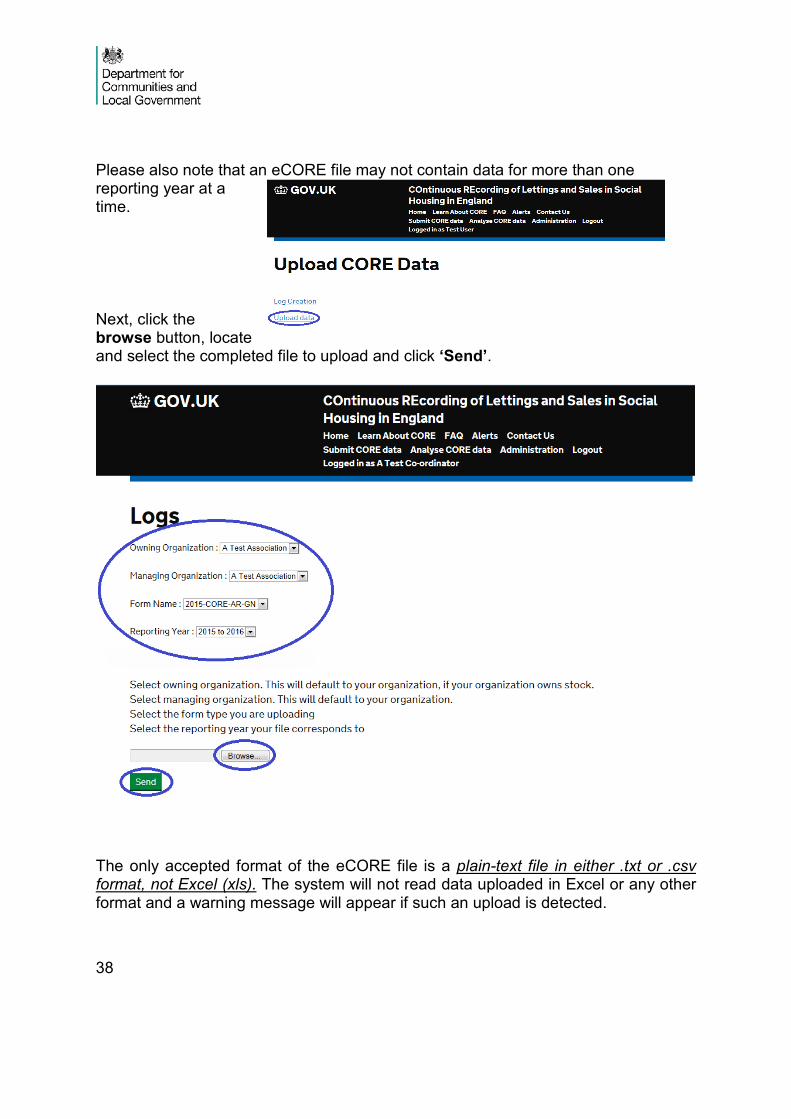
To submit data using bulk upload, select ‘Submit CORE data’ > ’Upload data’. From here, select the Owning Organisation for the data (either your organisation if you own the stock or the Parent institution if you are acting as a managing organisation and uploading on behalf of a managed (parent) institution).
It is necessary to upload a separate file for each owning organisation, so if your organisation is acting as a managing organisation and submitting data on behalf of three owning organisations, it is necessary to do this in three separate files as
three separate uploads.
Here you can also select the correct reporting year and form from the ‘Form Name’ and ‘Reporting Year’ dropdown menus. It is necessary to upload a separate file for each different let type, and for sales. The available forms are as follows:
Available forms
2015-CORE-AR-GN
2015-16 Affordable Rent General Needs Lettings
Please check that the selected owning organisation is listed as owning Affordable Rent stock (see Institution Management)
2015-CORE-AR-SH
2015-16 Affordable Rent Supported Housing Lettings
Please check that the selected owning organisation is listed as owning Affordable Rent stock (see Institution Management)
2015-CORE-SR-GN 2015-16 Social Rent General Needs Lettings
2015-CORE-SR-SH 2015-16 Social Rent Supported Housing Lettings
2015-CORE-Sales 2015-16 Sales
Key Difference
Key Difference
38
Please also note that an eCORE file may not contain data for more than one reporting year at a time.
Next, click the browse button, locate and select the completed file to upload and click ‘Send’.
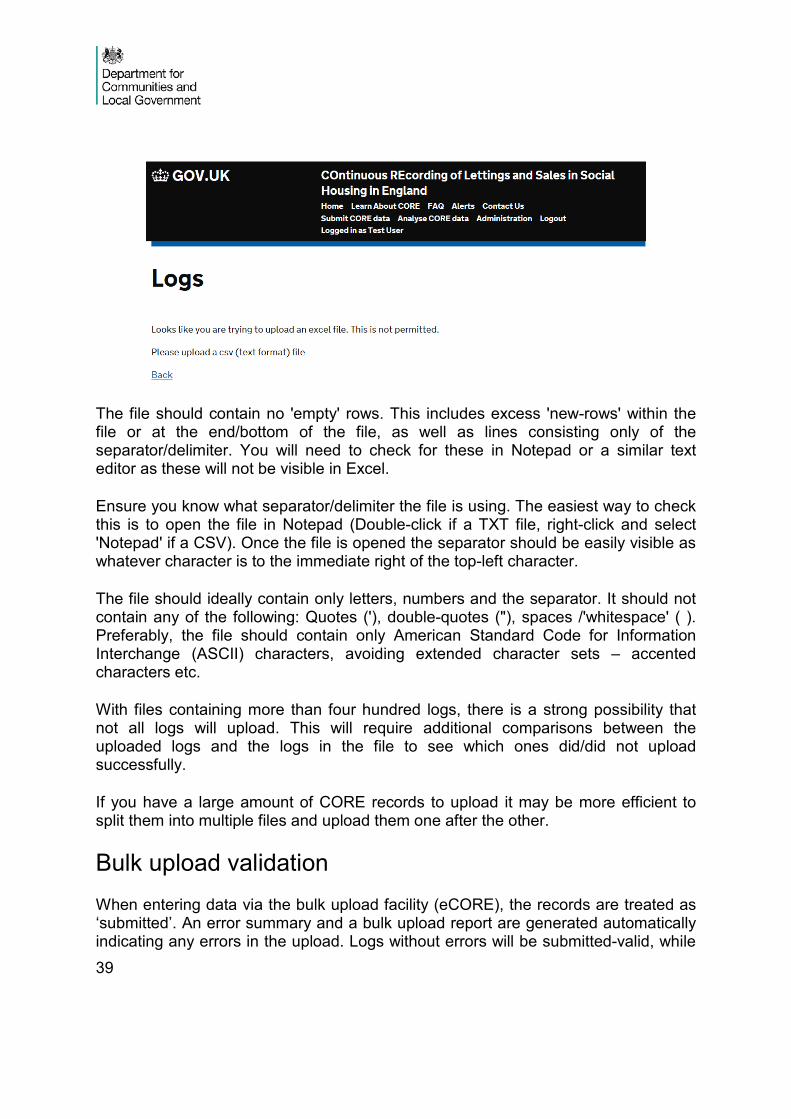
The only accepted format of the eCORE file is a plain-text file in either .txt or .csv format, not Excel (xls). The system will not read data uploaded in Excel or any other format and a warning message will appear if such an upload is detected.
39
The file should contain no 'empty' rows. This includes excess 'new-rows' within the file or at the end/bottom of the file, as well as lines consisting only of the separator/delimiter. You will need to check for these in Notepad or a similar text editor as these will not be visible in Excel.
Ensure you know what separator/delimiter the file is using. The easiest way to check this is to open the file in Notepad (Double-click if a TXT file, right-click and select 'Notepad' if a CSV). Once the file is opened the separator should be easily visible as whatever character is to the immediate right of the top-left character.
The file should ideally contain only letters, numbers and the separator. It should not contain any of the following: Quotes ('), double-quotes ("), spaces /'whitespace' ( ). Preferably, the file should contain only American Standard Code for Information Interchange (ASCII) characters, avoiding extended character sets – accented characters etc.
With files containing more than four hundred logs, there is a strong possibility that not all logs will upload. This will require additional comparisons between the uploaded logs and the logs in the file to see which ones did/did not upload successfully.
If you have a large amount of CORE records to upload it may be more efficient to split them into multiple files and upload them one after the other.
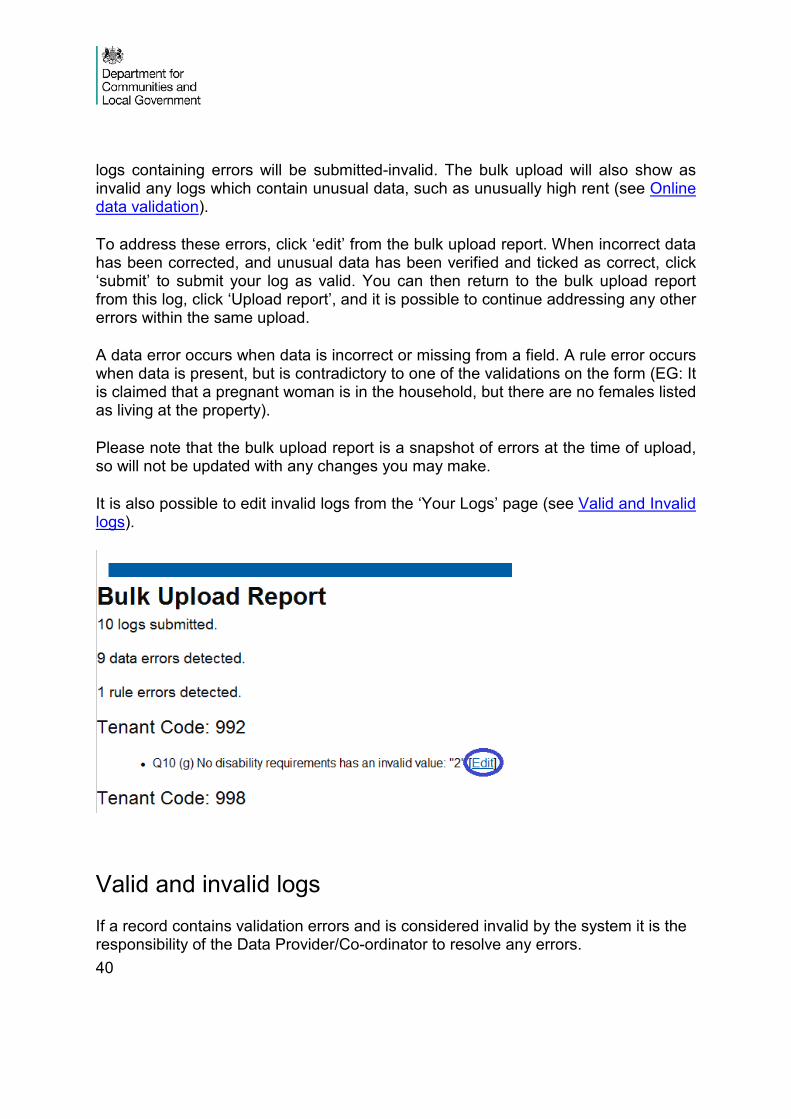
Bulk upload validation When entering data via the bulk upload facility (eCORE), the records are treated as ‘submitted’. An error summary and a bulk upload report are generated automatically indicating any errors in the upload. Logs without errors will be submitted-valid, while
40
logs containing errors will be submitted-invalid. The bulk upload will also show as invalid any logs which contain unusual data, such as unusually high rent (see Online data validation).
To address these errors, click ‘edit’ from the bulk upload report. When incorrect data has been corrected, and unusual data has been verified and ticked as correct, click ‘submit’ to submit your log as valid. You can then return to the bulk upload report from this log, click ‘Upload report’, and it is possible to continue addressing any other errors within the same upload.
A data error occurs when data is incorrect or missing from a field. A rule error occurs when data is present, but is contradictory to one of the validations on the form (EG: It is claimed that a pregnant woman is in the household, but there are no females listed as living at the property).
Please note that the bulk upload report is a snapshot of errors at the time of upload, so will not be updated with any changes you may make.
It is also possible to edit invalid logs from the ‘Your Logs’ page (see Valid and Invalid logs).
Valid and invalid logs If a record contains validation errors and is considered invalid by the system it is the responsibility of the Data Provider/Co-ordinator to resolve any errors.
41
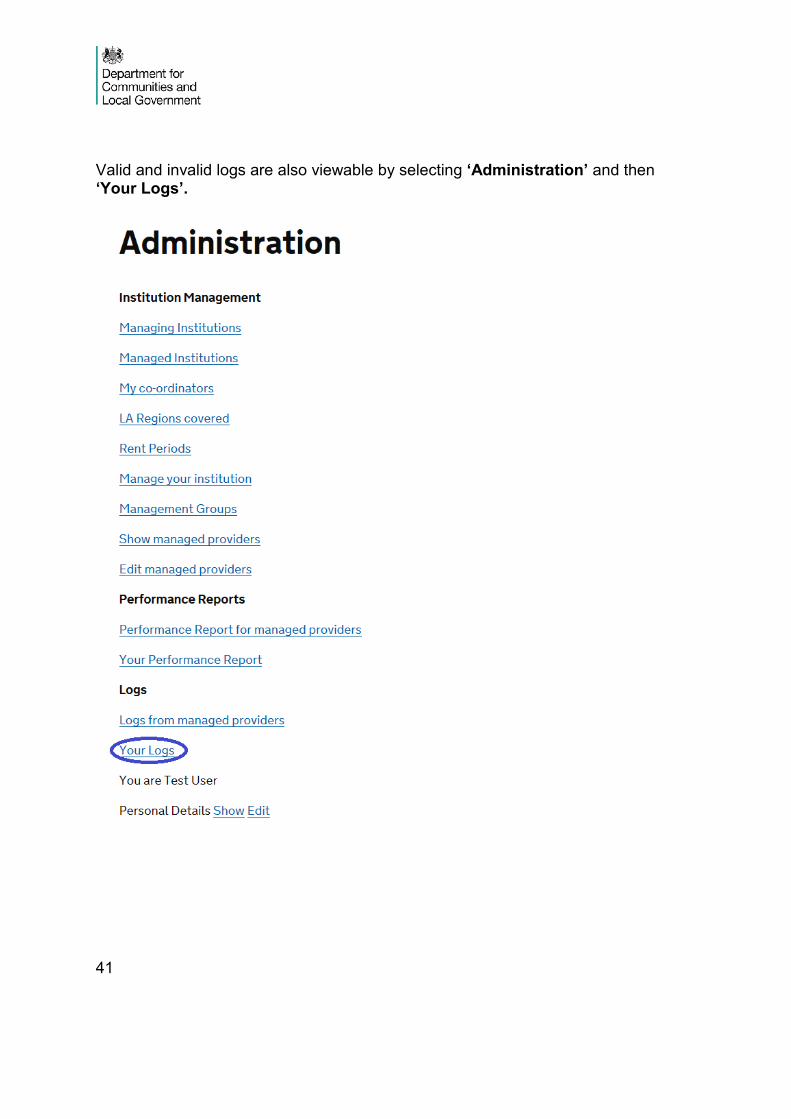
Valid and invalid logs are also viewable by selecting ‘Administration’ and then ‘Your Logs’.
42
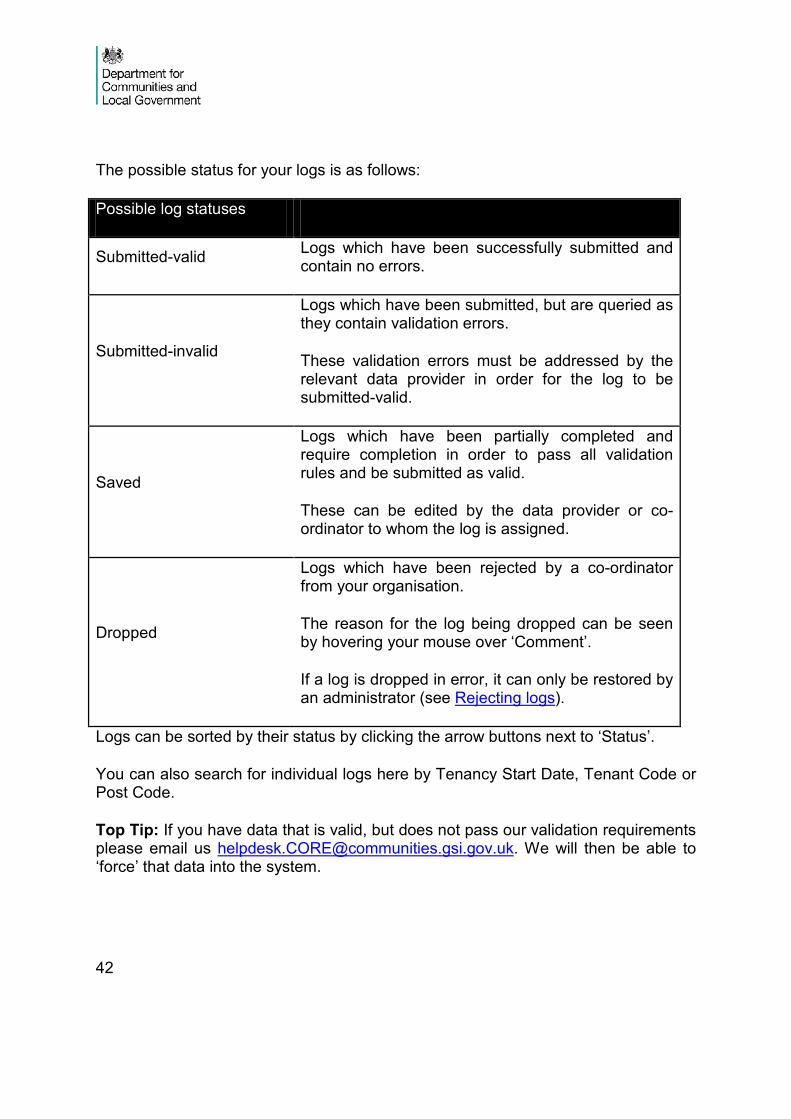
The possible status for your logs is as follows:
Possible log statuses
Submitted-valid Logs which have been successfully submitted and contain no errors.
Submitted-invalid
Logs which have been submitted, but are queried as they contain validation errors.
These validation errors must be addressed by the relevant data provider in order for the log to be submitted-valid.
Saved
Logs which have been partially completed and require completion in order to pass all validation rules and be submitted as valid.
These can be edited by the data provider or co-ordinator to whom the log is assigned.
Dropped
Logs which have been rejected by a co-ordinator from your organisation.
The reason for the log being dropped can be seen by hovering your mouse over ‘Comment’.
If a log is dropped in error, it can only be restored by an administrator (see Rejecting logs).
Logs can be sorted by their status by clicking the arrow buttons next to ‘Status’.
You can also search for individual logs here by Tenancy Start Date, Tenant Code or Post Code.
Top Tip: If you have data that is valid, but does not pass our validation requirements please email us [email protected]. We will then be able to ‘force’ that data into the system.

43
Editing logs Under ‘Your Logs’ (see ‘Valid and Invalid Logs’ section) you are able to edit logs that have been classified as ‘invalid’. Clicking ‘Edit’ allows you to enter the log, amend the data and re-submit.
While it is not currently possible to download the full list of logs under ‘Your Saved Logs’ it is possible to download a list of invalid logs (see View and Download your own data) which may be useful for reference.
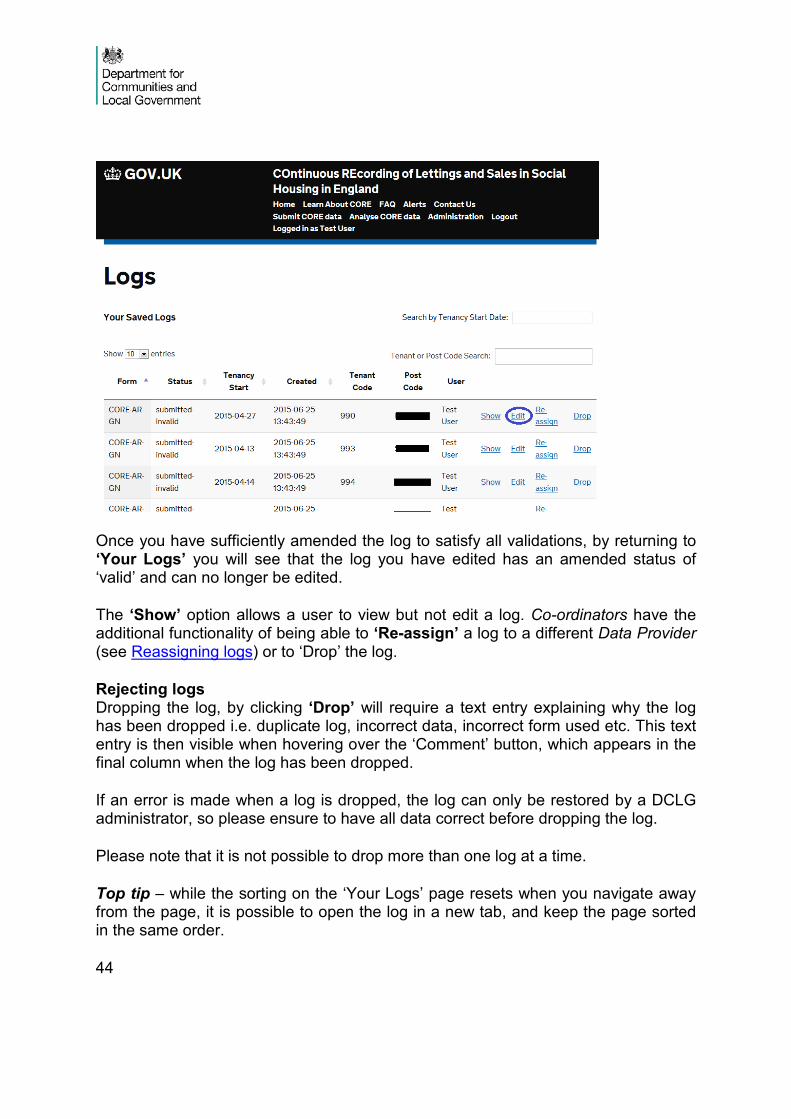
44
Once you have sufficiently amended the log to satisfy all validations, by returning to ‘Your Logs’ you will see that the log you have edited has an amended status of ‘valid’ and can no longer be edited.
The ‘Show’ option allows a user to view but not edit a log. Co-ordinators have the additional functionality of being able to ‘Re-assign’ a log to a different Data Provider (see Reassigning logs) or to ‘Drop’ the log.
Rejecting logs Dropping the log, by clicking ‘Drop’ will require a text entry explaining why the log has been dropped i.e. duplicate log, incorrect data, incorrect form used etc. This text entry is then visible when hovering over the ‘Comment’ button, which appears in the final column when the log has been dropped.
If an error is made when a log is dropped, the log can only be restored by a DCLG administrator, so please ensure to have all data correct before dropping the log.
Please note that it is not possible to drop more than one log at a time.
Top tip – while the sorting on the ‘Your Logs’ page resets when you navigate away from the page, it is possible to open the log in a new tab, and keep the page sorted in the same order.

45
Reassigning logs Co-ordinators can reassign logs to specific managed providers. If a data provider leaves an organisation or is no longer responsible for records, linked co-ordinators should ensure that all their saved/invalid logs are re-assigned to allow completion.
From ‘Administration’, click ‘Your Logs’ (see Valid and invalid logs) and on the page of Your Saved Logs click ‘Reassign’.
From your list of managed providers, select the managed provider to whom the log is to be assigned. Select their name, then click reassign. You will then receive a confirmation message, and the selected user will be listed against this specific log. Please note, it not possible to reassign multiple logs simultaneously.

46
47
Chapter 5: Management groups and schemes Data for Supported Housing is collected via the Affordable Rent Supported Housing (ARSH) and the Social Rent Supported Housing (SRSH) log forms. Each CORE submission for Supported Housing requires a Management Group and a Scheme Code.
The Management Group Code contains information about who manages different supported schemes. When creating a new a Management Group, the online system assumes you are the owning organisation. If you are not the owning organisation but an organisation that manages the scheme, please contact the owning organisation to arrange for the new Management Group and Scheme to be created.
Only the owning organisation can submit Management Group and Scheme codes.
Scheme codes are used so that the same information does not need to be re-entered for each CORE log that falls within a scheme.
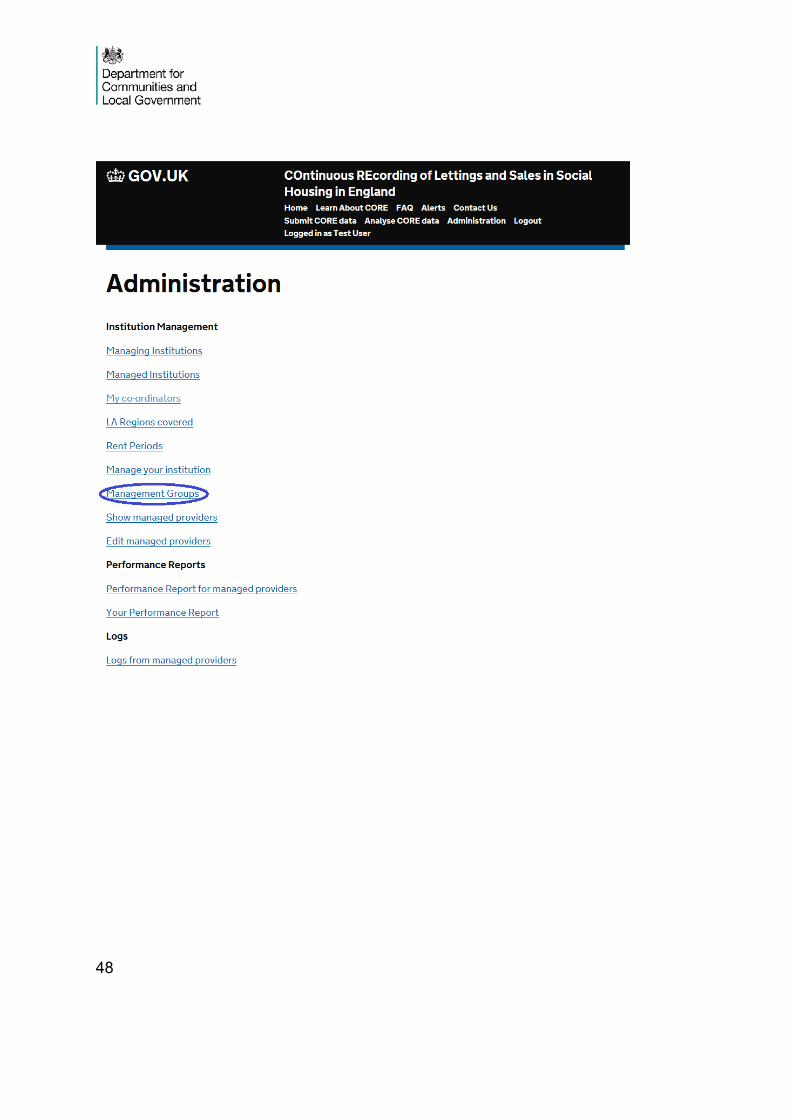
Creating new management groups Co-ordinators can create new management groups, and will need to request authorisation for the new management group from Administrators in DCLG when it has been created, as explained below.
To create a new management group select ‘Management Groups’ from the ‘Administration’ page.
48
49
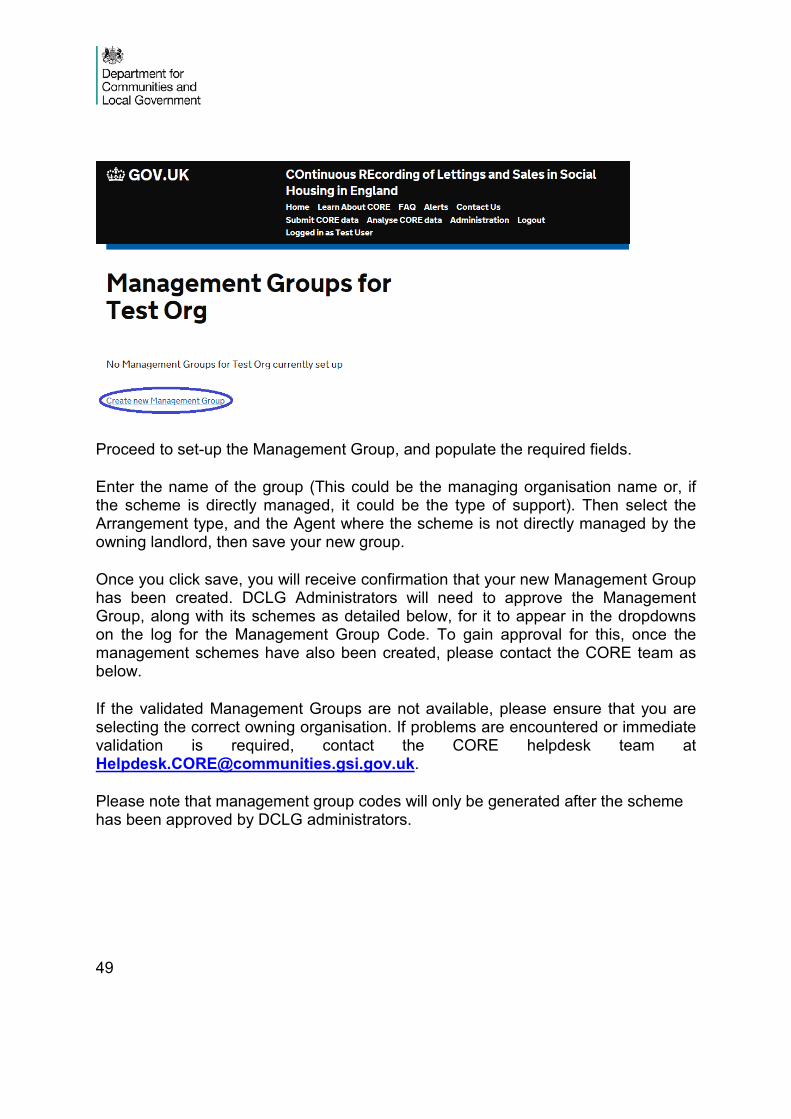
Proceed to set-up the Management Group, and populate the required fields.
Enter the name of the group (This could be the managing organisation name or, if the scheme is directly managed, it could be the type of support). Then select the Arrangement type, and the Agent where the scheme is not directly managed by the owning landlord, then save your new group.
Once you click save, you will receive confirmation that your new Management Group has been created. DCLG Administrators will need to approve the Management Group, along with its schemes as detailed below, for it to appear in the dropdowns on the log for the Management Group Code. To gain approval for this, once the management schemes have also been created, please contact the CORE team as below.
If the validated Management Groups are not available, please ensure that you are selecting the correct owning organisation. If problems are encountered or immediate validation is required, contact the CORE helpdesk team at [email protected].
Please note that management group codes will only be generated after the scheme has been approved by DCLG administrators.
50
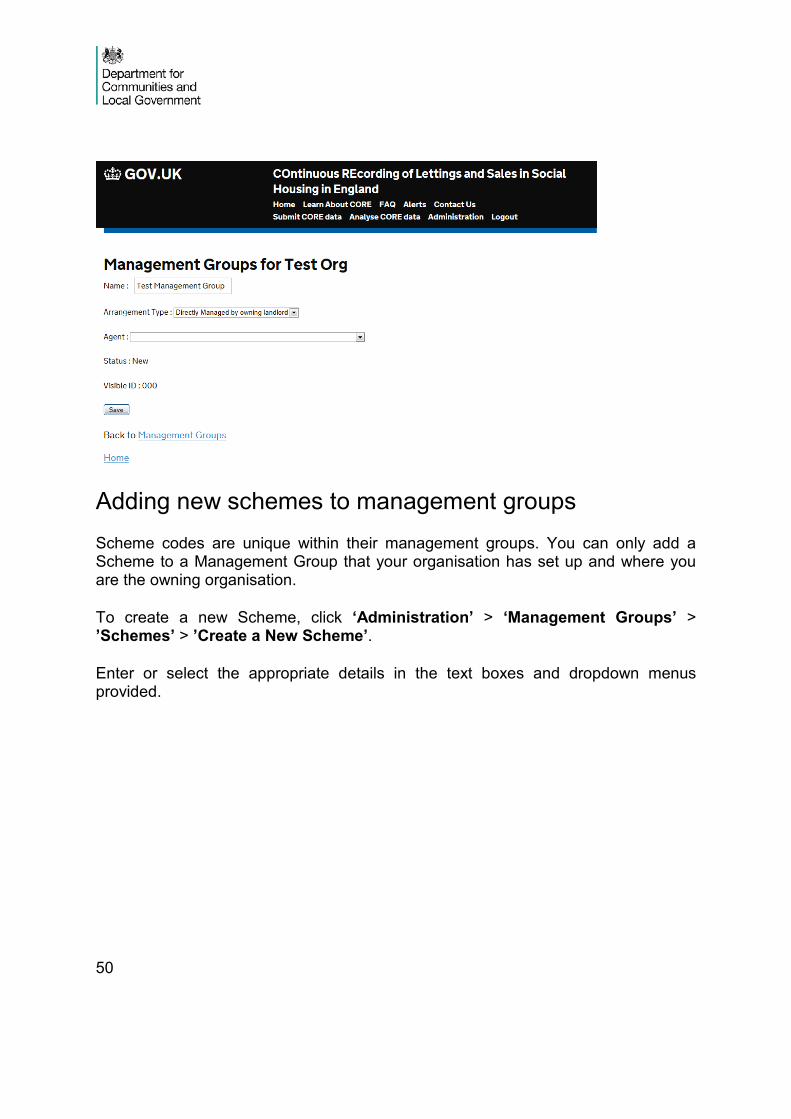
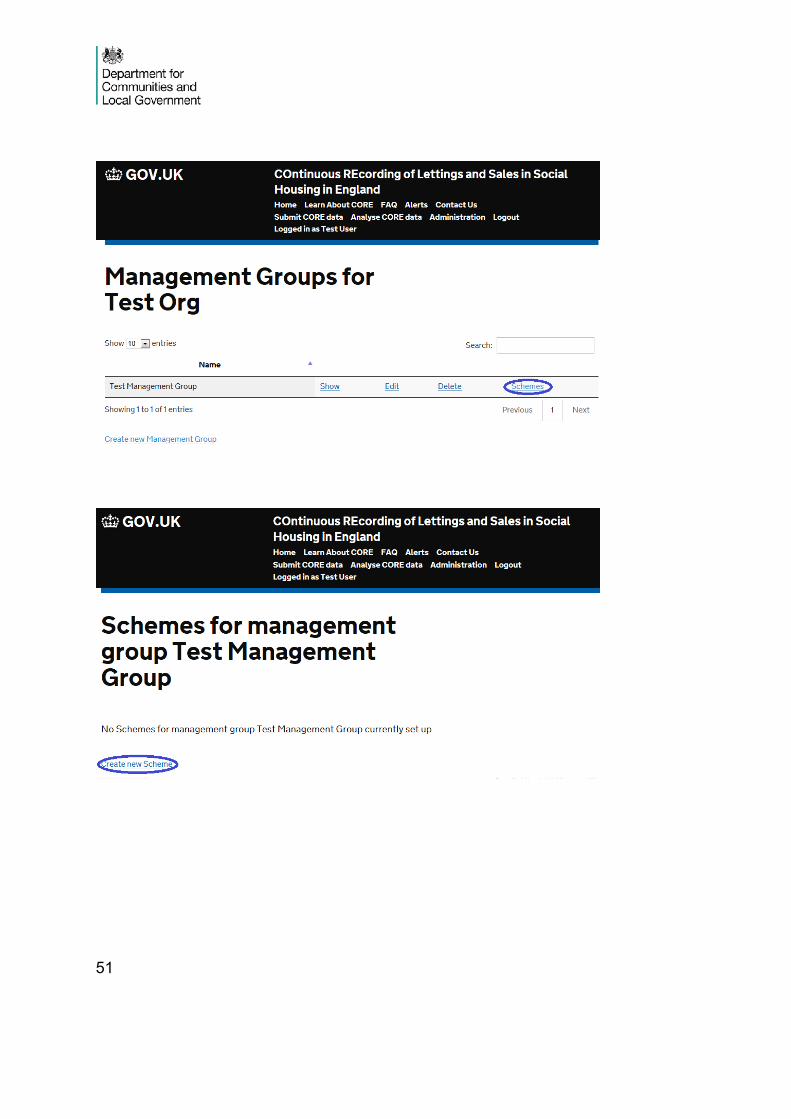
Adding new schemes to management groups Scheme codes are unique within their management groups. You can only add a Scheme to a Management Group that your organisation has set up and where you are the owning organisation.
To create a new Scheme, click ‘Administration’ > ‘Management Groups’ > ’Schemes’ > ’Create a New Scheme’.
Enter or select the appropriate details in the text boxes and dropdown menus provided.
51
52
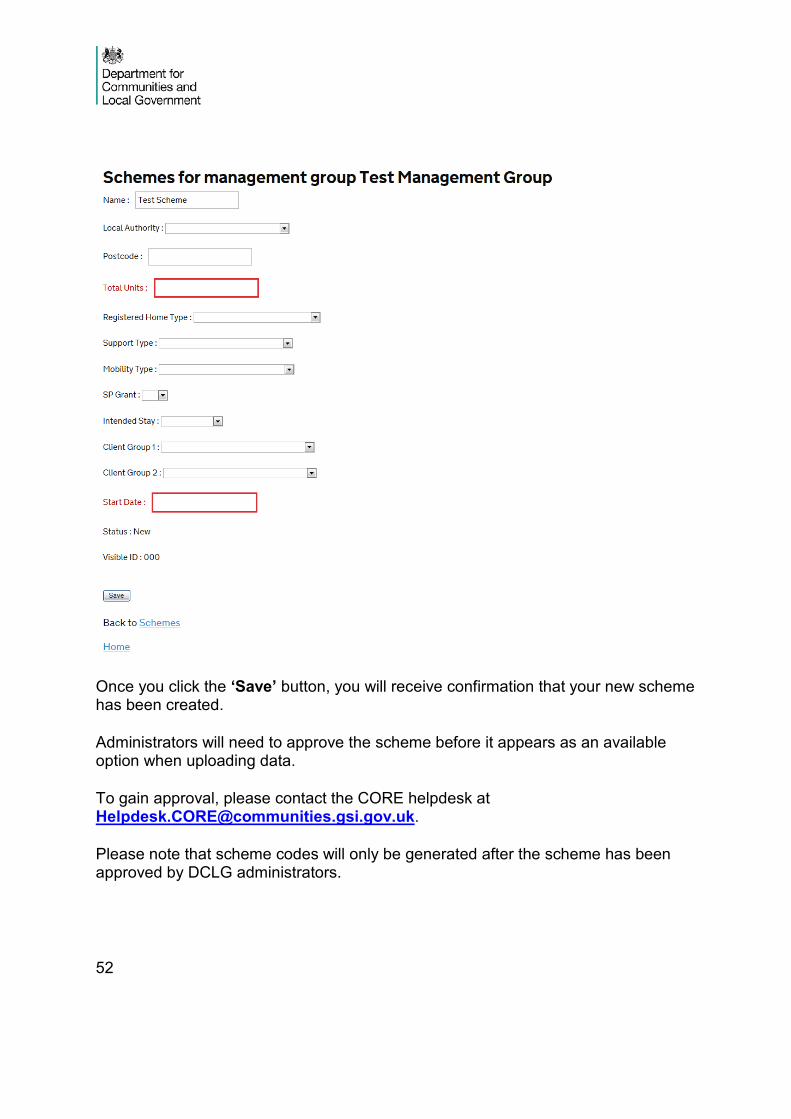
Once you click the ‘Save’ button, you will receive confirmation that your new scheme has been created.
Administrators will need to approve the scheme before it appears as an available option when uploading data.
To gain approval, please contact the CORE helpdesk at [email protected].
Please note that scheme codes will only be generated after the scheme has been approved by DCLG administrators.
53
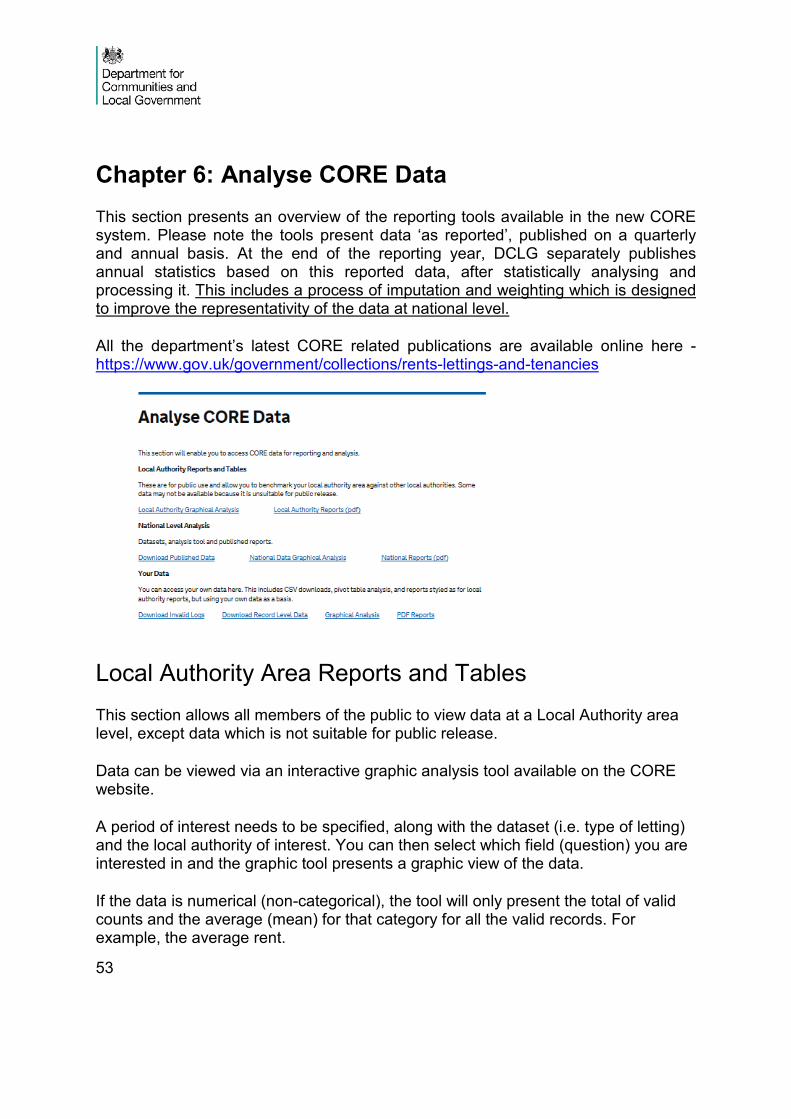
Chapter 6: Analyse CORE Data This section presents an overview of the reporting tools available in the new CORE system. Please note the tools present data ‘as reported’, published on a quarterly and annual basis. At the end of the reporting year, DCLG separately publishes annual statistics based on this reported data, after statistically analysing and processing it. This includes a process of imputation and weighting which is designed to improve the representativity of the data at national level.
All the department’s latest CORE related publications are available online here - https://www.gov.uk/government/collections/rents-lettings-and-tenancies
Local Authority Area Reports and Tables This section allows all members of the public to view data at a Local Authority area level, except data which is not suitable for public release.
Data can be viewed via an interactive graphic analysis tool available on the CORE website.
A period of interest needs to be specified, along with the dataset (i.e. type of letting) and the local authority of interest. You can then select which field (question) you are interested in and the graphic tool presents a graphic view of the data.
If the data is numerical (non-categorical), the tool will only present the total of valid counts and the average (mean) for that category for all the valid records. For example, the average rent.
54
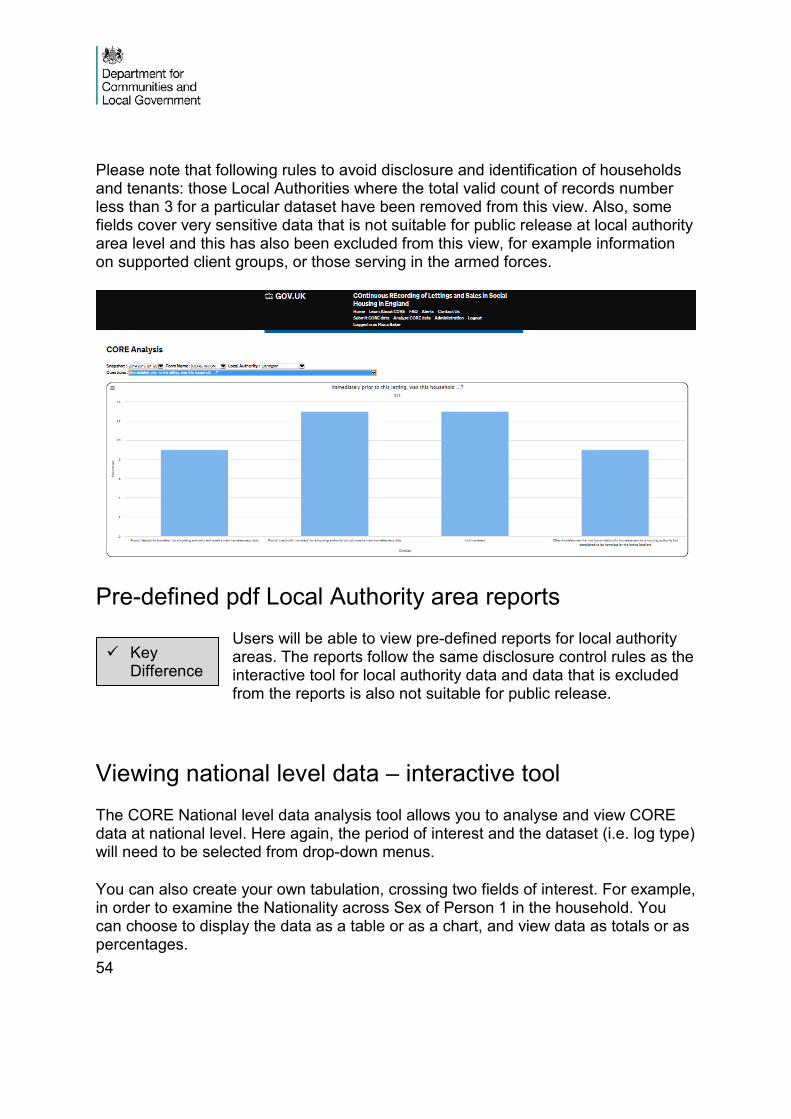
Please note that following rules to avoid disclosure and identification of households and tenants: those Local Authorities where the total valid count of records number less than 3 for a particular dataset have been removed from this view. Also, some fields cover very sensitive data that is not suitable for public release at local authority area level and this has also been excluded from this view, for example information on supported client groups, or those serving in the armed forces.
Pre-defined pdf Local Authority area reports Users will be able to view pre-defined reports for local authority areas. The reports follow the same disclosure control rules as the interactive tool for local authority data and data that is excluded from the reports is also not suitable for public release.
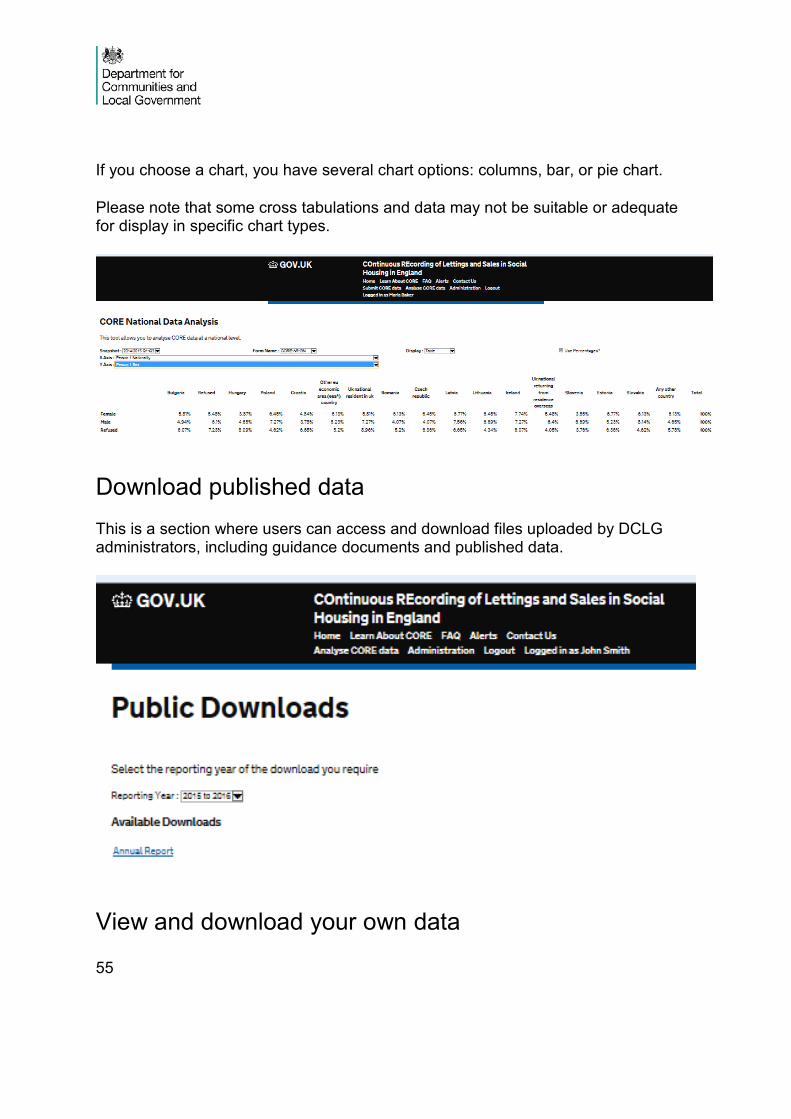
Viewing national level data – interactive tool The CORE National level data analysis tool allows you to analyse and view CORE data at national level. Here again, the period of interest and the dataset (i.e. log type) will need to be selected from drop-down menus.
You can also create your own tabulation, crossing two fields of interest. For example, in order to examine the Nationality across Sex of Person 1 in the household. You can choose to display the data as a table or as a chart, and view data as totals or as percentages.
Key Difference
55
If you choose a chart, you have several chart options: columns, bar, or pie chart.
Please note that some cross tabulations and data may not be suitable or adequate for display in specific chart types.
Download published data This is a section where users can access and download files uploaded by DCLG administrators, including guidance documents and published data.
View and download your own data
56
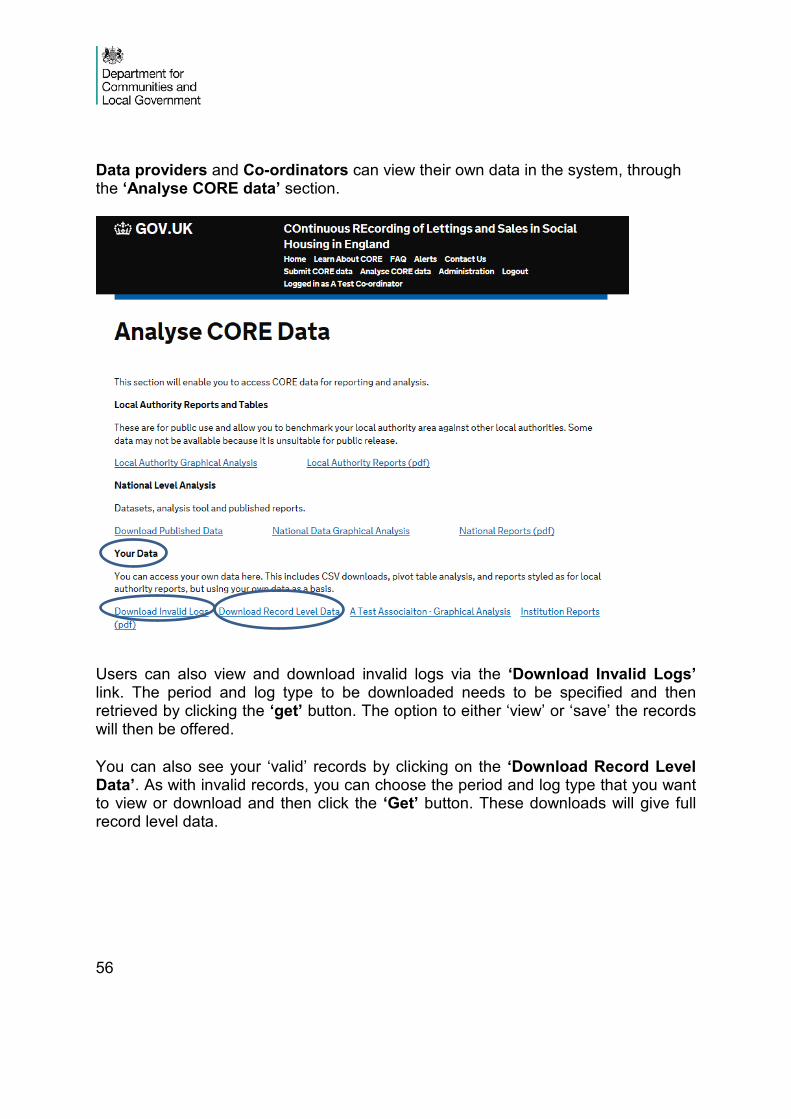
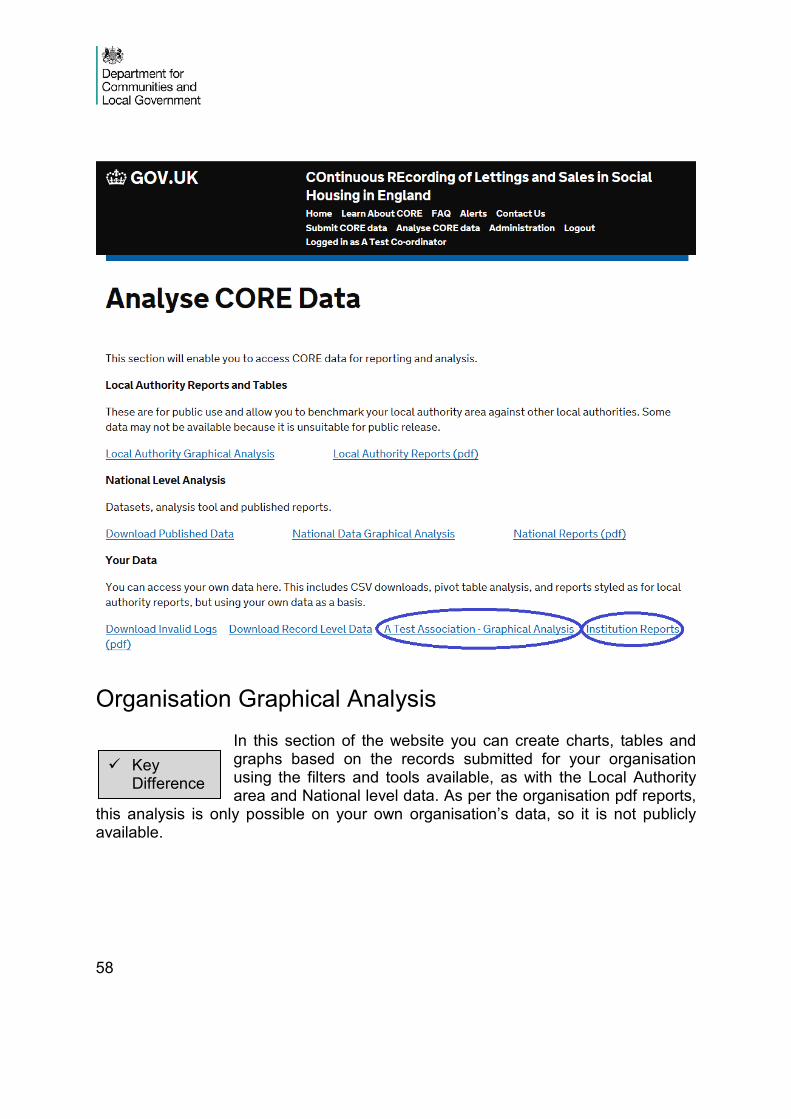
Data providers and Co-ordinators can view their own data in the system, through the ‘Analyse CORE data’ section.
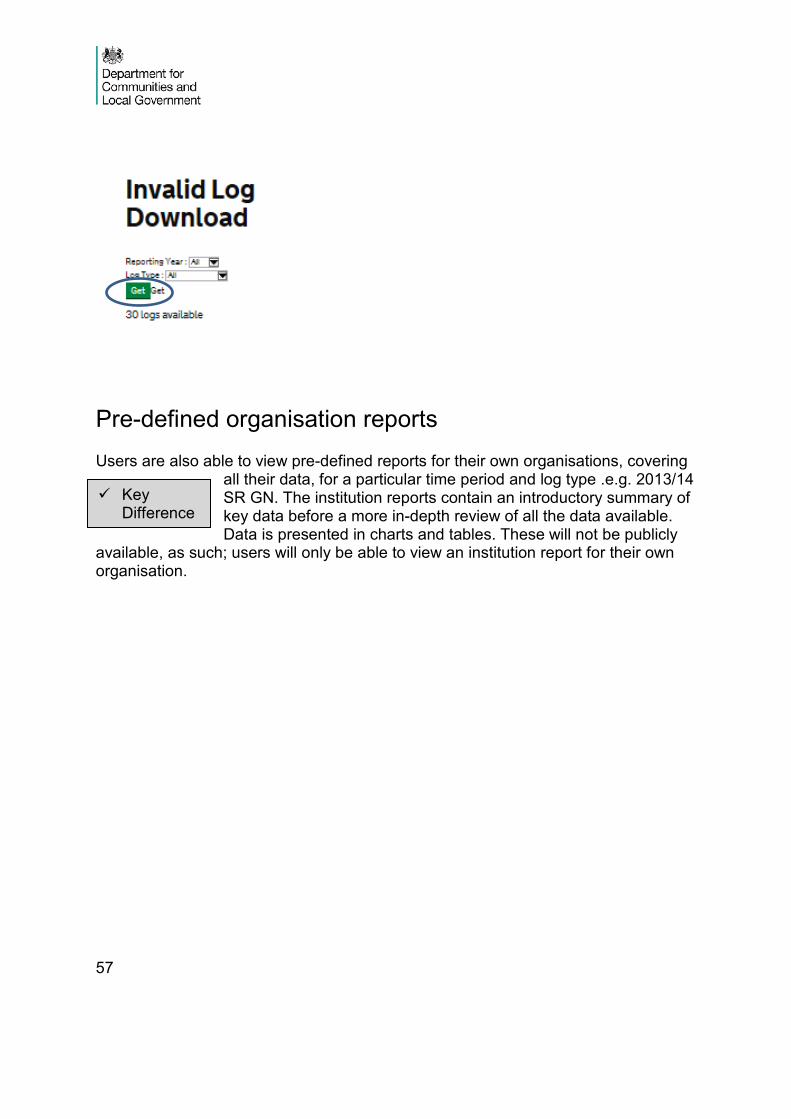
Users can also view and download invalid logs via the ‘Download Invalid Logs’ link. The period and log type to be downloaded needs to be specified and then retrieved by clicking the ‘get’ button. The option to either ‘view’ or ‘save’ the records will then be offered.
You can also see your ‘valid’ records by clicking on the ‘Download Record Level Data’. As with invalid records, you can choose the period and log type that you want to view or download and then click the ‘Get’ button. These downloads will give full record level data.
57
Pre-defined organisation reports
Users are also able to view pre-defined reports for their own organisations, covering all their data, for a particular time period and log type .e.g. 2013/14 SR GN. The institution reports contain an introductory summary of key data before a more in-depth review of all the data available. Data is presented in charts and tables. These will not be publicly
available, as such; users will only be able to view an institution report for their own organisation.
Key Difference
58
Organisation Graphical Analysis In this section of the website you can create charts, tables and graphs based on the records submitted for your organisation using the filters and tools available, as with the Local Authority area and National level data. As per the organisation pdf reports,
this analysis is only possible on your own organisation’s data, so it is not publicly available.
Key Difference