Embed Size (px)
Citation preview

Core Expenses Guide The purpose of this document is to provide a guide to using the Core Expenses system. It should be read as an aid to getting started with Core Expense. You should not proceed to using Core Expense without reading this guide. Any questions or feedback regarding the content of this document should be sent to Jim Ross at telephone ext 5922 or email at [email protected]
Outline authority should always be obtained before undertaking any trip, and the sufficiency of funds checked before any booking is confirmed. All expense reports must be approved within the system before they can be processed for payment.
The person submitting an expense report should ensure that; the expenses claimed represent a valid business expense in line with the University’s expenses policy, an adequate description of the expense is provided (what/when/why/where), the correct cost centre and sub project code is present for each expense item, the expense report is properly dated and all receipts are scanned and uploaded into the system.
The line manager authorising the expense report must be satisfied that the expenses claimed represent a valid business expense in line with the University’s expense policy. Where the authoriser is not satisfied in relation to any of the above points, the expense claim must be rejected. If unsure, in any way, advice should be sought from the Pay & Pensions section of the Finance Office.
Full details of the University expenses and travel policy can be found on the Pay & Pensions web pages at http://www.gla.ac.uk/services/finance/payandpensions/expensesprocedures/
Core Expenses Guide
Page ii
1. Accessing the System Page 1 2. Before You Begin Page 3 3. Creating an Expense Report Page 5 4. Business Entertaining/Meals Page 10 5. Claiming Mileage Page 13 6. Foreign Currency Items Page 15 7. Adding Receipts Page 18 8. Your Expense Bank Account Page 21 9. Keeping track of your Expense Reports Page 23
10. Approving Expense Reports Page 25 Appendix I – Expense Items & Descriptions of Use Page 29 Appendix II – Frequently Asked Questions Page 31
Core Expenses Guide
Page 1
1.0 Accessing the System
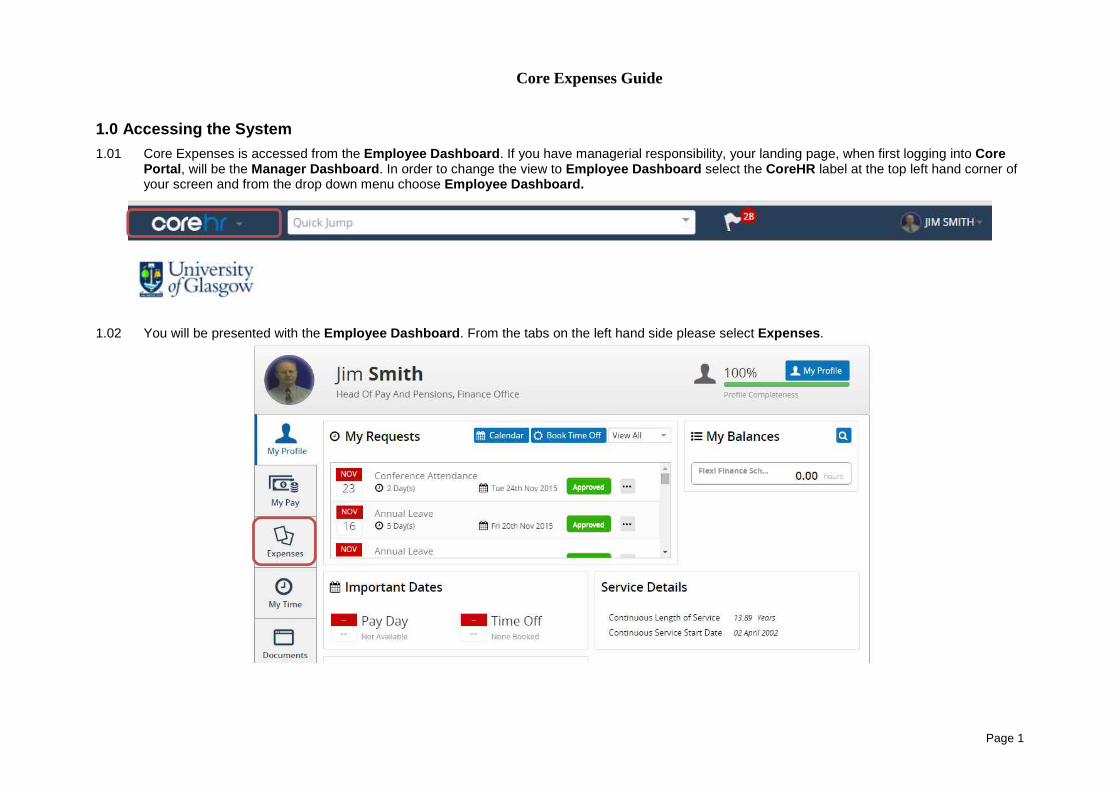
1.01 Core Expenses is accessed from the Employee Dashboard . If you have managerial responsibility, your landing page, when first logging into Core Portal , will be the Manager Dashboard . In order to change the view to Employee Dashboard select the CoreHR label at the top left hand corner of your screen and from the drop down menu choose Employee Dashboard.
1.02 You will be presented with the Employee Dashboard . From the tabs on the left hand side please select Expenses .
Core Expenses Guide
Page 2
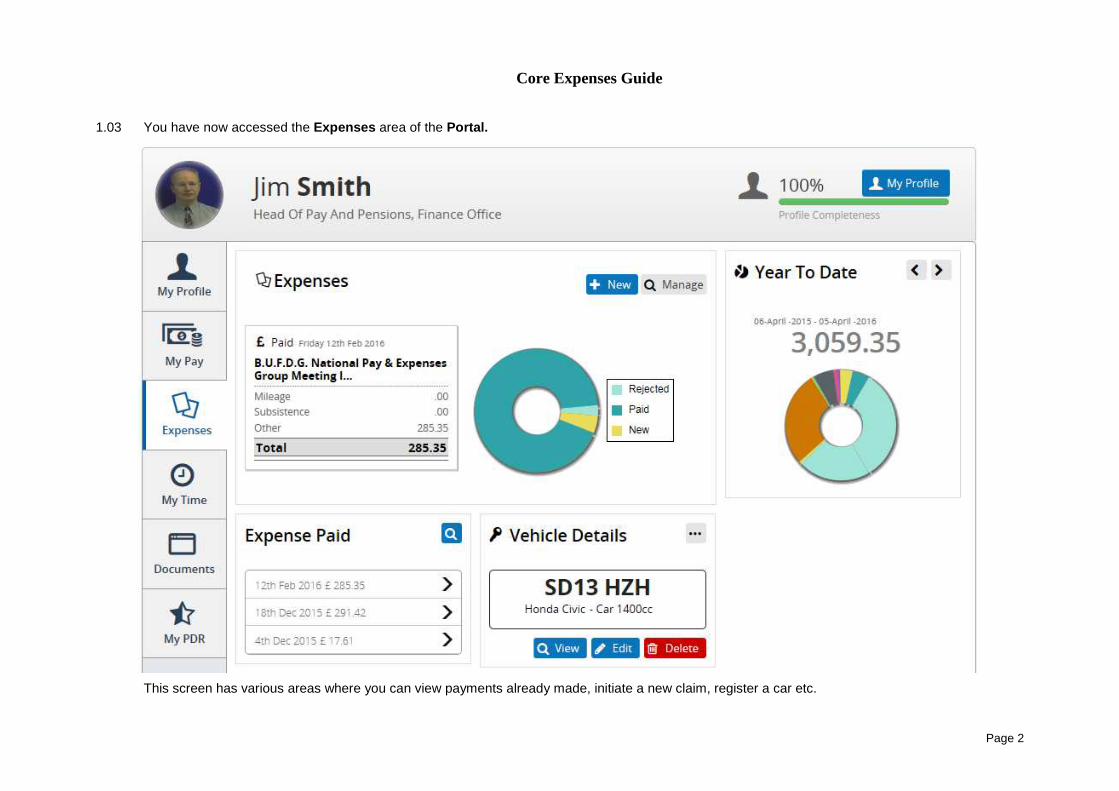
1.03 You have now accessed the Expenses area of the Portal.
This screen has various areas where you can view payments already made, initiate a new claim, register a car etc.
Core Expenses Guide
Page 3
2. Before You Begin
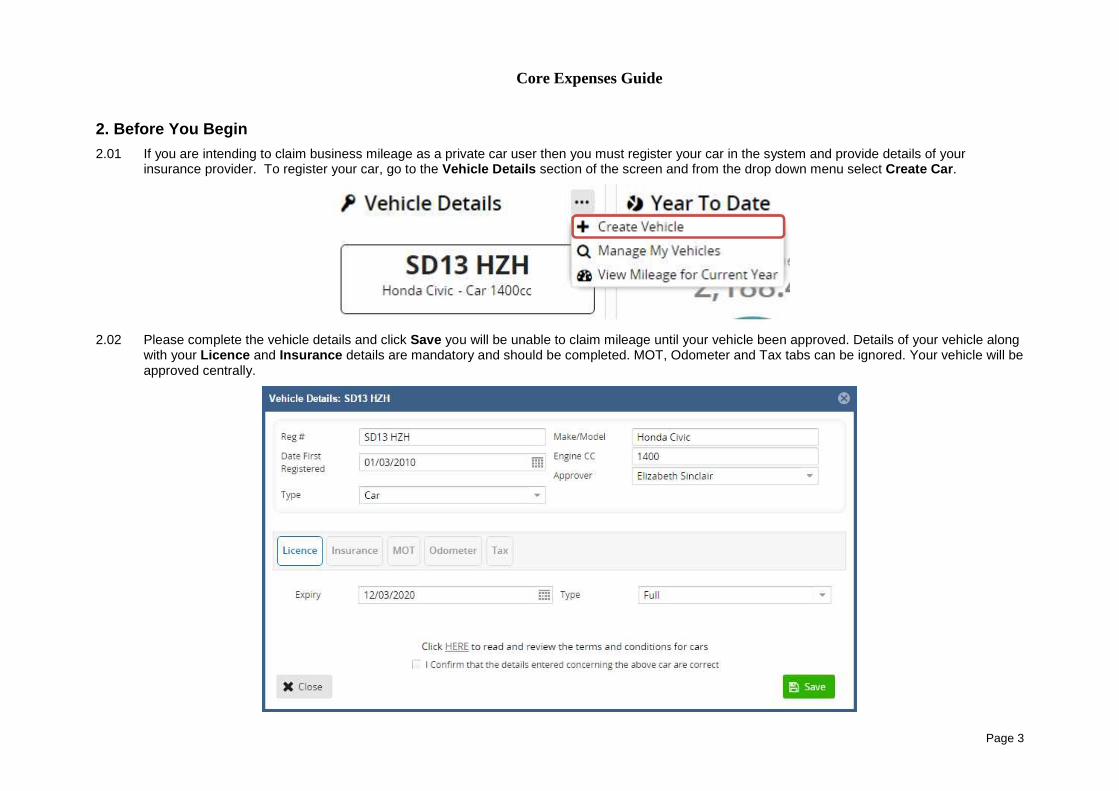
2.01 If you are intending to claim business mileage as a private car user then you must register your car in the system and provide details of your insurance provider. To register your car, go to the Vehicle Details section of the screen and from the drop down menu select Create Car .
2.02 Please complete the vehicle details and click Save you will be unable to claim mileage until your vehicle been approved. Details of your vehicle along with your Licence and Insurance details are mandatory and should be completed. MOT, Odometer and Tax tabs can be ignored. Your vehicle will be approved centrally.
Core Expenses Guide
Page 4
2.03 Prior to creating your Expense Report it is recommended that you scan all your receipts and store them in an appropriately named folder in your computer. Give each receipt a recognizable filename. For input into the expenses system filenames must have no spaces. An example of an appropriate name would be HotelReceiptLondonTrip or TaxiReceiptLondonTrip. A good tip is to put the date in front of the description e.g. 20151020Train or 20151020Taxi which should provide a degree of uniqueness for each receipt.
Core Expenses Guide
Page 5
3. Creating an Expense Report
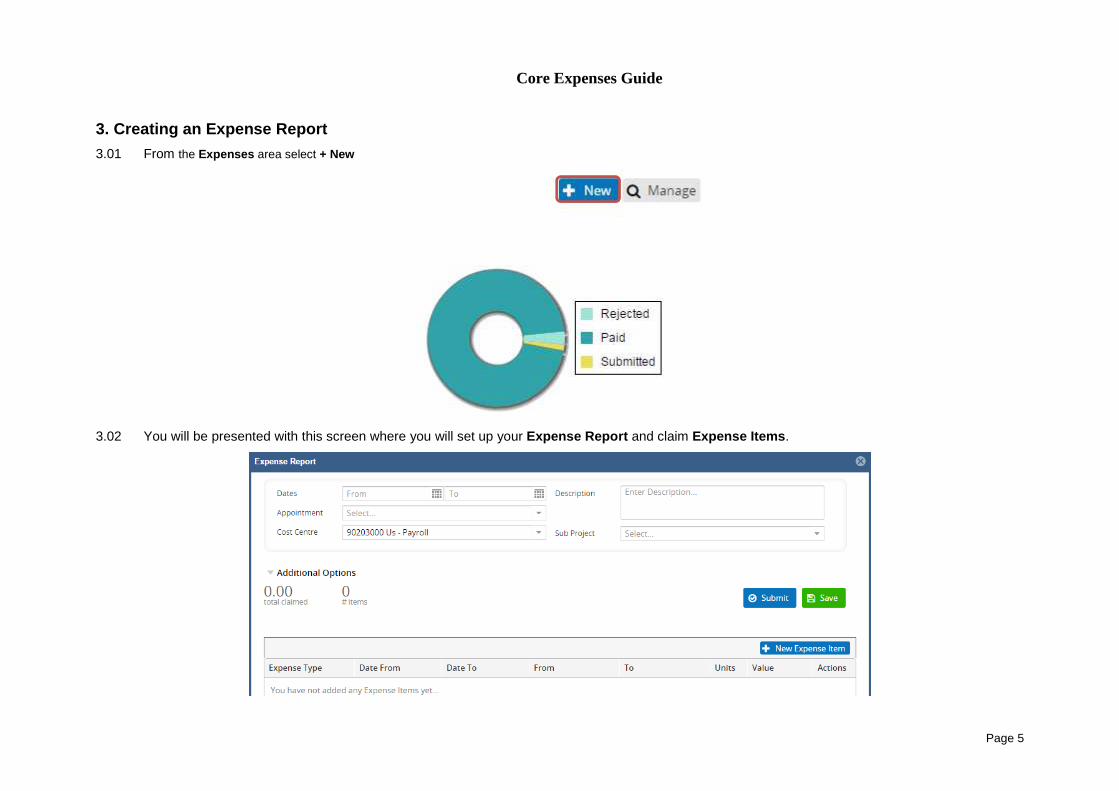
3.01 From the Expenses area select + New
3.02 You will be presented with this screen where you will set up your Expense Report and claim Expense Items .
Core Expenses Guide
Page 6
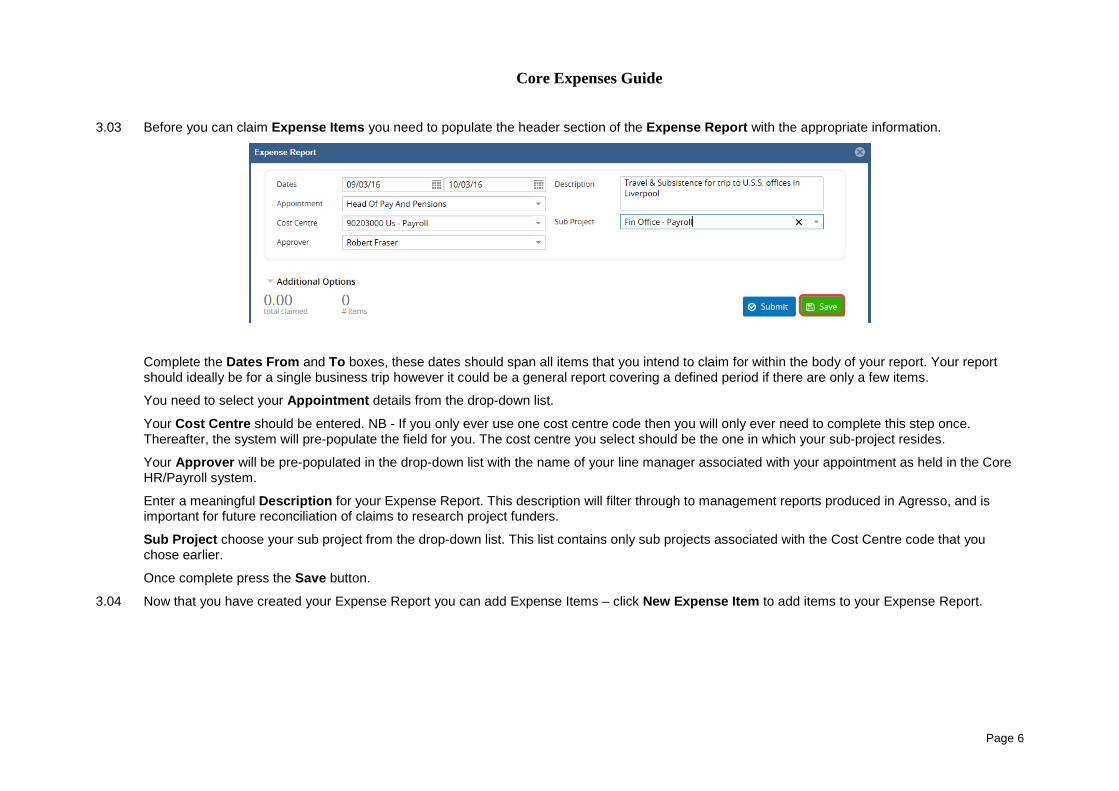
3.03 Before you can claim Expense Items you need to populate the header section of the Expense Report with the appropriate information.
Complete the Dates From and To boxes, these dates should span all items that you intend to claim for within the body of your report. Your report should ideally be for a single business trip however it could be a general report covering a defined period if there are only a few items.
You need to select your Appointment details from the drop-down list.
Your Cost Centre should be entered. NB - If you only ever use one cost centre code then you will only ever need to complete this step once. Thereafter, the system will pre-populate the field for you. The cost centre you select should be the one in which your sub-project resides.
Your Approver will be pre-populated in the drop-down list with the name of your line manager associated with your appointment as held in the Core HR/Payroll system.
Enter a meaningful Description for your Expense Report. This description will filter through to management reports produced in Agresso, and is important for future reconciliation of claims to research project funders.
Sub Project choose your sub project from the drop-down list. This list contains only sub projects associated with the Cost Centre code that you chose earlier.
Once complete press the Save button.
3.04 Now that you have created your Expense Report you can add Expense Items – click New Expense Item to add items to your Expense Report.
Core Expenses Guide
Page 7
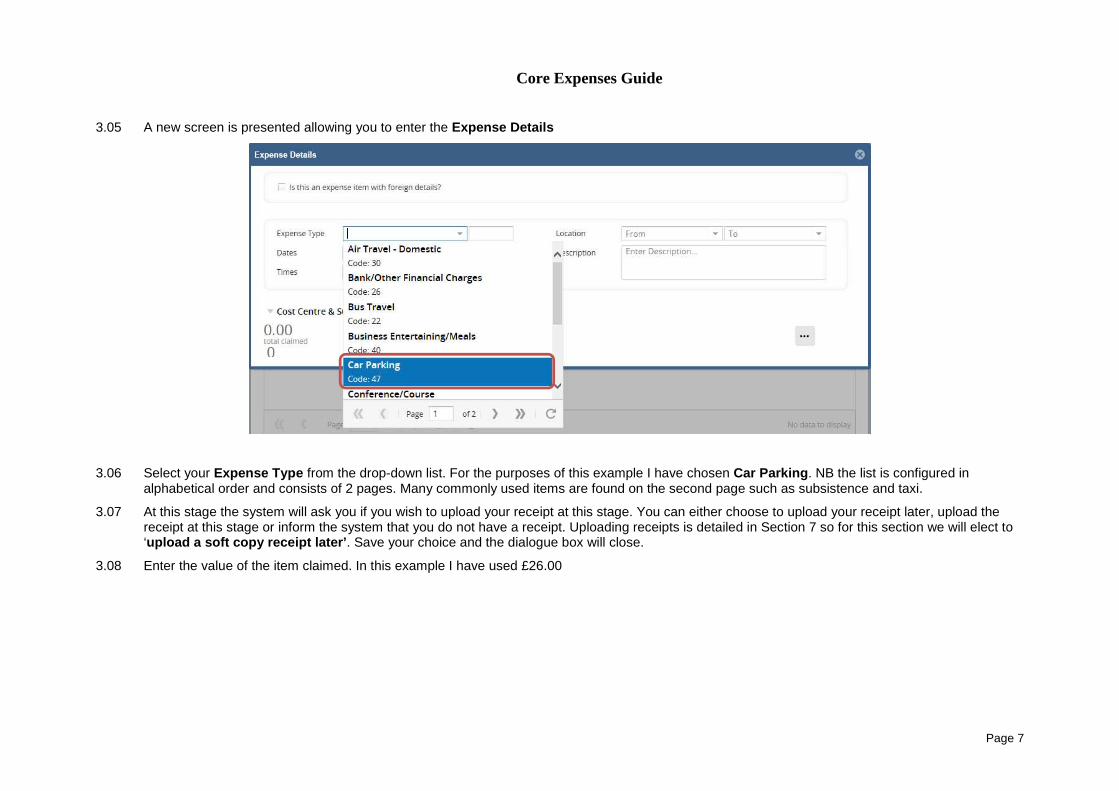
3.05 A new screen is presented allowing you to enter the Expense Details
3.06 Select your Expense Type from the drop-down list. For the purposes of this example I have chosen Car Parking . NB the list is configured in alphabetical order and consists of 2 pages. Many commonly used items are found on the second page such as subsistence and taxi.
3.07 At this stage the system will ask you if you wish to upload your receipt at this stage. You can either choose to upload your receipt later, upload the receipt at this stage or inform the system that you do not have a receipt. Uploading receipts is detailed in Section 7 so for this section we will elect to ‘upload a soft copy receipt later’ . Save your choice and the dialogue box will close.
3.08 Enter the value of the item claimed. In this example I have used £26.00

Core Expenses Guide
Page 8
3.09 The Dates entered must fall within the period entered in the Expense Report header section. Use the pop-up calendar to select the appropriate dates.
3.10 Times are available for personal use only and are not essential in order to submit an Expense Report.
3.11 Location ‘From ’ and ‘To’ is mandatory information where travel is involved however some claims will only require the first of these populated e.g. an overnight stay at a hotel, in which case you can enter the hotel name in the “From” box..
3.12 Description is a mandatory field and sufficient information must be provided in order to ensure that your approver can understand the reason for your claim.
3.13 If there is a requirement to charge costs to an alternative Cost Centre/Sub Project you can amend these at this stage of the process. Choose an alternative from the drop downs provided.
Core Expenses Guide
Page 9
3.14 To add further items to you claim, from the “Options ” button select Save & Add New or if you have completed your claim choose Save
3.15 When your claim is complete and all receipts (Section 7) and additional information (Section 4) has been attached press Submit to send your claim to your approver.
Core Expenses Guide
Page 10
4. Business Entertaining/Meals
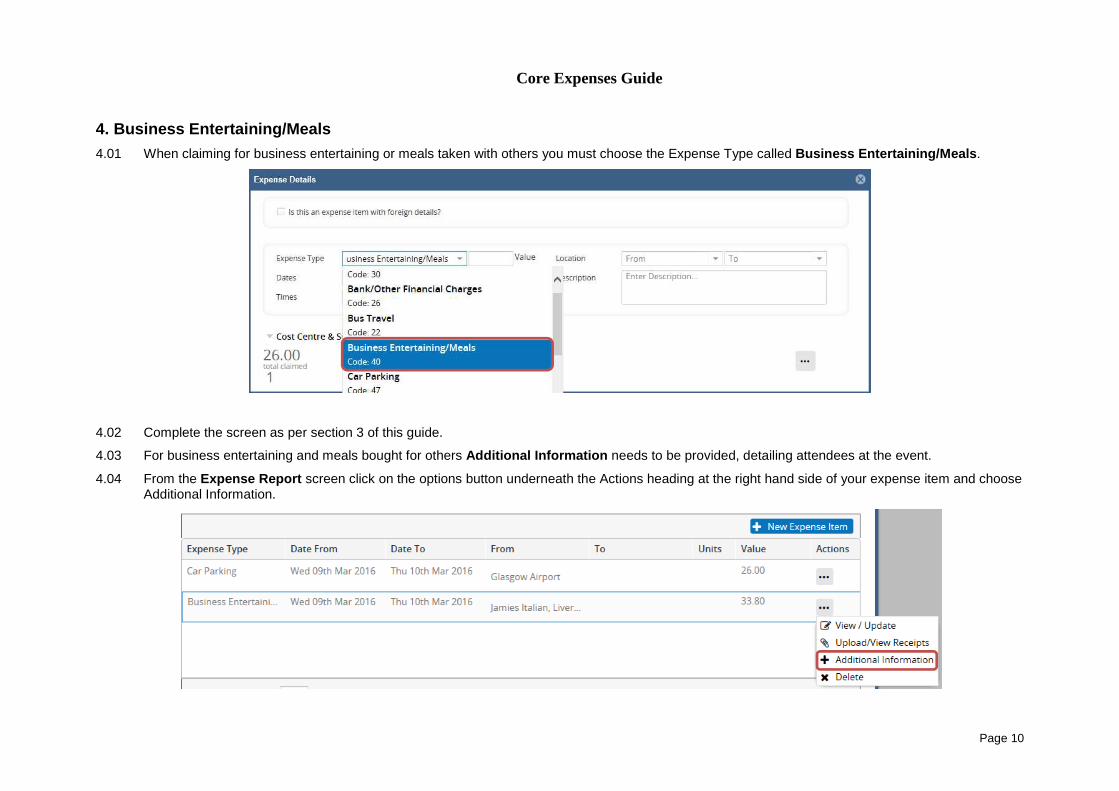
4.01 When claiming for business entertaining or meals taken with others you must choose the Expense Type called Business Entertaining/Meals .
4.02 Complete the screen as per section 3 of this guide.
4.03 For business entertaining and meals bought for others Additional Information needs to be provided, detailing attendees at the event.
4.04 From the Expense Report screen click on the options button underneath the Actions heading at the right hand side of your expense item and choose Additional Information.
Core Expenses Guide
Page 11
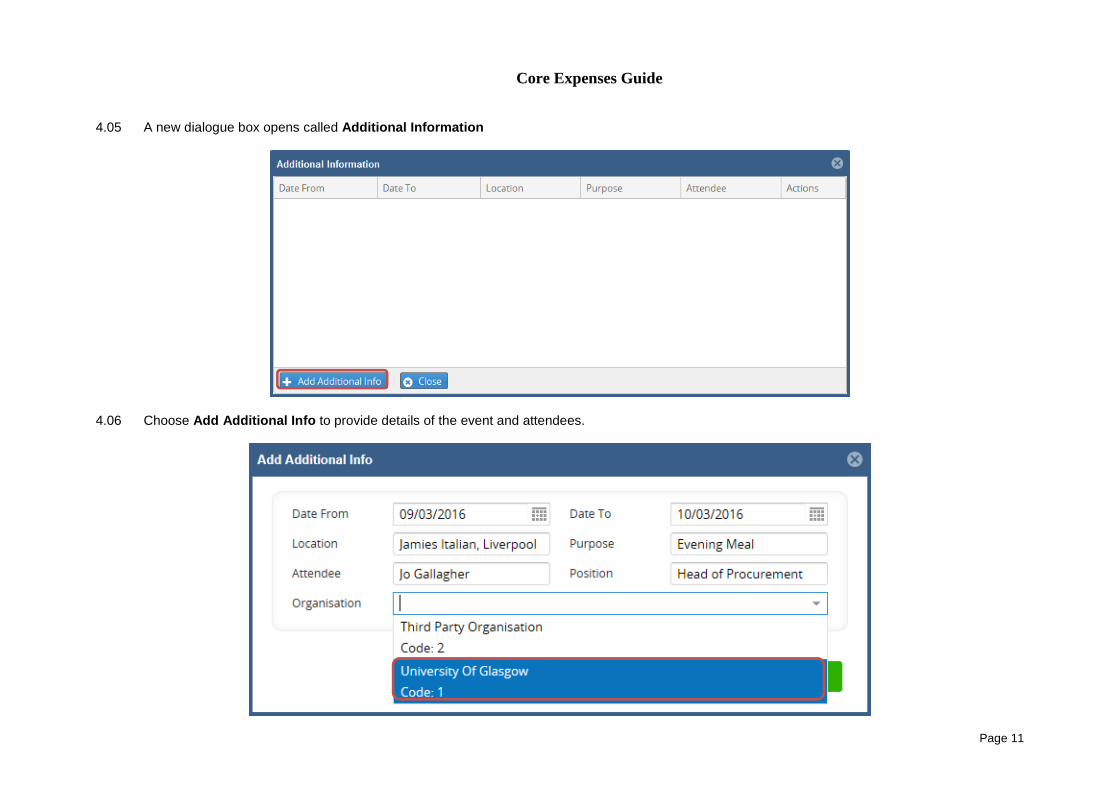
4.05 A new dialogue box opens called Additional Information
4.06 Choose Add Additional Info to provide details of the event and attendees.
Core Expenses Guide
Page 12
4.07 All fields are mandatory and must be completed. 4.08 Date From and Date To will be auto-populated from your claim, you can over-ride these if required. 4.09 In the Location field you should enter the name of the establishment where the event or meal took place. 4.10 You must provide a reason for the event/meal in the Purpose field. 4.11 Against Attendee you must enter the name of the individual. 4.12 Against Position enter the job role of the individual. 4.13 At Organisation you must enter whether the individual is a University of Glasgow employee of whether they belong to an external company. 4.14 Press Save
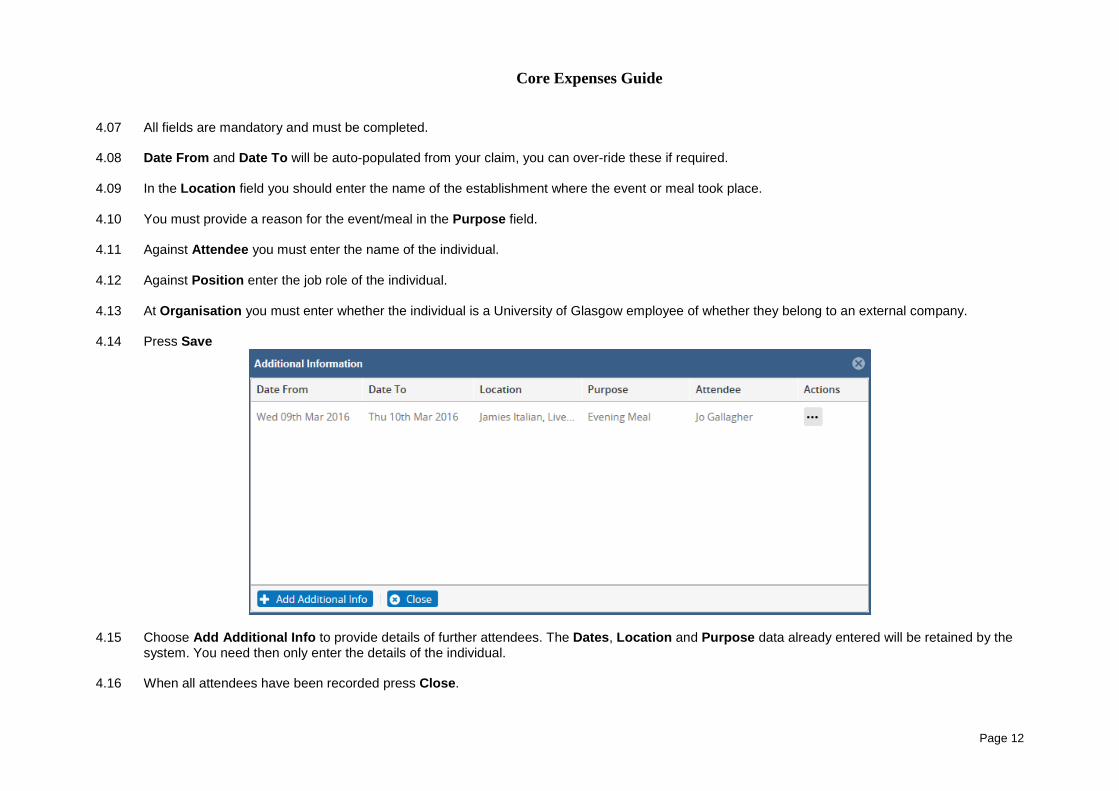
4.15 Choose Add Additional Info to provide details of further attendees. The Dates , Location and Purpose data already entered will be retained by the
system. You need then only enter the details of the individual. 4.16 When all attendees have been recorded press Close .
Core Expenses Guide
Page 13
5. Claiming Mileage
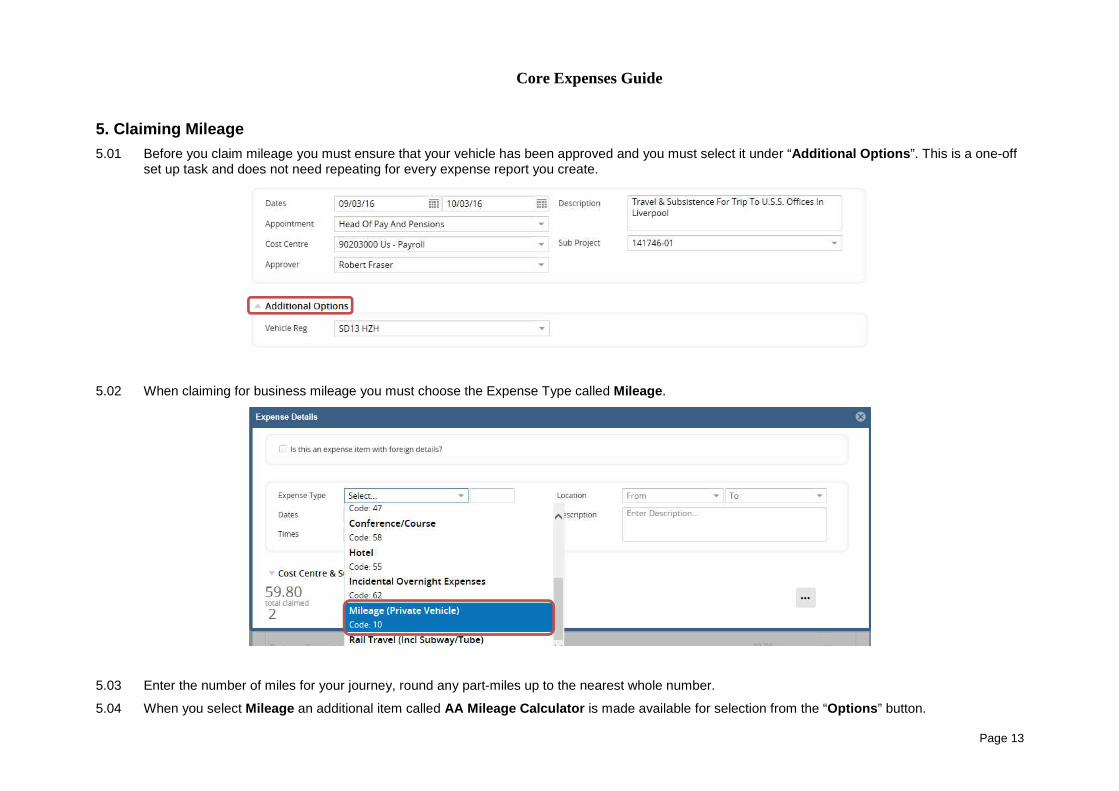
5.01 Before you claim mileage you must ensure that your vehicle has been approved and you must select it under “Additional Options ”. This is a one-off set up task and does not need repeating for every expense report you create.
5.02 When claiming for business mileage you must choose the Expense Type called Mileage .
5.03 Enter the number of miles for your journey, round any part-miles up to the nearest whole number.
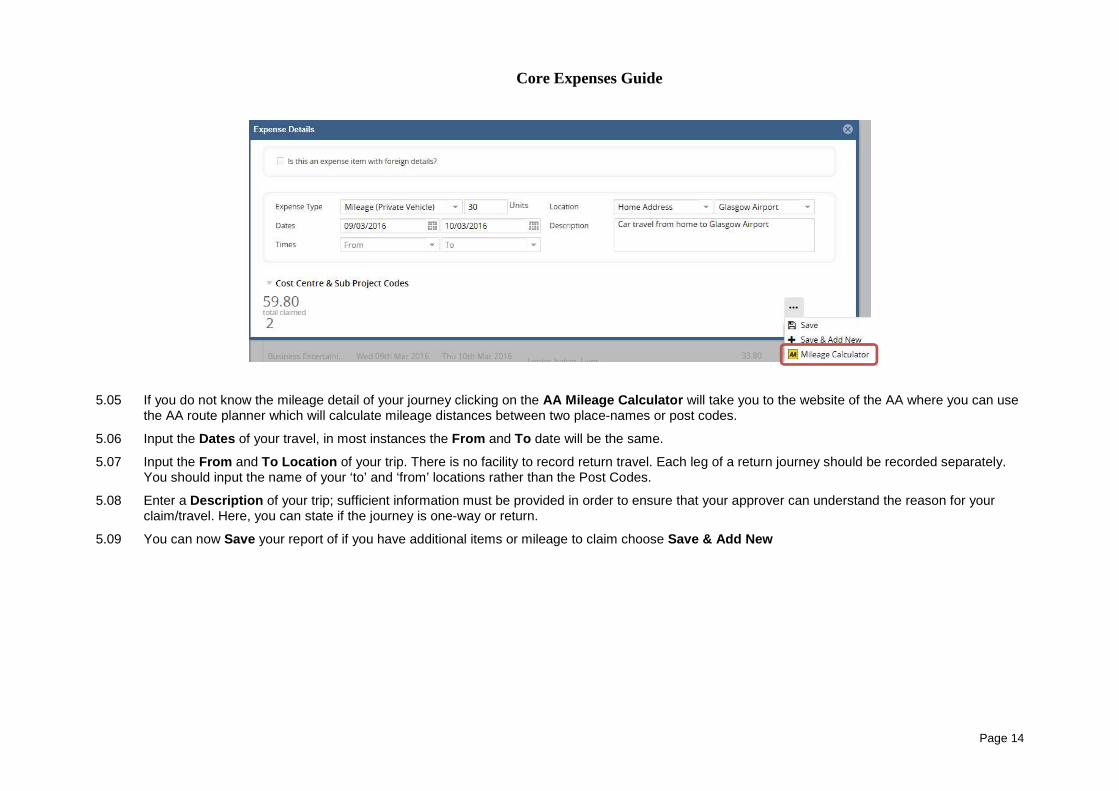
5.04 When you select Mileage an additional item called AA Mileage Calculator is made available for selection from the “Options ” button.
Core Expenses Guide
Page 14
5.05 If you do not know the mileage detail of your journey clicking on the AA Mileage Calculator will take you to the website of the AA where you can use the AA route planner which will calculate mileage distances between two place-names or post codes.
5.06 Input the Dates of your travel, in most instances the From and To date will be the same.
5.07 Input the From and To Location of your trip. There is no facility to record return travel. Each leg of a return journey should be recorded separately. You should input the name of your ‘to’ and ‘from’ locations rather than the Post Codes.
5.08 Enter a Description of your trip; sufficient information must be provided in order to ensure that your approver can understand the reason for your claim/travel. Here, you can state if the journey is one-way or return.
5.09 You can now Save your report of if you have additional items or mileage to claim choose Save & Add New

Core Expenses Guide
Page 15
6. Foreign Currency Items
6.01 Reports containing items in foreign currency follow the same system as domestic claims. Set up your Report Header as you would’ve done in section 3.03
6.02 Select New Expense Item from the Core Expense main menu to enter the details of your trip
6.03 The first item on this screen askes the question Is this an expense item with foreign details? Click in the box – it is important to remember to do this now as adding it later will remove subsequently entered data.

Core Expenses Guide
Page 16
6.04 Select your Expense Type from the drop down menu.
6.05 Enter the value of the item claimed. In this example I have used 26.00 – this figure will be the same as that in your foreign currency receipt.
6.06 The Dates entered must fall within the period entered in the Expense Report header section. Use the pop-up calendar to select the appropriate dates.
6.07 Times are available for personal use only and are not essential in order to submit an Expense Report.
6.08 Location ‘From ’ and ‘To’ is mandatory information where foreign currency is involved and the same location should be populated in both From and To locations. Below I have entered Belgium Brussels and now an exchange rate appears above the Value
6.09 Description is a mandatory field and sufficient information must be provided in order to ensure that your approver can understand the reason for your claim.
Core Expenses Guide
Page 17
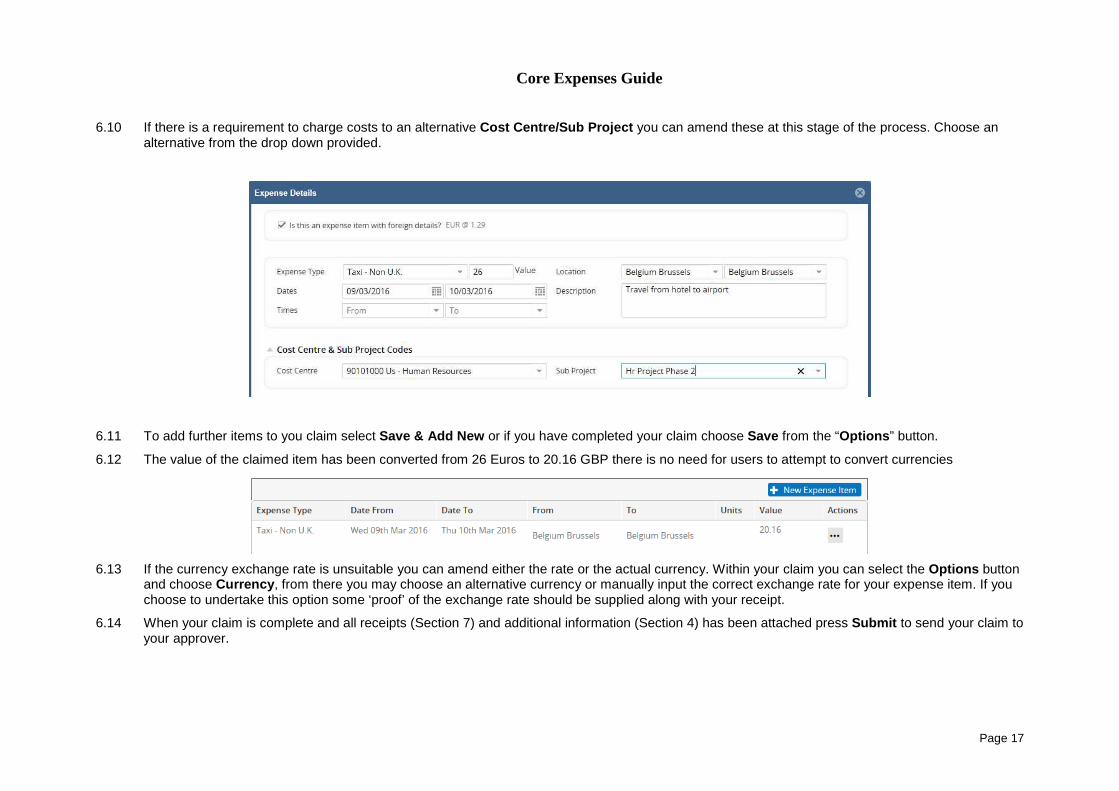
6.10 If there is a requirement to charge costs to an alternative Cost Centre/Sub Project you can amend these at this stage of the process. Choose an alternative from the drop down provided.
6.11 To add further items to you claim select Save & Add New or if you have completed your claim choose Save from the “Options ” button.
6.12 The value of the claimed item has been converted from 26 Euros to 20.16 GBP there is no need for users to attempt to convert currencies
6.13 If the currency exchange rate is unsuitable you can amend either the rate or the actual currency. Within your claim you can select the Options button and choose Currency , from there you may choose an alternative currency or manually input the correct exchange rate for your expense item. If you choose to undertake this option some ‘proof’ of the exchange rate should be supplied along with your receipt.
6.14 When your claim is complete and all receipts (Section 7) and additional information (Section 4) has been attached press Submit to send your claim to your approver.
Core Expenses Guide
Page 18
7. Adding Receipts
7.01 Once your claim is complete you are ready to Add Receipts to your claim.
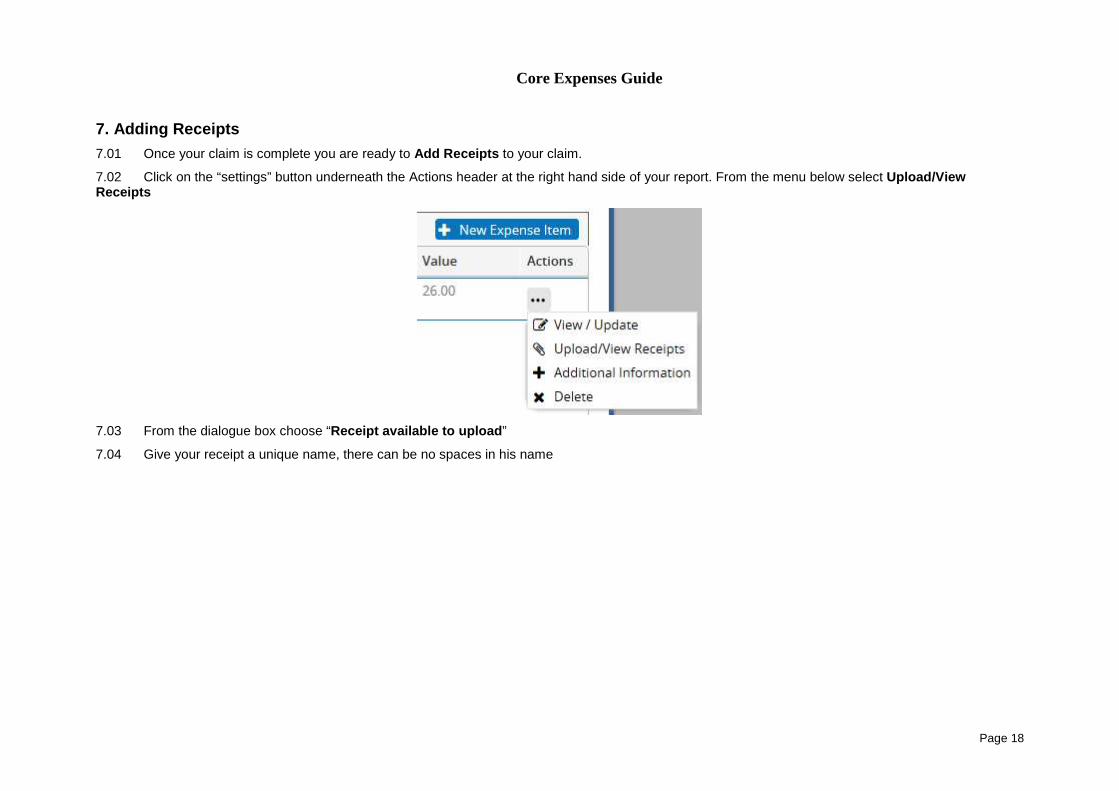
7.02 Click on the “settings” button underneath the Actions header at the right hand side of your report. From the menu below select Upload/View Receipts
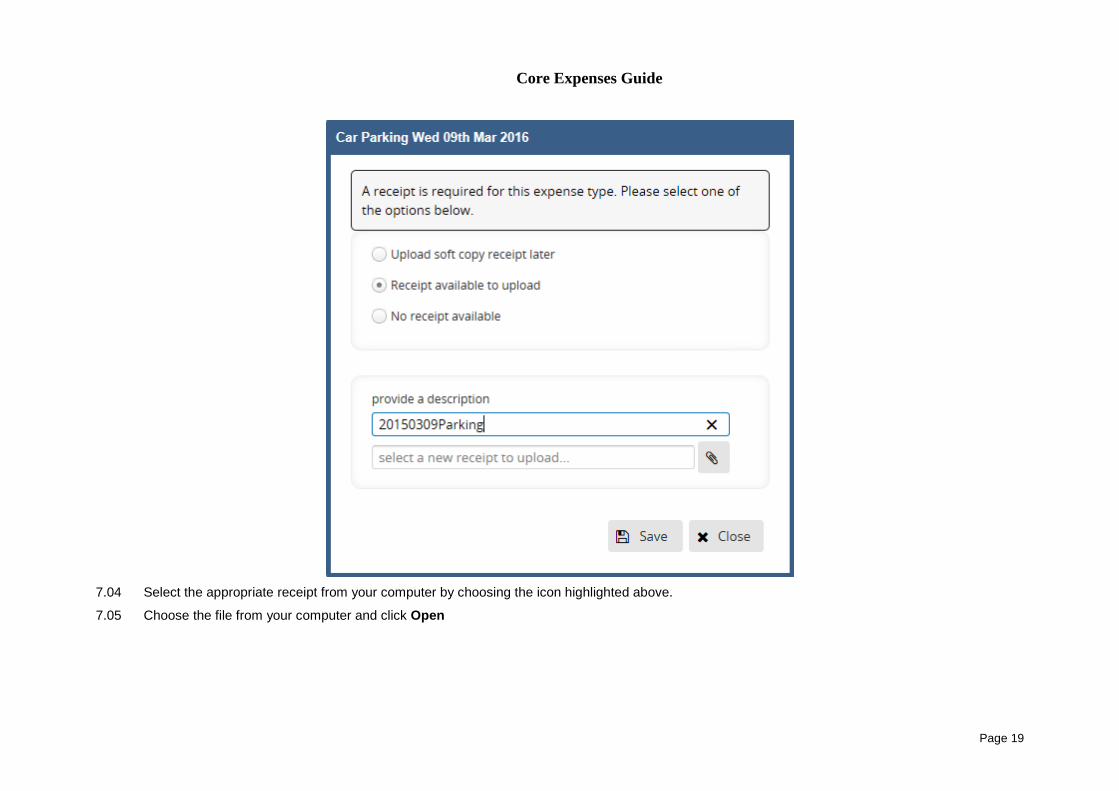
7.03 From the dialogue box choose “Receipt available to upload ”
7.04 Give your receipt a unique name, there can be no spaces in his name
Core Expenses Guide
Page 19
7.04 Select the appropriate receipt from your computer by choosing the icon highlighted above.
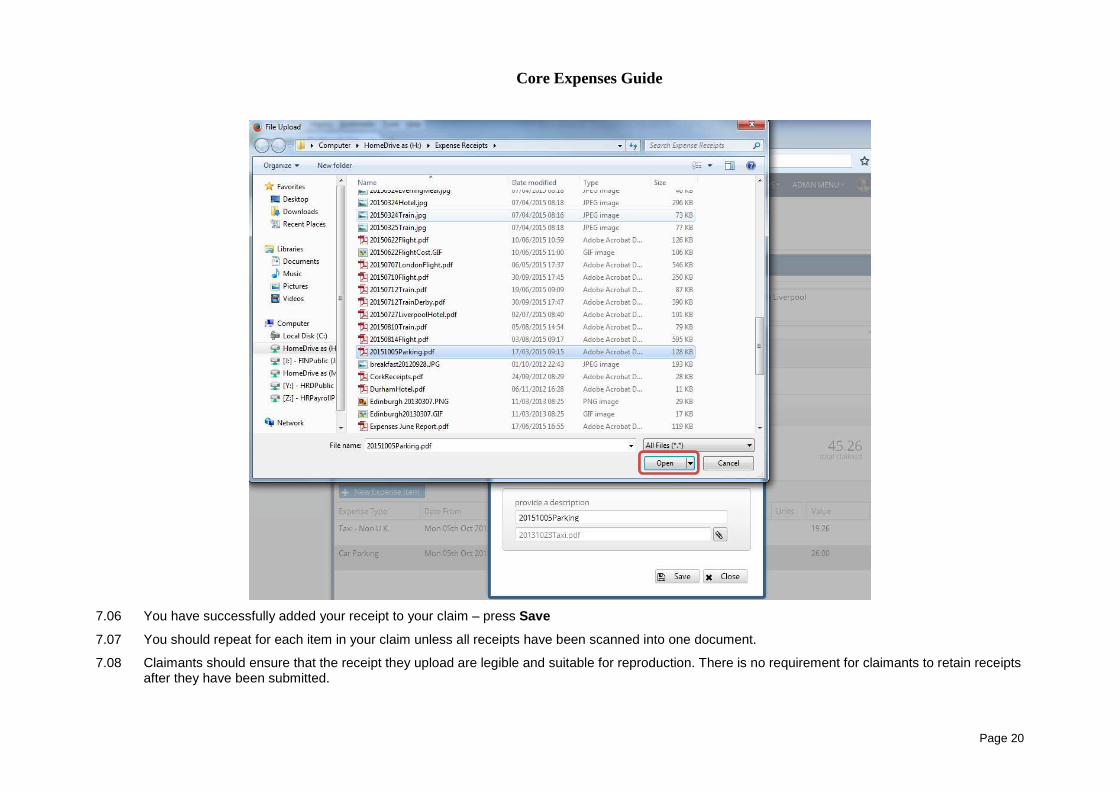
7.05 Choose the file from your computer and click Open
Core Expenses Guide
Page 20
7.06 You have successfully added your receipt to your claim – press Save
7.07 You should repeat for each item in your claim unless all receipts have been scanned into one document.
7.08 Claimants should ensure that the receipt they upload are legible and suitable for reproduction. There is no requirement for claimants to retain receipts after they have been submitted.
Core Expenses Guide
Page 21
8. Your Expenses Bank Account
8.01 Your Expenses Bank Account will initially be the same account that we use to pay your salary into. Some users may find it easier to manage their financial affairs by having a separate bank account for their expenses.
8.02 You can change you Expenses Bank Account from the My Pay tab on the Employee Dashboard or by clicking the My Profile button at the top right of the Employee Dashboard
8.03 From the My Profile screen choose Bank Detail which is found in the Employee Detail menu
8.04 To change your Expenses Bank Account click on the Magnifying Glass at the right hand side of the screen
Core Expenses Guide
Page 22
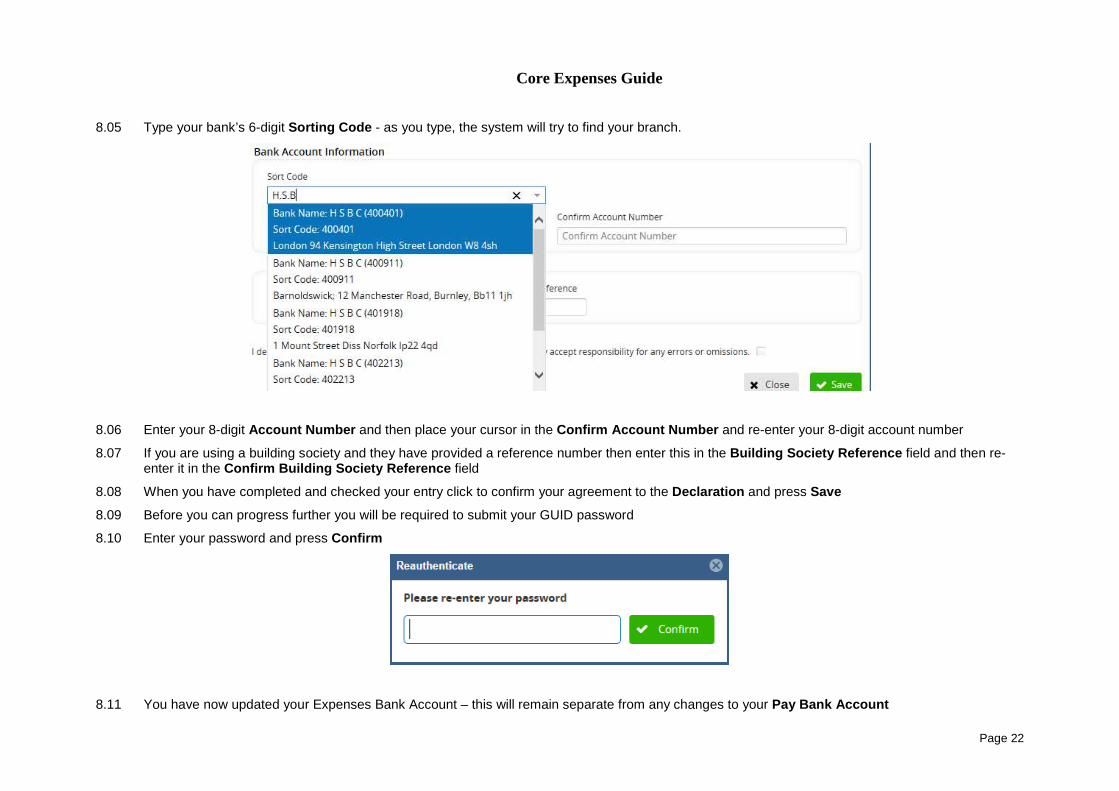
8.05 Type your bank’s 6-digit Sorting Code - as you type, the system will try to find your branch.
8.06 Enter your 8-digit Account Number and then place your cursor in the Confirm Account Number and re-enter your 8-digit account number
8.07 If you are using a building society and they have provided a reference number then enter this in the Building Society Reference field and then re-enter it in the Confirm Building Society Reference field
8.08 When you have completed and checked your entry click to confirm your agreement to the Declaration and press Save
8.09 Before you can progress further you will be required to submit your GUID password
8.10 Enter your password and press Confirm
8.11 You have now updated your Expenses Bank Account – this will remain separate from any changes to your Pay Bank Account
Core Expenses Guide
Page 23
9. Keeping track of your Expense Reports
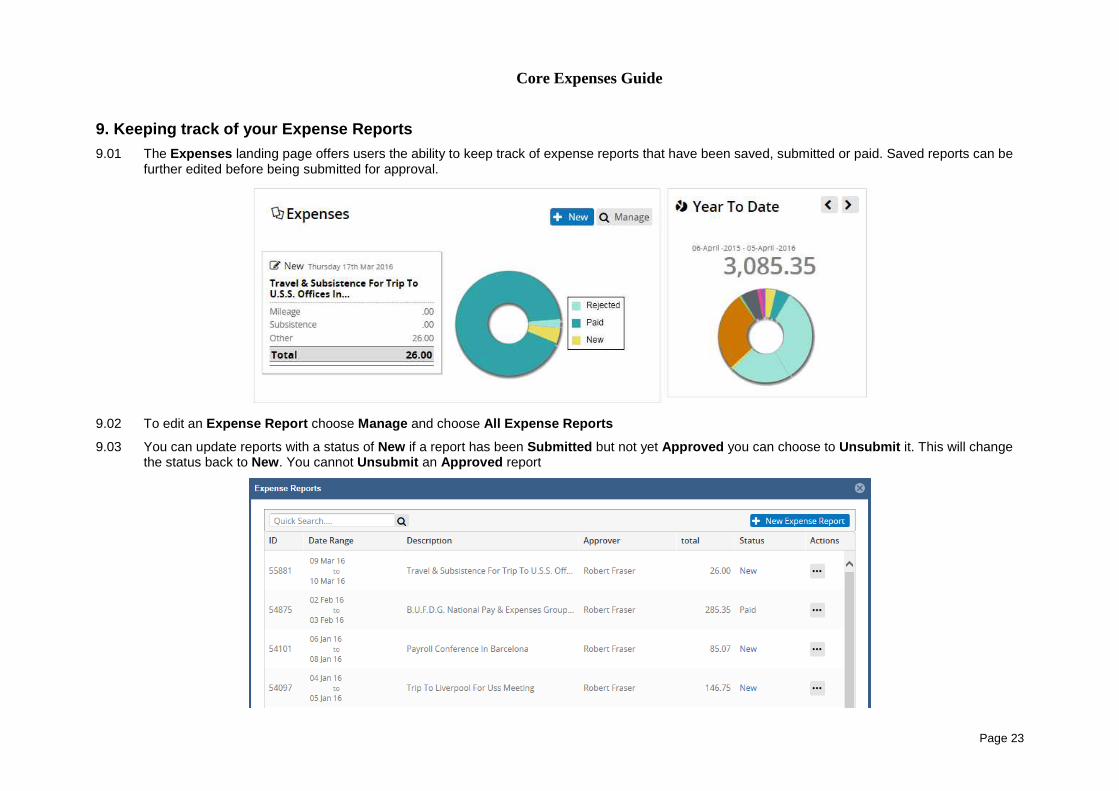
9.01 The Expenses landing page offers users the ability to keep track of expense reports that have been saved, submitted or paid. Saved reports can be further edited before being submitted for approval.
9.02 To edit an Expense Report choose Manage and choose All Expense Reports
9.03 You can update reports with a status of New if a report has been Submitted but not yet Approved you can choose to Unsubmit it. This will change the status back to New. You cannot Unsubmit an Approved report
Core Expenses Guide
Page 24
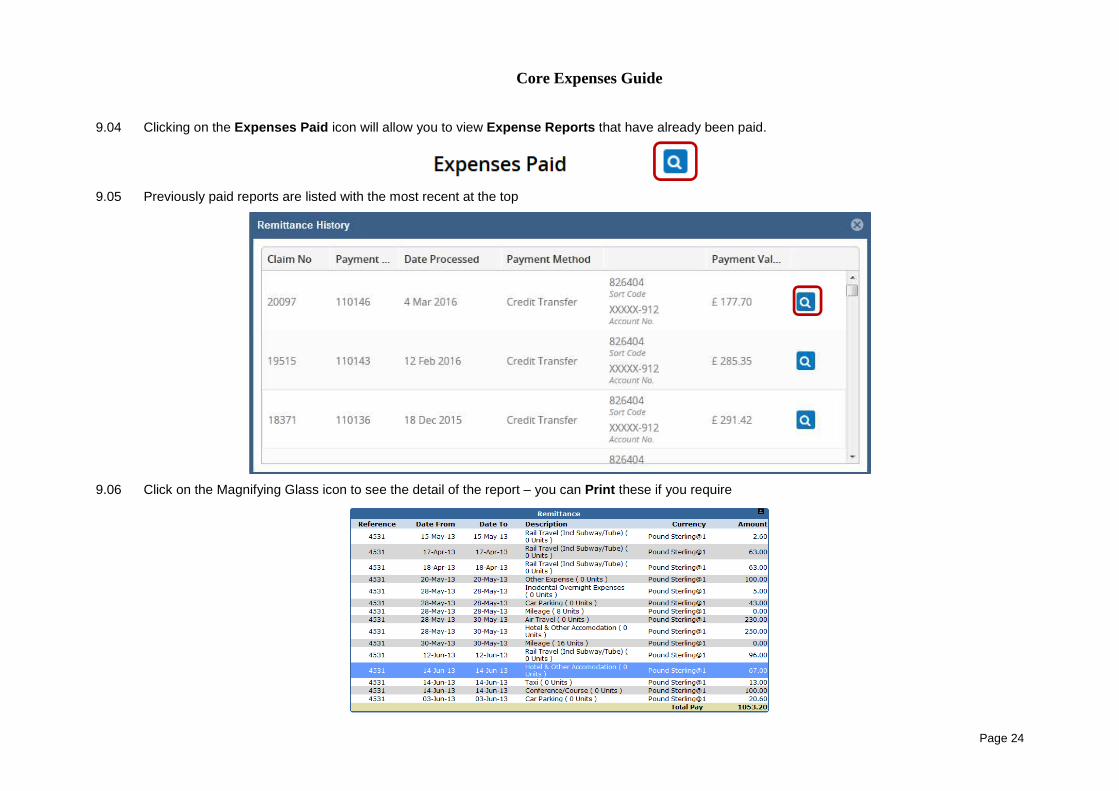
9.04 Clicking on the Expenses Paid icon will allow you to view Expense Reports that have already been paid.
9.05 Previously paid reports are listed with the most recent at the top
9.06 Click on the Magnifying Glass icon to see the detail of the report – you can Print these if you require
Core Expenses Guide
Page 25
10. Approving Expense Reports
10.01 If you have managerial responsibility it is likely that you will need to Approve an Expense Report at some point. The managers’ role is to ensure that the expenses claimed represent valid expenditure under the University Expenses Policy. If any item is out-with the policy then the Expense Report should be rejected.
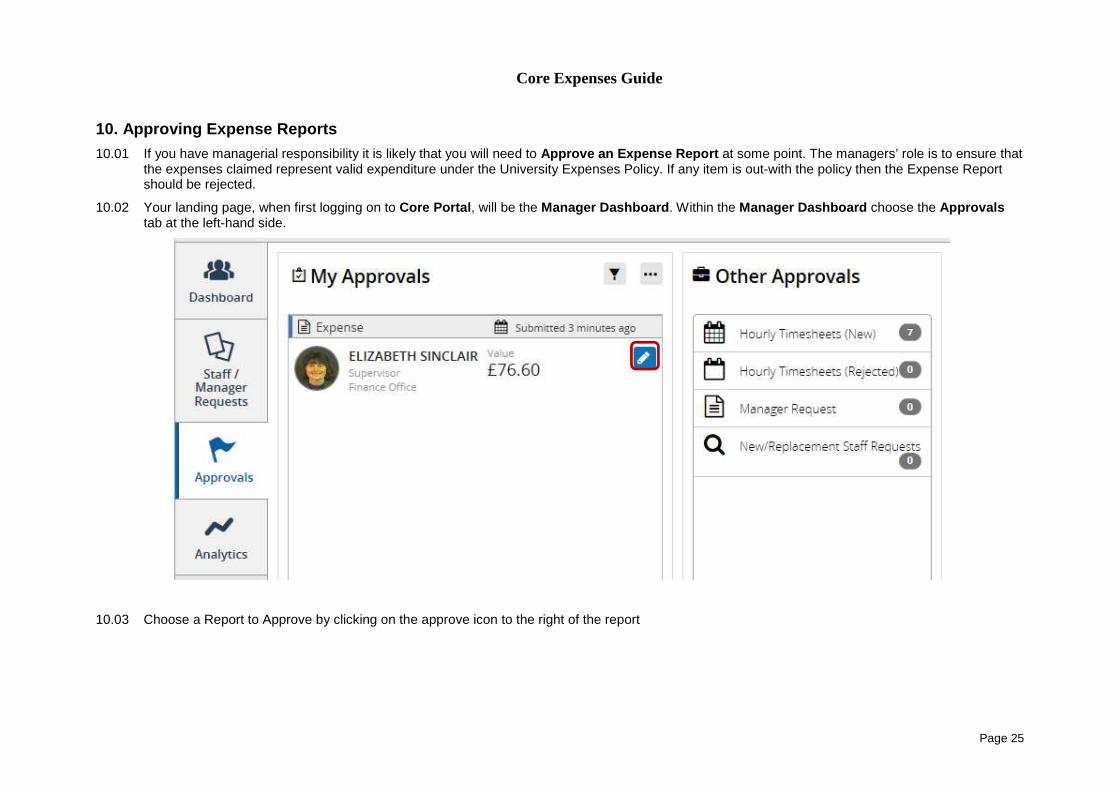
10.02 Your landing page, when first logging on to Core Portal , will be the Manager Dashboard . Within the Manager Dashboard choose the Approvals tab at the left-hand side.
10.03 Choose a Report to Approve by clicking on the approve icon to the right of the report
Core Expenses Guide
Page 26
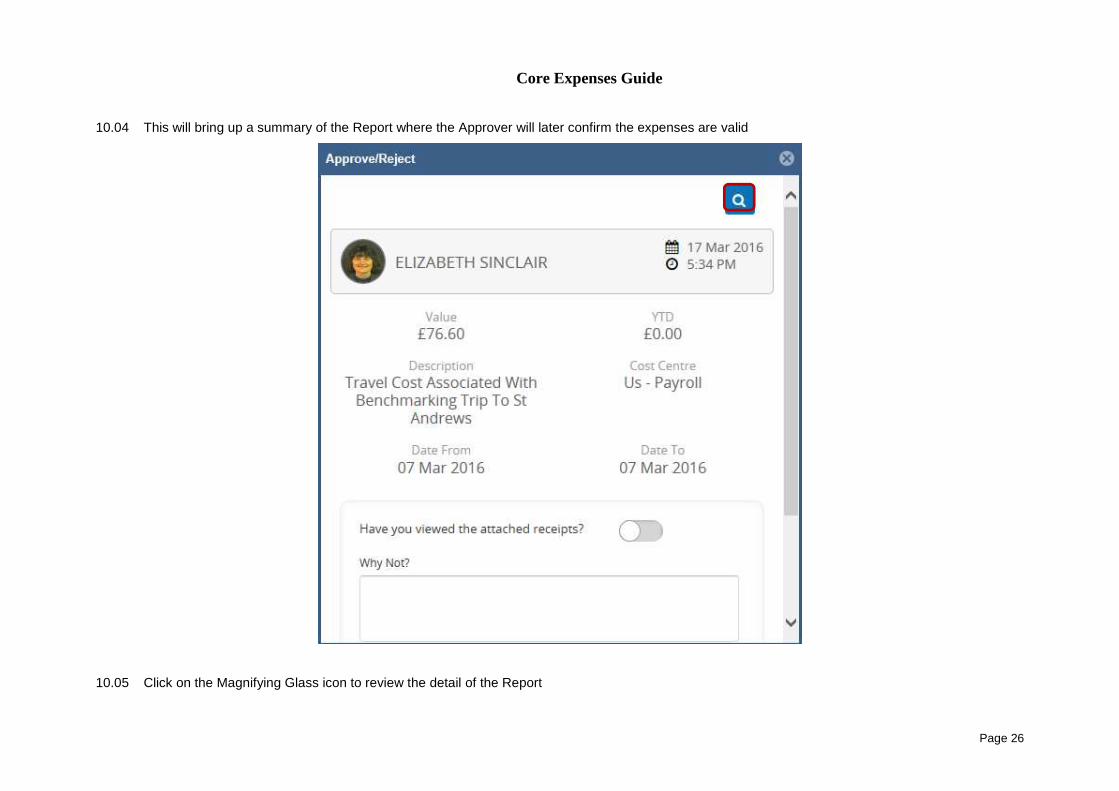
10.04 This will bring up a summary of the Report where the Approver will later confirm the expenses are valid
10.05 Click on the Magnifying Glass icon to review the detail of the Report
Core Expenses Guide
Page 27
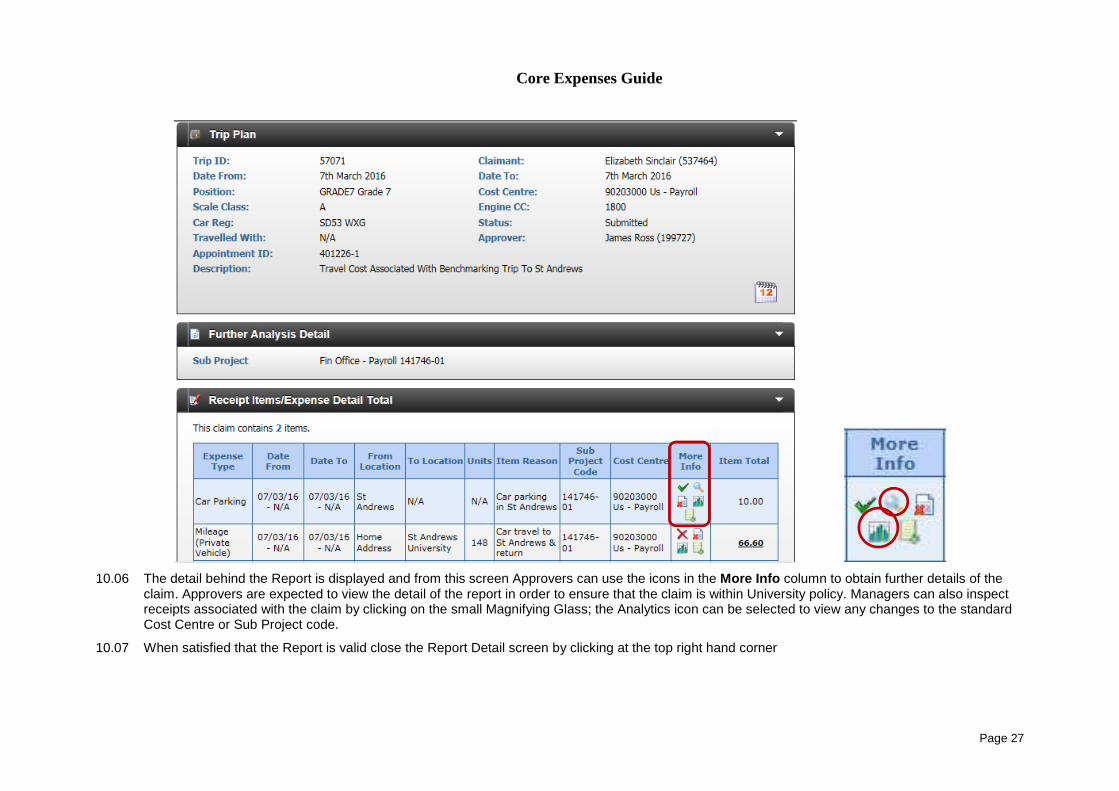
10.06 The detail behind the Report is displayed and from this screen Approvers can use the icons in the More Info column to obtain further details of the claim. Approvers are expected to view the detail of the report in order to ensure that the claim is within University policy. Managers can also inspect receipts associated with the claim by clicking on the small Magnifying Glass; the Analytics icon can be selected to view any changes to the standard Cost Centre or Sub Project code.
10.07 When satisfied that the Report is valid close the Report Detail screen by clicking at the top right hand corner
Core Expenses Guide
Page 28
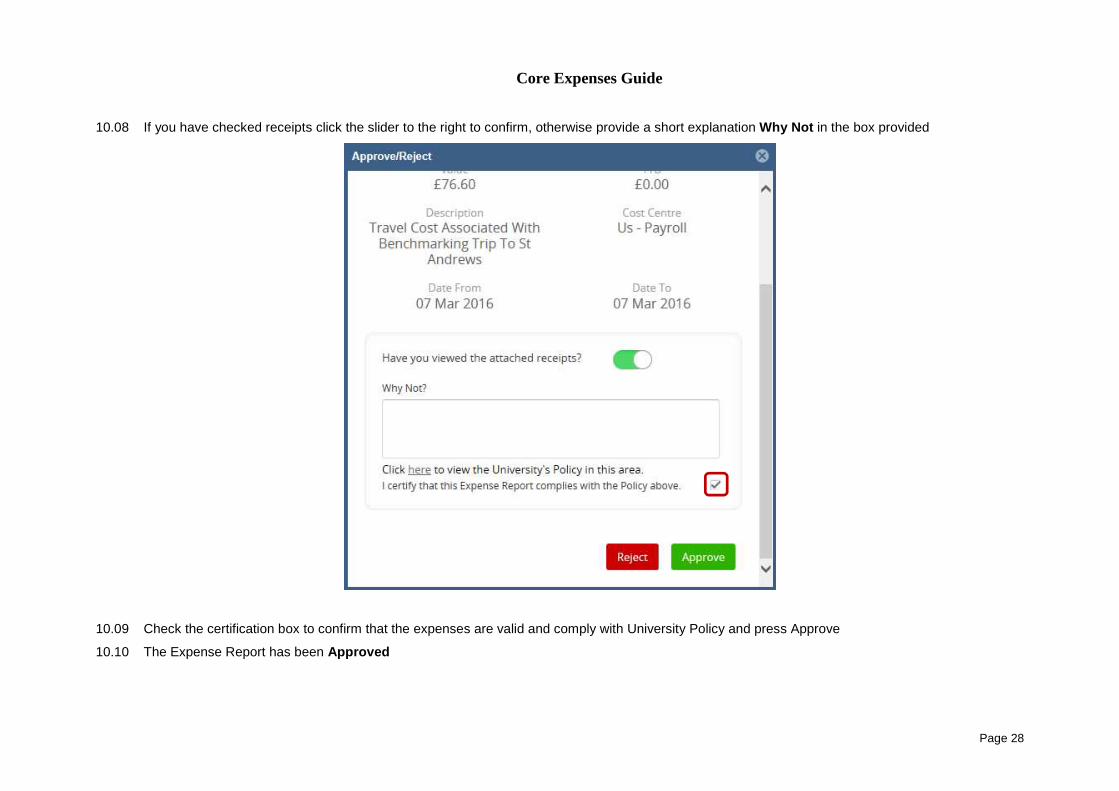
10.08 If you have checked receipts click the slider to the right to confirm, otherwise provide a short explanation Why Not in the box provided
10.09 Check the certification box to confirm that the expenses are valid and comply with University Policy and press Approve
10.10 The Expense Report has been Approved
Core Expenses Guide
Page 29
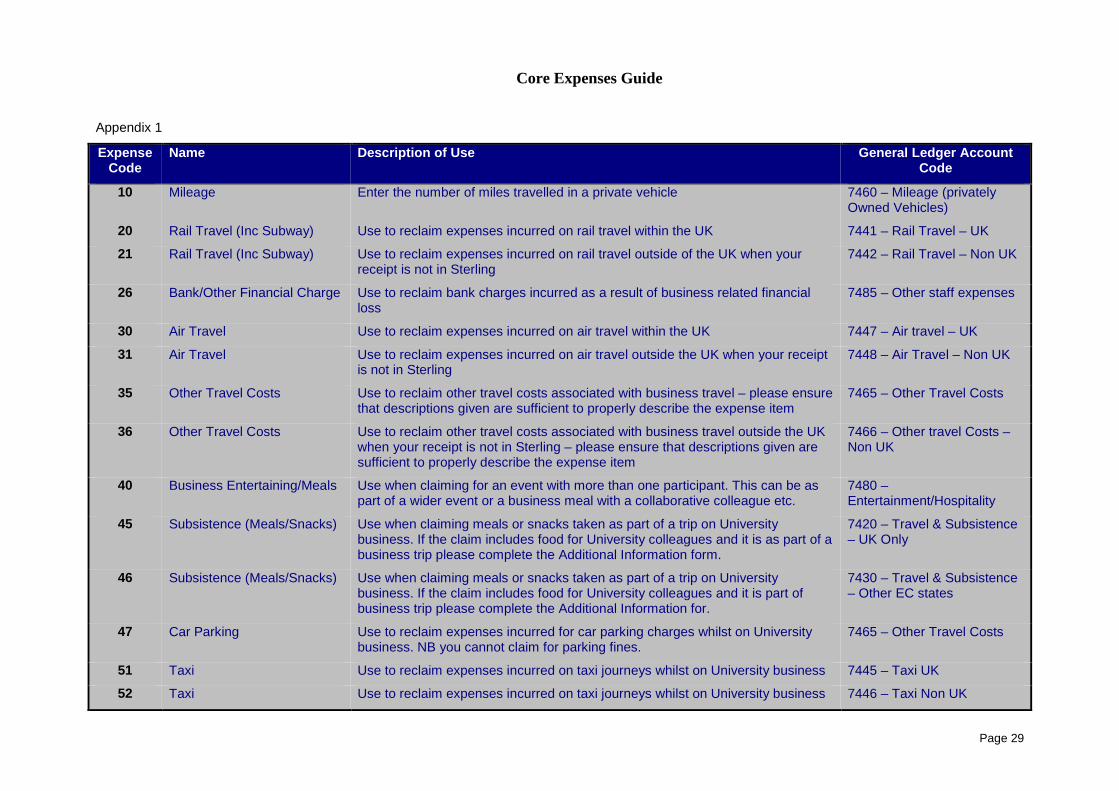
Appendix 1
Expense Code
Name Description of Use General Ledger Account Code
10 Mileage Enter the number of miles travelled in a private vehicle 7460 – Mileage (privately Owned Vehicles)
20 Rail Travel (Inc Subway) Use to reclaim expenses incurred on rail travel within the UK 7441 – Rail Travel – UK
21 Rail Travel (Inc Subway) Use to reclaim expenses incurred on rail travel outside of the UK when your receipt is not in Sterling
7442 – Rail Travel – Non UK
26 Bank/Other Financial Charge Use to reclaim bank charges incurred as a result of business related financial loss
7485 – Other staff expenses
30 Air Travel Use to reclaim expenses incurred on air travel within the UK 7447 – Air travel – UK
31 Air Travel Use to reclaim expenses incurred on air travel outside the UK when your receipt is not in Sterling
7448 – Air Travel – Non UK
35 Other Travel Costs Use to reclaim other travel costs associated with business travel – please ensure that descriptions given are sufficient to properly describe the expense item
7465 – Other Travel Costs
36 Other Travel Costs Use to reclaim other travel costs associated with business travel outside the UK when your receipt is not in Sterling – please ensure that descriptions given are sufficient to properly describe the expense item
7466 – Other travel Costs – Non UK
40 Business Entertaining/Meals Use when claiming for an event with more than one participant. This can be as part of a wider event or a business meal with a collaborative colleague etc.
7480 – Entertainment/Hospitality
45 Subsistence (Meals/Snacks) Use when claiming meals or snacks taken as part of a trip on University business. If the claim includes food for University colleagues and it is as part of a business trip please complete the Additional Information form.
7420 – Travel & Subsistence – UK Only
46 Subsistence (Meals/Snacks) Use when claiming meals or snacks taken as part of a trip on University business. If the claim includes food for University colleagues and it is part of business trip please complete the Additional Information for.
7430 – Travel & Subsistence – Other EC states
47 Car Parking Use to reclaim expenses incurred for car parking charges whilst on University business. NB you cannot claim for parking fines.
7465 – Other Travel Costs
51 Taxi Use to reclaim expenses incurred on taxi journeys whilst on University business 7445 – Taxi UK
52 Taxi Use to reclaim expenses incurred on taxi journeys whilst on University business 7446 – Taxi Non UK
Core Expenses Guide
Page 30
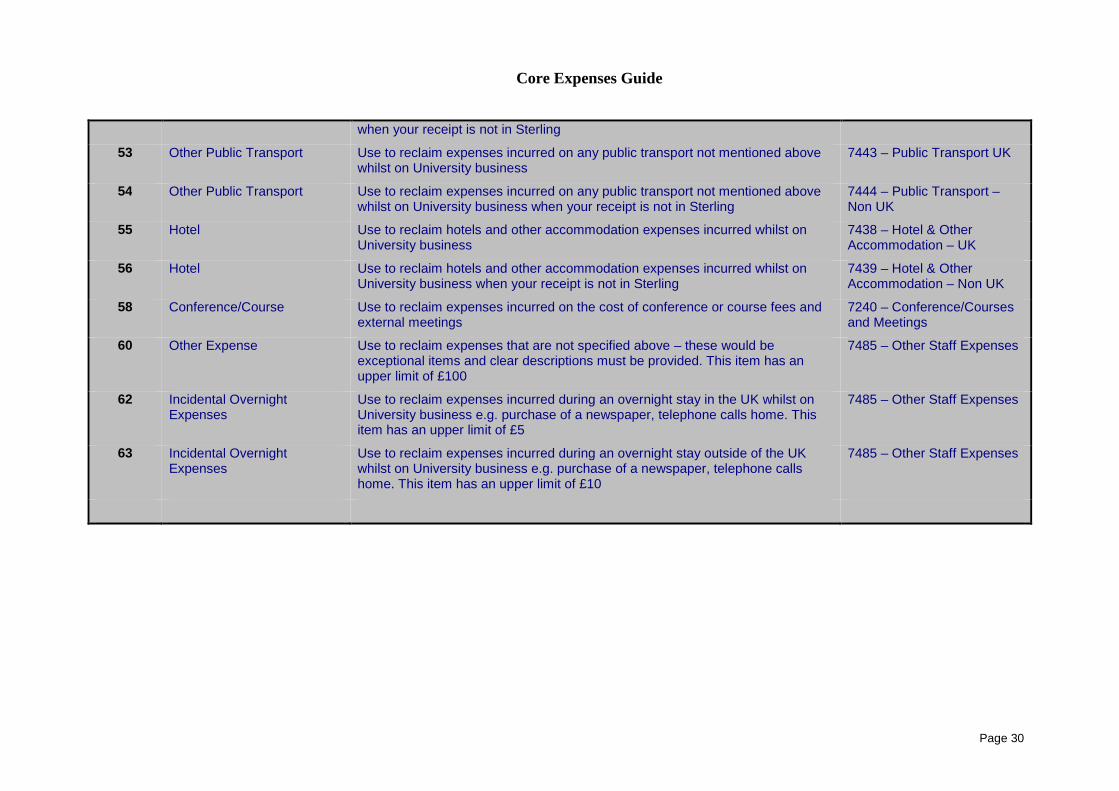
when your receipt is not in Sterling
53 Other Public Transport Use to reclaim expenses incurred on any public transport not mentioned above whilst on University business
7443 – Public Transport UK
54 Other Public Transport Use to reclaim expenses incurred on any public transport not mentioned above whilst on University business when your receipt is not in Sterling
7444 – Public Transport – Non UK
55 Hotel Use to reclaim hotels and other accommodation expenses incurred whilst on University business
7438 – Hotel & Other Accommodation – UK
56 Hotel Use to reclaim hotels and other accommodation expenses incurred whilst on University business when your receipt is not in Sterling
7439 – Hotel & Other Accommodation – Non UK
58 Conference/Course Use to reclaim expenses incurred on the cost of conference or course fees and external meetings
7240 – Conference/Courses and Meetings
60 Other Expense Use to reclaim expenses that are not specified above – these would be exceptional items and clear descriptions must be provided. This item has an upper limit of £100
7485 – Other Staff Expenses
62 Incidental Overnight Expenses
Use to reclaim expenses incurred during an overnight stay in the UK whilst on University business e.g. purchase of a newspaper, telephone calls home. This item has an upper limit of £5
7485 – Other Staff Expenses
63 Incidental Overnight Expenses
Use to reclaim expenses incurred during an overnight stay outside of the UK whilst on University business e.g. purchase of a newspaper, telephone calls home. This item has an upper limit of £10
7485 – Other Staff Expenses
Core Expenses Guide
Page 31
Frequently Asked Questions
Q. I’ve submitted my expense report before I have completed it, what can I do?
A. So long as your expense report has not been approved you have the opportunity to ‘un-submit’ your report. To do this, go to your Employee Dashboard and select Expenses . Click on Manage and choose All Expense Reports . Locate your submitted expense report and from the button in the Actions column select Unsubmit . The Status of your report will now have changed from Submitted to New and you can edit your report by again clicking the button in the Actions column and selecting View / Update .
Q. The exchange rate used with my foreign currency transaction is not the same as I experienced whilst travelling.
A. If the currency exchange rate is unsuitable you can amend either the rate or the actual currency. Within your claim you can select the Options button and choose Currency , from there you may choose an alternative currency or manually input the correct exchange rate for your expense item. If you choose to undertake this option some ‘proof’ of the exchange rate should be supplied along with your receipt.
Q. How can I delegate my expenses approvals?
A. You cannot delegate your expense approvals in isolation from the rest of the Core system. If you are going to be absent from the University for a significant period of time then you can raise a Manager Request . Manager requests are accessed via the Manager Dashboard you choose Approver Substitutions , input the start date and the end date of the substitution period and select the substitute from the list of people reporting to you. Full details of Manager Requests can be found on the University’s HR webpages and a short training clip is available at http://www.gla.ac.uk/services/humanresources/systems/processnotes/manguides/manrequest/
Q. I cannot find the sub project code in the drop-down list, what should I do?
A. All sub projects are available for all staff, however, to access a sub project you need to first select the correct cost centre code that the sub project is associated with. Your local Administrator or College finance staff should be able to provide you with the appropriate cost centre code.