Embed Size (px)
Citation preview
CM 15 - THE PROFESSIONAL
MANUAL PROFILE
Thank you for purchasing this mobile phone, a Series of Cyrus. This mobile
phone is designed for shockproof, waterproof and dustproof. This instruc-
tion manual special used to guide you to understand the functions and
features of Series of Cyrus phone.
In addition to common call functions, LM812 also provides you SMS, MMS,
MP3 player, Video player, Flashlight, EBook, etc. It will bring you more
convenience and pleasure for your work and life.
CM 15 provides including rechargeable batteries, charges and many kinds
of special accessories for your choosing to use. Unauthorized charger may
cause danger, and this would violate the recognition for this phone and
guarantee clauses. Such as described in this manual is incompatible with
your phone, please refer to the mobile phone.
The manufacturer has the final interpretation of this manual. The manufacturer reserves the right
to modify technical regulations without prior notice. The company reserves the right to modify the
contents of this manual without prior notice. The manufacturer reserves the right to modify the
technical product specifications without prior notice.
COPYRIGHT STATEMENT» Cyrus has the final interpretation of this manual.
» Cyrus reserves the right to modify the technical product specifications
without prior notice.
» Cyrus reserves the right to modify the contents of this manual without
prior notice.
» Without the prior written permission of Cyrus, it is strictly prohibited to
copy, use, published any content in this manual in any form.
» In any case, Cyrus disclaims responsible for any loss of data or income
which caused by mobile phone reasons.
EN
CONTENTS
1. Safety and Performance 2
2. Your CM 15 7
3. Preparing for use 10
3.1 Install SIM Card 10
3.2 Install Memory Card (T-FLASH Card) 10
3.3 USB Usage 11
3.4 Security Password Usage 11
3.4 Connect to Network 13
3.5 Charge the battery 13
3.6 On/Off the phone 14
3.7 Headset 14
4. Basic Function 14
4.1 Dial Call 14
4.2 Adjust Volume 15
4.3 Answer the incoming call 15
4.4 Call Process 15
5. Main Menu 16
5.1 Phonebook 16
5.2 Multimedia 18
5.3 Call Center 21
5.3.3 Call Setting 22
5.4 Settings 25
5.5 Message 30
5.6 Wireless WLAN 34
5.7 Organizer 34
5.9 File Management 36
5.10 Media player 37
6. Input Method 39
7. Appendix 39
Common problems and solutions 39
Explanation of terms 40
01 02
1. SAFETY AND PERFORMANCE
EMERGENCY SERVICE
Dial the emergency call in any country, you can directly dial 112 (or other
emergency services call). You need to confirm the mobile power supply
has been opened, and in the service area. Enter the emergency services
number (112 or other numbers) and press dial key to call.
Any digital network has 112 emergency call services. In UK, you can also
use 999 standby emergency number, but you must insert a valid SIM card.
Note: Due to the nature of cellular network, it can‘t guarantee the
emergency call success.
PERSONAL
» Interference might be caused by poor shielding performance of me-
dical devices such as hearing aids and heart pacemakers in the use
of radio frequency devices including mobile phones. Consult medical
device manufacturer or your doctor before using mobile phone.
» Please turn off the phone in which place posted notice required to.
These places include hospitals and rest homes and other medical
establishments. Because these facilities may be using equipments
sensitive to external RF signal.
» If you are using personal medical devices, please consult the manu-
facturer of these devices, to confirm that they are adequately shiel-
ded from around the RF signal. You can also ask your doctor the
relevant information.
» For users with heart disease, you must pay special attention to phone
ring volume and vibrating alert Settings.
» In oil storages, chemical factories and so on, which have explosive
gases, or the location of explosive production process, we should pay
close attention to the RP devices use restrictions. In standby state,
your mobile phone sill launches the electromagnetic signal. If reques-
ted, you should turn off the phone.
» To pay attention to traffic safety. Do not use mobile phones while
driving. And to use, you should park your car first.
» If your phone is lost or stolen, please immediately notify the telecom-
munications sector, in order to disable the SIM card. It will protect
you from the economic losses caused others to take the call.
» When you contact the telecommunications department or distributor,
they need to know your phone‘s IMEI number. It‘s printed on the label
on the back of the phone (or input „* # 06 #“ to check the IMEI num-
ber). Please put the number down and keep, for the future needs.
» In order to make your mobile phone is not misused, please take
preventive measures, such as: set up mobile phone SIM card PIN
code or personal security code, and modify in a timely manner when
others know.
» Do not remove the battery in standby state mode, it will result in the
loss of user data.
» When you leave your car, please do not put the phone on easy to be
seen. It is best to carry or locked in the trunk.
» Do not let the children play with mobile phone, charger or battery.
03 04
MOBILE PHONE
Mobile phone contains sophisticated electronic circuitry, magnets and
battery systems, it should be handle with care. In particular, you should
pay attention to the following points:
» Your mobile phone will generate electromagnetic fields, please do
not place it with magnetic storage media, such as computer disk.
» Using mobile phone near the TV, telephone, radio and personal com-
puters and other electrical equipments may cause interference, thus
affecting the performance of the phone.
» Please do not put the mobile phone on the temperature is too high
or too low.
» Please do not scribble on the mobile phone.
» Please do not place any objects within a slide phone.
» Please do not let the mobile phone drop or to have any rough throw
behavior.
» Please do not put the mobile phone and computer disks, credit cards,
travel cards or other magnetic objects together. Otherwise, the infor-
mation stored in the disk or credit card, may be affected by the
mobile phone.
» Please do not put the mobile phone or battery in the temperature
more than 60 ℃, such as car dashboard, windowsill, or direct sunlight
of glass windows, etc. Do not attempt to remove the mobile phone
or any other accessories.
» Can only use a damp or anti-static cloth to wipe the mobile phone.
Do not use dry cloth with static electricity to wipe the phone. Do not
use chemical reagents or abrasive cleanser, otherwise it may damage
the cabinet.
» The headset may be hot during normal using, and mobile phone may
be hot when charging.
» Please remember to recycle, the carton packing of this mobile phone
is well suited for recycling.
» Please do not keep the mobile phone not to install battery for a long
time or the battery power is empty, otherwise, some data may be lost.
» Mobile phone contains some metallic substances, it may let you pro-
duce allergic phenomenon, it depends on your body and health.
» If you turn on the vibration function, please keep the mobile phone
away from the heat source (such as radiator). And to avoid the phone
slipped from the desktop due to vibration.
» Please try to avoid scratch the touch screen. Do not use the common
pen or other sharp objects to write on the touch screen.
BATTERY
» Please do not short circuit battery equipment, it will damage the
battery and generate heat, and may cause fire.
» Banned to put the battery into fire, lest cause an explosion. Used
batteries should be returned to the supplier, or put it in the designa-
ted collection points, do not put in the household waste.
» Please do not use metal objects (such as coins or key ring) to contact
with the battery endpoint, and make the short circuit.
» Please do not remove the phone battery in the boot state.
» Please do not put the phone battery in the mouth, because after
swallow, the electrolyte can lead to poisoning.
» The internal components of the mobile phone battery can only be
replaced by professional maintenance engineer. If you use wrong
05 06
type of battery may cause explosion. Be sure to deal with the used
batteries according to the manufacturer’s instructions.
» Use any non-phone manufacturer specify battery, charger, there will be a
potential danger, which caused by the damage to the mobile phone out
of warranty.
Note: If the battery is damaged, you should avoid touching the things
inside. If it contact with the skin, please use a lot of water to wash. In the
necessary circumstances, you should seek medical help.
ON THE ROAD
» Must always safety control the car. Please focus on driving.
» Please comply with all the requirements of the local traffic safety
regulations.
» Before dialing or receiving calls, you should pay close attention to
local legal system for mobile wireless phone using, and pay attention
in using.
» According to the requirements of driving conditions, please stop the
car, and then dial or receive the call.
» Unless in case of emergency, banned to stop at the isolation pier
place in the highway to receive or dial a call.
» Airbag inflation aroused the strong force, please don‘t install or place
the wireless communication equipment above the airbag, or the area
that the airbag launch can touch. If the on-board wireless communi-
cation equipment is not properly installed, once the airbag inflation,
it will cause serious damage.
» Please turn off your mobile phone when refueling, the same situation
applies to ban the use of a two-way radio equipment. Please do
not take any hazardous material which is inflammable, explosive
with mobile phone together or handling, the internal spark may cau-
se burns.
The electronic system of the car, such as locked braking, speed control
and fuel injection systems, generally, they do not suffer the effects of
the radio waves. The manufacturers of such kind of equipment will tell
whether these devices have a good shield function. If you suspect that
radio waves cause the car broke down, please contact your dealer. Do
not boot without qualified professional installer checks.
ON THE PLANE
Please turn off the phone while you are in the plane or near the plane.
It is illegal to use a mobile phone in the plane, it could have dangerous
aircraft operating, it may also disrupt mobile phone networks.
» In an emergency situation, should according to safety regulations,
and consent the crew’s permission to use the phone.
OTHER MANUFACTURERS’ EQUIPMENTS
Use unauthorized equipments, cables or accessories of other manufac-
turers may lead to the phone’s warranty failure, and it will also affect
the normal use of the mobile phones. Please be sure to use the ratio-
ning cable.
07 08
MAINTENANCE SERVICE
No user-serviceable parts inside of the mobile phone, battery and char-
ger. Recommend to send your phone to designated repair facility for
service.
NON-IONIC RADIATION
Radio equipment should be connected to the antenna by non-radiating
cables, such as coaxial cable. Antenna should not device in close to
human body, unless both have metal shield, such as metal roof. You
can only use the antenna specifically design for the mobile phone. Use
of unauthorized antennas, unauthorized alterations or additions may
damage the phone or in violation of the relevant provisions, resulting
in reduced performance or cause the radiation level does not meet the
standard.
EFFECTIVE USE
Please note that the following provisions in order to get the best per-
formance with minimum power consumption: In communication, do
not hand cover the built-in antenna place, otherwise it may affect call
quality, and led to the phone to beyond normal level of output, shorten
the battery call time and standby time.
RADIO FREQUENCY ENERGY
Your mobile phone is a low power radio transmitter and receiver. Once
the boot, it will periodically receive and send radio signal. Network
system will control the transmitted power of the mobile phone.
09 10
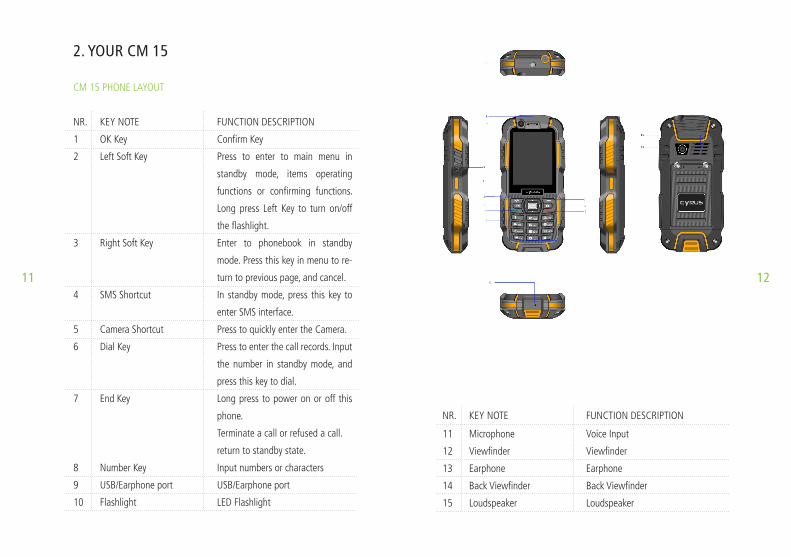
2. YOUR CM 15
CM 15 PHONE LAYOUT
NR. KEY NOTE FUNCTION DESCRIPTION
1 OK Key Confirm Key
2 Left Soft Key Press to enter to main menu in
standby mode, items operating
functions or confirming functions.
Long press Left Key to turn on/off
the flashlight.
3 Right Soft Key Enter to phonebook in standby
mode. Press this key in menu to re-
turn to previous page, and cancel.
4 SMS Shortcut In standby mode, press this key to
enter SMS interface.
5 Camera Shortcut Press to quickly enter the Camera.
6 Dial Key Press to enter the call records. Input
the number in standby mode, and
press this key to dial.
7 End Key Long press to power on or off this
phone.
Terminate a call or refused a call.
return to standby state.
8 Number Key Input numbers or characters
9 USB/Earphone port USB/Earphone port
10 Flashlight LED Flashlight
11 12
11 Microphone Voice Input
12 Viewfinder Viewfinder
13 Earphone Earphone
14 Back Viewfinder Back Viewfinder
15 Loudspeaker Loudspeaker
NR. KEY NOTE FUNCTION DESCRIPTION
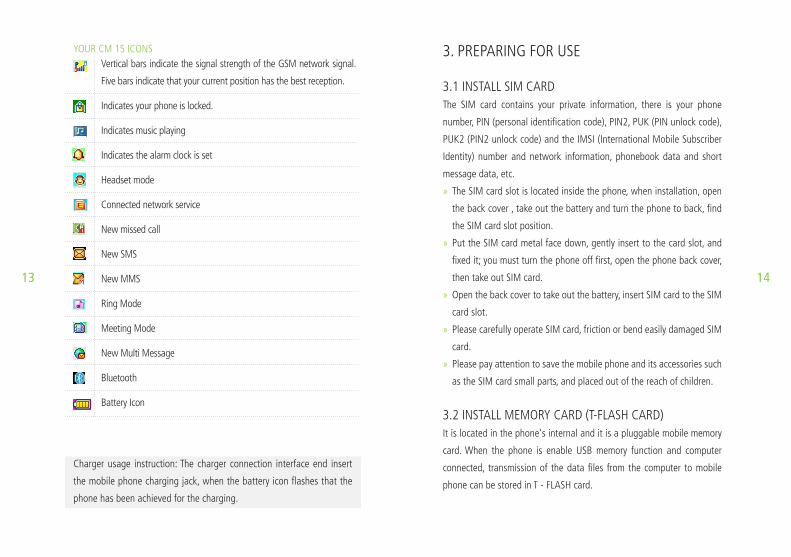
YOUR CM 15 ICONS
Charger usage instruction: The charger connection interface end insert
the mobile phone charging jack, when the battery icon flashes that the
phone has been achieved for the charging.
13 14
3. PREPARING FOR USE
3.1 INSTALL SIM CARDThe SIM card contains your private information, there is your phone
number, PIN (personal identification code), PIN2, PUK (PIN unlock code),
PUK2 (PIN2 unlock code) and the IMSI (International Mobile Subscriber
Identity) number and network information, phonebook data and short
message data, etc.
» The SIM card slot is located inside the phone, when installation, open
the back cover , take out the battery and turn the phone to back, find
the SIM card slot position.
» Put the SIM card metal face down, gently insert to the card slot, and
fixed it; you must turn the phone off first, open the phone back cover,
then take out SIM card.
» Open the back cover to take out the battery, insert SIM card to the SIM
card slot.
» Please carefully operate SIM card, friction or bend easily damaged SIM
card.
» Please pay attention to save the mobile phone and its accessories such
as the SIM card small parts, and placed out of the reach of children.
3.2 INSTALL MEMORY CARD (T-FLASH CARD)It is located in the phone‘s internal and it is a pluggable mobile memory
card. When the phone is enable USB memory function and computer
connected, transmission of the data files from the computer to mobile
phone can be stored in T - FLASH card.
Vertical bars indicate the signal strength of the GSM network signal.
Five bars indicate that your current position has the best reception.
Indicates your phone is locked.
Indicates music playing
Indicates the alarm clock is set
Headset mode
Connected network service
New missed call
New SMS
New MMS
Ring Mode
Meeting Mode
New Multi Message
Bluetooth
Battery Icon
INSTALL METHOD
Turn off the phone, open the back cover and other external power supply,
turn the phone to the back to find the location of the memory card slot.
Put the memory card metal face down, gently insert to the card slot, and
fixed it; you must turn the phone off first, open the phone back cover,
then take out the memory card.
Note: Because of the phone memory is lesser, in the need to use the
storage function, please try to store files in the memory card, so as not to
affect the use of your phone.
3.3 USB USAGEThis mobile phone supports USB1.0 port. You can connect the phone to
the computer through USB cable to copy\move files and some other ope-
rations. You can also browse the photos\sound records\video, etc through
the computer which saved on the phone. Using USB cable: Insert one side
of USB cable to USB interface on the PC, and connect the other side to
the “USB/Charging interface” on the left of phone.
3.4 Security Password UsageYour mobile phone and SIM card has a variety of passwords. These pass-
words can help prevent unauthorized use of your mobile phone and SIM
cards. When requested for any of the code explained below, key in the
appropriate code and press the OK key. If the input error, press the „Cle-
ar“ key to delete the incorrect input, and then enter the correct number.
You can use menu “Settings -> Security Settings -> Change Password”
to modify PIN Code, PIN2 Code and Phone Password.
15 16
PHONE PASSWORD
The phone password helps you to protect the phone against unauthorized
use. The phone password is usually provided by the manufacturer with
the phone. Manufacturer preset phone password is „0000“. If the mobile
phone has been locked, you will be required to enter the phone password
when boot.
PIN CODE
PIN Code (Personal Identification Code, 4-8digits) protects your SIM card
against unauthorized use. The PIN comes with the SIM card. If you start
the PIN check function, then you will be required to input PIN code each
boot. If you enter an incorrect PIN three times in succession, the SIM card
will be locked, the unlock method is as follows:
» According to the screen prompt to enter the correct PUK code, then
unlock the SIM card.
» Enter the new PIN code and press “OK Key”.
» Prompted to re-enter the new PIN code, re-enter the new PIN code and
press „OK Key“
» PUK code is correct, then unlock the SIM card, and the PIN code is
reset.
Note: If you enter the wrong PIN in three times, SIM card will be locked,
and you should use the PUK code to unlock. PUK code is usually stored
in the network operators.
PUK CODE
Enter the PUK code (Personal unlock code) to unlock the PIN code. PUK
code is provided from manufacturer with SIM card. In case you have not
it, please contact your network operator. If you enter an incorrect PUK ten
times in succession, the SIM card becomes invalid. Please contact your
network operator for a new card.
PIN2 CODE
PIN2 code (4-8 digits) is provided with SIM card. Enter the “Call costs”
and “Fixed dial”, please contact with the network operator to make sure if
your SIM card support to these functions. If wrong PIN code is entered for
three times, PIN2 code will be automatically locked. You have to enter the
correct PUK2 code to unlock PIN2 code. The unlock method is as below:
» According to the screen prompt to enter the correct PUK2 code, then
unlock.
» Enter the new PIN2 code, and press “OK Key”.
» Prompted to re-enter the new PIN2 code, re-enter the new PIN2 code
and press „OK Key“.
PUK2 CODE
PUK2 code (unlock PIN2 code, 8 digits) is used to unlock the locked PIN2
code. PUK2 code is provided from manufacturer with SIM card. If you
enter an incorrect PUK ten times in succession, you will not be able to use
PIN2 code function. Please contact your network operator for a new card.
PROHIBIT PASSWORD
You will use the prohibit password when you start the Call barring. When
17 18
you apply for this network function, the password can be obtained from
the network operator.
3.4 CONNECT TO NETWORKAfter unlocked SIM card and mobile phone successfully, the mobile pho-
ne will automatically search available network. After search to the net-
work, the phone gets into standby state. You can dial and receive calls,
and you can also make the following operation:
» Press Left Soft Key to enter main menu.
» Press Right Soft Key to enter Phonebook.
» Press Dial Key to enter the call records list.
Note: If the screen prompts „emergency call only“, and you can only make
emergency calls.
3.5 CHARGE THE BATTERY» The battery charge indicator: your phone can monitor and display in-
formation about the battery.
» Normally you can see the rest of the battery power from the battery
power of icons on the top right corner of the screen.
» When the battery power appears low, the screen shows „low power“.
If you choose warning tone in any mode of the scene mode, it still can
sound alarm warning tone.
» When the battery is on charge, it displays charging animation. When
charging animation stop, it means charging finish.
Note: The actual standby time and call time are concerned mobile phone
usage and local network environment, SIM card and the actual settings.
» Travel Charger: Travel charger can charge the battery through the
phone. When charge the battery, put the battery into the phone:
1. Connect the travel charger adapter and the slot of the top of phone.
2. Plug travel charger into the right main power supply socket.
» When charging, the electricity grid number of battery icon is a state of
flux until fully charged.
» At the end of the charging, the battery icon stops change.
Note: if the battery voltage low to can‘t allow the boot, when charging,
it needs a long time for the battery icon change.
Warning: You must ensure that the local standard voltage and frequency
match with your travel charger voltage and power ratings.
3.6 ON/OFF THE PHONE» Long press the End key, boot the phone. The screen displays boot
animation.
» If the phone asks to input the phone password, key in the password a
nd press the „OK“ soft key. Phone password is preset to 0000.
» If the phone asks for PIN code, key in the PIN code and press „OK“ soft
key. New account SIM card, PIN code is provided by the network ope-
rator.
» Enter the standby screen, the mobile phone will search network, when
find the network, the current date and time will appear in the screen,
19 20
now, you can dial or answer the call.
» Long press the End key to turn off the phone.
3.7 HEADSETWhen you insert the headset into the headset slot, it automatically get
into the headset mode, the headset plays the role of the earpiece and
microphone.
4. BASIC FUNCTION
4.1 DIAL CALLIn the standby screen, directly to press the number keys, key in the area
code and phone number, tap the dial-up icon or press the call button to
dial. Press the End key to end the call.
» International call: Press the * key twice, enter „+“ sign. Key in the
country code, area code and phone number, press the call button.
» Dial extension telephone: after key in the exchange number, press the
* key three or four times, appear „p“ or „w“, input „p“ or „w“, and
then key in the extension number and press call button.
» To correct typing errors: Press the right soft key to delete the last cha-
racter in the screen. To clear all the input, long press the right soft key,
or directly press the end key.
» Make phonebook call: press the right soft key to access the phonebook
in standby screen, queries to the call records, press the up or down key
to find the call records to call.
» Input number and press call button, the mobile phone will automati-
cally dial the corresponding number.
» Redial the last number: in the standby screen, press the call button to
display the dialed calls list of records. The phone displays the dialed
number, press the up or down key to select the number the call, and
press the call button.
» Speed Dial Phone calls: edit the speed dial number in speed dial list “the
phonebook -> the phonebook settings -> Speed Dial list”, and confirm
its status is set to „ON“.
4.2 ADJUST VOLUMEDuring a call, press the left and right navigation key to adjust the call
volume.
4.3 ANSWER THE INCOMING CALL» Press the call button or left soft key to answer. When the call „shock“,
it says your phone is the on call.
» Press the End key to end the call.
» Directly press End key to refuse an incoming call.
Note: If the phone can identify dialing, it will display calling phone number
(if mobile phone has storage calling phone records, then it display cal-
ling name and number). If the phone can‘t identify dialing, it will display
calling number. You can also answer the call when you use the menu or
phonebook.
4.4 CALL PROCESSDuring a call, you can click the options menu to achieve hands free, reser-
ve, end calls, new call, view the phonebook, send message, call records,
21 22
mute/resume, Dual tone multiple frequency and other functions. Please
see the next chapter „menu function“.
» Reserve: Retain the current call, the current call on hold, both side can
not hear each other‘s voice.
If network support call reserve function, you can start another call while
you during a call in at the same time:
A.
1) Direct input number or press left soft key to find the call number in the
phonebook, or press left soft key to choose new call and key in number,
press the dial key to have the second call.
2) The first call is automatically reserved.
B.
1) Press left soft key to open mute to reserve the current call.
2) Then start to dial another call.
Once connected, one is in a call, another is on hold, you can convert
these two call state, press switch keep to switch between these two
calls.
» End single call: end the current call.
» New Call: create a new call.
» Phonebook: view the phonebook while calling.
» Call records: view the call records while calling.
» Message: view or send message while calling.
» Switch Video Phone: Switch to video call (this feature is limited to
3G card)
» Sound recording: recording while calling.
» Mute: This function can be turned off or turned on the microphone of
the mobile phone and connect the other microphone. „Mute“ function
can let the other side cannot hear you.
» Dual tone multiple frequency: output the digital signal while calling.
Main MenuPlease read the following guidelines carefully, so as to better grasp the
functions.
5.1 PHONEBOOK5.1.1 SEARCHINGQuick Search: You can enter the name or telephone number, and other
related information to quickly find the contacts in the phonebook. Press
the # key to switch the input method. Press the left soft key, select „Sear-
ching“, the phonebook to find out all the records that meet the require-
ments in the phonebook. Press the up or down key to browse the records,
press the dial button to call.
5.1.2 ADD NEW CONTACTAdd a new contact to SIM Card or mobile phone. The specific operation is
as follows: in the phonebook menu, select „Add New Contact“, prompt
to select „to the SIM card“ or „to the phone”.
5.1.3 OPTIONS OF THE CONTACTPress left soft key in contact of phonebook, enter to the options of the
contact, you can view, send messages, call, edit, delete, copy, move, send
the name card, add to blacklist and mark multiple.
» View: view the details of contact.
23 24
» Send SMS: send the SMS to the selected contact.
» Call: call the selected contact.
» Edit: edit the selected contact.
» Delete: delete the selected contact.
» Copy: allow to copy the record to the phone, SIM1 or SIM2.
» Move: move from SIM Card to phone, or move between SIM Cards.
» Send name card: send the phone number via SMS, MMS, email or Bluet-
ooth.
» Add to Blacklist: add the contact to blacklist
» Mark multiple: mark multiple contacts of the phonebook, to send mes-
sage, send a name card, delete mark, mark all, cancel all marks and
other operations.
5.1.4 PHONEBOOK SETTINGS» Storage Position: set the phonebook display the contact storage po-
sition. You can select to save it in SIM1, SIM2, mobile phone and all
the above. If the phone only has SIM1, this option will only display
SIM1.
» Speed Dial: On/Off. When this function is set to open, a total of eight
groups speed dial number can be set (the corresponding number key
2 ~ key 9). In standby state, long press the corresponding number key,
you can dial the corresponding phone number.
» My number: to add my number.
» Other numbers: Can set the fixed dial (open fixed number need PIN2
code password, whether to support the fixed number need to consult
the local operator).
» Storage State: Display the phonebook and SIM card phone book’s
already storage contact and can store contact number.
Copy the contact: you can copy the phonebook from SIM1\SIM2 to the
phone or from phone to SIM1\SIM2.
» Move the contact: you can move the phonebook from SIM1/SIM2 to
the phone, or from phone to SIM1\SIM2.
» Delete all the contacts: you can delete all the contacts in phonebook
and SIM card.
» Display name: to set the name display
Note: boot and search the network, immediately check the phonebook if
it shows „please wait“, the tip is refers to the phonebook is initializing,
please check it later.
5.2 MULTIMEDIA5.2.1 CAMERAUse the camera application, you can shoot and camera for around people
or events any time. Photo will be stored in the „Album“. Camera genera-
ted photos are in JPG format.
Tip: JPG is a standard image compression format, you can use some of
the most commonly used image viewer, image editor to see JPG format
files. The files’ extension names are JPG.
Note: please comply with all local laws and regulations on taking photo-
graphs. Please don‘t illegal use this function.
25 26
When the camera application open, you can see the scene that you want
to shoot on the screen.
» EV: set the compensation parameter
» Switch to: you can switch to image viewer, video recording, use the
front camera.
» Photo mode: selectable as an ordinary, continuous, rapid shot selecti-
on, panoramic photo, framed.
» Scene mode: can be set to automatic or night mode.
» Image Size: You can set as wallpaper, VGA, 100 million pixels, 200
million pixels.
» Self-timer: can be set to Off, 5 seconds, 10 seconds
» White Balance: You can choose automatic, solar light, incandescent
lamp, fluorescent lamp, cloudy and white light.
» Effect Settings: You can select normal, grayscale, sepia, sepia green,
sepia blue and negative film, etc.
SENIOR SETTINGS
» Storage: Allows you to save the images on phone or memory card.
» Image quality: You can choose best, better and common.
» Contrast: can be set to increase to normal, reduced.
» Print date: select close or open the print date
» Shutter sound: you can choose closed, sound 1, sound 2 and sound 3.
» Avoid flicking: Optional 50Hz, 60Hz.
» Restore Default: Allows you to restore to the camera’s default settings.
5.2.2 IMAGE VIEWERPress left soft key to enter the menu:
» View: to view the images.
» Image information: view the details of image.
» Edit: to edit the image.
» Browse mode: to choose to view the images in List style or Matrix style.
» Send: to send the images via MMS, email or Bluetooth.
» Used as: Images can be selected for wallpaper, screen saver, caller pic-
ture.
» Rename: modify the image’s name.
» Delete: delete the image.
» Sort by: Selectable as by name, by type, by time, by size, etc..
» Delete all: delete all the images.
» Storage: select to save the image’s position.
5.2.3FM RADIOBefore use FM radio, please insert the headset first. Enter radio interfa-
ce, you can operate the following functions: turn on/off radio, forward
search, backward search, increase volume, decrease volume, add the cur-
rent channel to my channel, background play and switch channels. You
also can selection the following options in option menu:
» Channel List: This phone has 30 channels for setting, you can switch to
your favorite channel.
» Manual input: Key in the specified channel frequency.
» Auto search: Auto search the radio channel by phone.
27 28
SETTINGS:
» Background Play: You can set to open or close the background play.
» Loud speaker: You can open or close loud speaker play.
Note: press * and # key to adjust volume in FM radio interface.
5.2.4 IMAGE EDITING» Image artist: can choose from the file or take picture from the camera,
editing the picture.
» Image Patchwork: Selectable as two, four, nine for pictures Patchwork.
5.2.5 SOUND RECORDERSound Recorder file the default stored in the root directory „Audio“ of
T - Flash card. Select one sound recorder file, then press left soft key.
You can set the “play, append, rename, delete, delete all, used as and
send” options.
» Play: to play the specified sound record. Press * and # key to adjust the
volume.
» Append: to allow to record in same file.
» Rename: to amend the file’s name.
» Delete: to delete the selected sound record.
» Delete all: to delete all sound records.
» Used as: used the sound record file as call and video call ring.
» Send: send the file via MMS, email or Bluetooth.
5.3 CALL CENTER5.3.1 CALL RECORDS
DIALED CALL
» You can view the last 50 dialed calls. Press Left soft key to perform the
following operations:
» View: view the details of the phone number.
» Call: call the phone number.
» Send message: send SMS or MMS to the phone number.
» Save to phonebook: save the phone number to phonebook.
» Add to the blacklist: add the phone number to the blacklist.
» Edit before calling: edit the phone number before call it.
» Delete: delete the phone number.
» Delete all: delete all the dialed calls.
» Advanced Options: You can view the record of call time, call cost, SMS
counter, GPRS counter.
MISSED CALL
» You can view the last 50 missed calls. You can view, call, send message,
save to phonebook, add to the blacklist, edit before calling, delete,
delete all and advanced options. Such as “Dial Call”.
RECEIVED CALL
» You can view the last 50 received calls. You can view, call, send mes-
sage, save to phonebook, add to the blacklist, edit before calling, dele-
te, delete all and advanced options. Such as “Dial Call”.
29 30
ALL CALLS
» You can view the last dialed, missed and received calls. You can view,
call, send message, save to phonebook, add to the blacklist, edit before
calling, delete, delete all and advanced options. Such as “Dial Call”.
5.3.2 VIDEO CALLSThe phone supports 3G video calls (This feature is only available for 3G
card), bring different fun to your life. You can press „Options“ to access
the following features:
» Video calls: Enter the phone numbers you want to make video call, press
the left soft key „call“ to start to call the contact.
» Close the camera: close the camera window.
» Use the back camera: use the back camera.
» Night mode: you can turn the camera on night mode
» Switching images: You can switch the video image of the screen
» Hide small images: the small video screen hidden.
» Image Quality: You can set up as a smooth, normal or sharp
» Video call settings: You can set the answer mode, dialing mode, the
video of the video phone, and sound options.
5.3.3 CALL SETTING5.3.3.1 SIM1 CARD CALL RECORDS
THE PHONE NUMBER:
Choose the system default, Hide number, send the number (phone de-
faults to the system default, such as choosing other possible cause you
cannot make calls, you need network operators to provide this service)
CALL WAITING
» Start: Start the „call waiting“ function, you in the communication if
anyone call you, the other party can still come in. The network will provide
you with alarm, and display another call on the screen.
» Close: if you cancelled call waiting function, you have set up one call, if
another one call you, that the other party will not be able to call in.
» Inquiry: used to query the current state to the network.
CALL TRANSFER
This function allows the incoming call is transferred to another phone you
specify. Into the call settings, select call transfer, press the „OK“ soft key
to enter this function.
» Transfer all the voice call: this function used to unconditional transfer all
the voice call.
» Transfer when cannot connect: transfer the incoming call when turn off
the phone or not in service area.
» Transfer when no answer: transfer the incoming call when you no ans-
wer.
» Transfer in the busy: when the phone is in communication transfer the
incoming call.
» Transfer all the video calls: Unconditional transfer all the video calls.
» Transfer when cannot connect: transfer the incoming video call when
turn off the phone or not in service area.
» Transfer when no answer: transfer the incoming video call when you no
answer.
» Transfer in the busy: when the phone is in communication transfer the
incoming video call.
31 32
» Transfer all data calls: need to network operators support to transfer all
the data call.
» Cancel the transfer: this function is used to cancel the transfer function.
CALL BARRING
This function allows you to restrict your calls. Set this function, you first
need to network operator to provide network banning password. If the
password is incorrect, an error message will be prompted. After you selec-
ted the option, continue to select on or off , the phone will require to key
in the barring password. Then the phone will connect to network. Later,
the network will respond and inform the operating result.
» Ban to Dial
» All voice calls: this banning is on, you cannot dial all calls.
» International voice calls: this banning is on, you only cannot dial the
international calls.
» International voice calls except domestic calls: this banning is on, in
the foreign country, you could only call local phone or homewards (i.e.
ownership network provider host country) phone.
» All video calls: this banning is turn on, you cannot receive all the inco-
ming video calls.
» International video calls: this banning is on, you only cannot dial the
international video calls.
» International video calls except domestic calls: this banning is on, in
the foreign country, you could only call local phone or homewards (i.e.
ownership network provider host country) phone.
» Ban the incoming call
» All voice calls: this banning is turn on, you cannot receive all the inco-
ming calls.
» Roaming voice call: this banning is on, when using the phone outside of
the own ship service area, you cannot receive the calls.
» All video calls: this banning is turn on, you cannot receive all the inco-
ming calls.
» Roaming video call: this banning is on, when using the phone outside
of the own ship service area, you cannot receive the calls.
» Start: key in the banning password to start.
» Close: cancel this banning function.
» Inquiry: used to query the current state of the barring to the network.
CANCEL ALL:
Cancel the restrictions to call, cancel the restrictions also need to network
operators to provide the restriction network password.
CHANGE PASSWORD
This function is used to modify the banning password. You should key in
the original banning password before modifying.
Note: Some settings need network support. Call barring setting effective
by local network and SIM card to open this function.
5.3.3.2 SIM2 CARD CALL RECORDSSIM2 card call settings are referring to SIM1 card call settings.
5.3.3.3 SENIOR SETTINGS» Blacklist: You can turn on or off the blacklist and set the blacklist num-
33 34
bers
» Auto Redial: Turn on or off auto redial, start or close the auto redial
call. Select to start, in the dialing process, if the other party does not
respond, the phone will automatically redial over a period of time. Au-
tomatic redial cannot exceed 10 ten times. In the meantime, users can
not dial any other call. To end automatic redial, press the End key.
» Conversation time display: conversation time will be displayed when it
open.
» Conversation time prompt: This function can make a prompt to the
user. The alternative prompt types are for close, one sound or cycle.
» Automatically limit: Open and set, a call when it reaches the set time
will automatically hang up.
» Reject and send the message: When turned on call reject, it will auto-
matically send a SMS to the reject calls
» Notice of the connection call: Open call connection prompt, the phone
is connecting at the moment there will be heard vibrating alert tone.
» Answer mode: you can set any key to answer or automatic answer via
headset mode.
5.4 SETTINGS5.4.1 USER PROFILES5.4.1.1 STANDARD MODE» Start: start Standard Mode.
» Personal Settings: you can set ring type, alert type, incoming call ring,
ring volume, message ring, message ring volume, key sound, boot ring,
shutdown ring and system prompt on/off.
» Alert type: you can choose ring, vibration, vibration and ring, vibration
then ring.
» Ring type: ringing and ring once.
» Incoming call ring: system provides 20 types ringtone for your selection,
and one custom ringtones.
» Incoming video call ring: system provides 20 types ringtone for your
selection, and one custom ringtones.
» Ring Volume: sent the ring volume, it has 1-7 levels.
» Message: system provides 10 types ringtone.
» Message ringtone volume: set the message ringtone volume, it has 1-7
levels.
» Key Sound: you can choose tap and tone as key sound.
» Key sound volume: set the key sound volume, it has 1-7 levels.
» Boot ring: system provides 10 types ringtone and mute.
» Shutdown ring: system provides 10 types ringtone and mute.
» System prompt: turn on or off system prompt.
» Reset: after choose reset, the scene mode will restore the initial value.
5.4.1.2 MUTE MODE:All mute after boot.
5.4.1.3 Meeting mode
Please refer to “Standard Mode”.
5.4.1.4 OUTDOOR MODEPlease refer to “Standard Mode”.
35 36
5.4.1.5 MY MODEPlease refer to “Standard Mode”.
Note: Suggest that you can set your phone as meeting or mute mode in
quiet public places. Long press “#” key to switch the mode to standard
mode and mute mode in standby state.
5.4.2 PHONE SETTINGS5.4.2.1 TIME AND DATE» Set local city: you can set 77 cities of all over the world.
» Time and date: Let you set time, date and daylight saving time. Press the
arrow keys to move the cursor to the complete the operation.
» Format Setting: you can set the time in 12-hour or 24-hour format.
Chronological arrangement and date separator choice.
5.4.2.2 SCHEDULE POWER ON/OFF» Schedule Power on/off
» There are four groups timing function. You can set the time of automati-
cally power on and off. Before using the schedule power on/off function,
you must first set its status to open. Then set the option of power on/off,
last, set the time.
5.4.2.3 LANGUAGEDisplay the language menu for your selection. You can choose English or
simplified Chinese. Selected language, menu and prompt information will
change accordingly.
5.4.2.4 PREFERRED INPUT METHODPreferred input method: choose your commonly used input method as the
default input method.
5.4.2.5 QUICK FUNCTIONYou can add, edit, delete, delete all, close and change order, etc.
5.4.2.6 DEDICATED KEYDedicated key: Set „left, right“ navigation key shortcut functions.
5.4.2.7 AUTOMATICALLY UPDATE THE TIMEThe mobile phone can automatically update the time, Note: This feature
requires operator support
5.4.2.8 MODE SETTING» Boot by user options: users select mode according to the actual situati
on at the boot time.
» Boot by SIM Inserting state: users select mode according to the SIM
inserting actual situation at the boot time.
5.4.2.9 FLIGHT MODE» Normal mode: if your phone is in flight mode, this option will switch to
normal mode.
» Flight Mode: When set to this mode, the phone is no signal, you cannot
dial and receive and send message.
37 38
5.4.2.10 BACKLIGHT SETTINGLCD Backlight: set LCD backlight brightness and backlight time.
5.4.2.11 RESTORE FACTORY SETTINGSThis feature would reset parts of functions as those configured at the fac-
tory. The factory default password is 0000.
5.4.3 DISPLAY» Wallpaper: The system provides 10 default images and a theme picture
for users to choose, the user can download other pictures.
» Screen Saver: The system provides 10 default images for users to choo-
se, users can download other pictures. This function need first open
state, until the waiting time it arises to set the picture.
» Power on dispaly:The system provides 11 default images for users to
choose, the user can download other pictures.
» Power of dispaly: The system provides 10 default images for users to
choose, the user can download other pictures.
5.4.4 MODE SETTINGThe user can refer to the SIM card usage to set the corresponding operati-
on, this function in the double card insertion condition can choose:
» Open two modes: open two SIM cards at the meantime.
» SIM1 card only: open SIM1 card only.
» SIM2 card only: open SIM2 card only.
Note: if the user only insert SIM1 card, the bar just show only SIM1 card
open.
5.4.5 NETWORK SETTINGSTo obtain the following network services, please contact your network
operator.
» Available set on the SIM card network settings, priority mode, GPRS
transmission priority mode settings.
5.4.6 SECURITY SETTINGSThis function provides the safe use of mobile phones and related some
Settings.
SIM CARD SECURITY SETTINGS
PIN Lock: Ask to input the PIN code. You need to input PIN code when the
phone is startup each time, otherwise, you cannot use SIM card. If wrong
PIN code is entered for three times, you will have to enter PUK code to
unlock it. PUK code is used to unlock and revise the locked PIN code. If
the PUK code have been provided or missed, please contact with your
network operator.
Change password: this function can be used to change PIN code, PIN2
code, phone password.
PHONE SECURITY SETTINGS:
Using this function can be locked or unlocked the phone. Enter a password
to turn on or off the phone lock operation. When the phone is locked and
if you replace SIM card, you will be asked to enter the phone password
when boot. Phone password is for 4 to 8 digit.
» Change password: change phone lock password.
KEYBOARD LOCK
39 40
This function is used to lock the phone keypad operation, avoid to use
the phone in the case of misuse by careless start some functions to the
keyboard. Set automatic keypad lock time: Off, 5 seconds, 30 seconds,
60 seconds, the set time when no keys are pressed will automatically
lock the keypad. Unlock, press any key, you can unlock the prompts on
the screen
Privacy Protection
Privacy Protection: Privacy protection functions, privacy phonebook, mes-
sages, call records, protect your privacy. Key in “0000” to enter to Privacy
Protection, you can set the function.
5.4.7 CONNECTIVITY5.4.7.1 BLUETOOTHYou can activate Bluetooth function in this menu, including start Blue-
tooth, search hands free device, my device, connectivity device, settings,
my Bluetooth. Start Bluetooth, you can transfer the files to the matched
Bluetooth. And it can be paired with a Bluetooth headset to make a call.
» Activate Bluetooth: You can choose “activate” or “close” Bluetooth as
your demand.
» This phone can be searched: select to close this function, other Bluetooth
devices cannot search your Bluetooth.
» My device: Used to search for new device or display already pairing suc-
cessful device list record.
» Search hands free device: search hands free device with Bluetooth func-
tion.
» My Bluetooth name: display this phone’s Bluetooth name, and you can
also modify your phone’s Bluetooth name.
SENIOR OPTIONS:
» Sound path: set sound path to save as your phone or Bluetooth hands
free device.
» Storage: set the storage position for Bluetooth files. You can install the
files in phone or memory card.
» Share permissions: choose freely accessible and only allowed to read.
» My Address: Display this phone’s Bluetooth address.
5.5 MESSAGE5.5.1 SETTING UP MESSAGEEdit the new SMS or MMS. Press Options to achieve the following fun-
ctions.
» Send: send this SMS or MMS
» Add Recipient: Add recipient contacts.
» Punctuation: Choose you want to insert punctuation.
» Input method: Select the input method you want to edit.
» Title Message: edit title message.
» Add Image: add an image you want to send.
» Add sound: add sound file you want to send.
» Add video: add video file you want to send
» Page Options: add MMS new pages, add new pages to the rear or to the
front.
» Switch to MMS: Switch to MMS or SMS
41 42
SENIOR OPTION:
» Insert text templates: Insert text templates.
» Insert Attachment: Insert files of memory card or phone.
» Insert contact number: Insert contact phone number.
» Insert Contact Name: Insert contact name
» Insert bookmark: Insert the bookmarks address of network service.
» Save: Save the SMS or MMS to Drafts.
» Details: Shows the message type, number of pages, number of reci-
pients, total number of pages
5.5.2 INBOXThe Inbox save the SMS and MMS in it. In message list, press left soft key
to operate the following operations:
Note: The screen will show the icon when you receive new message. If the
short message is full already, you will not be able to receive new message,
please delete unnecessary short messages.
» Transfer: transfer the message.
» Delete: delete the message.
» Delete all: delete all the messages in inbox.
» Call the sender: dial to the sender.
» Reply: reply via SMS.
» View: view the message.
» Save to phonebook: save the number to phonebook.
» Sort by: choose the way to the date, sender, subject, unread / read,
message size, message format to be sorted.
» Move to folder: move the SMS to a folder.
» Mark multiple: You can mark multiple messages
» Senior Options: choose to copy to the phone, move to the phone, copy
all, move all.
5.5.3 DRAFT BOXDraft box storage the not yet ready to send message to prepare for modify
again and send. For details, please refer to Inbox.
5.5.4 OUTBOXOutbox storage and management the being sent SMS and failed to send
SMS. For details, please refer to Inbox.
5.5.5 SENT MESSAGESent message is stored messages sent successfully. For details, please refer
to Inbox.
5.5.6 ARCHIVEStore the moved SMS. For details, please refer to Inbox.
5.5.7 DELETE MESSAGEYou can delete the messages of Inbox, Drafts, Outbox, Sent messages,
folders, and delete all.
5.5.8 Message Settings
SMS
» Mode setting: Provides four modes for you to choose
» Status settings: according to your needs, choose whether you want to
open the send report, reply path and save the sent message.
43 44
» Storage State: check the percentage of the SMS which saved in SIM
card and phone. Specific capacity is based on message content, the
phone and the SIM card itself.
» Preferred save position: set the SMS storage mode. You can save the
SMS in phone or SIM card.
MMS
» Data account: Choose your service provider need to connect and view
the network parameters
» General settings
» Edit Settings: You can set the page time, edit mode, image narrow, au-
tomatic signatures and signatures
» Send settings: You can set the using period, send report, read report,
priority, interval time, transmission time, send and save.
» Receive settings: You can set the local network, Roaming network, fil-
ters, read report, send report.
» Preferred save position: set the MMS storage mode. You can save the
MMS in phone or SIM card.
» Storage status: view the usage for MMS in the phone and memory card.
Note: boot and search the network, immediately check the message if it
shows „Message is not able to use“, the tip is refers to the message is
initializing, please check it later.
5.5.9 E-MAILCreate an e-mail account, enter your email address and password, press
Options to enter the following operations:
» View: View Inbox, Outbox, Sent and Drafts. (Necessary to connect in
to view). Select a mailbox, you can press Options to view, edit e-mail,
connect, extract emails, settings, templates, and some other operations.
» Edit E-mail: edit the e-mail recipient, subject, content
» E-mail account: Show the e-mail account, press Options can be edited,
create new account, delete, storage location and some other opera-
tions.
5.5.10 BROADCASTING MESSAGE
» The network service allows you to receive various content of text mes-
sage, such as weather conditions or traffic information.
» Receiving mode: on or off broadcasting message settings.
» Channel settings: set the channel of broadcasting.
» Language: select the language.
» Reading message: read the broadcasting message.
5.5.11 TEMPLATEMessage template default 10 templates, you can use the template to cre-
ate a new message.
5.6 WIRELESS WLANOpen the phone WLAN, there is a wireless network environment, the
phone will automatically search for nearby wireless networks, when the
connection is successful, you can access through the wireless network, to
bring your life and work more convenient and fun.
Search to a wireless network, you can press the „Options“ to connect,
add, edit, delete, change the priority, wireless network status, network
45 46
status, disabled network status, power saving mode, updates and other
operations.
5.7 ORGANIZER5.7.1 ALARM This phone offers five alarm clocks for the user to use, users can set ac-
cording to their own needs. If the alarm clock doesn’t open, the screen
has no alarm clock signs show that, the screen display sign after opening.
» Press left and right key to select open or close.
» Set the alarm clock.
» Select the desired alarm clock ring: once a day, every day, custom choo-
se a day or some days in one week.
» Alarm tone: select as ringtone or FM radio.
» Snooze time: set the default value of „1-10“ minutes.
» Prompt type: set to „vibration and ringing, only ring, only vibrate“.
» Press “OK” to complete the settings.
5.7.2 CALENDAR» On the Calendar interface, press left and right key to switch date.
» Press „Options“ to enter the menu, you can see the day / all (events),
add / delete events, Jump to date, switch to today, to week / month
view, lunar operations opening or closing.
5.7.3 CALCULATORThe calculator applies simple calculate functions such as addition, subtrac-
tion, multiplication and division.
» Press the number keys to input numbers. Navigation key input +, -, ×, /.
» Right key to delete data
» OK key to calculate the result.
5.7.4 TASKThis feature can create a task
» Create new task, press the navigation up and down keys to select the
item you want to set, press the left or right key, or use the numeric
keypad to make changes, press the OK key to save the settings.
» Press “options” in Task list interface, you can view, add, edit, check
work, delete, delete overdue tasks, delete all, Jump to date, see the
unfinished task of sending the agenda, save to a file and other opera-
tions.
5.7.5 CURRENCY CONVERTERThis function supports to exchange rates between national and foreign
currency.
5.7.6 WORLD TIMEThis feature can view the current local time around the world.
5.8 HOTSPOT» WLAN hotspot.
» Switch: turn on and off WLAN hotspot.
» Auto-off: turn on and turn off auto-off feature
» SSID: You can manually edit the SSID.
» Safe Mode: You can set to open mode and WPA2 PSK mode.
» Password: Edit password
47 48
» Data Account: Displays phone data account
» Connection Information: Display the current SIM card, packet data
connections, and the number of connections.
» Help: Network sharing function description and operating instructions.
5.9 FILE MANAGEMENTDocument management features provide phones and T card file manage-
ment functions. Enter the file management, displays the list of current
storage devices, list interface can be formatted on the phone and T card.
After formatted, all data of the storage device will be deleted.
» Press the OK key to enter the selected folder.
» Press the left function key to access the options, for different types of
documents can perform the following operations:
» View(Play): view or play the specified file.
» Image Information: List the specified file name, date, size, image width
and height.
» Edit: to edit the image.
» Send: send the image via MMS, e-mail and Bluetooth.
» Use as: Use this file as wallpaper, screen saver or caller picture, for dif-
ferent types of documents are subject to change.
» New Folder: In the specified folder, create a new folder
» Rename: rename the specified file.
» Delete: delete the specified file.
» Sort: sort the storage file, you can select to sort by name, type, time and
size.
» Copy: copy the specified file to specified position. Press the „back“ can-
cel to this command. If the remaining space is not enough to complete
copy operation, the mobile phone will give prompt information.
» Move: move the specified file to specified position.
» Delete all files: delete all files of the specified file directory.
» Detail information: view the date and size of the file.
5.10 MEDIA PLAYER5.10.1 NOW PLAYINGEnter to playing interface, you can perform the related operations for play-
ing audio or video file. Press * and # key to control volume, press left or
right key to switch last one or next one. Press OK Key to pause or continue.
Press left soft key to enter the playlist, click “options” to complete the
following operations:
» Play: play the specified music.
» Add: Add new songs to the playlist
» Remove: Remove the specified music.
» Send: send the specified music via MMS, email and Bluetooth.
» Usage: You can specify the music as calls and video calls.
» Move up: Move up the specified music.
» Move down: Move down the specified music
» Detail information: Press this option to view the file name, title, artist,
album, length, size, quality, channel, location and other relevant infor-
mation.
Note: You should add music file to my playlist firstly.
5.10.2 MY PLAYLISTInto my playlists, create a new folder, and then the audio and video files
49 50
stored in the phone or T-Flash card can be played after import.
5.10.3 STREAMING URLUse the Browse Media, you can watch online TV, movies, news and a
variety of entertainment. To bring your life more fun.
5.11 ENTERTAINMENTThe phone provides EBook, Java, game, Sokoban for your entertainment.
Please according to the game instructions.
5.12 NETWORK APPLICATIONThe Internet is the platform combination of wireless communications and
Internet application, that allows you to get rich Internet information re-
sources and e-commerce applications through your phone.
Note:
1) Your network service provider may not support certain features, in order
to ensure normal operation of the browser, please confirm whether your
SIM card support and open Internet access.
2) If you browse the web, you need to be charged related traffic charges.
Related costs, please ask the local operator.
6. INPUT METHODThe phone provides intelligent input methods, including intelligent pinyin,
strokes, numbers, uppercase and lowercase input method, you can edit
the phone book, SMS, memos, file management, editing text greetings
and other applications.
7. APPENDIXAppendix1: Carry on the following simple examination before you contact
with after-sales service, perhaps can help you avoid the redundant main-
tenance time and expense to waste.
COMMON PROBLEMS AND SOLUTIONS
Unable to boot
1. Check whether the battery power is exhausted, please charge the
battery.
2. Check whether the battery is bad contact. Please remove it first and
reinstall, then retry boot.
SIM card error
1. SIM card metal surface have dirt, use clean cloth to brush the SIM card
metal contact point.
2. Reinstall the SIM card. SIM card is damaged, please replace SIM card.
Poor signal
Check on the signal strength indicator of the screen, 5 bars indicate a
strong signal. Less than 2 bars indicate a weak signal
Unable to dial out
1. You may set to hide your phone number, but your network operator
does not provide the service.
2. Surrounding environment may have a strong interference signal
3. You may activate call barring function.
4. You may activate the line2, but your network operator does not provide
51 52
the service.
Unable to charge
1. Battery may have over-discharge, it need to connect the charger after a
period of time to charge
2. Battery performance have been worse
Unable to connect the network
1. The signal is weak, or around the radio interference.
2. SIM card is invalid, please contact with your network operator.
EXPLANATION OF TERMS
SMS Short Message Service
EMS Enhanced Message Service
SIM Subscriber Identity Module
GSM Global System for Mobile Communication
PIN Personal Identity Number
PUK PIN Unblocking Key
IMEI International Mobile Equipment Identity