Embed Size (px)
Citation preview
COPYRIGHT NOTICE Tokeshi/Kendo
is published by University of Hawai‘i Press and copyrighted, © 2003, by University of Hawai‘i Press. All rights reserved. No part of this book may be reproduced in any form by any electronic or mechanical means (including photocopying, recording, or information storage and retrieval) without permission in writing from the publisher, except for reading and browsing via the World Wide Web. Users are not permitted to mount this file on any network servers.
Shinai (Bamboo Sword)
Bamboo for ShinaiIn the past skilled artisans in Japan produced the shinai, but due to
the shortage of craftsmen as well as raw material, today Japan depends
on foreign countries to provide substantial quantities of shinai and
other kendo bògu (equipment). Countries such as Taiwan, Korea, and
China supply an estimated 85 percent of shinai and other equipment.
As the quantity of non-Japanese products increases, it becomes more
and more urgent to set general standards for shinai and equipment.
Recently, at the request of the Zen Nihon Kendo Renmei, the
Japanese manufacturer has set a strict standard for such equipment.
Bamboo is native to many Southeast Asian countries.There are
over 600 different species of bamboo. In Japan, varieties include:
madake, mòsò chiku, hachiku, kurochiku, and others.They grow very well
in the south, but have some difficulty in the north. Madake is the
most suitable in making shinai because of its thickness, hardness, mal-
leability, and flexibility.The circumference of the bamboo for a shinaishould be approximately 18 cm. Only about 150 cm of the bamboo
growing above ground should be used for a shinai. The bamboo does
not have annual rings like trees, but with each passing winter it will
harden its grain.This improves the flexibility of bamboo.
CHAPTER
2
11
In Kyoto, bamboo is harvested at three years. In Kyushu, it is har-
vested at five to seven years.The most appropriate month to harvest
bamboo is October or November, because the bamboo absorbs less
water during these months. For a shinai, the ideal thickness of bam-
boo is twice as thick at the trunk as at the tip (kensen).
History of the ShinaiAccording to one theory, Kamiizumi Nobutsuna was the first to make
shinai from bamboo. He repeatedly split the end of a length of bam-
boo, then wrapped it with leather. He called this a fukuro shinai(wrapped bamboo sword). Some people think this type of shinai was
used during the match between Kamiizumi (Kòzumi) Nobutsuna and
Yagyû Muneyoshi. Even today in Yagyû Shinkage ryû, this fukuro shinai is used for practice.
Bògu consisting of men, dò, kote, and tare was improved and widely
used by the Jikishinkage ryû expert Naganuma Shiròzaemon in the
mid-Tokugawa period.
Nakanishi Chûzò was the first person to make the shinai in its
present form, four pieces of bamboo: tsuru, sakigawa, tsukagawa, and
tsuba. The length originally varied, but around 1856, the Kòbusho
(Tokugawa military office) forbade the use of a shinai longer than 3
shaku 8 sun (117 cm).
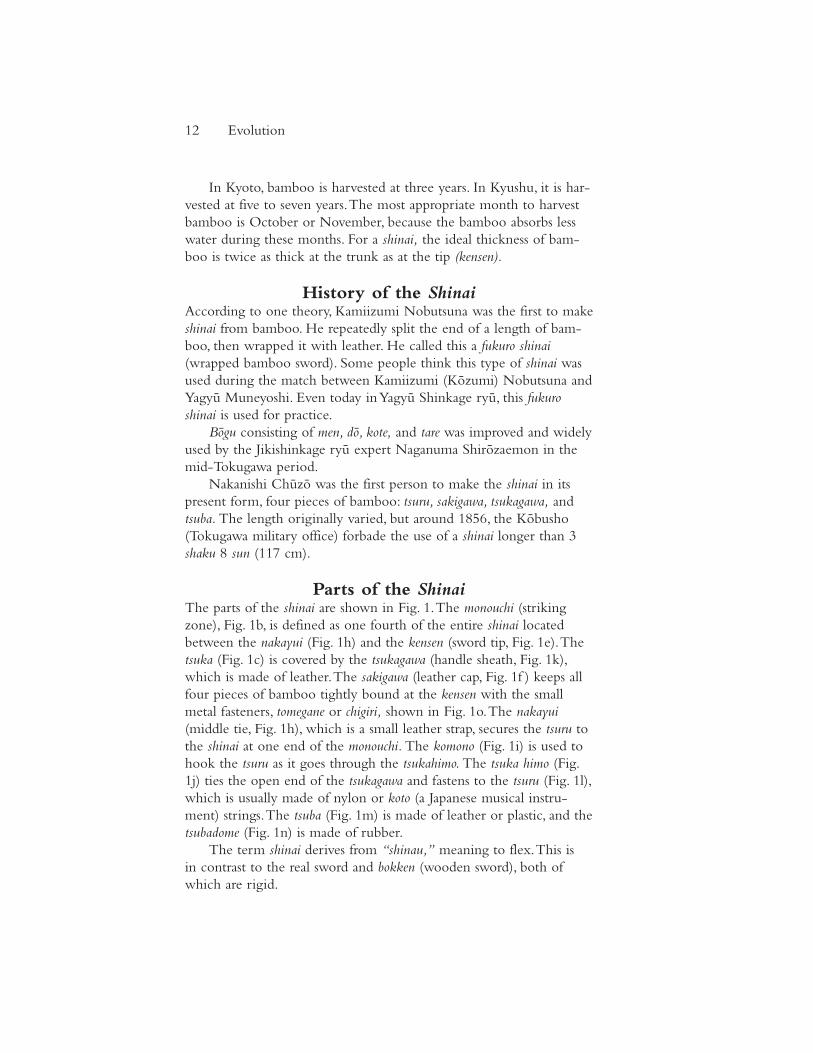
Parts of the ShinaiThe parts of the shinai are shown in Fig. 1.The monouchi (striking
zone), Fig. 1b, is defined as one fourth of the entire shinai located
between the nakayui (Fig. 1h) and the kensen (sword tip, Fig. 1e).The
tsuka (Fig. 1c) is covered by the tsukagawa (handle sheath, Fig. 1k),
which is made of leather.The sakigawa (leather cap, Fig. 1f ) keeps all
four pieces of bamboo tightly bound at the kensen with the small
metal fasteners, tomegane or chigiri, shown in Fig. 1o.The nakayui(middle tie, Fig. 1h), which is a small leather strap, secures the tsuru to
the shinai at one end of the monouchi. The komono (Fig. 1i) is used to
hook the tsuru as it goes through the tsukahimo. The tsuka himo (Fig.
1j) ties the open end of the tsukagawa and fastens to the tsuru (Fig. 1l),
which is usually made of nylon or koto (a Japanese musical instru-
ment) strings.The tsuba (Fig. 1m) is made of leather or plastic, and the
tsubadome (Fig. 1n) is made of rubber.
The term shinai derives from “shinau,” meaning to flex.This is
in contrast to the real sword and bokken (wooden sword), both of
which are rigid.
12 Evolution
Manufacture of the ShinaiThe art of shinai-making requires splitting the bamboo along the
grain, correcting the curvature, and shaving the bamboo into an
appropriate thickness. It takes about ten years to master these skills.
The most proficient craftsmen can make only thirty to forty shinai a
day.The bamboo harvested in the autumn and winter months are
split roughly and dried in the shade for approximately six months
while being exposed to the dry winter air. Craftsmen avoid drying
bamboo in direct sunlight because sunlight robs the bamboo of resin
and flexibility of grain.
It takes approximately twenty steps to make a shinai. When split-
ting the bamboo, craftsmen prefer to use a machete that cleaves bam-
boo along the natural grain. In contrast, a machine will cut straight
regardless of the natural grain, thus severing the fibers.Where the
bamboo curves, craftsmen straighten it with a tamegi (straightening
Shinai (Bamboo Sword) 13
Fig. 1. Parts of the shinai: (a) jinbu (blade area); (b) monouchi (striking zone);
(c) tsuka (handle); (d) tsukagashira (handle butt); (e) kensen (sword tip); (f ) sakigawa(leather cap); (g) sakigomu (rubber stopper); (h) nakayui (middle strap); (i) komono(leather hook); (j) tsukahimo (leather handle strap); (k) tsukagawa (leather handle
sheath); (l) tsuru (string); (m) tsuba (hand guard); (n) tsubadome (hand guard stopper);
(o) small metal fastener, tomegane or chigiri.
instrument). In the final shaping of individual pieces of bamboo, they
use several different planes.
Purchasing a ShinaiWhen you purchase a shinai, you must pay close attention to the fol-
lowing characteristics.
Thick wood and relatively light weight indicate that the bamboo
was young. Slightly reddish coloration is preferable over light coloration.
Dark stains near the knots are thought to indicate stronger bamboo.
Also, a clear and prominent grain over the cut surface is thought to indi-
cate durability in bamboo. If a fine powder spills from the shinai when it
is swung, it may be worm-infested. Examine it carefully for evidence of
worm infestation, such as the presence of tiny holes.
When buying a completed shinai, make sure that the sakigawa(leather cap) is not too thick, that the tsukagawa (handle sheath) is
firm, and that the tsuru (string) is taut.A nakayui (middle tie) should
be in the correct position and tightly bound.A loose tsuru or loose
nakayui can cause the sakigawa to come off the shinai. The danger is
that when you strike the men (headgear), the sakigawa can come off
and the tips of bamboo can pass between the mengane (men bars) to
pierce your opponent’s eyes.
Make sure that the bamboo piece does not cave in and slide
between adjacent bamboo pieces when you press it with your fingers.
This happens when the individual pieces are not well balanced.You can
check this by looking at the neat and even grooves between the indi-
vidual pieces.A good shinai has greater tensile strength. If you bend the
shinai by pressing the tip on the floor, it should spring strongly.
It is common to have four knots in a shinai. The ichiban bushi (first
knot) is at the largest diameter of the shinai. There are two knots locat-
ed above and one knot located below the ichiban bushi. It is prudent to
buy two or three shinai with the knots in similar locations so that when
one shinai is damaged, you can salvage the undamaged parts to make a
new shinai. When assembling the different pieces of bamboo into a
new shinai you must make a saw mark at the same level on each piece
so that the tomegane or chigiri (small metal fastener) fits into all pieces at
the same level.Another way to alter a shinai to your taste is to shave off
bamboo near the tsukagashira (butt end) to form an oval called a koban(an old Japanese oval-shaped gold coin). It is relatively simple to shave
about 10 cm of tsuka (handle) near the tsukagashira with a plane to
form an oval. Some people like the feel of an oval-shaped tsuka in their
hands because the tsuka of a real sword is shaped like a koban. The four
pieces of bamboo should be of equal thickness.
14 Evolution
It is preferable to buy a shinai made from a single bamboo.
However, shinai are often made from different bamboos, because
south-facing knots are slightly higher than those facing north, due to
the differential growth rates between the north and the south sides of
the bamboo. Inspect your shinai carefully to make sure it is free of any
damage or physical defects.
Size of the ShinaiThe most appropriate length of a shinai for an individual kendo prac-
titioner is from ground to about the height of the chest (see Fig. 2a).
The weight of the shinai should be such that one can freely swing it
without strain. It is easier to swing the shinai when the center of
Shinai (Bamboo Sword) 15
Fig. 2. Proper length of the (a) shinaiand (b) tsuka.
gravity is closer to the tsuka. The diameter of shinai varies and
depends on individual preferences. However, the shinai must fall
within the minimum and maximum standard range of weight and
length set by the Zen Nihon Kendo Renmei.To get the proper
length of a tsuka, grab the shinai at the tsuba with your right hand and
bend your right elbow.The tsuka end should touch the inner portion
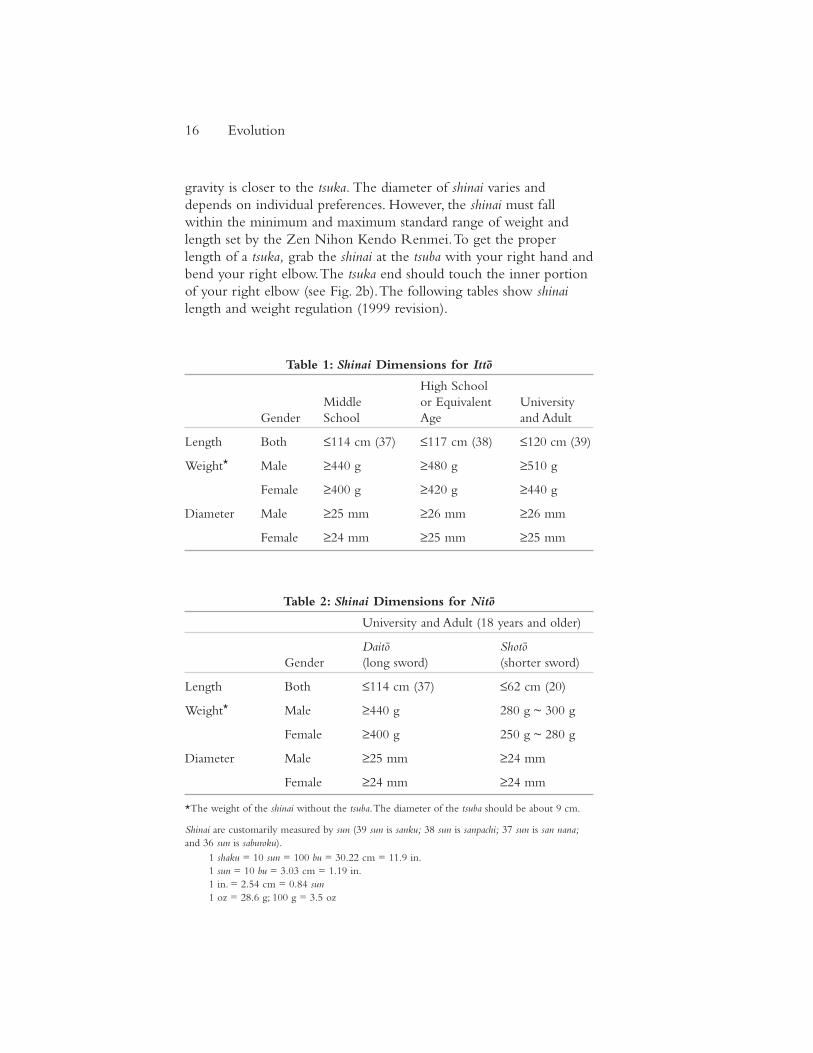
of your right elbow (see Fig. 2b).The following tables show shinailength and weight regulation (1999 revision).
Table 1: Shinai Dimensions for Ittò
High School
Middle or Equivalent University
Gender School Age and Adult
Length Both ≤114 cm (37) ≤117 cm (38) ≤120 cm (39)
Weight* Male ≥440 g ≥480 g ≥510 g
Female ≥400 g ≥420 g ≥440 g
Diameter Male ≥25 mm ≥26 mm ≥26 mm
Female ≥24 mm ≥25 mm ≥25 mm
Table 2: Shinai Dimensions for Nitò
University and Adult (18 years and older)
Daitò Shotò Gender (long sword) (shorter sword)
Length Both ≤114 cm (37) ≤62 cm (20)
Weight* Male ≥440 g 280 g ~ 300 g
Female ≥400 g 250 g ~ 280 g
Diameter Male ≥25 mm ≥24 mm
Female ≥24 mm ≥24 mm
*The weight of the shinai without the tsuba.The diameter of the tsuba should be about 9 cm.
Shinai are customarily measured by sun (39 sun is sanku; 38 sun is sanpachi; 37 sun is san nana;and 36 sun is saburoku).
1 shaku = 10 sun = 100 bu = 30.22 cm = 11.9 in.
1 sun = 10 bu = 3.03 cm = 1.19 in.
1 in. = 2.54 cm = 0.84 sun1 oz = 28.6 g; 100 g = 3.5 oz
16 Evolution
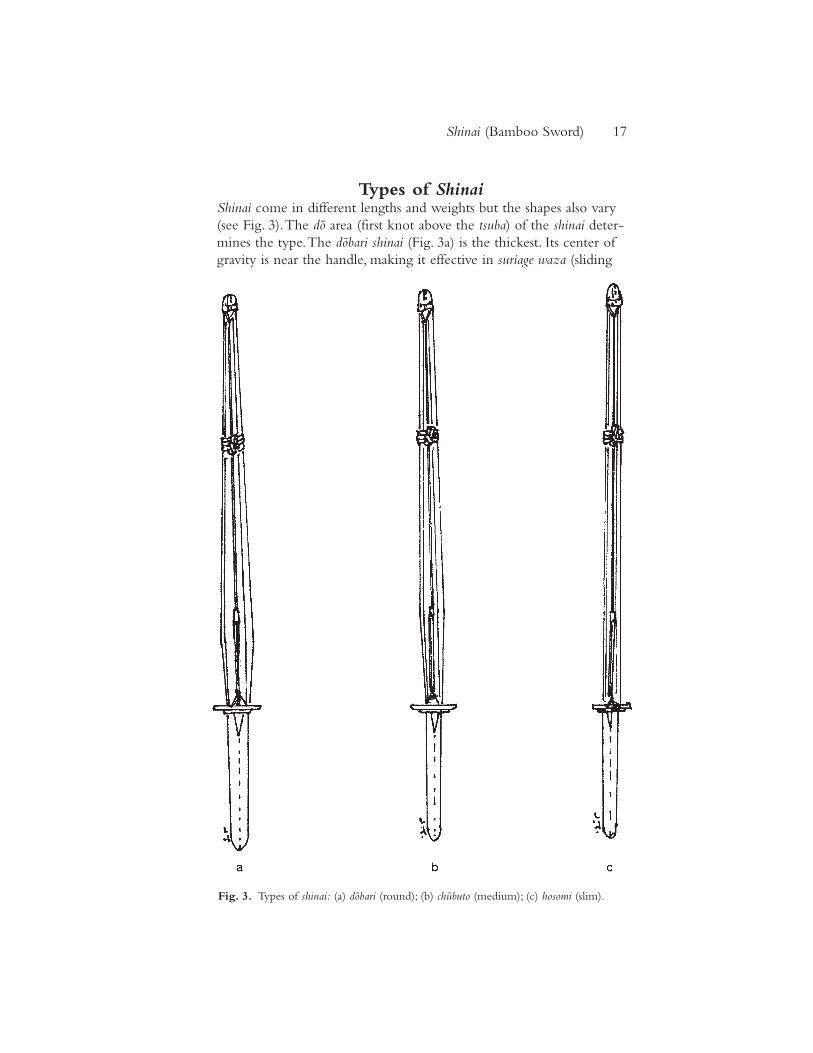
Types of ShinaiShinai come in different lengths and weights but the shapes also vary
(see Fig. 3).The dò area (first knot above the tsuba) of the shinai deter-
mines the type.The dòbari shinai (Fig. 3a) is the thickest. Its center of
gravity is near the handle, making it effective in suriage waza (sliding
Shinai (Bamboo Sword) 17
Fig. 3. Types of shinai: (a) dòbari (round); (b) chûbuto (medium); (c) hosomi (slim).
up technique).The chûbuto shinai (Fig. 3b) is thicker than the hosomiand thinner than the dòbari. The hosomi (Fig. 3c) is the thinnest.
Care of the ShinaiAs is true with any kendo equipment, the shinai should be used with
great care. Shinai represents a Japanese sword that was considered to
be a spirit of the samurai and as such it should be handled with
respect. Never step on or step over a shinai. If you have to go to the
other side of a shinai, remove it first or go around it. Never use a shi-nai as a cane or lean on it.Young kendo practitioners should be
taught not to play around with the shinai before and after practice.
When practice is finished store the shinai in a shinaibukuro (shinai sack)
and keep it in a cool place.
Depending on how often and intensely you practice, your shinaimay last anywhere from a few days to many months.The durability
also depends on the material the shinai is made of.The synthetic car-
bon shinai lasts longest but it does break eventually.A heat- and
smoke-treated shinai is fairly hard and durable.This type of shinai is
treated to retain the natural resin of the bamboo longer and is more
brownish than natural bamboo.The natural bamboo shinai is weakest
of the three but with proper care it can last longer.
Probably the most detrimental element to the life of shinai is dry-
ing of the bamboo.A shinai should be disassembled and oiled thor-
oughly before use. It is ideal to oil after each practice but if this is not
practical, you should take it apart and oil it at least periodically. Use a
soft cloth saturated with light oil to wipe the bamboo. If the shinaisplinters you should immediately take it apart and repair it so it does
not split completely and injure your opponent.You can repair the
splinters by shaving off the splintered area with a knife or plane.Also
it is important to shave off the sharp edges of the length of shinaiwith a knife or plane to keep the bamboo from splintering.You
should use a rubber bottle opener or something of similar, resistant
material to remove the tsukagawa to avoid excessive stretching of the
leather. If the tsukagawa is too loose, moisten it, then dry it in a cool
area, allowing it to tighten over the tsuka as it dries.
How to Tie the ShinaibukuroThe shinaibukuro comes in many different styles.The modern
shinaibukuro comes with zippers and snaps, and the use of it is self-
explanatory. But the traditional shinaibukuro must be tied, as shown
in Fig. 4.
18 Evolution
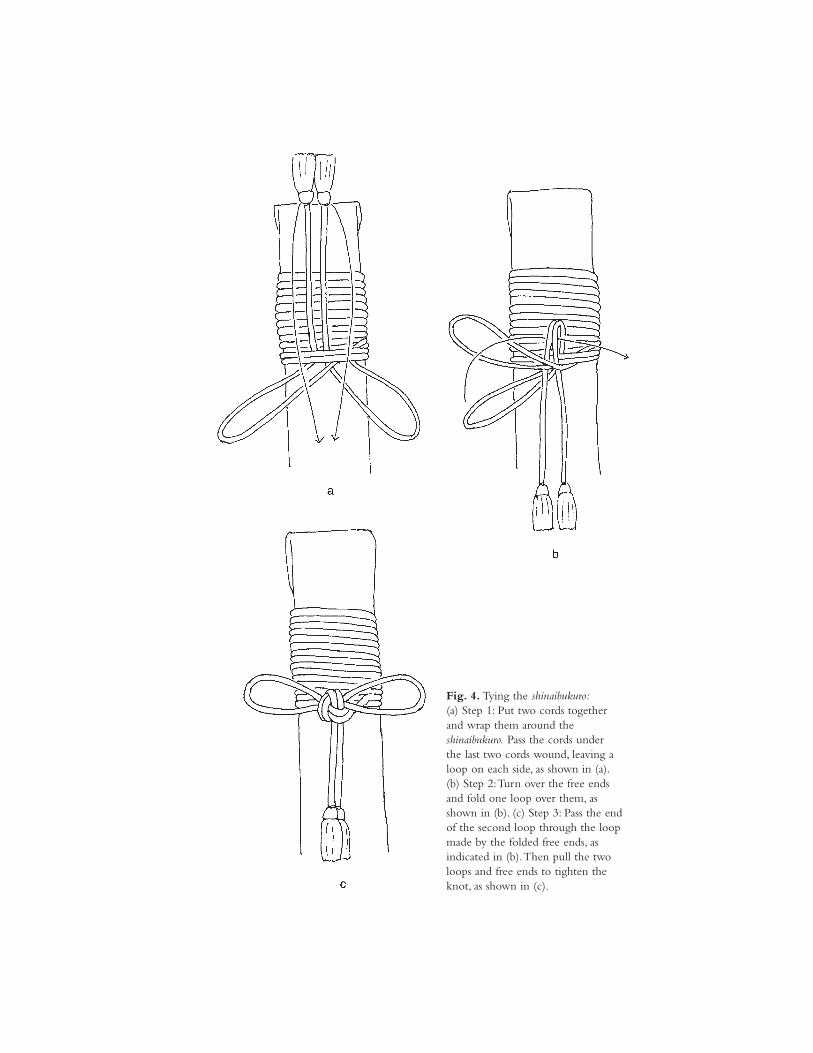
Fig. 4. Tying the shinaibukuro:(a) Step 1: Put two cords together
and wrap them around the
shinaibukuro. Pass the cords under
the last two cords wound, leaving a
loop on each side, as shown in (a).
(b) Step 2:Turn over the free ends
and fold one loop over them, as
shown in (b). (c) Step 3: Pass the end
of the second loop through the loop
made by the folded free ends, as
indicated in (b).Then pull the two
loops and free ends to tighten the
knot, as shown in (c).
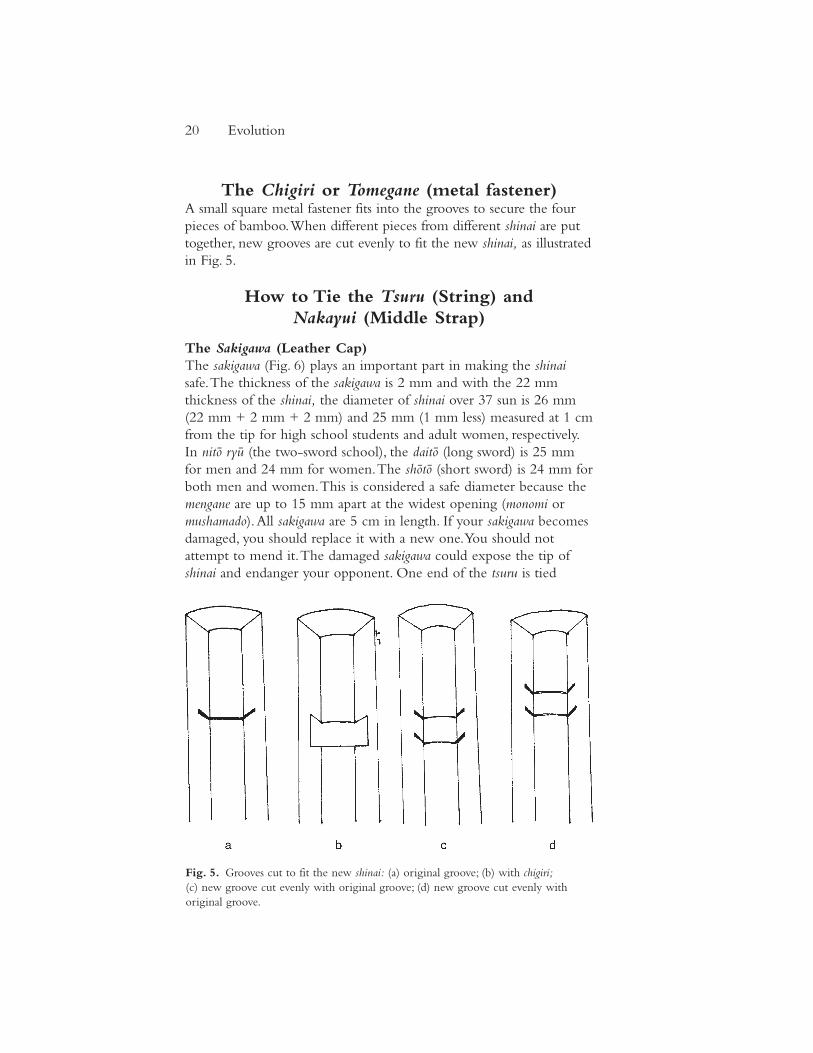
The Chigiri or Tomegane (metal fastener)A small square metal fastener fits into the grooves to secure the four
pieces of bamboo.When different pieces from different shinai are put
together, new grooves are cut evenly to fit the new shinai, as illustrated
in Fig. 5.
How to Tie the Tsuru (String) and
Nakayui (Middle Strap)
The Sakigawa (Leather Cap)
The sakigawa (Fig. 6) plays an important part in making the shinaisafe.The thickness of the sakigawa is 2 mm and with the 22 mm
thickness of the shinai, the diameter of shinai over 37 sun is 26 mm
(22 mm + 2 mm + 2 mm) and 25 mm (1 mm less) measured at 1 cm
from the tip for high school students and adult women, respectively.
In nitò ryû (the two-sword school), the daitò (long sword) is 25 mm
for men and 24 mm for women.The shòtò (short sword) is 24 mm for
both men and women.This is considered a safe diameter because the
mengane are up to 15 mm apart at the widest opening (monomi or
mushamado).All sakigawa are 5 cm in length. If your sakigawa becomes
damaged, you should replace it with a new one.You should not
attempt to mend it.The damaged sakigawa could expose the tip of
shinai and endanger your opponent. One end of the tsuru is tied
20 Evolution
Fig. 5. Grooves cut to fit the new shinai: (a) original groove; (b) with chigiri;(c) new groove cut evenly with original groove; (d) new groove cut evenly with
original groove.
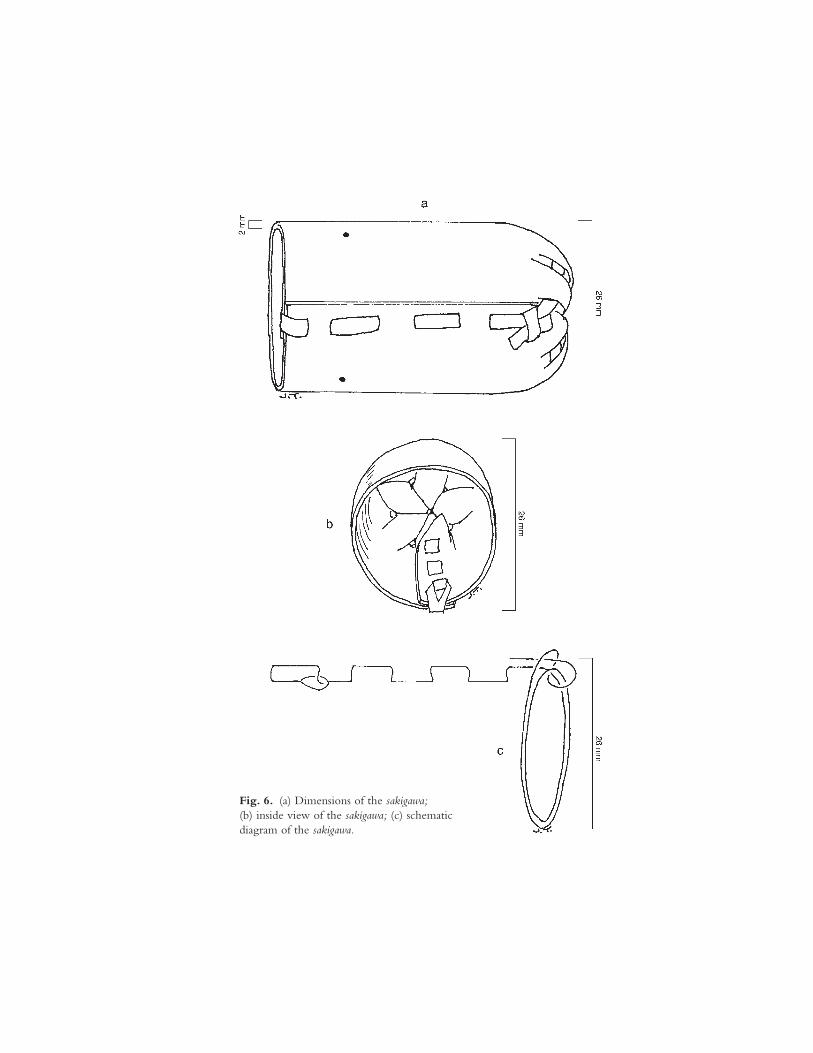
Fig. 6. (a) Dimensions of the sakigawa;(b) inside view of the sakigawa; (c) schematic
diagram of the sakigawa.
22 Evolution
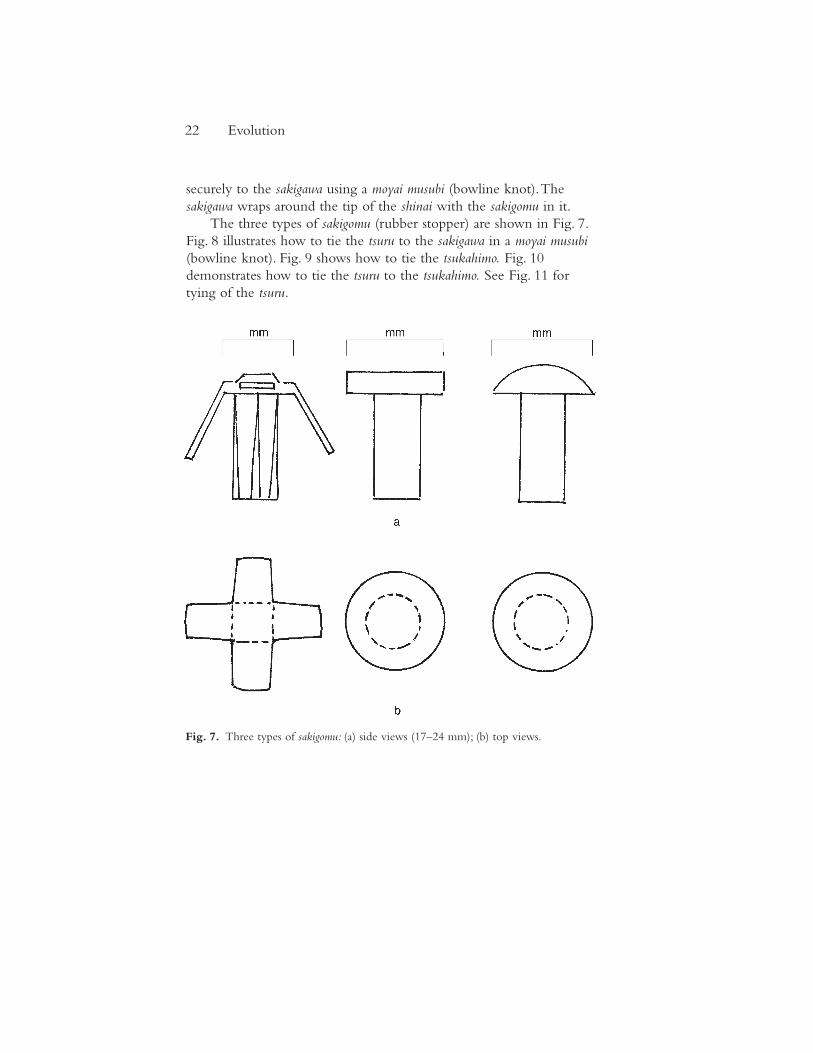
securely to the sakigawa using a moyai musubi (bowline knot).The
sakigawa wraps around the tip of the shinai with the sakigomu in it.
The three types of sakigomu (rubber stopper) are shown in Fig. 7.
Fig. 8 illustrates how to tie the tsuru to the sakigawa in a moyai musubi(bowline knot). Fig. 9 shows how to tie the tsukahimo. Fig. 10
demonstrates how to tie the tsuru to the tsukahimo. See Fig. 11 for
tying of the tsuru.
Fig. 7. Three types of sakigomu: (a) side views (17–24 mm); (b) top views.

Fig. 8. Tying the tsuru to the sakigawa: (a) Insert the tsuru into the tiny hole in the
sakigawa from the inside, bring it halfway around the outside of the sakigawa, and
reinsert it from the outside. (b) Make a loop in string 2. (c) Insert string 1 through
loop 2. (d) Bring string 1 behind and around string 2, and back through the loop.
(e) Tighten the knot by pulling strings 1 and 2.
Fig. 9. Tying the tsukahimo: (a) Thread the tsukahimo through the slit in the cuff of
the tsukagawa and reinsert it into a slit at the opposite side of tsukagawa. Insert one end
of the tsukahimo into a slit in the opposite end of tsukahimo. (b) Pass the free end of
the tsukahimo under and over the joined ends to form a loop. Insert the free end into
this loop. (c) Tighten by pulling the loose end. (d) Schematic diagram of the knot.
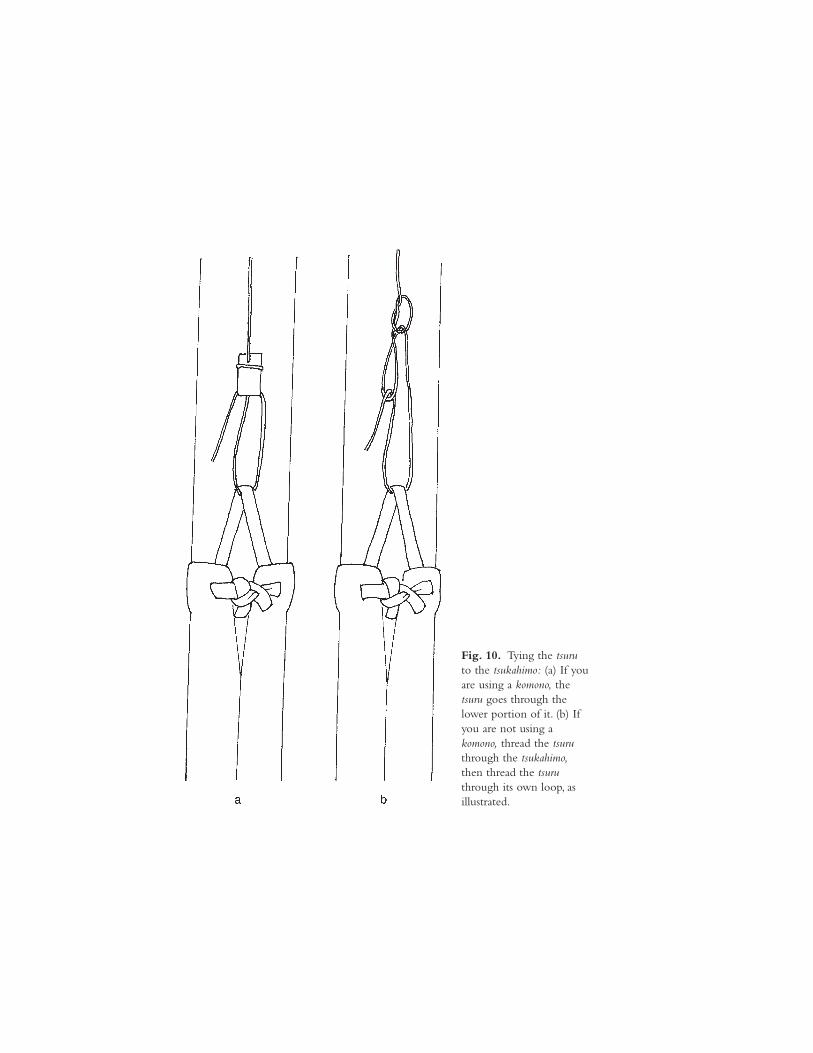
Fig. 10. Tying the tsuruto the tsukahimo: (a) If you
are using a komono, the
tsuru goes through the
lower portion of it. (b) If
you are not using a
komono, thread the tsuruthrough the tsukahimo,then thread the tsuruthrough its own loop, as
illustrated.

Shinai (Bamboo Sword) 25
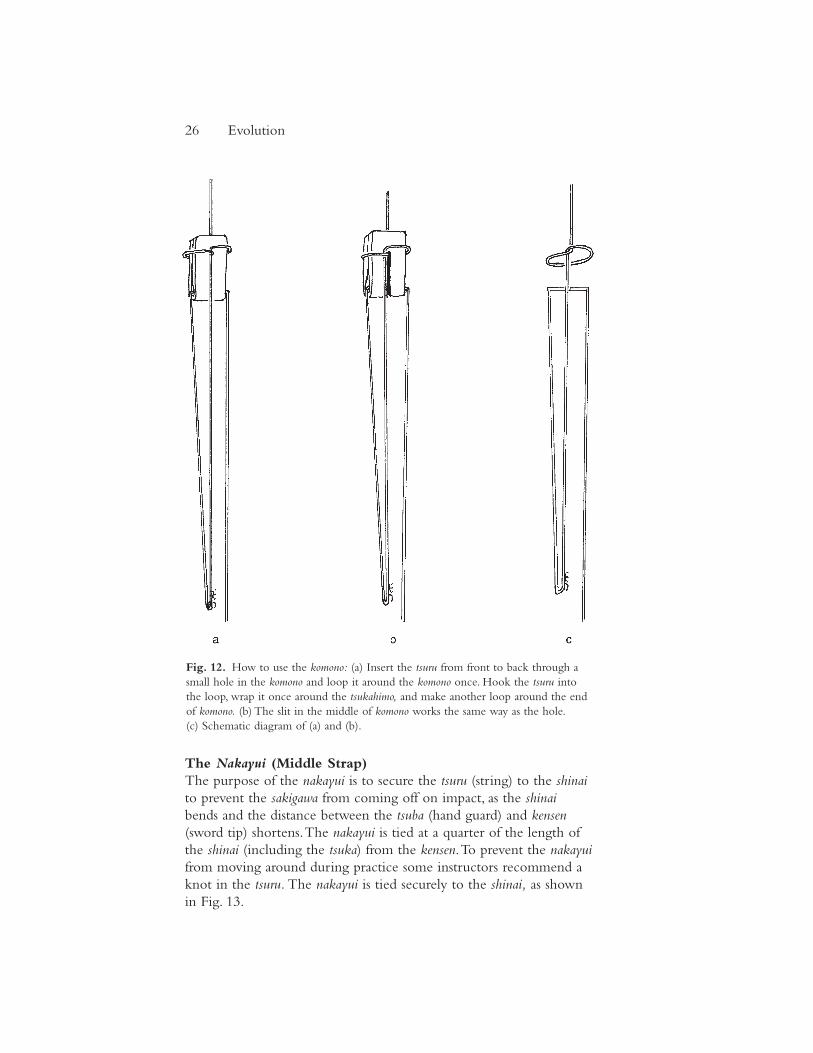
How to Use the Komono (Leather Hook)
Komono literally means “small piece.” It is a small piece of leather that
can be cut off the nakayui (middle strap).You can make a hole or a slit
in the middle as illustrated in Fig. 12.The komono serves as an anchor
to the tsuru, as it loops around the tsukahimo.
Fig. 11. Tying the tsuru: (a) Pass the tsuru under the knot of the tsukahimo, then tie
the tsuru in an overhand knot around the tsukahimo and itself. (b) Wrap the tsurutightly around the tsukahimo several times, then tie it off with another overhand
knot. (c) Schematic diagram of the tied tsuru.
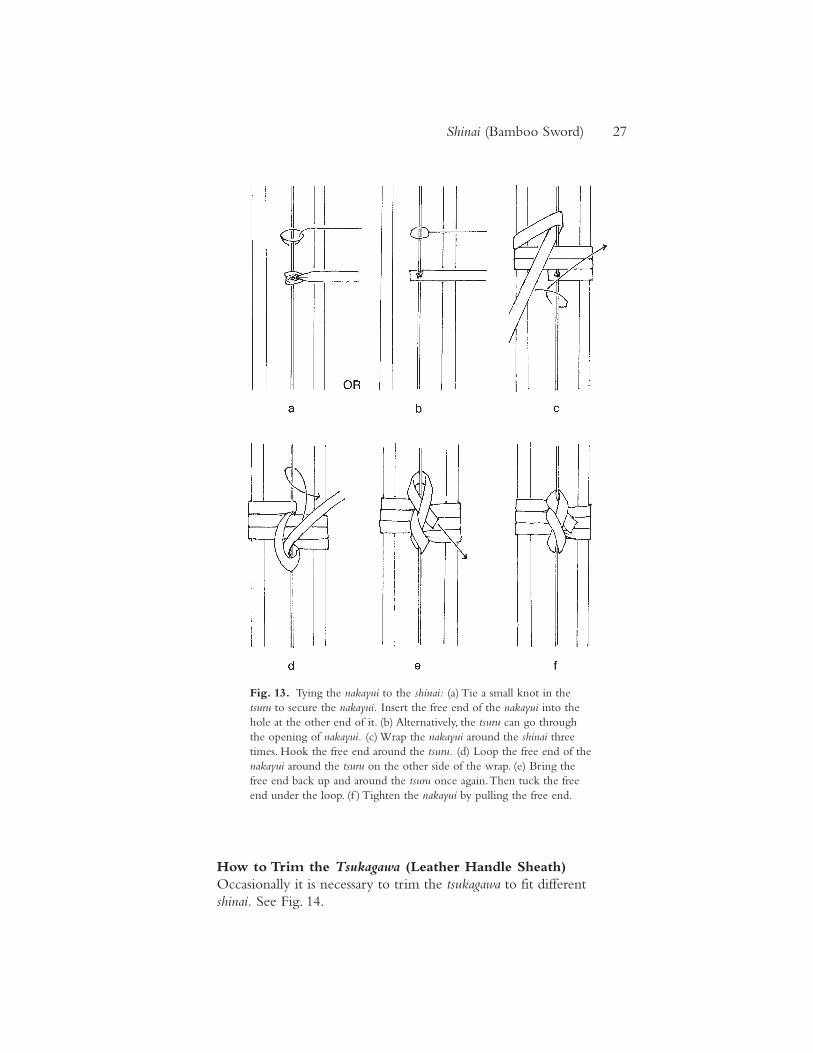
The Nakayui (Middle Strap)
The purpose of the nakayui is to secure the tsuru (string) to the shinaito prevent the sakigawa from coming off on impact, as the shinaibends and the distance between the tsuba (hand guard) and kensen(sword tip) shortens.The nakayui is tied at a quarter of the length of
the shinai (including the tsuka) from the kensen.To prevent the nakayuifrom moving around during practice some instructors recommend a
knot in the tsuru. The nakayui is tied securely to the shinai, as shown
in Fig. 13.
26 Evolution
Fig. 12. How to use the komono: (a) Insert the tsuru from front to back through a
small hole in the komono and loop it around the komono once. Hook the tsuru into
the loop, wrap it once around the tsukahimo, and make another loop around the end
of komono. (b) The slit in the middle of komono works the same way as the hole.
(c) Schematic diagram of (a) and (b).
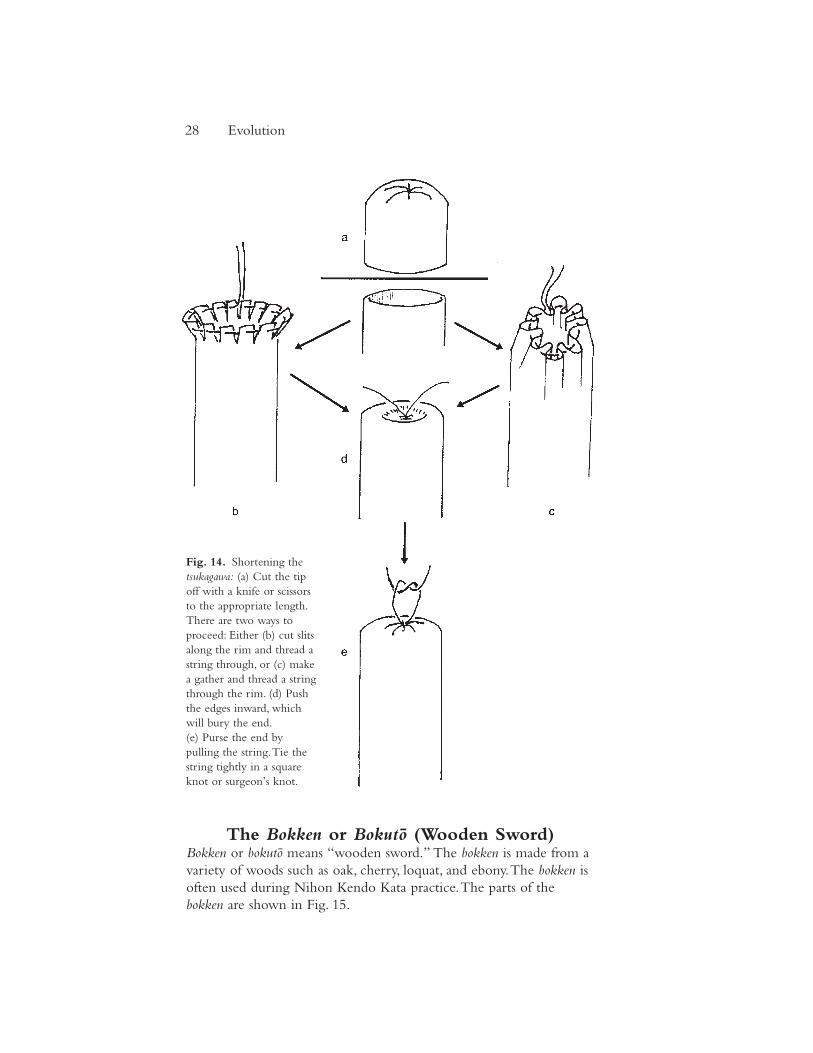
How to Trim the Tsukagawa (Leather Handle Sheath)
Occasionally it is necessary to trim the tsukagawa to fit different
shinai. See Fig. 14.
Shinai (Bamboo Sword) 27
Fig. 13. Tying the nakayui to the shinai: (a) Tie a small knot in the
tsuru to secure the nakayui. Insert the free end of the nakayui into the
hole at the other end of it. (b) Alternatively, the tsuru can go through
the opening of nakayui. (c) Wrap the nakayui around the shinai three
times. Hook the free end around the tsuru. (d) Loop the free end of the
nakayui around the tsuru on the other side of the wrap. (e) Bring the
free end back up and around the tsuru once again.Then tuck the free
end under the loop. (f ) Tighten the nakayui by pulling the free end.
The Bokken or Bokuto (Wooden Sword)Bokken or bokutò means “wooden sword.” The bokken is made from a
variety of woods such as oak, cherry, loquat, and ebony.The bokken is
often used during Nihon Kendo Kata practice.The parts of the
bokken are shown in Fig. 15.
28 Evolution
Fig. 14. Shortening the
tsukagawa: (a) Cut the tip
off with a knife or scissors
to the appropriate length.
There are two ways to
proceed: Either (b) cut slits
along the rim and thread a
string through, or (c) make
a gather and thread a string
through the rim. (d) Push
the edges inward, which
will bury the end.
(e) Purse the end by
pulling the string.Tie the
string tightly in a square
knot or surgeon’s knot.
Shinai (Bamboo Sword) 29
Fig. 15. Parts of the bokken: (a) kissaki (cutting tip); (b) monouchi (striking zone);
(c) jinbu (blade area); (d) tsubadòme (hand guard stopper); (e) tsuba (hand guard);
(f ) mine or mune (back of sword); (g) tsuka (handle); (h) tsukagashira (handle butt).
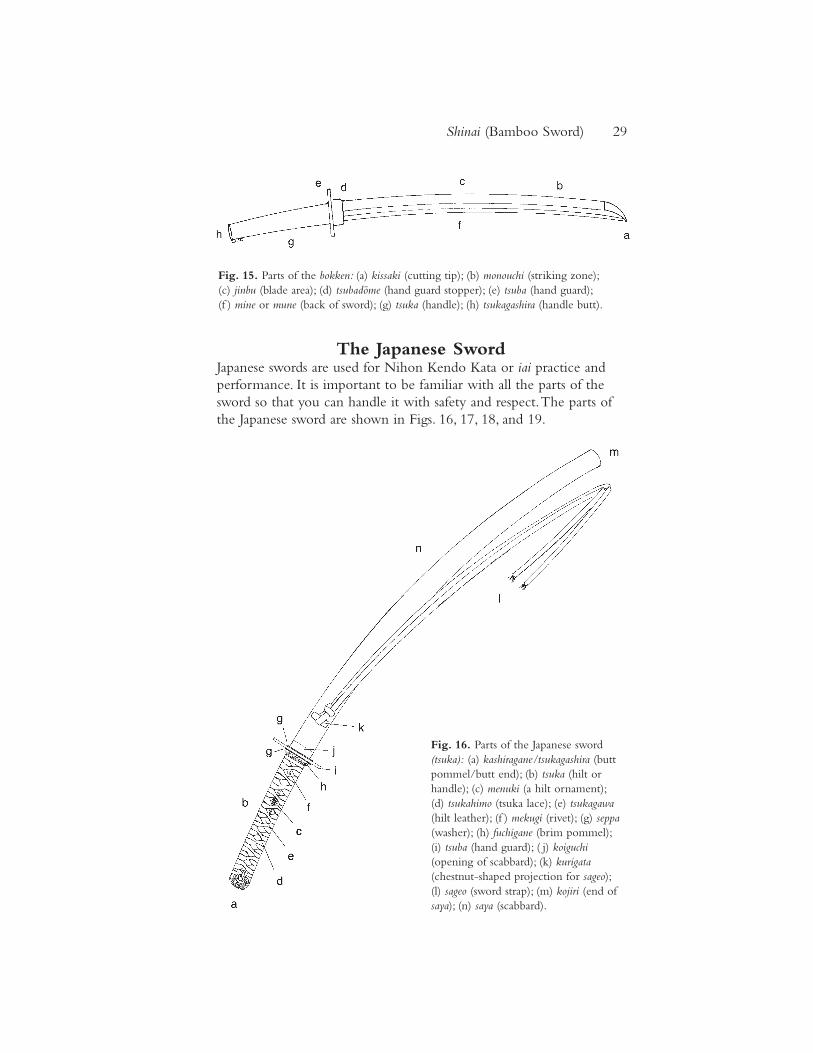
The Japanese SwordJapanese swords are used for Nihon Kendo Kata or iai practice and
performance. It is important to be familiar with all the parts of the
sword so that you can handle it with safety and respect.The parts of
the Japanese sword are shown in Figs. 16, 17, 18, and 19.
Fig. 16. Parts of the Japanese sword
(tsuka): (a) kashiragane/tsukagashira (butt
pommel/butt end); (b) tsuka (hilt or
handle); (c) menuki (a hilt ornament);
(d) tsukahimo (tsuka lace); (e) tsukagawa(hilt leather); (f ) mekugi (rivet); (g) seppa(washer); (h) fuchigane (brim pommel);
(i) tsuba (hand guard); ( j) koiguchi(opening of scabbard); (k) kurigata(chestnut-shaped projection for sageo);(l) sageo (sword strap); (m) kojiri (end of
saya); (n) saya (scabbard).
How to Hold the ShinaiIt is important to hold the shinai correctly.The left hand grasps the
tsuka with the base of the little finger wrapping the tsukagashira (Fig.
20a).The ring and middle fingers snugly grasp the tsuka, but the
index finger and thumb grasp it loosely.The right hand is about one
fist width above and has a grip like the left (Fig. 20b). Grasp the tsukatightly with the little and ring fingers, but less tightly with the middle
finger.The index finger and thumb should hold the tsuka very lightly.
Both thumbs point toward the floor, and the web of each thumb and
index finger form a V over the midline of the tsuka (Fig. 20c).
30 Evolution
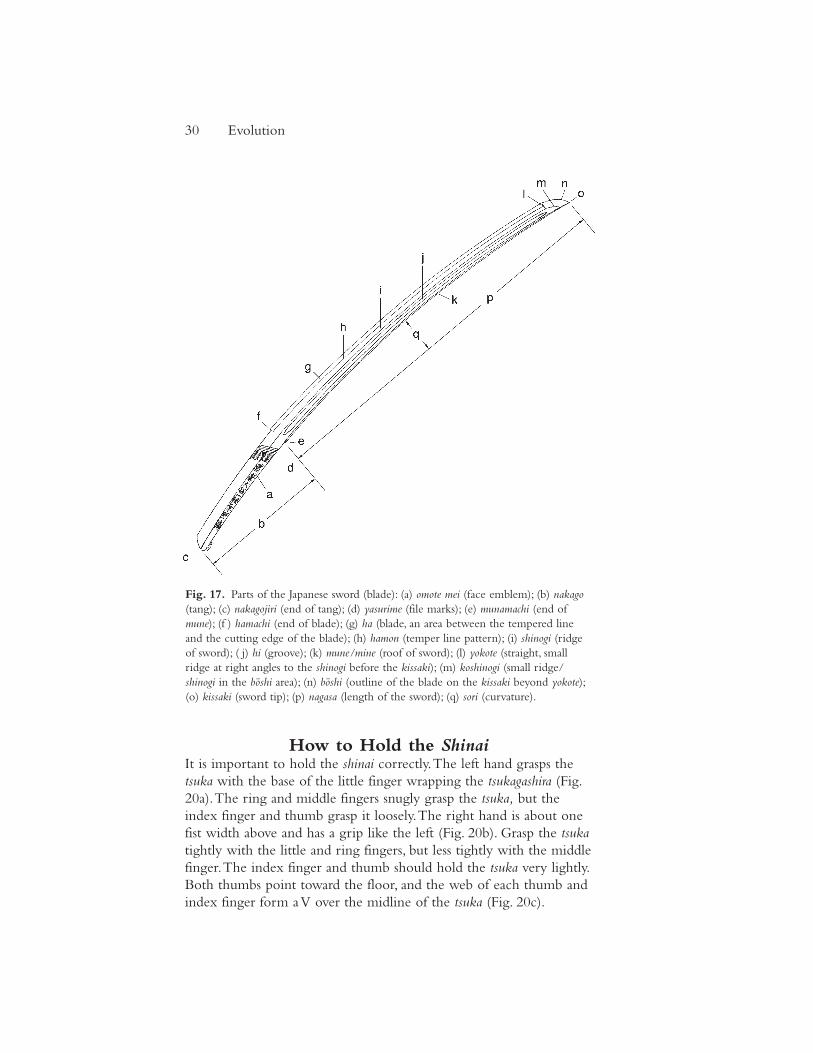
Fig. 17. Parts of the Japanese sword (blade): (a) omote mei (face emblem); (b) nakago(tang); (c) nakagojiri (end of tang); (d) yasurime (file marks); (e) munamachi (end of
mune); (f ) hamachi (end of blade); (g) ha (blade, an area between the tempered line
and the cutting edge of the blade); (h) hamon (temper line pattern); (i) shinogi (ridge
of sword); ( j) hi (groove); (k) mune/mine (roof of sword); (l) yokote (straight, small
ridge at right angles to the shinogi before the kissaki); (m) koshinogi (small ridge/
shinogi in the bòshi area); (n) bòshi (outline of the blade on the kissaki beyond yokote);(o) kissaki (sword tip); (p) nagasa (length of the sword); (q) sori (curvature).
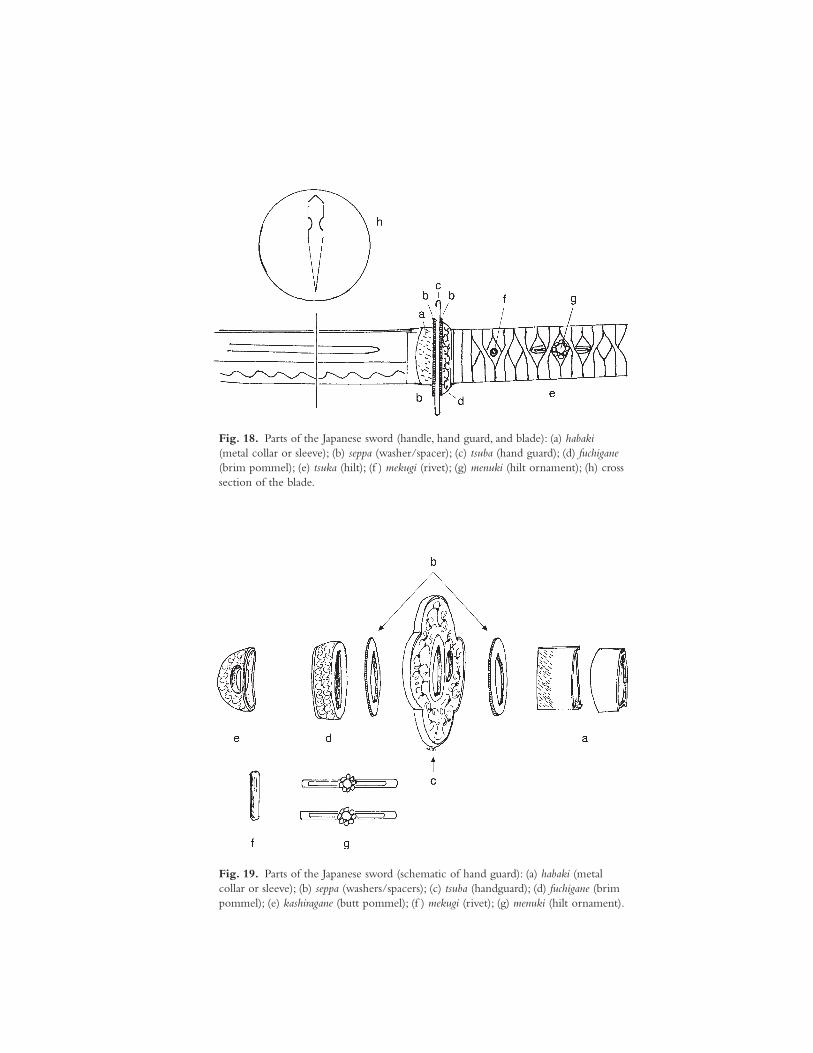
Fig. 18. Parts of the Japanese sword (handle, hand guard, and blade): (a) habaki(metal collar or sleeve); (b) seppa (washer/spacer); (c) tsuba (hand guard); (d) fuchigane(brim pommel); (e) tsuka (hilt); (f ) mekugi (rivet); (g) menuki (hilt ornament); (h) cross
section of the blade.
Fig. 19. Parts of the Japanese sword (schematic of hand guard): (a) habaki (metal
collar or sleeve); (b) seppa (washers/spacers); (c) tsuba (handguard); (d) fuchigane (brim
pommel); (e) kashiragane (butt pommel); (f ) mekugi (rivet); (g) menuki (hilt ornament).
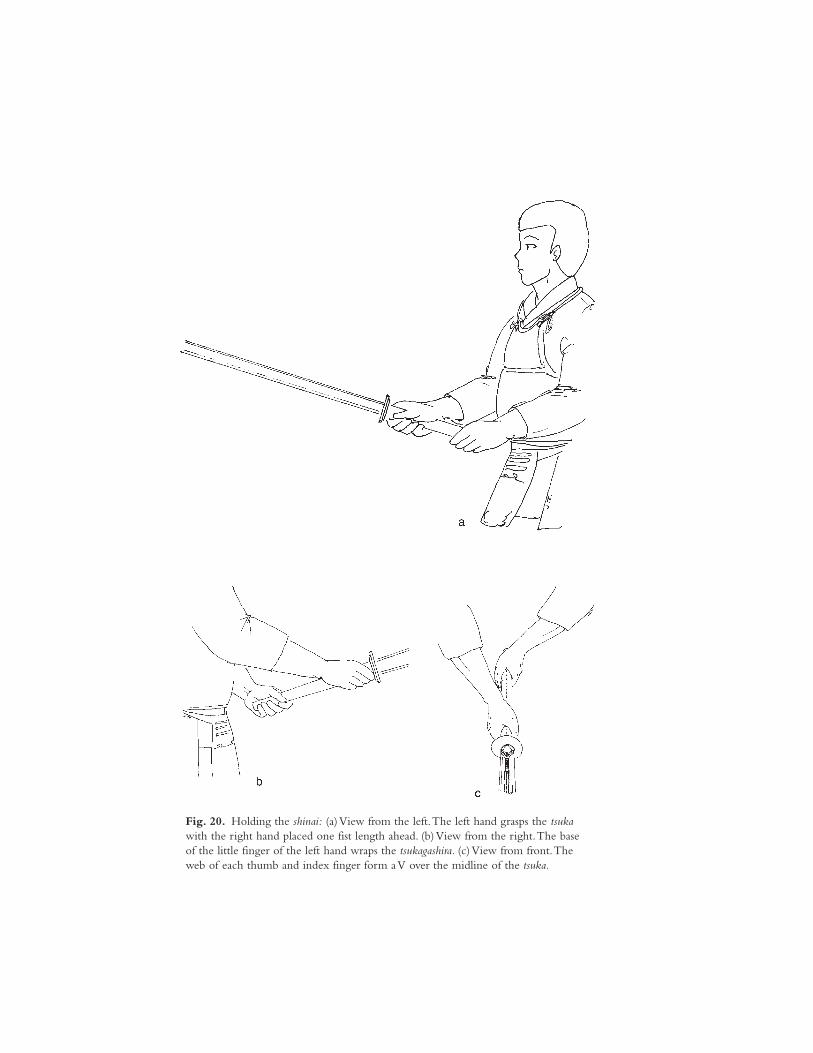
Fig. 20. Holding the shinai: (a) View from the left.The left hand grasps the tsukawith the right hand placed one fist length ahead. (b) View from the right.The base
of the little finger of the left hand wraps the tsukagashira. (c) View from front.The
web of each thumb and index finger form a V over the midline of the tsuka.