Embed Size (px)
Citation preview


Copyright 2017, Eventide Inc.P/N: 141259, Rev 6Eventide is a registered trademark of Eventide Inc.AAX and Pro Tools are trademarks of Avid Technology. Names and logos are used with permission.Audio Units is a trademark of Apple, Inc.VST is a trademark of Steinberg Media Technologies GmbH.All other trademarks contained herein are the property of their respective owners.
Eventide Inc.One Alsan WayLittle Ferry, NJ 07643201-641-1200www.eventide.com
I

Contents
1 Introduction 11.1 About This Product . . . . . . . . . . . . . . . . . . . . . . . . . . . . . . . . . . . . . . . 2
2 Registration, Activation, and Installation 32.1 Registering Your Plug-in . . . . . . . . . . . . . . . . . . . . . . . . . . . . . . . . . . . . . 32.2 Activating Your License . . . . . . . . . . . . . . . . . . . . . . . . . . . . . . . . . . . . . 32.3 Installing Your Plug-In . . . . . . . . . . . . . . . . . . . . . . . . . . . . . . . . . . . . . . 42.4 Moving or Removing an Activation . . . . . . . . . . . . . . . . . . . . . . . . . . . . . . . 42.5 Navigating the Plug-Ins . . . . . . . . . . . . . . . . . . . . . . . . . . . . . . . . . . . . . 4
3 H910 Harmonizer 53.1 H910 Harmonizer Controls . . . . . . . . . . . . . . . . . . . . . . . . . . . . . . . . . . . . 5
3.1.1 Main H910 Panel . . . . . . . . . . . . . . . . . . . . . . . . . . . . . . . . . . . . . 53.1.2 Secondary (HK941) Panel Controls . . . . . . . . . . . . . . . . . . . . . . . . . . . 6
3.2 H910 Dual Harmonizer Controls . . . . . . . . . . . . . . . . . . . . . . . . . . . . . . . . 73.2.1 Controls common to both H910s . . . . . . . . . . . . . . . . . . . . . . . . . . . . 73.2.2 Controls individual to each H910 . . . . . . . . . . . . . . . . . . . . . . . . . . . . 8
4 Working with the Harmonizer 104.1 Signal flow of the H910 Single . . . . . . . . . . . . . . . . . . . . . . . . . . . . . . . . . . 104.2 Playing the Harmonizers with a MIDI Keyboard . . . . . . . . . . . . . . . . . . . . . . . 104.3 Saving and Recalling Plug-In settings . . . . . . . . . . . . . . . . . . . . . . . . . . . . . 11
4.3.1 Mix Lock . . . . . . . . . . . . . . . . . . . . . . . . . . . . . . . . . . . . . . . . . 11
5 Conclusion 12
II

Chapter 1
Introduction
Figure 1.1: H910 Single Harmonizer
Figure 1.2: H910 Dual Harmonizer
1

1.1 About This Product
Thank you for your purchase of the Eventide H910 Harmonizer plug-in. The product recreated in thisplug-in was among the first introduced by Eventide - and among the world’s first commercially availableprofessional recording products. For over 40 years, innovative products like these have made Eventide anindustry leader, and we are extremely proud that they continue to be in demand today. This packageincludes a stunning recreation of the H910 Harmonizer, as well as a Dual H910 version, which recreatesthe popular technique of running two H910 units in parallel to create lush doubling and other interestingeffects. We’ll get into more depth on the product soon but, before you forget, please take a few minutesto register online. This helps us keep you informed of any important software updates, and any specialoffers that may only be available to registered users. If you find the need to get more informationfrom us than this manual can provide, please visit our support forum available via our website (http://www.eventideaudio.com).
2

Chapter 2
Registration, Activation, andInstallation
Eventide uses PACE’s ilok.com licensing system, with or without an iLok hardware dongle, to licenseour plug-in products. Each license provides two activations which can reside on either your computer oron an iLok license dongle. Once you’ve purchased your plug-in, you’ll need to register it on Eventide’swebsite, activate your license, and install the plug-in on to your computer.
2.1 Registering Your Plug-in
When you purchase an Eventide Native plug-in, you’ll receive a Serial Number and License Key. TheSerial Number will be two letters followed by 6 numbers. If you have an individual H910 Harmonizerlicense, the Serial Number will start with H1 (i.e. HD-######). If you purchased a group license,the Serial Number will be in the same format, but correspond to that group license (e.g. AX-######for Anthology X). The License Key will be 3 sets of 4 characters, a letter or a number, each; like XXXX-XXXX-XXXX.
Once you’ve received these codes, you can register your plug-in on the Eventide website. To do so, pleaselog in to http://www.eventideaudio.com, navigate to My Account in the top right corner, and selectRegister a New Product. Then, fill out the form by selecting Native Plug-in (VST, AU, AAX) in theProduct Category field, select H910/Dual H910 Native or the applicable group license in the Productlist, and enter your Serial Number, License Key, and iLok.com account name. If you don’t yet havean ilok.com account, you can create one for free at http://www.ilok.com. Once you’ve done so, pressRegister.
Once you’ve entered this information and pressed the Register button, Eventide will send the applicableplug-in license to your ilok.com account, which you will need to activate to your computer or iLokdongle.
2.2 Activating Your License
To activate and manage your plug-in licenses you’ll need to install PACE’s iLok License Manager softwarewhich you can download from http://www.ilok.com. If you don’t have this software installed, pleasedownload and install it now.
Once you have installed and launched iLok License Manager you should be able to log in to your accountby clicking the large Sign In button in the upper left hand corner of the application. Once you have,you should be able to see available licenses by choosing the Available tab at the top of the iLok LicenseManager application. If you have successfully registered your plugin, your H910 Harmonizer Nativelicense will be available in this list. Please activate this license by dragging it to either your computer oriLok dongle listed on the left. When you do so, you will be asked to confirm the activation, and you willbe able to see it by clicking on the location you have chosen. At this point your license is activated.
3
2.3 Installing Your Plug-In
You should have been given a link to the Eventide Native plug-in installer when you purchased your plug-in, but if you haven’t, you can find downloads for all of Eventide’s Native Plug-Ins at http://https:
//www.eventideaudio.com/products/plugins. Please download and launch the correct installer foryour system.
Once you’ve launched the plug-in installer, it will take you through several pages of options. We havetried to choose defaults for these options which will best serve the majority of users, but it is worth aminute to make sure you understand these options before clicking through to the next page. Once youhave followed through the installer, your plug-ins and presets should be in your chosen locations, andyou can hit finish to end the installer application.
At this point, you should be ready to use your Eventide H910 Harmonizer Plug-In.
2.4 Moving or Removing an Activation
If at any point, you decide to move your plug-in activation, you can do so in iLok license manager. Tomove an activation between an iLok dongle and your computer, simply plug in the iLok, locate the licensein its current location, and drag it to its new location. To deactivate a license, find it in its location,right click on it, and choose deactivate.
Remember that each Eventide Native Plug-In License comes with two activations, which can be used oneither a computer or iLok dongle, meaning you can use H910 in two locations at the same time.
2.5 Navigating the Plug-Ins
The H910 Harmonizer panel is designed with graphic knobs and buttons that resemble the controls onthe original units – but we’ve enhanced them for intuitive mouse control. Knobs are easily adjusted witheither an up-and-down or a left-and-right motion of the mouse. Click on any knob you want to adjust,then drag upward, or to the right, to increase the setting, and downward, or to the left, to decrease it.(It is not necessary to try to move the mouse in a circular motion to ”turn” the knobs.) While a knob isselected, the value of the parameter will appear in the center of the knob graphic.
4

Chapter 3
H910 Harmonizer
Production Dates 1975 – 1984
The Eventide Clockworks H910 was the world’s first harmonizer – and one of the first commercially-available digital audio products. It offered built-in delay, manual adjustment of +/- 1 octave and even hadan ”Anti-Feedback” mode which helped to eliminate feedback between a mic and speaker by constantly”riding” room modes. Today’s Native Plug-in format captures all the realism of the original, includingits ”glitching” as it modifies the pitch. The original HK940 keyboard option is included and augmentedwith modern MIDI control that allows you to ”play” the desired pitch using MIDI notes or bend it viapitch wheel. Simply assign the connected controller to the H910’s MIDI channel (See ’Working with theHarmonizers’ for more detail.). The H910 plug-in also includes additional Mixer and Envelope Followersections which allow you to utilize the delay output 2 and control voltage input options that were availablein the original hardware H910.
3.1 H910 Harmonizer Controls
3.1.1 Main H910 Panel
Line
When the Line control is in the LED is on and the unit is actively processing audio, when it is out theLED is off and the H910 is bypassed and passes audio directly from input to output.
Input Level
The Input LED will light at -0.5 dBFS. (Note that the Limit Indicator is ”after” the Input Level andFeedback controls, so it will illuminate when internal clipping is about to occur due to excessive inputlevel or feedback.) Adjust Level so that the Limit Indicator flashes only on input peaks.
Pitch Control Select
The four switches in this group allow you to select whether the pitch change is set by the manual knob(MAN), the anti-feedback oscillator (A-F), the HK941 keyboard and midi (KYBD), or the EnvelopeFollower (ENV).
• MAN – This switch activates the MANUAL control knob. When fully counter- clockwise, theoutput pitch is decreased by 1 octave (ratio=.5). When centered, the ratio is unity. When fullyclockwise, the output pitch is increased by 1 octave (Ratio=2). Intermediate settings producefractional octave ratios with the changes ”band spread” around unity.
• A-F – This switch activates the ANTI-FEEDBACK knob, allowing you to add small amounts ofan up-and-down frequency shift to the output signal. This serves to decrease the effect of roomresonance peaks on the signal which ultimately returns to the microphone. Note that higher settings
5

will make the effect more audible, so care should be taken to find a setting which provides adequatefeedback reduction with minimal audience/performer disturbance.
• KYBD – When selected, pitch ratio is determined by the HK941 keyboard below, or by receipt ofMIDI Note On and Pitch Bend messages. (See ’Working with the Harmonizers.’)
• ENV – When selected, pitch ratio is determined by the ENVELOPE FOLLOWER. The pitchratio is nominally 1.0, but when input signal is applied it will modulate toward the setting of theMANUAL knob as determined by the ATTACK, RELEASE, and SENSITIVITY knobs.
Pitch Ratio
The display shows the numerical pitch ratio.(See also Pitch Ratio Readouts for Various Musical Rela-tionships on page 30.) Note that, just as in the original unit, when the knob is set between two values,the display will ”jitter” between the two. This is visual jitter only, and does not affect the audio.
Delay
Allow you to insert additional delays before the output. When in DELAY ONLY mode, select delaytimes in 7.5 ms increments to a maximum of 112.5 ms. (7.5+15+30+60). When in pitch mode only theright two buttons are active for 30 mS each, allowing for up to 60 mS of additional delay (30+30).
Output 2 Delay Time
The OUTPUT 2 delay buttons control the amount of delay time for the second output. This seconddelay tap is fed from the same input as the first but allows you to mix another delay into the wet outputusing the mixer section in the second panel.
Feedback
Used to determine the decay time of the output delay. Clockwise rotation increases decay time untilfeedback reaches unity, at which time the system will begin to oscillate.
Power
When the Power button is in the H910 is powered up and operational, when it is out the H910 is poweredoff and the plug-in bypasses.
3.1.2 Secondary (HK941) Panel Controls
Mix
This parameter sets the overall balance of wet (effected) signal to dry (original) signal.
Main Level
The Main Level sets the level from the H910s Main output which can be set to either shift pitch or outputDelay Only. The main output is also the source for the Feedback.
Out2 Level
The Out2 Level control sets the level from the H910s Output 2, which is delay only. This output is also fedfrom the feedback from the Main Output, but it does not feed back into the feedback buss itself.
6

Envelope Follower Attack
When the Pitch Control Select is set to ENV this sets the attack time of the Envelope Follower.
Envelope Follower Release
When the Pitch Control Select is set to ENV this sets the release time of the Envelope Follower.
Envelope Follower Sensitivity
When the Pitch Control Select is set to ENV this sets the Sensitivity of the Envelope Follower.
HK941 Keyboard
When the Pitch Control Select is set to KYBD the HK941 Keyboard is an automatable keyboard whichcan be operated by your mouse and which automatically sets the H910 to musical intervals. This twooctave keyboard is set up in such a way that the center C key represents a pitch ratio of 1.0, with eachkey to the right shifting the pitch ratio one further half-step up and each key to the left shifting the pitchratio one further half-step down. This allows you to use the keyboard to easily transpose the incomingsignal up or down by a musical interval related to the center C.
In KYBD mode the H910 plug-in also responds to Midi Note Number input in the same way, using themidi notes centered around middle C. To use this mode you most route midi from your midi source tothe H910 plug-in in your DAW.
HK941 Keyboard Glide
The Glide control sets the rate at which the H910 shifts from one ratio to the next when the Pitch ControlSelect is set to KYBD.
HK941 Keyboard Hold
By default the H910 responds to notes momentarily, which means that the pitch ratio returns to unison(1.0) when no key is pressed. By turning the HOLD mode on the H910’s pitch ratio will stay at the valueset by the last pressed key until it gets another update.
3.2 H910 Dual Harmonizer Controls
The H910 Harmonizer plug-in comes bundled with the H910 Dual Harmonizer plug-in, which recreatestwo H910 units running in parallel, an application that was frequently used in the hardware version tocreate doubling effects. Of course, you can also use the H910 Dual to create a wide variety of otherinteresting sounds.
3.2.1 Controls common to both H910s
These controls effect the linking and coupling of the two H910s.
Stereo Feedback
The three buttons in this group allow you to control the feedback routing between the two H910 units. In”Mono” mode, the output from a single unit only feeds back into that unit. In ”Stereo” mode, the outputfrom the top unit feeds back into the bottom unit, and vice versa. In ”Both” mode, the output of eachunit feeds back into both itself and the other unit. An interesting application of these modes is whenusing feedback combined with pitch shifting, which based on the Pitch Ratios of the bottom and top
7

units, can cause the incoming signal to shift up/down continuously, shift up and then down continuously,or shift away from a Pitch Ratio of 1 in both directions.
Stereo Link
The three buttons in this group allow you to more easily control the plug-in, by linking correspondingcontrols in the bottom and top units. In ”Mono” mode, all controls can be set independently. In ”Link”mode, changing a control on one unit will cause the corresponding control on the other unit to followthat change. ”Reverse Link” mode behaves much like ”Link” mode, but changing the Pitch Ratio on oneunit will cause the other unit’s Pitch Ratio to move in the opposite direction. This is especially usefulfor creating stereo detuned and doubling effects. Note that when in ”Link” or ”Reverse Link” modes,only the top unit controls are automatable.
Stereo Width
Allows you to control how ”wide” the output of the plug-in is, from mono to full stereo.
Mix
Controls the total Wet/Dry mix of the H910 Dual plug-in.
3.2.2 Controls individual to each H910
These controls exist on both the upper and lower H910.
Input Level
The Input LED will light at -0.5 dBFS. (Note that the Limit Indicator is ”after” the Input Level andFeedback controls, so it will illuminate when internal clipping is about to occur due to excessive inputlevel or feedback.) Adjust Level so that the Limit Indicator flashes only on input peaks.
Pitch Control Select
The four switches in this group allow you to select whether the pitch change is set by the manual knob(MAN), the anti-feedback oscillator (A-F), the midi input (MIDI).
• MAN – This switch activates the MANUAL control knob. When fully counter- clockwise, theoutput pitch is decreased by 1 octave (ratio=.5). When centered, the ratio is unity. When fullyclockwise, the output pitch is increased by 1 octave (Ratio=2). Intermediate settings producefractional octave ratios with the changes ”band spread” around unity.
• A-F – This switch activates the ANTI-FEEDBACK knob, allowing you to add small amounts ofan up-and-down frequency shift to the output signal. This serves to decrease the effect of roomresonance peaks on the signal which ultimately returns to the microphone. Note that higher settingswill make the effect more audible, so care should be taken to find a setting which provides adequatefeedback reduction with minimal audience/performer disturbance.
• MIDI – When selected, pitch ratio is determined by receipt of MIDI Note On and Pitch Bendmessages. (See ’Working with the Harmonizers.’)
Pitch Ratio
The display shows the numerical pitch ratio.(See also Pitch Ratio Readouts for Various Musical Rela-tionships on page 30.) Note that, just as in the original unit, when the knob is set between two values,the display will ”jitter” between the two. This is visual jitter only, and does not affect the audio.
8

Delay
Allow you to insert additional delays before the output. When in DELAY ONLY mode, select delaytimes in 7.5 ms increments to a maximum of 112.5 ms. (7.5+15+30+60). When in pitch mode only theright two buttons are active for 30 mS each, allowing for up to 60 mS of additional delay (30+30).
Feedback
Used to determine the decay time of the output delay. Clockwise rotation increases decay time untilfeedback reaches unity, at which time the system will begin to oscillate.
9

Chapter 4
Working with the Harmonizer
4.1 Signal flow of the H910 Single
The original H910 Harmonizer had additional inputs and outputs which would have traditionally beenattached to external studio gear to work. In order to make this plug-in work well in a DAW environment,we’ve built some of this external gear, like and envelope follower and a mixer, into the H910 Single plug-in itself. Because of this, the signal flow in the H910 Single harmonizer can be difficult to understand.Please refer to the following figure if you have any difficulties.
4.2 Playing the Harmonizers with a MIDI Keyboard
A MIDI keyboard set to send MIDI on the H910’s MIDI Channel can be used to control the pitch ratioin discrete musical steps. Middle C on the keyboard will set Unison on the Harmonizers; 1.00 on thedisplay. Playing the E above Middle C will produce a harmony of a Major 3rd. Playing the E-Flat aboveMiddle C will produce a Minor 3rd and so on. Refer to the graphic below and the chart on the followingpage.
10
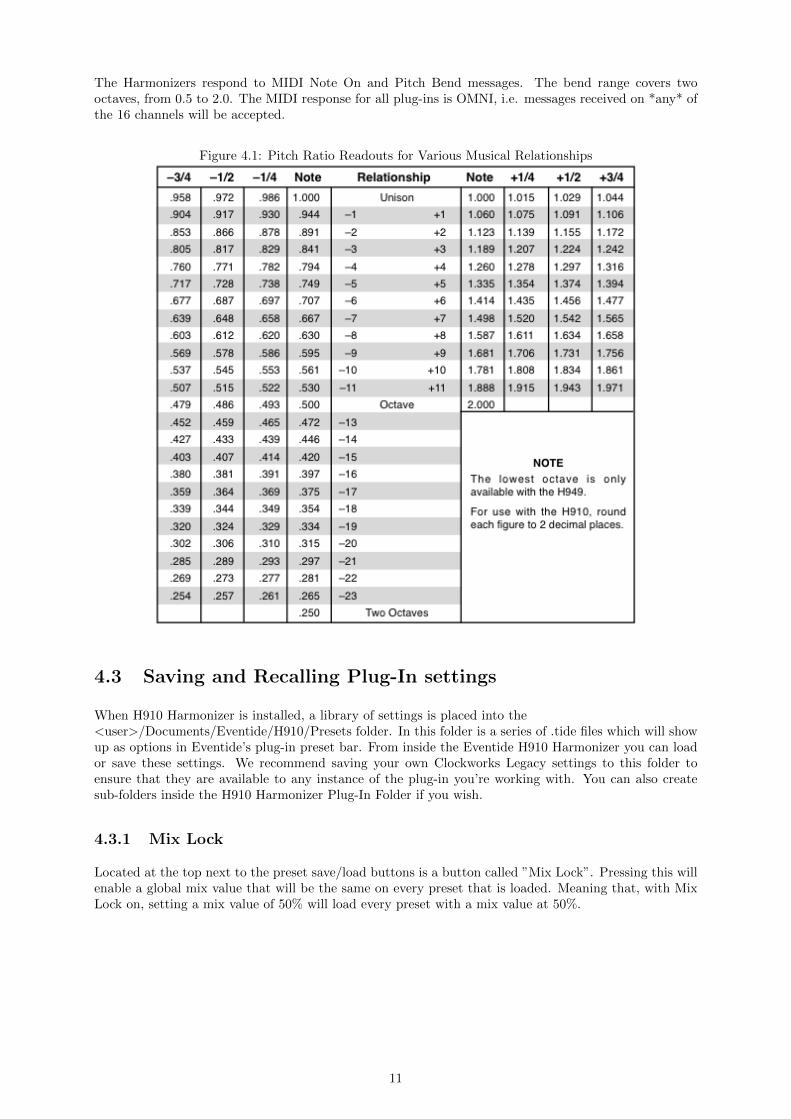
The Harmonizers respond to MIDI Note On and Pitch Bend messages. The bend range covers twooctaves, from 0.5 to 2.0. The MIDI response for all plug-ins is OMNI, i.e. messages received on *any* ofthe 16 channels will be accepted.
Figure 4.1: Pitch Ratio Readouts for Various Musical Relationships
4.3 Saving and Recalling Plug-In settings
When H910 Harmonizer is installed, a library of settings is placed into the<user>/Documents/Eventide/H910/Presets folder. In this folder is a series of .tide files which will showup as options in Eventide’s plug-in preset bar. From inside the Eventide H910 Harmonizer you can loador save these settings. We recommend saving your own Clockworks Legacy settings to this folder toensure that they are available to any instance of the plug-in you’re working with. You can also createsub-folders inside the H910 Harmonizer Plug-In Folder if you wish.
4.3.1 Mix Lock
Located at the top next to the preset save/load buttons is a button called ”Mix Lock”. Pressing this willenable a global mix value that will be the same on every preset that is loaded. Meaning that, with MixLock on, setting a mix value of 50% will load every preset with a mix value at 50%.
11

Chapter 5
Conclusion
We hope you enjoy the Eventide H910 Harmonizer plug-in and put it to good use in all of your mixes.Please be sure to check over Eventide’s other Native Plug-In offerings for more unique and interestingeffects.
12