Embed Size (px)
Citation preview

2006+ VW GTI 2.0T 2006+ VW GLI 2.0T 2005+ Audi A3 2.0T
High Flow Downpipe Contact us with any installation questions. 215-658-1670 AWE-Tuning.com [email protected]
Congratulations on your purchase of the AWE Tuning High Flow Downpipe for the VW and Audi 2.0T engine.
Exquisite build quality with industry leading performance distinguishes this exhaust system from all others.
Copyright 2012, AWE Tuning. No part of this document may be reused or duplicated without the express permission of AWE Tuning/Secor Ltd. All rights reserved. Rev2.2
INSTALLATION GUIDE
FOR RACING USE ONLY
2
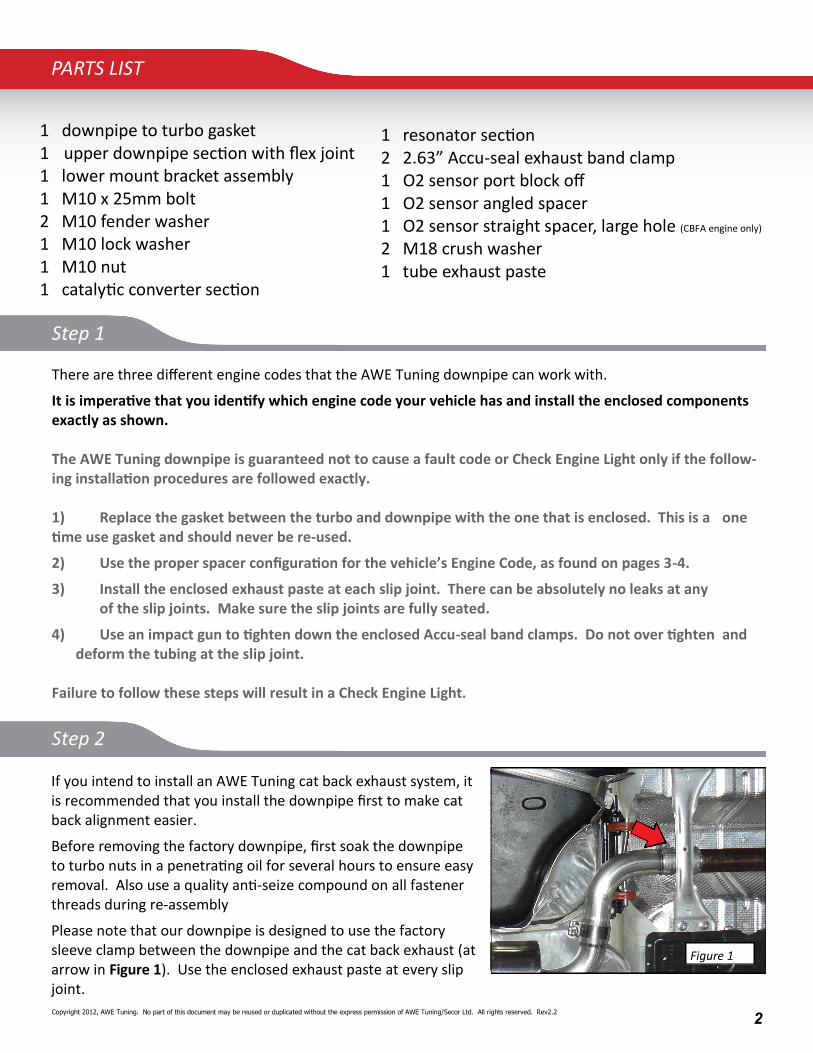
If you intend to install an AWE Tuning cat back exhaust system, it is recommended that you install the downpipe first to make cat back alignment easier.
Before removing the factory downpipe, first soak the downpipe to turbo nuts in a penetrating oil for several hours to ensure easy removal. Also use a quality anti-seize compound on all fastener threads during re-assembly
Please note that our downpipe is designed to use the factory sleeve clamp between the downpipe and the cat back exhaust (at arrow in Figure 1). Use the enclosed exhaust paste at every slip joint.
PARTS LIST
Figure 1
1 downpipe to turbo gasket 1 upper downpipe section with flex joint 1 lower mount bracket assembly 1 M10 x 25mm bolt 2 M10 fender washer 1 M10 lock washer 1 M10 nut 1 catalytic converter section
Step 2
There are three different engine codes that the AWE Tuning downpipe can work with.
It is imperative that you identify which engine code your vehicle has and install the enclosed components exactly as shown. The AWE Tuning downpipe is guaranteed not to cause a fault code or Check Engine Light only if the follow-ing installation procedures are followed exactly. 1) Replace the gasket between the turbo and downpipe with the one that is enclosed. This is a one time use gasket and should never be re-used.
2) Use the proper spacer configuration for the vehicle’s Engine Code, as found on pages 3-4.
3) Install the enclosed exhaust paste at each slip joint. There can be absolutely no leaks at any of the slip joints. Make sure the slip joints are fully seated.
4) Use an impact gun to tighten down the enclosed Accu-seal band clamps. Do not over tighten and deform the tubing at the slip joint.
Failure to follow these steps will result in a Check Engine Light.
Step 1
Copyright 2012, AWE Tuning. No part of this document may be reused or duplicated without the express permission of AWE Tuning/Secor Ltd. All rights reserved. Rev2.2
1 resonator section 2 2.63” Accu-seal exhaust band clamp 1 O2 sensor port block off 1 O2 sensor angled spacer 1 O2 sensor straight spacer, large hole (CBFA engine only)
2 M18 crush washer 1 tube exhaust paste

3
Figure 3
C
B
CCTA Engine Code
CCTA engine code is found in late 2008 and later TSI fuel injection vehicles. This engine has two O2 sensors.
Install angled spacer behind catalytic converter, at Arrow A in Figure 3. Install second O2 sensor here.
Install O2 sensor port block off plug and its crush washer at Arrow B in Figure 3.
Install first O2 sensor at Arrow C in Figure 3. Install first O2 sensor here.
Continued, next page
Figure 2
C
BPY Engine Code
BPY engine code is found in 2005 to early 2008 FSI fuel injection vehicles. This engine has two O2 sensors.
Install angled spacer behind catalytic converter, at Arrow A in Figure 2. Install second O2 sensor here.
Install O2 sensor port block off plug and its crush washer at Arrow B in Figure 2.
Install first O2 sensor at Arrow C in Figure 2. Install first O2 sensor here.
B
Copyright 2012, AWE Tuning. No part of this document may be reused or duplicated without the express permission of AWE Tuning/Secor Ltd. All rights reserved. Rev2.2
A
A

4
Figure 4
C
B
CBFA Engine Code
CBFA engine code is found in late 2008 and later TSI fuel injection vehicles. This engine has three O2 sensors (the first one is located in the turbine housing).
Install angled spacer behind catalytic converter, at Arrow A in Figure 4. Install third O2 sensor here.
Install spacer with large hole and its crush washer in front of catalytic converter, at Arrow B in Figure 4. In-stall second O2 sensor here.
Install O2 sensor port block off plug at Arrow C in Figure 4 (unless a K04 turbo is installed, and then first O2 sensor will install at Arrow C in Figure 4).
Large Hole
When installing the resonator section after the catalytic convert-er, rotate it to ensure that the second and third O2 sensors (if so equipped) clear the tunnel heat shield. Install the angled spacer as shown in Figure 6. Thread in the spac-er so that the threads do not extend past the base of the welded bung, and then tighten down the lock nut. Install the O2 sensor into the spacer last. Ensure that O2 sensor wiring is not twisted or damaged in any way during installation, or a Check Engine Light will occur.
Step 3
Figure 5
Copyright 2012, AWE Tuning. No part of this document may be reused or duplicated without the express permission of AWE Tuning/Secor Ltd. All rights reserved. Rev2.2
A
Figure 6

5
Step 5
After downpipe install, ensure that the flex joint area is not con-tacting the factory heat shield mat at arrow in Figure 8. The mat is flexible and can be pushed away from downpipe if there is contact.
ENJOY
Any questions or comments, please do not hesitate to contact us: 1-888-565-2257 AWE-Tuning.com [email protected]
Copyright 2012, AWE Tuning. No part of this document may be reused or duplicated without the express permission of AWE Tuning/Secor Ltd. All rights reserved. Rev2.2
Figure 8
Once installed properly, your AWE Tuning High Flow Downpipe will provide years of fault-code free enhanced performance.
Once the whole downpipe assembly is installed in the vehicle, make all necessary alignment adjustments and then install the lower front bracket assembly, This will ensure there is no pre-load on the silicone rubber subframe mounts. Install the bracket as show in Figure 7, using the enclosed nut, bolt, and washers.
Step 4
Figure 7
6
Thank you for choosing AWE Tuning as your performance automotive parts supplier. Please remember that a performance car is only as strong as its weakest link. Therefore, it is vital that you maintain your vehicle to factory specifications. By installing or using the purchased product, the Consumer accepts this warranty and any specific Manu-facturer warranties enclosed.
Limited Warranty The following warranty is valid only in the United States. The Manufacturer’s full warranty applies to all products sold. Secor Ltd. (AWE Tuning) warrants to the original retail purchaser (Consumer) this product (Audi A3, VW GTI/GLI 2.0T High Flow Downpipe) against manufacturing defects for one year on catalytic converter and two years on balance of parts from date of original purchase. Upon verification of warranty coverage, AWE Tuning will repair or replace the defective product at their dis-cretion, without charge. This is the only remedy the Consumer has for any loss or damage, however arising, due to nonconformity in or defect of the product. This warranty does not cover consequential damage, loss of time or revenues, shipping costs, inconvenience, loss of use of vehicle, damage to the vehicle or components, or other incidental or indirect damage. All warranties are void if the product was not installed by a certified auto mechanic, improperly serviced, modified, or used in a way not intended by the Manufacturer. Use of product in Motorsports or Racing con-ditions is grounds for warranty denial. Motorsports and Racing is an inherently abusive operational condi-tion, and it is impossible to warranty for this type of usage. The Consumer is responsible for ensuring that the product is installed in a safe and proper manner, and should cease usage of the product immediately if an unsafe or improper condition is noted. If an unsafe or improper condition is noted, the Consumer should then immediately contact the facility where the product was installed or AWE Tuning directly. Please contact the original place of purchase for any warranty claims or explanations of this document.
AWE Tuning 2385C Maryland Road Willow Grove, PA 19090 215-658-1670 [email protected]
Copyright 2012, AWE Tuning. No part of this document may be reused or duplicated without the express permission of AWE Tuning/Secor Ltd. All rights reserved. Rev2.2

![Untitled-2 [] · 2018-01-18 · injectors and cam from AWE Tuning. A Porsche diverter valve was also included for healthy boost recirculation. To improve fueling, AWE used Shawn's](https://img.pdfslide.us/doc/110x75/5f2f49c5c9263b55fe22fb49/untitled-2-2018-01-18-injectors-and-cam-from-awe-tuning-a-porsche-diverter.jpg)