Embed Size (px)
Citation preview


Copyright ©2006 - Stay Tooned, Inc. All rights reserved worldwide.
This book, or portions of it, may not be duplicated, resold, or redistributed in any way, without the expressed written consent of Stay Tooned, Inc.
TABLE OF CONTENTS 2INTRODUCTION 3SUPPLIES: WHAT YOU’RE GOING TO NEED 4STEP 1: CUTTING THE WOOD BASES TO THE RIGHT LENGTH 6STEP 2: CUTTING THE DOWELS TO THE RIGHT LENGTH 7STEP 3: DRILLING THE ARM HOLES 8STEP 4: DRILLING THE MOUNTING SCREW HOLES 10STEP 5: INSERTING THE DOWELS 13STEP 6: CUTTING AND DRILLING THE RUBBER PIECES 14STEP 7: PAINTING THE WALL HANGERS 15STEP 8: MOUNTING YOUR HANGERS TO THE WALL 16THE FINISHED PRODUCT 19CREATING YOUR OWN WALL OF GUITARS 20OTHER STUFF FROM PAINTYOUROWNGUITAR.COM 21
TABLE OF CONTENTSMAKE YOUR OWN GUITAR WALL HANGERS IN LESS THAN 5 MINUTES AND FOR LESS THAN $1.00!
2
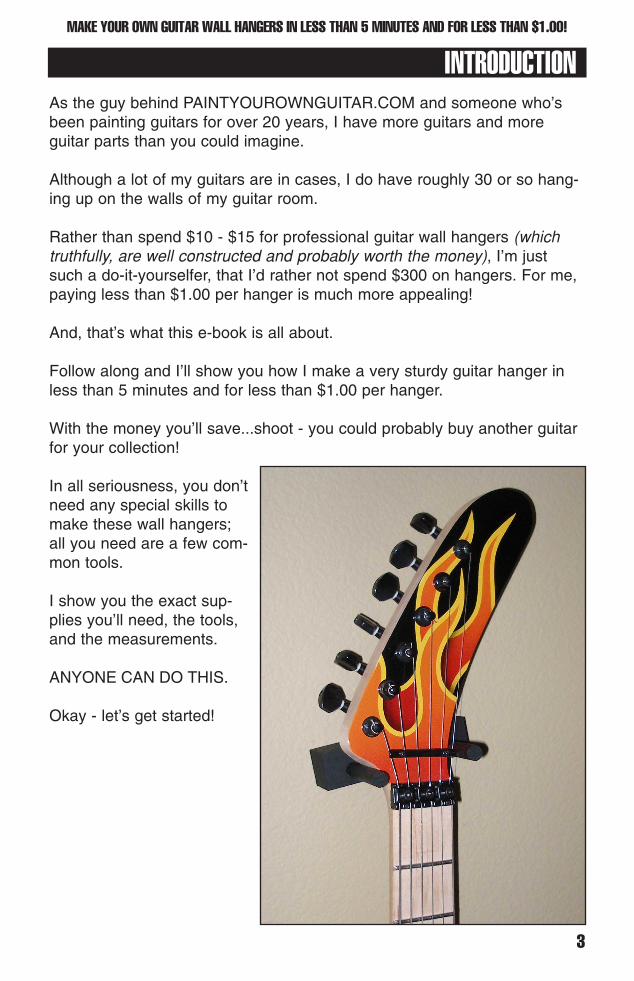
As the guy behind PAINTYOUROWNGUITAR.COM and someone who’sbeen painting guitars for over 20 years, I have more guitars and more guitar parts than you could imagine.
Although a lot of my guitars are in cases, I do have roughly 30 or so hang-ing up on the walls of my guitar room.
Rather than spend $10 - $15 for professional guitar wall hangers (whichtruthfully, are well constructed and probably worth the money), I’m justsuch a do-it-yourselfer, that I’d rather not spend $300 on hangers. For me,paying less than $1.00 per hanger is much more appealing!
And, that’s what this e-book is all about.
Follow along and I’ll show you how I make a very sturdy guitar hanger inless than 5 minutes and for less than $1.00 per hanger.
With the money you’ll save...shoot - you could probably buy another guitarfor your collection!
In all seriousness, you don’tneed any special skills tomake these wall hangers;all you need are a few com-mon tools.
I show you the exact sup-plies you’ll need, the tools,and the measurements.
ANYONE CAN DO THIS.
Okay - let’s get started!
INTRODUCTIONMAKE YOUR OWN GUITAR WALL HANGERS IN LESS THAN 5 MINUTES AND FOR LESS THAN $1.00!
3

FIG 1 shows the finished wall hanger without paint.
Here’s a list of items I used to make my Guitar Wall Hangers. You needthe first 6 items in order to do it right.
1. 1” Wood - I found this piece of wood(see FIG 2) in the area that you’ll findround dowels in your local hardwarestore. I bought these pieces from Lowe’s,but I’ve also seen them at ACEHardware, as well as Home Depot.
It’s 1” in width and the length you’llneed for each of your wall hangers isroughly 4”. You can make each longer,but it’s not necessary. One piece that’s3 ft. long will be enough to make 8hangers - which is what I did.
Buy your wood from HOME Depotrather than ACE Hardware - you’ll payhalf the price.
2. 3/8” Oak Dowel - I recommendusing an oak dowel (see FIG 2)because it’s a very strong wood.
3. Tape Measure (or Ruler) and aPencil - You need one or the other tomake accurate measurements and apencil to mark your cuts.
4. Drill Press or Power Drill - I usedmy drill press (see FIG 4), but you’reonly drilling 4 holes, so you could easilyuse a power drill and do it by hand.
5. Hand Saw or Miter Saw - I used aMiter Saw to cut my pieces to length,but you can easily cut your pieces tothe length with a hand saw like theones seen in FIG 5.
6. Wood screws - if you are screwingdirectly into a stud or solid wood, use ascrew that is at least 2.5” long. If youare NOT screwing directly into wood,but rather, a wall (which is drywall and
SUPPLIES: WHAT YOU’RE GOING TO NEEDMAKE YOUR OWN GUITAR WALL HANGERS IN LESS THAN 5 MINUTES AND FOR LESS THAN $1.00!
4
FIG 2
FIG 3
FIG 1
FIG 4

possibly plaster), you’ll need someheavy duty drywall anchors. I recom-mend using something like EZ ANCOR(see FIG 6). Choose the one that cansupport up to 20 lbs. or more. You’ll bedrilling two holes to keep your wallhanger in place, so these will hold theweight of your guitar without a problem.
OPTIONAL ITEMS
7. Paint - You can leave your wallhangers as bare wood, but if youdecide to finish them with paint, a flatblack may look best. Krylon’sInterior/Exterior Flat Black will worknicely.
6. Rubber Bungy - I live in California -the land of earthquakes, so althoughthe guitars sit nicely on the holders, Ithought it was best to place a piece ofrubber over the dowels - just in case weget a few strong tremors. The rubberwill prevent the guitars from falling offthe dowel/arms. I bought one bungycord and cut it into several pieces.
7. Wood File and Fine Sandpaper - Ididn’t bevel the edges of the wood, butthat’s something you can definitely do, ifyou want. After beveling the edges, takesome fine sandpaper to make it niceand smooth.
8. Level - I used a level to make surethat my wall hangers were perfectly 90º.
And that’s the list.
SUPPLIES: WHAT YOU’RE GOING TO NEEDMAKE YOUR OWN GUITAR WALL HANGERS IN LESS THAN 5 MINUTES AND FOR LESS THAN $1.00!
5
FIG 7
FIG 6
FIG 5
FIG 8

To begin, I measured 4” from the end ofmy piece of wood.
I marked this measurement with a pencil.
Using my miter saw, I made my cut (seeFIG 9). Keep in mind, this cut can easilybe made with any type of hand saw, souse what’s at your disposal.
If you plan on making a whole bunch ofthese wall hangers, which is what I rec-ommend you do, have your ruler ortape measure, and pencil handy, so youcan measure, cut, measure, cut, etc. Inno time, you’ll have 8 bases cut andready to go.
When you’ve made all of your cuts,you’re ready to move to Step 2.
STEP 1: CUTTING THE WOOD BASES TO THE RIGHT LENGTHMAKE YOUR OWN GUITAR WALL HANGERS IN LESS THAN 5 MINUTES AND FOR LESS THAN $1.00!
6
FIG 10
FIG 9
FIG 11
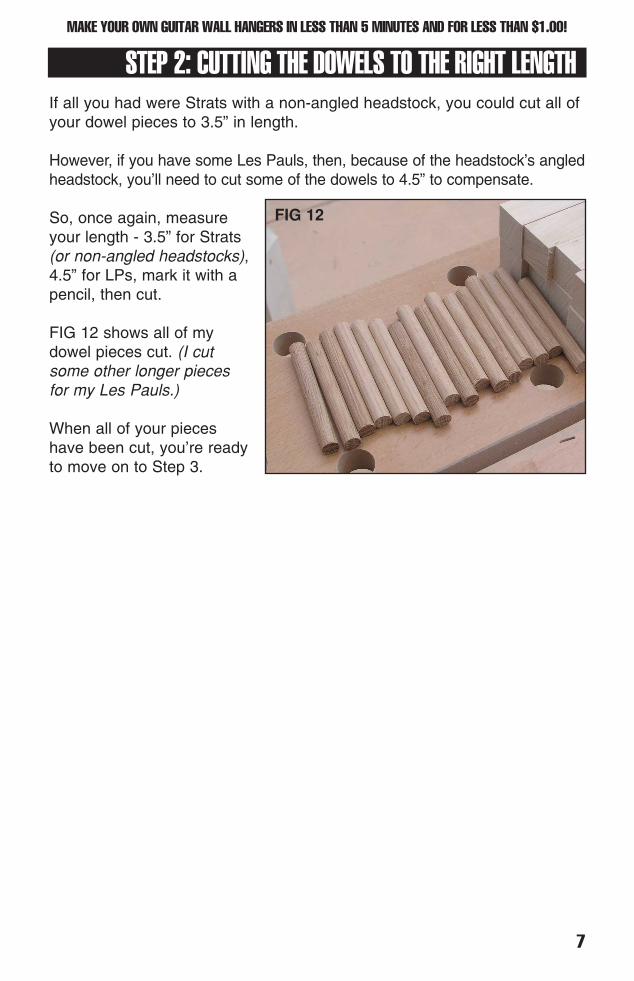
If all you had were Strats with a non-angled headstock, you could cut all ofyour dowel pieces to 3.5” in length.
However, if you have some Les Pauls, then, because of the headstock’s angledheadstock, you’ll need to cut some of the dowels to 4.5” to compensate.
So, once again, measureyour length - 3.5” for Strats(or non-angled headstocks),4.5” for LPs, mark it with apencil, then cut.
FIG 12 shows all of mydowel pieces cut. (I cutsome other longer piecesfor my Les Pauls.)
When all of your pieceshave been cut, you’re readyto move on to Step 3.
STEP 2: CUTTING THE DOWELS TO THE RIGHT LENGTHMAKE YOUR OWN GUITAR WALL HANGERS IN LESS THAN 5 MINUTES AND FOR LESS THAN $1.00!
7
FIG 12
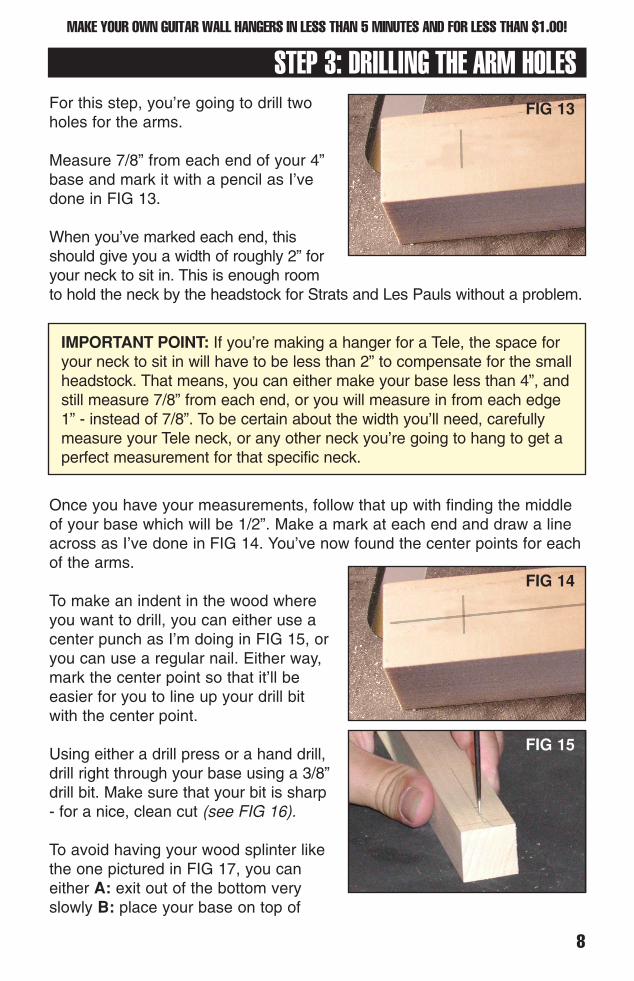
For this step, you’re going to drill twoholes for the arms.
Measure 7/8” from each end of your 4”base and mark it with a pencil as I’vedone in FIG 13.
When you’ve marked each end, thisshould give you a width of roughly 2” foryour neck to sit in. This is enough roomto hold the neck by the headstock for Strats and Les Pauls without a problem.
Once you have your measurements, follow that up with finding the middleof your base which will be 1/2”. Make a mark at each end and draw a lineacross as I’ve done in FIG 14. You’ve now found the center points for eachof the arms.
To make an indent in the wood whereyou want to drill, you can either use acenter punch as I’m doing in FIG 15, oryou can use a regular nail. Either way,mark the center point so that it’ll beeasier for you to line up your drill bitwith the center point.
Using either a drill press or a hand drill,drill right through your base using a 3/8”drill bit. Make sure that your bit is sharp- for a nice, clean cut (see FIG 16).
To avoid having your wood splinter likethe one pictured in FIG 17, you caneither A: exit out of the bottom veryslowly B: place your base on top of
STEP 3: DRILLING THE ARM HOLESMAKE YOUR OWN GUITAR WALL HANGERS IN LESS THAN 5 MINUTES AND FOR LESS THAN $1.00!
8
FIG 13
FIG 14
IMPORTANT POINT: If you’re making a hanger for a Tele, the space foryour neck to sit in will have to be less than 2” to compensate for the smallheadstock. That means, you can either make your base less than 4”, andstill measure 7/8” from each end, or you will measure in from each edge1” - instead of 7/8”. To be certain about the width you’ll need, carefullymeasure your Tele neck, or any other neck you’re going to hang to get aperfect measurement for that specific neck.
FIG 15

another piece of wood, then drill yourholes making sure your drill bit passesthrough your base, and slightly into thewood underneath, or C: use a drill bitwith a long point such as the one in FIG23. Once you feel the point exit out ofthe bottom, flip your base over and con-tinue to drill the hole through using thehole on the bottom as your center point.Personally, I use option “B.”
The one in FIG 17 is the worst of all ofthem that I drilled and I did this on pur-pose to show you that this can and willhappen - and to offer a way to prevent it.
All of the options above will reduce andeliminate splintering, but resting thebase on top of another piece of wood is probably the best option.
Once your holes for the dowels/arms have been drilled, you can move toStep 4 - drilling the holes for the screws.
STEP 3: DRILLING THE ARM HOLESMAKE YOUR OWN GUITAR WALL HANGERS IN LESS THAN 5 MINUTES AND FOR LESS THAN $1.00!
9
FIG 16
FIG 17

There are two options for drilling mounting screw holes; the first option isfor Les Paul-style guitars - where the headstock is perfectly symmetrical -the same on both sides. The second option is for headstocks like a strato-caster or explorer - where each side of the headstock is completely differ-ent.
OPTION 1 - Symmetrical Headstock
For this step, you’re going todrill two holes. If you choose,you can also drill a half-hole,as I did in FIG 18, to counter-sink the head of the screw, butit’s not absolutely necessary.
To start, find the center of your4” base - which will obviouslybe 2”. Mark the center with apencil as I’ve done in FIG 19.From there, place a ruler onthat center mark and mark off1/2” on both sides, so you nowhave a measurement of 1”(see FIG 20).
When choosing a drill bit forthe screw holes that’ll mountthe wall hanger to the wall,choose a bit that is slightlylarger in width than yourscrew. You want your screw tobe able to pass through thebase without getting “hung up”in it. But at the same time, youdo want it to be tight. So,choose a drill bit that is JUSTa bit wider than your screw.
Once again, use a centerpunch to make a small indentin the wood on the center pointof the hole before drilling yourscrew holes.
STEP 4: DRILLING THE MOUNTING SCREW HOLESMAKE YOUR OWN GUITAR WALL HANGERS IN LESS THAN 5 MINUTES AND FOR LESS THAN $1.00!
10
FIG 19
FIG 18
FIG 20
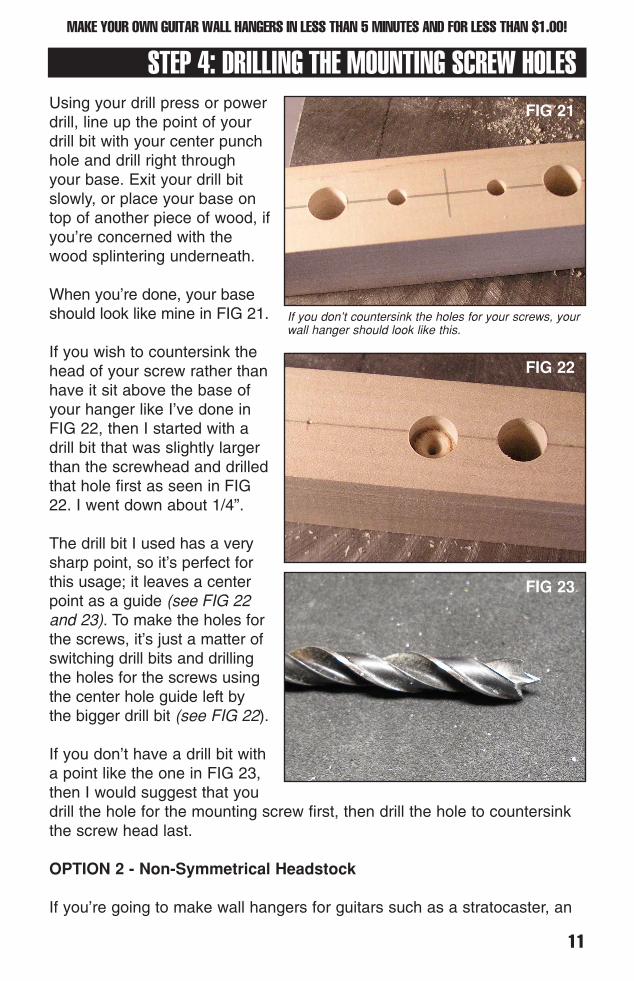
Using your drill press or powerdrill, line up the point of yourdrill bit with your center punchhole and drill right throughyour base. Exit your drill bitslowly, or place your base ontop of another piece of wood, ifyou’re concerned with thewood splintering underneath.
When you’re done, your baseshould look like mine in FIG 21.
If you wish to countersink thehead of your screw rather thanhave it sit above the base ofyour hanger like I’ve done inFIG 22, then I started with adrill bit that was slightly largerthan the screwhead and drilledthat hole first as seen in FIG22. I went down about 1/4”.
The drill bit I used has a verysharp point, so it’s perfect forthis usage; it leaves a centerpoint as a guide (see FIG 22and 23). To make the holes forthe screws, it’s just a matter ofswitching drill bits and drillingthe holes for the screws usingthe center hole guide left bythe bigger drill bit (see FIG 22).
If you don’t have a drill bit witha point like the one in FIG 23,then I would suggest that youdrill the hole for the mounting screw first, then drill the hole to countersinkthe screw head last.
OPTION 2 - Non-Symmetrical Headstock
If you’re going to make wall hangers for guitars such as a stratocaster, an
STEP 4: DRILLING THE MOUNTING SCREW HOLESMAKE YOUR OWN GUITAR WALL HANGERS IN LESS THAN 5 MINUTES AND FOR LESS THAN $1.00!
11
FIG 22
FIG 23
FIG 21
If you don’t countersink the holes for your screws, yourwall hanger should look like this.

explorer, or any other guitar that has a headstock that is non-symmetrical,you will have to angle the base of the wall hanger on the wall to compen-sate for the imbalance.
However, finding just the right angle can be tough when using two screwsto mount it to the wall. So, for guitars such as these, I drill only one hole -dead-center (see FIG 24). Thisallows me to pivot the baseand to get just the right anglefor each guitar. Once I havethe right angle, I tighten myscrew and it’s done. More onthis in a few minutes.
When making wall hangers forguitars with non-symmentricalheadstocks, follow the sameprocedure for symmetricalheadstocks - just substitutetwo screws 1” apart for onescrew dead-center.
Finishing Up
When I was all done drillingmy mounting screw holes, Ihad eight bases for Les Paulsall ready to go (see FIG 25).
This took me about 20 minutesto do, but that’s also because Iwas taking photos along the way. I imagine if I wasn’t snapping photos, Iwould’ve had them done in 15 minutes or less.
When you’ve got all of your holes drilled, it’s time to move to Step 5 -inserting your dowels.
STEP 4: DRILLING YOUR MOUNTING SCREW HOLESMAKE YOUR OWN GUITAR WALL HANGERS IN LESS THAN 5 MINUTES AND FOR LESS THAN $1.00!
12
FIG 24
FIG 25
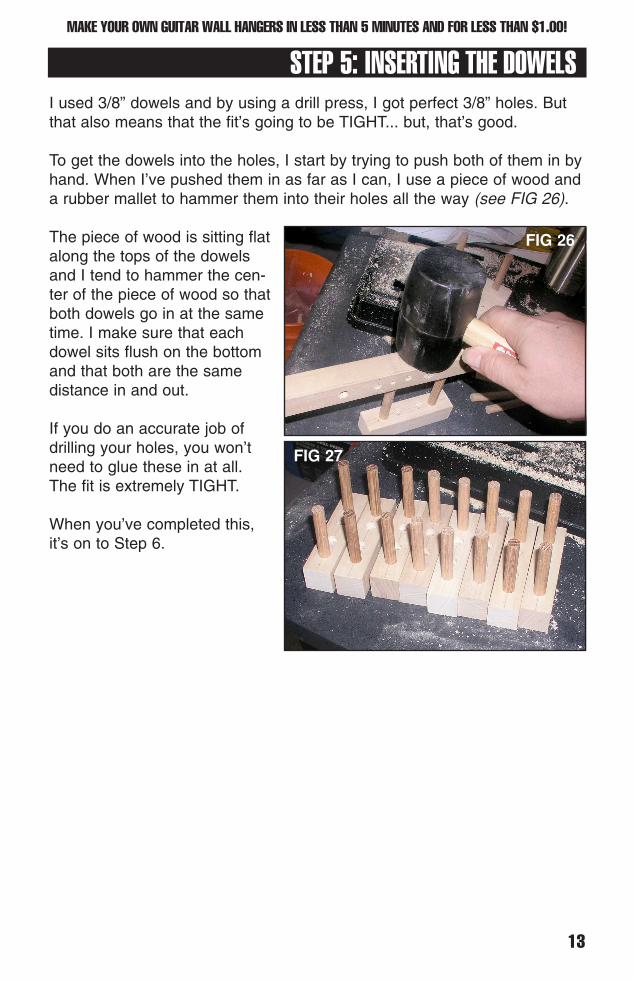
I used 3/8” dowels and by using a drill press, I got perfect 3/8” holes. Butthat also means that the fit’s going to be TIGHT... but, that’s good.
To get the dowels into the holes, I start by trying to push both of them in byhand. When I’ve pushed them in as far as I can, I use a piece of wood anda rubber mallet to hammer them into their holes all the way (see FIG 26).
The piece of wood is sitting flatalong the tops of the dowelsand I tend to hammer the cen-ter of the piece of wood so thatboth dowels go in at the sametime. I make sure that eachdowel sits flush on the bottomand that both are the samedistance in and out.
If you do an accurate job ofdrilling your holes, you won’tneed to glue these in at all.The fit is extremely TIGHT.
When you’ve completed this,it’s on to Step 6.
STEP 5: INSERTING THE DOWELSMAKE YOUR OWN GUITAR WALL HANGERS IN LESS THAN 5 MINUTES AND FOR LESS THAN $1.00!
13
FIG 26
FIG 27

This step is totally optional. I only added the bungy rubber over my hang-er’s arms just to be safe - in case of an earthquake. You don’t have to do itif you don’t want to.
FIG 28 shows a bungy cord cut up into pieces roughly 4” wide. I markedthe length with a pencil and then used an ordinary pair of scissors to makeeach cut.
When drilling the holes into the bungy, Imade my second hole slightly narrowerthan the hanger’s arms, so I’d have tostretch the bungy just a little to get it on.This makes it a nice, tight fit.
Once the holes were drilled, they slidover the hanger’s arms very nicely (seeFIG 29).
An option to using this bungy cordwould be to use a rubber band. Whendoing a search online, I found a fewonline retailers that sold black rubberbands for a very cheap price. Thosewould be a good alternative.
When you’re done, it’s on to Step 7.
STEP 6: CUTTING AND DRILLING THE RUBBER PIECESMAKE YOUR OWN GUITAR WALL HANGERS IN LESS THAN 5 MINUTES AND FOR LESS THAN $1.00!
14
FIG 29
FIG 28
PLEASE NOTE: I actually cut all of these pieces at the same time I wascutting and drilling the wood pieces. You can do all of it at the sametime, or you can do this step after all of the wood pieces are cut.
Once again, this step is completely optional. If you like the look of the barewood, you can leave them as is. I’ve made several of these wall hangers.Some were left “as is” while others were painted flat black like the onesseen here.
Painting Your Wall Hangers
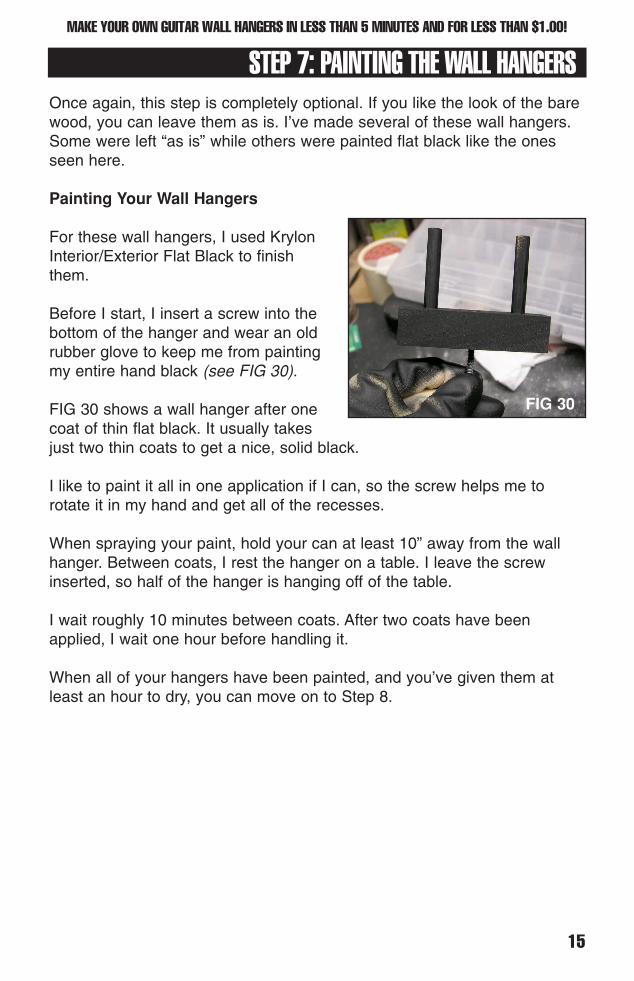
For these wall hangers, I used KrylonInterior/Exterior Flat Black to finishthem.
Before I start, I insert a screw into thebottom of the hanger and wear an oldrubber glove to keep me from paintingmy entire hand black (see FIG 30).
FIG 30 shows a wall hanger after onecoat of thin flat black. It usually takesjust two thin coats to get a nice, solid black.
I like to paint it all in one application if I can, so the screw helps me torotate it in my hand and get all of the recesses.
When spraying your paint, hold your can at least 10” away from the wallhanger. Between coats, I rest the hanger on a table. I leave the screwinserted, so half of the hanger is hanging off of the table.
I wait roughly 10 minutes between coats. After two coats have beenapplied, I wait one hour before handling it.
When all of your hangers have been painted, and you’ve given them atleast an hour to dry, you can move on to Step 8.
STEP 7: PAINTING THE WALL HANGERSMAKE YOUR OWN GUITAR WALL HANGERS IN LESS THAN 5 MINUTES AND FOR LESS THAN $1.00!
15
FIG 30

Now that our hangers are done, it’s time to mount them.
Before we start drilling, there are a few things you need to know: whenscrewing into a wall and not into a stud, you’ll need to use heavy-duty dry-wall anchors to help support the weight. EZ Ancors™, which are the ones Iuse (see SUPPLIES YOU’LL NEED), can hold up to 20 lbs of weight perancor (some hold less, so choose the right one), so when using two closetogether (an inch apart), they’ll support the weight of the guitar very well.
For the wall hangers that you make for guitars with non-symmetrical head-stocks such as a stratocaster, use the EZ Ancors that can support up to 50lbs.
EZ Ancor supply you with a screw, however, because the screws have topass through the base (3/4” if you countersunk your hole - 1” if you didn’tcountersink), they won’t be long enough. So, just pay a visit to your localACE hardware store (or LOWE’s or HOME Depot), and buy some 2.5”screws.
Another thing to consider is the placement of wall studs in a typical home.Normally, they are spaced 19” apart. Most guitars are about 12” - 14” inwidth. So, if you really wanted to screw your wall hangers into a wall stud,once you find one, you should be able to locate the others using the 19”measurement. (this is a general contractor’s rule, but not all contractorsswear by it, so use a wall stud finder just to be certain.)
At the end of this book, I give the measurements I used to create my wallof guitars. You can use this as a guide to help you create a similar wall.
Mounting A Wall Hanger For A Guitar With A Symmetrical Headstock
Once you’ve decided where youwant to place your first wallhanger, use a stud finder todetermine if you’re going to bedrilling into a stud or into drywall.When you’ve made that determi-nation, put a piece of maskingtape down on the wall as I’vedone in FIG 31.
Using a level, I drew a straightline across, then used a ruler to
STEP 8: MOUNTING YOUR HANGERS TO THE WALLMAKE YOUR OWN GUITAR WALL HANGERS IN LESS THAN 5 MINUTES AND FOR LESS THAN $1.00!
16
FIG 31
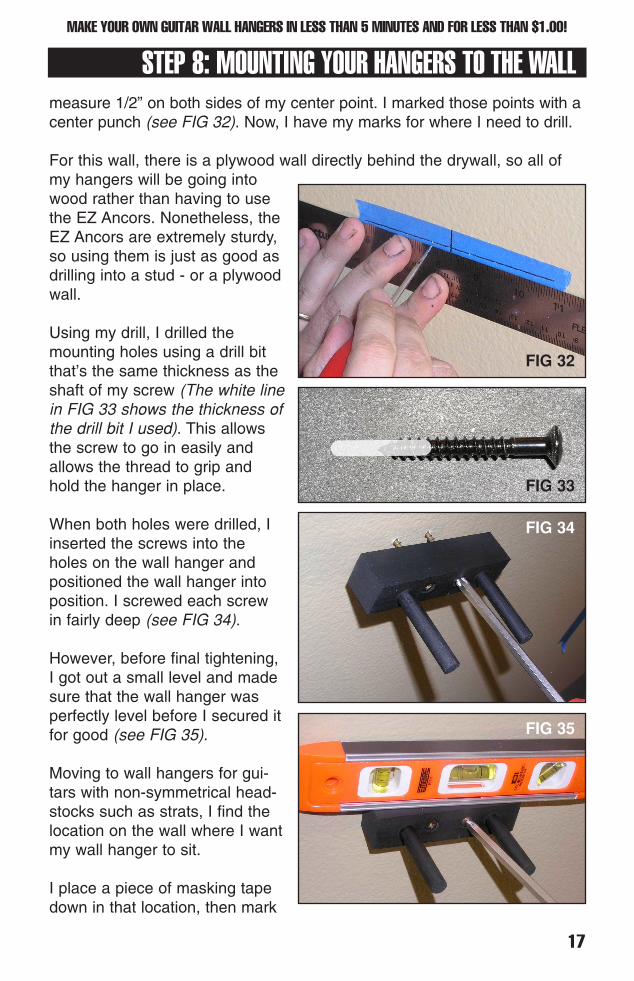
measure 1/2” on both sides of my center point. I marked those points with acenter punch (see FIG 32). Now, I have my marks for where I need to drill.
For this wall, there is a plywood wall directly behind the drywall, so all ofmy hangers will be going intowood rather than having to usethe EZ Ancors. Nonetheless, theEZ Ancors are extremely sturdy,so using them is just as good asdrilling into a stud - or a plywoodwall.
Using my drill, I drilled themounting holes using a drill bitthat’s the same thickness as theshaft of my screw (The white linein FIG 33 shows the thickness ofthe drill bit I used). This allowsthe screw to go in easily andallows the thread to grip andhold the hanger in place.
When both holes were drilled, Iinserted the screws into theholes on the wall hanger andpositioned the wall hanger intoposition. I screwed each screwin fairly deep (see FIG 34).
However, before final tightening,I got out a small level and madesure that the wall hanger wasperfectly level before I secured itfor good (see FIG 35).
Moving to wall hangers for gui-tars with non-symmetrical head-stocks such as strats, I find thelocation on the wall where I wantmy wall hanger to sit.
I place a piece of masking tapedown in that location, then mark
STEP 8: MOUNTING YOUR HANGERS TO THE WALLMAKE YOUR OWN GUITAR WALL HANGERS IN LESS THAN 5 MINUTES AND FOR LESS THAN $1.00!
17
FIG 32
FIG 34
FIG 35
FIG 33

the center point on the wall.
I drill just one mounting screwhole for that wall hanger.
I place a screw into the hole onthe wall hanger and screw it intoplace so that it’s tight but notfully tightened (see FIG 36).
I then grab the guitar that’sgoing to hang on that wall hang-er and put it in place. Then, Iadjust the position of the wallhanger until the guitar is hangingperfectly.
I then remove the guitar andgive the wall hanger a final tight-ening so it can’t move.
And, that’s all there is to it!
Once you’ve done one of each,you’ll get the hang of it and you’llhave no problem doing as manyas you need.
Remember that if you’re screwinga wall hanger for a non-symmetri-cal headstock into drywall, makesure that you use the EZ Ancorsthat can support up to 50 lbs.
STEP 8: MOUNTING YOUR HANGERS TO THE WALLMAKE YOUR OWN GUITAR WALL HANGERS IN LESS THAN 5 MINUTES AND FOR LESS THAN $1.00!
18
FIG 36
FIG 37
IMPORTANT: As a precaution, when hanging Les Pauls, make sure thatyou hang them so they sit close to the wall and not out hanging close tothe ends of the dowels. These wall hangers are sturdy and so are theoak dowels, but Les Pauls are heavy, so you don’t want to risk havingthe weight of the guitar snap the dowels.

THE FINISHED PRODUCTMAKE YOUR OWN GUITAR WALL HANGERS IN LESS THAN 5 MINUTES AND FOR LESS THAN $1.00!
19
This wall is a mixture of my own wall hangers and some profession wallhangers that cost $15 each. It was after I bought five of the professionalhangers that I decided to start making my own.
CREATING YOUR OWN WALL OF GUITARSMAKE YOUR OWN GUITAR WALL HANGERS IN LESS THAN 5 MINUTES AND FOR LESS THAN $1.00!
20
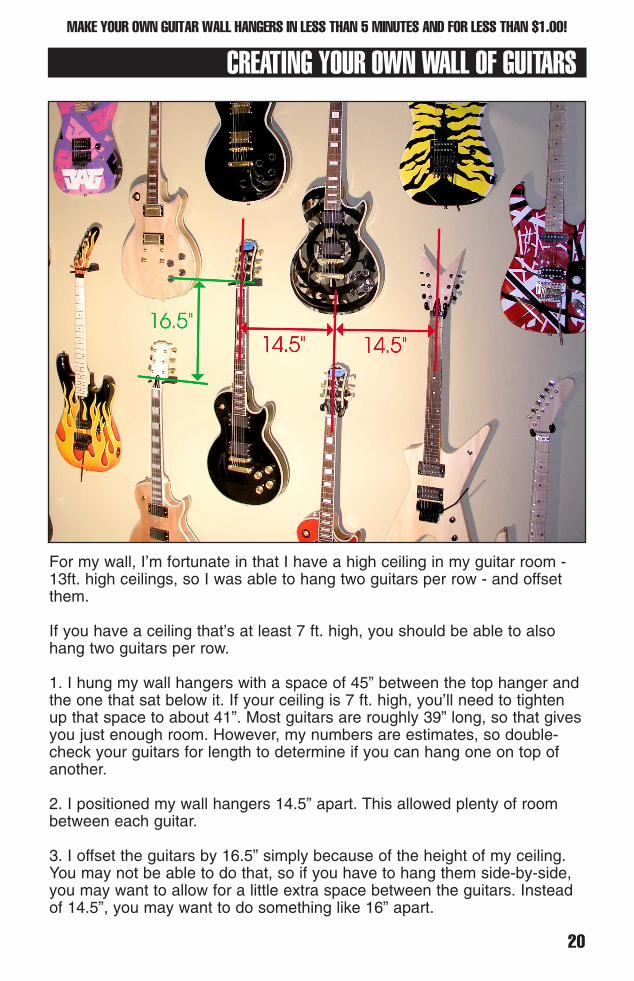
For my wall, I’m fortunate in that I have a high ceiling in my guitar room -13ft. high ceilings, so I was able to hang two guitars per row - and offsetthem.
If you have a ceiling that’s at least 7 ft. high, you should be able to alsohang two guitars per row.
1. I hung my wall hangers with a space of 45” between the top hanger andthe one that sat below it. If your ceiling is 7 ft. high, you’ll need to tightenup that space to about 41”. Most guitars are roughly 39” long, so that givesyou just enough room. However, my numbers are estimates, so double-check your guitars for length to determine if you can hang one on top ofanother.
2. I positioned my wall hangers 14.5” apart. This allowed plenty of roombetween each guitar.
3. I offset the guitars by 16.5” simply because of the height of my ceiling.You may not be able to do that, so if you have to hang them side-by-side,you may want to allow for a little extra space between the guitars. Insteadof 14.5”, you may want to do something like 16” apart.

21
OTHER STUFF FROM PAINTYOUROWNGUITAR.COM
The ‘PAINT YOUR OWN GUITAR’ Book Series
www.paintyourownguitar.com/dvds.html
www.paintyourownguitar.com/guitars.html
These books are available in both e-books and hard copies through my website.
DVD Series


![Strats for college succ [e doc find.com][1]](https://img.pdfslide.us/doc/110x75/5550d886b4c905f2318b524b/strats-for-college-succ-e-doc-findcom1.jpg)