Embed Size (px)
Citation preview

Lumber Liquidators Technical and Installation 10/03/14
Coping quarter-round, shoe and baseboard moldings
When installing baseboards, quarter-round or shoe-moldings, it’s tempting to quickly cut 45-degree (45°) miters at the corners and hope for a sure fit. The problem is that most walls aren’t square. Joining two perfectly cut 45° molding pieces may give a square joint, but a straight/square joint may not be best choice for most corners. In fact, due to underlying framing errors or a buildup of drywall compound in the corner or an un-flat subfloor most inside corners are usually out of square. Nevertheless, straight 45°miter joints can develop gaps when the wood further dries due to seasonal changes in weather or dry indoor environments (<30%). Unlike straight 45°miter inside joints that require both pieces to be mitered, a cope joint such as the baseboard shown (fig1), carefully follows the profile of any molding eliminating the problem of out-of-square corners and gaps are much more minimized when wood shrinks.
(fig1)
The traditional way to make cope joints is with a coping saw. The thin, flexible blade of a coping saw is designed especially for cutting out intricate patterns. When cutting, safely clamp the piece of molding securely to a work surface and use the coping saw to cut along the pencil line that marks the decorative pattern (fig2). It may help to angle the blade to back-cut the molding. Try to keep the blade about 1/16 inch to the waste side of the cutline (fig3)
(fig2) (fig3)

Lumber Liquidators Technical and Installation 10/03/14
After cutting, a utility knife or wood file is normally used to finish the joint “fine-tuning” any curves and edges.
For that professional look Next, test-fit the molding against the profile of the first piece. Check for any gaps and sand or file away any uneven spots for a good snug fit. The finished coped joint should have a clean, shaped edge without splinters that fits easily against the face or profile of the molding. Once you’re satisfied with the inside fit cut the molding to the desired length, nail in place and putty all nail holes.

Lumber Liquidators Technical and Installation 10/03/14
The following pictures are of appropriate inside and outside mitered joints
Outside miter at 22.5°

Lumber Liquidators Technical and Installation 10/03/14
Combination of an outside return cut, an outside miter @ 22.5° and an inside 45° cope
An outside return

Lumber Liquidators Technical and Installation 10/03/14
Mitered cuts are recommended when joining or continuing lengths of moldings. Joints are less noticable when the angle cut is pointed away from view.

Lumber Liquidators Technical and Installation 10/03/14
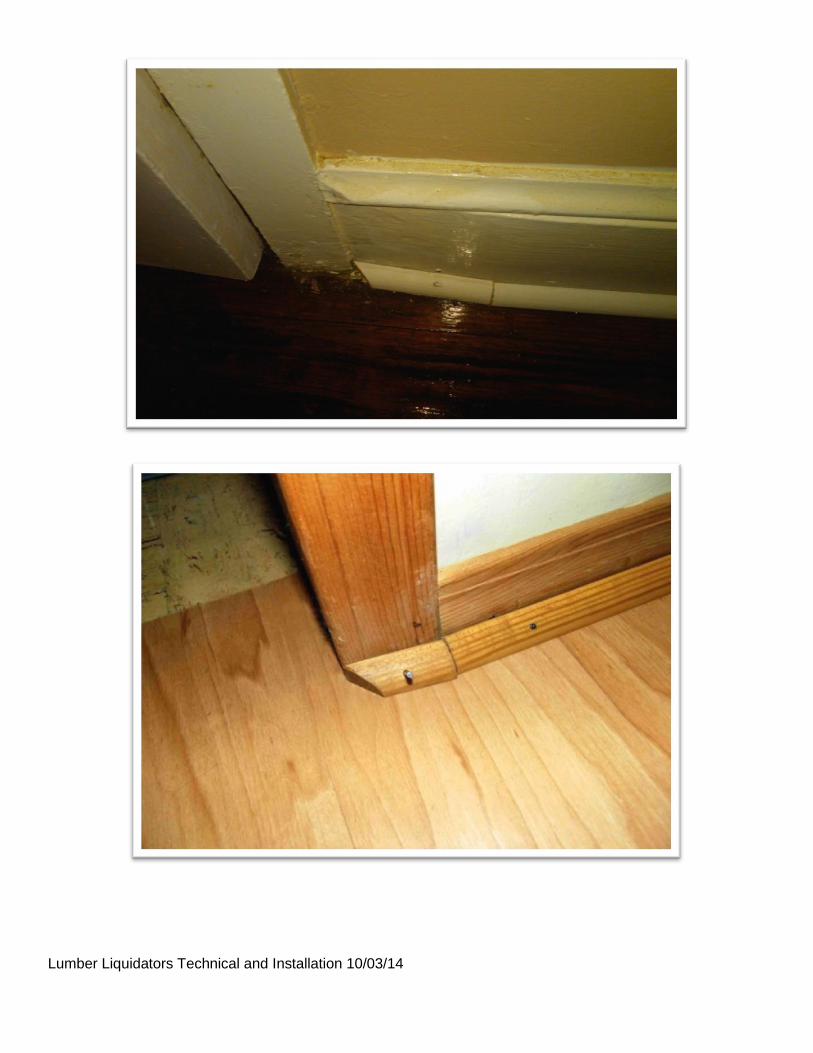
Door Jams Cutting the door jamb and base board allows the flooring to slide under and move freely; properly cut jams will allow a thickness of a business card in-between the jam and flooring. Tightly cut jams can be a source of squeaks.
Good examples
Bad examples (from an installer) (from a diy’er)

Lumber Liquidators Technical and Installation 10/03/14
Quality
Would you have accepted the way the following moldings and stair parts were cut/installed in your home?
Lumber Liquidators Technical and Installation 10/03/14

Lumber Liquidators Technical and Installation 10/03/14

Lumber Liquidators Technical and Installation 10/03/14

Lumber Liquidators Technical and Installation 10/03/14
Better miter cuts and filling nail holes will make a positive impression.

Lumber Liquidators Technical and Installation 10/03/14
Re-using the customers moldings can present issues
However this customer had additional moldings on hand that installers could have used.

Lumber Liquidators Technical and Installation 10/03/14
Avoid damaging wood surfaces (fig1,2) Ensure that the nailer has a protective nose piece (fig3).
Pre-drilling and hand nailing may be required for the harder wood species
(fig1)
(fig2) (fig3)