Embed Size (px)
Citation preview

Control Systems Security
Lab 11
Configure an Intrusion Detection System (IDS) for a Control System
You will complete the following:
• Create a Security Onion Xubuntu VM • Configure a Security Onion IDS for Control System protocols • Use custom Pcap files to generate attack traffic on a Control System Network
Part One – Security Onion Installation
1. Connect host machine to an Internet connection. 2. Download the Security Onion ISO file at:
https://code.google.com/p/security-onion/wiki/Installation 3. Open VMWare Player (or Workstation) and select “Create a New Virtual Machine”
4. Select “Installer disc image file (iso): and click the “Browse” button 5. Navigate to the disc location containing the ISO image file downloaded in step 1 or to the location
specified by the instructor and select the ISO image file 6. Select “I will install the operating system later.”
Robert Hamilton 7/21/2014 Page 1 of 19

Control Systems Security
7. Click the “Next” button 8. Choose “Linux” for the guest operating system and select “Ubuntu 64-bit” in the “Version”
dropdown list and click the “Next” button.
9. Enter a name (“scada” for example) for your virtual machine and make note of the location that it
will be created. If this is not the desired location, browse to the correct location. Click the “Next” button.
10. Change the “Maximum disk size” to 40 GB. If you want to later move the virtual machine or back it
up to external media, select “Split disk into multiple files” and click the “Next” button.
Robert Hamilton 7/21/2014 Page 2 of 19

Control Systems Security
11. Click the “Customize Hardware” button
12. Click the “Add” button and click the “Yes” button if prompted to allow changes.
13. Select “Network Adapter” and click “Next”
Robert Hamilton 7/21/2014 Page 3 of 19

Control Systems Security
14. Select “Host-only: A private network shared with the host”. Verify that the “Connect at power on”
option is selected and click “Finish”.
15. Select the first original network adapter and change the Network connection setting to “Bridged: Connected directly to the physical network.
16. Select “Memory” and change to memory to a minimum of “2 GB” with “4 GB” preferred.
Robert Hamilton 7/21/2014 Page 4 of 19

Control Systems Security
17. If your host computer supports it, increase the number of processors to 2.
18. Click the “Close” button and then click the “Finish” button. 19. Select the “CD/DVD (IDE)” and verify that the Security Onion ISO image file is selected. 20. Click the “Play virtual machine” button and follow the installation instructions from the download
web page in step 2.
21. After Security Onion has started, double-click the “Install SecurityOnion” icon on the desktop.
Robert Hamilton 7/21/2014 Page 5 of 19

Control Systems Security
22. Use all the “defaults” presented in the install process. 23. Enter the user name and password specified by the instructor and click “Continue” (for example, use
“scada” for the user name with a password of “pipelineandsecurity” for the password). 24. Click “Restart Now” when the installation finishes. 25. After the vm has rebooted, login using the user id and password created in the installation. 26. It is recommended to install VMWare Tools in the vm to enhance vm operation. Complete the
following steps to install VMWare Tools. 27. In VMWare player, click “Player” in the upper left corner and select Manage | Install VMware Tools 28. A file manager window will open. Copy the VMwareTools file to the desktop.
29. Double-click the VMwareTools file on the desktop. 30. Click the “Extract files from archive” icon in the toolbar.
31. Use the default settings and click the “Extract” button.
Robert Hamilton 7/21/2014 Page 6 of 19

Control Systems Security
32. Click the “Show the Files” button.
33. Double-click the vmare-tools-distrib folder to open it.
34. Double-click the “INSTALL” icon to open the installation instructions and use them to complete the installation.
35. Install any new updates for Security Onion if prompted.
Robert Hamilton 7/21/2014 Page 7 of 19

Control Systems Security
Part Two – Security Onion Setup NOTE: The example user id and password used in Part One are used in the following section. If your instructor has specified something different, use the correct user id and password.
1. Start the Security Onion vm and login, if necessary. 2. Double-click the “Setup” icon on the desktop.
3. Enter the password created in the installation and click “OK”.
4. Click the “Yes, Continue!” button in the popup dialog box.
5. Click the “Yes, configure /etc/network/interfaces!” button
Robert Hamilton 7/21/2014 Page 8 of 19

Control Systems Security
6. In the “Which network interface should be the management interface?” box, select “eth0” and click
the “OK” button.
7. Select the “DHCP” radio button and click “OK” NOTE: DHCP is being used to simplify the lab exercise in a test environment. A static IP address is preferred in an actual production environment. The correct network settings for your production environment would be used.
8. Click the “Yes, configure monitor interfaces” button
9. Select “eth1” and click “OK”.
Robert Hamilton 7/21/2014 Page 9 of 19

Control Systems Security
10. Click the “Yes, make changes and reboot” button.
11. Login with “scada” as the username with a password of “pipelineandsafety” 12. Double-click “Setup” and enter the password 13. Click “Yes, Continue!” button in the popup dialog box 14. Click the “Yes, skip network configuration!” button.
15. Click the “Advanced Setup” radio button and then click “OK”
Robert Hamilton 7/21/2014 Page 10 of 19

Control Systems Security
16. Click the “StandAlone” radio button and then click “OK”
17. On the SGUIL dialog box enter “scada” as the username and click “OK”
18. Enter “[email protected]” as the email address and then click “OK”
19. Enter “pipelineandsafety” as the password and click “OK” 20. Re-enter the password and click “OK” to confirm the password. 21. Select “Snort” as the IDS engine and click “OK”
Robert Hamilton 7/21/2014 Page 11 of 19

Control Systems Security
22. Select the “Snort VRT ruleset and Emerging Threats NoGPL ruleset” radio button and click “OK”
23. Enter the oinkcode provided to you by the instructor
24. Select “eth1” in the “Which network interface(s) should be monitored?” box and click “OK”
25. Click the “Yes, enable IDS Engine!” button
26. Click the radio button “2” on the “How many IDS engine processes would you like to run?” window and then click “OK”
Robert Hamilton 7/21/2014 Page 12 of 19

Control Systems Security
27. Click the “Yes, enable Bro!” button
28. Click the radio button “1” to select the number of processes to be used by Bro and then click “OK”
29. Click the “Yes, enable http_agent!” button
30. Click the “Yes, enable Argus!” Button
31. Click the “Yes, enable Prads!” Button
Robert Hamilton 7/21/2014 Page 13 of 19

Control Systems Security
32. Click “Yes, enable full packet capture!” button
33. Accept the default size of 150 for the Pcap files and click “OK”
34. Accept the default size of 90 for the purging old log files and click “OK”
35. Click the “Yes, enable Salt” button
36. Click the “Yes, enable ELSA” button
Robert Hamilton 7/21/2014 Page 14 of 19
Control Systems Security
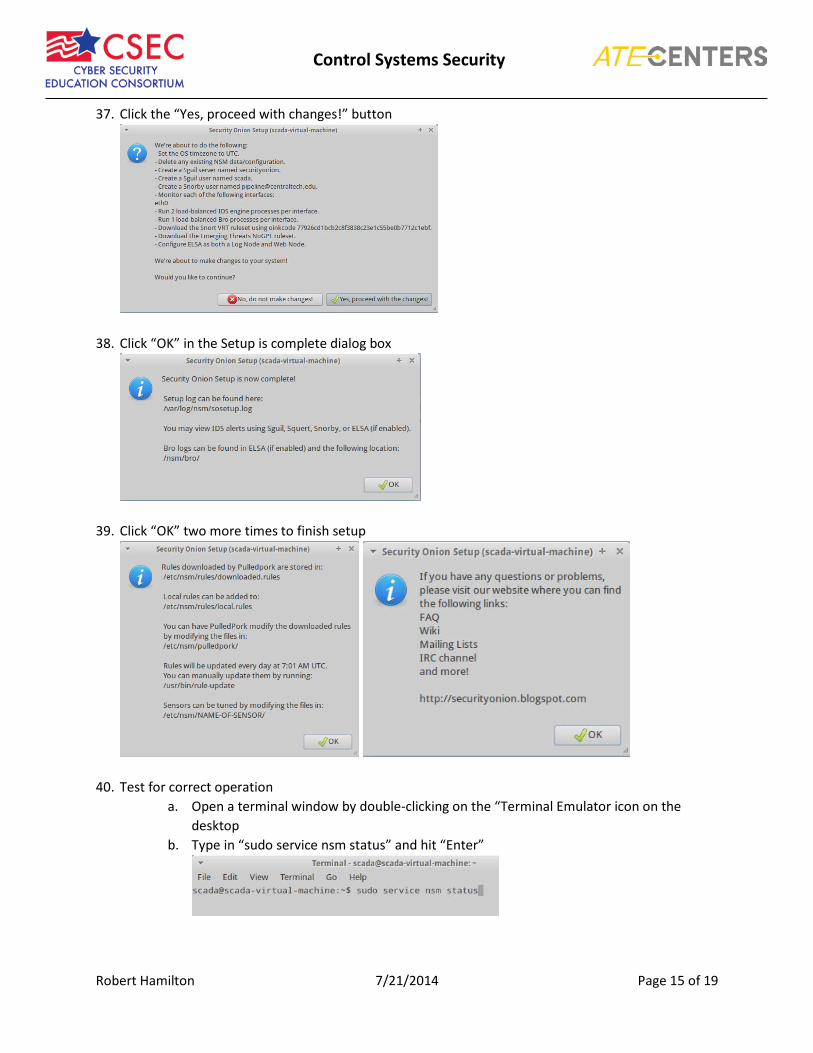
37. Click the “Yes, proceed with changes!” button
38. Click “OK” in the Setup is complete dialog box
39. Click “OK” two more times to finish setup
40. Test for correct operation a. Open a terminal window by double-clicking on the “Terminal Emulator icon on the
desktop b. Type in “sudo service nsm status” and hit “Enter”
Robert Hamilton 7/21/2014 Page 15 of 19

Control Systems Security
c. Verify that all items show a green “OK” for their status
41. (optional) Generate test traffic to test IDS a. Open terminal window if not already open b. Type in “curl www.testmyids.com” and hit “Enter”
42. (optional) Check for alerts in the Snorby web interface a. Double-click the “Snorby” icon on the desktop b. Click the “Proceed anyway” button in the security certificate warning window c. Enter the email address used above and enter the password then click the “Welcome,
Sign In” button
Robert Hamilton 7/21/2014 Page 16 of 19

Control Systems Security
Part Three – Configure and Test IDS for Control Systems
1. Start the Security Onion vm and login, if necessary. 2. Open Terminal window 3. Type “sudo /usr/bin/rule-update –c /etc/nsm/pulledpork/pulledpork.conf” and hit “Enter” 4. Make note of the number of Enabled and Disabled Rules in the results
5. Edit the pulledpork enablesid.conf file using the nano command line editor a. In a Terminal window type “nano /etc/nsm/pulledpork/enablesid.conf
b. Find these lines at about line 30
# Example of modifying state for specific categories entirely (see README.CATEGORIES) # VRT-web-iis,ET-shellcode,ET-emergingthreats-smtp,Custom-shellcode,Custom-emergingthreats-smtp
c. After these lines, add a new line containing “scada”. This adds the scada ruleset to the pulledpork downloads NOTE: See README.CATEGORIES at https://code.google.com/p/pulledpork/source/browse/trunk/doc/README.CATEGORIES?r=225
Robert Hamilton 7/21/2014 Page 17 of 19

Control Systems Security
6. Rerun /usr/bin/rule-update -c /etc/nsm/pulledpork/pulledpork.conf 7. Note the change in the output.
8. There are three basic pre-defined rule-sets in Security Onion a. Connectivity b. Balanced c. Security
9. To enable the security rules, complete the following steps. a. Open a Terminal window b. Type “sudo /usr/bin/rule-update –c /etc/nsm/pulledpork/pulledpork.conf –I security”
and hit “Enter”
10. To see the SCADA rules that were enabled: a. Open a Terminal window b. Type “cat /etc/nsm/rules/downloaded.rules |grep SCADA |more” and hit “Enter”
11. To generate control system alerts, complete the following steps: a. Download or navigate to the packet capture files specified by the instructor and copy to
the Security Onion vm. Make note of the path to the files. b. Extract the files if contained in a zipped file. c. Open a Terminal window d. Change to the location containing the packet capture files e. The replay utility TCPreplay is used to replay the packets.
Robert Hamilton 7/21/2014 Page 18 of 19

Control Systems Security
f. Type in “sudo tcpreplay –t - -intf1=eth1 modbus_test_data_part1.pcap”. This will replay
the modbus_test_data_part1.pcap file on the eth1 network adapter.
g. Substitute different file names for the Modbus file name at the end of the command to
run other packet capture files. The –t switch runs the packets at maximum speed. 12. Check for alerts in the Snorby web interface
a. Double-click the “Snorby” icon on the desktop b. Click the “Proceed anyway” button in the security certificate warning window
c. Enter the email address used above and enter the password then click the “Welcome,
Sign In” button
13. Identify the different protocols and signatures used in the generated alerts.
Robert Hamilton 7/21/2014 Page 19 of 19