Embed Size (px)
Citation preview
PAGE 1 OF 37 Copyright BMC Software, Inc. 2017
Control-M Workload Automation
Deploying Control-M in AWS Cloud
White Paper
Control-M Workload Automation
Deploying Control-M in Amazon Web Services
Cloud for version 9.0.00
PAGE 2 OF 37 Copyright BMC Software, Inc. 2017
Control-M Workload Automation
Deploying Control-M in AWS Cloud
Table of Contents Table of Contents ............................................................................................................................................................................... 2
Disclaimer ................................................................................................................................................................................... 2 Executive Summary ........................................................................................................................................................................... 3
Preparation Activities ......................................................................................................................................................................... 5
Installing Control-M on EC2 Unix/Linux Platform: ............................................................................................................................. 6
Installing Control-M on Windows Platform: ..................................................................................................................................... 14
Installing Control-M from AWS Marketplace ................................................................................................................................... 20
Creating instance from AWS Marketplace .............................................................................................................................. 20 Creating instance from AWS Marketplace under EC2 Console ............................................................................................ 24 Post Procedure – Activate Control-M ...................................................................................................................................... 28 Additional Information .............................................................................................................................................................. 32
Activities after recycling the AMI ...................................................................................................................................................... 35
Where to Get the Latest Product Information ................................................................................................................................. 37
Disclaimer BMC Software is providing this information to help users and potential users of BMC Control-M Workload Automation version 9.0.00 to a verified path for using this product in AWS. BMC Software intends to provide meaningful and accurate information, but does not guarantee the information is relevant or appropriate to your computing environment. BMC Software does not make any warranty, expressed or implied, with respect to the information in this document, nor guarantees the accuracy, completeness, usefulness, or adequacy of this information. BMC Software will not be liable for any damages, including special, indirect, or consequential damages, arising out of or in connection with the use of the information provided in this document.
PAGE 3 OF 37 Copyright BMC Software, Inc. 2017
Control-M Workload Automation
Deploying Control-M in AWS Cloud
Executive Summary
Cloud Services Background
Cloud Services is a collection of remote computing services that together make up a cloud computing platform, offered over the Internet by different vendors of Cloud environment.
Server platforms are created and maintained by the Cloud Services Management Console. In Cloud Services, providers use the Cloud Instance to allow users to rent virtual computers called “instances”. There are many features available for these virtual computer instances including, Auto-Scaling
1, Network and Storage management. This enables users to handle
changes in infrastructure requirements that are normally affected by spikes and outages and reduces the need to forecast traffic.
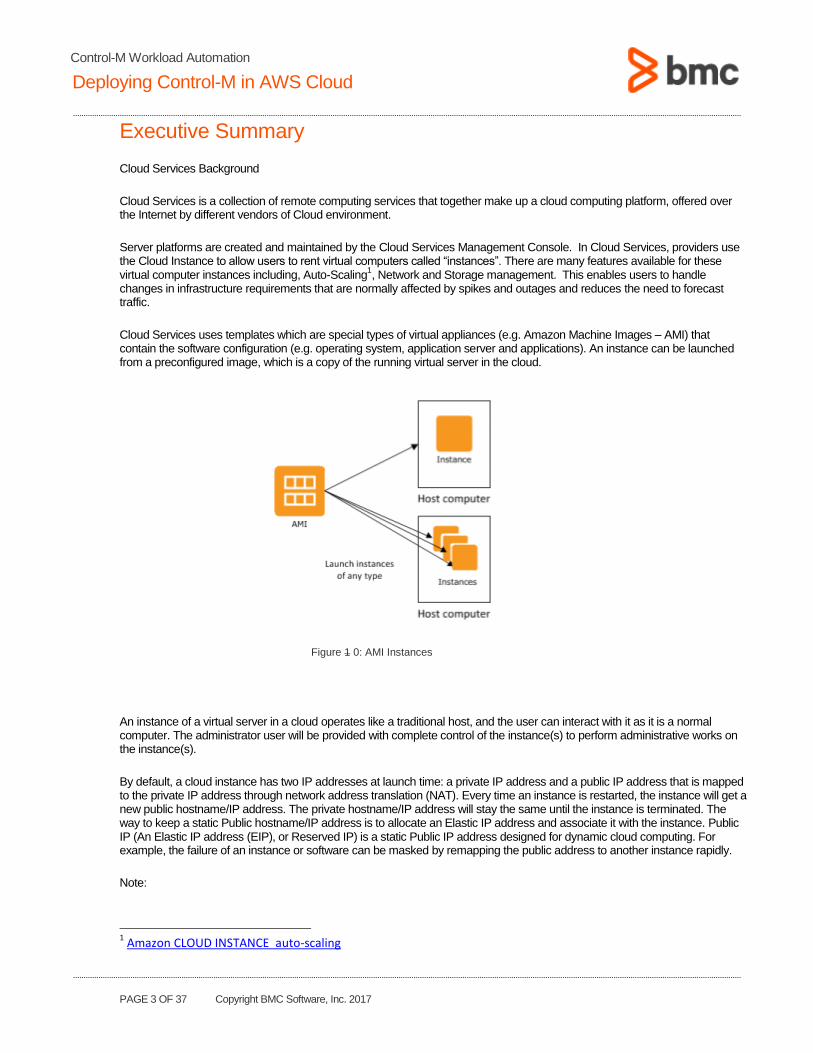
Cloud Services uses templates which are special types of virtual appliances (e.g. Amazon Machine Images – AMI) that contain the software configuration (e.g. operating system, application server and applications). An instance can be launched from a preconfigured image, which is a copy of the running virtual server in the cloud.
Figure 1 0: AMI Instances
An instance of a virtual server in a cloud operates like a traditional host, and the user can interact with it as it is a normal computer. The administrator user will be provided with complete control of the instance(s) to perform administrative works on the instance(s).
By default, a cloud instance has two IP addresses at launch time: a private IP address and a public IP address that is mapped to the private IP address through network address translation (NAT). Every time an instance is restarted, the instance will get a new public hostname/IP address. The private hostname/IP address will stay the same until the instance is terminated. The way to keep a static Public hostname/IP address is to allocate an Elastic IP address and associate it with the instance. Public IP (An Elastic IP address (EIP), or Reserved IP) is a static Public IP address designed for dynamic cloud computing. For example, the failure of an instance or software can be masked by remapping the public address to another instance rapidly.
Note:
1 Amazon CLOUD INSTANCE auto-scaling
PAGE 4 OF 37 Copyright BMC Software, Inc. 2017
Control-M Workload Automation
Deploying Control-M in AWS Cloud
- The private IP address of the instance is not reachable from the Internet. - Ensure that the hostnames used in the configuration files that need to be accessed externally resolve to the public IP
address within the local network.
PAGE 5 OF 37 Copyright BMC Software, Inc. 2017
Control-M Workload Automation
Deploying Control-M in AWS Cloud
Preparation Activities
EC2 on Windows Platform
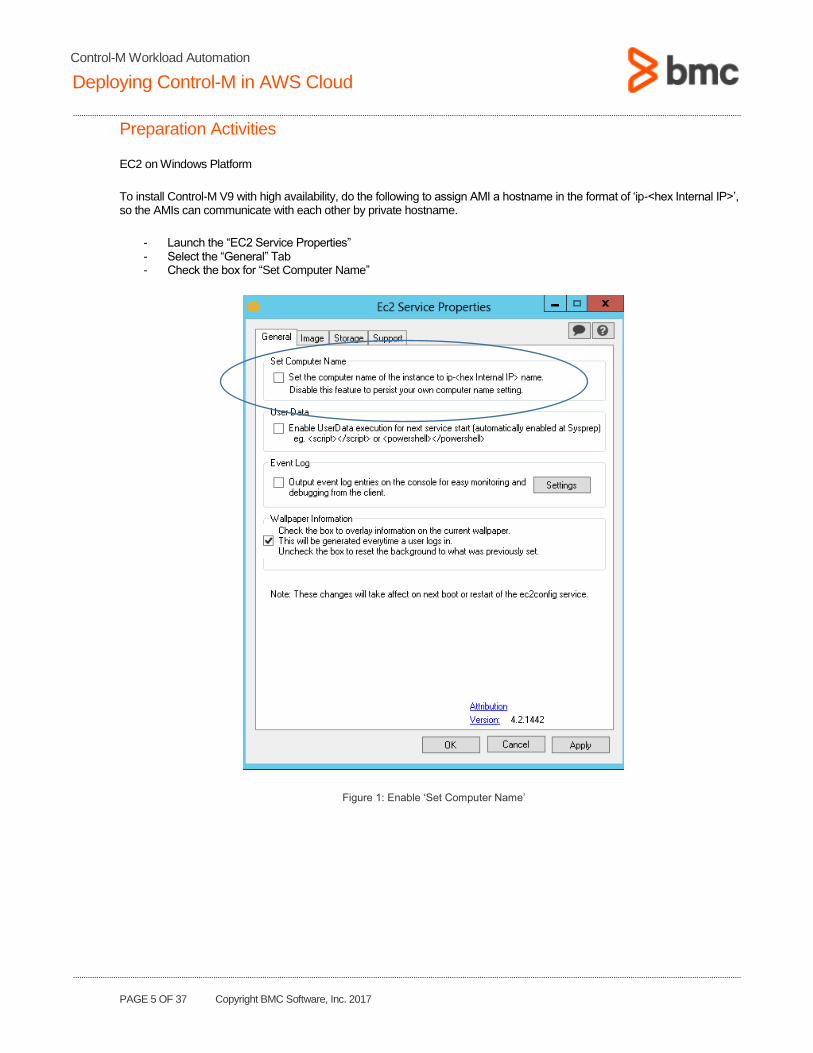
To install Control-M V9 with high availability, do the following to assign AMI a hostname in the format of ‘ip-<hex Internal IP>’, so the AMIs can communicate with each other by private hostname.
- Launch the “EC2 Service Properties” - Select the “General” Tab - Check the box for “Set Computer Name”
Figure 1: Enable ‘Set Computer Name’
PAGE 6 OF 37 Copyright BMC Software, Inc. 2017
Control-M Workload Automation
Deploying Control-M in AWS Cloud
Installing Control-M on EC2 Unix/Linux Platform:
Below is the step by step procedure for creating a virtual server using AWS and for installing Control-M with RDS Oracle. As the creation of an instance is Cloud specific, do setup the cloud instance using the procedures specified by the Cloud vendor.
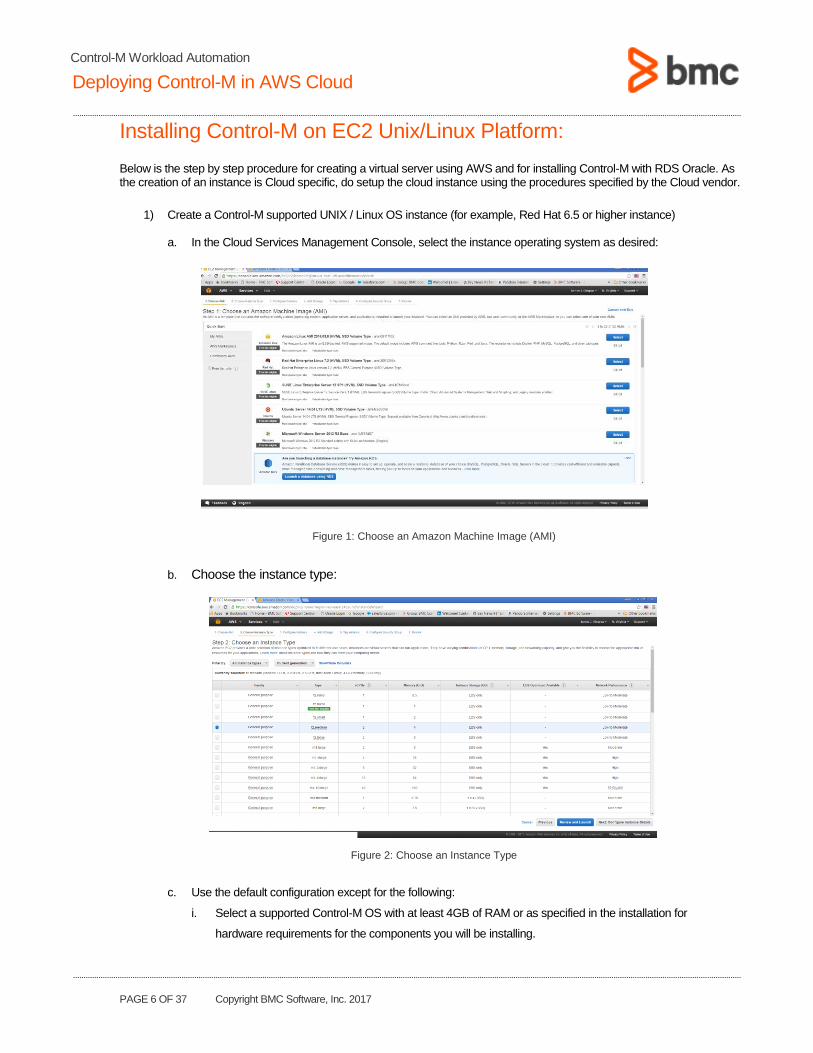
1) Create a Control-M supported UNIX / Linux OS instance (for example, Red Hat 6.5 or higher instance) a. In the Cloud Services Management Console, select the instance operating system as desired:
Figure 1: Choose an Amazon Machine Image (AMI)
b. Choose the instance type:
Figure 2: Choose an Instance Type
c. Use the default configuration except for the following:
i. Select a supported Control-M OS with at least 4GB of RAM or as specified in the installation for
hardware requirements for the components you will be installing.
PAGE 7 OF 37 Copyright BMC Software, Inc. 2017
Control-M Workload Automation
Deploying Control-M in AWS Cloud
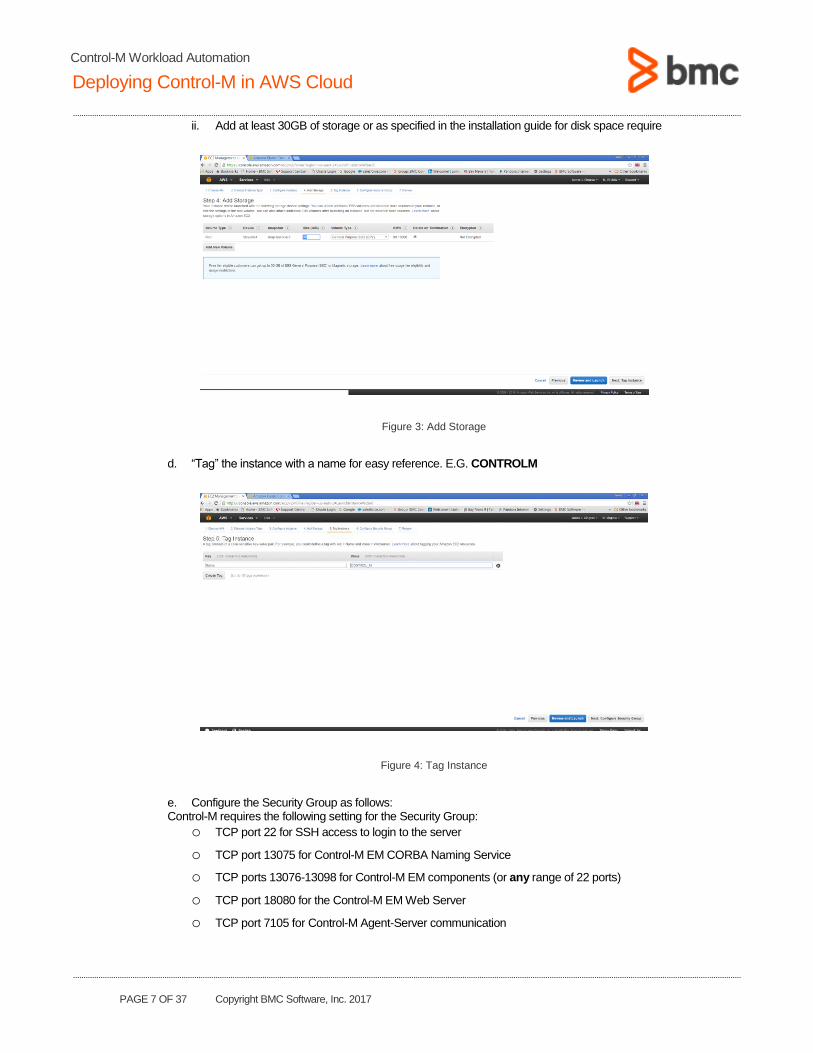
ii. Add at least 30GB of storage or as specified in the installation guide for disk space require
Figure 3: Add Storage
d. “Tag” the instance with a name for easy reference. E.G. CONTROLM
Figure 4: Tag Instance
e. Configure the Security Group as follows: Control-M requires the following setting for the Security Group:
o TCP port 22 for SSH access to login to the server
o TCP port 13075 for Control-M EM CORBA Naming Service
o TCP ports 13076-13098 for Control-M EM components (or any range of 22 ports)
o TCP port 18080 for the Control-M EM Web Server
o TCP port 7105 for Control-M Agent-Server communication
PAGE 8 OF 37 Copyright BMC Software, Inc. 2017
Control-M Workload Automation
Deploying Control-M in AWS Cloud
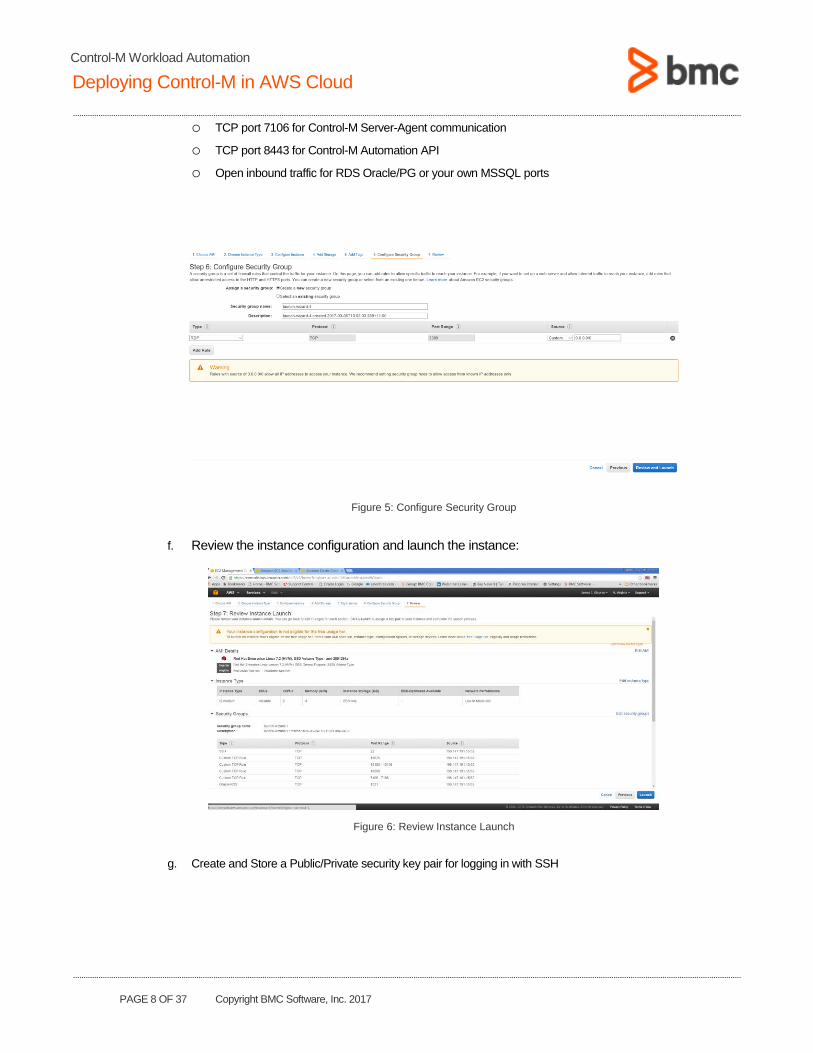
o TCP port 7106 for Control-M Server-Agent communication
o TCP port 8443 for Control-M Automation API
o Open inbound traffic for RDS Oracle/PG or your own MSSQL ports
Figure 5: Configure Security Group
f. Review the instance configuration and launch the instance:
Figure 6: Review Instance Launch
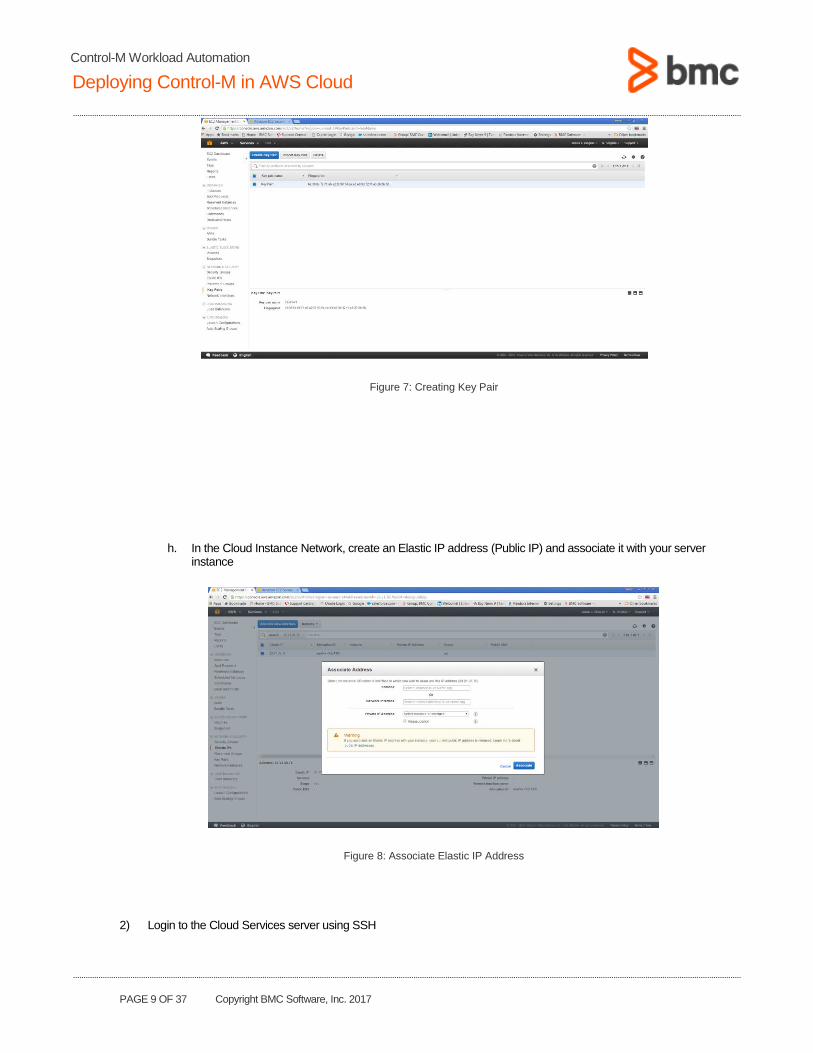
g. Create and Store a Public/Private security key pair for logging in with SSH
PAGE 9 OF 37 Copyright BMC Software, Inc. 2017
Control-M Workload Automation
Deploying Control-M in AWS Cloud
Figure 7: Creating Key Pair
h. In the Cloud Instance Network, create an Elastic IP address (Public IP) and associate it with your server
instance
Figure 8: Associate Elastic IP Address
2) Login to the Cloud Services server using SSH
PAGE 10 OF 37 Copyright BMC Software, Inc. 2017
Control-M Workload Automation
Deploying Control-M in AWS Cloud
a. Login username is “Cloud Instance” user, not root. b. SSH login format: ssh -i <path>/<private key file> <Cloud Instance user>@<public hostname> c. Login as root: sudo su –
Note: you may not be able to SSH from within the company network to the Cloud Services instance. You may need to have IT open the Cloud Services instance IP address for SSH or access the Cloud Services instance from inside the company network.
3) Configure the cloud instance
a. Create the controlm unix group: groupadd control Note: For Linux environment, it is recommended that Control-M Enterprise Manager and Control-M/Server are installed in its own individual OS accounts. Using separate accounts o Create the Control/EM unix user: useradd –d /<home>/ctmem –g controlm –s /bin/csh ctmem o Create the Control/Server unix user: useradd –d /<home>/ctmserv –g controlm –s /bin/csh ctmserv
After installing Control-M/EM repeat steps 4 – 7 below for Control-M/Server. Step 5 should be performed only once on a given machine.
Using OneInstall o Create the controlm unix user: useradd –d /<home>/ctm –g controlm –s /bin/csh ctm
Note: The Control-M OneInstall will install the EM V9 (64 bit), Server V9(64 bit), Agent V9(64 bit) and the CM’s (64bit) under one Unix user. The OneInstall requires the unix user shell to be either csh or tcsh since these are the only shells all 3 products support. (Use OneInstall for trial purposes only.)
b. Change permission on the Control-M EM and Control-M/Server home directory to 755:
chmod 755 /<home>/ctm
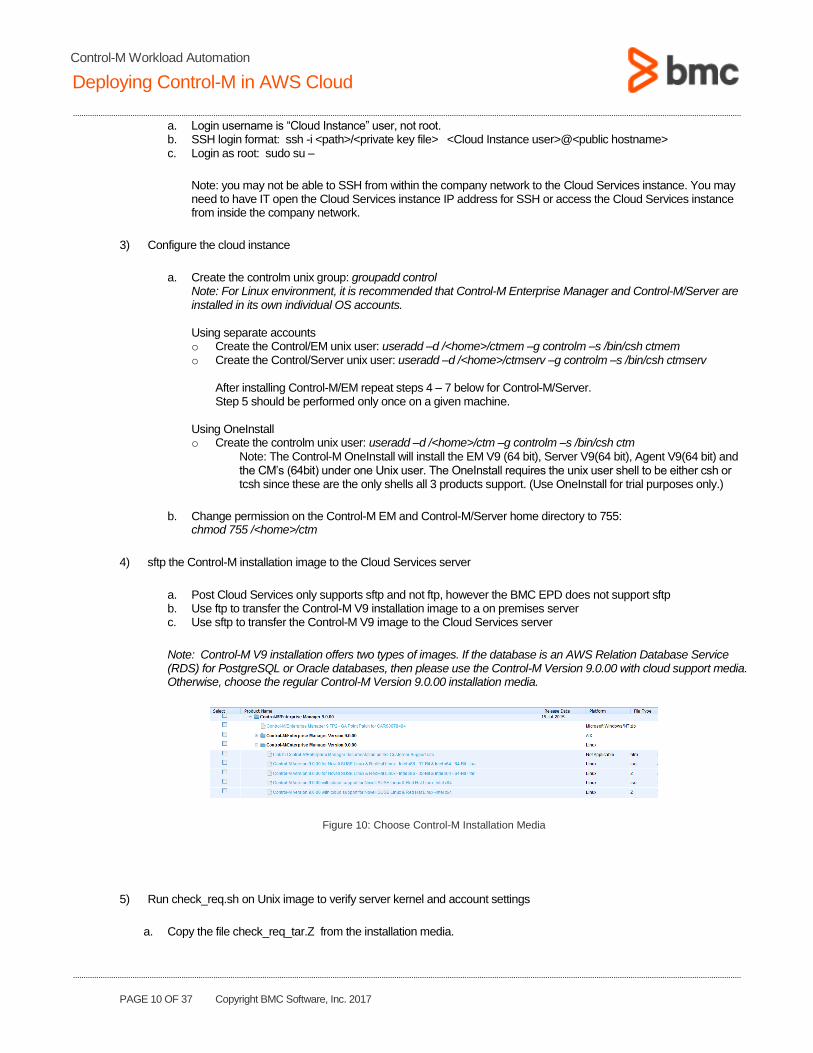
4) sftp the Control-M installation image to the Cloud Services server
a. Post Cloud Services only supports sftp and not ftp, however the BMC EPD does not support sftp b. Use ftp to transfer the Control-M V9 installation image to a on premises server c. Use sftp to transfer the Control-M V9 image to the Cloud Services server
Note: Control-M V9 installation offers two types of images. If the database is an AWS Relation Database Service (RDS) for PostgreSQL or Oracle databases, then please use the Control-M Version 9.0.00 with cloud support media. Otherwise, choose the regular Control-M Version 9.0.00 installation media.
Figure 10: Choose Control-M Installation Media
5) Run check_req.sh on Unix image to verify server kernel and account settings
a. Copy the file check_req_tar.Z from the installation media.
PAGE 11 OF 37 Copyright BMC Software, Inc. 2017
Control-M Workload Automation
Deploying Control-M in AWS Cloud
b. Ensure Korn shell is installed on the system. If not, install Korn shell as below: o Run: yum install ksh
The Korn shell will be needed later for installing fixpacks c. Ensure csh, psmisc, bc, flex, io libraries are install. If not, install the libraries as below
o yum install csh o yum install psmisc o yum install libaio o yum install bc o yum install flex
NOTE:
- If the following check_req error occurs “Not enough free swap space. At least 4GB free swap is required.”, then the following steps will create a 6GB swap space file but for production systems you should allocate a swap device instead
i. Create the swap file: dd if=/dev/zero of=/swapfile bs=1024 count=6291456 ii. Change the permission of the new swap file: chmod 0600 /swapfile iii. Setup the swap file with the command: mkswap /swapfile iv. enable the swap file: swapon /swapfile v. Enable it at boot time- edit /etc/fstab to include: /swapfile swap swap defaults 0 0 vi. Verify the swap file space: cat /proc/swaps or free
- If the following check_req error occurs “Change the kernel.sem (semmni) value to higher or equal to 500” o To view current settngs run: cat /proc/sys/kernel/sem o To change settngs run: sysctl –w kernel.sem=”250 32000 100 500”
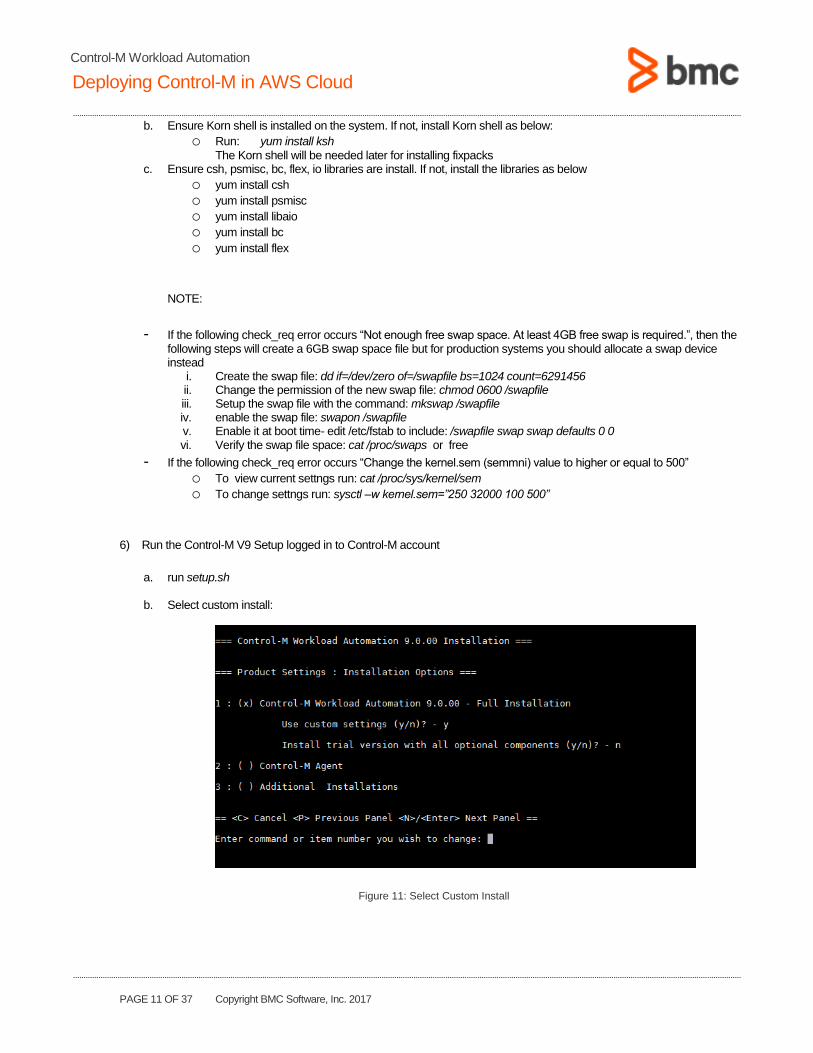
6) Run the Control-M V9 Setup logged in to Control-M account
a. run setup.sh
b. Select custom install:
Figure 11: Select Custom Install
PAGE 12 OF 37 Copyright BMC Software, Inc. 2017
Control-M Workload Automation
Deploying Control-M in AWS Cloud
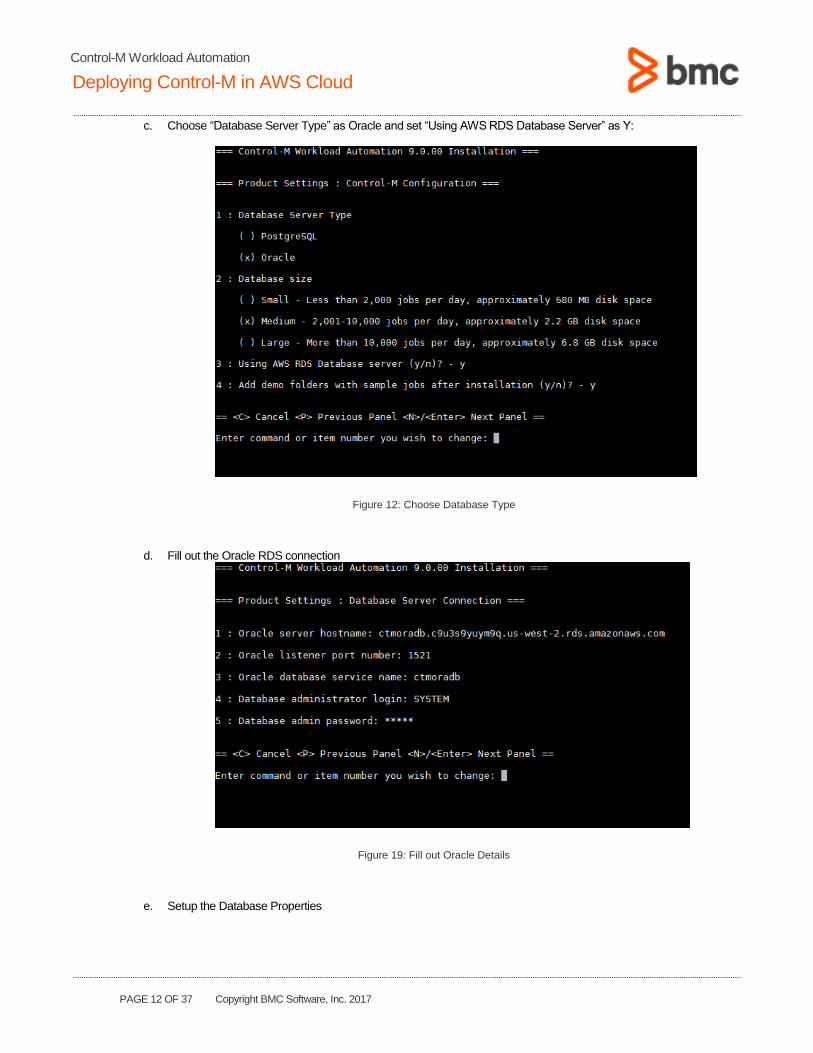
c. Choose “Database Server Type” as Oracle and set “Using AWS RDS Database Server” as Y:
Figure 12: Choose Database Type
d. Fill out the Oracle RDS connection
Figure 19: Fill out Oracle Details
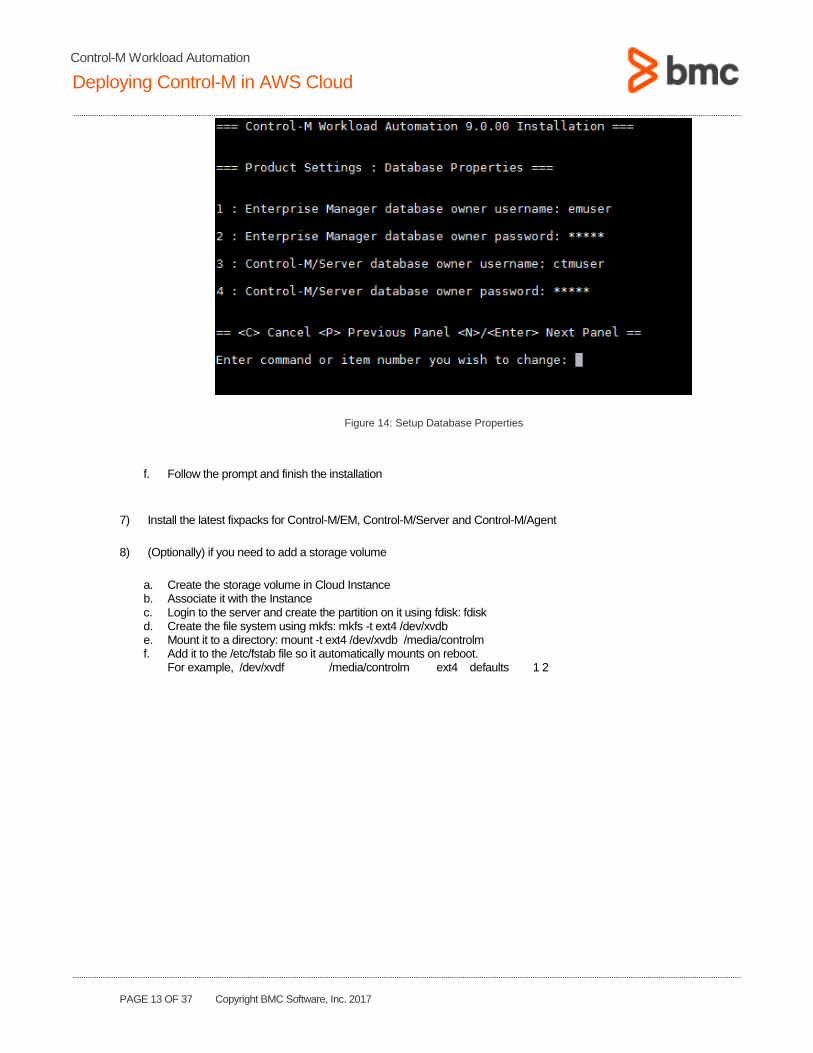
e. Setup the Database Properties
PAGE 13 OF 37 Copyright BMC Software, Inc. 2017
Control-M Workload Automation
Deploying Control-M in AWS Cloud
Figure 14: Setup Database Properties
f. Follow the prompt and finish the installation
7) Install the latest fixpacks for Control-M/EM, Control-M/Server and Control-M/Agent
8) (Optionally) if you need to add a storage volume
a. Create the storage volume in Cloud Instance b. Associate it with the Instance c. Login to the server and create the partition on it using fdisk: fdisk d. Create the file system using mkfs: mkfs -t ext4 /dev/xvdb e. Mount it to a directory: mount -t ext4 /dev/xvdb /media/controlm f. Add it to the /etc/fstab file so it automatically mounts on reboot.
For example, /dev/xvdf /media/controlm ext4 defaults 1 2
PAGE 14 OF 37 Copyright BMC Software, Inc. 2017
Control-M Workload Automation
Deploying Control-M in AWS Cloud
Installing Control-M on Windows Platform:
Below is the step by step procedure for using AWS to create a Windows virtual server and for installing Control-M with RDS PostgreSQL.
1) Create a Control-M Supported Windows Operating system (for example Windows 2012 Server instance). For the procedure, please refer to the Step (1) of Installing Control-M on EC2 Unix/Linux Platform and select desired Windows OS instead.
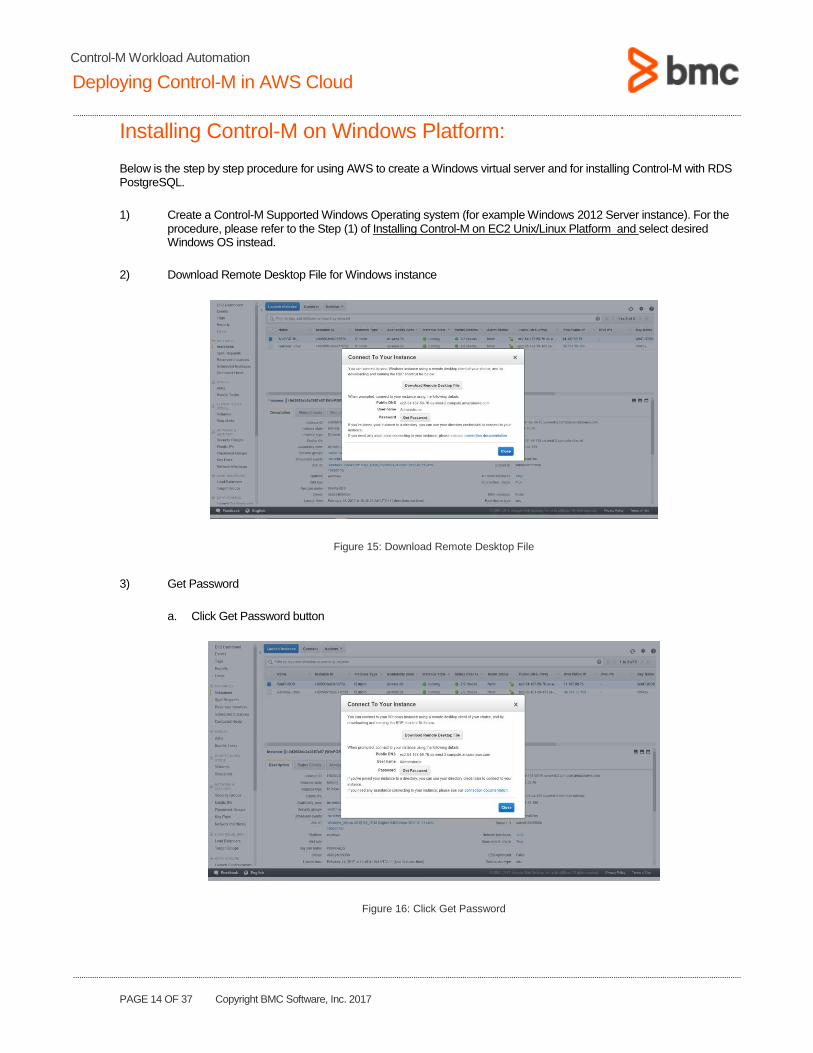
2) Download Remote Desktop File for Windows instance
Figure 15: Download Remote Desktop File
3) Get Password
a. Click Get Password button
Figure 16: Click Get Password
PAGE 15 OF 37 Copyright BMC Software, Inc. 2017
Control-M Workload Automation
Deploying Control-M in AWS Cloud
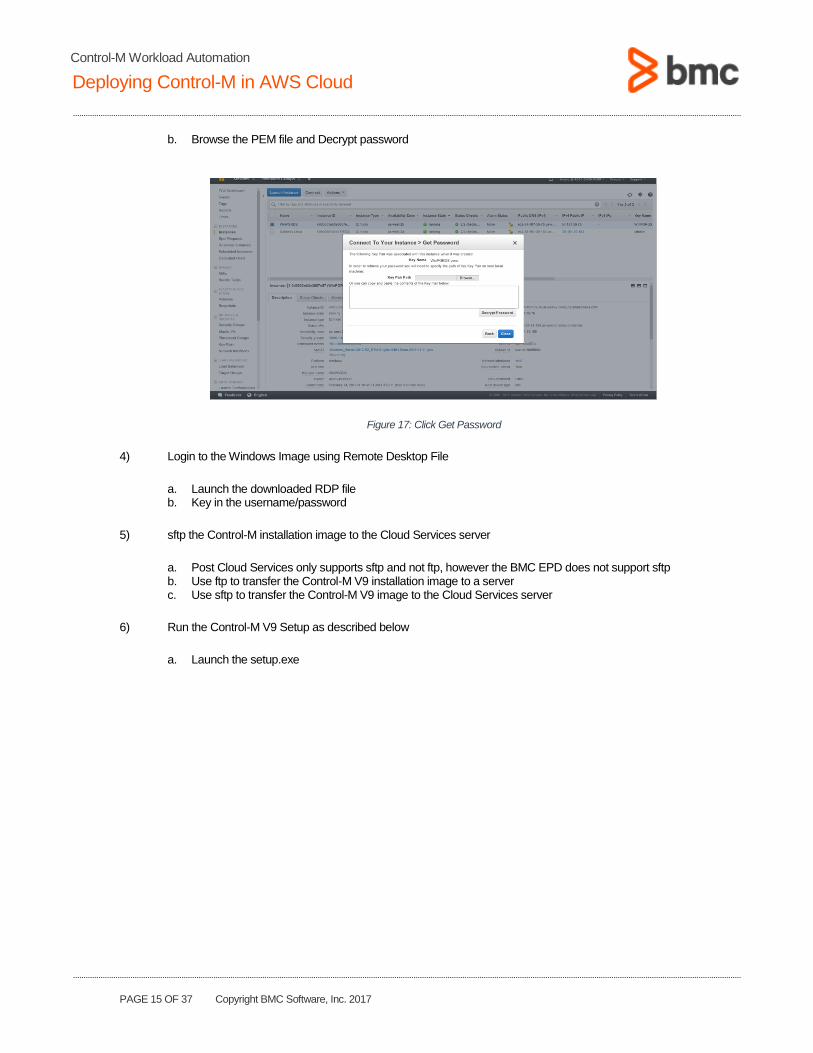
b. Browse the PEM file and Decrypt password
Figure 17: Click Get Password
4) Login to the Windows Image using Remote Desktop File
a. Launch the downloaded RDP file b. Key in the username/password
5) sftp the Control-M installation image to the Cloud Services server
a. Post Cloud Services only supports sftp and not ftp, however the BMC EPD does not support sftp b. Use ftp to transfer the Control-M V9 installation image to a server c. Use sftp to transfer the Control-M V9 image to the Cloud Services server
6) Run the Control-M V9 Setup as described below
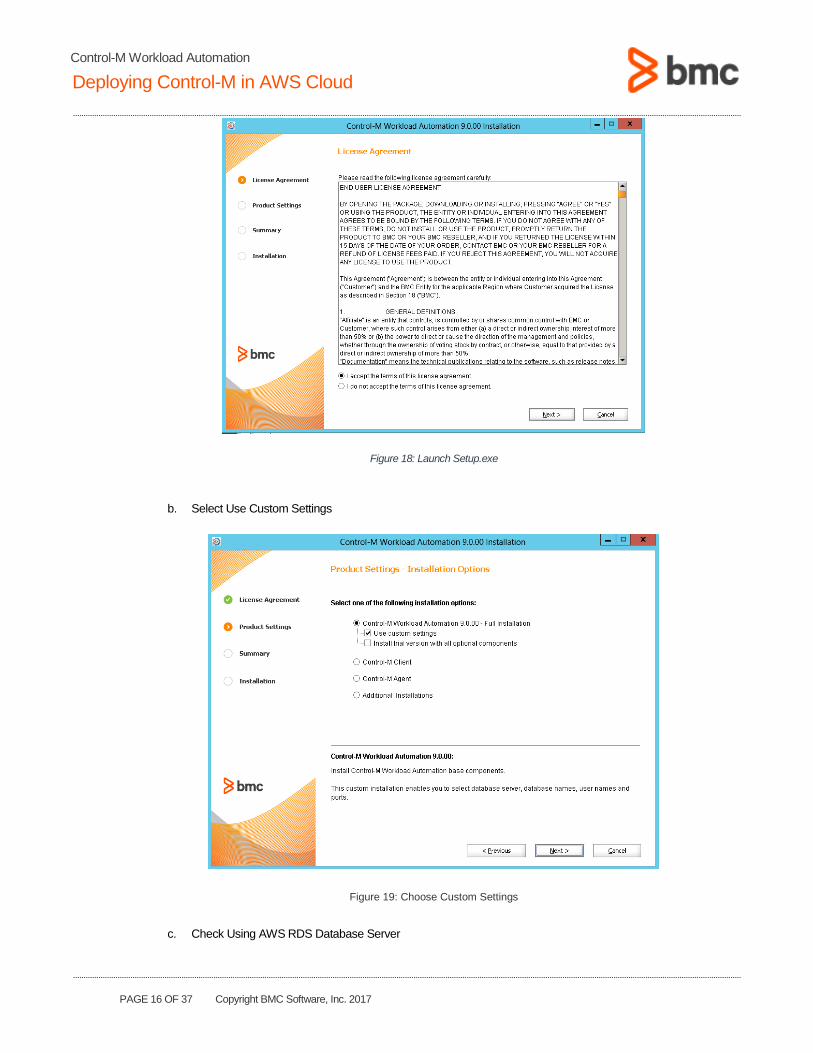
a. Launch the setup.exe
PAGE 16 OF 37 Copyright BMC Software, Inc. 2017
Control-M Workload Automation
Deploying Control-M in AWS Cloud
Figure 18: Launch Setup.exe
b. Select Use Custom Settings
Figure 19: Choose Custom Settings
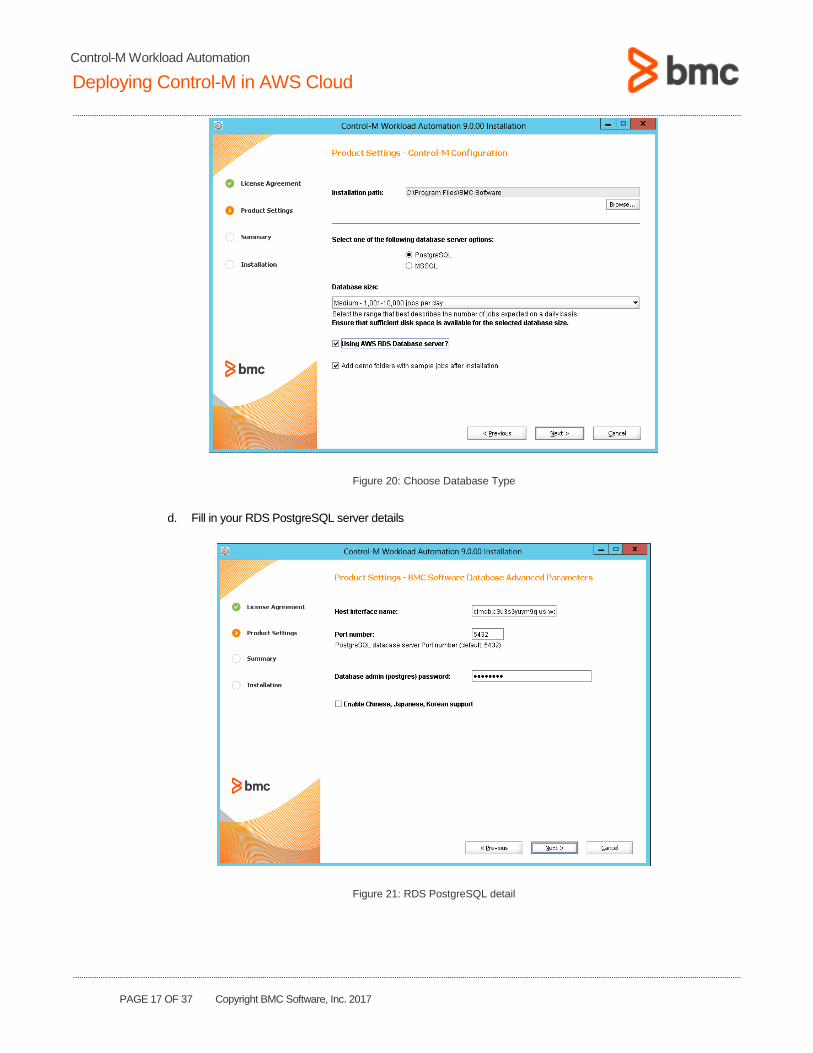
c. Check Using AWS RDS Database Server
PAGE 17 OF 37 Copyright BMC Software, Inc. 2017
Control-M Workload Automation
Deploying Control-M in AWS Cloud
Figure 20: Choose Database Type
d. Fill in your RDS PostgreSQL server details
Figure 21: RDS PostgreSQL detail
PAGE 18 OF 37 Copyright BMC Software, Inc. 2017
Control-M Workload Automation
Deploying Control-M in AWS Cloud
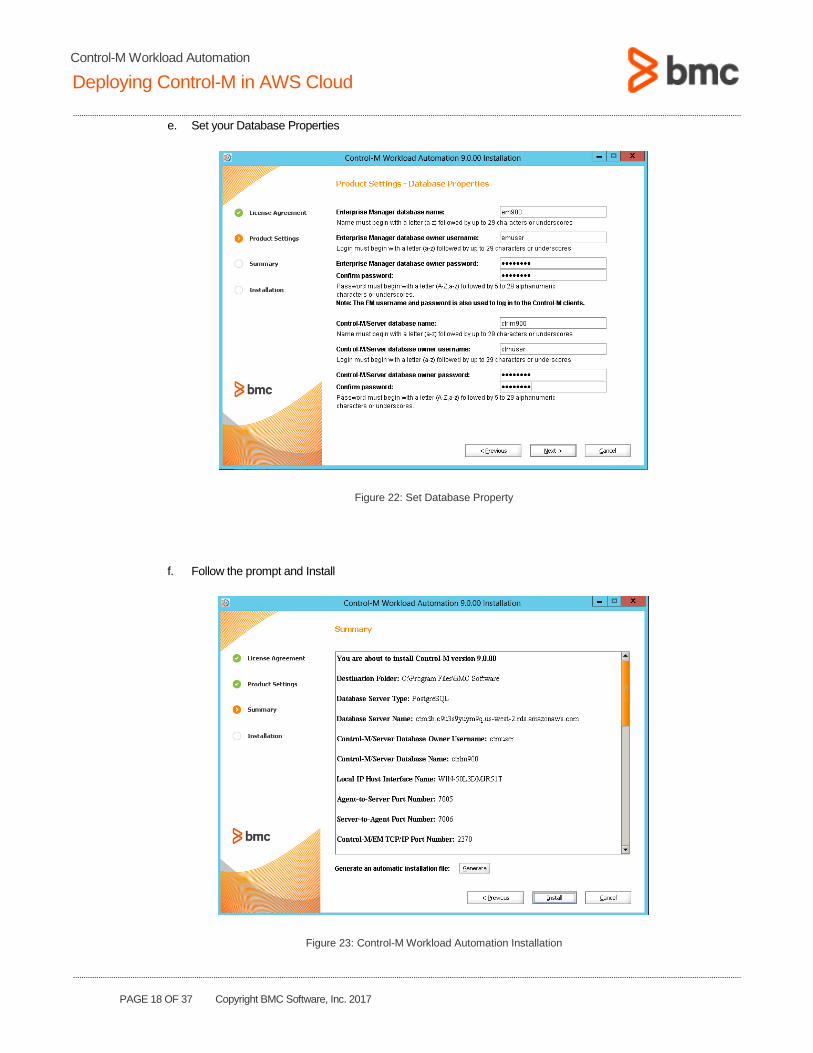
e. Set your Database Properties
Figure 22: Set Database Property
f. Follow the prompt and Install
Figure 23: Control-M Workload Automation Installation
PAGE 19 OF 37 Copyright BMC Software, Inc. 2017
Control-M Workload Automation
Deploying Control-M in AWS Cloud
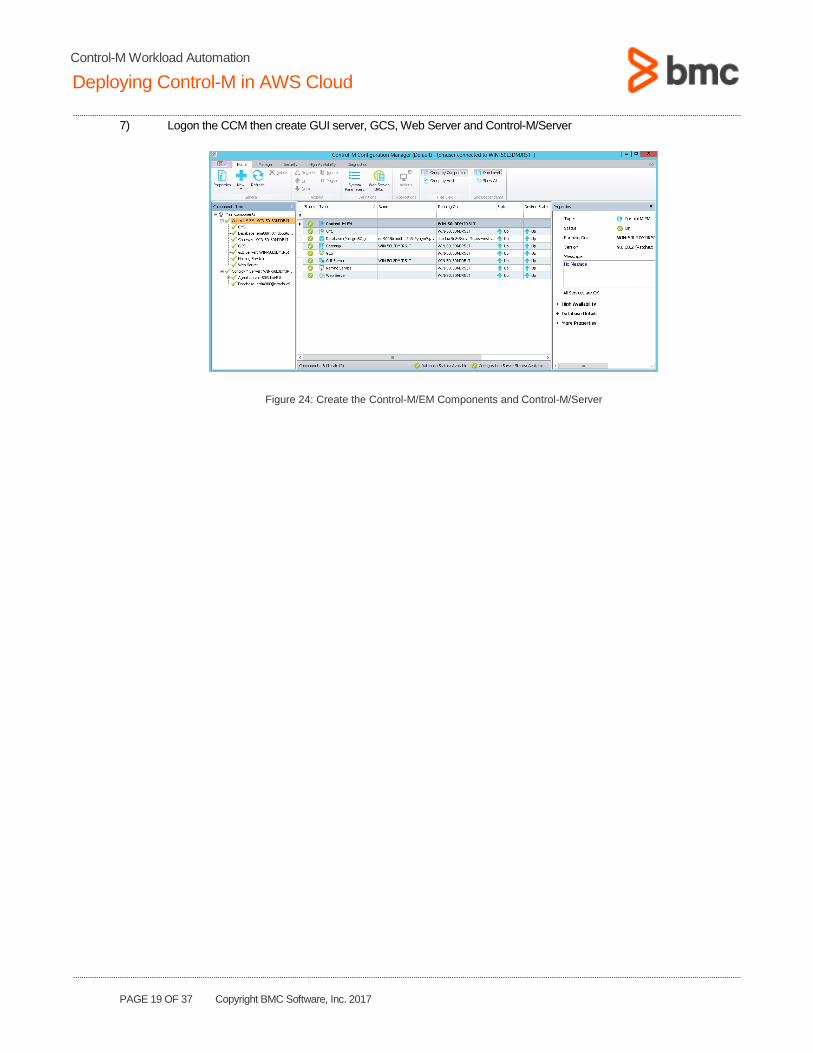
7) Logon the CCM then create GUI server, GCS, Web Server and Control-M/Server
Figure 24: Create the Control-M/EM Components and Control-M/Server
PAGE 20 OF 37 Copyright BMC Software, Inc. 2017
Control-M Workload Automation
Deploying Control-M in AWS Cloud
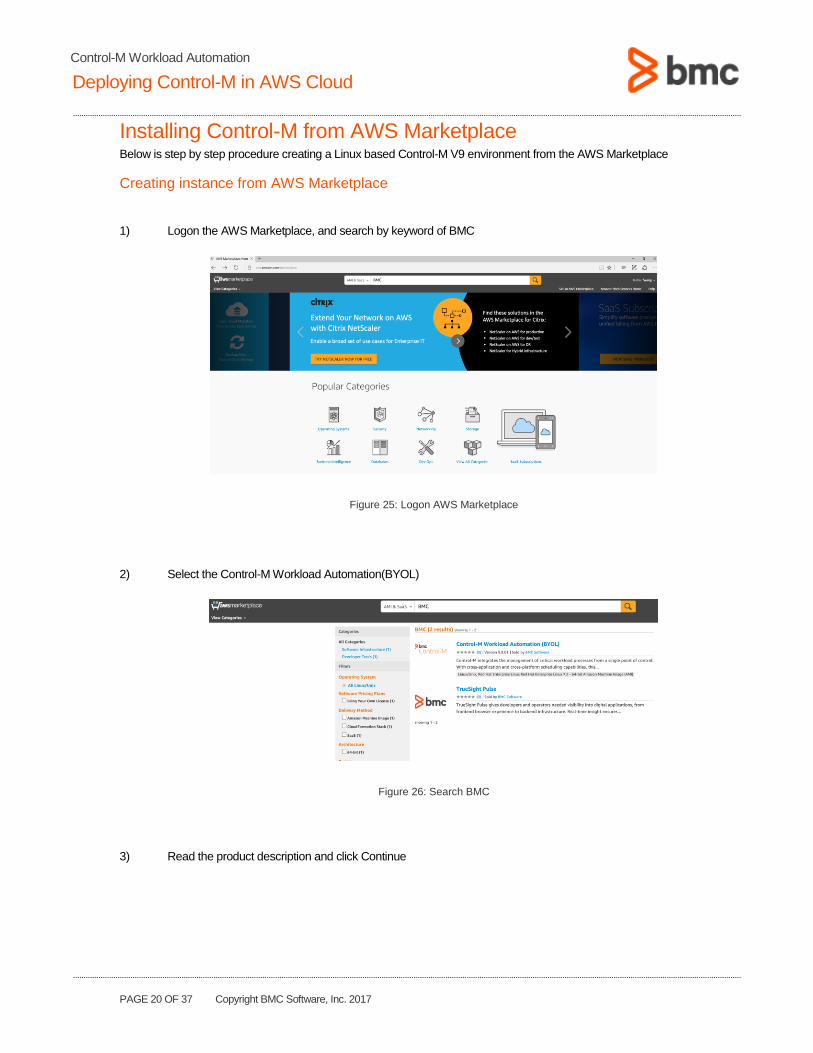
Installing Control-M from AWS Marketplace Below is step by step procedure creating a Linux based Control-M V9 environment from the AWS Marketplace
Creating instance from AWS Marketplace
1) Logon the AWS Marketplace, and search by keyword of BMC
Figure 25: Logon AWS Marketplace
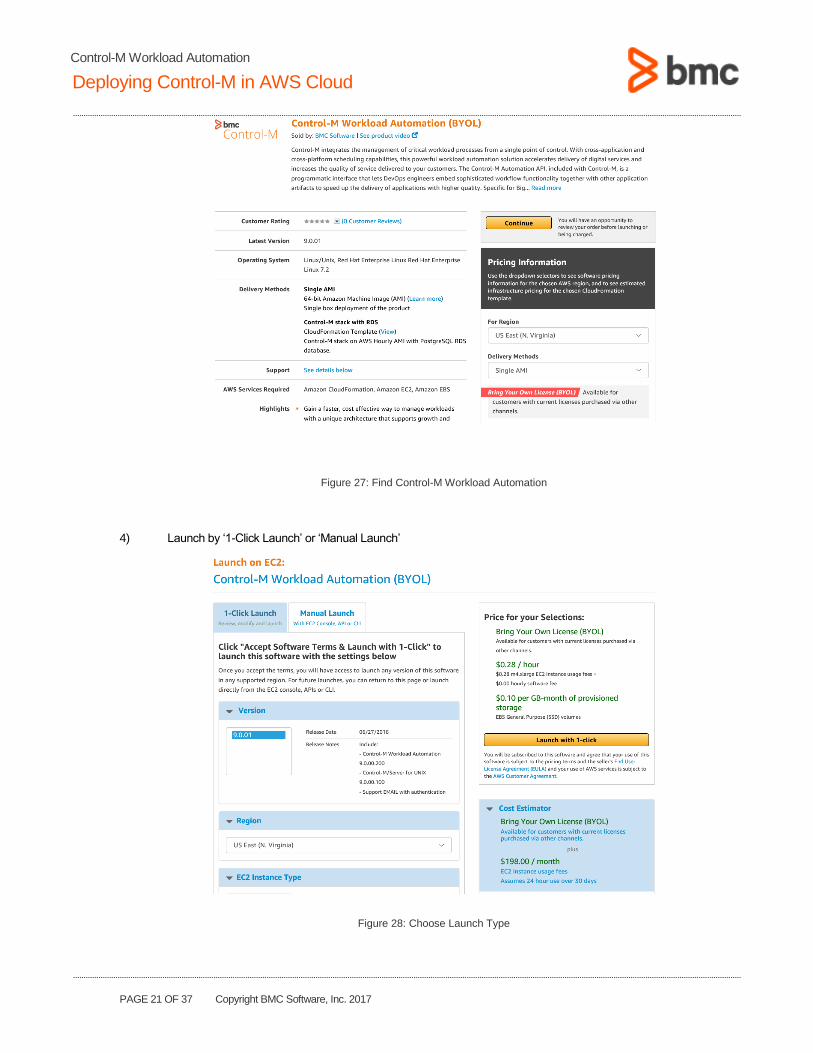
2) Select the Control-M Workload Automation(BYOL)
Figure 26: Search BMC
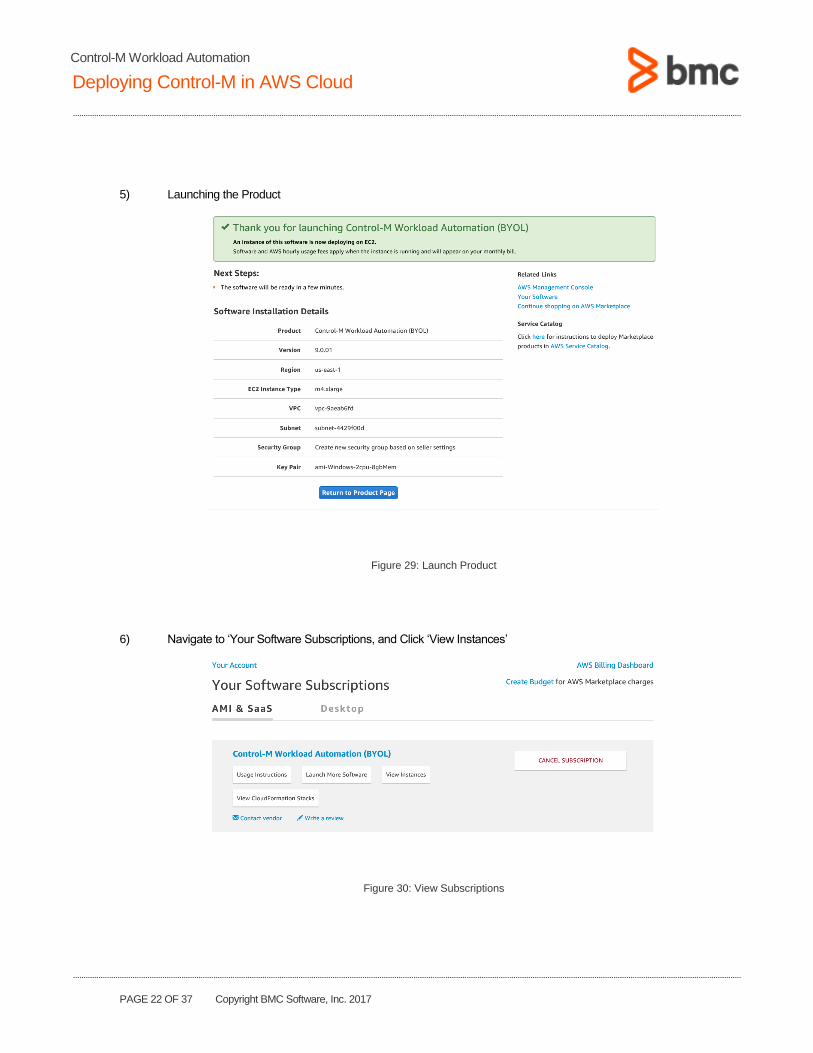
3) Read the product description and click Continue
PAGE 21 OF 37 Copyright BMC Software, Inc. 2017
Control-M Workload Automation
Deploying Control-M in AWS Cloud
Figure 27: Find Control-M Workload Automation
4) Launch by ‘1-Click Launch’ or ‘Manual Launch’
Figure 28: Choose Launch Type
PAGE 22 OF 37 Copyright BMC Software, Inc. 2017
Control-M Workload Automation
Deploying Control-M in AWS Cloud
5) Launching the Product
Figure 29: Launch Product
6) Navigate to ‘Your Software Subscriptions, and Click ‘View Instances’
Figure 30: View Subscriptions
PAGE 23 OF 37 Copyright BMC Software, Inc. 2017
Control-M Workload Automation
Deploying Control-M in AWS Cloud
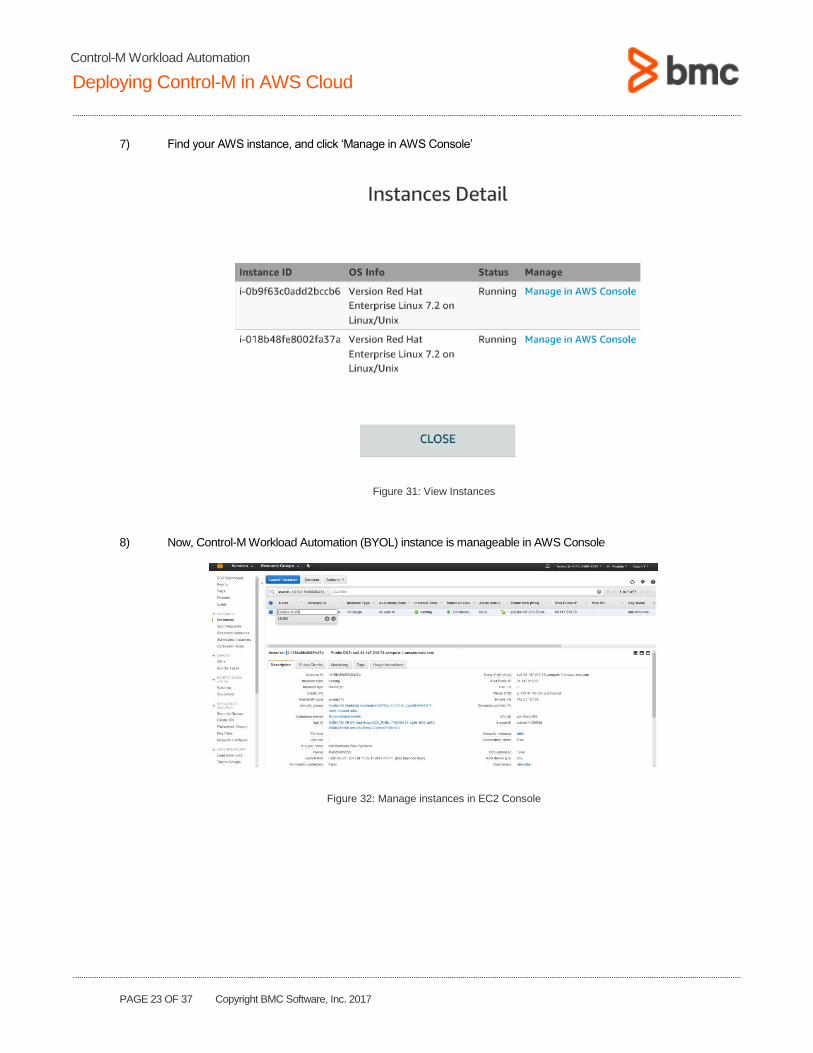
7) Find your AWS instance, and click ‘Manage in AWS Console’
Figure 31: View Instances
8) Now, Control-M Workload Automation (BYOL) instance is manageable in AWS Console
Figure 32: Manage instances in EC2 Console
PAGE 24 OF 37 Copyright BMC Software, Inc. 2017
Control-M Workload Automation
Deploying Control-M in AWS Cloud
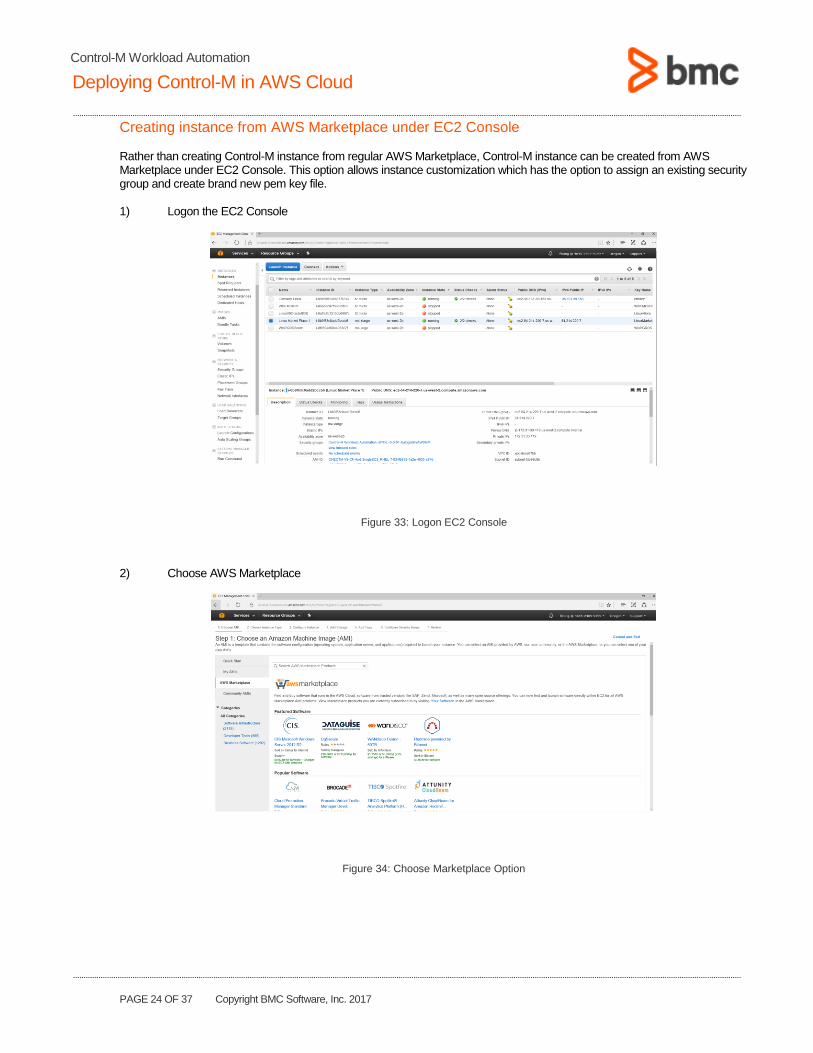
Creating instance from AWS Marketplace under EC2 Console
Rather than creating Control-M instance from regular AWS Marketplace, Control-M instance can be created from AWS Marketplace under EC2 Console. This option allows instance customization which has the option to assign an existing security group and create brand new pem key file. 1) Logon the EC2 Console
Figure 33: Logon EC2 Console
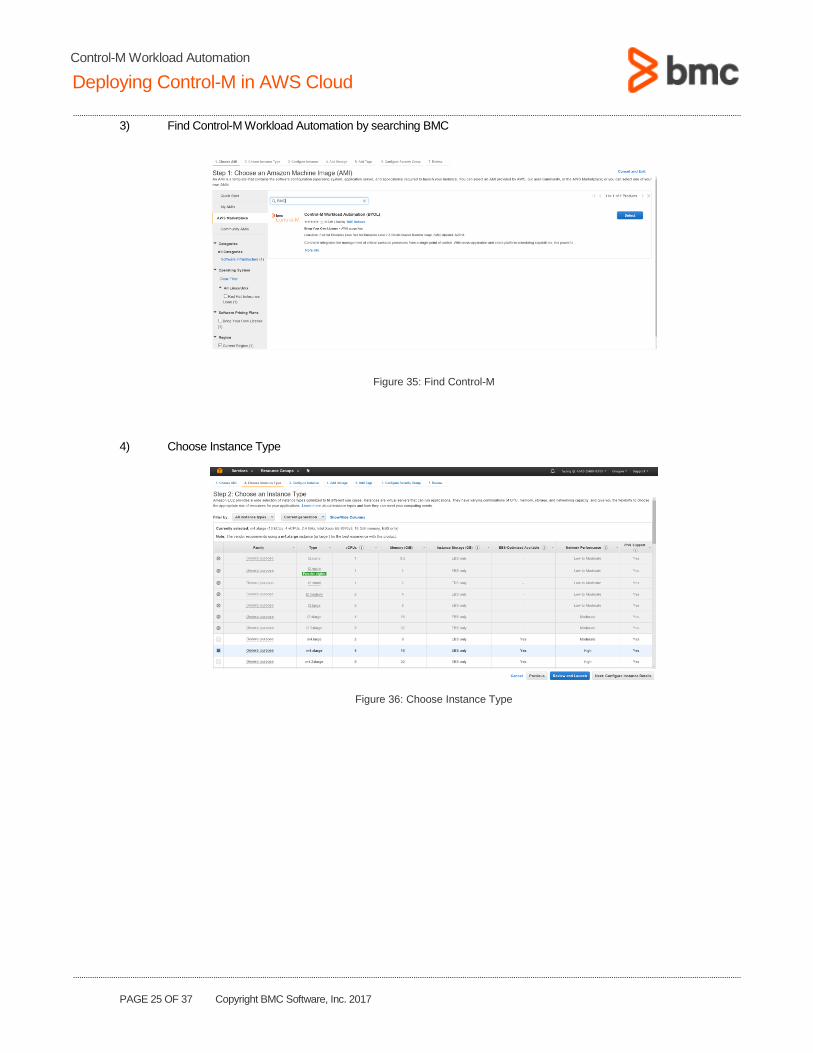
2) Choose AWS Marketplace
Figure 34: Choose Marketplace Option
PAGE 25 OF 37 Copyright BMC Software, Inc. 2017
Control-M Workload Automation
Deploying Control-M in AWS Cloud
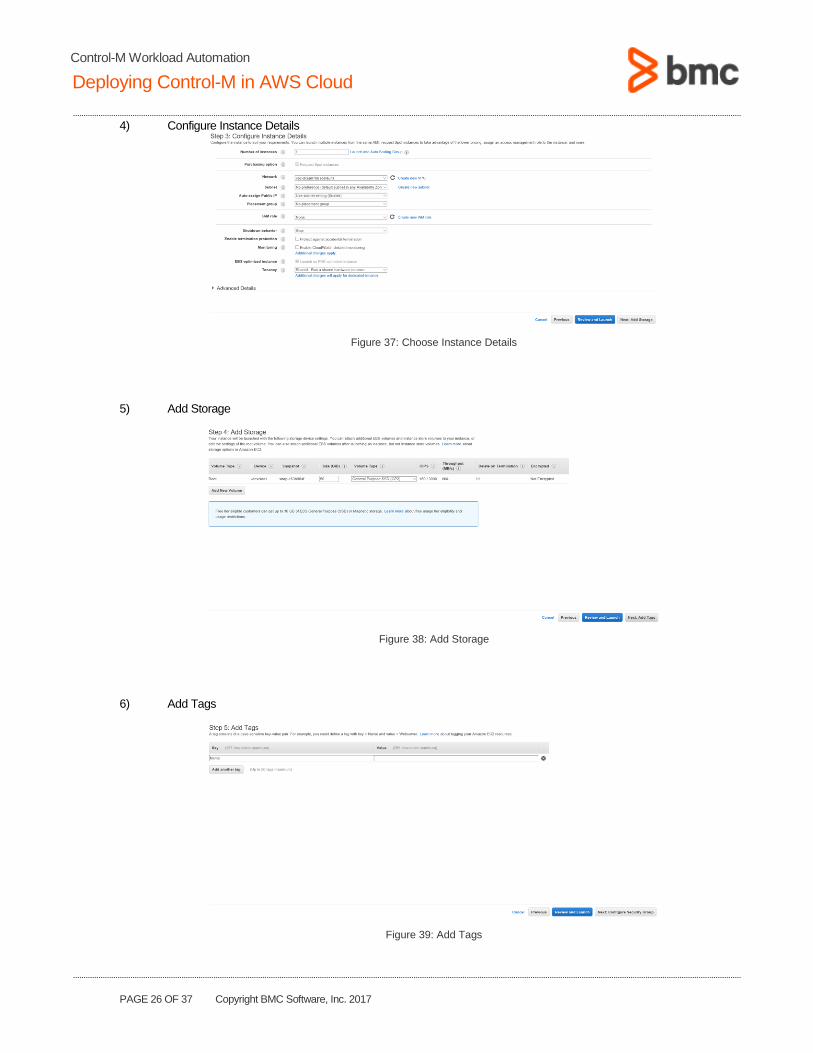
3) Find Control-M Workload Automation by searching BMC
Figure 35: Find Control-M
4) Choose Instance Type
Figure 36: Choose Instance Type
PAGE 26 OF 37 Copyright BMC Software, Inc. 2017
Control-M Workload Automation
Deploying Control-M in AWS Cloud
4) Configure Instance Details
Figure 37: Choose Instance Details
5) Add Storage
Figure 38: Add Storage
6) Add Tags
Figure 39: Add Tags
PAGE 27 OF 37 Copyright BMC Software, Inc. 2017
Control-M Workload Automation
Deploying Control-M in AWS Cloud
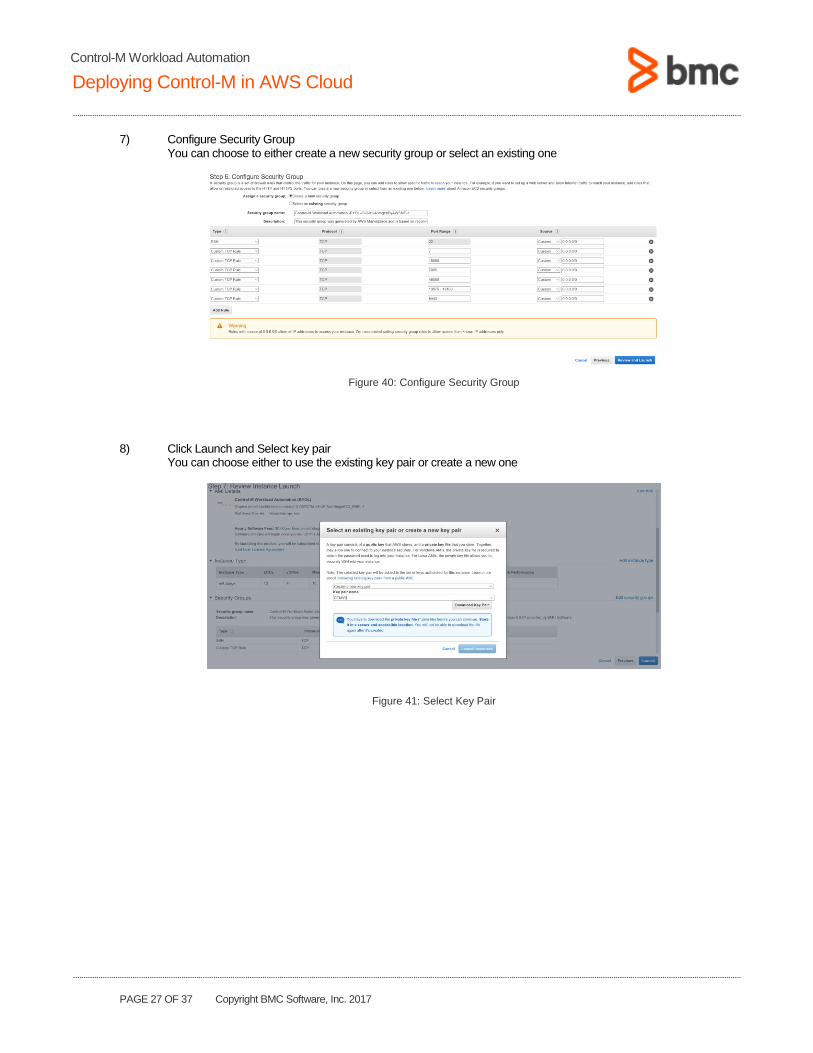
7) Configure Security Group
You can choose to either create a new security group or select an existing one
Figure 40: Configure Security Group
8) Click Launch and Select key pair
You can choose either to use the existing key pair or create a new one
Figure 41: Select Key Pair
PAGE 28 OF 37 Copyright BMC Software, Inc. 2017
Control-M Workload Automation
Deploying Control-M in AWS Cloud
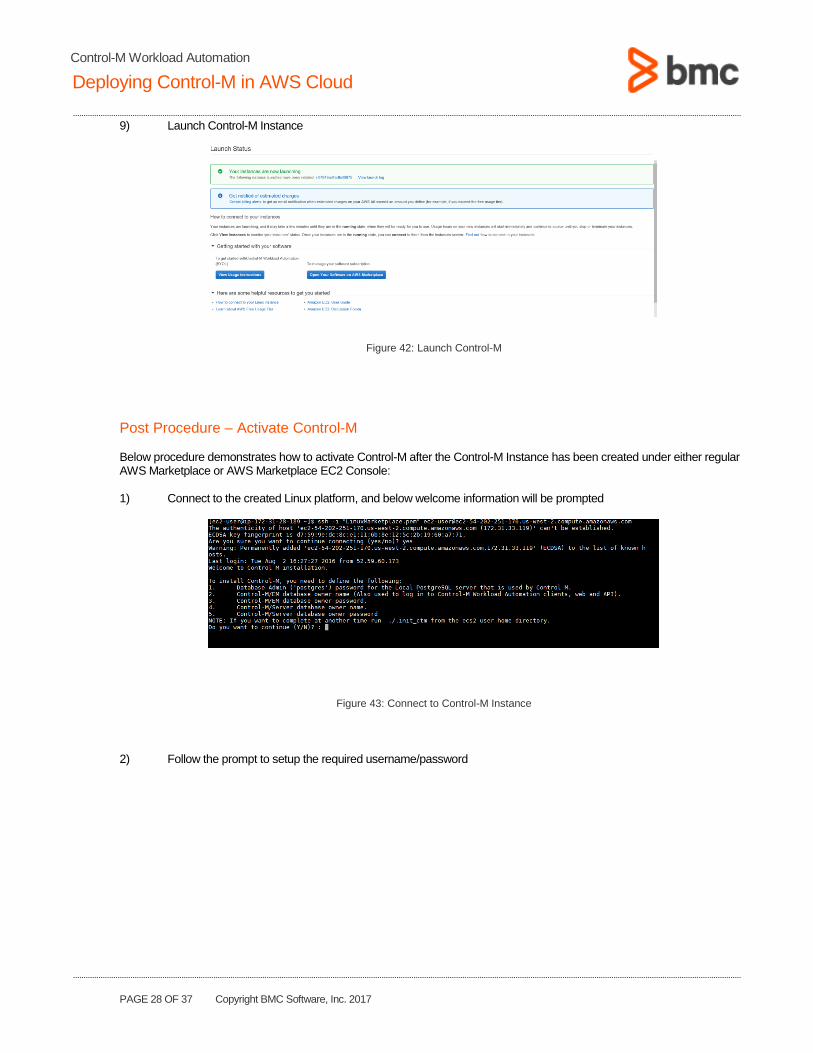
9) Launch Control-M Instance
Figure 42: Launch Control-M
Post Procedure – Activate Control-M
Below procedure demonstrates how to activate Control-M after the Control-M Instance has been created under either regular AWS Marketplace or AWS Marketplace EC2 Console: 1) Connect to the created Linux platform, and below welcome information will be prompted
Figure 43: Connect to Control-M Instance
2) Follow the prompt to setup the required username/password
PAGE 29 OF 37 Copyright BMC Software, Inc. 2017
Control-M Workload Automation
Deploying Control-M in AWS Cloud
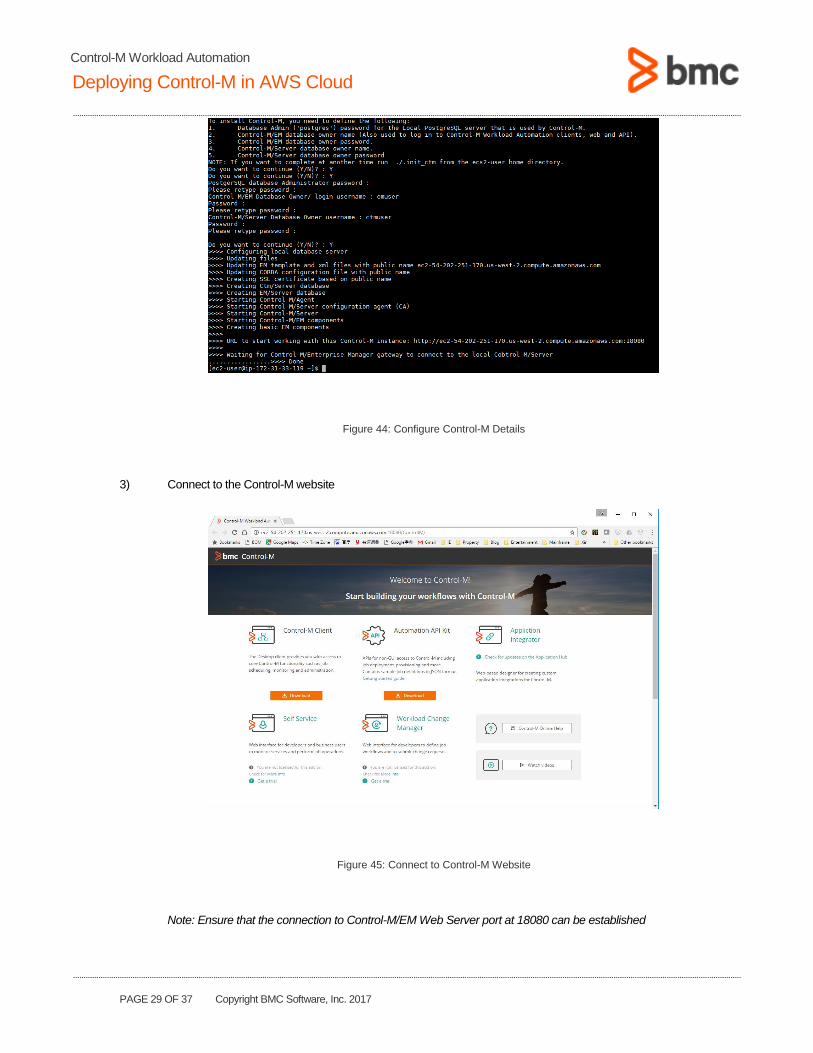
Figure 44: Configure Control-M Details
3) Connect to the Control-M website
Figure 45: Connect to Control-M Website
Note: Ensure that the connection to Control-M/EM Web Server port at 18080 can be established

PAGE 30 OF 37 Copyright BMC Software, Inc. 2017
Control-M Workload Automation
Deploying Control-M in AWS Cloud
Figure 46: Ensure Control-M/EM Web Server port 18080 is reachable
PAGE 31 OF 37 Copyright BMC Software, Inc. 2017
Control-M Workload Automation
Deploying Control-M in AWS Cloud
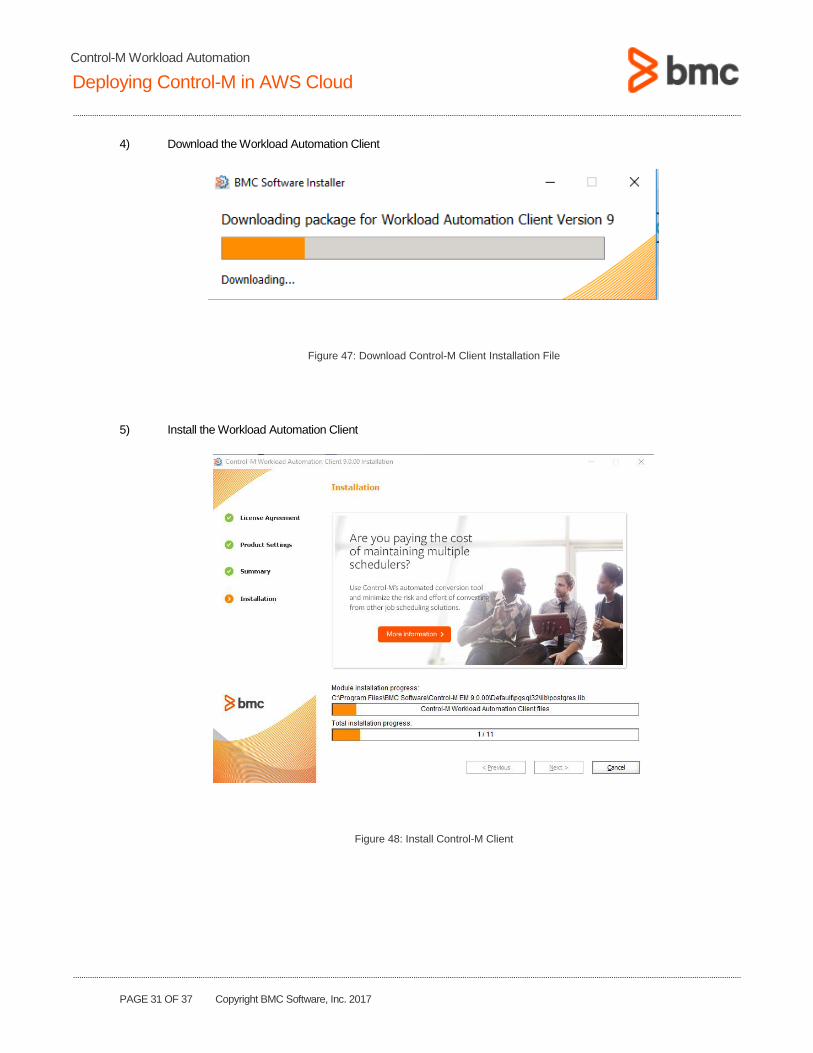
4) Download the Workload Automation Client
Figure 47: Download Control-M Client Installation File
5) Install the Workload Automation Client
Figure 48: Install Control-M Client
PAGE 32 OF 37 Copyright BMC Software, Inc. 2017
Control-M Workload Automation
Deploying Control-M in AWS Cloud
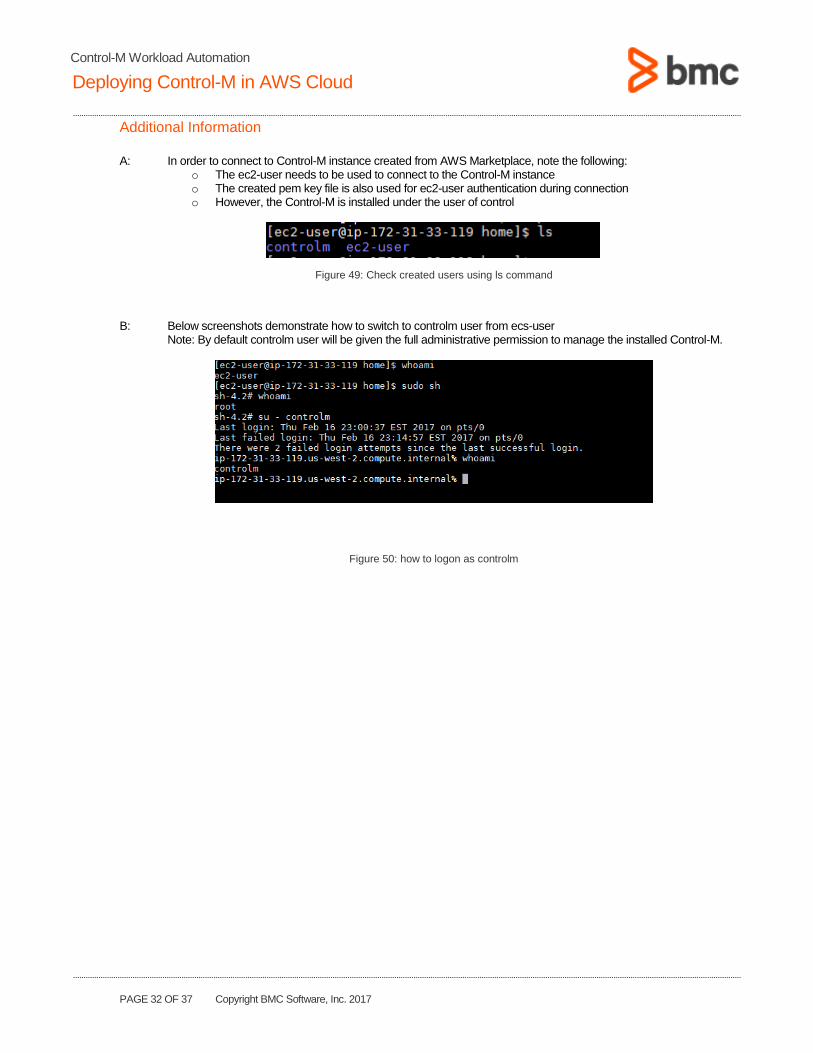
Additional Information
A: In order to connect to Control-M instance created from AWS Marketplace, note the following:
o The ec2-user needs to be used to connect to the Control-M instance o The created pem key file is also used for ec2-user authentication during connection o However, the Control-M is installed under the user of control
Figure 49: Check created users using ls command
B: Below screenshots demonstrate how to switch to controlm user from ecs-user Note: By default controlm user will be given the full administrative permission to manage the installed Control-M.
Figure 50: how to logon as controlm
PAGE 33 OF 37 Copyright BMC Software, Inc. 2017
Control-M Workload Automation
Deploying Control-M in AWS Cloud
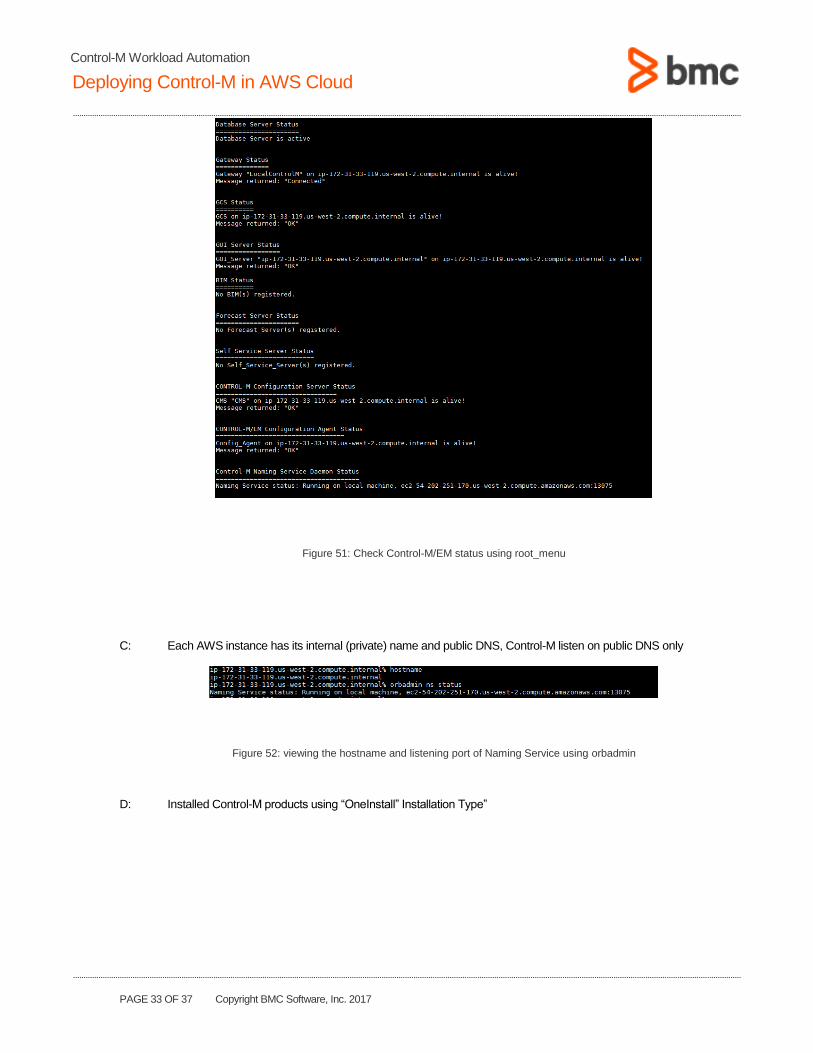
Figure 51: Check Control-M/EM status using root_menu
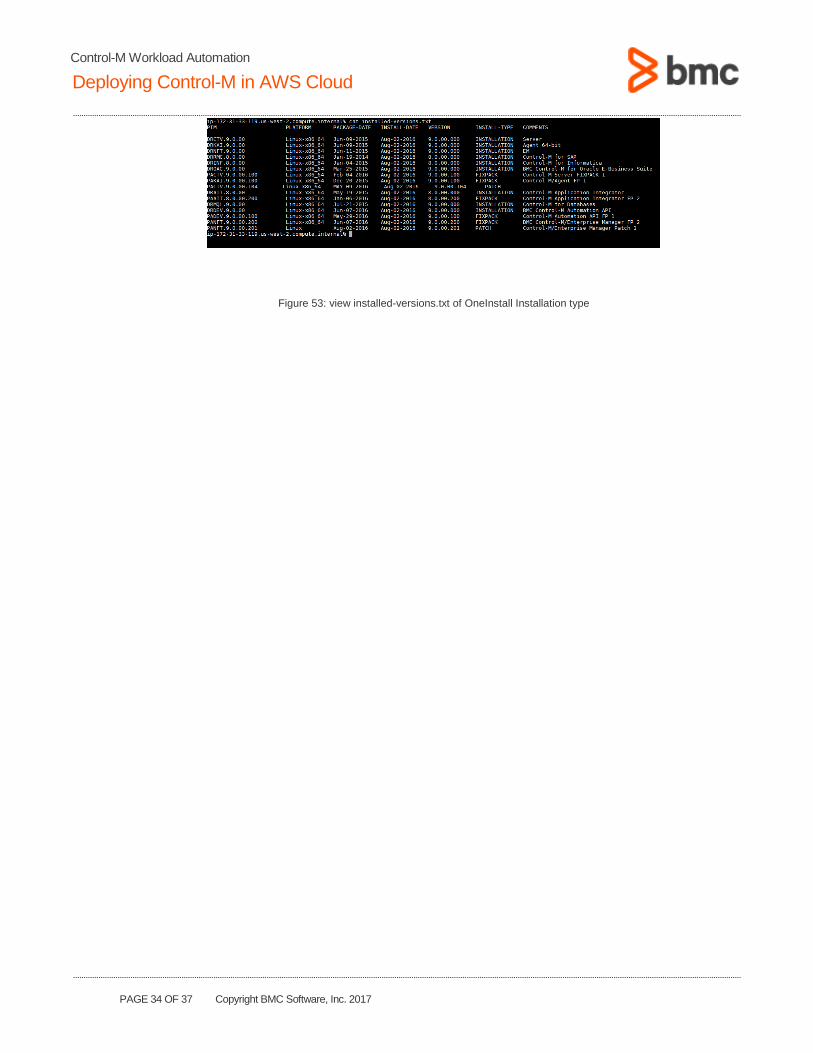
C: Each AWS instance has its internal (private) name and public DNS, Control-M listen on public DNS only
Figure 52: viewing the hostname and listening port of Naming Service using orbadmin
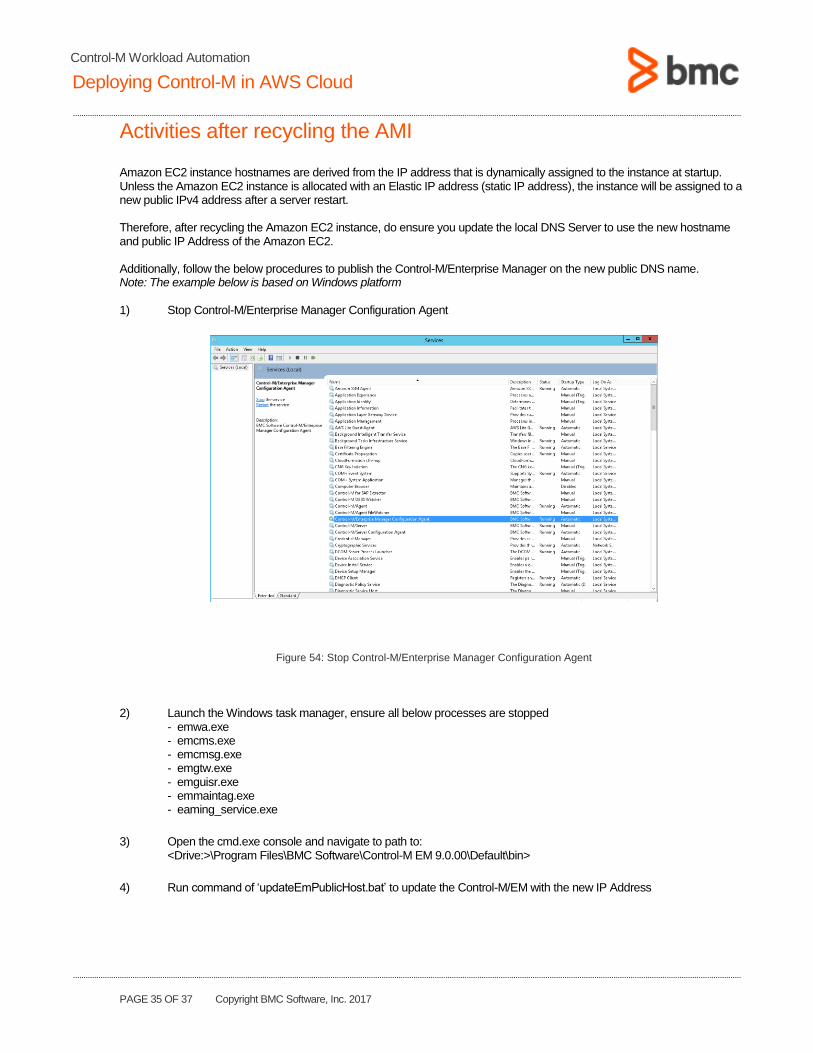
D: Installed Control-M products using “OneInstall” Installation Type”
PAGE 34 OF 37 Copyright BMC Software, Inc. 2017
Control-M Workload Automation
Deploying Control-M in AWS Cloud
Figure 53: view installed-versions.txt of OneInstall Installation type
PAGE 35 OF 37 Copyright BMC Software, Inc. 2017
Control-M Workload Automation
Deploying Control-M in AWS Cloud
Activities after recycling the AMI Amazon EC2 instance hostnames are derived from the IP address that is dynamically assigned to the instance at startup. Unless the Amazon EC2 instance is allocated with an Elastic IP address (static IP address), the instance will be assigned to a new public IPv4 address after a server restart. Therefore, after recycling the Amazon EC2 instance, do ensure you update the local DNS Server to use the new hostname and public IP Address of the Amazon EC2. Additionally, follow the below procedures to publish the Control-M/Enterprise Manager on the new public DNS name. Note: The example below is based on Windows platform
1) Stop Control-M/Enterprise Manager Configuration Agent
Figure 54: Stop Control-M/Enterprise Manager Configuration Agent
2) Launch the Windows task manager, ensure all below processes are stopped
- emwa.exe - emcms.exe - emcmsg.exe - emgtw.exe - emguisr.exe - emmaintag.exe - eaming_service.exe
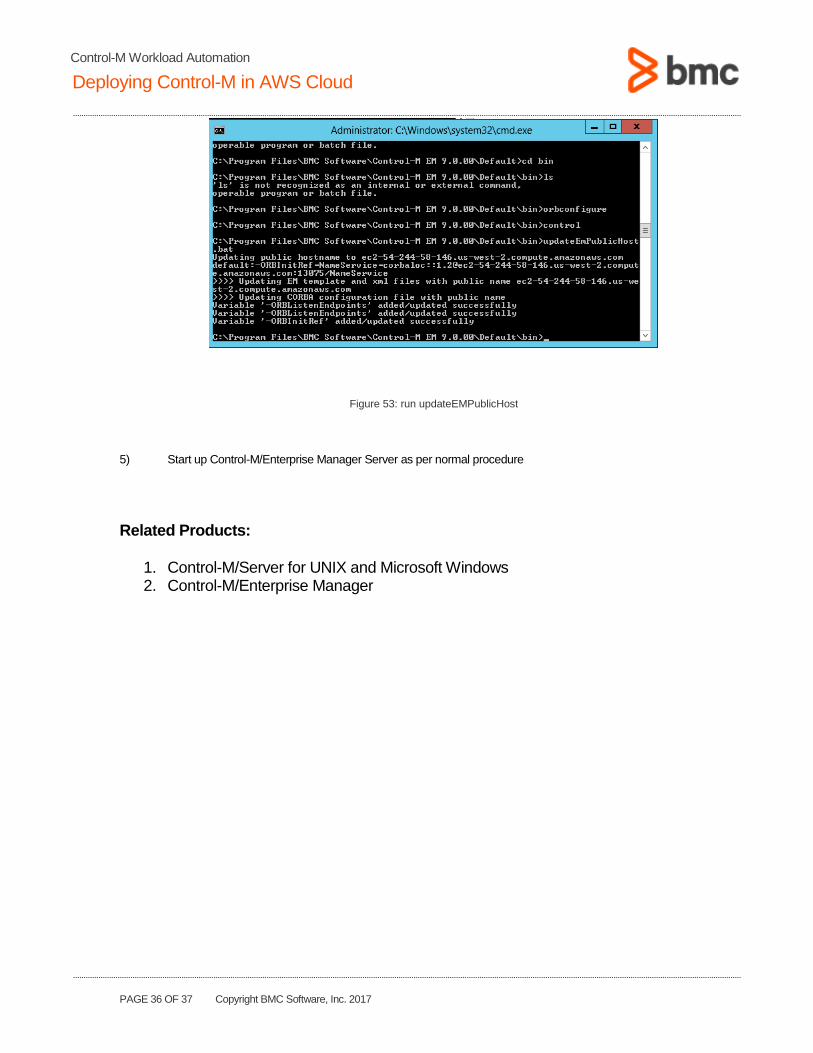
3) Open the cmd.exe console and navigate to path to:
<Drive:>\Program Files\BMC Software\Control-M EM 9.0.00\Default\bin>
4) Run command of ‘updateEmPublicHost.bat’ to update the Control-M/EM with the new IP Address
PAGE 36 OF 37 Copyright BMC Software, Inc. 2017
Control-M Workload Automation
Deploying Control-M in AWS Cloud
Figure 53: run updateEMPublicHost
5) Start up Control-M/Enterprise Manager Server as per normal procedure
Related Products:
1. Control-M/Server for UNIX and Microsoft Windows 2. Control-M/Enterprise Manager
PAGE 37 OF 37 Copyright BMC Software, Inc. 2017
Control-M Workload Automation
Deploying Control-M in AWS Cloud
Where to Get the Latest Product Information To view the latest BMC Software documents, visit the BMC Customer Support page at http://www.bmc.com/support_home . BMC Software distributes printed copies of flashes, technical bulletins, and release notes with most product shipments, as indicated on your shipping list. In addition, all notices are available on the Customer Support page, including any notices that BMC Software issues after you receive your product shipment. You will not receive new notices by mail. However, by subscribing to proactive notification, you can receive e-mail messages that direct you to those notices. For more information about proactive notification, refer to the Customer Support page.
BMC delivers software solutions that help IT transform digital enterprises for the ultimate competitive business advantage. We have
worked with thousands of leading companies to create and deliver powerful IT management services. From mainframe to cloud to
mobile, we pair high-speed digital innovation with robust IT industrialization—allowing our customers to provide amazing user
experiences with optimized IT performance, cost, compliance, and productivity. We believe that technology is the heart of every
business, and that IT drives business to the digital age.
BMC – Bring IT to Life