Embed Size (px)
Citation preview
Contents
ET5x System Update Using External microSD Card ........................................................................................... 2
Update Procedure for Android L .............................................................................................................................. 2
Upgrade Procedure for Android L to Android M ...................................................................................................... 9
Update Procedure for Android M to Android M .................................................................................................... 14
Downgrade Procedure for Android M to Android L………………………………………………………………………………………….19
ET5X SYSTEM UPDATE USING EXTERNAL MICROSD CARD
CAUTION: ALL USER DATA WILL BE LOST AFTER UPDATE.
ET50 Buttons
Update Procedure for Android L
1. Ensure the ET5x is fully charged.
2. On a host computer, copy the System Update Package (ET5XXXXXXPUEFXXXX.zip) to the microSD card.
3. Properly unmount the microSD card and remove from computer.
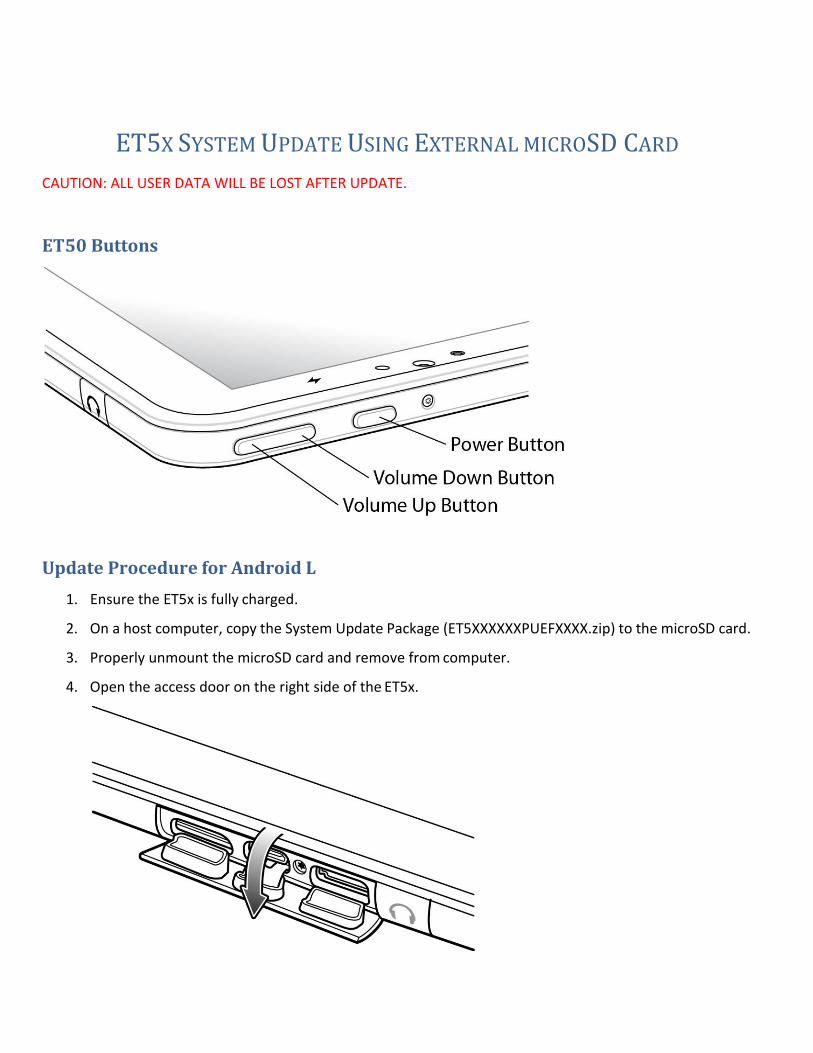
4. Open the access door on the right side of the ET5x.
RECOVERY MODE
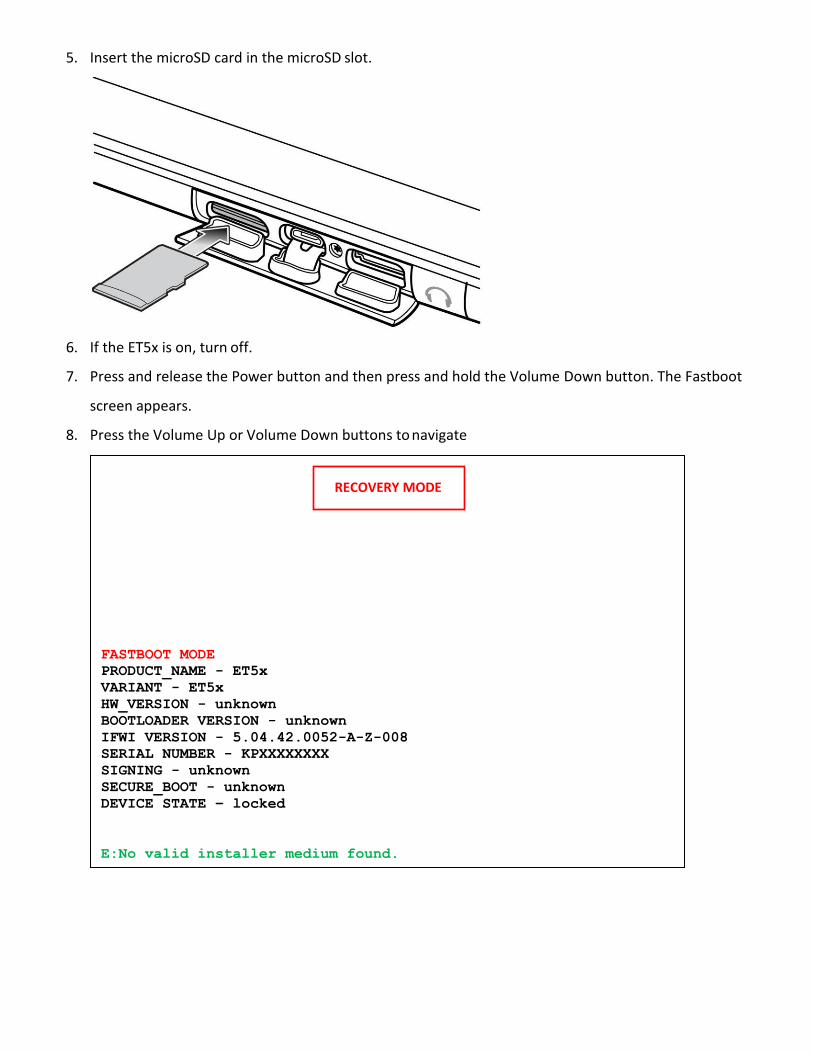
5. Insert the microSD card in the microSD slot.
6. If the ET5x is on, turn off.
7. Press and release the Power button and then press and hold the Volume Down button. The Fastboot
screen appears.
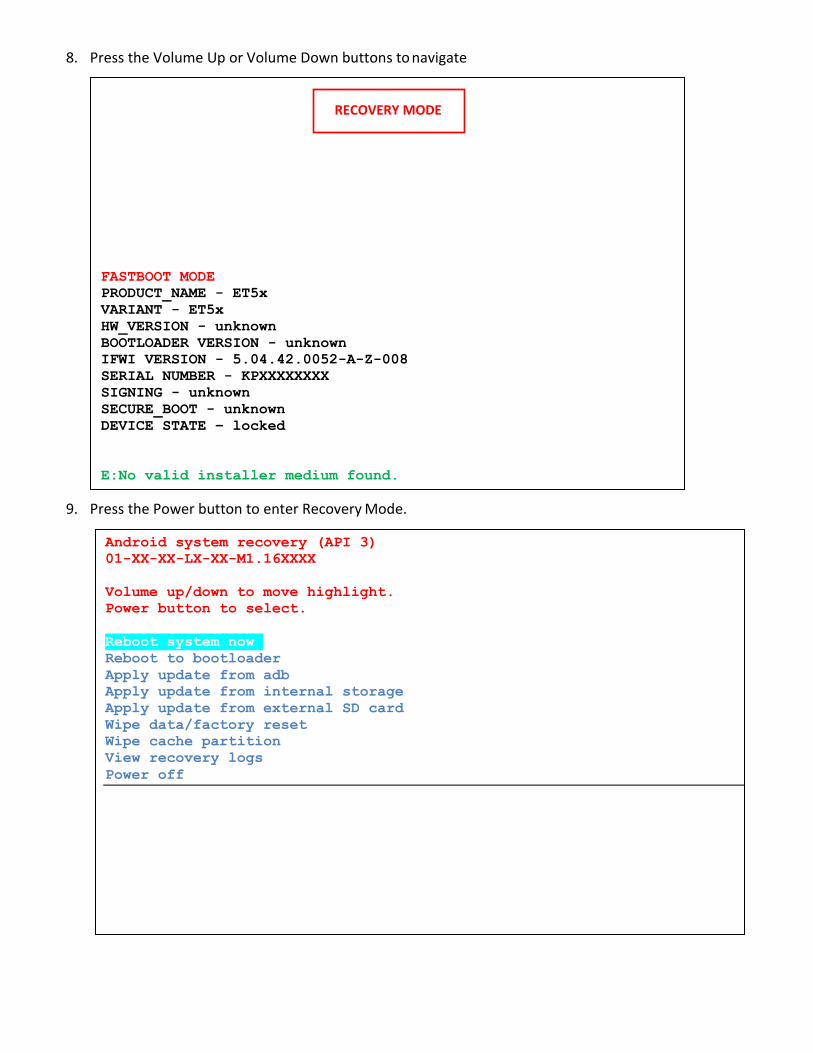
8. Press the Volume Up or Volume Down buttons to navigate
FASTBOOT MODE
PRODUCT_NAME - ET5x
VARIANT - ET5x
HW_VERSION - unknown
BOOTLOADER VERSION - unknown
IFWI VERSION - 5.04.42.0052-A-Z-008
SERIAL NUMBER - KPXXXXXXXX
SIGNING - unknown
SECURE_BOOT - unknown
DEVICE STATE – locked
E:No valid installer medium found.
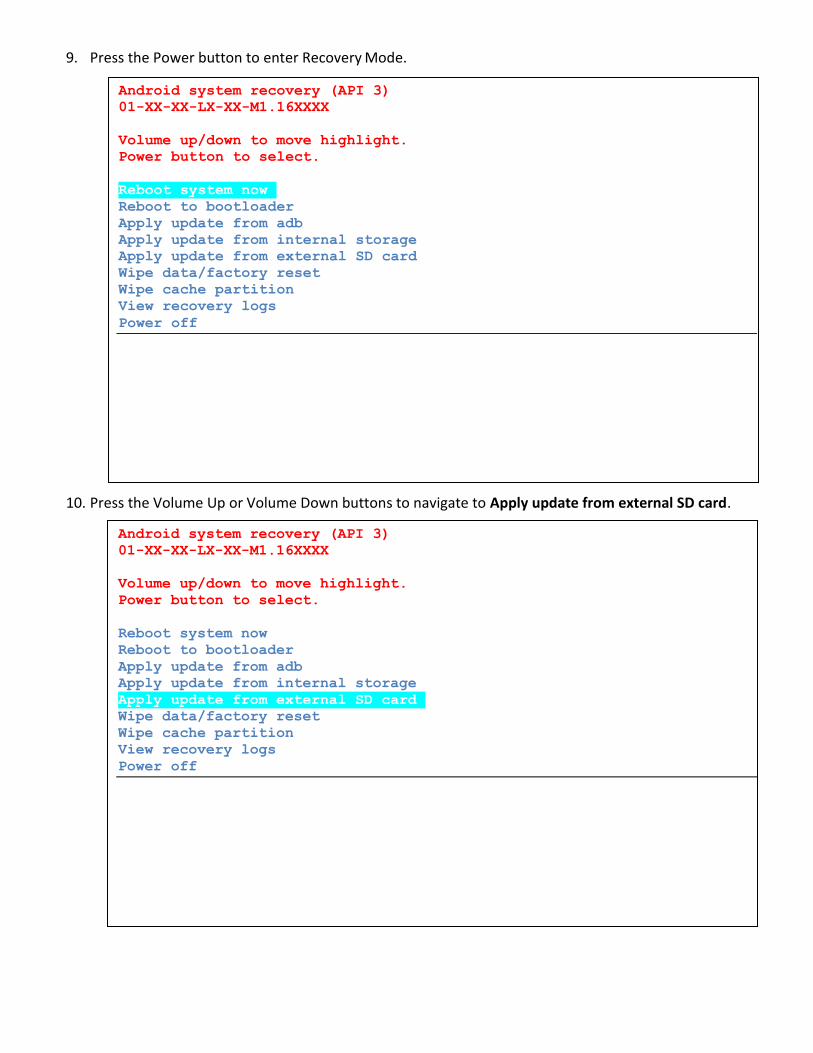
9. Press the Power button to enter Recovery Mode.
10. Press the Volume Up or Volume Down buttons to navigate to Apply update from external SD card.
Android system recovery (API 3)
01-XX-XX-LX-XX-M1.16XXXX
Volume up/down to move highlight.
Power button to select.
Reboot system now
Reboot to bootloader
Apply update from adb
Apply update from internal storage
Apply update from external SD card
Wipe data/factory reset
Wipe cache partition
View recovery logs
Power off
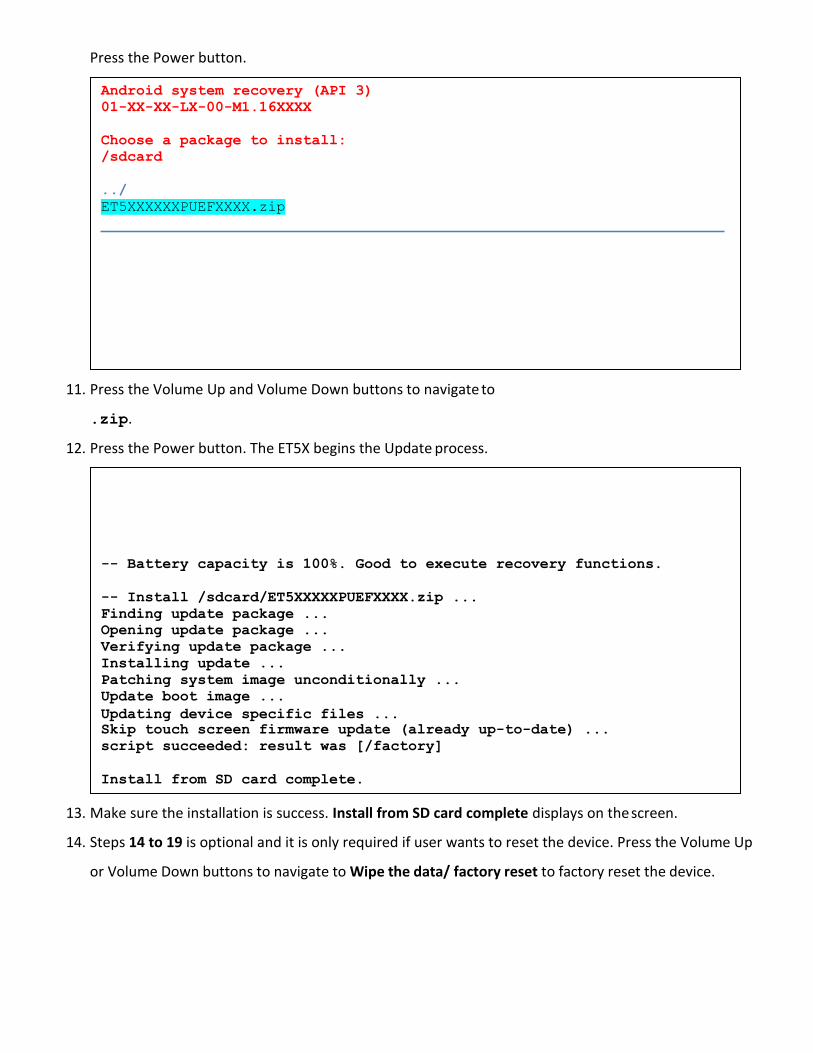
Press the Power button.
11. Press the Volume Up and Volume Down buttons to navigate to
.zip.
12. Press the Power button. The ET5X begins the Update process.
13. Make sure the installation is success. Install from SD card complete displays on the screen.
14. Steps 14 to 19 is optional and it is only required if user wants to reset the device. Press the Volume Up
or Volume Down buttons to navigate to Wipe the data/ factory reset to factory reset the device.
Android system recovery (API 3)
01-XX-XX-LX-00-M1.16XXXX
Choose a package to install:
/sdcard
../
ET5XXXXXXPUEFXXXX.zip
-- Battery capacity is 100%. Good to execute recovery functions.
-- Install /sdcard/ET5XXXXXPUEFXXXX.zip ...
Finding update package ...
Opening update package ...
Verifying update package ...
Installing update ...
Patching system image unconditionally ...
Update boot image ...
Updating device specific files ... Skip touch screen firmware update (already up-to-date) ...
script succeeded: result was [/factory]
Install from SD card complete.
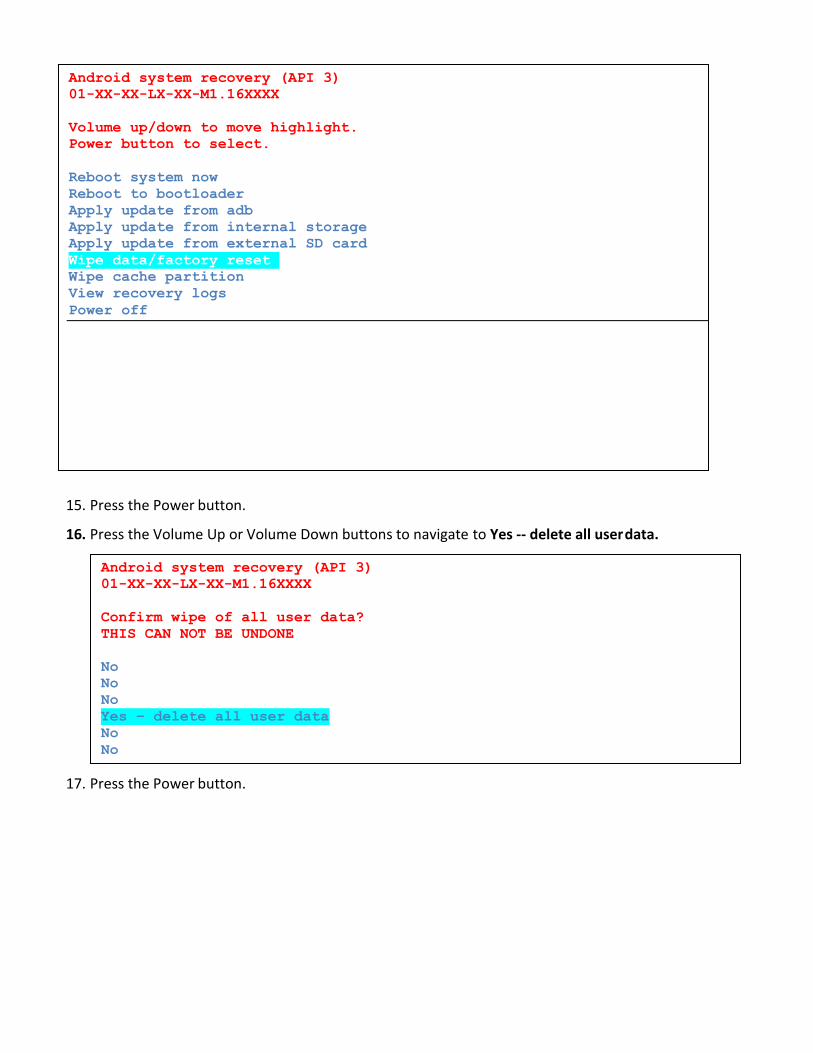
15. Press the Power button.
16. Press the Volume Up or Volume Down buttons to navigate to Yes -- delete all user data.
17. Press the Power button.
Android system recovery (API 3)
01-XX-XX-LX-XX-M1.16XXXX
Confirm wipe of all user data?
THIS CAN NOT BE UNDONE
No
No
No
Yes – delete all user data
No
No
Android system recovery (API 3)
01-XX-XX-LX-XX-M1.16XXXX
Volume up/down to move highlight.
Power button to select.
Reboot system now
Reboot to bootloader
Apply update from adb
Apply update from internal storage
Apply update from external SD card
Wipe data/factory reset
Wipe cache partition
View recovery logs
Power off
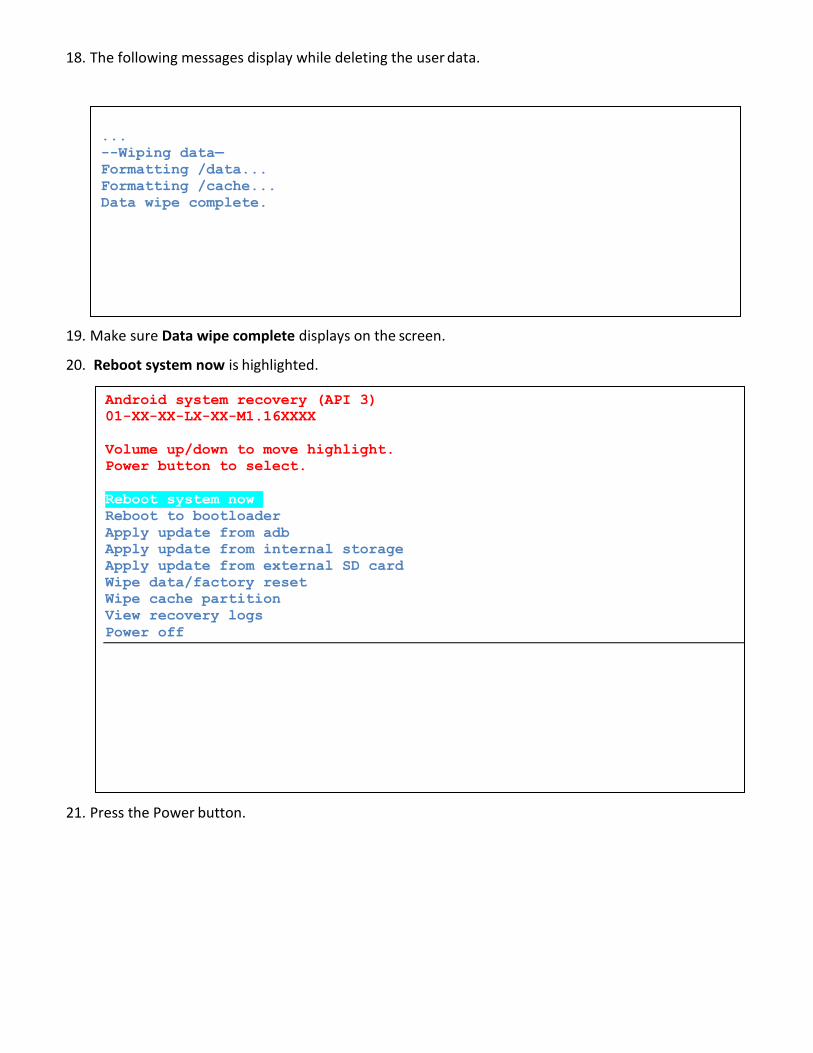
18. The following messages display while deleting the user data.
19. Make sure Data wipe complete displays on the screen.
20. Reboot system now is highlighted.
21. Press the Power button.
...
--Wiping data—
Formatting /data...
Formatting /cache...
Data wipe complete.
Android system recovery (API 3)
01-XX-XX-LX-XX-M1.16XXXX
Volume up/down to move highlight.
Power button to select.
Reboot system now
Reboot to bootloader
Apply update from adb
Apply update from internal storage
Apply update from external SD card
Wipe data/factory reset
Wipe cache partition
View recovery logs
Power off

22. After reboot display shows the software update progress as shown in the below screen.
23. After Update was successful message appears, the device automatically reboots to home screen.
24. Press the power button and select “power off” to power down the device.
25. Remove SD card from the SD card slot.
UPDATING BIOS, DO NOT UNPLUG POWER OR RESET SYSTEM!!!
Compatibility check of update image... pass
Processing update image... done
Storing 2nd stage backup to EMMC... done
Storing 1st stage pieces to fault tolerant region... done
Destroying old IBB... done
Updating Recovery2... done
Updating 1st stage... done
Updating 2nd stage... done
TXE update disabled
Purifying variables... done
Update was successful, system will soon restart
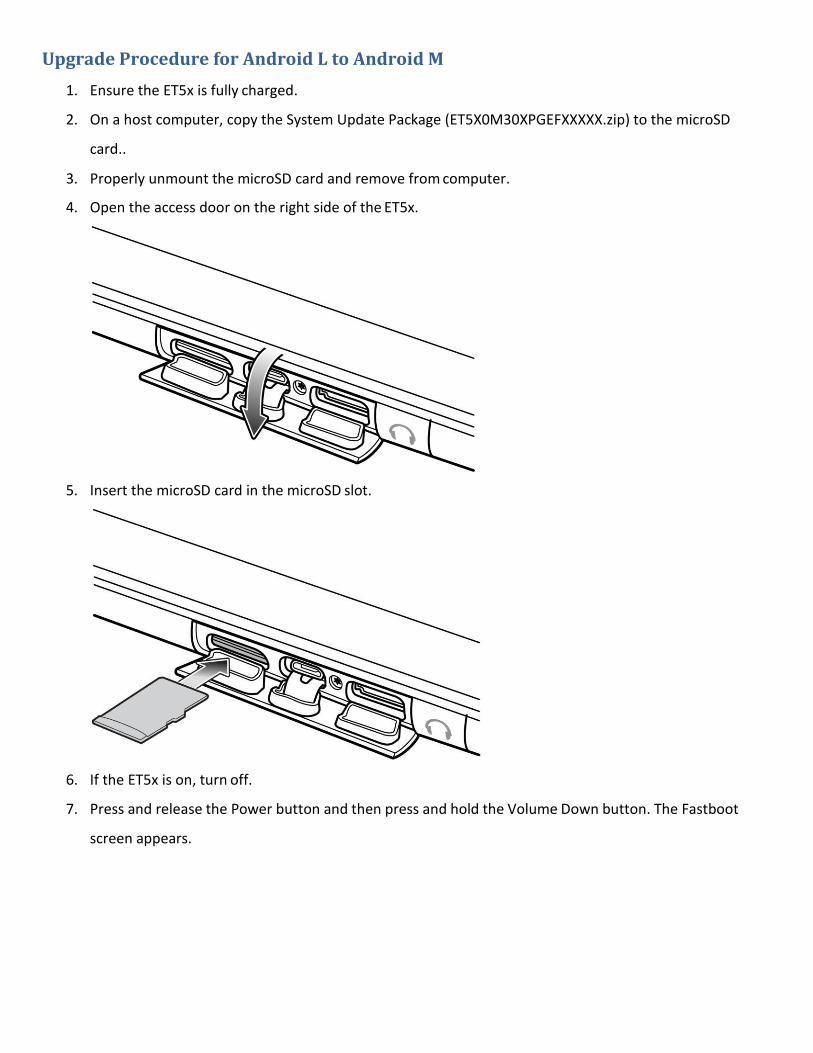
Upgrade Procedure for Android L to Android M
1. Ensure the ET5x is fully charged.
2. On a host computer, copy the System Update Package (ET5X0M30XPGEFXXXXX.zip) to the microSD
card..
3. Properly unmount the microSD card and remove from computer.
4. Open the access door on the right side of the ET5x.
5. Insert the microSD card in the microSD slot.
6. If the ET5x is on, turn off.
7. Press and release the Power button and then press and hold the Volume Down button. The Fastboot
screen appears.
RECOVERY MODE
8. Press the Volume Up or Volume Down buttons to navigate
9. Press the Power button to enter Recovery Mode.
FASTBOOT MODE
PRODUCT_NAME - ET5x
VARIANT - ET5x
HW_VERSION - unknown
BOOTLOADER VERSION - unknown
IFWI VERSION - 5.04.42.0052-A-Z-008
SERIAL NUMBER - KPXXXXXXXX
SIGNING - unknown
SECURE_BOOT - unknown
DEVICE STATE – locked
E:No valid installer medium found.
Android system recovery (API 3)
01-XX-XX-LX-XX-M1.16XXXX
Volume up/down to move highlight.
Power button to select.
Reboot system now
Reboot to bootloader
Apply update from adb
Apply update from internal storage
Apply update from external SD card
Wipe data/factory reset
Wipe cache partition
View recovery logs
Power off
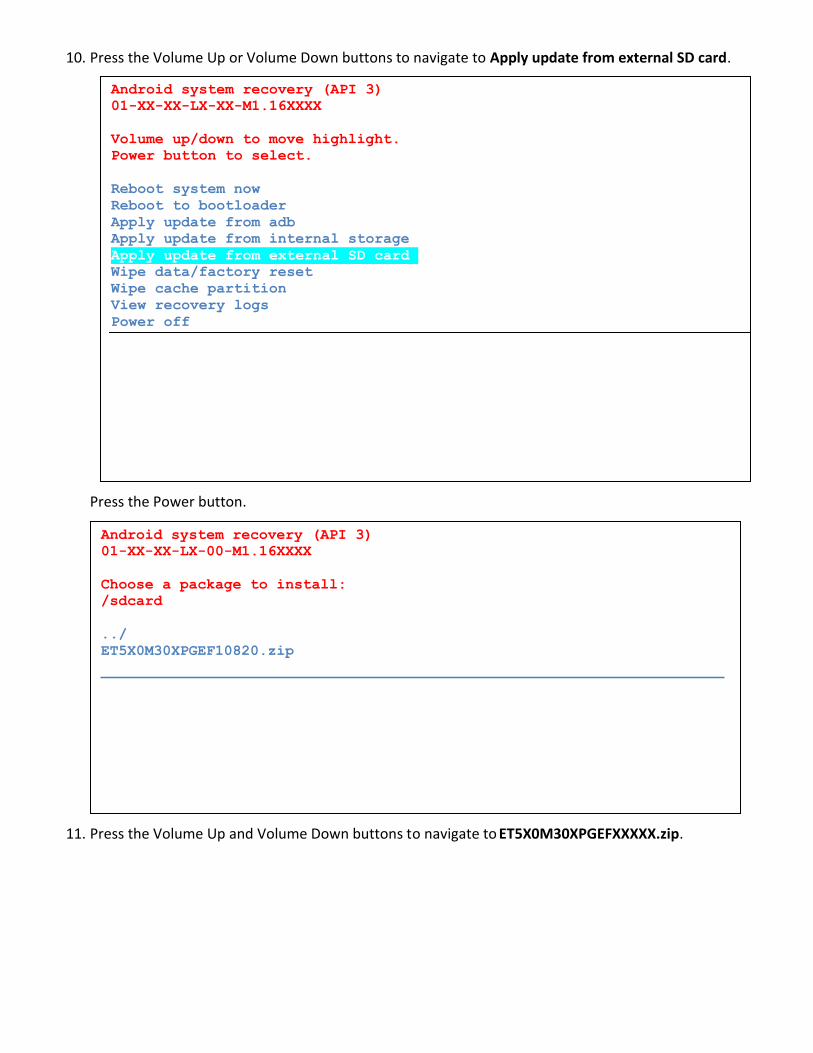
10. Press the Volume Up or Volume Down buttons to navigate to Apply update from external SD card.
Press the Power button.
11. Press the Volume Up and Volume Down buttons to navigate to ET5X0M30XPGEFXXXXX.zip.
Android system recovery (API 3)
01-XX-XX-LX-00-M1.16XXXX
Choose a package to install:
/sdcard
../
ET5X0M30XPGEF10820.zip
Android system recovery (API 3)
01-XX-XX-LX-XX-M1.16XXXX
Volume up/down to move highlight.
Power button to select.
Reboot system now
Reboot to bootloader
Apply update from adb
Apply update from internal storage
Apply update from external SD card
Wipe data/factory reset
Wipe cache partition
View recovery logs
Power off
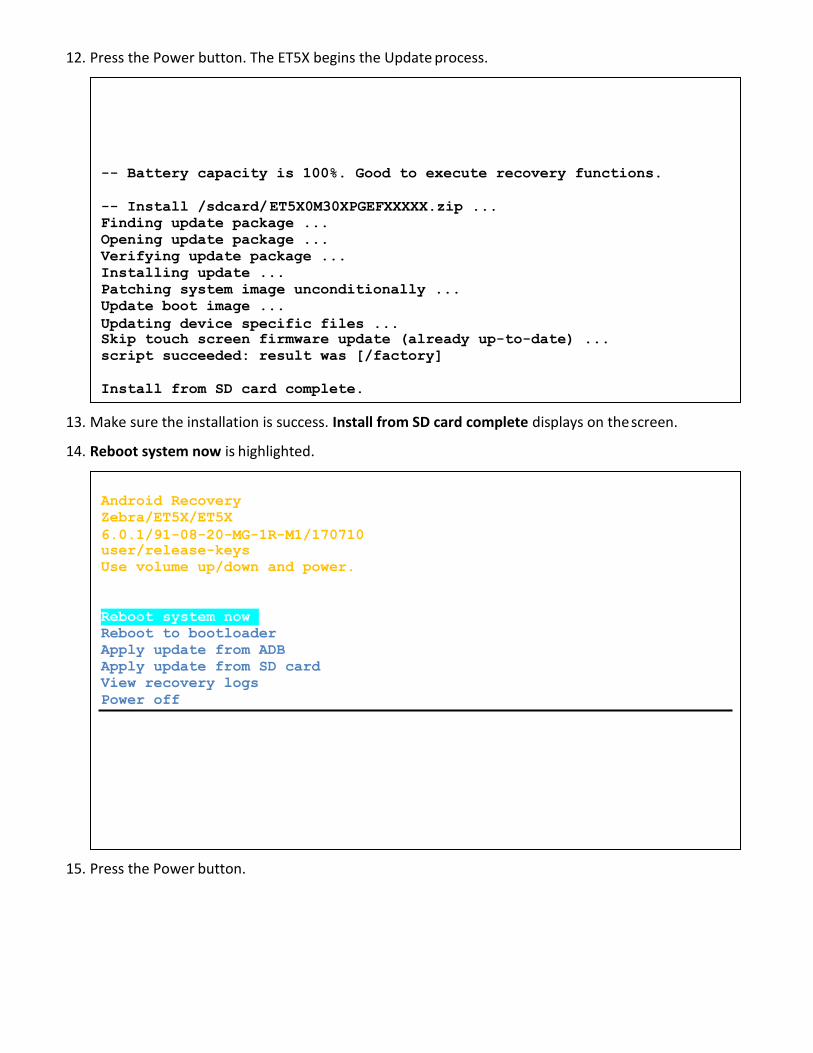
12. Press the Power button. The ET5X begins the Update process.
13. Make sure the installation is success. Install from SD card complete displays on the screen.
14. Reboot system now is highlighted.
15. Press the Power button.
-- Battery capacity is 100%. Good to execute recovery functions.
-- Install /sdcard/ ET5X0M30XPGEFXXXXX.zip ...
Finding update package ...
Opening update package ...
Verifying update package ...
Installing update ...
Patching system image unconditionally ...
Update boot image ...
Updating device specific files ... Skip touch screen firmware update (already up-to-date) ...
script succeeded: result was [/factory]
Install from SD card complete.
Android Recovery
Zebra/ET5X/ET5X
6.0.1/91-08-20-MG-1R-M1/170710 user/release-keys
Use volume up/down and power.
Reboot system now
Reboot to bootloader
Apply update from ADB
Apply update from SD card
View recovery logs
Power off
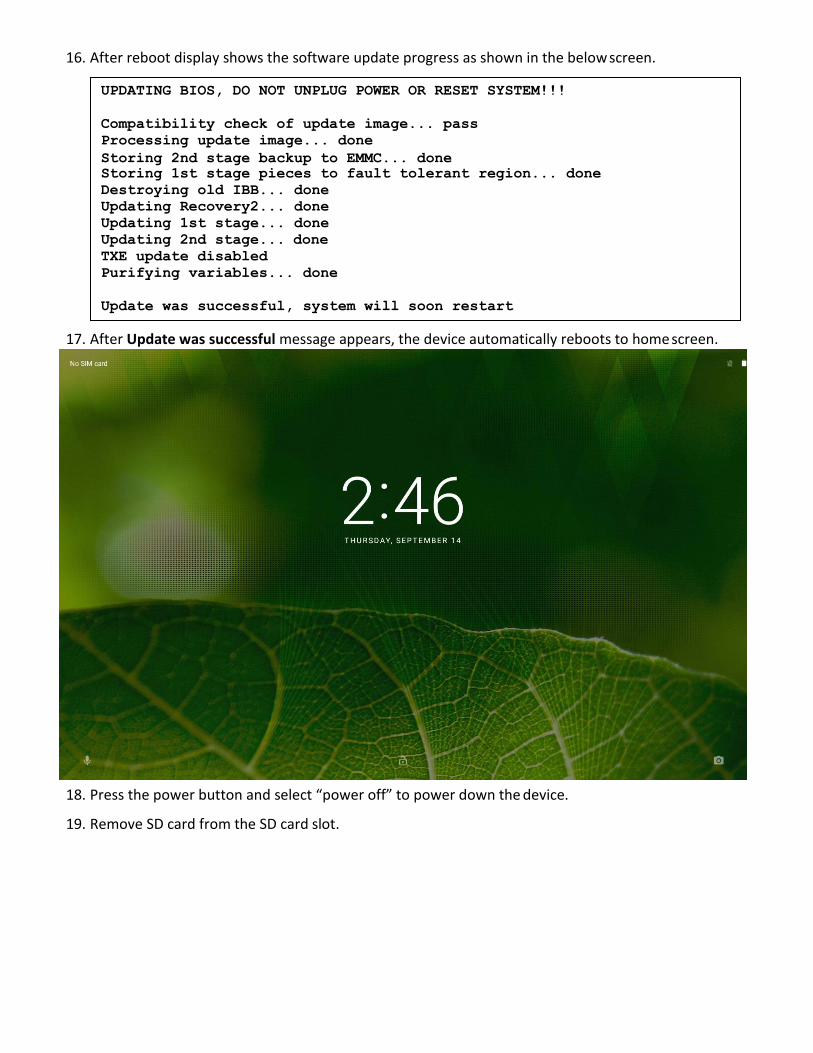
16. After reboot display shows the software update progress as shown in the below screen.
17. After Update was successful message appears, the device automatically reboots to home screen.
18. Press the power button and select “power off” to power down the device.
19. Remove SD card from the SD card slot.
UPDATING BIOS, DO NOT UNPLUG POWER OR RESET SYSTEM!!!
Compatibility check of update image... pass
Processing update image... done
Storing 2nd stage backup to EMMC... done Storing 1st stage pieces to fault tolerant region... done
Destroying old IBB... done
Updating Recovery2... done
Updating 1st stage... done
Updating 2nd stage... done
TXE update disabled
Purifying variables... done
Update was successful, system will soon restart
Update Procedure for Android M to Android M
1. Ensure the ET5x is fully charged.
2. On a host computer, copy the System Update Package (ET5X0M30XPUEFXXXXX) to the microSD card.
3. Properly unmount the microSD card and remove from computer.
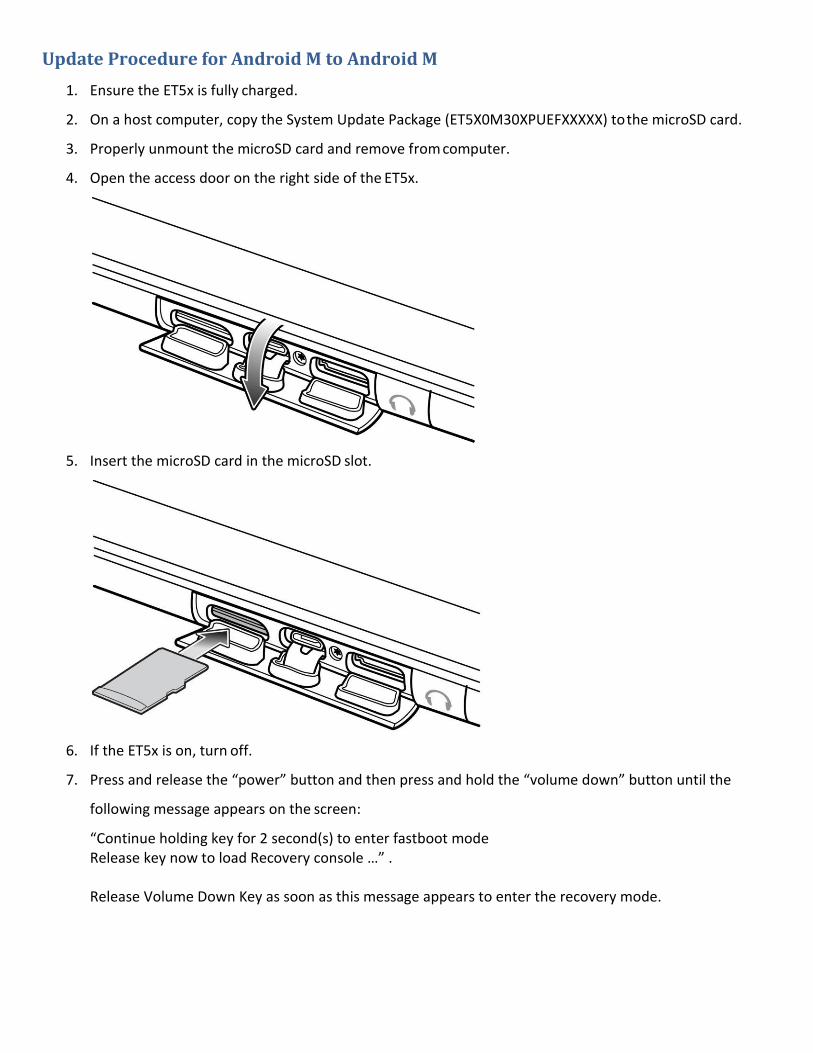
4. Open the access door on the right side of the ET5x.
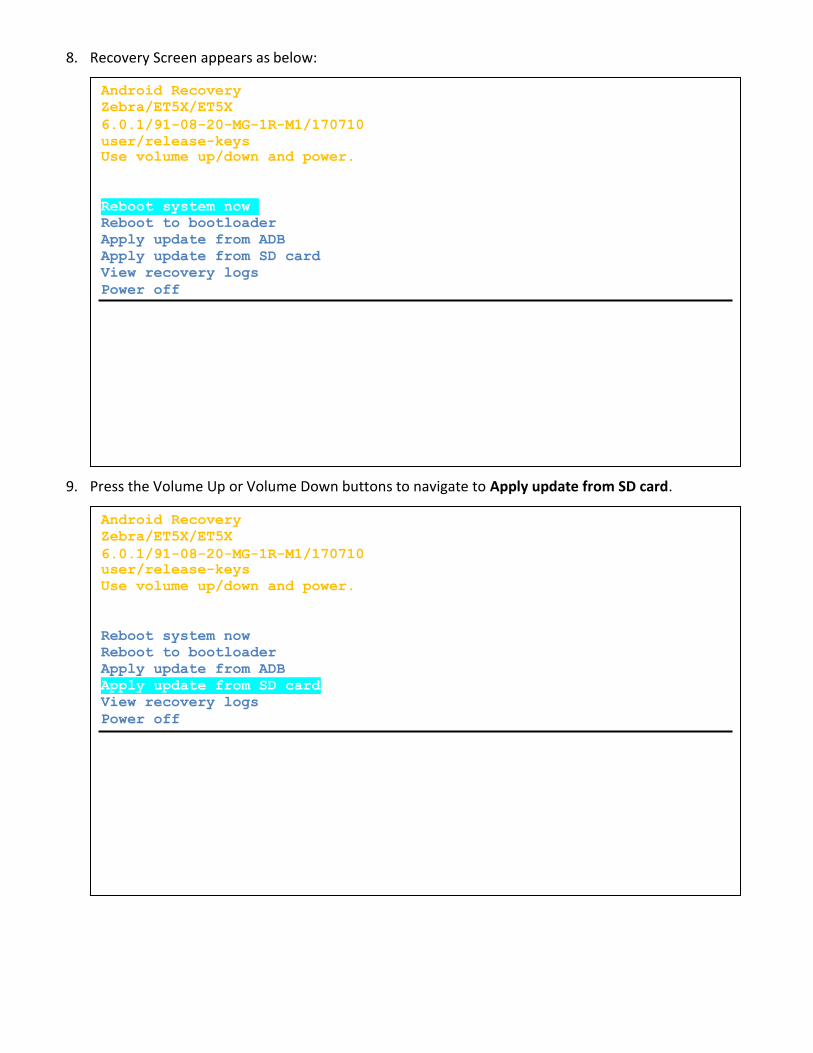
5. Insert the microSD card in the microSD slot.
6. If the ET5x is on, turn off.
7. Press and release the “power” button and then press and hold the “volume down” button until the
following message appears on the screen:
“Continue holding key for 2 second(s) to enter fastboot mode Release key now to load Recovery console …” .
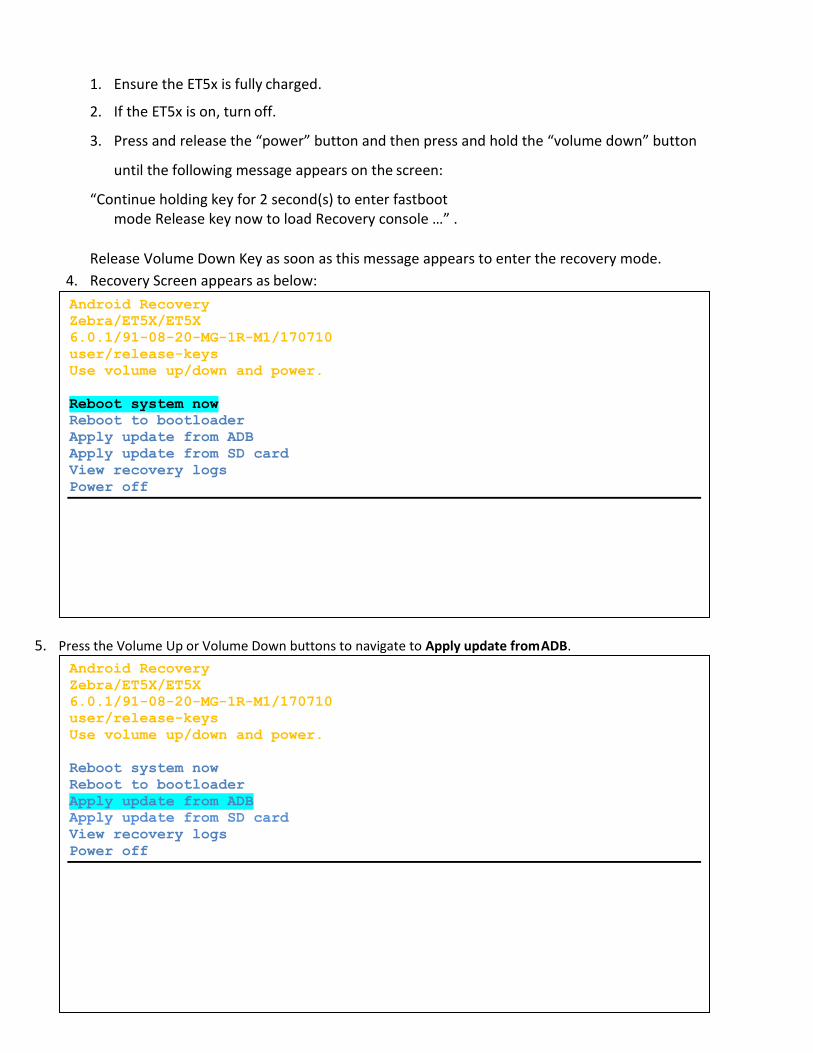
Release Volume Down Key as soon as this message appears to enter the recovery mode.
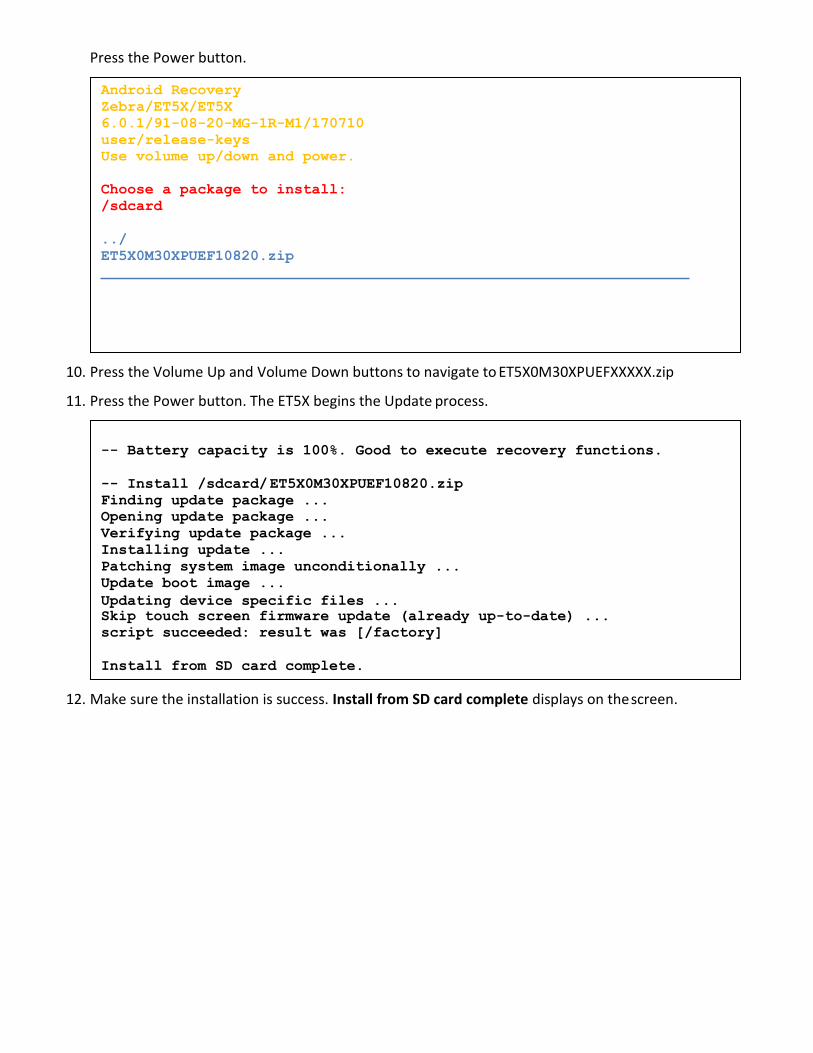
8. Recovery Screen appears as below:
9. Press the Volume Up or Volume Down buttons to navigate to Apply update from SD card.
Android Recovery
Zebra/ET5X/ET5X
6.0.1/91-08-20-MG-1R-M1/170710
user/release-keys Use volume up/down and power.
Reboot system now
Reboot to bootloader
Apply update from ADB
Apply update from SD card
View recovery logs
Power off
Android Recovery
Zebra/ET5X/ET5X
6.0.1/91-08-20-MG-1R-M1/170710 user/release-keys
Use volume up/down and power.
Reboot system now
Reboot to bootloader
Apply update from ADB
Apply update from SD card
View recovery logs
Power off
Press the Power button.
10. Press the Volume Up and Volume Down buttons to navigate to ET5X0M30XPUEFXXXXX.zip
11. Press the Power button. The ET5X begins the Update process.
12. Make sure the installation is success. Install from SD card complete displays on the screen.
Android Recovery
Zebra/ET5X/ET5X
6.0.1/91-08-20-MG-1R-M1/170710
user/release-keys
Use volume up/down and power.
Choose a package to install:
/sdcard
../
ET5X0M30XPUEF10820.zip
-- Battery capacity is 100%. Good to execute recovery functions.
-- Install /sdcard/ ET5X0M30XPUEF10820.zip
Finding update package ...
Opening update package ...
Verifying update package ...
Installing update ...
Patching system image unconditionally ...
Update boot image ...
Updating device specific files ... Skip touch screen firmware update (already up-to-date) ...
script succeeded: result was [/factory]
Install from SD card complete.
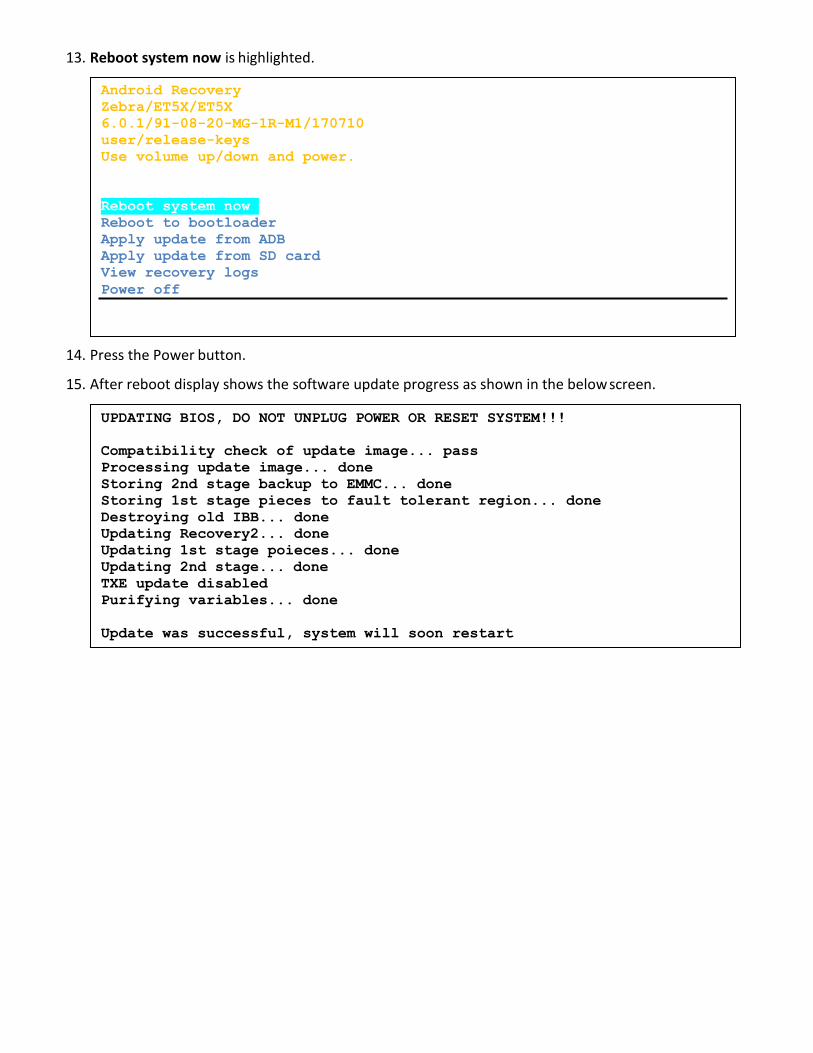
13. Reboot system now is highlighted.
14. Press the Power button.
15. After reboot display shows the software update progress as shown in the below screen.
Android Recovery
Zebra/ET5X/ET5X
6.0.1/91-08-20-MG-1R-M1/170710
user/release-keys
Use volume up/down and power.
Reboot system now
Reboot to bootloader
Apply update from ADB
Apply update from SD card
View recovery logs
Power off
UPDATING BIOS, DO NOT UNPLUG POWER OR RESET SYSTEM!!!
Compatibility check of update image... pass
Processing update image... done
Storing 2nd stage backup to EMMC... done
Storing 1st stage pieces to fault tolerant region... done
Destroying old IBB... done
Updating Recovery2... done
Updating 1st stage poieces... done
Updating 2nd stage... done
TXE update disabled
Purifying variables... done
Update was successful, system will soon restart

16. After Update was successful message appears, the device automatically reboots to home screen.
17. Press the power button and select “power off” to power down the device.
18. Remove SD card from the SD card slot.
Downgrade Procedure for Android M to Android L
1. Downgrade procedure uses Multi-Package update (UPL) mechanism. 2. Complete downgrade process will take ~20 min. 3. All packages/files should be there in same folder path.
Note: external sdcard, files should be placed in root folder. 4. .upl file is the input for downgrade process, which will have the list of packages to be installed
during downgrade.
5. upl file name should be "ET5X-downgrade-to-l.upl” (should not be renamed) and list of package names should start with “package:”
Sample upl file contents for ET55 M to ET55 L downgrade:
Where
ET55-ota-M-to-L-downgrade.zip – ET55 M to ET55 L downgrade recovery update package, the same downgrade package can be used for GMS and non GMS (similar one for ET50 is ET50-ota-M-to-L-downgrade.zip)
ET5X-ota-full-user-modem-nongms.zip – Released ET5x L OTA Full Software Update which can be GMS or non GMS
ET5X-ota-incremental.zip * - ET5x L OTA incremental CFE update software package (* this package is optional).
ET5X-ota-enterprise_reset.zip – ET5x L OTA Enterprise reset recovery update package
Persistence: After the downgrade process below contents will be persisted.
• Enterprise
• Factory
Downgrade procedure from MDM 1. MDM downgrade is a single step process
2. Upload all the zip files and upl file to server and download them to same location (one
folder) on the device and initiate the downgrade with upl file name. Files can be
downloaded to internal memory/external sdcard.
3. After the completion of downgrade process, device should boot to Android L.
For example: To install from SOTI • Download all the zip files to internal memory of the device from SOTI server and then use
package:ET55-ota-M-to-L-downgrade.zip
package:ET5X-ota-full-user-modem-nongms.zip
package:ET5X-ota-incremental.zip
package:ET5X-ota-enterprise_reset.zip
_______________________________________________________________________
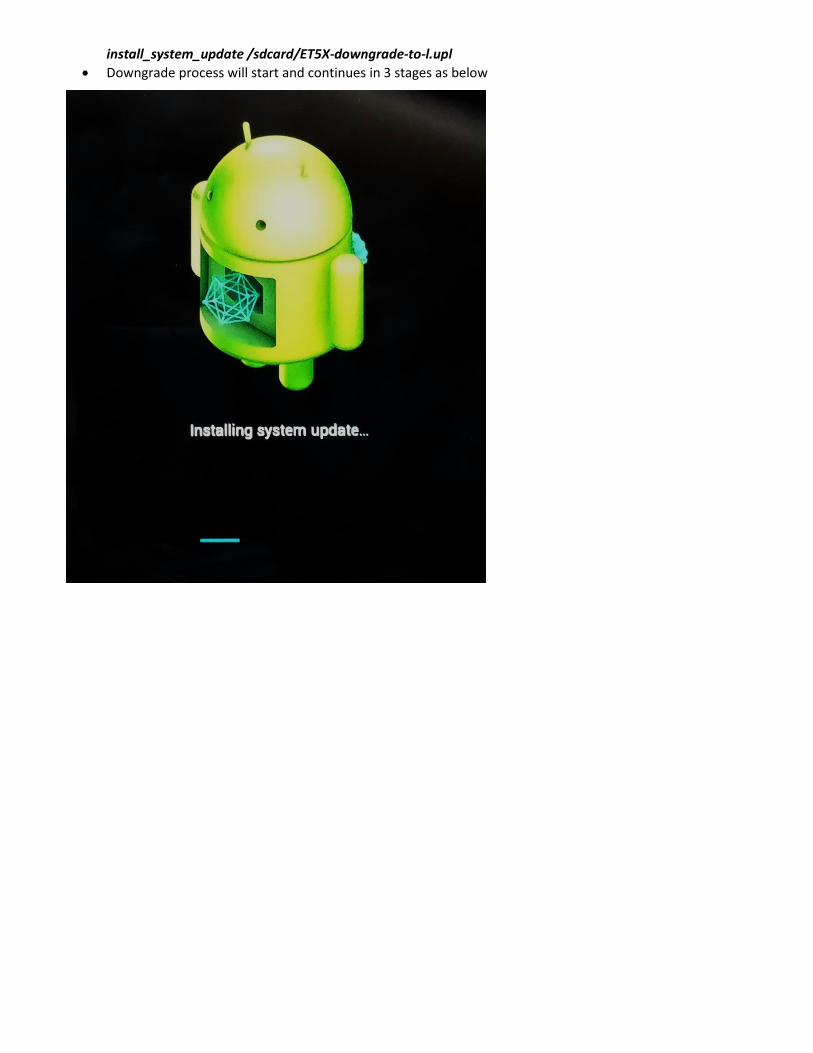
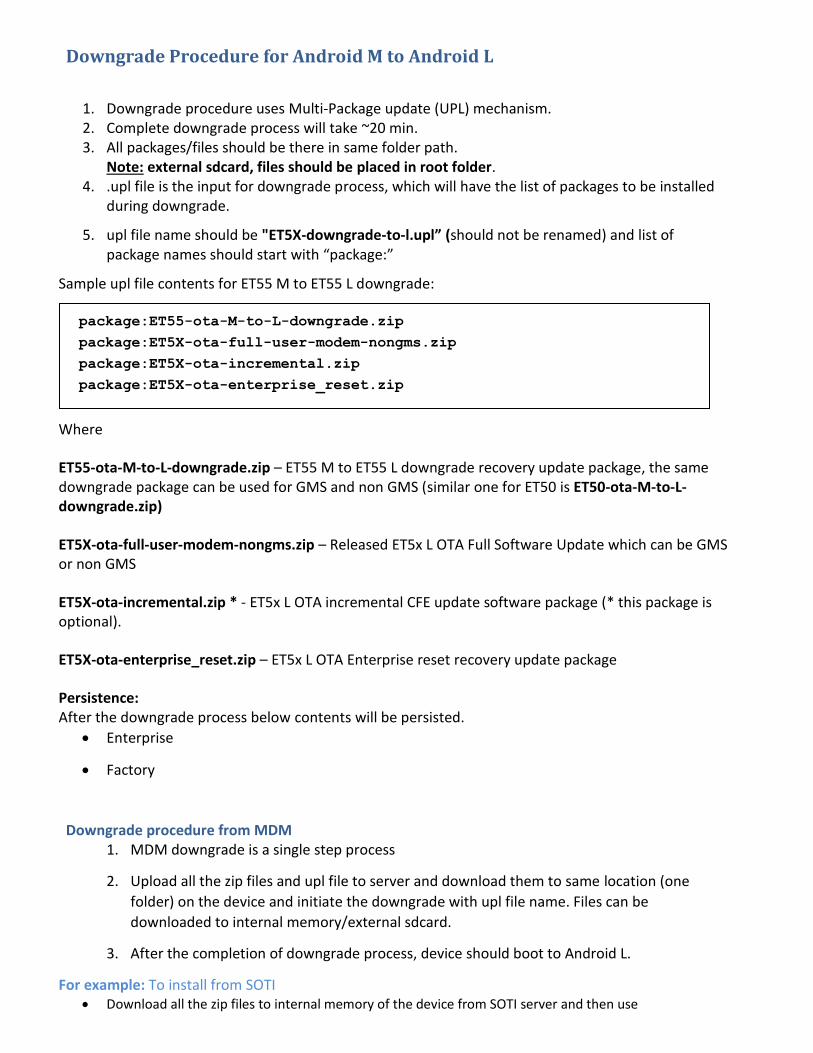
install_system_update /sdcard/ET5X-downgrade-to-l.upl
• Downgrade process will start and continues in 3 stages as below


• After the downgrade completes successfully device will boot automatically to Android L home screen.
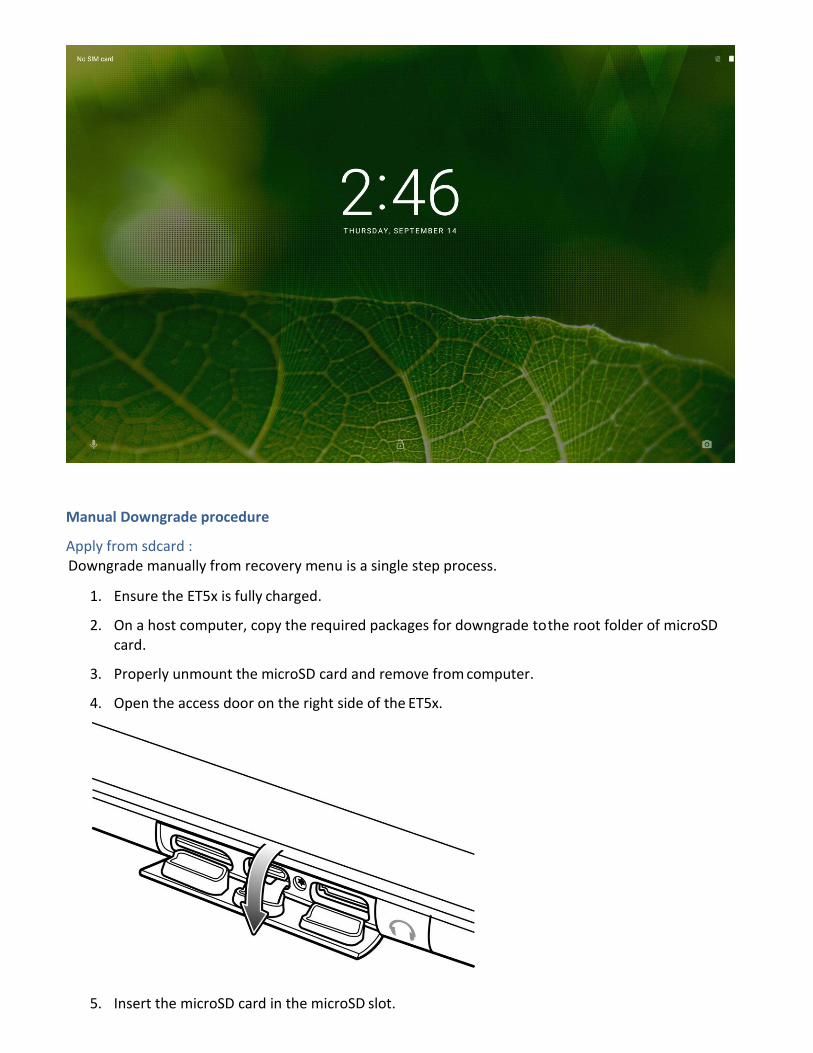
Manual Downgrade procedure
Apply from sdcard : Downgrade manually from recovery menu is a single step process.
1. Ensure the ET5x is fully charged.
2. On a host computer, copy the required packages for downgrade to the root folder of microSD card.
3. Properly unmount the microSD card and remove from computer.
4. Open the access door on the right side of the ET5x.
5. Insert the microSD card in the microSD slot.

6. If the ET5x is on, turn off.
7. Press and release the “power” button and then press and hold the “volume down” button
until the following message appears on the screen:
“Continue holding key for 2 second(s) to enter fastboot mode Release key now to load Recovery console …” .
Release Volume Down Key as soon as this message appears to enter the recovery mode.
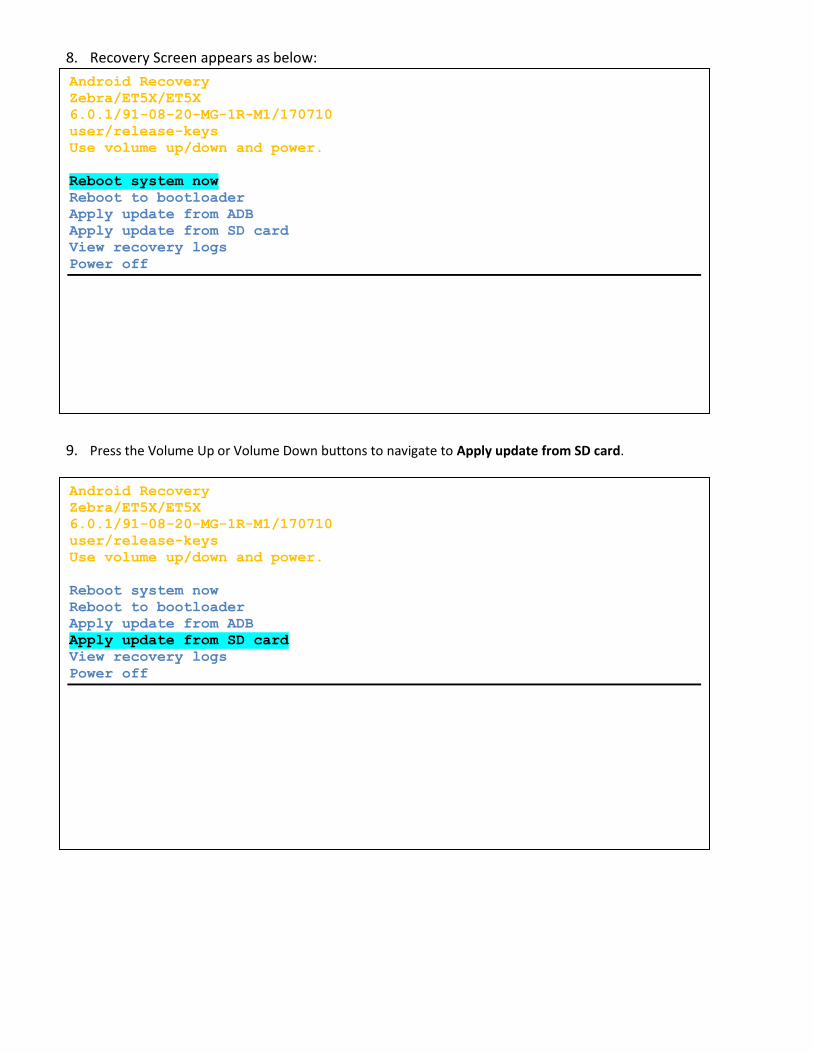
8. Recovery Screen appears as below:
9. Press the Volume Up or Volume Down buttons to navigate to Apply update from SD card.
Android Recovery
Zebra/ET5X/ET5X
6.0.1/91-08-20-MG-1R-M1/170710
user/release-keys
Use volume up/down and power.
Reboot system now
Reboot to bootloader
Apply update from ADB
Apply update from SD card
View recovery logs
Power off
Android Recovery
Zebra/ET5X/ET5X
6.0.1/91-08-20-MG-1R-M1/170710
user/release-keys
Use volume up/down and power.
Reboot system now
Reboot to bootloader
Apply update from ADB
Apply update from SD card
View recovery logs
Power off
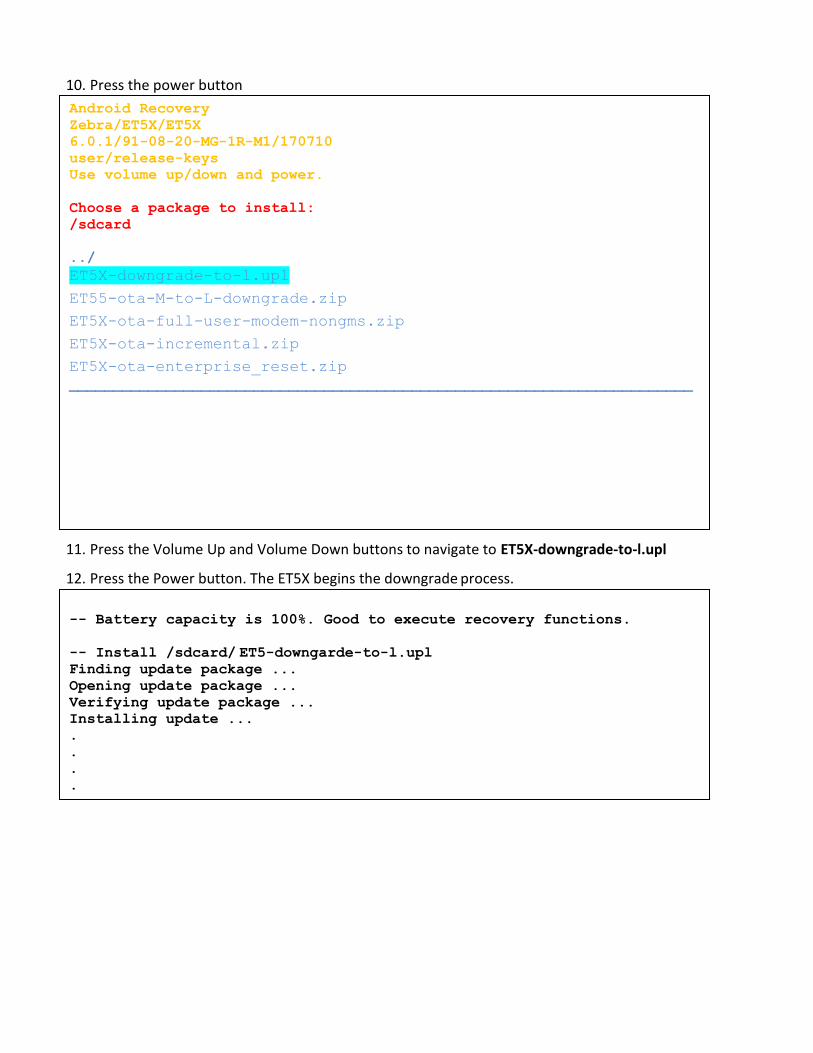
10. Press the power button
11. Press the Volume Up and Volume Down buttons to navigate to ET5X-downgrade-to-l.upl
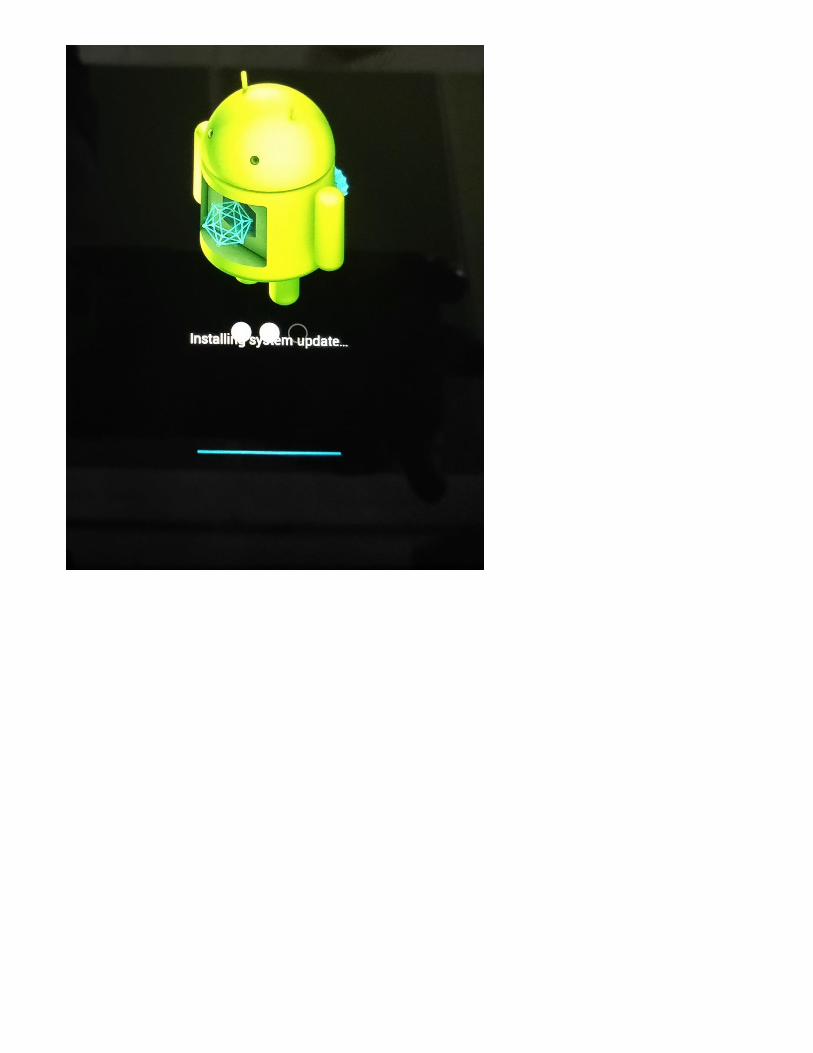
12. Press the Power button. The ET5X begins the downgrade process.
Android Recovery
Zebra/ET5X/ET5X
6.0.1/91-08-20-MG-1R-M1/170710
user/release-keys
Use volume up/down and power.
Choose a package to install:
/sdcard
../
ET5X-downgrade-to-l.upl
ET55-ota-M-to-L-downgrade.zip
ET5X-ota-full-user-modem-nongms.zip
ET5X-ota-incremental.zip
ET5X-ota-enterprise_reset.zip
_______________________________________________________________________
-- Battery capacity is 100%. Good to execute recovery functions.
-- Install /sdcard/ ET5-downgarde-to-l.upl Finding update package ...
Opening update package ...
Verifying update package ...
Installing update ...
.
.
.
.
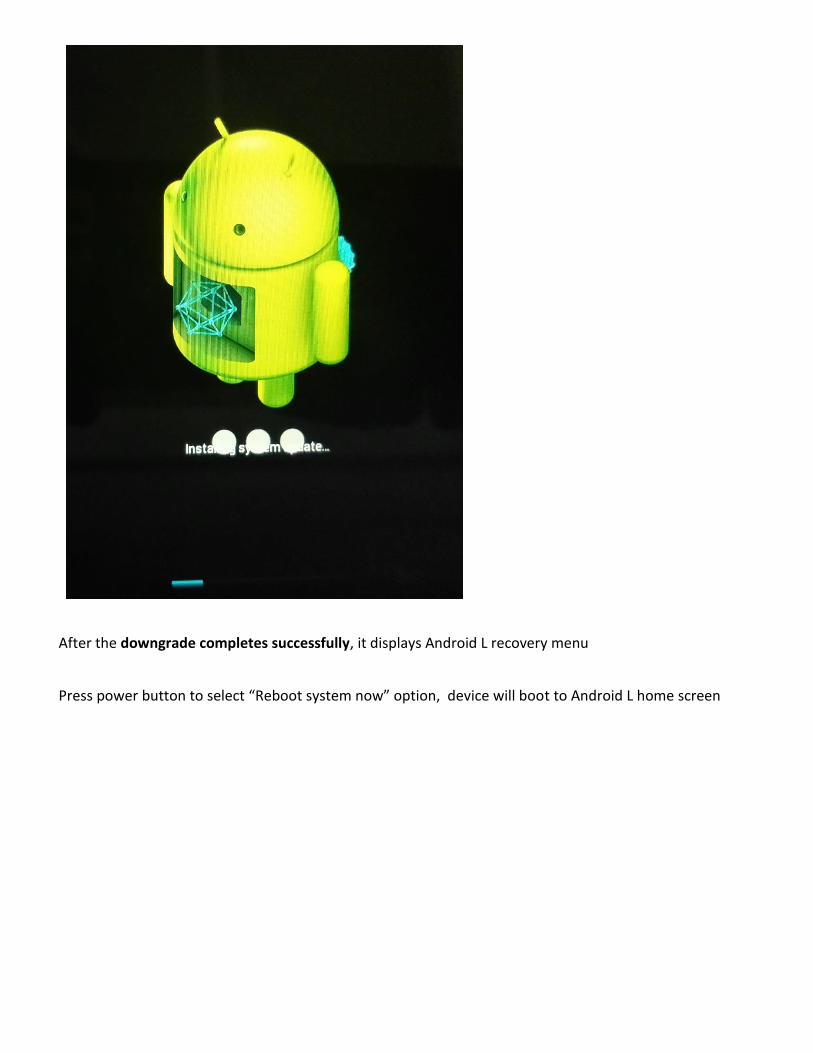
After the downgrade completes successfully, it displays Android L recovery menu
Press power button to select “Reboot system now” option, device will boot to Android L home screen
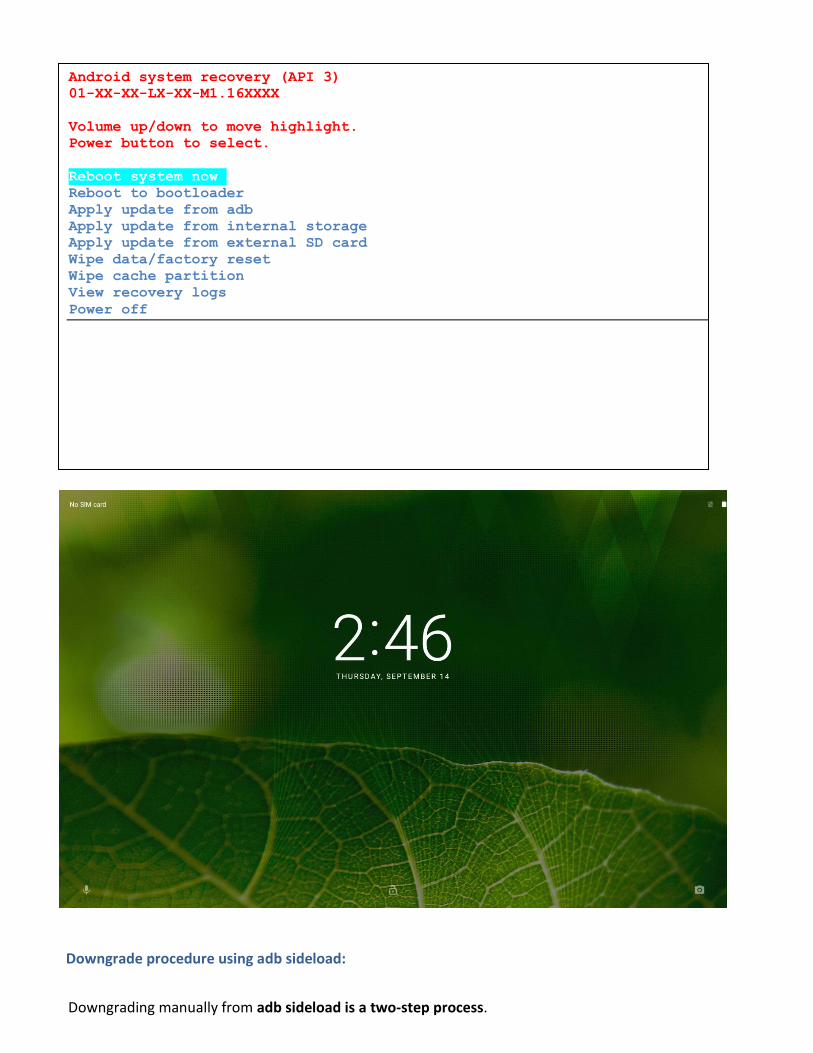
Downgrade procedure using adb sideload:
Downgrading manually from adb sideload is a two-step process.
Android system recovery (API 3)
01-XX-XX-LX-XX-M1.16XXXX
Volume up/down to move highlight.
Power button to select.
Reboot system now
Reboot to bootloader
Apply update from adb
Apply update from internal storage
Apply update from external SD card
Wipe data/factory reset
Wipe cache partition
View recovery logs
Power off
1. Ensure the ET5x is fully charged.
2. If the ET5x is on, turn off.
3. Press and release the “power” button and then press and hold the “volume down” button
until the following message appears on the screen:
“Continue holding key for 2 second(s) to enter fastboot mode Release key now to load Recovery console …” .
Release Volume Down Key as soon as this message appears to enter the recovery mode.
4. Recovery Screen appears as below:
5. Press the Volume Up or Volume Down buttons to navigate to Apply update from ADB.
Android Recovery
Zebra/ET5X/ET5X
6.0.1/91-08-20-MG-1R-M1/170710
user/release-keys
Use volume up/down and power.
Reboot system now
Reboot to bootloader
Apply update from ADB
Apply update from SD card
View recovery logs
Power off
Android Recovery
Zebra/ET5X/ET5X
6.0.1/91-08-20-MG-1R-M1/170710
user/release-keys
Use volume up/down and power.
Reboot system now
Reboot to bootloader
Apply update from ADB
Apply update from SD card
View recovery logs
Power off
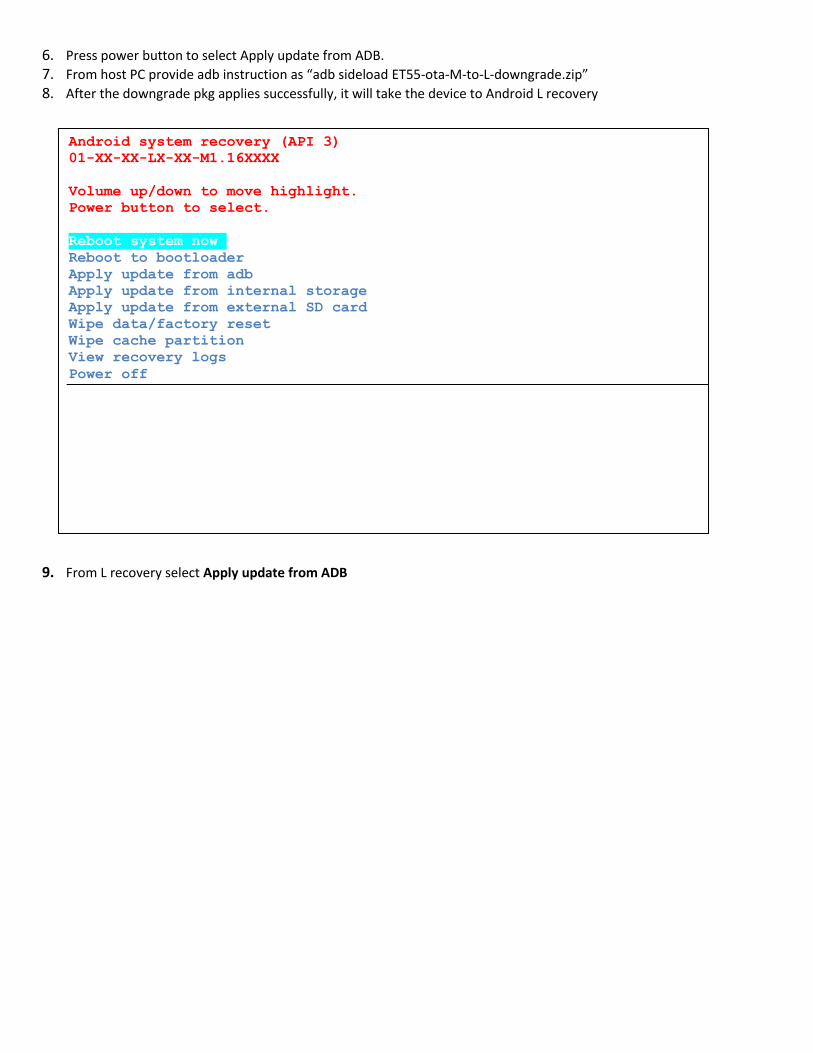
6. Press power button to select Apply update from ADB.
7. From host PC provide adb instruction as “adb sideload ET55-ota-M-to-L-downgrade.zip”
8. After the downgrade pkg applies successfully, it will take the device to Android L recovery
9. From L recovery select Apply update from ADB
Android system recovery (API 3)
01-XX-XX-LX-XX-M1.16XXXX
Volume up/down to move highlight.
Power button to select.
Reboot system now
Reboot to bootloader
Apply update from adb
Apply update from internal storage
Apply update from external SD card
Wipe data/factory reset
Wipe cache partition
View recovery logs
Power off
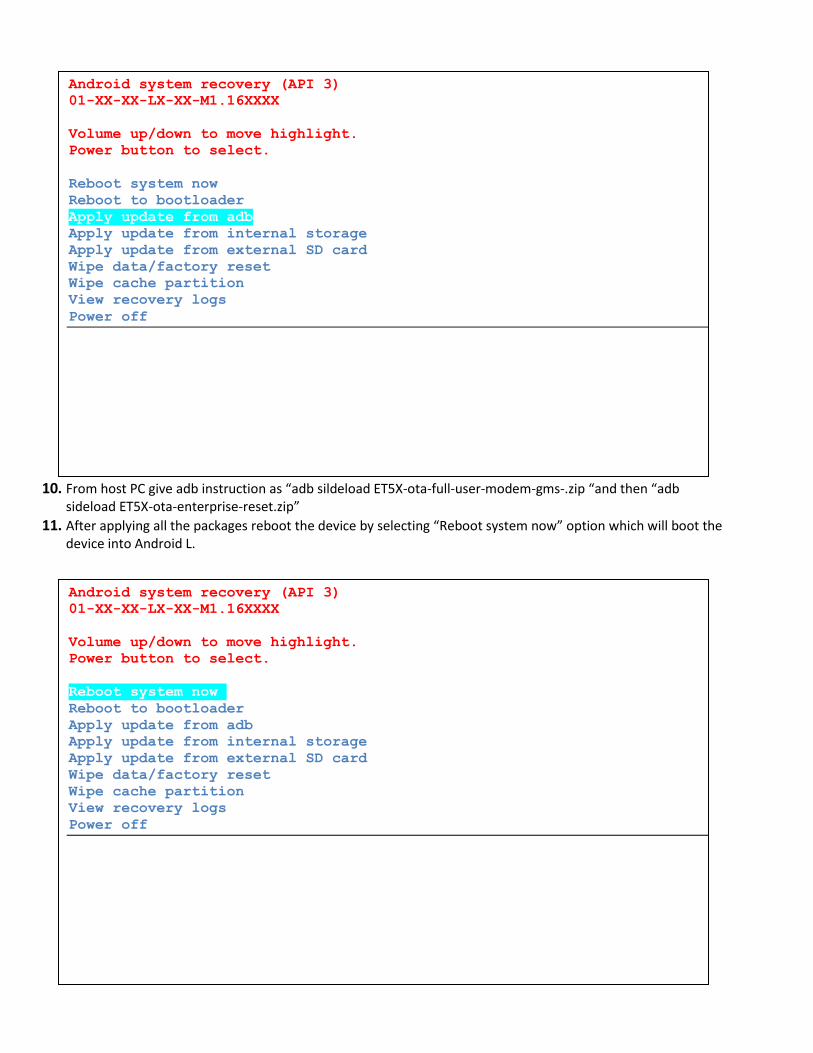
10. From host PC give adb instruction as “adb sildeload ET5X-ota-full-user-modem-gms-.zip “and then “adb sideload ET5X-ota-enterprise-reset.zip”
11. After applying all the packages reboot the device by selecting “Reboot system now” option which will boot the device into Android L.
Android system recovery (API 3)
01-XX-XX-LX-XX-M1.16XXXX
Volume up/down to move highlight.
Power button to select.
Reboot system now
Reboot to bootloader
Apply update from adb
Apply update from internal storage
Apply update from external SD card
Wipe data/factory reset
Wipe cache partition
View recovery logs
Power off

![microSD-CONF 1 タヴシクヴダ · 2011-08-08 · 1 or 8 bit幅 エリア設定 ロータリSW ①microSD => FPGA直接転送モード microSD microSD-CONF1 XMODE XAREA[3:0] 図1-1.uSD-CONF1](https://img.pdfslide.us/doc/110x75/5f30bf189d8acd0cba350893/microsd-conf-1-fff-2011-08-08-1-or-8-bit-iiie-iiiisw.jpg)