Embed Size (px)
Citation preview
National Informatics Centre Ministry of Electronics and Information Technology
Government of India
1
Contents
1. Managing Your Email
a. View .............................................................................................................................................. 2
b. Attachments ................................................................................................................................. 4
c. Set priority Mail ............................................................................................................................ 4
d. Undo Send .................................................................................................................................... 5
e. Dumpster ...................................................................................................................................... 6
f. Add Personas (A role granted to the user) ................................................................................... 6
2. Search
3. Calendar
a. Calendar sync .............................................................................................................................. 14
b. To create a custom calendar event with the content of the mail .............................................. 24
4. Contact Book/Address Book
a. Share Address Book .................................................................................................................... 25
b. How to create a new contact and Address book (Contact book)?............................................. 26
c. Automatically add contacts to emailed contact lists ................................................................. 28
5. Folders
a. How to share your folder? .......................................................................................................... 29
6. Briefcase ................................................................................................................................... 33
7. Configuring POP3/IMAP Client
8. Reset your password
a. How to reset password ............................................................................................................... 46
9. Offline Mode
National Informatics Centre Ministry of Electronics and Information Technology
Government of India
2
1. Managing Your Email
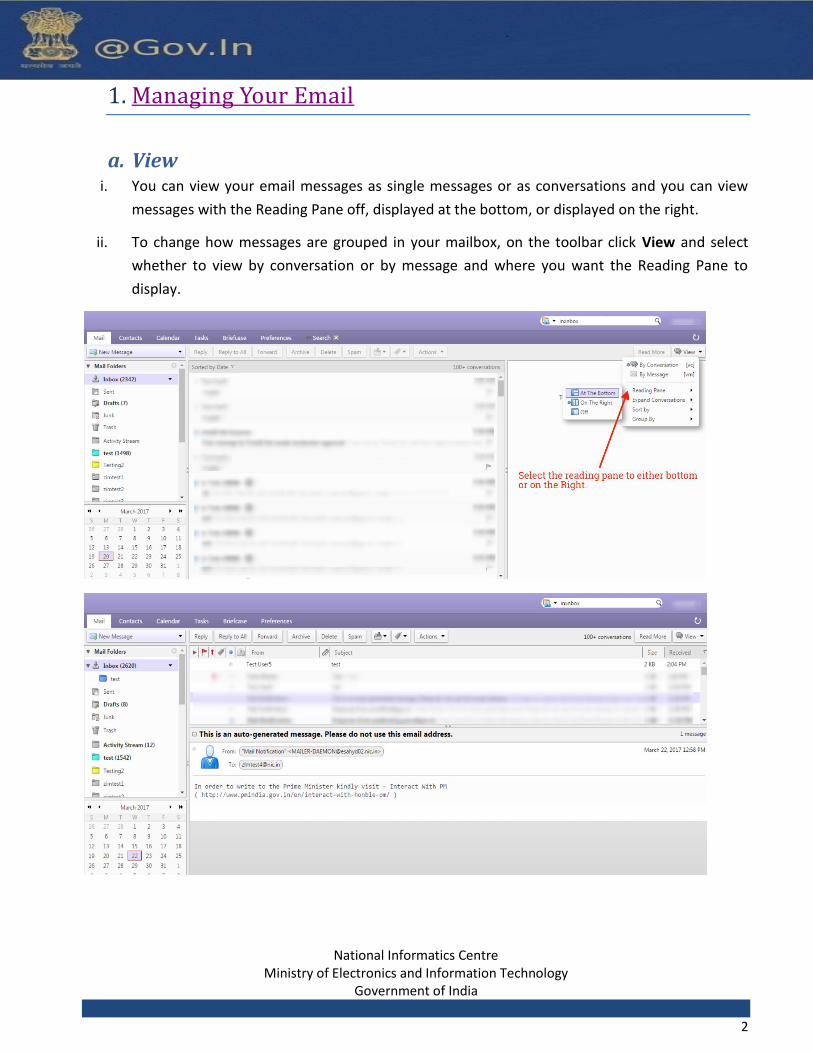
a. View i. You can view your email messages as single messages or as conversations and you can view
messages with the Reading Pane off, displayed at the bottom, or displayed on the right.
ii. To change how messages are grouped in your mailbox, on the toolbar click View and select
whether to view by conversation or by message and where you want the Reading Pane to
display.

National Informatics Centre Ministry of Electronics and Information Technology
Government of India
3
I. View Email Messages by Conversation In the Conversation view your messages are grouped to make it easier to follow the thread of an email
exchange. A conversation thread begins when you send or receive an email and then send or receive
subsequent replies and forwards based on the original email. The subject displays only once in your
Inbox and the number of email messages in the conversation is shown. Conversations containing
unread messages are shown in bold.
Conversations can be in your Inbox another in your sent folder, and others in another folder. If you
move a conversation from one folder to another, all messages within that conversation are also
moved to that folder. Messages in the Sent folder and in the Trash folder are not moved.
To create a new conversation thread, you must create a new message, not reply to or forward an
existing message.
II. View Email Messages by Message Email messages in your mailbox can be organized by selecting the date a message is received and by
Conversation.
i. On the Mail tab toolbar, click the View drop-down menu.
ii. Select either By Conversation or By Message.
National Informatics Centre Ministry of Electronics and Information Technology
Government of India
4
b. Attachments Add Attachments using drag and drop You can easily add an attachment to an email message by dragging the file from a folder into your
email.
i. Select one or more files from your desktop and hold down the cursor on the file(s) to
be attached.
ii. Drag the files to the message header area and release the cursor. The file names are
displayed in the header.
a. Removing an Attachment
i. To remove an attachment, click the x (cross) in the attachment bubble.
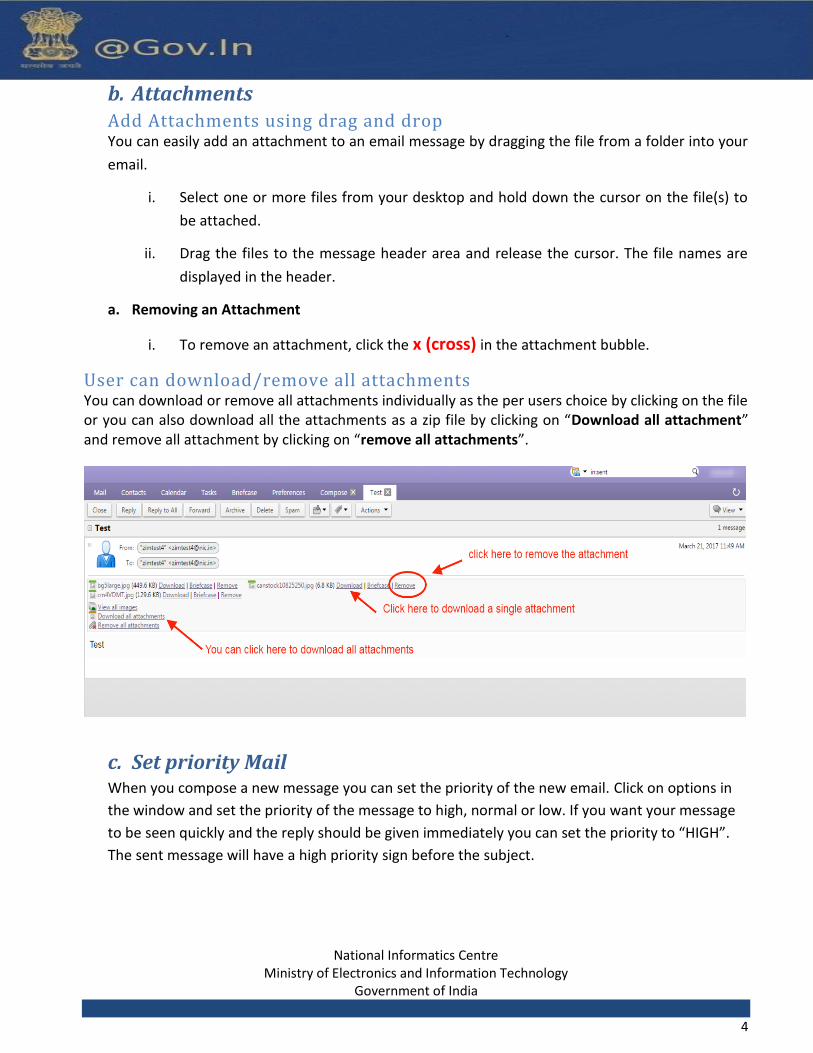
User can download/remove all attachments You can download or remove all attachments individually as the per users choice by clicking on the file or you can also download all the attachments as a zip file by clicking on “Download all attachment” and remove all attachment by clicking on “remove all attachments”.
c. Set priority Mail When you compose a new message you can set the priority of the new email. Click on options in
the window and set the priority of the message to high, normal or low. If you want your message
to be seen quickly and the reply should be given immediately you can set the priority to “HIGH”.
The sent message will have a high priority sign before the subject.

National Informatics Centre Ministry of Electronics and Information Technology
Government of India
5
d. Undo Send In the mail folders go to the last folder named as Undo send (Inside Zimlets). Click on “undo send”.
You can enable and set the number of seconds after which your mail will be sent. Compose an
email and it will show a timer i.e. the number of seconds after which the mail will be sent. You can
click on OK to proceed further or Cancel the sending process. Please enable undo send before
proceeding.
National Informatics Centre Ministry of Electronics and Information Technology
Government of India
6
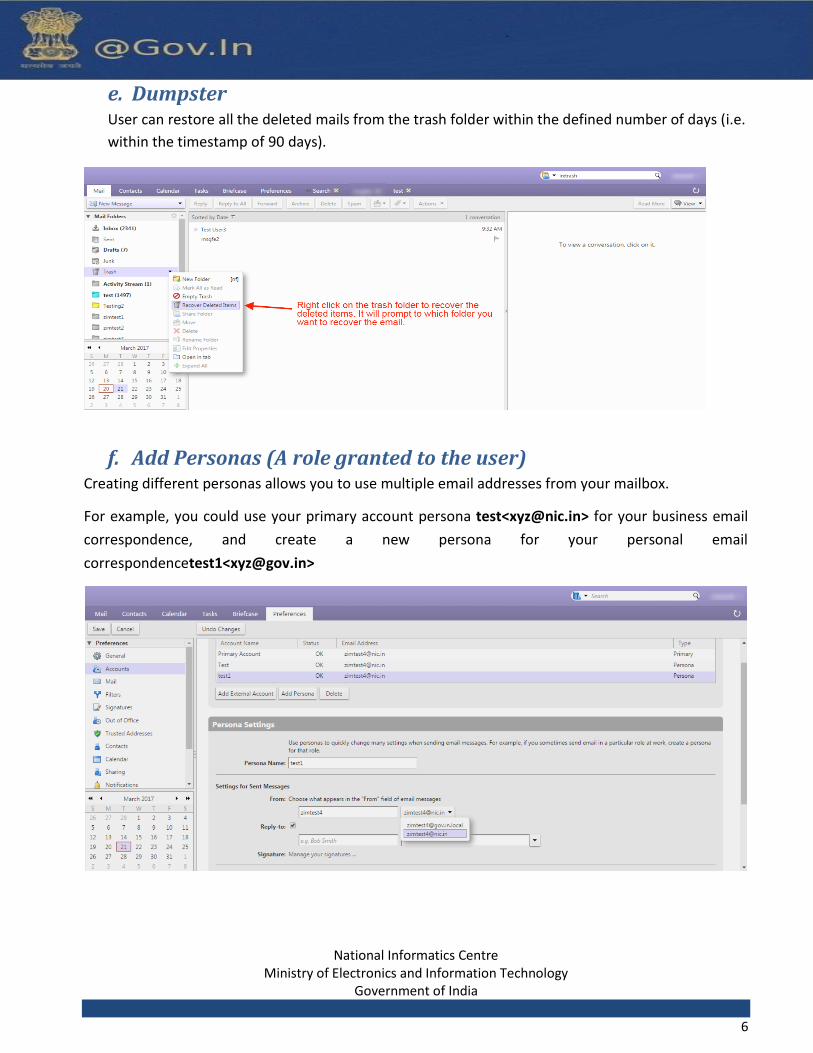
e. Dumpster User can restore all the deleted mails from the trash folder within the defined number of days (i.e.
within the timestamp of 90 days).
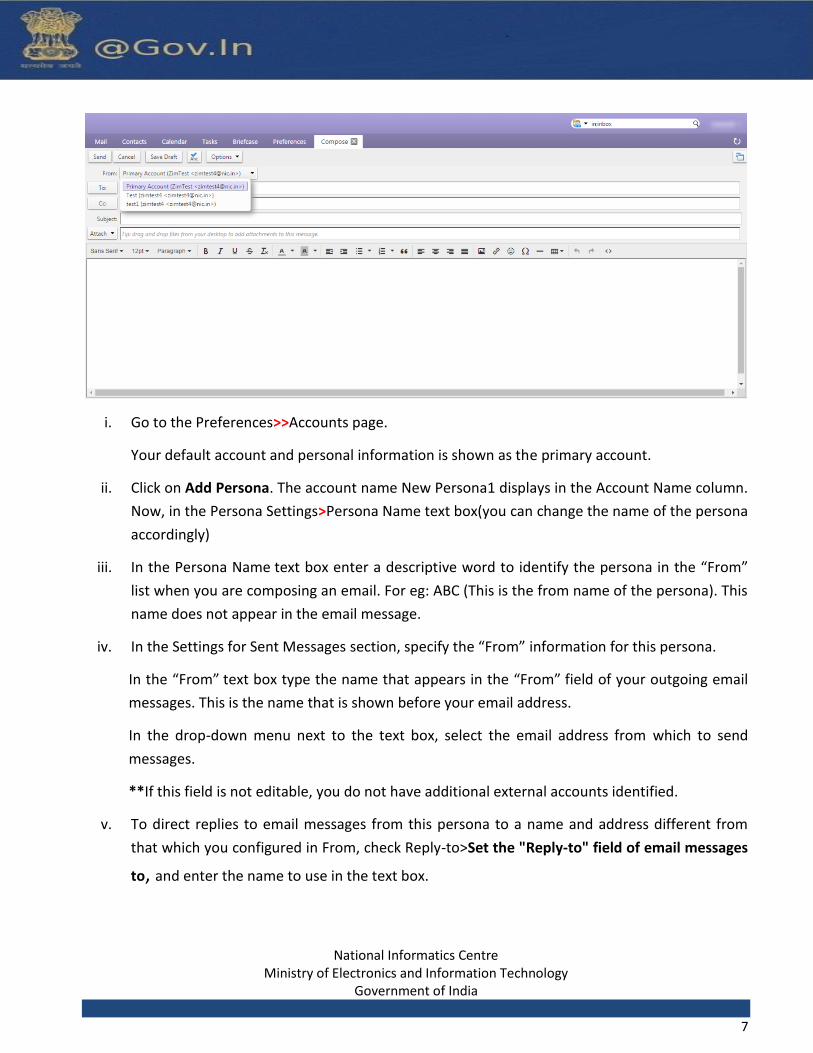
f. Add Personas (A role granted to the user) Creating different personas allows you to use multiple email addresses from your mailbox.
For example, you could use your primary account persona test<[email protected]> for your business email
correspondence, and create a new persona for your personal email
correspondencetest1<[email protected]>
National Informatics Centre Ministry of Electronics and Information Technology
Government of India
7
i. Go to the Preferences>>Accounts page.
Your default account and personal information is shown as the primary account.
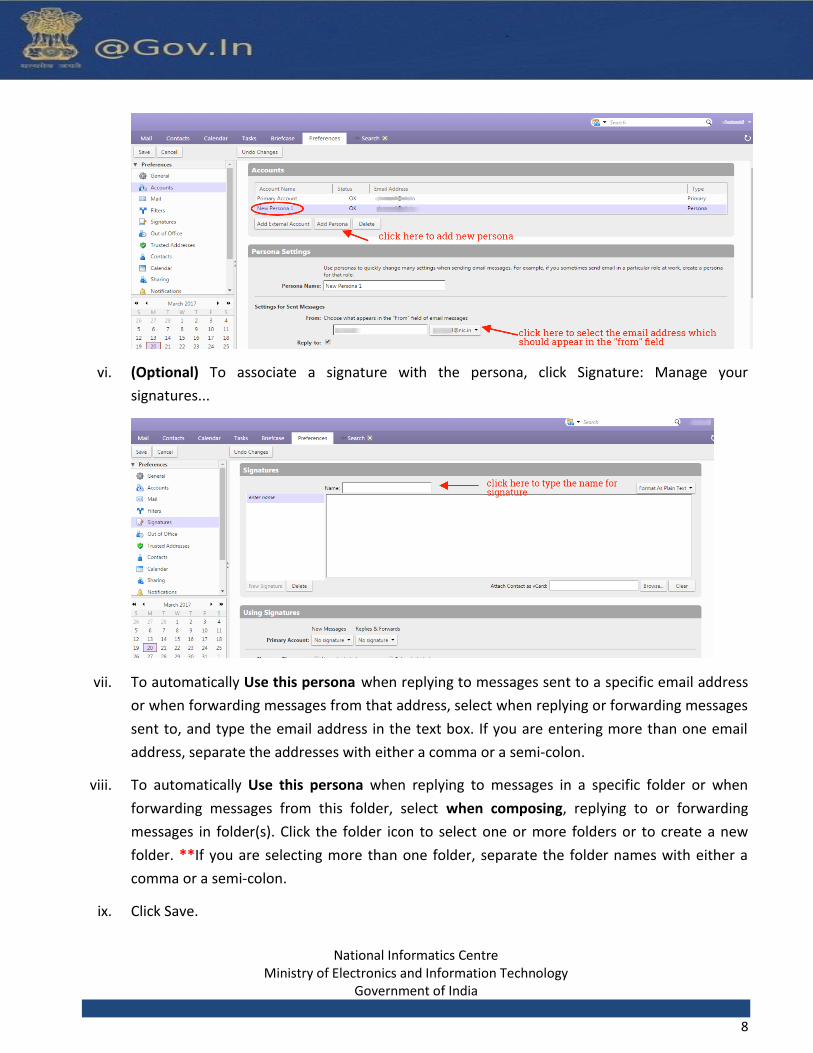
ii. Click on Add Persona. The account name New Persona1 displays in the Account Name column.
Now, in the Persona Settings>Persona Name text box(you can change the name of the persona
accordingly)
iii. In the Persona Name text box enter a descriptive word to identify the persona in the “From”
list when you are composing an email. For eg: ABC (This is the from name of the persona). This
name does not appear in the email message.
iv. In the Settings for Sent Messages section, specify the “From” information for this persona.
In the “From” text box type the name that appears in the “From” field of your outgoing email
messages. This is the name that is shown before your email address.
In the drop-down menu next to the text box, select the email address from which to send
messages.
**If this field is not editable, you do not have additional external accounts identified.
v. To direct replies to email messages from this persona to a name and address different from
that which you configured in From, check Reply-to>Set the "Reply-to" field of email messages
to, and enter the name to use in the text box.
National Informatics Centre Ministry of Electronics and Information Technology
Government of India
8
vi. (Optional) To associate a signature with the persona, click Signature: Manage your
signatures...
vii. To automatically Use this persona when replying to messages sent to a specific email address
or when forwarding messages from that address, select when replying or forwarding messages
sent to, and type the email address in the text box. If you are entering more than one email
address, separate the addresses with either a comma or a semi-colon.
viii. To automatically Use this persona when replying to messages in a specific folder or when
forwarding messages from this folder, select when composing, replying to or forwarding
messages in folder(s). Click the folder icon to select one or more folders or to create a new
folder. **If you are selecting more than one folder, separate the folder names with either a
comma or a semi-colon.
ix. Click Save.
National Informatics Centre Ministry of Electronics and Information Technology
Government of India
9
2. Search
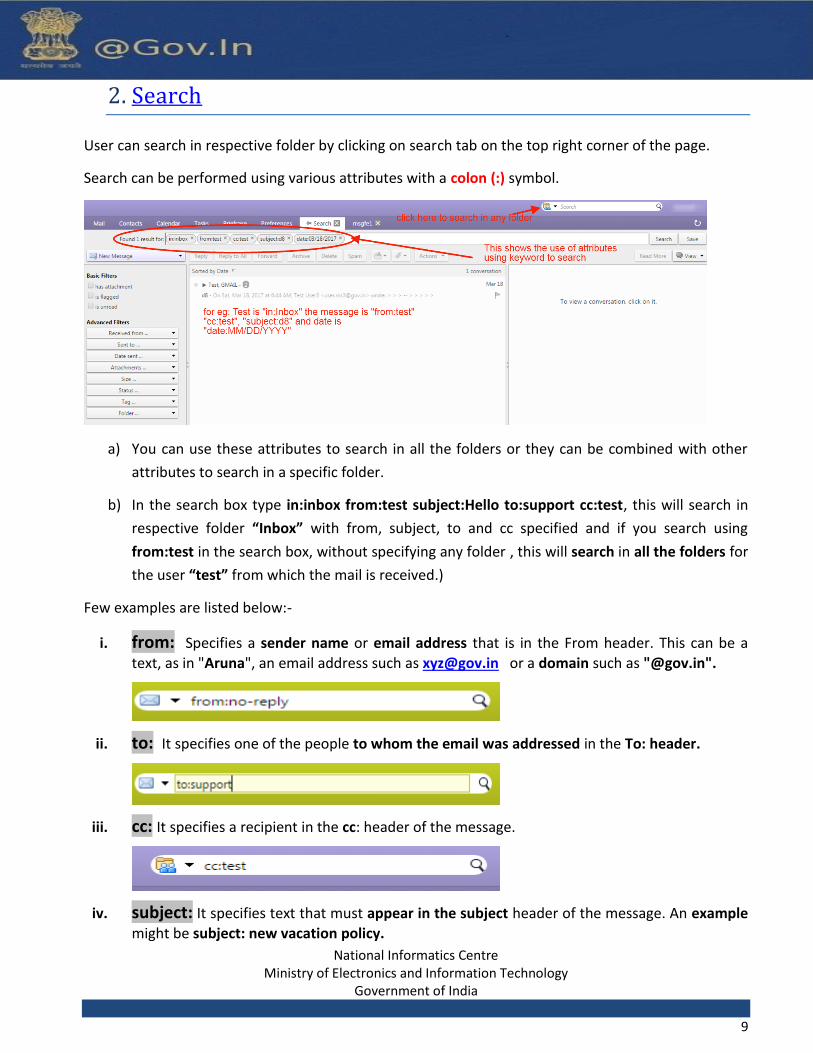
User can search in respective folder by clicking on search tab on the top right corner of the page.
Search can be performed using various attributes with a colon (:) symbol.
a) You can use these attributes to search in all the folders or they can be combined with other
attributes to search in a specific folder.
b) In the search box type in:inbox from:test subject:Hello to:support cc:test, this will search in
respective folder “Inbox” with from, subject, to and cc specified and if you search using
from:test in the search box, without specifying any folder , this will search in all the folders for
the user “test” from which the mail is received.)
Few examples are listed below:-
i. from: Specifies a sender name or email address that is in the From header. This can be a
text, as in "Aruna", an email address such as [email protected] or a domain such as "@gov.in".
ii. to: It specifies one of the people to whom the email was addressed in the To: header.
iii. cc: It specifies a recipient in the cc: header of the message.
iv. subject: It specifies text that must appear in the subject header of the message. An example
might be subject: new vacation policy.
National Informatics Centre Ministry of Electronics and Information Technology
Government of India
10
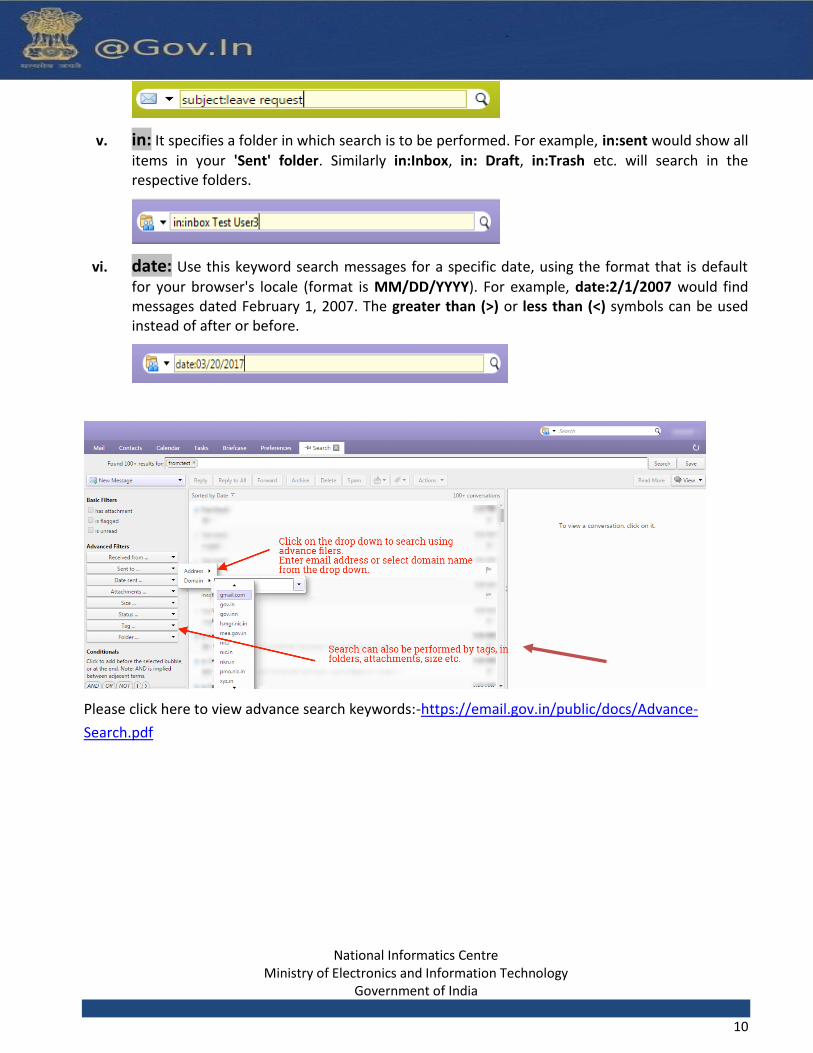
v. in: It specifies a folder in which search is to be performed. For example, in:sent would show all
items in your 'Sent' folder. Similarly in:Inbox, in: Draft, in:Trash etc. will search in the respective folders.
vi. date: Use this keyword search messages for a specific date, using the format that is default
for your browser's locale (format is MM/DD/YYYY). For example, date:2/1/2007 would find messages dated February 1, 2007. The greater than (>) or less than (<) symbols can be used instead of after or before.
Please click here to view advance search keywords:-https://email.gov.in/public/docs/Advance-
Search.pdf
National Informatics Centre Ministry of Electronics and Information Technology
Government of India
11
3. Calendar
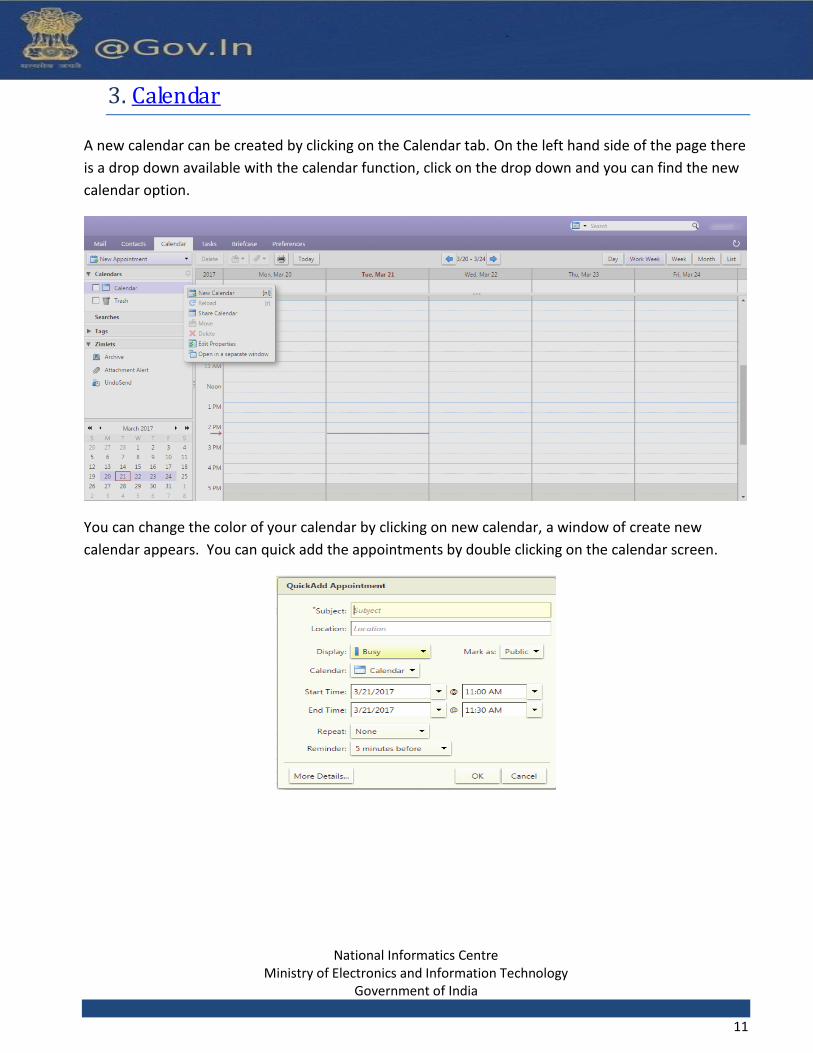
A new calendar can be created by clicking on the Calendar tab. On the left hand side of the page there
is a drop down available with the calendar function, click on the drop down and you can find the new
calendar option.
You can change the color of your calendar by clicking on new calendar, a window of create new
calendar appears. You can quick add the appointments by double clicking on the calendar screen.

National Informatics Centre Ministry of Electronics and Information Technology
Government of India
12
Select the color to personalize your calendar and save it with a desired name.
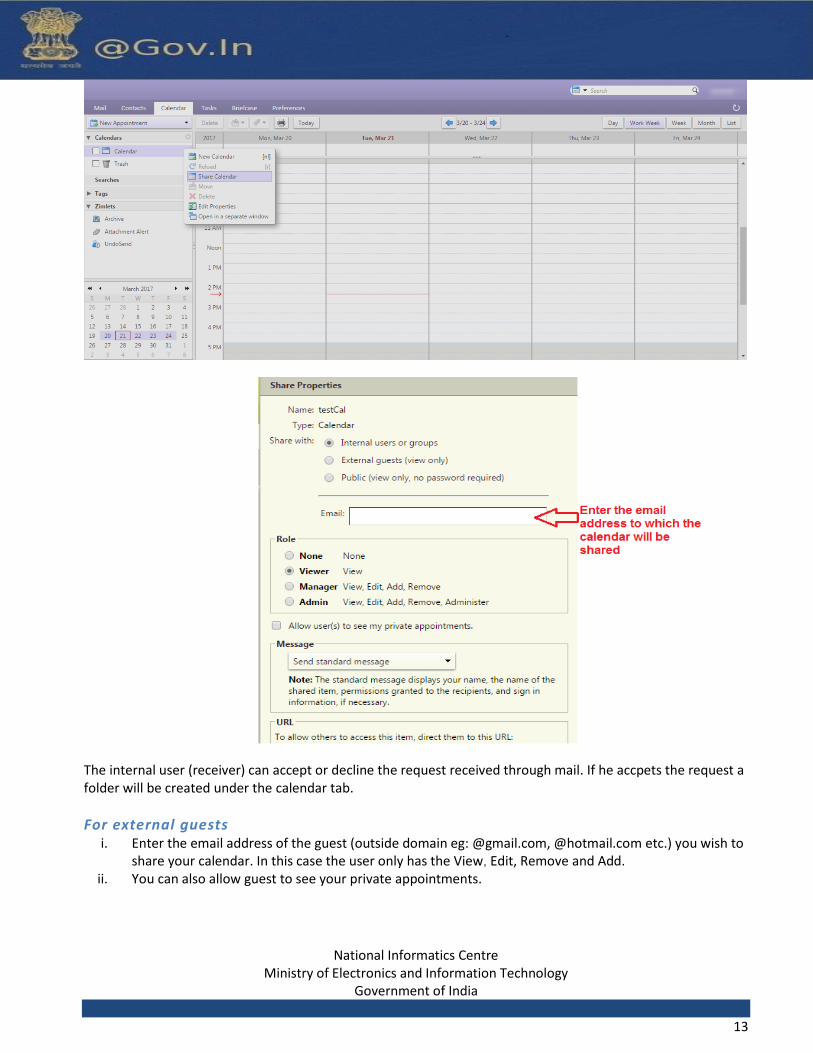
The calendar can also be shared with internal users or group, external users and public (view only, no
password is required).
For Internal Users or groups You can assign the following role:
i. None- No rights ii. Viewer – Only View right
iii. Manager – View, Edit, Add , Remove iv. Admin- View, Edit, Add, remove, Administer
National Informatics Centre Ministry of Electronics and Information Technology
Government of India
13
The internal user (receiver) can accept or decline the request received through mail. If he accpets the request a folder will be created under the calendar tab.
For external guests i. Enter the email address of the guest (outside domain eg: @gmail.com, @hotmail.com etc.) you wish to
share your calendar. In this case the user only has the View, Edit, Remove and Add. ii. You can also allow guest to see your private appointments.
National Informatics Centre Ministry of Electronics and Information Technology
Government of India
14
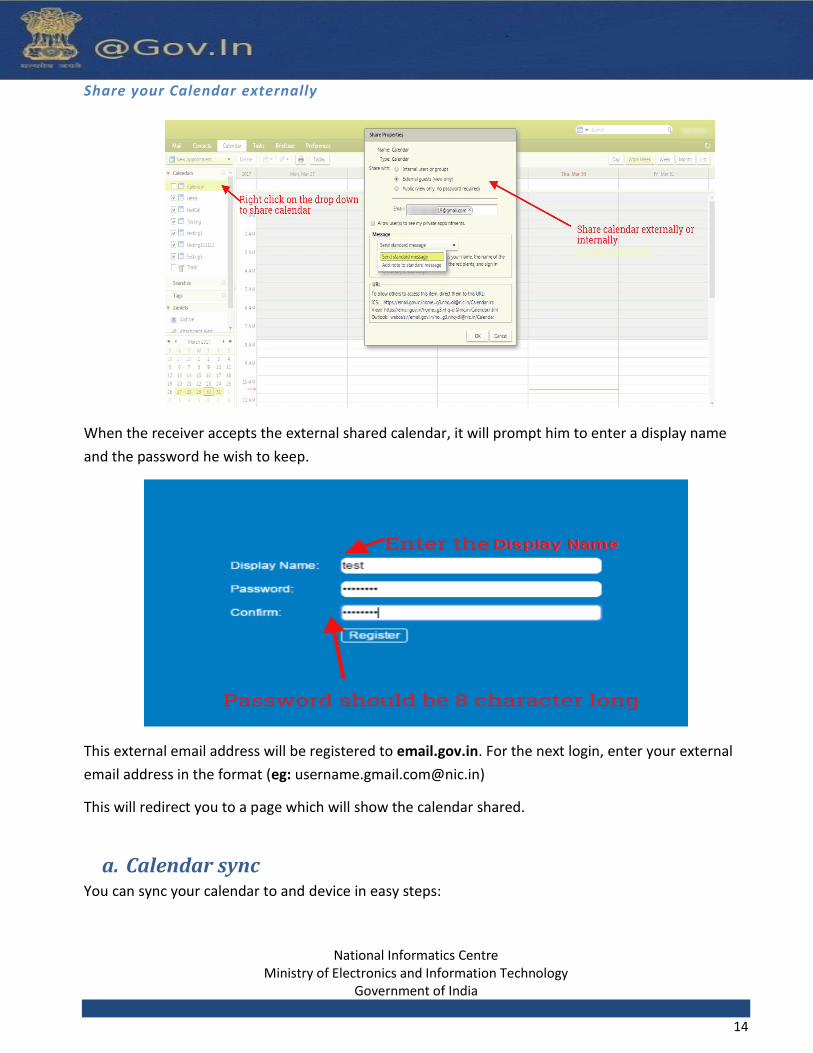
Share your Calendar externally
When the receiver accepts the external shared calendar, it will prompt him to enter a display name
and the password he wish to keep.
This external email address will be registered to email.gov.in. For the next login, enter your external
email address in the format (eg: [email protected])
This will redirect you to a page which will show the calendar shared.
a. Calendar sync You can sync your calendar to and device in easy steps:
National Informatics Centre Ministry of Electronics and Information Technology
Government of India
15
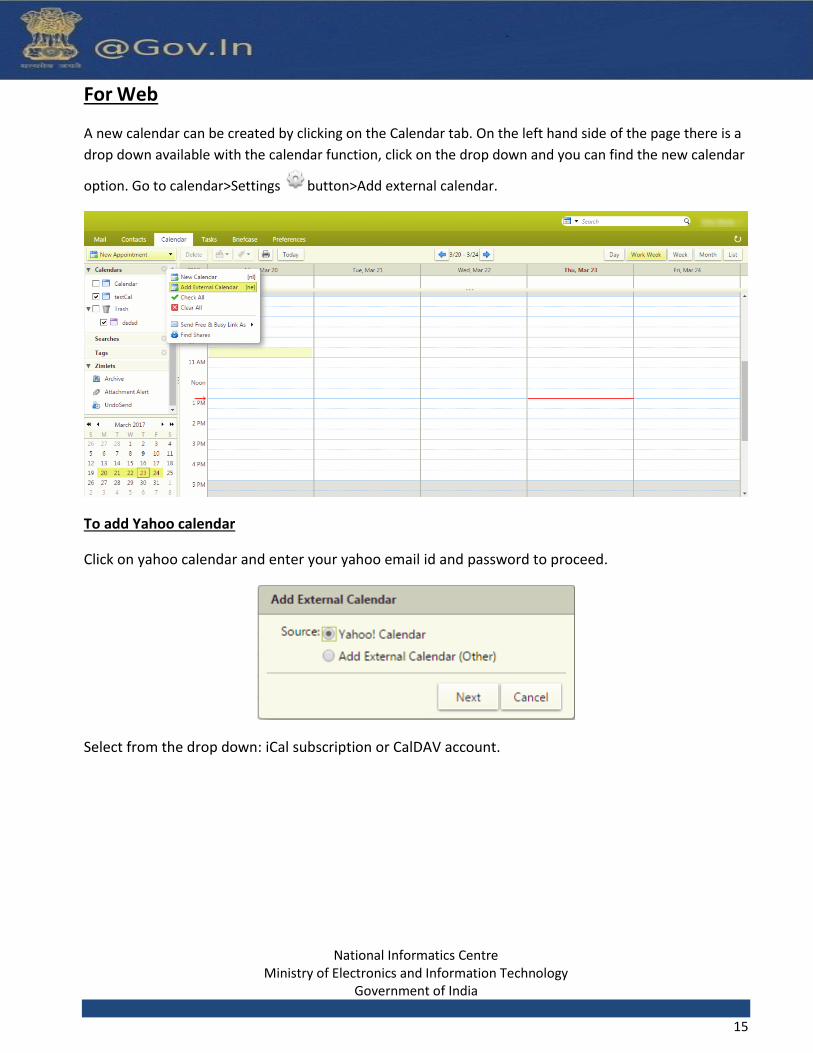
For Web
A new calendar can be created by clicking on the Calendar tab. On the left hand side of the page there is a
drop down available with the calendar function, click on the drop down and you can find the new calendar
option. Go to calendar>Settings button>Add external calendar.
To add Yahoo calendar
Click on yahoo calendar and enter your yahoo email id and password to proceed.
Select from the drop down: iCal subscription or CalDAV account.

National Informatics Centre Ministry of Electronics and Information Technology
Government of India
16
To add external calendar
Enter your external email id and password to proceed further. Enter the CalDAV server as
cal.mail.gov.in
Enter a folder name to distinguish your calendar folder and you can also change the color of the
folder.
National Informatics Centre Ministry of Electronics and Information Technology
Government of India
17
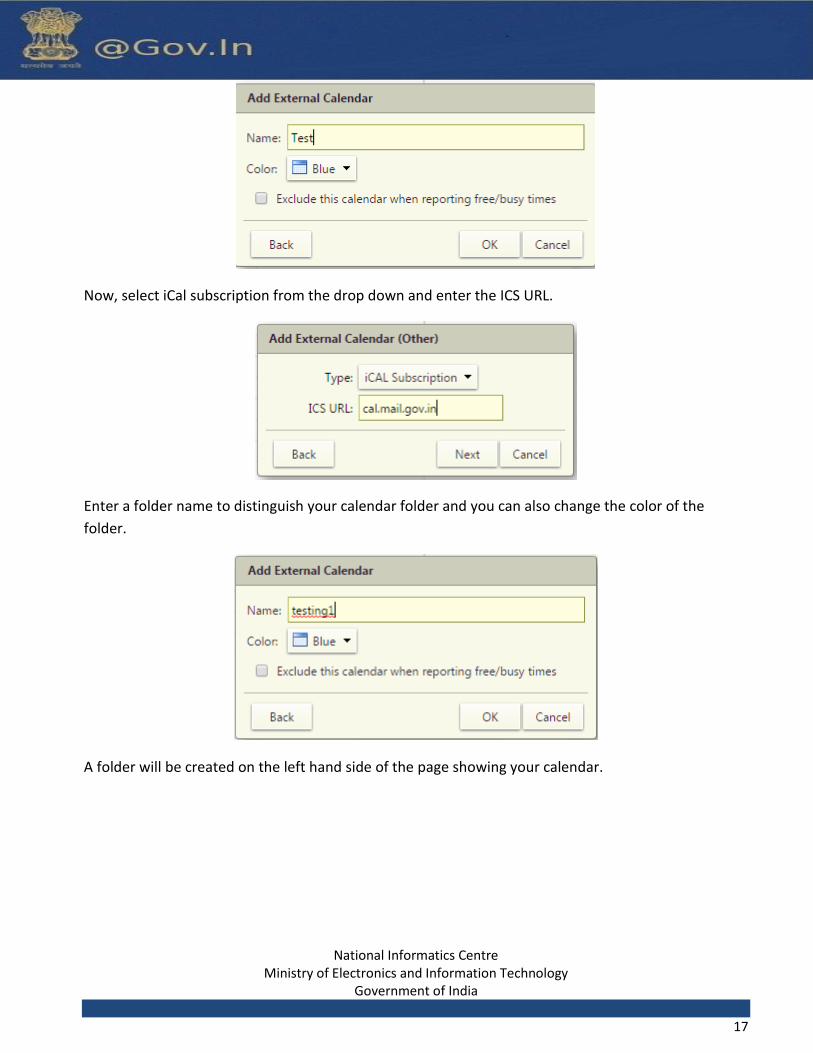
Now, select iCal subscription from the drop down and enter the ICS URL.
Enter a folder name to distinguish your calendar folder and you can also change the color of the
folder.
A folder will be created on the left hand side of the page showing your calendar.
National Informatics Centre Ministry of Electronics and Information Technology
Government of India
18
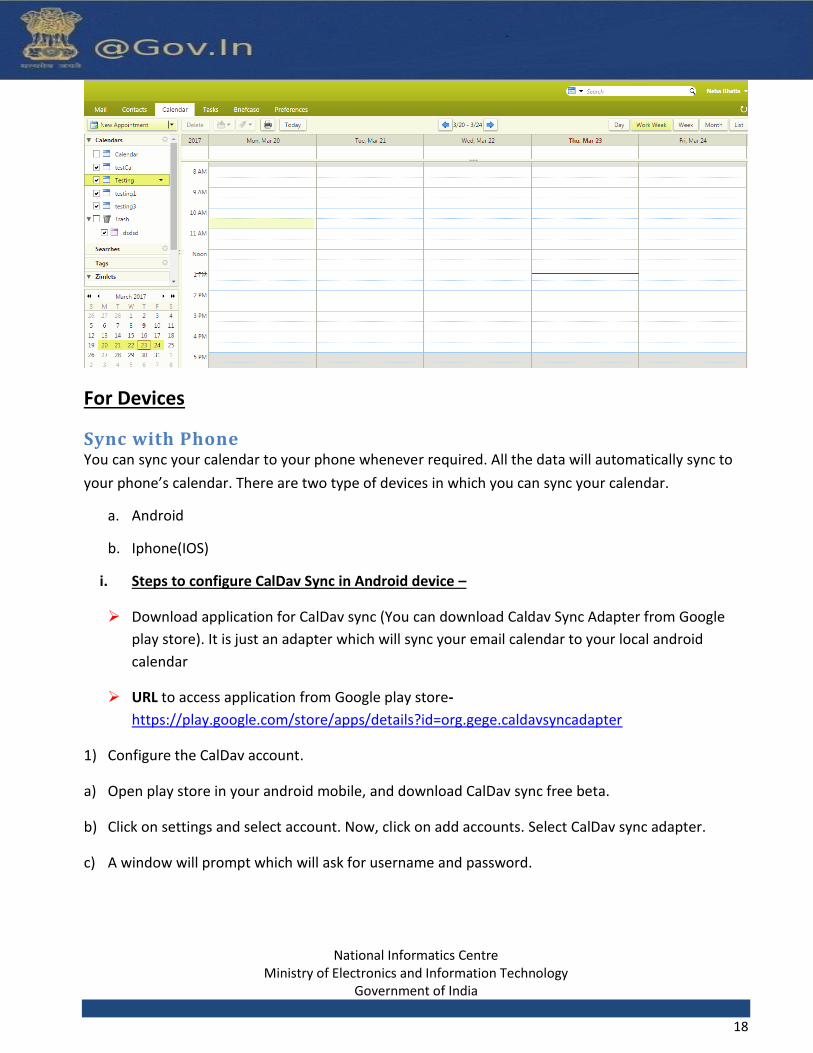
For Devices
Sync with Phone You can sync your calendar to your phone whenever required. All the data will automatically sync to
your phone’s calendar. There are two type of devices in which you can sync your calendar.
a. Android
b. Iphone(IOS)
i. Steps to configure CalDav Sync in Android device –
Download application for CalDav sync (You can download Caldav Sync Adapter from Google
play store). It is just an adapter which will sync your email calendar to your local android
calendar
URL to access application from Google play store-
https://play.google.com/store/apps/details?id=org.gege.caldavsyncadapter
1) Configure the CalDav account.
a) Open play store in your android mobile, and download CalDav sync free beta.
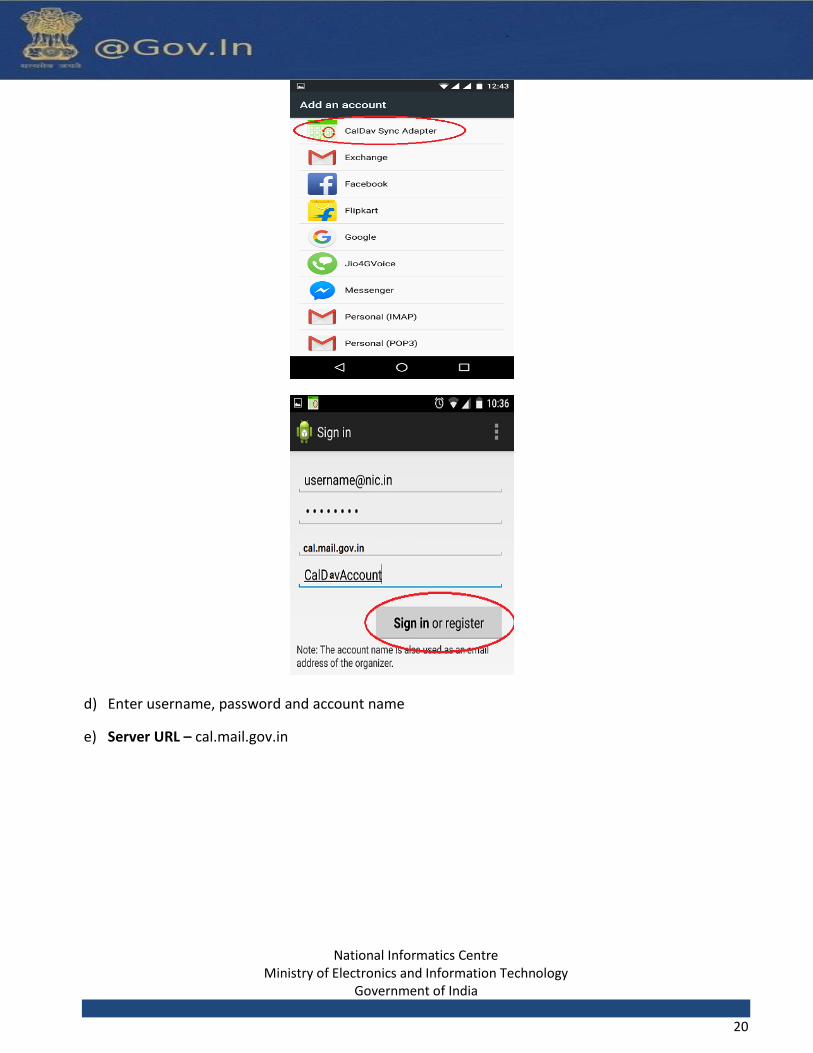
b) Click on settings and select account. Now, click on add accounts. Select CalDav sync adapter.
c) A window will prompt which will ask for username and password.
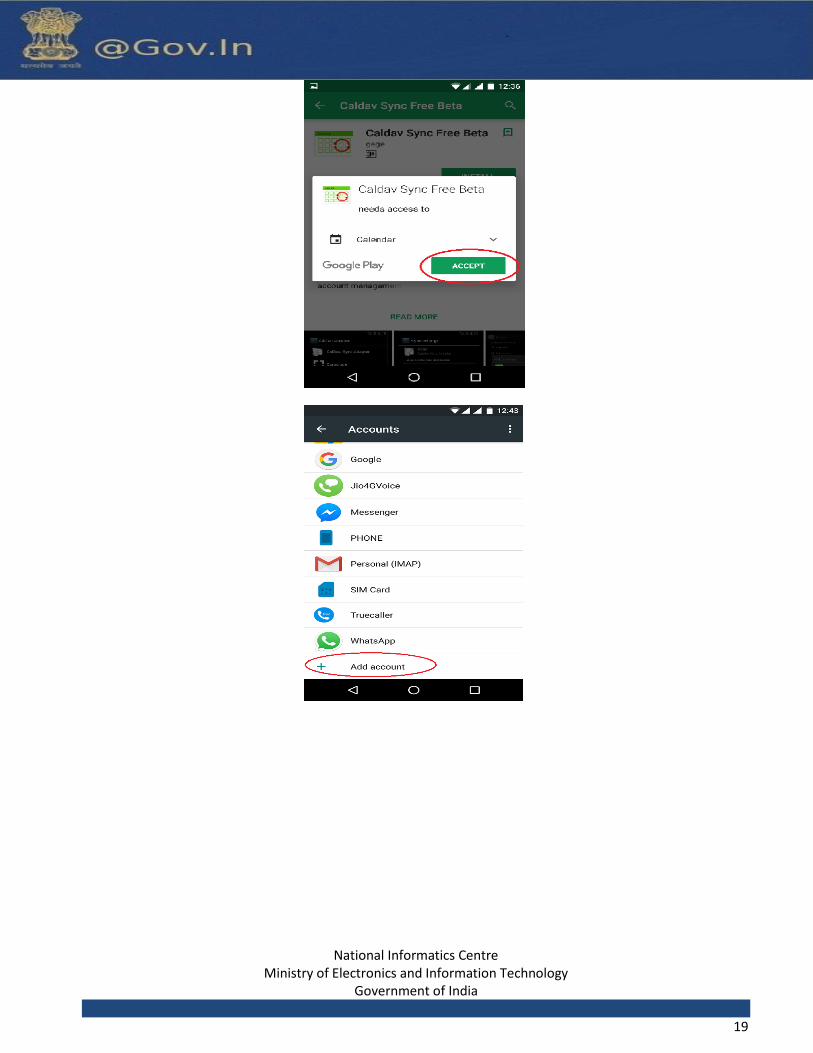
National Informatics Centre Ministry of Electronics and Information Technology
Government of India
19
National Informatics Centre Ministry of Electronics and Information Technology
Government of India
20
d) Enter username, password and account name
e) Server URL – cal.mail.gov.in
National Informatics Centre Ministry of Electronics and Information Technology
Government of India
21
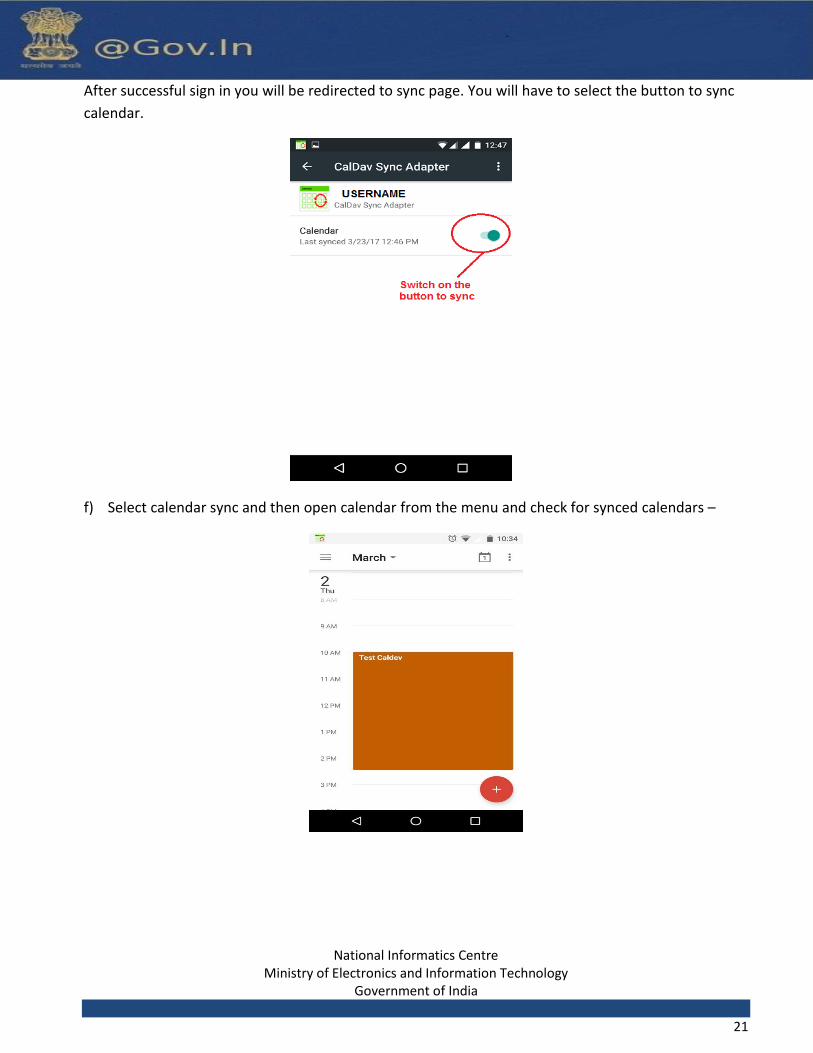
After successful sign in you will be redirected to sync page. You will have to select the button to sync
calendar.
f) Select calendar sync and then open calendar from the menu and check for synced calendars –
National Informatics Centre Ministry of Electronics and Information Technology
Government of India
22
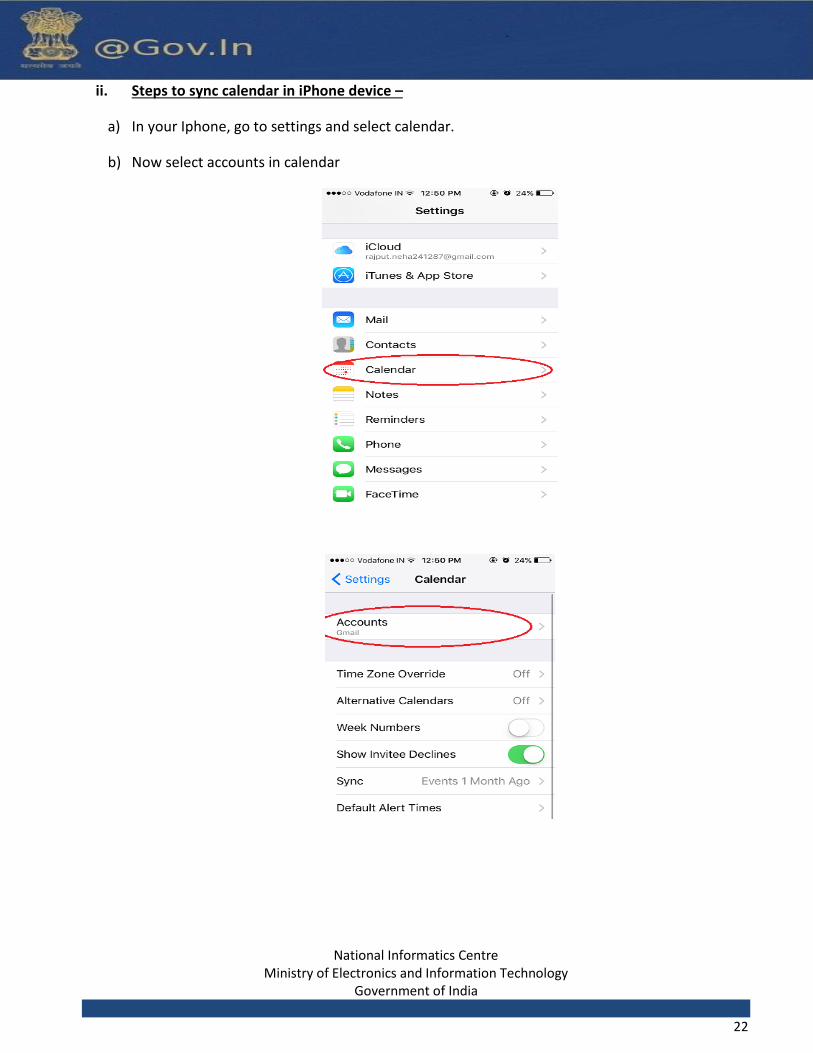
ii. Steps to sync calendar in iPhone device –
a) In your Iphone, go to settings and select calendar.
b) Now select accounts in calendar

National Informatics Centre Ministry of Electronics and Information Technology
Government of India
23
c) The next step would be to add accounts
d) It will prompt you to add CalDav account
g) Enter Username, password and Description
National Informatics Centre Ministry of Electronics and Information Technology
Government of India
24
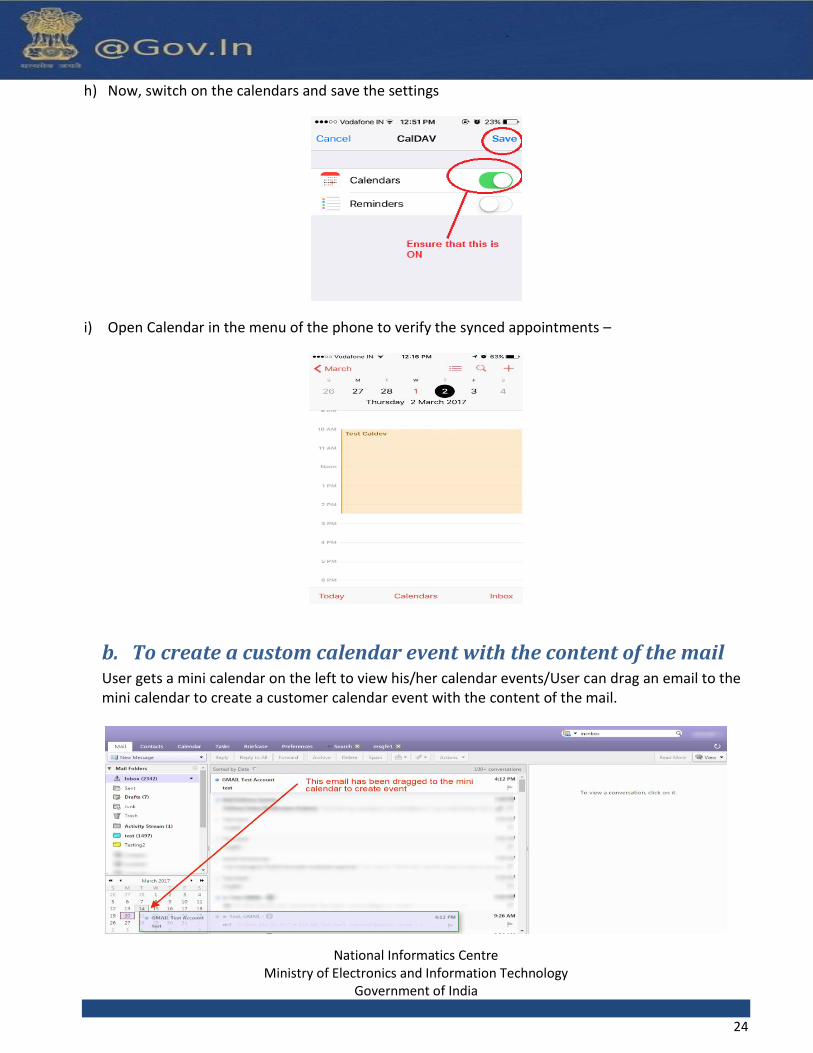
h) Now, switch on the calendars and save the settings
i) Open Calendar in the menu of the phone to verify the synced appointments –
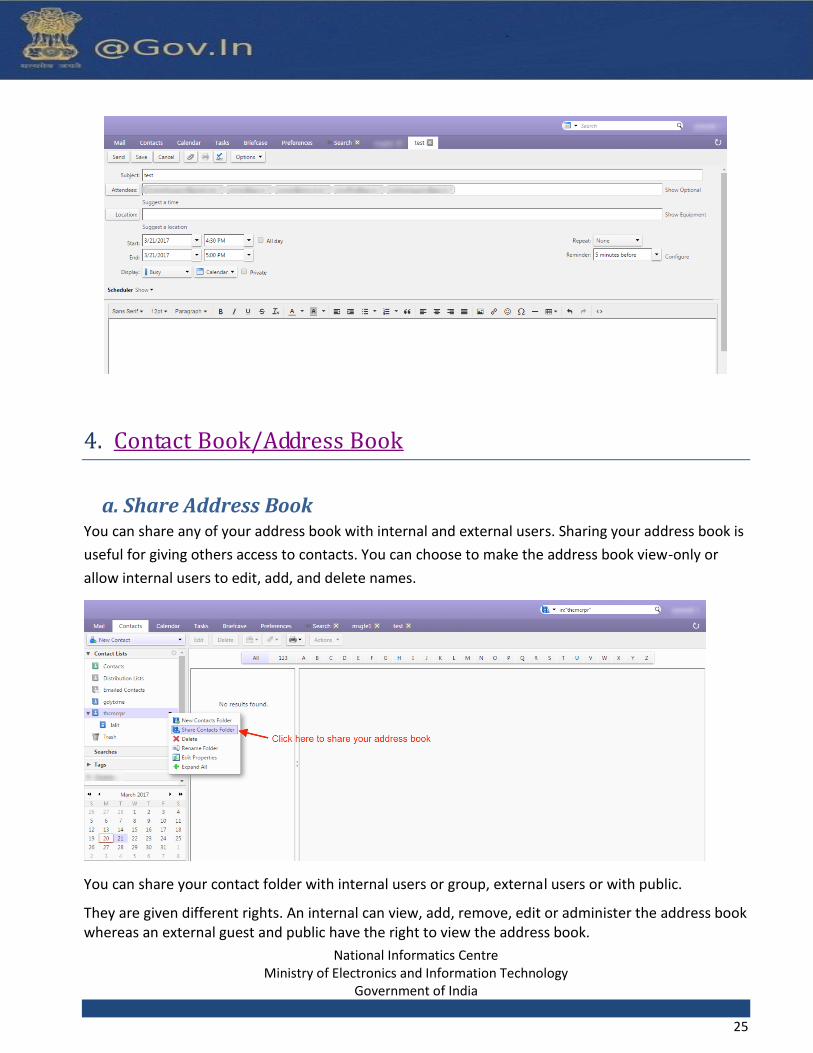
b. To create a custom calendar event with the content of the mail User gets a mini calendar on the left to view his/her calendar events/User can drag an email to the mini calendar to create a customer calendar event with the content of the mail.
National Informatics Centre Ministry of Electronics and Information Technology
Government of India
25
4. Contact Book/Address Book
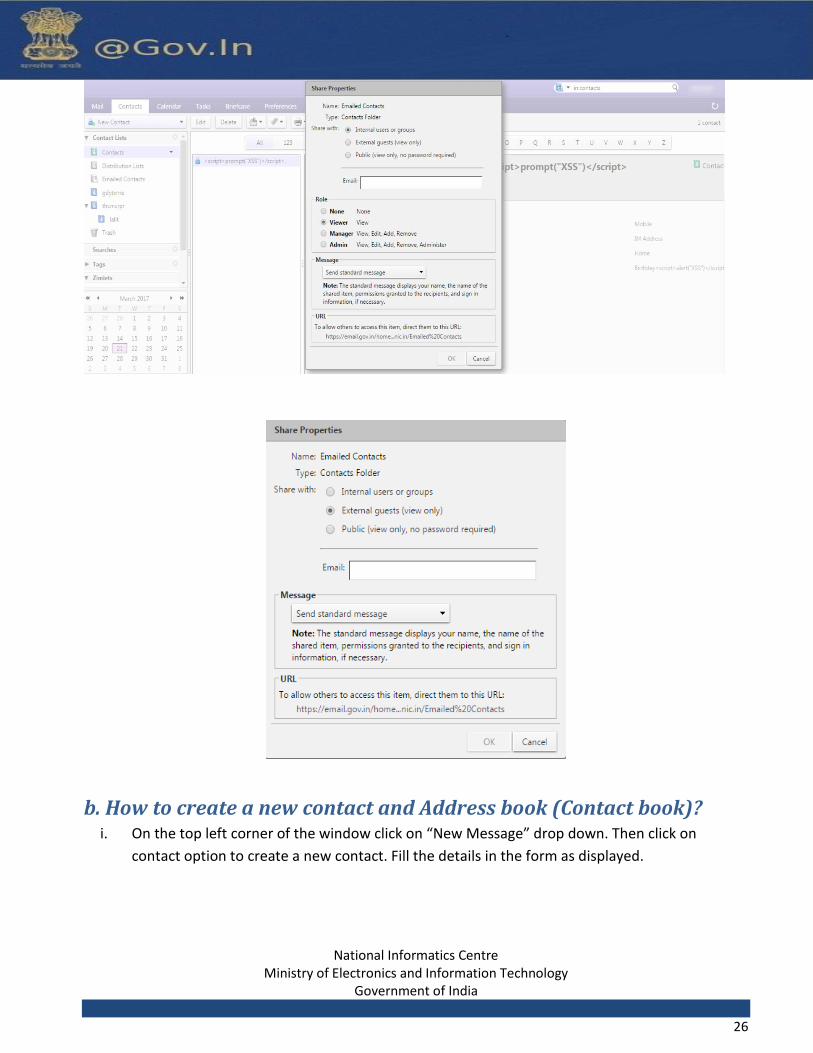
a. Share Address Book You can share any of your address book with internal and external users. Sharing your address book is
useful for giving others access to contacts. You can choose to make the address book view-only or
allow internal users to edit, add, and delete names.
You can share your contact folder with internal users or group, external users or with public.
They are given different rights. An internal can view, add, remove, edit or administer the address book whereas an external guest and public have the right to view the address book.
National Informatics Centre Ministry of Electronics and Information Technology
Government of India
26
b. How to create a new contact and Address book (Contact book)? i. On the top left corner of the window click on “New Message” drop down. Then click on
contact option to create a new contact. Fill the details in the form as displayed.

National Informatics Centre Ministry of Electronics and Information Technology
Government of India
27
New Contact page:-
ii. Click on save after filling the details in the form.
Contact group i. You can make a list of contact group by selecting the contact group option from the “New
Message” drop down.
ii. You can name the group and select the email id’s from the global address book or you can also
enter the email id’s in the space provided using a comma separator.
National Informatics Centre Ministry of Electronics and Information Technology
Government of India
28
iii. Click on Add or Add all button to add the contacts individually or in a group.
iv. The group made can be directly used while composing an email and entering the group name.
All the email address present in the group will be added to the “TO” of the new message. You
can edit the list by removing the email addresses as per your choice.
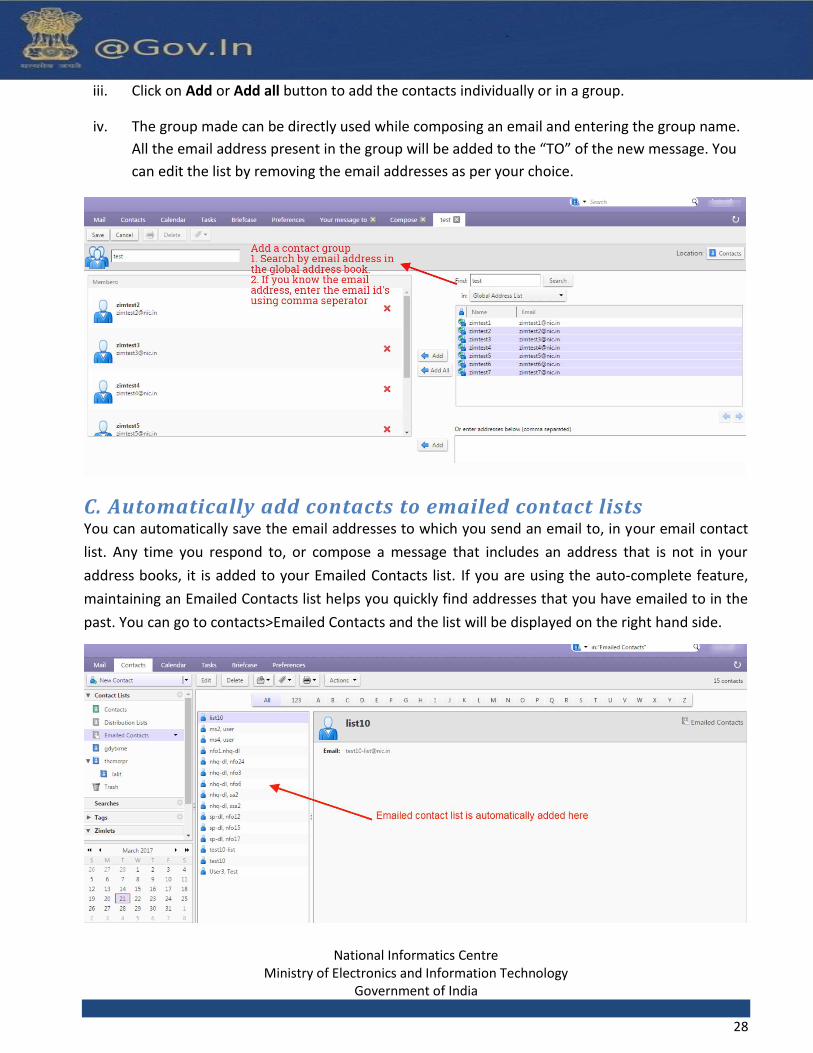
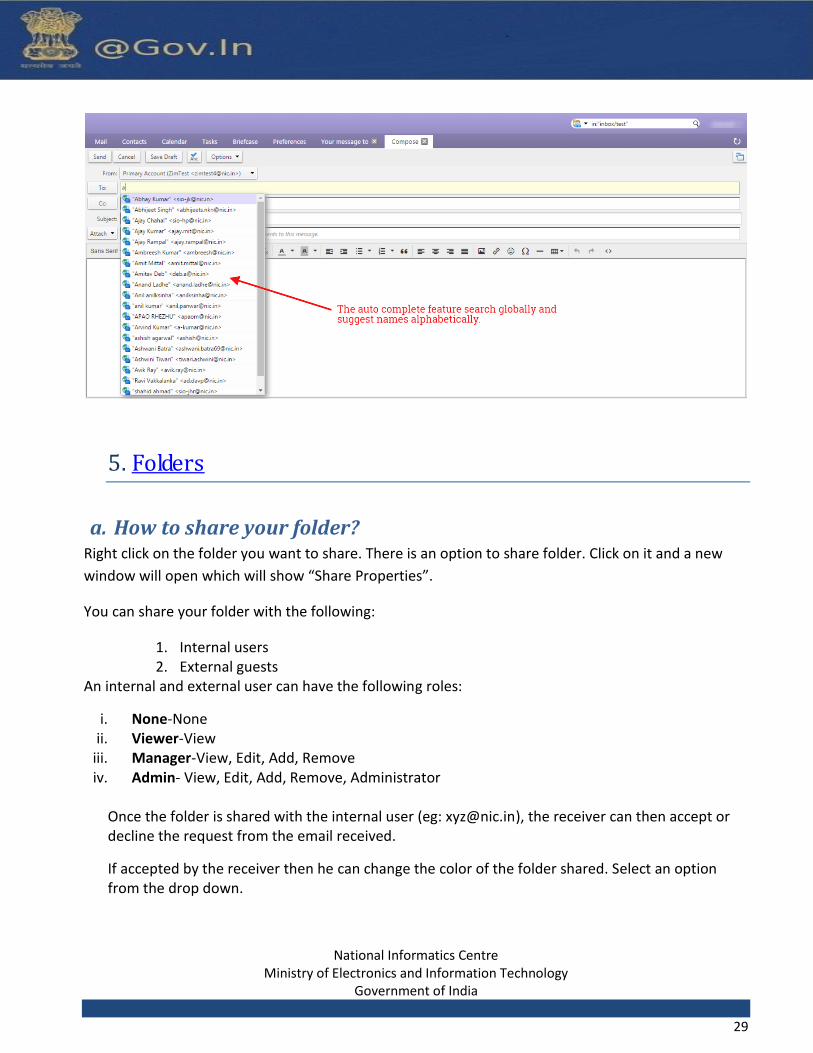
C. Automatically add contacts to emailed contact lists You can automatically save the email addresses to which you send an email to, in your email contact
list. Any time you respond to, or compose a message that includes an address that is not in your
address books, it is added to your Emailed Contacts list. If you are using the auto-complete feature,
maintaining an Emailed Contacts list helps you quickly find addresses that you have emailed to in the
past. You can go to contacts>Emailed Contacts and the list will be displayed on the right hand side.
National Informatics Centre Ministry of Electronics and Information Technology
Government of India
29
5. Folders
a. How to share your folder? Right click on the folder you want to share. There is an option to share folder. Click on it and a new
window will open which will show “Share Properties”.
You can share your folder with the following:
1. Internal users 2. External guests
An internal and external user can have the following roles:
i. None-None ii. Viewer-View
iii. Manager-View, Edit, Add, Remove iv. Admin- View, Edit, Add, Remove, Administrator
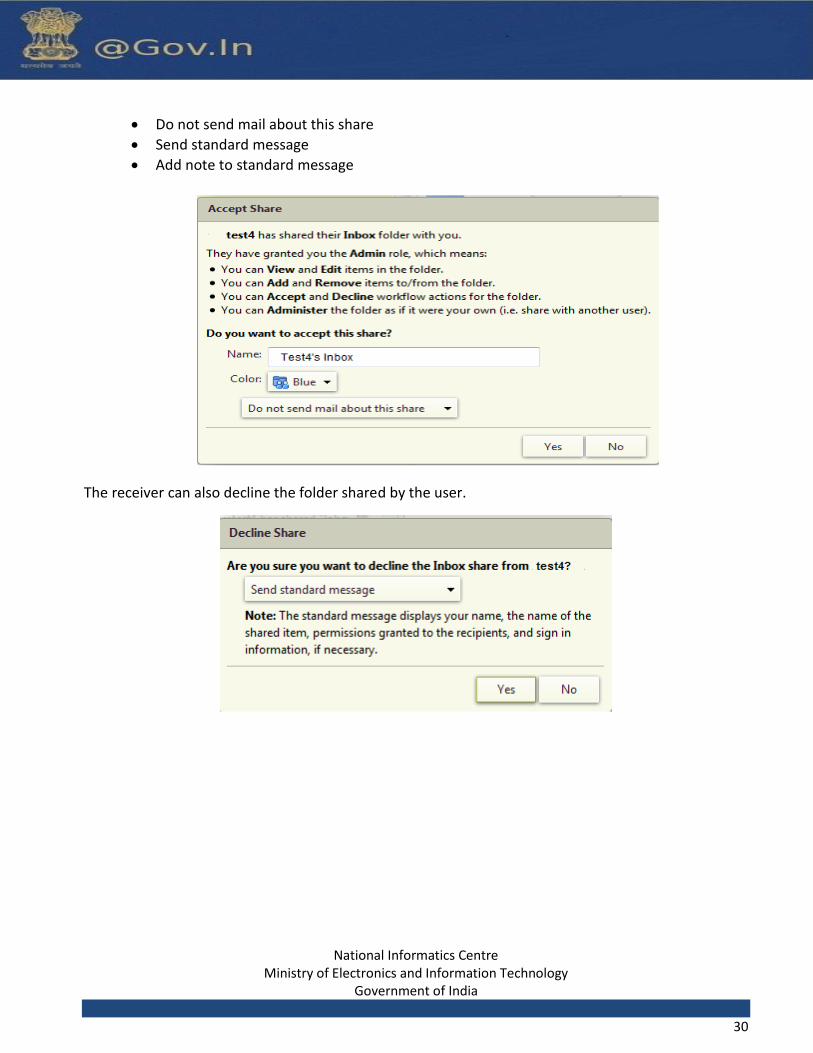
Once the folder is shared with the internal user (eg: [email protected]), the receiver can then accept or decline the request from the email received.
If accepted by the receiver then he can change the color of the folder shared. Select an option from the drop down.
National Informatics Centre Ministry of Electronics and Information Technology
Government of India
30
Do not send mail about this share
Send standard message
Add note to standard message
The receiver can also decline the folder shared by the user.
National Informatics Centre Ministry of Electronics and Information Technology
Government of India
31
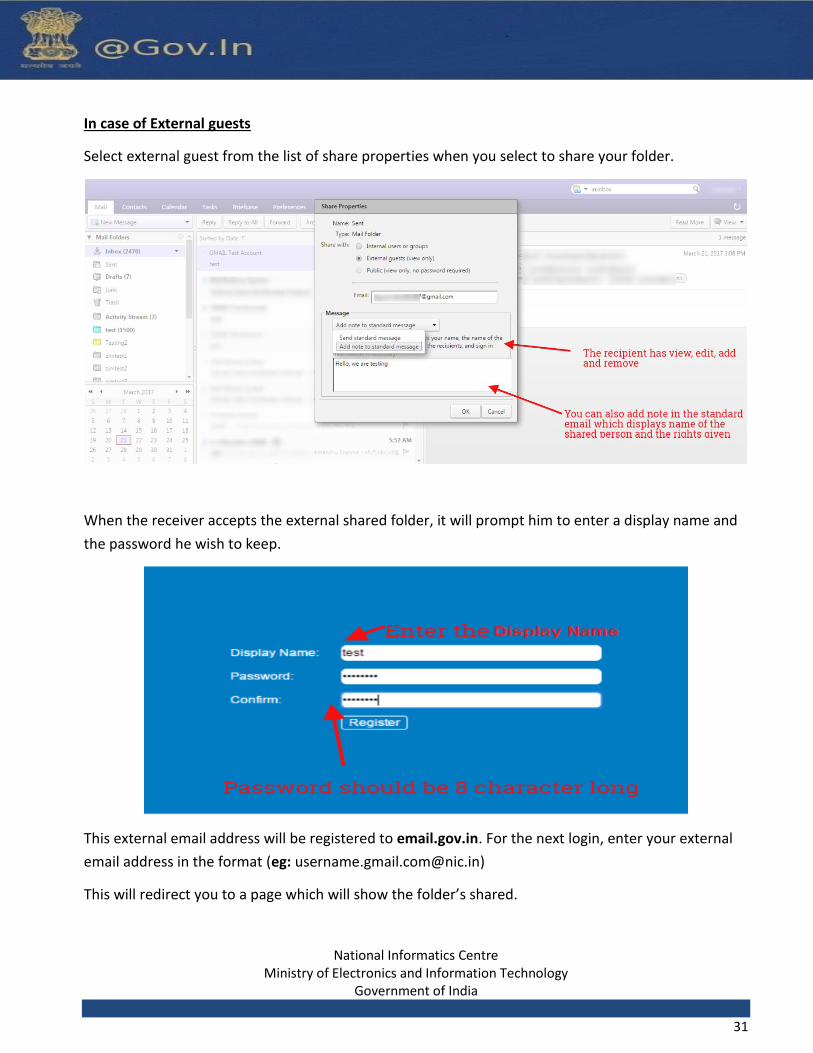
In case of External guests
Select external guest from the list of share properties when you select to share your folder.
When the receiver accepts the external shared folder, it will prompt him to enter a display name and
the password he wish to keep.
This external email address will be registered to email.gov.in. For the next login, enter your external
email address in the format (eg: [email protected])
This will redirect you to a page which will show the folder’s shared.

National Informatics Centre Ministry of Electronics and Information Technology
Government of India
32
Folder Properties I. Every folder has a property defined. Right click on any folder and click on edit properties. This
will open a window which will prompt you to enter the name of the folder with the folder color.
II. You can share your folder from here also. Just click on Add share and it will prompt to share to internal user or external guest.
III. There is an option for retention of messages in a specific folder.
IV. You can either enable message retention or enable message disposal. The difference is the message in the retention folder will ask for permission before deletion but the messages in the disposal folder will be automatically deleted/cleaned up after a certain period of time.
National Informatics Centre Ministry of Electronics and Information Technology
Government of India
33
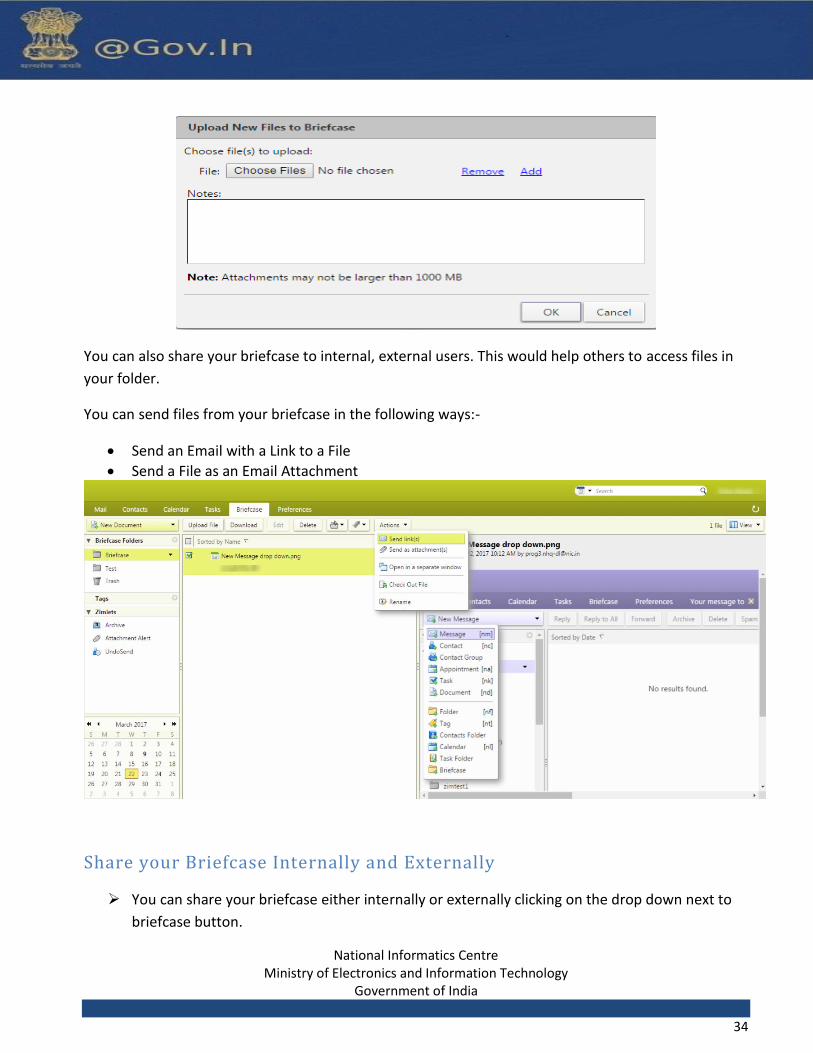
6. Briefcase
This feature allows you to share and manage documents that you create in Briefcase or documents
and images that you upload to your Briefcase folders. Go to the briefcase tab on the top of the page.
You can access the files saved in briefcase from any computer at any point of time. You just have to
login to your account and use the feature.
a) This feature enables you to upload files upto 1000MB which cannot be attached in the normal
attachment while composing an email.
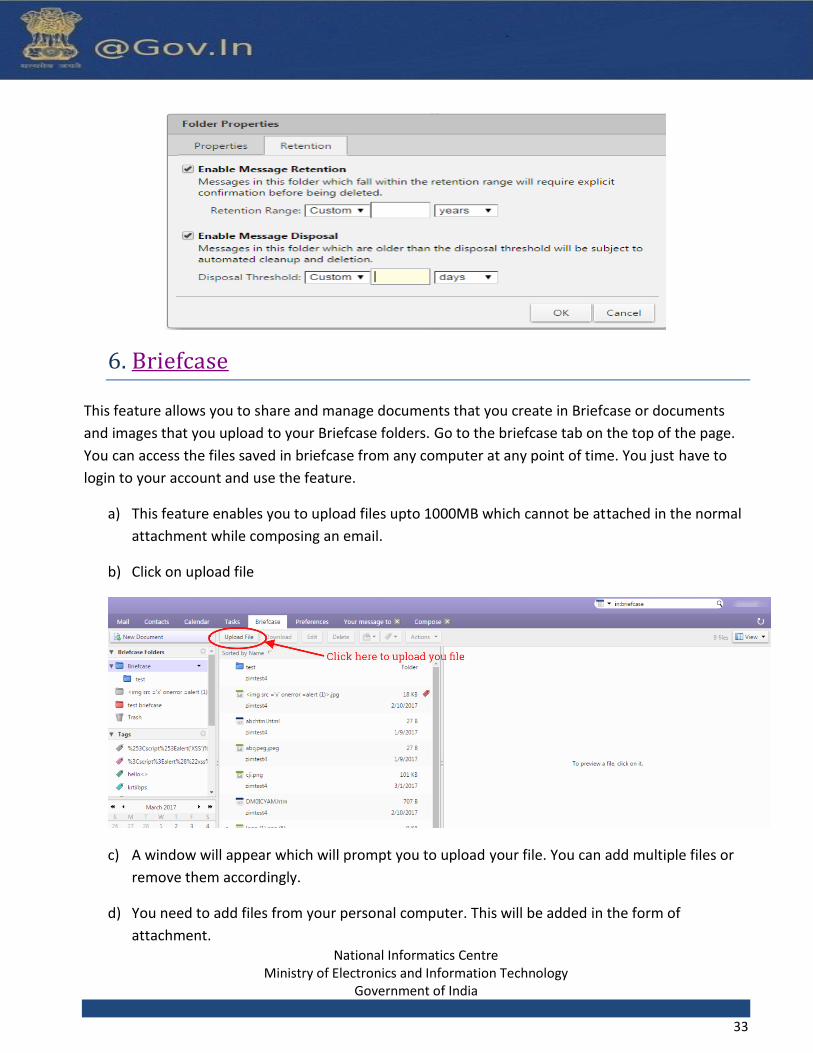
b) Click on upload file
c) A window will appear which will prompt you to upload your file. You can add multiple files or
remove them accordingly.
d) You need to add files from your personal computer. This will be added in the form of
attachment.
National Informatics Centre Ministry of Electronics and Information Technology
Government of India
34
You can also share your briefcase to internal, external users. This would help others to access files in
your folder.
You can send files from your briefcase in the following ways:-
Send an Email with a Link to a File
Send a File as an Email Attachment
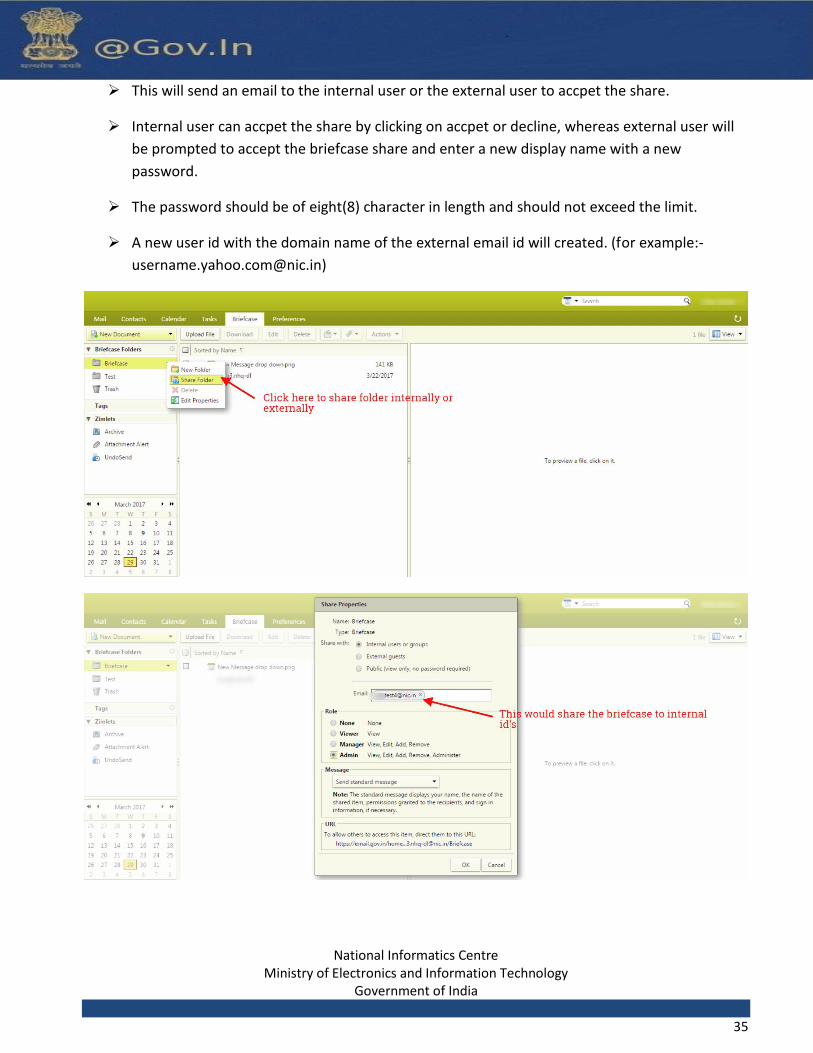
Share your Briefcase Internally and Externally
You can share your briefcase either internally or externally clicking on the drop down next to
briefcase button.
National Informatics Centre Ministry of Electronics and Information Technology
Government of India
35
This will send an email to the internal user or the external user to accpet the share.
Internal user can accpet the share by clicking on accpet or decline, whereas external user will
be prompted to accept the briefcase share and enter a new display name with a new
password.
The password should be of eight(8) character in length and should not exceed the limit.
A new user id with the domain name of the external email id will created. (for example:-
National Informatics Centre Ministry of Electronics and Information Technology
Government of India
36
National Informatics Centre Ministry of Electronics and Information Technology
Government of India
37
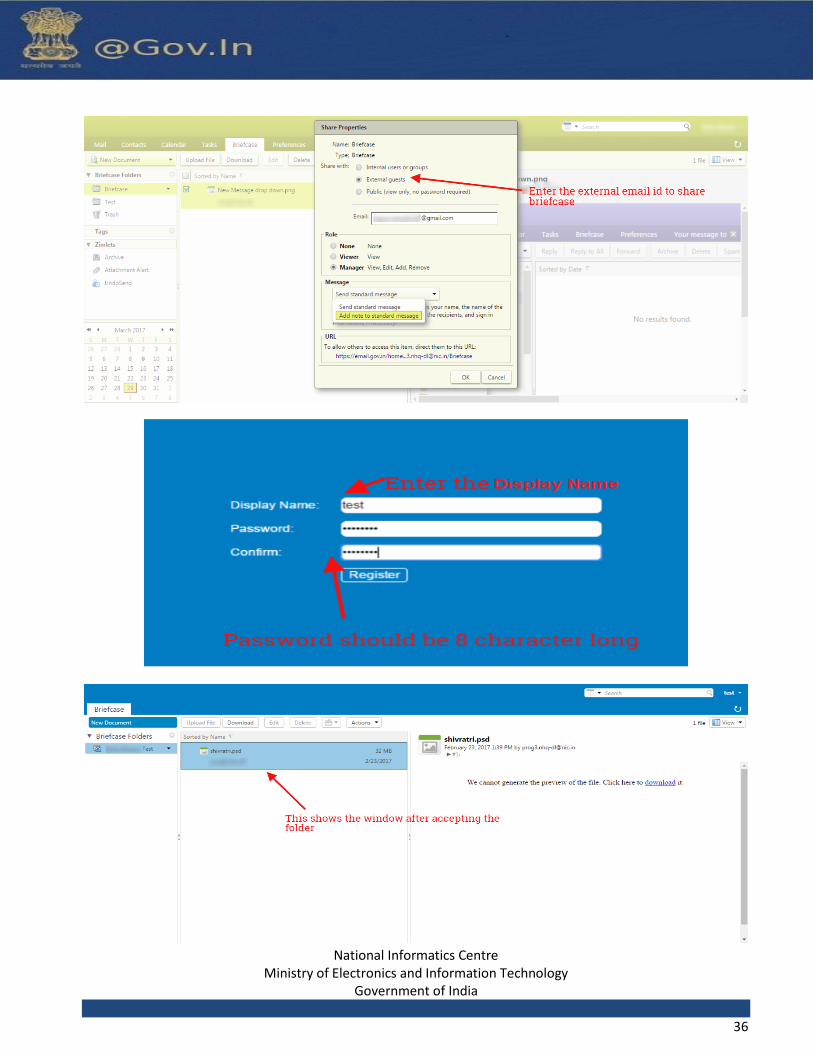
Send as Link. 1. Go to the Briefcase tab and select the file to share.
2. Click Actions and select Send link. A confirmation pane opens reminding you that the recipient
must have permission to view the content of the folder. Click Yes to proceed.
3. A new composes email message opens with the link displayed in the body of the message.
Complete the email message and click Send to mail the message.
Send as an Attachment 1. Go to the Briefcase tab and select the file to attach.
2. Click Actions and select Send as attachment. The email composes page opens with the file
attached.
3. Add the recipient’s email address and complete the email message.
4. Click Send.
j) Sharing a briefcase to external user includes adding the email address to which the folder is to be
shared.
k) The external guest will open the email and click on the option to open the shared folder. This will
redirect the external user to a window which will prompt for entering a display name along with
the desired password.
l) This will register the user to email.gov.in where he will enter the user name (for example:-
[email protected], [email protected]).
m) The shared briefcase is now ready to be accessed by external guest.
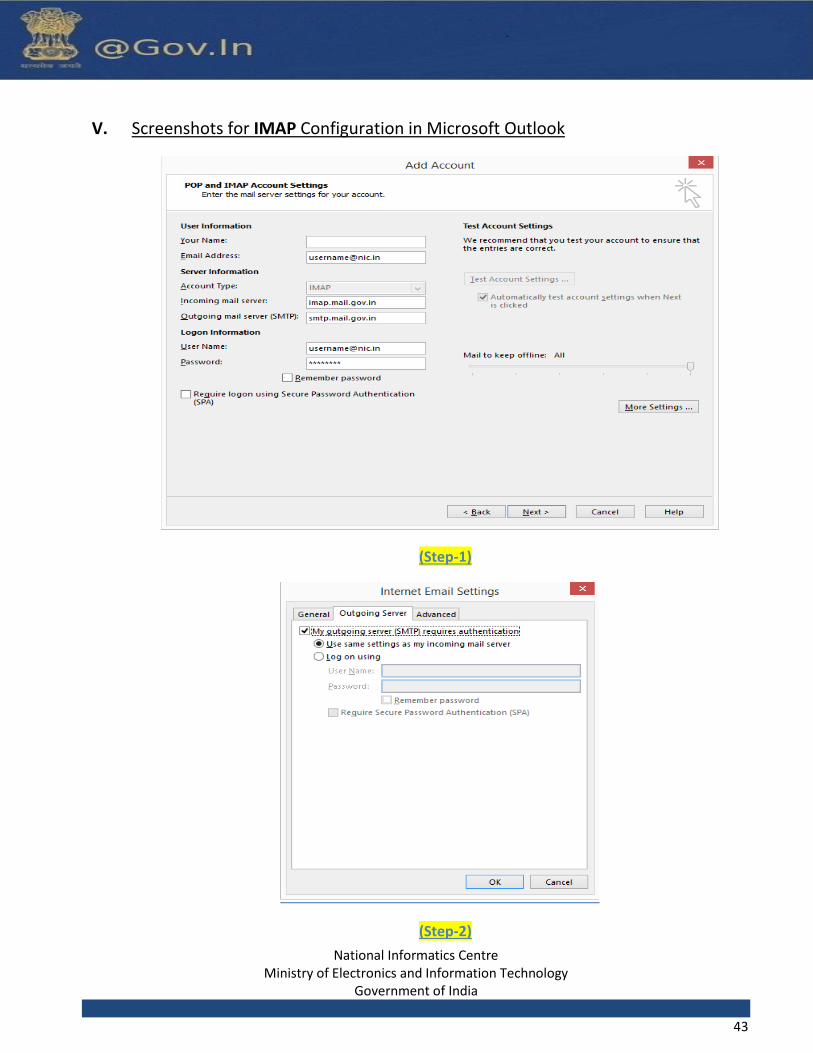
7. Configuring POP3/IMAP Client
Please find the steps to configure the IMAP or POP3 account -
i. Go to settings>>Mail>>Accounts>>Add Account ii. Enter valid Email ID
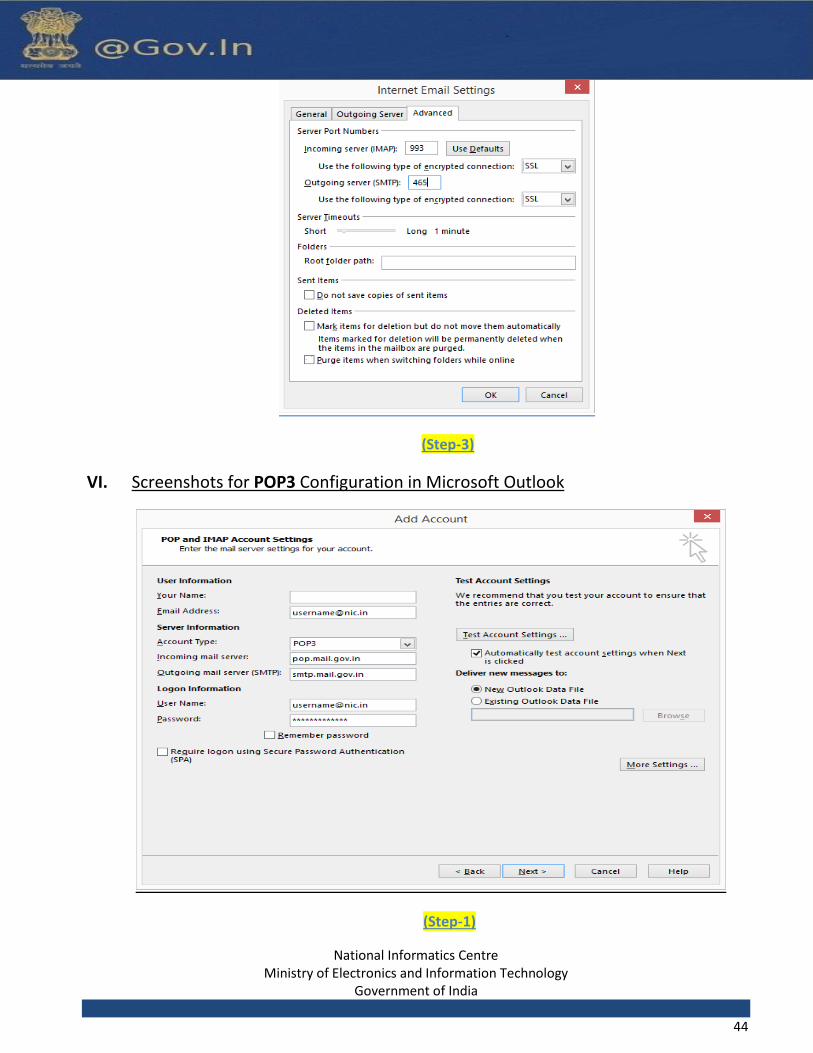
iii. Incoming mail serve : imap.mail.gov.in iv. Outgoing mail server/ SMTP : smtp.mail.gov.in v. IMAP Port: 993
vi. SMTP Port: 465
National Informatics Centre Ministry of Electronics and Information Technology
Government of India
38
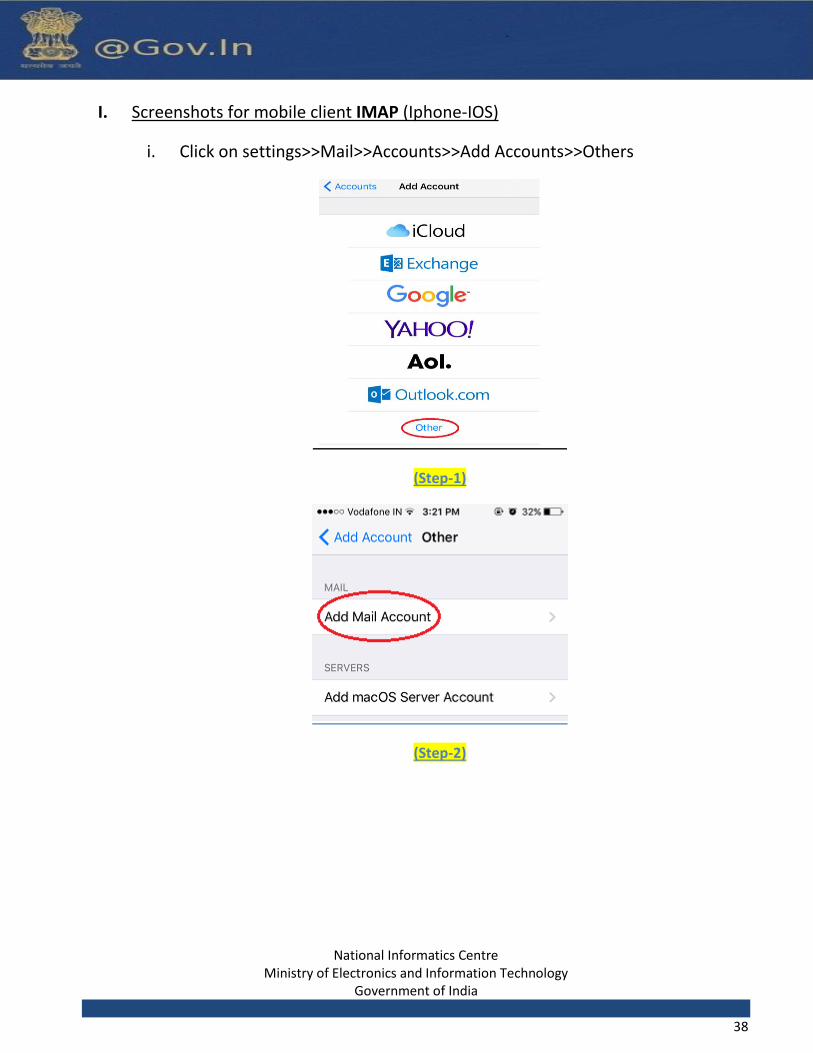
I. Screenshots for mobile client IMAP (Iphone-IOS)
i. Click on settings>>Mail>>Accounts>>Add Accounts>>Others
(Step-1)
(Step-2)
National Informatics Centre Ministry of Electronics and Information Technology
Government of India
39
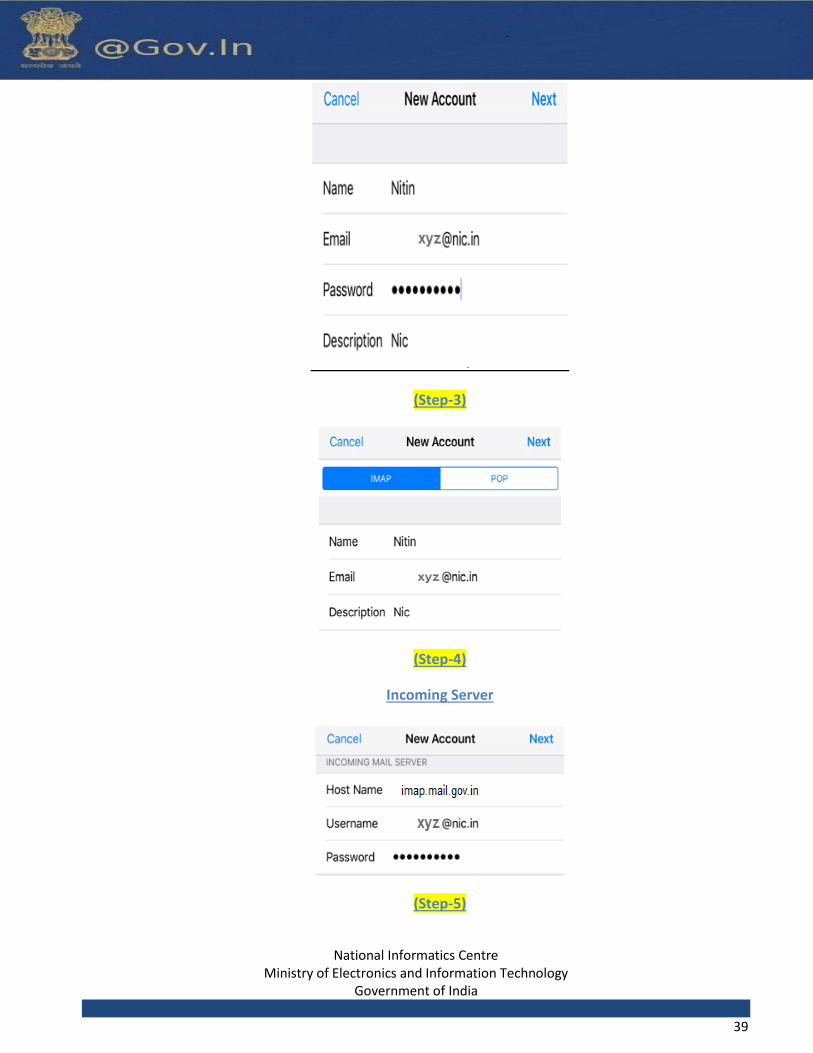
(Step-3)
(Step-4)
Incoming Server
(Step-5)

National Informatics Centre Ministry of Electronics and Information Technology
Government of India
40
Outgoing Server
II. Screenshots for mobile client POP (Iphone-IOS)
National Informatics Centre Ministry of Electronics and Information Technology
Government of India
41
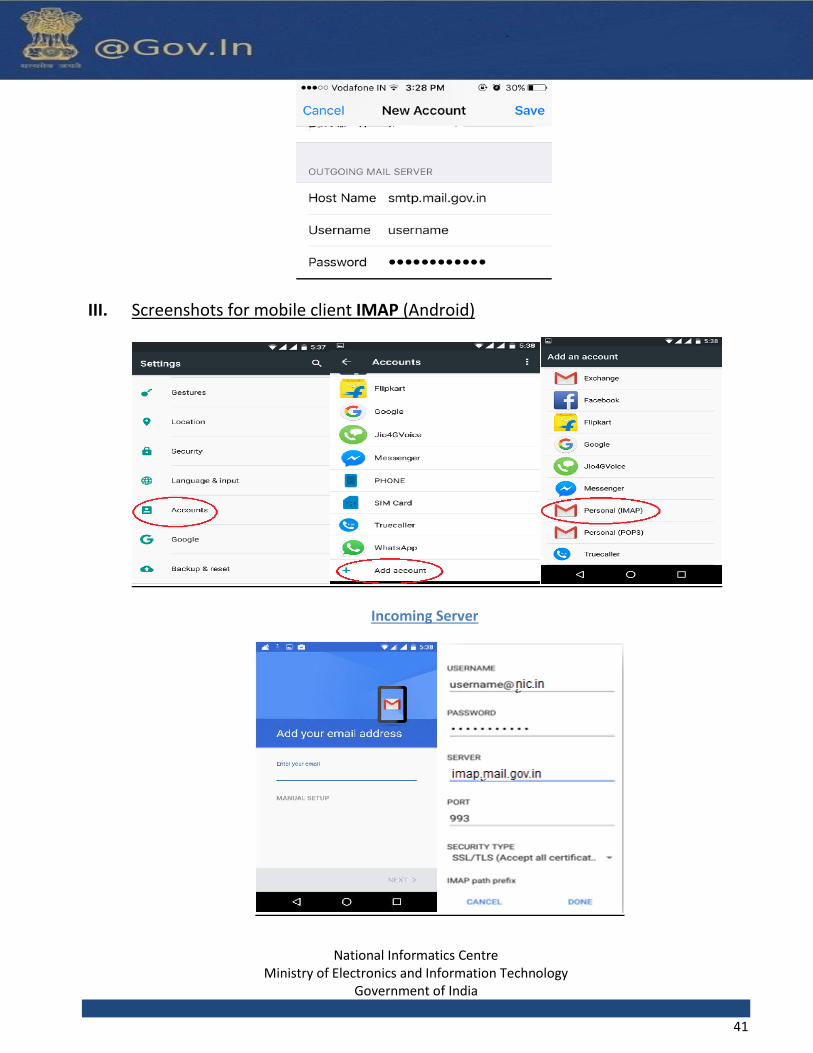
III. Screenshots for mobile client IMAP (Android)
Incoming Server
National Informatics Centre Ministry of Electronics and Information Technology
Government of India
42
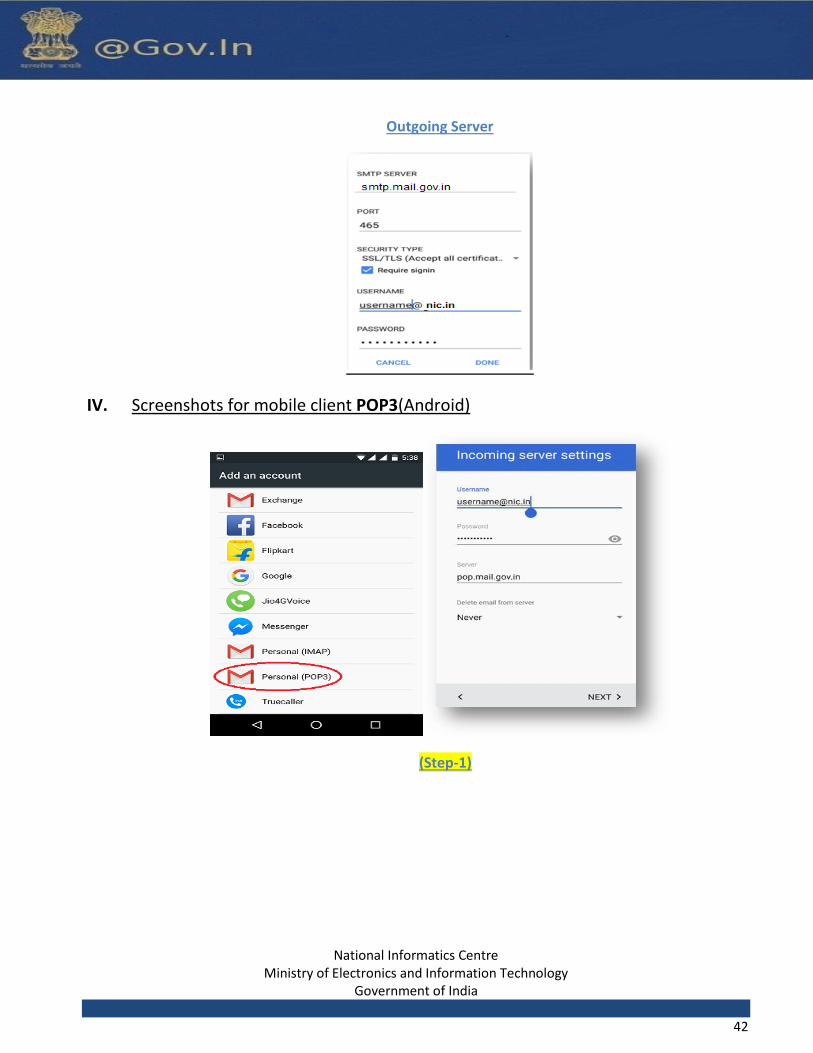
Outgoing Server
IV. Screenshots for mobile client POP3(Android)
(Step-1)
National Informatics Centre Ministry of Electronics and Information Technology
Government of India
43
V. Screenshots for IMAP Configuration in Microsoft Outlook
(Step-1)
(Step-2)
National Informatics Centre Ministry of Electronics and Information Technology
Government of India
44
(Step-3)
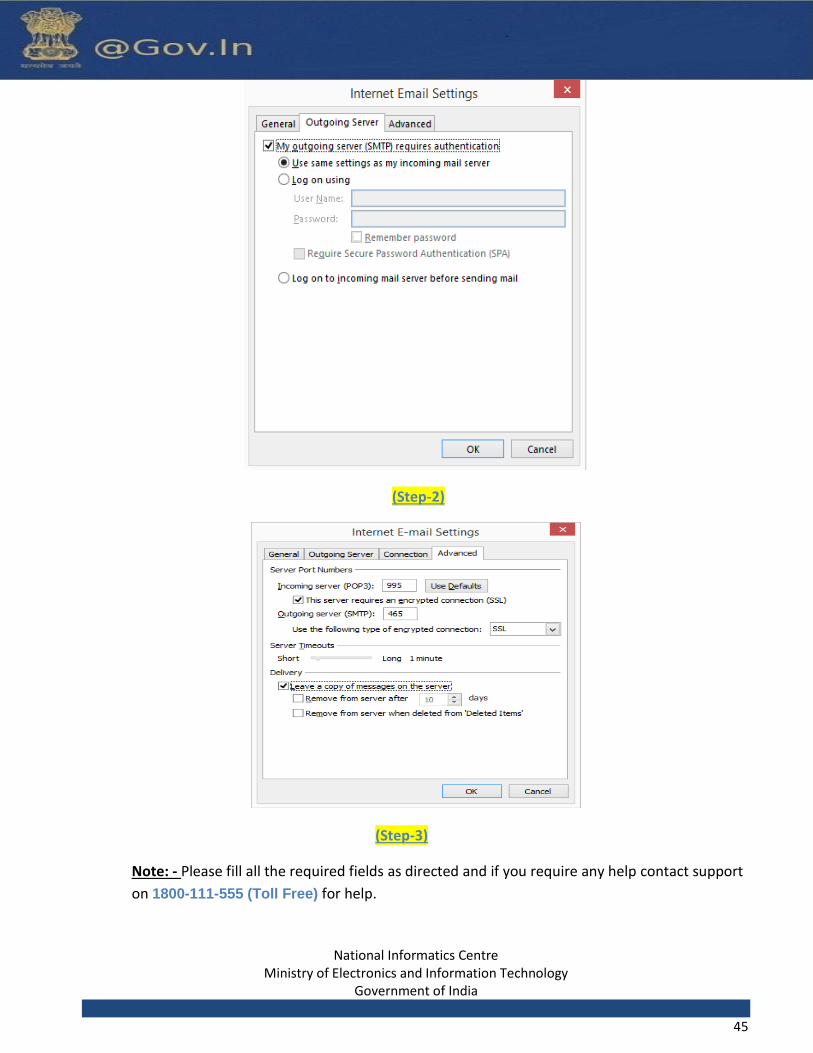
VI. Screenshots for POP3 Configuration in Microsoft Outlook
(Step-1)
National Informatics Centre Ministry of Electronics and Information Technology
Government of India
45
(Step-2)
(Step-3)
Note: - Please fill all the required fields as directed and if you require any help contact support
on 1800-111-555 (Toll Free) for help.
National Informatics Centre Ministry of Electronics and Information Technology
Government of India
46
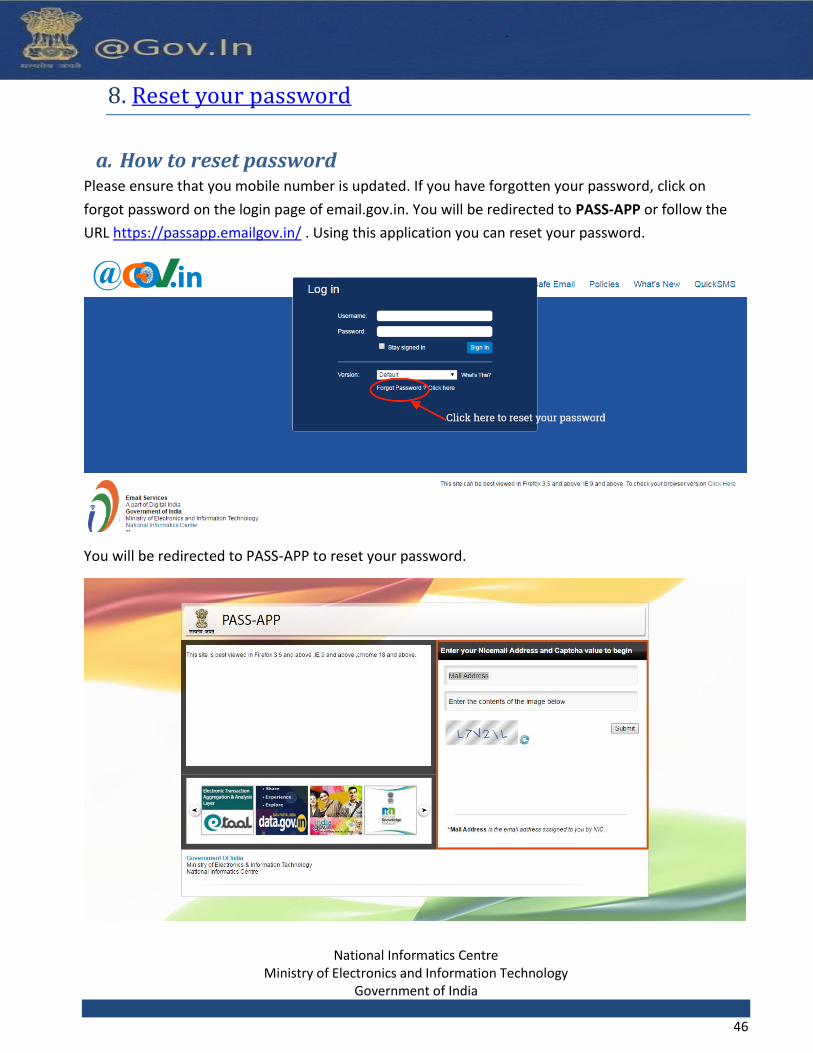
8. Reset your password
a. How to reset password Please ensure that you mobile number is updated. If you have forgotten your password, click on
forgot password on the login page of email.gov.in. You will be redirected to PASS-APP or follow the
URL https://passapp.emailgov.in/ . Using this application you can reset your password.
You will be redirected to PASS-APP to reset your password.
National Informatics Centre Ministry of Electronics and Information Technology
Government of India
47
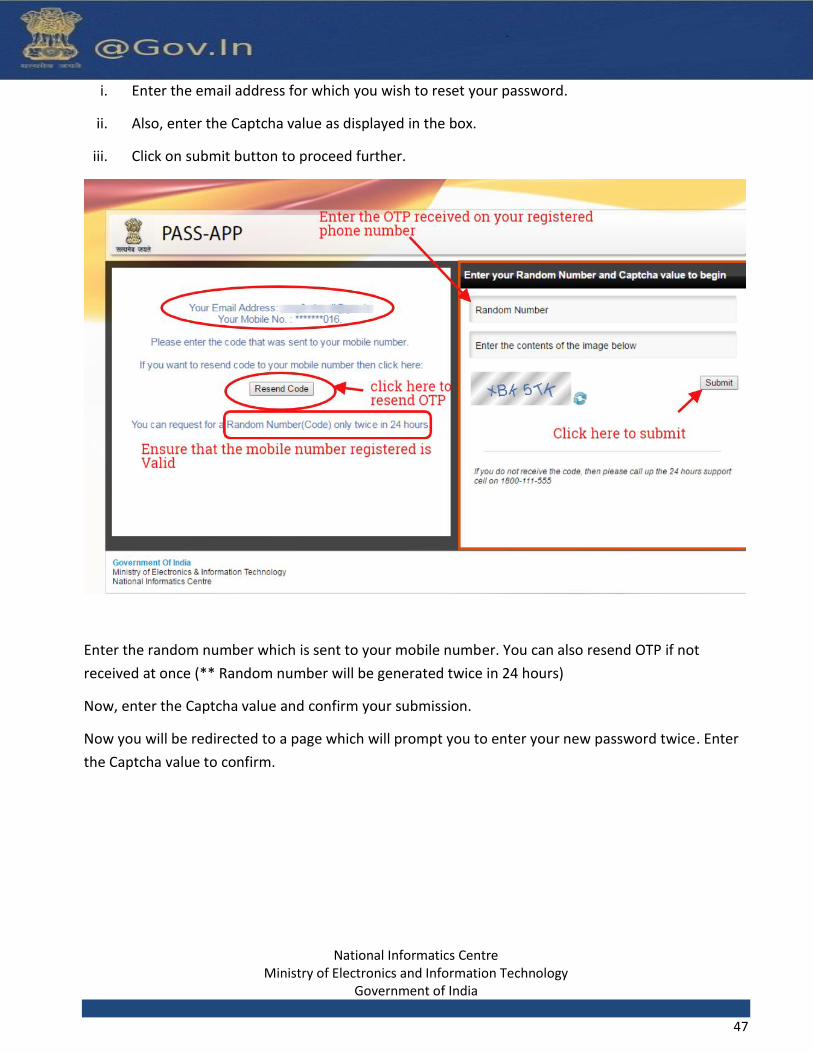
i. Enter the email address for which you wish to reset your password.
ii. Also, enter the Captcha value as displayed in the box.
iii. Click on submit button to proceed further.
Enter the random number which is sent to your mobile number. You can also resend OTP if not
received at once (** Random number will be generated twice in 24 hours)
Now, enter the Captcha value and confirm your submission.
Now you will be redirected to a page which will prompt you to enter your new password twice. Enter
the Captcha value to confirm.
National Informatics Centre Ministry of Electronics and Information Technology
Government of India
48
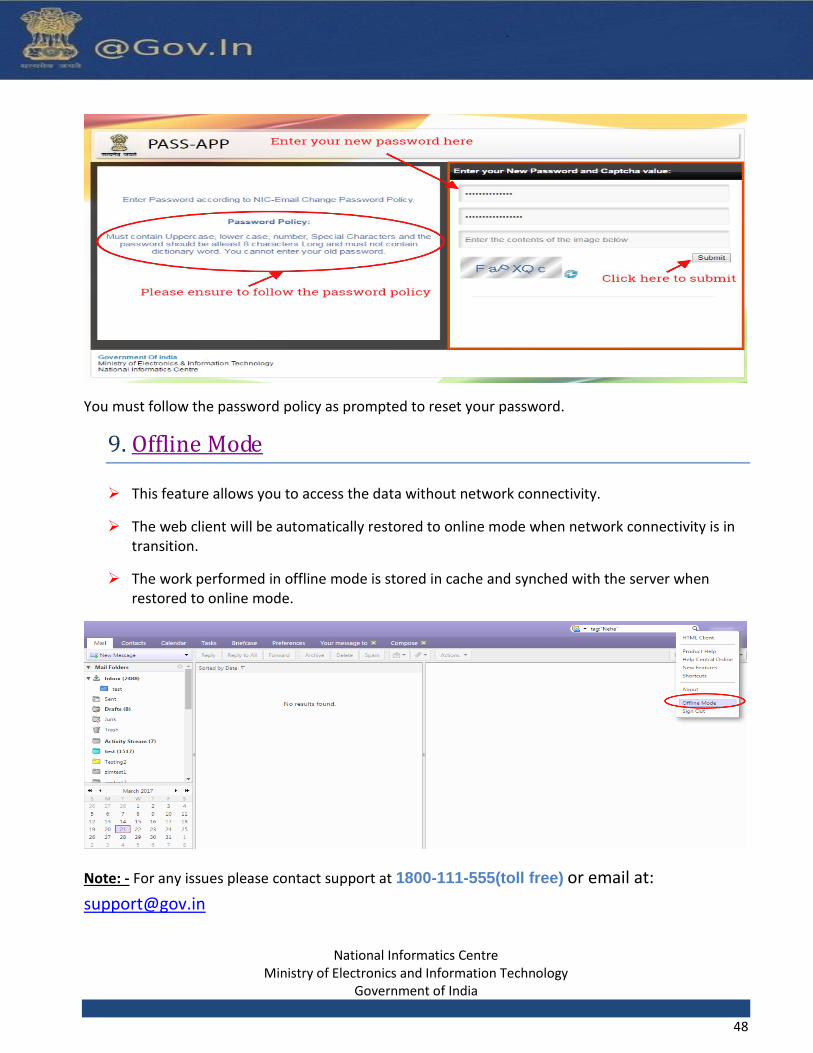
You must follow the password policy as prompted to reset your password.
9. Offline Mode
This feature allows you to access the data without network connectivity.
The web client will be automatically restored to online mode when network connectivity is in transition.
The work performed in offline mode is stored in cache and synched with the server when restored to online mode.
Note: - For any issues please contact support at 1800-111-555(toll free) or email at:


![PROCEEDINGS. [1] BY€¦ · limited to e-mails, text documents, spread sheets, images and graphics, database files, deleted files, and data back-ups. Electronic evidence may be located](https://img.pdfslide.us/doc/110x75/5e95643c14d2112a5f5b7ecd/proceedings-1-by-limited-to-e-mails-text-documents-spread-sheets-images-and.jpg)