Embed Size (px)
Citation preview
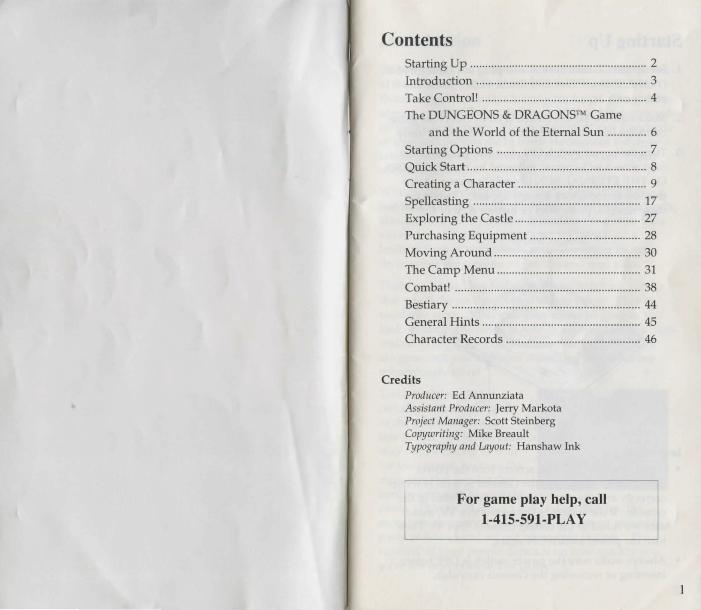
Contents Starting Up ..................................................... .. .... 2 Introduction ............. ... .. ....................................... 3 Take Control! .. ... ......... ............. ..... ... ..... ............... 4
The DUNGEONS & DRAGONS™ Game and the World of the Eternal Sun ............. 6
Starting Options ........ .......................................... 7 Quick Start . . . . . . . . . . . . . . . . . . . . . . . . . . . . . . . . . . . . . . . . . . . . .. . . . . . . . . . . . . . . 8 Creating a Character ...................... ..... ................ 9 Spellcasting .. ..... .... ......... ........ ... .......... ............... 17 Exploring the Castle ....................... .. .. .. ............. 27 Purchasing Equipment ............... ... ...... .. .. ......... 28 Moving Around ................................................. 30 The Camp Menu ................................................ 31
Combat! .............................................. .... ............ 38 Bestiary ............................................................... 44 General Hints .. .. .. .......................... ..................... 45 Character Records ............ ......... ...... .. ............. ... 46
Credits Producer: Ed Annunziata Assisla11t Producer: Jerry Markota Project Manager: Scott Steinberg Copywriling: Mike Breault Typography and l.Jlyout: Hanshaw Ink
For game play help, call
1-415-591-PLAY

Starting Up
1. Set up the Genesis System and plug in Control Pad 1. (WARRIORS OF THE ETERNAL SLJNTM is for one player only.)
2. Make sure the power switch is OFF. Insert the game cartridge into the console and press it down firmly.
3. Turn the power switch ON. In a few moments the Sega screen will appear, followed by the WARRIORS OF THE ETERNAL SUN Copyright screen. After this, the introductory screens appear. (To bypass these screens, press Start or Button A, B or C.)
Important:
• If you don't see the Sega screen, turn the power switch OFF. Make sure the Genesis System is set up correctly and the cartridge is firmly inserted in the console. If the system is connected to a TV, make sure it's tuned to the correct cha1mel (3 or 4). Then turn the power switch ON again.
• Always make sure the power switch is OFF before inserting or removing the Genesis cartridge.
2
Introduction
Standing atop the castle walls, you stare wearily down at the howling goblin hordes below. Smoke from a thousand goblin torches burns your lungs. The goblins scream at you, waving the heads of your fallen comrades on the ends of spears. Weeks of fighting saw hundreds of men and goblins die in battle throughout the duke's lands. Now all that remains is the duke's castle, and soon that will fall .
With blood-curdling shrieks, the goblins launch one last assault on the castle. Goblins swarm over the walls, slaughtering the weakened defenders. You raise your sword for a final blow, but then .. . FLASH! ... a brilliant flare of light blinds you. Deafening thunder drowns out the screams of goblins and men alike.
There's a wrenching feeling and you're falling, certain that you' ll die on the cobbled streets below. Then it suddenly stops. You open your eyes and gasp as you look around. The castle is now in a strange land, a highwalled valley illuminated by a red sun. The goblins are gone, but you and your remaining comrades are miraculously alive!
You have been spared certain death at the hands of the goblins, but what fate awaits you here? You may not have long to wait for the answer, because the monsters that inhabit this land continually assault the castle. Though all attacks have failed thus far, the monsters are gaining in strength. You must assemble a party of heroes and set out on an epic journey. The survival of your people depends on how quickly you solve the mysteries of this valley!
3
Take Control!
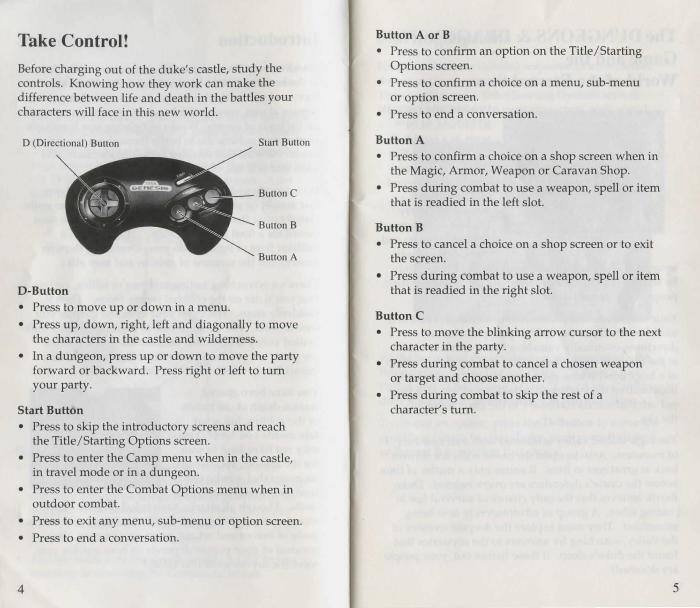
Before charging out of the duke's castle, study the controls. Knowing how they work can make the difference between life and death in the battles your characters will face in this new world.
D (Directional) Button Stan Bu1ton
Button C
Button B
Button A
D-Button • Press to move up or down in a menu.
• Press up, down, right, left and diagonally to move the characters in the castle and wilderness.
• In a dungeon, press up or down to move the party forward or backward. Press right or left to turn your party.
Start Button • Press to skip the introductory screens and reach
the Title/Starting Options screen. • Press to enter the Camp menu when in the castle,
in travel mode or in a dungeon. • Press to enter the Combat Options menu when in
outdoor combat. • Press to exit any menu, sub-menu or option screen. • Press to end a conversation.
4
Button A or B • Press to confirm an option on the Title/Starting
Options screen. • Press to confirm a choice on a menu, sub-menu
or option screen. • Press to end a conversation.
Button A • Press to confirm a choice on a shop screen when in
the Magic, Armor, Weapon or Caravan Shop. • Press during combat to use a weapon, spell or item
that is readied in the left slot.
Button B • Press to cancel a choice on a shop screen or to exit
the screen.
• Press during combat to use a weapon, spell or item that is readied in the right slot.
Button C • Press to move the blinking arrow cursor to the next
character in the party. • Press during combat to cancel a chosen weapon
or target and choose another. • Press during combat to skip the rest of a
character's turn.
5

The DUNGEONS & DRAGONS™ Game and the World of the Eternal Sun
WARRIORS OF THE ETERNAL SUN™ is set in a world of the DUNGEONS & DRAGONS game. Creatures of legend and nightmare lurk within every shadow - beastmen, wolves, dragons and many other deadly
monsters. Your heroes face death at every turn. Only by solving the mysteries of this land can they save their people from certain doom.
Your characters find themselves in a strange, red-hued world in which the horizon slopes upward in all directions, eventually vanishing into a crimson haze at the limits of sight. It's as if the castle is at the bottom of a huge bowl whose extent can only be guessed at. Illuminating the landscape is the Eternal Sun - a fiery red orb that stands stationary in the exact center of the sky.
The high-walled valley is infested with vast numbers of monsters. Attacks upon the castle walls are thrown back at great cost in lives. It seems only a matter of time before the castle's defenders are overwhelmed . Duke Barrik believes that the only chance of survival lies in finding allies. A group of adventurers is now being assembled. They must explore the deepest recesses of the valley, searching for answers to the mysteries that haunt the duke's sleep. If these heroes fail, your people are doomed!
6
Starting Options
First you'll see the opening sequence of screens that describes the events prior to the start of the game. Then you'll see the Title/Starting Options screen, which shows a view of your characters' new world.
At the bottom of the screen, you are presented with three options: "Use Default Party," "Create a ew Party" and "Load Game." (The "Load Game" option does not appear the first time you play the game.)
To choose an option, press the D-Button to move the sparkling cursor to your choice, then press Button A or Button B to confirm that choice.
7
Quick Start
The first time you play WARRIORS OF THE ETERNAL SUN™, you may want to use the default party to familiarize yourseli with the world and the strengths and weaknesses of various characters. You can load the default party by pressing Button A or Button B at the Title/Starting Options screen.
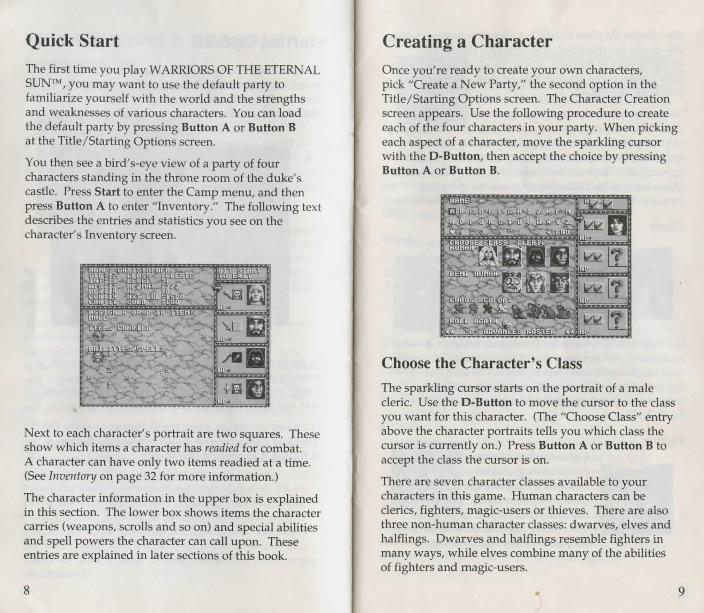
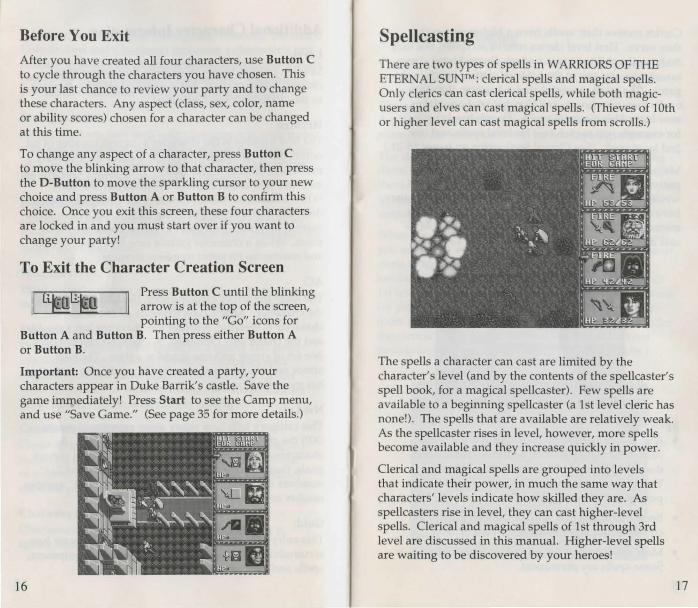
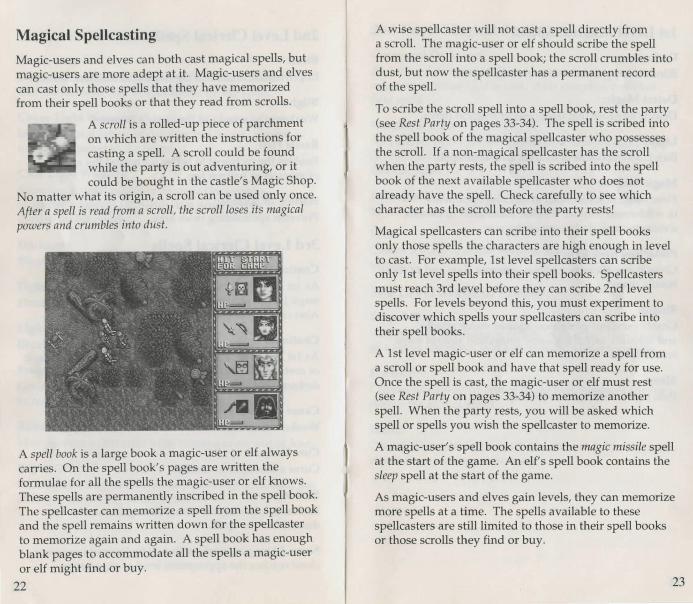
You then see a bird's-eye view of a party of four characters standing in the throne room of the duke's castle. Press Start to enter the Camp menu, and then press Button A to enter "Inventory." The following text describes the entries and statistics you see on the character's Inventory screen.
Next to each character's portrait are two squares. These show which items a character has readied for combat. A character can have only two items readied at a time. (See Inventory on page 32 for more information.)
The character information in the upper box is explained in this section. The lower box shows items the character carries (weapons, scrolls and so on) and special abilities and spell powers the character can call upon. These entries are explained in later sections of this book.
8
Creating a Character
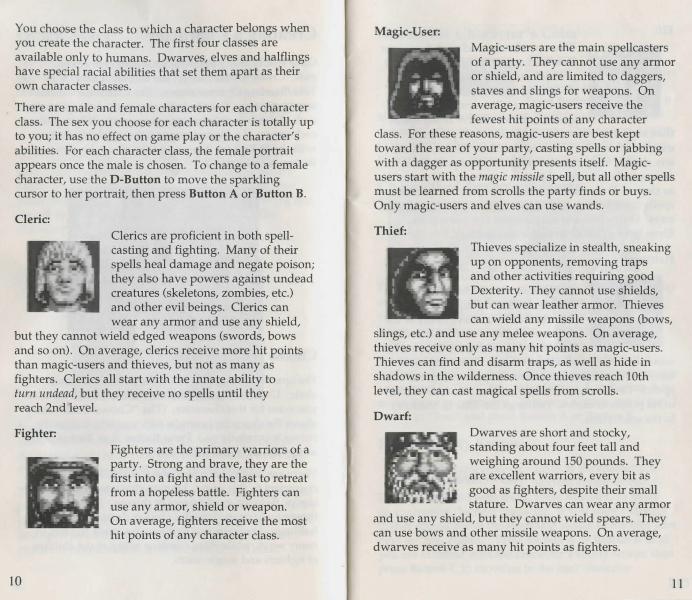
Once you're ready to create your own characters, pick "Create a New Party," the second option in the Title/Starting Options screen. The Character Creation screen appears. Use the following procedure to create each of the four characters in your party. When picking each aspect of a character, move the sparkling cursor with the 0-Button, then accept the choice by pressing Button A or Button B.
Choose the Character's Class
The sparkling cursor starts on the portrait of a male cleric. Use the D-Button to move the cursor to the class you want for this character. (The "Choose Class" entry above the character portraits tells you which class the cursor is currently on.) Press Button A or Button B to accept the class the cursor is on.
There are seven character classes available to your characters in this game. Human characters can be clerics, fighters, magic-users or thieves. There are also three non-human character classes: dwarves, elves and hal£lings. Dwarves and hal£lings resemble fighters in many ways, while elves combine many of the abilities of fighters and magic-users.
9
You choose the class to which a character belongs when you create the character. The first four classes are available only to humans. Dwarves, elves and halflings have special racial abilities that set them apart as their own character classes.
There are male and female characters for each character class. The sex you choose for each character is totally up to you; it has no effect on game play or the character's abilities. For each character class, the female portrait appears once the male is chosen. To change to a female character, use the D-Button to move the sparkling cursor to her portrait, then press Button A or Button B.
Cleric: Clerics are proficient in both spellcasting and fighting. Many of their spells heal damage and negate poison; they also have powers against undead creatures (skeletons, zombies, etc.) and other evil beings. Clerics can wear any armor and use any shield,
but they cannot wield edged weapons (swords, bows and so on) . On average, clerics receive more hit points than magic-users and thieves, but not as many as fighters. Clerics all start with the innate ability to turn undead, but they receive no spells until they reach 2nd level.
Fighter:
10
Fighters are the primary warriors of a party. Strong and brave, they are the first into a fight and the last to retreat from a hopeless battle. Fighters can use any armor, shield or weapon. On average, fighters receive the most hit points of any character class.
Magic-User: Magic-users are the main spellcasters of a party. They cannot use any armor or shield, and are limited to daggers, staves and slings for weapons. On average, magic-users receive the fewest hit points of any character
class. For these reasons, magic-users are best kept toward the rear of your party, casting spells or jabbing with a dagger as opportunity presents itself. Magicusers start with the magic missile spell, but all other spells must be learned from scrolls the party finds or buys. Only magic-users and elves can use wands.
Thief: Thieves specialize in stealth, sneaking up on opponents, removing traps and other activities requiring good Dexterity. They cannot use shields, but can wear leather armor. Thieves can wield any missile weapons (bows,
slings, etc.) and use any melee weapons. On average, thieves receive only as many hit points as magic-users. Thieves can find and disarm traps, as well as hide in shadows in the wilderness. Once thieves reach lOth level, they can cast magical spells from scrolls.
Dwarf: Dwarves are short and stocky, standing about four feet tall and weighing around 150 pounds. They are excellent warriors, every bit as good as fighters, despite their small stature. Dwarves can wear any armor
and use any shield, but they cannot wield spears. They can use bows and other missile weapons. On average, dwarves receive as many hit points as fighters.
11
Elf:
, Elves are slender and slightly shorter than humans, with fine features and pointed ears. They combine the abilities of fighters with those of magic-users. Elves can cast magical spells, but they receive fewer spells
than magic-users and can' t cast the most powerful magic-user spells. Elves can wear any armor and use any shield. They can also wield any weapon. On average, elves receive the same number of hit points as clerics. Elves start with the sleep spell, but all other spells must be learned from scrolls the party finds or buys. Only elves and magic-users can use wands. Elves have a chance to notice secret doors.
Halfling: Halflings resemble human children with pointed ears. They stand about three feet tall and weigh about 60 pounds. Halflings have many of the abilities of fighters and can more than hold their own in battle. They can
wear any armor and use any shield. They can wield missile weapons and all melee weapons except for spears. On average, halflings receive the same number of hit points as clerics. Halflings can hide in shadows in the wilderness.
12
Choose the Character's Color
After you choose the class, the sparkling cursor appears on the red patch of color. Press Button A or Button B
to choose; this determines an identifying color for the character' s figure during the game. This assigns a color to the magic-user's robes, the fighter's shield and so on. It's best to pick a different color for each character.
Choose the Character's Name
The sparkling cursor now appears by "Name" at the top of the screen. Press Button A or Button B to enter the name screen. The character's name can be up to 15 letters, symbols or spaces long. (To add a space to a name, move the box cursor to the blank space next to the exclamation point.) Press Button A or Button B to confirm a letter. To delete letters, move the cursor to the arrow next to "End" and press Button A or Button B as many times as necessary. To accept a name, move the cursor to "End" and press Button A or Button B.
Reroll Ability Scores
Look at the character's current ability scores.
If you're satisfied with them, press Button C to move on to creating the next character. If you want to try for higher scores, move the sparkling cursor to the dice icon next to "Roll Again." Press Button A or Button B until you are satisfied with the character's ability scores, then press Button C to move on to the next character.
13
Ability scores (Strength, Intelligence, Wisdom, D~xterity, Constitution and Charisma) represent a character s proficiency in skills that are important to the success.of your party. These scores range from nine to 18. The ~gher the number, the better the character is at that skill.
Strength (STR):
Strength affects how well your character hits with melee weapons (hand-held weapons) and how much dan:a~e each hit causes. Strength is an important characteristic for fighters, dwarves, elves and halflings.
Intelligence (INT):
Intelligence is a measure of your ~h~racter's. ability to think, analyze and memorize. This is most rmportant for magic-users and elves.
Wisdom (WIS): Wisdom reflects your character's ability to learn from experience. This ability is most important for clerics.
Dexterity (DEX): Dexterity measures your character's agility and handeye coordination. A high Dexterity decreases your character's armor class, making the character harder to hit in combat. A high Dexterity also makes it easier for a character to hit with missile weapons.
Constitution (CON): Constitution reveals how sturdy your character is, including how resistant the character is to the effects of poison. High Constitution scores grant a character extra hit points.
Charisma (CHR): Charisma measures how likeable your character is, taking into account appearance and personality.
14
Additional Character Information
Level:
Level is a measure of a character's skill within the chosen character class. Hit points and abilities increase as the character's level increases.
HP/Max:
The first number is the character's current number of hit points (HP); the number after the slash is the character's maximum number of hit points. A character's hit points measure how much damage the character can take. When a character suffers damage, the current hit points decrease. After resting or being healed, the character's current hit points increase, but never above the maximum. When a character gains a new level, the current and maximum hit point numbers increase.
AC:
The lower the armor class number, the harder it is to hit the character. Armor class depends on the armor the character is wearing, whether the character has a shield, and the character's Dexterity. A character can use only one set of armor and one shield at a time. The best armor and shield are automatically used if the character has more than one.
Nxt Lvl:
This category tells how many more experience points (XP) the character needs to reach the next level. As characters defeat monsters, gain gold and reach certain goals, they gain experience points and their "Nxt Lvl" numbers decrease. Once a character's "Nxt Lvl" number reaches zero, the character gains a level.
Gold:
This entry tells how many gold pieces the character has accumulated. This loot can be spent on new equipment, spells and other items.
15
Before You Exit
After you have created all four characters, use Button C to cycle through the characters you have chosen. This is your last chance to review your party and to change these characters. Any aspect (class, sex, color, name or ability scores) chosen for a character can be changed at this time.
To change any aspect of a character, press Button C to move the blinking arrow to that character, then press the D-Button to move the sparkling cursor to your new choice and press Button A or Button B to confirm this choice. Once you exit this screen, these four characters are locked in and you must start over if you want to change your party!
To Exit the Character Creation Screen
--~---...... Press Button C until the blinking ~ tik':(}Lf~ I h f i ,, ....... __.~-.......... ~------- arrow is at t e top o t 1e screen,
pointing to the "Go" icons for Button A and Button B. Then press either Button A or Button B.
Important: Once you have created a party, your characters appear in Duke Barrik's castle. Save the game imrnediately! Press Start to see the Camp menu, and use "Save Game." (See page 35 for more details.)
16
Spellcasting
There are two types of spells in WARRIORS OF THE ETERNAL SUN™: clerical spells and magical spells. Only clerics can cast clerical spells, while both magicusers and elves can cast magical spells. (Thieves of 10th or higher level can cast magical spells from scrolls.)
The spells a character can cast are limited by the character's level (and by the contents of the spellcaster's spell book, for a magical spellcaster). Few spells are available to a beginning spellcaster (a lst level cleric has none!) . The spells that are available are relatively weak. As the spellcaster rises in level, however, more spells become available and they increase quickly in power.
Clerical and magical spells are grouped into levels that indicate their power, in much the same way that characters' levels indicate how skilled they are. As spellcasters rise in level, they can cast higher-level spells. Clerical and magical spells of lst through 3rd level are discussed in this manual. Higher-level spells are waiting to be discovered by your heroes!
17
Clerics receive their spells from a higher power that they serve. First level clerics receive no spells, but they do have the ability to turn undead. Second level clerics can choose any one of the lst level clerical spells in the game. The more powerful clerics become, the more spells they can choose, and they get to choose from new lists of higher-level spells. Fourth level clerics, for example, get to pick two lst level spells and one 2nd level spell. (See Clerical Spellcasting on pages 19-21.)
Magic-users and elves learn spells from scrolls the party finds or buys. When these spellcasters have a scroll, they should scribe it into their spell books so they have a permanent record of it. The spellcaster must memorize the spell from the spell book to be able to cast it. (See Magical Spe/Icasting on pages 22-26.)
Spell Notes • A spell cast against an opponent is not always
successful. There is often a random chance that the opponent will resist the effects of the spell. This chance varies according to the spell and how powerful the opponent is.
• Beneficial spells that are cast on a spellcaster's comrades are automatically successful.
• Most spells last for only a certain length of time. Some spells are permanent.
18
Clerical Spellcasting
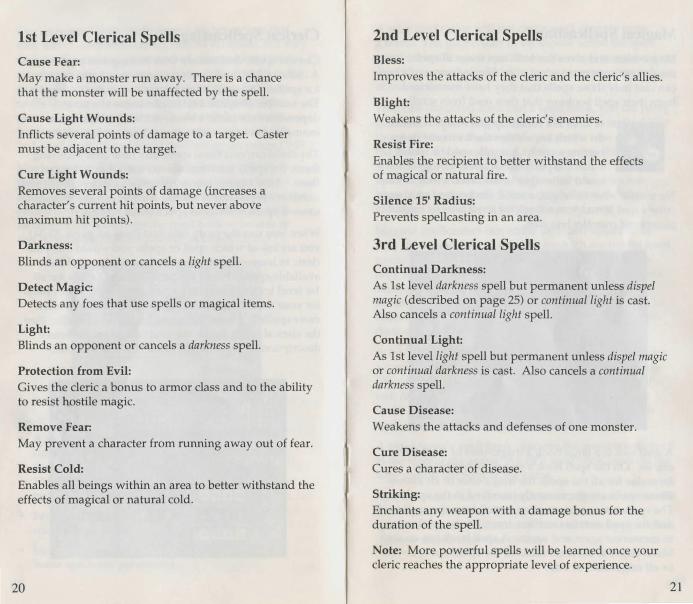
Clerical spells deal mainly with healing and protection. A cleric of 2nd level or above petitions a higher power for spells. The spells then appear in the cleric's mind. The number of spells a cleric can know at a time depends on the cleric's level. A 2nd level cleric, for example, can know only one lst level spell at a time.
The cleric can cast these spells any time after receiving them; the spells are remembered until the cleric casts them. After casting one or more spells, a cleric must rest to receive replacement spells. A cleric can also replace unused spells with other spells while resting.
When you rest the party (see Rest Party on pages 33-34), you are asked which spell or spells you would like your cleric to learn. The cleric gets to choose from all the available spells. When the party rests, the icons for all lst level spells appear and you must choose one of them for your cleric to learn. A higher-level cleric can learn more spells at a time, including higher-level spells. (See the clerical spells list on the next two pages for brief descriptions of lst through 3rd level clerical spells.)
19
lst Level Clerical Spells
Cause Fear: May make a monster run away. There is a chance that the monster will be unaffected by the spell.
Cause Light Wounds: Inflicts several points of damage to a target. Caster must be adjacent to the target.
Cure Light Wounds: Removes several points of damage (increases a character's current hit points, but never above maximum hit points).
Darkness: Blinds an opponent or cancels a light spell.
Detect Magic: Detects any foes that use spells or magical items.
Light: Blinds an opponent or cancels a darkness spell.
Protection from Evil: Gives the cleric a bonus to armor class and to the ability to resist hostile magic.
Remove Fear: May prevent a character from running away out of fear.
Resist Cold: Enables all beings within an area to better withstand the effects of magical or natural cold.
20
2nd Level Clerical Spells
Bless: Improves the attacks of the cleric and the cleric's allies.
Blight: Weakens the attacks of the cleric's enemies.
Resist Fire: Enables the recipient to better withstand the effects of magical or natural fire.
Silence 15' Radius: Prevents spellcasting in an area.
3rd Level Clerical Spells
Continual Darkness: As lst level darkness spell but permanent unless dispel magic (described on page 25) or continua/ light is cast. Also cancels a continua/ light spell.
Continual Light: As 1st level light spell but permanent unless dispel magic or continua/ darkness is cast. Also cancels a continua/ darkness spell.
Cause Disease: Weakens the attacks and defenses of one monster.
Cure Disease: Cures a character of disease.
Striking: Enchants any weapon with a damage bonus for the duration of the spell.
Note: More powerful spells will be learned once your cleric reaches the appropriate level of experience.
21
Magical Spellcasting
Magic-users and elves can both cast magical spells, but magic-users are more adept at it. Magic-users and elves can cast only those spells that they have memorized from their spell books or that they read from scrolls.
A scroll is a rolled-up piece of parchment on which are written the instructions for casting a spell. A scroll could be found while the party is out adventuring, or it could be bought in the castle's Magic Shop.
No matter what its origin, a scroll can be used only once. After a spell is read from a scroll , the scroll loses its magical powers and crumbles into dust.
A spell book is a large book a magic-user or elf always carries. On the spell book's pages are written the formulae for all the spells the magic-user or elf knows. These spells are permanently inscribed in the spell book. The spellcaster can memorize a spell from the spell book and the spell remains written down for the spellcaster to memorize again and again. A spell book has enough blank pages to accommodate all the spells a magic-user or elf might find or buy.
22
A wise spellcaster will not cast a spell directly from a scroll. The magic-user or elf should scribe the spell from the scroll into a spell book; the scroll crumbles into dust, but now the spellcaster has a permanent record of the spell.
To scribe the scroll spell into a spell book, rest the party (see Rest Party on pages 33-34). The spell is scribed into the spell book of the magical spellcaster who possesses the scroll. If a non-magical spellcaster has the scroll when the party rests, the spell is scribed into the spell book of the next available spellcaster who does not already have the spell. Check carefully to see which character has the scroll before the party rests!
Magical spellcasters can scribe into their spell books only those spells the characters are high enough in level to cast. For example, lst level spellcasters can scribe only lst level spells into their spell books. Spellcasters must reach 3rd level before they can scribe 2nd level spells. For levels beyond this, you must experiment to discover which spells your spellcasters can scribe into their spell books.
A lst level magic-user or elf can memorize a spell from a scroll or spell book and have that spell ready for use. Once the spell is cast, the magic-user or elf must rest (see Rest Party on pages 33-34) to memorize another spell. When the party rests, you will be asked which spell or spells you wish the spellcaster to memorize.
A magic-user's spell book contains the magic missile spell at the start of the game. An elf's spell book contains the sleep spell at the start of the game.
As magic-users and elves gain levels, they can memorize more spells at a time. The spells available to these spellcasters are still limited to those in their spell books or those scrolls they find or buy.
23
lst Level Magical Spells
Darkness: Blinds an opponent or cancels a light spell.
Detect Magic: Detects any foes that use spells or magical items.
Light: Blinds an opponent or cancels a darkness spell .
Magic Missile: Fires magical arrows that always hit opponents in wilderness combat. Within a dungeon or cavern, a monster may dodge out of the way.
Protection from Evil: Gives the spellcaster a bonus to armor class and to resist hostile magic.
Shield: Grants excellent protection against melee attacks and missiles, including some protection against magic missile spells.
Sleep: Puts low-level creatures to sleep.
24
l
'
2nd Level Magical Spells
Continual Darkness: As 1st level darkness spell but permanent unless dispel magic or continua/ light is cast. Also cancels a co11ti1111a/ Light spell.
Continual Light: As lst level light spell but permanent unless dispel magic or continua/ darkness is cast. Also cancels a co11ti1111a/ darkness spell.
Entangle: Binds an enemy with vines.
Web: Causes a mass of spider webs to appear and entangle its victim(s).
3rd Level Magical Spells
Dispel Magic: May remove any magical effects in an area. The chance of success improves as the spellcaster's level increases.
Fireball: Creates an exploding ball of flame that damages anyone within the area of effect.
Haste: Causes allies within the spell's area of effect to move and attack twice as often as normal.
25
Lightning Bolt:
Creates a bolt of electricity. When cast underground, this bolt bounces off solid objects.
Protection from Evil 10' Radius:
Improves ability of spellcaster and allies to resist hostile magic; weakens enemies' attacks. Repulses some creatures.
Protection from Normal Missiles:
Makes one being invulnerable to small, non-magical missiles.
Slow:
Causes enemies within the spell's area of effect to move and attack half as often as normal.
Note: More powerful spells exist, but these must be discovered by your characters as you play the game.
26
Exploring the Castle
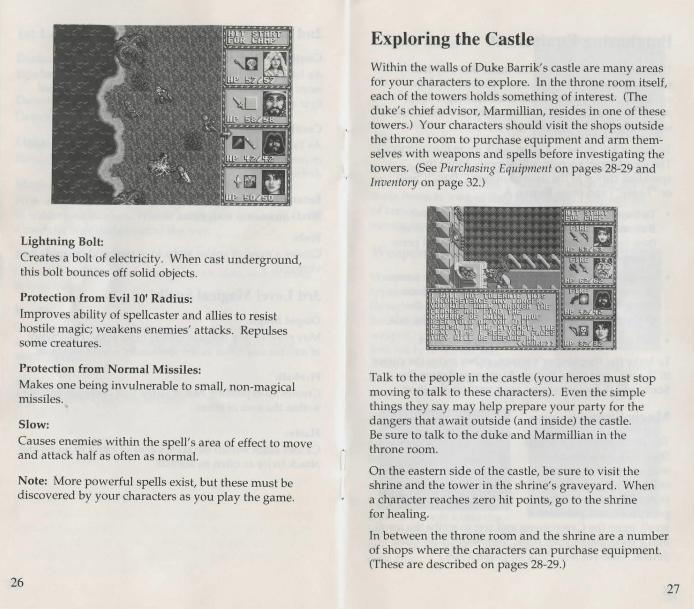
Within the walls of Duke Barrik's castle are many areas for your characters to explore. In the throne room itself, each of the towers holds something of interest. (The duke's chief advisor, Marmillian, resides in one of these towers.) Your characters should visit the shops outside the throne room to purchase equipment and arm themselves with weapons and spells before investigating the towers. (See Purchasing Equipment on pages 28-29 and Inventory on page 32.)
Talk to the people in the castle (your heroes must stop moving to talk to these characters). Even the simple things they say may help prepare your party for the dangers that await outside (and inside) the castle. Be sure to talk to the duke and Marmillian in the throne room.
On the eastern side of the castle, be sure to visit the shrine and the tower in the shrine's graveyard. When a character reaches zero hit points, go to the shrine for healing.
In between the throne room and the shrine are a number of shops where the characters can purchase equipment. (These are described on pages 28-29.)
27
Purchasing Equipment
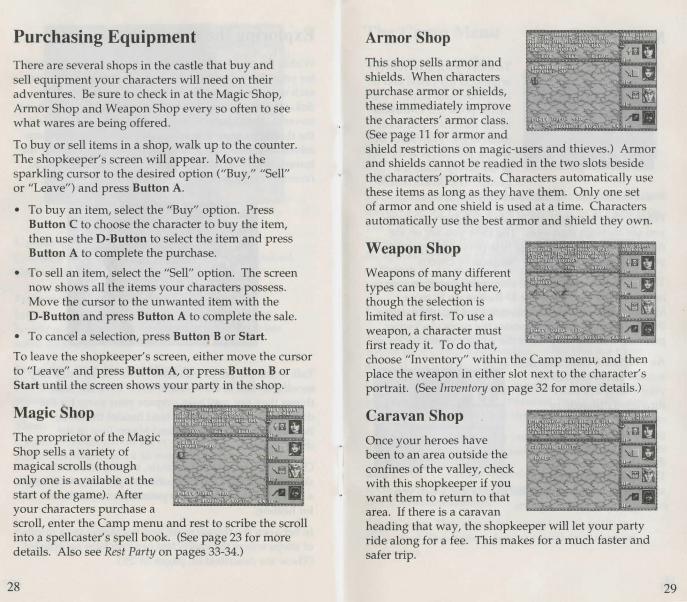
There are several shops in the castle that buy and sell equipment your characters will need on their adventures. Be sure to check in at the Magic Shop, Armor Shop and Weapon Shop every so often to see what wares are being offered.
To buy or sell items in a shop, walk up to the counter. The shopkeeper's screen will appear. Move the sparkling cursor to the desired option ("Buy," "Sell" or "Leave") and press Button A.
• To buy an item, select the "Buy" option. Press Button C to choose the character to buy the item, then use the D-Button to select the item and press Button A to complete the purchase.
• To sell an item, select the "Sell" option. The screen now shows all the items your characters possess. Move the cursor to the unwanted item with the D-Button and press Button A to complete the sale.
• To cancel a selection, press Button B or Start.
To leave the shopkeeper' s screen, either move the cursor to "Leave" and press Button A, or press Button B or Start until the screen shows your party in the shop.
Magic Shop
The proprietor of the Magic Shop sells a variety of magical scrolls (though only one is available at the start of the game). After your characters purchase a scroll, enter the Camp menu and rest to scribe the scroll into a spellcaster's spell book. (See page 23 for more details. Also see Rest Party on pages 33-34.)
28
Armor Shop
This shop sells armor and shields. When characters purchase armor or shields, these immediately improve the characters' armor class. (See page 11 for armor and shield restrictions on magic-users and thieves.) Armor and shields cannot be readied in the two slots beside the characters' portraits. Characters automatically use these items as long as they have them. Only one set of armor and one shield is used at a time. Characters automatically use the best armor and shield they own.
Weapon Shop
Weapons of many different types can be bought here, though the selection is limited at first. To use a weapon, a character must first ready it. To do that, choose "Inventory" within the Camp menu, and then place the weapon in either slot next to the character's portrait. (See inventory on page 32 for more details.)
Caravan Shop
Once your heroes have been to an area outside the confines of the valley, check with this shopkeeper if you want them to return to that area. If there is a caravan heading that way, the shopkeeper will let your party ride along for a fee. This makes for a much faster and safer trip.
29
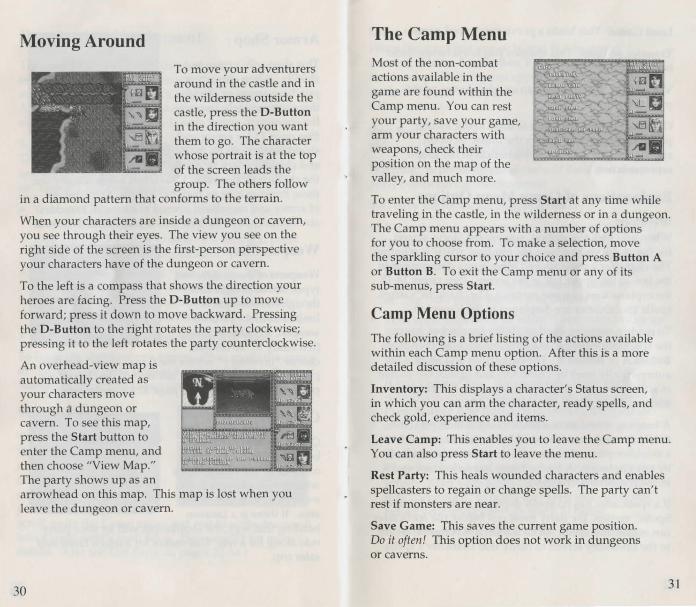
Moving Around
To move your adventurers around in the castle and in the wilderness outside the castle, press the D-Button in the direction you want them to go. The character whose portrait is at the top of the screen leads the group. The others follow
in a diamond pattern that conforms to the terrain.
When your characters are inside a dungeon or cavern, you see through their eyes. The view you see on the right side of the screen is the first-person perspective your characters have of the dungeon or cavern.
To the left is a compass that shows the direction your heroes are facing. Press the D-Button up to move forward; press it down to move backward. Pressing the D-Button to the right rotates the party clockwise; pressing it to the left rotates the party counterclockwise.
An overhead-view map is automatically created as your characters move through a dungeon or cavern. To see this map, press the Start button to enter the Camp menu, and then choose "View Map." The party shows up as an arrowhead on this map. This map is lost when you leave the dungeon or cavern.
30
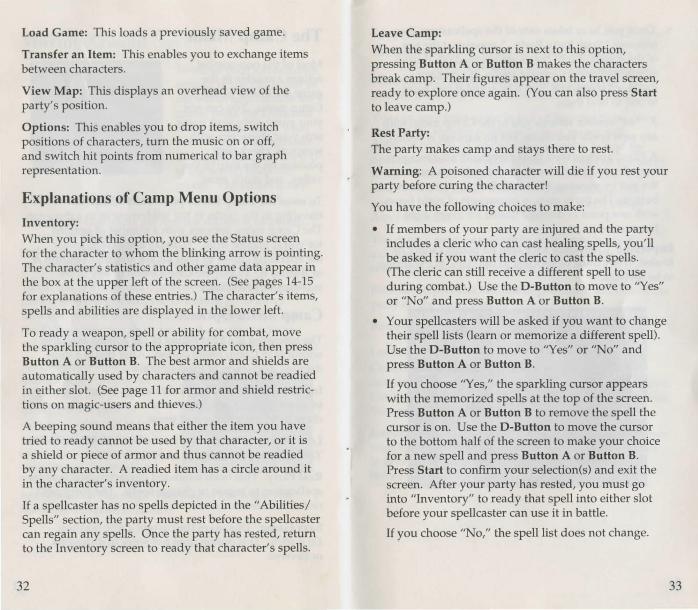
The Camp Menu
Most of the non-combat actions available in the game are found within the Camp menu. You can rest your party, save your game, arm your characters with weapons, check their position on the map of the valley, and much more.
To enter the Camp menu, press Start at any time while traveling in the castle, in the wilderness or in a dungeon. The Camp menu appears with a number of options for you to choose from. To make a selection, move the sparkling cursor to your choice and press Button A or Button B. To exit the Camp menu or any of its sub-menus, press Start.
Camp Menu Options
The following is a brief listing of the actions available within each Camp menu option. After this is a more detailed discussion of these options.
Inventory: This displays a character's Status screen, in which you can arm the character, ready spells, and check gold, experience and items.
Leave Camp: This enables you to leave the Camp menu. You can also press Start to leave the menu.
Rest Party: This heals wounded characters and enables spellcasters to regain or change spells. The party can't rest if monsters are near.
Save Game: This saves the current game position. Do it often! This option does not work in dungeons or caverns.
31
Load Game: This loads a previously saved game.
Transfer an Item: This enables you to exchange items between characters.
View Map: This displays an overhead view of the party's position.
Options: This enables you to drop items, switch positions of characters, tum the music on or off, and switch hit points from numerical to bar graph representation.
Explanations of Camp Menu Options
Inventory: When you pick this option, you see the Status screen for the character to whom the blinking arrow is pointing. The character's statistics and other game data appear in the box at the upper left of the screen. (See pages 14-15 for explanations of these entries.) The character's items, spells and abilities are displayed in the lower left.
To ready a weapon, spell or ability for combat, move the sparkling cursor to the appropriate icon, then press Button A or Button B. The best armor and shields are automatically used by characters and cannot be readied in either slot. (See page 11 for armor and shield restrictions on magic-users and thieves.)
A beeping sound means that either the item you have tried to ready cannot be used by that character, or it is a shield or piece of armor and thus cannot be readied by any character. A readied item has a circle around it in the character's inventory.
If a spellcaster has no spells depicted in the "Abilities/ Spells" section, the party must rest before the spellcaster can regain any spells. Once the party has rested, return to the Inventory screen to ready that character's spells.
32
Leave Camp: When the sparkling cursor is next to this option, pressing Button A or Button B makes the characters break camp. Their figures appear on the travel screen, ready to explore once again. (You can also press Start to leave camp.)
Rest Party: The party makes camp and stays there to rest.
Warning: A poisoned character will die if you rest your party before curing the character!
You have the following choices to make:
• If members of your party are injured and the party includes a cleric who can cast healing spells, you'll be asked if you want the cleric to cast the spells. (The cleric can still receive a different spell to use during combat.) Use the D-Button to move to "Yes" or "No" and press Button A or Button B.
• Your spellcasters will be asked if you want to change their spell lists (learn or memorize a different spell). Use the D-Button to move to "Yes" or "No" and press Button A or Button B.
If you choose "Yes," the sparkling cursor appears with the memorized spells at the top of the screen. Press Button A or Button B to remove the spell the cursor is on. Use the D-Button to move the cursor to the bottom half of the screen to make your choice for a new spell and press Button A or Button B. Press Start to confirm your selection(s) and exit the screen. After your party has rested, you must go into "Inventory" to ready that spell into either slot before your spellcaster can use it in battle.
If you choose "No," the spell list does not change.
33
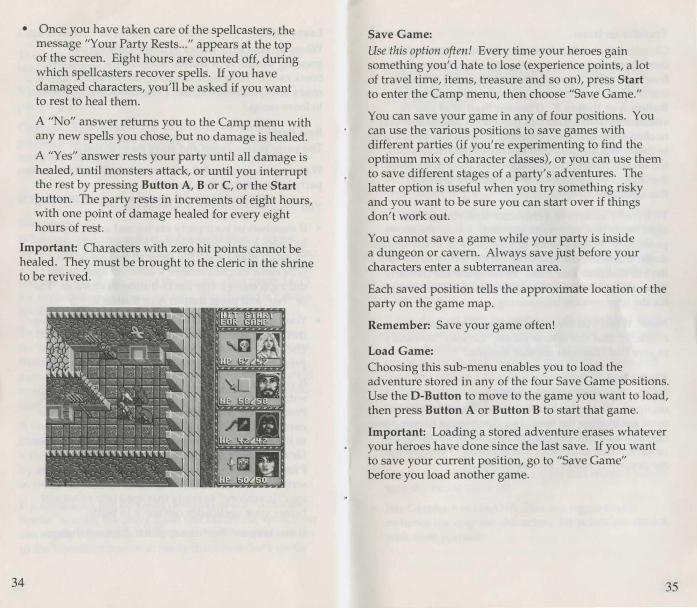
• Once you have taken care of the spellcasters, the message "Your Party Rests ... " appears at the top of the screen. Eight hours are counted off, during which spellcasters recover spells. If you have damaged characters, you'll be asked if you want to rest to heal them.
A "No" answer returns you to the Camp menu with any new spells you chose, but no damage is healed.
A "Yes" answer rests your party until all damage is healed, until monsters attack, or until you interrupt the rest by pressing Button A, B or C, or the Start button. The party rests in increments of eight hours, with one point of damage healed for every eight hours of rest.
Important: Characters with zero hit points cannot be healed. They must be brought to the cleric in the shrine to be revived.
34
Save Game: Use this option often! Every time your heroes gain something you'd hate to lose (experience points, a lot of travel time, items, treasure and so on), press Start to enter the Camp menu, then choose "Save Game."
You can save your game in any of four positions. You can use the various positions to save games with different parties (if you're experimenting to find the optimum mix of character classes), or you can use them to save different stages of a party's adventures. The latter option is useful when you try something risky and you want to be sure you can start over if things don't work out.
You cannot save a game while your party is inside a dungeon or cavern. Always save just before your characters enter a subterranean area.
Each saved position tells the approximate location of the party on the game map.
Remember: Save your game often!
Load Game: Choosing this sub-menu enables you to load the adventure stored in any of the four Save Game positions. Use the D-Button to move to the game you want to load, then press Button A or Button B to start that game.
Important: Loading a stored adventure erases whatever your heroes have done since the last save. If you want to save your current position, go to "Save Game" before you load another game.
35
Transfer an Item: Choosing this option brings up a screen showing all the items your characters are carrying. To transfer an item from one character to another, position the sparkling cursor over the item you wish to transfer, then press Button A or Button B. (Pressing Start after you've selected an item will cancel that choice and enable you to choose another item; pressing it again will return you to the Camp menu.) Now use the D-Button to move the chosen item to the character you want to receive the item. Press Button A or Button B to give it to this character.
To transfer an item to a character who already has eight items (the maximum allowed), follow the above procedure. When you try to give the item to the loadeddown character, the sparkling cursor moves to the first item in that character's list. To complete the transfer, move the cursor to an item that you want to exchange for the item you are transferring.
Note: When you take a readied weapon from a character, that slot is now vacant. Go into "Inventory" to give that character another weapon.
View Map: You can view the map of the area your party currently occupies. The white box shows your party's approximate position on the map. In a dungeon or cavern, this displays an overhead map of the part of the dungeon or cavern that your party has explored. When you leave the dungeon or cavern, the map disappears!
36
Options: This sub-menu enables you to do five things:
• Return to Camp: This option gets you back to the Camp menu. (You can also press Start to return to the Camp menu.)
• Drop an Item: Characters can each carry up to eight items (armor, shields, weapons, scrolls and so on) . If all your characters are at full capacity, they won't be able to pick up any more items. If they find an item you want them to pick up, you'll first have to drop something a character is currently carrying.
Choosing "Drop" shows all the items your characters are carrying. To drop an item, position the sparkling cursor over the item you want dropped, then press Button A or Button B. (Pressing Start after you've selected an item will cancel that choice and enable you to choose a different item or return to the Camp menu.)
If you drop an item by mistake, just press Start until you're back in travel mode (in the castle, wilderness or underground) and you'll see the item on the ground next to your party. If you drop an item and the party moves away, however, the item may be picked up by wandering monsters before your heroes can come back for it.
• Change Roster: You can switch the order of the characters in your party. The top character leads the party in the wilderness.
• Music Is On/Off: This is a toggle that enables you to tum the music on or off.
• Bar Graphs Are On/Off: This is a toggle that switches the way the characters' hit points are shown with their portraits.
37
Combat!
Anywhere your heroes go, they'll meet ferocious monsters of every description. The only way to deal with them is with sword and bow, mace and spell. The monsters fight back, of course. In addition to tooth and claw, many monsters have special attacks that often leave characters helpless.
Spells and monster abilities can also result in special conditions for characters. Characters may sometimes be under one of the following conditions:
• Bless: This beneficial condition is the result of a bless spell. It wears off when the party rests.
• Blind: Blind characters suffer a large penalty to their chance to hit a foe. This condition can be removed by the reverse of the spell that caused it.
• Diseased: Monster bites sometimes cause horrible diseases. A diseased character cannot be healed. This condition can be remedied by a cure disease or curea/l spell or by a visit to the castle's shrine.
• Hush: This condition prevents the character from casting spells. It wears off when the party rests.
• Poisoned: This condition gradually drains a character's hit points. A poisoned character dies if the party rests! Poison can be removed by a potion of cure poison, a cure poison or cureall spell, or by a visit to the castle's shrine.
• Stuck: This condition appears when a character becomes paralyzed, webbed or turned to stone. A character who is paralyzed or webbed is freed when the party rests, but a stone character needs a dispel magic or stone to flesh spell to recover. This condition can also be cured by a visit to the castle's shrine.
38
Wilderness Combat
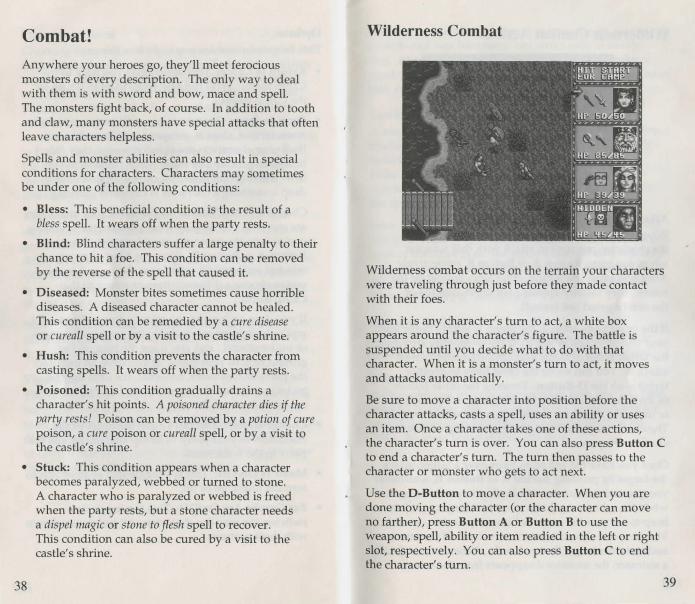
Wilderness combat occurs on the terrain your characters were traveling through just before they made contact with their foes.
When it is any character's turn to act, a white box appears around the character's figure. The battle is suspended until you decide what to do with that character. When it is a monster's turn to act, it moves and attacks automatically.
Be sure to move a character into position before the character attacks, casts a spell, uses an ability or uses an item. Once a character takes one of these actions, the character's turn is over. You can also press Button C to end a character's turn. The turn then passes to the character or monster who gets to act next.
Use the D-Button to move a character. When you are done moving the character (or the character can move no farther), press Button A or Button B to use the weapon, spell, ability or item readied in the left or right slot, respectively. You can also press Button C to end the character's turn.
39
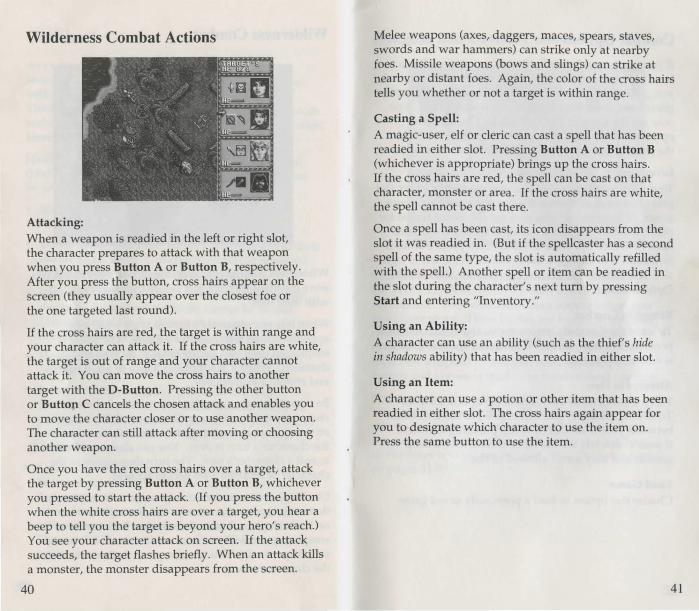
Wilderness Combat Actions
Attacking: When a weapon is readied in the left or right slot, the character prepares to attack with that weapon when you press Button A or Button B, respectively. After you press the button, cross hairs appear on the screen (they usually appear over the closest foe or the one targeted last round).
If the cross hairs are red, the target is within range and your character can attack it. If the cross hairs are white, the target is out of range and your character cannot attack it. You can move the cross hairs to another target with the D-Button. Pressing the other button or Button C cancels the chosen attack and enables you to move the character closer or to use another weapon. The character can still attack after moving or choosing another weapon.
Once you have the red cross hairs over a target, attack the target by pressing Button A or Button B, whichever you pressed to start the attack. (If you press the button when the white cross hairs are over a target, you hear a beep to tell you the target is beyond your hero's reach.) You see your character attack on screen. If the attack succeeds, the target flashes briefly. When an attack kills a monster, the monster disappears from the screen.
40
Melee weapons (axes, daggers, maces, spears, staves, swords and war hammers) can strike only at nearby foes. Missile weapons (bows and slings) can strike at nearby or distant foes. Again, the color of the cross hairs tells you whether or not a target is within range.
Casting a Spell: A magic-user, elf or cleric can cast a spell that has been readied in either slot. Pressing Button A or Button B (whichever is appropriate) brings up the cross hairs. If the cross hairs are red, the spell can be cast on that character, monster or area. If the cross hairs are white, the spell cannot be cast there.
Once a spell has been cast, its icon disappears from the slot it was readied in. (But if the spellcaster has a second spell of the same type, the slot is automatically refilled with the spell.) Another spell or item can be readied in the slot during the character' s next turn by pressing Start and entering "Inventory."
Using an Ability: A character can use an ability (such as the thief's hide in shadows ability) that has been readied in either slot.
Using an Item: A character can use a potion or other item that has been readied in either slot. The cross hairs again appear for you to designate which character to use the item on. Press the same button to use the item.
41
Combat Options
If your party gets into a battle and a character doesn't have a weapon readied or has the wrong items readied, you can quickly change what's in either slot. To do this, press Start at the beginning of a character's turn. You now see the Combat Options menu. One of these options ("Inventory") lets you change the choices for the slots. The four menu options are described below:
Inventory: To change what your character has readied in either slot, press Button A or Button B when the sparkling cursor is next to this option. You now see the Status screen for that character. Move the cursor to the item, weapon, spell or ability you want to ready, then press Button A or Button B to change what's readied in the left or right slot, respectively. Press Start to return to the Combat Options menu.
Return to Combat: To leave the Combat Options menu and return to battle, press Button A or Button B when the sparkling cursor is next to this option.
Attempt to Flee: When a battle turns ugly, this is the option for you. To flee successfully, you must have put some distance between your characters and the pursuing monsters. If your characters are too close to their foes, a beep sounds and they aren't allowed to flee.
Load Game: Choose this option to load a previously saved game.
42
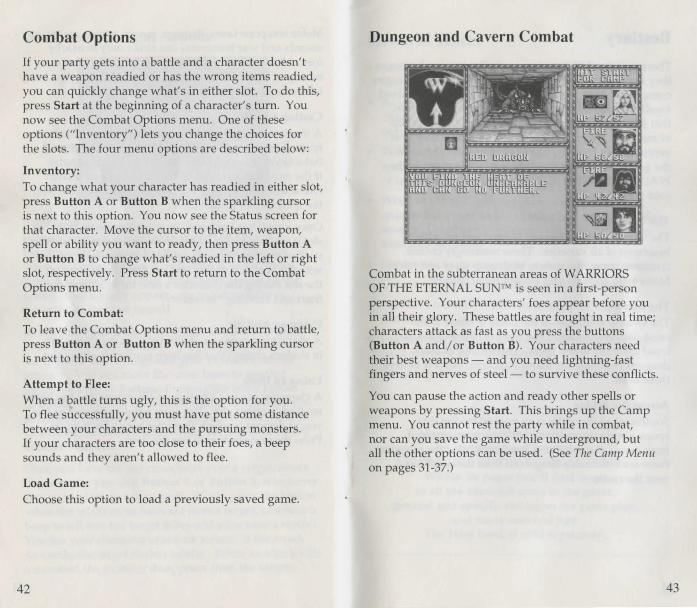
Dungeon and Cavern Combat
Combat in the subterranean areas of WARRIORS OF THE ETERNAL SUN™ is seen in a first-person perspective. Your characters' foes appear before you in all their glory. These battles are fought in real time; characters attack as fast as you press the buttons (Button A and/or Button B). Your characters need their best weapons - and you need lightning-fast fingers and nerves of steel - to survive these conflicts.
You can pause the action and ready other spells or weapons by pressing Start. This brings up the Camp menu. You cannot rest the party while in combat, nor can you save the game while underground, but all the other options can be used. (See The Camp Menu on pages 31-37.)
43
Bestiary
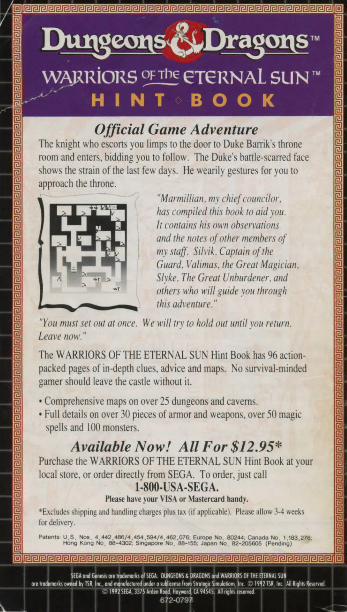
There are over 100 monsters to challenge your heroes as they explore the world of the Eternal Sun. The monsters come in all shapes and sizes, and they also come mixed together in randomly generated groups. This means that your characters will seldom face the same group of monsters twice. The ones they'll meet as they first venture forth from the castle are the weakest foes in the game. (More details on monsters are given in the WARRIORS OF THE ETERNAL SUN™ Hint Book, sold separately.)
The Woods The woods north of the castle are crawling with beastmen of all varieties. These seemingly crazed creatures come in a variety of shapes, sizes and colors. Many wild animals also inhabit these woods.
The Swamp The swamp southeast of the castle is home to the most dangerous foes in the vicinity of the castle, so tread carefully down there. There's talk of black dragons prowling the marshy ground, but few believe these tales.
Across the Bridge Southwest of the castle is an ancient bridge that spans a wide river. No scouts have ever returned from across the river, so it is assumed that the monsters there are even more dangerous than the ones found near the castle.
44
General Hints
• Save your game often and always before entering dungeons!
• Be sure to check the shops in the castle whenever a character goes up in level. The shopkeepers bring out new items from time to time.
• Pick party members so as to have a good mix of spellcasting and fighting skills. You'll need plenty of both to complete this game!
• When in combat, gang up on monsters so as to quickly cut down on the number of monsters making attacks. Go after the monsters who are causing the most damage first.
• Use terrain to your advantage in wilderness combat.
• Use missile weapons to attack from a distance.
• Position area-effect spells so as to affect the most monsters.
• Use sleep spells often! (But remember that they are most effective on weak enemies.)
• Run away when your heroes are overmatched.
Many more detailed hints are given in the Hint Book written for
WARRIORS OF THE ETERNAL SUN™. Within its pages you'll find maps
to all the essential areas in the game, general and specific strategies for game play,
and many survival tips. The Hint Book is sold separately.
45
Character Records Use these Character Records to write down your characters' statistics when you have completed the game. With this information, you ea~ bri~g yo~r heroes along on adventures in future games m th1s senes.
CHARACTER:
Name Class
Str Dex Level AC
Int Con HP/Max
Wis Chr Chksum
CHARACTER:
ame Class
Str Dex Level AC
lnt Con HP/Max
Wis Chr Chksum
CHARACTER:
ame Class
Str Dex Level AC
lnt Con HP/Max
Wis Chr Chksum
CHARACTER:
ame Class
Str Dex Level AC
lnt Con HP/Max
Wis Chr Chksum
46
Handling Your Cartridge • The Sega Genesis Cartridge is intended for use
exclusively for the Sega Genesis System.
• Do not bend it, crush it or submerge it in liquids.
• Do not leave it in direct sunlight or near a radiator or other source of heat.
• Be sure to take an occasional break during extended play, to rest yourself and the Sega Cartridge.
Warning to owners of projection televisions: Still pictures or images may cause permanent picture-tube damage or mark the phosphor of the CRT. Avoid repeated or extended use of video games on large-screen projection televisions.
~111~~~ Limited Warranty ~~~1 1 1 Sega of America, Inc., warrants to the original consumer purd1aser that the Sega Genesis Cartridge shall be free from defects in material and workmanship for a period of ninety days from the date of purchase. If a defect covered by this limited warranty occurs during this 90-day warranty period, Sega will repair or replace the defective cartridge or component part, at its option, free of charge.
This limited warranty does not apply if the defects have been caused by negligence, accident, unreasonable use, modification, tampering, or any other causes not related to defective materials or workmanship. To receive warranty service, call the Sega Consumer Service Department at this number:
1-800-USA-SEGA
DO OT RETURN YOUR SEGA GENESJS CARTRIDGE TO YOUR RETAIL SELLER. Return the cartridge to Sega Consumer Service. Please call first for further information.
47
If the Sega technician is unable to solve the problem by phone, we will provide you with instructions on returning your defective cartridge to us. The cost of returning the cartridge to Sega's Service Center shall be paid by the purchaser.
Repairs after Expiration of Warranty
1f your Sega Genesis Cartridge requires repairs after termination of the 90-day limited warranty period, you may contact the Sega Consumer Service Department at the number listed above. If the technician is unable to solve the problem by phone, he will advise you of the estimated cost of repair. 1f you elect to have the repair done, you will need to return the defective merchandise, freight prepaid and insured against loss or damage, to Sega's Service Center with an enclosed check or money order payable to Sega of America, Inc., for the amount of the cost estimate provided to you by the teclmician. If, after inspection, it is determined that your cartridge cannot be repaired, it will be returned to you and your payment will be refunded.
Limitations on Warranty
Any applicable implied warranties, including warranties of merchantability and fitness for a particular purpose, are hereby limited to ninety days from the date of purchase and are subject to the conditions set forth herein. In no event shall Sega of America, Inc., be liable for consequential or incidental damages resulting from the breach of any express or implied warranties.
The provisions of this limited warranty are valid in the United States only. Some states do not allow limitations on how long an implied warranty lasts, or exclusion of consequential or incidental damages, so the above limitation or exclusion may not apply to you. This warranty provides you with specific legal rights. You may have other rights which vary from state to state.
48
Official Game Adventure The knight who escorts you limps to the door to Duke Barrik' throne room and enter , bidding you to follow. The Duke's battle-scarred face show the strain of the la l few days. He wearily gestures for you to approach the throne.
.,
"Marmi/lia11. my chief cmmcilor. has compiled 1his bool. 10 aid you. 11 co111ai11s his ow11 obserra1io11s a11d 1he 1101es of 01her members of my sraf!. Sifrik. Capra in of 1he Guard, Valimas. 1he Great Magician. Slyke, The Great Unburdener. a11d others who will guide you through this adventure."
"You must se10111at011ce. We will try ro hold 0111 u111il you return. Leave llOlt '."
The WARRIORS OF THE ETERNAL SUN Hint Book has 96 actionpacked pages of in-depth clues. advice and map . No urvival-minded gamer should leave the castle without it.
• Comprehensive map on over 25 dungeons and cavern . • Full details on over 30 pieces of arrnor and weapons, over 50 magic
spell and I 00 mon ters.
Available Now! All For $12.95* Purchase the WARRIORS OF THE ETERNAL SUN Hmt Book at your local tore, or order directly from SEGA. To order, just call
1-800-USA-SEGA. Please ha1e iour VI A or Mastercard handy.
' Excludes shipping and handling charges plus lax (if applicable). Please allow 3-4 "eeks for delivery.