Embed Size (px)
Citation preview


2 3
CONTENTS1. Features .................................................................................................... 42. Before Using.............................................................................................. 43. Names of Components ............................................................................. 84. Hand Reference Position Check and Correction ................................. 12
• Reference Position Check• Returning to Local Time Mode After Checking Reference Position• Reference Position Correction
5. Switching the Mode (Display Function) ................................................ 206. Setting the Time ...................................................................................... 22
• Procedure for Setting the Time7. Setting the Date....................................................................................... 24
• Procedure for Setting the Date8. Using the Alarm ...................................................................................... 29
• Setting the Alarm Time• Switching Alarm ON and OFF• Alarm Tone Monitor
English
• Stopping the Alarm Tone• Alarm ON/OFF Check
9. Setting the Local Time............................................................................ 33• Procedure for Setting Local Time
10. Functions Unique to Solar-Powered Watches ..................................... 35• Insufficient Charge Warning Feature• Over Charge Prevention Feature• Power Save Feature
11. General Reference for Charging Times ................................................ 4112. Solar-Powered Watch Handling Precautions ....................................... 43
• Charging Precautions• Handling of Secondary Battery• Only Use the Specified Secondary Battery
13. Replacing the Secondary Battery.......................................................... 4514. All-Reset .................................................................................................. 46
• All-Reset Procedure15. Precautions ............................................................................................. 4816. Specifications.......................................................................................... 54

4 5
1. FeaturesThis watch is a solar-powered watch that contains a solar cell in its face that drives thewatch by converting light energy into electrical energy. It is also equipped withnumerous functions including a perpetual calendar that changes the date automatically(changes the number of years from the most recent leap year, month, date and dayautomatically until February 28, 2100 including leap years), a daily alarm that can beset based on a 24 hour clock, and a local time function that enables setting of timedifferences in one hour units.
2. Before Using<Be careful not to pull the crown too far out when switching the mode.>The mode of this watch can be changed with the crown pulled out to Position 1.If the crown is pulled out to Position 2, the second hand will move to the 0 secondsposition and the watch will enter the correction mode for each mode (when in the timemode or alarm mode; when in the calendar mode, the second hand moves to the monthdisplay, and when in the local time mode, the second hand continues to move at 1-
second intervals). When the crown is pulled out to Position 2 in the time mode, thesecond hand stops causing the time to be incorrect. In addition, since the set time,date, alarm time and so forth will end up changing if the crown is pulled out to Position2 in each mode, be careful not to pull out the crown too strongly. Refer to “5. Switching the Mode (Display Function)” for information on how toproperly switch the watch to each mode.
[Crown in Proper Position] [Crown Pulled Out Too Far]
Normal position
Position 1 Position 2
M
When the crown is pulled out too far toPosition 2, the second hand moves tothe 0 seconds position and stops, andthe watch enters the correction mode.
When the crown is pulled out toPosition 1, the second hand moves tothe 30 seconds position and stops.

6 7
<Proper Use of this Watch>To use this watch comfortably, make sure to charge it before it stops runningcompletely. Since there is no risk of overcharging no matter how much the watch ischarged (Over Charge Prevention Feature), it is recommended that the watch becharged every day.
This watch is a solar-powered watch. Please fully charge the watch beforeusing by exposing it to light by referring to “11. General Reference forCharging Times”.
A secondary battery is used in this watch to store electrical energy. This secondarybattery is a clean energy battery that does not contain mercury or other toxicsubstances. Once fully charged, the watch will continue to run for about 1.5 yearswithout additional charging (when the power save feature is operating). V Power Save Feature:
When power generation stops as a result of light not shining on the solar cell duringthe time (TME) or local time (L-TM) mode, the power save feature is activated andthe second hand stops at the 0 seconds position to save power. The 24 hour hand,hour hand and minute hand continue to move normally. When light once againbegins to shine on the solar cell, the power save feature is canceled and the secondhand rapidly moves to the current time and returns to moving at 1-second intervals.Although varying according to the design, the power save feature is activatedwhen light does not shine continuously on the solar cell for 30 minutes or more,and the second hand has reached the 0 seconds position.
8 9
3. Names of ComponentsMode
Name
(1) Mode hand
(2) Function hand
(3) Date
(4) Hour hand
(5) Minute hand
(6) Second hand
(7) 24 hour hand
Time (TME)
TME
Displays day
Displays date
Displays hours
Displays minutes
Displays seconds
24-hour time display incoordination with hour hand
Calendar (CAL)
CAL
Displays day
Displays date
Displays hours
Displays minutes
Displays month
24-hour time display incoordination with hour hand
Alarm (ALM)
ALM
Displays alarm ON/OFF
Displays date
Displays alarm hours
Displays alarm minutes
Stops at 0 seconds position
24-hour alarm time display incoordination with alarm hour hand
Local Time (L-TM)
L-TM
Displays day
Display date
Displays local time (hours)
Displays local time (minutes)
Displays seconds
24-hour local time display incoordination with local time (hours)

10 11
Name
(8) Crown
Button (A)
Button (B)
Crown position
Normal position
Position 1
Position 2
Normal position
Position 1
Position 2
Normal position
Position 1
Position 2
Crown and button operation
Not used
Mode switching (second handstops at 30 seconds position)
Time correction (second handstops at 00 seconds)
Not used
Not used
Function hand indicates alarmON or OFF while pressed
Not used
Not used
Not used
Not used
Mode switching (second hand stops at 30seconds position)
Alarm correction (second hand stops at 00seconds)
Not used
Not used
Not used
Alarm tone monitor (alarm tone sounds whilepressed)
Not used
Alarm ON/OFF setting
Not used
Mode switching (second hand stops at 30seconds position)
Local time correction (second hand continuesmoving in 1-second intervals)
Switches watch to reference position check modewhen pressed continuously for 10 seconds
Not used
Not used
Not used
Not used
Not used
Not used
Mode switching (second handstops at 30 seconds position)
Date correction (secondindicates the month)
Function hand indicates yearssince leap year while pressed
Not used
Not used
Not used
Not used
Switches date correction location(leap year c month c date c day)
Crown and button operation
12 13
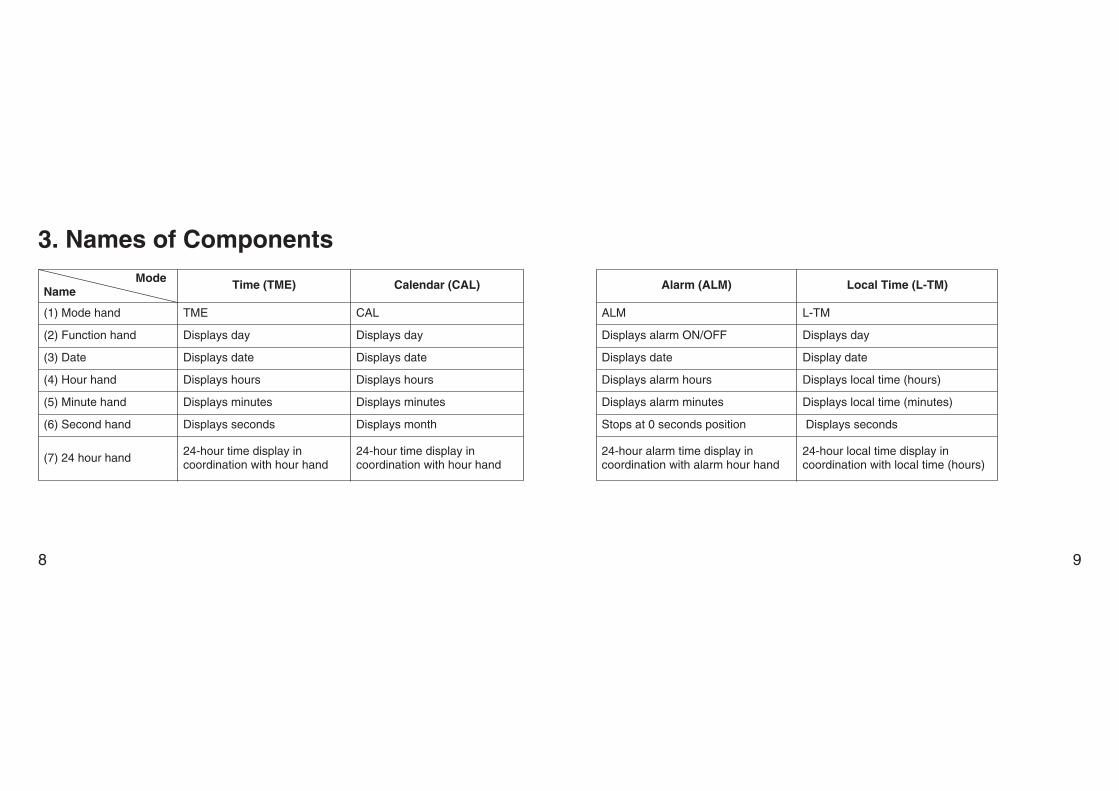
4. Hand Reference Position Check and CorrectionReference position: This refers to the base position of each hand for enabling thiswatch to function properly. Refer to the illustration below for the referenceposition of each hand. If the reference position is not set properly, the time, date,alarm ON/OFF positions and other watch functions will not be displayed properly.
Before using this watch, check that the functions of the watch operate properly byperforming the following procedure.
[Reference Position Check]1. After pulling out the crown to Position 1 (second hand moves to the 30 seconds
position and waits), turn the crown to set the mode hand to the local time [L-TM]mode.
2. Return the crown to the normal position.3. Press button (A) for at least 10 seconds and then release after each hand begins to
move in coordination. • The second hand rapidly advances forward (clockwise rotation), while the other
hands, including the function hand, rapidly move forward or backward. • The date changes by one day when the function hand completes four revolutions.
<Correct Reference Positions of Each Hand>
<Reference Positions of Each Hand>24 hour hand: 24:00Hour hand, minute hand: 00:00Second hand: 0 secondsFunction hand: SUN (SUN immediately after the date has changed to “1”)Date: 1st
Perform the “Reference Position Correction” procedure if any of the hands or date arenot at the positions indicated above.
Button (A)
(1) Mode switchingposition
(0) Normal position

14 15
[Returning to Local Time Mode After Checking ReferencePosition]
• After the date and each hand has displayed the reference position, pressing button(A) returns the watch to the local time mode. Alternatively, the watchautomatically returns to the local time mode if the crown or buttons are notoperated for two consecutive minutes.
• The reference position check is canceled when the mode is switched by pulling thecrown out to Position 1 while the reference position is displayed.
Note:• The watch will not return to the local time mode even if button (A) is pressed if the
crown is pulled out to Position 1 or Position 2. In addition, it will not automaticallyreturn to the local time mode after 2 minutes.
[Reference Position Correction]• Perform steps 5 through 10 below if continuing to correct the reference position
after just having checked the reference position.1. Pull the crown out to Position 1 (the second hand moves to the 30 seconds position
and waits). 2. Turn the crown to set the mode hand to the local time mode [L-TM].3. Return the crown to the normal
position.4. Press button (A) for at least 10
seconds and release when eachhand begins to move to thereference position.• The second hand rapidly advances
forward (clockwise rotation),while the other hands, includingthe function hand, rapidly moveforward or backward.
• The date changes by one daywhen the function hand completesfour revolutions.
Position 2
<Watch when Second Hand andMinute Hand have Shifted fromReference Position>

16 17
8. Click (turn) the crown.• Turn the crown by one click to the right causes the hour hand and minute hand to
advance by 1/4 minute (and 4 clicks cause them to advance by 1 minute). • Turn the crown by one click to the left to move back the hour hand and minute
hand by 1/4 minute (and 4 clicks cause them to move back by 1 minute). • Continuously turning the crown causes the hour hand and minute hand to advance
continuously. Turn the crown by one click to the right or left to stop the hour handand minute hand from advancing. The hour and minute hands will advance by 24hours and then stop automatically if they are not interrupted.
• First stop the hands at about 12:00 and then slowly move them one step at a time tocorrectly align them at the 12:00 position.
9. Press button (A).• After the function hand and date complete a demonstration movement (the function
hand rotates backward by 180 degrees and then returns to its original position,while the date moves in coordination with the function hand), the watch enters thecalendar correction mode.
10. Turn the crown to align the function hand at “SUN” immediately after the date haschanged to “1”.
• Turning the crown by one click to the right advances the function hand by one step.• Turning the crown by one click to the left moves back the function hand by one
step.
5. After the date has changed, pull the crown out to Position 2 once the function handhas stopped moving.
6. Click (turn) the crown to the right.• The second hand advances by 1 second for each click.• Turning the crown continuously (rapidly by two clicks or more) causes the second
hand to advance continuously. Turn the crown by one click to the right or left tostop the second hand from advancing. The second hand will advance by 60seconds and then stop automatically if it is not interrupted.
• First stop the second hand near the 55 seconds position and then move it slowly onesecond at a time to correctly align at the 0 seconds position.
Note: The second hand cannot be corrected in the reverse direction (counter-clockwise rotation).
7. Press button (A).• After the minute hand completes a demonstration movement (by moving back by 5
minutes and then moving forward by 5 minutes), the hour hand and minute handenter the correction mode.
18 19
• Turning the crown continuously causes the function hand to advance continuously.Turn the crown by one click to the right or left to stop the function hand fromadvancing.
• The date changes by one day when the function hand completes fourrevolutions. Turn the crown to the right to advance the function hand byclockwise rotation and continue to advance the function hand until “1” isdisplayed for the date.
• When setting the date by advancing the function hand counter-clockwise, firstmove back the function hand until “31” is displayed for the date, and then advancethe function hand by clockwise rotation until “1” is displayed for the date.
• Correctly set the function hand to “SUN” immediately after the date has changed to“1”. Once the date has changed to “1”, immediately interrupt movement of thefunction hand and align it with “SUN” on the scale by slowly moving it one step ata time.
Note: Pressing button (A) causes the watch to enter the second hand referenceposition setting mode again.
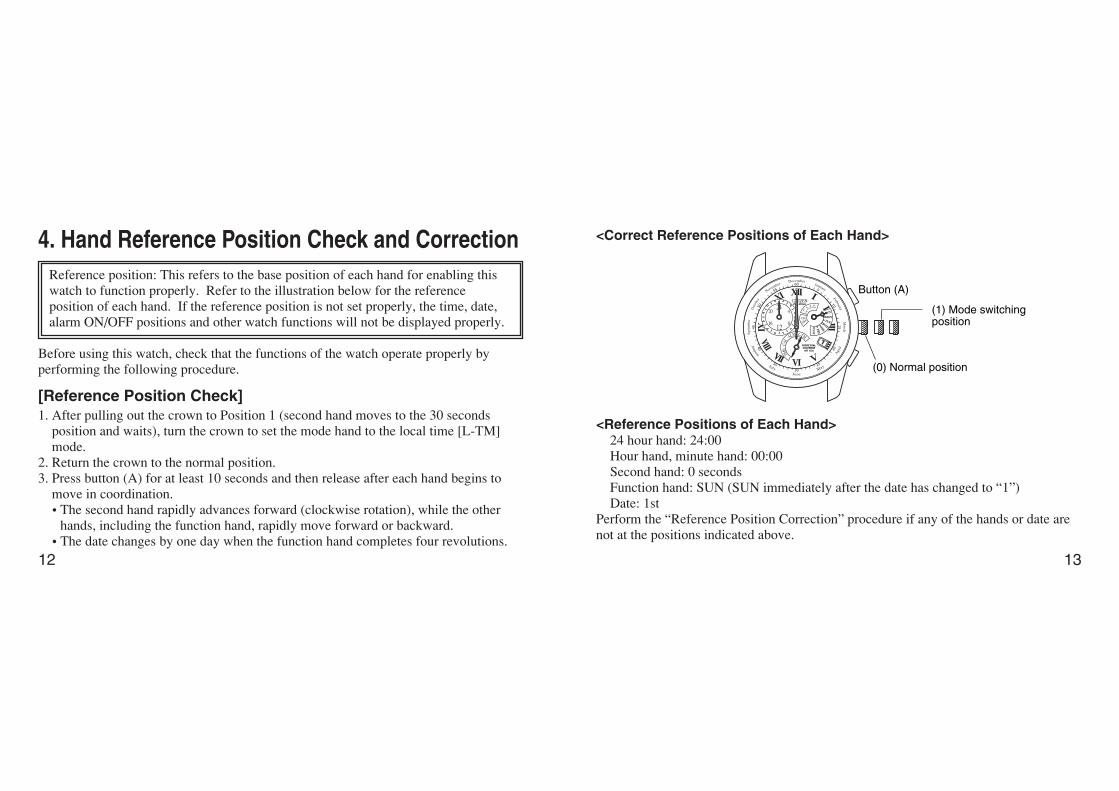
11. Return the crown to the normal position and press button (A). • The date and each hand return to the local time display.• Reference position correction can also be terminated by returning the crown to the
normal position and pressing button (A) following correction of the second hand orhour and minute hands. Example: If the crown is returned to the normal position and button (A) is pressed
after correcting seconds, reference position correction is terminated andthe watch returns to the local time display without correcting thereference positions for the hour hand, minute hand, function hand ordate.
This completes the procedure for correcting the reference position. Check that thetime, date and other modes are displayed correctly before using the watch.
<Change in Corrected Location>
Seconds Hour hand,minute hand
Function hand,date
(A) (A)
(A)

20 21
5. Switching the Mode (Display Function)This watch is equipped with four modes consisting of a time, calendar, alarm and localtime mode. The mode changes when the crown is pulled out to Position 1 and turned.The current mode can be confirmed with the mode hand.
Notes:• If the crown is pulled out too far to Position 2, the watch enters the correction mode
of each mode which may cause the time, date and other settings to change. • When switching the mode, slowly turn the crown until the mode hand points to the
center of the letters of the mode name. • Return the crown to the normal position after checking the mode. Using the watch
with the crown pulled out may cause damage to watch components or impair waterresistance.
(1) Mode switching position
Button (B)
Mode hand
Button (A)
Function hand
TMETime Mode
[Mode/Display Function]
CALCalendar Mode
L-TMLocal Time Mode
ALMAlarm Mode

22 23
6. Setting the Time
[Procedure for Setting the Time]1. Pull the crown out to Position 1 (the second hand rapidly advances to the 30 seconds
position and waits). Note: If the second hand does not stop at the 30 seconds position, refer to the section
on “Reference Position Correction” of “4. Hand Reference Position Check andCorrection” and set the reference position of the second hand.
2. Turn the crown to align the mode hand at the time mode [TME].3. Pull the crown out to Position 2 (time correction position).
• The second hand rapidly advances to the 0 seconds position and stops.4. Turn (click) the crown to set the 24 hour hand, hour hand and minute hand to the
current time.A Turning the crown one click to the right advances the 24 hour hand, hour hand
and minute hand by one minute.B Turning the crown by one click to the left moves back the 24 hour hand, hour
hand and minute hand by one minute.• Turning the crown continuously (rapidly by two clicks or more) causes the 24 hour
hand, hour hand and minute hand to move continuously. • Turn the crown to the left or right to interrupt continuous movement of the hands.
The hands will continue to advance by 12 hours and then stop automatically unlessmovement is interrupted by turning the crown to the right or left.
• The 24 hour hand moves in coordination with the hour hand. Make sure to set AMand PM correctly when setting the time.
5. Return the crown to the normal position in synchronization with a telephone timesignal or other time service.
Hour hand
Mode handMinute hand
(2) Time correction position
(0) Normal position
Button (A)
24 hour hand
Second hand

24 25
7. Setting the DateThis watch is equipped with a perpetual calendar that changes the year (number ofyears elapsed from the most recent leap year), month, date and day automatically untilFebruary 28, 2100, including leap years, once the date has been set.
Mode hand
Date
(1) Mode switchingposition
(2) Date settingposition
(0) Normal position
Day
Button (A)
Button (B)
Month
Years elapsed from most recent leap year
<Reading the Month>The months are arranged such that 1:00corresponds to January, 2:00 to February,3:00 to March and so forth so that 11:00corresponds to November and 12:00 toDecember. Read each month from thecorresponding location on the scale.
[Procedure for Setting the Date]1. Pull the crown out to Position 1 (the
second hand rapidly advances to the 30seconds position and stops).
2. Turn the crown to set the mode hand to the calendar [CAL] mode.3. Pull the crown out to Position 2 (date setting position).
• The second hand rapidly advances to the month display position stored in memorywhile the function hand moves to the year display position (elapsed years frommost recent leap year).
7
January
February
March
April
May
June
July
August
September
October
NovemberDecember
26 27
4. Turn (click) the crown to set the year.A Turning the crown to the right causes the year to change in order from LY (leap
year) c +1 c +2 c +3 c LY c +1 c and so on.B Turning the crown to the left causes the year to change in the opposite order from
LY (leap year) c +3 c +2 c +1 c LY c +3 c and so on. 5. Press button (A).
• The second hand makes one revolution and the watch enters the month correctionmode. A Turning the crown one click to the right causes the second hand to advance to the
next month.Note:
• The month can only be corrected by turning the crown to the right (clockwise), andwill not be corrected if the crown is turned to the left (counter-clockwise).
6. Press button (A).• The function hand moves from the year display to the day display and the watch
enters the date correction mode.7. Turn the crown to the set the date.AWhen the crown is turned by one click to the right, the function hand makes four
revolutions and the date changes.BWhen the crown is turned by one click to the left, the function makes four
revolutions in the opposite direction (counter-clockwise) and the date moves backby one day.
Note: • The date cannot be corrected continuously. Correct the date one day at a time.
8. Press button (A).• After the function hand completes a demonstration movement (in which it moves
back and forth across the day display range and then stops at the position of thecurrent day), the watch enters the day correction mode.
9. Turn the crown to set the day. A Turning the crown to the right changes the day in the order of SUN cMON c
TUE cWED c THU c FRI c SAT and then back to SUN. B Turning the crown to the left changes the day in the reverse order of SUN c SATc FRI c THU cWED c TUE cMON and then back to SUN.
10. When button (A) is pressed, the watch returns to the year correction mode.11. Return the crown to the normal position.
• Following correction of year, month, date or day, the correction mode can be endedby returning the crown to the normal position.
Example: After correcting the month, the watch can be returned to the normaldisplay without correcting the date or day by returning the crown to thenormal position.
• This completes date correction.

28 29
<Setting to a Non-Existent Date>The date is automatically changed to the first day of the following month when thecrown is returned to the normal position from the correction mode. Examples:
Regular year: February 29, 30 or 31 cMarch 1Regular year: April 31 cMay 1
Leap year: February 30 or 31 cMarch 1
8. Using the AlarmThe alarm function uses a 24 hour clock. Once the alarm has been set, the alarmsounds for 15 seconds when the set time is reached once a day. • When using the watch in each of time, calendar and alarm modes, the alarm sounds at
the time that coincides with the time mode. • When using the watch in the local time [L-TM] mode, since the alarm sounds at the
time that coincides with the local time, it is not necessary to correct the timedifference for the alarm time to coincide with the local time.
Year (elapsed years from mostrecent leap year)
DayDateMonth(A) (A) (A)
(A)
<Change in Corrected Location>
<Quick Reference Chart for Number of Years Since Leap Year>Year Elapsed year Display Year Elapsed year Display2004 Leap year LY 2008 Leap year LY2005 1st year +1 2009 1st year +12006 2nd year +2 2010 2nd year +22007 3rd year +3 2011 3rd year +3

30 31
[Setting the Alarm Time]1. Pull the crown out to Position 1
(the second hand rapidlyadvances to the 30 secondsposition and waits).
2. Turn the crown to set the modehand to the alarm mode [ALM]. • The hour hand and minute
hand rapidly advance to thepreviously set alarm time.
• The function hand moves toeither ON or OFF.
3. Pull the crown out to Position 2 (alarm time setting position). • The second hand moves the 0 seconds position.• The function hand switches to the ON position.
4. The alarm switches between ON and OFF when button (B) is pressed.5. Turn the crown to set the alarm time.A Turning the crown by one click to the right causes the 24 hour hand, hour hand
and minute hand to advance by one minute.
Mode hand
(1) Mode switchingposition
(2) Alarm timesetting position
(0) Normal position
Button (B)
Alarm ON/OFF B Turning the crown by one click to the left causes the 24 hour hand, hour hand andminute hand to move back by one minute.
• Turning the crown continuously causes the 24 hour hand, hour hand and minutehand to move continuously.
• Turn the crown by one click to the left or right to interrupt movement of the hands.The hands will continue to advance by 12 hours and then stop automatically unlesstheir movement is interrupted by turning the crown to the left or right.
• The 24 hour hand moves in coordination with the hour hand. Make sure to set AM and PM correctly when setting the time.
6. Return the crown to the normal position.
[Switching Alarm ON and OFF]1. Pull the crown out to Position 1 and then turn the crown to set the watch to the alarm
mode [ALM]. • The hour hand and minute hand rapidly advance to the set alarm time. • The function hand moves to either ON or OFF.
2. Pull the crown out to Position 2 (alarm time setting position). • The function hand switches to the ON position.
3. The alarm switches between ON and OFF when button (B) is pressed.4. Return the crown to the normal position after setting the alarm to ON or OFF.

[Alarm Tone Monitor]• When button (B) is pressed with the crown in the normal position in the alarm mode
[ALM], the alarm tone sounds for as long as button (B) is pressed.
[Stopping the Alarm Tone]• Press either button (A) or (B) to stop the alarm tone
while it is sounding.
[Alarm ON/OFF Check]• When button (B) is pressed when the
watch is in the time mode [TME], thefunction hand indicates ON or OFFfor as long as button (B) is pressed toindicate the alarm status.
32 33
9. Setting the Local Time• The local time [L-TM] function lets you set the watch to a time in a different area
from the time set in the time mode [TME]. • The time difference can be corrected in 1 hour units based on the time mode. The
local time can be set over a range of ±23 hours based on the time mode. • The minute and second hands move in coordination with the time mode.
[Procedure for SettingLocal Time]1. Pull the crown out to Position 1
(the second hand rapidly advancesto the 30 seconds position andwaits).
2. Turn the crown to set the modehand to the local time [L-TM]mode.
3. Pull the crown out to Position 2(local time setting position).
(1) Mode switchingposition
(2) Local timesetting position
(0) Normal position
Local time hour hand
Local time minute hand

34 35
• The second hand rapidly advances to the current time and begins 1-second intervalmovement.
4. Turn the crown by set the 24 hour hand and hour hand to the local time.A Turning the crown by one click to the right causes the 24 hour hand and hour
hand to advance by one hour.B Turning the crown by one click to the left causes the 24 hour hand and hour hand
to go back by one hour. • Turning the crown continuously (rapidly by two clicks or more) causes the hour
hand and minute hand to move continuously. • Turn the crown by one click to the left or right to interrupt continuous movement of
the hands. The hands will continue to advance by 12 hours and then stopautomatically unless movement is interrupted by turning the crown to the right orleft.
• The 24 hour hand moves in coordination with the hour hand. Make sure to set AMand PM correctly when setting the time.
5. Return the crown to the normal position to complete setting of the local time.
10. Functions Unique to Solar-Powered WatchesWhen the watch becomes insufficiently charged, the watch display changes as shownbelow. When the watch has changed normal hand movement to the insufficient chargewarning display, this indicates that that the watch is insufficiently charged. Allow lightto shine on the solar cell until the watch returns to 1-second interval movement. Evenafter the watch has returned to 1-second interval movement, sufficiently charge thewatch by exposing it to light by referring to “11. General Reference for ChargingTimes” to ensure that the watch is used comfortably.

36 37
[Power Save Feature]The second hand stops atthe 0 seconds position tosave power.
[Insufficient ChargeWarning Display]The second hand changes to2-second interval movement.
[Stopped]The second hand stops atthe 0 seconds position andthe other hands stop at thecorrect minute position.
Charge the watch by allowing light to shine on the solar cell until the watchbegins to run. In the case the watch has stopped as a result of beinginsufficiently charged, a minimum of 30 minutes are required until the watchbegins to run again even if light shines on the solar cell. Sufficiently charge thewatch by referring to “11. General Reference for Charging Times”.
[Normal Time Display]
When the watch stopsgenerating power as aresult of the solar cellnot being exposed tolight for 30 minutes ormore
When watchbecomesinsufficientlycharged
When powergeneration resumesas a result of the solarcell being exposed tolight
When charged
The time is incorrect sincethe watch has stopped as aresult of being insufficientlycharged. Reset the watch tothe correct time.
2 seconds
2 seconds
When the capacity ofthe secondary battery isdepleted as a result ofnot being charged

<Insufficient Charge Warning Feature>When the watch becomes insufficiently charged, thewatch switches to the time mode regardless of whichmode is displayed at that time, and the second handbegins to move at 2-second intervals to indicate that thewatch is insufficiently charged. • Although the watch continues to run normally at this
time, the watch ends up stopping if it remainsinsufficiently charged for about 3 days. Sufficiently charge the watch by exposing tolight so that the second hand returns to 1-second interval movement. Continue tocharge the watch even after the second hand returns to 1-second interval movement toensure that the watch can be used comfortably. There no need to worry aboutovercharging since it is equipped with an over charge prevention feature.
• Although the watch will begin to run when light is allowed to shine on the solar cellafter it has stopped as a result of being insufficiently charged, since the time isincorrect, reset the watch to the correct time after sufficiently charging.
Notes:• Alarm time and ON/OFF status continued to be stored in memory. However, the
alarm tone will not sound even if the alarm is set (ON). • The set time (time difference) is retained in memory for the local time.
38 39
• Crown (mode switching) and button operations will not function. • The time (including alarm and local time) and date cannot be corrected.
<Over Charge Prevention Feature>When the secondary battery becomes fully charged as result of light shining into thewatch dial (solar cell), the over charge prevention feature is activated automatically toprevent the battery from being charged further. This prevents the performance of thesolar cell and secondary battery from deteriorating no matter how much the watch ischarged, and lets you expose the watch to light without worrying about overcharging.
<Power Save Feature>When power is no longer generated as a result of lightnot shining continuously for 30 minutes or more on thesolar cell during the time or local time mode, the secondhand moves to the 0 seconds position and stops and thepower save feature is activated to reduce currentconsumption. • The 24 hour hand, hour hand and minute hand continue
to keep the correct time even when the watch is in thepower save mode.
2 seconds
2 seconds

40 41
• The calendar is corrected in coordination with the 24 hour hand, hour hand andminute hand.
• When the watch has been sufficiently charged and power generation resumes, thesecond hand rapidly advances to the current seconds and begins 1-second intervalmovement.
• The second hand begins 2-second interval movement if the watch is insufficientlycharged (insufficient charge warning feature). Allow light to shine on the solar cell tofully charge the watch.
11. General Reference for Charging TimesRecharging time varies according to the watch model (such as the color of the dial).The times in the table below should therefore only be used as a rough reference.
* Charging time refers to the amount of time during which the watch is continuouslyexposed to light.
Illuminance(lx)
500
Environment
Inside an ordinary office
Charging time
4 hours 100 hours
Charging time from thestopped state to normalhand movement (1-secondinterval movement)
Full charge time
-----
1.000 Under a fluorescent lamp (30 W) ata distance of 60-70 cm (24-28 in) 2 hours 45 hours -----
3.000 Under a fluorescent lamp (30 W)at a distance of 20 cm (8 in) 40 minutes 13 hours 150 hours
10.000 Outdoors, cloudy 11 minutes 4.5 hours 45 hours
100.000 Outdoors, summer and sunnyunder direct sunlight 2 minutes 1 hour 8 hours
One day usage
Full charge time: Time to fully recharge the watch after it has stopped.One day usage: Time required for recharging the watch to run for 1 day with normal hand
movement (1-second interval movement).

42 43
Note:• The watch will continue to operate for about 7 months without additional charging
once it has been fully charged. It will continue to keep time for about 1.5 years whenthe Power Save feature has been activated. However, once the watch has stopped as aresult of being insufficiently charged, a considerable amount of time is required untilit starts to run again as indicated in the table above. It is therefore recommended tocharge your watch everyday. Furthermore, it is recommended to charge your watchby exposing to direct sunlight once a month.
12. Solar-Powered Watch Handling Precautions<Try to keep the watch charged at all times.>Please note that if you frequently wear long sleeves, the watch can easily becomeinsufficiently charged because of being hidden and not exposed to light. • When you take the watch off, try to place in as bright a location as possible so that it
will always be charged and continue to run properly at all times.
CAUTION Charging Precautions• Avoid charging the watch at high temperatures (about 60°C/140°F or higher) since
allowing the watch to reach a high temperature during charging can causedeformation or discoloration of the dial, solar cell and other external components aswell as a malfunction of mechanical components. Examples: Charging by placing the watch too close to a light source that may
become hot such as an incandescent lamp or halogen lamp, or chargingby placing the watch on an automobile dashboard that can easily reach ahigh temperature.
• When charging the watch with an incandescent lamp, halogen lamp or other lightsource that may reach a high temperature, always make sure to place the watch atleast 50 cm (20 in) away from the light source to prevent the watch from reaching ahigh temperature.

44 45
13. Replacing the Secondary BatteryUnlike ordinary silver-based batteries, the secondary battery used in this watch does nothave to be periodically replaced since it is able to be charged and dischargedrepeatedly.
WARNING Handling of Secondary Battery• Never attempt to remove the secondary battery from the watch. If the secondary
battery must unavoidably be removed, store it out of the reach of small children toprevent accidental swallowing.
• If the secondary battery should happen to be swallowed, consult a physicianimmediately and seek medical attention.
WARNING Only Use the Specified Secondary Battery• Never use a secondary battery other than the genuine secondary battery used in this
watch. Even if another type of secondary battery is installed in the watch, the watchstructure does not permit its operation. In cases in which a different secondary batterysuch as a silver battery is forcibly installed in the watch and charged, overchargingmay occur that will eventually cause the secondary battery to rupture. This can resultin the risk of the watch being damaged or injury to the wearer. When the secondarybattery is replaced, always make sure to use the specified secondary battery.

46 47
14. All-ResetThis watch may not function properly as a result of being subjected to the effects ofstatic electricity, strong impact and so forth. When this happens, perform the All-Resetand Reference Position Alignment procedures described below. When performing theall-reset procedure, first make sure the watch is sufficiently charged and the secondhand is moving at 1-second intervals. If the all-reset procedure is performed when thewatch is insufficiently charged, it may not function properly or remain stoppedfollowing the all-reset procedure.
[All-Reset Procedure]1. Pull the crown out to Position 1 (the
second hand rapidly advances to the30 seconds position and waits).
2. Turn the crown to align the modehand to the local time mode [L-TM].
3. Pull the crown out to Position 2(local time setting position).
• The second hand rapidly moves to the current time and begins 1-second intervalmovement.
4. Press buttons (A) and (B) simultaneously. • Following a confirmation tone, each hand performs a demonstration movement.
5. This completes the all-reset procedure. Next, perform the reference positionalignment procedure for each hand and the calendar by referring to “4. HandReference Position Check and Correction”. Furthermore, if performing the reference position alignment procedure afterperforming the all-reset procedure, perform steps 6 through 10 of the “ReferencePosition Correction” described in “4. Hand Reference Position Check andCorrection”.
6. After having aligned the reference position, correctly reset the time, date and othermodes before using the watch.
Button (B)
(2) Local timesetting position
(0) Normal position
Button (A)

48 49
NO
OK
OK
NO
NO
OK
NO
NO
NO
NO
NO
NO
Moderate exposure to water (washing, kitchen work, swimming, etc.)
Marine sports (skin diving)
Scuba diving (with air tank)
Examples of use
For correct use within the design limits of the watch, confirm the level of water-resistance of your watch, as indicated on the dial and case, and consult the table.
OK
OK
OK
Minor exposure to water(washing face, rain, etc.)
Indication
WATER RESIST or no indication
WATER RESIST(ANT)
Water-resistant to 3 atmospheres
WR 50 or WATERRESIST 50
WATER RESIST(ANT) 5 bar orWATER RESIST(ANT)
Water-resistant to 5 atmospheres
WR 100/200 or WATER RESIST
100/200
WATER RESIST(ANT)10bar/20 bar or
WATER RESIST(ANT)
Water-resistant to 10/20 atmospheres
Dial Case (case back)
Specifications
15. Precautions CAUTION: Water-resistance performance There are several types of water-resistant watches, as shownin the following table.
The unit "bar" is roughly equal to 1 atmosphere.* WATER RESIST(ANT) xx bar may also be indicated as
W.R. xx bar.
Operation of the crown or button
with moisture visible

50 51
• Water-resistance for daily use (to 3 atmospheres): This type of watch is water-resistant to minor exposure to water. For example, you may wear the watch whilewashing your face; however, it is not designed for use underwater.
• Upgraded water-resistance for daily use (to 5 atmospheres): This type of watch iswater-resistant to moderate exposure to water. You may wear the watch whileswimming; however, it is not designed for use while skin diving.
• Upgraded water-resistance for daily use (to 10/20 atmospheres): This type of watchmay be used for skin diving; however, it is not designed for scuba or saturated divingusing helium gas.
CAUTION • Be sure to use the watch with the crown pressed in (normal position). If your watch
has a screw-lock type crown, be sure to tighten the crown completely. • Do NOT operate the crown or button with wet fingers or when the watch is wet.
Water may enter the watch and compromise water-resistance. • If the watch is used in seawater, rinse with fresh water afterward and wipe with a dry
cloth. • If moisture has entered the watch, or if the inside of the crystal is fogged up and does
not become clear within a day, immediately take the watch to your dealer or CitizenService Center for repair. Leaving the watch in such a state will allow corrosion toform inside.
• If seawater enters the watch, place the watch in a box or plastic bag and immediatelytake it in for repair. Otherwise, pressure inside the watch will increase, and parts(crystal, crown, buttons, etc.) may come off.
CAUTION: Keep your watch clean. • Leaving dust and dirt deposited between the case and crown may result in difficulty in
pulling the crown out. Rotate the crown while in its normal position, from time totime, to loosen dust and dirt and then brush it off.
• Dust and dirt tend to be deposited in gaps in the back of the case or band. Deposited dust and dirt may cause corrosion and soil your clothing. Clean the watchoccasionally.
Cleaning the Watch • Use a soft cloth to wipe off dirt, perspiration and water from the case and crystal . • Use a soft, dry cloth to wipe off perspiration and dirt from the leather band. • To clean a metal, plastic, or rubber watchband, wash away dirt with mild soap and
water. Use a soft brush to remove dust and dirt jammed in the gaps in the metal band.If your watch is not water-resistant, take it to your dealer.
NOTE: Avoid using solvents (thinner, benzine, etc.), as they may mar the finish.

52 53
CAUTION: Operating environment • Use the watch within the operating-temperature range specified in the instruction
manual. Using the watch where temperatures are outside the specified range, may result indeterioration of functions or even stoppage of the watch.
• Do NOT use the watch in places where it is exposed to high temperature, such as in asauna. Doing so may result in a skin burn.
• Do NOT leave the watch in a place where it is exposed to high temperature, such asthe glove compartment or dash-board of a car. Doing so may result in deterioration of the watch, such as deformation of plastic parts.
• Do NOT place the watch close to a magnet. Timekeeping will become inaccurate if you place the watch close to magnetic healthequipment such as a magnetic necklace or a magnetic latch of a refrigerator door orhandbag clasp or the earphone of a mobile phone. If this has occurred, move thewatch away from the magnet and reset the time.
• Do NOT place the watch close to household appliances that generate static electricity. Timekeeping may become inaccurate if the watch is exposed to strong staticelectricity, such as is emitted from a TV screen.
• Do NOT subject the watch to a strong shock such as dropping it onto a hard floor.
• Avoid using the watch in an environment where it may be exposed to chemicals orcorrosive gases. If solvents, such as thinner and benzine, or substances containing such solvents comein contact with the watch, discoloration, melting, cracking, etc. may result. If thewatch comes in contact with mercury used in thermometers, the case, band or otherparts may become discolored.
Periodical inspectionsYour watch needs inspection once in every two or three years for safety and long use.To keep your watch water-resistant, the packing needs to be replaced regularly.Other parts need to be inspected and replaced if necessary.Ask for Citizen geuine parts upon replacement.

54 55
16. Specifications1. Model: E87*2. Type: Analog solar-powered watch3. Timekeeping accuracy: Within ±15 seconds per month on average (when worn at
normal temperatures of +5°C to +35°C/41°F to 95°F) 4. Operating temperature range: -10°C to +60°C/14°F to 140°F5. Display functions:
• Time: 24 hour display, hours, minutes, seconds• Date: Date display by a date wheel (with continuous advance function)
Month display by second handDay display by function handYear display by function hand (elapsed years from leapyear)/display only while button (B) is pressed in the calendarmode)
6. Additional functions:• Perpetual calendar (elapsed years from leap year, month, date and day
are switched automatically until February 28, 2100 (including leapyears))
• Power save feature• Insufficient charge warning feature• Over charge prevention feature• Daily alarm (24 hour clock, alarm monitor, alarm ON/OFF)• Local time (time different correction: 1 hour units)
7. Continuous Operating Times• Time until watch stops without charging after being fully charged:
: Approx. 1.5 years (with the power save feature operatingcontinuously)
: Approx. 7 months (when the power save feature is notoperating)
• Insufficient charge warning display (2-second interval movement) tostopped: Approx. 3 days
8. Battery: Secondary battery, 1
* Specifications are subject to change without notice.