Embed Size (px)
Citation preview
AP Commerce Inc.
Container Management
Table of Contents
Installation & Setup ............................................................................................................... 2
Setup the Container Management App.............................................................................. 2
Modify the Container Management Setup ......................................................................... 6
Setup the Container Management Subscription ................................................................ 7
Subscription .......................................................................................................................... 8
Create subscription by credit card payment....................................................................... 9
Create subscription manually .......................................................................................... 14
Cancel the subscription if using card payment ................................................................. 15
User Scenarios .................................................................................................................... 18
Receive container ............................................................................................................ 18
Post & Batch Post ............................................................................................................ 21
Posted Container ............................................................................................................. 24
Appendix ............................................................................................................................. 27
Appendix A: How to create purchase order. .................................................................... 27

Installation & Setup
The Container Management app is installed per company. To enable and
initialize the app, use the Assisted Setup Wizard.
Setup the Container Management App
1. Choose the icon that opens the Tell Me feature, enter “User” and
click on the related link to open the Users list.
2. On the Users list, click on the user that will perform the Container
Management setup and open the User Card page.
3. On the User Card page, go to the User Permission Sets tab, add the
Container Management permission set for this user.
4. Go back to the Home Page, click the Setup & Extensions dropdown
menu.
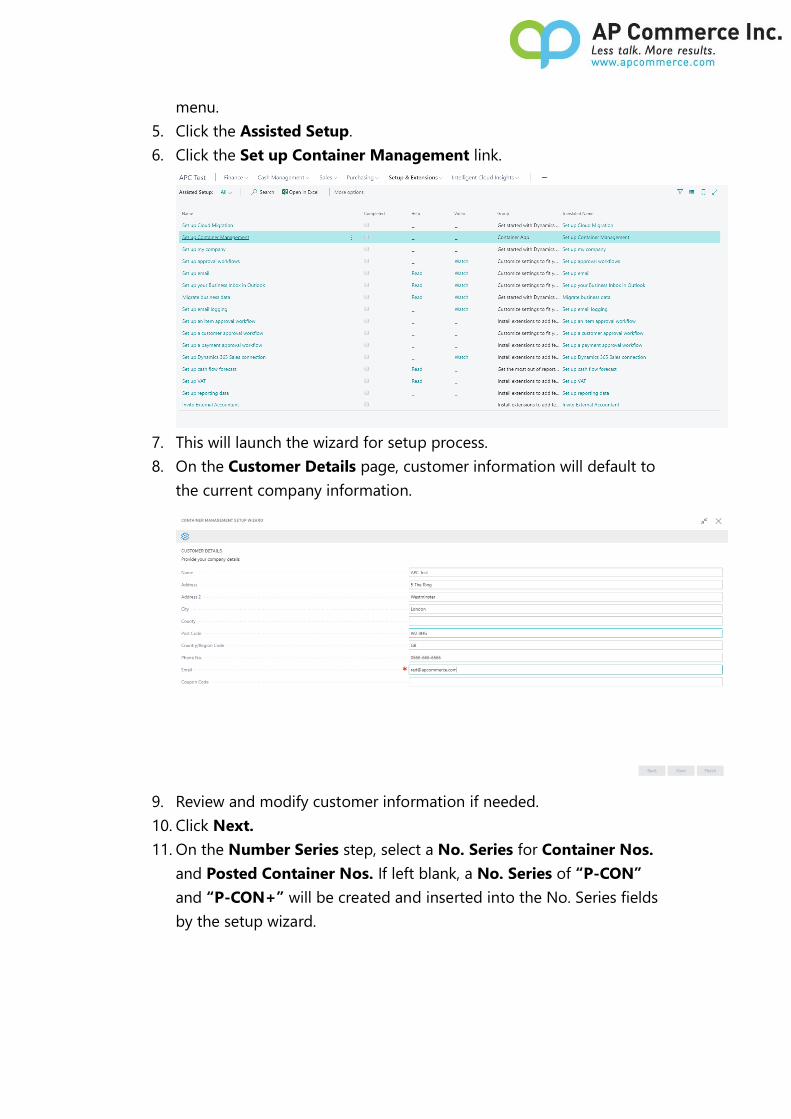
5. Click the Assisted Setup.
6. Click the Set up Container Management link.
7. This will launch the wizard for setup process.
8. On the Customer Details page, customer information will default to
the current company information.
9. Review and modify customer information if needed.
10. Click Next.
11. On the Number Series step, select a No. Series for Container Nos.
and Posted Container Nos. If left blank, a No. Series of “P-CON”
and “P-CON+” will be created and inserted into the No. Series fields
by the setup wizard.
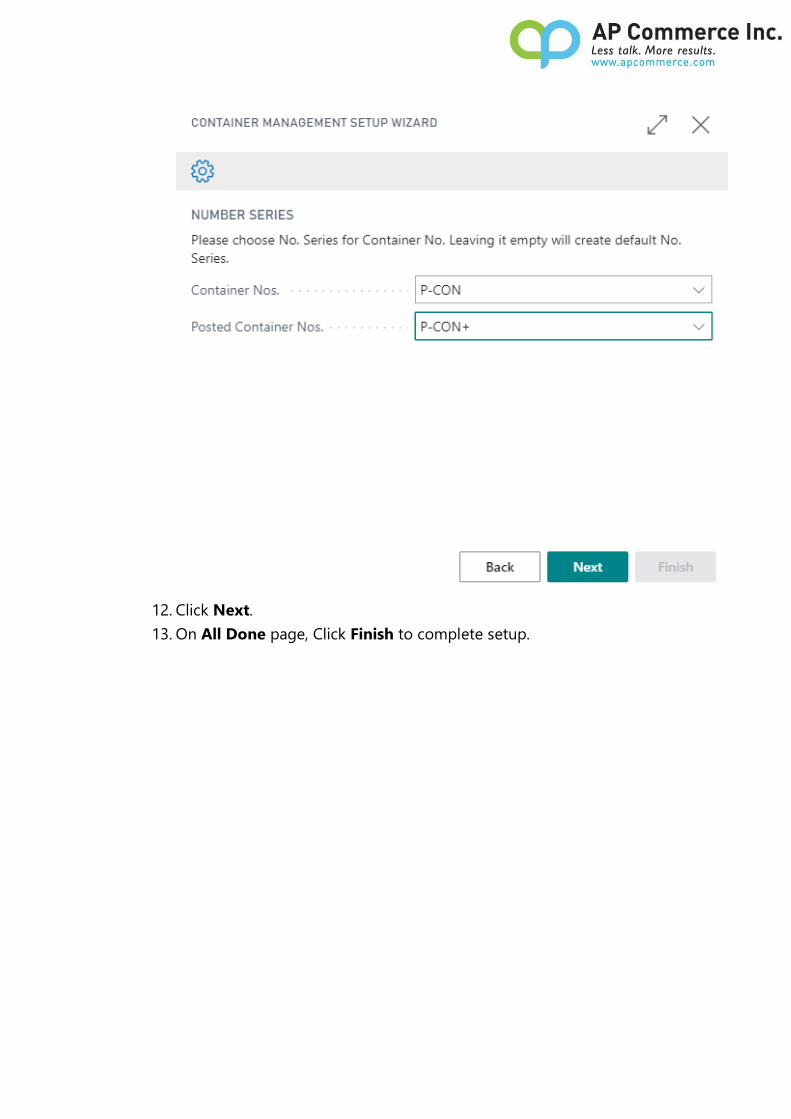
12. Click Next.
13. On All Done page, Click Finish to complete setup.

14. After setup wizard is closed, a confirmation window will pop up to
connect to the external service Stripe.com for subscription
synchronization. Please choose Allow Always and then click OK.

Modify the Container Management Setup
1. Choose the icon that opens the Tell Me feature, enter “container
setup”. Select the Container Management Setup link to open the
setup page.
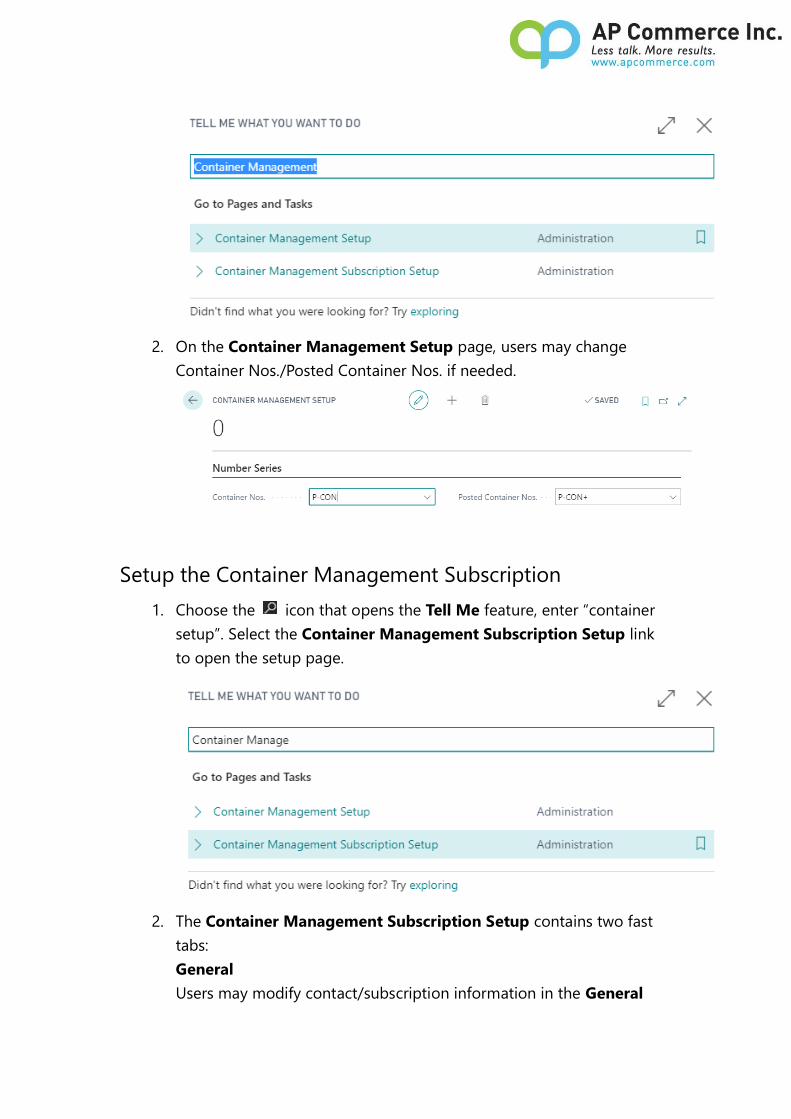
2. On the Container Management Setup page, users may change
Container Nos./Posted Container Nos. if needed.
Setup the Container Management Subscription
1. Choose the icon that opens the Tell Me feature, enter “container
setup”. Select the Container Management Subscription Setup link
to open the setup page.
2. The Container Management Subscription Setup contains two fast
tabs:
General
Users may modify contact/subscription information in the General
tab.
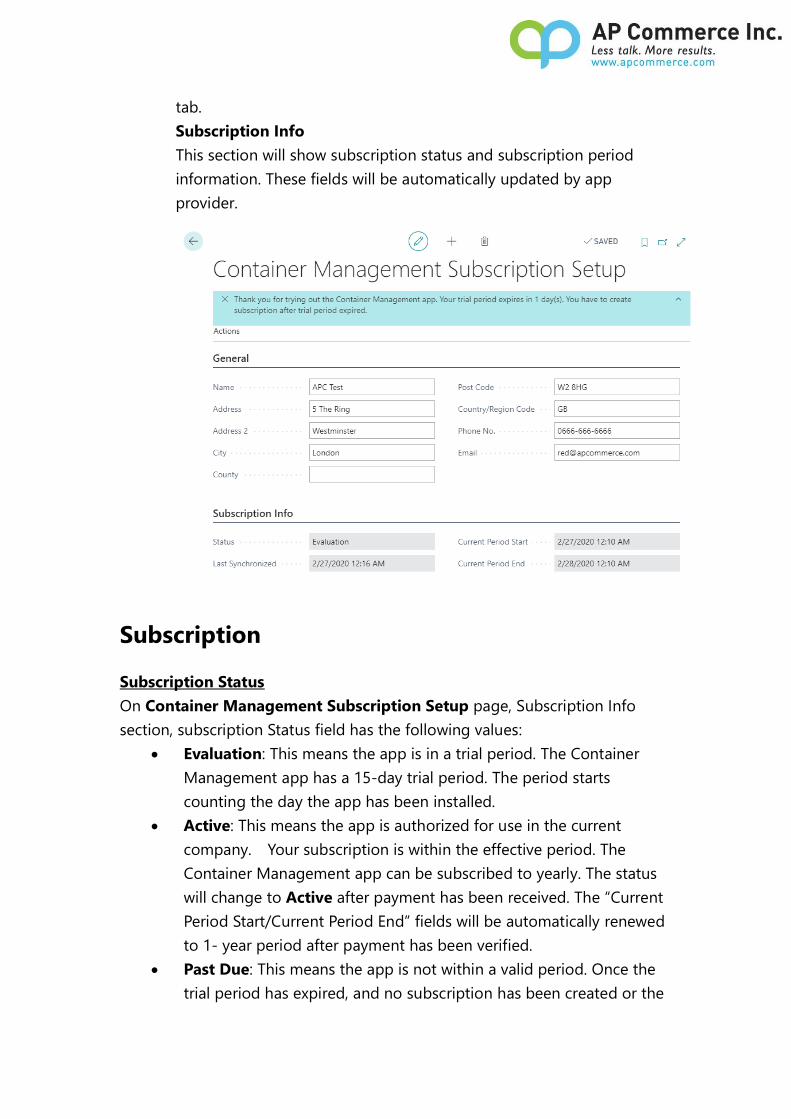
Subscription Info
This section will show subscription status and subscription period
information. These fields will be automatically updated by app
provider.
Subscription
Subscription Status
On Container Management Subscription Setup page, Subscription Info
section, subscription Status field has the following values:
Evaluation: This means the app is in a trial period. The Container
Management app has a 15-day trial period. The period starts
counting the day the app has been installed.
Active: This means the app is authorized for use in the current
company. Your subscription is within the effective period. The
Container Management app can be subscribed to yearly. The status
will change to Active after payment has been received. The “Current
Period Start/Current Period End” fields will be automatically renewed
to 1- year period after payment has been verified.
Past Due: This means the app is not within a valid period. Once the
trial period has expired, and no subscription has been created or the
payment has failed after processing, the app function will be blocked,
and the Status value will be changed to Past Due.
Canceled: This means the app was subscribed using card payment,
but the subscription has been canceled manually by the users. The
Status value will be changed to Canceled at the end of the current
effective period. Users can create a subscription again per the above
instructions on how to use the app.
Unpaid: This means the payment renewal has failed. The app
function will be blocked, and the Status will change to Unpaid.
Blocked: When new companies are created through copy company
function, the Container Management app will be automatically
installed, and Status will be set to Blocked. Users must run Set up
Container Management from Assisted Setup to register the current
company as a new customer before starting use.
When the trial period has ended, Status will be changed from Evaluation to
Active temporarily for users to process their payment. If the payment has not
been made within a couple of hours, then the Status will be changed to Past
Due.
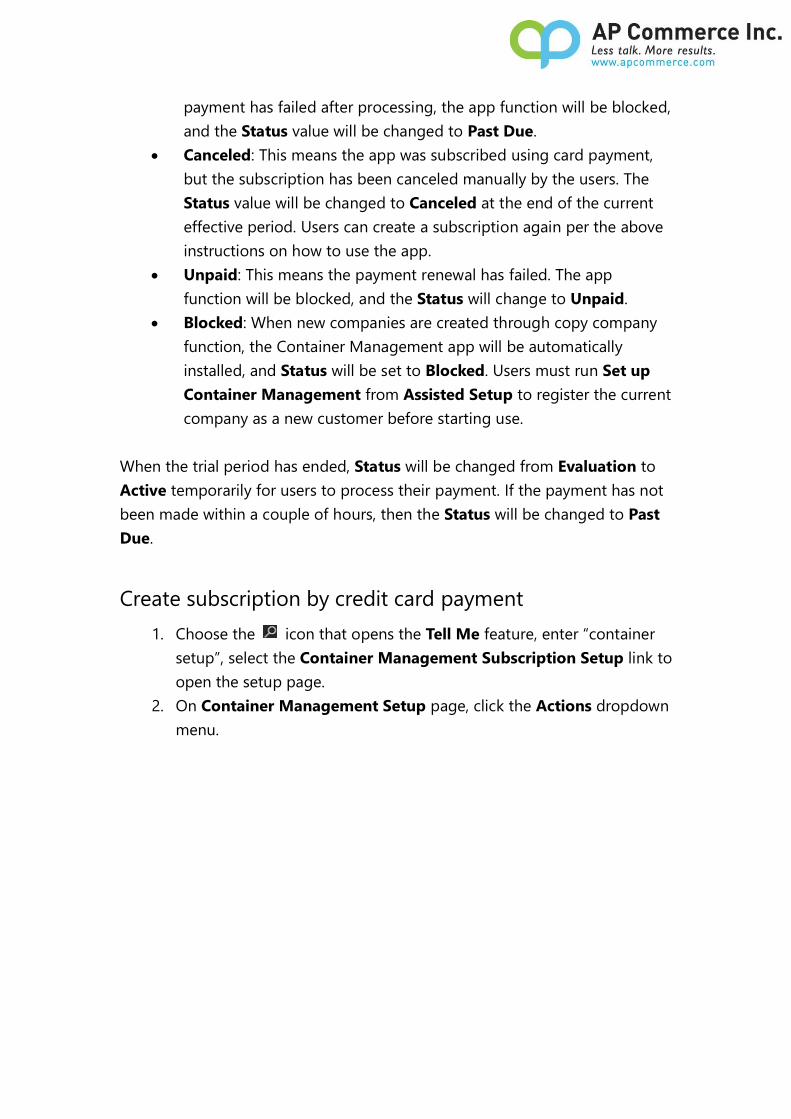
Create subscription by credit card payment
1. Choose the icon that opens the Tell Me feature, enter “container
setup”, select the Container Management Subscription Setup link to
open the setup page.
2. On Container Management Setup page, click the Actions dropdown
menu.

3. Click Create Subscription to launch the wizard for this process.
4. The wizard will automatically import the data from the Company
Information. You can modify or confirm the payment information, and
then click Next.
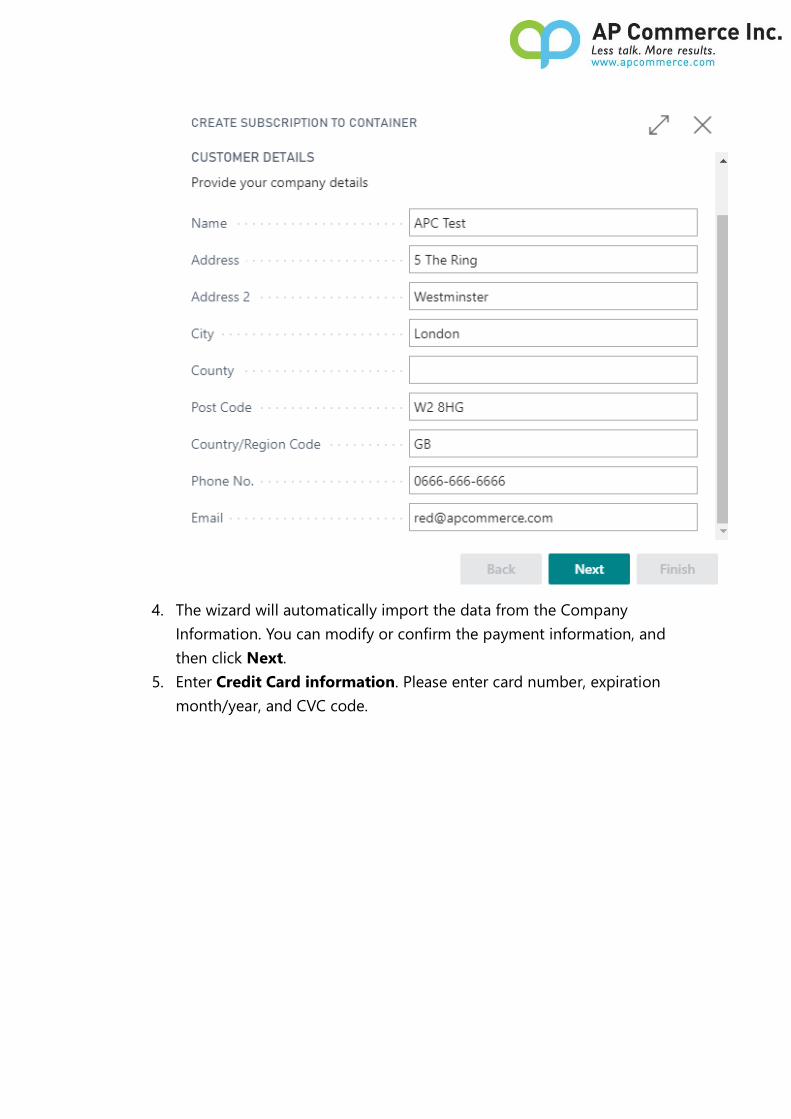
5. Enter Credit Card information. Please enter card number, expiration
month/year, and CVC code.
6. Click Next.
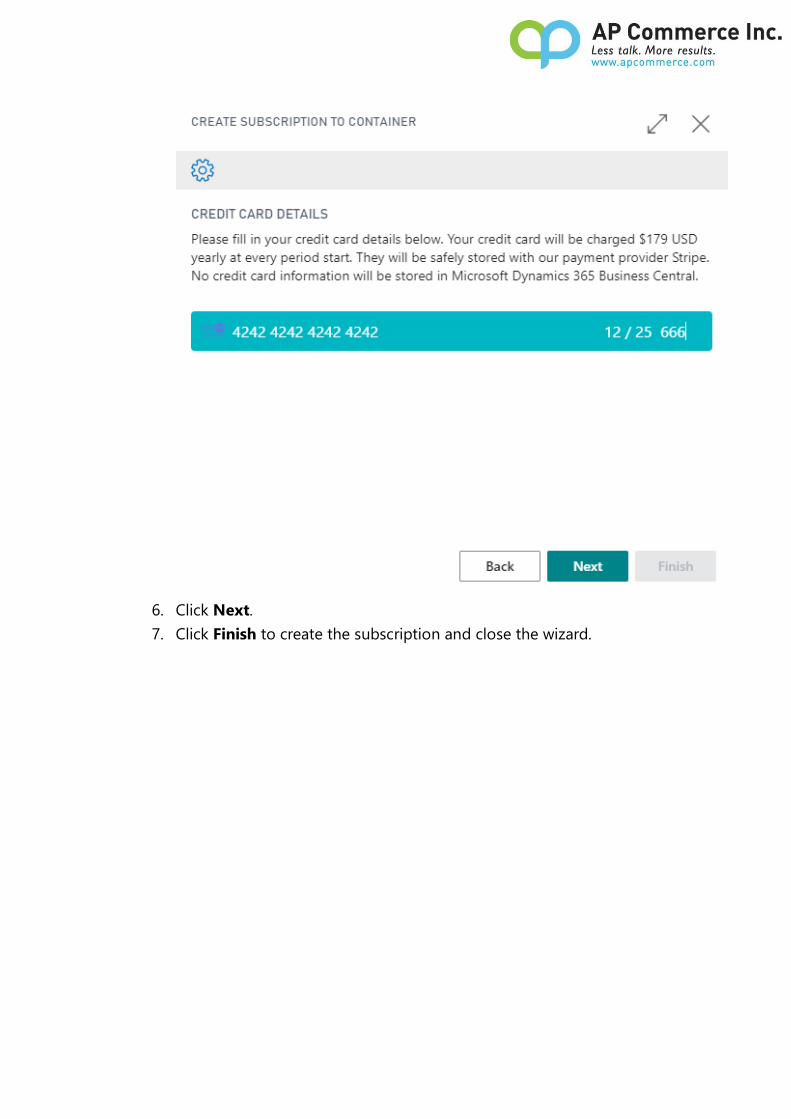
7. Click Finish to create the subscription and close the wizard.
8. The Container Management Subscription Setup page will be
updated with the renewed subscription message. The subscription
status will automatically update when current period ends.

Create subscription manually
1. On Container Management Subscription Setup page, click the
Action dropdown menu.
2. Click Create Subscription Manually.
3. A new page will be open with browser that links to
http://www.apcommerce.com/contact-us/. Please enter contact
information and app name in the “Write a Message” text box then
clicks Submit. After processing has been completed, the applicant will
receive an invoice through e-mail from AP Commerce Inc.
4. After payment has been remitted on the invoice, the subscription will
be automatically activated, and the Status on the Container
Management Subscription Setup page will be changed into Active.
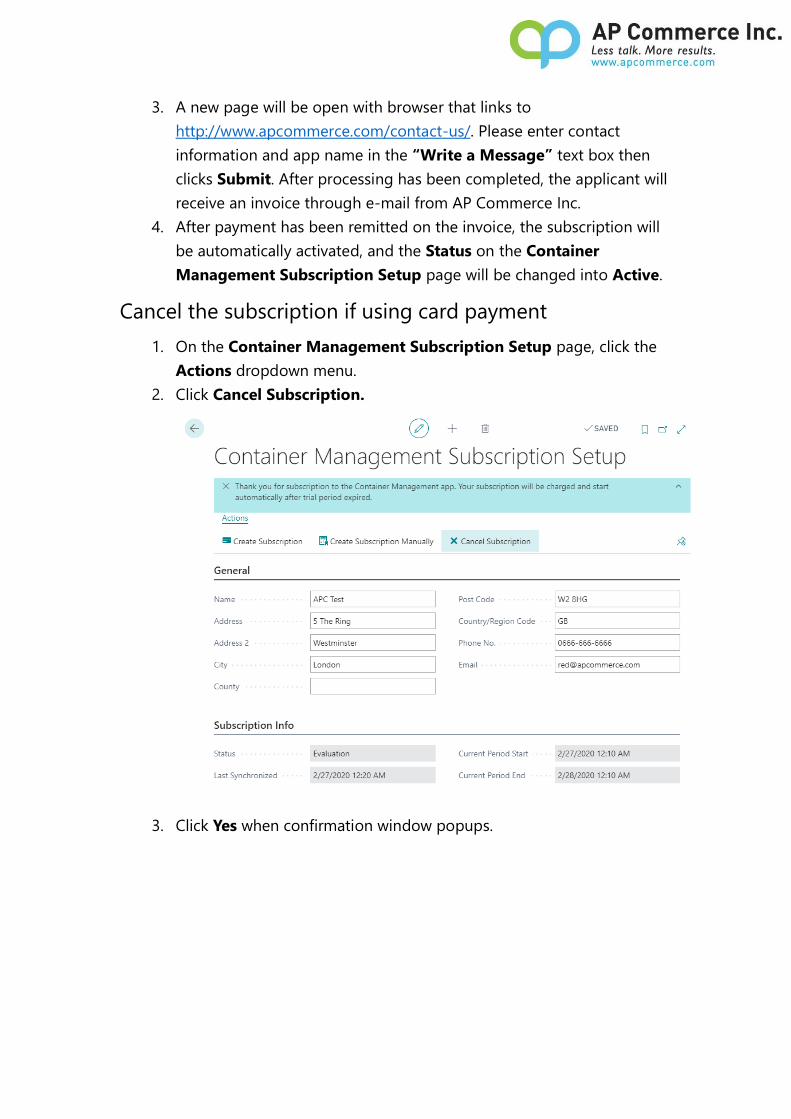
Cancel the subscription if using card payment
1. On the Container Management Subscription Setup page, click the
Actions dropdown menu.
2. Click Cancel Subscription.
3. Click Yes when confirmation window popups.
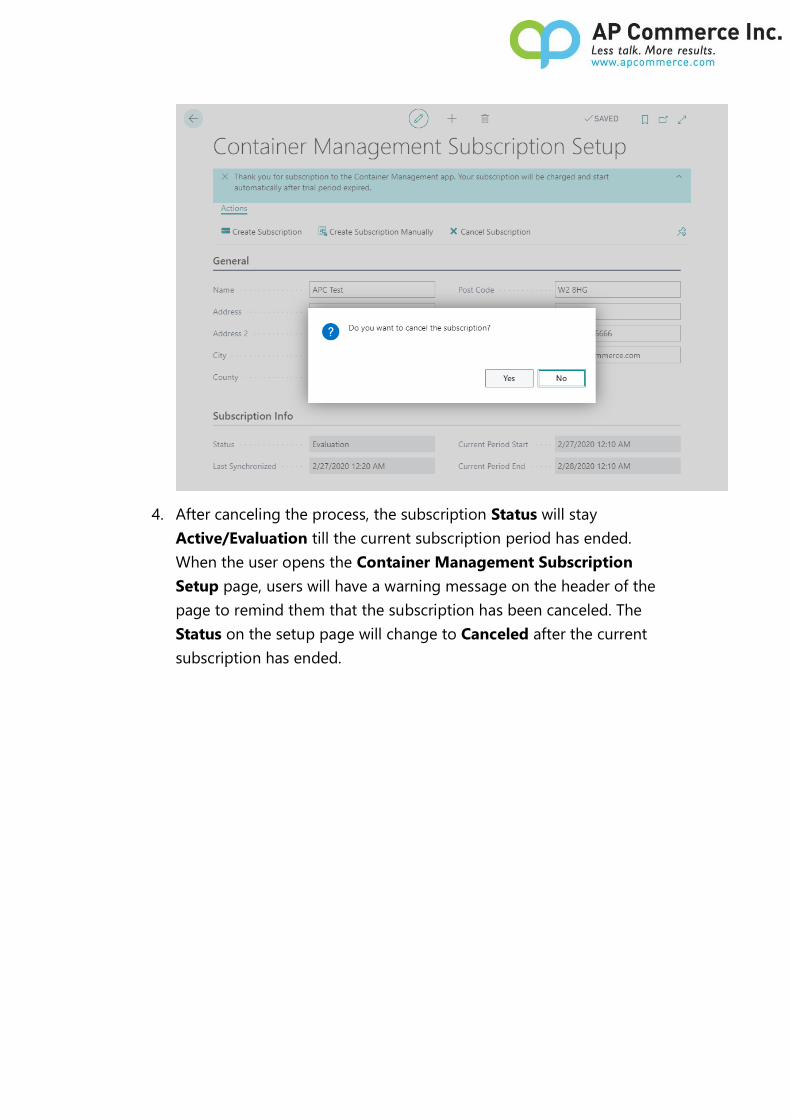
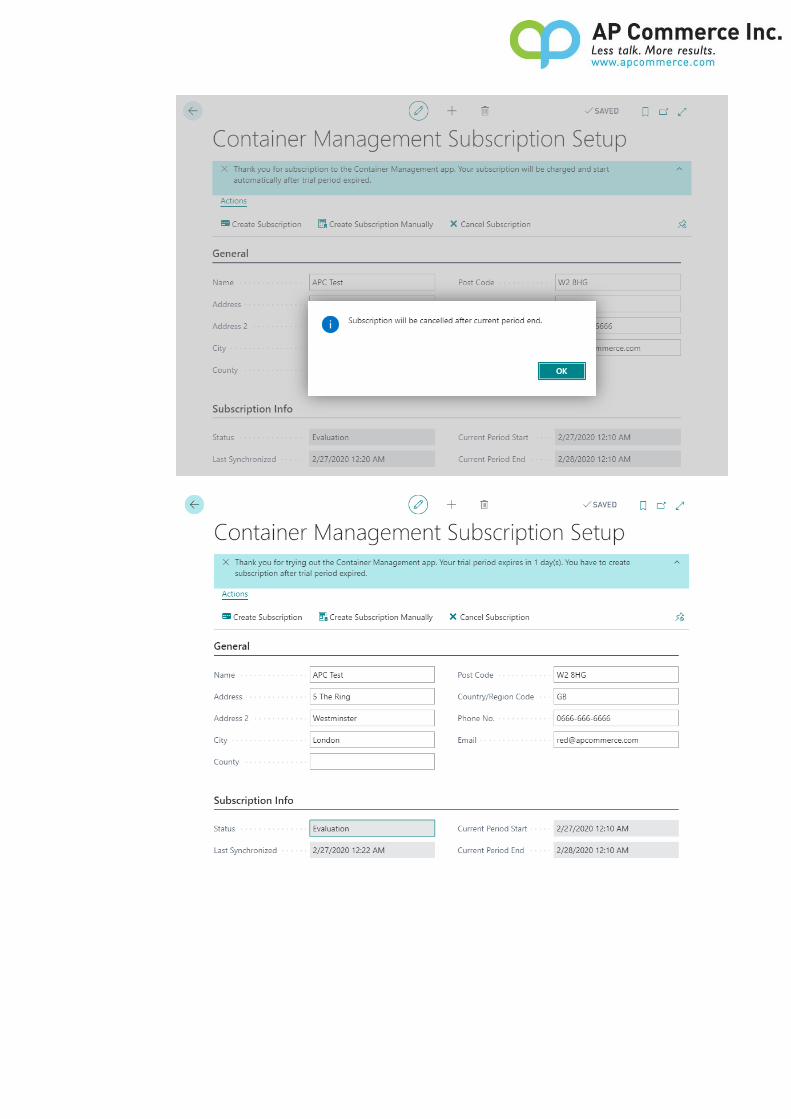
4. After canceling the process, the subscription Status will stay
Active/Evaluation till the current subscription period has ended.
When the user opens the Container Management Subscription
Setup page, users will have a warning message on the header of the
page to remind them that the subscription has been canceled. The
Status on the setup page will change to Canceled after the current
subscription has ended.
User Scenarios
Vendors may ship multiple orders within a container, and the same item might
be included in more than one orders. To management receiving items for
above scenario, user needs to open each purchase order separately to
complete receiving process, which is time consuming and ineffectiveness.
This app is built to help Business Central users managing container
information and receiving items for multiple orders in one worksheet.
※Appendix A is the instruction about “How to create purchase order”.
Below are the key functions for this app:
Receive container
1. Choose the icon that opens the Tell Me feature, enter “container”,
and then choose the Containers link to open the container list page.
2. Click New to create a container document.
3. The Container card page contains two fast tabs:
General
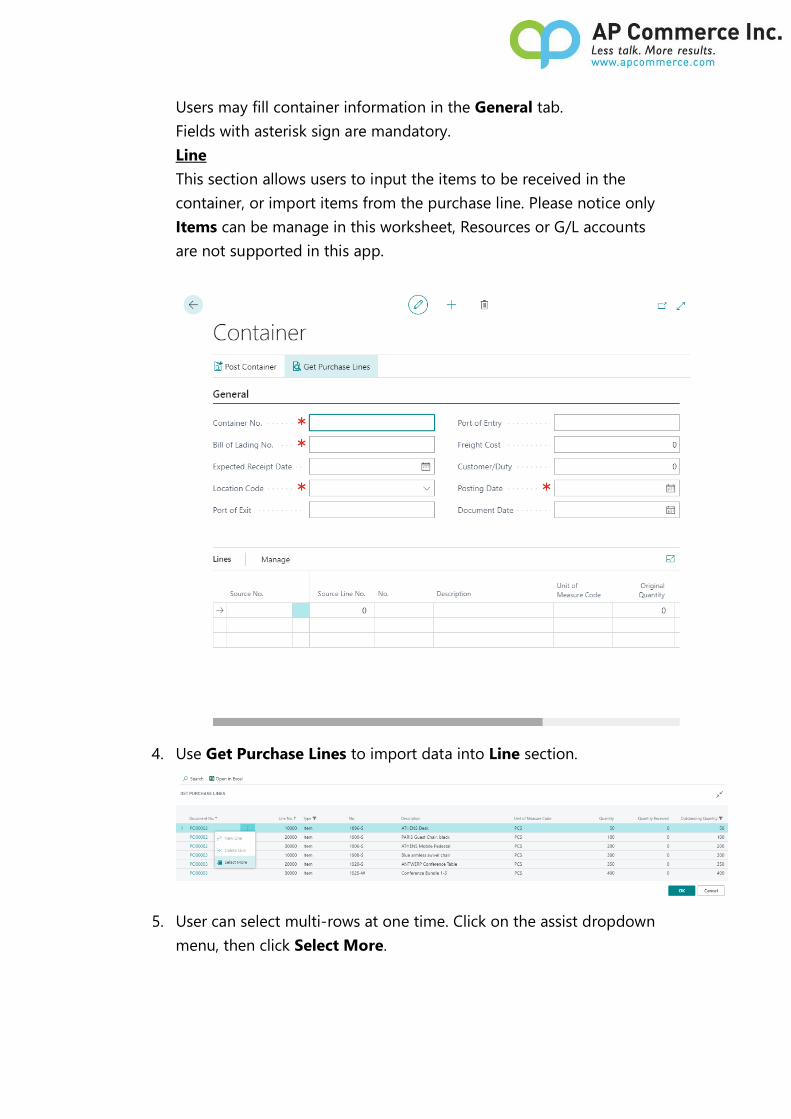
Users may fill container information in the General tab.
Fields with asterisk sign are mandatory.
Line
This section allows users to input the items to be received in the
container, or import items from the purchase line. Please notice only
Items can be manage in this worksheet, Resources or G/L accounts
are not supported in this app.
4. Use Get Purchase Lines to import data into Line section.
5. User can select multi-rows at one time. Click on the assist dropdown
menu, then click Select More.

6. Click OK.
7. Click Manage dropdown menu on the line section, then click View
Document to navigate the source purchase order.
8. On the line section, the “Original Quantity” will display the quantity on
the purchase order. Users can do Partial receive or Over receive by
entering less or more quantity on the “Qty. to Receive” fields.

Post & Batch Post
Post Single Container Document
Post container will update Qty. to Receive on the purchase order lines and
post receipt simultaneously.
Users can use the button “Post Container” on the container card page and
container list page to execute posting.
Post partial receive
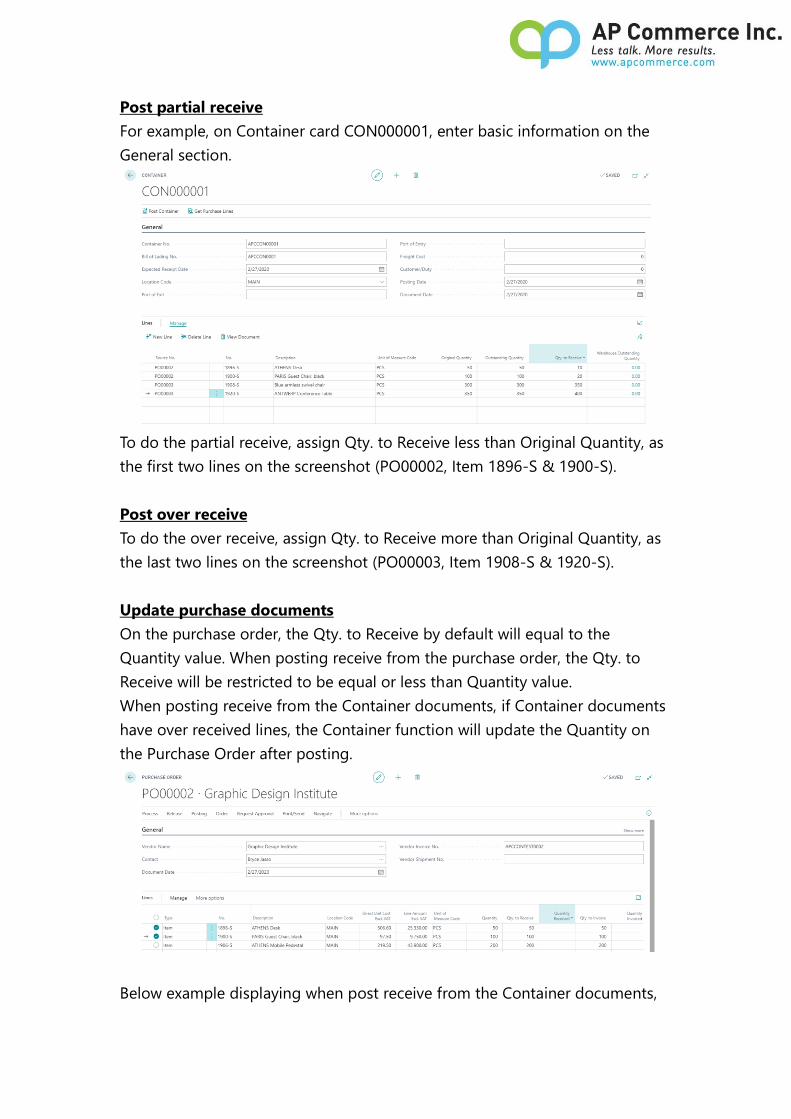
For example, on Container card CON000001, enter basic information on the
General section.
To do the partial receive, assign Qty. to Receive less than Original Quantity, as
the first two lines on the screenshot (PO00002, Item 1896-S & 1900-S).
Post over receive
To do the over receive, assign Qty. to Receive more than Original Quantity, as
the last two lines on the screenshot (PO00003, Item 1908-S & 1920-S).
Update purchase documents
On the purchase order, the Qty. to Receive by default will equal to the
Quantity value. When posting receive from the purchase order, the Qty. to
Receive will be restricted to be equal or less than Quantity value.
When posting receive from the Container documents, if Container documents
have over received lines, the Container function will update the Quantity on
the Purchase Order after posting.
Below example displaying when post receive from the Container documents,

the Quantity Received on the Purchase Orders will be updated to be
consistent with the Received Qty. in the Posted Container Lines.
Take below example, Item 1908-S on purchase order PO00003 has Quantity
equals 300, after posting container CON000001, the Quantity changed from
300 to 350. On the same purchase order, Item 1920-S has changed from 350
to 400.
PO00003 has Qty. to Receive = 300 for Item 1908-S and Qty. to Receive = 350
for Item 1920-S.
Post Received Qty. = 350 for Item 1908-S and Received Qty. = 400 for Item
1920-S on the Container document.
The Item 1908-S on PO00003 has been updated with Quantity & Quantity
Received = 350. The Item 1920-S has been updated with Quantity & Quantity
Received = 400.
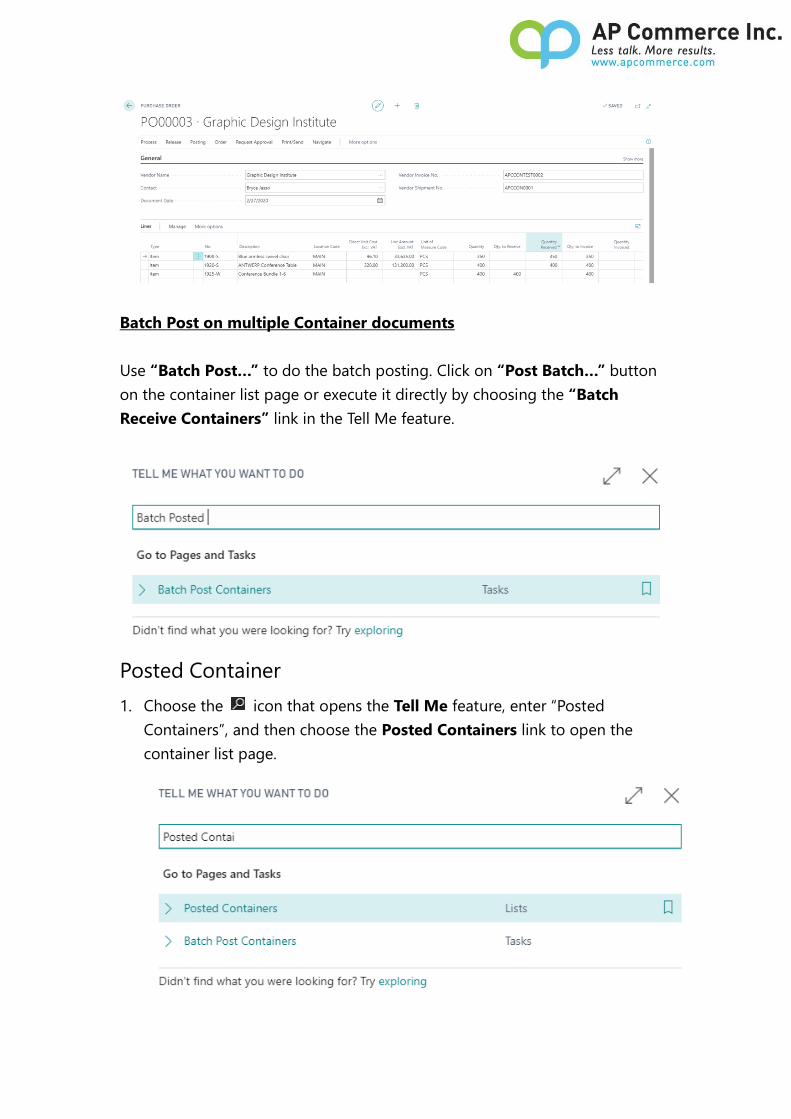
Batch Post on multiple Container documents
Use “Batch Post…” to do the batch posting. Click on “Post Batch…” button
on the container list page or execute it directly by choosing the “Batch
Receive Containers” link in the Tell Me feature.
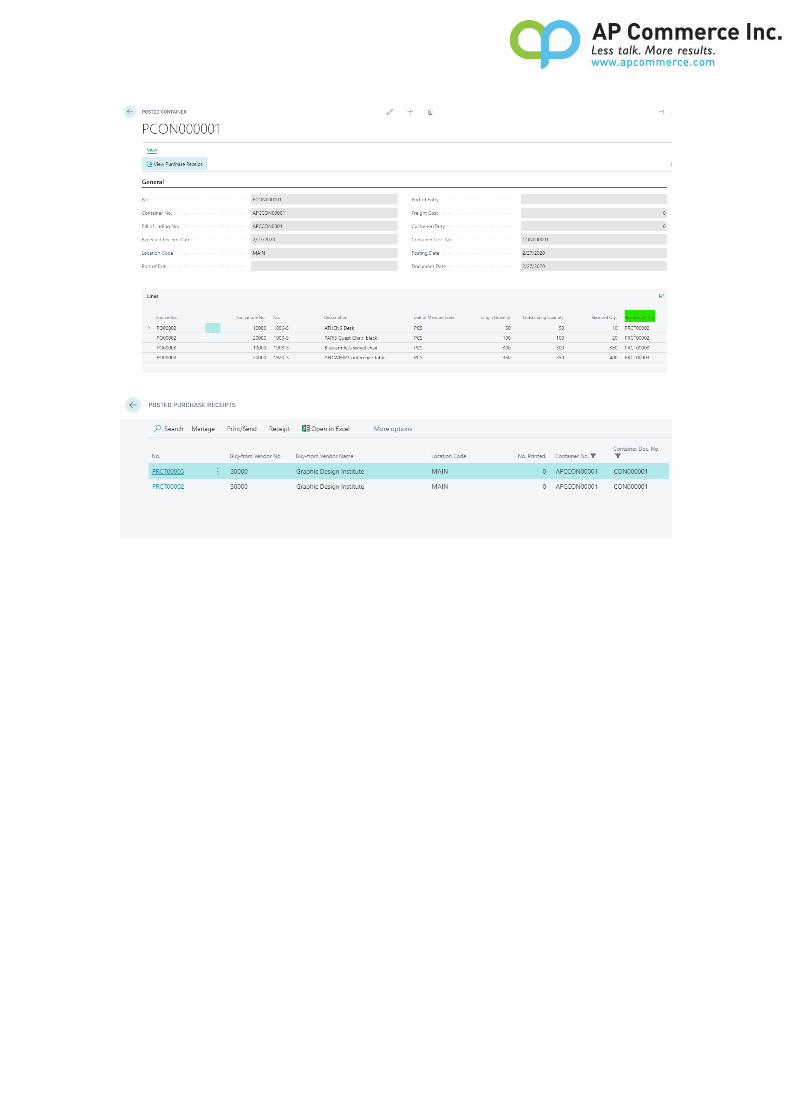
Posted Container
1. Choose the icon that opens the Tell Me feature, enter “Posted
Containers”, and then choose the Posted Containers link to open the
container list page.

2. Select a Posted Container Number.
3.Press “View Purchase Receipts” on the List/Card page to open related
“Posted Purchase Receipts”.

Appendix
Appendix A: How to create purchase order.
Choose the icon that opens the Tell Me feature, enter “Purchase Orders”,
and then choose the Purchase Orders link to open the purchase order list
page.
Click “New” on the list page tool bar, to create new order.
Make sure the fields with start sign be filled properly.

Since the function is use to receive the items from the container.
In purchase line, select “Item” from the type option values.
Also, make sure the field wit start sign be filled properly.


![Index [query.prod.cms.rt.microsoft.com]](https://img.pdfslide.us/doc/110x75/61cb0858cb9cbb72bc1df4f8/index-queryprodcmsrt-.jpg)