Embed Size (px)
Citation preview

Document Number: 338934-001
Container Bare Metal for 2nd Generation Intel® Xeon® Scalable Processor Reference Architecture April 2019

Container Bare Metal for 2nd Generation Intel® Xeon® Scalable Processor Reference Architecture April 2019 2 Document Number: 338934-001
You may not use or facilitate the use of this document in connection with any infringement or other legal analysis concerning Intel products described herein. You agree to grant Intel a non-exclusive, royalty-free license to any patent claim thereafter drafted which includes subject matter disclosed herein.
No license (express or implied, by estoppel or otherwise) to any intellectual property rights is granted by this document.
All information provided here is subject to change without notice. Contact your Intel representative to obtain the latest Intel product specifications and roadmaps.
The products described may contain design defects or errors known as errata which may cause the product to deviate from published specifications. Current characterized errata are available on request.
Copies of documents which have an order number and are referenced in this document may be obtained by calling 1-800-548-4725 or by visiting: http://www.intel.com/design/literature.htm
Intel technologies’ features and benefits depend on system configuration and may require enabled hardware, software or service activation. Learn more at http://www.intel.com/ or from the OEM or retailer.
No computer system can be absolutely secure.
Intel, Xeon, and the Intel logo are trademarks of Intel Corporation in the U.S. and/or other countries.
* Other names and brands may be claimed as the property of others.
Copyright © 2019, Intel Corporation. All rights reserved.

Container Bare Metal for 2nd Generation Intel® Xeon® Scalable Processor April 2019 Reference Architecture Document Number: 338934-001 3
Contents 1.0 Introduction ........................................................................................................................... 6
1.1 Terminology .................................................................................................................................................... 8 1.1.1 Reference documents ............................................................................................................ 9
2.0 Physical topology............................................................................................................. 10
3.0 Hardware BOM .................................................................................................................. 11
4.0 Software BOM .................................................................................................................... 12 4.1 Platform BIOS settings ......................................................................................................................... 13
5.0 System prerequisites .................................................................................................... 14 5.1 Master and minion BIOS prerequisites ...................................................................................... 14 5.2 Master and minion nodes network interface requirements ........................................ 14 5.3 Modify kernel boot parameters in minion nodes ................................................................ 14 5.4 Create SR-IOV virtual functions ..................................................................................................... 15 5.5 Ansible Host, master, and minion software prerequisites ........................................... 15
6.0 Deploy Kubernetes HA cluster ................................................................................. 17 6.1 Deploy a HA cluster using Kubespray ........................................................................................ 17 6.2 Deploy Node Feature Discovery (NFD) ..................................................................................... 18 6.3 Deploy CPU Manager for Kubernetes ......................................................................................... 22 6.4 Intel Device Plugins for Kubernetes ............................................................................................ 24
6.4.1 SR-IOV network device plugin ..................................................................................... 24 6.5 Deploy Advanced Networking Features .................................................................................... 26
6.5.1 Multus CNI plugin .................................................................................................................. 26 6.5.2 SR-IOV CNI plugin ................................................................................................................ 26 6.5.3 Userspace CNI plugin .......................................................................................................... 27
7.0 Use cases .............................................................................................................................. 30 7.1 Use NFD to select the node to deploy the pod .................................................................... 30 7.2 Pod using SR-IOV ..................................................................................................................................... 30
7.2.1 Pod using SR-IOV DPDK ................................................................................................... 31 7.2.2 Pod using SR-IOV CNI plugin ........................................................................................ 32
7.3 Pod using Userspace CNI plugin .................................................................................................... 35 7.3.1 Pod using Userspace CNI with OVS-DPDK ........................................................... 35
7.4 Pod using CPU Pinning and Isolation in Kubernetes ........................................................ 41
8.0 Conclusion............................................................................................................................ 43

Container Bare Metal for 2nd Generation Intel® Xeon® Scalable Processor Reference Architecture April 2019 4 Document Number: 338934-001
Figures
Figure 1. Reference architecture topology ...................................................................................................... 10 Figure 2. Features detected by NFD .................................................................................................................... 19
Tables
Table 1. Terminology ...................................................................................................................................................... 8 Table 2. Reference documents ................................................................................................................................. 9 Table 3. Hardware BOM ............................................................................................................................................. 11 Table 4. Software BOM ............................................................................................................................................... 12 Table 5. Platform BIOS settings ........................................................................................................................... 13 Table 6. Supported configuration parameters ............................................................................................ 25

Container Bare Metal for 2nd Generation Intel® Xeon® Scalable Processor April 2019 Reference Architecture Document Number: 338934-001 5
Revision History
Date Revision Description
April 2019 001 Initial release.
Introduction
Container Bare Metal for 2nd Generation Intel® Xeon® Scalable Processor Reference Architecture April 2019 6 Document Number: 338934-001
1.0 Introduction
The goal of this guide is to help developers adopt and use Enhanced Platform Awareness (EPA), advanced networking technologies, and device plugin features in a container bare metal reference architecture. This version of the paper has been updated to include coverage for the 2nd generation Intel® Xeon® Scalable processors (formerly codenamed Cascade Lake). The container reference architecture represents a baseline configuration of components that are combined to achieve optimal system performance for applications running in a container-based environment.
This document is part of the Network Transformation Experience Kit, which is available at: https://networkbuilders.intel.com/
Containers are one of the hottest technologies in cloud computing and fundamental to Cloud Native adoption. Moreso than the virtual machine, a container is lightweight, agile and portable. It can be quickly created, updated, and removed. Kubernetes* is the leading open source system for automating deployment, scaling, and management of containerized applications. To enhance Kubernetes for network functions virtualization (NFV) and networking usage, Intel and its partners are developing the following:
• Enhanced Platform Awareness suite of capabilities and methodologies that exposes Intel® Architecture platform features for increased and deterministic application and network performance.
• Networking features in Kubernetes including Multus, a plugin that provides multiple network interfaces within a Kubernetes container, SR-IOV CNI plugin, and Userspace CNI plugin to improve data throughput.
• Device plugin features in Kubernetes including GPU, FPGA, Intel® QuickAssist Technology, and SR-IOV device plugins to boost performance and platform efficiency.
Enhanced Platform Awareness (EPA) for Kubernetes represents a methodology and a related suite of changes across multiple layers of the orchestration stack targeting intelligent platform capability, configuration, and capacity consumption. Specifically, EPA underpins the three-fold objective of discovery, scheduling, and isolation of server hardware capabilities. Intel and partners have worked together to progress this strategy further through the following technologies:
• Node Feature Discovery (NFD) enables generic hardware capability discovery in Kubernetes, including Intel® Xeon® processor-based hardware.
• CPU Manager for Kubernetes provides a mechanism for CPU core pinning and isolation of containerized workloads.

Introduction
Container Bare Metal for 2nd Generation Intel® Xeon® Scalable Processor April 2019 Reference Architecture Document Number: 338934-001 7
• Huge page support, added to Kubernetes v1.8, enables the discovery, scheduling and allocation of huge pages as a native first-class resource. This support addresses low latency and deterministic memory access requirements.
• SR-IOV provides I/O virtualization that makes a single PCIe device (typically a NIC) appear as many network devices in the Linux* kernel. In Kubernetes this results in network connections that can be separately managed and assigned to different pods.
One of the important parts in the Advanced Networking Features is Multus, which supports multiple network interfaces per pod to expand the networking capability of Kubernetes. Supporting multiple network interfaces is a key requirement for many virtual network functions (VNFs), as they require separation of control, management, and data planes. Multiple network interfaces are also used to support different protocols or software stacks and different tuning and configuration requirements. Advanced Networking Features also introduced the SR-IOV CNI plugin and Userspace CNI plugin to enable high performance networking for container-based applications. The SR-IOV CNI plugin allows a Kubernetes pod to be attached directly to a SR-IOV virtual function (VF) using the standard SR-IOV VF driver in the container host’s kernel. The Userspace CNI plugin was designed to implement userspace networking (as opposed to kernel space networking), like DPDK based applications. It can run with vSwitches such as OVS-DPDK or VPP and provides a high performance container networking solution through dataplane acceleration in NFV environments.
With the Kubernetes Device Plugin Framework, Intel provides several device plugins to free up CPU cycles and boost performance. It can deliver efficient acceleration of graphics, compute, data processing, security, and compression. These device plugins include:
• GPU device plugin: VNFs can take advantage of storing, streaming, and transcoding with the Intel GPU device plugin. Intel® Graphics Technology and Intel® Quick Sync Video Technology can accelerate graphics performance.
• FPGA device plugin: Scalable and programmable acceleration in a broad array of applications such as communications, data center, military, broadcast, automotive, and other end markets.
• Intel® QuickAssist Technology (Intel® QAT) device plugin: Directs crypto and data compression functionality to dedicated hardware, accelerating bulk crypto, public key encryption, and compression on Intel® architecture platforms.
• SR-IOV device plugin: supports DPDK VNFs that execute the VF driver and network protocol stack in userspace.

Introduction
Container Bare Metal for 2nd Generation Intel® Xeon® Scalable Processor Reference Architecture April 2019 8 Document Number: 338934-001
1.1 Terminology
Table 1. Terminology
Term Description
BIOS Basic Input/Output System
CNI Container Networking Interface
DHCP Dynamic Host Configuration Protocol
DPDK Data Plane Development Kit
HA High Availability
IA Intel® Architecture
Intel® HT Technology Intel® Hyper-Threading Technology
Intel® VT-d Intel® Virtualization Technology (Intel® VT) for Directed I/O
Intel® VT-x Intel® Virtualization Technology (Intel® VT) for IA-32, Intel® 64 and Intel® Architecture
K8s Kubernetes*
NFD Node Feature Discovery
NFV Network Functions Virtualization
OS Operating System
OVS DPDK Open vSwitch with DPDK
RA Reference Architecture
SA Service Assurance
SDN Software-Defined Networking
SHVS Standard High-Volume Servers
SOCKS Socket Secure
SR-IOV Single Root Input/Output Virtualization
VLAN Virtual LAN
VNF Virtual Network Function
VPP Vector Packet Processing
VXLAN Virtual Extensible LAN

Introduction
Container Bare Metal for 2nd Generation Intel® Xeon® Scalable Processor April 2019 Reference Architecture Document Number: 338934-001 9
1.1.1 Reference documents
Table 2. Reference documents
Title Location
Advanced Networking Features in Kubernetes and Container Bare Metal Application Note
https://builders.intel.com/docs/networkbuilders/adv-network-features-in-kubernetes-app-note.pdf
Node Feature Discovery Application Note
https://builders.intel.com/docs/networkbuilders/node-feature-discovery-application-note.pdf
CPU Pinning and Isolation in Kubernetes Application Note
https://builders.intel.com/docs/networkbuilders/cpu-pin-and-isolation-in-kubernetes-app-note.pdf
Intel Device Plugins for Kubernetes Application Note
https://builders.intel.com/docs/networkbuilders/intel-device-plugins-for-kubernetes-appnote.pdf

Physical topology
Container Bare Metal for 2nd Generation Intel® Xeon® Scalable Processor Reference Architecture April 2019 10 Document Number: 338934-001
2.0 Physical topology
Figure 1 shows the topology for the reference architecture described in this document.
Figure 1. Reference architecture topology
overlayeno1
Flannel Linux* bridge
NIC overlayeno1
NICVF0 VFn VF0 VFn
Intel® Xeon® Gold 5218N @2.3GHz / 16C/32T
Intel® Xeon® Gold 6252N @2.3 GHz, 24C/48T
enp24f0s0 enp240fs1
Arista* 25GbE Switch
Cisco* 1GbE Switch
CMK V1.3.0
NFDV0.3.0
eno1
Ansible 2.7.1
Ansible Host
Kubespray2.8.0
Internet
Jinjia 2.10
Docker* v18.06.1-ce
K8s master-1
CentOS* 7.6 build 1810, Kernel v3.10.0-957
CentOS* 7.6 build 1810, Kernel v3.10.0-957
Docker v18.06.1-ce
K8s minion-1
Kubernetes* v1.13
Flannel Linux bridge
Intel® Xeon® Gold 5218N @2.3GHz / 16C/32T
Docker v18.06.1-ce
K8s master-2
CentOS* 7.6 build 1810, Kernel v3.10.0-957
Kubernetes v1.13
Kubernetes v1.13
DPDK v17.05
POD: testPMD
POD:pktgen
OVS-DPDK/VPP
POD: vCMTS POD: vBNG
NIC NICVF0 VFn VF0 VFn
Intel® Xeon® Gold 6252N @2.3 GHz, 24C/48T
enp24f0s0 enp240fs1
CMK V1.3.0
NFDV0.3.0
CentOS* 7.6 build 1810, Kernel v3.10.0-957
Docker v18.06.1-ce
K8s minion-2
Kubernetes v1.13
DPDK v17.05
POD: testPMD
POD:pktgen
OVS-DPDK/VPP
POD: vCMTS POD: vBNG
SR-IOV Device Plug-In v2.0.0
SR-IOV Device Plug-In v2.0.0
overlayeno1
Flannel Linux bridge
Intel® Xeon® Gold 5218N @2.3GHz / 16C/32T
Docker v18.06.1-ce
K8s master-3
CentOS* 7.6 build 1810, Kernel v3.10.0-957
Kubernetes v1.13
overlayeno1
Flannel Linux* bridge
overlayeno1
Flannel Linux* bridge

Hardware BOM
Container Bare Metal for 2nd Generation Intel® Xeon® Scalable Processor April 2019 Reference Architecture Document Number: 338934-001 11
3.0 Hardware BOM
This section lists the hardware components and systems that were utilized in this reference architecture. 2nd Generation Intel® Xeon® Scalable processors feature a scalable, open architecture designed for the convergence of key workloads such as applications and services, control plane processing, high-performance packet processing, and signal processing.
Table 3. Hardware BOM
Item Description Notes
Platform Intel® Xeon® Processor Scalable Family Intel® Xeon® processor-based dual-processor server board 2 x 25 GbE integrated LAN ports
Processors
2x Intel® Xeon® Gold 5218N Processor 16 cores, 32 threads, 2.3 GHz, 105 W, 38.5 MB L3 total cache per processor, 3 UPI Links, DDR4-2666, 6 memory channels
2x Intel® Xeon® Gold 6230N Processor 20 cores, 40 threads, 2.0 GHz, 125 W, 27.5 MB L3 cache per processor, 3 UPI Links, DDR4-2666, 6 memory channels
2x Intel® Xeon® Gold 6252N Processor 24 cores, 48 threads, 2.3 GHz, 150 W, 22 MB L3 cache per processor, 3 UPI Links, DDR4-2666, 6 memory channels
Memory
192GB (12 x 16GB 2666MHz DDR RDIMM) or minimum all 6 memory channels populated (1 DPC) to achieve 384 GB
192GB to 384GB
Networking 2 x NICs - Required Each NIC NUMA aligned
2 x Dual Port 25GbE Intel® Ethernet Network Adapter XXV710 SFP28+
2 x Dual Port 10GbE Intel® Ethernet Converged Network Adapter X710
2 x Intel® Ethernet Server Adapter X520-DA2 SFP
Local Storage
2 x >=480GB Intel® SSD SATA or Equivalent Boot Drive. This is for the primary Boot / OS storage. These drives can be sourced by the PCH. These drives should be capable of use in a RAID1 configuration.
2 x Intel® NVMe P4510 Series 2.0TB each Drive recommended NUMA aligned - Required
BIOS Intel Corporation SE5C620.86 B.0D.01.0241 Release Date: 11/19/2018
Intel® Hyper-Threading Technology (Intel® HT Technology) enabled Intel® Virtualization Technology (Intel® VT-x) enabled Intel® Virtualization Technology for Directed I/O (Intel® VT-d) enabled
Switches Cisco* Catalyst 2960-XR Arista* DCS-7280QR-C36-R
Cisco 1GbE Switch Arista 25GbE Switch
Software BOM
Container Bare Metal for 2nd Generation Intel® Xeon® Scalable Processor Reference Architecture April 2019 12 Document Number: 338934-001
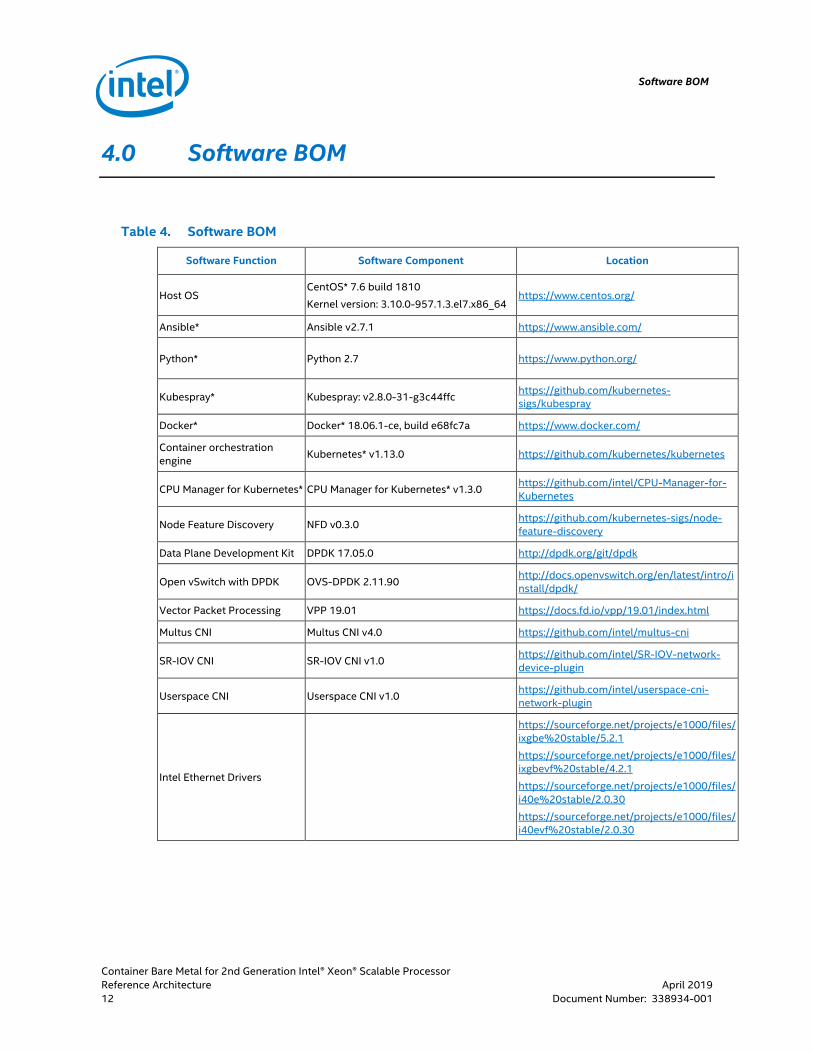
4.0 Software BOM
Table 4. Software BOM
Software Function Software Component Location
Host OS CentOS* 7.6 build 1810 Kernel version: 3.10.0-957.1.3.el7.x86_64
https://www.centos.org/
Ansible* Ansible v2.7.1 https://www.ansible.com/
Python* Python 2.7 https://www.python.org/
Kubespray* Kubespray: v2.8.0-31-g3c44ffc https://github.com/kubernetes-sigs/kubespray
Docker* Docker* 18.06.1-ce, build e68fc7a https://www.docker.com/
Container orchestration engine Kubernetes* v1.13.0 https://github.com/kubernetes/kubernetes
CPU Manager for Kubernetes* CPU Manager for Kubernetes* v1.3.0 https://github.com/intel/CPU-Manager-for-Kubernetes
Node Feature Discovery NFD v0.3.0 https://github.com/kubernetes-sigs/node-feature-discovery
Data Plane Development Kit DPDK 17.05.0 http://dpdk.org/git/dpdk
Open vSwitch with DPDK OVS-DPDK 2.11.90 http://docs.openvswitch.org/en/latest/intro/install/dpdk/
Vector Packet Processing VPP 19.01 https://docs.fd.io/vpp/19.01/index.html
Multus CNI Multus CNI v4.0 https://github.com/intel/multus-cni
SR-IOV CNI SR-IOV CNI v1.0 https://github.com/intel/SR-IOV-network-device-plugin
Userspace CNI Userspace CNI v1.0 https://github.com/intel/userspace-cni-network-plugin
Intel Ethernet Drivers
https://sourceforge.net/projects/e1000/files/ixgbe%20stable/5.2.1 https://sourceforge.net/projects/e1000/files/ixgbevf%20stable/4.2.1 https://sourceforge.net/projects/e1000/files/i40e%20stable/2.0.30 https://sourceforge.net/projects/e1000/files/i40evf%20stable/2.0.30

Software BOM
Container Bare Metal for 2nd Generation Intel® Xeon® Scalable Processor April 2019 Reference Architecture Document Number: 338934-001 13
4.1 Platform BIOS settings
Table 5. Platform BIOS settings
Menu (Advanced)
Path to BIOS Setting BIOS Setting
Settings for Deterministic Performance
Settings for Max Performance
with Turbo Mode Enabled
Required or Recommended
Power Configuration
CPU P State Control
EIST PSD Function HW_ALL SW_ALL Recommended
Boot Performance Mode Max. Performance Max. Performance Required
Energy Efficient Turbo Disable Disable Recommended
Turbo Mode Disable Enable Recommended
Intel® SpeedStep® (Pstates) Technology Disable Enable Recommended
Hardware PM State Control Hardware P-States Disable Disable Recommended
CPU C State Control
Autonomous Core C-State Disable Enable Recommended
CPU C6 Report Disable Disable Recommended
Enhanced Halt State (C1E) Disable Enable Recommended
Energy Perf Bias
Power Performance Tuning BIOS Controls EPB BIOS Controls EPB Recommended
ENERGY_PERF_BIAS_CFG Mode Perf Perf Recommended
Package C State Control Package C State C0/C1 State C6 Recommended
Intel® Ultra Path Interconnect (Intel® UPI) Configuration
Intel® UPI General Configuration
LINK L0P ENABLE Disable Disable Recommended
LINK L1 ENABLE Disable Disable Recommended
SNC Disable Disable Recommended
Memory Configuration
Enforce POR Disable Disable Recommended
IMC Interleaving 2-Way Interleave 2-Way Interleave Recommended
Volatile Memory Mode 2 LM mode 2 LM mode Required
Force 1-Ch Way in FM Disabled Disabled Required
Platform Configuration
Miscellaneous Configuration Serial Debug Message Level Minimum Minimum Recommended
PCI Express* Configuration PCIe* ASPM Support Per Port Per Port Recommended
Uncore Uncore Frequency Scaling Disable Disable Required
Note: To gather performance data required for conformance, use either column with deterministic performance or turbo mode enabled in this table. Some solutions may not provide the BIOS options that are documented in this table. For Intel® Select Solution, the BIOS should be set to the “Max Performance” profile with Virtualization.

System prerequisites
Container Bare Metal for 2nd Generation Intel® Xeon® Scalable Processor Reference Architecture April 2019 14 Document Number: 338934-001
5.0 System prerequisites
This section describes the minimal system prerequisites needed for the Ansible Host and master/minion nodes.
5.1 Master and minion BIOS prerequisites
Enter the BIOS menu and update the configuration as follows:
Package Ansible Host Master/Minion
Intel® VT-x Enabled Enabled
Intel® HT Technology Enabled Enabled
Intel® VT-d (SR-IOV) Enabled Enabled
5.2 Master and minion nodes network interface requirements
The following list provides a brief description of different networks and network interfaces used in the lab setup.
• Internet network − Ansible Host accessible − Capable of downloading packages from the internet − Can be configured for Dynamic Host Configuration Protocol (DHCP) or with
static IP address
• Management network and flannel pod network interface − Kubernetes master and minion nodes inter-node communications − Flannel pod network will run over this network − Configured to use a private static address
• Tenant data network(s) − Dedicated networks for traffic − SR-IOV enabled − VF can be DPDK bound in pod
5.3 Modify kernel boot parameters in minion nodes 1. Set up the boot parameters as follows:
− Use the isolcpus boot parameter to ensure exclusive cores in CPU Manager for Kubernetes are not affected by other system tasks.
− Add the isolcpus in grub file. − I/O Memory Management Unit (IOMMU) support is not enabled by default in
the CentOS* 7.0 distribution, however, IOMMU support is required for a VF to

System prerequisites
Container Bare Metal for 2nd Generation Intel® Xeon® Scalable Processor April 2019 Reference Architecture Document Number: 338934-001 15
function properly when assigned to a virtual environment, such as a VM or a container.
− Enable IOMMU support for Linux kernels. − Specify 1G hugepage size explicitly. (For hugepage sizes other than 2M, the size
must be specified explicitly. Optionally, it can be set as the default hugepage size for the system, as shown below.)
# cat /etc/default/grub GRUB_TIMEOUT=5 GRUB_DISTRIBUTOR="$(sed 's, release .*$,,g' /etc/system-release)" GRUB_DEFAULT=saved GRUB_DISABLE_SUBMENU=true GRUB_TERMINAL_OUTPUT="console" GRUB_CMDLINE_LINUX="crashkernel=auto rd.lvm.lv=centos/root rd.lvm.lv=centos/swap rhgb quiet intel_iommu=on iommu=pt default_hugepagesz=1G hugepagesz=1G hugepages=16 pci=realloc pci=assign-busses isolcpus=1,2,3,4,5,6,7,8,37,38,39,40,41,42,43,44" GRUB_DISABLE_RECOVERY="true"
2. Update grub configuration by using grub2-mkconfig: # grub2-mkconfig -o /boot/grub2/grub.cfg
3. Reboot the minion nodes.
5.4 Create SR-IOV virtual functions
SR-IOV virtual functions can be created by writing an appropriate value to the sriov_numvfs parameter via sysfs interface as shown in the example below. Note that you must use the appropriate SR-IOV PCI address to fit your environment.
# echo 4 > /sys/bus/pci/devices/0000\:02\:00.0/sriov_numvfs # echo 4 > /sys/bus/pci/devices/0000\:02\:00.1/sriov_numvfs
5.5 Ansible Host, master, and minion software prerequisites 1. Disable SELinux: # setenforce 0 # sed -i 's/^SELINUX=.*$/SELINUX=disabled/' /etc/selinux/config
2. Turn off the swap: # swapoff -a # sed -i '/^[^#].*[ \t]swap[ \t].*$/ s/^/#/' /etc/fstab
3. Set the firewall rules on all master nodes: # firewall-cmd --permanent --add-port=6443/tcp # firewall-cmd --permanent --add-port=2379-2380/tcp # firewall-cmd --permanent --add-port=10250/tcp # firewall-cmd --permanent --add-port=10251/tcp # firewall-cmd --permanent --add-port=10252/tcp # firewall-cmd --permanent --add-port=10255/tcp # firewall-cmd --reload # modprobe br_netfilter

System prerequisites
Container Bare Metal for 2nd Generation Intel® Xeon® Scalable Processor Reference Architecture April 2019 16 Document Number: 338934-001
# echo '1' > /proc/sys/net/bridge/bridge-nf-call-iptables # sysctl -w net.ipv4.ip_forward=1
4. Set the firewall rules on all minion nodes: # firewall-cmd --permanent --add-port=10250/tcp # firewall-cmd --permanent --add-port=10255/tcp # firewall-cmd --permanent --add-port=30000-32767/tcp # firewall-cmd --permanent --add-port=6783/tcp # firewall-cmd --reload # echo '1' > /proc/sys/net/bridge/bridge-nf-call-iptables # sysctl -w net.ipv4.ip_forward=1
5. Enter the following commands in Ansible Host: # sudo yum install epel-release # sudo yum install ansible # easy_install pip # pip2 install jinja2 –upgrade # sudo yum install python36 –y
6. Enable passwordless login between all nodes in the cluster.
Step 1: Create Authentication SSH-Kegen Keys on Ansible Host: # ssh-keygen
Step 2: Upload Generated Public Keys to all the nodes from Ansible Host: # ssh-copy-id root@node-ip-address

Deploy Kubernetes HA cluster
Container Bare Metal for 2nd Generation Intel® Xeon® Scalable Processor April 2019 Reference Architecture Document Number: 338934-001 17
6.0 Deploy Kubernetes HA cluster
This section describes the following tasks:
• Deploy a HA cluster using Kubespray
• Deploy Node Feature Discovery (NFD)
• Deploy CPU Manager for Kubernetes
• Intel Device Plugins for Kubernetes
• Deploy Advanced Networking Features
6.1 Deploy a HA cluster using Kubespray
Kubespray is a project under the Kubernetes community umbrella that helps deploy production-ready Kubernetes clusters easily. For details, refer to: https://kubespray.io
Follow the steps below to deploy a high availability (HA) cluster using Kubespray. 1. Get Kubespray and install all dependency packages in Ansible Host: # git clone https://github.com/kubernetes-incubator/kubespray.git # cd kubespray # sudo pip install -r requirements.txt
2. Copy inventory/sample as inventory/mycluster: # cp -r inventory/sample inventory/mycluster
3. Build hosts.ini using inventory_builder: # declare -a IPS=(ip of node1, ip of node2, ip of node3…………) # CONFIG_FILE=inventory/mycluster/hosts.ini python36 contrib/inventory_builder/inventory.py ${IPS[@]}
4. Edit the inventory/mycluster/hosts.ini to reflect the requirement. Here is the sample file.
[all] node1 ansible_host=10.250.250.161 ip=10.250.250.161 node2 ansible_host=10.250.250.162 ip=10.250.250.162 node3 ansible_host=10.250.250.163 ip=10.250.250.163 node4 ansible_host=10.250.250.166 ip=10.250.250.166 node5 ansible_host=10.250.250.167 ip=10.250.250.167 [kube-master] node1 node2 node3 [etcd] node1 node2 node3

Deploy Kubernetes HA cluster
Container Bare Metal for 2nd Generation Intel® Xeon® Scalable Processor Reference Architecture April 2019 18 Document Number: 338934-001
[kube-node] node5 [k8s-cluster:children] kube-master kube-node [calico-rr]
5. Add Multus feature in inventory/mycluster/group_vars/k8s-cluster.yml: # Choose network plugin (cilium, calico, contiv, weave or flannel) # Can also be set to 'cloud', which lets the cloud provider setup appropriate routing kube_network_plugin: flannel kube_network_plugin_multus: true
6. Deploy Kubespray with Ansible Playbook: # ansible-playbook -i inventory/mycluster/hosts.ini cluster.yml
7. Check the status of the cluster after the deployment is completed: # kubectl get nodes NAME STATUS ROLES AGE VERSION node1 Ready master 19d v1.13.0 node2 Ready master 19d v1.13.0 node3 Ready master 19d v1.13.0 node4 Ready node 19d v1.13.0 node5 Ready node 19d v1.13.0
6.2 Deploy Node Feature Discovery (NFD)
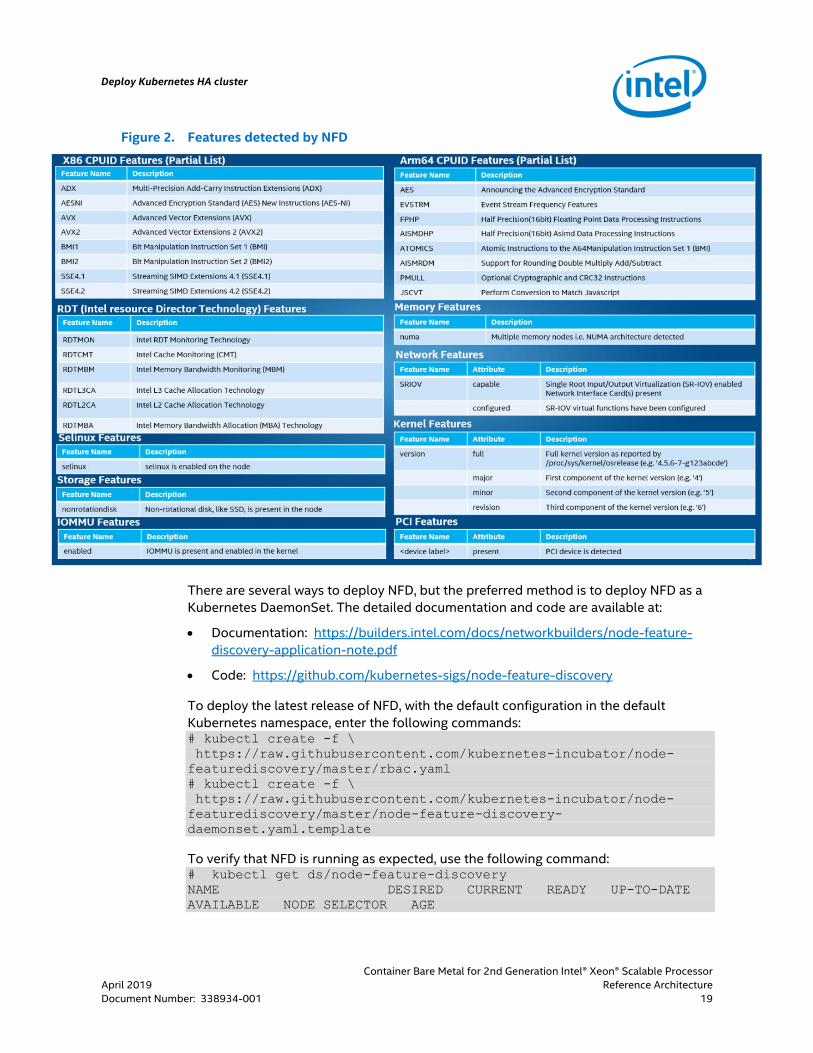
Node Feature Discovery (NFD) is a Kubernetes add-on that detects and advertises hardware and software capabilities of a platform that can, in turn, be used to facilitate intelligent scheduling of a workload. Node Feature Discovery is part of the Enhanced Platform Awareness (EPA) suite which represents a methodology and a set of changes in Kubernetes targeting intelligent configuration and capacity consumption of platform capabilities. NFD runs as a separate container on each individual node of the cluster, discovers capabilities of the node, and finally, publishes these as node labels using the Kubernetes API. NFD only handles non-allocatable features.
NFD currently detects the features shown in the following diagram.
Deploy Kubernetes HA cluster
Container Bare Metal for 2nd Generation Intel® Xeon® Scalable Processor April 2019 Reference Architecture Document Number: 338934-001 19
Figure 2. Features detected by NFD
There are several ways to deploy NFD, but the preferred method is to deploy NFD as a Kubernetes DaemonSet. The detailed documentation and code are available at:
• Documentation: https://builders.intel.com/docs/networkbuilders/node-feature-discovery-application-note.pdf
• Code: https://github.com/kubernetes-sigs/node-feature-discovery
To deploy the latest release of NFD, with the default configuration in the default Kubernetes namespace, enter the following commands: # kubectl create -f \ https://raw.githubusercontent.com/kubernetes-incubator/node-featurediscovery/master/rbac.yaml # kubectl create -f \ https://raw.githubusercontent.com/kubernetes-incubator/node-featurediscovery/master/node-feature-discovery-daemonset.yaml.template
To verify that NFD is running as expected, use the following command: # kubectl get ds/node-feature-discovery NAME DESIRED CURRENT READY UP-TO-DATE AVAILABLE NODE SELECTOR AGE

Deploy Kubernetes HA cluster
Container Bare Metal for 2nd Generation Intel® Xeon® Scalable Processor Reference Architecture April 2019 20 Document Number: 338934-001
node-feature-discovery 5 5 5 5 5 <none> 20d
To check the labels created by NFD: # kubectl label node --list --all Listing labels for Node./node1: node-role.kubernetes.io/master= node.alpha.kubernetes-incubator.io/nfd-cpuid-SSE2=true node.alpha.kubernetes-incubator.io/nfd-cpuid-AVX=true node.alpha.kubernetes-incubator.io/nfd-cpuid-MMXEXT=true node.alpha.kubernetes-incubator.io/nfd-cpuid-SSE=true node.alpha.kubernetes-incubator.io/nfd-cpuid-AVX2=true node.alpha.kubernetes-incubator.io/nfd-cpuid-AVX512F=true node.alpha.kubernetes-incubator.io/nfd-cpuid-RDTSCP=true node.alpha.kubernetes-incubator.io/nfd-cpuid-SSSE3=true node.alpha.kubernetes-incubator.io/nfd-cpuid-AVX512VL=true node.alpha.kubernetes-incubator.io/nfd-cpuid-SSE3=true beta.kubernetes.io/arch=amd64 node.alpha.kubernetes-incubator.io/nfd-cpuid-AESNI=true node.alpha.kubernetes-incubator.io/nfd-storage-nonrotationaldisk=true node.alpha.kubernetes-incubator.io/nfd-cpuid-AVX512DQ=true node.alpha.kubernetes-incubator.io/nfd-cpuid-AVX512BW=true node.alpha.kubernetes-incubator.io/nfd-cpuid-F16C=true node.alpha.kubernetes-incubator.io/nfd-cpuid-POPCNT=true node.alpha.kubernetes-incubator.io/nfd-cpuid-BMI1=true node.alpha.kubernetes-incubator.io/nfd-cpuid-ADX=true kubernetes.io/hostname=node1 node.alpha.kubernetes-incubator.io/nfd-cpuid-RDSEED=true node.alpha.kubernetes-incubator.io/nfd-cpuid-ERMS=true node.alpha.kubernetes-incubator.io/nfd-cpuid-MMX=true node.alpha.kubernetes-incubator.io/nfd-cpuid-HLE=true node.alpha.kubernetes-incubator.io/nfd-cpuid-SSE4.1=true node.alpha.kubernetes-incubator.io/nfd-cpuid-RTM=true node.alpha.kubernetes-incubator.io/nfd-cpuid-AVX512CD=true node.alpha.kubernetes-incubator.io/nfd-cpuid-CLMUL=true node.alpha.kubernetes-incubator.io/nfd-cpuid-NX=true beta.kubernetes.io/os=linux node.alpha.kubernetes-incubator.io/node-feature-discovery.version=v0.3.0 node.alpha.kubernetes-incubator.io/nfd-cpuid-CMOV=true node.alpha.kubernetes-incubator.io/nfd-cpuid-RDRAND=true node.alpha.kubernetes-incubator.io/nfd-cpuid-CX16=true node.alpha.kubernetes-incubator.io/nfd-cpuid-MPX=true node.alpha.kubernetes-incubator.io/nfd-cpuid-SSE4.2=true node.alpha.kubernetes-incubator.io/nfd-cpuid-BMI2=true node.alpha.kubernetes-incubator.io/nfd-cpuid-FMA3=true node.alpha.kubernetes-incubator.io/nfd-cpuid-LZCNT=true …………………………… Listing labels for Node./node5: node.alpha.kubernetes-incubator.io/nfd-cpuid-AVX512F=true node.alpha.kubernetes-incubator.io/nfd-cpuid-ADX=true node.alpha.kubernetes-incubator.io/nfd-iommu-enabled=true

Deploy Kubernetes HA cluster
Container Bare Metal for 2nd Generation Intel® Xeon® Scalable Processor April 2019 Reference Architecture Document Number: 338934-001 21
node.alpha.kubernetes-incubator.io/nfd-cpuid-LZCNT=true node.alpha.kubernetes-incubator.io/nfd-cpuid-MMXEXT=true node.alpha.kubernetes-incubator.io/nfd-cpuid-FMA3=true node.alpha.kubernetes-incubator.io/nfd-cpuid-AVX2=true node.alpha.kubernetes-incubator.io/nfd-cpuid-SSE=true node.alpha.kubernetes-incubator.io/nfd-cpuid-SSE4.1=true node.alpha.kubernetes-incubator.io/nfd-cpuid-RDTSCP=true node.alpha.kubernetes-incubator.io/nfd-cpuid-RDSEED=true beta.kubernetes.io/os=linux node-role.kubernetes.io/node= node.alpha.kubernetes-incubator.io/nfd-cpuid-RDRAND=true node.alpha.kubernetes-incubator.io/nfd-cpuid-AESNI=true node.alpha.kubernetes-incubator.io/nfd-cpuid-SSE3=true node.alpha.kubernetes-incubator.io/nfd-cpuid-CLMUL=true node.alpha.kubernetes-incubator.io/nfd-storage-nonrotationaldisk=true node.alpha.kubernetes-incubator.io/nfd-cpuid-CMOV=true node.alpha.kubernetes-incubator.io/nfd-cpuid-BMI1=true node.alpha.kubernetes-incubator.io/nfd-rdt-RDTMBM=true node.alpha.kubernetes-incubator.io/nfd-cpuid-NX=true node.alpha.kubernetes-incubator.io/nfd-pstate-turbo=true node.alpha.kubernetes-incubator.io/nfd-cpuid-MPX=true node.alpha.kubernetes-incubator.io/nfd-cpuid-SSE2=true node.alpha.kubernetes-incubator.io/nfd-cpuid-AVX=true node.alpha.kubernetes-incubator.io/nfd-rdt-RDTMBA=true node.alpha.kubernetes-incubator.io/nfd-rdt-RDTL3CA=true node.alpha.kubernetes-incubator.io/nfd-network-SR-IOV=true node.alpha.kubernetes-incubator.io/nfd-cpuid-ERMS=true node.alpha.kubernetes-incubator.io/nfd-network-SR-IOV-configured=true node.alpha.kubernetes-incubator.io/nfd-cpuid-AVX512DQ=true node.alpha.kubernetes-incubator.io/nfd-cpuid-RTM=true node.alpha.kubernetes-incubator.io/nfd-cpuid-SSE4.2=true node.alpha.kubernetes-incubator.io/nfd-rdt-RDTMON=true node.alpha.kubernetes-incubator.io/nfd-cpuid-AVX512BW=true kubernetes.io/hostname=node5 node.alpha.kubernetes-incubator.io/nfd-cpuid-HTT=true node.alpha.kubernetes-incubator.io/nfd-cpuid-MMX=true node.alpha.kubernetes-incubator.io/nfd-cpuid-POPCNT=true node.alpha.kubernetes-incubator.io/nfd-cpuid-HLE=true node.alpha.kubernetes-incubator.io/nfd-memory-numa=true beta.kubernetes.io/arch=amd64 node.alpha.kubernetes-incubator.io/nfd-cpuid-BMI2=true cmk.intel.com/cmk-node=true node.alpha.kubernetes-incubator.io/nfd-cpuid-F16C=true node.alpha.kubernetes-incubator.io/nfd-cpuid-SSSE3=true node.alpha.kubernetes-incubator.io/node-feature-discovery.version=v0.3.0 node.alpha.kubernetes-incubator.io/nfd-rdt-RDTCMT=true node.alpha.kubernetes-incubator.io/nfd-cpuid-AVX512CD=true node.alpha.kubernetes-incubator.io/nfd-cpuid-CX16=true node.alpha.kubernetes-incubator.io/nfd-cpuid-AVX512VL=true

Deploy Kubernetes HA cluster
Container Bare Metal for 2nd Generation Intel® Xeon® Scalable Processor Reference Architecture April 2019 22 Document Number: 338934-001
6.3 Deploy CPU Manager for Kubernetes
Kubernetes supports CPU and memory first class resources, while also providing basic support for CPU Pinning and Isolation through the native CPU Manager. To aid commercial adoption, Intel has created CPU Manager for Kubernetes, an open source project that introduces additional CPU optimization capabilities. Without CPU Manager for Kubernetes, the kernel task scheduler will treat all CPUs as available for scheduling process threads and regularly preempts executing process threads to give CPU time to other threads. This non-deterministic behavior makes it unsuitable for latency sensitive workloads.
Using the preconfigured isolcpus boot parameter, CPU Manager for Kubernetes can ensure that a CPU (or set of CPUs) is isolated from the kernel scheduler. Then the latency sensitive workload process thread(s) can be pinned to execute on that isolated CPU set only, providing them exclusive access to that CPU set. While beginning to guarantee the deterministic behavior of priority workloads, isolating CPUs also addresses the need to manage resources, which allows multiple VNFs to coexist on the same physical server. The exclusive pool within CPU Manager for Kubernetes assigns entire physical cores exclusively to the requesting container, meaning no other container will have access to the core.
CPU Manager for Kubernetes performs a variety of operations to enable core pinning and isolation on a container or a thread level. These include:
• Discovering the CPU topology of the machine.
• Advertising the resources available via Kubernetes constructs.
• Placing workloads according to their requests.
• Keeping track of the current CPU allocations of the pods, ensuring that an application will receive the requested resources provided they are available.
To deploy CPU Manager for Kubernetes, perform the following steps. 1. Get CPU Manager for Kubernetes: # git clone https://github.com/intel/CPU-Manager-for-Kubernetes
2. Build CPU Manager for Kubernetes image: # make
3. Deploy RBAC and service accounts yaml files: # kubectl create –f CPU-Manager-for-Kubernetes/resources/authorization/cmk-rbac-rules.yaml # kubectl create –f CPU-Manager-for-Kubernetes/resources/authorization/cmk-serviceaccount.yaml
4. Edit the minion nodes that need the CPU Manager for Kubernetes in cmk-cluster-init-pod.yaml under CPU-Manager-for-Kubernetes/resources/pods. (Note that ONLY minion nodes need CPU Manager for Kubernetes.)
In the following example, we ONLY installed CPU Manager for Kubernetes in node4 and node5.

Deploy Kubernetes HA cluster
Container Bare Metal for 2nd Generation Intel® Xeon® Scalable Processor April 2019 Reference Architecture Document Number: 338934-001 23
- args: # Change this value to pass different options to cluster-init. - "/cmk/cmk.py cluster-init --host-list=node4, node5 --saname=cmk-serviceaccount"
5. Launch the CPU Manager for Kubernetes: # kubectl create –f CPU-Manager-for-Kubernetes/resources/pods/cmk-cluster-init-pod.yaml
CPU Manager for Kubernetes will create three distinct pools: exclusive, shared, and infra. The exclusive pool is exclusive meaning only a single task may be allocated to a CPU at a time, whereas the shared and infra pools are shared such that multiple processes may be allocated to a CPU. Following is an output for successful CPU Manager for Kubernetes deployment and CPU initialization. In the example setup, HT is enabled, therefore both physical and associated logical processors are isolated. Four cores are allocated for the CPU Manager for Kubernetes exclusive pool and 1 core for the shared pool. The rest of the CPU cores on the system are for the infra pool. The correct assignment of CPUs can be seen in the following example. We use node5 minion node as an example. You can change the node name to reflect your environment. [root@node1 ~]# kubectl logs cmk-init-install-discover-pod-node5 --namespace=cmk init INFO:root:Writing config to /etc/cmk. INFO:root:Requested exclusive cores = 4. INFO:root:Requested shared cores = 1. INFO:root:Isolated logical cores: 1,2,3,4,5,6,7,8,37,38,39,40,41,42,43,44 WARNING:root:Not all isolated cores will be used by exclusive and shared pools. 8 isolated but only 5 used INFO:root:Isolated physical cores: 1,2,3,4,5,6,7,8 INFO:root:Adding exclusive pool. INFO:root:Adding cpu list 1,37 from socket 0 to exclusive pool. INFO:root:Adding cpu list 2,38 from socket 0 to exclusive pool. INFO:root:Adding cpu list 3,39 from socket 0 to exclusive pool. INFO:root:Adding cpu list 4,40 from socket 0 to exclusive pool. INFO:root:Adding shared pool. INFO:root:Adding cpu list 5,41 to shared pool. INFO:root:Adding infra pool. INFO:root:Adding cpu list 0,36,9,45,10,46,11,47,12,48,13,49,14,50,15,51,16,52,17,53 to infra pool. INFO:root:Adding cpu list 18,54,19,55,20,56,21,57,22,58,23,59,24,60,25,61,26,62,27,63,28,64,29,65,30,66,31,67,32,68,33,69,34,70,35,71 to infra pool.
CPU Manager for Kubernetes ensures exclusivity, therefore the performance of latency sensitive workloads is not impacted by having a noisy neighbor on the system. CPU Manager for Kubernetes can be used along with the other Enhanced Platform Awareness (EPA) capabilities to achieve the improved network I/O, deterministic compute performance, and server platform sharing benefits offered by Intel® Xeon® Processor-based platforms.

Deploy Kubernetes HA cluster
Container Bare Metal for 2nd Generation Intel® Xeon® Scalable Processor Reference Architecture April 2019 24 Document Number: 338934-001
Detailed documentation and code are available at:
• Documentation: https://builders.intel.com/docs/networkbuilders/cpu-pin-and-isolation-in-kubernetes-app-note.pdf
• Code: https://github.com/intel/CPU-Manager-for-Kubernetes/releases
6.4 Intel Device Plugins for Kubernetes
Like other vendors, Intel provides many hardware devices that deliver efficient acceleration of graphics, computation, data processing, security, and compression. Those devices optimize hardware for specific tasks, which saves CPU cycles for other workloads and typically results in performance gains. The Kubernetes device plugin framework provides a vendor-independent solution for hardware devices. Intel has developed a set of device plugins that comply with the Kubernetes device plugin framework and allow users to request and consume hardware devices across Kubernetes clusters such as Intel® QuickAssist Technology, GPUs, and FPGAs. The detailed documentation and code are available at:
• Documentation: https://builders.intel.com/docs/networkbuilders/intel-device-plugins-for-kubernetes-appnote.pdf
• Code: https://github.com/intel/intel-device-plugins-for-kubernetes
6.4.1 SR-IOV network device plugin
The Intel SR-IOV Network device plugin discovers and exposes SR-IOV network resources as consumable extended resources in Kubernetes. It works with SR-IOV VFs with both Kernel drivers and DPDK drivers. When a VF is attached with a kernel driver, then the SR-IOV CNI plugin can be used to configure this VF in the Pod. When using the DPDK driver, a VNF application configures this VF as required.
You need the SR-IOV CNI plugin for configuring VFs with the kernel driver in your pod. The DPDK driver supports VNFs that execute the VF driver and network protocol stack in userspace, allowing the application to achieve packet processing performance that greatly exceeds the ability of the kernel network stack. Details for SR-IOV Device plugin v2.0.0 can be found at:
• Code: https://github.com/intel/sriov-network-device-plugin
By default, when VFs are created for Intel X710 NIC, these VFs are registered with the i40evf kernel module. VF with the Linux network driver uses the kernel network stack for all packet processing. To take advantage of user space packet processing with DPDK, a VF needs to be registered with either igb_uio or vfio-pci kernel module. The example shown below binds VFs with PC address 18:10.1, 18:10.3, 18:10.5, and 18:10.7 with vfio-pci module using dpdk-devbind.py script bundled with DPDK distribution. # $RTE_SDK/dpdk-devbind.py -b vfio-pci 18:10.1 18:10.3 18:10.5 18:10.7

Deploy Kubernetes HA cluster
Container Bare Metal for 2nd Generation Intel® Xeon® Scalable Processor April 2019 Reference Architecture Document Number: 338934-001 25
Note: In the example, $RTE_SDK is the path to the DPDK source code. For more information, please refer to the DPDK user guide, Linux Drivers section: http://dpdk.org/doc/guides/linux_gsg/linux_drivers.html
Follow the steps below to deploy the SR-IOV network device plugin in Kubernetes. 1. Build SR-IOV network device plugin: # git clone https://github.com/intel/sriov-network-device-plugin.git # cd sriov-network-device-plugin # make image
Once the image is built successfully, a Docker image with tag nfvpe/sriov-device-plugin will be available in the machine where the build was run. To verify that the Docker image is created, we can run the following command:
# docker images | grep nfvpe nfvpe/sriov-device-plugin latest 9d63039f41c1 2 months ago 17.4MB
2. Create host configuration file:
The SR-IOV Network Device Plugin uses the configuration file given in file /etc/pcidp/config.json to advertise different resources consumable by the plugin. This configuration file is in json format as shown below:
# cat /etc/pcidp/config.json { "resourceList": [ { "resourceName": "sriov_net_A", "rootDevices": ["18:00.0"], "sriovMode": true, "deviceType": "netdevice" }, { "resourceName": "sriov_net_B", "rootDevices": ["18:00.1"], "sriovMode": true, "deviceType": "vfio" } ] }
Supported configuration parameters are described in the following table.
Table 6. Supported configuration parameters
Field Required Description Type - Accepted values Example
resourceName Yes Endpoint resource name string - must be unique and should not contain special characters
sriov_net_A
rootDevices Yes List of PCI addresses for a resource pool
A list of string - in sysfs pci address format
["02:00.0", "02:00.2"]
Deploy Kubernetes HA cluster
Container Bare Metal for 2nd Generation Intel® Xeon® Scalable Processor Reference Architecture April 2019 26 Document Number: 338934-001
Field Required Description Type - Accepted values Example
sriovMode No Whether the root devices are SRIOV capable or not
bool - true OR false [default] true
deviceType No Device driver type string - "netdevice"|"uio"|"vfio"
netdevice
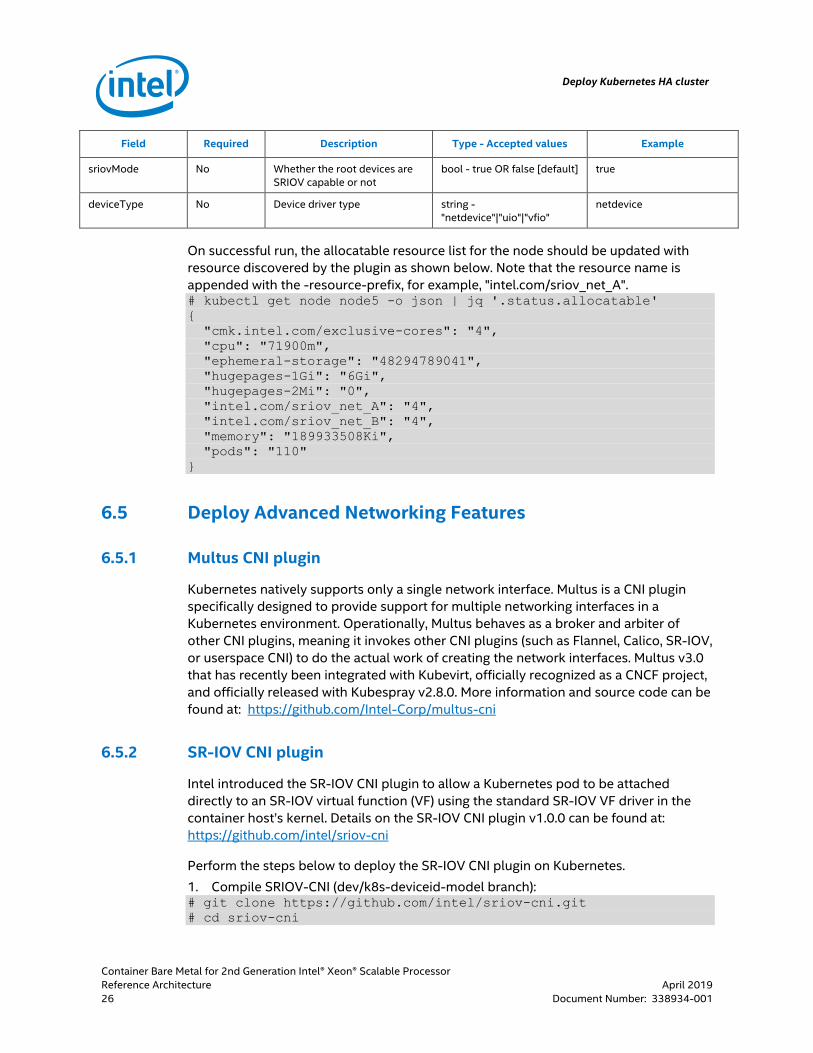
On successful run, the allocatable resource list for the node should be updated with resource discovered by the plugin as shown below. Note that the resource name is appended with the -resource-prefix, for example, "intel.com/sriov_net_A". # kubectl get node node5 -o json | jq '.status.allocatable' { "cmk.intel.com/exclusive-cores": "4", "cpu": "71900m", "ephemeral-storage": "48294789041", "hugepages-1Gi": "6Gi", "hugepages-2Mi": "0", "intel.com/sriov_net_A": "4", "intel.com/sriov_net_B": "4", "memory": "189933508Ki", "pods": "110" }
6.5 Deploy Advanced Networking Features
6.5.1 Multus CNI plugin
Kubernetes natively supports only a single network interface. Multus is a CNI plugin specifically designed to provide support for multiple networking interfaces in a Kubernetes environment. Operationally, Multus behaves as a broker and arbiter of other CNI plugins, meaning it invokes other CNI plugins (such as Flannel, Calico, SR-IOV, or userspace CNI) to do the actual work of creating the network interfaces. Multus v3.0 that has recently been integrated with Kubevirt, officially recognized as a CNCF project, and officially released with Kubespray v2.8.0. More information and source code can be found at: https://github.com/Intel-Corp/multus-cni
6.5.2 SR-IOV CNI plugin
Intel introduced the SR-IOV CNI plugin to allow a Kubernetes pod to be attached directly to an SR-IOV virtual function (VF) using the standard SR-IOV VF driver in the container host’s kernel. Details on the SR-IOV CNI plugin v1.0.0 can be found at: https://github.com/intel/sriov-cni
Perform the steps below to deploy the SR-IOV CNI plugin on Kubernetes. 1. Compile SRIOV-CNI (dev/k8s-deviceid-model branch): # git clone https://github.com/intel/sriov-cni.git # cd sriov-cni
Deploy Kubernetes HA cluster
Container Bare Metal for 2nd Generation Intel® Xeon® Scalable Processor April 2019 Reference Architecture Document Number: 338934-001 27
# make # cp build/sriov /opt/cni/bin
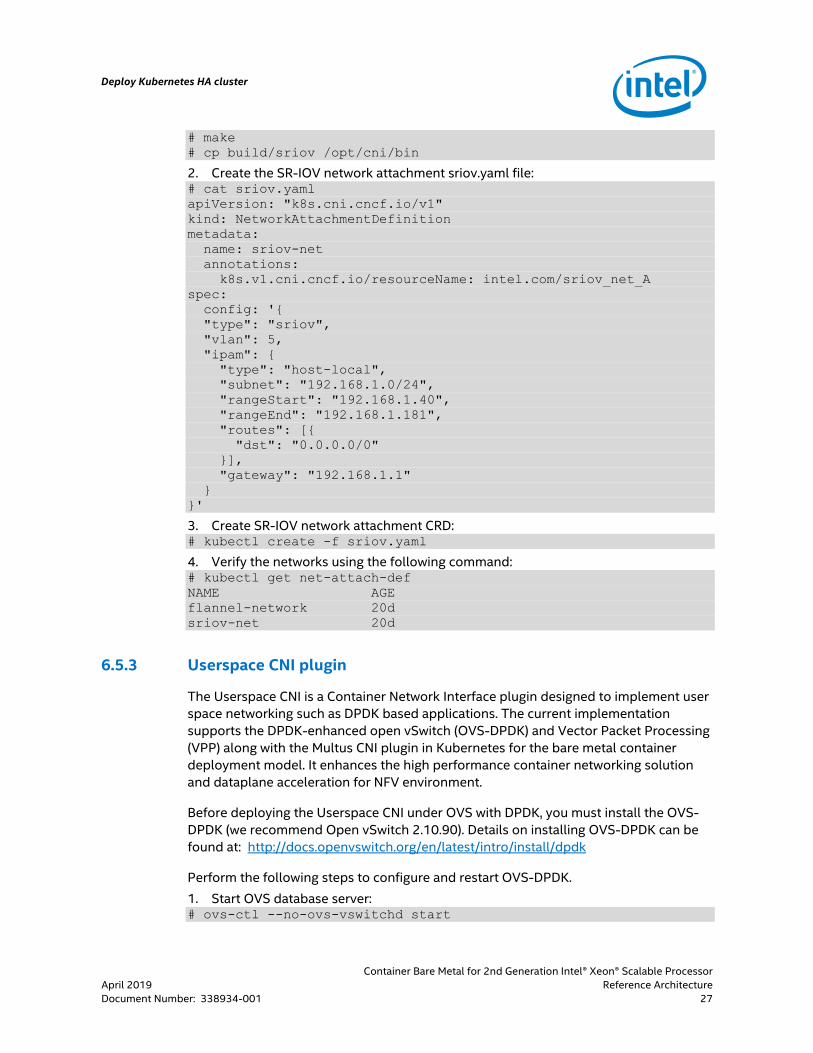
2. Create the SR-IOV network attachment sriov.yaml file: # cat sriov.yaml apiVersion: "k8s.cni.cncf.io/v1" kind: NetworkAttachmentDefinition metadata: name: sriov-net annotations: k8s.v1.cni.cncf.io/resourceName: intel.com/sriov_net_A spec: config: '{ "type": "sriov", "vlan": 5, "ipam": { "type": "host-local", "subnet": "192.168.1.0/24", "rangeStart": "192.168.1.40", "rangeEnd": "192.168.1.181", "routes": [{ "dst": "0.0.0.0/0" }], "gateway": "192.168.1.1" } }'
3. Create SR-IOV network attachment CRD: # kubectl create -f sriov.yaml
4. Verify the networks using the following command: # kubectl get net-attach-def NAME AGE flannel-network 20d sriov-net 20d
6.5.3 Userspace CNI plugin
The Userspace CNI is a Container Network Interface plugin designed to implement user space networking such as DPDK based applications. The current implementation supports the DPDK-enhanced open vSwitch (OVS-DPDK) and Vector Packet Processing (VPP) along with the Multus CNI plugin in Kubernetes for the bare metal container deployment model. It enhances the high performance container networking solution and dataplane acceleration for NFV environment.
Before deploying the Userspace CNI under OVS with DPDK, you must install the OVS-DPDK (we recommend Open vSwitch 2.10.90). Details on installing OVS-DPDK can be found at: http://docs.openvswitch.org/en/latest/intro/install/dpdk
Perform the following steps to configure and restart OVS-DPDK. 1. Start OVS database server: # ovs-ctl --no-ovs-vswitchd start

Deploy Kubernetes HA cluster
Container Bare Metal for 2nd Generation Intel® Xeon® Scalable Processor Reference Architecture April 2019 28 Document Number: 338934-001
2. Configure OVS dpdk-socket-mem for your system setup. This example is on a dual socket system and it allocates 2048MB to each socket.
# ovs-vsctl --no-wait set Open_vSwitch . other_config:dpdk-socket-mem="2048,2048"
3. Enable support for DPDK ports: # ovs-vsctl --no-wait set Open_vSwitch . other_config:dpdk-init=true
4. Specify the CPU cores where DPDK lcore threads should be spawned: # ovs-vsctl --no-wait set Open_vSwitch . other_config:dpdk-lcore-mask=0xc
5. Set the CPU affinity of Poll Mode Driver threads: # ovs-vsctl --no-wait set Open_vSwitch . other_config:pmd-cpu-mask=0x3
6. Start OVS daemon: # ovs-ctl --no-ovsdb-server --db-sock="/usr/local/var/run/openvswitch/db.sock" restart
7. Add OVS bridge br0: # ovs-vsctl add-br br0 -- set bridge br0 datapath_type=netdev
After OVS-DPDK is ready, perform the following steps to build and deploy the userspace CNI. 1. Download and build userspace CNI: # cd $GOPATH/src/ # go get github.com/intel/userspace-cni-network-plugin # cd github.com/intel/userspace-cni-network-plugin # make install
2. Copy the userspace binary to the CNI directory and copy get-prefix.sh script from userspace-cni-network-plugin repo to /var/lib/cni/vhostuser/:
# cp userspace/userspace /opt/cni/bin # cp tests/get-prefix.sh /var/lib/cni/vhostuser/
3. Create the userspace OVS DPDK network attachment userspace-net-ovs-no-ipam.yaml file.
# cat userspace-net-ovs-no-ipam.yaml apiVersion: "k8s.cni.cncf.io/v1" kind: NetworkAttachmentDefinition metadata: name: userspace-networkobj spec: config: '{ "cniVersion": "0.3.1", "type": "userspace", "host": { "engine": "ovs-dpdk", "iftype": "vhostuser" } }'
4. Create the userspace OVS DPDK network attachment CRD: # kubectl create -f userspace-net-ovs-no-ipam.yaml

Deploy Kubernetes HA cluster
Container Bare Metal for 2nd Generation Intel® Xeon® Scalable Processor April 2019 Reference Architecture Document Number: 338934-001 29
Verify the networks with the following comand: # kubectl get net-attach-def NAME AGE flannel-network 20d sriov-net 20d userspace-network 20d
Detailed deployment information including how to create a userspace VPP network can be found at: https://builders.intel.com/docs/networkbuilders/adv-network-features-in-kubernetes-app-note.pdf
Use cases
Container Bare Metal for 2nd Generation Intel® Xeon® Scalable Processor Reference Architecture April 2019 30 Document Number: 338934-001
7.0 Use cases
This section provides several typical use cases to utilize the EPA features and advanced networking features of Kubernetes. The examples shown below are limited to one of two pods for simplicity, but can of course be scaled to a full solution as needed. The first example is a brief showcase of NFD, where the list of available nodes is filtered to only include those with SR-IOV configured.
Three types of network connectivity examples are shown: SR-IOV DPDK, SR-IOV CNI, and Userspace CNI. These showcase different methods for attaching pods to networks, depending on the need for inter- or intra-node connectivity. The last example shows how to use CPU Manager for Kubernetes to provide exclusive CPU core pinning to a pod, which can be useful for deterministic performance and behavior.
7.1 Use NFD to select the node to deploy the pod
With the help of NFD, the Kubernetes scheduler can now use the information contained in node labels to deploy pods according to the requirements specified in the pod specification. Using the nodeSelector option in the pod specification and the matching label on the node, a pod can be deployed on a SR-IOV configured node. If the scheduler does not find such a node in the cluster, then the creation of that pod will fail. ... nodeSelector: “node.alpha.kubernetes-incubator.io/nfd-network-SR-IOV-configured”: “true” ...
Together with other EPA technologies, including device plugins, NFD facilitates workload optimization through resource-aware scheduling. In particular, NFD can benefit workloads that utilize modern vector data processing instructions, require SR-IOV networking, and have specific kernel requirements.
7.2 Pod using SR-IOV
With the SR-IOV network device plugin and advanced network features for Kubernetes, a pod can take advantage of SR-IOV DPDK or SR-IOV CNI plugin to achieve the best network performance. The following examples are useful when connecting outside of a minion node (inter-node), because the interface is attached to the NIC via SR-IOV, either directly or through the CNI plugin.

Use cases
Container Bare Metal for 2nd Generation Intel® Xeon® Scalable Processor April 2019 Reference Architecture Document Number: 338934-001 31
7.2.1 Pod using SR-IOV DPDK 1. Create the pod spec file sriov-dpdk-res.yaml.
In the example below, two VFs are requested from the ‘sriov_net_b’ resource that was created previously using the SR-IOV network device plugin. This method assigns VFs to the pod, without providing any interface configuration or IPAM. This makes it ideal for DPDK applications, where the configuration is done directly in the application.
# cat sriov-dpdk-res.yaml apiVersion: v1 kind: Pod metadata: name: sriov-dpdk-pod labels: env: test spec: tolerations: - operator: "Exists" containers: - name: appcntr1 image: centos/tools imagePullPolicy: IfNotPresent command: [ "/bin/bash", "-c", "--" ] args: [ "while true; do sleep 300000; done;" ] resources: requests: intel.com/sriov_net_B: '2' limits: intel.com/sriov_net_B: '2'
2. Create the pod from the master node using sriov-dpdk-res.yaml: # kubectl create -f sriov-dpdk-res.yaml pod/sriov-dpdk-pod created
3. Inspect the pod environment, you can find the VFs PCI address from the
environment variables, shown below using the env command. The PCI address of the VFs used by the pod are 0000:18:10.3 and 0000:18:10.5 in this example.
# kubectl exec -ti sriov-dpdk-pod env

Use cases
Container Bare Metal for 2nd Generation Intel® Xeon® Scalable Processor Reference Architecture April 2019 32 Document Number: 338934-001
PATH=/usr/local/sbin:/usr/local/bin:/usr/sbin:/usr/bin:/sbin:/bin HOSTNAME=sriov-dpdk-pod TERM=xterm PCIDEVICE_INTEL_COM_SRIOV_NET_B=0000:18:10.3,0000:18:10.5 KUBERNETES_PORT=tcp://10.233.0.1:443 KUBERNETES_PORT_443_TCP=tcp://10.233.0.1:443 KUBERNETES_PORT_443_TCP_PROTO=tcp KUBERNETES_PORT_443_TCP_PORT=443 KUBERNETES_PORT_443_TCP_ADDR=10.233.0.1 KUBERNETES_SERVICE_HOST=10.233.0.1 KUBERNETES_SERVICE_PORT=443 KUBERNETES_SERVICE_PORT_HTTPS=443 container=docker HOME=/root
At this point, the application running in the pod can decide what to do with the VFs.
7.2.2 Pod using SR-IOV CNI plugin 1. Create a sample pod specification sriov-test.yaml file.
In this example, two different networks objects are used, ‘flannel-networkobj’ for access and management, and ‘sriov-net’ for the SR-IOV interface which is already configured using the IPAM settings provided for the object.
# cat sriov-test.yaml apiVersion: v1 kind: Pod metadata: generateName: sriov-pod- annotations: k8s.v1.cni.cncf.io/networks: '[ { "name": "flannel-networkobj" }, { "name": "sriov-net" } ]' spec: # specification of the pod's contents tolerations: - operator: "Exists" containers: - name: multus-multi-net-poc image: busybox command: ["top"] stdin: true tty: true resources: requests: intel.com/sriov_net_A: '1' limits: intel.com/sriov_net_A: '1'
2. Create two multiple network-based pods from the master node using sriov-test.yaml:
# kubectl create -f sriov-test.yaml -f sriov-test.yaml pod/sriov-pod-x7g49 created

Use cases
Container Bare Metal for 2nd Generation Intel® Xeon® Scalable Processor April 2019 Reference Architecture Document Number: 338934-001 33
pod/sriov-pod-qk24t created
3. Retrieve the details of the running pod from the master: # kubectl get pods NAME READY STATUS RESTARTS AGE sriov-pod-qk24t 1/1 Running 0 5h1m sriov-pod-x7g49 1/1 Running 0 5h1m
Once the configuration is complete, you can verify the pod networks are working as expected. To verify these configurations, complete the following steps: 1. Run “ifconfig” command inside the container: # kubectl exec sriov-pod-x7g49 -ti -- ifconfig eth0 Link encap:Ethernet HWaddr 0A:58:0A:E9:44:12 inet addr:10.233.68.18 Bcast:0.0.0.0 Mask:255.255.255.0 UP BROADCAST RUNNING MULTICAST MTU:1450 Metric:1 RX packets:13 errors:0 dropped:0 overruns:0 frame:0 TX packets:0 errors:0 dropped:0 overruns:0 carrier:0 collisions:0 txqueuelen:0 RX bytes:983 (983.0 B) TX bytes:0 (0.0 B) lo Link encap:Local Loopback inet addr:127.0.0.1 Mask:255.0.0.0 UP LOOPBACK RUNNING MTU:65536 Metric:1 RX packets:0 errors:0 dropped:0 overruns:0 frame:0 TX packets:0 errors:0 dropped:0 overruns:0 carrier:0 collisions:0 txqueuelen:1000 RX bytes:0 (0.0 B) TX bytes:0 (0.0 B) net1 Link encap:Ethernet HWaddr 0A:58:0A:E9:44:02 inet addr:10.233.68.2 Bcast:0.0.0.0 Mask:255.255.255.0 UP BROADCAST RUNNING MULTICAST MTU:1450 Metric:1 RX packets:13 errors:0 dropped:0 overruns:0 frame:0 TX packets:0 errors:0 dropped:0 overruns:0 carrier:0 collisions:0 txqueuelen:0 RX bytes:983 (983.0 B) TX bytes:0 (0.0 B)

Use cases
Container Bare Metal for 2nd Generation Intel® Xeon® Scalable Processor Reference Architecture April 2019 34 Document Number: 338934-001
net2 Link encap:Ethernet HWaddr 72:DD:4B:F6:C1:30 inet addr:192.168.1.40 Bcast:0.0.0.0 Mask:255.255.255.0 UP BROADCAST RUNNING MULTICAST MTU:1500 Metric:1 RX packets:1772025 errors:0 dropped:0 overruns:0 frame:0 TX packets:662172 errors:0 dropped:0 overruns:0 carrier:0 collisions:0 txqueuelen:1000 RX bytes:567745190 (541.4 MiB) TX bytes:110196136 (105.0 MiB) # kubectl exec sriov-pod-qk24t -ti -- ifconfig eth0 Link encap:Ethernet HWaddr 0A:58:0A:E9:43:0F inet addr:10.233.67.15 Bcast:0.0.0.0 Mask:255.255.255.0 UP BROADCAST RUNNING MULTICAST MTU:1450 Metric:1 RX packets:12 errors:0 dropped:0 overruns:0 frame:0 TX packets:0 errors:0 dropped:0 overruns:0 carrier:0 collisions:0 txqueuelen:0 RX bytes:824 (824.0 B) TX bytes:0 (0.0 B) lo Link encap:Local Loopback inet addr:127.0.0.1 Mask:255.0.0.0 UP LOOPBACK RUNNING MTU:65536 Metric:1 RX packets:0 errors:0 dropped:0 overruns:0 frame:0 TX packets:0 errors:0 dropped:0 overruns:0 carrier:0 collisions:0 txqueuelen:1000 RX bytes:0 (0.0 B) TX bytes:0 (0.0 B) net1 Link encap:Ethernet HWaddr 0A:58:0A:E9:43:04 inet addr:10.233.67.4 Bcast:0.0.0.0 Mask:255.255.255.0 UP BROADCAST RUNNING MULTICAST MTU:1450 Metric:1 RX packets:12 errors:0 dropped:0 overruns:0 frame:0 TX packets:0 errors:0 dropped:0 overruns:0 carrier:0 collisions:0 txqueuelen:0 RX bytes:824 (824.0 B) TX bytes:0 (0.0 B) net2 Link encap:Ethernet HWaddr 5A:33:6A:C5:B9:7D inet addr:192.168.1.42 Bcast:0.0.0.0 Mask:255.255.255.0 UP BROADCAST RUNNING MULTICAST MTU:1500 Metric:1 RX packets:1937001 errors:0 dropped:0 overruns:0 frame:0 TX packets:756208 errors:0 dropped:0 overruns:0 carrier:0 collisions:0 txqueuelen:1000 RX bytes:634654278 (605.2 MiB) TX bytes:125495488 (119.6 MiB)

Use cases
Container Bare Metal for 2nd Generation Intel® Xeon® Scalable Processor April 2019 Reference Architecture Document Number: 338934-001 35
In the above output, ‘net1’ is the flannel interface (each pod is on a separate subnet), and ‘net2’ is the SR-IOV interface (shared subnet). This provides separation of the external access, while still allowing pods to communicate on a shared subnet.
2. Verify the networks by pinging from one pod to another through the SR-IOV (net2) interface:
# kubectl exec sriov-pod-x7g49 -ti -- ping 192.168.1.42 PING 192.168.1.40 (192.168.1.40): 56 data bytes 64 bytes from 192.168.1.42: seq=0 ttl=64 time=0.131 ms 64 bytes from 192.168.1.42: seq=1 ttl=64 time=0.102 ms 64 bytes from 192.168.1.42: seq=2 ttl=64 time=0.124 ms 64 bytes from 192.168.1.42: seq=3 ttl=64 time=0.113 ms 64 bytes from 192.168.1.42: seq=4 ttl=64 time=0.106 ms 64 bytes from 192.168.1.42: seq=5 ttl=64 time=0.108 ms
7.3 Pod using Userspace CNI plugin
The Userspace CNI plugin example focuses on connectivity between pods mainly residing on the same node (intra-node), which is provided through the Userspace CNI that connects the interface to OVS or VPP using vhost-user.
7.3.1 Pod using Userspace CNI with OVS-DPDK
The following example creates a testpmd pod with two interfaces using the ‘userspace-networkobj’ object, which creates vhost-user interfaces that are connected to OVS. Since this is using vhost-user, the pod is also configured with a volume mount for the socket file, and a huge page memory resource.
Note: 1G hugepages are not available by default and need to be created using kernel boot parameters before the system boots up. Refer to Section 5.3 for details.
Here is the testpmd pod specification example file. # cat testpmd.yaml apiVersion: v1 kind: Pod metadata: generateName: testpmd- annotations: k8s.v1.cni.cncf.io/networks: userspace-networkobj, userspace-networkobj spec: containers: - name: testpmd image: testpmd:v1.0 imagePullPolicy: IfNotPresent securityContext: privileged: true runAsUser: 0 volumeMounts:

Use cases
Container Bare Metal for 2nd Generation Intel® Xeon® Scalable Processor Reference Architecture April 2019 36 Document Number: 338934-001
- mountPath: /vhu/ name: socket - mountPath: /dev/hugepages1G name: hugepage resources: requests: memory: 1Gi limits: hugepages-1Gi: 1Gi command: ["sleep", "infinity"] tolerations: - operator: "Exists" volumes: - name: socket hostPath: path: /var/lib/cni/vhostuser/ - name: hugepage emptyDir: medium: HugePages securityContext: runAsUser: 0 restartPolicy: Never
1. Create the testpod pod from the master node: # kubectl create -f testpmd.yaml pod/testpmd-wfw9v created
2. Run this command to enter the testpmd container: # kubectl exec -ti testpmd-wfw9v bash
3. Inside the testpmd container, run these commands: root@ testpmd-wfw9v:/# export ID=$(/vhu/get-prefix.sh) root@multi-vhost-examplewfw9v:/# testpmd -d librte_pmd_virtio.so.17.11 -m 1024 -c 0xC \ --file-prefix=testpmd_ --vdev=net_virtio_user0,path=/vhu/${ID}/${ID:0:12}-net1 \ --vdev=net_virtio_user1,path=/vhu/${ID}/${ID:0:12}-net2 --no-pci -- --no-lsc-interrupt \ --auto-start --tx-first --stats-period 1 --disable-hw-vlan

Use cases
Container Bare Metal for 2nd Generation Intel® Xeon® Scalable Processor April 2019 Reference Architecture Document Number: 338934-001 37
You will see output similar to the following screenshot, which means your testpmd app can send and receive data packages. Both ports are connected through the NIC, and connectivity is verified by packets being both sent and received on both ports.
You also can have two or more pods connect the OVS via Userspace CNI plugin. Here is an example using two pods, one is pktgen and one is l3fwd. 1. Create a pktgen pod specification pktgen.yaml.
This is similar to the testpmd.yaml specification from above, but instead of having two interfaces this only has one.
# cat pktgen.yaml apiVersion: v1 kind: Pod metadata: generateName: dpdk-pktgen- annotations: k8s.v1.cni.cncf.io/networks: userspace-networkobj spec: containers: - name: dpdk-pktgen image: dpdk-pktgen:v1.0 imagePullPolicy: IfNotPresent securityContext: privileged: true runAsUser: 0 volumeMounts: - mountPath: /vhu/ name: socket - mountPath: /dev/hugepages1G name: hugepage resources: requests:

Use cases
Container Bare Metal for 2nd Generation Intel® Xeon® Scalable Processor Reference Architecture April 2019 38 Document Number: 338934-001
memory: 2Gi limits: hugepages-1Gi: 2Gi command: ["sleep", "infinity"] tolerations: - operator: "Exists" nodeSelector: kubernetes.io/hostname: node5 volumes: - name: socket hostPath: path: /var/lib/cni/vhostuser/ - name: hugepage emptyDir: medium: HugePages securityContext: runAsUser: 0 restartPolicy: Never
2. Create l3fwd pod specification l3fwd.yaml, which uses similar resources as pktgen.yaml, but with a different name and image:
# cat l3fwd.yaml apiVersion: v1 kind: Pod metadata: generateName: dpdk-l3fwd- annotations: k8s.v1.cni.cncf.io/networks: userspace-networkobj spec: containers: - name: dpdk-l3fwd image: dpdk-l3fwd:v1.0 imagePullPolicy: IfNotPresent securityContext: privileged: true runAsUser: 0 volumeMounts: - mountPath: /vhu/ name: socket - mountPath: /dev/hugepages1G name: hugepage resources: requests: memory: 1Gi limits: hugepages-1Gi: 1Gi command: ["sleep", "infinity"] tolerations: - operator: "Exists" nodeSelector: kubernetes.io/hostname: node5 volumes: - name: socket

Use cases
Container Bare Metal for 2nd Generation Intel® Xeon® Scalable Processor April 2019 Reference Architecture Document Number: 338934-001 39
hostPath: path: /var/lib/cni/vhostuser/ - name: hugepage emptyDir: medium: HugePages securityContext: runAsUser: 0 restartPolicy: Never
3. Create the pktgen pod from the master node: # kubectl create -f pktgen.yaml pod/dpdk-pktgen-knpp4 created
4. Run this command to enter the pktgen container from master mode: # kubectl exec -ti dpdk-pktgen-knpp4 bash
5. Run the following commands inside the pktgen container: root@dpdk-pktgen-knpp4:/usr/src/pktgen# export ID=$(/vhu/get-prefix.sh) root@dpdk-pktgen-knpp4:/usr/src/pktgen# ./app/x86_64-native-linuxapp-gcc/pktgen -l 10,11,12 --vdev=virtio_user0,path=/vhu/${ID}/${ID:0:12}-net1 --no-pci --socket-mem=512 --master-lcore 10 -- -m 11:12.0 –P Pktgen:/>
The pktgen application should launch. Among the statistics, make note of the pktgen source MAC address listed as ‘Src MAC Address’.
6. In another terminal, create the l3fwd pod from the master node: # kubectl create -f l3fwd.yaml pod/dpdk-l3fwd-t4ppr created
7. Run this command to enter the l3fwd container from master node: # kubectl exec -ti dpdk-l3fwd-t4ppr bash
8. Inside the l3fwd container, export the port ID prefix and start the l3fwd application. Set the destination MAC address using the ‘dest’ argument. This should be the Src MAC Address previously noted from the pktgen pod (adjust cores, memory, etc. to suit your system):
root@dpdk-l3fwd-t4ppr:/usr/src/dpdk/examples/l3fwd/x86_64-native-linuxapp-gcc/app# export ID=$(/vhu/get-prefix.sh)

Use cases
Container Bare Metal for 2nd Generation Intel® Xeon® Scalable Processor Reference Architecture April 2019 40 Document Number: 338934-001
root@dpdk-l3fwd-t4ppr:/usr/src/dpdk/examples/l3fwd/x86_64-native-linuxapp-gcc/app# ./l3fwd -c 0x10 --vdev=virtio_user0,path=/vhu/${ID}/${ID:0:12}-net1 --no-pci --socket-mem=512 -- -p 0x1 -P --config "(0,0,4)" --eth-dest=0, ,<pktgen-source-mac-add> --parse-ptype
The l3fwd app should start up. Among the information printed to the screen will be the ‘Address’. This is the MAC address of the l3fwd port, make note of it.
9. Back on the pktgen pod, set the destination MAC address to that of the l3fwd port: Pktgen:/> set 0 dst mac <l3fwd-mac-address>
10. Start traffic generation: Pktgen:/> start 0
You should see the packet counts for Tx and Rx increase, verifying that packets are being transmitted by pktgen and are being sent back via l3fwd running in the other pod.
11. To exit: Pktgen:/> stop 0 Pktgen:/> quit

Use cases
Container Bare Metal for 2nd Generation Intel® Xeon® Scalable Processor April 2019 Reference Architecture Document Number: 338934-001 41
You also can use Userspace CNI with VPP; it is similar to OVS-DPDK. Learn more at: https://builders.intel.com/docs/networkbuilders/adv-network-features-in-kubernetes-app-note.pdf.
7.4 Pod using CPU Pinning and Isolation in Kubernetes
To run testpmd using CPU Pinning and Isolation in Kubernetes, perform the steps below. 1. Add the following in the testpmd pod spec in previous testpmd.yaml file. You can
change the core number you want to use for the pod. In following case, we just use 4 exclusive cores in this example.
resources: requests: cmk.intel.com/exclusive-cores: '4' limits: cmk.intel.com/exclusive-cores: '4'
Note: If the webhook is used, then you need an additional annotation. If the webhook is not used, you need additional mount points.
For more details, refer to a sample pod spec at: https://github.com/intel/CPU-Manager-for-Kubernetes/blob/master/resources/pods/cmk-isolate-pod.yaml
2. Deploy testpmd pod and connect to it using a terminal window: # kubectl create -f testpmd-cmk.yaml pod/testpmd-cmk-pm3uu created # kubectl exec testpmd-cmk-pm3uu -ti bash
3. Create /etc/cmk/use_cores.sh file with the following content: #!/bin/bash export CORES=`printenv CMK_CPUS_ASSIGNED` SUB=${ID:0:12} COMMAND=${@//'$CORES'/$CORES} COMMAND=${COMMAND//'$ID'/$ID} COMMAND=${COMMAND//'$SUB'/$SUB} $COMMAND
Note: The above script uses CMK to assign the cores from temporary environment variable ‘CMK_CPUS_ASSIGNED’ to its local variable CORES. Then, this variable substitutes the $CORES phrase in the command provided below as argument to this script and executes it with the correct cores selected. 4. Add executable rights to the script: # chmod +x /etc/kcm/use_cores.sh
5. Start testpmd using use_cores.sh script: root@ testpmd-cmk-pm3uu:/# export ID=$(/vhu/get-prefix.sh) root@multi-vhost-examplewfw9v:/# /opt/bin/cmk isolate --conf-dir=/etc/cmk --pool=exclusive --no-affinity /etc/cmk/use_cores.sh 'testpmd -d librte_pmd_virtio.so.17.11 -m 1024 -l \$CORES --file-prefix=testpmd_ --vdev=net_virtio_user0,path=/vhu/\$ID/\$SUB-net1 --vdev=net_virtio_user1,path=/vhu/\$ID/\$SUB-net2 --no-pci -- --
Use cases
Container Bare Metal for 2nd Generation Intel® Xeon® Scalable Processor Reference Architecture April 2019 42 Document Number: 338934-001
no-lsc-interrupt --auto-start --tx-first --stats-period 1 --disable-hw-vlan'
The testpmd has requested exclusive cores from CPU Manager for Kubernetes, which have been advertised to the workload via environment variables. The workload is using the –no-affinity option, which indicates that CPU Manager for Kubernetes has left the pinning of the cores to the application and is pinning the CPU Manager for Kubernetes assigned cores itself using the variable from the script. The testpmd can get deterministic performance due to the guaranteed CPUs exclusivity by CPU Manager for Kubernetes.
CPU Manager for Kubernetes can be utilized along with the other Enhanced Platform Awareness (EPA) capabilities to achieve the improved network I/O, deterministic compute performance, and server platform sharing benefits offered by Intel® Xeon® Processor-based platforms.
CPU Pinning and Isolation capability is part of EPA methodology and the related suite of changes across the orchestration layers’ stack. EPA methodology enables platform capabilities discovery, intelligent configuration and workload-placement decisions resulting in improved and deterministic application performance.

Conclusion
Container Bare Metal for 2nd Generation Intel® Xeon® Scalable Processor April 2019 Reference Architecture Document Number: 338934-001 43
8.0 Conclusion
Intel and its partners have been working with open source communities to add new techniques and address key barriers to adoption for commercial containers by harnessing the power of Intel Architecture-based servers to improve configuration, manageability, deterministic performance, network throughput, service-assurance and resilience of container deployments.
This document contains brief, high-level notes on installation, configuration, and use of Enhanced Platform Awareness (EPA), networking, and device plugin features for Kubernetes. By following this document, it is possible to set up a Kubernetes cluster and add simple configurations for some of the features provided by Intel. The included example usage cases show how the features can be consumed to provide additional functionality in both Kubernetes and the deployed pods, including but not limited to flexible network configurations, Node Feature Discovery, and CPU pinning for exclusive access to host cores.
We highly recommend that you take advantage of these EPA features, advanced network features and device plugins in container-based NFV deployment.