Embed Size (px)
Citation preview
R
Phone: +1 (214) 421-7366 Fax: +1 (214) 565-0976 Toll Free: +1 (800) 527-2100 Website: www.apwwyott.com E-mail: [email protected]
INSTALLATION
AND OPERATING INSTRUCTIONS
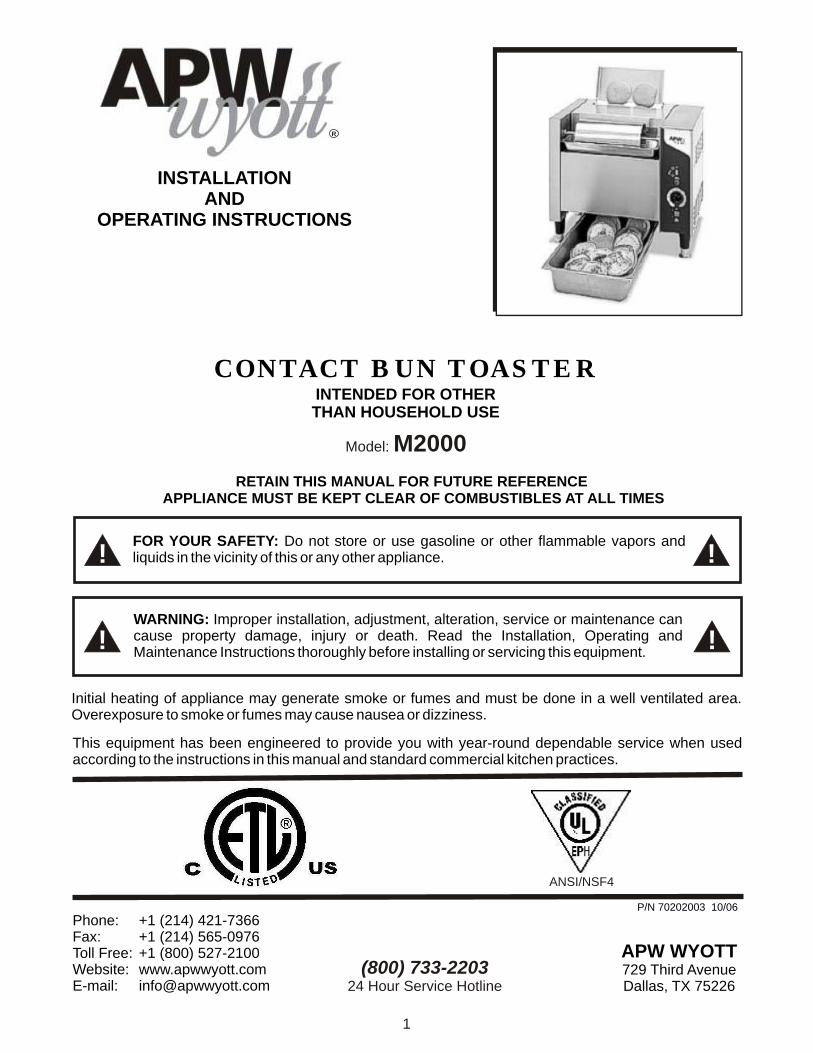
INTENDED FOR OTHER THAN HOUSEHOLD USE
RETAIN THIS MANUAL FOR FUTURE REFERENCE
APPLIANCE MUST BE KEPT CLEAR OF COMBUSTIBLES AT ALL TIMES
P/N 70202003 10/06
1
CONTACT BUN TOASTER
APW WYOTT729 Third AvenueDallas, TX 75226
This equipment has been engineered to provide you with year-round dependable service when used according to the instructions in this manual and standard commercial kitchen practices.
Initial heating of appliance may generate smoke or fumes and must be done in a well ventilated area. Overexposure to smoke or fumes may cause nausea or dizziness.
FOR YOUR SAFETY: Do not store or use gasoline or other flammable vapors and liquids in the vicinity of this or any other appliance. !!
WARNING: Improper installation, adjustment, alteration, service or maintenance can cause property damage, injury or death. Read the Installation, Operating and Maintenance Instructions thoroughly before installing or servicing this equipment.
!!
ANSI/NSF4
(800) 733-220324 Hour Service Hotline
Model: M2000
TABLE OF CONTENTS
Safety Precautions 2
General Information 2
Installation 3
Location 4
Operating Instructions 4
Cleaning 5
Troubleshooting Guide 7
Replacement Parts List w/Exploded View 8
Wiring Diagram 10
Warranty 12
SAFETY PRECAUTIONS
APW Wyott toasters are designed, built, and sold for commercial use and should be operated by trained personnel only. Clearly post all CAUTIONS, WARNINGS and operating instructions near each unit to insure proper operation and to reduce the chance of personal injury and/or equipment damage.
Always disconnect power before cleaning or servicing the toaster. Surfaces will remain hot after power has been turned off, allow unit to cool before cleaning or servicing. Never clean the toaster by immersing it in water. The toaster is not protected against water jets; DO NOT CLEAN TOASTER WITH A WATER JET. Always clean equipment before first use.
Operating toaster without legs will void the warranty. Insure all accessories and exterior panels are properlyinstalled and adjusted before applying power and operating.
GENERAL INFORMATION
Check the rating label for your model designation and electrical rating. Rating Label is located on the bottom front of the control panel.
Overall dimensions with feeder: 23.5"(59.7cm) W x 25.9"(65.8cm) H x 17.5"(44.5cm) D
Electrical Ratings:M2KA: 208VAC, 2880W, 13.8A, 60HzM2KH: 240VAC, 3840W, 16A, 60Hz
Cordset Configuration:208/250V: NEMA 6-20P Plug, 4 foot, 3 wire grounded cord.
If the supply cord is damaged, the manufacturer or an authorized service agent or a similarly qualified person must replace it to avoid a hazard or warranty.
Shipping Weight:94 lbs (42.7 Kg)
2
!
!WARNING: In Europe, appliance must be connected by an earthing cable to all other units in the complete installation and thence to an independent earth connection in compliance with EN 60335-1 and/or local codes
! !WARNING: An earthing cable must connect the appliance to all other units in the complete installation and from there to an independent earth connection.
INSTALLATION
1. Examine carton for damageThe freight carrier has assumed responsibility for its safe transit and delivery. If equipment is received damaged, either apparent or concealed, a claim must be made with delivering carrier.
a. Apparent damage or loss must be noted on the freight bill at the time of delivery. The carrier representative (Driver) must sign the freight bill. If this is not done, the carrier may refuse the claim. The carrier can supply the necessary forms.
b. Concealed damage or loss if not apparent until after the toaster is removed from carton, a request for inspection must be made to the carrier within 15 days. The carrier should arrange an inspection. Be sure to save all contents and packaging material.
2. Verify PartsAfter removing unit from the shipping carton, unwrapping loose parts and remove any packing tape, plastic wrap and nylon tie-down. Verify the following parts:
Item Packaging QtyLegs In plastic bag 4Feeder/Bun Chute Wrapped, loose in top of carton 1Conveyor In individual carton 1Instruction Manual Loose in carton 1Teflon Sheet Kit (optional) Loose in carton Optional
NOTE: PRIOR TO INITIAL START-UP, ALL REMOVABLE PARTS AND THE GRILL SURFACE SHOULDBE CLEANED WITH WARM SOAPY WATER TO REMOVE MANUFACTURING OILS, THEN RINSEDAND DRIED THOROUGHLY. Apply oil (vegetable oil) to the conveyor chain after washing. (Bun oil can be used if it contains no animal fats, salts or dairy products).
3. Assemble LegsLay the toaster on its back and install the four adjustable legs into the threaded holes on the bottom of the toaster sides. Hand tighten the legs by gripping the black shank and turning until it is seated firmly against the bottom of the toaster. Set the toaster upright on a flat surface. Unscrewing the lower, chrome insert of each leg levels the unit. Flats are provided on two sides of the insert to allow use of a wrench. “Precise” leveling is not required for proper operation.
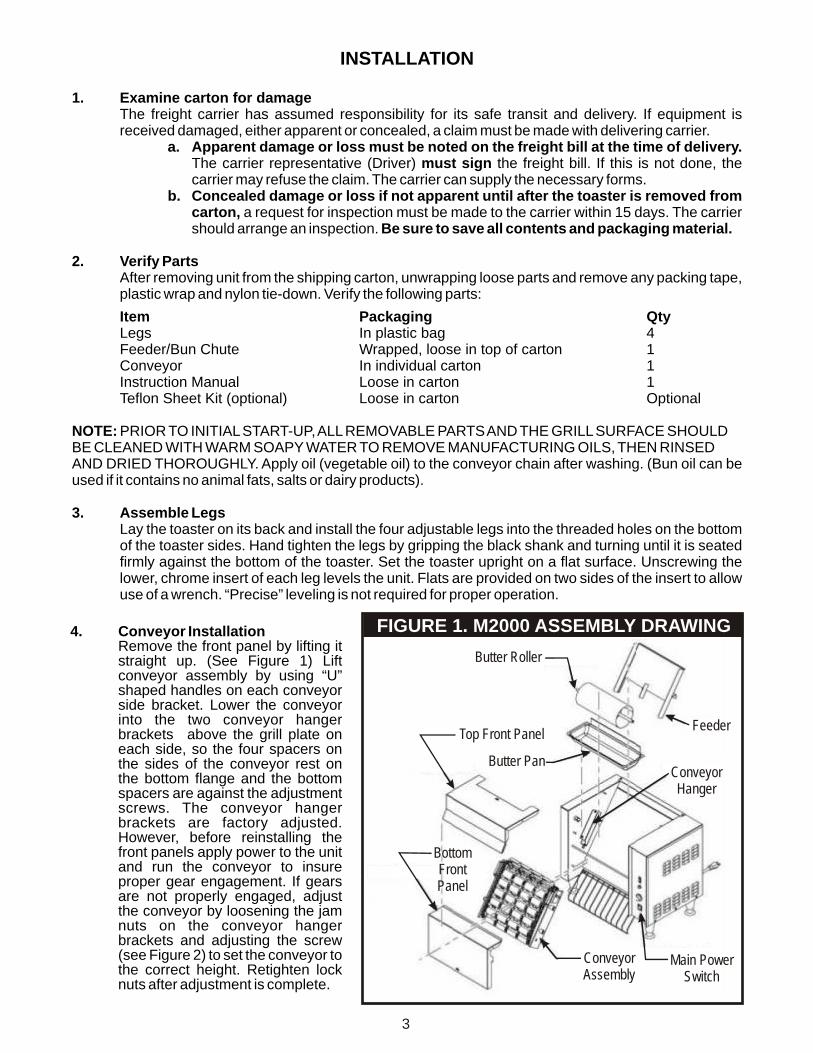
4. Conveyor InstallationRemove the front panel by lifting it straight up. (See Figure 1) Lift conveyor assembly by using “U” shaped handles on each conveyor side bracket. Lower the conveyor into the two conveyor hanger brackets above the grill plate on each side, so the four spacers on the sides of the conveyor rest on the bottom flange and the bottom spacers are against the adjustment screws. The conveyor hanger brackets are factory adjusted. However, before reinstalling the front panels apply power to the unit and run the conveyor to insure proper gear engagement. If gears are not properly engaged, adjust the conveyor by loosening the jam nuts on the conveyor hanger brackets and adjusting the screw (see Figure 2) to set the conveyor to the correct height. Retighten lock nuts after adjustment is complete.
3
FIGURE 1. M2000 ASSEMBLY DRAWING
Bottom Front Panel
Top Front PanelFeeder
Conveyor Hanger
Main Power Switch
Conveyor Assembly
Butter Roller
Butter Pan

a. To adjust the conveyor up into the drive gear, turn the conveyor adjustment screw clockwise. Use a 7/16-end wrench to tighten the jam nut.
b. To adjust the conveyor away from the drive gear, turn the conveyor adjustment screw counterclockwise. Use a 7/16-end wrench to tighten the lock nut.
5. Replace front panel.
6. Feeder Assembly
Install Feeder by fitting slots on back of feeder onto back panel studs located at top rear of unit.
7. Install Teflon Sheet (Optional)Remove Feeder. Allow one end of the Teflon sheet to overlap the top of the rear panel to the rear studs. Align the holes in the sheet with the stud heads and push the sheet over the stud heads. Balance of the sheet will fit over the grill surface. Reinstall Feeder c a p t u r i n g Te f l o n S h e e t b e t w e e n the feeder and the top of the toaster.
FIGURE 2
Jam Nut
Screw
LOCATION
Place the toaster on a flat surface. This toaster is tested and approved for zero clearances against non-heated surfaces. Locate the toaster near a wall receptacle of the proper configuration. DO NOT USE AN EXTENSION CORD. Plug the power cord into an outlet (receptacle) of the specified voltage on the rating label. Outlets must be properly grounded.
OPERATING INSTRUCTIONS
Choose Dry or Wet operation.
1. Dry operation. (no oil) Insure Teflon sheet, 86298 is properly installed.a. Turn Main Power Switch on. Set Temperature Control knob to desired temperature. Allow Pilot
Light to cycle at least two times (on/off). When the light is on, the grill is heating. Heat up time is about 15-20 minutes.
b. Turn on motor switch. Conveyor should start to turn.c. Place bun halves on feeder cut side down (facing grill surface). Toast time is approximately 210
sec. depending on bun height and diameter. Increase or decrease temperature setting to achieve desired brownness and temperature.
2. Wet operation. (using oil) Apply a light coating of oil to grill surface. (Fry oil can be used) When toasting using oil, any high-quality cooking oil may be used with this toaster (do not use oils that contain dairy products such as butter). The Teflon sheet may be used, but it is not required. Fill the Butter Pan 2/3 full of warmed cooking oil. The oil should spread evenly over the surface of the roller.a. Turn Main Power Switch on. Set Temperature Control knob to desired temperature. Allow Pilot
Light to cycle at least two times (on/off). When the light is on, the grill is heating. Heat up time is about 15-20 minutes.
b. Turn on motor switch. Conveyor should start to turn.c. Hold bun half in the palm of the hand, slap the face (cut side) of the bun on the turning Butter
Roller surface.d. Place bun halves on feeder cut side down (facing grill surface). Try several buns to determine
the correct pressure and time to achieve the desired browning and temperature of bun. Using too little oil will cause the bun surface to be cool and uneven in color. It will also cause the bun to stick to the grill. Using too much oil will give the bun a yellow un-toasted look. Toast time is
approximately 22 sec. depending on bun height and diameter. Increase or decrease the temperature setting to achieve desired brownness and temperature.
4
NOTE: Should the temperature setting be changed, allow several cycles for the grill plate to adjust. Once the desired setting has been achieved, note the temperature and keep it set there.
CLEANING
WARNING: Make sure the toaster is in the off position and has been off at least 15 – 30 minutes. Do not attempt this cleaning procedure if the toaster components are too hot to touch.
Never spray water on the toaster or controls. Damage to the toaster as well as injury could occur. Severe injury and burns may occur if you do not follow this instruction sheet.
DISASSEMBLYTurn off main power switch and conveyor switch. Disconnect the power supply cord from the wall outlet. The toaster will be hot when turned off. Allow the toaster to cool for at least 15 – 30 minutes before handling. USE CAUTION during disassembly and cleaning. Grasp the left side of the Butter Roller shaft. Lift up and to the left to remove from drive assembly. Remove the Butter Pan. Remove the Top and Bottom Front Panels.
Daily Parts Cleaning:The Feeder, and Top and Bottom Front Panel can be placed in a dishwasher or sink and washed with detergent and warm water.
Daily Conveyor Cleaning:NOTE: Do not use any chloride or chlorine -based products to clean or rinse toaster or toaster parts.Conveyor may be hot and is heavy, use caution when lifting and removing. Remove the conveyor assembly by gripping the two handles at the top and lifting forward until it clears the gears. Lift it up and out gently placing it in a sink with the drain stopped, or in a suitable container to soak over night. Conveyor can be placed in the sink or container while warm. Use caution when handling a hot conveyor. The soak solution is a mix of 10 parts hot water (120ºF or more) to 1 part (minimum) “INSIDE OUT” brand 3-IN-1. Fill the sink or suitable container with the solution, to completely cover the conveyor by approximately one inch. Allow the conveyor to soak in the solution over night. Remove the conveyor from the solution. Use a stiff non- metal brush or plastic pad to remove residual bun oil. Insure the chains are clean and free from debris. Use a brush to remove any soil or debris remaining on the chain. Rinse conveyor with plain hot water and allow to drain. Clean and sanitize sink or container after over night use!
Re-AssemblyBefore assembling the conveyor check the following: Fasteners on the Conveyor Assembly hardware should be tight with no signs of wear. Conveyor shaft gear and the Motor Shaft gear are tight. Hanger Bracket screws are tight and the brackets have not shifted during use.
Lubricate both chains thoroughly with vegetable oil. Bun oil may be used if it contains no animal fats, salts or dairy products. Note: Chain Lubrication is critical to chain life. Oil the chain daily. Gently replace conveyor into toaster. Replace all removed toaster parts. Plug power supply cord into wall outlet. Turn main power switch on. Turn conveyor switch on.
Last Important Note: The conveyor must stay clean to optimize speed and bun temperature. Keep conveyor looking new.
Daily Griddle Cleaning:Dry Operation: Wipe off the Teflon sheet with a damp cloth to remove any debris or particles that have collected on the sheet. If the sheet is worn, replace it with a new sheet.
Wet Operation: It is not necessary to completely remove residue, as long as the grill surface is smooth and free of burned on bread that may cause buns to stick.Tools needed for cleaning:
TM•Scotch-Brite Quick Clean Small Appliance Cleaner No. 702 or EquivalentTM
•Scotch-Brite Multi-Purpose Pad Holder No. 405 or EquivalentTM
•Scotch-Brite Squeegee No. 410 or Equivalent
5
TM•Scotch-Brite Griddle Polishing Pad No. 46 or Scotch-Brite™ General Purpose scrubbing Pad number 9650 or Equivalent
Also needed:•(Wet) terry towel •Catch pan for food soil •Common kitchen scraper
NOTE: Do not use a Grill Screen or Grill Brick to clean grill plate on the M-2000 Toaster.
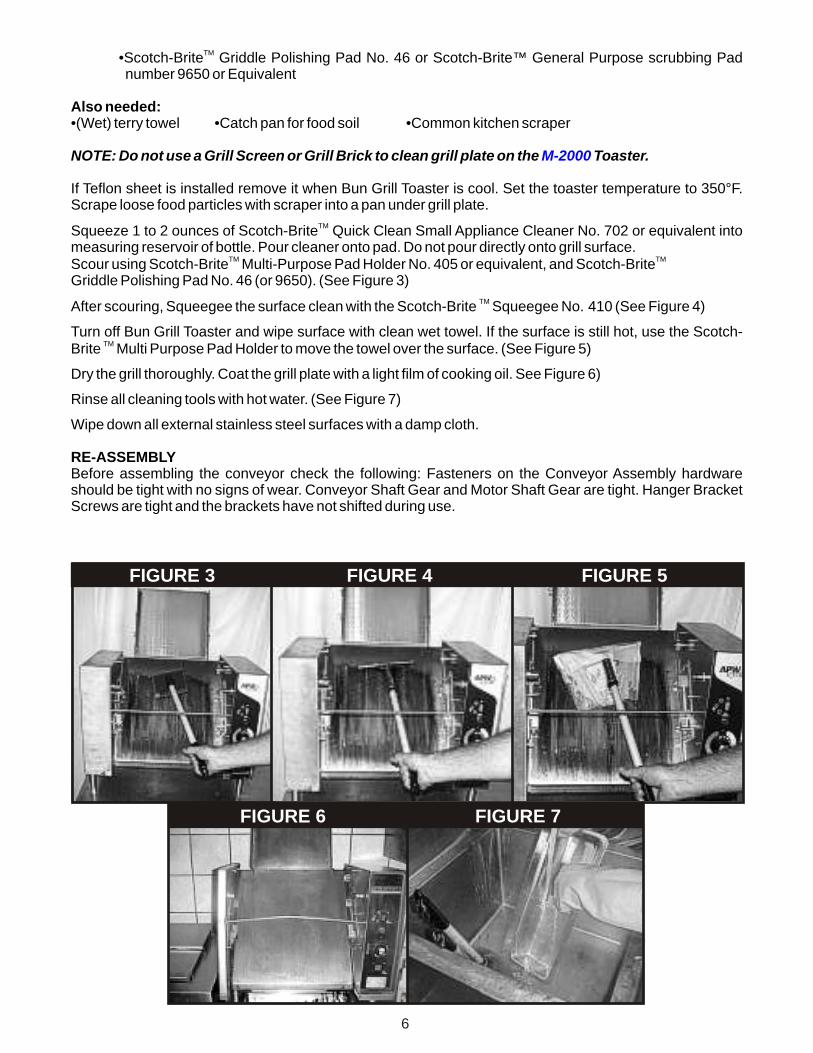
If Teflon sheet is installed remove it when Bun Grill Toaster is cool. Set the toaster temperature to 350°F. Scrape loose food particles with scraper into a pan under grill plate.
TMSqueeze 1 to 2 ounces of Scotch-Brite Quick Clean Small Appliance Cleaner No. 702 or equivalent into measuring reservoir of bottle. Pour cleaner onto pad. Do not pour directly onto grill surface.
TM TMScour using Scotch-Brite Multi-Purpose Pad Holder No. 405 or equivalent, and Scotch-BriteGriddle Polishing Pad No. 46 (or 9650). (See Figure 3)
TMAfter scouring, Squeegee the surface clean with the Scotch-Brite Squeegee No. 410 (See Figure 4)
Turn off Bun Grill Toaster and wipe surface with clean wet towel. If the surface is still hot, use the Scotch-TMBrite Multi Purpose Pad Holder to move the towel over the surface. (See Figure 5)
Dry the grill thoroughly. Coat the grill plate with a light film of cooking oil. See Figure 6)
Rinse all cleaning tools with hot water. (See Figure 7)
Wipe down all external stainless steel surfaces with a damp cloth.
RE-ASSEMBLYBefore assembling the conveyor check the following: Fasteners on the Conveyor Assembly hardware should be tight with no signs of wear. Conveyor Shaft Gear and Motor Shaft Gear are tight. Hanger Bracket Screws are tight and the brackets have not shifted during use.
.
6
FIGURE 3 FIGURE 4 FIGURE 5
FIGURE 6 FIGURE 7
TROUBLESHOOTING GUIDE
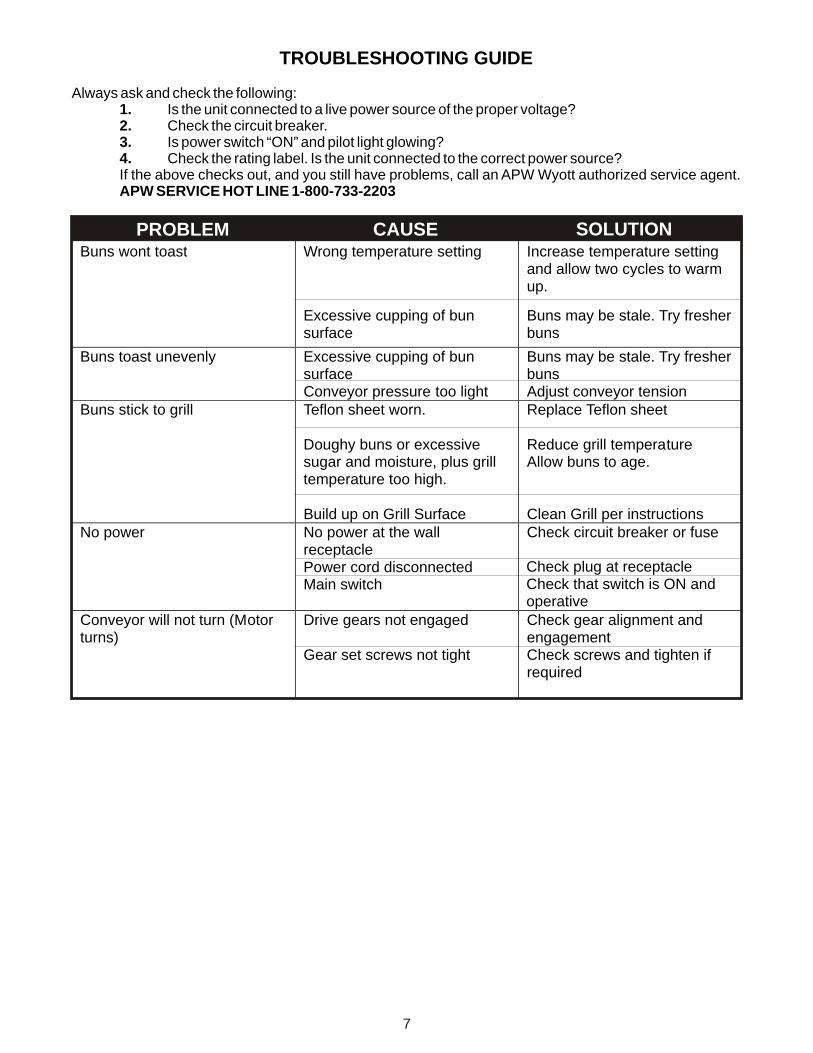
Always ask and check the following:1. Is the unit connected to a live power source of the proper voltage?2. Check the circuit breaker.3. Is power switch “ON” and pilot light glowing?4. Check the rating label. Is the unit connected to the correct power source?If the above checks out, and you still have problems, call an APW Wyott authorized service agent. APW SERVICE HOT LINE 1-800-733-2203
Buns wont toast Wrong temperature setting Excessive cupping of bun surface
Increase temperature setting and allow two cycles to warm up. Buns may be stale. Try fresher buns
Buns toast unevenly Excessive cupping of bun surface Conveyor pressure too light
Buns may be stale. Try fresher buns Adjust conveyor tension
Buns stick to grill Teflon sheet worn. Doughy buns or excessive sugar and moisture, plus grill temperature too high. Build up on Grill Surface
Replace Teflon sheet Reduce grill temperature Allow buns to age. Clean Grill per instructions
No power No power at the wall receptacle Power cord disconnected Main switch
Check circuit breaker or fuse
Check plug at receptacle Check that switch is ON and operative
Conveyor will not turn (Motor turns)
Drive gears not engaged Gear set screws not tight
Check gear alignment and engagement
Check screws and tighten if required
PROBLEM CAUSE SOLUTION PROBLEM CAUSE SOLUTION
7
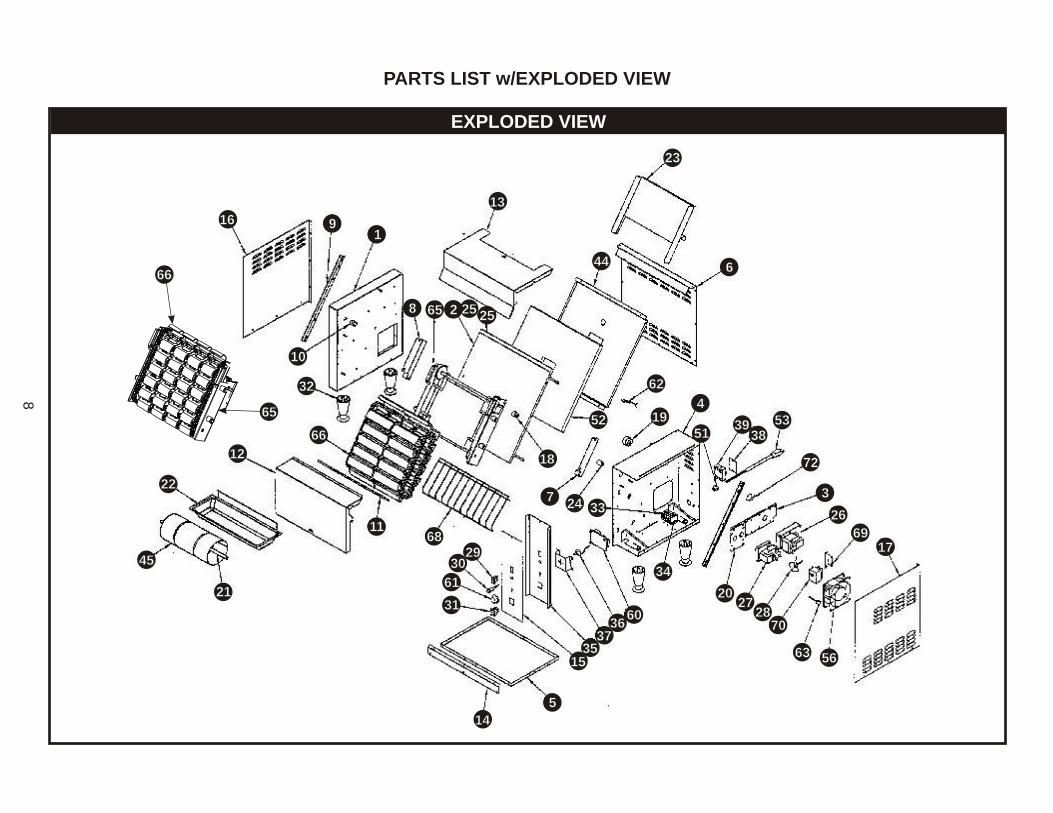
PARTS LIST w/EXPLODED VIEW
EXPLODED VIEW
8
6969
11
33
44
55
1111
1212
1313
1414
1515
2121
2222
2323
2424
4545
4444
3131
3232
3333
3434
3535
535352525151
6565
6565
6363
6262
7272
6161
66
77
88
99
1010
1616
1717
1818
1919
2020
2626
27272828
29293030
36363737
38383939
60607070
6868
5656
6666
6666
22 25252525
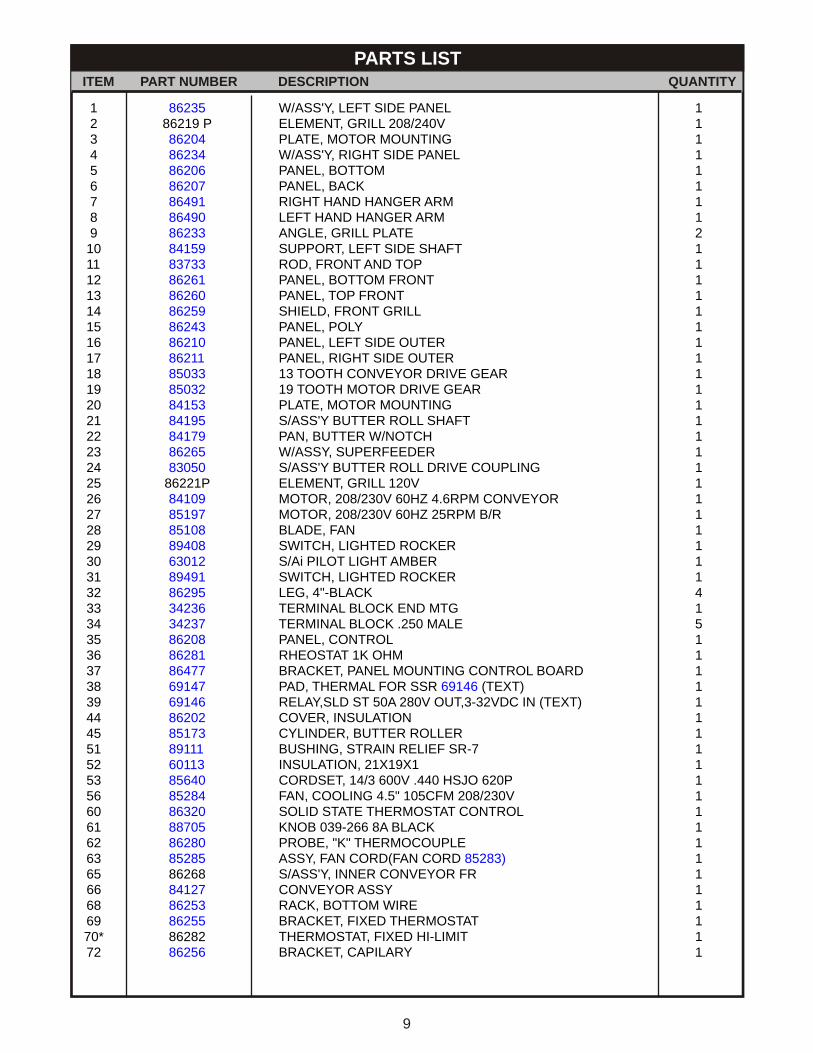
PARTS LISTITEM PART NUMBER DESCRIPTION QUANTITY
9
123456789101112131415161718192021222324252627282930313233343536373839444551525356606162636566686970*72
8623586219 P86204862348620686207864918649086233841598373386261862608625986243862108621185033850328415384195841798626583050
86221P841098519785108894086301289491862953423634237862088628186477691476914686202851738911160113856408528486320887058628085285862688412786253862558628286256
1111111121111111111111111111111415111111111111111111111
W/ASS'Y, LEFT SIDE PANELELEMENT, GRILL 208/240VPLATE, MOTOR MOUNTINGW/ASS'Y, RIGHT SIDE PANELPANEL, BOTTOMPANEL, BACKRIGHT HAND HANGER ARMLEFT HAND HANGER ARMANGLE, GRILL PLATESUPPORT, LEFT SIDE SHAFTROD, FRONT AND TOPPANEL, BOTTOM FRONTPANEL, TOP FRONTSHIELD, FRONT GRILLPANEL, POLYPANEL, LEFT SIDE OUTERPANEL, RIGHT SIDE OUTER13 TOOTH CONVEYOR DRIVE GEAR19 TOOTH MOTOR DRIVE GEARPLATE, MOTOR MOUNTINGS/ASS'Y BUTTER ROLL SHAFTPAN, BUTTER W/NOTCHW/ASSY, SUPERFEEDERS/ASS'Y BUTTER ROLL DRIVE COUPLINGELEMENT, GRILL 120VMOTOR, 208/230V 60HZ 4.6RPM CONVEYORMOTOR, 208/230V 60HZ 25RPM B/RBLADE, FANSWITCH, LIGHTED ROCKERS/Ai PILOT LIGHT AMBERSWITCH, LIGHTED ROCKERLEG, 4"-BLACKTERMINAL BLOCK END MTGTERMINAL BLOCK .250 MALEPANEL, CONTROLRHEOSTAT 1K OHMBRACKET, PANEL MOUNTING CONTROL BOARDPAD, THERMAL FOR SSR 69146 (TEXT)RELAY,SLD ST 50A 280V OUT,3-32VDC IN (TEXT)COVER, INSULATIONCYLINDER, BUTTER ROLLERBUSHING, STRAIN RELIEF SR-7INSULATION, 21X19X1CORDSET, 14/3 600V .440 HSJO 620PFAN, COOLING 4.5" 105CFM 208/230VSOLID STATE THERMOSTAT CONTROLKNOB 039-266 8A BLACKPROBE, "K" THERMOCOUPLEASSY, FAN CORD(FAN CORD 85283)S/ASS'Y, INNER CONVEYOR FRCONVEYOR ASSYRACK, BOTTOM WIREBRACKET, FIXED THERMOSTATTHERMOSTAT, FIXED HI-LIMITBRACKET, CAPILARY
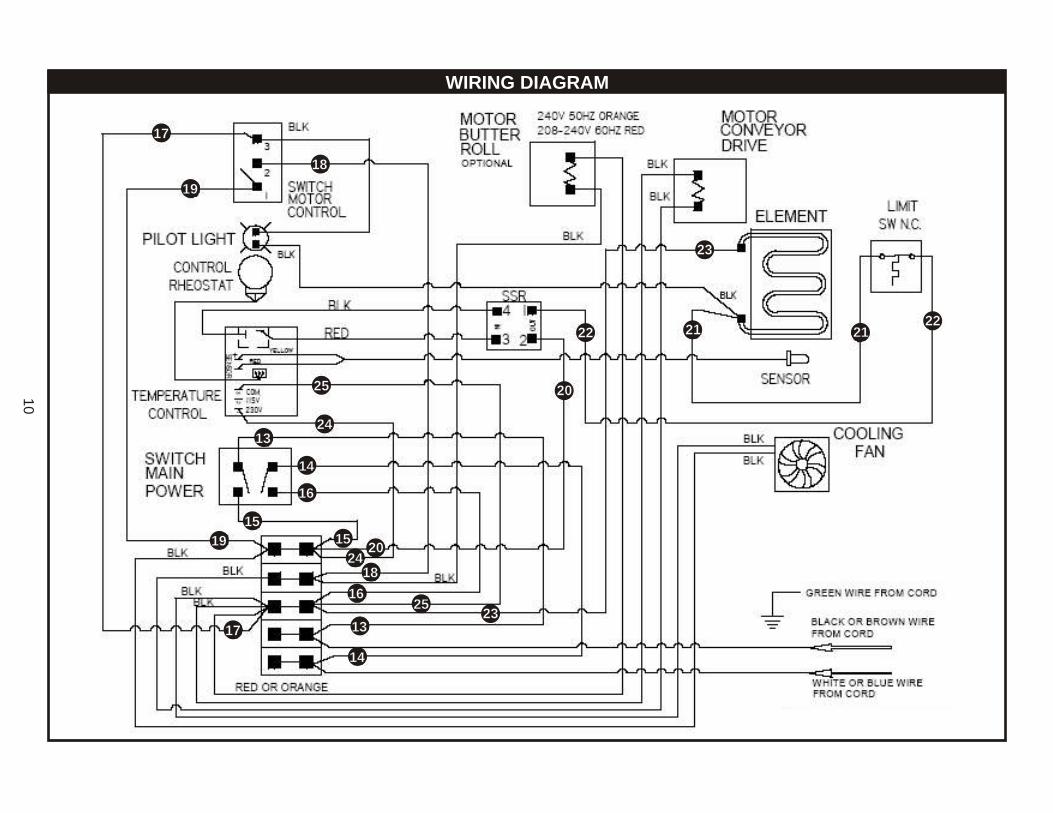
WIRING DIAGRAM
10
1313
1313
1414
1414
1515
1515
1616
1616
1717
1717
1818
1818
1919
1919 2020
2020
212121212222
2222
2323
2323
2424
2424
2525
2525
IMPORTANT FOR FUTURE REFERENCE
Please complete this information and retain this manual for the life of the equipment. For Warranty Service and/or Parts, this information is required.
Model Number Serial Number Date Purchased
Notes:
11
12
APW WYOTT EQUIPMENT LIMITED WARRANTY
APW Wyott Foodservice Equipment Company warrants it's equipment against defects in materials and workmanship, subject to the following conditions:
This warranty applies to the original owner only and is not assignable.
Should any product fail to function in its intended manner under normal use within the limits defined in this warranty, at the option of APW Wyott such product will be repaired or replaced by APW Wyott or its Authorized Service Agency. APW Wyott will only be responsible for charges incurred or service performed by its Authorized Service Agencies. The use of other than APW Wyott Authorized Service Agencies will void this warranty and APW Wyott will not be responsible for such work or any charges associated with same. The closest APW Wyott Authorized Service Agent must be used.
This warranty covers products shipped into the 48 contiguous United States, Hawaii, metropolitan areas of Alaska and Canada. There will be no labor coverage for equipment located on any island not connected by roadway to the mainland.
Warranty coverage on products used outside the 48 contiguous United States, Hawaii, and metropolitan areas of Alaska and Canada may vary. Contact the international APW Wyott distributor, dealer, or service agency for details.
Time PeriodOne year for parts and one year for labor, effective from the date of purchase by the original owner. The Authorized Service Agency may, at their option, require proof of purchase. Parts replaced under this warranty are warranted for the un-expired portion of the original product warranty only.
Exceptions*Gas/Electric Cookline: Models GCB, GCRB, GF, GGM, GGT, CHP-H, EF, EG, EHP. Three (3) Year Warranty on all component parts, except switches and thermostats. (2 additional years on parts only. No labor on second or third year.)
*Broiler Briquettes, *Heat Strips: Models FD, FDL, FDD, FDDL. Two (2) Year Warranty on element only. No labor second year.*Glass Windows, Doors, Seals, Rubber Seals, Light Bulbs:
In all cases, parts covered by extended warranty will be shipped FOB the factory after the first year.
Portable Carry In ProductsEquipment weighing over 70 pounds or permanently installed will be serviced on-site as per the terms of this warranty. Equipment weighing 70 pounds or under, and which is not permanently installed, i.e. with cord and plug, is considered portable and is subject to the following warranty handling limitations. If portable equipment fails to operate in its intended manner on the first day of connection, or use, at APW Wyott's option or its Authorized Service Agency, it will be serviced on site or replaced.
From day two through the conclusion of this warranty period, portable units must be taken to or sent prepaid to the APW Wyott Authorized Service Agency for in-warranty repairs. No mileage or travel charges are allowed on portable units after the first day of use. If the customer wants on-site service, they may receive same by paying the travel and mileage charges. Exceptions to this rule: (1) countertop warmers and cookers, which are covered under the Enhanced Warranty Program, and (2) toasters or rollergrills which have in store service.
ExclusionsThe following conditions are not covered by warranty:
*Equipment failure relating to improper installation, improper utility connection or supply and problems due to ventilation.*Equipment that has not been properly maintained, calibration of controls, adjustments, damage from improper cleaning and water damage to controls.*Equipment that has not been used in an appropriate manner, or has been subject to misuse or misapplication, neglect, abuse, accident, alteration, negligence, damage during transit, delivery or installation, fire, flood, riot or act of god.*Equipment that has the model number or serial number removed or altered.
If the equipment has been changed, altered, modified or repaired by other than an Authorized Service Agency during or after the warranty period, then the manufacturer shall not be liable for any damages to any person or to any property, which may result from the use of the equipment thereafter.
This warranty does not cover services performed at overtime or premium labor rates. Should service be required at times which normally involve overtime or premium labor rates, the owner shall be charged for the difference between normal service rates and such premium rates. APW Wyott does not assume any liability for extended delays in replacing or repairing any items beyond its control.
In all cases, the use of other than APW Wyott Authorized OEM Replacement Parts will void this warranty.
This equipment is intended for commercial use only. Warranty is void if equipment is installed in other than commercial application.
Water Quality RequirementsWater supply intended for a unit that has in excess of 3.0 grains of hardness per gallon (GPG) must be treated or softened before being used. Water containing over 3.0 GPG will decrease the efficiency and reduce the operation life of the unit.
Note: Product failure caused by liming or sediment buildup is not covered under warranty.
“THE FOREGOING WARRANTY IS IN LIEU OF ANY AND ALL OTHER WARRANTIES EXPRESSED OR IMPLIED INCLUDING ANY IMPLIED WARRANTY OF MERCHANTABILITY OR FITNESS FOR PARTICULAR PURPOSES AND CONSTITUTES THE ENTIRE LIABILITY OF APW WYOTT. IN NO EVENT DOES THE LIMITED WARRANTY EXTEND BEYOND THE TERMS STATED HEREIN.”
9/05
Rock Grates, Cooking Grates, Burner Shields, Fireboxes: 90 Day Material Only. No Labor.
90 Day Material Only. No Labor.