Embed Size (px)
Citation preview
Y Balt B.Sc. (Math Science) Hons
USER MANUAL
SUPERVISOR (IT)
Munsoft 5i Rel. 5.2
V2.6
2
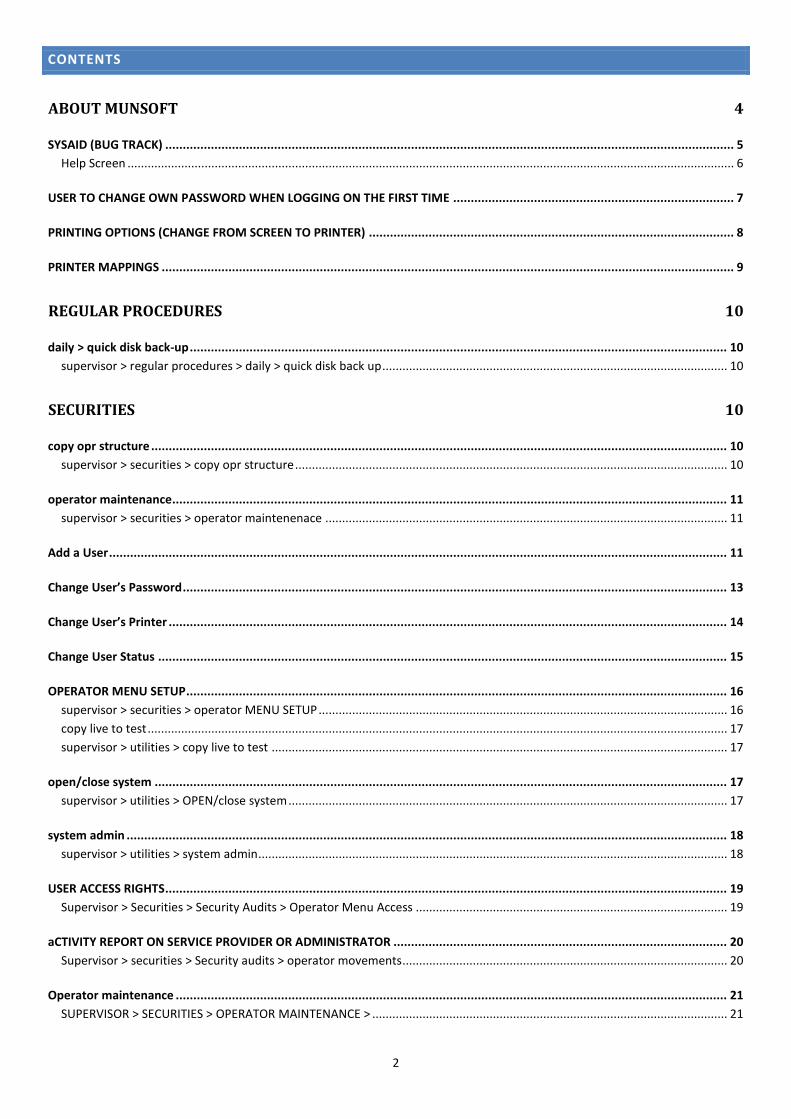
CONTENTS
ABOUT MUNSOFT 4
SYSAID (BUG TRACK) .................................................................................................................................................................. 5
Help Screen ..................................................................................................................................................................................... 6
USER TO CHANGE OWN PASSWORD WHEN LOGGING ON THE FIRST TIME ................................................................................ 7
PRINTING OPTIONS (CHANGE FROM SCREEN TO PRINTER) ........................................................................................................ 8
PRINTER MAPPINGS ................................................................................................................................................................... 9
REGULAR PROCEDURES 10
daily > quick disk back-up ......................................................................................................................................................... 10
supervisor > regular procedures > daily > quick disk back up ....................................................................................................... 10
SECURITIES 10
copy opr structure .................................................................................................................................................................... 10
supervisor > securities > copy opr structure ................................................................................................................................. 10
operator maintenance .............................................................................................................................................................. 11
supervisor > securities > operator maintenenace ........................................................................................................................ 11
Add a User ................................................................................................................................................................................ 11
Change User’s Password ........................................................................................................................................................... 13
Change User’s Printer ............................................................................................................................................................... 14
Change User Status .................................................................................................................................................................. 15
OPERATOR MENU SETUP .......................................................................................................................................................... 16
supervisor > securities > operator MENU SETUP .......................................................................................................................... 16
copy live to test ............................................................................................................................................................................. 17
supervisor > utilities > copy live to test ........................................................................................................................................ 17
open/close system ................................................................................................................................................................... 17
supervisor > utilities > OPEN/close system ................................................................................................................................... 17
system admin ........................................................................................................................................................................... 18
supervisor > utilities > system admin ............................................................................................................................................ 18
USER ACCESS RIGHTS ................................................................................................................................................................ 19
Supervisor > Securities > Security Audits > Operator Menu Access ............................................................................................. 19
aCTIVITY REPORT ON SERVICE PROVIDER OR ADMINISTRATOR ............................................................................................... 20
Supervisor > securities > Security audits > operator movements................................................................................................. 20
Operator maintenance ............................................................................................................................................................. 21
SUPERVISOR > SECURITIES > OPERATOR MAINTENANCE > .......................................................................................................... 21
3
Password reset ......................................................................................................................................................................... 23
SUPERVISOR > SECURITIES > OPERATOR MAINTENANCE ............................................................................................................. 23
SETTING GLOBAL PASSWORD PARAMETERS ............................................................................................................................ 24
SUPERVISOR > SECURITIES > SECURITY SETTINGS ........................................................................................................................ 24
USER AUDIT TRAIL REPORT ....................................................................................................................................................... 25
sUPERVISOR > SECURITIES > SECURITY AUDITS > OPERATOR MASTER AUDIT ............................................................................. 25
Report on failed logon attempts ............................................................................................................................................... 26
SUPERVISOR > SECURITIES > SECURITY AUDITS > OPERATOR LOGIN AUDIT ................................................................................ 26
Logon Report ............................................................................................................................................................................ 27
SUPERVISOR > SECURITIES > SECURITY AUDITS > OPERATOR LOGIN AUDIT ................................................................................ 27
BLOCKED USER REPORT ............................................................................................................................................................ 28
SUPERVISOR > SECURITIES > SECURITY AUDITS > OPERATOR LOGIN AUDIT ................................................................................ 28
Log System Change ................................................................................................................................................................... 29
SUPERVISOR > SECURITIES > LOG SYSTEM CHANGE ..................................................................................................................... 29
Automated change management for support technician.......................................................................................................... 30
SUPERVISOR > SECURITIES > SUPPORT LOG ................................................................................................................................. 30
Module Usage Screen & Print ................................................................................................................................................... 32
Supervisor > Utilities > Check System Usage ................................................................................................................................ 32
NOTES 33
4
ABOUT MUNSOFT
- Munsoft is developed in a modern recognized programming language to facilitate quick and easy enhancements.
- The user interface is a Graphical User Interface and screens are easy to understand and navigate.
- Munsoft runs on a recognized modern relational database called ORACLE 11g.
- The database performs Audit functions that records all master file amendments (Add, Change, Delete), records the date and time,
user as well as the old and new value of the field changed.
- Third party vendors may easily gain direct read-only access to Munsoft via an ODBC driver.
- All Munsoft operator menus are customized to the operator’s functions to be performed i.e. the system has a soft menu structure.
If at any stage you don’t have an option on your menu that you need you can ask your System Administrator or the support staff at
Munsoft to give you the latest Menu structure.
- All updating happens in real-time i.e. no batch processing or overnight updating.
- Munsoft integrates with 3rd party software systems like Contour, PAYDAY, VIP, EasyPay, Pay@, electronic meter reading handhelds,
prepaid vending systems, TGIS, ZMS, Metrolev, MBS, Lawpac, LaserCom, CAB Holdings and all South African Banks.
- Auditors and Financial consultants can easily extract any information from the FMS menu into Excel. (Consumers Debtors Extract
Menu)
- Munsoft uses an issue logging system called SYSAID.
SYSAID is a web based call logging system that automatically escalates issues should they not be attended to within a time-frame
and keeps all parties informed via email.
It is important to log all requests on the Issue Logging system as requests telephonically or via email could get lost or the person
may be on leave and not be able to attend immediately.
When the issues are logged on SYSAID the issues are picked up by any of the support staff at Munsoft immediately and the status of
the issue can be monitored by the municipality.
When logging an issue remember to give as much information as possible regarding the query and attach screenshots or reports to
assist the support staff in troubleshooting the issue quickly.
- Munsoft provides the option of sending out SARS compliant Consumer Statements via MMS to cell phones and Warning, Cut Off,
Final Notice and General Notices via SMS to cell phones. Once you have signed up you will be given an MMS and SMS account.
- All modules on Munsoft are integrated to the Vote Ledger.
- Munsoft is parameter driven.
- All Modules run on their own calendar which allows a module to run ahead until the GL catches up. For example the Cashier Module
can close to allow the cashiers to carry on with the new month if the other modules are running behind.
5
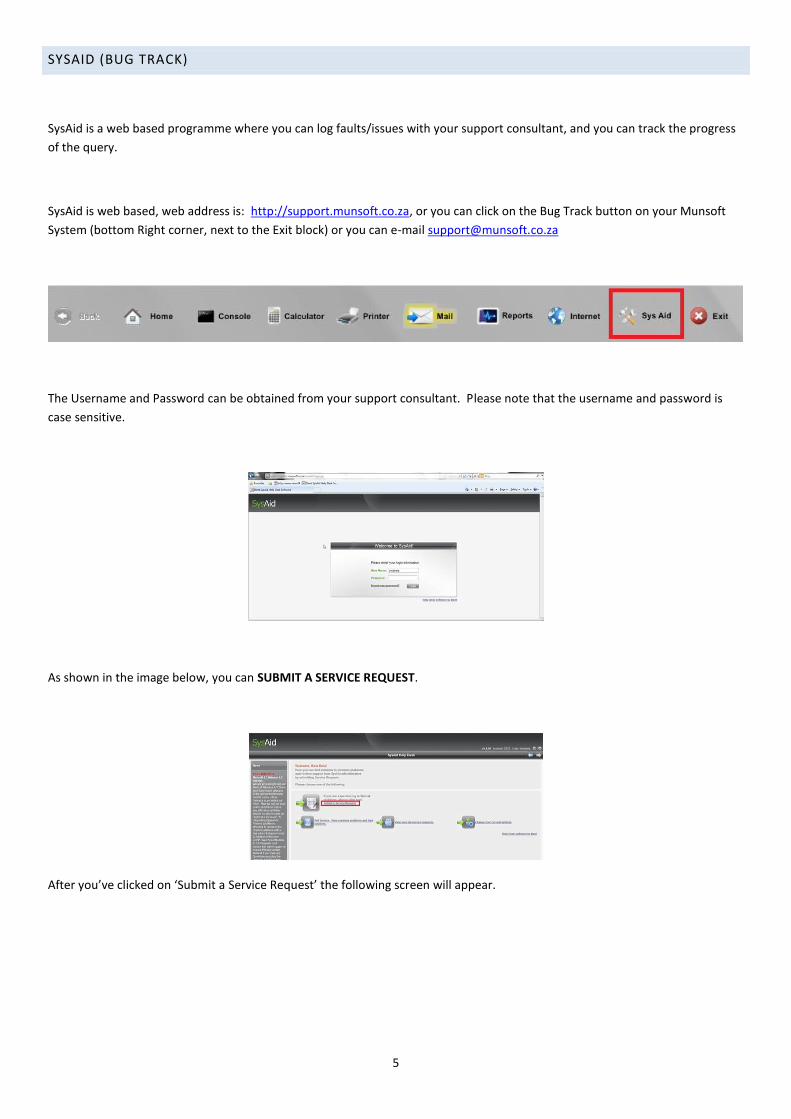
SYSAID (BUG TRACK)
SysAid is a web based programme where you can log faults/issues with your support consultant, and you can track the progress
of the query.
SysAid is web based, web address is: http://support.munsoft.co.za, or you can click on the Bug Track button on your Munsoft
System (bottom Right corner, next to the Exit block) or you can e-mail [email protected]
The Username and Password can be obtained from your support consultant. Please note that the username and password is
case sensitive.
As shown in the image below, you can SUBMIT A SERVICE REQUEST.
After you’ve clicked on ‘Submit a Service Request’ the following screen will appear.
6
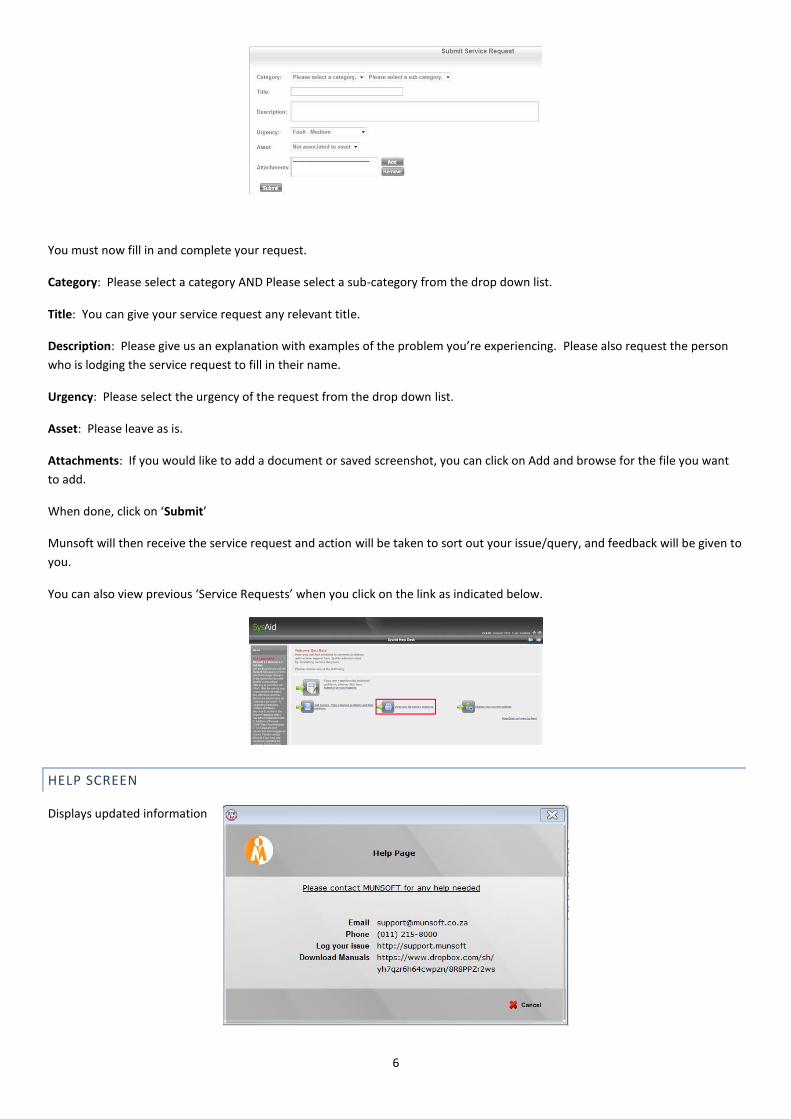
You must now fill in and complete your request.
Category: Please select a category AND Please select a sub-category from the drop down list.
Title: You can give your service request any relevant title.
Description: Please give us an explanation with examples of the problem you’re experiencing. Please also request the person
who is lodging the service request to fill in their name.
Urgency: Please select the urgency of the request from the drop down list.
Asset: Please leave as is.
Attachments: If you would like to add a document or saved screenshot, you can click on Add and browse for the file you want
to add.
When done, click on ‘Submit’
Munsoft will then receive the service request and action will be taken to sort out your issue/query, and feedback will be given to
you.
You can also view previous ‘Service Requests’ when you click on the link as indicated below.
HELP SCREEN
Displays updated information
7
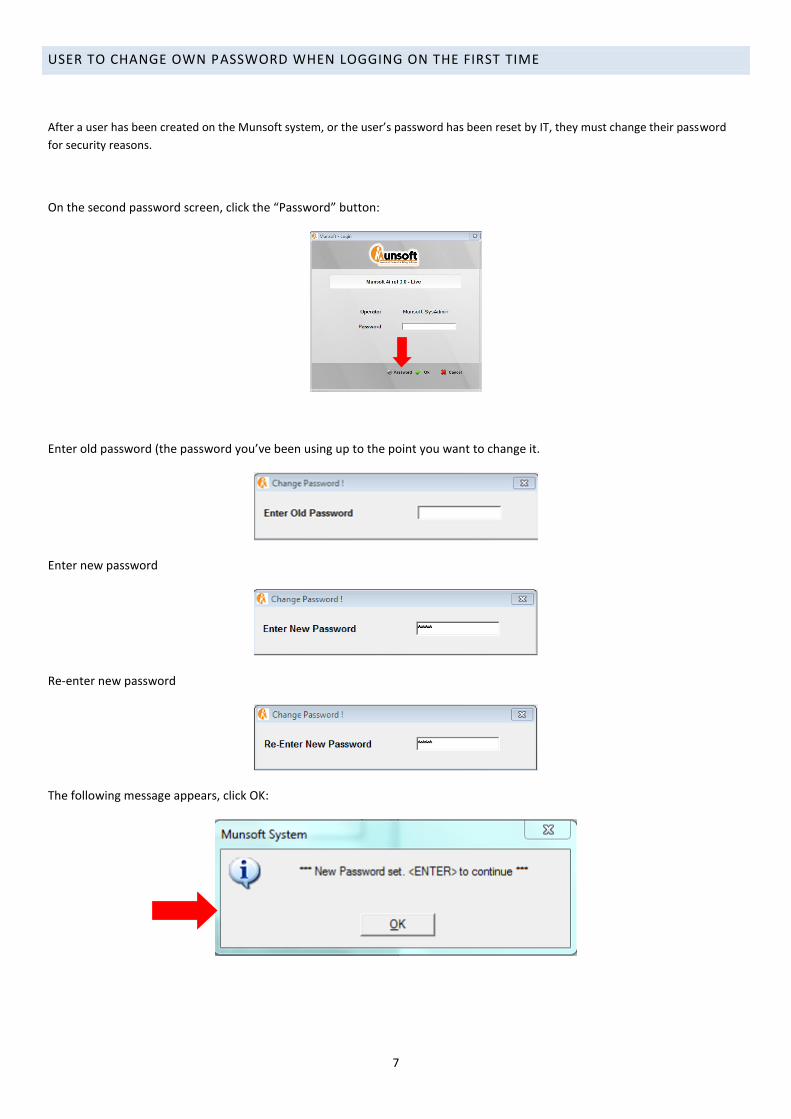
USER TO CHANGE OWN PASSWORD WHEN LOGGING ON THE FIRST TIME
After a user has been created on the Munsoft system, or the user’s password has been reset by IT, they must change their password
for security reasons.
On the second password screen, click the “Password” button:
Enter old password (the password you’ve been using up to the point you want to change it.
Enter new password
Re-enter new password
The following message appears, click OK:
8
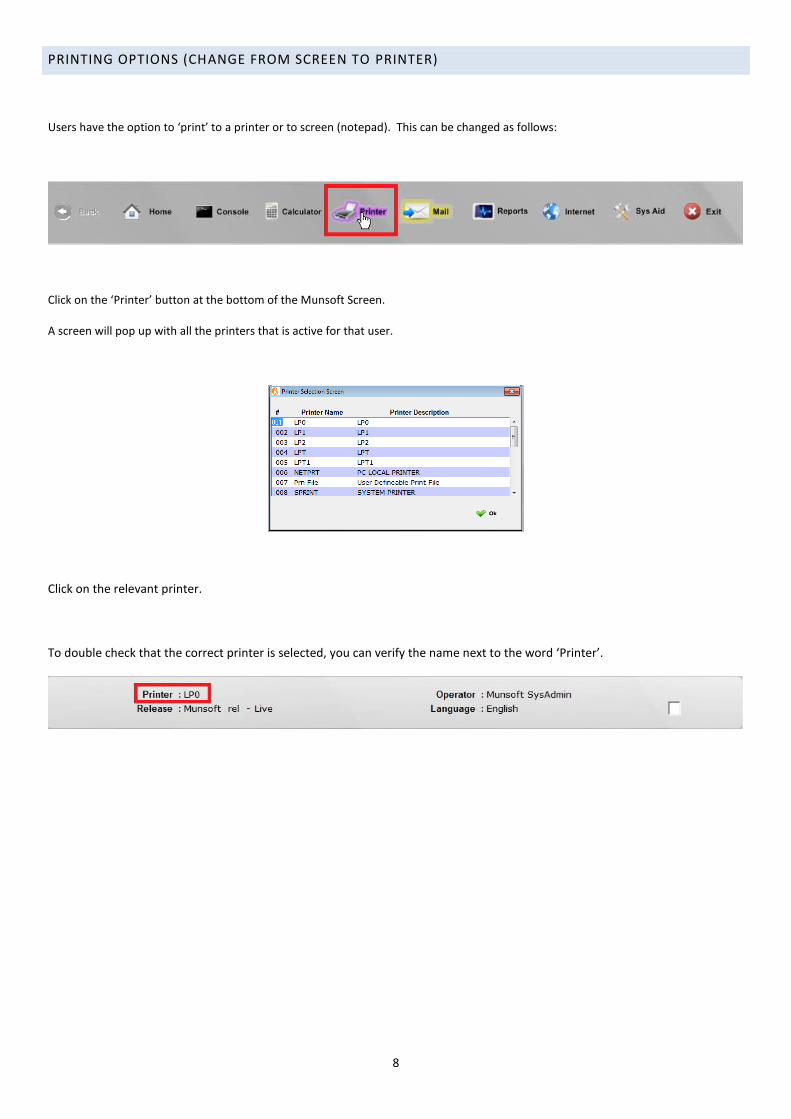
PRINTING OPTIONS (CHANGE FROM SCREEN TO PRINTER)
Users have the option to ‘print’ to a printer or to screen (notepad). This can be changed as follows:
Click on the ‘Printer’ button at the bottom of the Munsoft Screen.
A screen will pop up with all the printers that is active for that user.
Click on the relevant printer.
To double check that the correct printer is selected, you can verify the name next to the word ‘Printer’.
9
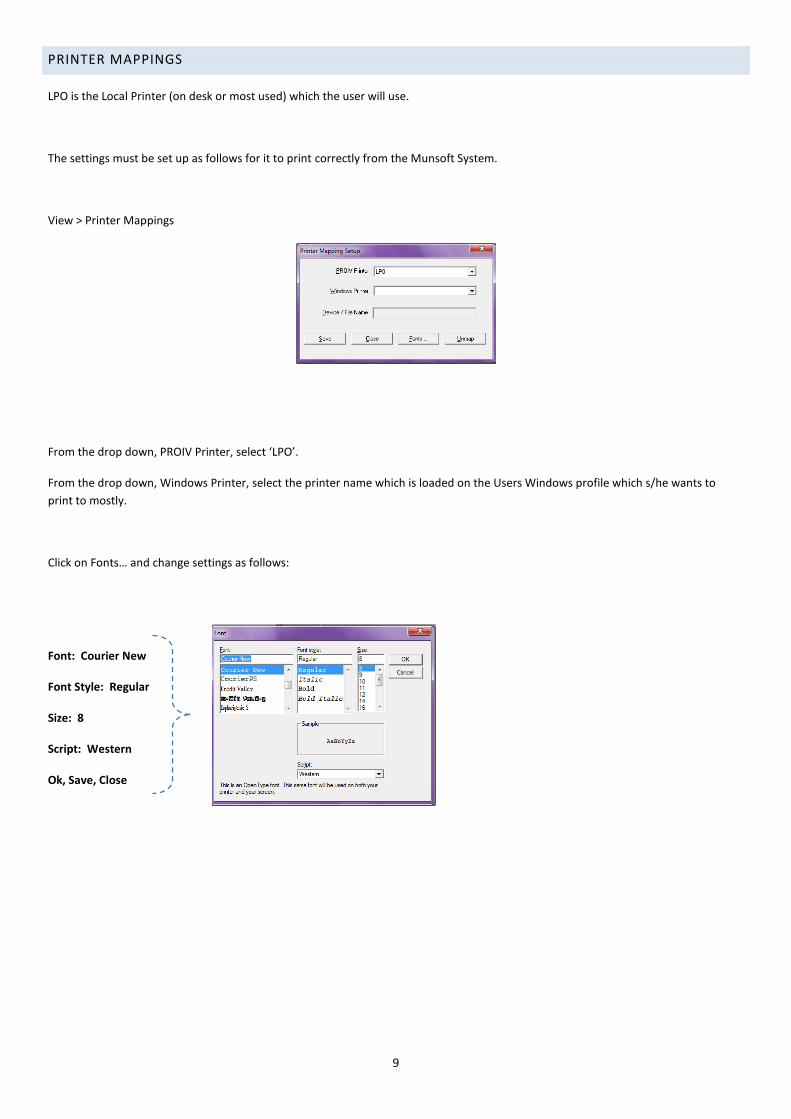
PRINTER MAPPINGS
LPO is the Local Printer (on desk or most used) which the user will use.
The settings must be set up as follows for it to print correctly from the Munsoft System.
View > Printer Mappings
From the drop down, PROIV Printer, select ‘LPO’.
From the drop down, Windows Printer, select the printer name which is loaded on the Users Windows profile which s/he wants to
print to mostly.
Click on Fonts… and change settings as follows:
Font: Courier New
Font Style: Regular
Size: 8
Script: Western
Ok, Save, Close
10
REGULAR PROCEDURES
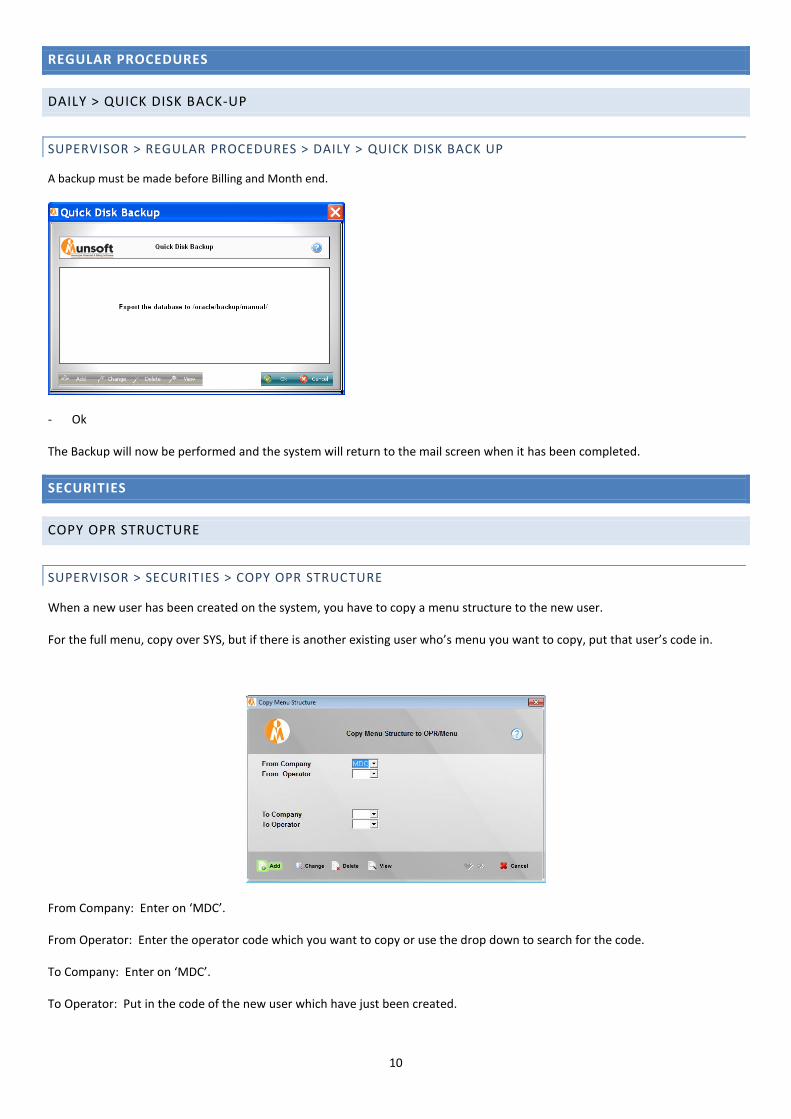
DAILY > QUICK DISK BACK-UP
SUPERVISOR > REGULAR PROCEDURES > DAILY > QUICK DISK BACK UP
A backup must be made before Billing and Month end.
- Ok
The Backup will now be performed and the system will return to the mail screen when it has been completed.
SECURITIES
COPY OPR STRUCTURE
SUPERVISOR > SECURITIES > COPY OPR STRUCTURE
When a new user has been created on the system, you have to copy a menu structure to the new user.
For the full menu, copy over SYS, but if there is another existing user who’s menu you want to copy, put that user’s code in.
From Company: Enter on ‘MDC’.
From Operator: Enter the operator code which you want to copy or use the drop down to search for the code.
To Company: Enter on ‘MDC’.
To Operator: Put in the code of the new user which have just been created.
11
OPERATOR MAINTENANCE
SUPERVISOR > SECURITIES > OPERATOR MAINTENENACE
This screen is used to:
- Add users
- Change User’s printers
- Change passwords
- Change user status
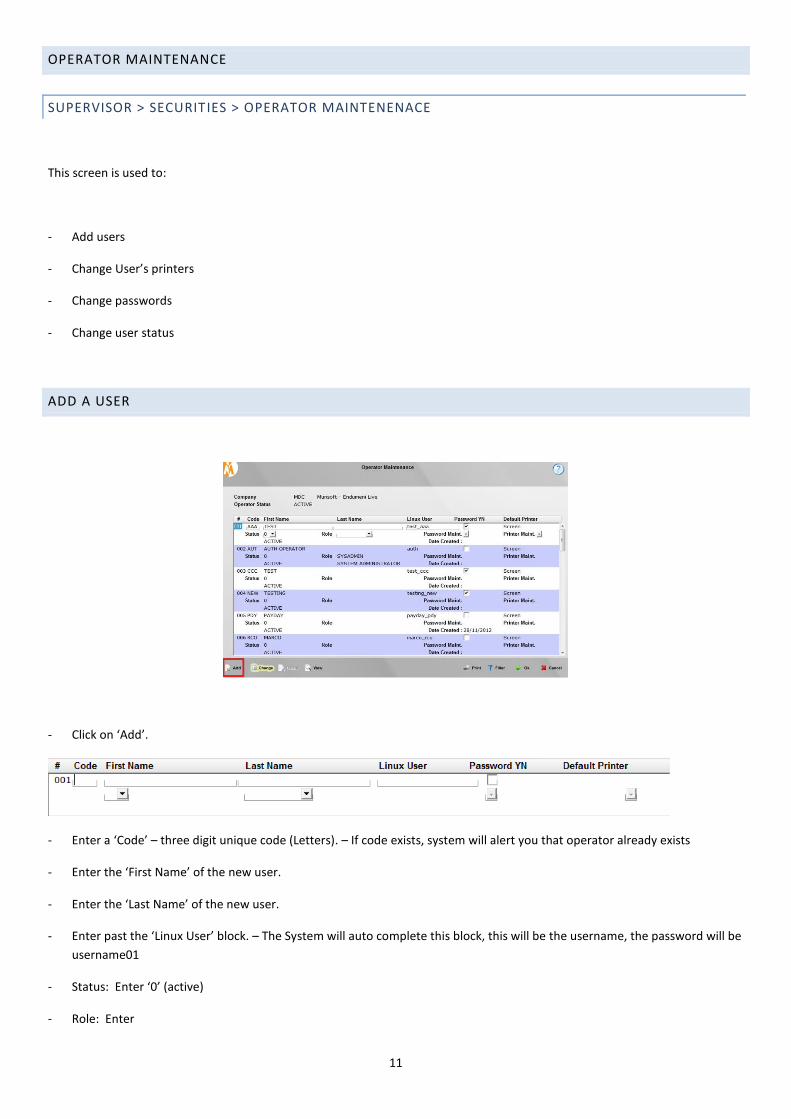
ADD A USER
- Click on ‘Add’.
- Enter a ‘Code’ – three digit unique code (Letters). – If code exists, system will alert you that operator already exists
- Enter the ‘First Name’ of the new user.
- Enter the ‘Last Name’ of the new user.
- Enter past the ‘Linux User’ block. – The System will auto complete this block, this will be the username, the password will be
username01
- Status: Enter ‘0’ (active)
- Role: Enter

12
- Enter
- On the Assign Menu Template’ screen, assign the Munsoft 5i Menu Template.
- A message will pop up, ‘CODE’ has been created. Click on ‘Ok’.
- Click on ‘Set Password’.
- New Password: enter your desired institution standard password.
- Retype Password: re-enter your desired institution standard password.
- Ok
- Ok
- Ok
13
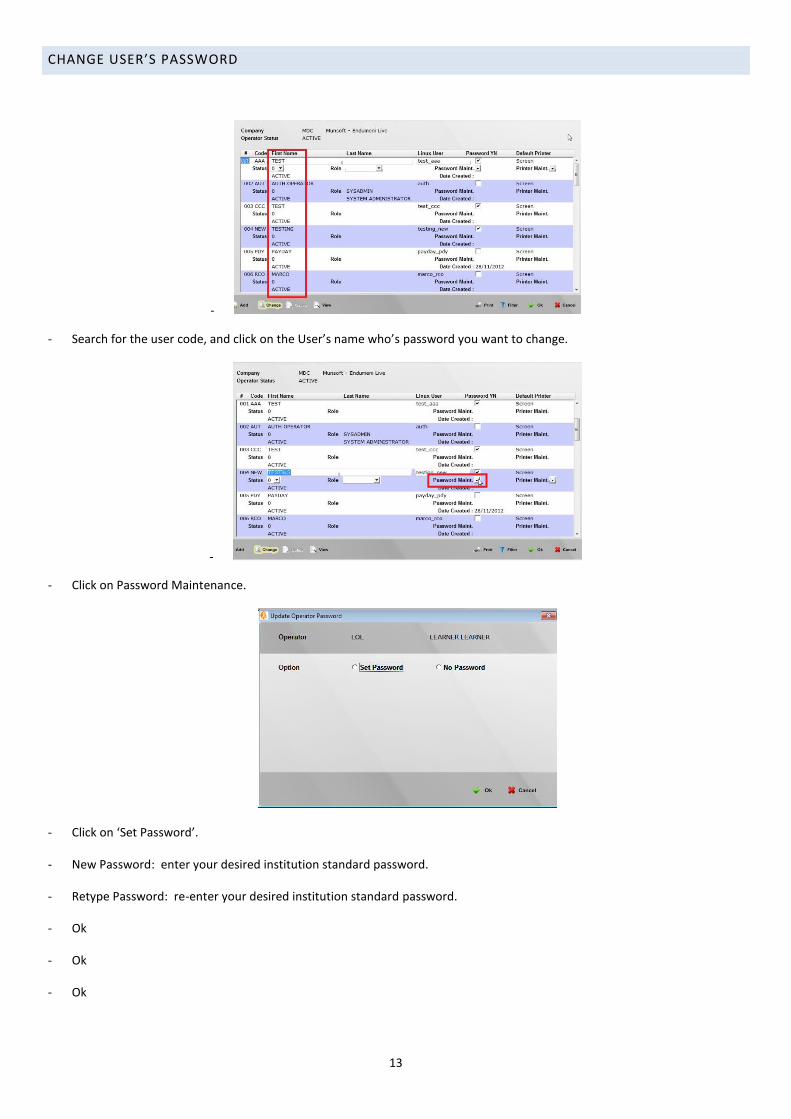
CHANGE USER’S PASSWORD
-
- Search for the user code, and click on the User’s name who’s password you want to change.
-
- Click on Password Maintenance.
- Click on ‘Set Password’.
- New Password: enter your desired institution standard password.
- Retype Password: re-enter your desired institution standard password.
- Ok
- Ok
- Ok
14
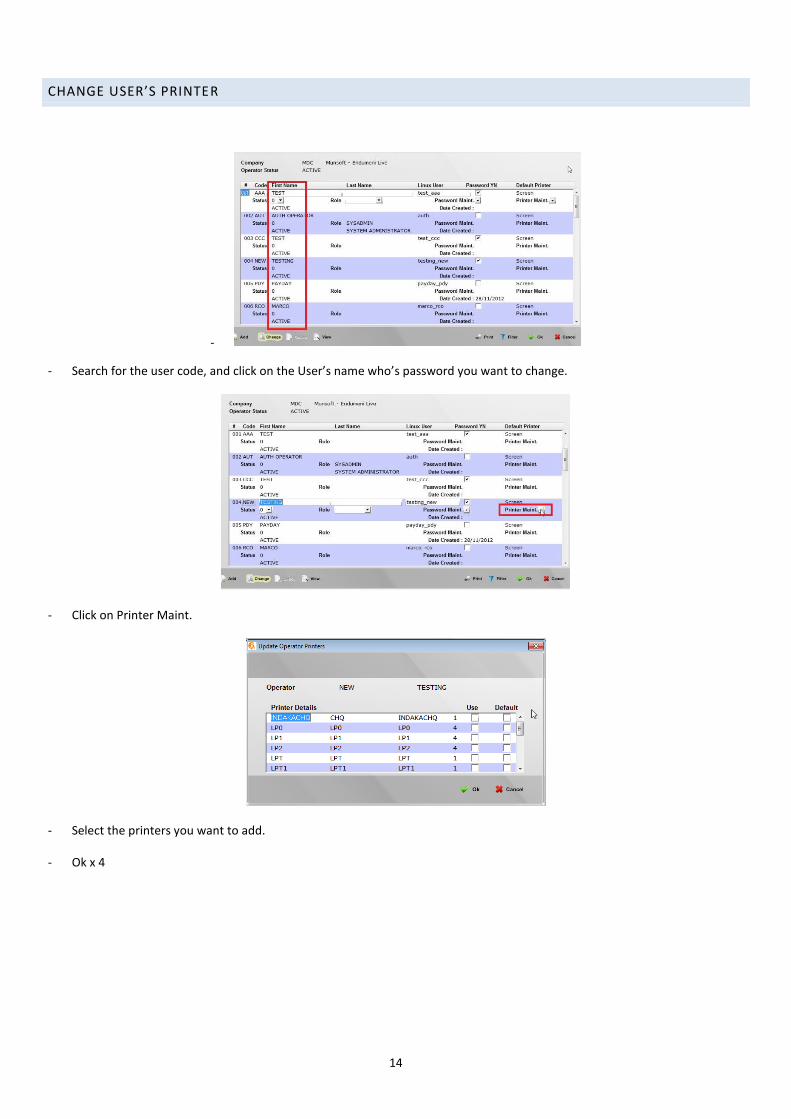
CHANGE USER’S PRINTER
-
- Search for the user code, and click on the User’s name who’s password you want to change.
- Click on Printer Maint.
- Select the printers you want to add.
- Ok x 4
15
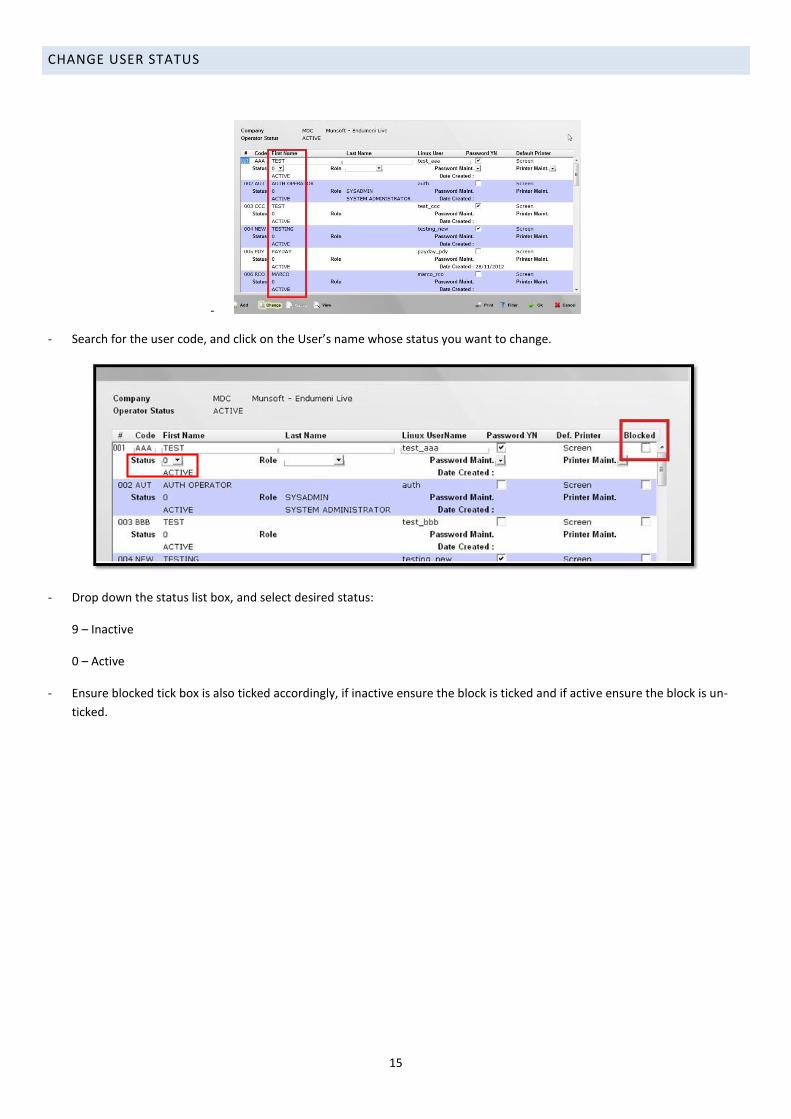
CHANGE USER STATUS
-
- Search for the user code, and click on the User’s name whose status you want to change.
- Drop down the status list box, and select desired status:
9 – Inactive
0 – Active
- Ensure blocked tick box is also ticked accordingly, if inactive ensure the block is ticked and if active ensure the block is un-
ticked.
16
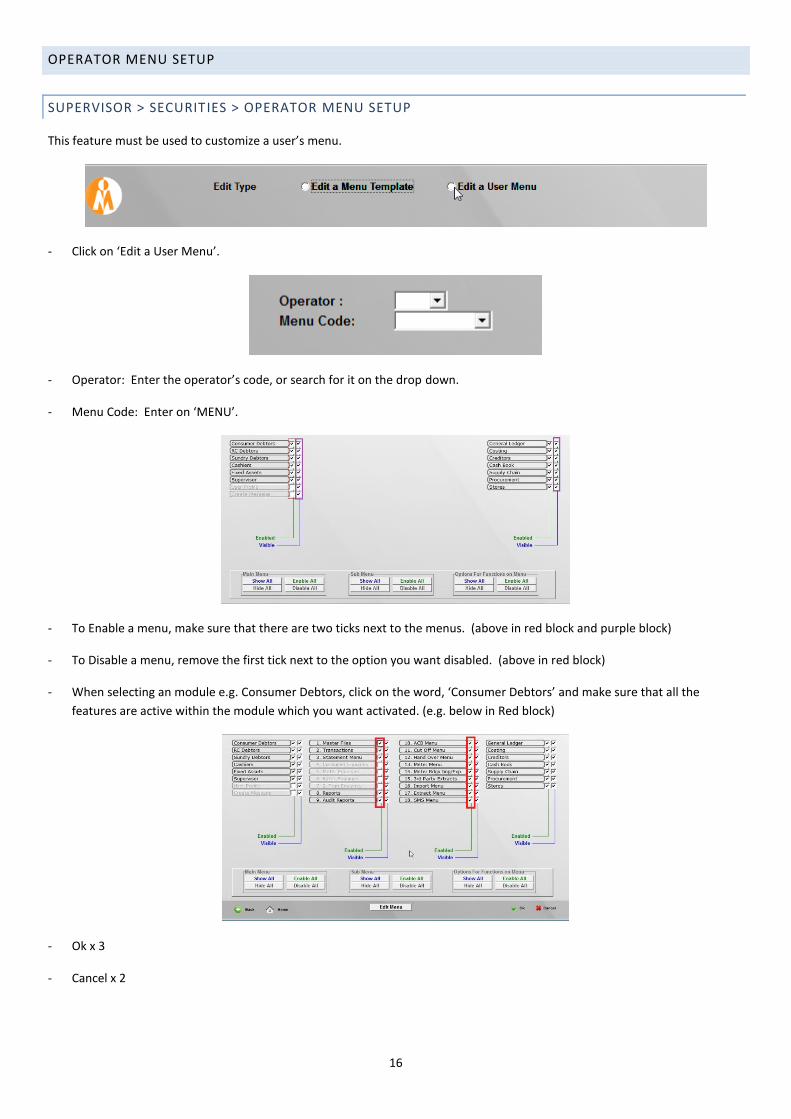
OPERATOR MENU SETUP
SUPERVISOR > SECURITIES > OPERATOR MENU SETUP
This feature must be used to customize a user’s menu.
- Click on ‘Edit a User Menu’.
- Operator: Enter the operator’s code, or search for it on the drop down.
- Menu Code: Enter on ‘MENU’.
- To Enable a menu, make sure that there are two ticks next to the menus. (above in red block and purple block)
- To Disable a menu, remove the first tick next to the option you want disabled. (above in red block)
- When selecting an module e.g. Consumer Debtors, click on the word, ‘Consumer Debtors’ and make sure that all the
features are active within the module which you want activated. (e.g. below in Red block)
- Ok x 3
- Cancel x 2
17
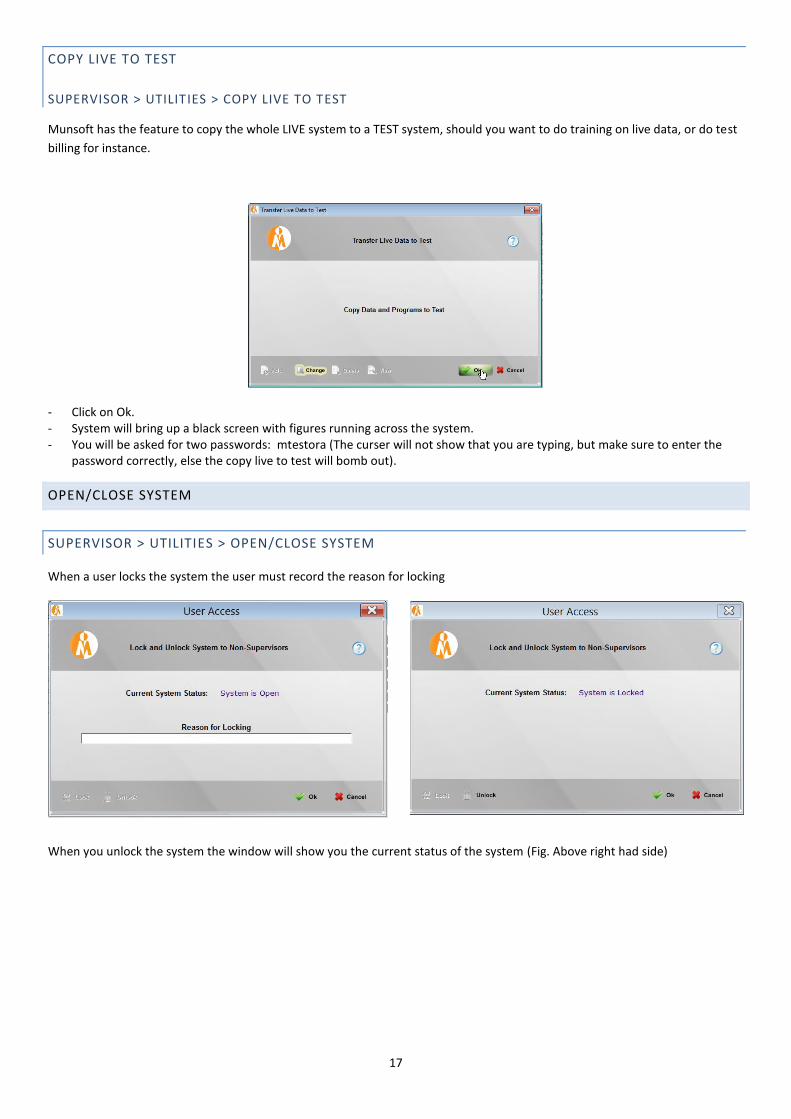
COPY LIVE TO TEST
SUPERVISOR > UTILIT IES > COPY LIVE TO TEST
Munsoft has the feature to copy the whole LIVE system to a TEST system, should you want to do training on live data, or do test
billing for instance.
- Click on Ok. - System will bring up a black screen with figures running across the system. - You will be asked for two passwords: mtestora (The curser will not show that you are typing, but make sure to enter the
password correctly, else the copy live to test will bomb out).
OPEN/CLOSE SYSTEM
SUPERVISOR > UTILITIES > OPEN/CLOSE SYSTEM
When a user locks the system the user must record the reason for locking
When you unlock the system the window will show you the current status of the system (Fig. Above right had side)
18
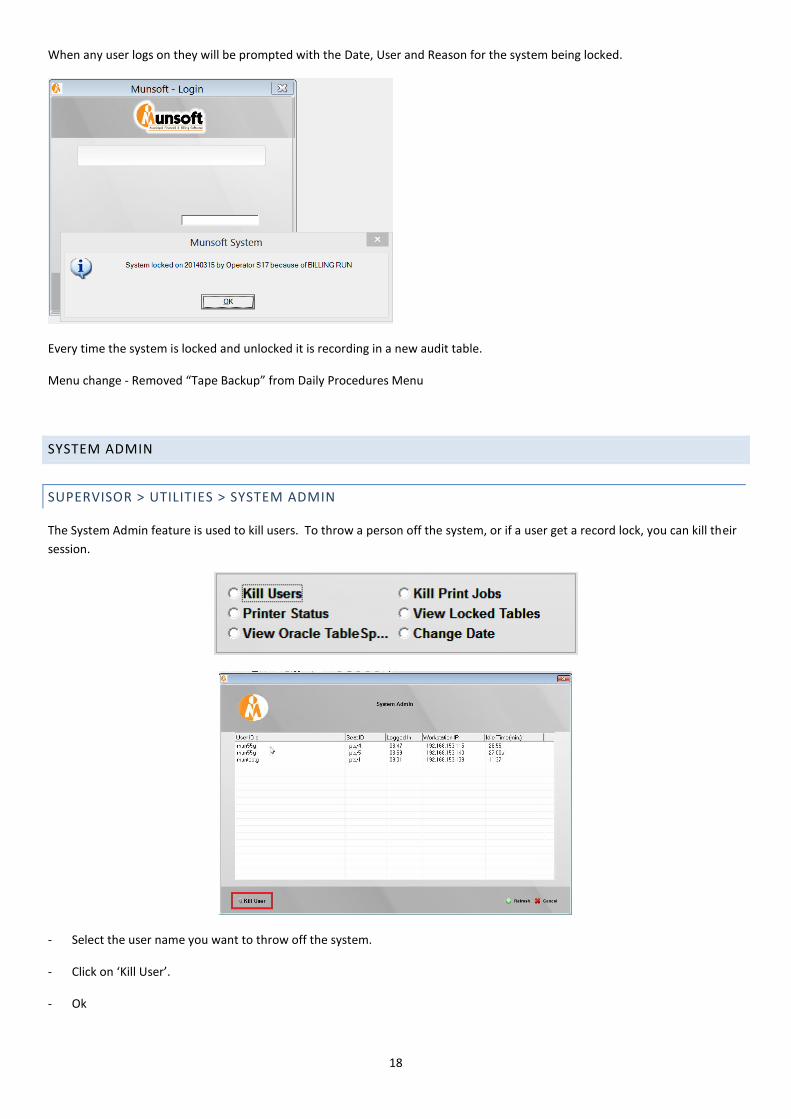
When any user logs on they will be prompted with the Date, User and Reason for the system being locked.
Every time the system is locked and unlocked it is recording in a new audit table.
Menu change - Removed “Tape Backup” from Daily Procedures Menu
SYSTEM ADMIN
SUPERVISOR > UTILITIES > SYSTEM ADMIN
The System Admin feature is used to kill users. To throw a person off the system, or if a user get a record lock, you can kill their
session.
- Select the user name you want to throw off the system.
- Click on ‘Kill User’.
- Ok
19
USER ACCESS RIGHTS
How to print/extract user access rights on a month to month basis to ensure that each change is referenced to the extract?
- The implementation of this would involve a monthly print out of the Operator Menu Report
- You would then check it against the previous month’s print out
- For each user with any changes you should then make sure that you have a formal request and approved form for the
identified change.
- This Print out should be signed by the ICT Manager and Director to acknowledge & ensure that review/monitoring for user
access rights has been performed.
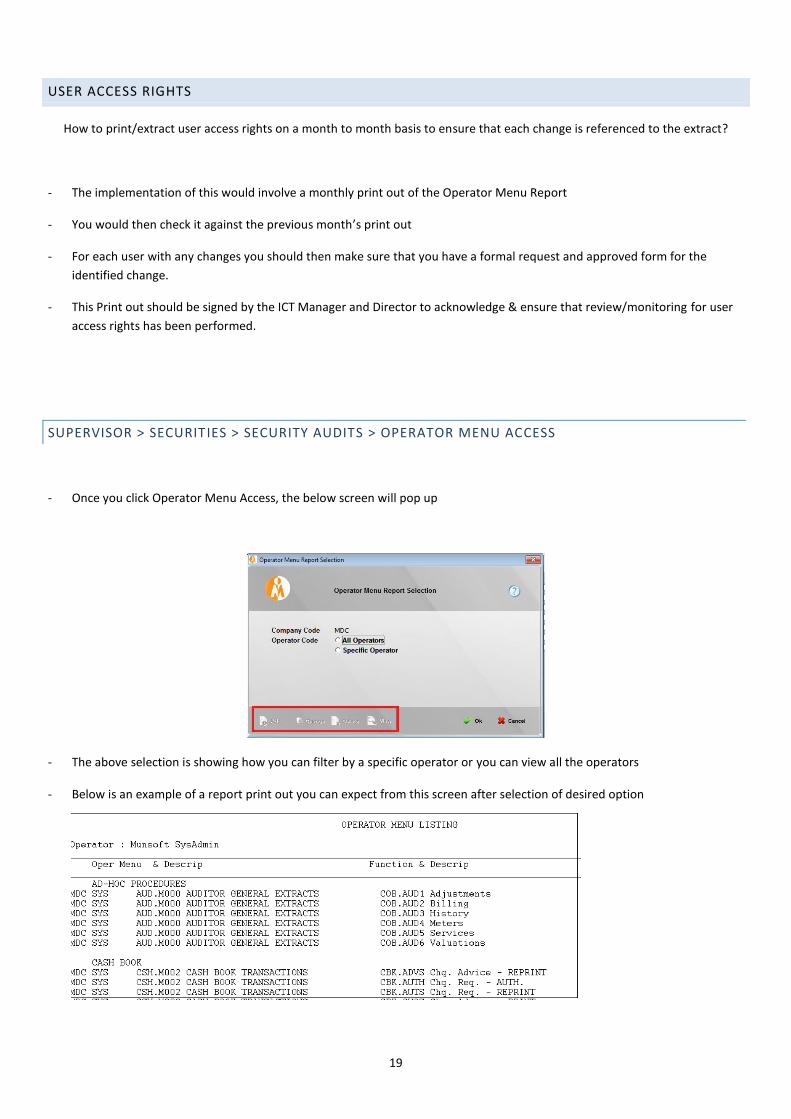
SUPERVISOR > SECURITIES > SECURITY AUDITS > OPERATOR MENU ACCESS
- Once you click Operator Menu Access, the below screen will pop up
- The above selection is showing how you can filter by a specific operator or you can view all the operators
- Below is an example of a report print out you can expect from this screen after selection of desired option
20
ACTIVITY REPORT ON SERVICE PROVIDER OR ADMINISTRATOR
What menus did Administrator Access?
- The implementation of this would involve a monthly print out of the Operator Movement Audit
- This Report is just to ensure that an Administrator is not accessing what he/she is not supposed to be accessing
- E.g. If an administrator was set to Inactive and he/she calls and asks for access to work on a certain menu, after the access
form is approved and you grant access, you can then when done check their movement.
- If you notice something strange (Menu Access that was not requested) you may then go a step further and Audit the
changes they made using the Operator Master File Audit.
- This Print out should be signed by the ICT Manager and Director to acknowledge & ensure that review/monitoring for user
movement has been performed.
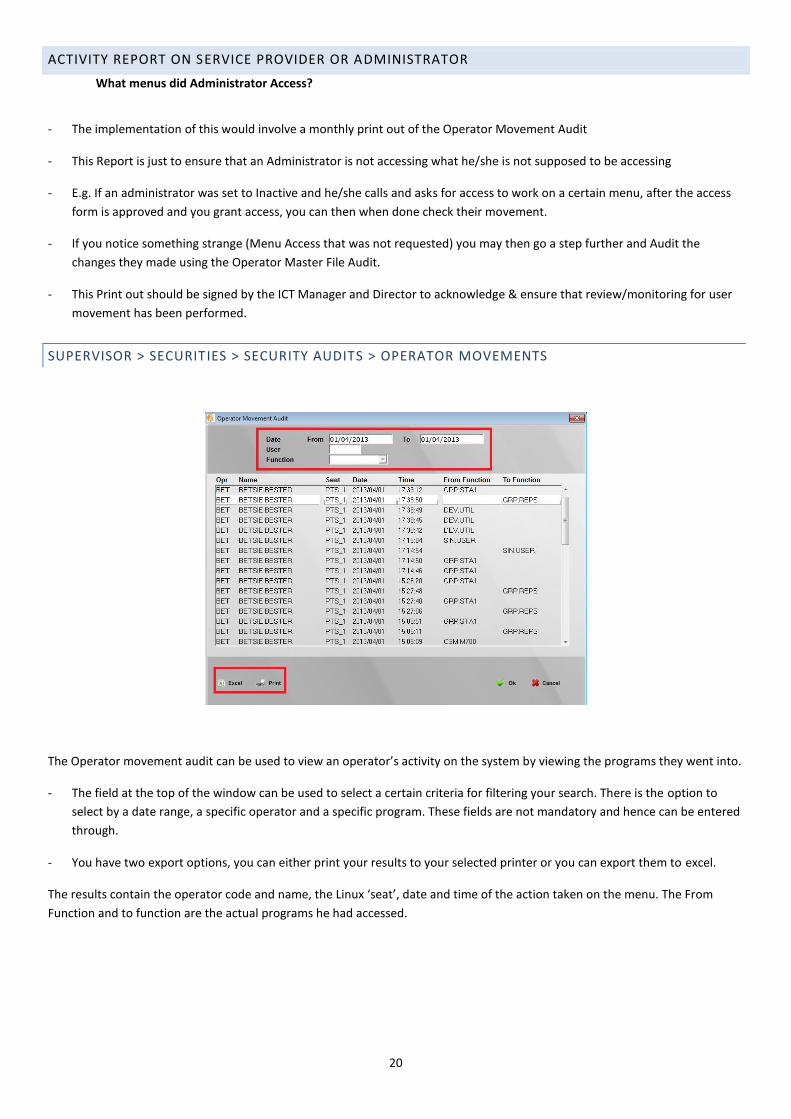
SUPERVISOR > SECURITIES > SECURITY AUDITS > OPERATOR MOVEMENTS
The Operator movement audit can be used to view an operator’s activity on the system by viewing the programs they went into.
- The field at the top of the window can be used to select a certain criteria for filtering your search. There is the option to
select by a date range, a specific operator and a specific program. These fields are not mandatory and hence can be entered
through.
- You have two export options, you can either print your results to your selected printer or you can export them to excel.
The results contain the operator code and name, the Linux ‘seat’, date and time of the action taken on the menu. The From
Function and to function are the actual programs he had accessed.
21
OPERATOR MAINTENANCE
Who are my active users, Inactive Users, last logon date, date created and can I link this username to anyone?
- The implementation of this would involve a monthly print out of the Operator Maintenance screen filtered according to
desired output
- This Report can perform many checks, active users, inactive users, last logon date, date user created on system
- To ensure that each user can be linked to a unique code, Munsoft uses the three digit code as a unique code which the
system does not allow duplicates, when that digit code is created ensure that you link it to a full user name and not a
function (e.g. Cashier), in the same operator maintenance screen you can also state the function of the user
- This Print out should be signed by the ICT Manager and Director to acknowledge & ensure that review/monitoring for user
changes has been performed and those changes that need an approved form have an approved form e.g. User Deletion,
Addition, Menu Change etc.
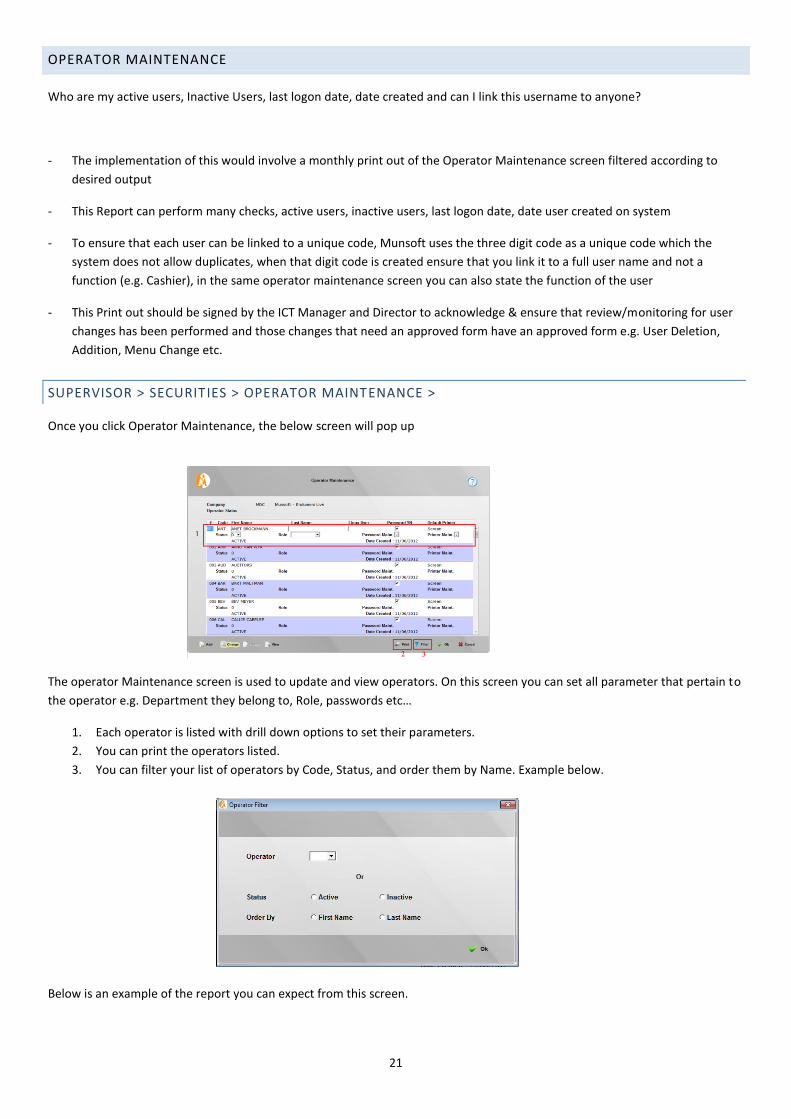
SUPERVISOR > SECURITIES > OPERATOR MAINTENANCE >
Once you click Operator Maintenance, the below screen will pop up
The operator Maintenance screen is used to update and view operators. On this screen you can set all parameter that pertain to
the operator e.g. Department they belong to, Role, passwords etc…
1. Each operator is listed with drill down options to set their parameters.
2. You can print the operators listed.
3. You can filter your list of operators by Code, Status, and order them by Name. Example below.
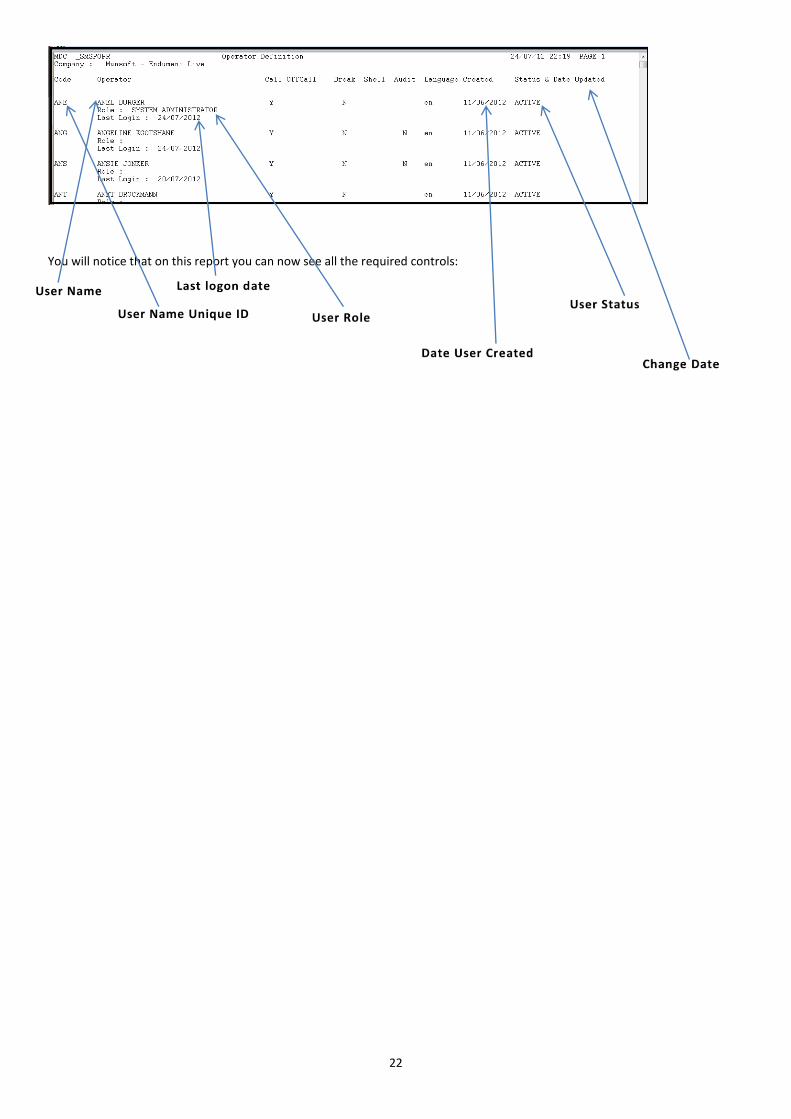
Below is an example of the report you can expect from this screen.
22
You will notice that on this report you can now see all the required controls:
User Name Unique ID
User Name
23
PASSWORD RESET
Are the password parameters set according to Minimum Best practice standard?
- The implementation of this would involve a password reset form and the administrator effecting the approved request
using the Operator Maintenance screen
- Do not change the password unless the form has been completed and signed by the user requesting the password change
for their own account
- Ensure you they sign in your presence and you also sign the same form in their presence after effecting change and the user
has tested and confirmed they can work
- This form needs to be kept safe as when the month end logon violation report is printed and a user has violations that
reached the lock out threshold, the date of the password reset to revoke the lockout should correspond with the date on
the password reset form
- The logon violation report print out should be signed by the ICT Manager and Director to acknowledge & ensure that
review/monitoring for user account lockout has been performed.
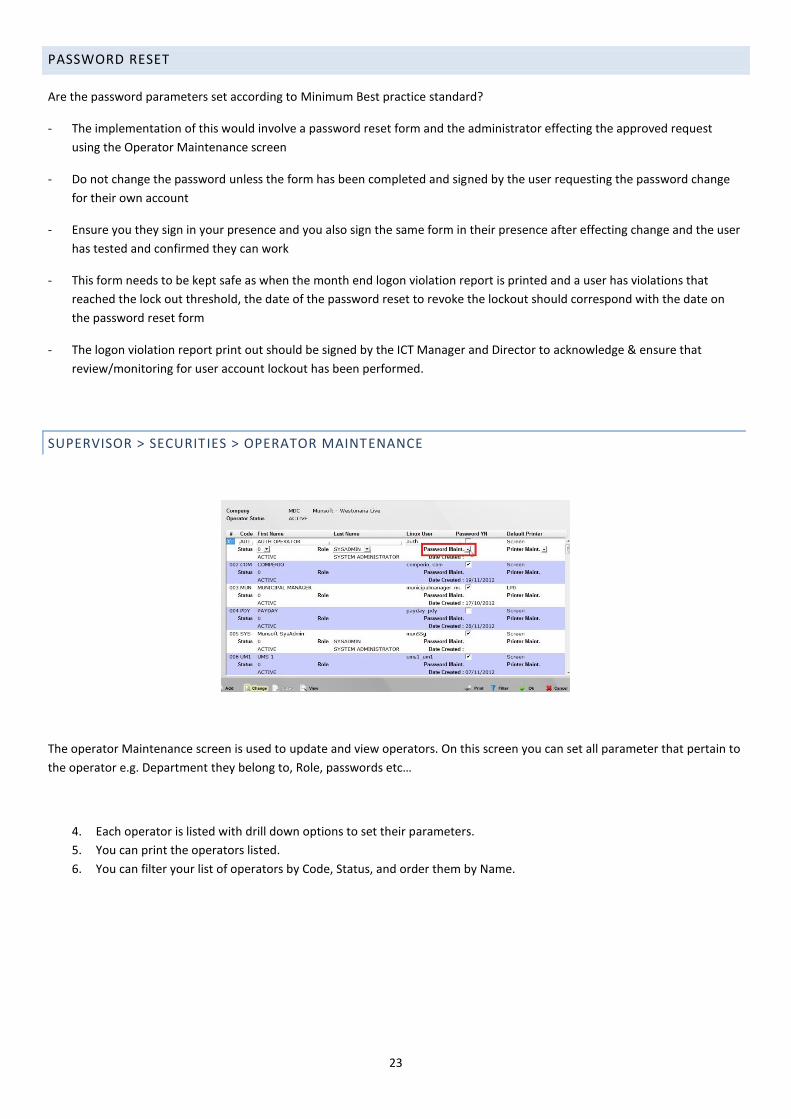
SUPERVISOR > SECURITIES > OPERATOR MAINTENANCE
The operator Maintenance screen is used to update and view operators. On this screen you can set all parameter that pertain to
the operator e.g. Department they belong to, Role, passwords etc…
4. Each operator is listed with drill down options to set their parameters.
5. You can print the operators listed.
6. You can filter your list of operators by Code, Status, and order them by Name.
24
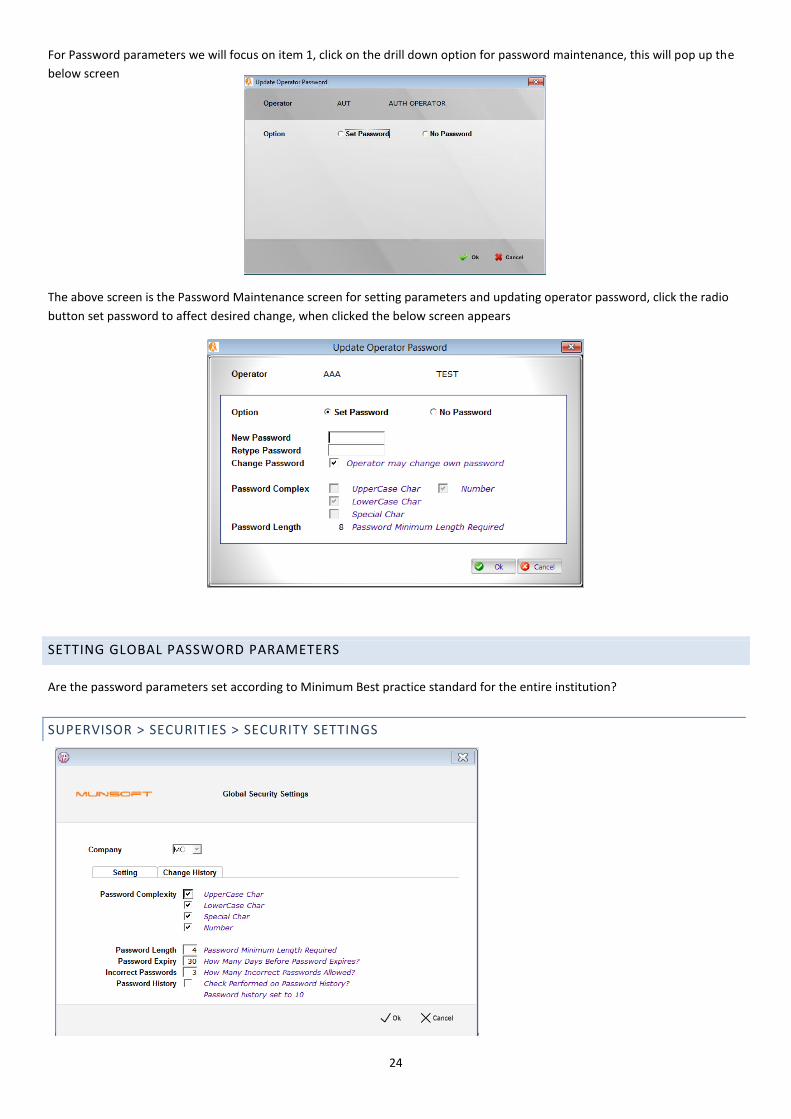
For Password parameters we will focus on item 1, click on the drill down option for password maintenance, this will pop up the
below screen
The above screen is the Password Maintenance screen for setting parameters and updating operator password, click the radio
button set password to affect desired change, when clicked the below screen appears
SETTING GLOBAL PASSWORD PARAMETERS
Are the password parameters set according to Minimum Best practice standard for the entire institution?
SUPERVISOR > SECURITIES > SECURITY SETTINGS
25
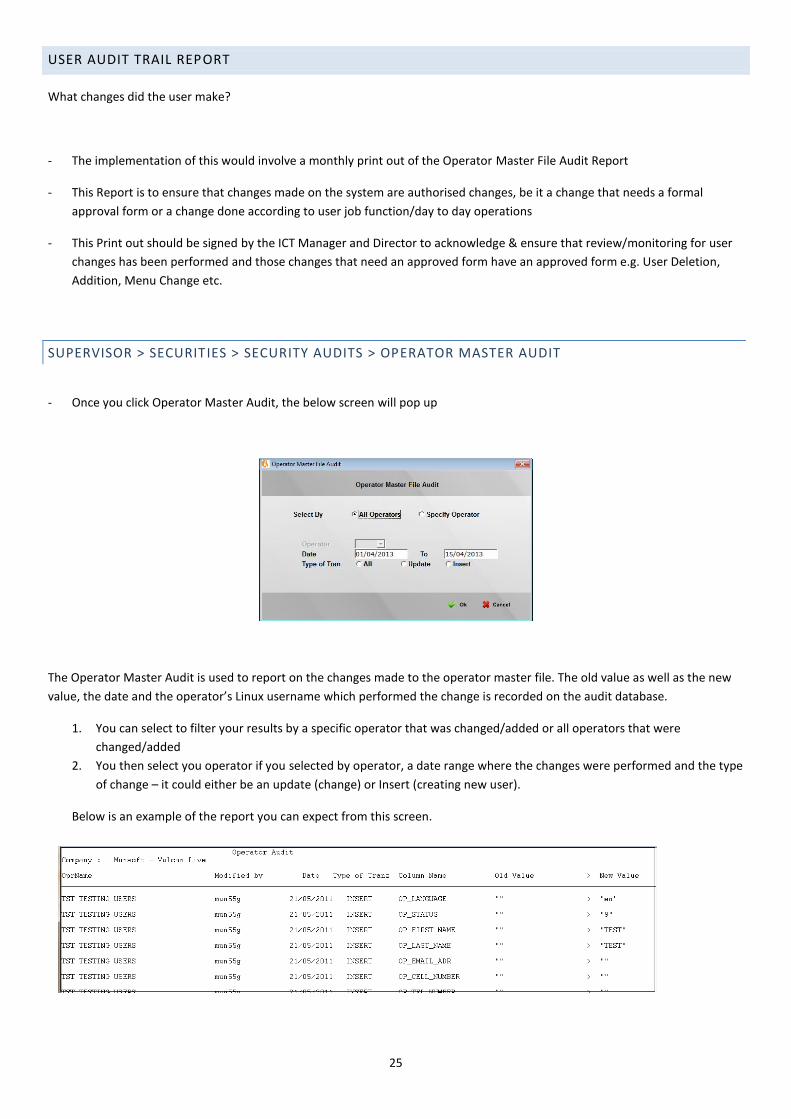
USER AUDIT TRAIL REPORT
What changes did the user make?
- The implementation of this would involve a monthly print out of the Operator Master File Audit Report
- This Report is to ensure that changes made on the system are authorised changes, be it a change that needs a formal
approval form or a change done according to user job function/day to day operations
- This Print out should be signed by the ICT Manager and Director to acknowledge & ensure that review/monitoring for user
changes has been performed and those changes that need an approved form have an approved form e.g. User Deletion,
Addition, Menu Change etc.
SUPERVISOR > SECURITIES > SECURITY AUDITS > OPERATOR MASTER AUDIT
- Once you click Operator Master Audit, the below screen will pop up
The Operator Master Audit is used to report on the changes made to the operator master file. The old value as well as the new
value, the date and the operator’s Linux username which performed the change is recorded on the audit database.
1. You can select to filter your results by a specific operator that was changed/added or all operators that were
changed/added
2. You then select you operator if you selected by operator, a date range where the changes were performed and the type
of change – it could either be an update (change) or Insert (creating new user).
Below is an example of the report you can expect from this screen.
26
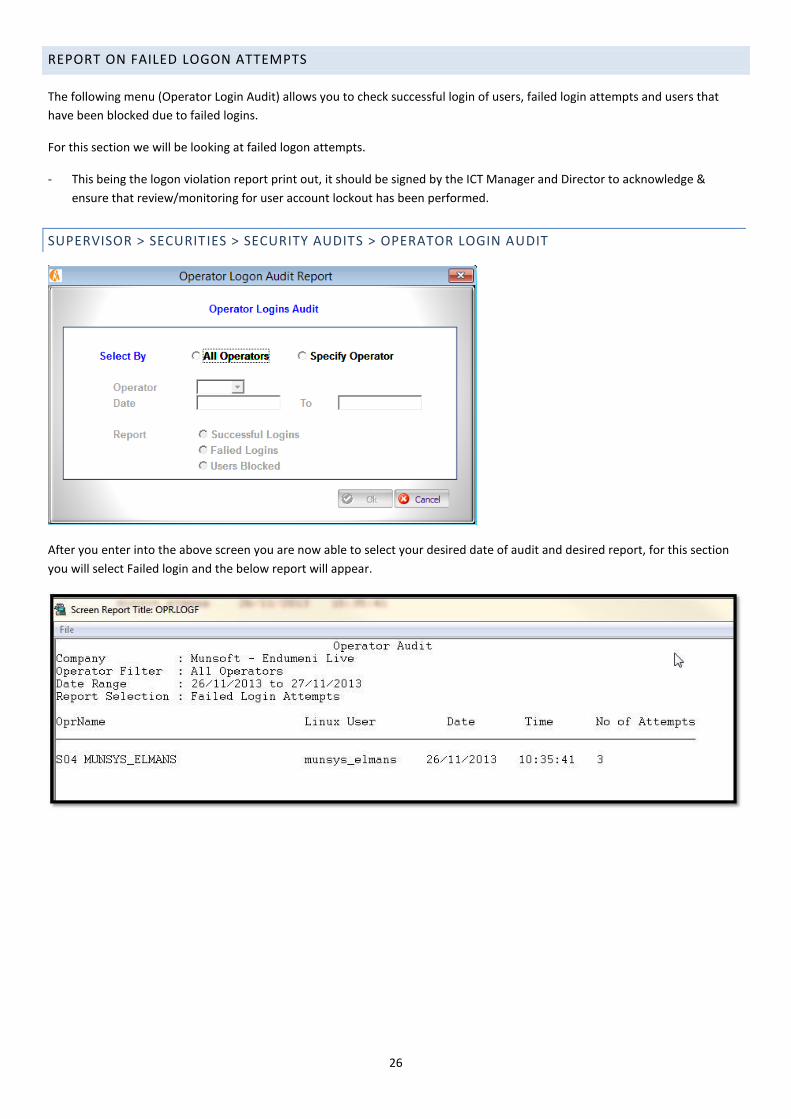
REPORT ON FAILED LOGON ATTEMPTS
The following menu (Operator Login Audit) allows you to check successful login of users, failed login attempts and users that
have been blocked due to failed logins.
For this section we will be looking at failed logon attempts.
- This being the logon violation report print out, it should be signed by the ICT Manager and Director to acknowledge &
ensure that review/monitoring for user account lockout has been performed.
SUPERVISOR > SECURITIES > SECURITY AUDITS > OPERATOR LOGIN AUDIT
After you enter into the above screen you are now able to select your desired date of audit and desired report, for this section
you will select Failed login and the below report will appear.
27
LOGON REPORT
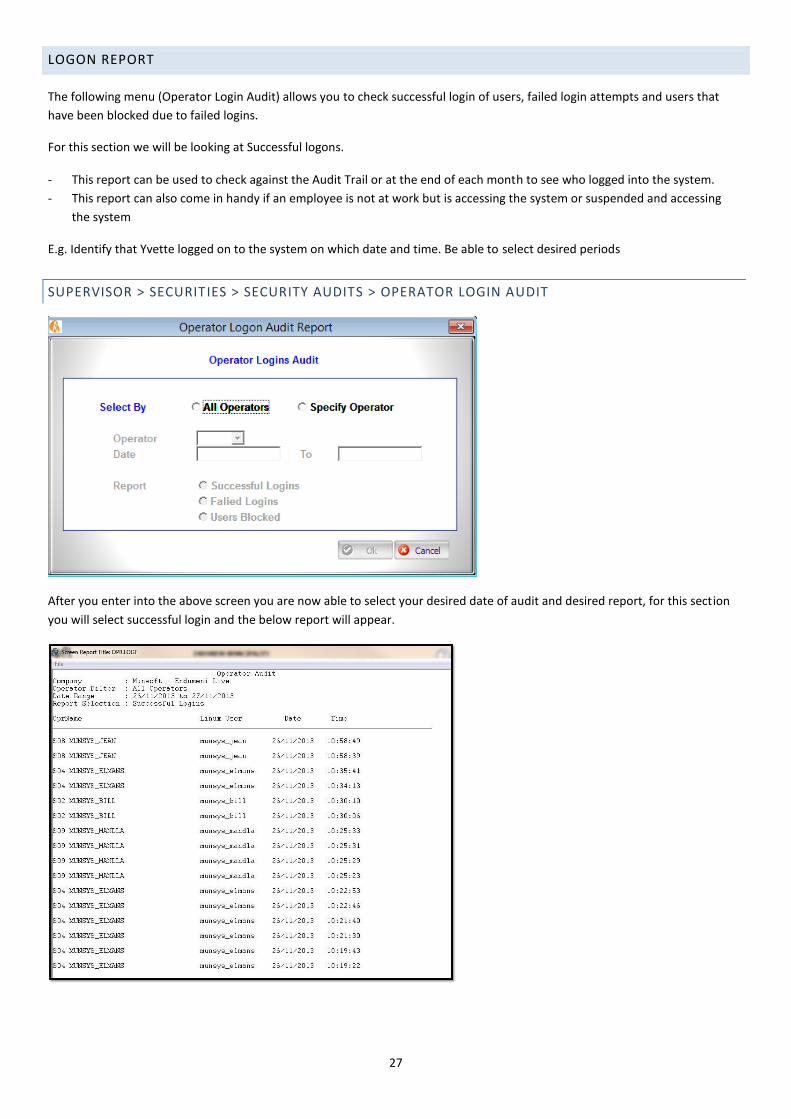
The following menu (Operator Login Audit) allows you to check successful login of users, failed login attempts and users that
have been blocked due to failed logins.
For this section we will be looking at Successful logons. - This report can be used to check against the Audit Trail or at the end of each month to see who logged into the system.
- This report can also come in handy if an employee is not at work but is accessing the system or suspended and accessing
the system
E.g. Identify that Yvette logged on to the system on which date and time. Be able to select desired periods
SUPERVISOR > SECURITIES > SECURITY AUDITS > OPERATOR LOGIN AUDIT
After you enter into the above screen you are now able to select your desired date of audit and desired report, for this section
you will select successful login and the below report will appear.
28
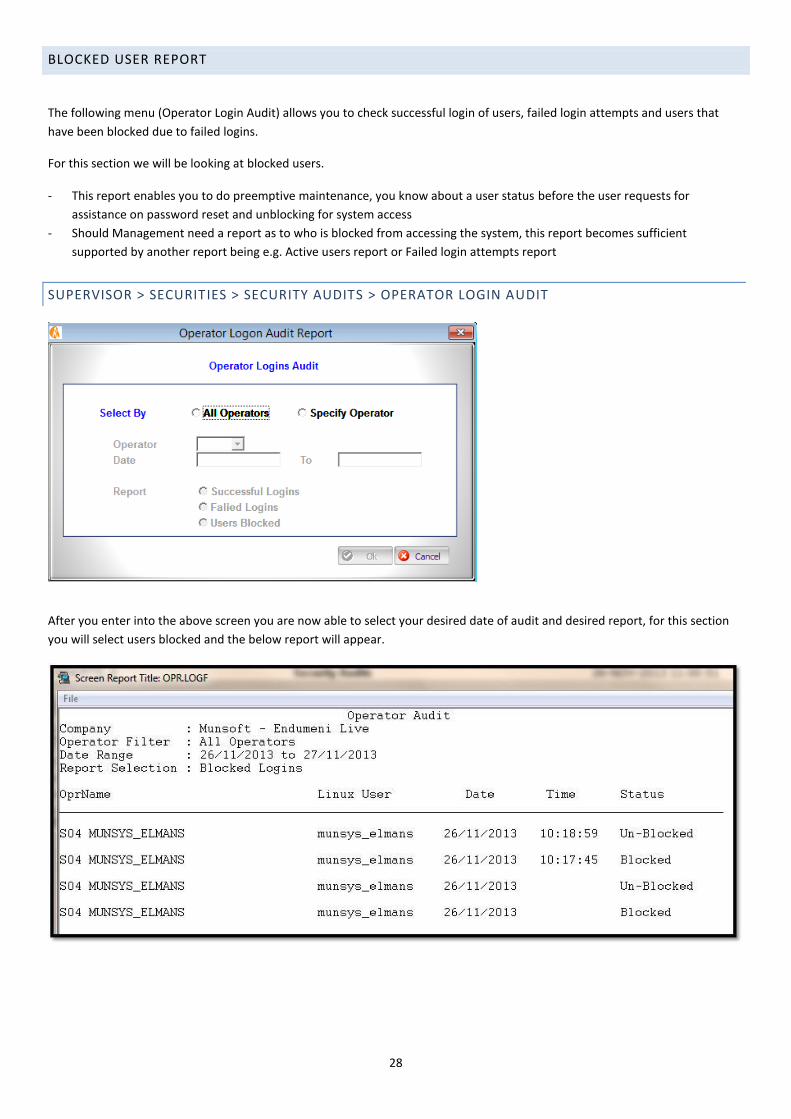
BLOCKED USER REPORT
The following menu (Operator Login Audit) allows you to check successful login of users, failed login attempts and users that
have been blocked due to failed logins.
For this section we will be looking at blocked users. - This report enables you to do preemptive maintenance, you know about a user status before the user requests for
assistance on password reset and unblocking for system access
- Should Management need a report as to who is blocked from accessing the system, this report becomes sufficient
supported by another report being e.g. Active users report or Failed login attempts report
SUPERVISOR > SECURITIES > SECURITY AUDITS > OPERATOR LOGIN AUDIT
After you enter into the above screen you are now able to select your desired date of audit and desired report, for this section
you will select users blocked and the below report will appear.
29
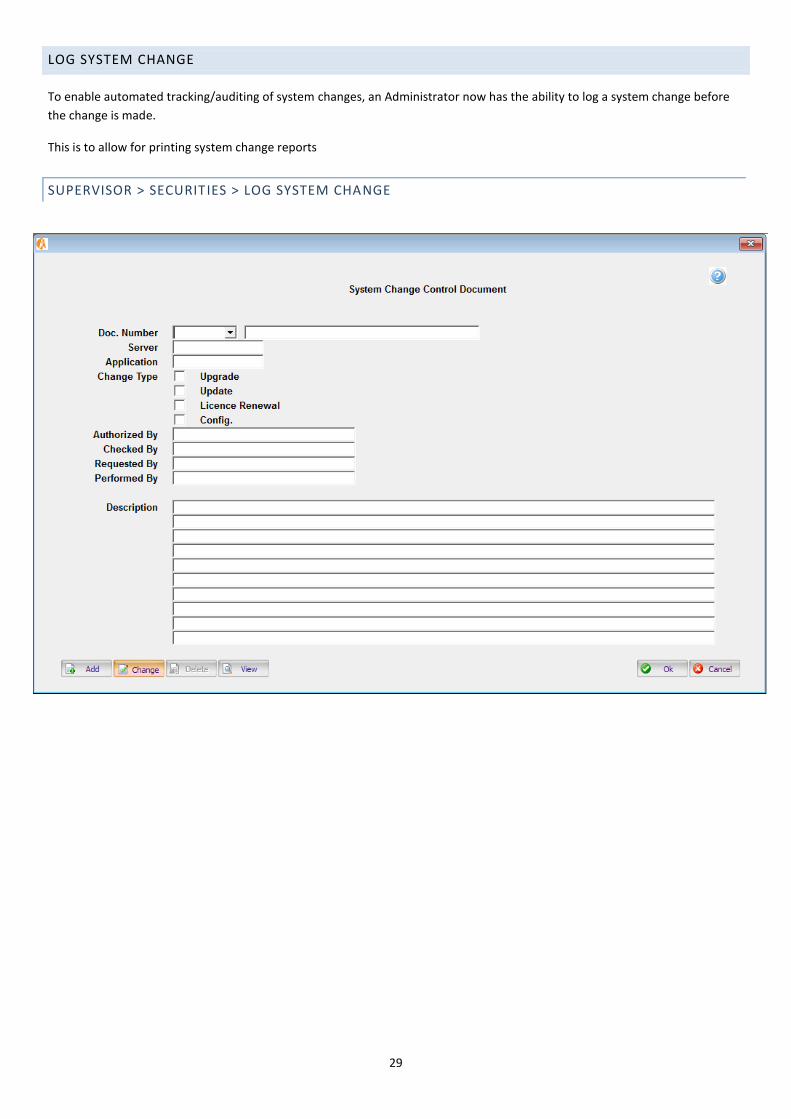
LOG SYSTEM CHANGE
To enable automated tracking/auditing of system changes, an Administrator now has the ability to log a system change before
the change is made.
This is to allow for printing system change reports
SUPERVISOR > SECURITIES > LOG SYSTEM CHANGE
30
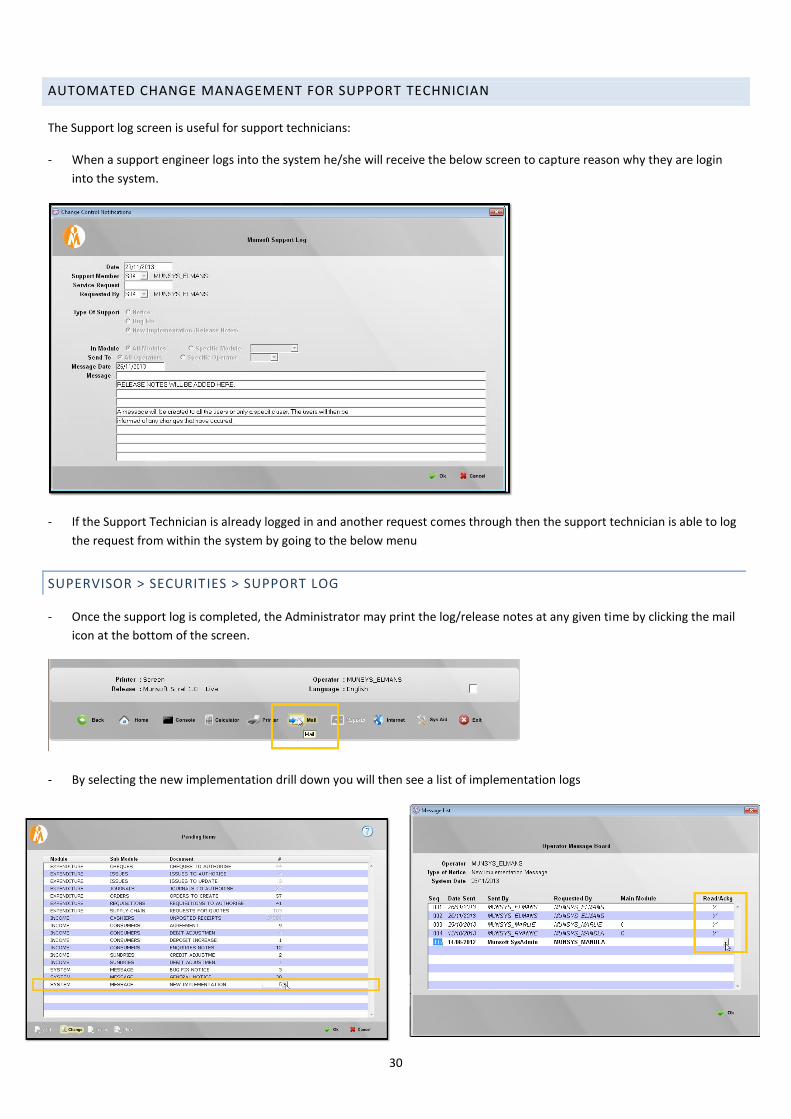
AUTOMATED CHANGE MANAGEMENT FOR SUPPORT TECHNICIAN
The Support log screen is useful for support technicians:
- When a support engineer logs into the system he/she will receive the below screen to capture reason why they are login
into the system.
- If the Support Technician is already logged in and another request comes through then the support technician is able to log
the request from within the system by going to the below menu
SUPERVISOR > SECURITIES > SUPPORT LOG
- Once the support log is completed, the Administrator may print the log/release notes at any given time by clicking the mail
icon at the bottom of the screen.
- By selecting the new implementation drill down you will then see a list of implementation logs
31
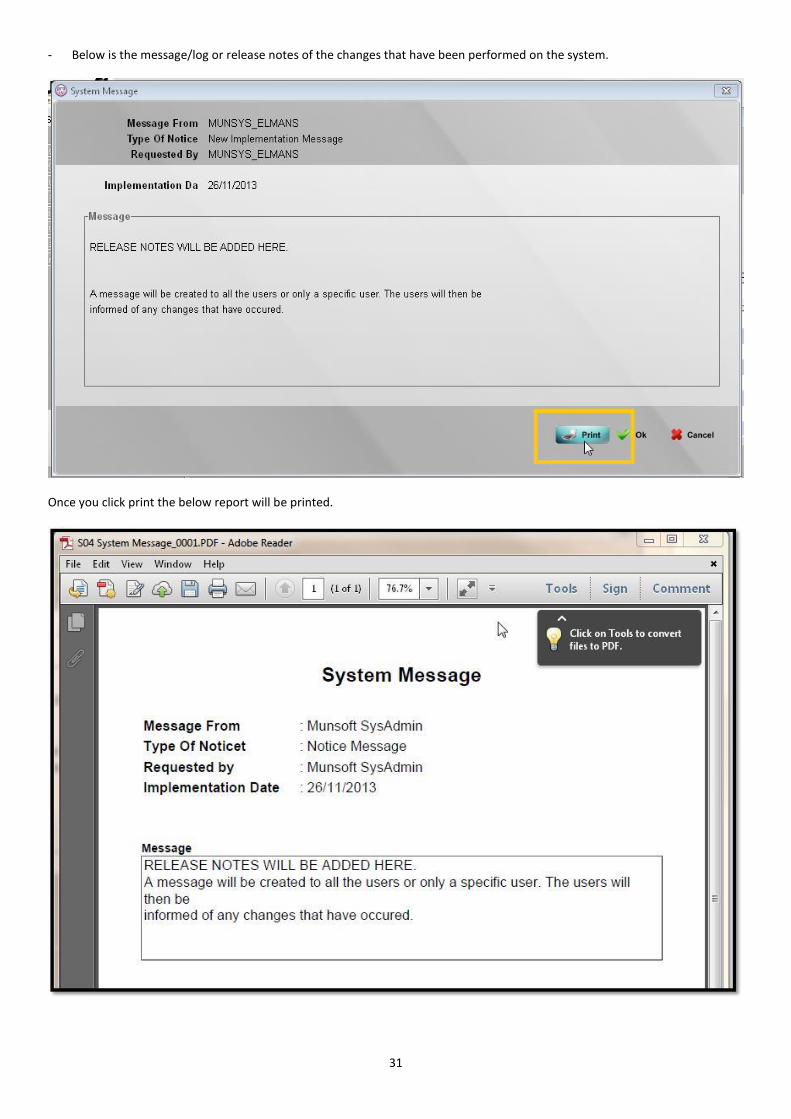
- Below is the message/log or release notes of the changes that have been performed on the system.
Once you click print the below report will be printed.
32
MODULE USAGE SCREEN & PRINT
SUPERVISOR > UTILITIES > CHECK SYSTEM USAGE
33
NOTES