Embed Size (px)
Citation preview
Retrospective Theses and Dissertations Iowa State University Capstones, Theses andDissertations
1-1-1983
Construction techniques used on women's dressesand wraps during the 1860sPatricia Marie HavilandIowa State University
Follow this and additional works at: https://lib.dr.iastate.edu/rtd
Part of the Home Economics Commons
This Thesis is brought to you for free and open access by the Iowa State University Capstones, Theses and Dissertations at Iowa State University DigitalRepository. It has been accepted for inclusion in Retrospective Theses and Dissertations by an authorized administrator of Iowa State University DigitalRepository. For more information, please contact [email protected].
Recommended CitationHaviland, Patricia Marie, "Construction techniques used on women's dresses and wraps during the 1860s" (1983). Retrospective Thesesand Dissertations. 18219.https://lib.dr.iastate.edu/rtd/18219

Construction techniques used on women's dresses
and wraps during the 1860s
by
Patricia Marie Haviland
A Thesis Submitted to the
Graduate Faculty in Partial Fulfillment of the
Requirements for the Degree of
~STER OF SCIENCE
Major: Textiles and Clothing
Signatures have been redacted for privacy Signatures have been redacted for privacy
Iowa State University Ames, Iowa
1983

ii
TABLE OF CONTENTS
INTRODUCTION 1
Justification 1
Purpose 3
Hypotheses 4
Limitations 5
Assumptions 6
REVIEW OF LITERATURE 8
Dating by Design Characteristics 8
Dating by Construction Techniques 9
Dating that Classifies Construction Techniques 10
Classification of secondary information 10 Classification of primary garment data 12
Summary 14
PROCEDURES 15
Preliminary Search of Primary Literature 15
Development of a Worksheet 17
Choice of Museums 18
Screening of Garments 19
Examination of Garments 19
Second Review of Primary Literature 20
SEWING TECHNOLOGY AND MATERIALS AVAILABLE IN IOOA AND MINNESOTA 21
Migration to the Upper Midwest 21
Distribution of Goods 22
Railroads 23

iii
Development of the Ready-to-Wear Industry
Ready-to-wear Part-made garments The sewing machine
The industrial machine The domestic machine
Sewing thread Cutting equipment
Band-knife Scissors and shears Pinking-machines Scissors gauge
Pressing equipment
Flat irons Fluting irons
Fasteners
Hooks and eyes Buttons
Paper patterns Miscellaneous tools and notions
Dress shields
Summary
CONSTRUCTION ADVICE IN FASHION PERIODICALS
Periodicals Examined
Godey's Lady~s Book Harper's Bazar The Prairie Farmer and Peterson's Magazine Ladies' Repository
Levels of Construction Advice
Level 1 Level 2 Level 3 Level 4 Level 5
26
26 28 30
33 34
36 37
37 37 37 38
38
38 38
39
39 40
41 43
43
44
45
45
46 46 47 47
47
47 48 48 49 49

iv
Construction Advice 50
Taking measurements 50 Selection and treatment of fabrics 52 Cutting out the garments 54
Measuring off the skirt 54 Cutting the bodice 55
Common rules about plain sewing 56 Garment fastenings 56
Buttons and buttonholes 56 Eyelets 59 Hooks and eyes 59
Darts 60 Bloused waists 61 Bodice side and princess seam 61 Boning 62 Wadding or padding 62 Shoulder seams 63 Waist cording 63 Necklines and collars 64 Preparation of the armscye 65
Cording 65 Dress-protectors 65
Sleeves 65 Skirt seams 66 Skirt hems 67 Skirt placket openings 69 Bustle linings 70 Skirt pleating and gathering 70 Attached versus separate skirts 71 Looping skirts 72 Loops for hanging 73 Trims 73
Summary 74
GARMENT FINDINGS 75
Organization of the Findings 77
The Relationship of Construction Techniques to Published Information 77
Matching plaids and stripes 78 Lining 78
Measuring off the skirt Seaming the skirt Skirt hems Bodice fastenings
v
79 81 84 89
Buttons and buttonholes 89 Hooks and eyes 91
Corselets 93 Direction of bodice closures 94 Darts 94 Princess seams 99 Side seams 99 Shoulder seams 100 Boning 100 Wadding or padding 105 Cording 105 Armscyes 108 Dress protectors 108 Bustle techniques 108 Turning the skirt 110 Pleating and gathering 110 Loops for hanging garments 117 Conclusion 117
The Relationship of Construction Techniques to Style 119
Dress styles examined in this study 120 Wrap styles examined in the study 120 Effects of a center front point 120 The vanishing waist 121 Darts 122 MOdified peplums 122 Boning 123 Skirt trains 123 Conclusion 123
The Relationship of Construction Techniques to Technology 124
Use of the sewing machine 124 Pressing equipment 127 Pinking tools 127 Hooks and eyes 127 Conclusion 128
The Relationship of Construction Techniques to Fabric 128
Lining/underlining 128 Seam allowances 130 Skirt pleats and gathers 130 Skirt hems 132

vi
Conclusion 132
SUMMARY AND CONCLUSIONS 134
RECOMMENDATIONS FOR FURTHER RESEARCH 137
LITERATURE CITED 139
ACKNOWLEDGMENTS 142
GLOSSARY 143
APPENDIX A. THE DATA WORKSHEET 146
APPENDIX B. MUSEUMS THAT PARTICIPATED IN THE STUDY AND THE TYPES OF GARMENTS FOUND AT EACH 152
APPENDIX C. RAILROADS IN lOOA BY 1869 155
vii
LIST OF FIGURES
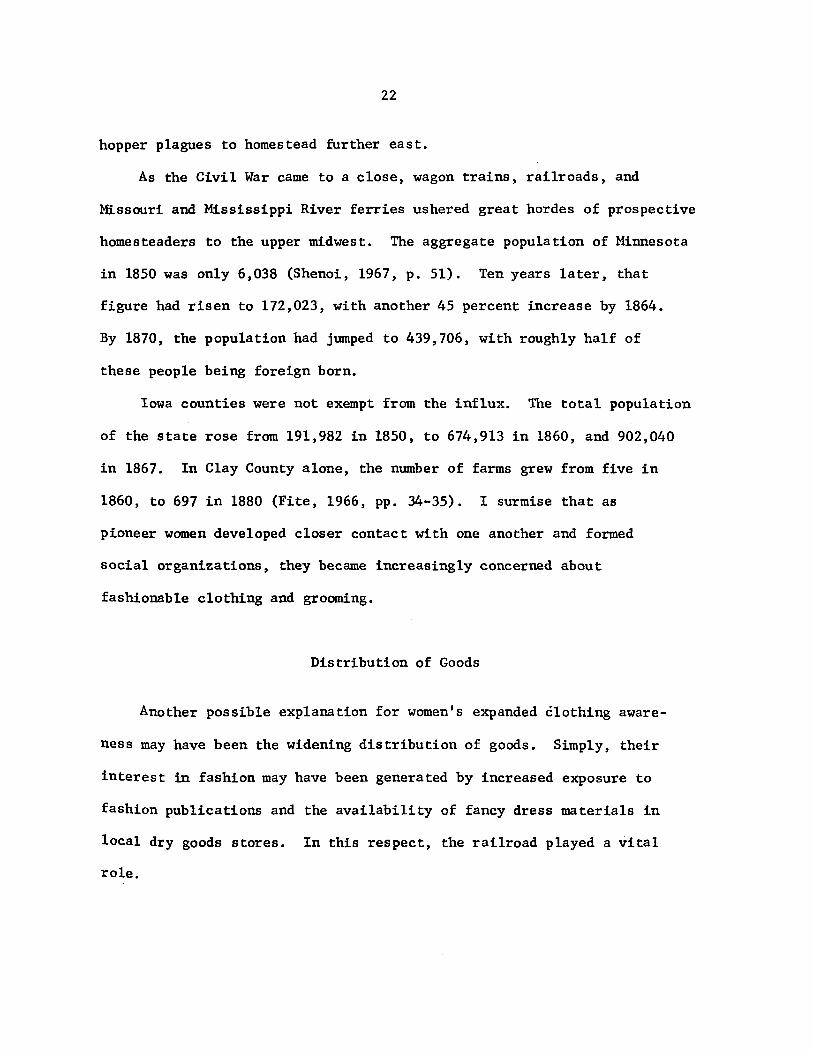
Figure 1. Distribution of railroad track in Iowa by 1867. (The census of Iowa as returned in the year 1867, 1867) 24
Figure 2. Location of skirt openings 82
Figure 3. Locations of skirt pockets 83
Figure 4. Seam finishes on skirts 85
Figure 5. Hem treatments on skirts 86
Figure 6. Faced hem with glazed cotton and worsted braid 87
Figure 7. Faced hem with pieced calico and no worsted braid 87
Figure 8. Bodice underlining with princess seams but without a center back dart 97
Figure 9. Bodice underlining without princess seams but with a center back dart 97
Figure 10. Seam finishes on bodices and wraps 101
Figure 11. Insertion of whalebones into trimmed bodice darts 103
Figure 12. Insertion of whalebones into untrimmed bodice darts 103
Figure 13. Cording placed at the armscye and sleeve outside seam
Figure 14. Armscye finishes on bodices and wraps
Figure 15. Bustle ties in the side seams of a skirt
Figure 16. Skirt bustle formed by tapes
Figure 17. Bustle tapes attached to the waist
Figure 18. Knife pleated skirt unevenly turned
Figure 19. Cartridge pleated skirt evenly turned
Figure 20. Distribution of machine and hand sewn dresses
Figure 21. Distribution of fabrics
107
109
111
112
112
114
114
125
129

viii
LIS T OF TABLES
Table 1. Sewing machine production during the mid-nineteenth century ("The sewing machine," 1896, p. 73) 32
Table 2. Distribution of the examined garments 76
Table 3. Bodice and skirt lining fabrics 80
Table 4. Button sizes at the center front of the bodice 90
Table 5. Distance of buttons from the center front edge 92
Table 6. Location of darts 96
Table 7. Locations of boning on bodices and wraps 102
Table 8. Locations of cording 106
Table 9. Treatment of the skirt top edges 116
Table 10. Skirt pleats and gathers 118
Table 11. Ratios of dress fabrics to garment linings 131
Table 12. Relationship of seam allowance width to fabric 131
Table 13. Relationship of skirt pleats and gathers 133

1
INTRODUCTION
Justification
Over the course of this century, there has been a steadily growing
appreciation for textiles in the world of decorative arts. Not to be
excluded from this "textile mania" is the category of historic costume.
Although the recognition of historic costume as a legitimate art form
remains far from universal, many museums have devoted entire wings ex
pressly to its appreciation. Unfortunately, one major problem faced by
these museums is the proper dating of their apparel holdings. Methods
presently used to date historic garments consider mainly the design
elements (i.e., proportion, silhouette, style features, and trim)
associated with various historic periods. Despite the relatively high
degree of accuracy that this procedure has produced, some garments
persist in baffling even the best trained researchers.
Perhaps dating by design elements alone is not enough. According
to Haggard (1972), no studies have produced evidence to indicate that
one particular part of a garment provides the definitive clue to its
dating. It is, instead, a combination of many factors. This problem
of dating becomes particularly apparent when garments are not 'high
fashion' styles, or result from the modification of earlier styles.
One of the most perplexing ~hallenges faced by the historian is the
identification of a garment's original design elements, in the face
of later alterations. For instance, a garment that was originally
made in the 1850s could have been modified a decade later to conform
to the style features of the 1860s. Costume dating is even further
2
complicated by cases of reconstructed garments in earlier styles (e.g.,
theatrical costume and masquerade costume).
Arnold (1973) recommended that the safest method of dating costumes
was to consider the shape of the garment as it was worn (i.e., what
types of foundation garments were worn beneath it), plus the cut and
construction techniques associated with each historic period. This
procedure would help reveal certain discrepancies that might exist
within a garment. Arnold, however, focused her research on English
costume as it was altered to meet later style requirements. She did
not intend to define the construction techniques associated with each
historic period.
Bradfield (1968) also recognized the importance of construction
techniques in the dating process, but did not try to classify them
systematically. Instead, she focused upon the incorporation of
construction information into the total description of a garment.
Schlick (1981) made a significant research contribution to historic
costume dating by construction features. Using information obtained
from secondary sources, primarily costume references, Schlick developed
a systematic process for dating women's dresses of the nineteenth century
by their structural features. Many of the books that she used to date
American costume, however, were written by British authors and dealt
with English costume. The study that I am presenting here differs from
the Schlick study because the raw data come from actual surviving gar
ments and contemporary American women's periodicals.
Although this particular study addresses only the construction
techniques of a selected decade, 1860-1869, it is actually to be part
3
of a series of investigations which will eventually include the entire
nineteenth and early twentieth centuries. It is in this larger con
text that this study finds its true usefulness. Until research has
been done on the remaining decades, a contrast cannot be made of the
differing techniques from one style period to the next. The fact that
narrow piping, for example, was used around the armscyes of 1860s
women's garments does not exclude it from possible use in other periods
as well. Therefore, a complete investigation of construction techniques
must be made across several decades before broad conclusions may be
drawn about dating through construction techniques.
Purpose
I proposed in this study to develop a descriptive summary of
specific garment construction techniques used on women's dresses and
wraps during the years 1860-1869, to assist in the dating of historic
garments. It was not my intention to replace existing methods of
costume dating, but rather to supply the researcher with an additional
tool in the dating process. This information might alert historians to
possible inconsistencies within a garment. Such inconsistencies,
for example, might be the result of later alterations or modifications
to a garment. If a researcher could confirm the date of a garment's
construction characteristics, he or she might even be able to use the
same method to date a garment's alterations or modifications.
Another aim of this study was to provide guidance to individuals or
institutions interested in the reconstruction or restoration of historic

4
garments, using the construction techniques authentic to a particular
style period.
Hypotheses
The umbrella null hypothesis for this investigation into historic
clothing construction techniques is that: There is as much variation of
construction techniques in women's dresses and wraps within one period
of costume style as among different periods of costume style. Several fac
tors mayor may not be intimately related to the selection of techniques.
Particular null hypotheses developed are: For the period 1860-1869:
1. There is as much variation of construction techniques within
a single style of women's dress (or wrap) as among several
prevalent styles of dress (or wrap).
2. Technology does not affect the choice of construction tech
niques in dresses and wraps.
3. The construction techniques prevalent in surviving dresses
and wraps are not related to published information about the
style and structure of women's dresses and wraps.
4. The type of fabric in a dress or wrap does not affect
the choice of construction techniques found in the gar
ment.
Elements that may affect the construction of a garment that were not
considered in this study (i.e., the formality of a garment and the
geographical or regional differences in construction), are discussed
in the section on recommendations for future research.

5
Limitations
This study attempted to accept or reject the four particular
hypotheses as they relate strictly to women's dresses and wraps of the
1860s. Men's and children's clothing, as well as other women's gar
ments (i.e., underclothing and foundations) were not considered in the
study. These omissions should each be taken up independently in future
research.
The period 1860-1869 was selected for several reasons. First, the
increased publication and circulation of ladies' periodicals (i.e.,
Harper's Bazar, Godey's Lady's Book and Magazine, and Peterson's Maga
zine) could have had a homogenizing effect upon the construction tech
niques used on garments, or at least may have helped to disseminate
new techniques more rapidly. Second, the style changes from the l850s
to the l860s may have encouraged a change in the construction methods
of the l860s.
Another consideration in the selection of the period was the
availability of extant garments. It was desirable to study as many
examples as possible, and earlier decades did not appear to be as we11-
represented in Iowa and Minnesota. And finally, I suspected that the
surge in invention and the availability of sewing-related technology
during the 1860s may have had a profound impact upon sewing techniques
of the l860s and subsequent decades.
The primary focus of the study was upon the construction features
of garments, rather than on the design elements, except as they related
to the choice of construction techniques. For example, the pattern
6
motif in a fabric was not considered important except in terms of
construction (e.g., if an attempt had or had not been made at matching
pieces). But, if the weight of a fabric influenced the types of
support (i.e., interfacing or underlining), it was considered
pertinent. Similarly, pattern drafting and draping were not ex
plored, except as they related to the construction of a garment. For
example, it was important in the investigation of seam finishes to
note whether garment pieces had been cut on the bias or had been cut
on the straight grain to make use of the selvage edges.
For feasibility of data collection, the garments examined in the
study came from 13 museum or university collections. These were
clustered geographically and limited to central and northeastern por
tions of Iowa and the Minneapolis-St. Paul vicinity. This geographical
clustering allowed for possible representation of garments from both
rural and urban communities. However, not all of the garments had
known origins or actually came from those localities. Some, for
instance, may have been brought to Iowa and Minnesota as families
moved westward.
Assumptions
Before this research could proceed, a primary assumption was first
made that there would be a sufficient number of dresses and wraps datable
to 1860-1869 to allow generalizations to be made about typical construction
techniques. Second, it was assumed that construction advice could be
found in women's periodicals of the 1860s. And, finally, it was assumed
7
that fashion plates of the period 1850-1870 would serve a dual function:
1. To aid in the initial selection of dresses and wraps to be
examined, and
2. To provide some confirmation of the "earliest possible" date
of a garment.
8
REVIEW OF LI TERA TURE
The literature reviewed for this study has been divided into three
categories and will be addressed in the following order:
1. Studies that consider only the design elements of a garment
in the dating process.
2. Studies that consider construction techniques important in
the dating process, but do not attempt to relate the ob
served techniques to a fashion period.
3. American studies that attempt to classify garment construction
techniques according to style period.
This last category has been further divided into two subgroups:
a. Studies that use secondary sources.
b. Studies that use primary data, specifically from actual garments.
Dating by Design Characteristics
Despite the many methods developed by costume historians to date
and classify historic clothing, no one method has provided answers to
all of the dating problems. The gamut of dating techniques runs from
moderately intuitive to extremely systematic. Haggard (1972), for
instance, applied systems of numerical taxonomy to costume proportions
in order to identify similarities and differences between fashion
periods quantitatively and systematically. Furthermore, Haggard's
taxonomy was similar to many other dating devices because it identified
only the design elements of a garment (i.e., proportion) associated
with various historic periods. Rarely were construction techniques
9
taken into account.
Anderson's (1967) investigation of women's dresses from the 1920s
illustrates the same point. In her study, Anderson established some
"verbal criteria" for dating dresses of that decade by examining the
contemporary fashion literature (i.e., pamphlets, bulletins, advertise
ments, and women's periodicals) for design information only. The present
study differs from Anderson's because it uses literature to investigate
the relationship between construction advice in periodicals and the way
garments were actually sewn.
Dating by Construction Techniques
Two British costume historians, Arnold (1973) and Bradfield (1968),
acknowledged the importance of construction techniques in the dating
process. Arnold, for example, in her examination of English costume,
used construction to identify cases of garment tampering (i.e., altera
tions or style modification). Neither of the researchers, however,
attempted to generalize about the techniques typically used in
various fashion periods. Instead, they described what was actually
found in individual garments, each exemplifying a different style.
Furthermore, since these British historians examined strictly European
(primarily British) costumes, the techniques that they observed might
not be applicable to American dress of the same period.
10
Dating that Classifies Construction Techniques
Although some American studies were conducted in the area of dating
by construction techniques, the data have only been gathered from
either secondary sources (costume references) or garments in single
university costume collections.
Classification of secondary information
Schlick's study (1981) blended construction characteristics (i.e.,
hem depth, placement of boning, closures, tapes, darts, and finishes)
with garment design features (i.e., unit proportions, shapes of neck
lines and sleeves) to form a category of "structural" features. As
these "structural" features appeared in costume references, they were
organized into tree diagrams and then transferred to a decision table
for use as a dating instrument.
Schlick fur ther ordered the "mos t discrimina ting charac teris tics"
into an algorithm. The accuracy of the algorithm was then tested by a
panel of judges, on actual nineteenth century women's dresses from the
costume collection at Indiana University. Schlick found that the
algorithm had about an 80 percent accuracy rating.
The present study differs from Schlick's in two major respects.
First, as Schlick stressed, it was not the purpose of her study to
uncover new garment information, but rather to develop a reliable and
practical instrument for dating. Therefore, she accepted the use of
British secondary sources for structural information, rather than using
primary United States sources. One goal of the present study, however,
is to gather new information about construction methods in the
11
United States. Hence, the data in the present study came from actual
garments and periodicals of the l860s, rather than from costume
references.
The second major difference between the two studies pertains to
the design of the dating tool. Rather than collapse the information
into tree diagrams and algorithms, as Schlick did, I chose to organize
it into a descriptive summary.
A study by Vachon (1976) to develop a dating tool also used
secondary sources (i.e., British costume references) but in combination
with telephone surveys to selected museum curators. Instead of or
ganizing the information into tree diagrams and algorithms, Vachon
ordered it by decades into a checksheet. Each decade, from 1850 to
1949, contained general information pertaining to both the design and
construction of bodices and skirts. The scope of the construction
information, however, was quite limited. Bodices from the 1860s, for
instance, had only five construction features listed:
1. Front button or hook and eye closure,
2. Lined with white fabric,
3. Set-in dropped shoulder sleeve,
4. Vertical waist darts,
5. Boned.
Garments used in the present study, however, were not always boned,
and many of them used several types of lining fabrics. This suggests
that secondary sources are deficient in construction information.

12
Classification of primary garment data
The first attempt to systematically classify construction tech
niques using actual garment data was probably made by Carter (1954).
Carter's study of nineteenth and early twentieth century dresses in
the Drexel Institute's historic costume collection tried to answer
two questions:
1. Do construction details occur in definable cycles?
2. If construction cycles exist, do they parallel style features,
or do they occur independently?
Carter concluded that construction details do not occur in de-
finable cycles, and that apparently, no exact match between a specific
construction technique and a corresponding style feature could be
determined, even though there did seem to be some observable relationship.
Perhaps one cause for the ambiguity of the findings is the absence of many
style divisions. Carter (1954, p~ 5) divided her style periods very broadly
according to changes in skirt silhouette as formulated by Young in 1937:
1. First Tubular Cycle, 1796 through 1829,
2. Bell-Shaped Cycle, 1830 through 1867,
3. Back-Fullness Cycle, 1868 through 1899,
4. Repeat of Tubular Cycle, 1900 through 1937.
These few style divisions did not take into consideration design features
other than silhouette. Furthermore, Carter examined only four dresses
from the 1860s. The present study differs from Carter's because of its
1) narrower period (1860-1869), which permits a more precise and de
tailed description of the possible relationship between style and
construction, and 2) larger, more varied sampling of garments.
13
Another observation that Carter made - but did not test - per
tained to the relationship between technology and dress construction.
She contended that the construction techniques that appeared in each
category of skirt silhouette seemed to reflect the technology of the
period.
Miller (1975) further addressed the topic of technology and its
relationship to the design and construction of women's day dresses.
After examination of the dresses for the following construction
criteria:
1. Sewing method (hand or machine sewn),
2. "Finesse" and location of hand sewing,
3. Number of pattern pieces,
Miller determined that a trend toward simplification of both design and
construction were related to advancements in sewing technology. How
ever, the criterion of "finesse" was ambiguous since it was not defined
and could refer to a garment's neatness.
The present study differs from Miller's in two respects. First,
it includes more construction criteria (e.g., garment support, closures,
position of openings, pockets, and hem depths). Second, it describes
garments from several museum and university collections, rather than
just one university collection. Furthermore, the garments used by
Miller were limited to the period 1890 to 1940. The sewing machine
became available to housewives during the mid-1850s; therefore, gar
ments for the years 1850 to 1890 also need to be studied.

14
Summary
Because previous studies either:
1. Operated under very broad style divisions,
2. Examined British garments,
3. Examined American garments from single costume collections,
4. Were limited in construction criteria,
the present study examines women's dresses and wraps of the period
1860-1869 from several costume collections. Furthermore, this study
tests the relationship between construction techniques and 1) style,
2) technology, 3) published information about sewing, and 4) fabric
type.

15
PROCEDURES
Preliminary Search of Primary Literature
In order to select the garments for this study, two preliminary
investigations were made. The first was a concentrated study of the
typical design features (i.e., silhouette and trim) and fabrics of
women's dresses and wraps during the 1860s. This information was
gathered from three major sources:
1. Color fashion plates and their accompanying descriptions in
women's fashion magazines,
2. Other primary sources (i.e., old photographs) in historical
Teferences on Iowa for serious confiTmation of what was worn,
3. American and European costume references.
The European references were included in this investigation be
cause of the tremendous Parisian influence upon American fashions at
that time. Subscribers to Godey's Lady's Book and Magazine (Godey's),
for instance, were frequently reminded of Godey's specially engaged
fashion correspondent in Paris, and thereby guaranteed the most cur
rent information of French fashions. Thus, French fashions acted as
a starting point for particular styles and revealed a general trend in
fashions of the 1860s. However, the exposition of new fashion trends
in periodicals did not guarantee their immediate adoption. According
to Hooper's study (1976) of rural Missouri women's clothing in the
1860s, a few years of fashion lag probably did exist. Hooper contended
that the silhouette was particularly affected by lag due to the common
practice (prior to the appearance of clothing patterns) of picking
16
apart old garments to use as patterns for new garments (Hooper, p. 27).
The general design characteristics of 1860s dresses were found
to be in a state-of transition. The skirts, for example, lost much of
the bell-shaped fullness characteristic of the previous decade, and
adopted a smoother fullness via gores, with the majority of the full
ness in the back. The "pagoda" sleeve of the 1850s was gradually
abandoned for a fitted and slightly curved two-piece coat sleeve.
Pointed waists slowly yielded to straighter and slightly raised
waists (often belted). Although the slope of the shoulders remained
quite steep throughout the 1860s, the very end of the decade witnessed
a very slight raising of the shoulder seam. Combinations of these
features qualified a garment for inclusion in the study. There were
some features, however, that remained virtually constant throughout the
decade. The bodice back, for example, typically had princess seaming
for a smoother fit. The neck was either bound or had a narrow band
collar, and the center front opening was fastened with either hooks and
eyes or buttons. These features were confirmed by Hooper (1976),
who further contended that, regardless of the fabric, the features
remained constant.
Fabrics that were frequently used for dresses include: 1) solid
and plaid silk taffetas, 2) plaid wools, and 3) cotton calicoes. These
were often trimmed with silk fringe in a yoke pattern, or edged with
contrasting braid. Buttons were also used for decoration down the
center front of dresses, regardless of their functional value. Other
trimming fads appeared which reflected a military influence (i.e., the
Zouave styles).
17
The second part of the pre1~inary investigation was an examination
of the sewing-related technology and the availability of sewing tools
and notions during the 1860s. This part of the investigation was im
portant because it defined which construction techniques were tech
nologically feasible. Topics that were studied include: 1) sewing
machines and their attachments, 2) the ready-to-wear garment in-
dustry, 3) sewing thread, 4) cutting and pressing equipment, 5) notions
(e.g., hooks and eyes), and 6) paper patterns. I will discuss each of
these topics in detail in the section on garment findings. Garments that
evinced an abundance of techniques technologically inappropriate to
the period were seen as lacking in authenticity and omitted from the
study.
Development of a Worksheet
The next step in the study was the development of a data collection
worksheet. After considering the immense variations of construction
Possible in the garments, I decided that an open-ended worksheet was
better suited to the study than a closed checklist. In addition, the
worksheet allowed room for helpful sketches. It was divided into
several sections (see Appendix A), with subtopics under each section.
In the first section, I recorded information obtained from the museum
records (i.e., garment donor or owner, documented background, garment's
degree of formality or occasion for which it was worn, and condition
of garment).
The second section required a complete description of a garment's

18
design elements. Included in this were descriptions of the silhouette,
style features, applied trims, number of garment pieces, and types of
fabrics used. The remainder of the worksheet consisted of the features
of construction. These included ten major categories: 1) major seams,
2) minor seams (i.e., princess, sleeve, shoulder, armscye, skirt waist
band, collar, cuffs, and pockets), 3) gores and godets, 4) darts, 5) sup
port materials, 6) hems, 7) application of trim, 8) ribbons and tapes,
9) closures, and 10) miscellaneous. The last page of the worksheet
allowed space for detailed sketches of a garment. Before visiting the
museums, I tested the worksheet on several 1860s dresses from the
historic costume collection at Iowa State University. There appeared
to be no problems with it; hence, I did not modify it.
Choice of Museums
The selection of museums for the study was based upon two criteria:
1) the number of garments said to date from the 1860s, and 2) the close
proxtmity to other museums. This last criterion of geographical
clustering was necessary to limit the expenses of data collection. The
13 museums and universities that I visited were located in the
central and northeastern portions of Iowa, as well as the vicinity of
Minneapolis-St. Paul (see Appendix B). This aUo·wed me to see garments
possibly worn in both rural and urban communities at that time.
19
Screening of Garments
Upon visiting a museum, I found it necessary to screen each garment
for authenticity. To do this, I critically examined them for fabric
and design characteristics that had been determined typical of the
1860s. Next, I made a thorough check of the museum records to find out
if any restoration or repair work had been done by the museum. This
recorded information, however, I treated with much circumspection, since
a garment could have been repaired before reaching the museum or repairs
simply not recorded in the museum files. I also checked each garment
for suspicious signs of tampering or alterations (e.g., differences in
thread color, or old needle-hole marks). Based upon the number of
incongruities within a garment, I either accepted or rejected it for
the study.
Examination of Garments
Once a garment was accepted, I made a more detailed inspection of
its construction, and then filled out the worksheet. These examinations
were conducted under a variety of conditions. Several garments had to
be examined while on display mannequins. Others were laid out horizontally
on tables covered with white cotton sheeting. Levels of lighting also
varied somewhat, but generally the garments were examined and photo
graphed under fluorescent light. A few museums in the study required
gloves to be worn when handling the garments. This diminished my finger
dexterity and may have hampered me slightly in the probing operation
of certain garments. After completing the worksheet, I took color
20
photographs. These emphasized the interior parts of a garment to high
light the construction techniques used.
Second Review of Primary Literature
A second phase of this study involved a search through women's
periodicals of the 1850s and 1860s for sewing instructions. The ob
jective of this phase was to determine if construction techniques
used on most of the selected garments were the same techniques recom
mended to women in periodicals. The information from the two sources
was then synthesized by means of written description and the frequencies
of the selected construction features in surviving garments were
expressed in bar graphs.

21
SEWING TECHNOLOGY AND MATERIALS AVAIIABLE
IN IOWA AND MINNESOTA
Contrary to the sterotypica1 images of upper midwest pioneer women
as sturdy creatures, struggling in poverty, and dressed in homespun and
leather, many surviving diaries and household ledgers indicate that such
rugged lifestyles were surprisingly shortlived (Riley, 1981, p. 70).
Furthermore, they reveal that typical Iowa women who longed to stay
abreast of eastern fashions invested a great deal of time and money in
clothing. The New York Tribune, as early as 1854, described Iowa women
as decorated in fine lawns and rich brocades. Riley (1981, p. 73)
mentioned this in her study of frontier Iowa women, and also contended
that the majority of women owned at least one good dress that could be
worn to weddings and funerals. Often these 'good' dresses were altered
to meet the demands of later fashion trends. Similar1y,Shenoi (1967,
p. 3) found that Mitmesota women " ••• despite their isolation from
civilization in the earlier years of the nineteenth century, still
managed to keep up to date with the rest of the nation •••• "
Migration to the Upper Midwest
One possible reason for such frontier preoccupation with eastern
fashions may have been the tremendous, yet fluctuating, surge of migra
tion to Iowa and Minnesota during the 1860s. Usually, the imudgrants
came from eastern states, but occasionally they retreated from the
western ones. Some of the immigrants between 1862 and 1864, for instance,
were Dakota refugees, forced by Sioux uprisings, drought, and grass-
22
hopper plagues to homestead fUrther east.
As the Civil War came to a close, wagon trains, railroads, and
Missouri and Mississippi River ferries ushered great hordes of prospective
homesteaders to the upper midwest. The aggregate population of Minnesota
in 1850 was only 6,038 (Shenoi, 1967, p. 51). Ten years later, that
figure had risen to 172,023, with another 45 percent increase by 1864.
By 1870, the population had jumped to 439,706, with roughly half of
these people being foreign born.
Iowa counties were not exempt from the influx. The total population
of the state rose from 191,982 in 1850, to 674,913 in 1860, and 902,040
in 1867. In Clay County alone, the number of farms grew from five in
1860, to 697 in 1880 (Fite, 1966, pp. 34-35). I surmise that as
pioneer women developed closer contact with one another and formed
social organizations, they became increasingly concerned about
fashionable clothing and grooming.
Distribution of Goods
Another possible explanation for women's expanded clothing aware
ness may have been the widening distribution of goods. Simply, their
interest in fashion may have been generated by increased exposure to
fashion publications and the availability of fancy dress materials in
local dry goods stores. In this respect, the railroad played a vital
role.
23
Railroads
In 1857, railroad track was extended across the Mississippi River
into Davenport, Iowa. Although the big expansion in Iowa railroads
did not occur until after the Civil War, enough track had been laid
before then to serve the region quite well (Haack, 1979, p. 26). A
study of the 1867 census of Iowa revealed that in 1865, 793 miles of
track had been finished (see Figure 1). One Kossuth County woman re
corded in 1862 that most goods were easy enough to obtain. Thin cottons
and calicoes could be had for 20 cents a yard, and a spool of
thread for 10 cents. She did mention, however, a temporary shortage of
sewing needles (Riley, 1981, p. 67). Two years later, even Godey's had
to stop taking orders for needles due to the tremendously inflated
prices. "Owing to the great increase in price, we can no longer take
orders for needles. The wholesale price is now greater than we retail
them for. If they should ever get lower, we will announce our renewal
of sales" (Gooey's, September 1864, p. 266).
This information appears to be consistent with Hooper's (1976)
findings of rural Missouri dress in the 1860s. She discovered that most
cottons, wools, and sewing notions were readily available before the
war, but Missourians suffered some shortages during the worst war
years (Hooper, 1976, p. 32).
After the Civil War, expansion of railroad track resumed. In
1867, the Iowa census reported 1,152 miles of finished track. By the
end of decade, that number had grown to almost 3,000, thus supplying
many areas with rail service (see Appendix C for a list of railroads
in Iowa and Figure 1 for the distribution of track).

24

Fig
ure
1
. D
istr
ibu
tio
n o
f ra
ilro
ad
tr
ack
in
Iow
a b
y 1
867.
(T
he
cen
sus
of
Iow
a as
retu
rned
in
th
e
yea
r 18
67,
18
67
.)
Whi
te
area
s in
dic
ate
no
tr
ack
pre
sen
t.

MIL
ES
O
F T
RA
CK
~ S
O-5
9 ~ 1
0-1
9
40
-49
m~H
30
-39
....
~20-29
~
5-1
0
prj u
nd
er
5 .~ ....
. WJ in
form
atio
n
no
t o
rgan
ized
N
VI

26
Development of the Ready-to-Wear Industry
Generally, there were two options open to women of the 1860s
for building their wardrobes. First, they could purchase the neces-
sary materials at dry goods stores and sew their garments together
at home. Second, they could take the purchased materials to a
local dressmaker. For special occasions which required a tremendous
amount of sewing to be done (i.e., weddings), people could hire a
temporary live-in dressmaker. Live-in dressmakers, however, had
become increasingly difficult to find due to the demand for a ready-
to-wear labor force. Immigrants who had previously sought domestic
employment turned, instead, to factory sewing. That in turn placed
a heavy burden upon upper middle class women to do all of the family
sewing (Burlingame, 1943, p. 374). The outcome was two-fold:
1) the ready-to-wear industry blossomed, and 2) families purchased
sewing machines for their homes.
Ready-to-wear
By 1860, the women's clothing industry had 96 factories, with
New York and Boston as the centers of apparel production. Ninety
percent of the workers in the factory sweat shops were women.
This branch of the domestic clothing trade which thus employs nearly half a million dollars in capital, and with the labor of less than 1,600 hands, produces cloaks and mantillas annually, is one of quite recent growth, and has received its principal development within the ten or fifteen years preceding the last census. The manufacture has its principal seat in New York, which has 15 large establishments, one of which employs 100 girls and makes goods to the value of $120,000 per annum.

27
Two others employ 70 and 40 hands, respectively, and make each about $100,000 worth. The whole value of cloaks and mantillas made in that city in 1860 was $618,400. A large manufacturer in that city who commenced business in 1849 was the first to introduce sewing machines in the business, as well as the first to employ young women in the retail sales department. The largest establishment in Boston also employs 100 females and makes $150,000 worth of ladies' cloaks and mantillas annually, while two others in that city employ about 75 hands, and manufacture to the value of $125,000 each. All but $13,000 of the product in Massachusetts was made by 10 factories in Boston. (Allinson, 1916, p. 19)
According to the Magee study (1930, p. 111), of the U.S. manufacturing
census records, the women's clothing industry was still in its infancy
by the Civil War, with only a few items like outer wear and skirt hoops
being produced. One possible explanation for this was that women
simply preferred the fit of custom made dresses and undergarments.
This desired sleek fit was further complicated by the fashion for
wearing corsets. Women were also concerned that factory-made garments
would all look alike, and consequently make all women look alike.
In fact, it was so shocking to think of two or more women wearing the
same dress that precautions were taken to the extreme. The leading
Parisian designer, Charles Worth, for example, kept detailed records
of his clients' gowns so that no two dresses would be made the same
(DeMar1y, 1980, p. 102).
Dressmakers were able to take the time to apply unique trims to
their garments whereas, in a factory, such deviations from a model were
inefficient and costly. Furthermore, the factory system could not
keep up with the constant changes in women's fashions due to pro-
duction lags. Consequently, some of the first factory-made dresses
28
were intended for mourning because they were often needed on a
moment's notice and did not need to follow fashion trends so
closely.
Since men, on the other hand, were content to wear uniformly
made clothes and did not face the same fitting problems as women,
the men's clothing industry developed much earlier. In fact, some
men's ready-to-wear clothing (called 'slops') had been imported from
Europe as early as the Colonial period. These 'slops' were very
badly fitted and sewn, and limited to a small selection of sizes
and fabrics (Hooper, 1976, p. 24). Godey's advised that such "cheap
bought slop-clothes are scarcely worth the time and trouble of re
making into anything" (1854, p. 422). The major boom in men's ready
to-wear, however, came during the Civil War when the mass production
of uniforms encouraged the standardization of sizes, job specialization,
and assembly lines.
Part-made garments
Although few references to it have been found, women sometimes
had a third option open to them that had existed since before the
reign of Queen Victoria. It was called 'part-made' clothing, and
it gained most of its popularity in England. "In 1830, T. Challinier
of 109 New Bond Street advertised in the World of Fashion: 'Muslin
Bodices exceedingly useful to the country trade ••• the dresses can
be completed for wearing in [sic] a few hours' notice" (Adburgham,
1981, p. 123).
Forty years later, 'part-made' dresses were still being advertised.

29
The October 1870 issue of The New Fashion Book (a catalogue of British
fashions), for instance, offered its readers four different methods of
buying their featured costumes (Adburgham, 1981, p. 135):
1. Have it made to measure in the dressmaking department,
2. Buy it ready-made,
3. Buy the skirt ready-made, and have the bodice made to measure,
4. Buy it 'post order' by sending a list of measurements or
else by sending an old bodice as a size guide.
Although part-made dresses were rarely mentioned in American fashion
periodicals, one advertisement for a part-made walking dress did appear
in Harper's Bazar (November 16, 1867, p. 35). "Imported walking
dresses may be bought with the skirt and pale tot ready made and
trimmed. Material for the body is furnished." Two years later, another
advertisement appeared: "Strangers making transient visits to the city
can purchase the skirts and panniers of silk dresses ready-made, the
waist and sleeves being made to order in a few hours" (Harper's Bazar,
May 22, 1869, p. 323).
Manufacturers tried various methods of sizing ready-made clothing
after the Civil War. Peter Robinson's garments came in three sizes:
A, B, and C. This sizing format proved satisfactory and~ by the 1880s,
it had been incorporated into the production of ladies' suits, followed
in the 1890s with lingerie, shirt waists, fancy waists, skirts, gowns,
and neckwear.
Although New York was the first American commercial center to open
up ready-to-wear department stores, it was only a short time before
other eastern and midwestern cities did the same. By 1860, Philadelphia,

30
Chicago, Cincinnati, and St. Louis had all established major deparbnent
stores. Furthermore, if something was not available in the stores, a
customer could always obtain the item by mail-order from manufacturers
whose addresses were often advertised in fashion journals. This
distribution method was a forerunner to the large "mailorder houses"
(i.e., Sears, Roebuck & Co. and MOntgomery Ward) which developed later
in the nineteenth century (Hooper, 1976, p. 28).
The sewing machine
One of the primary ingredients to the development of the ready-to
wear industry was the invention of the sewing machine. The rapid expan
sion of the sewing machine industry between 1842 and 1895 is witnessed
by over 7,000 patents granted for modifications, with almost 900 issued
before 1867 (liThe sewing-n;a-aiine-, ';-1896, -p. 73f. -"By ~f860 -there were
seventy-four factories in the United States producing more than
111,000 sewing machines a year, with fourteen factories devoted
to the production of cases and attachments" (Pearsall, 1973, p. 31).
The treadle-powered sewing machine debuted in Iowa during the
late 1850s and, as early as 1855, the Davenport Gazette ran advertise
ments for the Wheeler and Wilson machines. Other papers, such as the
Burlington Daily Hawkeye, Fairfield Ledger, and Waterloo Courier, soon
followed the example. Other sewing machine companies which advertised
in Iowa included Wilcox and Gibbs; Singer; Grover and Baker; West and
Wilson; Raymond; and Weed. Their machines were priced between $25 and
$110 (still within the range of some budgets) and often featured at
tachments for hemming, tucking, cording, binding, quilting, and embroidery.
31
Sewing machines were made available to Iowans by several means:
1) traveling salesmen, 2) local agents for the manufacturer, or 3) mai1-
order directly from the company. Weeds, a New York based company,
advertised their Burlington, Iowa agent as early as 1859 (Riley, 1981,
p. 72). By 1870, six sewing machine dealers had begun advertising in
a Des Moines business directory.
Nationwide production of sewing machines had reached an annual
rate of half a million by 1870 (see Table 1). Most of this rapid
growth, however, would not have been possible were it not for two
things. The first was the invention of a simple grinding machine
that made production of standard sewing machine parts possible. In
vented by the Brown and Sharpe Company, the grinding machine trans
formed the previously hand-crafted sewing machine into a mass produced
item (Gilbert, 1970, p. xi).
The second impetus was an ingenious patent plan by Orlando Potter
(lawyer, later president of Grover and Baker). Beginning with such
landmark patent suits as Howe vs. Singer and Hunt vs. Howe, the sewing
machine industry of the early 1850s became bogged down in endless
litigation. Inventors filed lawsuits and counter suits in continuous
succession. It became apparent to Potter that a truly workable sewing
machine could not be built without infringing upon another company's
patent. By 1856, for example, the Singer Company had control of 25 of
the 30 significant patents alone, with numerous suits against Grover
and Baker and Wheeler and Wilson. Finally, all three companies met in
Albany, New York for a series of patent trials. Orlando Potter seized
the opportunity to introduce his plan for a patent pool, whereby companies
32
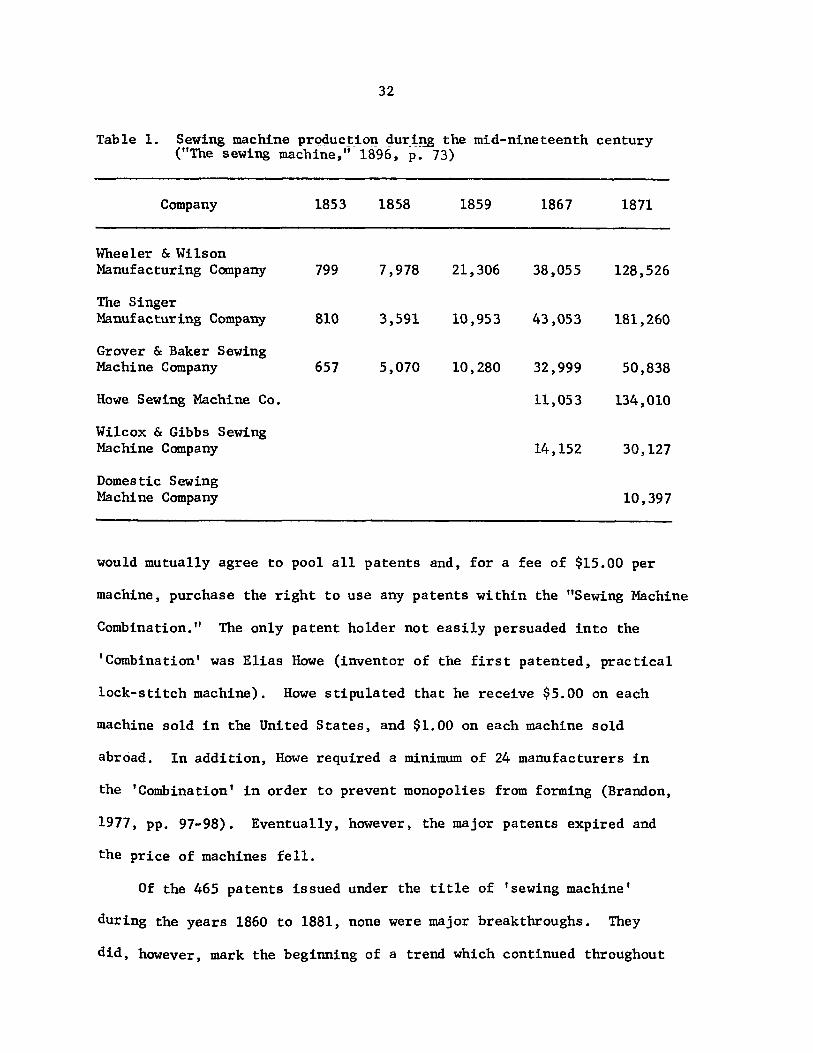
Table 1. Sewing machine procluc~io~ duri~ the mid-nineteenth century ("The sewing machine," 1896, p. 73)
Company 1853 1858 1859 1867 1871
Wheeler & Wilson Manufacturing Company 799 7,978 21,306 38,055 128,526
The Singer Manufac turing Company 810 3,591 10,953 43,053 181,260
Grover & Baker Sewing Machine Company 657 5,070 10,280 32,999 50,838
Rowe Sewing Machine Co. 11,053 134,010
Wilcox & Gibbs Sewing Machine Company 14,152 30,127
Domestic Sewing Machi ne Company 10,397
would mutually agree to pool all patents and, for a fee of $15.00 per
machine, purchase the right to use any patents within the "Sewing Machine
Combination." The only patent holder not easily persuaded into the
'Combination' was Elias Rowe (inventor of the first patented, practical
lock-stitch machine). Rowe stipulated that he receive $5.00 on each
machine sold in the United States, and $1.00 on each machine sold
abroad. In addition, Howe required a minimum of 24 manufacturers in
the 'Combination' in order to prevent monopolies from forming (Brandon,
1977, pp. 97-98). Eventually, however, the major patents expired and
the price of machines fell.
Of the 465 patents issued under the title of 'sewing machine'
during the years 1860 to 1881, none were major breakthroughs. They
did, however, mark the beginning of a trend which continued throughout

33
the twentieth century, the division of the sewing machine industry into
two separate spheres: 1) the industrial machine and 2) the domestic
machine.
The industrial machine The early industrial machine was charac-
terized by tremendous bulk, weight, and austerity. Purely utilitarian in
nature as the industrial machine was, no one attempted to improve its
aesthetic qualities. Quite early, however, inventors made great strides
in adapting the machine to various types of operation. Singer's foot
treadle, for instance, was well-received. Unlike the earlier hand-cranked
variety, the treadle machine afforded the operator use of both hands
to manipulate the cloth through the needle.
While the treadle machine continued to be the favorite kind of
machine well into the second decade of the twentieth century, a few
factories of the 1860s used steam power (Pearsall, 1973, p. 29). How
ever, an even greater turning point came in 1871, when Solomon Jones
attempted to electrically power an 1865 machine. Isaac Singer per
fected Jones' idea, but it was not until 1889 that the first suc
cessful electrically powered sewing machine was completed. It. be
came an instant success with the apparel industry due to its ability
to start and stop much faster and more accurately. In addition, the
machine operator could sew for much longer periods of time without
tiring.
Specialization was another major characteristic of the industrial
machine. Not only was the sewing machine adept at clothing production,
but it was adaptable to manufacturing shoes, gloves, umbrellas,
34
upholstery, books, mattresses, carpets, corsets, tents, hosiery,
millinery, and flags.
The domestic machine While the industrial machine moved in
the direction of specialization of tasks, the domestic machine held
to a course of ornamentation, generalization, and price reduction.
By the end of the l850s, the appearance of the domestic machine had
become quite a preoccupation. Painted floral borders or geometric
pa tterns often adorned the "iron maiden." Gradually, however, the
ornamentation became excessive and was directly incorporated into
the functional apparatus of the machine. The shape, for example,
often mimicked animal or mythological forms. Some of the more popular
ones included the dolphin and cherub (1858), the horse, the mermaid
(1859), and (the most peculiar of all) the sewing shears machine, which
"has the appearance of a pair of scissors clamped on a wooden stand.
The spool projects above one of the finger-holes and the other finger
hole is left free, for this machine could not only sew but cut as
well, the scissors that form the design being actual scissors"
(Pearsall, 1973, pp. 27-28).
Due to the fashion trends of the mid-nineteenth century, many
sewing machine companies developed and patented attachments for
tucking, ruffling, pleating, cording, and braiding. One of the first
such attachments, patented in 1853 by Harry Sweet, was described as a
binder attachment "used to stitch a special binding edge to the fabric"
(Cooper, 1976, p. 62). It was followed a year later by a hemmer at
tachment and an inept zigzag machine. By 1856, a special buttonhole
attachment had been designed for standard machines but, despite the
35
developments in buttonhole machines and attachments, a fully automated
and practical buttonholer was not invented until 1881 (Godfrey, 1982,
p. 129). Meanwhile other features, such as bobbin winders (1862)
and braid guides (1871) were added to the list of capabilities.
Magazine circulation spread rapidly during the nineteenth
century, tempting women with their sewing machine articles.
One of the earliest descriptions of a sewing machine appeared in
Godey's (1854, p. 127):
The sewing-machine, of which a representation is now given, is about twelve inches square, and is driven by a wheel at the end of a main shaft which passes through the machine. The wheel can be driven either by the hand, foot, or steamengine •... The machine is capable of stitching every part of any garment, except the buttons and button-holes, whether the work be light or heavy, coarse or fine •••. It is so simple in its construction and action that it may be worked by a child, and will sew a circle, curve, or turn a square corner, equally well as a straight line ••.• By the action of a screen in the machine, the stitch can be either lengthened or shortened as may be desired. The machine feeds itself with both cloth and thread, and it is only necessary for the operator to guide the material to the needle to sew. It will with ease sew a yard per minute, stronger, more uniform, and consequently better than it is possible to be done by hand.
Another article claimed in the same journal to illustrate the amount
of income that could be generated from owning a Wheeler and Wilson
sewing machine:
Example For the Ladies. - Mrs. Mary R. Hubbard, Troy, N.Y. earned with a Wheeler & Wilson in 1868, $731.47; stitching 31,092 shirt fronts, equal to 886,122 feet of seam. At 20 stitches to the inch, this would give 212,669,280, an average of 708,891 per day, 88,612 per hour, and 1477 per minute, or sixty times as fast as hand sewing. Sixty years in one! The machine has run three years by steam and three by footpower without repair, and is as good as when bought. (Kunciov, 1971, p. 123)
Complaints occasionally appeared in Godey's from disgruntled
36
customers who considered the price of Singer sewing machines entirely
too high, but admittedly preferred them over the Wheeler and Wilson
machines (Kunciov, 1971, p. 70). Realizing the need for truly affordable
machines, James Gibbs began production in 1859 on an inexpensive ($50)
model which was only half the price charged by other machine companies
(Pearsall, 1973, p. 23). The idea caught on quickly and soon several
companies were producing poor quality, lightweight imitations. Among
these were the 1863 Heyer's Pocket Sewing machine, the $5.00 'Fairy,'
and the $10.00 'Gold Medal' of 1862. By 1863, the cost of machines had
fallen to a price that many families could afford.
Sewing thread
It is possible, however, that the sewing machine would never have been
such a success had it not been for improvements in cotton thread (Cooper,
1976, p. 64). Until 1850, cotton thread had primarily been a three-ply
glazed yarn. It had a rather wiry texture, however, and demonstrated it
self to be totally unsuitable for machine sewing. Furthermore, the yarns
were far too weak to withstand the necessary machine tension. Improvements
in thread began in 1850 with C. E. Bennett's six-ply cotton thread. Al
though far from perfect, Bennett's thread received a gold medal from the
Fair of the American Institute. Not until the mid-1860s was a superior
six-ply thread produced by twisting three two-ply yarns together. The
two brothers responsible for this softer thread, George and William Clark,
originally hailed from Paisley, Scotland and were third-generation
manufacturers of cotton thread. It was the Clark's improvements in
thread which made the sewing machine practical.
37
Cutting equipment
Band-knife As the Civil War came to a close, a fairly new
(1859) invention entered the garment industry and required great
strength to operate. It was a long cutting knife, called the "band-
knife," adapted from the band-saw so that bulk layers of cloth could be
cut at one time. Evidently, British clothing manufacturers began using
both the sewing machine and the band-kn~fe a little earlier than the
American firms. With the gradual infusion of the band-knife into the
apparel industry, men slowly began to infiltrate clothing factories
and assume jobs previously held by women.
Scissors and shears Home sewers, however, had to be content
with their simple cutting shears. Of the variety available to them,
cast iron shears ranked among the worst. The brittleness of cast iron,
plus its tendency to lose a sharp edge, made it a very poor grade for
scissors (Souder, 1922, p. 6). Although many other types of metal were
used, two types of steel worked particularly well for shears. The first
one, forged steel, came only from Europe, and due to its weight, was
predominantly used for smaller shears. United States' factories, on the
other hand, produced laid steel. First manufactured in Newark, New
Jersey during the 1840s, laid steel shears were typically the heavy
duty variety (Souder, 1922, p. 17).
Pinking-machines Only one advertisement for pinking-machines
was found:
Pinking-machines are sold at any house-furnishings store. An iron of each of the different patterns costs fifty cents. Saw-teeth notches are most fashionable. The mallet and block are fifty cents in addition. A flat-iron and hammer answer as well. (Harper's 'Bazar, 1869, p. 286)

38
Scissors gauge In order to solve the problem of crooked cutting
of garment pieces, Mme. Demorest proposed her latest invention. "Among
the new inventions is a scissor gauge, invented by Mme. Demorest. It is
a neat little affair to slip on a pair of scissors to insure the straight
cutting of bands and trinu:nings" (Godey's, March 1866).
Pressing eguipment
Flat irons Pressing with heated or charcoal filled flat irons
was a nasty, time-consuming task for pioneer women. In order to ease the
drudgery and speed the process along, most households owned at least
two irons. That way, the woman could be using one iron while heating
another.
Although many women probably avoided ironing as they sewed, fashion
periodicals did advise them to press for a more professional look.
One article that appeared in Godey's (1854, p. 422), for example, an-
nounced that the tailor's secret for neatly made clothes was to press
open all seams before inserting the lining, and it should be done on
both sides of a dampened seam.
Flu ting irons In addition to flat irons, other types with
ridged and fluted surfaces that produce various pleated designs for
ruffles and trims were also available. These came in a variety of
styles, as described in Godey's (August 1865):
Fluted ruffles are exceedingly popular •... The objection to fluted ruffles is, that they generally necessitate the skill of a French laundress, and consequently the expense is very great. This, however, need not be, if one is willing to take a little trouble; and for the benefit of the ladies we will mention the different styles of fluting irons brought out for their use. First, there are the threepronged fluting scissors, then scissors with two very thick

39
prongs or rods, used most especially for the wide ruffles on petticoats. Another kind is called the Italian iron, and consists of a hollow tube about six inches long, mounted on a stand. In this tube you run a heated rod, and form the flutes of the ruffles by stretching the muslin over the tube which is heated by the inside rod. A very nice little affair has been invented which shuts up in a box, and is found very convenient for travelling. It consists of three fluting rods with a lamp attached which keeps them always heated. A string with stirrup is fastened to these rods, the machine is screwed to a table, the foot is put in the stirrup, working it up and down very much like the treadle of a sewing machine. The ruffles are passed through these rods, making most beautiful even flutes. (p. 185).
The ruff1er most frequently seen at the museums in this study, however,
had an 1866 patent date stamped across the bottom plate, with 'Geneva'
inscribed across the top iron.
Fasteners
Since snap fasteners were not invented until the turn of the twen-
tieth century (Souder, 1922, p. 121), there remained basically three types
of garment closures (excluding pins) available to women during the l860s:
(1) hooks and eyes, (2) lacings, and (3) buttons and buttonholes.
Of the three, lacings were used the least and reserved mainly for
evening dress. Godey's had recommended them quite heartily just a
decade earlier when pointed back evening corsages were popular:
The back of the corsage has also a point, which many wear quite deep. We would commend the present fashion of lacing the corsage of an evening-dress, as it gives the figure much more to advantage than the compression of hooks and eyes, but it is too troublesome for a walking-dress. (Godey's, 1851, p. 336)
Hooks and eyes The hook and eye fastener could hardly be called
a novel invention of the nineteenth century, since its history can be
traced as far back as the fourteenth century when it was called the
40
"crochet and loop" (Souder, 1922, p. 120). Nevertheless, tremendous
strides were made in its production and design during the nineteenth
century which merit mention.
Charles Atwood and Elisha C. Savage received the first two patents
for handcrafted brass and iron hooks and eyes in the early 1840s. The
brass variety was by far the smoother, stronger, and more rustproof
of the two, but unfortunately cost about twice as much as the iron
ones (Souder, 1922, p. 117). Both hooks, however, lacked the proper
engineering to stay closed, thereby requiring the fabric to be under a
small amount of tension. Ultimately, hooks and eyes (at least of the
early 1860s) were really only useful for snugly fitted styles. In 1862,
however, Mme. Demorest advertised a revolutionary hook and eye that did
not come unhooked.
Their peculiarity consists in a simple arrangement of one end of the wire forming a tongue or spring having a projecting curve under the hook, that allows the eye to easily slip over it, both in hooking and unhooking, without requiring any attention or variation in the usual method, and without the possibility of failure or annoyance. The sizes are numbered, and are also sewed on the same as the common kind. They are sold at about the same prices as the common kind, and their peculiar merits are easily understood. (Godey's, March 1862, p. 290)
Despite the obvious advantages of the 'Eagle Talon Hooks and Eyes,'
it is not known how quickly they were adopted. Furthermore, none of
the original hooks on garments in this study had the spring hump.
Buttons The button industry came into existence quite early
in the United States. While some buttons (e.g., vegetable ivory)
had to be imported from Europe, the Colonists were carving buttons
out of wood. Then in 1812, horn buttons came on the market, followed
41
in 1855 by ocean pearl buttons. Also available were porcelain and
crochet (or fabric) covered buttons. One very popular type of button
produced in the United States during the 1860s was the '~omposition
button." As the name implies, several different materials were used,
ordinarily beginning with a foundation of either lime or asbestos. Added
to that were various chemicals and dyes; ingredients were then held
together with a gum-like substance. Following that, the mixture was
rolled out, cut into buttons, and filed smooth (Souder, 1922, p. 157).
Paper patterns
Before the invention of paper patterns, women hesitated to draft
their own garments. Rather than try to draft new patterns, they quite
commonly took apart old garments and used the pieces as patterns for
new ones (Hooper, 1976, p. 27). No one knows for certain who invented
the first paper pattern, but there is abundant evidence to indicate
that patterns were in existence in England as early as the 1830s. One
English paper pattern warehouse, for example, advertised in March 1831
for its full size millinery and dress patterns (i.e., pe1isses, dresses,
bonnets, and caps). Another merchant announced in October 1836 that:
Mrs. Hobson solicits an early inspection of her French Paper Models, comprising a very superior and extensive display of Real Fashions, selected fran the newest designs for Cloaks, Bonnets, Caps, Dresses, new Sleeves, Capes, with every new pattern as they appear, at 8/-set of four articles, and 15/-for two sets of eight articles, packed in a box charged 3/-and forwarded to any part of the Kingdom. (Adburgham, 1981, p. 41)
Then in August 1850, a major step revolutionized the demand for
paper patterns. The English women's periodical, World of Fashion, began
to insert supplementary paper patterns into each monthly issue. The
42
pattern insert was actually composed of several garment patterns super
imposed on one large piece of tissue paper, each garment having its
own distinct set of lines. A dressmaker had only to trace the neces
sary pieces onto separate paper. Among the items popularly featured
were embroideries, trimmings, capes, collars, undergarments, sleeves,
bodices, caps, and dresses for morning, evening, and balls (Adburgham,
1981, p. 114). Furthermore, subscribers paid no extra charge for the
paper pattern inserts; the magazine's price remained fixed at one
shilling.
Other English fashion magazines soon copied the idea of pattern
supplements. In 1860, for instance, Samuel and Isabella Beeton arranged
to include patterns in their Englishwomen's Domestic Magazine. To
supply them with the latest in Parisian fashions, the Beetons secured
the aid of Adophe Gouband of Paris. The idea was such a tremendous
success that the Beetons began putting patterns in their newest
publication, The Young Englishwoman (Adburgham, 1981, p. 118).
Although the English initiated the pattern supplement, it was not
long before American publishers caught on and improved upon it. In
1860, Ellen and William Jennings Demorest founded the Mirror of Fashion.
Rather than insert miniature pattern diagrams, as Godey's and Peterson's
did, the Demorests Chose instead to include full-scale paper patterns.
The full-scale patterns were warmly received, and by 1863, circulation
of the magazine reached 60,000. At the close of the Civil War, with
300 agents to distribute their purveyor of fashion, the.Demorests decided
to rename the magazine Demorest's Illustrated MOnthly and Mme. Demorest's
Mirror of Fashions (Haack, 1979, p. 35).

43
Although the demand for full-scale patterns remained unwavering,
seamstresses were still burdened with the problem of adjusting the
size. Around 1863, Ebenezer Butterick, a Massachusetts tailor,
developed the first sized paper pattern business. Butterick (like
Singer) had a keen sense of business, so that by 1871, he was selling
six.mil1ion patterns a year. (Seven years after Butterick began
pattern production, another tailor, James McCall, started manufacturing
similar patterns. At first, his patterns were for such small items
as fancy aprons, but soon he diversified into wraps and dresses as
well. )
Miscellaneous tools and notions
Although not much has been written about sewing notions and
smaller sewing tools of the l860s, a search through advertisements
at the back of periodicals revealed some interesting clues as to what
was available. Items found in this manner include copying wheels, seam
rippers, needle threaders, wire stiffening for fluted trims. Also
advertised were dress shields.
Dress shields "We must call attention to the admirable dress
shields just brought out by Mme. Demorest. They are of a new material,
perfectly impervious to moisture, and resemble a creamy white muslin.
They are very thin, and have not the disagreeable odor of India rubber"
(Godey's, 1863, p. 198). These Excelsior Dress Shields, "which may be
applied in an instant, are taken in and out without any trouble"
(Godey's, 1864, p. 80).
44
Summary
Midwestern women of the 1860s had some unique opportunities for
expanding their clothing awareness which were denied to many of earlier
decades. The railroad brought eastern magazines, brimming with tempting
fashions, to rural women. Many advertisements reassured the readers
that items which could not be procured through local dry goods stores
could always be ordered directly from the manufacturer. Even the
Civil War did not cause as much severe deprivation in Iowa and Minnesota
as might be expected.
Due to improvements in mass production, sewing machines of the
1860s were not nearly as costly as were those of the 1850s. Prices
fell to within the range of many seamstresses. The practicality of the
sewing machine was also increased as ~provements were made in cotton
thread.
Finally, the availability of paper patterns gave women the neces
sary confidence to sew newer, more complicated eastern fashions,
rather than pick apart old garments.

45
CONSTRUCTION ADVICE IN FASHION PERIODICALS
According to Carter (1954, p. 27), women's magazines of the nine-
teenth century helped narrow the social gap regarding dress by equipping
middle class women with enough fashion illustrations and construction
advice to sew their own garments. This part of my study examines the
recommended construction techniques in magazines from the 1850s and
l860s to determine two things:
1. How detailed and frequent was the advice?
2. Was conflicting advice given?
Periodicals Examined
Although many women's periodicals were in existence during the mid-
nineteenth century, only five were available for use in this study:
(I) Godey's Lady's Book (Godey's), (2) Harper's Bazar (Harper's),
(3) Ladies' Repository, (4) Peterson's Magazine (Peterson's), and
(5) The Prairie Farmer. Accurate circulation figures for these maga-
zines, however, are difficult to determine, since according to Haack
(1979, p. 14), publishers often exaggerated their circulation numbers.
Clues to a magazine's regional availability, however, may often be
found in printed letters to the editor. One Iowa woman, for instance,
wrote:
When times are hard and war is about throughout the land, homes seem lonely and cheerless; then all times we hail with delight the Coming of an expected friend, who will at once amuse, instruct, and entertain, a combination of qualities rarely met with. And I think I can bestow no
46
greater praise on the Lady's Book than this: we have selected it as that friend.
Mrs. W., Iowa (Godey's, 1862, p. 511)
Godey's Lady's Book
Of all the American fashion periodicals in the nineteenth century,
Godey's Lady's Book was the first to reach national prominence. Shenoi's
study (1967, p. 49) of Minnesota dress found that even as early as 1840,
Godey's was reaching Minnesotans. Sarah Josepha Hale (editor of Godey's)
estimated in 1861 that, of Godey's 150,000 magazine subscriptions,
each copy was passed to at least five people (Finley, 1931, p. 177).
Unfortunately, almost one-third of Godey's readers lived in southern
states. This caused some problems during the Civil War, since mail
service in the South became unreliable (Finley, 1931, p. 177). After
1865, however, the demand revived quickly. Much of the magazine's
success may be attributed to the colorful fashion engravings that
appeared each month, along with suggestions for fabric, trim, and
construction.
Harper's Bazar
What began during the l850s as a regular fashion feature in Harper's
Monthly developed into another popular fashion magazine in 1867,
called Harper's Bazar. Harper's competed directly with Godey's and
presented very similar content, including short stories, novels,
poetry, needlecraft, news from abroad, and fashions from Paris. In
addition, Harper's contained an abundance of fashion illustrations.
These became an attractive feature of the magazine and were usually
47
accompanied by recommendations for fabrics, trims, and (occasionally)
construction.
The Prairie Farmer and Peterson's Magazine
The Prairie Farmer and Peterson's Magazine also contained some
fashion illustrations, along with instructions for needlecrafts and
plain and fancy sewing. Both magazines, however, were targeted at
less wealthy customers than those of Godey's and Harper's; hence, many
of the fashion articles were designed to help thrifty women remake
older garments. However, The Prairie Farmer did not yield much information
since it was actually an agricultural periodical.
Ladies' Repository
Of the five periodicals used in this study, Ladies' Repository
provided the least in fashion advice. This was due, in part, to the
religious nature of the magazine and its mission to curb fanatic dis
play. Of the few fashion articles that did appear, only healthful and
sensible dress was encouraged.
Levels of Construction Advice
After the five magazines were reviewed, I discovered that the con
struction advice contained in them was presented at a variety of levels.
Level I
Some advice, for instance, was located amid design descriptions of
garments and generally was associated with the design elements of those
garments. Many dresses, for example, were described as having "pinked"

48
flounces or ruchings. In other cases, skirts were described as either
"gored" or "straight" (indicating the grain), rather than identi-
fied as "flared" or "bouffant." Although this type of information
was not of a detailed "how to" nature, it does indicate that
construction terminology sometimes replaced design terminology. One
way to distinguish design terminology from that of construction is to
analyze the cause and effect. Gores, for example, are used to achieve
flare; flare is not used to achieve gores. Similarly, a saw-tooth edged
flounce is the result of pinking; a pinked flounce is not the result
of a saw-toothed edge.
Level 2
Slightly more detailed in construction advice were the accompanying
instructions to pattern inserts. During the 1860s, reduced one-page
patterns became a regular feature in many magazines. The instructions
to these patterns, while they did provide some information as to the
assembly of the pattern pieces, offered very little additional informa
tion.
Level 3
Another source of construction advice was the question-answer
section of magazines where readers could write in their problems and
queries. Harper's Bazar's feature entitled "Answers to Correspondents"
was particularly full of sewing hints.
49
Level 4
The most extensive and detailed sewing advice appeared rather
sporadically in both Godey's and Harper's. Apparently, the editor of
Godey's considered the instruction of "plain work" a responsibility of
mothers, and not something to be learned from a book.
An article of practical instructions in the art of plainsewing ••• will be given from time to time. It is a great pity that this knowledge has, in most cases, to be acquired by the married woman. We think it should be considered an essential part of the education of the daughter. All the pages of instruction that may be written or read upon the subject, can never give that aptitude ••• which would be acquired by seeing how others do it, and being taught while young to take a part in the operation. (Godey's, 1854, p. 460)
Such sentiments, however, did not impede the promotion of Godey's 25 cent
pamphlet, How to Make a Dress (Godey's, 1860, p. 90). However, this
pamphlet was not located for this study.
Level 5
The final level of construction advice addressed the fashion con-
cerns of thrifty women with instructions for the remaking and updating
of older garments. One particular article, "Dress under difficulties;
or Passages from the blockade experience of rebel women," appeared in
GOdey's (1866, p. 32) just following the Civil War. The article was
written by a southern woman, and it described how rebel women survived
the Yankee blockade of goods by rejuvenating their old dresses.
It is also worth noting that some of the articles stressing thrift
were reprinted years later, despite changes in style. For example, one
article entitled "The economics of clothing and dress" first appeared
in Godey's in 1854 (pp. 421-422), then reappeared, without modification,
eight years later.

50
Construction Advice
The following construction advice has been arranged in the same
sequence as it appeared in articles of the 1860s. Where conflicting
information was given, I have noted this fact.
Taking measurements
To begin, a properly made garment had to have an accurate fit.
Therefore, it was imperative that the seamstress take very exact mea-
surements. Methods previously used to fit garments required clients
to "submit to be pinned up in a newspaper, and, in terror and torture,
gagged here and there, under the pretence of being 'cut out'" (Godey's,
1862, p. 407). An easier and more scientific method, developed in the
l850s by Mme. Demorest, required only four measurements to be taken:
(1) shoulder (and armscye circumference), (2) length of waist, (3) bust,
and (4) waist.
Lay on the table a large sheet of stiff white or brown paper, and upon it lay the model •••• Then, taking a tape measure in the ••• left hand, make the person to be measured stand straight up, with her back toward you.
Commence by placing the end of the tape at the bone of the neck, bringing it down under the right arm, closely, and round up over the top of the shoulder, until it meets at the same point where it begun.... Hold the tape to the same place again, measure down the length of the waist, allowing half an inch for what it will take up in making •••• Now place the measure across the fullest part of the bust, drawing .it round under the arms loosely, so as to give freedom to the chest, and allowing an inch for padding, if it is desirable •••• Last, take the measure tightly round the waist. (Godey's, 1862, p. 407)
It is quite possible, however, that many women were not completely
satisfied with the fit produced by only four measurements, because just

51
seven years later, Harper's Bazar (1869, p. 564) offered some ~sllght1y
different advice. First, instead of measuring the shoulder and
armscye, women were instructed to measure the circumference of the
chest running the tape just under the arms and over the fullest part
of the bust. Widths of the front and back upper chest were then
measured across from armscye to armscye. Shoulder seams were measured
from the base of the neck to the sleeve cap and did not include the
arms eye circumference. Next, measurements were taken under the arm
along the side seams to determine waist length. Using these four mea-
surements (chest, upper chest width, shoulder, and waist length), the
shape of the arms eye was formed. Additional measurements included:
(1) center front and back bodice lengths, (2) inside sleeve seam,
(3) waist circumference, and (4) front, side and back skirt lengths.
Many of the changes in measurement, particularly of the shoulder
and armscye, may be due, in part, to corresponding changes in style.
What was appropriate for sloping shoulders early in the 1860s may
not have been appropriate for a more normally positioned arms eye later
in the decade. In 1869, for instance, Harper's Bazar explained:
That fashionably-made corsages show the figure in its natural and beautiful proportions, the seams of the corsage following as closely as may be the outlines of the figure. For instance: shoulder seams are placed on the shoulder, not back of it, as was formerly the case; the shoulders do not extend over the arm, but are short enough to make the arm-hole in its appropriate place; there is no attempt to make the back look narrower by placing the side seam behind the arm instead of under it. (1869, p. 563)

52
Selection and treatment of fabrics
The amount of fabric required to make a dress varied tremendously
according to: (1) the type and width of the fabric, (2) the desired
amount of fullness in the skirt, and (3) the desired length of the
train. Some skirts, such as the one mentioned in Godey's (1861, p. 91),
reached circumferences of eleven yards. And in extreme cases (es-
pecially ball-dresses), five or six times that amount might be used.
Plain tarlatan, either white or colored, is sold for from fifty to seventy-five cents a yard. It is a yard and threequarters wide, and there are sixteen yards in a piece. Modistes say they frequently use two and even three whole pieces for a dress, and that it is not uncommon to use sixty yards of tulle in making a puffed trained ball-dress. (Harper's Bazar, 1869, p. 51)
Still, women were reassured that it was possible to sew very fashionable
demi-trained gowns with only nine yards of fabric (Harper's Bazar,
1869, p. 19).
Peterson's (1854, p. 379) advised women to purchase an extra one
or two yards of material so that later modifications could be made to
the body or sleeves of a dress. Furthermore, if a fabric was checked,
plaid, or striped, extra was needed to match pieces.
Checked circulars (mantles) should be cut with great precision, and care should be taken to match the plaid when sewing them up the back, otherwise the effect will be very irregular and distressing to the eye. (Peterson's, 1864, p. 89)
In addition to fashion fabrics, periodicals of the l850s and l860s
also suggested suitable fabrics for the lining and underling of garments.
Satin jean and ordinary twilled cotton are the materials most often used for dress linings. They are durable and firm, consequently they wear well, and do not stretch out of shape. Linen is also used, but it is elastic, soon shows soil, and is objectionable on account of the chilled feeling it gives the wearer when it is first put on. White

53
lining is used for all dresses with light grounds. Dark drab and gray for thick colored materials •••• Modistes prefer silk linings to all others as they fit to the figure more smoothly.... (Harper's Bazar, 1869, p. 563)
The type of lining used, however, was dependent upon the style and
fabric of a garment. Light quality silks and poplins, for instance,
were best lined with "paper muslin" (Harper's Bazar, 1869, p. 259).
On the other hand, gored skirts of thin materials should never be
lined (Harper's Bazar, 1869, p. 350). Nevertheless, the general rule
for lining dresses seems to have been: "A light thin lining is better
to use than a heavy one. For skirts, the lining should not be harsh
or hard, as it wears out the dress quicker (sic)" (Godey's, 1858, p. 37).
Some fabrics, such as printed piques, merinoes, and good silks,
did not require a lining. Even calico dresses "should not be lined,
as the lining and outside shrink differently when washed, making the
seams look drawn and puckered" (Harper's Bazar, 1869, p. 83). One
fashion columnist for Godey's even claimed that, "Dresses never hang
so well as when there is no lining in the skirt," but then quickly
added that, owing to the cold climate, women were "frequently compelled
to resort to almost ugly means to attain our end" (1858, p. 37).
Since, therefore, lining was often a necessity for warmth, yet
shrank miserably in the wash, a special precaution was recommended.
It is always advisable that muslin should be well soaked in cold water before being made up; it is easier to work upon, and you can then cut out anything to the exact pattern, without allowing for shrinking. (Godey's, 1868, p. 190)
Furthermore, by adding an ounce of alum or sal-ammoniac to the last
rinse water, cottons and muslins could be made temporarily fire re-
tardant (Godey's, 1860, p. 479).

54
Cutting ~ the garments
In 1860, Peterson's Magazine presented its readers with a very
standard pattern for a two-dart bodice. Featured in the basic top,
and retained throughout most of the l860s, were: (1) back princess
seams, (2) fitted sleeves, and (3) a center front opening. Before
cutting out the bodice, however, Godey's recommended that the seamstress
measure and tear off the material for the skirt (1851, p. 192). That
way it would be easier to calculate the amount of remaining fabric for
sleeves and trim.
Measuring off the skirt Unlike bodices of the l860s, skirts
went through some dramatic changes. Early in the decade, periodicals
described skirts as being torn into plain widths. Eventually, however,
a smoother, more flared skirt came into fashion which required the use
of gored panels. I must mention, however, that rarely were skirts made
entirely of gores. Generally, the gores were used in combination with
straight widths. For instance, Godey's (1864) suggested:
Have the front breadth plain; then a gore on each side, the straight side of each against the breadth; then two gores one each side these, the plain part of each gore coming against the plain side of the second gore on each side against the gored part of the first of the two gores. Then comes the back breadth, the gored sides of the two gores coming against the straight sides of this plain breadth. (p. 556)
This style was particularly recommended for skirts of lawn or muslin
(Godey's, 1866, p. 185).
When cutting a trained skirt, Godey's advised, "The train should
be cut on the bottom of the skirt, the side and front breadths gored,
the back ones plain" (1869, p. 474). Only a year later, however,
~arper's Bazar described a trained skirt that had "a sloped front

55
breadth, three narrow gored ones on each Side, and two full widths
behind" (1868, p. 243).
Throughout the l860s, fashion columnists advised women against
goring the back skirt panel(s) because it would cause the skirt not to
hang well. Furthermore, they warned that gored breadths should never
be pieced at the bottom. Instead, one should "design the shape and
number of gores with reference to the width of the material" (Harper's
~, 1868, p. 819).
Cutting the bodice To reduce the chances of error, hence of
waste, it was paramount when cutting out the bodice of a dress to begin
first with the lining fabric.
In doing this double the material at half its width, and fasten the patterns with pins smoothly on the material; the back, which is always cut in one piece for a dress fastening in front, is laid along the middle on the straight edge of the material, which is folded over. (Harper's Bazar, 1869, p. 564)
Next, the front lining piece was laid on the bias and an extra I" to
1-1/4" was added to each center front for a facing. With I" to 3/4"
allowed for side and shoulder seams, and 1/4" allowed for neck, waist,
and armscye seams, the bodice was cut out and basted together for
fitting. "Creasing the seams with your naiL •• rip them all open, and
you are ready to fit the material of your dress to it" (Godey's, 1851,
p. 192). The reader was then advised to sew a four inch piece of 2/5"
Wide linen tape vertically to the center back at the waist. This served
as a casing for the center back stay.
Both lining and fashion fabrics were cut to exactly the same size;
56
then writers instructed women to baste the layers together before
stitching seams and darts.
Common rules about plain sewing
In 1869, Harper's Bazar ran a special feature that outlined basic
rules for plain sewing.
The needle should be rather long and somewhat coarser than the thread used. The thread should be rather finer than the thread of the cloth, and never longer than from sixteen to twenty inches, except for gathering. A knot should never be made in the end, except for gathering or running, but the end should be left half an inch long, and sewed in with the hem or seam. (p. 728)
Also discussed were a variety of stitches suitable for hems, gathers,
seams, and buttonholes. Those stitches suggested for seams and darts
included: (1) the running stitch, (2) the backstitch, (3) the close
backstitch (or stitched seam) which imitated the look of machine
sewing, and (4) the overhand stitch. Seams which resulted from comb ina-
tions of stitches were the felled seam and the double seam. Oddly
enough, Harper's failed to mention both the overcast and buttonhole
stitches as possible seam finishes. It did, however, praise the sewing
machine as an invaluable tool for sewing bodices. "With the proper
tension every seam in the entire corsage may be sewed more neatly and
substantially by the machine than it could possibly be done by the
fingers" (Harper's Bazar, 1869, p. 563).
£Larment fastenings
Buttons and buttonholes Occasional contradictions appeared in
magazines about the correct order of bodice construction. Several
articles suggested that the seamstress begin by stitching the bust darts,
57
while others contended that it was easier to hem the center front facing
1" to 1 .. 1/4" and work the buttonholes before stitching seams and
darts. According to numerous articles, the proper direction of bodice
closures was right over left, or buttonholes on the right front, buttons
on the left. This information, however, is somewhat inconsistent with
the illustrations of garments fastened in the opposite direction.
After the seamstress hemmed under the center front facing and
worked the buttonholes, Harper's Bazar advised her to sew a narrow
facing of the dress material beside the buttons. This narrow bodice ex ..
tension prevented the white underclothes from showing through the
buttonholes (1868, p. 818).
Center front facings on cloaks were sometimes constructed so that
the buttons and buttonholes were hidden beneath the outer layer of the
coat. To do this, the buttonholes were stitched onto a narrow strip
of cloth. The cloth was then attached to the inside opening of the
cloak and fastened down at the ends and the inner side. Only the front
edge was left loose (Harper's Bazar, 1869, p. 565).
Some of the magazines featured illustrated instructions for making
fancy buttonholes. These ranged from tatted and knotted openings, to
very ornate herringbone and chainstitched types. Even the basic button
hole stitch was not immune to intricate variations. But despite the
wide assortment of buttonhole stitches, women were still advised to
heed some standard buttonhole techniques. First, a thread was worked
around the edge of the buttonhole with either a chainstitch or a running
stitch. This technique, called 'barring,' was always done to stabilize
the buttonhole region. Next, the buttonhole was cut and the edges of
58
the hole were loosely overcast (Harper's Bazar, 1869, p. 564). With.
that completed, the seamstress could begin working the buttonhole with
anyone of the many stitches, completing first the sides of the button-
hole before sewing the ends.
Among the details missing from descriptions, however, was informa-
tion about the correct placement and orientation of buttonholes. Such
detailed instructions were reserved more for the application of buttons.
It is well to have the buttons set back about an inch from the edge, and placed an inch and a half apart from the throat to the waist, to prevent gaping. (Godey's, 1853, p. 568)
Furthermore, it was specifically recommended that if ball type buttons
were used, they should be placed closer together to prevent gaping
(Harper's Bazar, 1868, p. 499).
After the buttons were positioned, the seamstress was instructed
to sew the buttons on, forming thread shanks.
Lay the button on the designated place, and sew it on from the under side with coarse thread. Then run the needle out on the right side, wind the stitches six or eight times with the thread, and fasten the thread on the underside ••• the stitches must take up as little space as possible so as not to stretch the button-hole apart. (Harper's Bazar, 1869, (p. 564)
There were certain types of buttons, however (i.e., linen, woven, or
crocheted), that allowed room for more creative application. Harper's
!azar (1869, p. 729), for instance, illustrated a fancy star pattern
in the button stitchery.
One thing that influenced how a button was sewn on was the type
of dress fabric used. Calico garments, for example, were best "made
With a shank secured by a ring, so that they may be removed before

59
washing" (Harper's Bazar, 1869, p. 195). Furthermore, if a starchedl
fabric was used, it was necessary to strengthen the button by placing
a small piece of folded muslin directly beneath it. After the button
was sewn to the garment, any protruding muslin was trimmed away
(Harper's Bazar, 1867, p. 125).
Eyelets Buttons were not the only dress closures available to
women of the 1860s. Eyelet lacings, which had been in use for centuries,
continued to be used for the back closures of ball gowns.
Low-necked waists are of late fastened again behind, in which case the backs are arranged for a cord. For doing this turn down the outside material an inch and a half on the under side, and prepare the double material for two round slender whalebones.... Then work the intervening spaces with eyelets, after which run in the whalebones. (Harper's Bazar, 1869, p. 564)
Although no detailed information was given for the actual "sewing" of
eyelets, an accompanying illustration showed an eyelet worked with a
simple buttonhole stitch.
Hooks and eyes Another type of fastener used, and often in
combination with buttons and buttonholes particularly at the waist,
was the hook and eye. "Half a dozen hooks and eyes sewed on the belt
and above it relieve the button-holes from a strain at the waist"
(Harper's Bazar, 1868, p. 818). The use of hooks anq eyes in combina-
tion with just ornamental buttons, however, was a matter of deep debate
among fashion columnists. Peterson's (1868, p. 230), for instance,
described the typical plain bodice as having a row of decorative
buttons dawn the front which did not fasten closed. Instead, long
hooks and eyes were sewn underneath. Disapproval came strong from one
!!arper's Bazar columnist who contended that "Nothing gives a dress so
60
unfinished an appearance as buttons set on without holes" (1869, p. 158).
Magazines were even a little inconsistent in their own advice. For
example, Harper's advised women in September 1869 that "Buttons should
not be set on the waist of a dress merely for ornament. They are for
use, not show, and require buttonholes opposite to make them effective"
(p. 563). Then, just one month later, it instructed women to "Sew hooks
on the under and buttons on the upper side, which latter serve only as
ornaments" (1869, p. 673).
Only one article appeared with specific instructions for the ap-
plication of hooks and eyes.
Sew the eyes to an under strip (made of outside and lining) ••• and stitch the strip on the left front in such a manner as to cover the place where the eye was set on. Sew the hooks on the hem of the right front ••• in doing which fasten both layers of the lining, but leave the outside material alone. Then hem down the outside, and run the points of the hooks through it. (Harper's Bazar, 1869, p. 564)
The accompanying illustration showed one hook and eye, each stitched
through the pair of holes supplied, and then anchored in the middle
with additional stitches.
Darts
After the seamstress hemmed the bodice opening and worked the button-
holes, magazines next instructed her to backstitch the bodice darts.
As a general rule, two darts were used. They were slightly shorter
than darts of earlier periods "but taken deep, to make an easy
tapering shape" (Harper's Bazar, 1869, p. 259). According to Harper's,
many tailors used just single darts, but they ended rather abruptly
and did not always give proper fullness to the bust (1868, p. 498).
61
Some French-made dresses used three darts on each side, but Harper's
considered two darts generally sufficient.
As for the positioning of darts, Godey's advised that the first
dart "should be about one inch and a quarter from the line of the front,
at a slope of two and a half inches" (1862, p. 407). The second dart
should then be made parallel to the first.
After a dart was stitched, the excess seam was trimmed to a third
of an inch, bound with silk or linen tape, and hemmed to the bodice
lining.
Bloused waists
Not to be overlooked was another type of bodice called the blouse
waist. Typically, the lower edge of the bodice was gathered onto a
"belt," or dress waistband. Some magazine columnists occasionally
referred to it as the "infant" waist. Although not much information
was written about its construction, Harper's (1869, p. 563) did suggest
that it could easily be made from the pattern of a darted tight waist
simply by omitting the dart seams and gathering the fullness onto a
belt.
Bodice side and princess ~
Both side pieces were then lapped onto the bodice back forming
two so-called "princess seams" that were spaced an inch apart at the
center back. Women were told to carefully backstitch the seams from
the outside, letting the stitches show, rather than hide them on the
inside of the garment (Harper's Bazar, 1868, p. 377).
Next, the side panel was joined to the bodice front with a normal
62
(hidden) backstitched seam. Harper's instructed women to press open the
side seams and bind each side of the allowance separately with tape
(1869, p. 673).
Boning
Despite the fact that whalebone corsets were worn beneath dresses
during the 1860s, it was customary to incorporate some stays into the
various structural seams of the bodice. According to numerous fashion
articles of the period, the most frequent placement of boning occurred
at the side seams and darts, with occasional boning encased at the center
back or along a center back eyelet opening. The technique prescribed
for boning at the side seams and darts, however, conflicted directly
with the recommended seam finish (pressed and bound with tape).
Run, about two-fifths of an inch from the seam, the back edge of the seam of the side pieces and the back edge of the seam of the fronts, taking care not to put the needle through the outside material; the other sides of the seams must previously have been cut away to the width of two-fifths of an inch •••• In the space thus formed, and in the spaces which must be made in like manner in the darts, and also in that formed by the tape on the back, run in whalebones which must be furnished with holes at the ends, and carefully fastened.... (Harper's Bazar, 1869, p. 564)
When inserting the stays, Godey's (1853, p. 568) cautioned that very
stiff whalebones created a very unpleasing effect. To alleviate the
problem, it recommended one French dressmaker's secret of splitting the
whalebones as thin as possible before inserting them.
Wadding ~ padding
In order to increase and enhance the appearance of the bust, many
periodicals suggested the use of cotton or wool padding. Peterson's

63
for example, disclosed that the secret to the superior fit of riding
habits on the majority of young lady equestrians was the incredible
amount of padding in them (1868, p. 230). Godey's stated that cotton
wadding was even used on mantuas to correct figure deformities such as
crooked shoulders (1853, p. 477). The magazine later added that no
matter which part of a wrap was to be padded, the seamstress should
follow some simple rules.
Quilt the wadding on dimet before laying it in the cloth -the dimet, not the wadding, going next to the cloth. Unless this is done, the fluff will work its way through the finest and coarsest cloth, or even through velvet, and will give both materials a dusty look.... (Godey's, 1858, p. 97)
Harper's (1868, p. 193) also suggested that the wadding be thinned out
a little along the seams of a garment.
Shoulder seams
Information regarding the construction of shoulder seams was ex-
tremely sparse. Only two references were found, and both of them from
Harper's Bazar. The first article (1869, p. 563) stated that shoulder
seams were no longer corded, indicating that perhaps it was once a
common construction technique. The second article prescribed a lapped
method of construction.
In the shoulder-seams of a dress the front should be laid on the back and stitched outside, the seam being turned toward the front. (Harper's Bazar, 1869, p. 462)"
Waist cording
Harper's outlined a method for cording bodice hems, after the
Shoulder seams were sewn.
64
The cord is either run in a bias strip of the material an inch wide, or in silk which corresponds to it.... Sew this cord on the right side of the waist, backstitching close to the cord in a manner that the edge of the cording extends about two-fifths of an inch beyond the edge of the waist; this is then hemmed down on the wrong side ••• so that the cord forms the edge of the waist, and the stitches are not visible on the right side. (1869, p. 565)
Two illustrations also accompanied the directions. One showed a single
row of bias cording, while the other showed a double row. The article
further explained that double cording was especially used for edging
mantillas and dresses, but required the bias strip to be an inch and a
half wide instead of an inch. Yet another article, just two pages before
this one, suggested that in certain cases the cord should be left out
of the bias strip since it may draw (Harper's Bazar, 1869, p. 563).
Necklines ~ collars
Most periodicals of the l860s described necklines as cut plain and
corded along the edge in much the same manner as at the waist. But
there was another fashion movement during the decade to replace the
corded neckline with a half inch standing band collar.
For the benefit of amateur dressmakers •••• Instead of cording round the top as heretofore, a small band, of the same material as the dress, is arranged in the same manner as the strap which attaches the collar to a habit-shirt. This band being cut separately, and then joined on to the high bodice, will be found easier to fit neatly round the throat than when the bodice is simply corded round the top. (Peterson's, 1863, p. 315)
Two months later, Peterson's again praised the band collar, adding that
when worn combined with a fine lace collar, it resembled a neck ribbon
(1863, p. 483).
65
Preparation of the armscye
Cording According to Harper's (1869, p. 563), and supported by
numerous garment descriptions in other periodicals, armholes were always
corded before sleeves were set in. However, only Harper's offered a
brief description of how it was sewn on.
Cord the arm-hole around ••• with a cord, the edge of which must lie along the edge of the material of the waist, and the ends of which must extend about a quarter of an inch over each other on the side seam of the waist. (1869, p. 565)
Dress-protectors Although commercially made dress-protectors
(or shields) were available during the l860s, Harper's contended that
"a piece of chamois leather sewed in the arm-hole is the most efficient
dress-protector" (1868, p. 947). Another article which appeared in the
same magazine just two months later advised a different method for pro-
tecting calico dresses from perspiration stains. "Face the arm-holes
and side seams with strong muslin" (Harper's Bazar, 1869, p. 83).
Unfortunately, no further information was supplied.
Sleeves
Compared to the rest of the bodice, very little information was
published about sleeve construction. I surmise that this was partly
due to the more frequent style changes made in sleeves. The construction
of one style of sleeve, however, did become nearly uniform during the
1860s. It was called the two-piece coat sleeve. When the dressmaker
cut out the sleeve pieces, writers recommended that she cut the upper
piece an inch and a half broader than the under piece, as well as a
little longer. The shapes of the pieces were curved to smoothly fit
a half bent arm. As the two pieces were sewn together, the longer
66
one was held toward the sewer. In that way, the extra length could be
eased, or "fulled" into the under sleeve piece (Harper's Bazar, 1868,
p. 643). This particular type of sleeve, however, was rather un-
popular with dressmakers, as one article explained.
In spite of continued efforts of the dressmakers to prevent it, the tight sleeve will certainly reign supreme after the summer months are past •••• The dressmakers object to this sleeve, because of the absence of all trimming; in buying this last they always have their profit, and will not make a dress for which the trimming is brought to them. (Peterson's, 1859, p. 152)
When setting a sleeve into the corded armscye, Harper's advised
sewers to hold the sleeve at the cap so that the fullness could be
gradually "gathered" into the arm-hole (1869, p. 563). After she
stitched the quarter inch deep armscye seams, the seamstress overcast
the allowance to keep it from unraveling (Harper's Bazar, 1869, p.
565).
Skirt seams
After the bodice was completed, the seamstress was instructed to
backstitch the skirt lengths together, taking special care to position
the front panel so that both side seams fell over the front hips. Since
the skirt required a slit type of opening, the seam on the left was
left open 14 inches at the top. The right seam also had an opening,
but the slit was much smaller and used instead for a pocket aperture.
"The pocket is concealed beneath the opposite seam on the right side.
Small fancy pouches are attached to the belt or made to hook on the
corsage" (Harper's, 1868, p. 339). No further instruc tion was given
for the pocket.

67
Certain fabrics required special care when skirt lengths were
seamed together. For instance, in order to prevent seams from puckering
on very firmly woven fabrics, such as some silks, Harper's (1869, p.
565) recommended that seam allowances which used selvage edges be clipped
at three- or four-inch intervals. Black fabrics also required special
care since sewing with black thread on black cloth was difficult to
see.
Pin or baste a strip of white paper on the seam ••• then sew through the paper and cloth, and when the seam is completed the paper may be torn off •••• This method is well adapted for sewing machinery as well as by hand. (The Ladies' Repository, 1860, p. 501)
Seam allowances were then ordinarily finished with either an overcast
stitch or a double seam.
Skirt hems
In contrast to the present-day idea that hemming is a final step
in garment construction, l860s skirts were hemmed at a very early stage
of the operation. One obvious advantage of early hemming was the ease
which which large quantities of flat fabric could be manipulated, as op-
posed to the same yardage of gathered or pleated fabric. Furthermore,
it was not the purpose of the 1860 hem to adjust the skirt length,
since that was almost always done at the waist with a turning.
If it is too long ••• the skirt should be taken from the body, and sewed on again at the right length. (Godey's, 1862, p. 158)
This changed toward the end of the decade, however, when gored skirts
came into fashion. Peterson's (1868) advised that "should any shortening
or lengthening be required to suit an individual figure, it must be

68
allowed for at the bottom, and not at the top of the skirt" (p. 73).
Throughout most of the decade, however, the length was adjusted at the
waist and the major purpose of the hem was to add body to the skirt so
that it would stand out away from the wearer. It was to this end that
much of the hemming advice was given.
Generally, writers told the seamstress to form a hem facing out of
a rather stiff foundation fabric, such as muslin, paper muslin, corded
fabric, hair cloth, or crinoline. Even grass cloth and enameled leather
were recommended (Godey's, 1863, p. 197). Also suggested was a special
hair cloth facing, bound on each edge and stiffened with whalebone.
Women were instructed to cut the facings deep (2" to 27") to give added
body, the average size being nine inches. In addition, the hems could
be weighted either with straw braid, a Parisian technique (Godey's,
1862, p. 210), or with shot inserted in the facing of the skirt. The
use of shot, however, was discouraged toward the end of the decade.
Habit-makers now are beginning to discard the good old plan of putting shot in the hems of skirts to weight them; ••• but if a deep hem, say a quarter of a yard wide ••• is put on inside at the bottom of the skirt, it will answer nearly as well. (Peterson's, 1868, p. 230)
Of the five periodicals examined in this study, Harper's Bazar
(1869) provided the most complete description of a faced skirt hem.
First, it should be faced --
••• with a strip of foundation muslin twelve inches wide, and a piece of the outside material four inches wide (the muslin stiffens the skirt and keeps the bottom clean). Next sew the str,ip of outside material to the foundation on the wrong side, and turn so that the seam lies inside ••• and the under edges come together. Then run this facing on the skirt, in doing which the right sides must come together; after which turn so that the seams lie inside ••• lay the skirt on a table, and turn up the foundation smoothly on the inside of
69
the skirt. As the skirt is smaller above than below, the foundation must be sloped off at the seams and the ends joined. The foundation may also be cut in separate pieces from the skirt pattern, and sewed up like the skirt. In sewing on the foundation run the needle from right to left horizontally through the stuff, but work from left to right •••• Bind the bottom with woolen or silk braid, which must be stitched down on the right side ••• and then hennned down on the wrong side.... The skirt may also be edged with cord, which must be sewed on with overcast stitches. (p. 565)
But in certain cases, Harper's recommended that this method not be fo1-
lowed. If a calico skirt, for instance, "is sloped at the bottom do
not hem or face it, but merely bind with worsted braid that has been
scalded to prevent further shrinking" (1869, p. 83). The worsted braid I
that was mentioned, could be purchased in six-yard lengths for 12
cents a bunch. However, it was not recommended for gored dresses of
very thin material, which were to be hemmed instead with a turned
facing of the dress material (Harper's, 1869, p. 259).
Skirt placket openings
Next, a placket was formed at left seam opening. Unfortunately,
only one reference was found that described just how the placket was
constructed. The seamstress was told to set a narrow strip of
fabric (one and a half inches wide) into the left side of the slit.
The right side was then hemmed and positioned an inch over the placket
strip (Harper's, 1869, p. 565). An alternate method was also mentioned,
whereby "a piece may also be set on the side breadth, in which case an
under piece is set on the back breadth, and the edge is not laid over
on the under side" (Harper's, 1869, p. 565).
70
Bustle linings
Both Harper's (1869, p. 565) and Peterson's (1868, p. 320) reported
the practice of many dressmakers to fit a 12 inch deep piece of
muslin or lining fabric along the top edge of the skirt at the center
back. When the piece was gathered in with the skirt, it formed a small
built-in bustle.
Skirt pleating and gathering
Magazines advised sewers to turn down the top edge of the skirt
before pleating or gathering it. The usual amount for a "top turning"
was about an inch; however, Godey's (1858, p. 37) reported that many
women turned down two or three inches with the expectation of future
skirt lengthening. However, the magazine did not endorse this idea
since the skirt was most likely to fade, and consequently the brighter
turned down edge would not match the rest of the skirt.
Throughout the decade, numerous combinations of single, double,
and triple box-pleats, knife pleats, and French gathers were used on
skirts. So many, in fact, that Godey 1 s insisted every seamstress had
her own style of pleating and gathering. Out of the chaos, however,
there did develop a few rather standard formulas, the most popular
of which required skirts to remain plain or flatly pleated in the
front, moderately pleated on the sides, and heavily pleated or gathered
at the center back. However, the type of formula used was dictated
by the dress fabric, and as a general rule, "dresses of silk or any
heavy material have the skirt set on in large flat plaits, and those
of transparent textures are set on in gathers" (Peterson's, 1854, p. 412).
71
Although the information in periodicals about skirt pleats was
rather sparse, there seemed abundant information about gathers. One
technique mentioned, which was especially recommended for very thin
fabrics since it did not require "stroking," was called "gauging."
It involved running two or three rows of basting thread, using
alternating long and short stitches. The basting threads were then
pulled simultaneously to form small even gathers (Harper's, 1869, p.
158). But for the majority of dress fabrics, Harper's (1869) advised
the following technique.
Pin the material to a cushion, make a knot in the thread at a distance from the edge ••• and gather by means of regular running stitches •••• In order to make the gathers lie in the same direction, first push them close together, then hold them in the left hand, and with the needle in the right hand stroke perpendicularly along the stuff between every two gathers. (p. 728)
Then, to sew the skirt to the bodice, a stitch was taken through
each gather.
One other type of gather recommended by Harper's .(1869, p. 728),
and formed as if m~king a tightly pulled hem, was the "rolled gather."
The neeclle, however, entered from under the hem and was worked in a
back to front direction. The rolled gather then had to be overseamed
when it was attached to some part of the garment.
Attached versus separate skirts
Judging from the amount of conflicting information in magazines,
there was no absolute rule about attaching skirts permanently to
bodices, and it was really left to the discretion of each seamstress.
On the one hand, women were reminded that by leaving the skirt separate,
72
it could be worn with other waists. On the other hand, a separate
skirt required more thicknesses of fabric at the waist, which made it
appear "clumsy" (Harper's, 1868, p. 819). Some writers argued that
separate skirts gapped at the waist when the wearer moved. To combat
the problem, they recommended that several hooks be sewn along the
inside of the waistband, each with a corresponding eye along the edge
of the waist (Harper's, 1869, p. 565). Another trick, particularly
used on riding habits, was to sew a button just below the waistband,
over each hip. The button was then fastened to a corresponding tab
suspended from the bodice.
Looping skirts
Toward the end of the decade, dame fashion decreed that skirts
should be ornamentally looped up in the back,. and to keep their readers
abreast of the latest styles, magazines offered various suggestions
to accomplish this end. Some of the simpler designs required only that
buttons and loops, or hooks and eyes, be sewn to the center back seam.
A slightly more complicated design required a piece of elastic to be
fastened inside the side breadths, about a quarter of a yard from the waist, with a hook attached to that on the one side, and an eye to that on the other. Just at the place where they are sewn the seam must be left unstitched for about an inch, so that when not used the pieces of elastic may be slipped inside the skirt; when, however, these are hooked together, they shorten the skirt sufficiently in front, and all the fullness at the back can be drawn through the loop. (Peterson's, 1868, p. 236)
. Although some very ornamental means were used to loop skirts which
employed brooches, bows, and ribbons (Godey's, 1868, p. 384), more often,
functional apparatuses were used. For example, Harper's Bazar suggested

73
that tapes could then be tied behind the wearer to draw the skirt
material toward the back (1869, p. 371). Still other writers pro
posed the use of tapes suspended from the waistband, as well as
numerous drawstring arrangements.
Loops for hanging
Since hangers had not been developed, it was necessary to sew
hook loops inside each garment. The loops were constructed out of one
inch bias strips of fabric hemmed over a cord (Harper's, 1869, p. 565).
Bodice loops were sewn to the inside of the armholes or at the waist.
For skirts, two loops were applied to the back of the waistband, and
wraps had one sewn to the inside center back, just below the collar
(Godey's, 1860, p. 571).
Trims
Throughout the l860s, numerous types of trim were used, and
especially popular were the braids, fringes, ruches (pleated ruffles),
and narrow flounces. Many of them were sold commercially by the yard,
but magazines continued to instruct women how to make them at home.
To begin, most ruffles were cut out on the bias, but that depended a
great deal upon the type of fabric or the design on it. It was sug
gested, for instance, that checkered fabrics did not look good if they
were cut bias. And most cotton fabrics, because of the difficulty of
ironing, were not cut on the bias either. Silk, on the other hand, was
suitable for both bias and straight cut trims.
The edges of the flounces and ruches were finished in a variety
of ways. Some were simply hemmed by machine or bound with a contrasting

74
fabric. However, trims most frequently mentioned in periodicals had
either "pinked-out" edges, or were unraveled to half an inch (Peterson's,
1869, p. 235). In addition, trims were sometimes sewn onto garments
with cordings or half inch headings (Peterson's, 1867, p. 82).
As indicated by several of the periodicals in the study, it was
not only acceptable to sew dress trims by machine, but it was the pre
ferred method. Peterson's applauded the effect as both "neat" and
"elegant" (1866, p. 232), while Harper's declared that "common-sense
dictates a return to styles in which fingers shall no longer be obliged
to do work which can be done by machines" (1869, p. 19). However, when
it came to the application of pleated ruchings, little time was saved
by the machine since the trim had to first be basted in place anyway
(Harper's, 1869, p. 163).
Summary
Although only a handful of articles appeared with extensive
construction information throughout the 1850s and 1860s, when combined
with scattered information found in regular design descriptions, pattern
inserts, questions to the editors, and helpful hints sections, an almost
complete picture can be drawn of how garments were supposed to be
constructed. Only a small amount of the information was conflicting,
and generally it was due to the handling of different fabrics.

75
GARMENT FINDINGS
In order to test the relationship between construction techniques
used on women's dresses and wraps during the 1860s and the variables
of style, technology, published information, and fabric, I examined
costumes from museums in Iowa, Minneapolis, and St. Paul. Of the 13
museums visited (see Appendix B), many of the larger costume collections
appeared either in towns along the Mississippi River (i.e., Davenport,
MCGregor, and St. Paul), or in towns with access to railroads (i.e.,
Waterloo) •
A total of 44 garments from the 1860s were examined. Twenty
of the dresses appeared as attached bodices and skirts, seven as separated
bodices and skirts, five as bodices without skirts, nine as wraps, and
three as dresses with coordinated wraps (ensembles). Of the three
ensembles, two had attached bodices and skirts, while the third had
separate pieces.
Five other garments dated outside the 1860-1869 period were also
added to the study since 1) the documented dates (e.g., weddings)
were extremely close (within one or two years) to the 1860s, and 2) the
styles appeared to be quite similar to those within the period. Many of
the garments dated 1859, for instance, were probably worn well into the
1860s. Furthermore, the lag in fashion change may have been a couple
of years, allowing urban styles of the late 1860s to have continued
in Iowa during the early 1870s. (For a complete breakdown of the five
garments' dates, refer to Table 2.) Hence, the total number of gar
ments examined in this study was 49.
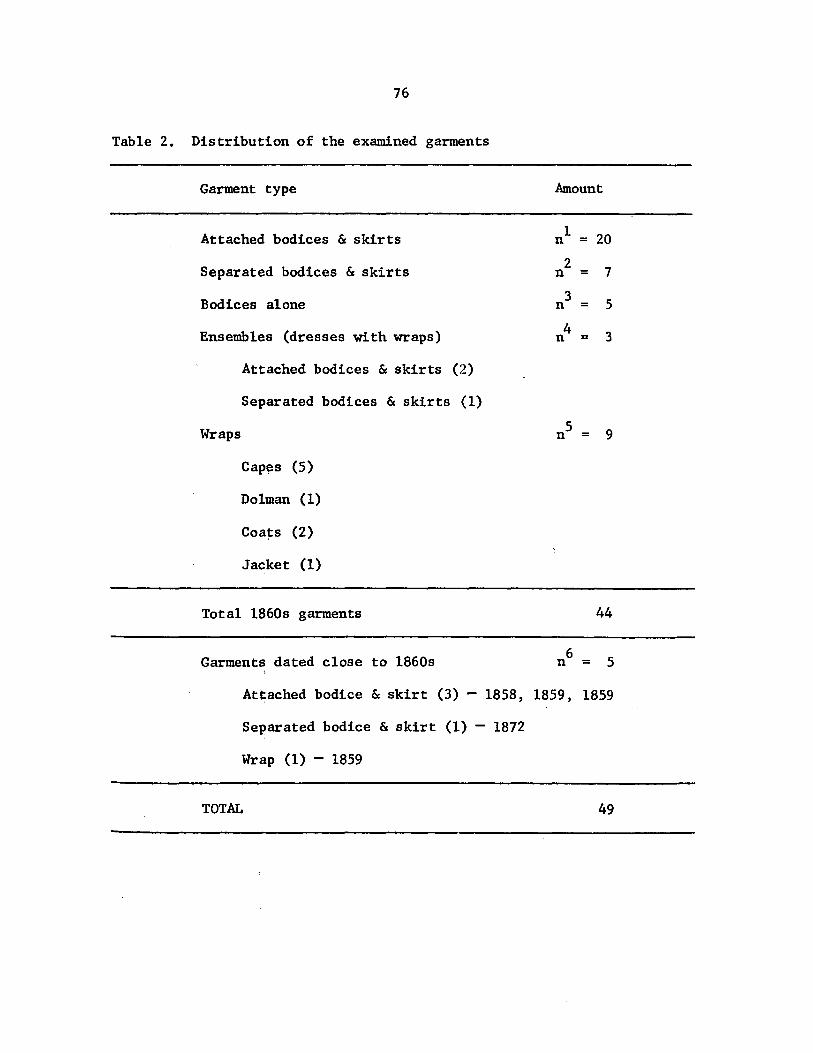
76
Table 2. Distribution of the examined garments
Garment type
Attached bodices & skirts
Separated bodices & skirts
Bodices alone
Ensembles (dresses with wraps)
Wraps
Attached bodices & skirts (2)
Separated bodices & skirts (1)
Cap~s (5)
Dolman (1)
Coa~s (2)
Jacket (1)
Total 1860s garments
Garments dated close to 1860s
Amount
1 20 n =
2 7 n =
3 5 n =
4 3 n =
44
6 n = 5
Attached bodice & skirt (3) - 1858, 1859, 1859
Separated bodice & skirt (1) - 1872
Wrap (1) - 1859
TOTAL 49
77
Organization of the Findings
Since the amount of published information regarding clothing
construction was quite extensive during the 1860s, it is the first
variable discussed in this chapter. The other three variables, 1) gar-
ment style, 2) technology, and 3) fabric, follow. Because construction
techniques may, in some cases, relate to more than one variable (e.g.,
skirt pleating to both style and fabric), some techniques may be
discussed more than once.
The Relationship of Construction Techniques
to Published Information
The major purpose in examining women's fashion periodicals of
the l850s and 1860s was to accept or reject the null hypothesis that:
the construction techniques prevalent in surviving dresses and wraps are not related to published information about the style and structure of women's dresses and wraps.
The 49 garment~ used in this study seem to indicate that, while some
minor techniques went unobserved, sewers followed the majority of
recommended techniques. However, since 1) most of the published
information concerned the construction of dresses rather than
wraps, 2) relatively few wraps were examined, and 3) of the wraps that
were examined, ,there were several species (i.e., capes, coats, and
jackets), most of the information in this section concerns the re-
lationship between published information and the construction of
dresses. Therefore, since not enough information on wraps was col-
78
lected to necessitate a separate section, the garment findings of wraps
and dresses are discussed collectively.
Matching plaids and stripes
Periodicals reminded women to match plaids and stripes, and the
findings of this study suggest that most women tried to do just that.
Of the 10 plaid and two striped dresses that 1 examined, only one, a
plaid dress, appeared to be totally unmatched at the back bodice, while
another dress was only slightly unmatched. Unlike present-day
standards for matching fabric designs, it appears that in the l860s,
only selected seams (primarily at the bodice back) were matched. Shoulder
seams and armscyes, on the other hand, were almost ignored. For instance,
three of the plaid dresses in this study were matched around the body,
but left totally unmatched at the shoulder seams. These findings also
suggest that, although women tried to heed the published advice, the
instructions in magazines for matching fabric designs were not specific
enough for women to follow and did not tell them where or how to match.
Lining
As recommended, most of the dresses in this study were lined in
the bodice with either cambrics, muslins, twills, or old remnant
calicoes. Only one, a cotton bodice, was left completely unlined.
Eleven skirts were also left unlined (five cotton, three silk, and
three wool). This seemed to be a particular trend among cotton gar
ments and was recommended in periodicals.
One thing that was not mentioned, however, was the use of
multiple lining fabrics within one garment. Two of the bodices,

79
for instance, each had three different kinds of lining. The majority
of garments, however, were lined with only one fabric.
Especially popular as bodice linings were tan cambrics, glazed
cottons, and cotton twills. (See Table 3 for distribution of dress
lining fabrics.) The assorted glazed cottons and tan cambrics also
made popular skirt linings. However, unlike bodice linings, skirts
had no twill or muslin linings.
After women cut the lining and dress fabrics to the identical
size, magazines advised them to baste the layers together before
stitching any darts or seams. The fact that this was actually done
is evident from the many garments which still had basting threads
intact. In other cases, needle-holes remained where threads once
were. Although the magazines referred to the technique as "lining,"
the fact that the layers acted as one makes that term inaccurate for
present-day readers. In present vernacular, the correct term is
"underlining." It refers to the collective seaming of two layers of
fabric, whereas a lining is constructed independently of the outer
layer of fabric and then sewn into it. According to this distinction,
only two skirts and one overskirt were lined, compared to the 22
that were underlined.
Measuring off the skirt
Periodicals often mentioned the use of plain widths as pieces for
skirts. This method not only reduced the amount of wasted fabric, but
it also provided maximum use of selvages, thus saving the seamstress
the bother of finishing seam allowances. So popular was this technique

80
Table 3. Bodice and skirt lining fabrics
Fabrics Bodices Skirts
Tan cambric 6 5
Brown cambric 1 3
White cambric 1 1
Tan twill 16 0
Brown twill 2 0
White twill 3 0
Muslin 3 0
Glazed cottons 9 14
Other 3 3
81
that 22 of the 34 skirts contained only selvage edges. Even as
styles changed to include gored panels, seamstresses continued to
use as many selvages as possible. In this study, only five skirts
did not make use of at least one selvage edge.
Seaming the skirt
Magazines recommended two things to women when seaming up their
skirts. First, they were told to leave an opening for the skirt at the
left seam. Second, they were told to leave another smaller opening in
the right seam for a pocket. Both of these recommendations were used
extensively on garments in this study, and of the 34 skirts, 22 had
openings in the left seam, nine had openings at the center front,
and only three had openings at the center back. None of them opened
at the right seam (see Figure 2).
As for the placement of pockets, 22 of the skirts had pockets in
the right seam, while only one was found in the left seam (see Figure 3).
Fifteen of the pockets were supported from the waistband of the skirt
and, as advised in magazines, 16 of them had two-inch pocket facings
of the dress fabric just inside the opening. Only one skirt had a
pair of patch pockets applied to the front, and another had a peculiar
small pocket set in the center back seam. Neither of these last two
pockets were described in periodicals of the period.
Next, the seamstress was told to backstitch up the seams, clip
the selvage allowances at four-inch intervals, and finish the allowances
with either an overcast stitch or a double seam. However, none of the
selvage allowances in this study were clipped, and only six skirts

82
lS
1
0'------RS CF LS CB
.. RS Right Side Seam
CF Center Front
; LS Left Side Seam
CB Center Back
Figure 2. Locations of skirt openings

83
2S
20
lS
10
S
RSS LSS CBS HPP NP
RSS Right Side Seam
LSS Left Side Seam
CBS Center Back Seam
HPP Hip Patch Pocket·
NP No Pocket
Figure 3. Locations of skirt pockets

84
used the overcast finish (see Figure 4). None of the skirts, further
more, used the double seam (or present-day French seam) construction
(see Glossary).
Skirt hems
Periodicals described a variety of hem treatments for skirts, and
most frequently mentioned was the deeply faced hem (see Figure 5).
Although the magazines recommended very stiff fabrics, such as enameled
leathers and paper muslins, the skirts in this study were primarily
faced with lining fabrics, particularly glazed cottons or muslins.
The depth of these facings was generally between three and six inches,
despite the recommended nine inches. Only two skirts were found with
facings deeper than six inches; one was 14 inches, while the other
was 12.
None -of the 34 skirts examined in this study were weighted
with shot, stiffened with whalebone, or run with straw braid. Twenty
two, however, were run along the bottom edge with worsted braid and
used either in combination with hem facings (on eight skirts), or
used alone (on 14) _(see Figures 6 and 7). Other hem treatments
included turned facings, bias binding, or rolled hems.
Despite the extensive instructions for facing hems, periodicals
did not mention how the top edge of the facing was finished. Among
the faced hems in this study, four were pinked along the edge, another
four wer~ left raw, and the remainder were simply folded under at the
top.
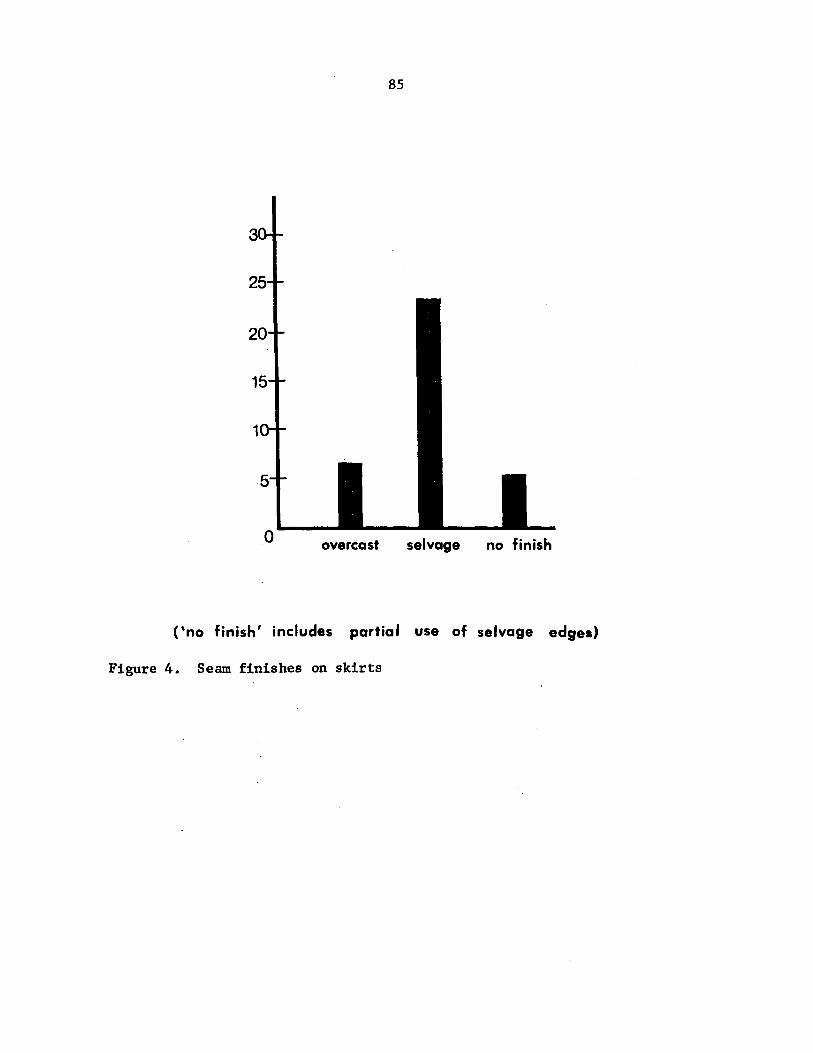
85
o overcast selvage no finish
('no finish' includes partial use of selvage edges)
Figure 4. Seam finishes on skirts
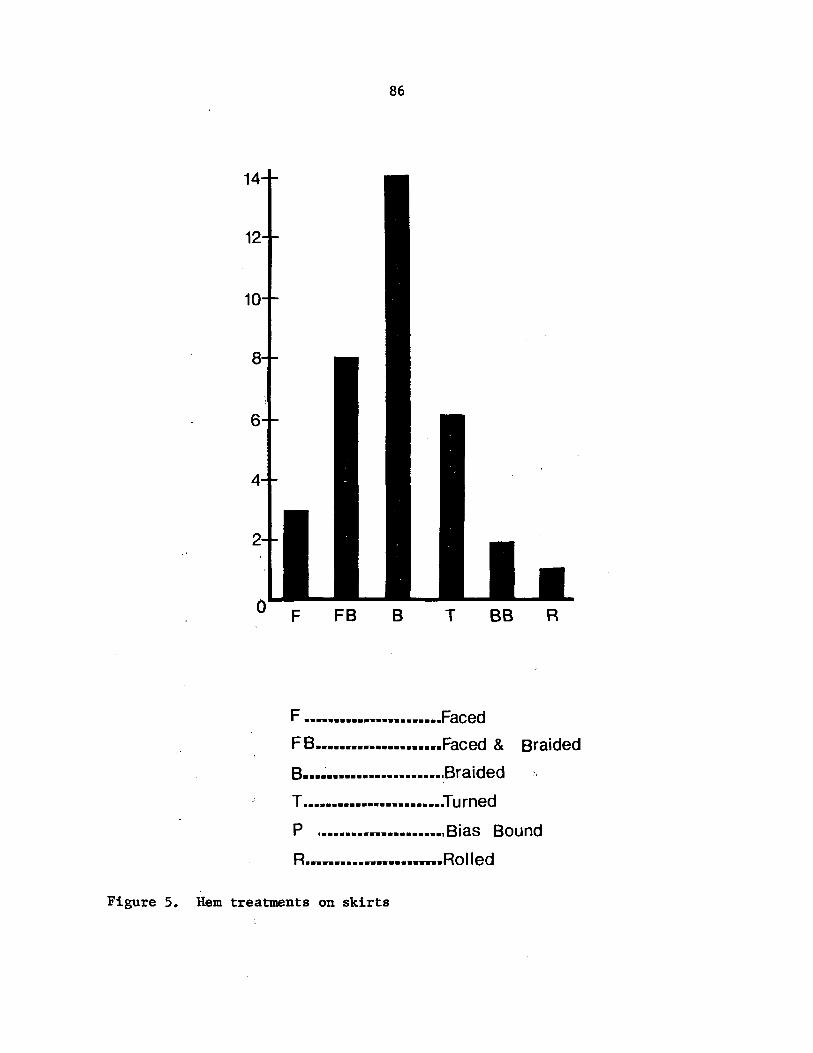
86
F •• _ .................... Faced
F B ...................... Faced & Braided
B ••• ~ ••••••••••••••••••• IBraided
T ........................ Turned
P I .................... .., Bias Bound
R ... __ ................. Rolled
Figure 5. Hem treatments on skirts

87

Figure 6. Faced hem with glazed cotton and worsted braid
Figure 7. Faced hem with pieced calico and no worsted braid

88

89
Bodice fastenings
Throughout the 1860s, fashion magazines reported that all bodices
fastened at the center front, with the exception of some ball-gowns.
Every one of the 39 bodices in this study (including the one ba11-
gown) supported that assertion. It is particularly unusual, therefore,
that only one dress exemplified the recommended procedure of attaching
a center front lap in order to prevent undergarments from showing
through the buttonholes.
Buttons and buttonholes Of the 23 bodices with .center front
buttons, only 11 had functional button closures. The .rest were
purely decorative buttons combined with hooks and eyes. Although
writers deplored this technique, it was prevalent amo~g the bodices
in this study.
While the standard size of center front buttons was about five
eighths of an inch (see Table 4), the type of shank at the back was
a little more varied. Thirteen of the groups of buttons had padded
cloth backs and reguired the addition of thread shanks. One of the metal
buttons had punched holes which also required thread shanks. And
seven groups of buttons had built-in metal shanks. One of the metal
shank types of but~on had a hole in the shaft and a spiral ring at the end,
which, according to the periodicals separated from the shaft so that the
buttons could be removed from calico dresses before washing.
A simple technique that magazines recommended for sewing on
buttons but that did not appear on any of the garments in this study
involved the application of a folded piece of muslin between the button
and the garment. Supposedly, this technique strengthened the button.

90
Table 4. Button sizes at the center front of the bodice
Button sizes 1/4" 3/8" 1/2" 5/8" 1"
1 4 1 4 n
2 1 1 4 n
3 3 n 1
4 1 n
6 3 n
Total 5 1 1 15 1
1 n attached bodices and skirts;
2 n separated bodices and skirts;
3 n bodices alone;
4 n ensemble dresses;
n6 dresses close to the 1860s.

91
Magazines also advised that buttons be placed about one and a
half inches apart and one inch from the center front edge. Of the 23
bodices in this study with center front buttons, only one followed
the recommended one inch distance. Generally, they were placed
between one and two inches apart and only one-eighth to one-quarter
of an inch from the center front edge (see Table 5).
The distance of buttonholes from the center front edge was very
similar to that of buttons. Of the 11 bodices with buttonholes,
five were placed one-quarter inch from the edge, another five
one-eighth inch and the remaining garment one-sixteenth inch. All of
the buttonholes had been handworked and positioned horizontally,
despite the fact that buttonhole orientation was never discussed in
periodicals.
Hooks and eyes Hooks and eyes were by far the most popular
fasteners used during the l860s. They appeared as major front closures
on 26 of the 39 bodices, and were the only closures fOlmd on wraps.
Even the one ball-dress in the study which, according to periodicals
could be laced up the back, was fastened in the front with hooks and
eyes.
Alt~ough hooks and eyes were typically spaced about 3/4" from
the edge and one inch apart, the amount varied tremendously between
bodices and wraps. For instance, while 17 of the bodices were
found to have hooks spaced one inch apart, only one wrap was found
with the same. One coat had hooks spaced as much as four inches
apart.
Periodicals endorsed the practice of many sewers to conceal

92
Table 5. Distance of buttons from the center front edge
0" 1/16" 1/8" 1/4" 3/8" 1/2" 1"
1 1 6 1 1 n
2 2 1 3 n
3 2 1 1 n
4 1 n
6 2 1 n
Total 2 1 5 11 2 1 1
1 attached bodices and skirts; n
2 separated bodices and skirts; n
3 bodices alone; n
4 ensemble dresses; n
6 dresses close to the 1860s. n
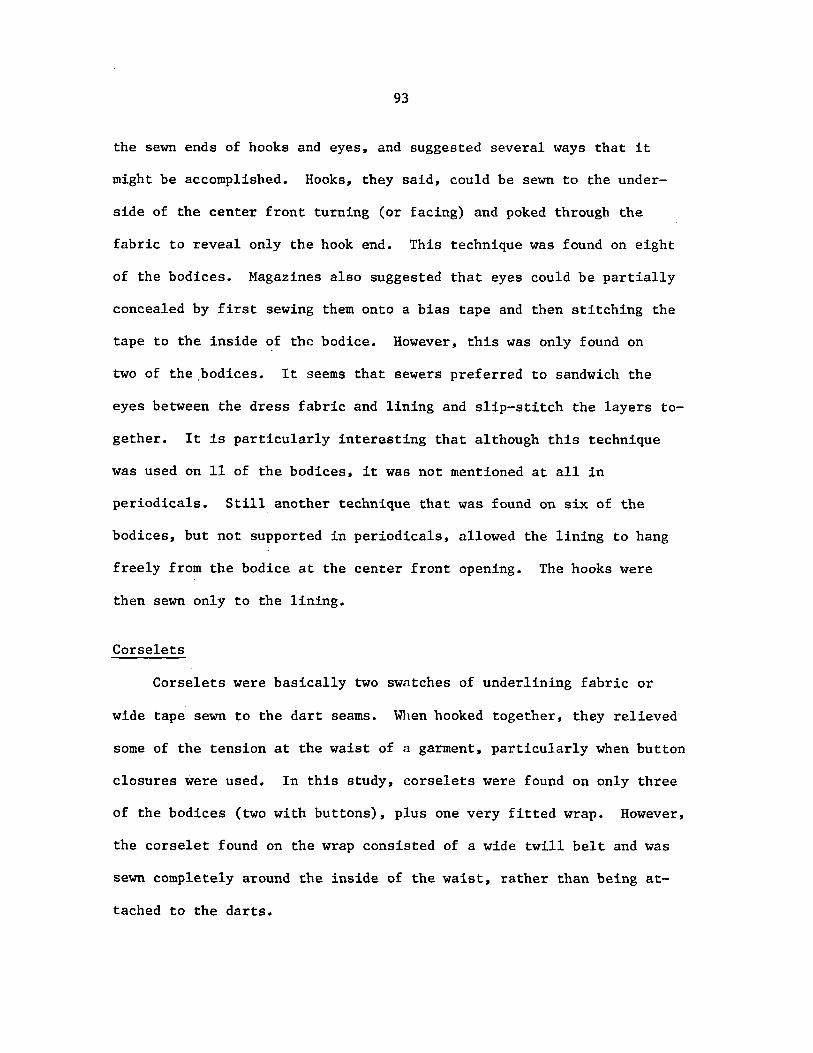
93
the sewn ends of hooks and eyes, and suggested several ways that it
might be accomplished. Hooks, they said, could be sewn to the under
side of the center front turning (or facing) and poked through the
fabric to reveal only the hook end. This technique was found on eight
of the bodices. Magazines also suggested that eyes could be partially
concealed by first sewing them ontd a bias tape and then stitching the
tape to the inside of the bodice. However, this was only found on
two of the ;bodices. It seems that sewers preferred to sandwich the
eyes between the dress fabric and lining and slip-stitch the layers to
gether. It is particularly interesting that although this technique
was used on 11 of the bodices, it was not mentioned at all in
periodicals. Still another technique that was found on six of the
bodices, but not supported in periodicals, allowed the lining to hang
freely from the bodice at the center front opening. The hooks were
then sewn only to the lining.
Corselets
Corselets were basically two swatches of underlining fabric or
wide tape sewn to the dart seams. ~len hooked together, they relieved
some of the tension at the waist of a garment, particularly when button
closures were used. In this study, corselets were found on only three
of the bodices (two with buttons), plus one very fitted wrap. However,
the corselet found on the wrap consisted of a wide twill belt and was
sewn completely around the inside of the waist, rather than being at
tached to the darts.
94
Direction of bodice closures
Despite the efforts of some magazines to foster a standard
right over left direction for fastening bodices, the same maga
zines occasionally showed garments that fastened in the opposite
direction. This inconsistency in the literature may partly explain
the capriciousness of bodice fastenings at that time. Of the 37
bodices with center front closures, 19 fastened right to left and
18 fastened left over right. The remaining two bodices in the
study had no fasteners at the openings and may have been pinned
closed.
Since buttons were not found on any of the wraps and many of
the capes simply tied at the neck or fastened with just one hook and
eye, a conscious direction of fastening was difficult to ascertain
for wraps. Of the 13 wraps in the study, only three had a sufficient
number (two or more) of hooks and eyes to be considered consciously
fastened in either direction. All three wraps fastened left to
right.
Darts
With the exception of special fitting problems which required single
or triple bust darts, magazines normally agreed that two darts were
sufficient for most figures. Evidently, women heeded some of that
advice, since 28 bodices had double darts, compared to only single
cases of single and triple darts. Additional advice about darts,
however, was generally ignored. For instance, women were instructed
95
to trim away some of the bulk from darts, press them open, and over
cast the raw edges. Of the garments in this study, however, only 13
bodices had trimmed darts at the bust, and only 11 of those had
been overcast together. Furthermore, pressing was only done on two
of the trimmed darts. The rest of the darts were left untreated.
Other types of darts were occasionally present on bodices and
wraps (see Table 6). One dress, for instance, was darted at the
elbow of the upper sleeve rather than having the excess fabric eased
into the lower sleeve, as writers recommended. Another dress, specifically
designed for maternity and breast feeding, had front princess seams
that extended into the shoulder. From each seam, three short darts
angled toward the bust. Beneath the outer layer of fabric was a triple
darted underlining, with darts commencing at the waist rather than at
the princess seams as on the top layer. Nothing at all was found in
periodicals that pertained to either the construction of maternity and
nursing garments, or the separate darting of underlinings.
One other type of dart that was unique to underlinings was located
at the center back. It was a fairly shallow dart and ran from the
waist to the neck. Interestingly enough, the dart was only found on
bodices with one-piece back underlinings. It did not appear on garments
where the lining had princess seams (see Figures 8 and 9). Although
this particular dart was not mentioned in periodicals, it may have
only been necessary for certain figure types. That would explain why
only six of the 22 under linings without princess seams had center
back darts.

96
Table 6. Location of darts
1 2 3 n 4(d) 4 5 n6(d) 6 Total n n n n (w) n n (w)
1 at bust 1 1
2 at bust 12 6 4 2 1 4 29
3 at bust 1 1 2
Center back underlining 3 2 1 6
Front prin-cess seams 1 1
1 at bust underlining 2 2
2 at bust underlining 2 2
3 at bust underlining 1 1
Elbow 1 1
Shoulder 3 3
Back neck 1 1 1 3
1 attached bodices and skirts; n
2 separated bodices and skirts; n
3 bodices alone; n
n4(d) ensemble dresses;
4 ensemble n (w) wraps;
5 n wraps;
n6(d) dresses close to 18608;
6 n (w) wraps close to 1860s.

97

Figure 8. Bodice underlining with princess seams but without a center back dart
Figure 9. Bodice underlining without princess seams but with a center back dart

98
99
Princess seams
Of the 30 bodices in this study with so-called "princess seams,"
29 were constructed by first folding under the seam allowance of the side
piece, lapping it over the allowance of the center back piece, and then
stitching the seam from the outside. Since this was the technique
recommended in periodicals, it is not surprising that every bodice
except one was sewn together in this manner. However, magazines neg
lected to suggest a technique for underlining the side panels. Twenty
two of the bodices were underlined with one combined back and side
piece, whereas eight had separate underlining pieces for the side panels
and were cut identically to the outer layer of fabric.
The only other advice that magazines offered in regard to princess
seams was that the two seams be spaced an inch apart at the center back.
Only seven bodices in this study followed the recommended spacing of
one inch; however, many garments came close to that (i.e., five at
1-1/4", and four at 3/4"). Unfortunately, no explanation was given
for the recommendation.
Side seams
Women were also advised to seam the bodice sides from the inside,
press the allowances open, and then bind each side with tape. However,
judging from the mere two bodices and two wraps that were pressed
open, plus the one wrap that was clipped to lie flat, the advice was
not taken seriously. Furthermore, 22 of the bodices and five of
the wraps were not finished at all in the seams. Of the remaining
garments, 13 bodices and three wraps were overcast, one sheer
100
cotton dress was rolled and stitched, and two cape-style wraps used
only selvage edges (see Figure 10).
Shoulder seams
Shoulder seams followed a pattern similar to the side seams except
that four additional garments were overcast at the seam allowances,
and one more was pressed open for a total of five.
Boning
According to numerous fashion articles, boning was usually placed
at side seams and darts, and occasionally at the center back or along
a center back opening. In addition to those locations, however, the
garments in this study reveal several other minor locations, such as
the princess seams and the center front opening (see Table 7). But
the majority of boning occurred at the bust darts, and in 23 of the
cases, the bones had been slipped inside the dart and secured with a
row of stitches 2/5" from the dart seam (see Figures 11 and 12). The
only other technique found for bust dart boning was on a fitted jacket.
In that case, the darts were split open and pressed. A narrow casing
of twill tape was then hand-stitched to the pressed dart seam and the
bones run inside. This casing technique was also used at center backs,
princess seams, and (in six cases) center front openings.
One other technique used in four cases at the center front opening
was to sandwich the boning between the layers of dress fabric and
underlining. The center front edge was then slip-stitched closed and
run 2/5" from the edge with stitches to prevent the whalebone from
migrating.

101
20-
15
1
5
B NF o EL s p R
B •··•••••••• •••••••...• .Buttonhole Stitch
NF···· •••••••••••••••• ...J\Jo Finish
O····· ........•.•....... Overcast
EL •••••••••••••••••••••• Enclosed in Lining
s·· ...................... Selvage
P ........................ Pinked
R· •••••••••••••••••••••• Rolled
Figure 10. Seam finishes on bodices and wraps

102
Table 7. Locations of boning on bodices and wraps
1 2 3 n4(b) 4 5 n6(b) 6 Total n n n n (w) n n (w)
Right center front opening 2 1 1 1 1 1 7
Left center front opening 2 2 2 1 1 8
Center back 1 2 3
Bust darts 9 6 3 3 1 2 24
Side seams 4 2 1 7
Princess seams 1 1 2
No boning used at all 9 1 2 3 8 1 1 25
1 attached bodices and skirts; n
2 separated bodices and skirts; n
3 bodices alone; n
n4(b) ensemble bodices;
4 ensemble n (w) wraps;
5 n wraps;
n6(b) bodices close to 1860s;
6 n (w) wraps close to 1860s.

103
Figure 11. Insertion of whalebones into trimmed bodice darts
Figure 12. Insertion of whalebones into untrimmed bodice darts

104

105
However, not all garments in this study contained boning. Thirteen
bodices, for instance, were left completely free of stays, as were 12
wraps.
Wadding ~ padding
Only one bodice was found with padding at the bust, but as instructed
in periodicals, the cotton "fluff" was not placed directly against the
dress fabric. Instead, it was covered with another fabric and then
basted into the garment. But despite the periodical's suggestion that
dimet be used as the covering fabric, the bodice in this study was
covered with ordinary muslin.
Cording
Throughout the l860s, cording was recommended as a finish for bodice
hems, sleeve hems, and plain necks (see Table 8). When the cord was
applied at these locations, a bias strip of fabric was sewn to the garment
edge as a small facing. As the strip was hemmed down to the inside of
the garment, a narrow cord was run between the layers. The cord and
facing were then rolled slightly forward and stitched in place so that
the covered cord was visible to the outside of the garment. Although
cording was not recommended in combination with band collars, four gar
ments in this study used them together.
Another recommended location for cording was the armscye of bodices
and wraps. Thirty-two of the garments in this study were corded there
(see Figure 13). Two other locations that were found on single garments
were the center front opening and the sleeve outside seam. Neither of
these, however, were mentioned in periodicals.

106
Table 8. Locations of cording
1 n
2 3 n n n4(d)
Waist hems 14 7 3 2
Sleeve hems 3 3 2 3
Armscyes 17 4 4 2
Plain necks 9 4 3 1
Collars 1
Center front openings 1
Sleeve outside seams 1
1 n attached bodices and skirts;
2 n separated bodices and skirts;
3 n bodices alone;
n4(d) ensemble dresses;
4 n (w) ensemble wraps;
5 n wraps;
n6(d) dresses close to 1860s;
6 n (w) wraps close to 1860s.
4 n (w)
1
2
5 n
2
2
4
1
6 n (w) Total
28
1 12
3 32
1 23
4
1
1
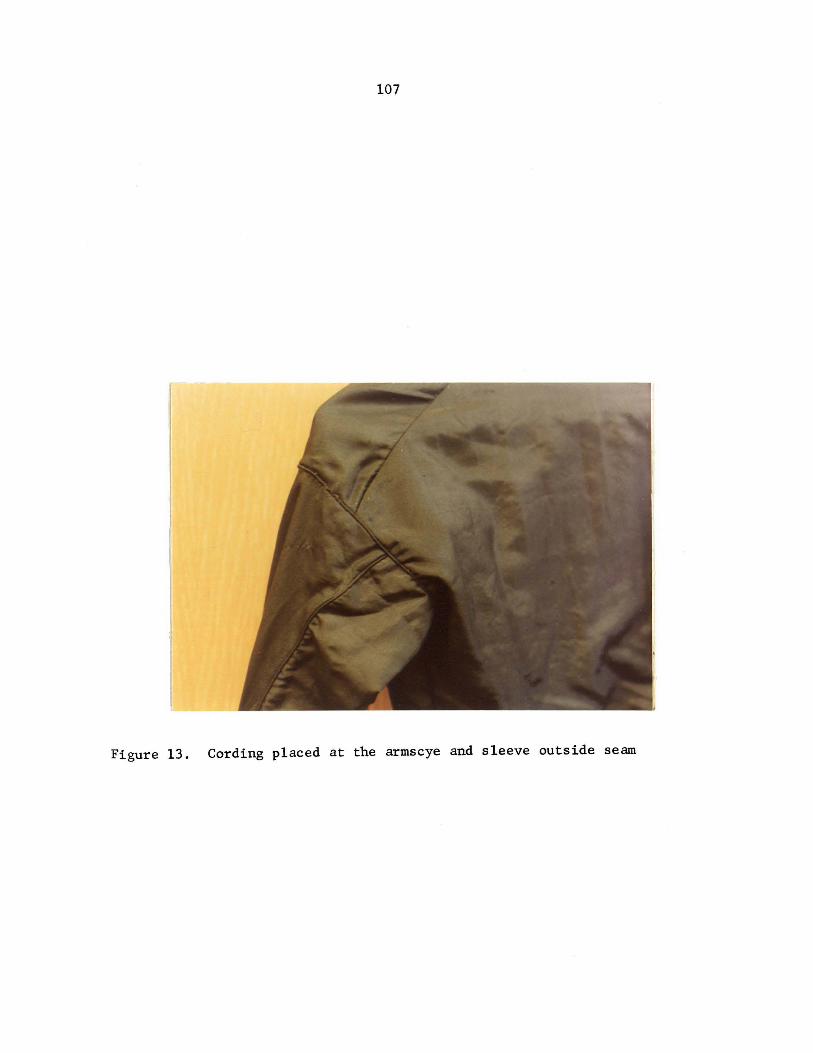
107
Figure 13. Cording placed at the armscye and sleeve outside seam
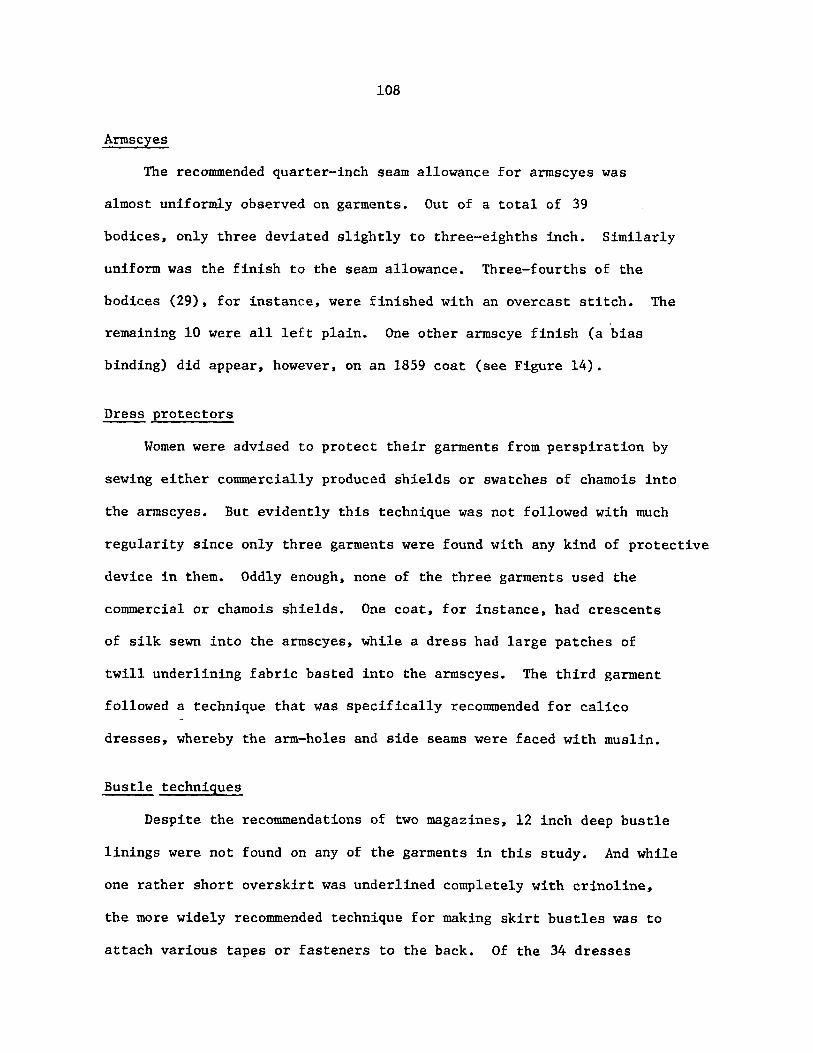
108
Armscyes
The recommended quarter-inch seam allowance for armscyes was
almost uniformly observed on garments. Out of a total of 39
bodices, only three deviated slightly to three-eighths inch. Similarly
uniform was the finish to the seam allowance. Three-fourths of the
bodices (29), for instance, were finished with an overcast stitch. The
remaining 10 were all left plain. One other armscye finish (a bias
binding) did appear, however, on an 1859 coat (see Figure 14).
Dress protectors
Women were advised to protect their garments from perspiration by
sewing either commercially produced shields or swatches of chamois into
the armscyes. But evidently this technique was not followed with much
regularity since only three garments were found with any kind of protective
device in them. Oddly enough, none of the three garments used the
commercial or chamois shields. One coat, for instance, had crescents
of silk sewn into the armscyes, while a dress had large patches of
twill underlining fabric basted into the armscyes. The third garment
followed a technique that was specifically recommended for calico
dresses, whereby the arm-holes and side seams were faced with muslin.
Bustle techniques
Despite the recommendations of two magazines, 12 inch deep bustle
linings were not found on any of the garments in this study. And while
one rather short overskirt was underlined completely with crinoline,
the more widely recommended technique for making skirt bustles was to
attach various tapes or fasteners to the back. Of the 34 dresses
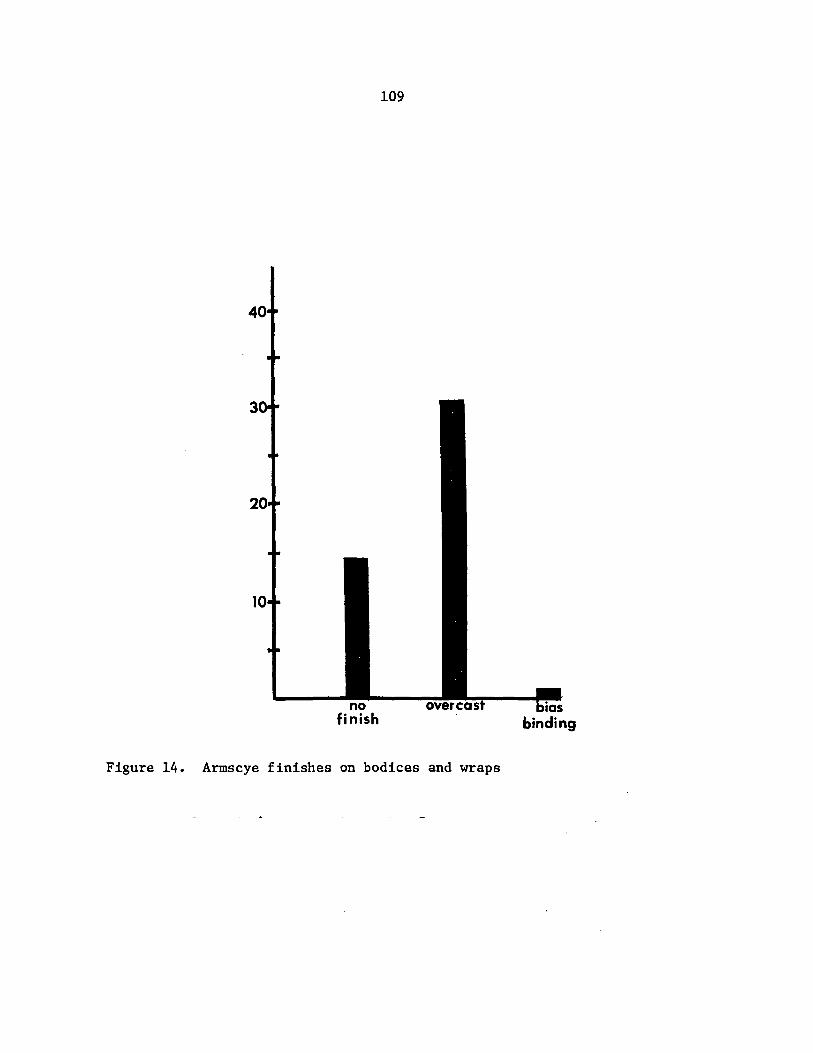
no finish
109
Figure 14. Armscye finishes on bodices and wraps
binding
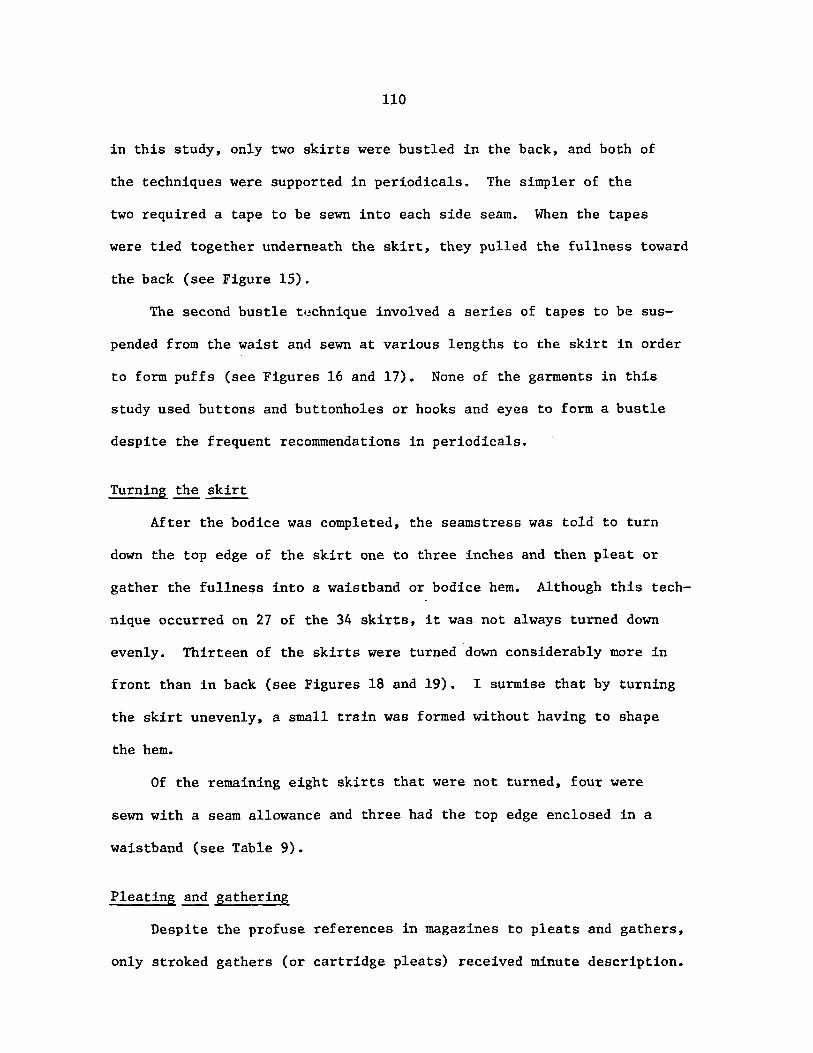
110
in this study. only two skirts were bustled in the back. and both of
the techniques were supported in periodicals. The simpler of the
two required a tape to be sewn into each side seam. When the tapes
were tied together underneath the skirt. they pulled the fullness toward
the back (see Figure 15).
The second bustle technique involved a series of tapes to be sus
pended from the waist and sewn at various lengths to the skirt in order
to form puffs (see Figures 16 and 17). None of the garments in this
study used buttons and buttonholes or hooks and eyes to form a bustle
despite the frequent recommendations in periodicals.
Turning the skirt
After the bodice was completed. the seamstress was told to turn
down the top edge of the skirt one to three inches and then pleat or
gather the fullness into a waistband or bodice hem. Although this tech
nique occurred on 27 of the 34 skirts. it was not always turned down
evenly. Thirteen of the skirts were turned down considerably more in
front than in back (see Figures 18 and 19). I surmise that by turning
the skirt unevenly. a small train was formed without having to shape
the hem.
Of the remaining eight skirts that were not turned. four were
sewn with a seam allowance and three had the top edge enclosed in a
waistband (see Table 9).
Pleating and gathering
Despite the profuse references in magazines to pleats and gathers.
only stroked gathers (or cartridge pleats) received minute description.
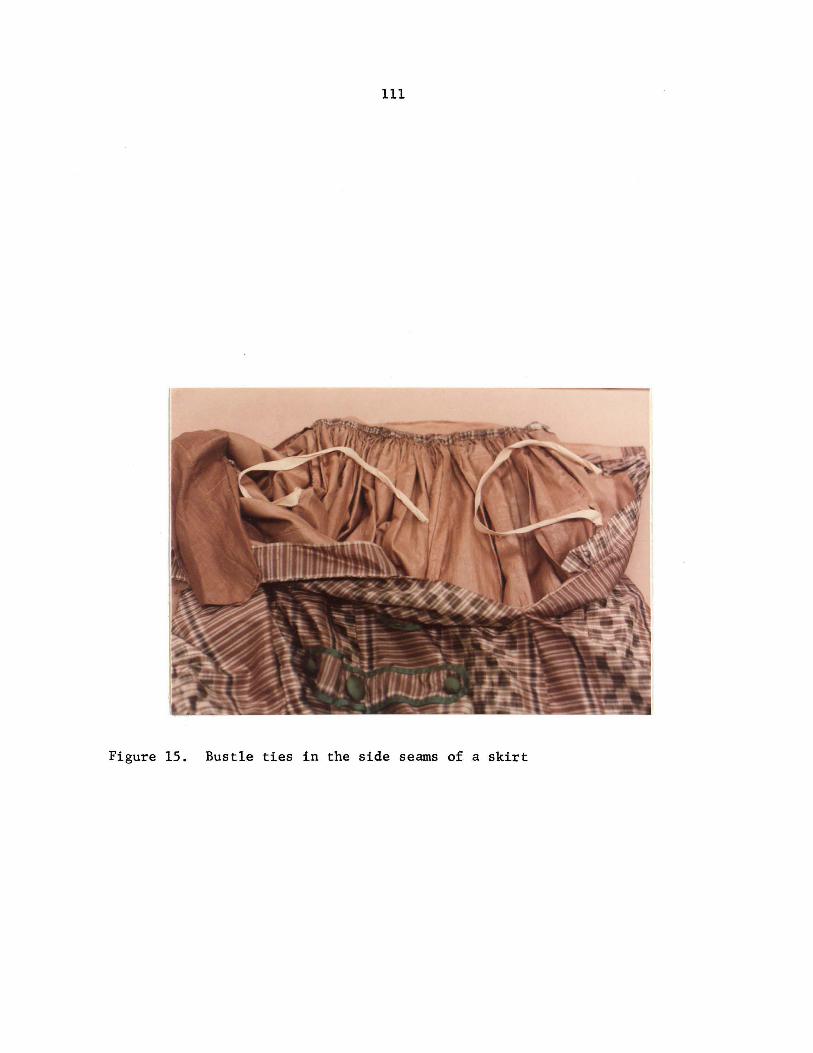
111
Figure 15. Bustle ties in the side seams of a skirt

112

Figure 16. Skirt bustle formed by tapes
Figure 17. Bustle tapes attached to the waist
113

114

Figure 18. Knife pleated skirt unevenly turned
Figure 19. Cartridge pleated skirt evenly turned

115

116
Table 9. Treatment of the skirt top edges
1 n
2 n
3 n
,6 n
Total
1 n
2 n
3 n
6 n
Turned evenly Turned unevenly
9 7
2 4
1
3 1
14 13
attached bodices and skirts;
separated bodices and skirts;
bodices alone;
Dresses close to l860s.
Seamed
3
1
4
Enclosed in waistband
1
1
1
3
117
Consequently, 18 (or over 50 percent) of the skirts in this study
were found to contain some cartridge pleats. Of those 18, how-
ever, only four were completely cartridge pleated. The rest were
cartridge pleated only at the back and combined with the flatter knife
pleats (see Table 10). Furthermore, of the six skirts containing plain
(unstroked) gathers, two appeared as if they had been tampered with
and, therefore, may have also originally been stroked.
Loops for hanging garments
According to periodicals, one of the final steps in construction
was to attach loops of fabric run with cord to the inside of a garment
so that it could be hung from hooks. The recommended locations for
loops were the center back of the neck on wraps, the waist hem and
armscyes on bodices, and the waistband on skirts, all of which were
evinced on garments in this study. However, the magazines further
stated that loops should be made from rolled and corded bias strips of
fabric. Only six garments in this study had loops made from bias
strips, and only one was run with cord. The remaining loops were
formed from twill tapes and worsted braids.
Conclusion
Although sewers of the 1860s did not strictly adhere to published
advice about construction, the dresses and wraps examined in this
study indicate that many of the recommended techniques were actually
followed. Therefore, I reject the null hypothesis that:
the construction techniques prevalent in surviving dresses and wraps are not related to published information about the style and structure of women's dresses and wraps.
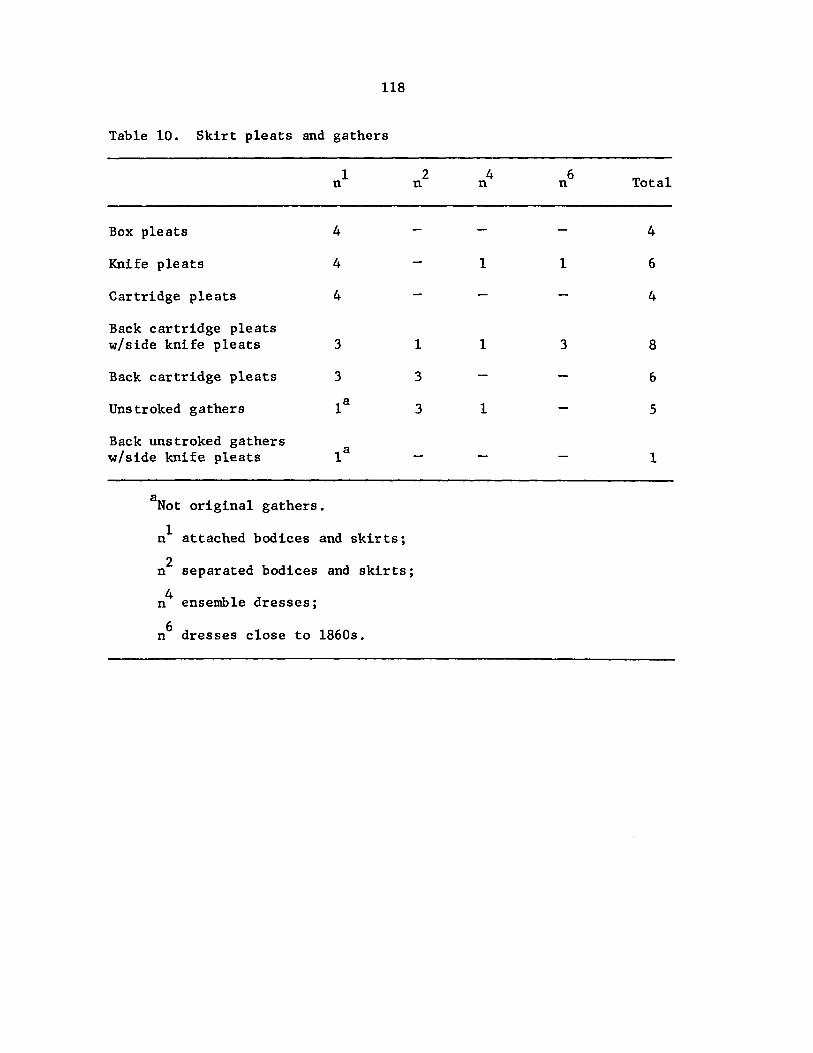
118
Table 10. Skirt pleats and gathers
Box pleats
Knife pleats
Cartridge pleats
Back cartridge pleats w/side knife pleats
Back cartridge pleats
Unstroked gathers
Back unstroked gathers w/side knife pleats
a Not original gathers.
1 n
4
4
4
3
3
1a
1a
n1 attached bodices and skirts;
2 n separated bodices and skirts;
4 n ensemble dresses;
n6 dresses close to 1860s.
2 n
1
3
3
4 n
1
1
1
6 n
1
3
Total
4
6
4
8
6
5
1

119
The Relationship of Construction Techniques to Style
One major purpose of this study was to accept or reject the
hypothesis that:
there is as much variation of construction techniques within a single style of women's dress (or wrap) as among several prevalent styles of dress (or wrap).
In selecting garments to test this hypothesis, the possibility was
allowed that not all garments would be of the same "high fashion" styles
as those illustrated in fashion magazines, and that perhaps some would
consist of local modification or rural interpretation. It was also
important to allow for the continuous changes that occurred in fashion
throughout the decade, rather than view the period as having just
one autonomous and immutable style. For instance, the dome-shaped
skirts that were found early in the decade became more flared with
gentle back fullness toward the middle of the decade. Then, at the
end of the l860s, the back fullness became highly exaggerated with
loops and puffs. Bodice waistlines also went through a series
of change. Starting out the decade pointed in front, the bodice
waistline gradually became plain and slightly raised from the natural
pOSition, until finally a short peplum was added. Another less formal
type of bodice that was worn throughout the decade consisted of a
dartless front gathered onto a skirt waistband and was christened
the "infant waist." Other major style changes occurred in the sleeve.
For instance, the wide bell-shaped "pagoda" sleeve, especially popular
during the l850s, diminished in size and was gradually replaced by the
fitted two-piece coat sleeve.
120
Dress styles examined in this study
Despite the transitory styles during the 1860s, two garment
features remained relatively constant throughout the decade. First,
dresses of the 1860s were characterized by a dropped armscye which
made the bodice appear sloped at the shoulders. It was a particularly
significant feature and appeared on all 39 dresses. Then, in order
to further exaggerate the slope, the shoulder seams were placed toward
the back of the bodice instead of at the top, as is presently done.
Second, magazines reported that all day dresses had bodices that
fastened in the front, and that only some ball-gowns still retained
the back lacing. Of the 39 bodices I examined in this study, all
examples, including the single ball-gown, fastened at the center front.
Wrap styles examined in the study
Wrap styles were a little harder to define than dress styles simply
because there were so many more species of wraps. For instance, the
types of wraps included in this study range from snugly fitted jackets,
to full-shaped coats, to unshaped capes. Usually, however, wraps fol
lowed the same design lines as dresses. Sleeved wraps, for example,
had sloped shoulders similar to the bodices over which they would be
worn.
Effects of ~ center front point
Only three bodices in this study dipped to a point at the center
front. Two, from the early l860s, were normally positioned at the
waist, while the third, from 1871, had a short peplum-type bodice.
But one thing that all three had in common was the fact that they were

121
left separate from their skirts. Of the 39 bodices that were examined,
25 were attached to a skirt, as compared to 14 left separate. I sur
mise, therefore, that attaching a skirt to a pointed waist was diffi
cult, and as the plain waist came into favor, skirts were increasingly
attached to bodices.
~ vanishing waist
One of the major preoccupations (or compulsions) of women during
the 1860s was their pursuit of a small waist, and to that end, no device
was spared. Of course, tightly laced corsets helped, but where compres
sion failed, illusion triumphed. The designers realized that by
broadening the shoulders and hips, they made the waist appear smaller
in comparison. Vertical lines in garments also assisted in the il
lusion. The placement of buttons (functional or nonfunctional) down
the center front, for instance, drew the eye vertically. This device
was used on 23 of the bodices.
Optical illusion was also applied to the backs of bodices. Side
seams, for example, were placed at the back of armscyes on all bodices
and sleeved wraps. Princess seams were also used to narrow the ap
pearance of the waist. The tightness of the princess curve, however,
necessitated a lapped (or applied) technique of construction. Of the
26 bodices with princess seams, only one was seamed from the inside.
The rest were all lapped. Of the three coats with princess seams,
however, all three were seamed from the inside. This was probably
due to the gentler curves used on the wraps.
122
Darts
Ordinarily, bodices required only two bust darts to be sewn
jointly with the underlining, but all of that changed with the "infant
waist" style. Since the infant waist (or bloused waist) was gathered
onto a waistband instead of being darted, the "underlining" was worked
independently of the outer fabric. Hence, the "infant wais t" dresses
found in this study all had darted underlinings beneath undarted
bodices.
Another major change in the bust dart occurred toward the end
of the decade as peplum bodices came into fashion. In order to create
the flare at the hips, sewers made darts double-pointed and sometimes
bisected them with a very short horizontal dart at the waist. This
horizontal dart not only provided flare to the front of the peplum,
but it was also a convenient location for setting in a tiny watch
pocket. Unfortunately, only two bodices of that style were examined
in this study, and while both used the double-ended dart, only one had
the short horizontal dart and watch pocket.
Modified peplums
Two of the dresses in this study revealed some information about
rural interpretation of urban styles. Each had a plain bodice with
single-pointed bust darts, but instead of being cut long for a peplum,
they had separate peplum skirts. One of the peplums was cut with flare
and sewn onto a separate waistband. The other was cut in plain widths,
then pleated and sewn directly to the bodice.

123
Boning
The change in the shape of the dart had a definite effect upon the
method of boning. The single-pointed darts usually had bones slipped
inside and secured with a row of stitching. But as the dart became
much longer and pointed at both ends, that technique became obsolete.
Of the two bodices in this study with double-pointed darts, none were
boned. There was, however, one fitted jacket with boning at its doub1e-
pointed darts. The darts had been split open, pressed, and overcast.
Then a casing of twill tape was sewn onto each dart seam and whalebone
slipped inside.
Skirt trains
As the fullness in the skirt gradually migrated more toward the
back, skirt trains correspondingly gained in length. Therefore, the
technique of uneven waist turning was no longer adequate. Instead, the
gored and bustled styles had to be turned evenly at the waist and
shaped at the hem. This later technique was found on four dresses in
this study, all of which were of the gored style.
Conclusion
Since some construction techniques were found to vary on dresses
and wraps according to their style, I reject the null hypothesis
that:
there is as much variation of construction techniques within a single style of women's dress (or wrap) as among several prevalent styles of dress (or wrap).

124
The Relationship of Construction Techniques to Technology
During the mid-nineteenth century, great strides were made in the
development of sewing technology, and at the top of the list was the
sewing machine. By the end of the l860s, the "iron maidens" had become
so readily available and so low priced that, quite literally, hundreds
of thousands of women owned them. Therefore, it was another purpose of
this study to test the hypothesis that:
technology does not affect the choice of construction techniques in dresses and wraps.
Use of the sewing machine
The popularity of the sewing machine is evident from the 22
dresses in this study that were sewn by machine. However, the fact
that one part of a dress was sewn by machine did not guarantee that
the entire garment would be sewn the same way. Six of the garments
in this study, for instance, had bodices that were sewn by machine and
corresponding skirts that were sewn by hand (see Figure 20). Out of
this phenomenon, several theories emerged.
1. Two people worked together on a garment but only one machine
was available.
2. The seamstress anticipated the recycling of the skirt fabric;
therefore, she only basted the widths together.
3. Only the garment seams that received a tremendous amount of
strain (i.e., darts and bodice side seams) needed to be sewn
by machine.
However, only the first theory could explain the two dresses that were
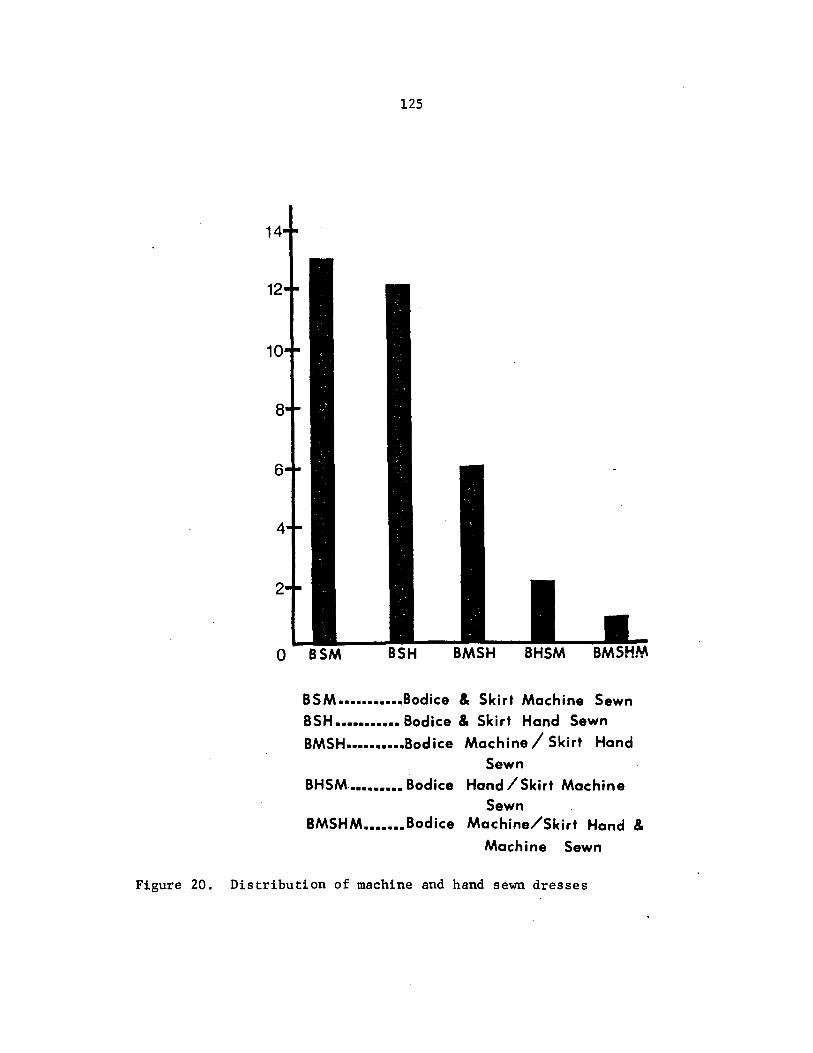
125
BSM ••••••••••• Bodice & Skirt Machine Sewn BSH ••••••••••• Bodice & Skirt Hand Sewn
BMSH •••••••••• Bodice Machine / Skirt Hand Sewn
BHSM ••••••••• Bodice Hand /Skirt Machine Sewn
BMSHM ••••••• Bodice Machine/Skirt Hand &
Machine Sewn
Figure 20. Distribution of machine and hand sewn dresses

126
hand sewn in the bodice and machine sewn in the skirt. To complicate
matters even more, one dress was sewn with a chain-stitch machine in
the bodice and a lock-stitch machine in the attached skirt and sleeves.
Although the machine was readily accepted for major garment
seams, some areas of the garment retained the conventional hand tech
nique. Sleeves, for instance, were genera11ybackstitched into the
armscyes, and only five garments (4 dresses and 1 coat) in this study
were sewn into an armscye by machine. It is plausible that the sewing
machine was too bulky to fit into an armscye, or that the presence
of cording made it too difficult to stitch by machine. However, three
of the five armscyes that were sewn by machine were corded. Another
theory is that the frequent style changes in sleeves inhibited most
seamstresses from attaching them too securely, lest they have to re
move them later.
Another area of the garment where hand sewing was conventionally
used was at the waist. Of the 34 dresses that were examined, only
one had a skirt attached to the bodice by machine. The rest were all
overhanded as prescribed in magazines. I surmise that the technique
of stroking the gathers with a needle as they were sewn was the reason
most women preferred to attach the skirt by hand. Furthermore, women
may have anticipated future adjustments at the waist for skirt length
or redistribution of the pleats or gathers for changes in style or
weight.
Finally, the application of trims was almost always done by
hand. Only one bodice and one wrap had trim sewn on by machine. The

127
rest were merely basted with running stitches as if the trims were only
temporary.
Pressing equipment
Despite the availability of flat irons and the encouragement of
writers during the l860s, only a few garments (two bodices, two
skirts, and two wraps) in this study were pressed open at the seams.
I surmise since the irons required continual heating the technique of
pressing seams during construction was rather a nuisance for most
women and, therefore, was avoided as much as possible.
Pinking tools
Pinking was similarly avoided by women since the tools were rather
crude in design. Only two garments had pinked ruches, four skirts had
pinked hem facings, and one skirt had a pinked waist turning. As for
seam finishes, pinking was used on only one coat. However, the notches
were rather large and spaced farther apart than is normal at present.
This indicates that perhaps the notching was intended more for clipped
curve seams so that they would press flat, rather than to prevent
edges from unravelling.
Hooks and eyes
Although hooks with spring humps were advertised in magazines, all
of the garments in this study with hooks had the brass or iron hammered
variety. Since they were not engineered to stay closed on their own,
garments were required to fit snugly so that there would be some tension
placed on them. It appears, then, that the technological development

128
of hooks and eyes affected both the style and the construction of
garments.
Conclusion
Since many of the technological developments (particularly the
sewing machine) were used on garments in this study, I partially re-
ject the null hypothesis that:
technology does not affect the choice of construction techniques in dresses and wraps.
The Relationship of Construction Techniques to Fabric
Another objective of this study is to accept or reject the
hypothesis that:
the type of fabric (differentiated by fiber) in a dress or wrap does not affect the choice of construction techniques found in the garment.
To test this hypothesis, I examined five different fabrics: cotton,
linen, silk, wool, and a blend of wool and silk (see Figure 21). Of
the 31 silk garments, only one velvet wrap and one rep weave dress
deviated from the light, firm taffeta-type weight. Of the seven
cotton garments, the fabric weights varied only from calicoes to
dimities. The three woolen dresses in the study were generally of
a coarse homespun-type, whereas the woolen wraps were more of a
finer gabardine weight.
Lining/underlining
One thing that seemed to be affected by the choice of fabric was
the usage of linings and underlinings. Cottons and woolens, for instance,
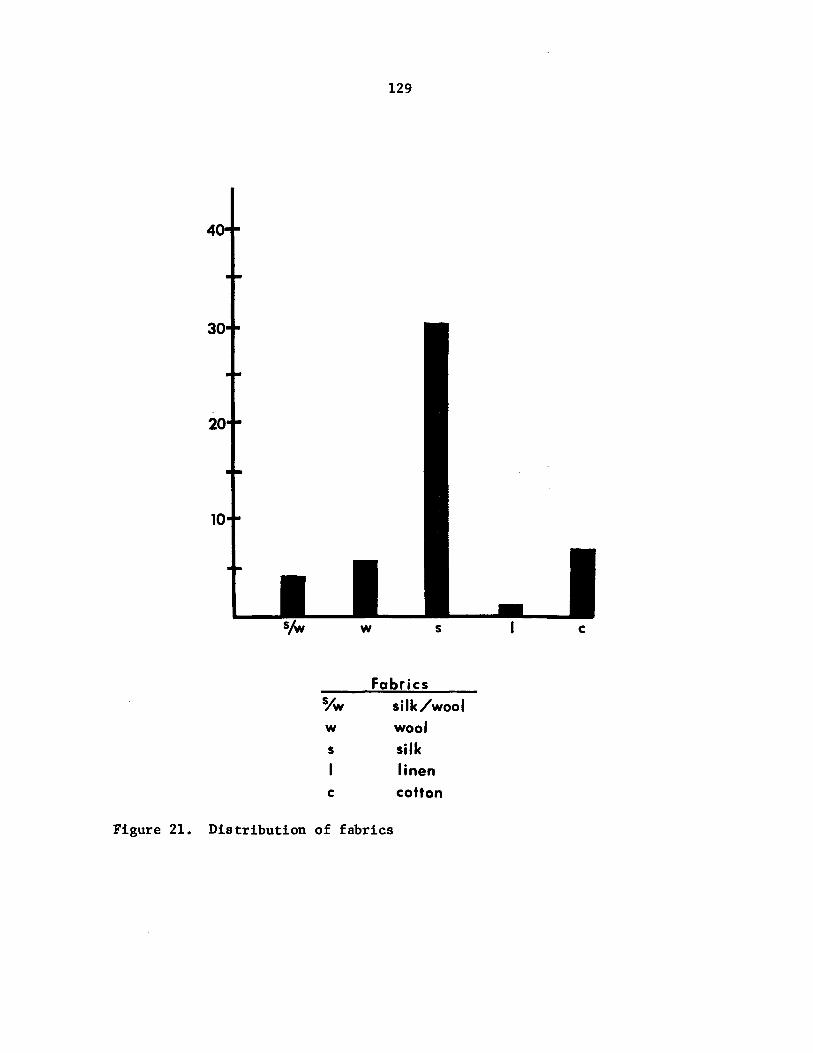
129
Fabrics O/W silk/wool w wool s silk
linen c cotton
Figure 21. Distribution of fabrics
130
were typically underlined in the bodice, yet left plain in the skirt,
while silks and silk/wool blends were generally underlined throughout
(see Table 11). Unfortunately, not enough wraps were examined to show
any specific fabric trends. However, it did appear that the style of
wrap played an important role. For instance, the fitted types of wraps
tended to be lined more often than capes.
Seam allowances
Another thing that seemed to be affected by the choice of fabric
was the size of the seam allowance. However, since the depth tended
to vary more within a bodice, skirt seams were the more reliable
indicator.
The skirts examined in this study suggest that the heavier the
fabric was, the larger the seam allowance used. Cottons, for instance,
tended to have a 1/811 allowance, whereas some coarsely woven woolens
had 3/811 allowances. The majority of garments, however, used a 1/411
allowance, and that amount extended across all fabrics (see Table 12).
Skirt pleats and gathers
Periodicals were quite adamant about the types of pleats and
gathers appropriate to certain fabrics. For instance, women were told
that light cottons should be gauged into gathers, while very heavy
fabrics should be flatly pleated. The dresses in this study support
that advice strongly. Five the of the six cotton dresses were either
cartridge pleated or gathered, and two of the three wool dresses were
box pleated. All three of Silk/wool blend dresses had back cartridge
pleats and only one had knife pleats at the side. The plain silk
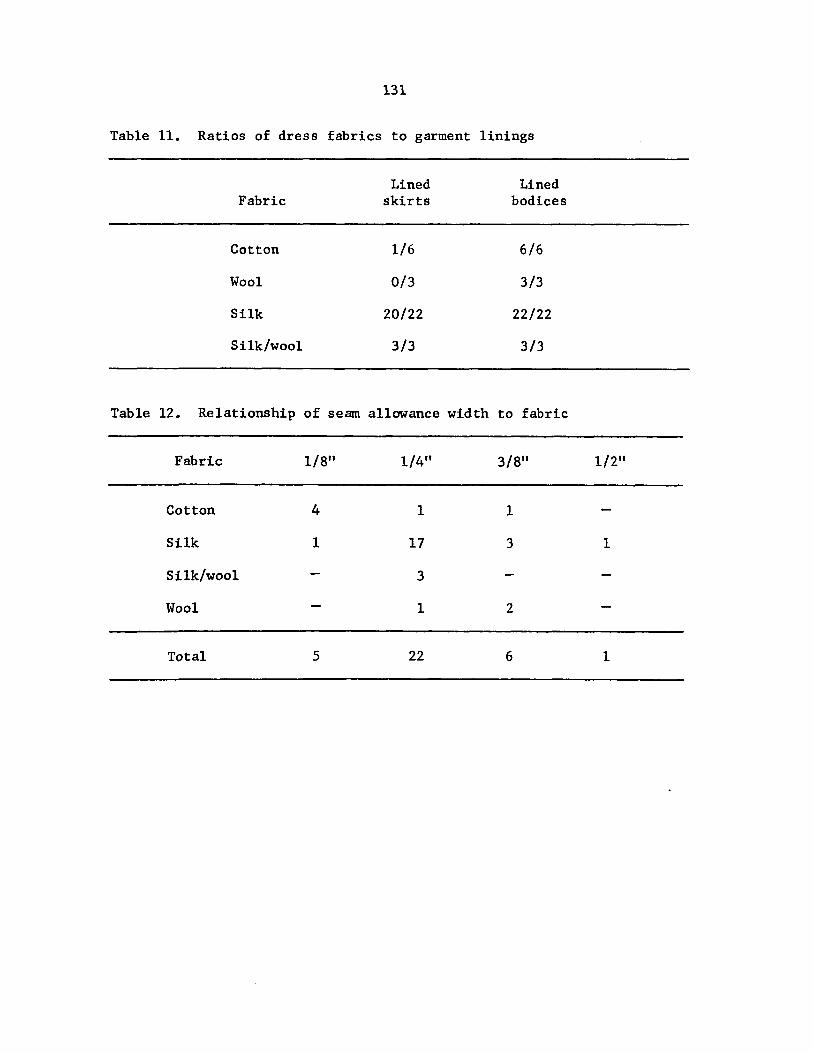
131
Table 11. Ratios of dress fabrics to garment linings
Lined Lined Fabric skirts bodices
Cotton 1/6 6/6
Wool 0/3 3/3
Silk 20/22 22/22
Silk/wool 3/3 3/3
Table 12. Relationship of seam allowance width to fabric
Fabric 1/8" 1/4" 3/8" 1/2"
Cotton 4 1 1
Silk 1 17 3 1
Silk/wool 3
Wool 1 2
Total 5 22 6 1
132
dresses, although they evinced a variety of pleats and gathers, clustered
around knife pleats with or without back cartridge pleats (see Table
13).
Skirt hems
The type of skirt hem treatment also appeared to relate to the
type of dress fabric. TWelve of the silk and two of the wool and silk
blend skirts, for instance, were merely run with worsted braid. Eight
other silk dresses used a combination hem facing and braid. Cotton and
wool skirts, on the other hand, were primarily just turned up and hemmed,
although two cotton dresses were faced with cotton calico and muslin.
Conclusion
Since several construction techniques did appear to be used with
only certain fabrics, I reject the hypothesis that:
the type of fabric (differentiated by fiber) in a dress or wrap does not affect the choice of construction techniques found in the garment.
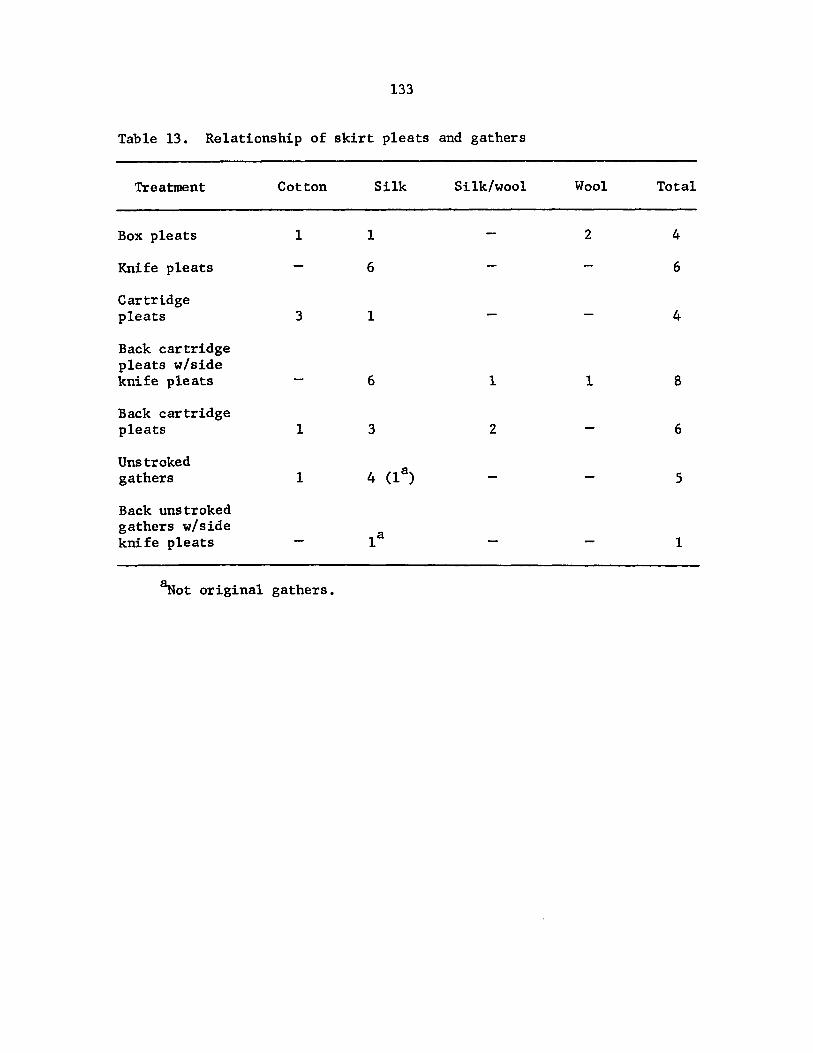
133
Table 13. Relationship of skirt pleats and gathers
Treatment Cotton Silk Silk/wool Wool Total
Box pleats 1 1 2 4
Knife pleats 6 6
Cartridge pleats 3 1 4
Back cartridge pleats w/side knife pleats 6 1 1 8
Back cartridge pleats 1 3 2 6
Unstroked gathers I 4 (la) 5
Back unstroked gathers w/side
la knife pleats I
~ot original gathers.
134
SUMMARY AND CONCLUSIONS
The decade of the 1860s has been characterized as a destructive and
volatile period in American history, but it was also an age of tremendous
industrial growth, flanked by years of western expansion. By the end
of the decade, railroads and riverboats had penetrated deeply into the
midwestern states, carrying with them commercially produced eastern
goods. Among the various items on board were tools and equipment for
sewing garments, ready-to-wear wraps and undergarments, and (most
importantly) women's periodicals.
Periodicals played a vital role in keeping women informed of the
latest fashions. Furthermore, they instructed women in the construction
of various styles and eventually provided them with scaled-down paper
patterns to follow. Toward the back of each magazine were also printed
many alluring advertisements for the latest in sewing gadgets.
Particularly cogent were the advertisements for sewing machines, which
even offered reduced club rates. Eventually, the competition between
sewing machine manufacturers became so fierce that the price of machines
fell to a level that most families could afford. However, since 1) the
styles of dresses and wraps changed, and 2) women became increasingly
equipped with new sewing tools and current information about construction,
the question remains whether or not a corresponding change occurred in
the methods of construction.
This study specifically examines dresses and wraps of the 1860s
to determine if no relationship exists between methods of garment
construction and 1) changes in garment style, 2) published advice about

135
sewing, 3) changes in sewing-related technology, and 4) types of fabric.
The purpose is to gather as much primary structural information as
possible from dresses and wraps of the 1860s to determine if certain
techniques (or combinations of techniques) are prevalent among certain
styles. If a relationship does exist, then the construction informa
tion could assist in the dating of historic clothing.
The findings of this study reveal that periodicals contained an
enormous amount of advice on construction, and that many of the tech
niques were used with much regularity, particularly those most re
lated to garment design (i.e., cording, pleating, gathering, bustle
looping, and measuring off the skirt widths). Technology also played
a role in the construction of garments, but it was not as strong as I
anticipated. For instance, regardless of whether a garment was
sewn by machine, women still engaged the hand techniques when attaching
sleeves to armscyes and skirts to bodices.
Style played a major role in the types of techniques that were
used, particularly in the treatment of darts and boning. The shorter
bodice style, for instance, had single-pointed darts at the waist which
made it easy to slip whalebones inside. But as the long peplum-type
bodice came into favor, the longer double-pointed darts made that tech
nique obsolete. Instead, the darts were split open, pressed, and
stitched with a special whalebone casing. Bloused (or "infant")
waists also required a different technique. Since the outer fabric
was gathered onto a waistband, but the underlining fabric was darted,
the two layers of the front bodice had to be constructed independently
and then joined.

l36a
Fabric also influenced the selection of certain construction tech
niques. Hems were largely determined by the type of fabric, as were
seam allowance depths and types of pleating or gathering. For example,
heavy fabrics, such as wool, often had slightly deeper seam allowances
in the skirt and were box-pleated at the waist. Thin cottons, on the
other hand, had narrower seam allowances and were generally gathered to
a waistband. There was also a tendency among the cotton and wool
dresses in this study to have underlining in just the bodice portion,
whereas silks and silk/wool blends had underlining in the bodice and
the skirt.
Despite the need for further research into the construction tech
niques of the l860s, some tentative conclusions can be drawn from this
study. Typically (or on at least half of the garments), dresses and
fitted wraps were corded at the waistline, armscyes, and neckline. The
armscye seam was almost always 1/4 inch deep and sewn by hand, even when
other seams were sewn by machine. Bodices closed at the center front
with either hooks and eyes or buttons and buttonholes. Sometimes buttons
were used decoratively down the center front with no corresponding button
holes. Boning was typically slipped inside bust darts and secured with
a row of basting. When boning occurred at the center back, it was en
closed in a fabric casing. Usually an entire garment was underlined
with cambric. The shoulder and bodice side seams were positioned toward
the back and the deeply curved "princess-like" seams were lapped at the
back.
Bodices and skirts could be either left separate or attached; however,
the bodice was finished along the waistline before the skirt was over-

l36b
handed to it. Also, before the skirt was attached the hem was finished
with a deep facing, worsted braid, or both, and the waist edge was
folded under. Generally, a slit was left in the left side seam of the
skirt and a pocket was placed in the right seam. The skirt fullness
was then controlled with combinations of box and knife pleats and small
even gathers, called "cartridge pleats." These cartridge pleats were
particularly used at the center back for a higher concentration of full
ness. At present it is not known whether these techniques were exclusive
to the l860s, nor is it known if they were exclusive to the upper mid
west.
137
RECOMMENDATIONS FOR FURTHER RESEARCH
Although the four specific hypotheses in this study were rejected
fully or partially, many other possible relationships to construction
have yet to be tested. The formality of the garments, for instance,
was not included in this study since there existed a built-in bias
in the garments that were examined. Only the dressier garments are
usually preserved. Geographical variation in construction was also
not tested, and judging from the articles which appeared in periodicals,
it may have been particularly important during that decade. Women in
the southern United States, for example, may have had to modify their
usual construction techniques to get through severe shortages or simply
alter older garments to interpret new fashion trends.
Unfortunately, just because a technique was used during one decade
does not automatically exclude it from use in other decades as well.
In order to make construction dating a viable method, garments of
women, men, and children across other decades surrounding the 1860s
still need to be investigated.
I would also like to suggest a few additional things that should
be done if this study is replicated with 1860s garments from other
regions. First, some attention should be given to the manner in which
buttons, especially the decorative type, were sewn onto bodices. A few
of the bodices in this study had rows of buttons sewn on with a continuous
strand of thread. Unfortunately, this technique was not documented.
Second, not enough wraps with center front fasteners were examined
to determine if any real trends existed in the direction of closure.

138
Since wraps were one of the first female garments to be manufactured,
it would be interesting to determine when the direction became uniform.
Last, measurements of dress waists should be taken to find if a
relationship exists between the size and whether a skirt was attached
to a bodice. Periodicals recommended that stouter women attach the
skirt so there would be fewer layers of fabric at the waist.
139
LITERATURE CITED
Adburgham, A. Shops and shopping 1800-1914: Where. and in what manner the well-dressed Englishwoman bought her clothes (2nd ed.). London: George Allen and Unwin, 1981.
Allinson, M. Dressmaking as a trade for women in Massachusetts. Boston: Women's Educational and Industrial Union, 1916.
Anderson, G. B. The development of identifying criteria for the dating of dresses of the 1920 decade in the Elizabeth Sage Historic Costume Collection. Unpublished master's thesis, Indiana University, 1967.
Arnold, J. Handbook of costume. London: Macmillan, 1973.
Bradfield, N. Costume in detail: Women's dresses 1730-1930. Boston: Plays, Inc., 1968.
Brandon, R. Singer and the sewing machine: A capitalist romance. London: Barrie and Jenkins, 1977.
Burlingame, R. invention.
March of the iron men: A social history of union through New York: Charles Scribner's Sons, 1943.
Carter, M. B. Dress construction details during the nineteenth and twentieth century as reflected in the Drexel Costume Collection. Unpublished master's thesis, Drexel Institute of Technology, 1954.
The census of Iowa as returned in the year 1867. Des Moines: F. W. Palmer, 1867.
The census of Iowa as returned in the year 1869. Des Moines: F. M. Mills, 1869.
Cooper, G. R. The sewing machine: Its invention and development (2nd ed.). Washington, D.C.: Smithsonian Institution Press, 1976.
DeMar1y, D. Worth: Father of haute couture. London: Elm Tree Books, 1980.
Finley, R. E. The lady of Godey's: Sarah Josepha Hale. Philadelphia: J. B. Lippincott, 1931.
Fite, G. The farmer's frontier 1865-1900. New York: "Holt, Rinehart and Winston, 1966.
•
Gilbert, K. R. Sewing machines. London: Her Majesty's Stationery Office, 1970.
140
Godey's Lady's Book and Magazine, January l850-December 1869.
Godfrey, F. P. An international" history of the sewing machine. London: Robert Hale, 1982.
Haack, E. J. Clothing worn by Iowa residents in professional and business classes who lived in selected interior small towns between 1870 and 1880. Unpublished master's thesis, Iowa State University, 1979.
Haggard, A. L. Developing a taxonomic system for woman's dresses in a historic costume collection. Unpublished master's theSiS, Iowa State University, 1972.
Harper's Bazar, November 1867-December 1869.
Hooper, S. E. M. Rural dress in southwestern Missouri between 1860 and 1880. Unpublished master's theSiS, Iowa State University, 1976.
Kunciov, R. Mr. Godey's ladies: Being a mosaic of fashions and fancies. New York: Bonanza Books, 1971.
Ladies' Repository, January 1850-December 1869.
Magee, M. A. Trends in location of the women's clothing industry. Chicago: The University of Chicago Press, 1930.
Miller, R. A. The design and construction of women's day dresses from 1890 to 1940 in relation to the advancement of technology. Unpublished master's theSiS, Florida State University, 1975.
Pearsall, R. Collecting mechanical antiques. Newton Abbot: David and Charles Ltd., 1973.
Peterson's Ladies' National Magazine, 1854-1869.
The Prairie Farmer, 1850-1869.
Riley, G. Frontierswomen: The Iowa experience. Ames: The Iowa State University Press, 1981.
Schlick, P. J. D. A systematic process for dating ladies (sic) dresses of the nineteenth century using structural features. Unpublished master's thesis, Indiana University, 1981.
The sewing machine. Scientific American, July 25, 1896, pp. 72-73.
Shenoi, S. A. Women's costume in Minnesota during (sic) nineteenth century. Unpublished master's thesis, The University of Minnesota, 1967.
Souder, M. A. Notions (2nd ed.). New York: Ronald Press, 1922.

141
Vachon, D. L. Documentation guidelines for women's day dress, 1850-1949. Unpublished master's thesis, University of Kentucky, 1976.
ACKNOWLEDGMENTS
My deepest appreciation is extended to Dr. Jane Farrell-Beck for
not only her expert advice and guidance, but for the gentle manner in
which it was given. I would also like to thank Dr. T. Geite1 Winakor,
Dr. James Whitaker, and Dr. Sara Kado1ph for their interest and
constructive criticism during the study, and the many museums that
permitted me to examine their fine costume holdings.
Finally, a special thanks should go to my husband, Andrew, who
has not only been my greatest source for emotional support, but has
also sacrificed much to help me through my graduate program and the
writing of this thesis.

143
GLOSSARY
Most of the terms in this glossary are only operationally defined;
however, there are a few terms which were defined in women's magazines
of the 1860s. Those terms are identified at the end of each defini-
tion.
Backstitched Seam:
Bias:
Boning:
Box Pleat:
Braid:
Cartridge Pleats:
Cambric:
Chain Stitch:
Close Backstitch: (or stitched seam)
Corded Piping:
Corsage:
The needle is run upward from underneath the double material, then the needle is set three or four threads back of the place where it was drawn out. It is then drawn out again six threads (sic) in front of the same point. (periodical)
A line used in the folding and cutting of cloth which runs diagonally across the goods.
The insertion of whalebone in the bodice for shaping.
A pleat formed by alternating the directions of the folds.
Any material made from textile yarns used for binding or trimming widths. It may be woven, round or tubular, or plaited flat.
A series of very round and uniform tucks that resembles a military cartridge belt.
Plain-weave cotton fabriC, bleached or dyed in the piece.
A basic stitch made by connecting loop stitches forming links as in a chain.
A tightly backstitched seam. (periodical)
An edging made by inserting the cord between a narrow bias strip and stitching it in place. It is applied to the edge of the garment in the same manner as plain piping or it can be included in the seam.
The front part of a bodice.

Double Seaming:
Faced Hem:
Gores:
Homespun:
Interfacing:
Interlining:
Knife Pleats:
Lock-Stitch:
Overcasting Stitch:
Overhand Seam:
Pinking:
Running Stitch:
Selvage:
Slip Stitch:
144
Another term for a French seam. The two layers of fabric are first run together from the right side, then turned and backstitched from the wrong side. (periodical)
A hem created by sewing on a piece of fabric, in the same shape as the hem, and turning it up.
A trapezoidal shaped skirt panel.
A plain weave cloth of coarse, rugged yarns, originally spun and woven on crude machinery in the home.
A woven or nonwoven fabric used to provide body and substance to a garment.
A lining placed between the ordinary lining and the outside fabric, usually to provide extra warmth.
Small pleats turned in the same direction to give a sharp knife effect.
A sewing machine stitch by which the lower thread is interlaced with the upper thread and held fast.
A slanting stitch used mainly to protect raw edges from raveling or to hold edges together.
A seam used primarily for joining two selvage or hemmed edges together. The edges are layed (sic) exactly together and the needle is worked back to front through both fabrics. Everyone or two stitches, the thread is pulled tight. (periodical)
The process of trimming a seam in a saw-tooth edge to prevent raveling.
Small, even stitches that join together two pieces of fabric. (periodical)
The warp edge of a woven fabric which does not ravel because the filling yarns wrap around the warp yarns.
Short loose stitch which is concealed between two thicknesses of cloth. It is used wherever invisible stitching is necessary.
Twilled Tape:
Twills:
Underlining:
Waist:
Zouave:
145
Rugged cotton narrow fabric or tape made with herringbone weave in a compact texture.
Cloths that show a diagonal construction on the face of the material.
A lining type fabric that is cut to exactly the same shape as the outer fabric pieces. The two layers are first basted together and then (acting as one layer) seamed with the other pieces.
The term refers to both the waistline and bodices in general.
A military style of decoration using strong contrasting colors and braid trim.

146
APPENDIX A.
THE DATA WORKSHEET

147
DATA WORKSHEET
Item: Dress Wrap Ensemble Garment if:
Date:
Museum: ____________________________ ~--~-------~--~-------(City) (State)
Garment Date: Garment Donor: -----------------Documented Background:
Degree of Formality or Occasion Garment Was Worn for:
Condition:
Label or Dressmaker Tag? ____ Home Sewn? _____________________ __
I. Garment Description: Number of Parts: ____________ _
Silhouette:
Style Features:
Applied Decoration:
Fabrics:
Major Fashionable Fabric ____________________ Color ______ __
Subsidiary Fashionable Fabric Color ______ _
Lining/Underlining Fabric Color ___ _
Support Fabric ________________________________ _
Thread Type ___________________ __
Other _________________________________________ __
148
II. Methods of Construction:
Major Seams (side, back, & front):
Fashionable Fabric - (stitches and seam finishes)
Lining Fabric - (stitches and seam finishes)
Minor Seams:
Princess Seams - (position, application, stitches, and finishes)
Sleeve Seams - (stitches and finishes)
Shoulder Seams - (placement, stitches, and finishes)
Armscyes - (placement, piping, stitches, finishes, and fit of sleeve cap)
Waistband - (type of band, position of opening, piping, method of reducing bulk, and method of application)
Collar - (support fabric, application to bodice, and finish)

149
Cuffs - (support fabric, application to sleeve, and finish)
Pockets - (lining, location on garment, method of application)
Gores and Godets: (position)
Darts: (positions, type, length, stitches, and finishes)
Support System:
Hems :
Position and application of support fabrics -
Boning - (type, position, and method of application)
Skirt Hem - (hem depth, interfacing, braid, dust ruffle, facing, piping, and stitches)

150
Bodice Hem - (hem depth, facing, piping, and stitches)
Sleeve Hem - (hem depth, facing, piping, and stitches)
Trims: (description and method of application)
Ribbons and Tapes: (position and application)
Closures:
Hooks and Eyes - (position and application)
Buttons - (description, position, and application)
Buttonholes - (position, amount, spacing, size, orientation, distance from edge, method of construction)
151
Other Closures - (i.e., snaps, loops, frogs)
Miscellaneous:
III. Sketch of Garment:

152
APPENDIX B.
MUSEUMS THAT PARTICIPATED IN THE SWDY
AND THE TYPES OF GARMENTS FOUND AT EACH

Museum
Clarke County Historical Museum Osceola, Iowa
Grout Museum Waterloo, Iowa
Iowa State University Textiles and Clothing Dept. Ames, Iowa
Marion County Historical Village Knoxville, Iowa
Maxwell Community Historical Museum Maxwell, Iowa
McGregor Historical Museum McGregor, Iowa
Minnesota Hist. Society St. Paul, Minnesota
Nelson Pioneer Farm Oskaloosa, Iowa
Putnam Museum Davenpor t, Iowa
Rice County Historical Museum Fairbau1t, Minnesota
Susie Sower House Marshalltown, Iowa
University of Minnesota, Goldstein Gallery St. Paul, Minnesota
153
Garments
Dress with separate skirt - 1
Dress with attached skirt - 2 (11) Dress with separate skirt - 2
Dress with attached skirt - 3 Ensemble w/attached skirt - 1 Bodice alone - 3 Wrap - 1
Dress with attached skirt - 1
Dress with attached skirt - 1 (11)
Dress with attached skirt - 2 Dress with separate skirt - 2
Dress wi th at tached skirt - 3 Wrap - 2 (11)
Wrap - 1
Dress with attached skirt - 5 (11) Dress with separate skirt - 1 Ensemble w/attached skirt - 1 Bodice alone - 1 Wrap - 1
1 Dress with separate skirt - 1 (1 ) Bodice alone - 1 Wrap - 1
Dress attached to skirt - 1
Dress with attached skirt - 4 Dress with separate skirt - 1 Ensemble w/separate skirt - 1 Wrap - 4
1 Close to 1860 period by one or two years.

Museum
Washington County Rist. Society Museum Stillwater, Minnesota
154
Garment
Dress with attached skirt - 1

155
APPENDIX C.
RAILROADS IN IOWA BY 1869
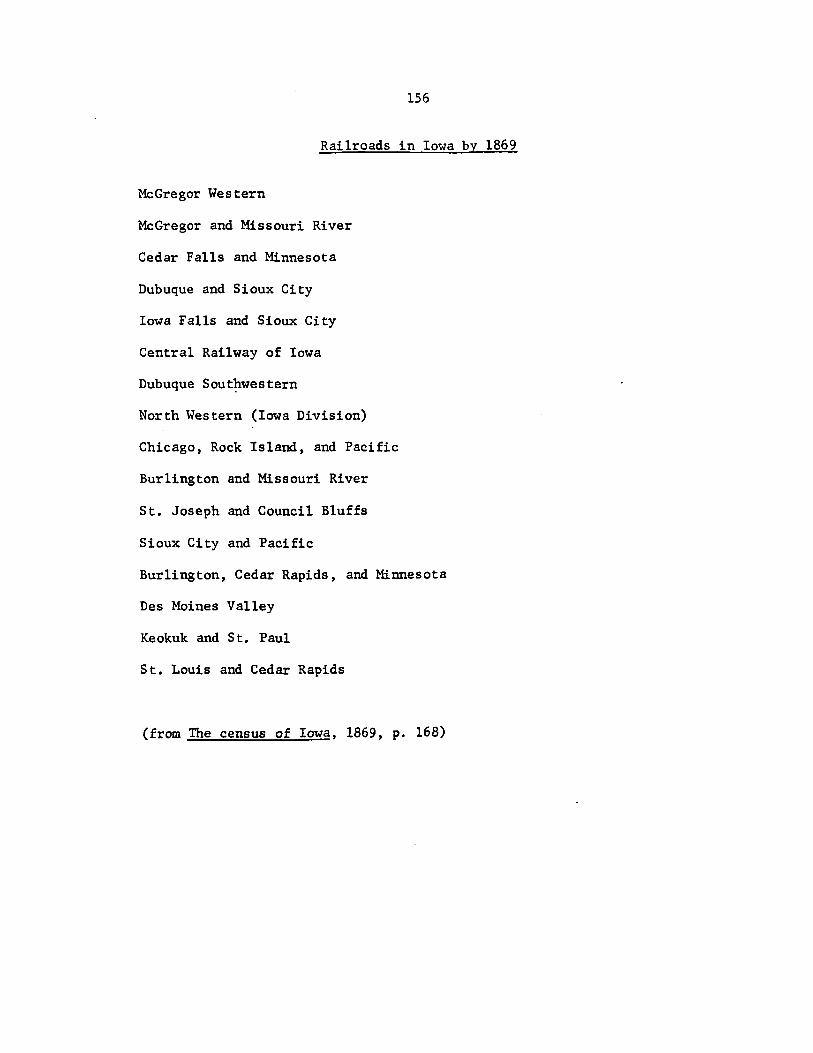
156
Railroads in Iowa by 1869
McGregor Western
McGregor and Missouri River
Cedar Falls and Minnesota
Dubuque and Sioux City
Iowa Falls and Sioux City
Central Railway of Iowa
Dubuque Southwestern
North Western (Iowa Division)
Chicago, Rock Island, and Pacific
Burlington and Missouri River
St. Joseph and Council Bluffs
Sioux City and Pacific
Burlington, Cedar Rapids, and Minnesota
Des Moines Valley
Keokuk and St. Paul
St. Louis and Cedar Rapids
(from The census of Iowa, 1869, p. 168)