Embed Size (px)
Citation preview

Construction Risks Insurance Fund
Instructions for Placing Insurance Through icare
1. Logging in
Login to the Insurance for NSW Portal at https://my.icare.nsw.gov.au/login using your unique credentials. Note: If you haven’t received these credentials, you can request access by going to the portal request access page at https://my.icare.nsw.gov.au/portal-access-request/ . Select the ‘Other’ access level, and scroll down to download the “icare Insurance for NSW Portal access form”. Complete the form (make sure to select the “CRIF access” option and email the completed form to [email protected].
2. Apply for a new policy
After logging in, navigate down to the “CRIF Quote and Policies” tab and click the “Apply for new policy” button.
This will take you to the “Apply for a new construction risk policy” page. Your agency name will be displayed in the “Agency Name” field.
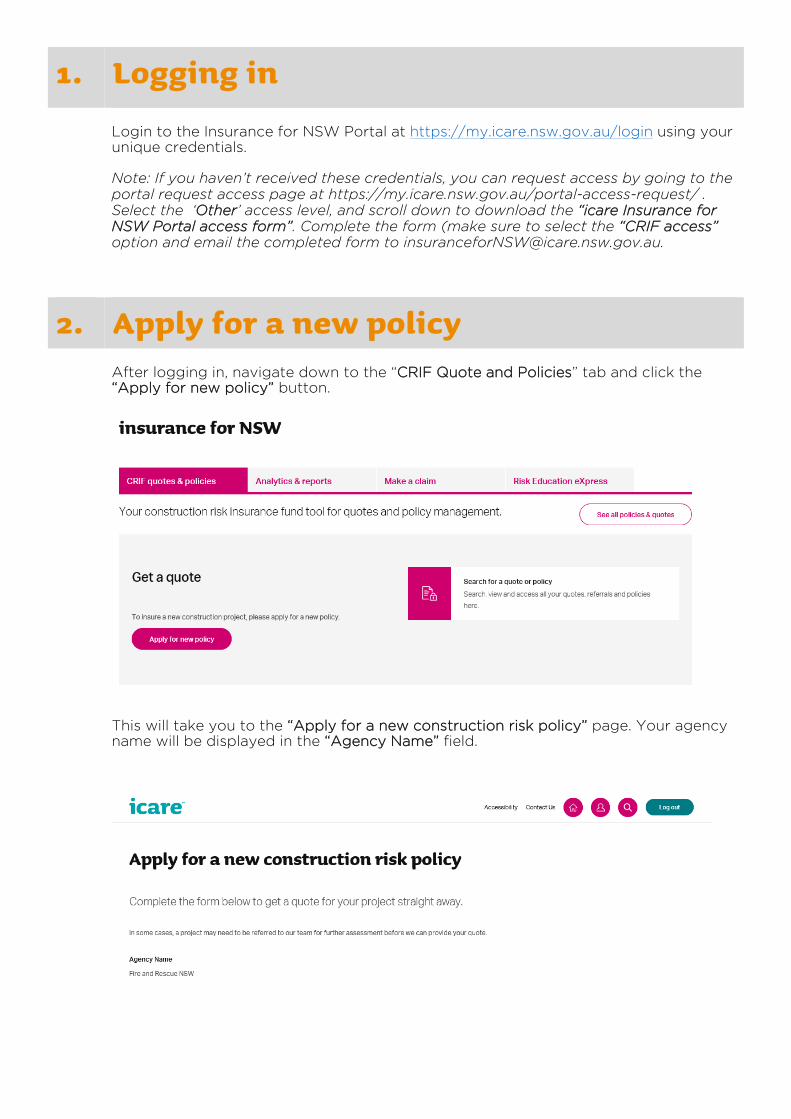
To begin the quote process, complete all mandatory fields. The details you enter will appear on all policy documents. There are three sections you will need to complete.
Section 1: Project Information
Project Information
In the Government contract number field, enter the contract number if known. If not known, enter ‘TBA’. In the Project Name field, enter the full project title. The project title will appear as entered on all policy documents. In the Project Type field, select the description that best suits the contract. In the Contaminated Land Register field select ‘Yes’ or ‘No’.
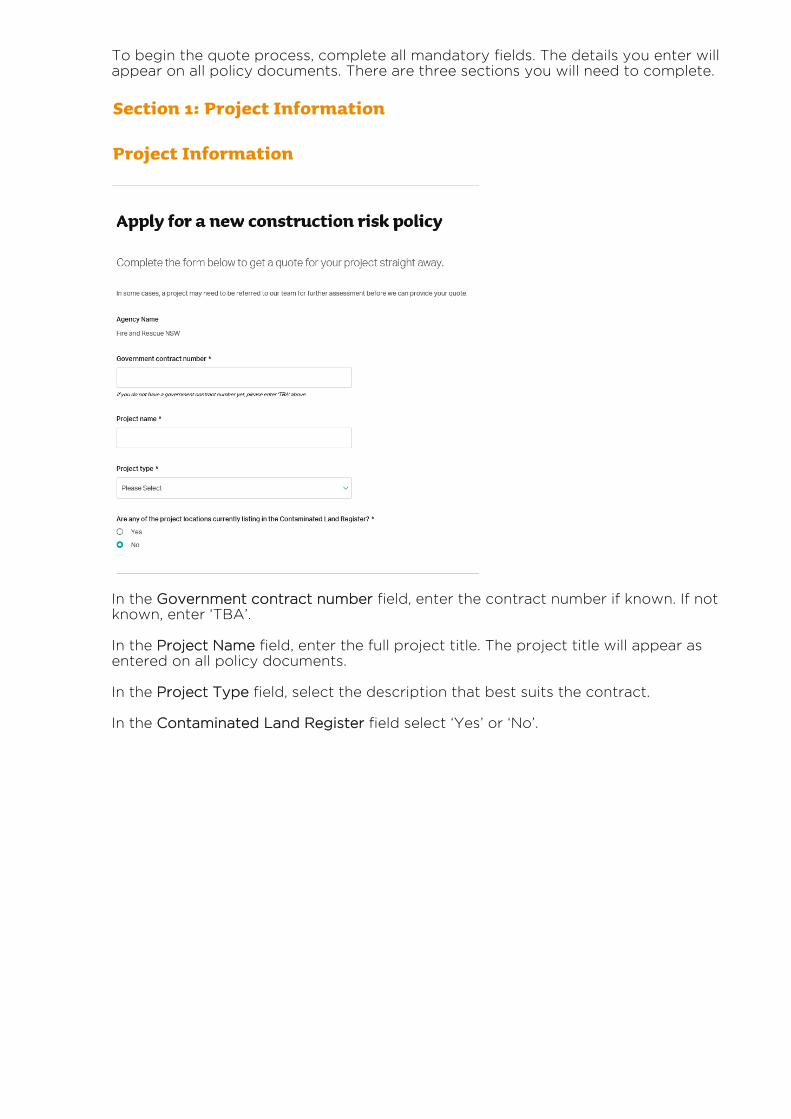
Section 2: Period of Insurance
In the Cover Inception Date field, enter the contract’s date of award. In the Construction Start Date field, enter the day the works are due to begin. In the Construction End Date field, enter the expected date of completion. The Policy Period noted on policy documents will encompass the date of award through to the date of completion. Note: If the Policy period exceeds 36 months, a referral will be generated, and the user will need to contact their local CRIF officer for a policy. In the Testing Period field, enter the period within your construction time frame to test your building asset at capacity. If there is no value selected, the default is 1 month. Note: The Policy Period is inclusive of the Testing Period. The Post Completion Period refers to the Defects and Liability period. This is a period of time following practical completion during which a contractor remains liable under the contract for rectifying any defects which become apparent. Select a time period from the dropdown list. If no selection is entered, the default value is 12 months.
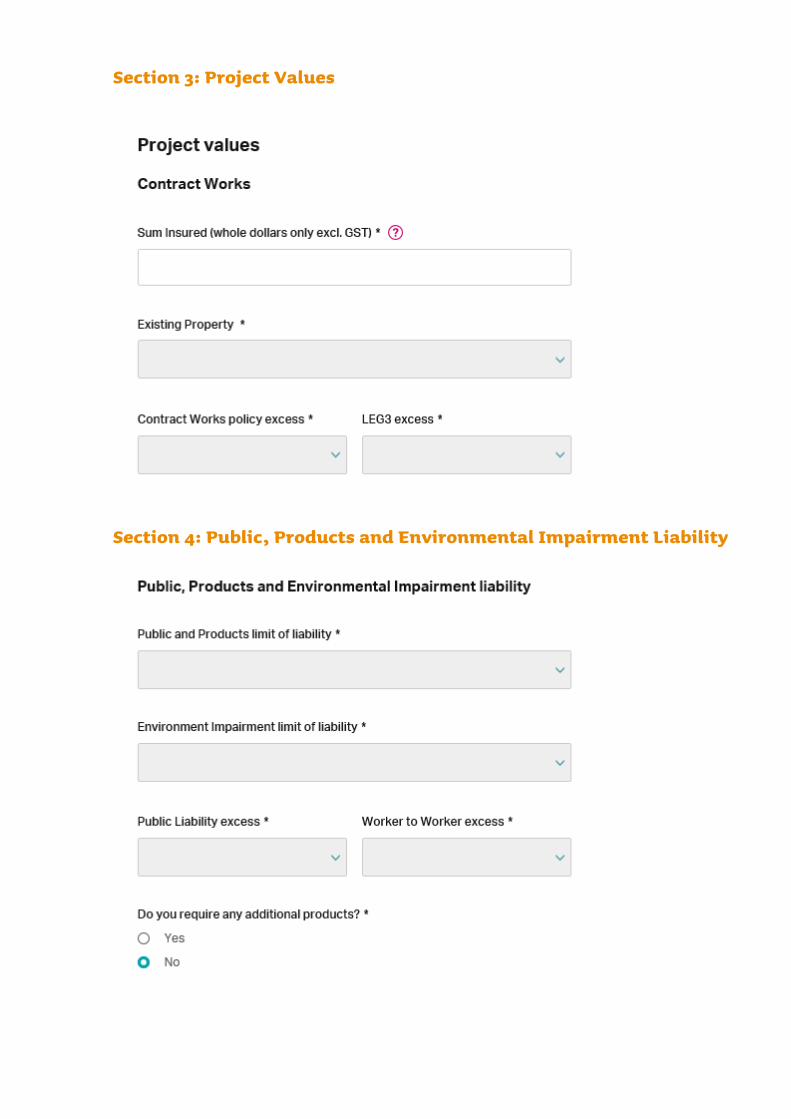
Section 3: Project Values
Section 4: Public, Products and Environmental Impairment Liability
In the Sum Insured field, enter the estimated contract value of the project excluding GST in whole dollars e.g. 10000 for $10,000. In the Existing Property field, select from one of 3 options: ‘Not Insured’ ‘Cover Required’ or ‘Included in above’. icare recommends getting in touch with a CRIF officer before placing cover for any Existing Property to explore the possibility that cover may already be afforded through the Treasury Managed Fund, under the Construction Liability policy or otherwise. In the Contract Works policy excess field, the recommended excess option is automatically shown by the system. If the preferred option is not the automatic section, please pick another via the drop-down box. In the LEG3 excess field, the default value is $250,000. You can select another value from the dropdown if required.
Public, Products and Environmental Impairment Liability
In the Public and Products limit of liability field, the liability limit is determined from the total value of the project. A default is automatically selected based on the total dollar amount of your project. If you would like more cover, you can choose to increase the amount from the dropdown field. In the Environmental impairment limit of liability field, the recommended value is displayed as per your contract value. If your preferred limit is not displayed, you can choose another amount from the dropdown field. In the Public Liability excess field, the recommended excess option is automatically displayed in the dropdown field. If your preferred option is not displayed, you can choose another amount from the dropdown field. In the Worker to Worker excess field, the recommended value is displayed as a function of the total Sum Insured. If your preferred excess is not displayed, you can choose another amount from the dropdown field. Do you require any additional products? The default option is ‘No’. If you need additional products, select ‘Yes’. This option alerts the CRIF team of your request, and a CRIF officer will be in contact with you to discuss your needs. Other insurance product examples can include Marine Liability.
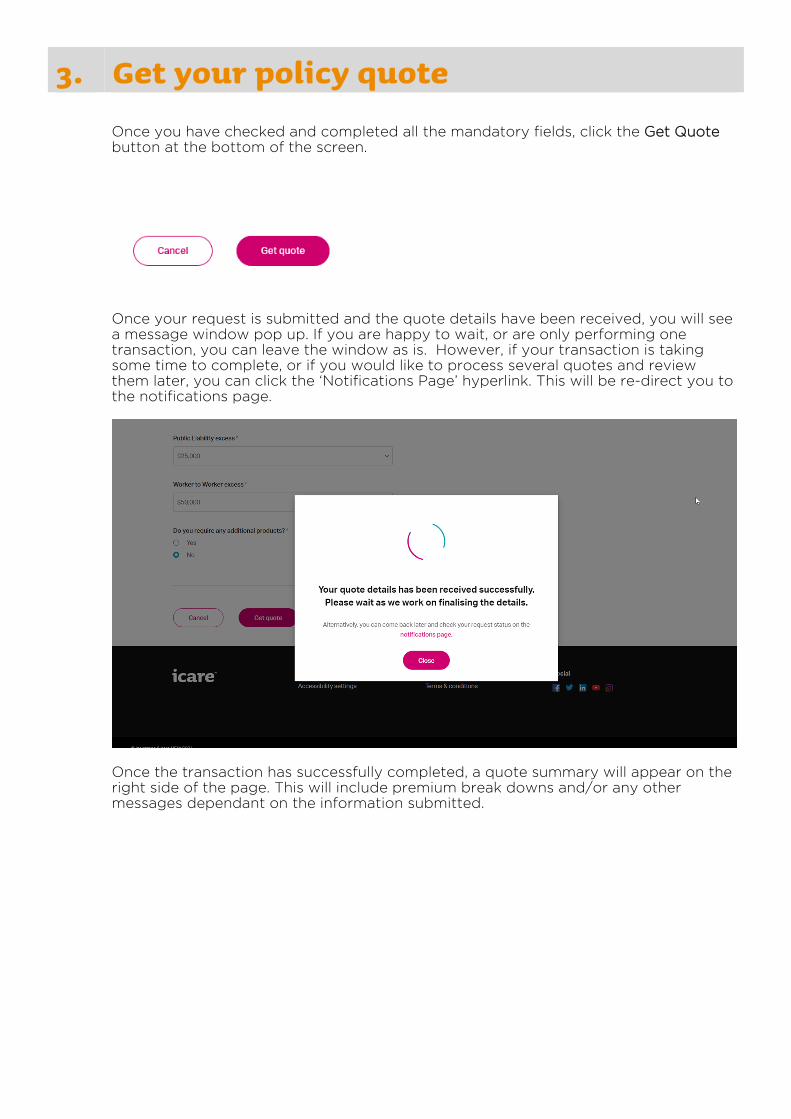
3. Get your policy quote
Once you have checked and completed all the mandatory fields, click the Get Quote button at the bottom of the screen.
Once your request is submitted and the quote details have been received, you will see a message window pop up. If you are happy to wait, or are only performing one transaction, you can leave the window as is. However, if your transaction is taking some time to complete, or if you would like to process several quotes and review them later, you can click the ‘Notifications Page’ hyperlink. This will be re-direct you to the notifications page.
Once the transaction has successfully completed, a quote summary will appear on the right side of the page. This will include premium break downs and/or any other messages dependant on the information submitted.
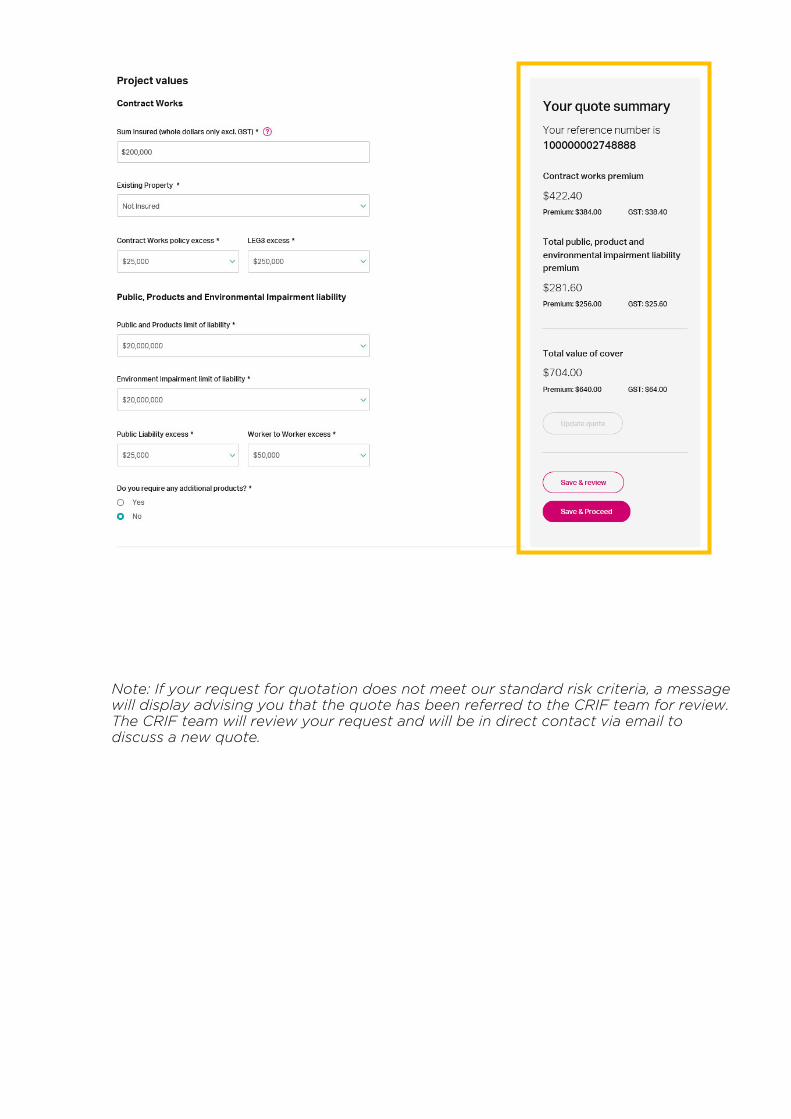
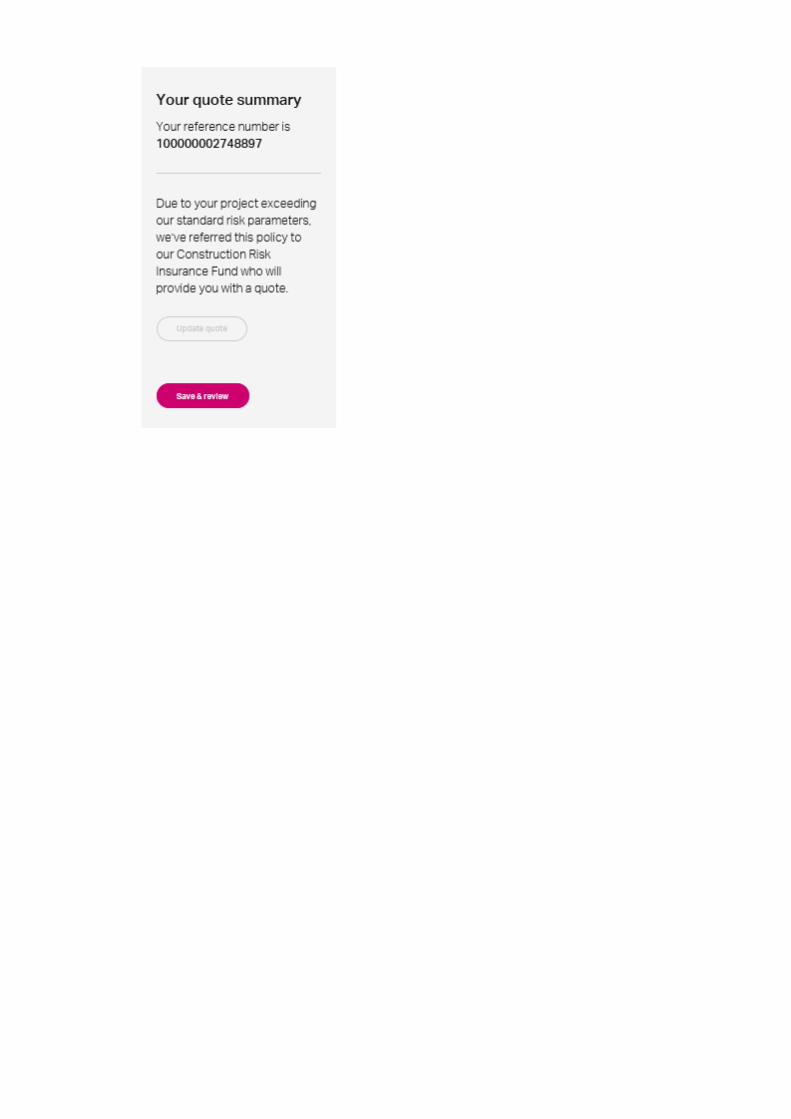
Note: If your request for quotation does not meet our standard risk criteria, a message will display advising you that the quote has been referred to the CRIF team for review. The CRIF team will review your request and will be in direct contact via email to discuss a new quote.
4. Submit and Bind Policy
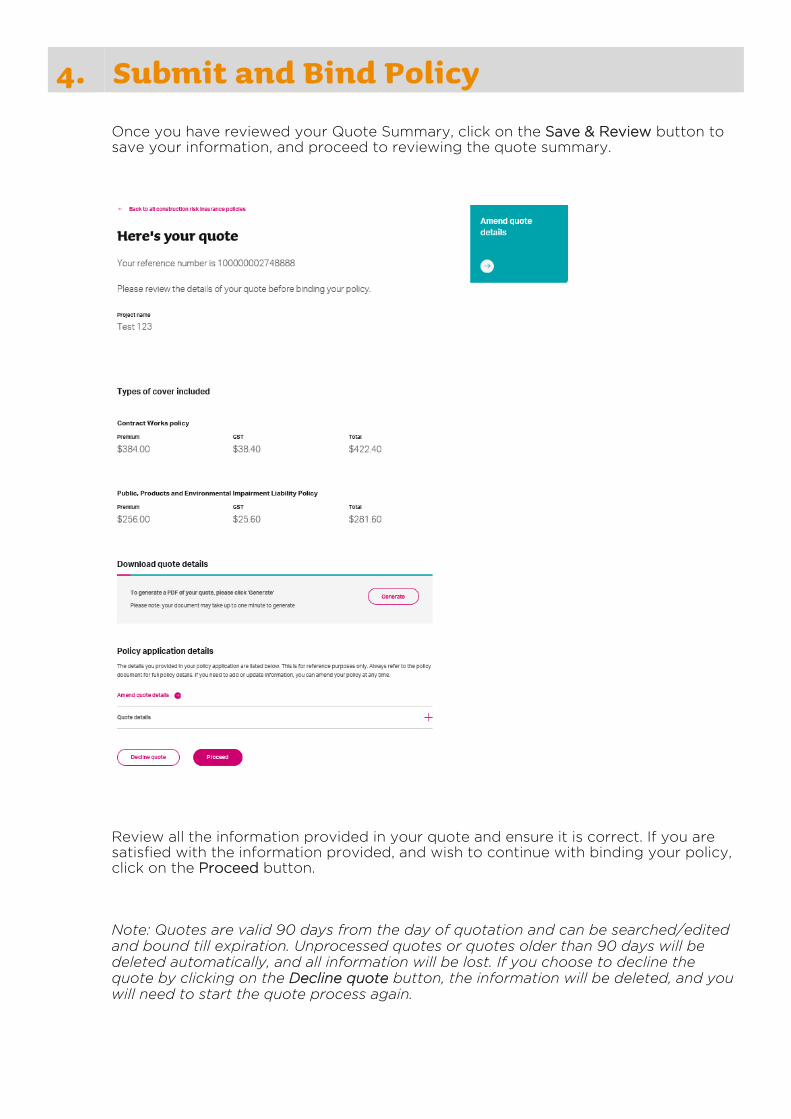
Once you have reviewed your Quote Summary, click on the Save & Review button to save your information, and proceed to reviewing the quote summary.
Review all the information provided in your quote and ensure it is correct. If you are satisfied with the information provided, and wish to continue with binding your policy, click on the Proceed button. Note: Quotes are valid 90 days from the day of quotation and can be searched/edited and bound till expiration. Unprocessed quotes or quotes older than 90 days will be deleted automatically, and all information will be lost. If you choose to decline the quote by clicking on the Decline quote button, the information will be deleted, and you will need to start the quote process again.
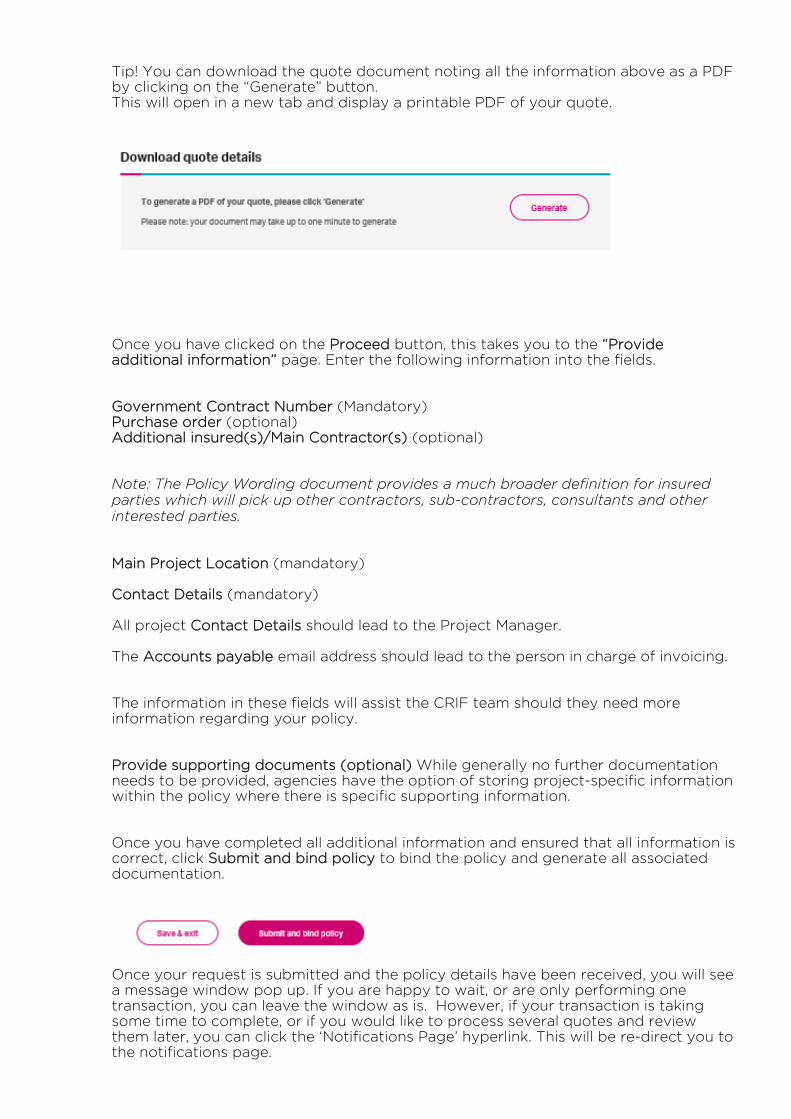
Tip! You can download the quote document noting all the information above as a PDF by clicking on the “Generate” button. This will open in a new tab and display a printable PDF of your quote.
Once you have clicked on the Proceed button, this takes you to the “Provide additional information” page. Enter the following information into the fields. Government Contract Number (Mandatory) Purchase order (optional) Additional insured(s)/Main Contractor(s) (optional) Note: The Policy Wording document provides a much broader definition for insured parties which will pick up other contractors, sub-contractors, consultants and other interested parties. Main Project Location (mandatory) Contact Details (mandatory) All project Contact Details should lead to the Project Manager. The Accounts payable email address should lead to the person in charge of invoicing. The information in these fields will assist the CRIF team should they need more information regarding your policy. Provide supporting documents (optional) While generally no further documentation needs to be provided, agencies have the option of storing project-specific information within the policy where there is specific supporting information.
Once you have completed all additional information and ensured that all information is correct, click Submit and bind policy to bind the policy and generate all associated documentation.
Once your request is submitted and the policy details have been received, you will see
a message window pop up. If you are happy to wait, or are only performing one transaction, you can leave the window as is. However, if your transaction is taking some time to complete, or if you would like to process several quotes and review them later, you can click the ‘Notifications Page’ hyperlink. This will be re-direct you to the notifications page.
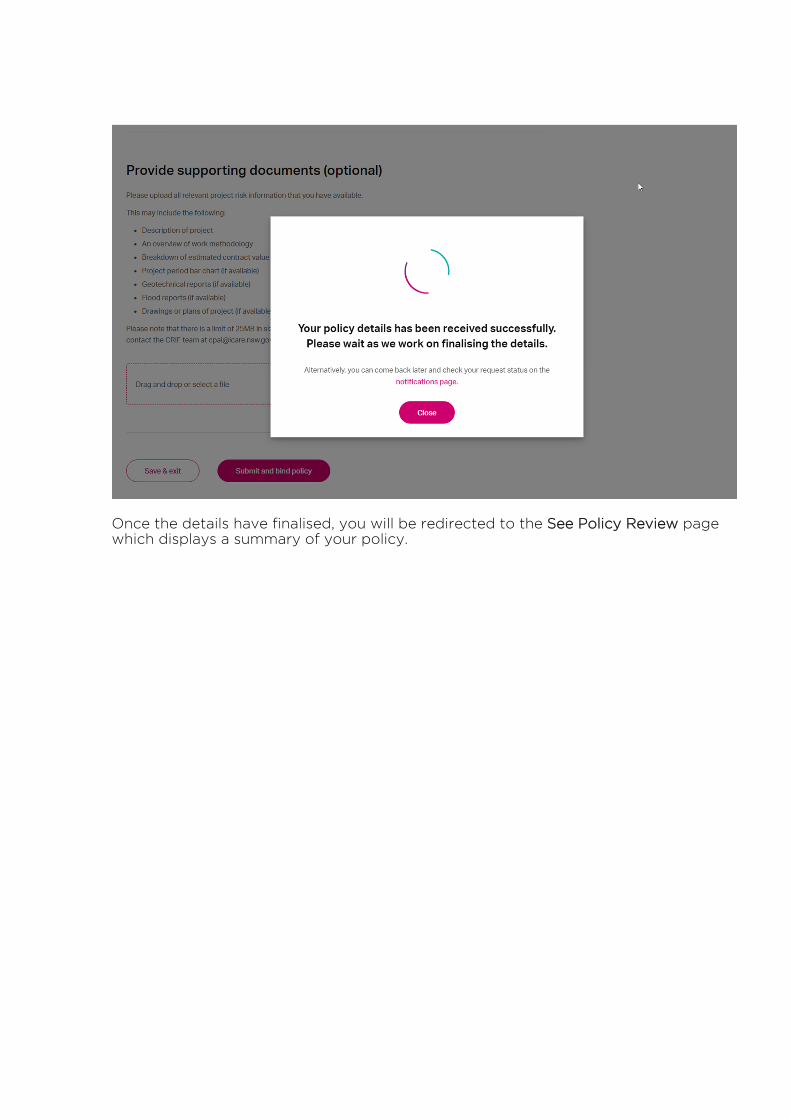
Once the details have finalised, you will be redirected to the See Policy Review page which displays a summary of your policy.
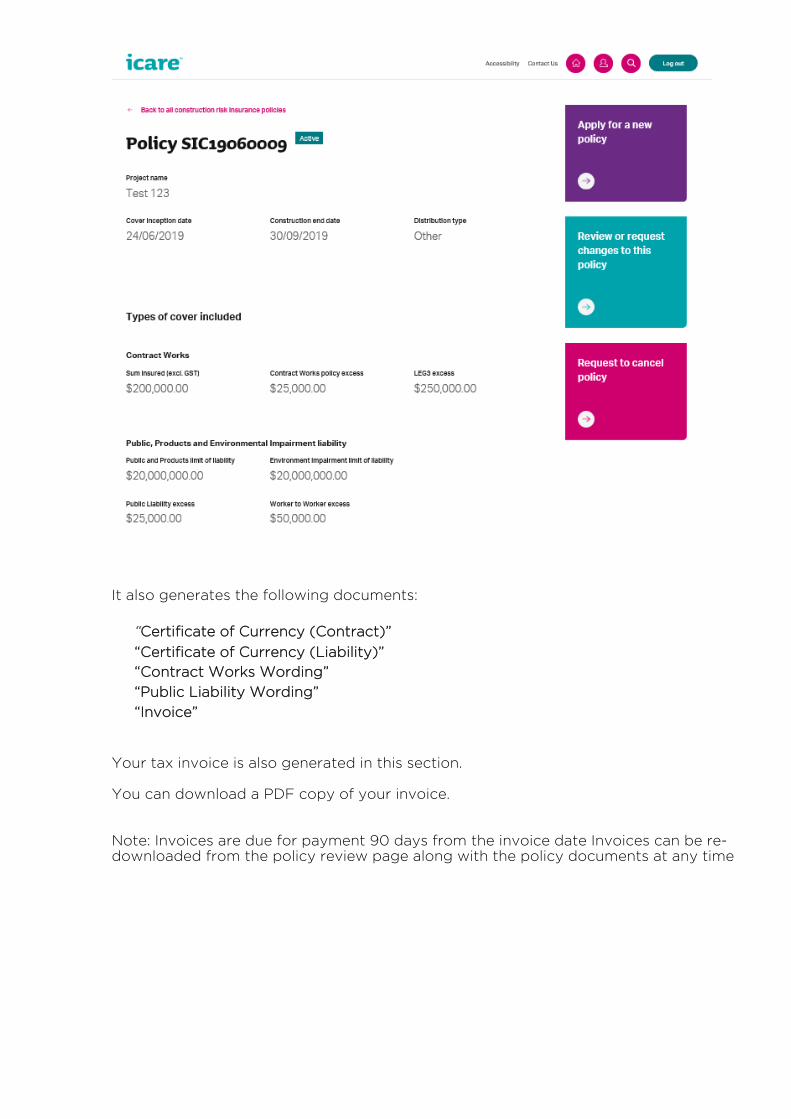
It also generates the following documents:
“Certificate of Currency (Contract)”
“Certificate of Currency (Liability)”
“Contract Works Wording”
“Public Liability Wording”
“Invoice”
Your tax invoice is also generated in this section. You can download a PDF copy of your invoice. Note: Invoices are due for payment 90 days from the invoice date Invoices can be re-downloaded from the policy review page along with the policy documents at any time
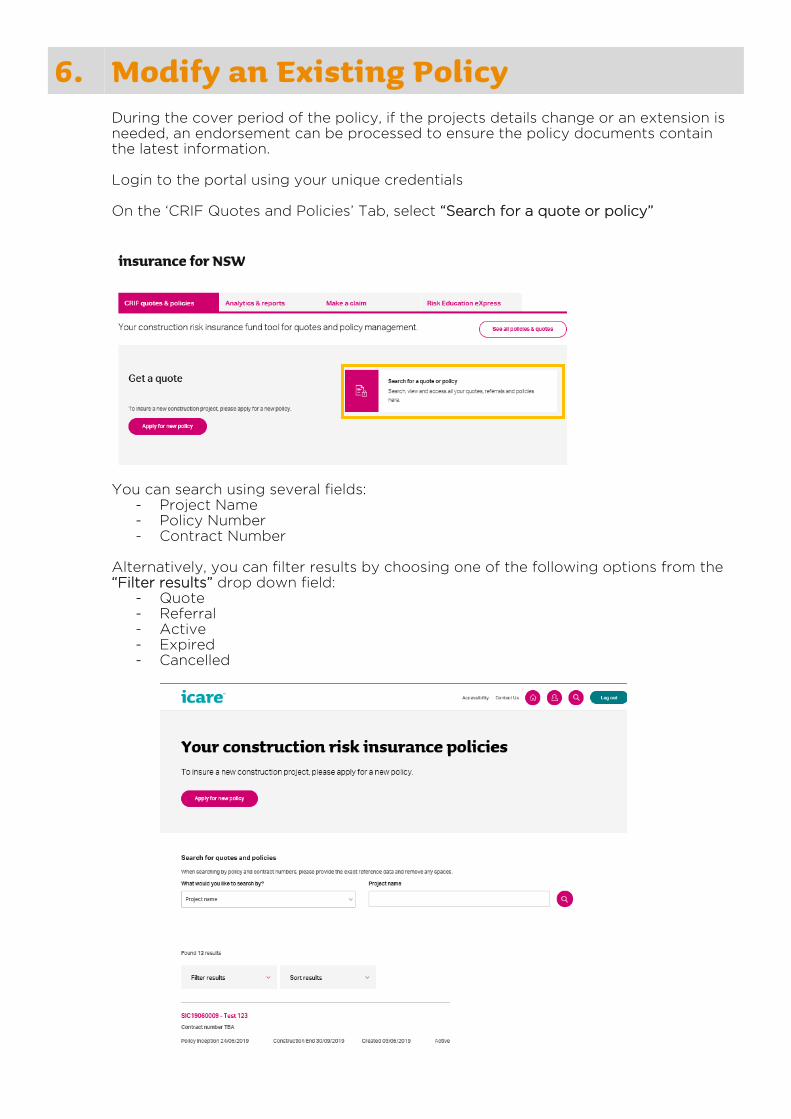
6. Modify an Existing Policy
During the cover period of the policy, if the projects details change or an extension is needed, an endorsement can be processed to ensure the policy documents contain the latest information. Login to the portal using your unique credentials On the ‘CRIF Quotes and Policies’ Tab, select “Search for a quote or policy”
You can search using several fields:
- Project Name - Policy Number - Contract Number
Alternatively, you can filter results by choosing one of the following options from the “Filter results” drop down field:
- Quote - Referral - Active - Expired - Cancelled
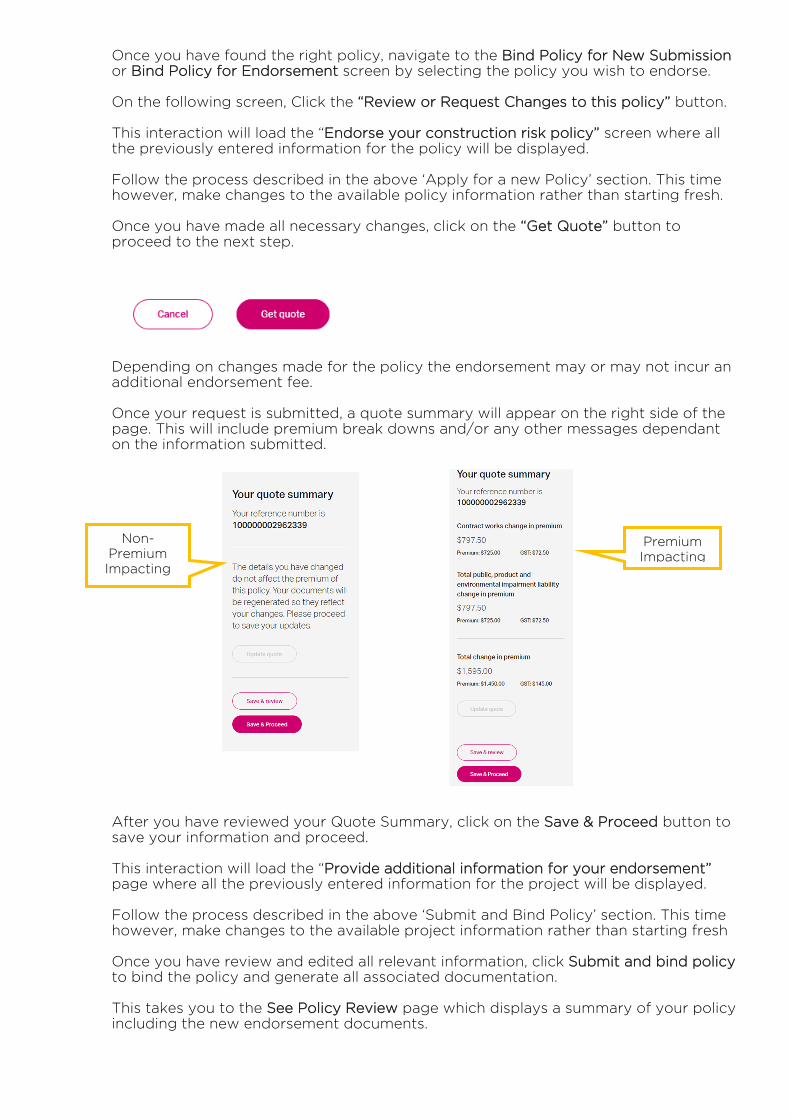
Once you have found the right policy, navigate to the Bind Policy for New Submission or Bind Policy for Endorsement screen by selecting the policy you wish to endorse. On the following screen, Click the “Review or Request Changes to this policy” button. This interaction will load the “Endorse your construction risk policy” screen where all the previously entered information for the policy will be displayed. Follow the process described in the above ‘Apply for a new Policy’ section. This time however, make changes to the available policy information rather than starting fresh. Once you have made all necessary changes, click on the “Get Quote” button to proceed to the next step.
Depending on changes made for the policy the endorsement may or may not incur an additional endorsement fee. Once your request is submitted, a quote summary will appear on the right side of the page. This will include premium break downs and/or any other messages dependant on the information submitted.
After you have reviewed your Quote Summary, click on the Save & Proceed button to save your information and proceed. This interaction will load the “Provide additional information for your endorsement” page where all the previously entered information for the project will be displayed. Follow the process described in the above ‘Submit and Bind Policy’ section. This time however, make changes to the available project information rather than starting fresh Once you have review and edited all relevant information, click Submit and bind policy to bind the policy and generate all associated documentation. This takes you to the See Policy Review page which displays a summary of your policy including the new endorsement documents.
Non-
Premium
Impacting
Premium
Impacting
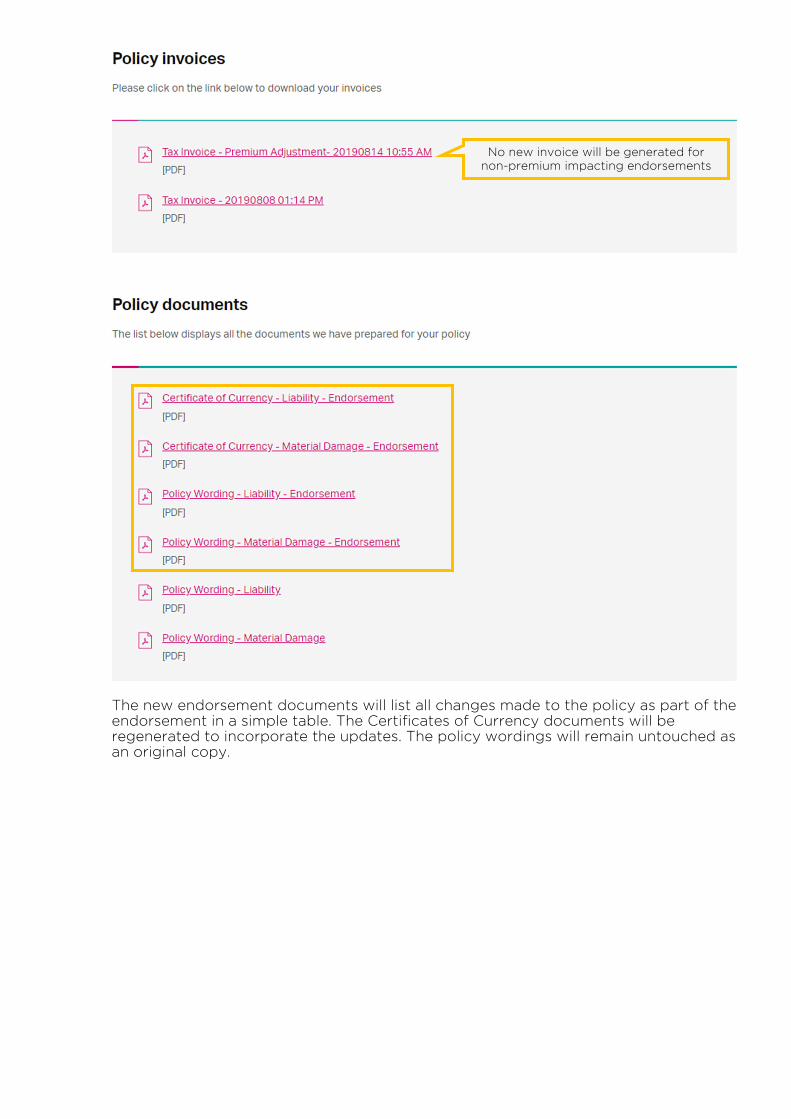
The new endorsement documents will list all changes made to the policy as part of the endorsement in a simple table. The Certificates of Currency documents will be regenerated to incorporate the updates. The policy wordings will remain untouched as an original copy.
No new invoice will be generated for
non-premium impacting endorsements

6. Cancel a Policy
If the project in question has been cancelled due to a number of reasons, the agency can either cancel the policy through the portal or contact CRIF directly to request cancellation of the policy.
Login to the portal using your unique credentials and search for your policy using the process described above. Once you have found the right policy, navigate to the Bind Policy for New Submission or Bind Policy for Endorsement screen by selecting the policy you wish to cancel.
On the following screen, Click the Request Cancellation button. This initiates a notification to the CRIF team to review the policy cancellation. Please allow a minimum of 5 business days for this to be resolved.
You will be requested to reconfirm your cancellation request.
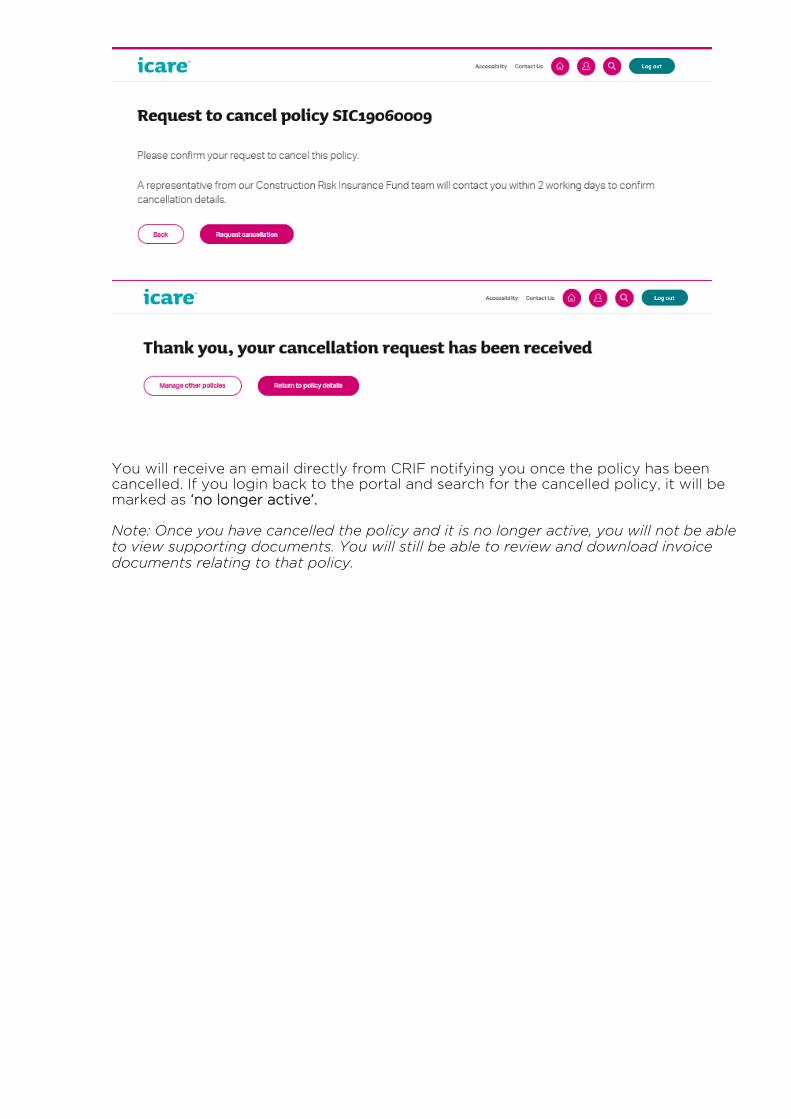
You will receive an email directly from CRIF notifying you once the policy has been cancelled. If you login back to the portal and search for the cancelled policy, it will be marked as ‘no longer active’. Note: Once you have cancelled the policy and it is no longer active, you will not be able to view supporting documents. You will still be able to review and download invoice documents relating to that policy.
7. Paying an invoice
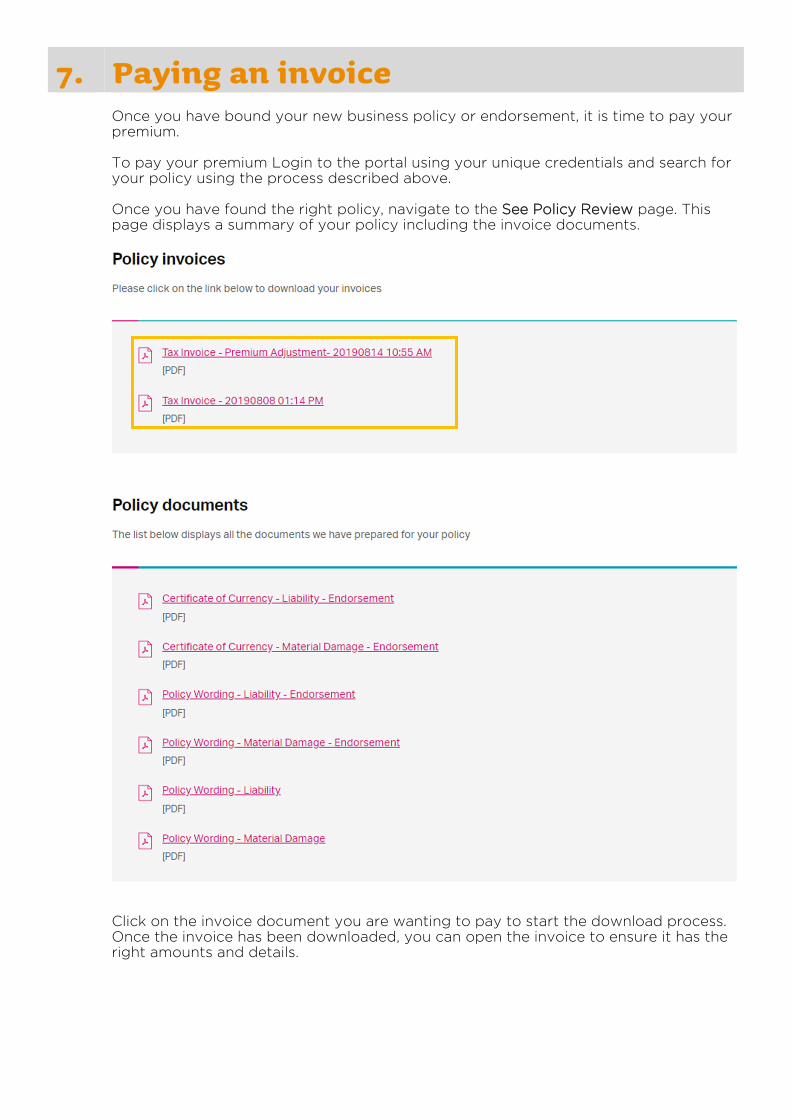
Once you have bound your new business policy or endorsement, it is time to pay your premium.
To pay your premium Login to the portal using your unique credentials and search for your policy using the process described above. Once you have found the right policy, navigate to the See Policy Review page. This page displays a summary of your policy including the invoice documents.
Click on the invoice document you are wanting to pay to start the download process. Once the invoice has been downloaded, you can open the invoice to ensure it has the right amounts and details.
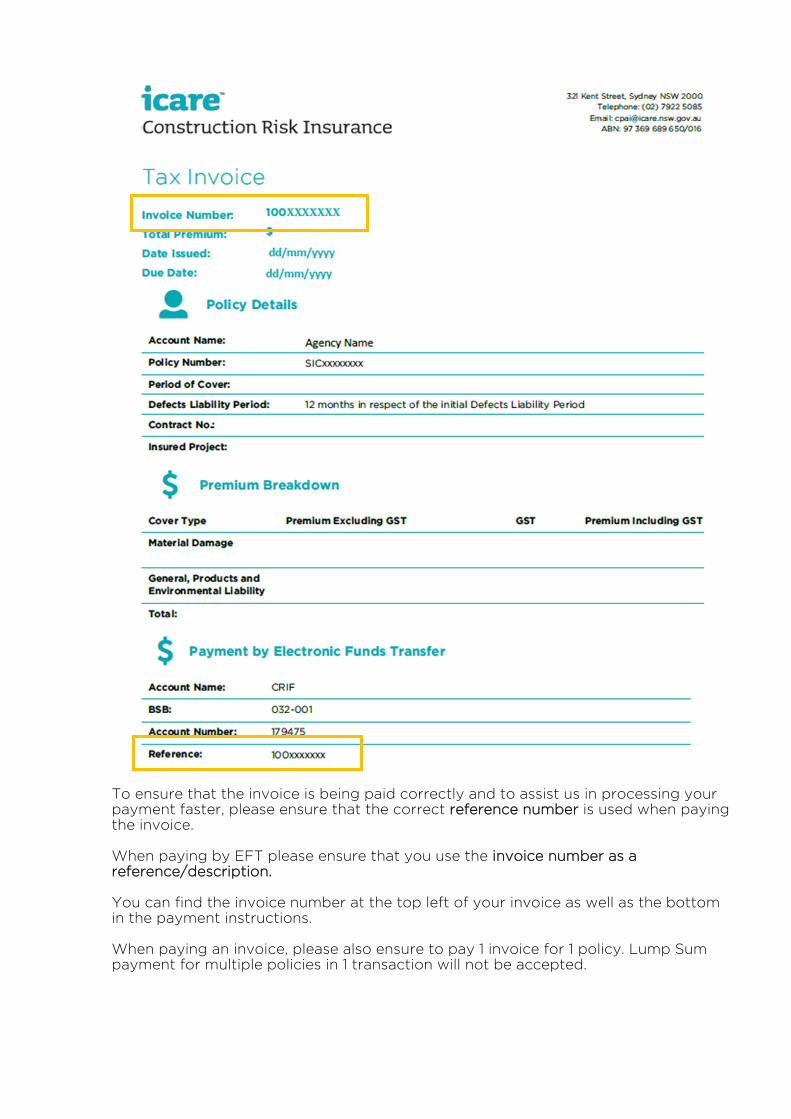
To ensure that the invoice is being paid correctly and to assist us in processing your payment faster, please ensure that the correct reference number is used when paying the invoice.
When paying by EFT please ensure that you use the invoice number as a reference/description. You can find the invoice number at the top left of your invoice as well as the bottom in the payment instructions. When paying an invoice, please also ensure to pay 1 invoice for 1 policy. Lump Sum payment for multiple policies in 1 transaction will not be accepted.
Note: If the incorrect reference number is used when making a payment, we will not be able to receipt your payment in which case, you will be sent automated emails notifying you of either a payment being due or overdue. To ensure that the payment has been processed correctly, it is imperative that the reference number be used as the payment description. Note: If lump sum payments are made (1 transaction that includes payments for multiple policies) we will not be able to receipt against your policies which will result in email notifications being triggered.
8. Notifications
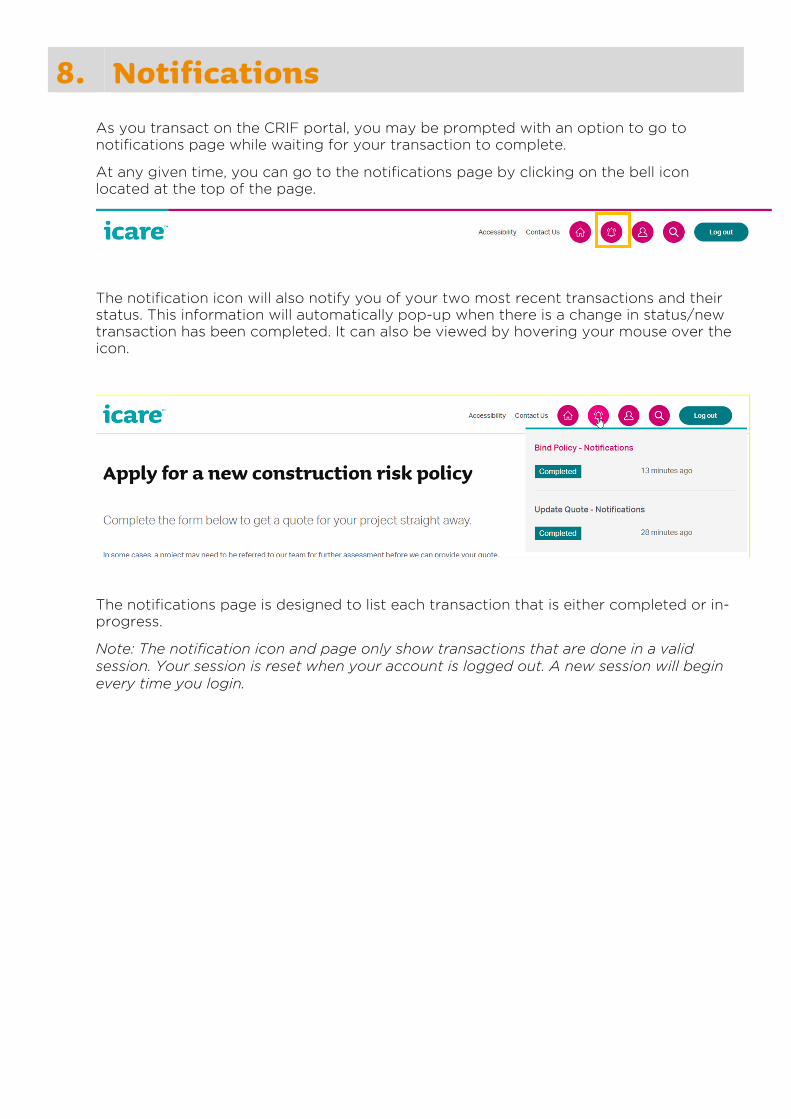
As you transact on the CRIF portal, you may be prompted with an option to go to
notifications page while waiting for your transaction to complete.
At any given time, you can go to the notifications page by clicking on the bell icon
located at the top of the page.
The notification icon will also notify you of your two most recent transactions and their
status. This information will automatically pop-up when there is a change in status/new
transaction has been completed. It can also be viewed by hovering your mouse over the
icon.
The notifications page is designed to list each transaction that is either completed or in-
progress.
Note: The notification icon and page only show transactions that are done in a valid
session. Your session is reset when your account is logged out. A new session will begin
every time you login.
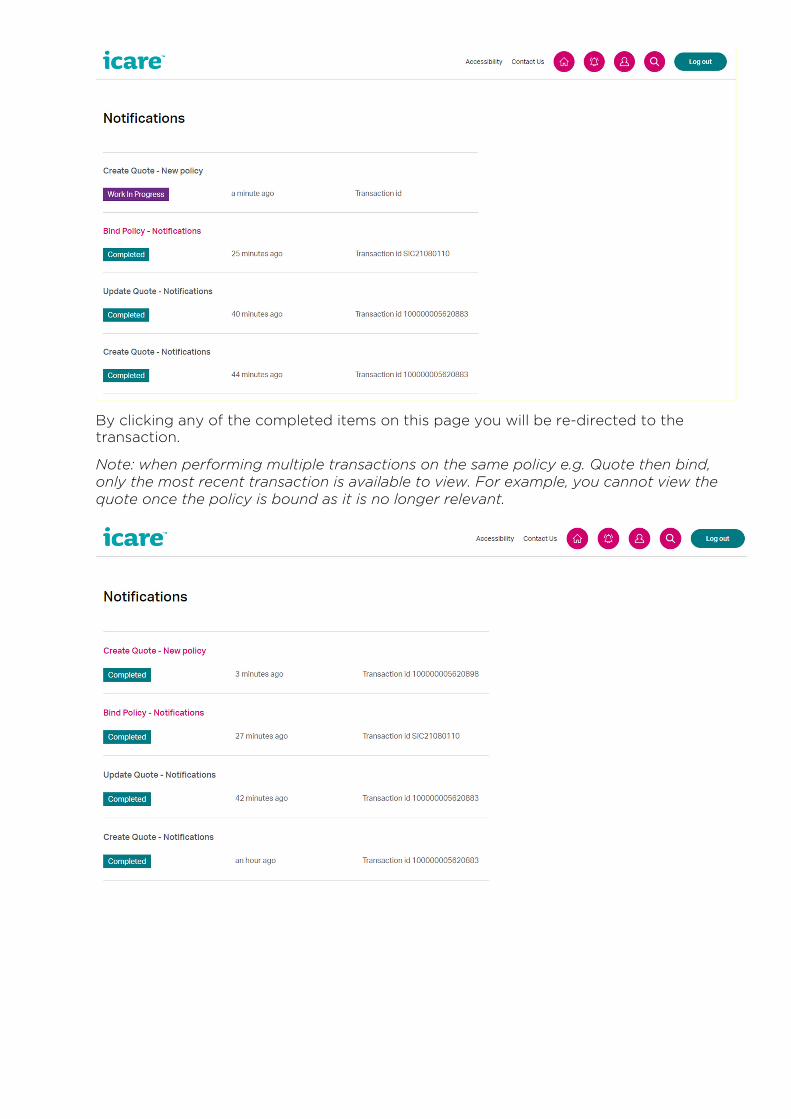
By clicking any of the completed items on this page you will be re-directed to the
transaction.
Note: when performing multiple transactions on the same policy e.g. Quote then bind,
only the most recent transaction is available to view. For example, you cannot view the
quote once the policy is bound as it is no longer relevant.


![BlackRock Advantage Global Fund, Inc. BlackRock FundsSM ......Prospectus(es) entitled “Details About the Fund[s] — Investment Risks — Principal Risks of Investing in the Fund”](https://img.pdfslide.us/doc/110x75/5f0256f37e708231d403c8e0/blackrock-advantage-global-fund-inc-blackrock-fundssm-prospectuses-entitled.jpg)


![Insurance Risks and Industry Trends [Autosaved]](https://img.pdfslide.us/doc/110x75/58ae861d1a28abdf068b47c9/insurance-risks-and-industry-trends-autosaved.jpg)