Embed Size (px)
Citation preview
Installation guide
Conservatory roof

2
Here at Liniar, we love our conservatory roof
We want to ensure that your customers love it too, so we’ve created a detailed installation guide to help you fit our roof system the way it was intended.
In addition, a detailed installation video can be found by visiting www.liniar.co.uk.
Roof - Installation Guide
3
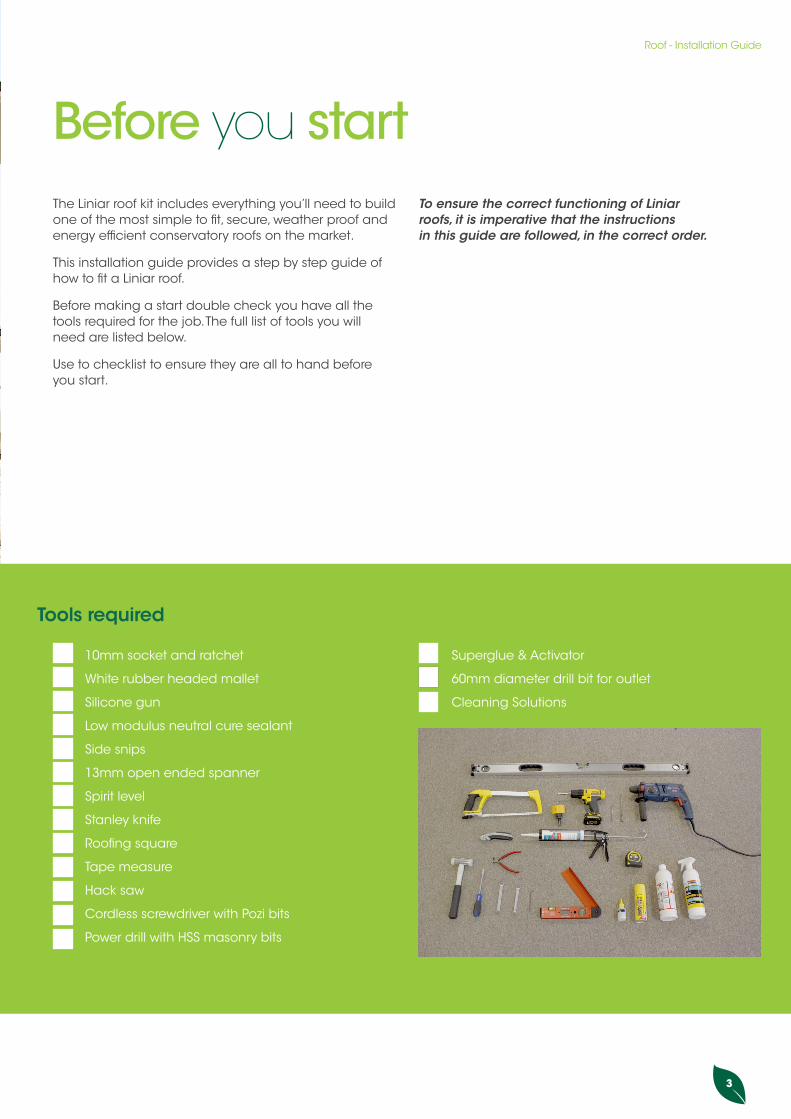
Before you startThe Liniar roof kit includes everything you’ll need to build one of the most simple to fit, secure, weather proof and energy efficient conservatory roofs on the market.
This installation guide provides a step by step guide of how to fit a Liniar roof.
Before making a start double check you have all the tools required for the job. The full list of tools you will need are listed below.
Use to checklist to ensure they are all to hand before you start.
To ensure the correct functioning of Liniar roofs, it is imperative that the instructions in this guide are followed, in the correct order.
Tools required
10mm socket and ratchet
White rubber headed mallet
Silicone gun
Low modulus neutral cure sealant
Side snips
13mm open ended spanner
Spirit level
Stanley knife
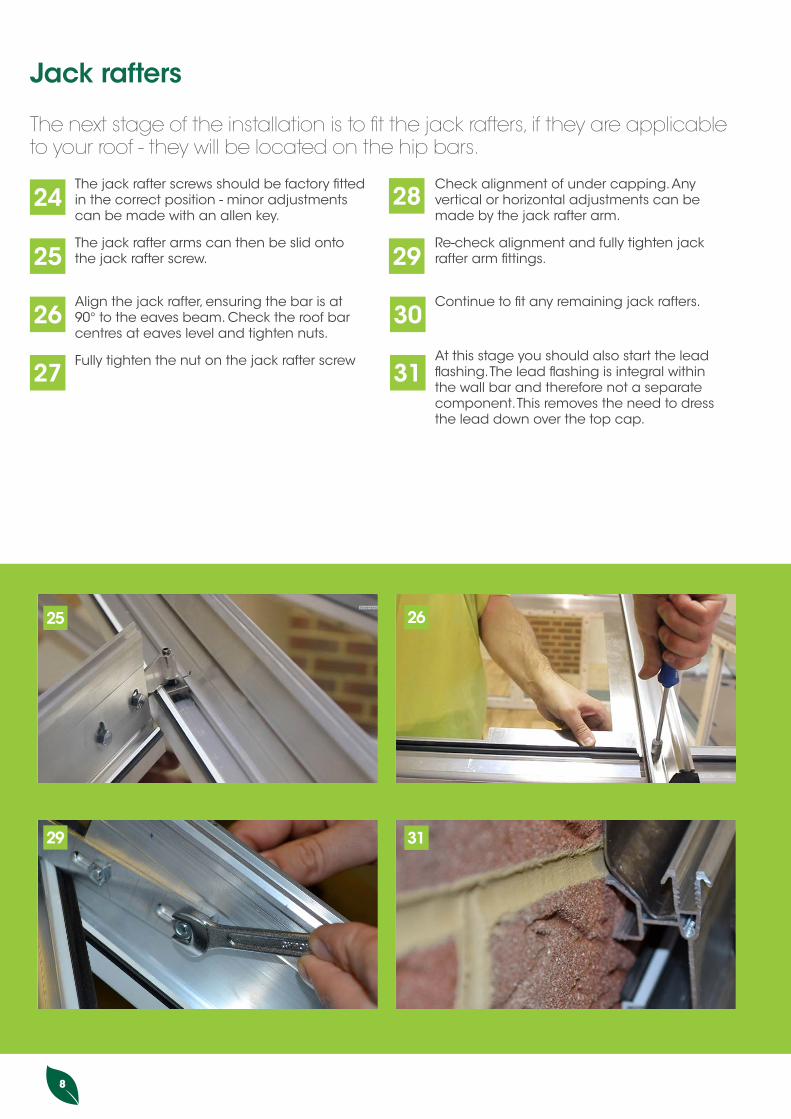
Roofing square
Tape measure
Hack saw
Cordless screwdriver with Pozi bits
Power drill with HSS masonry bits
Superglue & Activator
60mm diameter drill bit for outlet
Cleaning Solutions
4
Step by Step guideTo ensure the correct structure and operation of the Liniar roof it is imperative that the following instructions are followed in the correct order
Preparation
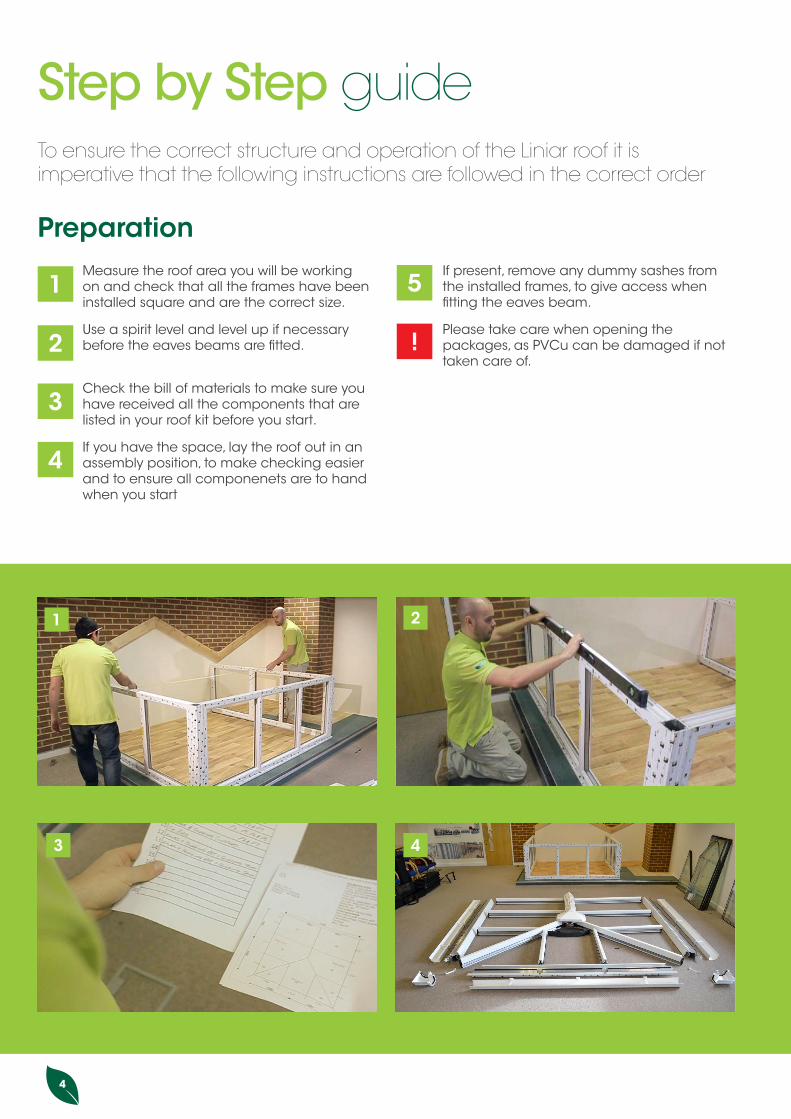
Measure the roof area you will be working on and check that all the frames have been installed square and are the correct size.
Use a spirit level and level up if necessary before the eaves beams are fitted.
Check the bill of materials to make sure you have received all the components that are listed in your roof kit before you start.
If you have the space, lay the roof out in an assembly position, to make checking easier and to ensure all componenets are to hand when you start
If present, remove any dummy sashes from the installed frames, to give access when fitting the eaves beam.
Please take care when opening the packages, as PVCu can be damaged if not taken care of.
21
5
!2
1
3
4
43
Roof - Installation Guide
5
Bi-Fold – Installation Guide
Eaves beam
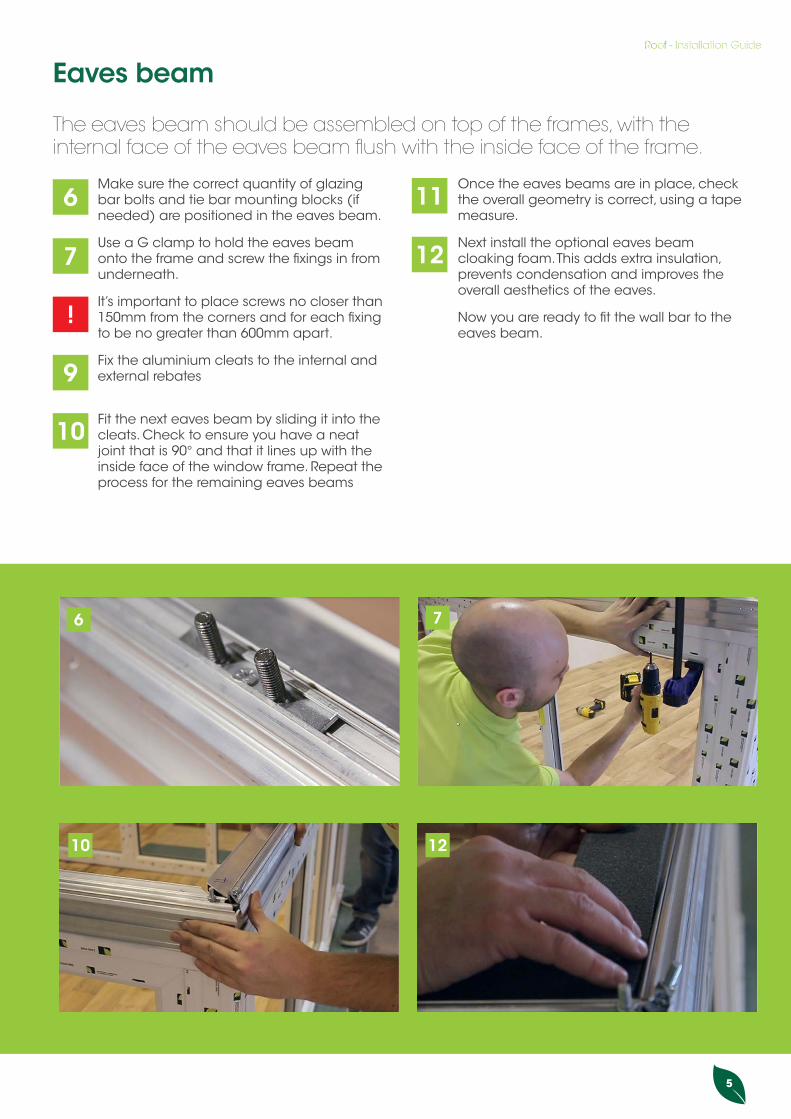
The eaves beam should be assembled on top of the frames, with the internal face of the eaves beam flush with the inside face of the frame.
Make sure the correct quantity of glazing bar bolts and tie bar mounting blocks (if needed) are positioned in the eaves beam.
Use a G clamp to hold the eaves beam onto the frame and screw the fixings in from underneath.
It’s important to place screws no closer than 150mm from the corners and for each fixing to be no greater than 600mm apart.
Fix the aluminium cleats to the internal and external rebates
Fit the next eaves beam by sliding it into the cleats. Check to ensure you have a neat joint that is 90° and that it lines up with the inside face of the window frame. Repeat the process for the remaining eaves beams
Once the eaves beams are in place, check the overall geometry is correct, using a tape measure.
Next install the optional eaves beam cloaking foam. This adds extra insulation, prevents condensation and improves the overall aesthetics of the eaves.
Now you are ready to fit the wall bar to the eaves beam.
11
127
6
!
9
76
1210
10
6
1513
1817
Wall bars/ridge
Preparations should be made at this point for lead flashing if necessary.
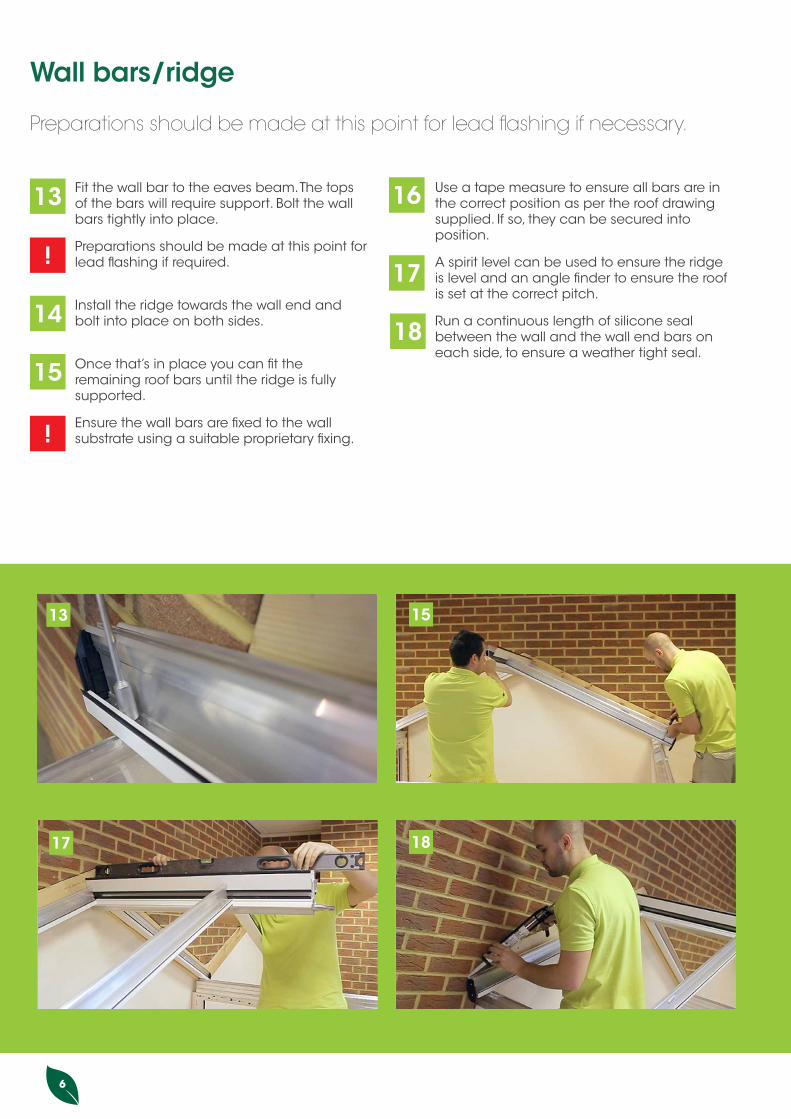
Fit the wall bar to the eaves beam. The tops of the bars will require support. Bolt the wall bars tightly into place.
Preparations should be made at this point for lead flashing if required.
Install the ridge towards the wall end and bolt into place on both sides.
Once that’s in place you can fit the remaining roof bars until the ridge is fully supported.
Ensure the wall bars are fixed to the wall substrate using a suitable proprietary fixing.
Use a tape measure to ensure all bars are in the correct position as per the roof drawing supplied. If so, they can be secured into position.
A spirit level can be used to ensure the ridge is level and an angle finder to ensure the roof is set at the correct pitch.
Run a continuous length of silicone seal between the wall and the wall end bars on each side, to ensure a weather tight seal.
16
17!
13
14
15
18
!
Roof - Installation Guide
7
2019
2322
Glazing support
Liniar’s patented ‘glazing stop’ retainers prevent the glass from slipping while it is being installed, and simply click into place.
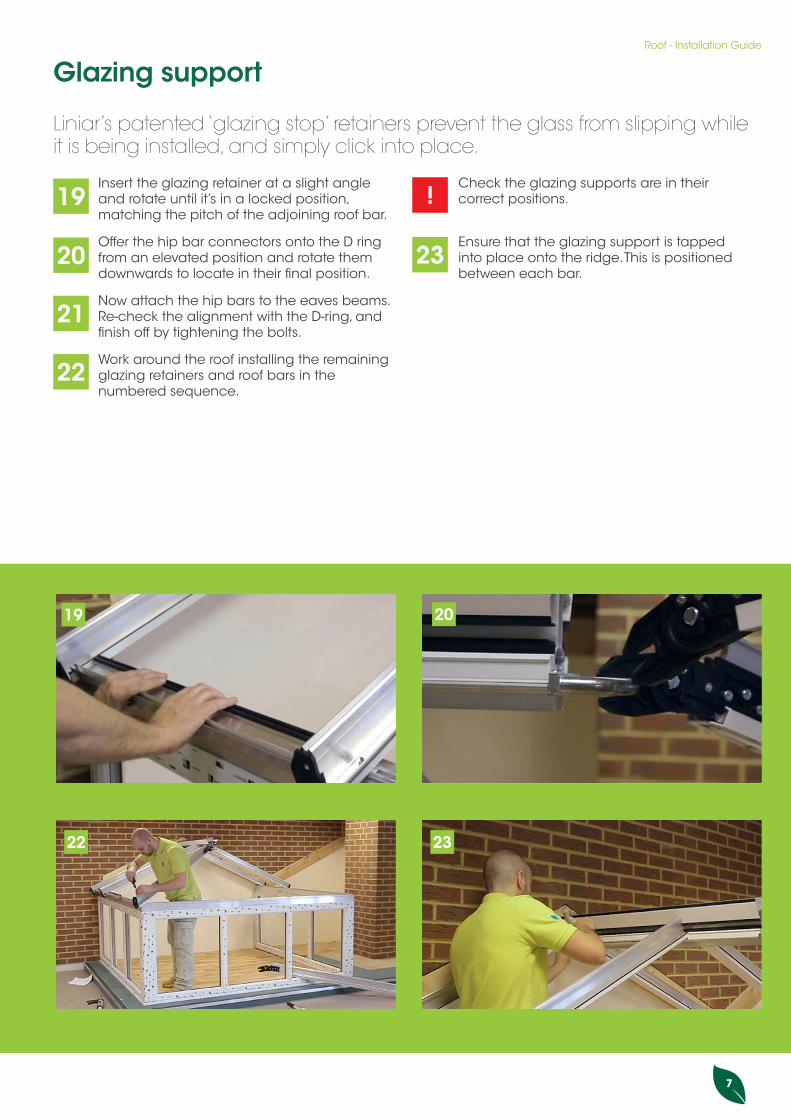
Insert the glazing retainer at a slight angle and rotate until it’s in a locked position, matching the pitch of the adjoining roof bar.
Offer the hip bar connectors onto the D ring from an elevated position and rotate them downwards to locate in their final position.
Now attach the hip bars to the eaves beams. Re-check the alignment with the D-ring, and finish off by tightening the bolts.
Work around the roof installing the remaining glazing retainers and roof bars in the numbered sequence.
Check the glazing supports are in their correct positions.
Ensure that the glazing support is tapped into place onto the ridge. This is positioned between each bar.
!
2320
19
21
22
8
25
29
26
31
Jack rafters
The next stage of the installation is to fit the jack rafters, if they are applicable to your roof - they will be located on the hip bars.
The jack rafter screws should be factory fitted in the correct position - minor adjustments can be made with an allen key.
The jack rafter arms can then be slid onto the jack rafter screw.
Align the jack rafter, ensuring the bar is at 90° to the eaves beam. Check the roof bar centres at eaves level and tighten nuts.
Fully tighten the nut on the jack rafter screw
Check alignment of under capping. Any vertical or horizontal adjustments can be made by the jack rafter arm.
Re-check alignment and fully tighten jack rafter arm fittings.
Continue to fit any remaining jack rafters.
At this stage you should also start the lead flashing. The lead flashing is integral within the wall bar and therefore not a separate component. This removes the need to dress the lead down over the top cap.
28
2925
24
26
27
30
31
Roof - Installation Guide
9
36
39
37
38
Tie bars
Please note: if a tie bar is supplied, it has been deemed necessary to maintain the structural integrity of the roof due to the design or size.
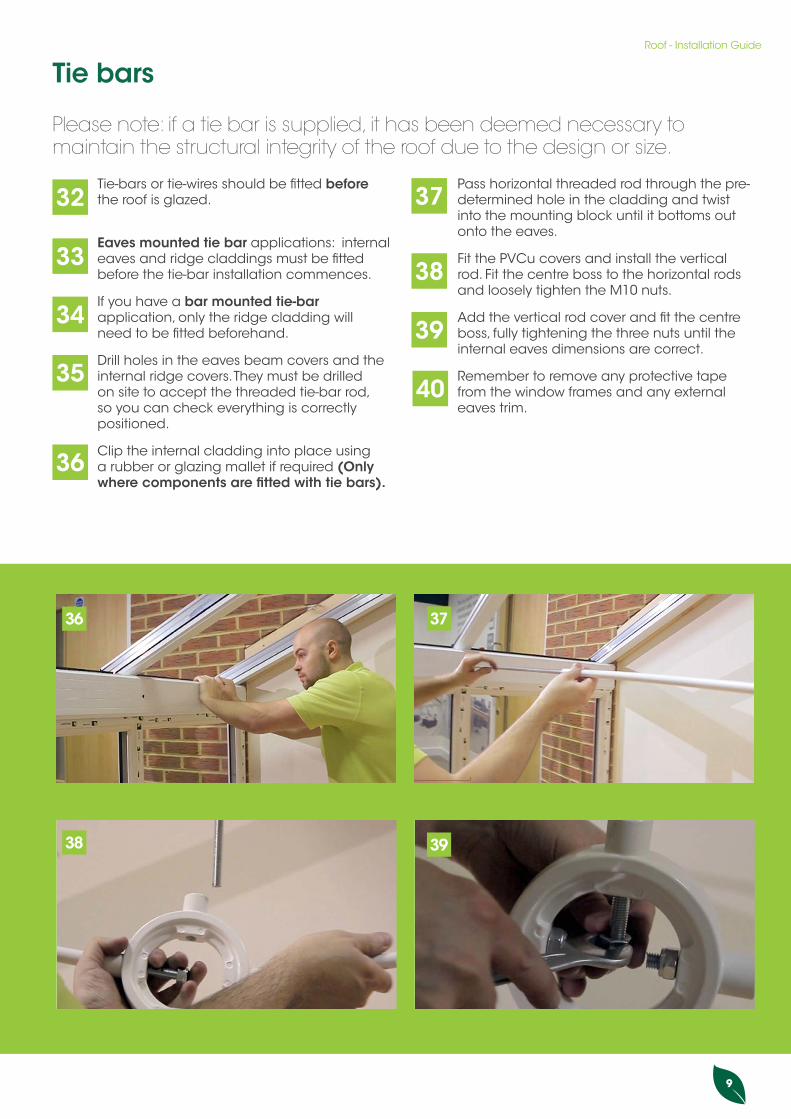
Tie-bars or tie-wires should be fitted before the roof is glazed.
Eaves mounted tie bar applications: internal eaves and ridge claddings must be fitted before the tie-bar installation commences.
If you have a bar mounted tie-bar application, only the ridge cladding will need to be fitted beforehand.
Drill holes in the eaves beam covers and the internal ridge covers. They must be drilled on site to accept the threaded tie-bar rod, so you can check everything is correctly positioned.
Clip the internal cladding into place using a rubber or glazing mallet if required (Only where components are fitted with tie bars).
Pass horizontal threaded rod through the pre-determined hole in the cladding and twist into the mounting block until it bottoms out onto the eaves.
Fit the PVCu covers and install the vertical rod. Fit the centre boss to the horizontal rods and loosely tighten the M10 nuts.
Add the vertical rod cover and fit the centre boss, fully tightening the three nuts until the internal eaves dimensions are correct.
Remember to remove any protective tape from the window frames and any external eaves trim.
37
3833
32
34
35
39
40
36
10
41
45
43
47
Glazing
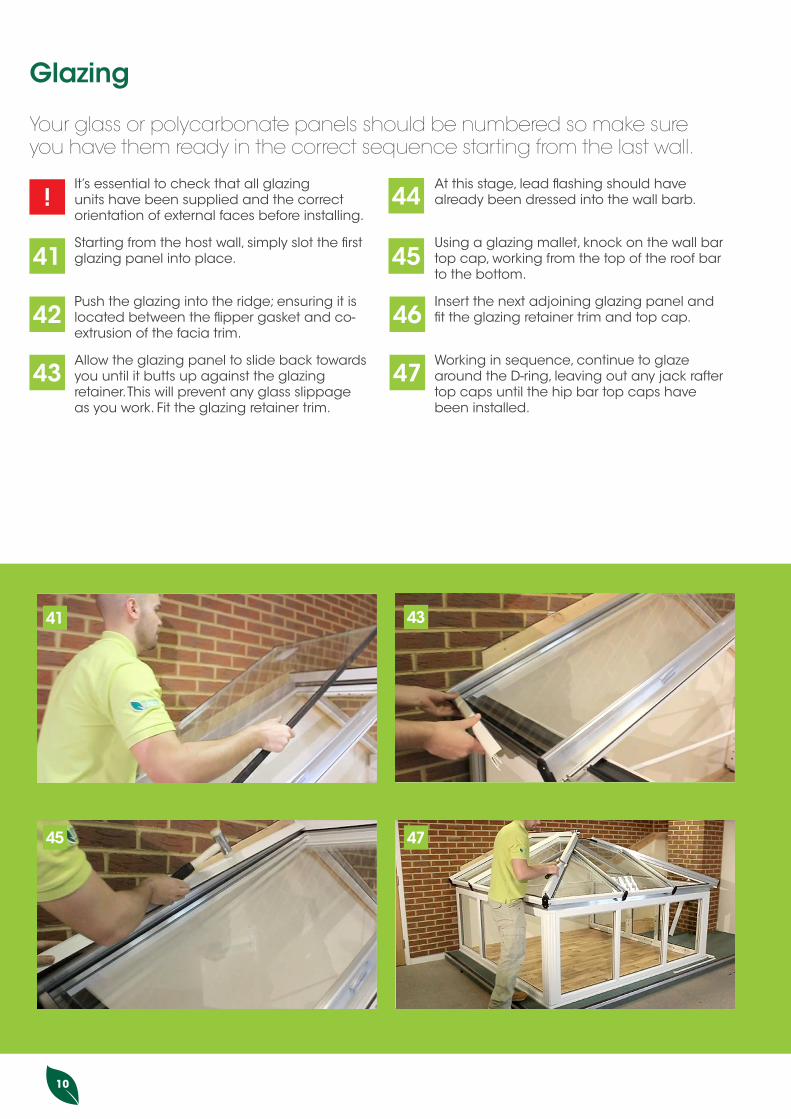
Your glass or polycarbonate panels should be numbered so make sure you have them ready in the correct sequence starting from the last wall.
It’s essential to check that all glazing units have been supplied and the correct orientation of external faces before installing.
Starting from the host wall, simply slot the first glazing panel into place.
Push the glazing into the ridge; ensuring it is located between the flipper gasket and co-extrusion of the facia trim.
Allow the glazing panel to slide back towards you until it butts up against the glazing retainer. This will prevent any glass slippage as you work. Fit the glazing retainer trim.
At this stage, lead flashing should have already been dressed into the wall barb.
Using a glazing mallet, knock on the wall bar top cap, working from the top of the roof bar to the bottom.
Insert the next adjoining glazing panel and fit the glazing retainer trim and top cap.
Working in sequence, continue to glaze around the D-ring, leaving out any jack rafter top caps until the hip bar top caps have been installed.
44
4541
!
42
43
46
47
Roof - Installation Guide
11
50
55
52
53
Tie bars
Please note: if a tie bar is supplied, it has been deemed necessary to maintain the structural integrity of the roof due to the design or size.
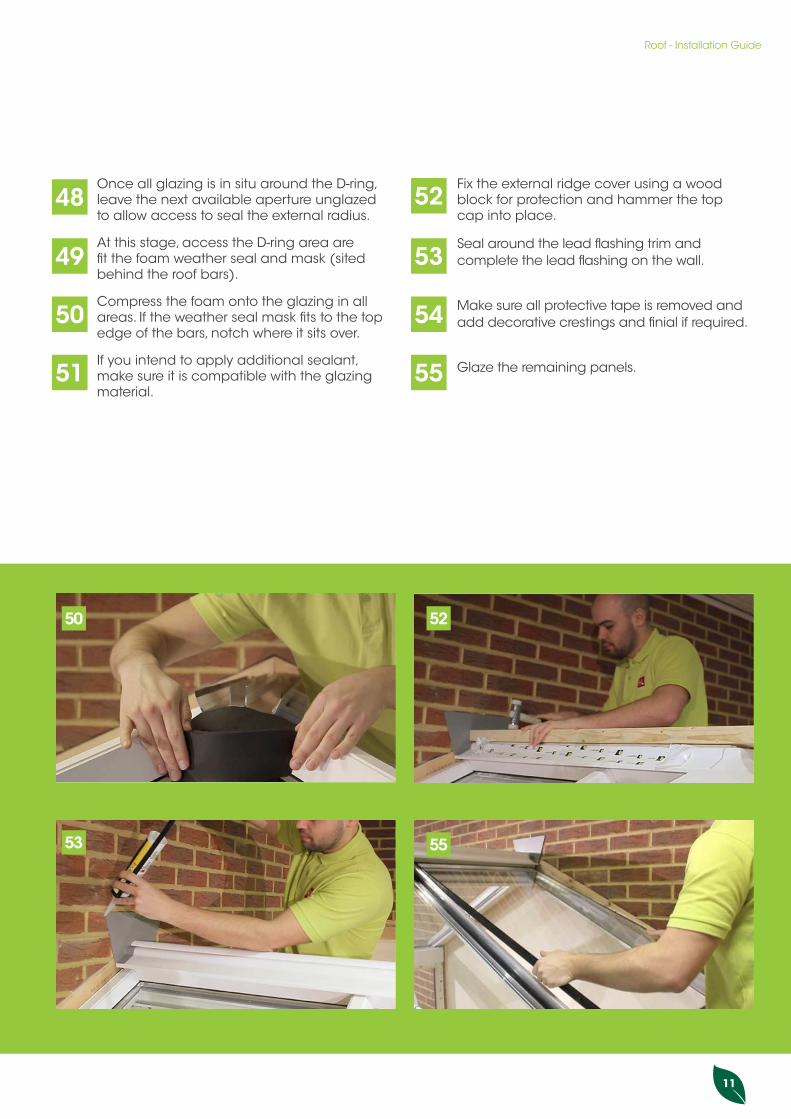
Once all glazing is in situ around the D-ring, leave the next available aperture unglazed to allow access to seal the external radius.
At this stage, access the D-ring area are fit the foam weather seal and mask (sited behind the roof bars).
Compress the foam onto the glazing in all areas. If the weather seal mask fits to the top edge of the bars, notch where it sits over.
If you intend to apply additional sealant, make sure it is compatible with the glazing material.
Fix the external ridge cover using a wood block for protection and hammer the top cap into place.
Seal around the lead flashing trim and complete the lead flashing on the wall.
Make sure all protective tape is removed and add decorative crestings and finial if required.
Glaze the remaining panels.
52
5349
48
50
51
54
55
12
55
57
56
58
Finishing the roof
Now the outside of the roof is almost complete, you can finish off the inside. c
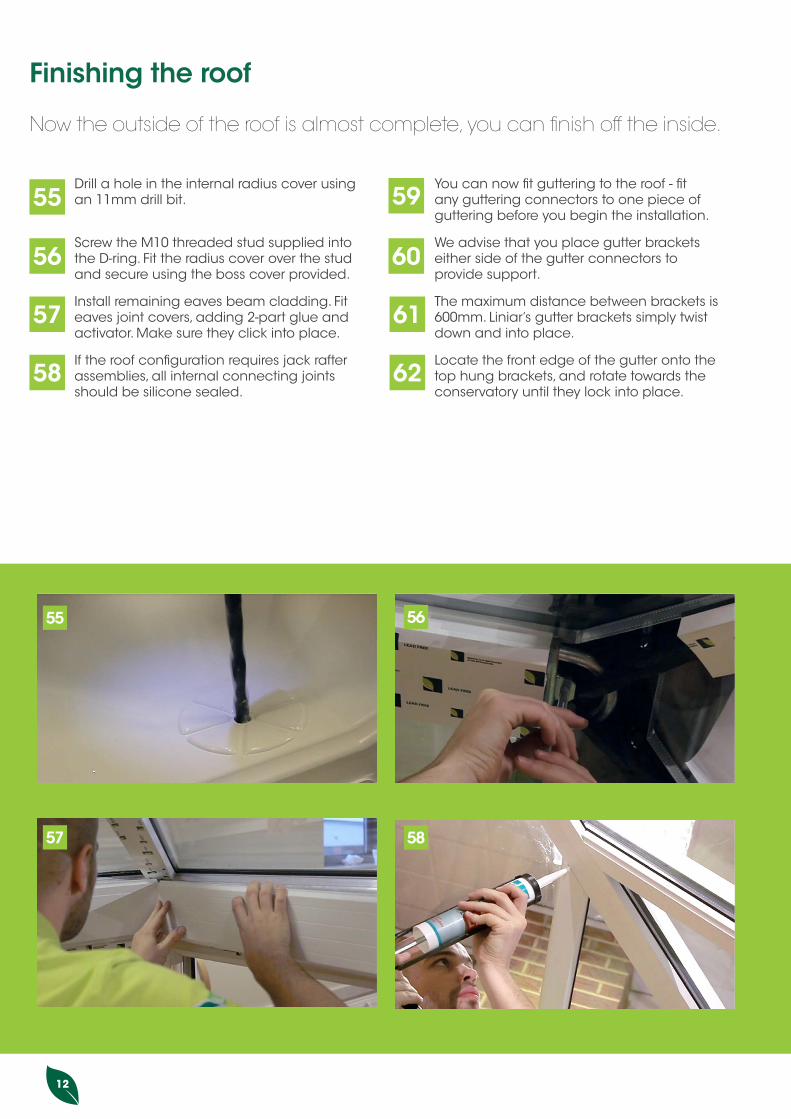
Drill a hole in the internal radius cover using an 11mm drill bit.
Screw the M10 threaded stud supplied into the D-ring. Fit the radius cover over the stud and secure using the boss cover provided.
Install remaining eaves beam cladding. Fit eaves joint covers, adding 2-part glue and activator. Make sure they click into place.
If the roof configuration requires jack rafter assemblies, all internal connecting joints should be silicone sealed.
You can now fit guttering to the roof - fit any guttering connectors to one piece of guttering before you begin the installation.
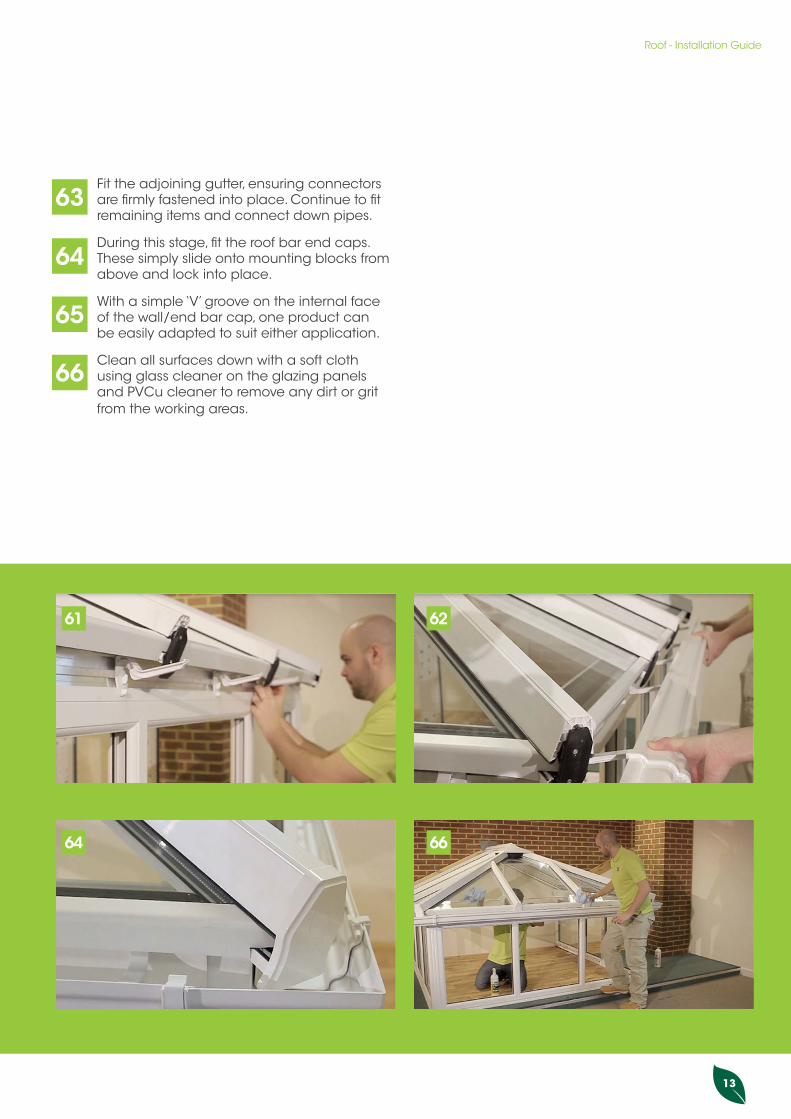
We advise that you place gutter brackets either side of the gutter connectors to provide support.
The maximum distance between brackets is 600mm. Liniar’s gutter brackets simply twist down and into place.
Locate the front edge of the gutter onto the top hung brackets, and rotate towards the conservatory until they lock into place.
59
6056
55
57
58
61
62
Roof - Installation Guide
13
61 62
64
Tie bars
Please note: if a tie bar is supplied, it has been deemed necessary to maintain the structural integrity of the roof due to the design or size.
Fit the adjoining gutter, ensuring connectors are firmly fastened into place. Continue to fit remaining items and connect down pipes.
During this stage, fit the roof bar end caps. These simply slide onto mounting blocks from above and lock into place.
With a simple ‘V’ groove on the internal face of the wall/end bar cap, one product can be easily adapted to suit either application.
Clean all surfaces down with a soft cloth using glass cleaner on the glazing panels and PVCu cleaner to remove any dirt or grit from the working areas.
64
63
65
66
66
14
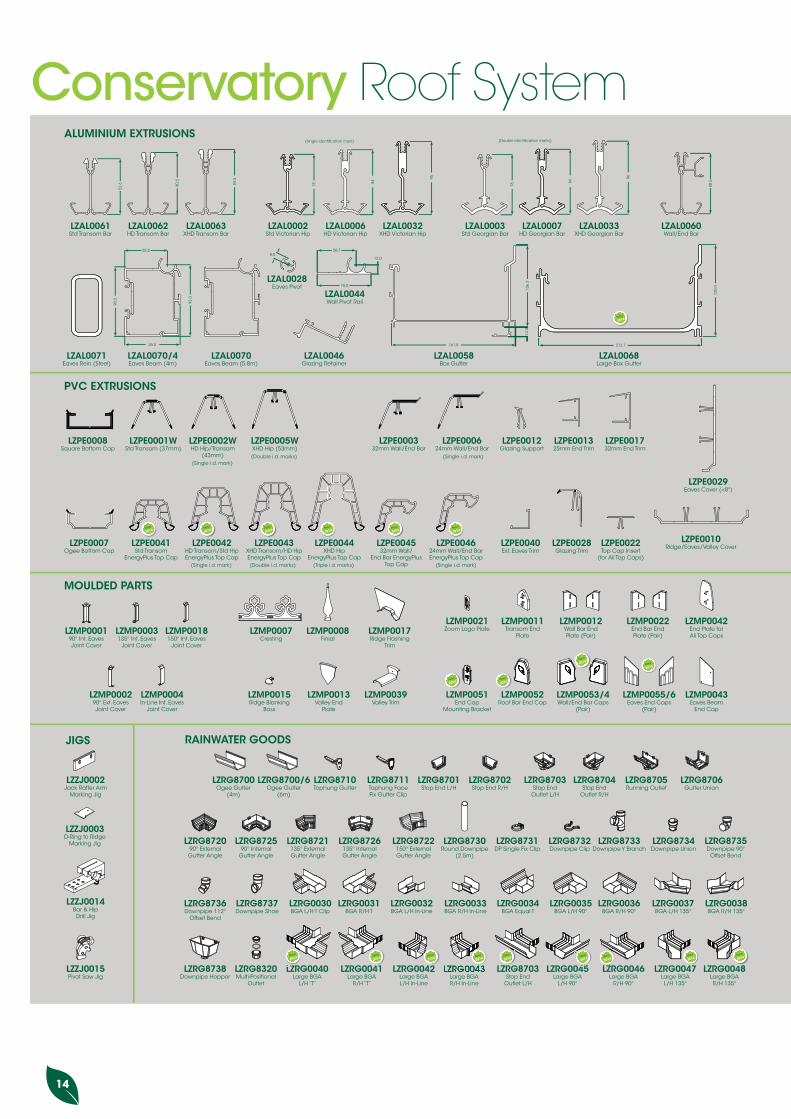
Conservatory Roof SystemALUMINIUM EXTRUSIONS
(Single identification mark) (Double identification marks)
PVC EXTRUSIONS
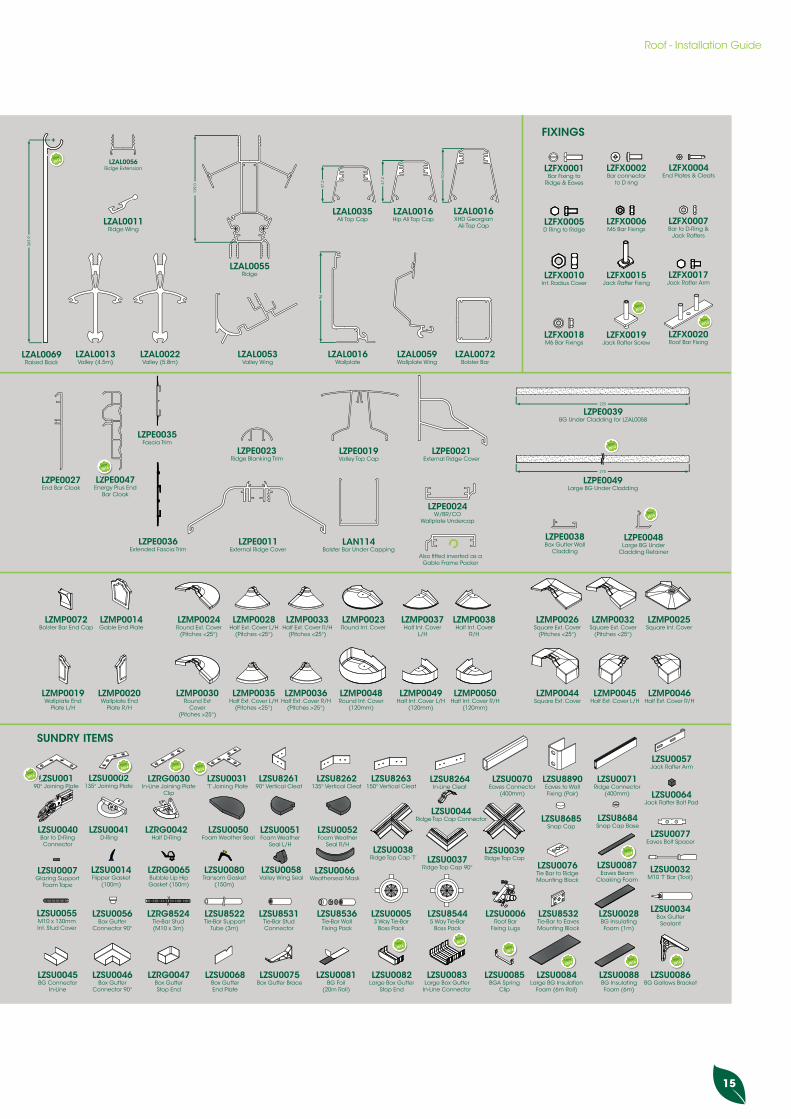
FIXINGS
MOULDED PARTS
RAINWATER GOODSJIGS SUNDRY ITEMS
8.012.0
(Triple i.d. marks)(Double i.d. marks)(Single i.d. mark)
(Double i.d. marks)(Single i.d. mark)
(Single i.d. mark)
(Single i.d. mark)
52.6 80
.5
84.5
LZAL0061Std Transom Bar
LZAL0062HD Transom Bar
LZAL0063XHD Transom Bar
LZAL0002Std Victorian Hip
LZAL0006HD Victorian Hip
LZAL0032XHD Victorian Hip
78
84
95
LZAL0003Std Georgian Bar
LZAL0007HD Georgian Bar
LZAL0033XHD Georgian Bar
LZAL0060Wall/End Bar
78
84
96
80.5
LZAL0056Ridge Extension
LZAL0011Ridge Wing
LZAL0068Large Box Gutter
LZAL0058Box Gutter
LZAL0046Glazing Retainer
LZAL0028Eaves Pivot
LZAL0071Eaves Rein (Steel)
LZAL0070/4Eaves Beam (4m)
LZAL0070Eaves Beam (5.8m)
LZAL0044Wall Pivot Rail
LZAL0059Wallplate Wing
LZAL0022Valley (5.8m)
LZAL0013Valley (4.5m)
LZAL0016Wallplate
LZAL0053Valley Wing
LZAL0055Ridge
LZAL0072Bolster Bar
LZAL0035Ali Top Cap
LZAL0016Hip Ali Top Cap
LZAL0016XHD Georgian
Ali Top Cap
93.0
90.5
55.5
55.5
50.7
70.0
12.8
106.
3
161.8 212.1
120.
0
47.2
96
47.2 70
.0
225
275
139.
0
LZFX0019Jack Rafter Screw
LZFX0020Roof Bar Fixing
LZFX0017Jack Rafter Arm
LZFX0010Int. Radius Cover
LZFX0006M6 Bar Fixings
LZFX0018M6 Bar Fixings
LZFX0015Jack Rafter Fixing
LZFX0007Bar to D-Ring &
Jack Rafters
LZFX0004End Plates & Cleats
LZFX0005D Ring to Ridge
LZFX0002Bar connector
to D ring
LZFX0001Bar Fixing to
Ridge & Eaves
LZPE0039BG Under Cladding for LZAL0058
LZPE0049Large BG Under Cladding
LZPE0038Box Gutter Wall
Cladding
LZPE0048Large BG Under
Cladding RetainerAlso fitted inverted as a
Gable Frame Packer
LZPE0024W/BR/CO
Wallplate Undercap
LZPE0021External Ridge Cover
LZPE0019Valley Top Cap
LZPE0023Ridge Blanking Trim
LAN114Bolster Bar Under Capping
LZPE0011External Ridge Cover
LZPE0036Extended Fascia Trim
LZPE0035Fascia Trim
LZPE0027End Bar Cloak
LZPE0029Eaves Cover (<8°)
LZPE0010Ridge/Eaves/Valley Cover
LZPE001732mm End Trim
LZPE001325mm End Trim
LZPE000624mm Wall/End Bar
LZPE0012Glazing Support
LZPE000332mm Wall/End Bar
LZPE0008Square Bottom Cap
LZPE0002WHD Hip/Transom
(43mm)
LZPE0001WStd Transom (37mm)
LZPE0005WXHD Hip (53mm)
LZPE0043XHD Transom/HD HipEnergyPlus Top Cap
LZPE0044XHD Hip
EnergyPlus Top Cap
LZPE004532mm Wall/
End Bar EnergyPlus Top Cap
LZPE004624mm Wall/End BarEnergyPlus Top Cap
LZPE0040Ext. Eaves Trim
LZPE0028Glazing Trim
LZPE0022Top Cap Insert
(for Ali Top Caps)
LZPE0007Ogee Bottom Cap
LZPE0041Std Transom
EnergyPlus Top Cap
LZPE0042HD Transom/Std HipEnergyPlus Top Cap
LZZJ0002Jack Rafter Arm
Marking Jig
LZZJ0003D-Ring to Ridge
Marking Jig
LZZJ0015Pivot Saw Jig
LZZJ0014Bar & HipDrill Jig
LZMP000190° Int. Eaves Joint Cover
LZMP0003135° Int. Eaves
Joint Cover
LZMP0018150° Int. Eaves
Joint Cover
LZMP000290° Ext. EavesJoint Cover
LZMP0004In-Line Int. Eaves
Joint Cover
LZMP0007Cresting
LZMP0008Finial
LZMP0017Ridge Flashing
Trim
LZMP0015Ridge Blanking
Boss
LZMP0013Valley End
Plate
LZMP0039Valley Trim
LZMP0021Zoom Logo Plate
LZMP0011Transom End
Plate
LZMP0012Wall Bar End Plate (Pair)
LZMP0051End Cap
Mounting Bracket
LZMP0052Roof Bar End Cap
LZMP0053/4Wall/End Bar Caps
(Pair)
LZMP0022End Bar End Plate (Pair)
LZMP0042End Plate for Ali Top Caps
LZMP0072Bolster Bar End Cap
LZMP0055/6Eaves End Caps
(Pair)
LZMP0043Eaves Beam
End Cap
LZMP0019Wallplate End
Plate L/H
LZMP0014Gable End Plate
LZMP0020Wallplate End
Plate R/H
LZMP0024Round Ext. Cover
(Pitches <25°)
LZMP0028Half Ext. Cover L/H
(Pitches <25°)
LZMP0033Half Ext. Cover R/H
(Pitches <25°)
LZMP0030Round Ext
Cover(Pitches >25°)
LZMP0035Half Ext. Cover L/H
(Pitches <25°)
LZMP0036Half Ext. Cover R/H
(Pitches >25°)
LZMP0023Round Int. Cover
LZMP0037Half Int. Cover
L/H
LZMP0048Round Int. Cover
(120mm)
LZMP0049Half Int. Cover L/H
(120mm)
LZMP0050Half Int. Cover R/H
(120mm)
LZMP0038Half Int. Cover
R/H
LZMP0026Square Ext. Cover
(Pitches <25°)
LZMP0032Square Ext. Cover
(Pitches <25°)
LZMP0044Square Ext. Cover
LZMP0045Half Ext. Cover L/H
LZMP0046Half Ext. Cover R/H
LZMP0025Square Int. Cover
LZRG8700Ogee Gutter
(4m)
LZRG8700/6Ogee Gutter
(6m)
LZRG8710Tophung Gutter
LZRG8711Tophung FaceFix Gutter Clip
LZRG8701Stop End L/H
LZRG8702Stop End R/H
LZRG8703Stop End
Outlet L/H
LZRG8704Stop End
Outlet R/H
LZRG8705Running Outlet
LZRG8706Gutter Union
LZRG872090° ExternalGutter Angle
LZRG872590° Internal
Gutter Angle
LZRG8721135° ExternalGutter Angle
LZRG8726135° InternalGutter Angle
LZRG8722150° ExternalGutter Angle
LZRG8730Round Downpipe
(2.5m)
LZRG8731DP Single Fix Clip
LZRG8732Downpipe Clip
LZRG8733Downpipe Y Branch
LZRG8734Downpipe Union
LZRG8736Downpipe 112°
Offset Bend
LZRG8737Downpipe Shoe
LZRG0030BGA L/H T Clip
LZRG0031BGA R/H T
LZRG0032BGA L/H In-Line
LZRG0033BGA R/H In-Line
LZRG0034BGA Equal T
LZRG0035BGA L/H 90°
LZRG0036BGA R/H 90°
LZRG0037BGA L/H 135°
LZRG8738Downpipe Hopper
LZRG8320Multi-Positional
Outlet
LZRG0040Large BGA
L/H “T”
LZRG0041Large BGA
R/H “T”
LZRG0042Large BGAL/H In-Line
Large BGA R/H In-Line
LZRG8703Stop End
Outlet L/H
LZRG0045Large BGA
L/H 90°
LZRG0046Large BGA
R/H 90°
LZRG0047Large BGAL/H 135°
LZRG0048Large BGAR/H 135°
LZRG0038BGA R/H 135°
LZRG8735Downpipe 90°
Offset Bend
LZSU0031‘T’ Joining Plate
LZSU826190° Vertical Cleat
LZSU8262135° Vertical Cleat
LZSU8263150° Vertical Cleat
LZSU8264In-Line Cleat
LZSU0070Eaves Connector
(400mm)
LZSU8890Eaves to Wall Fixing (Pair)
LZSU0071Ridge Connector
(400mm)
LZSU0040Bar to D-RingConnector
LZSU0041D-Ring
LZRG0042Half D-Ring
LZSU0050Foam Weather Seal
LZSU0051Foam Weather
Seal L/H
LZSU0052Foam Weather
Seal R/HLZSU0038
Ridge Top Cap ‘T’ LZSU0037Ridge Top Cap 90°
LZSU0039Ridge Top Cap
LZSU0076Tie Bar to RidgeMounting Block
LZSU0087Eaves Beam
Cloaking Foam
LZSU0044Ridge Top Cap Connector
LZSU0007Glazing Support
Foam Tape
LZSU0014Flipper Gasket
(100m)
LZRG0065Bubble Lip HipGasket (150m)
LZSU0080Transom Gasket
(150m)
LZSU0058Valley Wing Seal
LZSU0066Weatherseal Mask
LZSU8685Snap Cap
LZSU8684Snap Cap Base
LZSU0056Box Gutter
Connector 90°
LZRG8524Tie-Bar Stud(M10 x 3m)
LZSU8522Tie-Bar Support
Tube (3m)
LZSU8531Tie-Bar StudConnector
LZSU8536Tie-Bar WallFixing Pack
LZSU0045BG Connector
In-Line
LZSU0046Box Gutter
Connector 90°
LZRG0047Box GutterStop End
LZSU0068Box GutterEnd Plate
LZSU0075Box Gutter Brace
LZSU0081BG Foil
(20m Roll)
LZSU00053 Way Tie-Bar
Boss Pack
LZSU85445 Way Tie-Bar
Boss Pack
LZSU0006Roof Bar
Fixing Lugs
LZSU0082Large Box Gutter
Stop End
LZSU0083Large Box GutterIn-Line Connector
LZSU0085BGA Spring
Clip
LZSU8532Tie-Bar to EavesMounting Block
LZSU0028BG InsulatingFoam (1m)
LZSU0084Large BG Insulation
Foam (6m Roll)
LZSU0088BG InsulatingFoam (6m)
LZSU0057Jack Rafter Arm
LZSU0077Eaves Bolt Spacer
LZSU0064Jack Rafter Bolt Pad
LZSU0032M10 ‘T’ Bar (Tool)
LZSU0034Box Gutter
Sealant
LZSU0086BG Gallows Bracket
New
2014
New
2014
LZAL0069Raised Back
263.
9
New
2014
New
2014
20
New
2014
New
2014
New
2014
LZPE0047Energy Plus End
Bar Cloak
LZ
New
2014
New
2014New
2014New
2014New
2014New
2014New
2014
New
2014New
2014
New
2014 New
2014
LZSU00190° Joining PlateL
New
2014
0
New
2014
LZSU0002135° Joining Plate
LZRG0030In-Line Joining Plate
Clip
02
New
2014
00
New
2014 New
2014
New
2014
New
2014
0
New
2014New
2014New
2014
04
New
2014
04
New
2014
LZ
New
2014
045
New
2014
ZR
New
2014
42
New
2014New
2014
04
New
2014
LZ
New
2014
LZSU0055M10 x 130mmInt. Stud Cover
Roof - Installation Guide
15
ALUMINIUM EXTRUSIONS(Single identification mark) (Double identification marks)
PVC EXTRUSIONS
FIXINGS
MOULDED PARTS
RAINWATER GOODSJIGS SUNDRY ITEMS
8.012.0
(Triple i.d. marks)(Double i.d. marks)(Single i.d. mark)
(Double i.d. marks)(Single i.d. mark)
(Single i.d. mark)
(Single i.d. mark)
52.6 80
.5
84.5
LZAL0061Std Transom Bar
LZAL0062HD Transom Bar
LZAL0063XHD Transom Bar
LZAL0002Std Victorian Hip
LZAL0006HD Victorian Hip
LZAL0032XHD Victorian Hip
78
84
95
LZAL0003Std Georgian Bar
LZAL0007HD Georgian Bar
LZAL0033XHD Georgian Bar
LZAL0060Wall/End Bar
78
84
96
80.5
LZAL0056Ridge Extension
LZAL0011Ridge Wing
LZAL0068Large Box Gutter
LZAL0058Box Gutter
LZAL0046Glazing Retainer
LZAL0028Eaves Pivot
LZAL0071Eaves Rein (Steel)
LZAL0070/4Eaves Beam (4m)
LZAL0070Eaves Beam (5.8m)
LZAL0044Wall Pivot Rail
LZAL0059Wallplate Wing
LZAL0022Valley (5.8m)
LZAL0013Valley (4.5m)
LZAL0016Wallplate
LZAL0053Valley Wing
LZAL0055Ridge
LZAL0072Bolster Bar
LZAL0035Ali Top Cap
LZAL0016Hip Ali Top Cap
LZAL0016XHD Georgian
Ali Top Cap
93.0
90.5
55.5
55.5
50.7
70.0
12.8
106.
3
161.8 212.1
120.
0
47.2
96
47.2 70
.0
225
275
139.
0
LZFX0019Jack Rafter Screw
LZFX0020Roof Bar Fixing
LZFX0017Jack Rafter Arm
LZFX0010Int. Radius Cover
LZFX0006M6 Bar Fixings
LZFX0018M6 Bar Fixings
LZFX0015Jack Rafter Fixing
LZFX0007Bar to D-Ring &
Jack Rafters
LZFX0004End Plates & Cleats
LZFX0005D Ring to Ridge
LZFX0002Bar connector
to D ring
LZFX0001Bar Fixing to
Ridge & Eaves
LZPE0039BG Under Cladding for LZAL0058
LZPE0049Large BG Under Cladding
LZPE0038Box Gutter Wall
Cladding
LZPE0048Large BG Under
Cladding RetainerAlso fitted inverted as a
Gable Frame Packer
LZPE0024W/BR/CO
Wallplate Undercap
LZPE0021External Ridge Cover
LZPE0019Valley Top Cap
LZPE0023Ridge Blanking Trim
LAN114Bolster Bar Under Capping
LZPE0011External Ridge Cover
LZPE0036Extended Fascia Trim
LZPE0035Fascia Trim
LZPE0027End Bar Cloak
LZPE0029Eaves Cover (<8°)
LZPE0010Ridge/Eaves/Valley Cover
LZPE001732mm End Trim
LZPE001325mm End Trim
LZPE000624mm Wall/End Bar
LZPE0012Glazing Support
LZPE000332mm Wall/End Bar
LZPE0008Square Bottom Cap
LZPE0002WHD Hip/Transom
(43mm)
LZPE0001WStd Transom (37mm)
LZPE0005WXHD Hip (53mm)
LZPE0043XHD Transom/HD HipEnergyPlus Top Cap
LZPE0044XHD Hip
EnergyPlus Top Cap
LZPE004532mm Wall/
End Bar EnergyPlus Top Cap
LZPE004624mm Wall/End BarEnergyPlus Top Cap
LZPE0040Ext. Eaves Trim
LZPE0028Glazing Trim
LZPE0022Top Cap Insert
(for Ali Top Caps)
LZPE0007Ogee Bottom Cap
LZPE0041Std Transom
EnergyPlus Top Cap
LZPE0042HD Transom/Std HipEnergyPlus Top Cap
LZZJ0002Jack Rafter Arm
Marking Jig
LZZJ0003D-Ring to Ridge
Marking Jig
LZZJ0015Pivot Saw Jig
LZZJ0014Bar & HipDrill Jig
LZMP000190° Int. Eaves Joint Cover
LZMP0003135° Int. Eaves
Joint Cover
LZMP0018150° Int. Eaves
Joint Cover
LZMP000290° Ext. EavesJoint Cover
LZMP0004In-Line Int. Eaves
Joint Cover
LZMP0007Cresting
LZMP0008Finial
LZMP0017Ridge Flashing
Trim
LZMP0015Ridge Blanking
Boss
LZMP0013Valley End
Plate
LZMP0039Valley Trim
LZMP0021Zoom Logo Plate
LZMP0011Transom End
Plate
LZMP0012Wall Bar End Plate (Pair)
LZMP0051End Cap
Mounting Bracket
LZMP0052Roof Bar End Cap
LZMP0053/4Wall/End Bar Caps
(Pair)
LZMP0022End Bar End Plate (Pair)
LZMP0042End Plate for Ali Top Caps
LZMP0072Bolster Bar End Cap
LZMP0055/6Eaves End Caps
(Pair)
LZMP0043Eaves Beam
End Cap
LZMP0019Wallplate End
Plate L/H
LZMP0014Gable End Plate
LZMP0020Wallplate End
Plate R/H
LZMP0024Round Ext. Cover
(Pitches <25°)
LZMP0028Half Ext. Cover L/H
(Pitches <25°)
LZMP0033Half Ext. Cover R/H
(Pitches <25°)
LZMP0030Round Ext
Cover(Pitches >25°)
LZMP0035Half Ext. Cover L/H
(Pitches <25°)
LZMP0036Half Ext. Cover R/H
(Pitches >25°)
LZMP0023Round Int. Cover
LZMP0037Half Int. Cover
L/H
LZMP0048Round Int. Cover
(120mm)
LZMP0049Half Int. Cover L/H
(120mm)
LZMP0050Half Int. Cover R/H
(120mm)
LZMP0038Half Int. Cover
R/H
LZMP0026Square Ext. Cover
(Pitches <25°)
LZMP0032Square Ext. Cover
(Pitches <25°)
LZMP0044Square Ext. Cover
LZMP0045Half Ext. Cover L/H
LZMP0046Half Ext. Cover R/H
LZMP0025Square Int. Cover
LZRG8700Ogee Gutter
(4m)
LZRG8700/6Ogee Gutter
(6m)
LZRG8710Tophung Gutter
LZRG8711Tophung FaceFix Gutter Clip
LZRG8701Stop End L/H
LZRG8702Stop End R/H
LZRG8703Stop End
Outlet L/H
LZRG8704Stop End
Outlet R/H
LZRG8705Running Outlet
LZRG8706Gutter Union
LZRG872090° ExternalGutter Angle
LZRG872590° Internal
Gutter Angle
LZRG8721135° ExternalGutter Angle
LZRG8726135° InternalGutter Angle
LZRG8722150° ExternalGutter Angle
LZRG8730Round Downpipe
(2.5m)
LZRG8731DP Single Fix Clip
LZRG8732Downpipe Clip
LZRG8733Downpipe Y Branch
LZRG8734Downpipe Union
LZRG8736Downpipe 112°
Offset Bend
LZRG8737Downpipe Shoe
LZRG0030BGA L/H T Clip
LZRG0031BGA R/H T
LZRG0032BGA L/H In-Line
LZRG0033BGA R/H In-Line
LZRG0034BGA Equal T
LZRG0035BGA L/H 90°
LZRG0036BGA R/H 90°
LZRG0037BGA L/H 135°
LZRG8738Downpipe Hopper
LZRG8320Multi-Positional
Outlet
LZRG0040Large BGA
L/H “T”
LZRG0041Large BGA
R/H “T”
LZRG0042Large BGAL/H In-Line
Large BGA R/H In-Line
LZRG8703Stop End
Outlet L/H
LZRG0045Large BGA
L/H 90°
LZRG0046Large BGA
R/H 90°
LZRG0047Large BGAL/H 135°
LZRG0048Large BGAR/H 135°
LZRG0038BGA R/H 135°
LZRG8735Downpipe 90°
Offset Bend
LZSU0031‘T’ Joining Plate
LZSU826190° Vertical Cleat
LZSU8262135° Vertical Cleat
LZSU8263150° Vertical Cleat
LZSU8264In-Line Cleat
LZSU0070Eaves Connector
(400mm)
LZSU8890Eaves to Wall Fixing (Pair)
LZSU0071Ridge Connector
(400mm)
LZSU0040Bar to D-RingConnector
LZSU0041D-Ring
LZRG0042Half D-Ring
LZSU0050Foam Weather Seal
LZSU0051Foam Weather
Seal L/H
LZSU0052Foam Weather
Seal R/HLZSU0038
Ridge Top Cap ‘T’ LZSU0037Ridge Top Cap 90°
LZSU0039Ridge Top Cap
LZSU0076Tie Bar to RidgeMounting Block
LZSU0087Eaves Beam
Cloaking Foam
LZSU0044Ridge Top Cap Connector
LZSU0007Glazing Support
Foam Tape
LZSU0014Flipper Gasket
(100m)
LZRG0065Bubble Lip HipGasket (150m)
LZSU0080Transom Gasket
(150m)
LZSU0058Valley Wing Seal
LZSU0066Weatherseal Mask
LZSU8685Snap Cap
LZSU8684Snap Cap Base
LZSU0056Box Gutter
Connector 90°
LZRG8524Tie-Bar Stud(M10 x 3m)
LZSU8522Tie-Bar Support
Tube (3m)
LZSU8531Tie-Bar StudConnector
LZSU8536Tie-Bar WallFixing Pack
LZSU0045BG Connector
In-Line
LZSU0046Box Gutter
Connector 90°
LZRG0047Box GutterStop End
LZSU0068Box GutterEnd Plate
LZSU0075Box Gutter Brace
LZSU0081BG Foil
(20m Roll)
LZSU00053 Way Tie-Bar
Boss Pack
LZSU85445 Way Tie-Bar
Boss Pack
LZSU0006Roof Bar
Fixing Lugs
LZSU0082Large Box Gutter
Stop End
LZSU0083Large Box GutterIn-Line Connector
LZSU0085BGA Spring
Clip
LZSU8532Tie-Bar to EavesMounting Block
LZSU0028BG InsulatingFoam (1m)
LZSU0084Large BG Insulation
Foam (6m Roll)
LZSU0088BG InsulatingFoam (6m)
LZSU0057Jack Rafter Arm
LZSU0077Eaves Bolt Spacer
LZSU0064Jack Rafter Bolt Pad
LZSU0032M10 ‘T’ Bar (Tool)
LZSU0034Box Gutter
Sealant
LZSU0086BG Gallows Bracket
New
2014
New
2014
LZAL0069Raised Back
263.
9
New
2014
New
2014
20
New
2014
New
2014
New
2014
LZPE0047Energy Plus End
Bar Cloak
LZ
New
2014
New
2014New
2014New
2014New
2014New
2014New
2014
New
2014New
2014
New
2014 New
2014
LZSU00190° Joining PlateL
New
2014
0
New
2014
LZSU0002135° Joining Plate
LZRG0030In-Line Joining Plate
Clip
02
New
2014
00
New
2014 New
2014
New
2014
New
2014
0
New
2014New
2014New
2014
04
New
2014
04
New
2014
LZ
New
2014
045
New
2014
ZR
New
2014
42
New
2014New
2014
04
New
2014
LZ
New
2014
LZSU0055M10 x 130mmInt. Stud Cover

Liniar Flamstead HouseDenby Hall Business ParkDenby Derbyshire DE5 8JX
Tel: +44 (0)1332 883900Fax: +44 (0)1332 883901Email: [email protected]
GIB/001
7 great reasons to choose LiniarInnovative – the only entirely new PVCu window and door profile system to be developed in the last 10 years
Energy efficient – designed from scratch to achieve the pinnacle of thermal performance and retain more heat in your property
Safe and secure – engineered with built-in security features and approved by independent testing facilities
British made – manufactured in our state-of-the-art factory in the heart of Derbyshire
Lead free – all Liniar profiles are extruded using materials that are 100% lead free
Quality assured – backed with ISO 9001 accreditation for your peace of mind
Guaranteed – all Liniar frames are guaranteed to not warp, split or discolour for a minimum of 10 years
Your Liniar roof was installed by: