Embed Size (px)
Citation preview
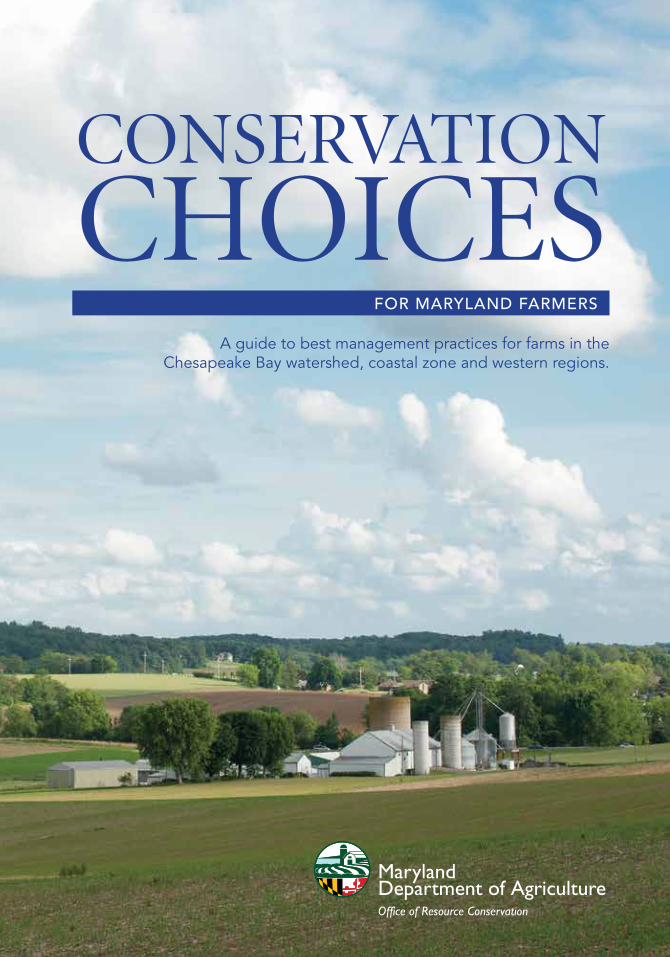
CONSERVATION
CHOICES FOR MARYLAND FARMERS
A guide to best management practices for farms in the Chesapeake Bay watershed, coastal zone and western regions.

About this GuideMaryland farmers play a key role in protecting water quality in our streams, rivers, and the Chesapeake Bay. With two million acres of land devoted to agriculture, farming activities can have a direct impact on water quality throughout the state. As Maryland works to meet federally mandated nutrient and sediment reductions for the Chesapeake Bay known as the Total Maximum Daily Load (TMDL), the conservation work of farmers takes on even greater importance.
This guide features popular conservation practices—best management practices (BMPs)—that farmers can use to maintain farm production, control soil erosion, manage nutrients, safeguard water quality, provide wildlife habitat, and improve air quality.
A description of how each best management practice works, items to think about when considering a practice and information on USDA Natural Resources Conservation Service (NRCS) technical standards and maintenance requirements are included.
Six symbols are used throughout the guide to show the benefits of individual best management practices:
Helps reduce soil erosion and sediment runoff; may add organic matter to the soil.
Helps protect or improve water quality.
May help increase profits by reducing costs, increasing production or both.
Provides wildlife habitat or food.
Helps improve air quality by reducing odors or other pollutants.
May qualify for state or federal cost-share assistance.
1
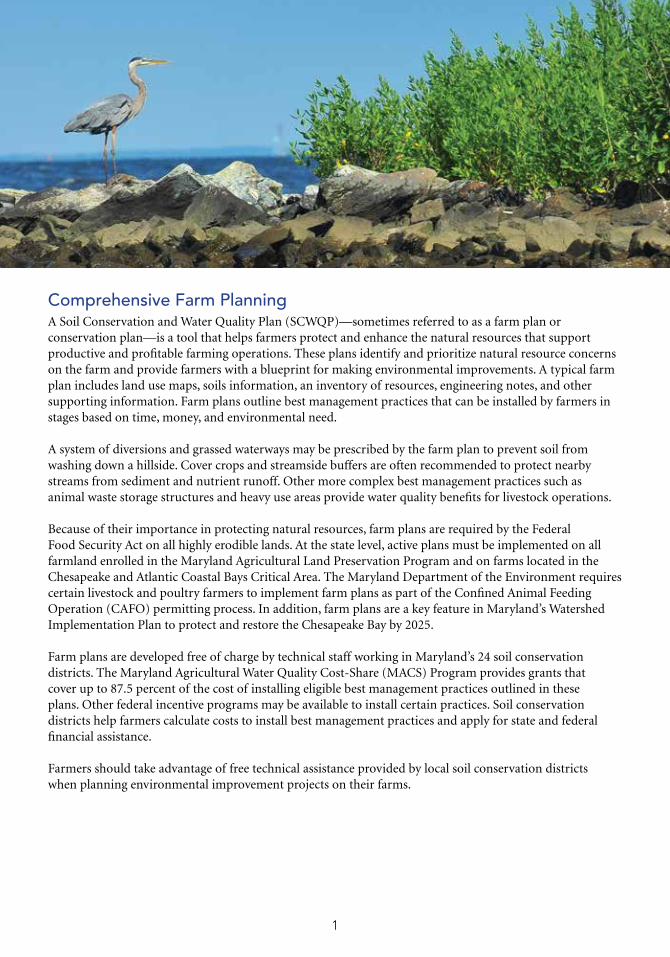
Comprehensive Farm PlanningA Soil Conservation and Water Quality Plan (SCWQP)—sometimes referred to as a farm plan or conservation plan—is a tool that helps farmers protect and enhance the natural resources that support productive and profitable farming operations. These plans identify and prioritize natural resource concerns on the farm and provide farmers with a blueprint for making environmental improvements. A typical farm plan includes land use maps, soils information, an inventory of resources, engineering notes, and other supporting information. Farm plans outline best management practices that can be installed by farmers in stages based on time, money, and environmental need.
A system of diversions and grassed waterways may be prescribed by the farm plan to prevent soil from washing down a hillside. Cover crops and streamside buffers are often recommended to protect nearby streams from sediment and nutrient runoff. Other more complex best management practices such as animal waste storage structures and heavy use areas provide water quality benefits for livestock operations.
Because of their importance in protecting natural resources, farm plans are required by the Federal Food Security Act on all highly erodible lands. At the state level, active plans must be implemented on all farmland enrolled in the Maryland Agricultural Land Preservation Program and on farms located in the Chesapeake and Atlantic Coastal Bays Critical Area. The Maryland Department of the Environment requires certain livestock and poultry farmers to implement farm plans as part of the Confined Animal Feeding Operation (CAFO) permitting process. In addition, farm plans are a key feature in Maryland’s Watershed Implementation Plan to protect and restore the Chesapeake Bay by 2025.
Farm plans are developed free of charge by technical staff working in Maryland’s 24 soil conservation districts. The Maryland Agricultural Water Quality Cost-Share (MACS) Program provides grants that cover up to 87.5 percent of the cost of installing eligible best management practices outlined in these plans. Other federal incentive programs may be available to install certain practices. Soil conservation districts help farmers calculate costs to install best management practices and apply for state and federal financial assistance.
Farmers should take advantage of free technical assistance provided by local soil conservation districts when planning environmental improvement projects on their farms.
Questions to Ask When Developing a Soil Conservation and Water Quality Plan
■ What natural resources and sensitive areas are on my farm?
■ What crops do I plan to grow?
■ Am I rotating crops in order to reduce disease and pest problems?
■ Am I using commercial fertilizer, animal manure and/or other nutrients in accordance with my nutrient management plan?
■ Have I minimized runoff?
■ Could I use wetlands or vegetated buffers to reduce nutrients leaving my farm?
■ What types of wildlife would I like to see?
■ Will a new best management practice interfere with or cancel out another practice?
Vegetative PracticesCover Crop ...................................3Critical Area Planting ....................4Pasture Planting ............................5Pollinator Habitat ..........................6Riparian Buffers ............................7Windbreaks for Poultry Houses ....8
Structural Practices Agrichemical Handling Facility .....9Animal Mortality Facility .............10Diversion .....................................11Grade Control Structure .............12Grassed Waterway ......................13Heavy Use Area Protection .........14Livestock Fencing .......................15Livestock Stream Crossing ..........16Livestock Watering System .........17Manure Storage Structure ..........18Roof Runoff System ....................19Roofs and Covers .......................20Terrace ........................................21Water Control Structure ..............22Wetland Restoration ...................23
Management PracticesContour Farming ........................24Crop Residue Management .......25Crop Rotation .............................26Integrated Pest Management .....27Manure Transport .......................28Nutrient Management ...............29Rotational Grazing ......................30Well Protection ...........................31
Contacts ..................................33

3
DescriptionCereal grains such as wheat, rye, or barley, brassicas (plants in the cabbage family), or legumes such as clover that grow in cool weather are planted as cover crops in the fall following the summer harvest of corn, soybeans, vegetables, or other crops.
BenefitsCover crops of small grains are recommended in the fall and winter to tie up nutrients that are left over from the previous crop and to reduce leaching of nutrients to surface and groundwater supplies. Cover crops are used to protect the soil from wind and water erosion, improve soil health, increase water retention, and reduce weeds and pests. Cover crops may reduce fertilizer requirements in the spring.
Planning ■ Can the cover crop be planted into standing crops?
■ Will the seeding method allow you to meet fall planting deadlines for nutrient uptake?
■ Are adequate soil conservation measures installed?
Tech Notes ■ Cover crops are recommended to improve
nutrient management.
■ Cover crops need 30 to 40 days of good growth before the first hard frost. Plant fall cover crops from early August until mid-October for best results.
■ Cover crops are often recommended when low residue producing crops such as soybeans or corn silage are grown.
■ To optimize germination, use tillage methods that achieve soil to seed contact.
■ Cover crops may be aerial seeded prior to harvesting summer crops or seeded using no till, vertical tillage, or conventional methods after harvest.
■ Follow NRCS recommended seeding rates.
■ Aerial seeding rates should be increased by 25 percent.
Maintenance ■ Cover crops may be green chopped or grazed,
once well established.
■ Kill cover crops in the spring. Mowing or herbicide application is acceptable. Deep tillage is not recommended because it will bury residue.
■ Timely kill is important to reduce the risk of depleting moisture needed for spring crops.
Cover Crop A small grain or legume crop planted in the fall to recover unused plant nutrients from the root zone, control soil erosion and improve the soil.

4
DescriptionGrasses and legumes are established in areas where there is excessive soil erosion, often in places where there is bare ground or steep slopes. The vegetation provides surface cover to stop raindrop splash and slow water flow.
Benefits ■ Reduces soil erosion.
■ A vegetated area improves water quality by reducing the amount of sediment, nutrients and pesticides running off farmland.
■ Protects areas such as dams or gullied areas where vegetation may be difficult to establish.
■ Vegetation provides nesting cover for birds and small animals.
Planning ■ Will the planting provide adequate protection?
■ Are proper soil conservation practices installed above the planting area?
■ Will the planting area provide wildlife cover?
■ Will the planting be used for grazing livestock?
■ Can the area be stabilized using other conservation methods?
Tech Notes ■ Follow NRCS specifications.
■ Protect the area from erosion with annual grasses until permanent cover is established.
■ Apply lime and fertilizer, if needed, in the top three inches of the soil before planting.
■ Follow recommended seeding rates.
■ Severely eroded areas may need a nurse crop like oats. Mow oats before they head out. Mow high to avoid clipping the permanent seeding.
■ Areas disturbed during construction on barren slopes 4:1 or steeper should be mulched to provide temporary protection before seeding.
■ Mulches include hay, grain, straw, or commercially produced wood fiber matting.
Maintenance ■ Do not allow grazing the year after planting;
prevent overgrazing after permanent cover is established.
■ Fence, if needed, and permanently exclude livestock from extremely steep slopes.
■ Native or warm season grasses may benefit from periodic burning to reduce and remove competing plants.
Critical Area Planting Planting grass or other vegetation to protect a severely eroding area from soil erosion.

5
Pasture Planting Planting grasses or legumes to improve forage production, enhance livestock nutrition, protect the soil from erosion and safeguard water quality.
DescriptionEstablishing perennial grass cover provides quality forage for livestock, stabilizes eroding areas, filters runoff water, and provides wildlife habitat and cover.
Benefits ■ Heavy grass cover slows water flow, reducing
soil erosion.
■ Protects water quality by filtering runoff water and increasing infiltration.
■ Provides cover and habitat for wildlife.
■ Increases organic matter in the soil.
Planning ■ Are selected species suited to the soil types?
■ Will the species selected minimize pesticide and herbicide applications?
■ Will the plant species selected meet livestock needs?
Tech Notes ■ Use a current soil test to determine whether soil
pH and nutrient levels need to be adjusted. For best results, allow several months before planting for lime applications to take effect.
■ Before reseeding, graze or closely clip pastures to expose soil surface to sunlight.
■ Use legumes to improve forage quality and extend the grazing season.
■ Simple mixes of one grass plus one or two legumes are easier to manage and are generally preferred.
■ Do not mix warm and cool season grasses in the same pasture.
■ For most grasses and legumes, drill seed uniformly to a depth of 1/4 to 1/2 inch, or broadcast and cultipack on a conventionally prepared seedbed.
■ For new pastures, plant a nurse crop on steeper slopes or where weeds may interfere with getting a good stand. NRCS recommends seeding a small grain at 3/4 of a bushel per acre as a nurse crop.
Maintenance ■ Wait until pasture is well established before
grazing.
■ Mow weeds when they reach six to eight inches.
■ Control persistent weeds with herbicides.
■ Fertilize based on soil test results.
6
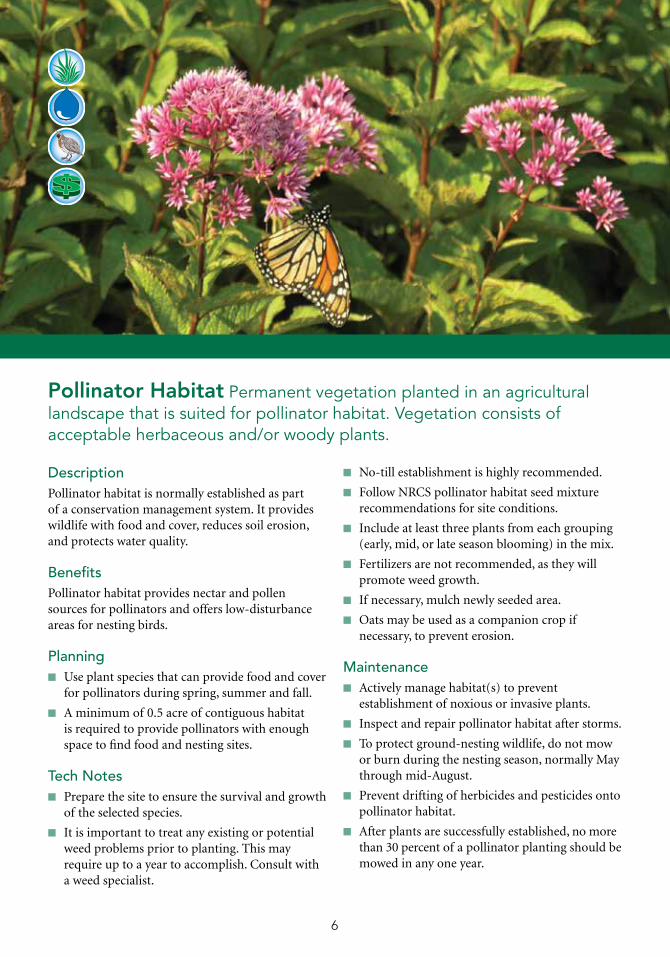
Pollinator Habitat Permanent vegetation planted in an agricultural landscape that is suited for pollinator habitat. Vegetation consists of acceptable herbaceous and/or woody plants.
DescriptionPollinator habitat is normally established as part of a conservation management system. It provides wildlife with food and cover, reduces soil erosion, and protects water quality.
BenefitsPollinator habitat provides nectar and pollen sources for pollinators and offers low-disturbance areas for nesting birds.
Planning ■ Use plant species that can provide food and cover
for pollinators during spring, summer and fall.
■ A minimum of 0.5 acre of contiguous habitat is required to provide pollinators with enough space to find food and nesting sites.
Tech Notes ■ Prepare the site to ensure the survival and growth
of the selected species.
■ It is important to treat any existing or potential weed problems prior to planting. This may require up to a year to accomplish. Consult with a weed specialist.
■ No-till establishment is highly recommended.
■ Follow NRCS pollinator habitat seed mixture recommendations for site conditions.
■ Include at least three plants from each grouping (early, mid, or late season blooming) in the mix.
■ Fertilizers are not recommended, as they will promote weed growth.
■ If necessary, mulch newly seeded area.
■ Oats may be used as a companion crop if necessary, to prevent erosion.
Maintenance ■ Actively manage habitat(s) to prevent
establishment of noxious or invasive plants.
■ Inspect and repair pollinator habitat after storms.
■ To protect ground-nesting wildlife, do not mow or burn during the nesting season, normally May through mid-August.
■ Prevent drifting of herbicides and pesticides onto pollinator habitat.
■ After plants are successfully established, no more than 30 percent of a pollinator planting should be mowed in any one year.

7
Riparian Buffers Trees, shrubs, or grasses planted next to waterways (including rivers, streams, and drainage ditches) filter runoff, improve water quality, protect the soil from erosion, and provide wildlife habitat.
DescriptionVegetative buffers slow or intercept water flow, trapping sediment and other pollutants such as pesticides and nutrients. Trees and shrubs planted along a waterway provide wildlife habitat and reduce stream temperatures, providing aquatic benefits.
Benefits ■ Buffers prevent contaminants from entering
waterways and provide shade, food, and habitat for wildlife, fish, and other aquatic life.
■ Buffers help stabilize streams.
Planning ■ Are adequate soil conservation measures
installed upslope of the buffer?
■ Will fencing be needed to exclude livestock from buffers?
■ What types of plants would be suitable for site conditions?
■ How wide should the buffer be to meet objectives?
Tech Notes ■ Follow NRCS specifications.
■ Work with a conservationist to select plants for the buffer and determine its width.
■ Prepare the site to ensure the survival and growth of selected species.
■ Treat any existing or potential weed problems prior to planting. This may require a year to accomplish. Consult with a weed specialist.
■ Use tree shelters to increase the survival rate of young trees.
Maintenance ■ Delay mowing grass areas until after August 15
to protect nesting birds.
■ Troubleshoot survival problems before replanting; replace dead trees and shrubs as needed.
■ Remove tree shelters two years after trees emerge.
■ Control weeds and other undesirable vegetative competition.
■ Repair fences and check for damage to livestock crossings.
8
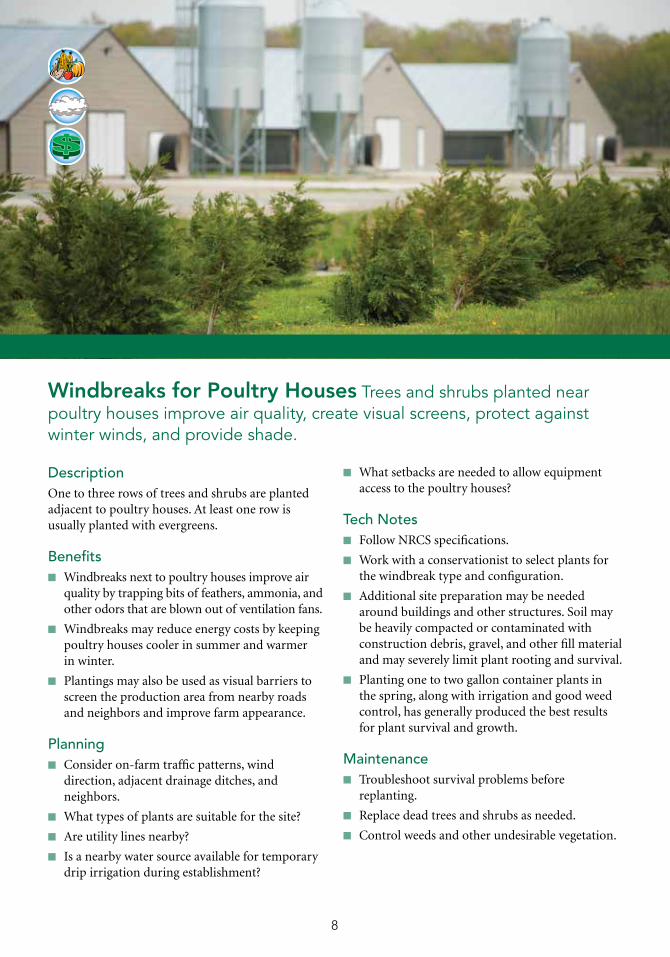
Windbreaks for Poultry Houses Trees and shrubs planted near poultry houses improve air quality, create visual screens, protect against winter winds, and provide shade.
DescriptionOne to three rows of trees and shrubs are planted adjacent to poultry houses. At least one row is usually planted with evergreens.
Benefits ■ Windbreaks next to poultry houses improve air
quality by trapping bits of feathers, ammonia, and other odors that are blown out of ventilation fans.
■ Windbreaks may reduce energy costs by keeping poultry houses cooler in summer and warmer in winter.
■ Plantings may also be used as visual barriers to screen the production area from nearby roads and neighbors and improve farm appearance.
Planning ■ Consider on-farm traffic patterns, wind
direction, adjacent drainage ditches, and neighbors.
■ What types of plants are suitable for the site?
■ Are utility lines nearby?
■ Is a nearby water source available for temporary drip irrigation during establishment?
■ What setbacks are needed to allow equipment access to the poultry houses?
Tech Notes ■ Follow NRCS specifications.
■ Work with a conservationist to select plants for the windbreak type and configuration.
■ Additional site preparation may be needed around buildings and other structures. Soil may be heavily compacted or contaminated with construction debris, gravel, and other fill material and may severely limit plant rooting and survival.
■ Planting one to two gallon container plants in the spring, along with irrigation and good weed control, has generally produced the best results for plant survival and growth.
Maintenance ■ Troubleshoot survival problems before
replanting.
■ Replace dead trees and shrubs as needed.
■ Control weeds and other undesirable vegetation.
9
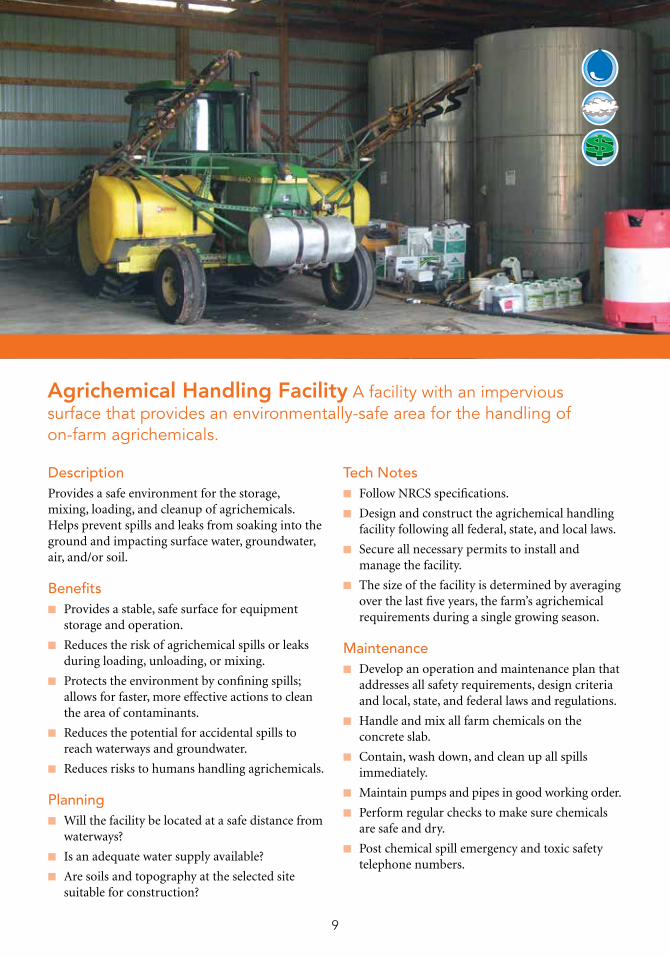
DescriptionProvides a safe environment for the storage, mixing, loading, and cleanup of agrichemicals. Helps prevent spills and leaks from soaking into the ground and impacting surface water, groundwater, air, and/or soil.
Benefits ■ Provides a stable, safe surface for equipment
storage and operation.
■ Reduces the risk of agrichemical spills or leaks during loading, unloading, or mixing.
■ Protects the environment by confining spills; allows for faster, more effective actions to clean the area of contaminants.
■ Reduces the potential for accidental spills to reach waterways and groundwater.
■ Reduces risks to humans handling agrichemicals.
Planning ■ Will the facility be located at a safe distance from
waterways?
■ Is an adequate water supply available?
■ Are soils and topography at the selected site suitable for construction?
Tech Notes ■ Follow NRCS specifications.
■ Design and construct the agrichemical handling facility following all federal, state, and local laws.
■ Secure all necessary permits to install and manage the facility.
■ The size of the facility is determined by averaging over the last five years, the farm’s agrichemical requirements during a single growing season.
Maintenance ■ Develop an operation and maintenance plan that
addresses all safety requirements, design criteria and local, state, and federal laws and regulations.
■ Handle and mix all farm chemicals on the concrete slab.
■ Contain, wash down, and clean up all spills immediately.
■ Maintain pumps and pipes in good working order.
■ Perform regular checks to make sure chemicals are safe and dry.
■ Post chemical spill emergency and toxic safety telephone numbers.
Agrichemical Handling Facility A facility with an impervious surface that provides an environmentally-safe area for the handling of on-farm agrichemicals.

10
Animal Mortality Facility A roofed structure designed for composting the normal daily accumulation of dead birds from a poultry operation.
DescriptionComposting provides a safe and desirable method for disposing of dead birds by converting nitrogenous materials (manure and birds) and carboniferous materials (straw or sawdust) into a humus-like substance.
Benefits ■ When properly managed, composting
substantially reduces the volume of carcasses, kills most pathogens, prevents odors, and produces a stable, odorless, humus-like material that is useful as a nutrient source and soil amendment.
■ By eliminating the on-site burial of large numbers of carcasses, composting facilities reduce the potential for groundwater contamination and protect public health.
Planning ■ Consider on-farm traffic patterns, wind
direction, drainage ditches, sensitive areas, topography, and proximity of neighbors in determining where to place the facility.
■ Is a carbon source available?
■ What equipment is available?
Tech Notes ■ Follow the suggested straw-bird-litter recipe
in creating the compost pile.
■ Always completely cover dead birds with dry litter.
■ Turn and reactivate compost before applying to land.
■ Use a thermometer to monitor temperatures within the compost bin.
■ Don’t pile birds against composter walls or leave exposed to flies or scavengers.
■ Contact the local soil conservation district or University of Maryland Extension for assistance.
Maintenance ■ Obtain and follow a written operation and
maintenance plan from NRCS. As a minimum, the instructions should detail the materials to be used in the compost mix, moisture content, temperature to be achieved, aeration schedule, and end use for the compost.
■ The compost facility should be inspected at least twice a year, when empty, for structural integrity.

11
Diversion A long earthen embankment built across the slope to direct runoff water from a specific area.
DescriptionA diversion is often built near the top of a steep slope to intercept runoff and reduce erosion. It may be used to divert runoff flows away from a feedlot or to collect and direct water to a pond.
Benefits ■ Reduces soil erosion on steep slopes by
intercepting runoff water and preventing it from reaching farmland or sensitive resources downslope.
■ Vegetation in the diversion channel filters runoff water, improving water quality.
■ Vegetation provides cover for small birds and animals.
■ Allows better crop growth on bottomland soils.
Planning ■ Are proper soil conservation measures installed
to prevent the diversion from filling with sediment?
■ Is the outlet planned in a location that will not cause erosion?
■ Are the diversion and outlet large enough to handle the runoff from the selected location?
Tech Notes ■ Follow NRCS specifications.
■ Diversions must be built to carry at least the peak amount of runoff generated by a ten-year, 24-hour storm.
■ Minimum top width for a diversion ridge is four feet.
■ Each diversion must have an outlet. A grassed waterway, grade stabilization structure, or underground outlet is acceptable.
■ Establish vegetative outlets before a diversion is constructed.
■ Diversions should not be built in high sediment-producing areas unless installed in conjunction with other conservation measures.
Maintenance ■ Keep outlet clear of debris.
■ Keep burrowing animals out of the diversion.
■ Maintain vegetative cover on the diversion ridge.
■ Fertilize based on soil test results.
■ Install filter strips above the diversion channel to trap sediment and protect the diversion, if needed.

12
DescriptionThese structures drop water from one stabilized grade to another and prevent gullies from advancing up a slope.
Benefits ■ A grade control structure is often used to stabilize
the outlet of a waterway, preventing gully erosion.
■ Grassed, non-eroding waterways with a grade control structure provide better water quality, can be crossed with equipment, and look better than non-stabilized gullies.
■ If it is planned to retain water, a grade control structure may provide a water source and habitat for wildlife.
Planning ■ Are adequate conservation practices installed
above the structure to reduce erosion and sedimentation?
■ Is the planned location in the proper place to achieve the level of control needed?
Tech Notes ■ Consult with NRCS for design and construction
specifications.
■ Obtain necessary permits or authorizations before construction.
■ Remove all trees and shrubs within 30 feet of the structure.
■ Clear debris approximately 50 feet downstream from the spillway outlet.
Maintenance ■ Keep burrowing animals off earthen structures.
■ Repair cracks in concrete.
■ Keep outlets free of debris.
Grade Control Structure Earthen, wooden, concrete, or other structure built across a drainageway or gully to control and reduce water flow.

13
Grassed Waterway Shaping and establishing grass in a natural drainageway to prevent gullies from forming and control soil erosion.
DescriptionA natural drainageway is graded and shaped to form a smooth, parabolic-shaped channel. This area is seeded to sod-forming grasses. Runoff water flows over the grass rather than tearing soil away and forming a gully. An outlet is often installed at the base of the drainageway to stabilize the waterway.
Benefits ■ Grass cover protects the drainageway from
gully erosion.
■ Vegetation may act as a filter, absorbing some of the pesticides and nutrients in runoff water.
■ Vegetation provides cover for wildlife.
Planning ■ Is major land reshaping needed?
■ Is there a proper outlet for surface runoff at the bottom of the waterway?
■ Are soil conservation measures installed to prevent siltation?
■ Will tile drainage be necessary to establish vegetation in the waterway?
Tech Notes ■ A waterway should be designed to carry the peak
runoff from a ten-year, 24-hour storm. Check NRCS design charts.
■ Plant seed at recommended time and rate. Place seed about 1/4 to 1/2 inch deep. If feasible, plant across the slope to reduce erosion.
■ A nurse crop, temporary cover, or mulch may be necessary until permanent cover is established.
Maintenance ■ Lift implements off the ground and shut off
spray equipment when crossing.
■ Do not use the waterway as a roadway.
■ Fertilize based on soil test results.
■ Mow periodically, but wait until August 15 to allow young birds to leave the nest.
■ Maintain the width of the grass area when tilling surrounding fields.
■ Avoid planting end rows along the waterway to prevent a new gully from forming on the outside edges of the waterway.

14
DescriptionThis practice involves the use of concrete pads and other artificial surfaces or vegetative cover to help manage and prevent animal waste, sediment, and nutrients from entering waterways.
Benefits ■ Reduces soil erosion by covering the ground
surface with permanent cover such as tough grasses, gravel, or concrete.
■ Improves water quality where livestock or animal wastes are concentrated. Concrete walkways or pads allow farmers to scrape up manure more easily and manage it for future use.
■ Improves livestock health by providing firm footing.
■ Improves air quality by reducing windblown dust.
Planning ■ Have adjoining land uses and the proximity
to residences, utilities, wetlands, or other environmentally sensitive areas been taken into account?
■ Have windbreaks been considered?
■ Is the heavy use area as far away from waterways as possible? Can a vegetated buffer be planted?
■ If the heavy use area is adjacent to existing buildings, do these building have adequate roof runoff control to keep additional water off the heavy use area?
Tech Notes ■ Follow NRCS specifications.
■ Keep heavy use areas as small as practical.
■ Provide surface and subsurface drainage for disposal of runoff without causing erosion or water quality concerns.
■ For heavy use areas protected by vegetation, choose appropriate plant species.
■ Fence all livestock walkways.
■ Collect, store, utilize, and treat manure accumulations and contaminated runoff.
Maintenance ■ Inspect the area annually and after significant
storm events.
■ Replant vegetative areas, as necessary.
Heavy Use Area Protection Stabilizing areas that are disturbed because of frequent and intensive use by livestock or farm equipment.
15
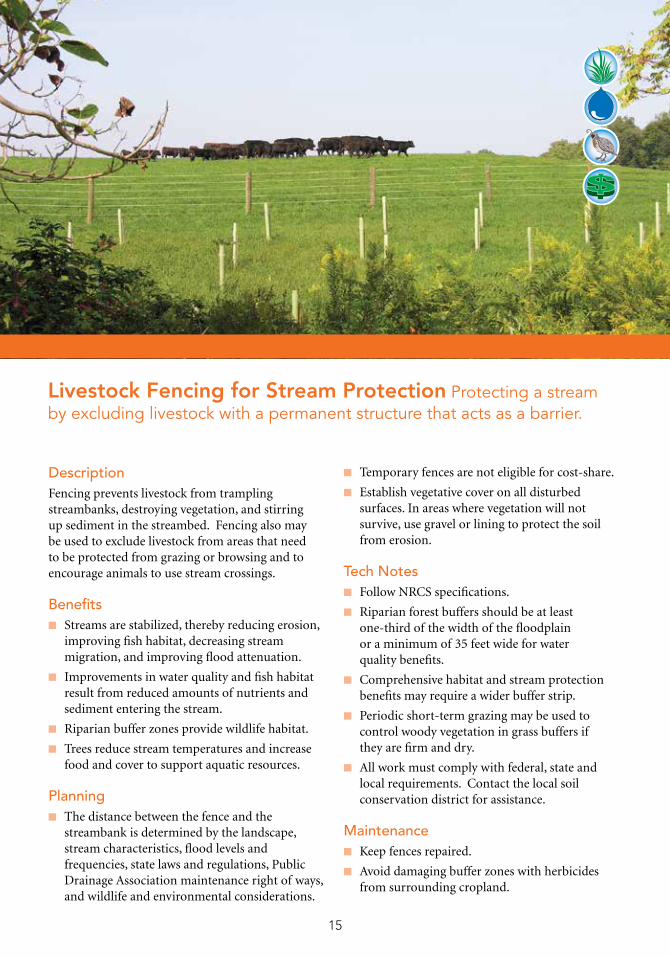
DescriptionFencing prevents livestock from trampling streambanks, destroying vegetation, and stirring up sediment in the streambed. Fencing also may be used to exclude livestock from areas that need to be protected from grazing or browsing and to encourage animals to use stream crossings.
Benefits ■ Streams are stabilized, thereby reducing erosion,
improving fish habitat, decreasing stream migration, and improving flood attenuation.
■ Improvements in water quality and fish habitat result from reduced amounts of nutrients and sediment entering the stream.
■ Riparian buffer zones provide wildlife habitat.
■ Trees reduce stream temperatures and increase food and cover to support aquatic resources.
Planning ■ The distance between the fence and the
streambank is determined by the landscape, stream characteristics, flood levels and frequencies, state laws and regulations, Public Drainage Association maintenance right of ways, and wildlife and environmental considerations.
■ Temporary fences are not eligible for cost-share.
■ Establish vegetative cover on all disturbed surfaces. In areas where vegetation will not survive, use gravel or lining to protect the soil from erosion.
Tech Notes ■ Follow NRCS specifications.
■ Riparian forest buffers should be at least one-third of the width of the floodplain or a minimum of 35 feet wide for water quality benefits.
■ Comprehensive habitat and stream protection benefits may require a wider buffer strip.
■ Periodic short-term grazing may be used to control woody vegetation in grass buffers if they are firm and dry.
■ All work must comply with federal, state and local requirements. Contact the local soil conservation district for assistance.
Maintenance ■ Keep fences repaired.
■ Avoid damaging buffer zones with herbicides from surrounding cropland.
Livestock Fencing for Stream Protection Protecting a stream by excluding livestock with a permanent structure that acts as a barrier.

16
DescriptionA stream crossing provides safe animal access to pastures while helping to control streambank and streambed erosion.
Benefits ■ Provides livestock access to all pastures
■ Livestock are encouraged to use the crossing instead of the streambed to navigate streams.
■ Crossings allow vegetation to stabilize streambanks while promoting wildlife habitat.
■ Reduces the risk of livestock injury due to unstable footing in stream channels.
■ Minimizes the risk of livestock breaking through frozen stream surfaces in the winter.
■ Improves cattle health by keeping animals out of the mud.
Planning ■ How will livestock be excluded from the stream?
■ Can a livestock watering system be installed?
■ Are soil conservation measures in place?
■ Have upstream conditions been considered?
Tech Notes ■ Follow NRCS specifications.
■ Slope the banks of the stream on each side and provide a firm streambed.
■ Make banks flat enough for livestock or equipment to move safely down the bank.
■ Protect banks with gravel laid over filter fabric.
■ Make the streambed firm enough for cows to walk across or equipment to cross without causing ruts.
■ All work must comply with federal, state, and local requirements. Contact the local soil conservation district for assistance.
Maintenance ■ If livestock use the crossing, make sure that
fences are in place.
■ Inspect after major storm events.
■ Remove any accumulation of organic material, woody material, or excess sediment.
■ Replace surfacing stone used for the livestock crossing as needed.
Livestock Stream Crossing A stream crossing provides a hard, stable area where cattle or equipment can cross a stream without damaging the streambed or banks.
Before After

17
Livestock Watering System A system of troughs and water lines to provide livestock with water from a spring, pond, well, or other source.
DescriptionSelectively placed watering troughs can make pasture management easier. Farmers can control grazing more efficiently and prevent erosion and water pollution by excluding livestock from streams, springs, and other environmentally-sensitive water sources.
Benefits ■ Provides a clean, reliable, easily accessible
water supply for animals.
■ Allows farmers to divide large pastures into smaller units and rotate livestock from one pasture to another to maintain good forage quality.
■ Can help reduce erosion from messy or muddy areas resulting from livestock having uncontrolled access to springheads or streams.
■ Can reduce mastitis or hoof problems by providing water for livestock in dry pastures.
Planning ■ Will the system have adequate capacity to meet
the water requirements of the livestock?
■ Will the watering system affect downstream flows or aquifers?
■ Will wetlands or other water-dependent wildlife habitats be impacted?
■ Will fencing be needed to exclude livestock from streams and other sensitive areas?
Tech Notes ■ Follow NRCS specifications.
■ Locate troughs to promote even grazing distribution in pastures. Make certain that troughs are located as far from streams and drainageways as practical.
■ Overflow from a watering trough should be handled using an underground outlet.
■ Permanently installed watering troughs should be constructed of reinforced concrete or an equally durable material.
■ Obtain necessary permits or authorizations before construction.
Maintenance ■ Reseed and fertilize, as needed, around the
watering trough to maintain vegetative cover.
■ Inspect the water source, pipelines and outlets regularly.
18
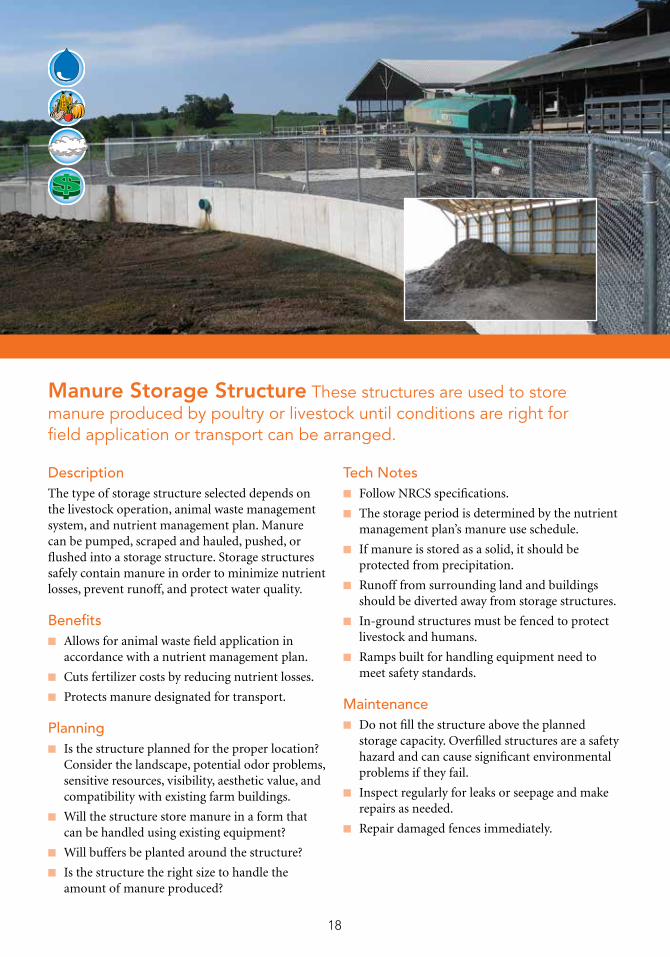
DescriptionThe type of storage structure selected depends on the livestock operation, animal waste management system, and nutrient management plan. Manure can be pumped, scraped and hauled, pushed, or flushed into a storage structure. Storage structures safely contain manure in order to minimize nutrient losses, prevent runoff, and protect water quality.
Benefits ■ Allows for animal waste field application in
accordance with a nutrient management plan.
■ Cuts fertilizer costs by reducing nutrient losses.
■ Protects manure designated for transport.
Planning ■ Is the structure planned for the proper location?
Consider the landscape, potential odor problems, sensitive resources, visibility, aesthetic value, and compatibility with existing farm buildings.
■ Will the structure store manure in a form that can be handled using existing equipment?
■ Will buffers be planted around the structure?
■ Is the structure the right size to handle the amount of manure produced?
Tech Notes ■ Follow NRCS specifications.
■ The storage period is determined by the nutrient management plan’s manure use schedule.
■ If manure is stored as a solid, it should be protected from precipitation.
■ Runoff from surrounding land and buildings should be diverted away from storage structures.
■ In-ground structures must be fenced to protect livestock and humans.
■ Ramps built for handling equipment need to meet safety standards.
Maintenance ■ Do not fill the structure above the planned
storage capacity. Overfilled structures are a safety hazard and can cause significant environmental problems if they fail.
■ Inspect regularly for leaks or seepage and make repairs as needed.
■ Repair damaged fences immediately.
Manure Storage Structure These structures are used to store manure produced by poultry or livestock until conditions are right for field application or transport can be arranged.

19
DescriptionGutters, downspouts, and other water conveyance devices prevent roof runoff water from causing severe erosion or mixing with animal waste and transporting pollutants to waterways.
Benefits ■ Improves water quality.
■ Reduces soil erosion.
■ Increases infiltration.
■ Protects buildings and other structures.
Planning ■ Does runoff need to be diverted away from
structures or contaminated areas?
■ Will the runoff be collected and used for other purposes?
Tech Notes ■ Follow NRCS design specifications.
■ Runoff may empty into surface or underground outlets.
■ Outlets must not discharge near wells, septic system drain fields, basements, or buried tanks.
■ Discharge runoff a minimum of five feet from the building. The discharge area must slope away from the structure.
■ Avoid discharging outlets directly into surface waters. When feasible, divert runoff onto pervious landscapes such as lawns, infiltration trenches, and natural areas to allow infiltration of runoff.
Maintenance ■ Keep roof runoff systems clean and free of debris
and obstructions that reduce flow.
■ Inspect regularly and perform repairs to ensure proper function.
Roof Runoff System A system for collecting, controlling and disposing of runoff water from non-residential farm buildings.

20
DescriptionInstalling roofs and covers over an existing or planned heavy use area helps prevent rainwater runoff from mixing with animal waste and transporting pollutants to nearby waterways.
Benefits ■ Prevents clean water from entering a barnyard or
feedlot where it can become contaminated.
■ Provides a temporary animal confinement area during inclement weather.
Planning ■ Cost-share assistance is available to construct
roofs and covers on existing heavily used animal areas that pose a significant water quality problem.
■ To qualify for cost-share assistance, a minimum of 15 animal units (one animal unit equals 1,000 lbs. of live animal weight) must regularly use or occupy the area to be protected.
■ In addition, a minimum of 100 square feet of housing per animal unit is required with 40 square feet available or constructed at the owner’s expense.
Tech Notes ■ Consult with NRCS for design and construction
specifications.
■ Obtain necessary permits and authorizations before construction.
■ To qualify for cost-share, the roof or cover may not be attached to an existing structure but may be attached to a new structure under construction. Additionally, a roof or cover may only be built over a heavy use area constructed of concrete.
Maintenance ■ Inspect areas surrounding the roofed/covered
heavy use area after major runoff events and repair promptly.
■ Maintain grassed areas around the structure. Reseed as needed according to the operation and maintenance plan.
■ Fill in low areas and re-grade as needed using materials similar to those originally installed.
Roofs and Covers A roof structure placed over a heavy use area to divert clean water from animal management areas such as barnyards or feedlots.

21
DescriptionTerraces usually follow the contour and are used to break long slopes into shorter ones. As water makes its way down a hill, terraces serve as small dams to intercept and guide the water to an outlet. There are two types of terraces—storage terraces and gradient terraces. Storage terraces collect and store the water until it can infiltrate into the ground or be released through a stable outlet. Gradient terraces are designed as channels to slow runoff and carry water to a stable outlet like a grassed waterway.
Benefits ■ Both water quality and soil quality are improved.
■ Terraces with grass on their slopes can provide nesting habitat.
Planning ■ Will other conservation practices be used to
prevent sedimentation?
Tech Notes ■ Chisel the parts of the terrace that will be farmed
to loosen compacted soil.
■ Fertilize and seed according to NRCS recommendations.
■ Grassed back slope terraces have a farmable front slope with a 2:1 back slope (2 ft. horizontal to every 1 ft. of vertical drop).
■ Narrow base terraces have 2:1 slopes on both the front slope and back slope.
■ Broad base terraces should not be built on slopes greater than eight percent. Farmable slopes should not be steeper than 5:1.
■ Terraces are designed to control runoff from a ten-year storm.
Maintenance ■ Avoid farming too close to intakes.
■ Remove sediment build-up in the channel to maintain the required water-holding capacity.
■ Repair sections of embankment that have eroded or have excessive settlement.
■ Fill settled or eroded areas in the tile trench.
■ Repair or replace damaged intakes.
■ Remove sediment build-up and trash from around the intake.
■ Control rodents or burrowing animals, weeds, brush, and trees.
■ Reseed and fertilize based on soil test results to maintain good vegetation.
Terrace An earthen ridge around a hillside that stops water flow and stores or guides water safely off a field.
22
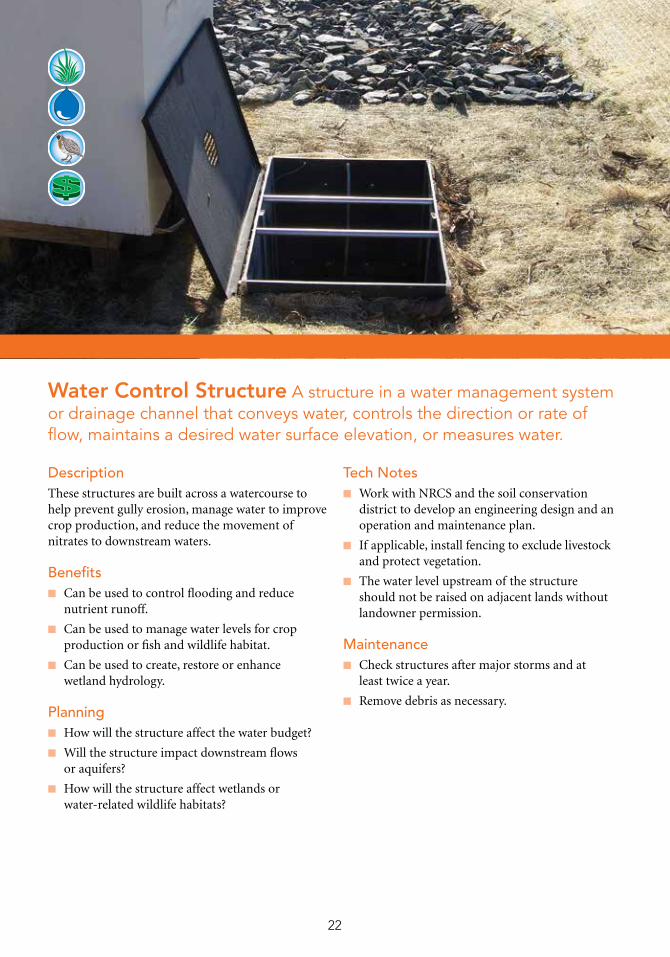
DescriptionThese structures are built across a watercourse to help prevent gully erosion, manage water to improve crop production, and reduce the movement of nitrates to downstream waters.
Benefits ■ Can be used to control flooding and reduce
nutrient runoff.
■ Can be used to manage water levels for crop production or fish and wildlife habitat.
■ Can be used to create, restore or enhance wetland hydrology.
Planning ■ How will the structure affect the water budget?
■ Will the structure impact downstream flows or aquifers?
■ How will the structure affect wetlands or water-related wildlife habitats?
Tech Notes ■ Work with NRCS and the soil conservation
district to develop an engineering design and an operation and maintenance plan.
■ If applicable, install fencing to exclude livestock and protect vegetation.
■ The water level upstream of the structure should not be raised on adjacent lands without landowner permission.
Maintenance ■ Check structures after major storms and at
least twice a year.
■ Remove debris as necessary.
Water Control Structure A structure in a water management system or drainage channel that conveys water, controls the direction or rate of flow, maintains a desired water surface elevation, or measures water.
23
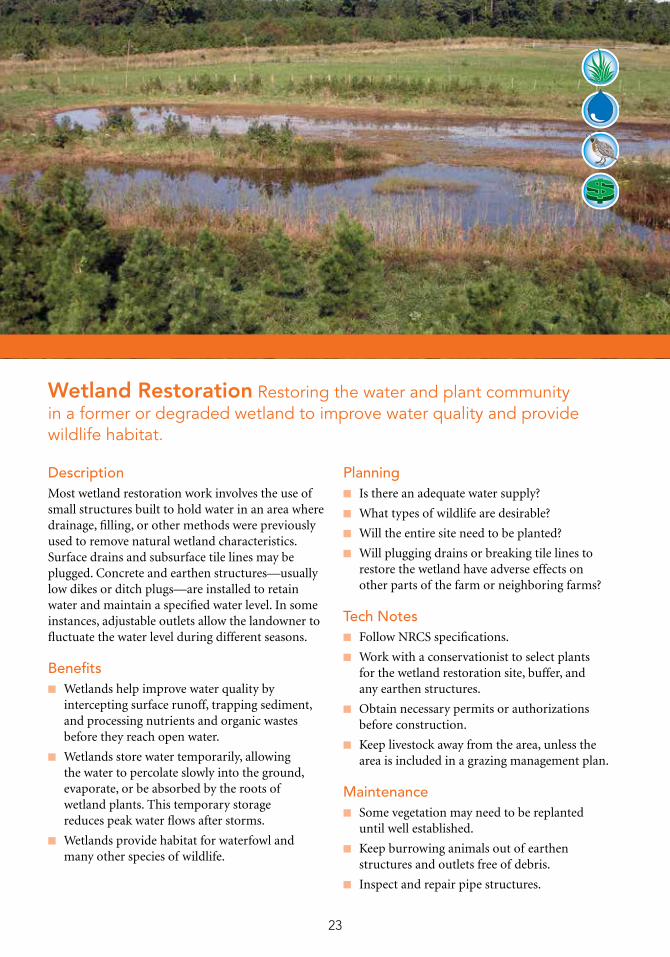
DescriptionMost wetland restoration work involves the use of small structures built to hold water in an area where drainage, filling, or other methods were previously used to remove natural wetland characteristics. Surface drains and subsurface tile lines may be plugged. Concrete and earthen structures—usually low dikes or ditch plugs—are installed to retain water and maintain a specified water level. In some instances, adjustable outlets allow the landowner to fluctuate the water level during different seasons.
Benefits ■ Wetlands help improve water quality by
intercepting surface runoff, trapping sediment, and processing nutrients and organic wastes before they reach open water.
■ Wetlands store water temporarily, allowing the water to percolate slowly into the ground, evaporate, or be absorbed by the roots of wetland plants. This temporary storage reduces peak water flows after storms.
■ Wetlands provide habitat for waterfowl and many other species of wildlife.
Planning ■ Is there an adequate water supply?
■ What types of wildlife are desirable?
■ Will the entire site need to be planted?
■ Will plugging drains or breaking tile lines to restore the wetland have adverse effects on other parts of the farm or neighboring farms?
Tech Notes ■ Follow NRCS specifications.
■ Work with a conservationist to select plants for the wetland restoration site, buffer, and any earthen structures.
■ Obtain necessary permits or authorizations before construction.
■ Keep livestock away from the area, unless the area is included in a grazing management plan.
Maintenance ■ Some vegetation may need to be replanted
until well established.
■ Keep burrowing animals out of earthen structures and outlets free of debris.
■ Inspect and repair pipe structures.
Wetland Restoration Restoring the water and plant community in a former or degraded wetland to improve water quality and provide wildlife habitat.

24
DescriptionCrop row ridges built by tilling and planting on the contour slow water flow and increase infiltration, reducing erosion. Contour farming may be used with stripcropping, whereby crops such as corn are alternated with strips of crops that grow close together (meadow grasses, alfalfa, clover, and small grains). Alternating strips slows runoff, increases infiltration, traps sediment, and provides overall cover. Crop rotation with legumes as part of the stripcropping measure will add nitrogen to the soil.
Benefits ■ Contouring may reduce soil erosion by as much
as 50 percent.
■ Contouring promotes better water quality.
Planning ■ Will more than one key contour line be needed
because of steep or irregular slopes?
■ Will stripcropping, crop residue management, diversions, or other practices be needed for steeper slopes?
Tech Notes ■ Follow NRCS specifications.
■ Establish a key contour line around the hill.
■ The key contour line grade should not exceed two percent, except within 150 feet of a grassed waterway, field border or other stable outlet, in which case the row grade may be up to three percent.
■ Perform all tillage and planting operations parallel to the key contour line.
■ Replace end rows with field borders to reduce erosion.
■ Contour strips of open row crops such as corn, should be approximately the same width as strips of close-grown crops, including small grains or meadow grasses.
■ Strip widths may be adjusted to accommodate equipment.
Maintenance ■ Use grassed waterways to prevent gully erosion.
■ Keep strip widths consistent from year to year.
Contour Farming Tillage, planting and other farming practices performed on or near the contour of the field—not up and down the hill.
25
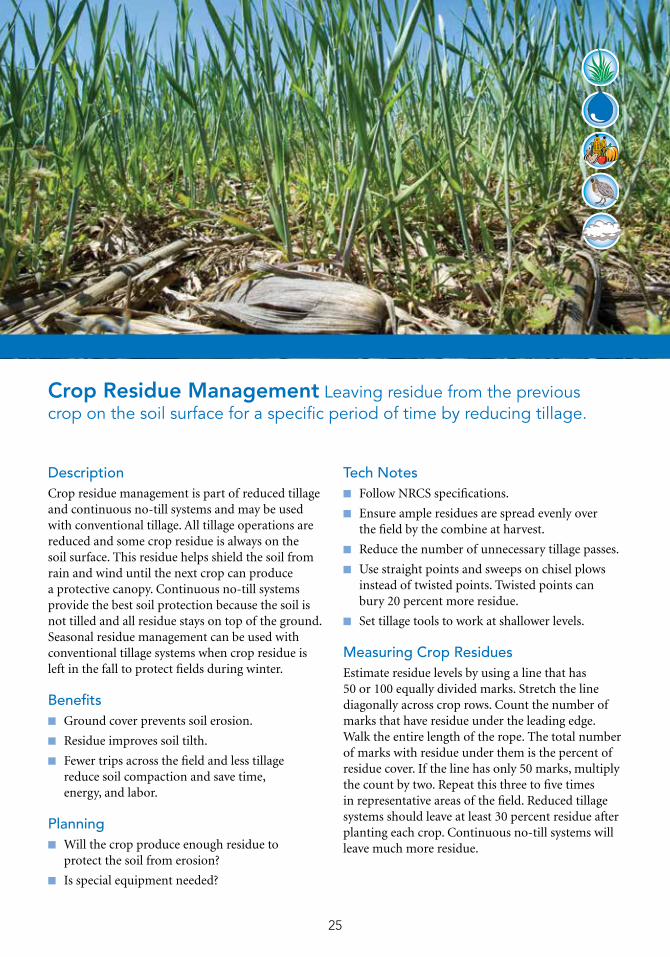
DescriptionCrop residue management is part of reduced tillage and continuous no-till systems and may be used with conventional tillage. All tillage operations are reduced and some crop residue is always on the soil surface. This residue helps shield the soil from rain and wind until the next crop can produce a protective canopy. Continuous no-till systems provide the best soil protection because the soil is not tilled and all residue stays on top of the ground. Seasonal residue management can be used with conventional tillage systems when crop residue is left in the fall to protect fields during winter.
Benefits ■ Ground cover prevents soil erosion.
■ Residue improves soil tilth.
■ Fewer trips across the field and less tillage reduce soil compaction and save time, energy, and labor.
Planning ■ Will the crop produce enough residue to
protect the soil from erosion?
■ Is special equipment needed?
Tech Notes ■ Follow NRCS specifications.
■ Ensure ample residues are spread evenly over the field by the combine at harvest.
■ Reduce the number of unnecessary tillage passes.
■ Use straight points and sweeps on chisel plows instead of twisted points. Twisted points can bury 20 percent more residue.
■ Set tillage tools to work at shallower levels.
Measuring Crop ResiduesEstimate residue levels by using a line that has 50 or 100 equally divided marks. Stretch the line diagonally across crop rows. Count the number of marks that have residue under the leading edge. Walk the entire length of the rope. The total number of marks with residue under them is the percent of residue cover. If the line has only 50 marks, multiply the count by two. Repeat this three to five times in representative areas of the field. Reduced tillage systems should leave at least 30 percent residue after planting each crop. Continuous no-till systems will leave much more residue.
Crop Residue Management Leaving residue from the previous crop on the soil surface for a specific period of time by reducing tillage.
26
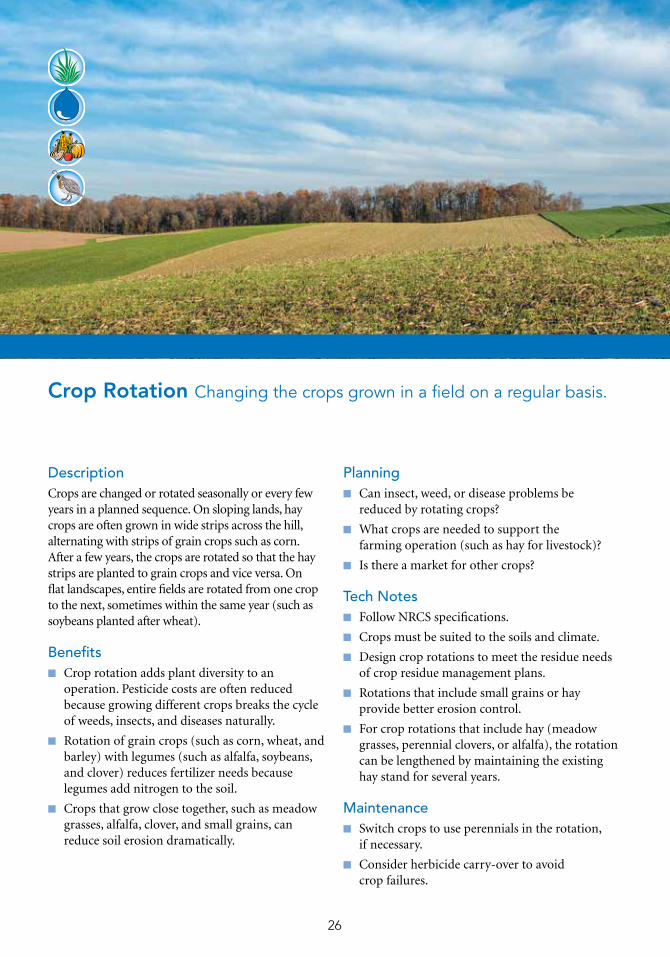
DescriptionCrops are changed or rotated seasonally or every few years in a planned sequence. On sloping lands, hay crops are often grown in wide strips across the hill, alternating with strips of grain crops such as corn. After a few years, the crops are rotated so that the hay strips are planted to grain crops and vice versa. On flat landscapes, entire fields are rotated from one crop to the next, sometimes within the same year (such as soybeans planted after wheat).
Benefits ■ Crop rotation adds plant diversity to an
operation. Pesticide costs are often reduced because growing different crops breaks the cycle of weeds, insects, and diseases naturally.
■ Rotation of grain crops (such as corn, wheat, and barley) with legumes (such as alfalfa, soybeans, and clover) reduces fertilizer needs because legumes add nitrogen to the soil.
■ Crops that grow close together, such as meadow grasses, alfalfa, clover, and small grains, can reduce soil erosion dramatically.
Planning ■ Can insect, weed, or disease problems be
reduced by rotating crops?
■ What crops are needed to support the farming operation (such as hay for livestock)?
■ Is there a market for other crops?
Tech Notes ■ Follow NRCS specifications.
■ Crops must be suited to the soils and climate.
■ Design crop rotations to meet the residue needs of crop residue management plans.
■ Rotations that include small grains or hay provide better erosion control.
■ For crop rotations that include hay (meadow grasses, perennial clovers, or alfalfa), the rotation can be lengthened by maintaining the existing hay stand for several years.
Maintenance ■ Switch crops to use perennials in the rotation,
if necessary.
■ Consider herbicide carry-over to avoid crop failures.
Crop Rotation Changing the crops grown in a field on a regular basis.
27
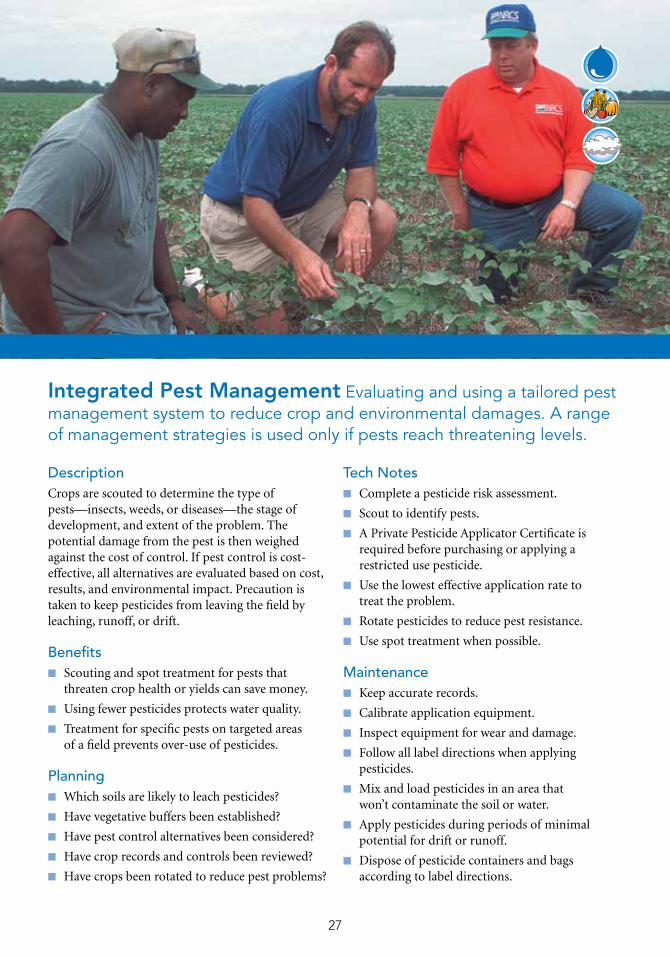
DescriptionCrops are scouted to determine the type of pests—insects, weeds, or diseases—the stage of development, and extent of the problem. The potential damage from the pest is then weighed against the cost of control. If pest control is cost-effective, all alternatives are evaluated based on cost, results, and environmental impact. Precaution is taken to keep pesticides from leaving the field by leaching, runoff, or drift.
Benefits ■ Scouting and spot treatment for pests that
threaten crop health or yields can save money.
■ Using fewer pesticides protects water quality.
■ Treatment for specific pests on targeted areas of a field prevents over-use of pesticides.
Planning ■ Which soils are likely to leach pesticides?
■ Have vegetative buffers been established?
■ Have pest control alternatives been considered?
■ Have crop records and controls been reviewed?
■ Have crops been rotated to reduce pest problems?
Tech Notes ■ Complete a pesticide risk assessment.
■ Scout to identify pests.
■ A Private Pesticide Applicator Certificate is required before purchasing or applying a restricted use pesticide.
■ Use the lowest effective application rate to treat the problem.
■ Rotate pesticides to reduce pest resistance.
■ Use spot treatment when possible.
Maintenance ■ Keep accurate records.
■ Calibrate application equipment.
■ Inspect equipment for wear and damage.
■ Follow all label directions when applying pesticides.
■ Mix and load pesticides in an area that won’t contaminate the soil or water.
■ Apply pesticides during periods of minimal potential for drift or runoff.
■ Dispose of pesticide containers and bags according to label directions.
Integrated Pest Management Evaluating and using a tailored pest management system to reduce crop and environmental damages. A range of management strategies is used only if pests reach threatening levels.

28
DescriptionPoultry, dairy, beef, or other animal producers with high soil phosphorus levels or inadequate cropland to use manure in accordance with nutrient management plans transport manure to other farms or alternative use facilities that can use the product safely.
Benefits ■ Protects water quality.
■ Reduces odors.
Planning ■ Is a storage structure available to protect
stockpiled manure from the elements until transport?
■ Does the receiving farm have a safe off-loading site that does not pose an undue risk to water quality?
■ Has the manure been analyzed to determine nitrogen and phosphorus levels before transporting?
■ Does the receiving farm have a nutrient management plan?
■ Is the appropriate equipment available to transport the manure?
Tech Notes ■ Biosecurity measures must be followed for
all transported manure.
■ Do not transport or offer for transport poultry litter containing dead birds that are not completely composted.
■ Schedule transport of manure to be compatible with weather conditions, use by the receiving facility, and in accordance with a nutrient management plan.
Maintenance ■ Make certain equipment is in good working order.
■ Promptly clean up manure that is spilled during loading and unloading.
■ Cover all loads during transportation when traveling on public roads.
■ Cover all truck-mounted or tractor-drawn spreaders when moving manure between farms on public roads.
■ Clean, wash, and disinfect all transporting and handling equipment prior to operating at a different poultry or livestock operation.
Manure Transport Poultry and livestock producers transport manure off their farms as part of an animal waste management system and nutrient management plan.
29
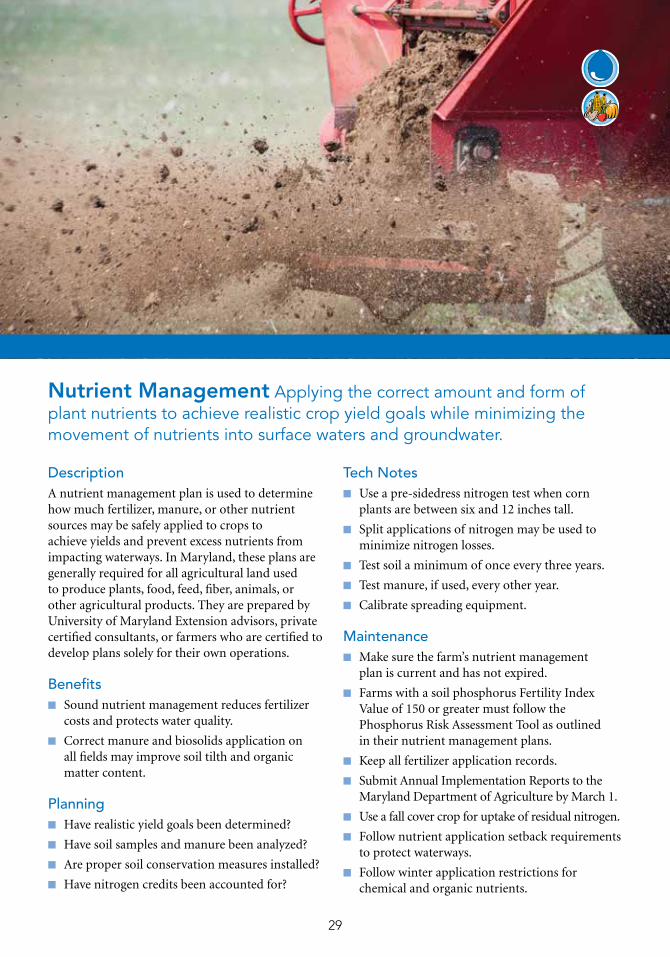
DescriptionA nutrient management plan is used to determine how much fertilizer, manure, or other nutrient sources may be safely applied to crops to achieve yields and prevent excess nutrients from impacting waterways. In Maryland, these plans are generally required for all agricultural land used to produce plants, food, feed, fiber, animals, or other agricultural products. They are prepared by University of Maryland Extension advisors, private certified consultants, or farmers who are certified to develop plans solely for their own operations.
Benefits ■ Sound nutrient management reduces fertilizer
costs and protects water quality.
■ Correct manure and biosolids application on all fields may improve soil tilth and organic matter content.
Planning ■ Have realistic yield goals been determined?
■ Have soil samples and manure been analyzed?
■ Are proper soil conservation measures installed?
■ Have nitrogen credits been accounted for?
Tech Notes ■ Use a pre-sidedress nitrogen test when corn
plants are between six and 12 inches tall.
■ Split applications of nitrogen may be used to minimize nitrogen losses.
■ Test soil a minimum of once every three years.
■ Test manure, if used, every other year.
■ Calibrate spreading equipment.
Maintenance ■ Make sure the farm’s nutrient management
plan is current and has not expired.
■ Farms with a soil phosphorus Fertility Index Value of 150 or greater must follow the Phosphorus Risk Assessment Tool as outlined in their nutrient management plans.
■ Keep all fertilizer application records.
■ Submit Annual Implementation Reports to the Maryland Department of Agriculture by March 1.
■ Use a fall cover crop for uptake of residual nitrogen.
■ Follow nutrient application setback requirements to protect waterways.
■ Follow winter application restrictions for chemical and organic nutrients.
Nutrient Management Applying the correct amount and form of plant nutrients to achieve realistic crop yield goals while minimizing the movement of nutrients into surface waters and groundwater.
30
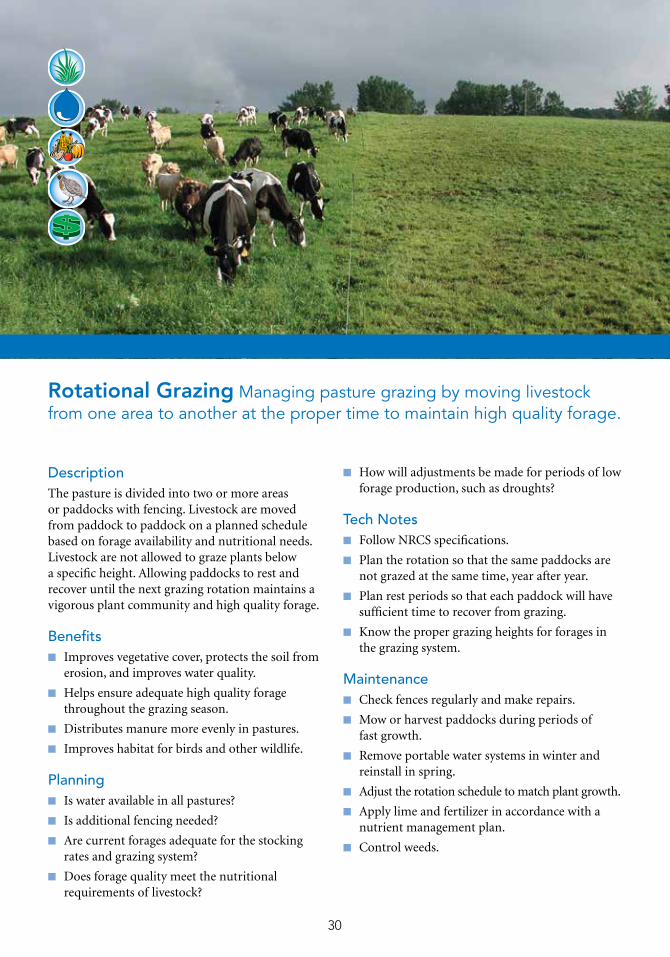
DescriptionThe pasture is divided into two or more areas or paddocks with fencing. Livestock are moved from paddock to paddock on a planned schedule based on forage availability and nutritional needs. Livestock are not allowed to graze plants below a specific height. Allowing paddocks to rest and recover until the next grazing rotation maintains a vigorous plant community and high quality forage.
Benefits ■ Improves vegetative cover, protects the soil from
erosion, and improves water quality.
■ Helps ensure adequate high quality forage throughout the grazing season.
■ Distributes manure more evenly in pastures.
■ Improves habitat for birds and other wildlife.
Planning ■ Is water available in all pastures?
■ Is additional fencing needed?
■ Are current forages adequate for the stocking rates and grazing system?
■ Does forage quality meet the nutritional requirements of livestock?
■ How will adjustments be made for periods of low forage production, such as droughts?
Tech Notes ■ Follow NRCS specifications.
■ Plan the rotation so that the same paddocks are not grazed at the same time, year after year.
■ Plan rest periods so that each paddock will have sufficient time to recover from grazing.
■ Know the proper grazing heights for forages in the grazing system.
Maintenance ■ Check fences regularly and make repairs.
■ Mow or harvest paddocks during periods of fast growth.
■ Remove portable water systems in winter and reinstall in spring.
■ Adjust the rotation schedule to match plant growth.
■ Apply lime and fertilizer in accordance with a nutrient management plan.
■ Control weeds.
Rotational Grazing Managing pasture grazing by moving livestock from one area to another at the proper time to maintain high quality forage.

31
DescriptionThe way materials are handled near a water supply and the distance of possible contaminants from a well or other water source can have a dramatic effect on the quality of drinking water on the farm. If pesticides are typically mixed near the well, the risk of contaminating the drinking water supply increases. To protect wells from contamination, take an inventory of farming practices, including pesticide mixing, container washing, and disposal methods. Follow up by assessing the risk of contamination and making necessary changes.
Benefits ■ Farm modifications may improve efficiency and
reduce operating and production costs.
■ The drinking water supply and other water resources will be protected from contamination.
Planning ■ Are necessary soil conservation and water quality
practices in place?
■ Has an inventory of activities near the farmstead been completed?
■ Have all abandoned wells near the farmstead been properly closed and sealed?
Tech Notes ■ Soil conservation practices may be installed to
divert runoff from the well area.
■ Mix farm chemicals and rinse containers a minimum of 100 feet from a well.
■ Apply pesticides on days with minimal wind to prevent chemical drift into farmstead areas.
■ Use a backflow device in the hose when filling a sprayer tank to be sure chemicals will not siphon back to the well.
Maintenance ■ Keep an emergency chemical spill kit handy.
■ Maintain filter strips surrounding the farmstead or wellhead.
■ Repair wellhead casing, as needed.
■ Repair cracks in concrete pads used for chemical mixing, loading, or container washing.
Well Protection Changing farming practices near the farmstead to reduce the risk of contaminating water sources, particularly domestic water supplies.

32
Notes:
____________________________________________________________________________
____________________________________________________________________________
____________________________________________________________________________
____________________________________________________________________________
____________________________________________________________________________
____________________________________________________________________________
____________________________________________________________________________
____________________________________________________________________________
____________________________________________________________________________
____________________________________________________________________________
____________________________________________________________________________
____________________________________________________________________________
____________________________________________________________________________
____________________________________________________________________________
____________________________________________________________________________
____________________________________________________________________________
____________________________________________________________________________
____________________________________________________________________________
____________________________________________________________________________
____________________________________________________________________________
Maryland’s Conservation PartnershipFree technical and financial assistance to install best management practices is available from local, state, and federal agencies, including soil conservation districts, the Maryland Department of Agriculture, USDA’s Natural Resources Conservation Service and Farm Service Agency, and University of Maryland Extension. In addition, private nutrient management consultants, crop advisors, and agribusiness specialists may be hired by farmers to assist in conservation planning.
Maryland Department of Agriculture Soil Conservation DistrictsUSDA Natural Resources Conservation Service USDA Farm Service AgencyUniversity of Maryland Extension State Soil Conservation Committee
Soil Conservation DistrictsAllegany .................................................................................. 301-777-1747, ext. 3Anne Arundel ....................................................................................410-571-6757Baltimore County .................................................................. 410-527-5920, ext. 3Calvert ..................................................................................... 410-535-1521, ext. 3Caroline .................................................................................. 410-479-1202, ext. 3Carroll ..................................................................................... 410-848-8200, ext. 3Catoctin .................................................................................. 301-695-2803, ext. 3Cecil......................................................................................... 410-398-4411, ext. 3Charles ................................................................................................301-638-3028Dorchester .............................................................................. 410-228-5640, ext. 3Frederick ................................................................................. 301-695-2803, ext. 3Garrett ..................................................................................... 301-334-6950, ext. 3Harford ................................................................................... 410-838-6181, ext. 3Howard ...............................................................................................410-313-0680Kent ......................................................................................... 410-778-5150, ext. 3Montgomery ......................................................................................301-590-2855Prince George’s ....................................................................... 301-574-5162, ext. 3Queen Anne’s ......................................................................... 410-758-3136, ext. 3St. Mary’s................................................................................. 301-475-8402, ext. 3Somerset ............................................................................................ 410-621-9310Talbot ...................................................................................... 410-822-1577, ext. 3Washington County .............................................................. 301-797-6821, ext. 3Wicomico ............................................................................... 410-546-4777, ext. 3Worcester ................................................................................ 410-632-5439, ext. 3
170861_36pg.indd 33 6/6/17 9:39 AM

34
50 Harry S. Truman Parkway Annapolis, MD 21401410-841-5863 mda.maryland.gov
RECYCLED PAPER \ MDA 15.07.16


![BA(Conservation) - HKURBANLABS · Bachelor of Arts in Conservation Degree [BA(Conservation)]. The BA(Conservation) integrates the discipline of conservation with the fields of architecture,](https://img.pdfslide.us/doc/110x75/5f02bf917e708231d405d0fe/baconservation-hkurbanlabs-bachelor-of-arts-in-conservation-degree-baconservation.jpg)