Embed Size (px)
Citation preview
Oracle® Identity ManagerConnector Guide for SAP SuccessFactors
Release 11.1.1E79511-02April 2018

Oracle Identity Manager Connector Guide for SAP SuccessFactors, Release 11.1.1
E79511-02
Copyright © 2017, 2018, Oracle and/or its affiliates. All rights reserved.
Primary Author: Alankrita Prakash
Contributing Authors: Vagdevi Jayashankar
Contributors: Akash Sharama
This software and related documentation are provided under a license agreement containing restrictions onuse and disclosure and are protected by intellectual property laws. Except as expressly permitted in yourlicense agreement or allowed by law, you may not use, copy, reproduce, translate, broadcast, modify,license, transmit, distribute, exhibit, perform, publish, or display any part, in any form, or by any means.Reverse engineering, disassembly, or decompilation of this software, unless required by law forinteroperability, is prohibited.
The information contained herein is subject to change without notice and is not warranted to be error-free. Ifyou find any errors, please report them to us in writing.
If this is software or related documentation that is delivered to the U.S. Government or anyone licensing it onbehalf of the U.S. Government, then the following notice is applicable:
U.S. GOVERNMENT END USERS: Oracle programs, including any operating system, integrated software,any programs installed on the hardware, and/or documentation, delivered to U.S. Government end users are"commercial computer software" pursuant to the applicable Federal Acquisition Regulation and agency-specific supplemental regulations. As such, use, duplication, disclosure, modification, and adaptation of theprograms, including any operating system, integrated software, any programs installed on the hardware,and/or documentation, shall be subject to license terms and license restrictions applicable to the programs.No other rights are granted to the U.S. Government.
This software or hardware is developed for general use in a variety of information management applications.It is not developed or intended for use in any inherently dangerous applications, including applications thatmay create a risk of personal injury. If you use this software or hardware in dangerous applications, then youshall be responsible to take all appropriate fail-safe, backup, redundancy, and other measures to ensure itssafe use. Oracle Corporation and its affiliates disclaim any liability for any damages caused by use of thissoftware or hardware in dangerous applications.
Oracle and Java are registered trademarks of Oracle and/or its affiliates. Other names may be trademarks oftheir respective owners.
Intel and Intel Xeon are trademarks or registered trademarks of Intel Corporation. All SPARC trademarks areused under license and are trademarks or registered trademarks of SPARC International, Inc. AMD, Opteron,the AMD logo, and the AMD Opteron logo are trademarks or registered trademarks of Advanced MicroDevices. UNIX is a registered trademark of The Open Group.
This software or hardware and documentation may provide access to or information about content, products,and services from third parties. Oracle Corporation and its affiliates are not responsible for and expresslydisclaim all warranties of any kind with respect to third-party content, products, and services unless otherwiseset forth in an applicable agreement between you and Oracle. Oracle Corporation and its affiliates will not beresponsible for any loss, costs, or damages incurred due to your access to or use of third-party content,products, or services, except as set forth in an applicable agreement between you and Oracle.
Contents
Preface
Audience x
Documentation Accessibility x
Related Documents x
Conventions x
What’s New in Oracle Identity Manager Connector for SAPSuccessFactors?
Software Updates xii
Documentation-Specific Updates xii
1 About the SAP SuccessFactors Connector
1.1 Introduction to the SAP SuccessFactors Connector 1-1
1.2 Certified Components for the SAP SuccessFactors Connector 1-2
1.3 Certified Languages for the SAP SuccessFactors Connector 1-2
1.4 Architecture of the SAP SuccessFactors Connector 1-3
1.5 Use Cases Supported by the Connector 1-5
1.6 Features of the SAP SuccessFactors Connector 1-5
1.6.1 Full and Incremental Reconciliation 1-6
1.6.2 Support for Trusted Source Reconciliation 1-6
1.6.3 Limited Reconciliation 1-6
1.6.4 Support for the Connector Server 1-6
1.6.5 Transformation and Validation of Account Data 1-7
1.7 Lookup Definitions Used During Reconciliation and Provisioning 1-7
1.7.1 Lookup Definitions Synchronized with the Target System 1-7
1.7.2 Preconfigured Lookup Definitions 1-8
1.7.2.1 Lookup.SuccessFactors.Configuration 1-9
1.7.2.2 Lookup.SuccesFactors.UM.Configuration 1-13
1.7.2.3 Lookup.SuccessFactors.UM.ProvAttrMap 1-14
1.7.2.4 Lookup.SuccessFactors.UM.ReconAttrMap 1-14
1.7.2.5 Lookup.SuccessFactors.UM.Configuration.Trusted 1-15
iii
1.7.2.6 Lookup.SuccessFactors.UM.ReconAttrMap.TrustedDefaults 1-15
1.7.2.7 Lookup.SuccessFactors.Configuration.Trusted 1-16
1.7.2.8 Lookup.SuccessFactors.UM.ReconAttrMap.Trusted 1-17
1.7.2.9 Lookup.SuccessFactors.Division 1-18
1.7.2.10 Lookup.SuccessFactors.Department 1-18
1.7.2.11 Lookup.SuccessFactors.Married 1-18
1.7.2.12 Lookup.SuccessFactors.Citizenship 1-19
1.7.2.13 Lookup.SuccessFactors.Gender 1-19
1.7.2.14 Lookup.SuccessFactors.Country 1-19
1.7.2.15 Lookup.SuccessFactors.State 1-19
1.7.2.16 Lookup.SuccessFactors.BussinessUnit 1-20
1.7.2.17 Lookup.SuccessFactors.Company 1-20
1.7.2.18 Lookup.SuccessFactors.EventReason 1-20
1.7.2.19 Lookup.SuccessFactors.JobClassification 1-21
1.7.2.20 Lookup.SuccessFactors.BooleanValues 1-21
1.7.2.21 Lookup.SuccessFactors.Location 1-21
1.7.2.22 Lookup.SuccessFactors.City 1-21
1.8 Connector Objects Used During Target Resource Reconciliation 1-22
1.8.1 User Fields for Target Resource Reconciliation 1-22
1.8.2 Reconciliation Rules for Target Resource Reconciliation 1-23
1.8.2.1 Target Resource Reconciliation Rules for Users 1-24
1.8.2.2 Viewing Reconciliation Rules for Target Resource Reconciliation 1-24
1.8.3 Reconciliation Action Rules for Target Resource Reconciliation 1-25
1.8.3.1 Target Resource Reconciliation Action Rules for Users 1-25
1.8.3.2 Viewing Reconciliation Action Rules for Target ResourceReconciliation 1-25
1.9 Connector Objects Used During Provisioning 1-26
1.9.1 Provisioning Functions 1-26
1.9.2 User Fields for Provisioning 1-27
1.10 Connector Objects Used During Trusted Source Reconciliation 1-28
1.10.1 User Fields for Trusted Source Reconciliation 1-28
1.10.2 Reconciliation Rule for Trusted Source Reconciliation 1-29
1.10.2.1 Trusted Source Reconciliation Rule for Users 1-29
1.10.2.2 Viewing Reconciliation Rules for Trusted Source Reconciliation 1-29
1.10.3 Reconciliation Action Rules for Trusted Source Reconciliation 1-30
1.10.3.1 Trusted Source Reconciliation Action Rules for Users 1-30
1.10.3.2 Viewing Reconciliation Action Rules for Trusted SourceReconciliation 1-30
1.11 Roadmap for Deploying and Using the SAP SuccessFactors Connector 1-31
iv
2 Deploying the SAP SuccessFactors Connector
2.1 Preinstallation 2-1
2.2 Installation 2-2
2.2.1 Understanding Installation of the SAP SuccessFactors Connector 2-2
2.2.2 Running the Connector Installer 2-2
2.2.3 Configuring the IT Resource for the Target System 2-4
2.2.3.1 IT Resource Parameters 2-4
2.2.3.2 Specifying Values for the IT Resource Parameters 2-6
2.3 Postinstallation 2-6
2.3.1 Configuring Oracle Identity Manager 2-7
2.3.1.1 Creating and Activating a Sandbox 2-7
2.3.1.2 Creating a New UI Form 2-7
2.3.1.3 Creating an Application Instance 2-7
2.3.1.4 Publishing a Sandbox 2-8
2.3.1.5 Harvesting Entitlements and Sync Catalog 2-8
2.3.1.6 Updating an Existing Application Instance with a New Form 2-9
2.3.1.7 Updating an Existing Field for Provisioning 2-9
2.3.1.8 Updating an Existing Field for Reconciliation 2-10
2.3.2 Localizing Field Labels in UI Forms 2-10
2.3.3 Clearing Content Related to Connector Resource Bundles from theServer Cache 2-11
2.3.4 Managing Logging for the SAP SuccessFactors Connector 2-12
2.3.4.1 Understanding Log Levels 2-13
2.3.4.2 Enabling Logging 2-14
2.3.5 Configuring SSL for the SAP SuccessFactors 2-15
3 Using the SAP SuccessFactors Connector
3.1 Scheduled Jobs for Lookup Field Synchronization 3-1
3.2 Configuring Reconciliation for the SAP SuccessFactors Connector 3-2
3.2.1 Full and Incremental Reconciliation for the SAP SuccessFactorsConnector 3-2
3.2.2 Limited Reconciliation for the SAP SuccessFactors Connector 3-3
3.2.3 Reconciling Large Number of Records 3-3
3.2.4 Reconciliation Scheduled Jobs for the SAP SuccessFactors Connector 3-4
3.2.4.1 SAP SuccessFactors User Reconciliation 3-4
3.2.4.2 SAP SuccessFactors Trusted User Reconciliation 3-5
3.3 Configuring Scheduled Jobs 3-6
3.4 Guidelines on Performing Provisioning Operations 3-7
3.5 Performing Provisioning Operations 3-7
v
3.6 Uninstalling the Connector 3-8
4 Extending the Functionality of the SAP SuccessFactors Connector
4.1 Adding New User Attributes for Reconciliation 4-1
4.1.1 Adding New Attributes on the Process Form 4-2
4.1.2 Adding Attributes to the Resource Object 4-3
4.1.3 Creating Reconciliation Field Mapping 4-3
4.1.4 Creating Entries in Lookup Definitions 4-4
4.1.5 Performing Changes in a New UI Form 4-5
4.2 Adding New User Attributes for Provisioning 4-5
4.2.1 Adding New Attributes for Provisioning 4-6
4.2.2 Creating Entries in Lookup Definitions for Provisioning 4-7
4.2.3 Creating a Task to Enable Update Operations 4-7
4.2.4 Replicating Form Designer Changes to a New UI Form 4-10
4.3 Configuring Validation of Data During Reconciliation and Provisioning 4-10
4.4 Configuring Transformation of Data During User Reconciliation 4-12
4.5 Configuring the Connector for Multiple Installations of the Target System 4-13
4.6 Defining the Connector 4-14
4.7 Understanding OData API Dictionary 4-14
4.7.1 About OData API Dictionary 4-14
4.7.2 Viewing OData API Dictionary in the SAP SuccessFactors Connector 4-15
4.7.3 Adding Custom Attributes and Object Entities in Oracle IdentityManager 4-15
4.7.4 Providing Values in Static Lookups 4-16
5 Known Issues and Workarounds for the SAP SuccessFactorsConnector
5.1 Support for Delete User Operation 5-1
5.2 Support for Removing Child Attributes 5-1
5.3 Support for Translation of Termination Date 5-1
A Files and Directories on the SAP SuccessFactors ConnectorInstallation Media
Index
vi
List of Figures
1-1 Architecture of the SuccessFactors Connector 1-3
1-2 Reconciliation Rule for Target Resource Reconciliation of Users 1-24
1-3 Reconciliation Action Rules for Target Resource Reconciliation of Users 1-26
1-4 Reconciliation Rule for Trusted Source Reconciliation 1-30
1-5 Reconciliation Action Rules for Trusted Source Reconciliation 1-31
4-1 New Field Added to the Process Form 4-2
4-2 New Reconciliation Field Added to the Resource Object 4-3
4-3 New Reconciliation Field Mapped to a Process Data Field in the Process Definition 4-4
4-4 Entry Added to the Lookup Definition 4-5
4-5 New Field Added to the Process Form 4-7
4-6 New task Added to the Process Definition 4-8
4-7 List of Adapter Variables 4-9
4-8 OData API Entities 4-15
4-9 Providing Values in a Static Lookup 4-17
vii
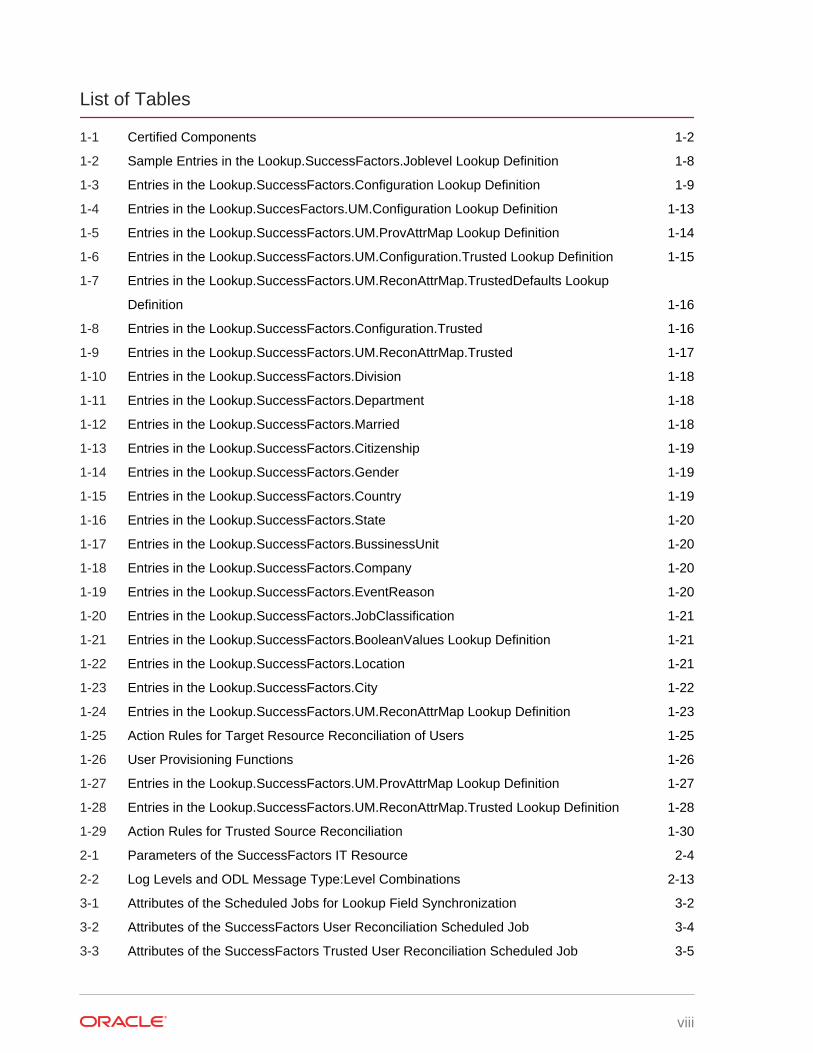
List of Tables
1-1 Certified Components 1-2
1-2 Sample Entries in the Lookup.SuccessFactors.Joblevel Lookup Definition 1-8
1-3 Entries in the Lookup.SuccessFactors.Configuration Lookup Definition 1-9
1-4 Entries in the Lookup.SuccesFactors.UM.Configuration Lookup Definition 1-13
1-5 Entries in the Lookup.SuccessFactors.UM.ProvAttrMap Lookup Definition 1-14
1-6 Entries in the Lookup.SuccessFactors.UM.Configuration.Trusted Lookup Definition 1-15
1-7 Entries in the Lookup.SuccessFactors.UM.ReconAttrMap.TrustedDefaults Lookup
Definition 1-16
1-8 Entries in the Lookup.SuccessFactors.Configuration.Trusted 1-16
1-9 Entries in the Lookup.SuccessFactors.UM.ReconAttrMap.Trusted 1-17
1-10 Entries in the Lookup.SuccessFactors.Division 1-18
1-11 Entries in the Lookup.SuccessFactors.Department 1-18
1-12 Entries in the Lookup.SuccessFactors.Married 1-18
1-13 Entries in the Lookup.SuccessFactors.Citizenship 1-19
1-14 Entries in the Lookup.SuccessFactors.Gender 1-19
1-15 Entries in the Lookup.SuccessFactors.Country 1-19
1-16 Entries in the Lookup.SuccessFactors.State 1-20
1-17 Entries in the Lookup.SuccessFactors.BussinessUnit 1-20
1-18 Entries in the Lookup.SuccessFactors.Company 1-20
1-19 Entries in the Lookup.SuccessFactors.EventReason 1-20
1-20 Entries in the Lookup.SuccessFactors.JobClassification 1-21
1-21 Entries in the Lookup.SuccessFactors.BooleanValues Lookup Definition 1-21
1-22 Entries in the Lookup.SuccessFactors.Location 1-21
1-23 Entries in the Lookup.SuccessFactors.City 1-22
1-24 Entries in the Lookup.SuccessFactors.UM.ReconAttrMap Lookup Definition 1-23
1-25 Action Rules for Target Resource Reconciliation of Users 1-25
1-26 User Provisioning Functions 1-26
1-27 Entries in the Lookup.SuccessFactors.UM.ProvAttrMap Lookup Definition 1-27
1-28 Entries in the Lookup.SuccessFactors.UM.ReconAttrMap.Trusted Lookup Definition 1-28
1-29 Action Rules for Trusted Source Reconciliation 1-30
2-1 Parameters of the SuccessFactors IT Resource 2-4
2-2 Log Levels and ODL Message Type:Level Combinations 2-13
3-1 Attributes of the Scheduled Jobs for Lookup Field Synchronization 3-2
3-2 Attributes of the SuccessFactors User Reconciliation Scheduled Job 3-4
3-3 Attributes of the SuccessFactors Trusted User Reconciliation Scheduled Job 3-5
viii

A-1 Files and Directories on the SuccessFactors Connector Installation Media A-1
ix
Preface
This guide describes the connector that is used to onboard SAP SuccessFactorsapplications to Oracle Identity Manager.
AudienceThis guide is intended for resource administrators and target system integration teams.
Documentation AccessibilityFor information about Oracle's commitment to accessibility, visit the OracleAccessibility Program website at http://www.oracle.com/pls/topic/lookup?ctx=acc&id=docacc.
Access to Oracle Support
Oracle customers that have purchased support have access to electronic supportthrough My Oracle Support. For information, visit http://www.oracle.com/pls/topic/lookup?ctx=acc&id=info or visit http://www.oracle.com/pls/topic/lookup?ctx=acc&id=trsif you are hearing impaired.
Related DocumentsFor information about installing and using Oracle Identity Manager, visit the followingOracle Help Center page:
http://docs.oracle.com/cd/E52734_01/index.html
For information about Oracle Identity Manager Connectors documentation, visit thefollowing Oracle Help Center page:
http://docs.oracle.com/cd/E22999_01/index.htm
ConventionsThe following text conventions are used in this document:
Convention Meaning
boldface Boldface type indicates graphical user interface elements associatedwith an action, or terms defined in text or the glossary.
italic Italic type indicates book titles, emphasis, or placeholder variables forwhich you supply particular values.
Preface
x

Convention Meaning
monospace Monospace type indicates commands within a paragraph, URLs, codein examples, text that appears on the screen, or text that you enter.
Preface
xi
What’s New in Oracle Identity ManagerConnector for SAP SuccessFactors?
This chapter provides an overview of the updates made to the software anddocumentation for the Oracle Identity Manager Connector for SAP SuccessFactors(SuccessFactors connector) in release 11.1.1.5.0.
The updates discussed in this chapter are divided into the following categories:
• Software Updates
This section provides details on the updates made to the connector software. Thissection also points out the sections of this guide that have been changed inresponse to each software update.
• Documentation-Specific Updates
This section provides details on the major changes that are made to this guide.For example, the relocation of a section from the second chapter to the thirdchapter is a documentation-specific update. These changes are not related tosoftware updates.
Software UpdatesThese are the updates made to the connector software.
Software Updates in Release 11.1.1.5.0
This is the first release of the SuccessFactors connector. Therefore, there are nosoftware-specific updates in this release.
Documentation-Specific UpdatesThese are the updates made to the connector documentation.
Documentation-Specific Updates in Release 11.1.1.5.0
The following documentation-specific update has been made in revision “02” of thisguide:
The “authenticationType” row of the Parameters of the SuccessFactors IT Resourcetable in the IT Resource Parameters section has been modified.
The following documentation-specific update has been made in revision “01” of thisguide:
This is the first release of the SuccessFactors connector. Therefore, there are nodocumentation-specific updates in this release.
What’s New in Oracle Identity Manager Connector for SAP SuccessFactors?
xii
1About the SAP SuccessFactors Connector
Oracle Identity Manager connectors are used to integrate Oracle Identity Manager withthe external and identity-aware applications. The SAP SuccessFactors connectorintegrates Oracle Identity Manager with the SuccessFactors target system.
This chapter contains the following sections:
• Certified Components for the SAP SuccessFactors Connector
• Certified Languages for the SAP SuccessFactors Connector
• Architecture of the SAP SuccessFactors Connector
• Use Cases Supported by the Connector
• Features of the SAP SuccessFactors Connector
1.1 Introduction to the SAP SuccessFactors ConnectorOracle Identity Manager is a centralized identity management solution that providesself service, compliance, provisioning and password management services forapplications residing on-premise or on the Cloud. The SAP SuccessFactors connectorenables you to use SuccessFactors either as a managed (target) resource or as anauthoritative (trusted) source of identity data for Oracle Identity Manager.
Note:
At some places in this guide, SAP SuccessFactors has been referred toeither as the target system or as SuccessFactors.
In the account management (target resource) mode of the connector, informationabout users created or modified directly on the target system can be reconciled intoOracle Identity Manager. This data is used to add or modify resources (that is,accounts) allocated to Oracle Identity Manager Users. In addition, you can use OracleIdentity Manager to provision or update SuccessFactors resources (accounts)assigned to Oracle Identity Manager Users. These provisioning operations performedon Oracle Identity Manager translate into the creation or updates to target systemaccounts.
In the identity reconciliation (trusted source) mode of the connector, users are createdor modified only on the target system and information about these users is reconciledinto Oracle Identity Manager.
1-1
1.2 Certified Components for the SAP SuccessFactorsConnector
These are the software components and their versions required for installing and usingthe SuccessFactors connector.
Table 1-1 Certified Components
Component Requirement
Oracle Identity Manager You can use one of the following releases ofOracle Identity Manager:
• Oracle Identity Manager 11g Release 2PS2 BP09 (11.1.2.2.9)
• Oracle Identity Manager 11g Release 2PS3 BP06 (11.1.2.3.6)
Target systems SAP SuccessFactors
Connector Server 11.1.2.1.0
Connector Server JDK JDK 1.6 or Later
1.3 Certified Languages for the SAP SuccessFactorsConnector
These are the languages that the connector supports.
• Arabic
• Chinese (Simplified)
• Chinese (Traditional)
• Czech
• Danish
• Dutch
• English (US)
• Finnish
• French
• French (Canadian)
• German
• Greek
• Hebrew
• Hungarian
• Italian
• Japanese
Chapter 1Certified Components for the SAP SuccessFactors Connector
1-2
• Korean
• Norwegian
• Polish
• Portuguese
• Portuguese (Brazilian)
• Romanian
• Russian
• Slovak
• Spanish
• Swedish
• Thai
• Turkish
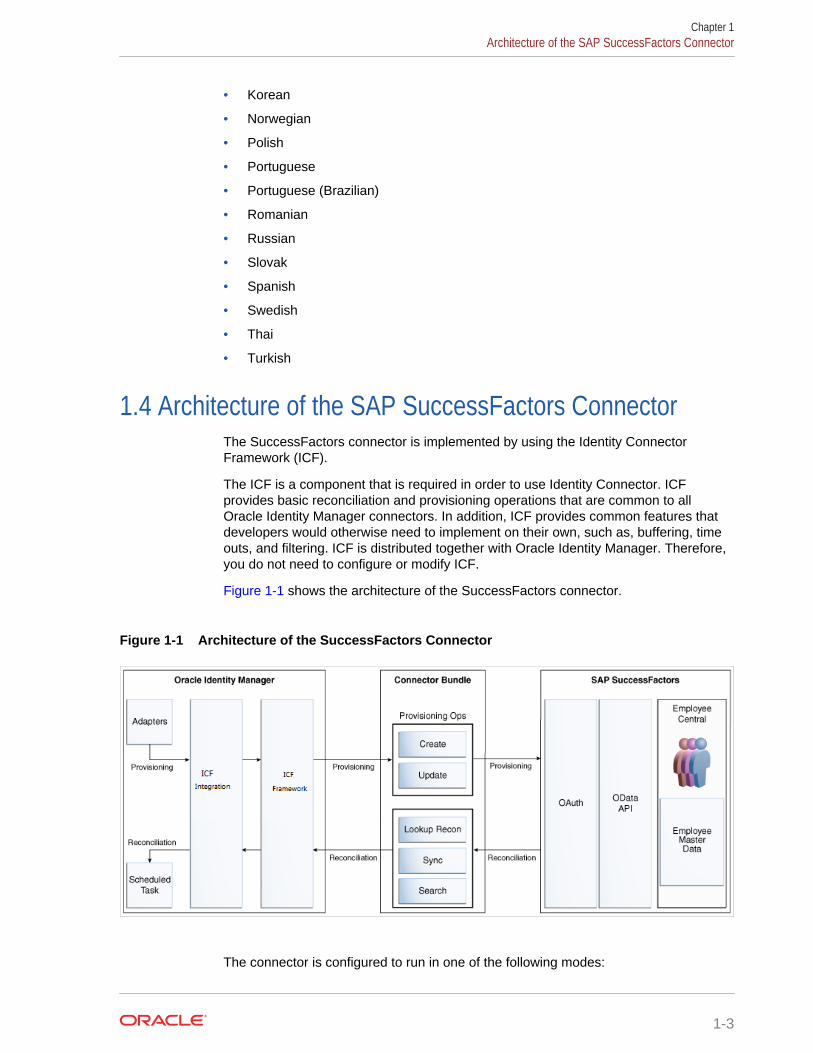
1.4 Architecture of the SAP SuccessFactors ConnectorThe SuccessFactors connector is implemented by using the Identity ConnectorFramework (ICF).
The ICF is a component that is required in order to use Identity Connector. ICFprovides basic reconciliation and provisioning operations that are common to allOracle Identity Manager connectors. In addition, ICF provides common features thatdevelopers would otherwise need to implement on their own, such as, buffering, timeouts, and filtering. ICF is distributed together with Oracle Identity Manager. Therefore,you do not need to configure or modify ICF.
Figure 1-1 shows the architecture of the SuccessFactors connector.
Figure 1-1 Architecture of the SuccessFactors Connector
The connector is configured to run in one of the following modes:
Chapter 1Architecture of the SAP SuccessFactors Connector
1-3
• Identity reconciliation
Identity reconciliation is also known as authoritative or trusted sourcereconciliation. In this mode, the target system is used as the trusted source andusers are directly created and modified on it. During reconciliation, a scheduledtask invokes an ICF operation. ICF inturn invokes a search operation on theSuccessFactors Connector Bundle and then the bundle calls the OData API forreconciliation operation. The API extracts user records that match thereconciliation criteria and hands them over through the bundle and ICF back to thescheduled task, which brings the records to Oracle Identity Manager.
Each user record fetched from the target system is compared with existing OracleIdentity Manager Users. If a match is found between the target system record andthe Oracle Identity Manager User, then the Oracle Identity Manager Userattributes are updated with changes made to the target system record. If no matchis found, then the target system record is used to create an Oracle IdentityManager User.
• Account management
Account management is also known as target resource management. In thismode, the target system is used as a target resource and the connector enablesthe following operations:
– Provisioning
Provisioning involves creating and updating users on the target systemthrough Oracle Identity Manager. During provisioning, the adapters invoke ICFoperation, ICF inturn invokes create operation on the SuccessFactors IdentityConnector Bundle and then the bundle calls the target system API forprovisioning operations. The API on the target system accepts provisioningdata from the bundle, carries out the required operation on the target system,and returns the response from the target system back to the bundle, whichpasses it to the adapters.
– Target resource reconciliation
During reconciliation, a scheduled task invokes an ICF operation. ICF inturninvokes a search operation on the SuccessFactors Identity Connector Bundleand then the bundle calls the target system API for reconciliation operation.The API extracts user records that match the reconciliation criteria and handsthem over through the bundle and ICF back to the scheduled task, whichbrings the records to Oracle Identity Manager.
Each record fetched from the target system is compared with SuccessFactorsresources that are already provisioned to Oracle Identity Manager Users. If amatch is found, then the update made to the SuccessFactors record from thetarget system is copied to the SuccessFactors resource in Oracle IdentityManager. If no match is found, then the user ID of the record is compared withthe user ID of each Oracle Identity Manager User. If a match is found, thendata in the target system record is used to provision a SuccessFactorsresource to the Oracle Identity Manager User.
Chapter 1Architecture of the SAP SuccessFactors Connector
1-4
See Also:
Understanding the Identity Connector Framework in Oracle FusionMiddleware Developing and Customizing Applications for Oracle IdentityManager
1.5 Use Cases Supported by the ConnectorThe SAP SuccessFactors application uses the Software as a Service (SaaS) modeland supports full human resource lifecycle functions on a single platform. The SAPSuccessFactors application allows an organization to make various data-driven peoplemanagement decisions. The SAP SuccessFactors connector integrates Oracle IdentityManager with SuccessFactors application.
The SAP SuccessFactors connector standardizes service processes and implementsautomation to replace manual tasks. The SuccessFactors connector enables you touse SuccessFactors either as a managed (target) resource or as an authoritative(trusted) source of identity data for Oracle Identity Manager. Multiple instances ofSuccessFactors solution can use a single connector bundle.
User Management is an example scenario which the SuccessFactors connectorfacilitates:
User Management
An organization using SuccessFactors wants to integrate with Oracle Identity Managerto manage the employee provisioning operations. The organization wants to manageits employee information (add and update functions) by creating them in the targetsystem using Oracle Identity Manager. The organization also wants to synchronizeemployee updates performed directly in the target system with Oracle IdentityManager. In such a scenario, a quick and an easy way is to install the SuccessFactorsconnector and configure it with your target system by providing connection informationin the IT resource.
The SuccessFactors connector is used to manage various employee attributes suchas email id, hire-date, and job-level.
1.6 Features of the SAP SuccessFactors ConnectorThe features of the connector include support for connector server, full reconciliation,incremental reconciliation, limited reconciliation, and reconciliation of updates toaccount data.
• Full and Incremental Reconciliation
• Support for Trusted Source Reconciliation
• Limited Reconciliation
• Support for the Connector Server
• Transformation and Validation of Account Data
Chapter 1Use Cases Supported by the Connector
1-5
1.6.1 Full and Incremental ReconciliationAfter you create the connector, you can perform full reconciliation to bring all existinguser data from the target system to Oracle Identity Manager. After the first fullreconciliation run, you can configure your connector for incremental reconciliation. Inincremental reconciliation, only records that are added or modified after the lastreconciliation run are fetched into Oracle Identity Manager.
Note:
The connector supports incremental reconciliation if the target systemcontains an attribute that holds the timestamp at which an object is createdor modified.See Full and Incremental Reconciliation for the SAP SuccessFactorsConnector
1.6.2 Support for Trusted Source ReconciliationThe SuccessFactors connector can be configured as a trusted source for reconciliationof records into Oracle Identity Manager.
See Reconciliation Scheduled Jobs for the SAP SuccessFactors Connector.
1.6.3 Limited ReconciliationTo limit or filter the records that are fetched into Oracle Identity Manager during areconciliation run, you can specify the subset of added or modified target systemrecords that must be reconciled.
You can set a reconciliation filter as the value of the Filter Suffix attribute of the userreconciliation scheduled job. The Filter Suffix attribute helps you to assign filters to theAPI based on which you get a filtered response from the target system.
See Limited Reconciliation for the SAP SuccessFactors Connector
1.6.4 Support for the Connector ServerConnector Server is one of the features provided by ICF. By using one or moreconnector servers, the connector architecture permits your application to communicatewith externally deployed bundles.
See Also:
Using an Identity Connector Server in Oracle Fusion Middleware Developingand Customizing Applications for Oracle Identity Manager
Chapter 1Features of the SAP SuccessFactors Connector
1-6
1.6.5 Transformation and Validation of Account DataYou can configure validation of account data that is brought into or sent from OracleIdentity Manager during reconciliation and provisioning. In addition, you can configuretransformation of account data that is brought into Oracle Identity Manager duringreconciliation.
The following sections provide more information:
• Configuring Transformation of Data During User Reconciliation
• Configuring Validation of Data During Reconciliation and Provisioning
1.7 Lookup Definitions Used During Reconciliation andProvisioning
Lookup definitions used during reconciliation and provisioning are either preconfiguredor can be synchronized with the target system.
Lookup definitions used during connector operations can be categorized as follows:
• Lookup Definitions Synchronized with the Target System
• Preconfigured Lookup Definitions
1.7.1 Lookup Definitions Synchronized with the Target SystemDuring a provisioning operation, you use a lookup field on the process form to select asingle value from a set of values. For example, you may want to select a supervisorfrom the Supervisor lookup field to specify the supervisor being assigned to the user.
When you deploy the connector, lookup definitions corresponding to the lookup fieldson the target system are created in Oracle Identity Manager. Lookup fieldsynchronization involves copying additions or changes made to specific fields in thetarget system to lookup definitions in Oracle Identity Manager.
After you deploy the connector, the following lookup definitions, which are used as aninput source for lookup fields, are automatically created in Oracle Identity Manager:
• Lookup.SuccessFactors.Joblevel
• Lookup.SuccessFactors.Supervisor
• Lookup.SuccessFactors.HR
These lookup definitions are empty by default. They are populated with values fetchedfrom the target system when you run the scheduled jobs for lookup fieldsynchronization. For example, when you run the scheduled job for Joblevel lookupfield synchronization, all job levels on the target system are fetched to Oracle IdentityManager and populated in the Lookup.SuccessFactors.Joblevel lookup definition.
After lookup field synchronization, data in each of the lookup definitions for lookup fieldsynchronization is stored in the following format:
• Code Key: <IT_RESOURCE_KEY>~<LOOKUP_FIELD_VALUE>
In this format:
Chapter 1Lookup Definitions Used During Reconciliation and Provisioning
1-7
– IT_RESOURCE_KEY is the numeric code assigned to each IT resource inOracle Identity Manager.
– LOOKUP_FIELD_VALUE is the connector attribute value defined for code.
For example, for the Lookup.SuccessFactors.Joblevel lookup definition, the codekey value for one of its entries is 101~VP-MKT. In this example, 101 is the numericcode assigned to the IT resource associated with the target system.
• Decode: <IT_RESOURCE_KEY>~<LOOKUP_FIELD_VALUE_ID>
In this format:
– IT_RESOURCE_KEY is the numeric code assigned to an IT resource inOracle Identity Manager.
– LOOKUP_FIELD_VALUE_ID is the ID of the target system field value
For example, for the Lookup.SuccessFactors.HR lookup definition, the decodevalue for one of its entries is 121~fjones. In this example, 121 is the numericcode assigned to the IT resource associated with the target system and fjonesis the ID of the HR associate in the target system.
Table 1-2 Sample Entries in the Lookup.SuccessFactors.Joblevel LookupDefinition
Code Key Decode
101~VP-MKT SuccessFactors~Vice President of Marketing
101~SALES-ENG SuccessFactors~Sales Engineer
101~STORE-MAN SuccessFactors~Store Manager
101~FIN-DIR SuccessFactors~Director, Finance
1.7.2 Preconfigured Lookup DefinitionsPreconfigured lookup definitions are automatically created in Oracle Identity Managerafter you deploy the connector. These lookup definitions are either prepopulated withvalues or values must be manually entered in them after the connector is deployed.
The preconfigured lookup definitions are as follows:
• Lookup.SuccessFactors.Configuration
• Lookup.SuccesFactors.UM.Configuration
• Lookup.SuccessFactors.UM.ProvAttrMap
• Lookup.SuccessFactors.UM.ReconAttrMap
• Lookup.SuccessFactors.UM.Configuration.Trusted
• Lookup.SuccessFactors.UM.ReconAttrMap.TrustedDefaults
• Lookup.SuccessFactors.Configuration.Trusted
• Lookup.SuccessFactors.UM.ReconAttrMap.Trusted
• Lookup.SuccessFactors.Division
• Lookup.SuccessFactors.Department
• Lookup.SuccessFactors.Married
Chapter 1Lookup Definitions Used During Reconciliation and Provisioning
1-8
• Lookup.SuccessFactors.Citizenship
• Lookup.SuccessFactors.Gender
• Lookup.SuccessFactors.Country
• Lookup.SuccessFactors.State
• Lookup.SuccessFactors.BussinessUnit
• Lookup.SuccessFactors.Company
• Lookup.SuccessFactors.EventReason
• Lookup.SuccessFactors.JobClassification
• Lookup.SuccessFactors.BooleanValues
• Lookup.SuccessFactors.Location
• Lookup.SuccessFactors.City
1.7.2.1 Lookup.SuccessFactors.ConfigurationThe Lookup.SuccessFactors.Configuration lookup definition holds connectorconfiguration entries that are used during target resource reconciliation andprovisioning operations.
Table 1-3 Entries in the Lookup.SuccessFactors.Configuration LookupDefinition
Code Key Decode Description
lookupUrl /odata/v2/FOJobCode?$select=externalCode,name,jobFunction,jobLevel
This the endpointURL used toreconcile lookupdata from the targetsystem.
Sample URLformat: https://apisalesdemo4.successfactors.com/odata/v2/FOJobCode?$select=externalCode,name,jobFunction,jobLevel
upsertUrl /odata/v2/upsert This entry holds thevalue of endpointURL that is used forperforming anyupsert operation onthe user account.
Sample URLformat: https://<hostname>/odata/v2/upsert
Chapter 1Lookup Definitions Used During Reconciliation and Provisioning
1-9
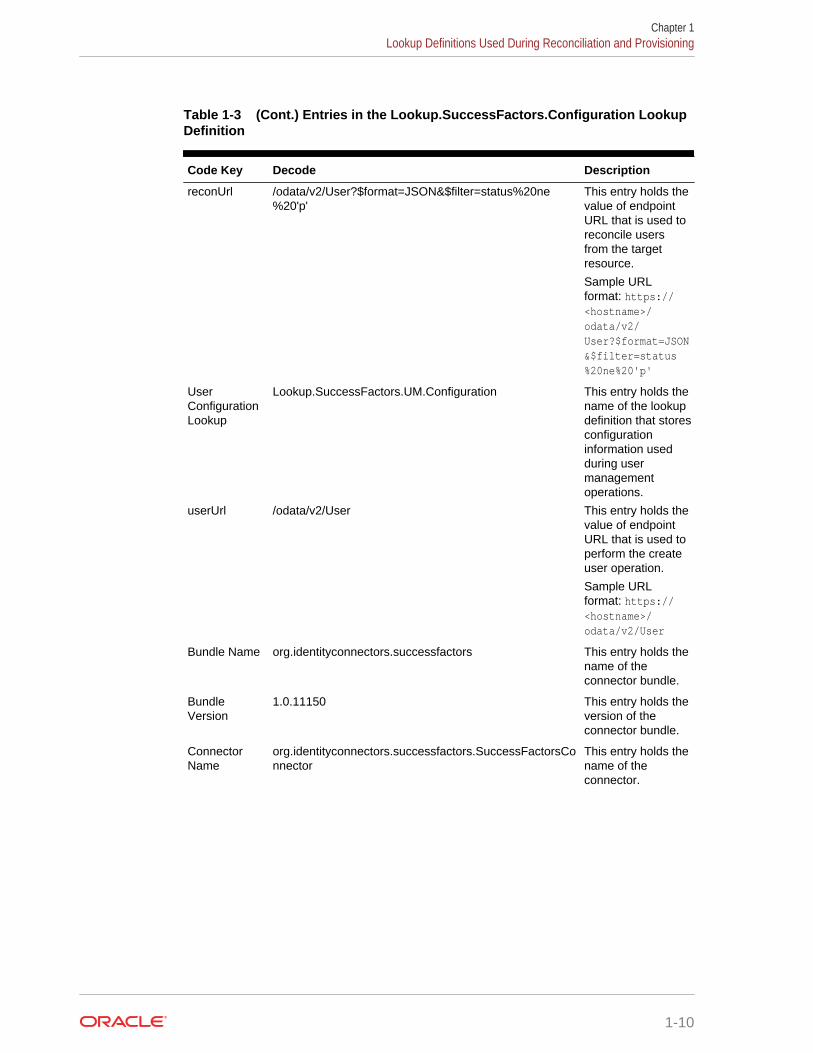
Table 1-3 (Cont.) Entries in the Lookup.SuccessFactors.Configuration LookupDefinition
Code Key Decode Description
reconUrl /odata/v2/User?$format=JSON&$filter=status%20ne%20'p'
This entry holds thevalue of endpointURL that is used toreconcile usersfrom the targetresource.
Sample URLformat: https://<hostname>/odata/v2/User?$format=JSON&$filter=status%20ne%20'p'
UserConfigurationLookup
Lookup.SuccessFactors.UM.Configuration This entry holds thename of the lookupdefinition that storesconfigurationinformation usedduring usermanagementoperations.
userUrl /odata/v2/User This entry holds thevalue of endpointURL that is used toperform the createuser operation.
Sample URLformat: https://<hostname>/odata/v2/User
Bundle Name org.identityconnectors.successfactors This entry holds thename of theconnector bundle.
BundleVersion
1.0.11150 This entry holds theversion of theconnector bundle.
ConnectorName
org.identityconnectors.successfactors.SuccessFactorsConnector
This entry holds thename of theconnector.
Chapter 1Lookup Definitions Used During Reconciliation and Provisioning
1-10

Table 1-3 (Cont.) Entries in the Lookup.SuccessFactors.Configuration LookupDefinition
Code Key Decode Description
customURIs "EmpJob=/odata/v2/ EmpJob?$filter=userId%20eq%20'(Username)'", "PerPersonal=/odata/v2/PerPersonal? $filter=personIdExternal %20eq%20'(Username)'", "UserEntity=/odata/v2/User?$filter=status%20ne %20'p'%20and%20userId%20eq%20'(Username)'", "EmpEmployment=/ odata/v2/EmpEmployment? $filter=userId%20eq%20'(Username)'", "PerPerson=/odata/v2/PerPerson? $filter=personIdExternal %20eq%20'(Username)'"
This entry holds acomma separatedlist of relative URLsfor all objectentities.Sample URLformat: https://<hostName>/odata/v2/EmpCompensation?$filter=userId%20eq%20'rallen1'
Here the sampleURI is used to filterinformation for aparticular object,which in the abovesample URL is theEmpCompensationobject for aparticular user.
Chapter 1Lookup Definitions Used During Reconciliation and Provisioning
1-11
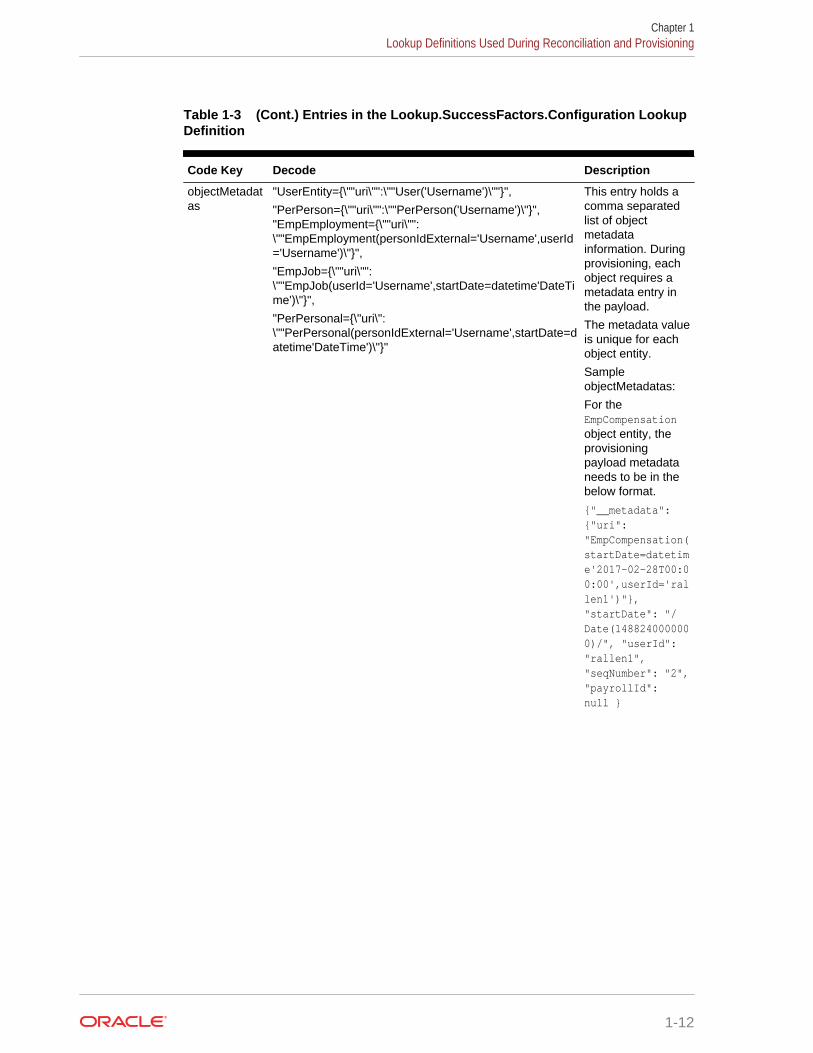
Table 1-3 (Cont.) Entries in the Lookup.SuccessFactors.Configuration LookupDefinition
Code Key Decode Description
objectMetadatas
"UserEntity={\""uri\"":\""User('Username')\""}",
"PerPerson={\""uri\"":\""PerPerson('Username')\"}","EmpEmployment={\""uri\"":\""EmpEmployment(personIdExternal='Username',userId='Username')\"}",
"EmpJob={\""uri\"":\""EmpJob(userId='Username',startDate=datetime'DateTime')\"}",
"PerPersonal={\"uri\":\""PerPersonal(personIdExternal='Username',startDate=datetime'DateTime')\"}"
This entry holds acomma separatedlist of objectmetadatainformation. Duringprovisioning, eachobject requires ametadata entry inthe payload.
The metadata valueis unique for eachobject entity.
SampleobjectMetadatas:
For theEmpCompensationobject entity, theprovisioningpayload metadataneeds to be in thebelow format.
{"__metadata":{"uri":"EmpCompensation(startDate=datetime'2017-02-28T00:00:00',userId='rallen1')"},"startDate": "/Date(1488240000000)/", "userId":"rallen1","seqNumber": "2","payrollId":null }
Chapter 1Lookup Definitions Used During Reconciliation and Provisioning
1-12
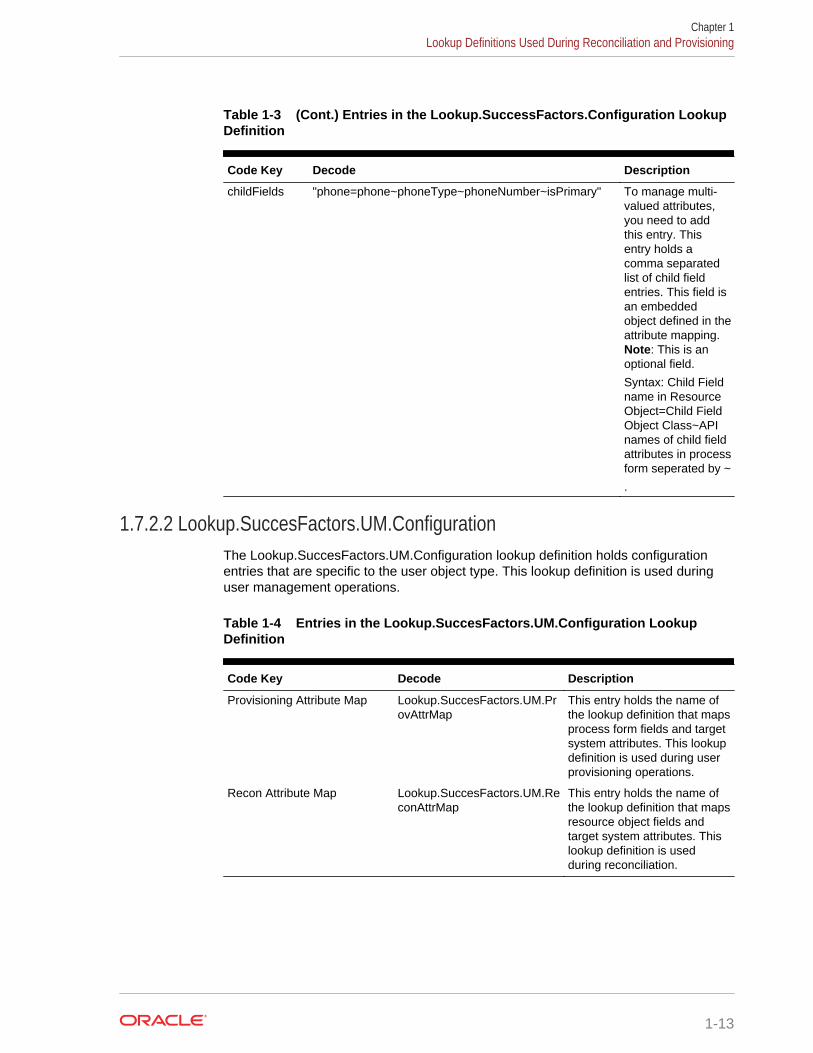
Table 1-3 (Cont.) Entries in the Lookup.SuccessFactors.Configuration LookupDefinition
Code Key Decode Description
childFields "phone=phone~phoneType~phoneNumber~isPrimary" To manage multi-valued attributes,you need to addthis entry. Thisentry holds acomma separatedlist of child fieldentries. This field isan embeddedobject defined in theattribute mapping.Note: This is anoptional field.
Syntax: Child Fieldname in ResourceObject=Child FieldObject Class~APInames of child fieldattributes in processform seperated by ~
.
1.7.2.2 Lookup.SuccesFactors.UM.ConfigurationThe Lookup.SuccesFactors.UM.Configuration lookup definition holds configurationentries that are specific to the user object type. This lookup definition is used duringuser management operations.
Table 1-4 Entries in the Lookup.SuccesFactors.UM.Configuration LookupDefinition
Code Key Decode Description
Provisioning Attribute Map Lookup.SuccesFactors.UM.ProvAttrMap
This entry holds the name ofthe lookup definition that mapsprocess form fields and targetsystem attributes. This lookupdefinition is used during userprovisioning operations.
Recon Attribute Map Lookup.SuccesFactors.UM.ReconAttrMap
This entry holds the name ofthe lookup definition that mapsresource object fields andtarget system attributes. Thislookup definition is usedduring reconciliation.
Chapter 1Lookup Definitions Used During Reconciliation and Provisioning
1-13
1.7.2.3 Lookup.SuccessFactors.UM.ProvAttrMapThe Lookup.SuccessFactors.UM.ProvAttrMap lookup definitions hold mappingsbetween process form fields and target system attributes.
This lookup definition is preconfigured and used during provisioning. Table 1-27 liststhe default entries.
You can add entries in this lookup definitions if you want to map new target systemattributes for provisioning. See Adding New Attributes for Provisioning.
Table 1-5 Entries in the Lookup.SuccessFactors.UM.ProvAttrMap LookupDefinition
User Field on Oracle Identity Manager SuccessFactors Field
Supervisor[LOOKUP] EmpJob.managerId
Business Unit EmpJob.businessUnit
Citizenship UserEntity.citizenship
City UserEntity.city
Company EmpJob.company
Country UserEntity.country
HR[LOOKUP] UserEntity.hr
Location EmpJob.location
Married UserEntity.married
Password UserEntity.password
Hire Date[DATE] EmpEmployment.startDate
State UserEntity.state
Person Id __UID__
Username __NAME__
Status __ENABLE__
Department EmpJob.department
Division EmpJob.division
Email UserEntity.email
Employee Id UserEntity.empId
Event Reason EmpJob.eventReason
First Name PerPersonal.firstName
Gender PerPersonal.gender
Job Classification EmpJob.jobCode
Job Level UserEntity.jobLevel
Last Name PerPersonal.lastName
1.7.2.4 Lookup.SuccessFactors.UM.ReconAttrMapThe Lookup.SuccessFactors.UM.ReconAttrMap lookup definition holds mappingsbetween resource object fields and target system attributes.
Chapter 1Lookup Definitions Used During Reconciliation and Provisioning
1-14
This lookup definition is preconfigured and used during target resource reconciliation. Table 1-24 lists the default entries.
You can add entries in this lookup definitions if you want to map new target systemattributes for target resource reconciliation. See Adding New User Attributes forReconciliation.
1.7.2.5 Lookup.SuccessFactors.UM.Configuration.TrustedThe Lookup.SuccessFactors.UM.Configuration.Trusted lookup definition holdsconfiguration entries that are specific to the user object type. This lookup definition isused during trusted source user reconciliation runs.
Table 1-6 Entries in the Lookup.SuccessFactors.UM.Configuration.TrustedLookup Definition
Code Key Decode Description
Recon Attribute defaults Lookup.SuccessFactors.UM.ReconAttrMap.TrustedDefaults
This entry holds the name ofthe lookup definition that mapsreconciliation fields to theirdefault values. This lookupdefinition is discussed later inthis guide.
Recon Attribute Map Lookup.SuccessFactors.UM.ReconAttrMap.Trusted
This entry holds the name ofthe lookup definition that mapsresource object fields andtarget system attributes. Thislookup definition is discussedlater in this guide.
1.7.2.6 Lookup.SuccessFactors.UM.ReconAttrMap.TrustedDefaultsThe Lookup.SuccessFactors.UM.ReconAttrMap.Trusted.Defaults lookup definitionholds mappings between reconciliation fields and their default values.
This lookup definition is used when there is a mandatory field on the Oracle IdentityManager User form, but no corresponding field in the target system from which valuescan be fetched during trusted source reconciliation. This is explained in the followingexample.
For example, Employee Type is a mandatory field on the Oracle Identity ManagerUser form. The target system contains no field that stores information about theemployee type for a user account. During reconciliation, no value for the EmployeeType field is fetched from the target system. However, as the Employee Type fieldcannot be left empty, the connector uses the decode value of the Employee Typeentry of this lookup definition. This implies that the value of the Employee Type field onthe Oracle Identity Manager User form displays Full-Time for all user accountsreconciled from the target system.
Table 1-7 lists the default entries in this lookup definition. Do not add or modify entriesto this lookup definition.
Chapter 1Lookup Definitions Used During Reconciliation and Provisioning
1-15
Table 1-7 Entries in theLookup.SuccessFactors.UM.ReconAttrMap.TrustedDefaults Lookup Definition
Code Key (Resource Object Field) Decode (SuccessFactors Field)
Employee Type Full-Time
Organization Xellerate Users
User Type End-User
1.7.2.7 Lookup.SuccessFactors.Configuration.TrustedThe Lookup.SuccessFactors.UM.Configuration.Trusted lookup definition holdsconfiguration entries that are used during trusted source reconciliation.
Note:
Do not modify the entries in this lookup definition.
Table 1-8 Entries in the Lookup.SuccessFactors.Configuration.Trusted
Code Key Decode Description
Bundle Name org.identityconnectors.successfactors
This entry holds the name ofthe connector bundle.
Bundle Version 1.0.11150 This entry holds the version ofthe connector bundle.
Connector Name org.identityconnectors.successfactors.SuccessFactorsConnector
This entry holds the name ofthe connector.
customURIs "EmpJob=/odata/v2/EmpJob?$filter=userId%20eq%20'(Username)'","PerPersonal=/odata/v2/PerPersonal?$filter=personIdExternal%20eq%20'(Username)'","UserEntity=/odata/v2/User?$filter=status%20ne%20'p'%20and%20userId%20eq%20'(Username)'","EmpEmployment=/odata/v2/EmpEmployment?$filter=userId%20eq%20'(Username)'","PerPerson=/odata/v2/PerPerson?$filter=personIdExternal%20eq%20'(Username)'"
This entry holds a commaseparated list of relative URLsfor all object entities.Sample URL: https://<hostName>/odata/v2/EmpCompensation?$filter=userId%20eq%20'rallen1'
Here the sample URI is usedto filter information for aparticular object, which in theabove sample URL is theEmpCompensation object for aparticular user.
Chapter 1Lookup Definitions Used During Reconciliation and Provisioning
1-16
Table 1-8 (Cont.) Entries in the Lookup.SuccessFactors.Configuration.Trusted
Code Key Decode Description
reconUrl /odata/v2/User?$format=JSON&$filter=status%20ne%20'p'
This entry holds the value ofendpoint URL that is used toreconcile users from the targetresource.
Sample URL Format:https://<hostname>/odata/v2/User?$format=JSON&$filter=status%20ne%20'p'
User Configuration Lookup Lookup.SuccessFactors.UM.Configuration.Trusted
This entry holds the name ofthe lookup definition thatstores configurationinformation used during usermanagement operations.
1.7.2.8 Lookup.SuccessFactors.UM.ReconAttrMap.TrustedThe Lookup.SuccessFactors.UM.ReconAttrMap.Trusted lookup definition holdsmappings between resource object fields and target system attributes.
This lookup definition is preconfigured and used during trusted source userreconciliation runs. Table 1-9 lists the default entries.
You can add entries in this lookup definition if you want to map new target systemattributes for trusted source reconciliation.
Table 1-9 Entries in the Lookup.SuccessFactors.UM.ReconAttrMap.Trusted
Code Key Decode
Email UserEntity.email
First Name PerPersonal.firstName
Hire Date[DATE] EmpEmployment.startDate
Last Name PerPersonal.lastName
Person Id __UID__
Status __ENABLE__
Termination Date[DATE] EmpEmployment.endDate
Username __NAME__
Chapter 1Lookup Definitions Used During Reconciliation and Provisioning
1-17
1.7.2.9 Lookup.SuccessFactors.DivisionThe Lookup.SuccessFactors.Division lookup definition holds values of all divisions thatyou can select for a user account.
Note:
Do not modify the entries in this lookup definition.
Table 1-10 Entries in the Lookup.SuccessFactors.Division
Code Key Decode
ENT Enterprises (ENT)
HC Healthcare (HC)
IND Industries (IND)
SVC Professional Service (SVC)
1.7.2.10 Lookup.SuccessFactors.DepartmentThe Lookup.SuccessFactors.Department lookup definition contains information aboutdepartment that you can select for a user account.
Table 1-11 Entries in the Lookup.SuccessFactors.Department
Code Key Decode
CLNC-CR Community Relations (CLNC-CR)
CLNC Clinical (CLNC)
ALNCE Alliances (ALNCE)
IND Industries (IND)
CORP Enterprises (CORP)
TALENT Talent Management (TALENT)
1.7.2.11 Lookup.SuccessFactors.MarriedThe Lookup.SuccessFactors.Married lookup definition contains information aboutmartial status (true or false) for a user account that you create through Oracle IdentityManager. You cannot add or modify entries in this lookup definition.
Table 1-12 Entries in the Lookup.SuccessFactors.Married
Code Key Decode
1 True
0 False
Chapter 1Lookup Definitions Used During Reconciliation and Provisioning
1-18
1.7.2.12 Lookup.SuccessFactors.CitizenshipThe Lookup.SuccessFactors.Citizenship lookup definition provides citizenshipinformation for a user account that you create through Oracle Identity Manager.
Table 1-13 Entries in the Lookup.SuccessFactors.Citizenship
Code Key Decode
US US
Canada Canada
France France
Germany Germany
1.7.2.13 Lookup.SuccessFactors.GenderThe Lookup.SuccessFactors.Gender lookup definition contains information aboutgender (female or male) information that you can select for a user account.
Table 1-14 Entries in the Lookup.SuccessFactors.Gender
Code Key Decode
F Female
M Male
1.7.2.14 Lookup.SuccessFactors.CountryThe Lookup.SuccessFactors.Country lookup definition contains information aboutcountries that you can select for a user account.
Table 1-15 Entries in the Lookup.SuccessFactors.Country
Code Key Decode
Australia Australia
Canada Canada
France France
Germany Germany
Italy Italy
USA USA
1.7.2.15 Lookup.SuccessFactors.StateThe Lookup.SuccessFactors.State lookup definition contains information about variousstates which can be assigned for a user account created through Oracle IdentityManager.
Chapter 1Lookup Definitions Used During Reconciliation and Provisioning
1-19
Table 1-16 Entries in the Lookup.SuccessFactors.State
Code Key Decode
Alberta Alberta
British Coloumbia British Coloumbia
California California
1.7.2.16 Lookup.SuccessFactors.BussinessUnitThe Lookup.SuccessFactors.BussinessUnit lookup definition contains informationabout various business units (within an organization) that you create through OracleIdentity Manager.
Table 1-17 Entries in the Lookup.SuccessFactors.BussinessUnit
Code Key Decode
ACE_HC Corporate Healthcare
ACE_IND Corporate Industries
1.7.2.17 Lookup.SuccessFactors.CompanyThe Lookup.SuccessFactors.Company lookup definition contains information aboutdifferent companies (within an organization) that you create through Oracle IdentityManager.
Table 1-18 Entries in the Lookup.SuccessFactors.Company
Code Key Decode
ACE_BRA Ace Brazil
ACE_CAN Ace Canada Corp
ACE_USA Ace USA
1.7.2.18 Lookup.SuccessFactors.EventReasonThe Lookup.SuccessFactors.EventReason lookup definition contains informationregarding reasons for a certain event.
Table 1-19 Entries in the Lookup.SuccessFactors.EventReason
Code Key Decode
HIRACQRE Acquired employee
HIRAFFIL Hired from Affiliate
Chapter 1Lookup Definitions Used During Reconciliation and Provisioning
1-20
1.7.2.19 Lookup.SuccessFactors.JobClassificationThe Lookup.SuccessFactors.JobClassification lookup definition contains informationabout various job classification available for a user account that you create throughOracle Identity Manager.
Table 1-20 Entries in the Lookup.SuccessFactors.JobClassification
Code Key Decode
ACC-MGR Account Manager
ADMIN-1 Administrative Assistant
ANALYST-IT Analyst
1.7.2.20 Lookup.SuccessFactors.BooleanValuesThe Lookup.SuccessFactors.BooleanValues lookup definition maps boolean valuesthat are used for some of the fields in the target system with the correspondingboolean values to be displayed in the fields of Oracle Identity Manager User form.
Table 1-21 Entries in the Lookup.SuccessFactors.BooleanValues LookupDefinition
Code Key (Resource Object Field) Decode (SuccessFactors Field)
T True
F False
1.7.2.21 Lookup.SuccessFactors.LocationThe Lookup.SuccessFactors.Location lookup definition contains information aboutlocations that you can select for a user account.
Table 1-22 Entries in the Lookup.SuccessFactors.Location
Code Key Decode
US_SFO San Mateo (US_SFO)
US_NYC New York (US_NYC)
US_DCM Arlington, Virginia (US_DCM)
US_ATL Atlanta (US_ATL)
CN_BJS Beijing (CN_BJS)
BR_SAO Sao Paolo (BR_SAO)
1.7.2.22 Lookup.SuccessFactors.CityThe Lookup.SuccessFactors.City lookup definition contains information about citiesthat you can select for a user account.
Chapter 1Lookup Definitions Used During Reconciliation and Provisioning
1-21
Table 1-23 Entries in the Lookup.SuccessFactors.City
Code Key Decode
Sydney Sydney
Sydney Seoul
San Mateo San Mateo
New York New York
London London
Beijing Beijing
1.8 Connector Objects Used During Target ResourceReconciliation
Connector objects such as reconciliation rules, reconciliation action rules, andscheduled jobs are used for reconciling user records from the target system intoOracle Identity Manager.
The SuccessFactors Target Resource User Reconciliation scheduled job is used toinitiate a reconciliation run. This scheduled job is discussed in ReconciliationScheduled Jobs for the SAP SuccessFactors Connector.
See Also:
Managing Reconciliation in Oracle Fusion Middleware Administering OracleIdentity Manager for generic information about connector reconciliation
This section contains the following topics related to connector objects::
• User Fields for Target Resource Reconciliation
• Reconciliation Rules for Target Resource Reconciliation
• Reconciliation Action Rules for Target Resource Reconciliation
1.8.1 User Fields for Target Resource ReconciliationThe Lookup.SuccessFactors.UM.ReconAttrMap lookup definition maps resourceobject fields with target system attributes. This lookup definition is used for performingtarget resource user reconciliation runs.
In this lookup definition, entries are in the following format:
• Code Key: Reconciliation field of the resource object
• Decode: Name of the target system user attribute at the OData API level
Table 1-24 lists the entries in this lookup definition.
Chapter 1Connector Objects Used During Target Resource Reconciliation
1-22
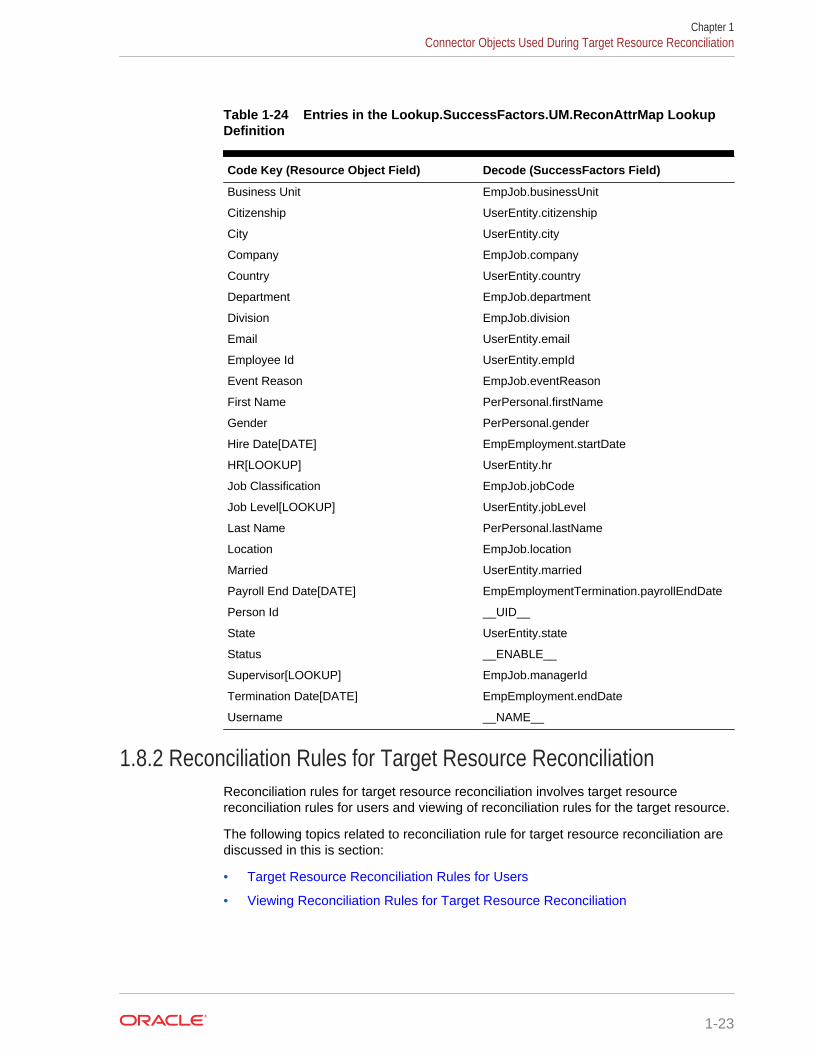
Table 1-24 Entries in the Lookup.SuccessFactors.UM.ReconAttrMap LookupDefinition
Code Key (Resource Object Field) Decode (SuccessFactors Field)
Business Unit EmpJob.businessUnit
Citizenship UserEntity.citizenship
City UserEntity.city
Company EmpJob.company
Country UserEntity.country
Department EmpJob.department
Division EmpJob.division
Email UserEntity.email
Employee Id UserEntity.empId
Event Reason EmpJob.eventReason
First Name PerPersonal.firstName
Gender PerPersonal.gender
Hire Date[DATE] EmpEmployment.startDate
HR[LOOKUP] UserEntity.hr
Job Classification EmpJob.jobCode
Job Level[LOOKUP] UserEntity.jobLevel
Last Name PerPersonal.lastName
Location EmpJob.location
Married UserEntity.married
Payroll End Date[DATE] EmpEmploymentTermination.payrollEndDate
Person Id __UID__
State UserEntity.state
Status __ENABLE__
Supervisor[LOOKUP] EmpJob.managerId
Termination Date[DATE] EmpEmployment.endDate
Username __NAME__
1.8.2 Reconciliation Rules for Target Resource ReconciliationReconciliation rules for target resource reconciliation involves target resourcereconciliation rules for users and viewing of reconciliation rules for the target resource.
The following topics related to reconciliation rule for target resource reconciliation arediscussed in this is section:
• Target Resource Reconciliation Rules for Users
• Viewing Reconciliation Rules for Target Resource Reconciliation
Chapter 1Connector Objects Used During Target Resource Reconciliation
1-23
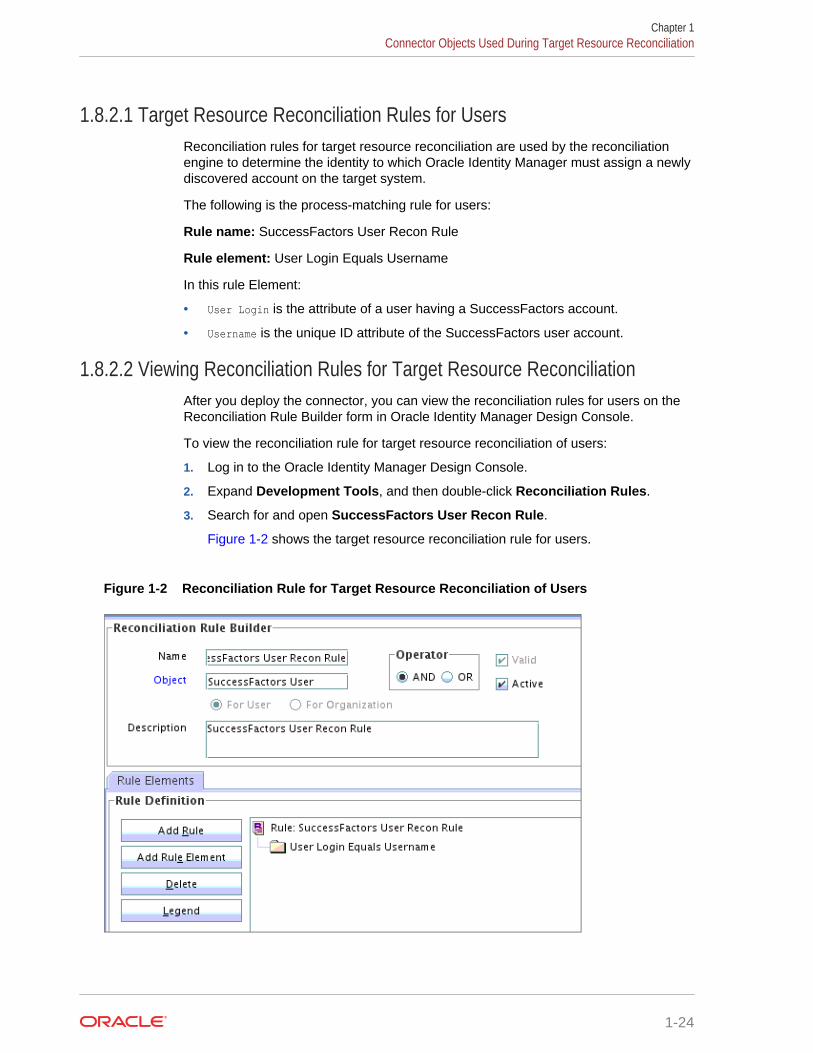
1.8.2.1 Target Resource Reconciliation Rules for UsersReconciliation rules for target resource reconciliation are used by the reconciliationengine to determine the identity to which Oracle Identity Manager must assign a newlydiscovered account on the target system.
The following is the process-matching rule for users:
Rule name: SuccessFactors User Recon Rule
Rule element: User Login Equals Username
In this rule Element:
• User Login is the attribute of a user having a SuccessFactors account.
• Username is the unique ID attribute of the SuccessFactors user account.
1.8.2.2 Viewing Reconciliation Rules for Target Resource ReconciliationAfter you deploy the connector, you can view the reconciliation rules for users on theReconciliation Rule Builder form in Oracle Identity Manager Design Console.
To view the reconciliation rule for target resource reconciliation of users:
1. Log in to the Oracle Identity Manager Design Console.
2. Expand Development Tools, and then double-click Reconciliation Rules.
3. Search for and open SuccessFactors User Recon Rule.
Figure 1-2 shows the target resource reconciliation rule for users.
Figure 1-2 Reconciliation Rule for Target Resource Reconciliation of Users
Chapter 1Connector Objects Used During Target Resource Reconciliation
1-24
1.8.3 Reconciliation Action Rules for Target Resource ReconciliationReconciliation action rules define the actions the connector must perform based on thereconciliation rules defined for users.
The following topics related to reconciliation action rules for target resourcereconciliation are discussed in this section:
• Target Resource Reconciliation Action Rules for Users
• Viewing Reconciliation Action Rules for Target Resource Reconciliation
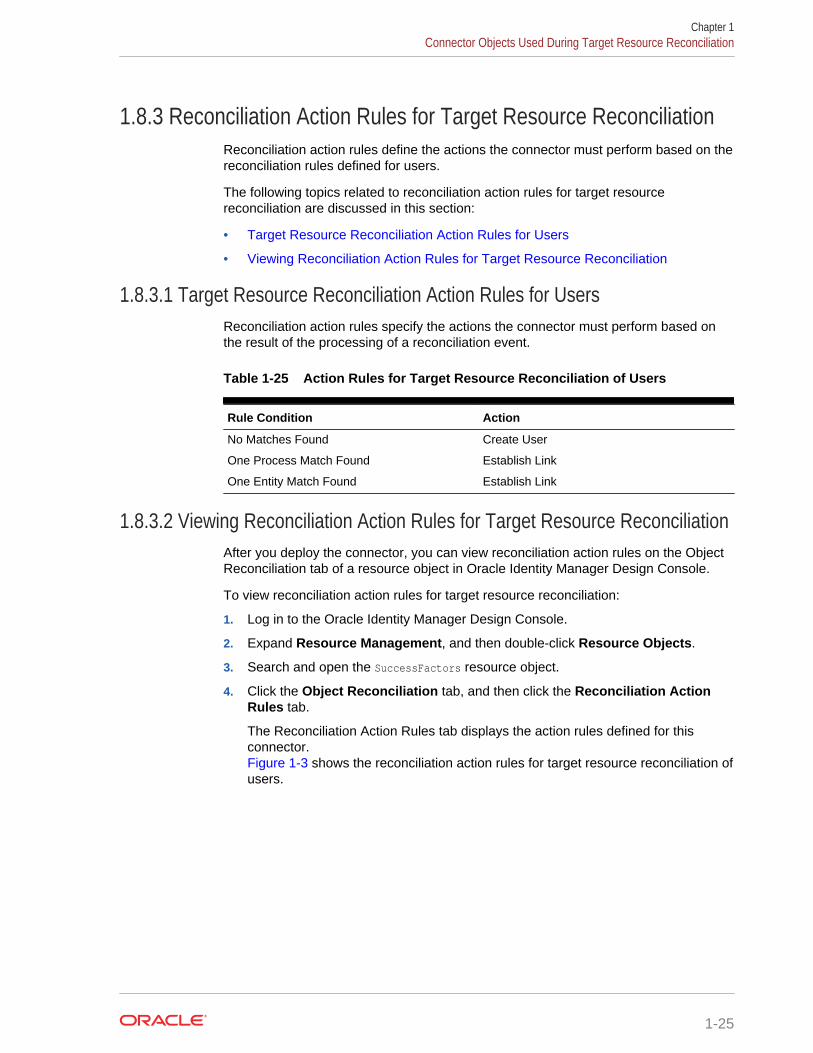
1.8.3.1 Target Resource Reconciliation Action Rules for UsersReconciliation action rules specify the actions the connector must perform based onthe result of the processing of a reconciliation event.
Table 1-25 Action Rules for Target Resource Reconciliation of Users
Rule Condition Action
No Matches Found Create User
One Process Match Found Establish Link
One Entity Match Found Establish Link
1.8.3.2 Viewing Reconciliation Action Rules for Target Resource ReconciliationAfter you deploy the connector, you can view reconciliation action rules on the ObjectReconciliation tab of a resource object in Oracle Identity Manager Design Console.
To view reconciliation action rules for target resource reconciliation:
1. Log in to the Oracle Identity Manager Design Console.
2. Expand Resource Management, and then double-click Resource Objects.
3. Search and open the SuccessFactors resource object.
4. Click the Object Reconciliation tab, and then click the Reconciliation ActionRules tab.
The Reconciliation Action Rules tab displays the action rules defined for thisconnector.Figure 1-3 shows the reconciliation action rules for target resource reconciliation ofusers.
Chapter 1Connector Objects Used During Target Resource Reconciliation
1-25
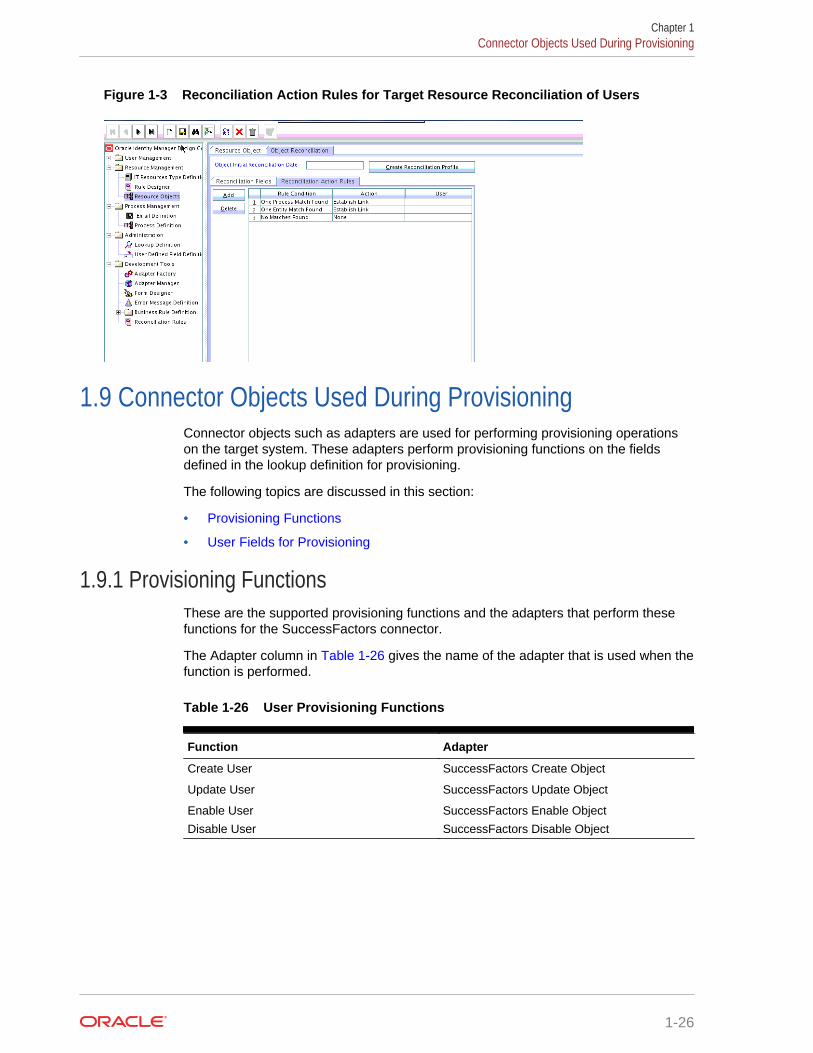
Figure 1-3 Reconciliation Action Rules for Target Resource Reconciliation of Users
1.9 Connector Objects Used During ProvisioningConnector objects such as adapters are used for performing provisioning operationson the target system. These adapters perform provisioning functions on the fieldsdefined in the lookup definition for provisioning.
The following topics are discussed in this section:
• Provisioning Functions
• User Fields for Provisioning
1.9.1 Provisioning FunctionsThese are the supported provisioning functions and the adapters that perform thesefunctions for the SuccessFactors connector.
The Adapter column in Table 1-26 gives the name of the adapter that is used when thefunction is performed.
Table 1-26 User Provisioning Functions
Function Adapter
Create User SuccessFactors Create Object
Update User SuccessFactors Update Object
Enable User SuccessFactors Enable Object
Disable User SuccessFactors Disable Object
Chapter 1Connector Objects Used During Provisioning
1-26
See Also:
Types of Adapters in Oracle Fusion Middleware Developing and CustomizingApplications for Oracle Identity Manager for generic information aboutprocess tasks and adapters
1.9.2 User Fields for ProvisioningThe Lookup.SuccessFactors.UM.ProvAttrMap lookup definition holds the user fieldsfor provisioning. This lookup definition holds mapping between process form fields andtarget system attributes.
In this lookup definition, entries are in the following format:
• Code Key: Name of the process form field
• Decode: Name of the target system user attribute at the OData API level
Table 1-27 lists the entries in this lookup definition.
Table 1-27 Entries in the Lookup.SuccessFactors.UM.ProvAttrMap LookupDefinition
Code Key (Process Form Field) Decode (SuccessFactors Field)
Supervisor [LOOKUP] EmpJob.managerId
Business Unit EmpJob.businessUnit
Citizenship UserEntity.citizenship
City UserEntity.city
Company EmpJob.company
Country UserEntity.country
HR[LOOKUP] UserEntity.hr
Location EmpJob.location
Password UserEntity.password
Hire Date[DATE] EmpEmployment.startDate
State UserEntity.state
Time Zone UserEntity.timeZone
Person Id __UID__
Username __NAME__
Status UserEntity.status
Department EmpJob.department
Division EmpJob.division
Email UserEntity.email
Employee Id UserEntity.empId
Event Reason EmpJob.eventReason
First Name PerPersonal.firstName
Gender PerPersonal.gender
Chapter 1Connector Objects Used During Provisioning
1-27
Table 1-27 (Cont.) Entries in the Lookup.SuccessFactors.UM.ProvAttrMapLookup Definition
Code Key (Process Form Field) Decode (SuccessFactors Field)
Job Classification EmpJob.jobClassification
Job Level UserEntity.jobLevel
Last Name PerPersonal.lastName
For information about understanding and customizing the OData API Dictionary, see Understanding OData API Dictionary.
1.10 Connector Objects Used During Trusted SourceReconciliation
Connector objects such as reconciliation rules, reconciliation action rules, andscheduled jobs are used for reconciling user records from the target system intoOracle Identity Manager.
The SuccessFactors Trusted User Reconciliation scheduled task is used to initiate atrusted source reconciliation run. This scheduled task is discussed in SAPSuccessFactors User Reconciliation.
The following connector objects are discussed in this section:
• User Fields for Trusted Source Reconciliation
• Reconciliation Rule for Trusted Source Reconciliation
• Reconciliation Action Rules for Trusted Source Reconciliation
1.10.1 User Fields for Trusted Source ReconciliationThe Lookup.SuccessFactors.UM.ReconAttrMap.Trusted lookup definition maps userfields of the Oracle Identity Manager User form with corresponding field names in thetarget system. This lookup definition is used for performing trusted sourcereconciliation runs. Values for the user identity fields in this lookup definition arefetched from the target system during a trusted source reconciliation run.
Table 1-28 Entries in the Lookup.SuccessFactors.UM.ReconAttrMap.TrustedLookup Definition
Code Key (Resource Object Field) Decode (SuccessFactors Field)
Email UserEntity.email
First Name PerPersonal.firstName
Hire Date[DATE] EmpEmployment.startDate
Last Name PerPersonal.lastName
Person Id __UID__
Status __ENABLE__
Termination Date[DATE] EmpEmployment.endDate
Chapter 1Connector Objects Used During Trusted Source Reconciliation
1-28

Table 1-28 (Cont.) Entries in theLookup.SuccessFactors.UM.ReconAttrMap.Trusted Lookup Definition
Code Key (Resource Object Field) Decode (SuccessFactors Field)
Username __NAME__
1.10.2 Reconciliation Rule for Trusted Source ReconciliationReconciliation rule for trusted source reconciliation is invoked when Oracle IdentityManager tries to determine the user record that is associated with a change on yourtarget system (a trusted source).
The following topics related to reconciliation rule for trusted source reconciliation arediscussed in this section:
• Trusted Source Reconciliation Rule for Users
• Viewing Reconciliation Rules for Trusted Source Reconciliation
1.10.2.1 Trusted Source Reconciliation Rule for UsersReconciliation rule for trusted source reconciliation is invoked when Oracle IdentityManager tries to determine the user record that is associated with a change on yourtarget system (a trusted source).
The following is the entity matching rule for users:
Rule name: SuccessFactors User Trust Rule
Rule element: (User Name Equals User Login) OR (SuccessFactors GUID EqualsObject Id)
In this first rule component:
• User Name is the Person Id field of the OIM user form.
• User Login is the unique login name of a user.
In the second rule component:
• SuccessFactors GUID is UDF (user-defined field) for mapping target object ID withan OIM User
• Object Id is the Object Id for a SuccessFactors user.
1.10.2.2 Viewing Reconciliation Rules for Trusted Source ReconciliationAfter you deploy the connector, you can view the reconciliation rules on theReconciliation Rule Builder form in Oracle Identity Manager Design Console.
To view the reconciliation rule for trusted source reconciliation:
1. Log in to the Oracle Identity Manager Design Console.
2. Expand Development Tools.
3. Double-click Reconciliation Rules.
4. Search for and open SuccessFactors Trust Rule.
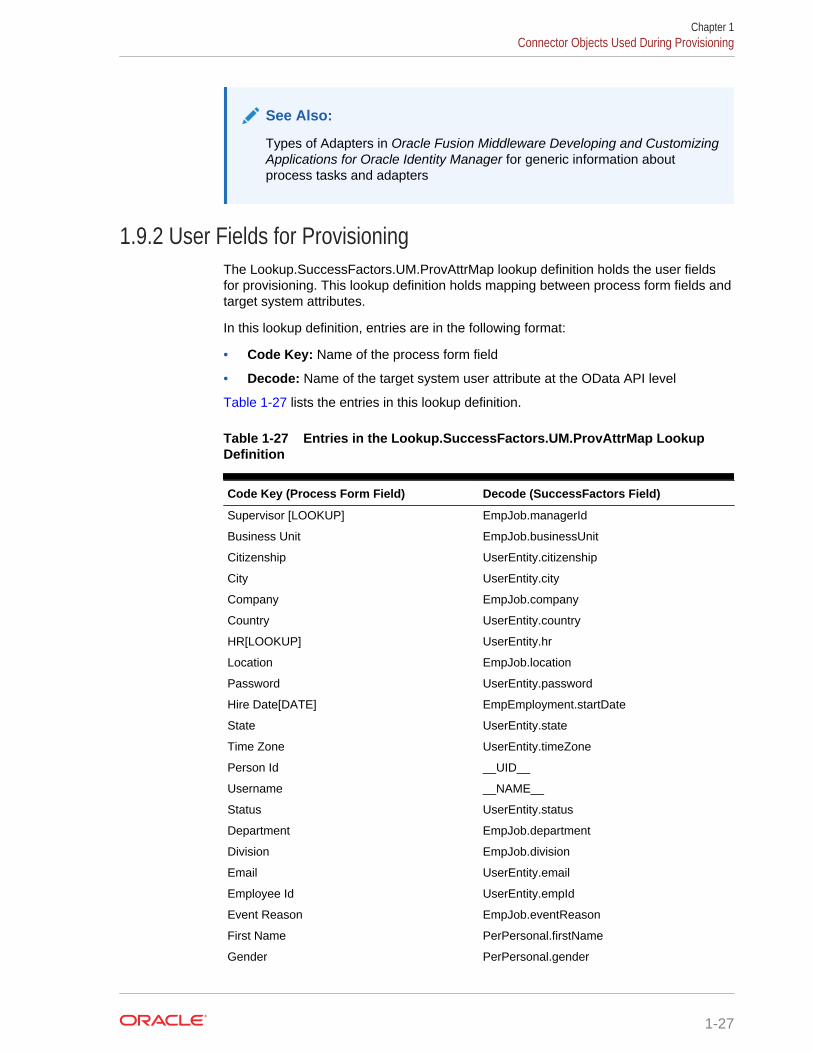
Chapter 1Connector Objects Used During Trusted Source Reconciliation
1-29
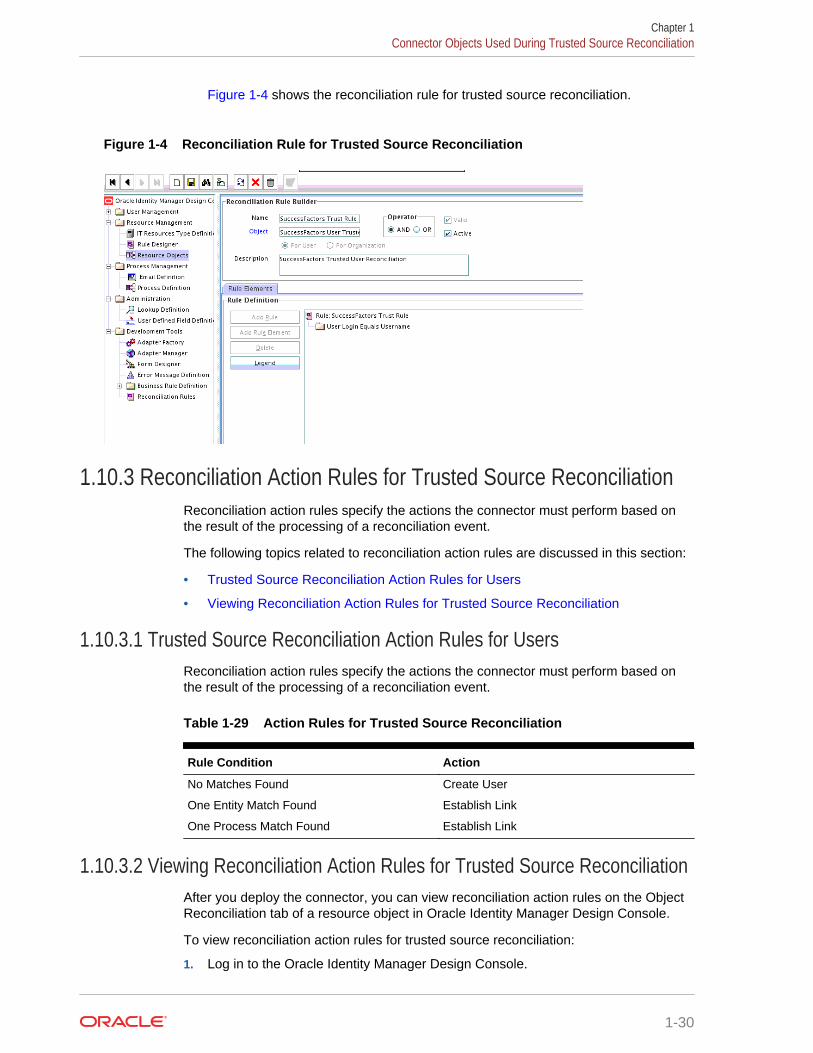
Figure 1-4 shows the reconciliation rule for trusted source reconciliation.
Figure 1-4 Reconciliation Rule for Trusted Source Reconciliation
1.10.3 Reconciliation Action Rules for Trusted Source ReconciliationReconciliation action rules specify the actions the connector must perform based onthe result of the processing of a reconciliation event.
The following topics related to reconciliation action rules are discussed in this section:
• Trusted Source Reconciliation Action Rules for Users
• Viewing Reconciliation Action Rules for Trusted Source Reconciliation
1.10.3.1 Trusted Source Reconciliation Action Rules for UsersReconciliation action rules specify the actions the connector must perform based onthe result of the processing of a reconciliation event.
Table 1-29 Action Rules for Trusted Source Reconciliation
Rule Condition Action
No Matches Found Create User
One Entity Match Found Establish Link
One Process Match Found Establish Link
1.10.3.2 Viewing Reconciliation Action Rules for Trusted Source ReconciliationAfter you deploy the connector, you can view reconciliation action rules on the ObjectReconciliation tab of a resource object in Oracle Identity Manager Design Console.
To view reconciliation action rules for trusted source reconciliation:
1. Log in to the Oracle Identity Manager Design Console.
Chapter 1Connector Objects Used During Trusted Source Reconciliation
1-30
2. Expand Resource Management.
3. Double-click Resource Objects.
4. Locate the SuccessFactors User Trusted resource object.
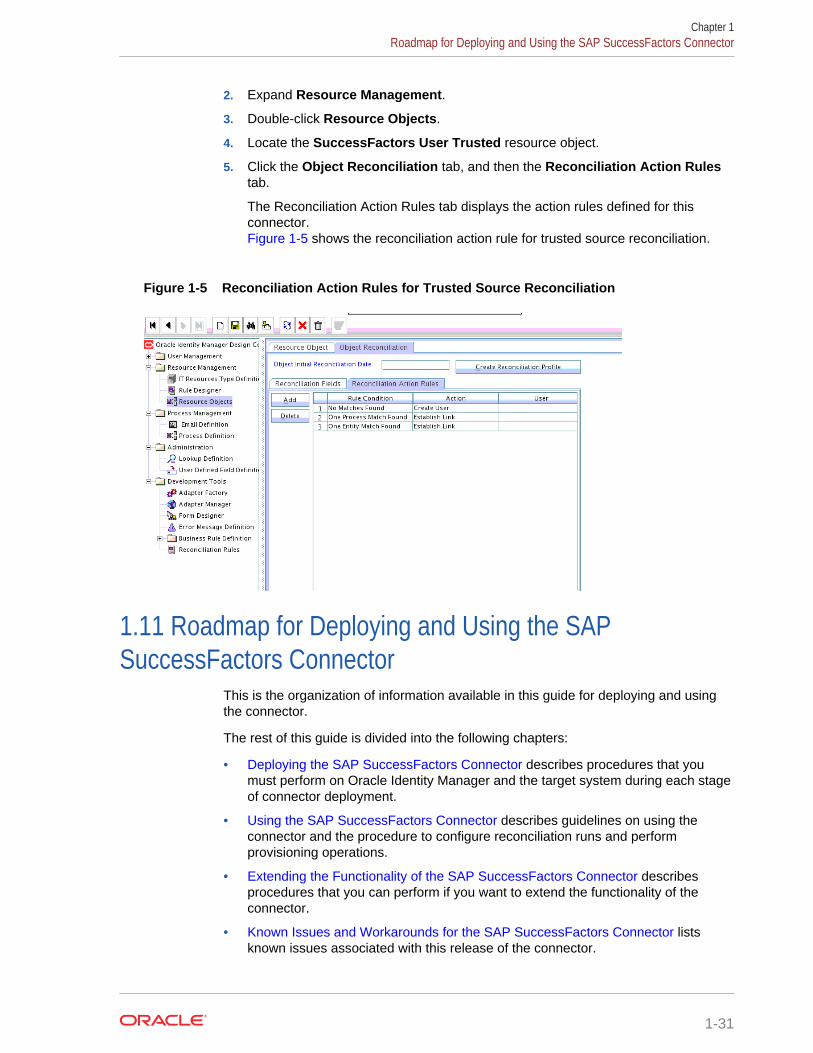
5. Click the Object Reconciliation tab, and then the Reconciliation Action Rulestab.
The Reconciliation Action Rules tab displays the action rules defined for thisconnector.Figure 1-5 shows the reconciliation action rule for trusted source reconciliation.
Figure 1-5 Reconciliation Action Rules for Trusted Source Reconciliation
1.11 Roadmap for Deploying and Using the SAPSuccessFactors Connector
This is the organization of information available in this guide for deploying and usingthe connector.
The rest of this guide is divided into the following chapters:
• Deploying the SAP SuccessFactors Connector describes procedures that youmust perform on Oracle Identity Manager and the target system during each stageof connector deployment.
• Using the SAP SuccessFactors Connector describes guidelines on using theconnector and the procedure to configure reconciliation runs and performprovisioning operations.
• Extending the Functionality of the SAP SuccessFactors Connector describesprocedures that you can perform if you want to extend the functionality of theconnector.
• Known Issues and Workarounds for the SAP SuccessFactors Connector listsknown issues associated with this release of the connector.
Chapter 1Roadmap for Deploying and Using the SAP SuccessFactors Connector
1-31

• Files and Directories on the SAP SuccessFactors Connector Installation Medialists the files and directories that comprise the connector installation media.
Chapter 1Roadmap for Deploying and Using the SAP SuccessFactors Connector
1-32
2Deploying the SAP SuccessFactorsConnector
The procedure to deploy the connector is divided across three stages namelypreinstallation, installation, and postinstallation.
The following topics provide details on these stages:
• Preinstallation
• Installation
• Postinstallation
Note:
Some of the procedures described in this chapter must be performed on thetarget system. To perform these procedures, you must use aSuccessFactors account with administrator privileges.
2.1 PreinstallationPreinstallation for the SuccessFactors connector involves registering a clientapplication (that is, the SuccessFactors connector) with the target system so that theconnector can access REST APIs. The preinstallation step includes client applicationregistration, certificate generation, and obtaining clientid and client secret attributes.
Preinstallation involves performing the following tasks on the target system:
Note:
The detailed instructions for performing these preinstallation tasks areavailable in SuccessFactors product documentation at https://support.sap.com/documentation.html/
1. Register your client application with SuccessFactors to provide a secure sign inand authorization of your services. You can register your client application bycreating an application in the SuccessFactors Manage OAuth2 Client Applicationspage.
2. While creating an application, ensure that you provide information in themandatory fields. Fields such as Application Name, Description, Application URL,Common Name (CN), and Validity (Days) are mandatory fields required for theSuccessFactors connector. As a best practice, SuccessFactors recommends touse your company ID as the Common Name (CN) field information. As part ofregistering your client application, a Certificate.pem file gets generated.
2-1
3. Make a note of the clientId and client secret information. Post applicationregistration, from the Manage OAuth2 Client Application page you can view theclientId and client secret information. The clientId and client secret information isrequired during the IT resource configuration of the SuccessFactors connector.
2.2 InstallationYou must install the connector in Oracle Identity Manager. If necessary, you can alsodeploy the connector in a Connector Server.
The following topics provide details on installing the connector:
• Understanding Installation of the SAP SuccessFactors Connector
• Running the Connector Installer
• Configuring the IT Resource for the Target System
2.2.1 Understanding Installation of the SAP SuccessFactorsConnector
You can run the connector code either locally in Oracle Identity Manager or remotely ina Connector Server.
Depending on where you want to run the connector code (bundle), the connectorprovides the following installation options:
• Run the connector code locally in Oracle Identity Manager.
In this scenario, you deploy the connector in Oracle Identity Manager. Deployingthe connector in Oracle Identity Manager involves performing the proceduresdescribed in Running the Connector Installer and IT Resource Parameters .
• Run the connector code remotely in a Connector Server.
In this scenario, you deploy the connector in Oracle Identity Manager, and then,deploy the connector bundle in a Connector Server. See Using an IdentityConnector Server in Oracle Fusion Middleware Developing and CustomizingApplications for Oracle Identity Manager for information about installing,configuring, and running the Connector Server, and then installing the connector ina Connector Server.
2.2.2 Running the Connector InstallerWhen you run the Connector Installer, it automatically copies the connector files todirectories in Oracle Identity Manager, imports connector XML files, and compilesadapters used for provisioning.
To run the Connector Installer:
1. Copy the contents of the connector installation media into the following directory:OIM_HOME/server/ConnectorDefaultDirectory.
Chapter 2Installation
2-2
Note:
If this is the first time you are running the Connector Installer fordeploying the connector bundle in a Connector Server, then place thebundle in the connector server bundle directory.
2. Log in to Oracle Identity System Administration.
3. From the left pane, expand the Provisioning Configuration tab and clickManage Connector.
4. In the Manage Connector page, click Install.
5. From the Connector List, select SuccessFactors ConnectorRELEASE_NUMBER.
This list displays the names and release numbers of connectors whose installationfiles you copy into the default connector installation directory in Step 1.If you have copied the installation files into a different directory, then:
a. In the Alternative Directory field, enter the full path and name of thatdirectory.
b. To repopulate the list of connectors in the Connector List list, click Refresh.
c. From the Connector List list, select SuccessFactors ConnectorRELEASE_NUMBER.
6. Click Load.
7. To start the installation process, click Continue.
The following tasks are performed in sequence:
a. Configuration of connector libraries
b. Import of the connector XML files (by using the Deployment Manager)
c. Compilation of adapters
On successful completion of a task, a check mark is displayed for the task. If atask fails, then an X mark and a message stating the reason for failure aredisplayed. If a task fails, then make the required correction and perform one of thefollowing steps:
a. Retry the installation by clicking Retry.
b. Cancel the installation and begin again from Step 3.
8. Click Exit to finish the installation procedure.
If all three tasks of the connector installation process are successful, then amessage indicating successful installation is displayed. In addition, a list of thesteps that you must perform after the installation is displayed. These steps are asfollows:
a. Configuring the IT resource for the connector.
b. Configuring the scheduled tasks that are created when you installed theconnector.
When you run the Connector Installer, it copies the connector files and externalcode files to destination directories on the Oracle Identity Manager host computer.
Chapter 2Installation
2-3
These files are listed in Files and Directories on the SAP SuccessFactorsConnector Installation Media.
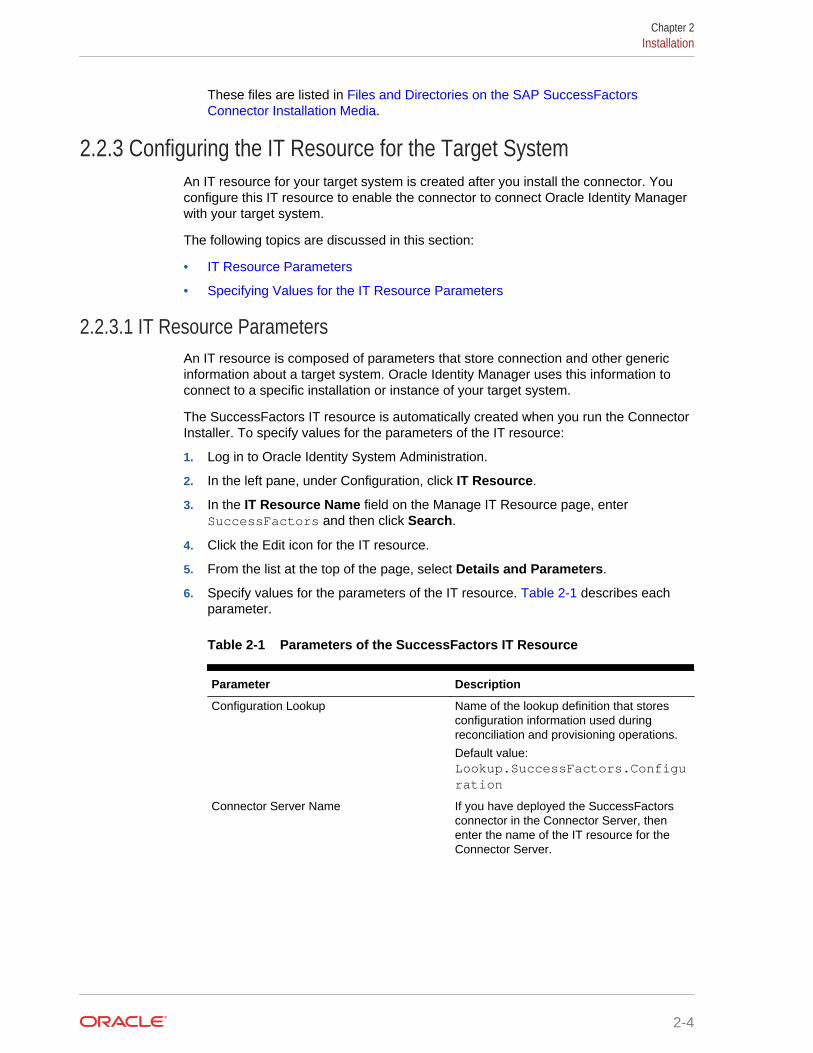
2.2.3 Configuring the IT Resource for the Target SystemAn IT resource for your target system is created after you install the connector. Youconfigure this IT resource to enable the connector to connect Oracle Identity Managerwith your target system.
The following topics are discussed in this section:
• IT Resource Parameters
• Specifying Values for the IT Resource Parameters
2.2.3.1 IT Resource ParametersAn IT resource is composed of parameters that store connection and other genericinformation about a target system. Oracle Identity Manager uses this information toconnect to a specific installation or instance of your target system.
The SuccessFactors IT resource is automatically created when you run the ConnectorInstaller. To specify values for the parameters of the IT resource:
1. Log in to Oracle Identity System Administration.
2. In the left pane, under Configuration, click IT Resource.
3. In the IT Resource Name field on the Manage IT Resource page, enterSuccessFactors and then click Search.
4. Click the Edit icon for the IT resource.
5. From the list at the top of the page, select Details and Parameters.
6. Specify values for the parameters of the IT resource. Table 2-1 describes eachparameter.
Table 2-1 Parameters of the SuccessFactors IT Resource
Parameter Description
Configuration Lookup Name of the lookup definition that storesconfiguration information used duringreconciliation and provisioning operations.
Default value:Lookup.SuccessFactors.Configuration
Connector Server Name If you have deployed the SuccessFactorsconnector in the Connector Server, thenenter the name of the IT resource for theConnector Server.
Chapter 2Installation
2-4
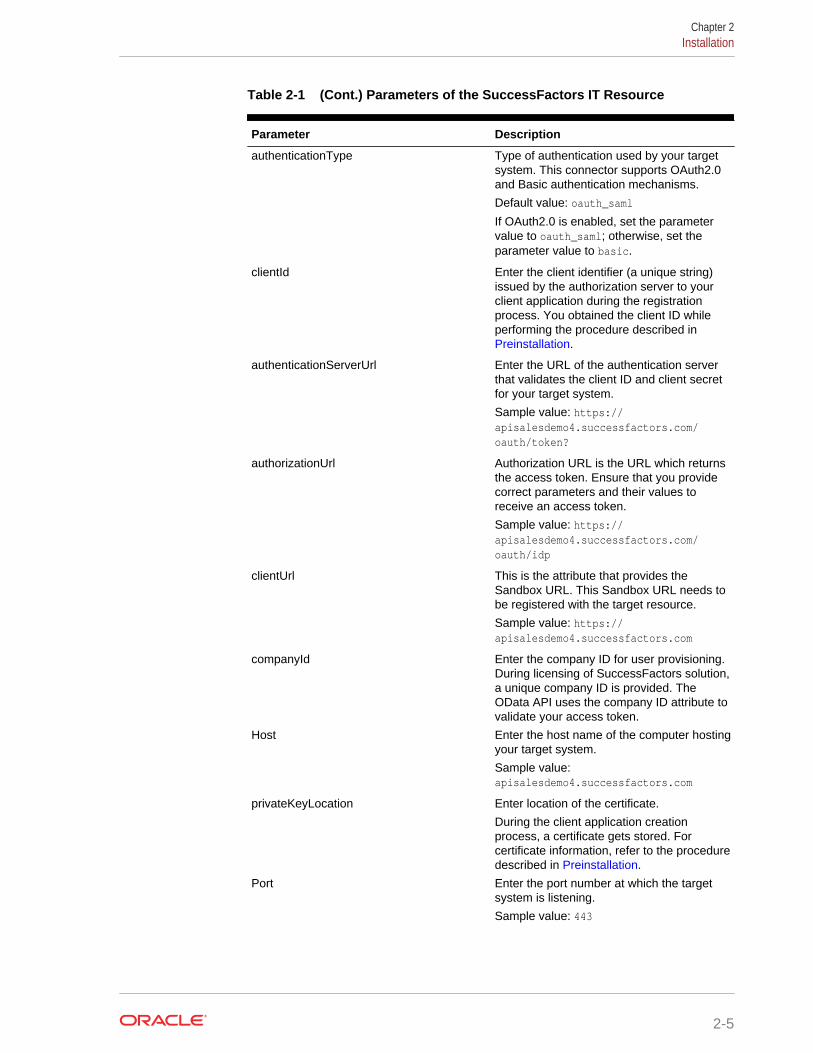
Table 2-1 (Cont.) Parameters of the SuccessFactors IT Resource
Parameter Description
authenticationType Type of authentication used by your targetsystem. This connector supports OAuth2.0and Basic authentication mechanisms.
Default value: oauth_saml
If OAuth2.0 is enabled, set the parametervalue to oauth_saml; otherwise, set theparameter value to basic.
clientId Enter the client identifier (a unique string)issued by the authorization server to yourclient application during the registrationprocess. You obtained the client ID whileperforming the procedure described in Preinstallation.
authenticationServerUrl Enter the URL of the authentication serverthat validates the client ID and client secretfor your target system.
Sample value: https://apisalesdemo4.successfactors.com/oauth/token?
authorizationUrl Authorization URL is the URL which returnsthe access token. Ensure that you providecorrect parameters and their values toreceive an access token.
Sample value: https://apisalesdemo4.successfactors.com/oauth/idp
clientUrl This is the attribute that provides theSandbox URL. This Sandbox URL needs tobe registered with the target resource.
Sample value: https://apisalesdemo4.successfactors.com
companyId Enter the company ID for user provisioning.During licensing of SuccessFactors solution,a unique company ID is provided. TheOData API uses the company ID attribute tovalidate your access token.
Host Enter the host name of the computer hostingyour target system.
Sample value:apisalesdemo4.successfactors.com
privateKeyLocation Enter location of the certificate.
During the client application creationprocess, a certificate gets stored. Forcertificate information, refer to the proceduredescribed in Preinstallation.
Port Enter the port number at which the targetsystem is listening.
Sample value: 443
Chapter 2Installation
2-5
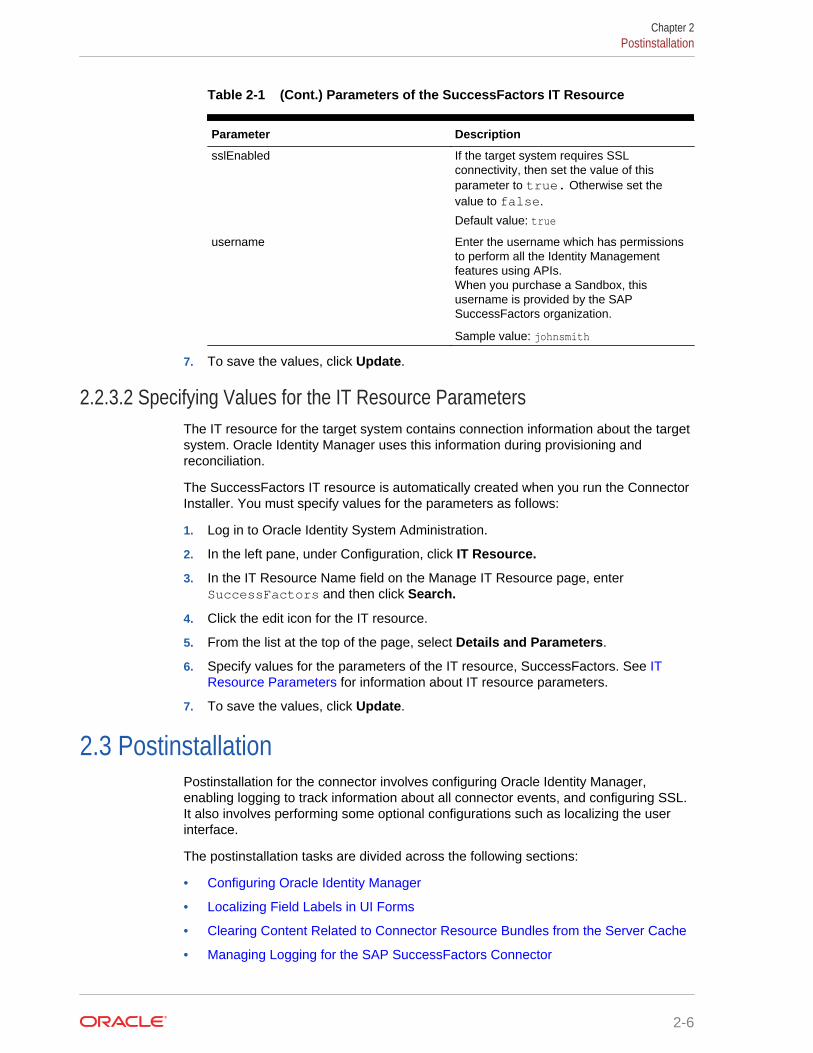
Table 2-1 (Cont.) Parameters of the SuccessFactors IT Resource
Parameter Description
sslEnabled If the target system requires SSLconnectivity, then set the value of thisparameter to true. Otherwise set thevalue to false.
Default value: true
username Enter the username which has permissionsto perform all the Identity Managementfeatures using APIs.When you purchase a Sandbox, thisusername is provided by the SAPSuccessFactors organization.
Sample value: johnsmith
7. To save the values, click Update.
2.2.3.2 Specifying Values for the IT Resource ParametersThe IT resource for the target system contains connection information about the targetsystem. Oracle Identity Manager uses this information during provisioning andreconciliation.
The SuccessFactors IT resource is automatically created when you run the ConnectorInstaller. You must specify values for the parameters as follows:
1. Log in to Oracle Identity System Administration.
2. In the left pane, under Configuration, click IT Resource.
3. In the IT Resource Name field on the Manage IT Resource page, enterSuccessFactors and then click Search.
4. Click the edit icon for the IT resource.
5. From the list at the top of the page, select Details and Parameters.
6. Specify values for the parameters of the IT resource, SuccessFactors. See ITResource Parameters for information about IT resource parameters.
7. To save the values, click Update.
2.3 PostinstallationPostinstallation for the connector involves configuring Oracle Identity Manager,enabling logging to track information about all connector events, and configuring SSL.It also involves performing some optional configurations such as localizing the userinterface.
The postinstallation tasks are divided across the following sections:
• Configuring Oracle Identity Manager
• Localizing Field Labels in UI Forms
• Clearing Content Related to Connector Resource Bundles from the Server Cache
• Managing Logging for the SAP SuccessFactors Connector
Chapter 2Postinstallation
2-6
• Configuring SSL for the SAP SuccessFactors
2.3.1 Configuring Oracle Identity ManagerYou must create a UI form and an application instance for the resource against whichyou want to perform reconciliation and provisioning operations. In addition, you mustrun entitlement and catalog synchronization jobs.
These procedures are described in the following sections:
• Creating and Activating a Sandbox
• Creating a New UI Form
• Creating an Application Instance
• Publishing a Sandbox
• Harvesting Entitlements and Sync Catalog
• Updating an Existing Application Instance with a New Form
• Updating an Existing Field for Provisioning
• Updating an Existing Field for Reconciliation
2.3.1.1 Creating and Activating a SandboxYou must create and activate a sandbox to begin using the customization and formmanagement features. You can then publish the sandbox to make the customizationsavailable to other users.
See Managing Sandboxes in Oracle Fusion Middleware Developing and CustomizingApplications for Oracle Identity Manager for instructions on creating and activating asandbox.
2.3.1.2 Creating a New UI FormYou can use Form Designer in Oracle Identity System Administration to create andmanage application instance forms.
See Managing Forms in Oracle Fusion Middleware Administering Oracle IdentityManager for instructions on creating a new UI form. While creating the UI form, ensurethat you select the resource object corresponding to the SuccessFactors connectorthat you want to associate the form with. In addition, select the Generate EntitlementForms check box.
2.3.1.3 Creating an Application InstanceCreate an application instance as follows. For detailed instructions, see ManagingApplication Instances in Oracle Fusion Middleware Administering Oracle IdentityManager.
1. In the left pane of the System Administration console, under Configuration, clickApplication Instances. The Application Instances page is displayed.
2. From the Actions menu, select Create. Alternatively, click Create on the toolbar.The Create Application Instance page is displayed.
3. Specify values for the following fields:
Chapter 2Postinstallation
2-7
• Name: The name of the application instance.
• Display Name: The display name of the application instance.
• Description: A description of the application instance.
• Resource Object: The resource object name. Click the search icon next tothis field to search for and select SuccessFactors User.
• IT Resource Instance: The IT resource instance name. Click the search iconnext to this field to search for and select SuccessFactors.
• Form: Select the form name. See Creating a New UI Form.
4. Click Save. The application instance is created.
5. Publish the application instance to an organization to make the applicationinstance available for requesting and subsequent provisioning to users. See Managing Organizations Associated With Application Instances in Oracle FusionMiddleware Administering Oracle Identity Manager for detailed instructions.
2.3.1.4 Publishing a SandboxBefore you publish a sandbox, perform the following procedure as a best practice tovalidate all sandbox changes made till this stage as it is hard to revert changes once asandbox is published:
1. In the System Administration, deactivate the sandbox.
2. Log out of the System Administration.
3. Log in to the Self Service using the xelsysadm user credentials and then activatethe sandbox that you deactivated in Step 1.
4. In the Catalog, ensure that the SuccessFactors application instance form appearswith correct fields.
5. Publish the sandbox. See Publishing a Sandbox in Oracle Fusion MiddlewareDeveloping and Customizing Applications for Oracle Identity Manager forinstructions on publishing a sandbox.
2.3.1.5 Harvesting Entitlements and Sync CatalogYou can populate Entitlement schema from child process form table, and harvestroles, application instances, and entitlements into catalog. You can also load catalogmetadata.
To harvest entitlements and sync catalog:
1. Run the scheduled jobs for lookup field synchronization listed in Scheduled Jobsfor Lookup Field Synchronization.
2. Run the Entitlement List scheduled job to populate Entitlement Assignmentschema from child process form table.
3. Run the Catalog Synchronization Job scheduled job. See Predefined ScheduledTasks in Oracle Fusion Middleware Administering Oracle Identity Manager.
Chapter 2Postinstallation
2-8
2.3.1.6 Updating an Existing Application Instance with a New FormFor any changes you do in the Form Designer, you must create a new UI form andupdate the changes in an application instance. To update an existing applicationinstance with a new form:
1. Create a sandbox and activate it as described in Creating and Activating aSandbox.
2. Create a new UI form for the resource as described in Creating a New UI Form.
3. Open the existing application instance.
4. In the Form field, select the new UI form that you created.
5. Save the application instance.
6. Publish the sandbox as described in Publishing a Sandbox.
2.3.1.7 Updating an Existing Field for ProvisioningDuring a user provisioning operation, the target system requires a few mandatoryfields. When these fields, which are required to be mandatory in the target system, arenot mandatory fields in the Oracle Identity Manager, in such a scenario theprovisioning operation will not be successful.
For the provisioning operation to be successful, you need to edit an existing field in theOracle Identity Manager and make it mandatory. Using the Form Designer, you canmodify fields and update them from an optional type to a mandatory type.
Note:
When you perform any changes in the Form Designer, you must create anew UI form and update the changes in an application instance.
To edit a field within a new form:
1. Log in to Oracle Identity Manager Design Console.
2. Expand Development Tools and double-click Form Designer.
3. Click Create New Version from the Form Designer pane.
4. Enter a name for the newly created form.
5. On the Properties tab:
a. Scroll and select the field which is under consideration.
b. Click Add Property. The Add Property dialog box appears.
c. In the Add Property dialog box, select Required from the Property Namedrop-down list and enter a new value in the Property Value box.
d. Click Save.
6. Click Make Version Active.
7. Click Save.
Chapter 2Postinstallation
2-9
2.3.1.8 Updating an Existing Field for ReconciliationDuring a reconcile operation, the target system requires a few mandatory fields to bepresent in Oracle Identity Manager. The reconciliation operation will not be successfulwhen these mandatory fields are not present in Oracle Identity Manager.
For the reconciliation operation to be successful, you need to edit an existing field inthe Oracle Identity Manager and make it mandatory. Using Design Console andResource Objects, you can modify fields and update them from an optional type to amandatory type.
To edit an existing field:
1. Log in to Oracle Identity Manager Design Console.
2. Expand Resource Objects and then double-click Resource Objects.
3. Scroll and double-click the field under consideration. The Add Reconciliation Fielddialog box appears.
4. In the Add Reconciliation Field dialog box, select the Required check box tomodify the attribute as a required type.
5. Click Save to save changes in the Add Reconciliation Field dialog box.
6. Click Create Reconciliation Profile after a successful save operation.
7. Scroll and double-click the field under consideration. The Edit Reconciliation FieldMapping dialog box appears.
8. In the Edit Reconciliation Field Mapping dialog box, select the Key Field forReconciliation Mapping check box to modify the attribute as a required type.
9. Click Save to save the changes in the Edit Reconciliation Field Mapping dialogbox.
10. Click Save.
2.3.2 Localizing Field Labels in UI FormsYou can localize UI form field labels by using the resource bundle corresponding to thelanguage you want to use. Resource bundles are available in the connector installationmedia.
To localize field label that you add to in UI forms:
1. Log in to Oracle Enterprise Manager.
2. In the left pane, expand Application Deployments and then selectoracle.iam.console.identity.sysadmin.ear.
3. In the right pane, from the Application Deployment list, select MDS Configuration.
4. On the MDS Configuration page, click Export and save the archive to the localcomputer.
5. Extract the contents of the archive, and open the following file in a text editor:
SAVED_LOCATION\xliffBundles\oracle\iam\ui\runtime\BizEditorBundle_en.xlf"
6. Edit the BizEditorBundle.xlf file in the following manner:
a. Search for the following text:
Chapter 2Postinstallation
2-10
<file source-language="en" original="/xliffBundles/oracle/iam/ui/runtime/BizEditorBundle.xlf" datatype="x-oracle-adf">
b. Replace with the following text:
<file source-language="en" target-language="LANG_CODE" original="/xliffBundles/oracle/iam/ui/runtime/BizEditorBundle.xlf" datatype="x-oracle-adf">
In this text, replace LANG_CODE with the code of the language that you wantto localize the form field labels. The following is a sample value for localizingthe form field labels in Japanese:
<file source-language="en" target-language="ja" original="/xliffBundles/oracle/iam/ui/runtime/BizEditorBundle.xlf" datatype="x-oracle-adf">
c. Search for the application instance code. This procedure shows a sample editfor SuccessFactors Application instance. The original code is:
<trans-unit id="${adfBundle['oracle.adf.businesseditor.model.util.BaseRuntimeResourceBundle']['persdef.sessiondef.oracle.iam.ui.runtime.form.model.user.entity.userEO.UD_USER_NAME__c_description']}"><source>User Name</source><target/></trans-unit><trans-unit id="sessiondef.oracle.iam.ui.runtime.form.model.RSAForm.entity.SuccessFactorsFormEO.UD_USER_NAME __c_LABEL"><source>First Name</source><target/></trans-unit>
d. Open the resource file from the connector package, for exampleSuccessFactors_ja.properties, and get the value of the attribute from the file,for example,
global.udf.UD_GA_USR_ USER_NAME =\u30A2\u30AB\u30A6\u30F3 \u30C8\u540D.
e. Replace the original code shown in Step 6.c with the following:
<trans-unit id="${adfBundle['oracle.adf.businesseditor.model.util.BaseRuntimeResourceBu ndle']['persdef.sessiondef.oracle.iam.ui.runtime.form.model.user.entity.use rEO.UD_GA_USR_ USER_NAME __c_description']}"><source>Account Name</source> <target>u30A2\u30AB\u30A6\u30F3\u30C8\u540D</target></trans-unit> <trans-unitid="sessiondef.oracle.iam.ui.runtime.form.model.SuccessFactors.entity sEO.UD_GA_USR_ACCOUNT_NAME__c_LABEL"><source>Account Name</source> <target>\u30A2\u30AB\u30A6\u30F3\u30C8\u540D</target> </trans-unit>
f. Repeat Steps 6.a through 6.d for all attributes of the process form.
g. Save the file as BizEditorBundle_LANG_CODE.xlf. In this file name, replaceLANG_CODE with the code of the language to which you are localizing.Sample file name: BizEditorBundle_ja.xlf.
7. Repackage the ZIP file and import it into MDS.
8. Log out of and log in to Oracle Identity Manager.
2.3.3 Clearing Content Related to Connector Resource Bundles fromthe Server Cache
When you deploy the connector, the resource bundles are copied from the resourcesdirectory on the installation media into the Oracle Identity Manager database.
Chapter 2Postinstallation
2-11
Whenever you add a new resource bundle to the connectorResources directory ormake a change in an existing resource bundle, you must clear content related toconnector resource bundles from the server cache.
To clear content related to connector resource bundles from the server cache:
1. In a command window, switch to the OIM_HOME/server/bin directory.
2. Enter one of the following commands:
• On Microsoft Windows: PurgeCache.bat All
• On UNIX: PurgeCache.sh All
Note:
You can use the PurgeCache utility to purge the cache for any contentcategory. Run PurgeCache.bat CATEGORY_NAME on MicrosoftWindows or PurgeCache.sh CATEGORY_NAME on UNIX. TheCATEGORY_NAME argument represents the name of the contentcategory that must be purged.For example, the following commands purge Metadata entries from theserver cache:
• PurgeCache.bat MetaData
• PurgeCache.sh MetaData
Before running the PurgeCache utility, ensure the WL_HOME andJAVA_HOME environment variables are set.
When prompted, enter the user name and password of an account belonging tothe SYSTEM ADMINISTRATORS group. In addition, you are prompted to enterthe service URL in the following format:
t3://OIM_HOST_NAME:OIM_PORT_NUMBER
In this format:
• Replace OIM_HOST_NAME with the host name or IP address of the OracleIdentity Manager host computer.
• Replace OIM_PORT_NUMBER with the port on which Oracle IdentityManager is listening.
2.3.4 Managing Logging for the SAP SuccessFactors ConnectorOracle Identity Manager uses the Oracle Diagnostic Logging (ODL) logging service forrecording all types of events pertaining to the connector.
The following topics provide detailed information about logging:
• Understanding Log Levels
• Enabling Logging
Chapter 2Postinstallation
2-12
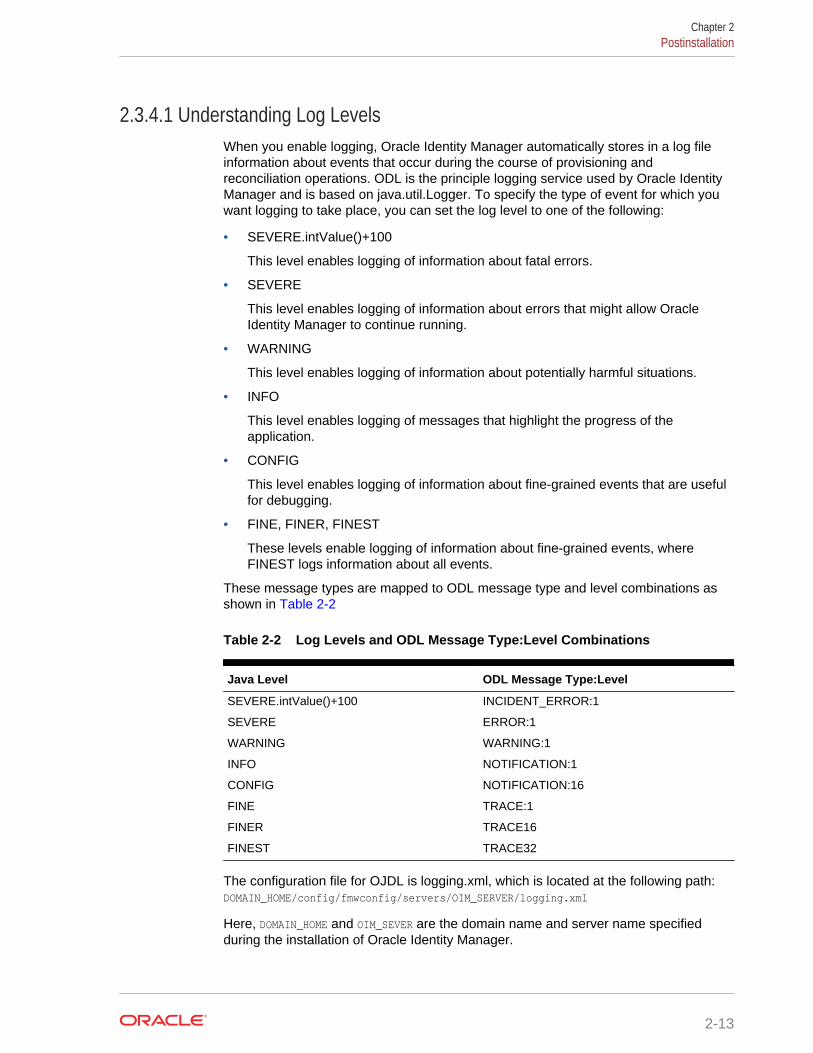
2.3.4.1 Understanding Log LevelsWhen you enable logging, Oracle Identity Manager automatically stores in a log fileinformation about events that occur during the course of provisioning andreconciliation operations. ODL is the principle logging service used by Oracle IdentityManager and is based on java.util.Logger. To specify the type of event for which youwant logging to take place, you can set the log level to one of the following:
• SEVERE.intValue()+100
This level enables logging of information about fatal errors.
• SEVERE
This level enables logging of information about errors that might allow OracleIdentity Manager to continue running.
• WARNING
This level enables logging of information about potentially harmful situations.
• INFO
This level enables logging of messages that highlight the progress of theapplication.
• CONFIG
This level enables logging of information about fine-grained events that are usefulfor debugging.
• FINE, FINER, FINEST
These levels enable logging of information about fine-grained events, whereFINEST logs information about all events.
These message types are mapped to ODL message type and level combinations asshown in Table 2-2
Table 2-2 Log Levels and ODL Message Type:Level Combinations
Java Level ODL Message Type:Level
SEVERE.intValue()+100 INCIDENT_ERROR:1
SEVERE ERROR:1
WARNING WARNING:1
INFO NOTIFICATION:1
CONFIG NOTIFICATION:16
FINE TRACE:1
FINER TRACE16
FINEST TRACE32
The configuration file for OJDL is logging.xml, which is located at the following path:DOMAIN_HOME/config/fmwconfig/servers/OIM_SERVER/logging.xml
Here, DOMAIN_HOME and OIM_SEVER are the domain name and server name specifiedduring the installation of Oracle Identity Manager.
Chapter 2Postinstallation
2-13

2.3.4.2 Enabling LoggingTo enable logging in Oracle WebLogic Server:
1. Edit the logging.xml file as follows:
a. Add the following blocks in the file:
<log_handler name='SuccessFactors-handler' level='[LOG_LEVEL]'class='oracle.core.ojdl.logging.ODLHandlerFactory'> <property name='logreader:' value='off'/> <property name='path' value='[FILE_NAME]'/> <property name='format' value='ODL-Text'/> <property name='useThreadName' value='true'/> <property name='locale' value='en'/> <property name='maxFileSize' value='5242880'/> <property name='maxLogSize' value='52428800'/> <property name='encoding' value='UTF-8'/></log_handler>
<logger name="ORG.IDENTITYCONNECTORS.SuccessFactors" level="[LOG_LEVEL]" useParentHandlers="false"> <handler name="SuccessFactors-handler"/> <handler name="console-handler"/></logger>
b. Replace both occurrences of [LOG_LEVEL] with the ODL message type andlevel combination that you require. Table 2-2 lists the supported message typeand level combinations. Similarly, replace [FILE_NAME] with the full path andname of the log file in which you want log messages to be recorded. Thefollowing blocks show sample values for [LOG_LEVEL] and [FILE_NAME]:
<log_handler name='SuccessFactors-handler' level='NOTIFICATION:1'class='oracle.core.ojdl.logging.ODLHandlerFactory'> <property name='logreader:' value='off'/> <property name='path' value='F:\MyMachine\middleware\user_projects\domains\base_domain1\servers\oim_server1\logs\oim_server1-diagnostic-1.log'/> <property name='format' value='ODL-Text'/> <property name='useThreadName' value='true'/> <property name='locale' value='en'/> <property name='maxFileSize' value='5242880'/> <property name='maxLogSize' value='52428800'/> <property name='encoding' value='UTF-8'/></log_handler> <logger name="ORG.IDENTITYCONNECTORS.SuccessFactors" level="NOTIFICATION:1" useParentHandlers="false"> <handler name="SuccessFactors-handler"/> <handler name="console-handler"/></logger>
With these sample values, when you use Oracle Identity Manager, all messagesgenerated for this connector that are of a log level equal to or higher than theNOTIFICATION:1 level are recorded in the specified file.
2. Save and close the file.
3. Set the following environment variable to redirect the server logs to a file:
• For Microsoft Windows: set WLS_REDIRECT_LOG=FILENAME
Chapter 2Postinstallation
2-14
• For UNIX: export WLS_REDIRECT_LOG=FILENAME
Replace FILENAME with the location and name of the file to which you want toredirect the output.
4. Restart the application server.
2.3.5 Configuring SSL for the SAP SuccessFactorsYou configure SSL to secure data communication between Oracle Identity Managerand the target system.
To configure SSL:
1. Obtain the SSL public key certificate of SuccessFactors.
2. Copy the public key certificate of SuccessFactors to the computer hosting OracleIdentity Manager.
3. Run the following keytool command to import the public key certificate into theidentity key store in Oracle Identity Manager:
keytool -import -alias ALIAS -trustcacerts -file CERT_FILE_NAME -keystore
KEYSTORE_NAME -storepass PASSWORD
In this command:
• ALIAS is the public key certificate alias.
• CERT_FILE_NAME is the full path and name of the certificate store (thedefault is cacerts).
• KEYSTORE_NAME is the name of the keystore.
• PASSWORD is the password of the keystore.
The following is a sample value for this command:
keytool -import -alias serverwl -trustcacerts -file supportcert.pem -keystore
client_store.jks -storepass weblogic1
Note:
• Change the parameter values passed to the keytool commandaccording to your requirements. Ensure that there is no line break inthe keytool arguments.
• Ensure that the system date for Oracle Identity Manager is in syncwith the validity date of the SSL certificate to avoid any errors duringSSL communication.
Chapter 2Postinstallation
2-15
3Using the SAP SuccessFactors Connector
You can use the connector for performing reconciliation and provisioning operationsafter configuring it to meet your requirements.
The following topics are discussed in this chapter:
Note:
These sections provide both conceptual and procedural information aboutconfiguring the connector. It is recommended that you read the conceptualinformation before you perform the procedures.
• Scheduled Jobs for Lookup Field Synchronization
• Configuring Reconciliation for the SAP SuccessFactors Connector
• Configuring Scheduled Jobs
• Guidelines on Performing Provisioning Operations
• Performing Provisioning Operations
• Uninstalling the Connector
3.1 Scheduled Jobs for Lookup Field SynchronizationScheduled jobs for lookup field synchronization fetch the most recent values fromspecific fields in the target system to lookup definitions in Oracle Identity Manager.These lookup definitions are used as an input source for lookup fields in OracleIdentity Manager.
The following scheduled jobs are used for lookup fields synchronization:
• SuccessFactors HR Lookup Reconciliation Scheduled Job
• SuccessFactors JobLevel Lookup Reconciliation Scheduled Job
• SuccessFactors Supervisor Lookup Reconciliation Scheduled Job
Values fetched by these scheduled jobs from the target system are populated in theLookup.SuccessFactors.HR, Lookup.SuccessFactors.JobLevel andLookup.SuccessFactors.Supervisor lookup definitions, respectively.
The attributes for all the scheduled jobs for lookup field synchronization are the same. Table 3-1 describes the attributes of the scheduled jobs. The procedure to configurescheduled jobs is described later in this guide.
3-1
Table 3-1 Attributes of the Scheduled Jobs for Lookup Field Synchronization
Attribute Description
Application Name Name of the application you created for yourtarget system. This value is the same as thevalue that you provided for the ApplicationName field while creating your targetapplication.
Do not modify this value.
Lookup Name Enter the name of the lookup definition inOracle Identity Manager that must bepopulated with values fetched from the targetsystem.
Object Type Type of object you want to reconcile.
Sample value: HR
Code Key Attribute Name of the connector attribute that is used topopulate the Code Key column of the lookupdefinition (specified as the value of the LookupName attribute).
Default value: __UID__
Decode Attribute Name of the connector attribute that is used topopulate the Decode column of the lookupdefinition (specified as the value of the LookupName attribute).
Default value :__NAME__
3.2 Configuring Reconciliation for the SAP SuccessFactorsConnector
You can configure the connector to specify the type of reconciliation and its schedule.
The following topics related to configuring reconciliation are discussed in this section:
• Full and Incremental Reconciliation for the SAP SuccessFactors Connector
• Limited Reconciliation for the SAP SuccessFactors Connector
• Reconciling Large Number of Records
• Reconciliation Scheduled Jobs for the SAP SuccessFactors Connector
3.2.1 Full and Incremental Reconciliation for the SAP SuccessFactorsConnector
Full reconciliation involves reconciling all existing user records from the target systeminto Oracle Identity Manager.
After you deploy the connector, you must first perform full reconciliation. To perform afull reconciliation run, ensure that no value is specified for the Filter attribute of thescheduled job for reconciling users. If the target system contains more number ofrecords than what it can return in a single response, then use the Flat File connector toperform full reconciliation. See Reconciling Large Number of Records.
Chapter 3Configuring Reconciliation for the SAP SuccessFactors Connector
3-2
3.2.2 Limited Reconciliation for the SAP SuccessFactors ConnectorLimited or filtered reconciliation is the process of limiting the number of records beingreconciled based on a set filter criteria.
By default, all target system records that are added or modified after the lastreconciliation run are reconciled during the current reconciliation run. You cancustomize this process by specifying the subset of added or modified target systemrecords that must be reconciled. You do this by creating filters for the reconciliationmodule.
You can perform limited reconciliation by creating filters for the reconciliation module.This connector provides a Filter Suffix attribute (a scheduled task attribute) that allowsyou to use any of the attributes of the target system to filter target system records. Youspecify a value for the Filter Suffix attribute while configuring the user reconciliationscheduled job.
Consider a filter suffix value: userId eq ‘JohnSmith’
In this example, the connector performs filter reconciliation and only reconciles theuser information whose PersonID is JohnSmith
Note:
If the target system contains more number of records than what it can returnin a single response, then use the Flat File connector to perform limitedreconciliation. See Reconciling Large Number of Records.
3.2.3 Reconciling Large Number of RecordsDuring a reconciliation run, if the target system contains more number of records thanwhat it can return in a single response, then you must use the Flat File connector tofetch all the records into Oracle Identity Manager. The Flat File connector consumesinformation in a flat file, and generates connector metadata using the metadatageneration utility.
To reconcile a large number of records from the target system into Oracle IdentityManager:
1. Export all users in the target system to a flat file.
2. Copy the flat file to a location that is accessible from Oracle Identity Manager.
3. Create a schema file representing the structure of the flat file. See Creating aSchema File in Oracle Identity Manager Connector Guide for Flat File.
4. Install the Flat File connector. See Running the Connector Installer in OracleIdentity Manager Connector Guide for Flat File.
5. Configure the Flat File IT resource. See Configuring the IT Resource in OracleIdentity Manager Connector Guide for Flat File.
6. Configure and run the Flat File Accounts Loader scheduled job.
Chapter 3Configuring Reconciliation for the SAP SuccessFactors Connector
3-3
While configuring this scheduled job, ensure that you set the value of the TargetIT Resource Name attribute to SuccessFactors and Target Resource ObjectName to SuccessFactors User.
See Flat File Accounts Loader and IT_RES_NAME Flat File Accounts Loader inOracle Identity Manager Connector Guide for Flat File for information about theattributes of the Flat File Accounts Loader scheduled job.
3.2.4 Reconciliation Scheduled Jobs for the SAP SuccessFactorsConnector
When you run the Connector Installer, reconciliation scheduled jobs are automaticallycreated in Oracle Identity Manager. You must configure these scheduled jobs to suityour requirements by specifying values for its attributes.
The following scheduled jobs that you can configure for reconciliation are discussed inthis section:
• SAP SuccessFactors User Reconciliation
• SAP SuccessFactors Trusted User Reconciliation
3.2.4.1 SAP SuccessFactors User ReconciliationYou use the SuccessFactors Target Resource User Reconciliation scheduled job toreconcile user account data from the target system in the target resource (accountmanagement) mode of the connector.
Table 3-2 Attributes of the SuccessFactors User Reconciliation Scheduled Job
Attribute Description
Filter Suffix Enter the search filter for fetching user recordsfrom the target system during a reconciliationrun.
IT Resource Name Enter the name of the IT resource for thetarget system installation from which you wantto reconcile user records.
Default value: SuccessFactors
Object Type This attribute holds the name of the objecttype for the reconciliation run.
Default value: User
Do not change the default value.
Resource Object Name Name of the resource object against whichreconciliation runs are performed.
Default value: SuccessFactors User
Do not change the default value.
Incremental Recon Attribute The value in this attribute is used duringincremental reconciliation to determine thenewest (or recently updated) record reconciledfrom the target system.
Default value: lastModifiedDateTime
Note: Do not change the value of this attribute.
Chapter 3Configuring Reconciliation for the SAP SuccessFactors Connector
3-4
Table 3-2 (Cont.) Attributes of the SuccessFactors User ReconciliationScheduled Job
Attribute Description
Latest Token This attribute holds the value of thelastModifiedDateTime attribute of a domaincontroller that is used for reconciliation.
Note: The reconciliation engine automaticallyenters a value for this attribute. It isrecommended not to change the value of thisattribute.
If you manually specify a value for thisattribute, then only user accounts whoselastModifiedDateTime value is greater thanthe Latest Token attribute value getsreconciled.
Scheduled Task Name This attribute holds the name of the scheduledtask.
Default value: SuccessFactors UserReconciliation
3.2.4.2 SAP SuccessFactors Trusted User ReconciliationYou use the SuccessFactors Trusted User Reconciliation scheduled job to reconcileuser account data in the trusted source (identity management) mode of the connector.
Table 3-3 Attributes of the SuccessFactors Trusted User ReconciliationScheduled Job
Attribute Description
Filter Suffix Enter the search filter for fetching user recordsfrom the target system during a reconciliationrun.
IT Resource Name Enter the name of the IT resource for thesystem installation from which you want toreconcile user records.
Default value: SuccessFactors
Object Type This attribute holds the name of the objecttype for the reconciliation run.
Default value: User
Note: Do not change the default value.
Resource Object Name This attribute holds the name of the resourceobject used for reconciliation.
Default value: SuccessFactors UserTrusted
Note: Do not change the default value.
Chapter 3Configuring Reconciliation for the SAP SuccessFactors Connector
3-5
Table 3-3 (Cont.) Attributes of the SuccessFactors Trusted User ReconciliationScheduled Job
Attribute Description
Incremental Recon Attribute The value in this attribute is used duringincremental reconciliation to determine thenewest (or recently updated) record reconciledfrom the target system.
Default value: lastModifiedDateTime
Note: Do not change the value of this attribute.
Latest Token This attribute holds the value of thelastModifiedDateTime attribute of a domaincontroller that is used for reconciliation.
Note: The reconciliation engine automaticallyenters a value for this attribute. It isrecommended not to change the value of thisattribute.
If you manually specify a value for thisattribute, then only user accounts whoselastModifiedDateTime value is greater thanthe Latest Token attribute value getsreconciled.
Scheduled Task Name This attribute holds the name of the scheduledtask.
Default value: SuccessFactors Trusted UserReconciliation
3.3 Configuring Scheduled JobsConfigure scheduled jobs to perform reconciliation runs that check for new informationon your target system periodically and replicates the data in Oracle Identity Manager.
You can apply this procedure to configure the scheduled jobs for lookup fieldsynchronization and reconciliation.
To configure a scheduled job:
1. Log in to Oracle Identity System Administration.
2. In the left pane, under System Management, click Scheduler.
3. Search for and open the scheduled job as follows:
a. In the Search field, enter the name of the scheduled job as the searchcriterion. Alternatively, you can click Advanced Search and specify the searchcriterion.
b. In the search results table on the left pane, click the scheduled job in the JobName column.
4. On the Job Details tab, you can modify the parameters of the scheduled task:
• Retries: Enter an integer value in this field. This number represents thenumber of times the scheduler tries to start the job before assigning theStopped status to the job.
Chapter 3Configuring Scheduled Jobs
3-6
• Schedule Type: Depending on the frequency at which you want the job to run,select the appropriate schedule type.
Note:
See Creating Jobs in Oracle Fusion Middleware Administering OracleIdentity Manager for detailed information about schedule types.
In addition to modifying the job details, you can enable or disable a job.
5. On the Job Details tab, in the Parameters region, specify values for the attributesof the scheduled task.
Note:
See Reconciliation Scheduled Jobs for the SAP SuccessFactorsConnector for the list of scheduled tasks and their attributes.
6. Click Apply to save the changes.
Note:
You can use the Scheduler Status page in Identity SystemAdministration to either start, stop, or reinitialize the scheduler.
3.4 Guidelines on Performing Provisioning OperationsThese are the guidelines that you must apply while performing provisioning operations.
For a Create User Provisioning operation, you must specify a value for the User Namefield along with the domain name. For example, [email protected]. The User Nameis a mandatory field, other mandatory fields are Business Unit, Company, Hire Date,Username, Event Reason, First Name, Last Name, Supervisor and Job Classification.
3.5 Performing Provisioning OperationsYou create a new user in Oracle Identity Self Service by using the Create User page.You provision or request for accounts on the Accounts tab of the User Details page.
To perform provisioning operations in Oracle Identity Manager:
1. Log in to Oracle Identity Self Service.
2. Create a user. See Managing Users in Oracle Fusion Middleware Performing SelfService Tasks with Oracle Identity Manager for more information about creating auser.
3. On the Account tab, click Request Accounts.
Chapter 3Guidelines on Performing Provisioning Operations
3-7
4. In the Catalog page, search for and add to cart the application instance created in Creating an Application Instance, and then click Checkout.
5. Specify value for fields in the application form and then click Ready to Submit.
6. Click Submit.
7. If you want to provision entitlements, then:
a. On the Entitlements tab, click Request Entitlements.
b. In the Catalog page, search for and add to cart the entitlement, and then clickCheckout.
c. Click Submit.
3.6 Uninstalling the ConnectorUninstalling the connector deletes all the account related data associated withresource objects of the connector.
If you want to uninstall the connector for any reason, see Uninstalling Connectors inOracle Fusion Middleware Administering Oracle Identity Manager.
Chapter 3Uninstalling the Connector
3-8
4Extending the Functionality of the SAPSuccessFactors Connector
You can extend the functionality of the connector to address your specific businessrequirements.
The following topics are discussed in this section:
Note:
From Oracle Identity Manager Release 11.1.2 onward, lookup queries arenot supported. See Managing Lookups in Oracle Fusion MiddlewareAdministering Oracle Identity Manager for information about managinglookups by using the Form Designer in the Oracle Identity Manager SystemAdministration console.
• Adding New User Attributes for Reconciliation
• Adding New User Attributes for Provisioning
• Configuring Validation of Data During Reconciliation and Provisioning
• Configuring Transformation of Data During User Reconciliation
• Configuring the Connector for Multiple Installations of the Target System
• Defining the Connector
• Understanding OData API Dictionary
4.1 Adding New User Attributes for ReconciliationThe connector provides a default set of attribute mappings for reconciliation betweenOracle Identity Manager and the target system. If required, you can add new userattributes for reconciliation.
The default attribute mappings for reconciliation are listed in Table 1-24 and Table 1-28.
Note:
Only single-valued attributes can be mapped for reconciliation.
The following topics discuss the procedure to add new attributes for users:
• Adding New Attributes on the Process Form
4-1

• Adding Attributes to the Resource Object
• Creating Reconciliation Field Mapping
• Creating Entries in Lookup Definitions
• Performing Changes in a New UI Form
4.1.1 Adding New Attributes on the Process FormTo add a new attribute on the process form:
1. Log in to the Oracle Identity Manager Design Console.
2. Expand Development Tools, and double-click Form Designer.
3. Search for and open the UD_SFSF_USR process form.
4. Click Create New Version, and then click Add.
5. Enter the details of the field.
For example, if you are adding the LASTNAME field, enterUD_SFSF_USR_LASTNAME in the Name field and then enter other details such asVariable Type, Length, Field Label, and Field Type.
6. Click the Save icon, and then click Make Version Active.
The following screenshot shows the new field added to the process form.
Figure 4-1 New Field Added to the Process Form
Chapter 4Adding New User Attributes for Reconciliation
4-2

4.1.2 Adding Attributes to the Resource ObjectYou can add the new attribute to the resource object in the Resource Objects sectionof Oracle Identity Manager Design Console.
To add the new attribute to the list of reconciliation fields in the resource object:
1. Expand Resource Management, and double-click Resource Objects.
2. Search for and open the SuccessFactors User process form.
3. On the Object Reconciliation tab, click Add Field.
4. Enter the details of the field.
For example, enter LASTNAME in the Field Name field and select String from theField Type list. Later in this procedure, you enter the field name as the Code valueof the entry that you create in the lookup definition for reconciliation.
5. Click the Save icon.
The following screenshot shows the new reconciliation field added to the resourceobject:
Figure 4-2 New Reconciliation Field Added to the Resource Object
6. Click Create Reconciliation Profile.
4.1.3 Creating Reconciliation Field MappingYou create a reconciliation field mapping for the new attribute in the Process Definitionsection of Oracle Identity Manager Design Console.
To create reconciliation field mapping for the new attribute in the process definition:
Chapter 4Adding New User Attributes for Reconciliation
4-3
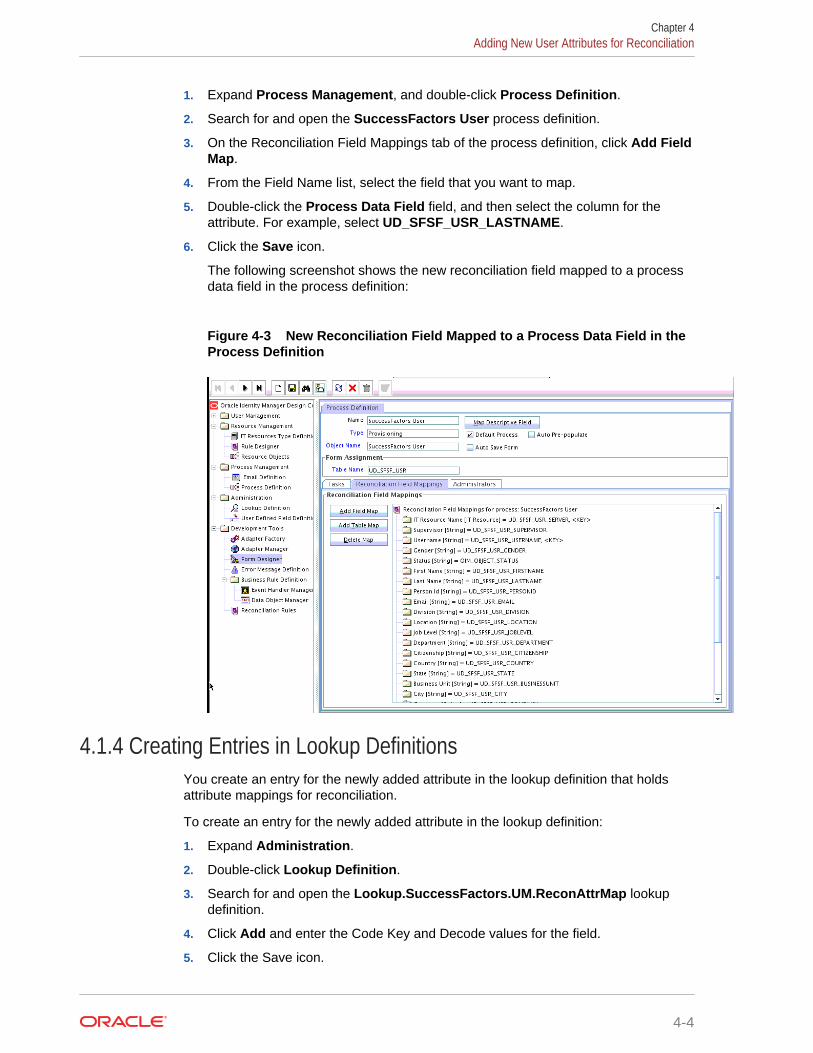
1. Expand Process Management, and double-click Process Definition.
2. Search for and open the SuccessFactors User process definition.
3. On the Reconciliation Field Mappings tab of the process definition, click Add FieldMap.
4. From the Field Name list, select the field that you want to map.
5. Double-click the Process Data Field field, and then select the column for theattribute. For example, select UD_SFSF_USR_LASTNAME.
6. Click the Save icon.
The following screenshot shows the new reconciliation field mapped to a processdata field in the process definition:
Figure 4-3 New Reconciliation Field Mapped to a Process Data Field in theProcess Definition
4.1.4 Creating Entries in Lookup DefinitionsYou create an entry for the newly added attribute in the lookup definition that holdsattribute mappings for reconciliation.
To create an entry for the newly added attribute in the lookup definition:
1. Expand Administration.
2. Double-click Lookup Definition.
3. Search for and open the Lookup.SuccessFactors.UM.ReconAttrMap lookupdefinition.
4. Click Add and enter the Code Key and Decode values for the field.
5. Click the Save icon.
Chapter 4Adding New User Attributes for Reconciliation
4-4
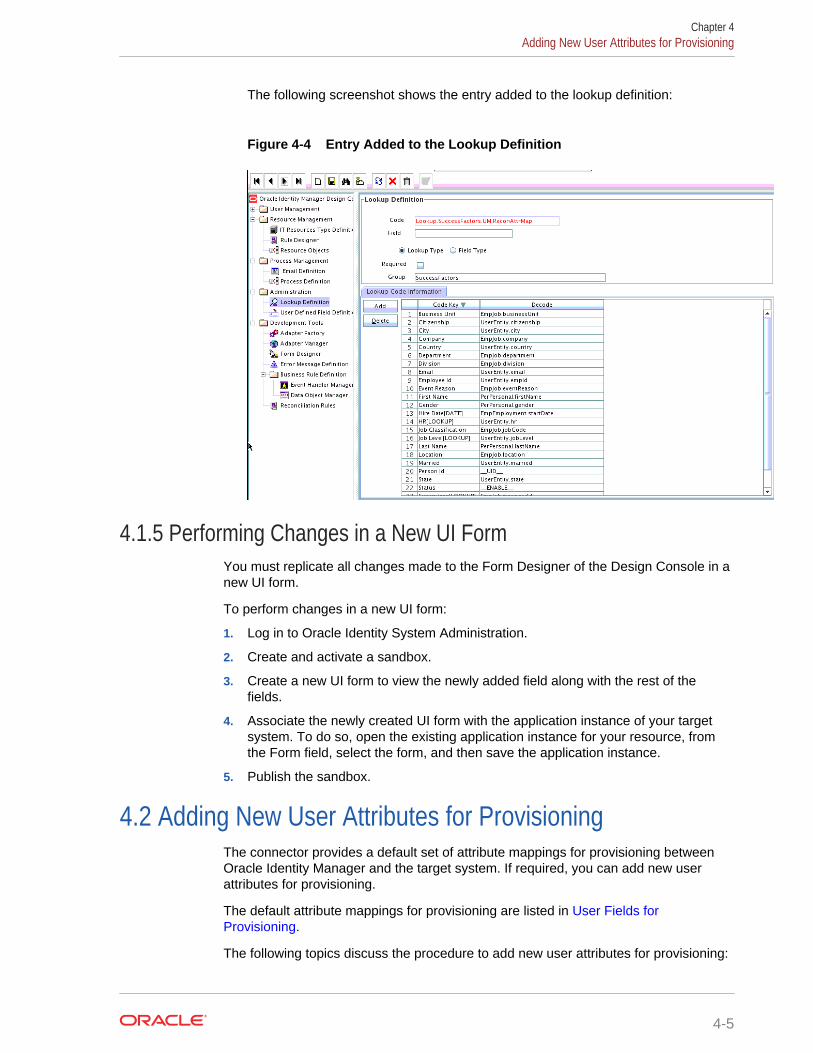
The following screenshot shows the entry added to the lookup definition:
Figure 4-4 Entry Added to the Lookup Definition
4.1.5 Performing Changes in a New UI FormYou must replicate all changes made to the Form Designer of the Design Console in anew UI form.
To perform changes in a new UI form:
1. Log in to Oracle Identity System Administration.
2. Create and activate a sandbox.
3. Create a new UI form to view the newly added field along with the rest of thefields.
4. Associate the newly created UI form with the application instance of your targetsystem. To do so, open the existing application instance for your resource, fromthe Form field, select the form, and then save the application instance.
5. Publish the sandbox.
4.2 Adding New User Attributes for ProvisioningThe connector provides a default set of attribute mappings for provisioning betweenOracle Identity Manager and the target system. If required, you can add new userattributes for provisioning.
The default attribute mappings for provisioning are listed in User Fields forProvisioning.
The following topics discuss the procedure to add new user attributes for provisioning:
Chapter 4Adding New User Attributes for Provisioning
4-5
• Adding New Attributes for Provisioning
• Creating Entries in Lookup Definitions for Provisioning
• Creating a Task to Enable Update Operations
• Replicating Form Designer Changes to a New UI Form
4.2.1 Adding New Attributes for ProvisioningYou add a new attribute on the process form in the Form Designer section of OracleIdentity Manager Design Console.
To add a new attribute on the process form:
Note:
If you have already added an attribute for reconciliation, then you need notrepeat steps performed as part of that procedure.
1. Log in to the Oracle Identity Manager Design Console.
2. Expand Development Tools, and double-click Form Designer.
3. Search for and open the UD_SFSF_USR process form.
4. Click Create New Version, and then click Add.
5. Enter the details of the attribute.
For example, if you are adding the LASTNAME, enter UD_SFSF_USR_LASTNAMEin the Name field, and then enter the rest of the details of this field.
6. Click the Save icon, and then click Make Version Active.
The following screenshot shows the new field added to the process form:
Chapter 4Adding New User Attributes for Provisioning
4-6
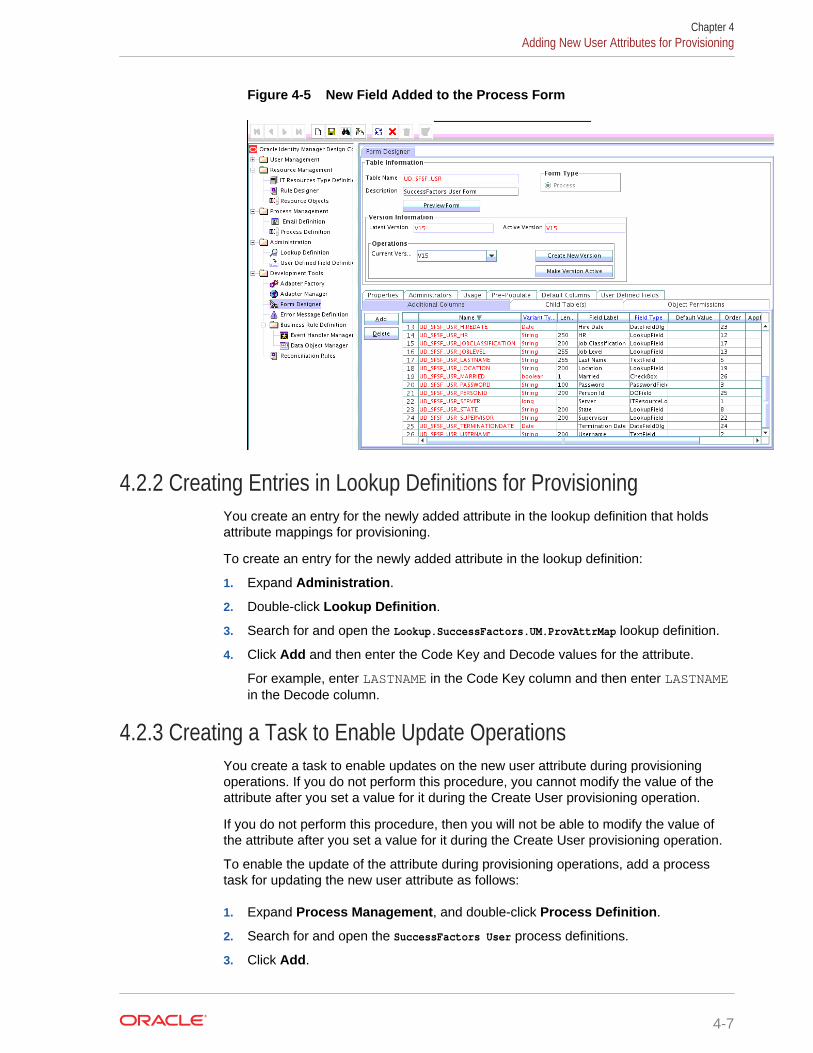
Figure 4-5 New Field Added to the Process Form
4.2.2 Creating Entries in Lookup Definitions for ProvisioningYou create an entry for the newly added attribute in the lookup definition that holdsattribute mappings for provisioning.
To create an entry for the newly added attribute in the lookup definition:
1. Expand Administration.
2. Double-click Lookup Definition.
3. Search for and open the Lookup.SuccessFactors.UM.ProvAttrMap lookup definition.
4. Click Add and then enter the Code Key and Decode values for the attribute.
For example, enter LASTNAME in the Code Key column and then enter LASTNAMEin the Decode column.
4.2.3 Creating a Task to Enable Update OperationsYou create a task to enable updates on the new user attribute during provisioningoperations. If you do not perform this procedure, you cannot modify the value of theattribute after you set a value for it during the Create User provisioning operation.
If you do not perform this procedure, then you will not be able to modify the value ofthe attribute after you set a value for it during the Create User provisioning operation.
To enable the update of the attribute during provisioning operations, add a processtask for updating the new user attribute as follows:
1. Expand Process Management, and double-click Process Definition.
2. Search for and open the SuccessFactors User process definitions.
3. Click Add.
Chapter 4Adding New User Attributes for Provisioning
4-7
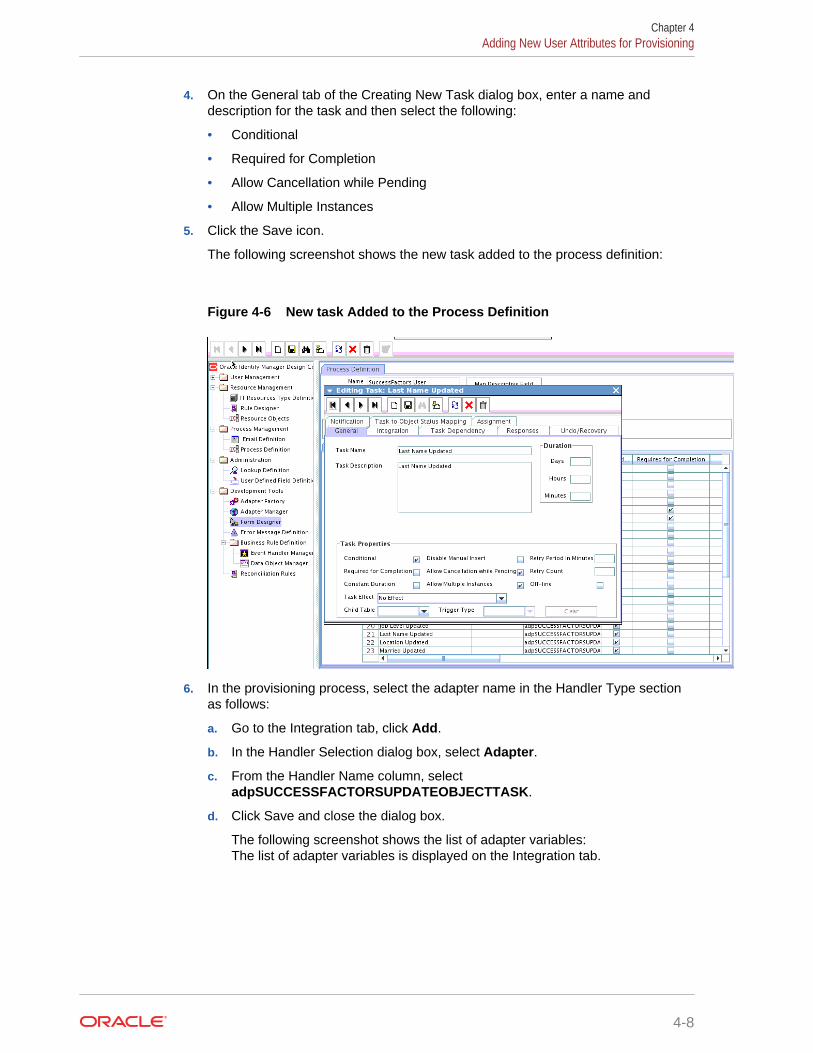
4. On the General tab of the Creating New Task dialog box, enter a name anddescription for the task and then select the following:
• Conditional
• Required for Completion
• Allow Cancellation while Pending
• Allow Multiple Instances
5. Click the Save icon.
The following screenshot shows the new task added to the process definition:
Figure 4-6 New task Added to the Process Definition
6. In the provisioning process, select the adapter name in the Handler Type sectionas follows:
a. Go to the Integration tab, click Add.
b. In the Handler Selection dialog box, select Adapter.
c. From the Handler Name column, selectadpSUCCESSFACTORSUPDATEOBJECTTASK.
d. Click Save and close the dialog box.
The following screenshot shows the list of adapter variables:The list of adapter variables is displayed on the Integration tab.
Chapter 4Adding New User Attributes for Provisioning
4-8
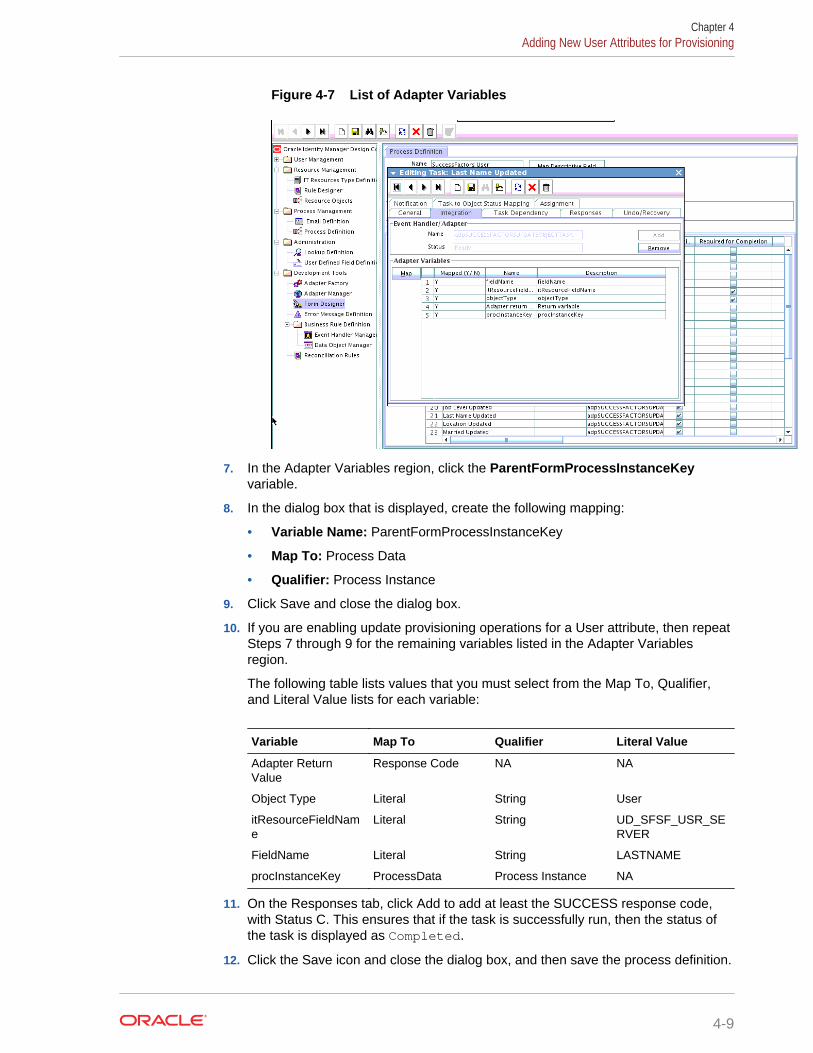
Figure 4-7 List of Adapter Variables
7. In the Adapter Variables region, click the ParentFormProcessInstanceKeyvariable.
8. In the dialog box that is displayed, create the following mapping:
• Variable Name: ParentFormProcessInstanceKey
• Map To: Process Data
• Qualifier: Process Instance
9. Click Save and close the dialog box.
10. If you are enabling update provisioning operations for a User attribute, then repeatSteps 7 through 9 for the remaining variables listed in the Adapter Variablesregion.
The following table lists values that you must select from the Map To, Qualifier,and Literal Value lists for each variable:
Variable Map To Qualifier Literal Value
Adapter ReturnValue
Response Code NA NA
Object Type Literal String User
itResourceFieldName
Literal String UD_SFSF_USR_SERVER
FieldName Literal String LASTNAME
procInstanceKey ProcessData Process Instance NA
11. On the Responses tab, click Add to add at least the SUCCESS response code,with Status C. This ensures that if the task is successfully run, then the status ofthe task is displayed as Completed.
12. Click the Save icon and close the dialog box, and then save the process definition.
Chapter 4Adding New User Attributes for Provisioning
4-9

4.2.4 Replicating Form Designer Changes to a New UI FormYou must replicate all changes made to the Form Designer of the Design Console in anew UI form.
To replicate all changes in a new UI form:
1. Log in to Oracle Identity System Administration.
2. Create and activate a sandbox.
3. Create a new UI form to view the newly added field along with the rest of thefields.
4. Associate the newly created UI form with the application instance of your targetsystem. To do so, open the existing application instance for your resource, fromthe Form field, select the form, and then save the application instance.
5. Publish the sandbox.
4.3 Configuring Validation of Data During Reconciliation andProvisioning
You can configure validation of reconciled and provisioned single-valued dataaccording to your requirements.
For example, you can validate data fetched from the User Name attribute to ensurethat it does not contain the number sign (#). In addition, you can validate data enteredin the User Name field on the process form so that the number sign (#) is not sent tothe target system during provisioning operations. For data that fails the validationcheck, the following message is displayed or recorded in the log file: Validation failedfor attribute ATTRIBUTE_NAME.To configure validation of data:
1. Write code that implements the required validation logic in a Java class.
The validation class must implement validate method with the following methodsignature:
boolean validate(HashMap hmUserDetails, HashMap hmEntitlementDetails, String field)
The following sample validation class checks if the value in the User Nameattribute contains the number sign (#):
public boolean validate(HashMap hmUserDetails,HashMap hmEntitlementDetails, String field) { /** You must write code to validate attributes. Parent* data values can be fetched by using hmUserDetails.get(field)* For child data values, loop through the* ArrayList/Vector fetched by hmEntitlementDetails.get("Child Table")* Depending on the outcome of the validation operation,* the code must return true or false.*//** In this sample code, the value "false" is returned if the field* contains the number sign (#). Otherwise, the value "true" is* returned.
Chapter 4Configuring Validation of Data During Reconciliation and Provisioning
4-10
*/ boolean valid=true; String sUserName=(String) hmUserDetails.get(field); for(int i=0;i<sUserName.length();i++){if (sUserName.charAt(i) == '#'){ valid=false;break;} } return valid; }
2. Create a JAR file to hold the Java class.
3. Copy the JAR file to Oracle Identity Manager database.
Run the Oracle Identity Manager Upload JARs utility to post the JAR file to theOracle Identity Manager database. This utility is copied into the following locationwhen you install Oracle Identity Manager:
Note:
Before you use this utility, verify that the WL_HOME environmentvariable is set to the directory in which Oracle WebLogic Server isinstalled.
• For Microsoft Windows: OIM_HOME/server/bin/UploadJars.bat
• For UNIX: OIM_HOME/server/bin/UploadJars.sh
When you run the utility, you are prompted to enter the login credentials of theOracle Identity Manager administrator, URL of the Oracle Identity Manager hostcomputer, context factory value, type of JAR file being uploaded, and the locationfrom which the JAR file is to be uploaded. Specify 1 as the value of the JAR type.
4. If you created the Java class for validating a process form field for reconciliation,then:
a. Log in to the Design Console.
b. Create a lookup definition namedLookup.SuccessFactors.UM.ReconValidation.
c. Save the changes to the lookup definition.
d. Search for and open the Lookup.SuccessFactors.UM.Configuration lookupdefinition.
e. In the Code Key column, enter Recon Validation Lookup. In the Decodecolumn, enter Lookup.SuccessFactors.UM.ReconValidation.
f. Save the changes to the lookup definition.
5. Add an entry in the Lookup.SuccessFactors.UM.Configuration lookup definitionto enable transformation as follows:
a. Expand Administration, and then double-click Lookup Definition.
b. Search for and open the Lookup.SuccessFactors.UM.Configuration lookupdefinition.
c. In the Code Key column, enter Recon Transformation Lookup. In theDecode column, enterLookup.SuccessFactors.UM.ReconTransformation.
Chapter 4Configuring Validation of Data During Reconciliation and Provisioning
4-11
d. Save the changes to the lookup definition.
4.4 Configuring Transformation of Data During UserReconciliation
You can configure transformation of reconciled single-valued account data accordingto your requirements.
For example, you can use User Name and Last Name values to create a value for theFull Name field in Oracle Identity Manager.To configure transformation of single-valued account data fetched duringreconciliation:
1. Write code that implements the required transformation logic in a Java class.
The transformation class must implement the transform method with the followingmethod signature:
Object transform(HashMap hmUserDetails, HashMap hmEntitlementDetails, String sField)
The following sample transformation class creates a value for the Full Nameattribute by using values fetched from the User Name and Last Name attributes ofthe target system:
package oracle.iam.connectors.common.transform;import java.util.HashMap;public class TransformAttribute {/*Description:Abstract method for transforming the attributesparam hmUserDetails< String,Object>HashMap containing parent data detailsparam hmEntitlementDetails < String,Object>HashMap containing child data details*/public Object transform(HashMap hmUserDetails, HashMap hmEntitlementDetails,String sField) {/** You must write code to transform the attributes. Parent data attribute values can be fetched by using hmUserDetails.get("Field Name").*To fetch child data values, loop through the* ArrayList/Vector fetched by hmEntitlementDetails.get("Child Table")* Return the transformed attribute.*/String sUserName= (String)hmUserDetails.get("User Name"); String sLastName= (String)hmUserDetails.get("Last Name"); String sFullName=sUserName+"."+sLastName;return sFullName;}}
2. Create a JAR file to hold the Java class.
3. Copy the JAR file to Oracle Identity Manager database.
Run the Oracle Identity Manager Upload JARs utility to post the JAR file to theOracle Identity Manager database. This utility is copied into the following locationwhen you install Oracle Identity Manager:
Chapter 4Configuring Transformation of Data During User Reconciliation
4-12

Note:
Before you use this utility, verify that the WL_HOME environmentvariable is set to the directory in which Oracle WebLogic Server isinstalled.
• For Microsoft Windows: OIM_HOME/server/bin/UploadJars.bat
• For UNIX: OIM_HOME/server/bin/UploadJars.sh
When you run the utility, you are prompted to enter the login credentials of theOracle Identity Manager administrator, URL of the Oracle Identity Manager hostcomputer, context factory value, type of JAR file being uploaded, and the locationfrom which the JAR file is to be uploaded. Specify 1 as the value of the JAR type.
4. If you created the Java class for transforming a process form field forreconciliation, then:
a. Log in to the Design Console.
b. Create a lookup definition namedLookup.SuccessFactors.UM.ReconTransformation.
c. In the Code Key column, enter the resource object field name on which youwant to apply transformation. For example, User Name. In the Decodecolumn, enter the name of the class that implements the transformation logic.For example,oracle.iam.connectors.common.transform.TransformAttribute.
d. Save the changes to the lookup definition.
5. Add an entry in the Lookup.SuccessFactors.UM.Configuration lookup definitionto enable transformation as follows:
a. Expand Administration, and then double-click Lookup Definition.
b. Search for and open the Lookup.SuccessFactors.UM.Configuration lookupdefinition.
c. In the Code Key column, enter Recon Transformation Lookup. In theDecode column, enterLookup.SuccessFactors.UM.ReconTransformation.
d. Save the changes to the lookup definition.
4.5 Configuring the Connector for Multiple Installations ofthe Target System
You must create copies of the connector to configure it for multiple installations of thetarget system.
The following example illustrates this requirement:
The London and New York offices of Example Multinational Inc. have their owninstallations of the target system. The company has recently installed Oracle IdentityManager, and they want to configure Oracle Identity Manager to link all theinstallations of the target system.
Chapter 4Configuring the Connector for Multiple Installations of the Target System
4-13
To meet the requirement posed by such a scenario, you must create copies of theconnector. See Cloning Connectors in Oracle Fusion Middleware Administering OracleIdentity Manager for more information.
4.6 Defining the ConnectorDefining a connector is equivalent to registering the connector with Oracle IdentityManager. You can define a customized or reconfigured connector using OracleIdentity System Administration. After you define a connector, a record representing theconnector is created in the Oracle Identity Manager database.
A connector is automatically defined when you install it using the Install Connectorsfeature or when you upgrade it using the Upgrade Connectors feature. You mustmanually define a connector if:
• You import the connector by using the Deployment Manager.
• You customize or reconfigure the connector.
• You upgrade Oracle Identity Manager.
The following events take place when you define a connector:
• A record representing the connector is created in the Oracle Identity Managerdatabase. If this record already exists, then it is updated.
• The status of the newly defined connector is set to Active. In addition, the status ofa previously installed release of the same connector automatically is set toInactive.
See Defining Connectors in Oracle Fusion Middleware Administering Oracle IdentityManager for detailed information about the procedure to define connectors.
4.7 Understanding OData API DictionaryThe OData API Dictionary component stores a bundle of object entities. EachSuccessFactors instance contains ready-to-use object entities. The object entities inthe OData API Dictionary can also be customized as per requirement.
The following topics are discussed in this appendix:
• About OData API Dictionary
• Viewing OData API Dictionary in the SAP SuccessFactors Connector
• Adding Custom Attributes and Object Entities in Oracle Identity Manager
• Providing Values in Static Lookups
4.7.1 About OData API DictionaryEvery SuccessFactors instance has several object entities. The OData API Dictionarybundles these object entities and presents them in a tabular format. TheSuccessFactors object entities contain information such as allowed operations,attributes (also referred to as property name) and labels.
Chapter 4Defining the Connector
4-14
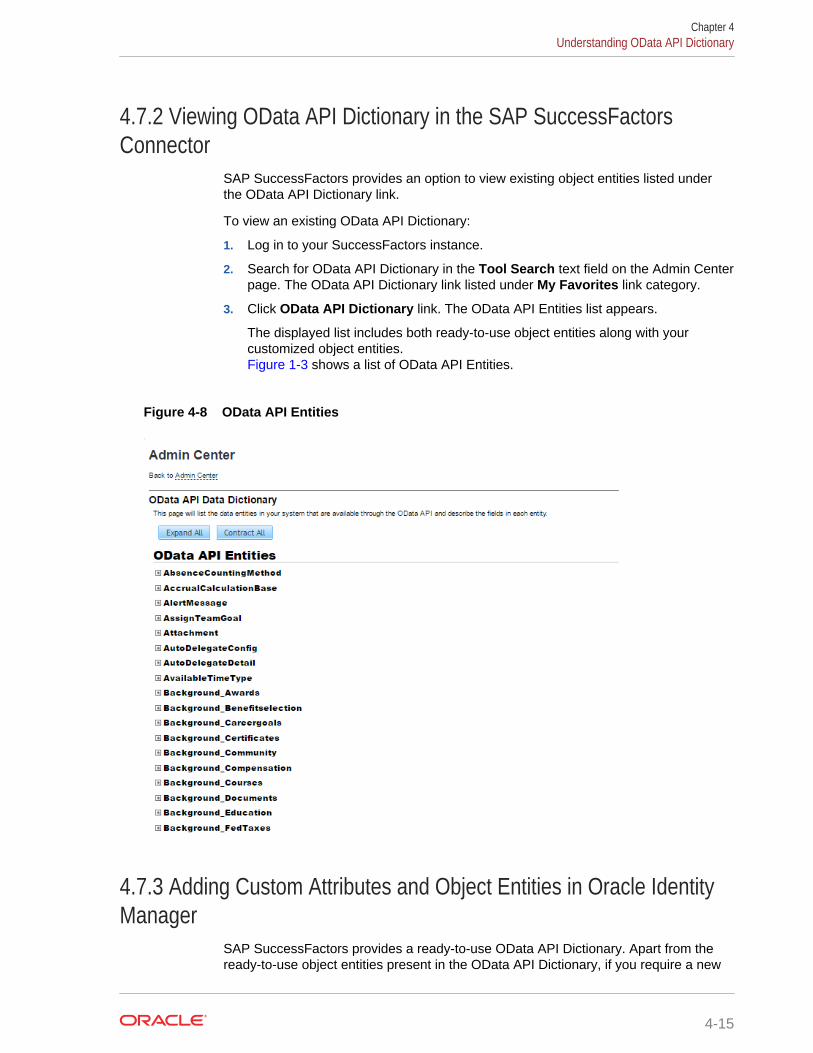
4.7.2 Viewing OData API Dictionary in the SAP SuccessFactorsConnector
SAP SuccessFactors provides an option to view existing object entities listed underthe OData API Dictionary link.
To view an existing OData API Dictionary:
1. Log in to your SuccessFactors instance.
2. Search for OData API Dictionary in the Tool Search text field on the Admin Centerpage. The OData API Dictionary link listed under My Favorites link category.
3. Click OData API Dictionary link. The OData API Entities list appears.
The displayed list includes both ready-to-use object entities along with yourcustomized object entities.Figure 1-3 shows a list of OData API Entities.
Figure 4-8 OData API Entities
4.7.3 Adding Custom Attributes and Object Entities in Oracle IdentityManager
SAP SuccessFactors provides a ready-to-use OData API Dictionary. Apart from theready-to-use object entities present in the OData API Dictionary, if you require a new
Chapter 4Understanding OData API Dictionary
4-15
attribute and a new object entity, then you need to customize the OData APIDictionary. Using the OData API Dictionary component, all customized object entitiesare mapped to their corresponding attributes in the target system.
Adding custom attributes and object entities to Oracle Identity Manager is a two-stepoperation as follows:
• Firstly in your SuccessFactors instance, you need to search for the customattribute that is present in the OData API Dictionary. Make a note of the customattribute and the entity object below which this custom attribute is listed. For moreinformation about customizing the OData API Dictionary, contact SAPSuccessFactors support .
• After obtaining the required information about custom attribute and object entity,you need to add this new attribute to Oracle Identity Manager. This new attribute(with the help of Code key and Decode values) provides a mapping between thecustom attribute and the target system.
To associate the attribute with an object entity:
1. Log in to your SuccessFactors instance.
2. Search for OData API Dictionary in the Tool Search text field on the Admin Centerpage. The OData API Dictionary link listed under My Favorites link category.
3. Click OData API Dictionary link. The OData API Entities list appears.
4. From the list of OData API Entities, scroll and search for the attribute underconsideration.
5. For the attribute under consideration, make a note of Property Name and Labelalong with Object Entity to which this attribute belongs.
As an example, consider business unit is the attribute under consideration. Scrolland search for this attribute in the OData API Entities. After finding this attribute,make a note of: bussinetUnit to be the Property Name, Business Unit to be theLabel and these two are present under the EmpJob object entity list.
6. Log in to Oracle Identity Manager Design Console.
7. Expand Administration and then double-click Lookup Definition.
8. Search for and open the Lookup.SuccessFactors.UM.ProvAttrMap Lookupdefinition.
9. Click Add to add a new attribute.
10. Enter values for the Code Key and for the Decode in their corresponding textboxes. Use the format provided below:
Code Key Format: LABEL ; Decode : OBJ_ENTITY.PROP_NAMEIn this format, replace LABEL, OBJ_ENTITY, and PROP_NAME with the valuesfrom the Label, Object Entity, and Property Name columns from the OData APIDictionary you noted in Step 4.
11. Click Save to save your changes.
4.7.4 Providing Values in Static LookupsSuccessFactors provides an option to add values to the static lookup definition. Addingvalues is a requirement to associate code key and decode values in the target system.To add values in the static lookups for SuccessFactors, first you need to check if anycode value is present for the attribute under consideration. If a code value is present,
Chapter 4Understanding OData API Dictionary
4-16
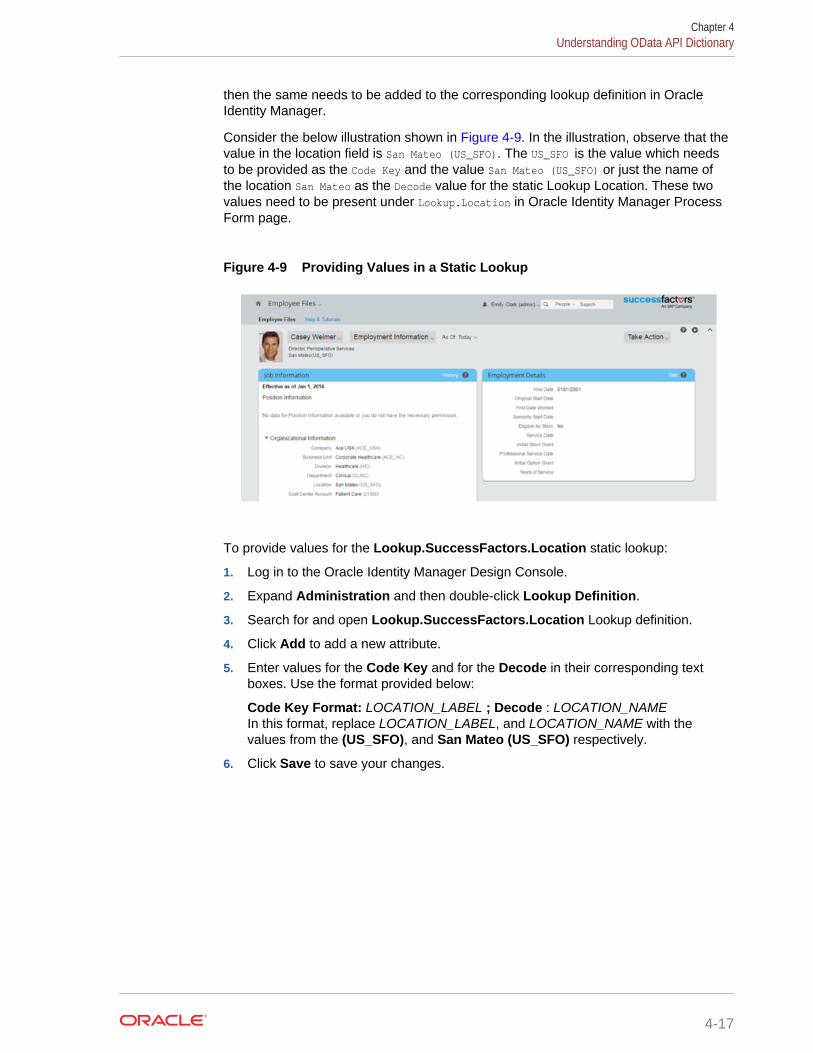
then the same needs to be added to the corresponding lookup definition in OracleIdentity Manager.
Consider the below illustration shown in Figure 4-9. In the illustration, observe that thevalue in the location field is San Mateo (US_SFO). The US_SFO is the value which needsto be provided as the Code Key and the value San Mateo (US_SFO) or just the name ofthe location San Mateo as the Decode value for the static Lookup Location. These twovalues need to be present under Lookup.Location in Oracle Identity Manager ProcessForm page.
Figure 4-9 Providing Values in a Static Lookup
To provide values for the Lookup.SuccessFactors.Location static lookup:
1. Log in to the Oracle Identity Manager Design Console.
2. Expand Administration and then double-click Lookup Definition.
3. Search for and open Lookup.SuccessFactors.Location Lookup definition.
4. Click Add to add a new attribute.
5. Enter values for the Code Key and for the Decode in their corresponding textboxes. Use the format provided below:
Code Key Format: LOCATION_LABEL ; Decode : LOCATION_NAMEIn this format, replace LOCATION_LABEL, and LOCATION_NAME with thevalues from the (US_SFO), and San Mateo (US_SFO) respectively.
6. Click Save to save your changes.
Chapter 4Understanding OData API Dictionary
4-17
5Known Issues and Workarounds for theSAP SuccessFactors Connector
These are the known issues and workarounds associated with this release of theconnector.
The following are issues associated with the target system:
• Support for Delete User Operation
• Support for Removing Child Attributes
• Support for Translation of Termination Date
5.1 Support for Delete User OperationThis connector does not support delete user operation. When you initiate a delete useroperation in Oracle Identity Manager, since the delete operation is not supported, thetarget system disables the user.
Workaround:
There is no workaround available for this issue.
5.2 Support for Removing Child AttributesIn this release, removing child attributes are not supported.
As an example consider phone number to be a multivalued attribute. As a multivaluedattribute, phone number includes child attributes such as mobile number, work phone,and alternate mobile number. In this connector release, you cannot remove childattribute such as mobile number from the phone number parent attribute.
Workaround:
There is no workaround available for this issue.
5.3 Support for Translation of Termination DateThe SuccessFactors connector bundle supports 28 different languages. In thisrelease, the translation for the attribute Termination Date is not supported acrossdifferent languages.
Workaround:
There is no workaround available for this issue.
5-1
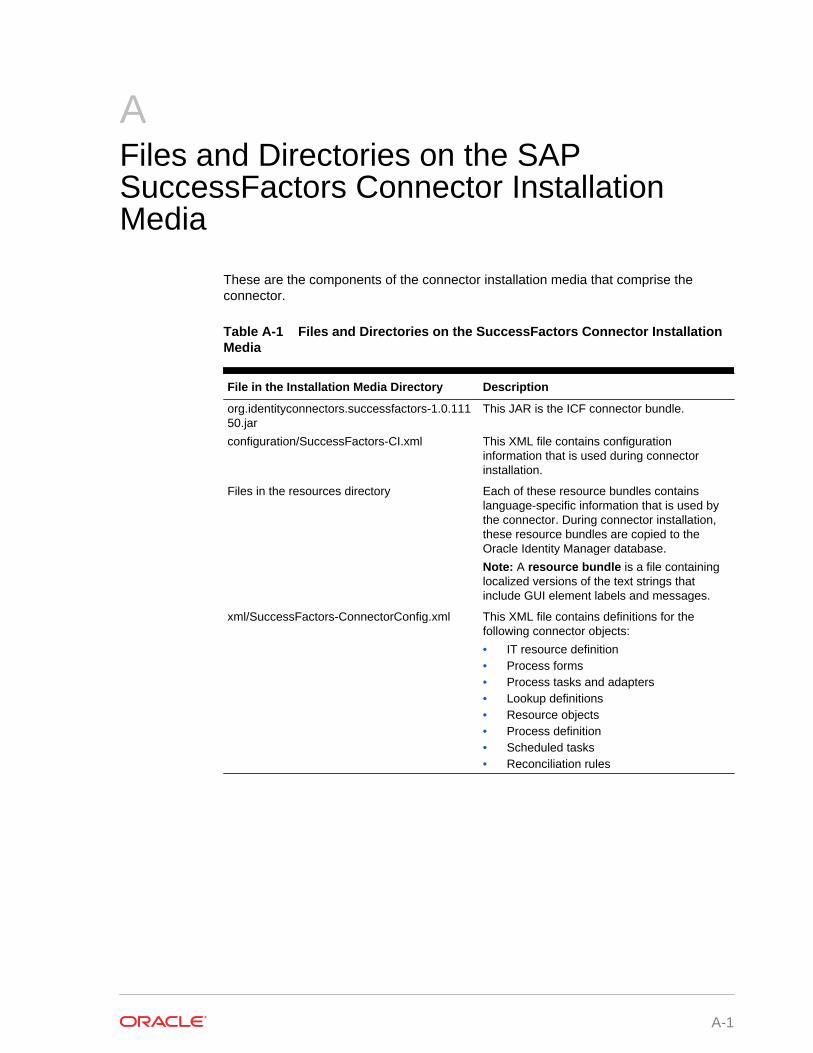
AFiles and Directories on the SAPSuccessFactors Connector InstallationMedia
These are the components of the connector installation media that comprise theconnector.
Table A-1 Files and Directories on the SuccessFactors Connector InstallationMedia
File in the Installation Media Directory Description
org.identityconnectors.successfactors-1.0.11150.jar
This JAR is the ICF connector bundle.
configuration/SuccessFactors-CI.xml This XML file contains configurationinformation that is used during connectorinstallation.
Files in the resources directory Each of these resource bundles containslanguage-specific information that is used bythe connector. During connector installation,these resource bundles are copied to theOracle Identity Manager database.
Note: A resource bundle is a file containinglocalized versions of the text strings thatinclude GUI element labels and messages.
xml/SuccessFactors-ConnectorConfig.xml This XML file contains definitions for thefollowing connector objects:
• IT resource definition• Process forms• Process tasks and adapters• Lookup definitions• Resource objects• Process definition• Scheduled tasks• Reconciliation rules
A-1
Index
Aaccount management, 1-1
Ccertified components, 1-2certified languages, 1-2configure scheduled jobs, 3-6configure SSL
SSL, 2-15connector
clone, 4-13define, 4-14uninstall, 3-8
connector architecture, 1-3connector features, 1-5connector files and directories, A-1connector installation media, A-1connector objects, 1-26
Ddefine connector, 4-14
Eenable logging, 2-14
Ffeatures of connector, 1-5filtered reconciliation, 3-3full reconciliation, 1-6, 3-2
Iidentity management, 1-1identity reconciliation, 1-1IT resource
configuring, 2-4parameters, 2-4
Llimited reconciliation, 3-3localizing, 2-10log levels, 2-13logging, 2-12–2-14lookup definitions
Lookup.SuccesFactors.UM.Configuration, 1-13Lookup.SuccessFactors.Configuration, 1-9Lookup.SuccessFactors.Configuration.Trusted, 1-16Lookup.SuccessFactors.Division, 1-18Lookup.SuccessFactors.UM.Configuration.Trusted, 1-15Lookup.SuccessFactors.UM.ProvAttrMap, 1-14Lookup.SuccessFactors.UM.ReconAttrMap, 1-14Lookup.SuccessFactors.UM.ReconAttrMap.Trusted, 1-17Lookup.SuccessFactors.UM.ReconAttrMap.TrustedDefaults,
1-15lookup field synchronization, 1-7Lookup.SuccessFactors.BooleanValues, 1-21Lookup.SuccessFactors.BussinessUnit, 1-20Lookup.SuccessFactors.Citizenship, 1-19Lookup.SuccessFactors.City, 1-21Lookup.SuccessFactors.Company, 1-20Lookup.SuccessFactors.Country, 1-19Lookup.SuccessFactors.Department, 1-18Lookup.SuccessFactors.EventReason, 1-20Lookup.SuccessFactors.Gender , 1-19Lookup.SuccessFactors.JobClassification, 1-21Lookup.SuccessFactors.Location, 1-21Lookup.SuccessFactors.Married, 1-18Lookup.SuccessFactors.State, 1-19
Oother lookup definitions, 1-8
Ppreconfigured lookup definitions, 1-8provisioning functions, 1-26provisioning operations, 1-1
Index-1
Rreconciliation
full, 3-2limited, 3-3
reconciliation action ruletarget resource reconciliation
users, 1-25trusted source reconciliation, 1-30
reconciliation action rulestarget resource reconciliation, 1-25
reconciliation ruletarget resource reconciliation, 1-24
users, 1-24trusted source reconciliation, 1-29
Sscheduled job
lookup field synchronization, 3-1SuccessFactors Trusted User Reconciliation,
3-5SuccessFactors User Target Resource User
Reconciliation, 3-4
scheduled job (continued)stages of connector deployment
installation, 2-2postinstallation, 2-6
support for the connector server, 1-6
Ttarget resource reconciliation, 1-1, 1-3transformation, 4-12trusted resource reconciliation, 1-3trusted source reconciliation, 1-1, 1-6
Uuninstall connector, 3-8use cases example, 1-5user fields for provisioning, 1-27user fields for target resource, 1-22
Vvalidation, 4-10
Index
Index-2