Embed Size (px)
Citation preview

4015-2 Yanokuchi, Inagi-city, Tokyo 206-0812 Japan
2006 KORG INC.
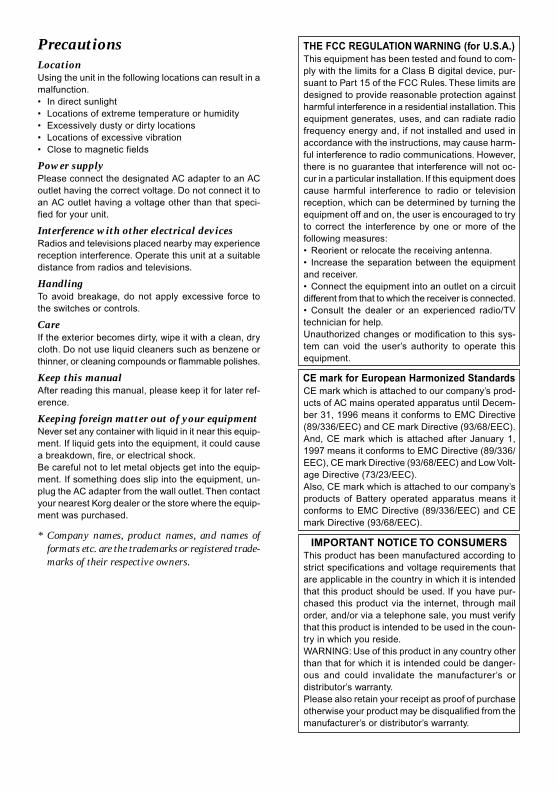
Connections
LINE IN LINE OUTDC4.5V
MIXER
AC
CD PLAYER
Option: AC ADAPTER
PHONES
DJ MIXER
LINE IN
MP3 PLAYER
PHONES
LiaisonsAnschlüsse
PrecautionsLocationUsing the unit in the following locations can result in amalfunction.• In direct sunlight• Locations of extreme temperature or humidity• Excessively dusty or dirty locations• Locations of excessive vibration• Close to magnetic fields
Power supplyPlease connect the designated AC adapter to an ACoutlet having the correct voltage. Do not connect it toan AC outlet having a voltage other than that speci-fied for your unit.
Interference with other electrical devicesRadios and televisions placed nearby may experiencereception interference. Operate this unit at a suitabledistance from radios and televisions.
HandlingTo avoid breakage, do not apply excessive force tothe switches or controls.
CareIf the exterior becomes dirty, wipe it with a clean, drycloth. Do not use liquid cleaners such as benzene orthinner, or cleaning compounds or flammable polishes.
Keep this manualAfter reading this manual, please keep it for later ref-erence.
Keeping foreign matter out of your equipmentNever set any container with liquid in it near this equip-ment. If liquid gets into the equipment, it could causea breakdown, fire, or electrical shock.Be careful not to let metal objects get into the equip-ment. If something does slip into the equipment, un-plug the AC adapter from the wall outlet. Then contactyour nearest Korg dealer or the store where the equip-ment was purchased.
* Company names, product names, and names offormats etc. are the trademarks or registered trade-marks of their respective owners.
THE FCC REGULATION WARNING (for U.S.A.)This equipment has been tested and found to com-ply with the limits for a Class B digital device, pur-suant to Part 15 of the FCC Rules. These limits aredesigned to provide reasonable protection againstharmful interference in a residential installation. Thisequipment generates, uses, and can radiate radiofrequency energy and, if not installed and used inaccordance with the instructions, may cause harm-ful interference to radio communications. However,there is no guarantee that interference will not oc-cur in a particular installation. If this equipment doescause harmful interference to radio or televisionreception, which can be determined by turning theequipment off and on, the user is encouraged to tryto correct the interference by one or more of thefollowing measures:• Reorient or relocate the receiving antenna.• Increase the separation between the equipmentand receiver.• Connect the equipment into an outlet on a circuitdifferent from that to which the receiver is connected.• Consult the dealer or an experienced radio/TVtechnician for help.Unauthorized changes or modification to this sys-tem can void the user’s authority to operate thisequipment.
CE mark for European Harmonized StandardsCE mark which is attached to our company’s prod-ucts of AC mains operated apparatus until Decem-ber 31, 1996 means it conforms to EMC Directive(89/336/EEC) and CE mark Directive (93/68/EEC).And, CE mark which is attached after January 1,1997 means it conforms to EMC Directive (89/336/EEC), CE mark Directive (93/68/EEC) and Low Volt-age Directive (73/23/EEC).Also, CE mark which is attached to our company’sproducts of Battery operated apparatus means itconforms to EMC Directive (89/336/EEC) and CEmark Directive (93/68/EEC).
IMPORTANT NOTICE TO CONSUMERSThis product has been manufactured according tostrict specifications and voltage requirements thatare applicable in the country in which it is intendedthat this product should be used. If you have pur-chased this product via the internet, through mailorder, and/or via a telephone sale, you must verifythat this product is intended to be used in the coun-try in which you reside.WARNING: Use of this product in any country otherthan that for which it is intended could be danger-ous and could invalidate the manufacturer’s ordistributor’s warranty.Please also retain your receipt as proof of purchaseotherwise your product may be disqualified from themanufacturer’s or distributor’s warranty.
Thank you for purchasing the KAOSS PAD mini-KP Dynamic Effect Processor. For trouble-freeenjoyment of the mini-KP’s fullest potential,please read this manual carefully and use themini-KP only as directed.
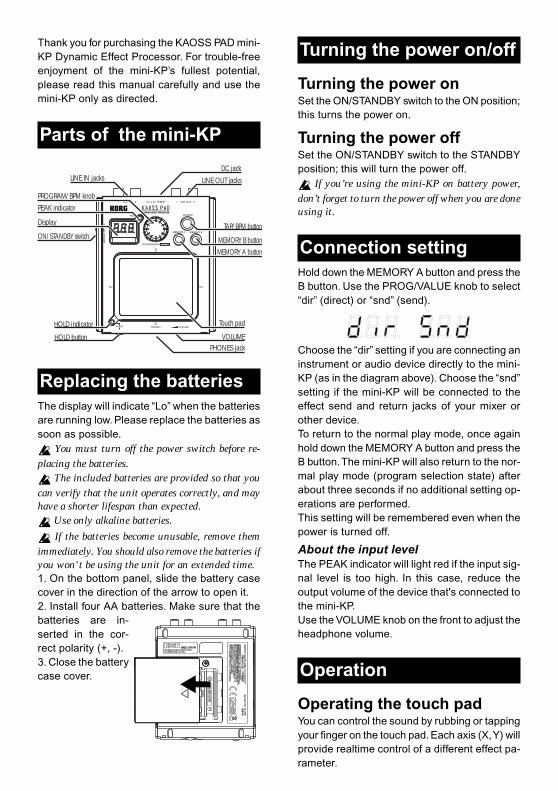
Parts of the mini-KP
PROGRAM/BPM knobPEAK indicator
Display
LINE IN jacks LINE OUT jacksDC jack
VOLUMEPHONES jack
Touch pad
HOLD button
HOLD indicator
ON/STANDBY switch MEMORY B buttonMEMORY A button
TAP/BPM button
Replacing the batteriesThe display will indicate “Lo” when the batteriesare running low. Please replace the batteries assoon as possible.
You must turn off the power switch before re-placing the batteries.
The included batteries are provided so that youcan verify that the unit operates correctly, and mayhave a shorter lifespan than expected.
Use only alkaline batteries.
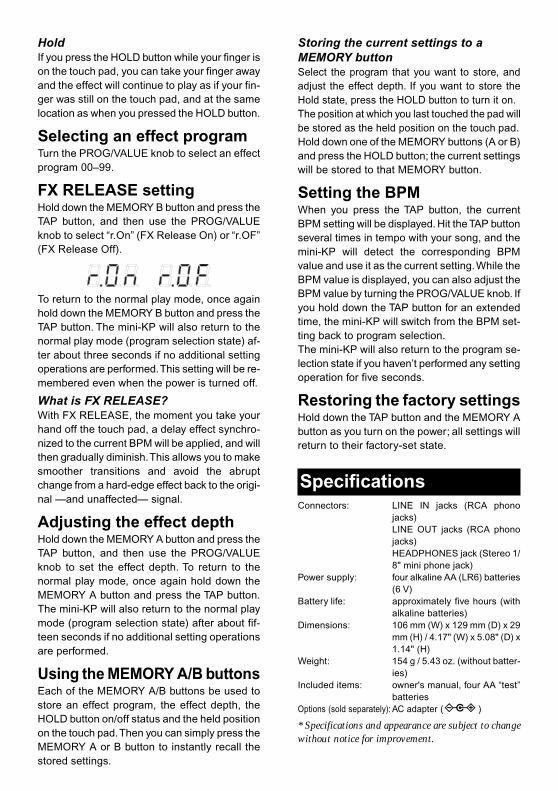
If the batteries become unusable, remove themimmediately. You should also remove the batteries ifyou won't be using the unit for an extended time.1. On the bottom panel, slide the battery casecover in the direction of the arrow to open it.2. Install four AA batteries. Make sure that thebatteries are in-serted in the cor-rect polarity (+, -).3. Close the batterycase cover.
Turning the power on/off
Turning the power onSet the ON/STANDBY switch to the ON position;this turns the power on.
Turning the power offSet the ON/STANDBY switch to the STANDBYposition; this will turn the power off.
If you’re using the mini-KP on battery power,don’t forget to turn the power off when you are doneusing it.
Connection settingHold down the MEMORY A button and press theB button. Use the PROG/VALUE knob to select“dir” (direct) or “snd” (send).
Choose the “dir” setting if you are connecting aninstrument or audio device directly to the mini-KP (as in the diagram above). Choose the “snd”setting if the mini-KP will be connected to theeffect send and return jacks of your mixer orother device.To return to the normal play mode, once againhold down the MEMORY A button and press theB button. The mini-KP will also return to the nor-mal play mode (program selection state) afterabout three seconds if no additional setting op-erations are performed.This setting will be remembered even when thepower is turned off.
About the input levelThe PEAK indicator will light red if the input sig-nal level is too high. In this case, reduce theoutput volume of the device that's connected tothe mini-KP.Use the VOLUME knob on the front to adjust theheadphone volume.
Operation
Operating the touch padYou can control the sound by rubbing or tappingyour finger on the touch pad. Each axis (X, Y) willprovide realtime control of a different effect pa-rameter.
HoldIf you press the HOLD button while your finger ison the touch pad, you can take your finger awayand the effect will continue to play as if your fin-ger was still on the touch pad, and at the samelocation as when you pressed the HOLD button.
Selecting an effect programTurn the PROG/VALUE knob to select an effectprogram 00–99.
FX RELEASE settingHold down the MEMORY B button and press theTAP button, and then use the PROG/VALUEknob to select “r.On” (FX Release On) or “r.OF”(FX Release Off).
To return to the normal play mode, once againhold down the MEMORY B button and press theTAP button. The mini-KP will also return to thenormal play mode (program selection state) af-ter about three seconds if no additional settingoperations are performed. This setting will be re-membered even when the power is turned off.
What is FX RELEASE?With FX RELEASE, the moment you take yourhand off the touch pad, a delay effect synchro-nized to the current BPM will be applied, and willthen gradually diminish. This allows you to makesmoother transitions and avoid the abruptchange from a hard-edge effect back to the origi-nal —and unaffected— signal.
Adjusting the effect depthHold down the MEMORY A button and press theTAP button, and then use the PROG/VALUEknob to set the effect depth. To return to thenormal play mode, once again hold down theMEMORY A button and press the TAP button.The mini-KP will also return to the normal playmode (program selection state) after about fif-teen seconds if no additional setting operationsare performed.
Using the MEMORY A/B buttonsEach of the MEMORY A/B buttons be used tostore an effect program, the effect depth, theHOLD button on/off status and the held positionon the touch pad. Then you can simply press theMEMORY A or B button to instantly recall thestored settings.
Storing the current settings to aMEMORY buttonSelect the program that you want to store, andadjust the effect depth. If you want to store theHold state, press the HOLD button to turn it on.The position at which you last touched the pad willbe stored as the held position on the touch pad.Hold down one of the MEMORY buttons (A or B)and press the HOLD button; the current settingswill be stored to that MEMORY button.
Setting the BPMWhen you press the TAP button, the currentBPM setting will be displayed. Hit the TAP buttonseveral times in tempo with your song, and themini-KP will detect the corresponding BPMvalue and use it as the current setting. While theBPM value is displayed, you can also adjust theBPM value by turning the PROG/VALUE knob. Ifyou hold down the TAP button for an extendedtime, the mini-KP will switch from the BPM set-ting back to program selection.The mini-KP will also return to the program se-lection state if you haven’t performed any settingoperation for five seconds.
Restoring the factory settingsHold down the TAP button and the MEMORY Abutton as you turn on the power; all settings willreturn to their factory-set state.
SpecificationsConnectors: LINE IN jacks (RCA phono
jacks)LINE OUT jacks (RCA phonojacks)HEADPHONES jack (Stereo 1/8" mini phone jack)
Power supply: four alkaline AA (LR6) batteries(6 V)
Battery life: approximately five hours (withalkaline batteries)
Dimensions: 106 mm (W) x 129 mm (D) x 29mm (H) / 4.17" (W) x 5.08" (D) x1.14" (H)
Weight: 154 g / 5.43 oz. (without batter-ies)
Included items: owner's manual, four AA “test”batteries
Options (sold separately): AC adapter ( )
* Specifications and appearance are subject to changewithout notice for improvement.
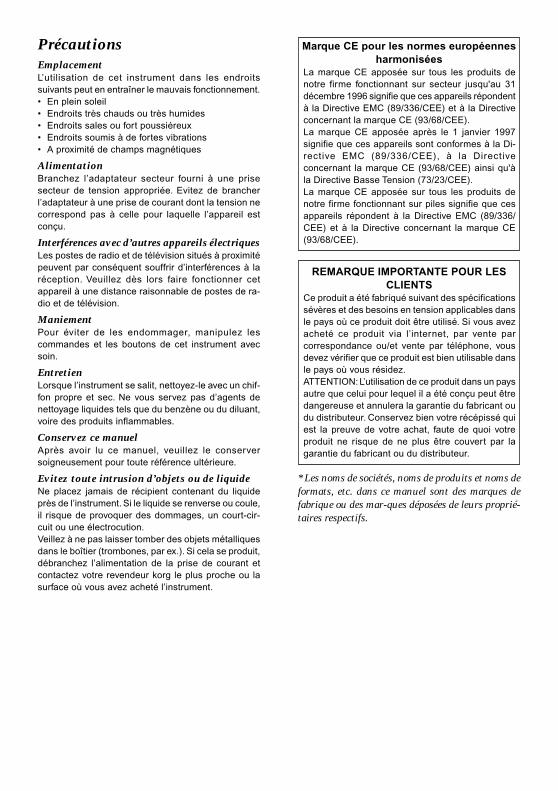
PrécautionsEmplacementL’utilisation de cet instrument dans les endroitssuivants peut en entraîner le mauvais fonctionnement.• En plein soleil• Endroits très chauds ou très humides• Endroits sales ou fort poussiéreux• Endroits soumis à de fortes vibrations• A proximité de champs magnétiques
AlimentationBranchez l’adaptateur secteur fourni à une prisesecteur de tension appropriée. Evitez de brancherl’adaptateur à une prise de courant dont la tension necorrespond pas à celle pour laquelle l’appareil estconçu.
Interférences avec d’autres appareils électriquesLes postes de radio et de télévision situés à proximitépeuvent par conséquent souffrir d’interférences à laréception. Veuillez dès lors faire fonctionner cetappareil à une distance raisonnable de postes de ra-dio et de télévision.
ManiementPour éviter de les endommager, manipulez lescommandes et les boutons de cet instrument avecsoin.
EntretienLorsque l’instrument se salit, nettoyez-le avec un chif-fon propre et sec. Ne vous servez pas d’agents denettoyage liquides tels que du benzène ou du diluant,voire des produits inflammables.
Conservez ce manuelAprès avoir lu ce manuel, veuillez le conserversoigneusement pour toute référence ultérieure.
Evitez toute intrusion d’objets ou de liquideNe placez jamais de récipient contenant du liquideprès de l’instrument. Si le liquide se renverse ou coule,il risque de provoquer des dommages, un court-cir-cuit ou une électrocution.Veillez à ne pas laisser tomber des objets métalliquesdans le boîtier (trombones, par ex.). Si cela se produit,débranchez l’alimentation de la prise de courant etcontactez votre revendeur korg le plus proche ou lasurface où vous avez acheté l’instrument.
Marque CE pour les normes européennesharmonisées
La marque CE apposée sur tous les produits denotre firme fonctionnant sur secteur jusqu'au 31décembre 1996 signifie que ces appareils répondentà la Directive EMC (89/336/CEE) et à la Directiveconcernant la marque CE (93/68/CEE).La marque CE apposée après le 1 janvier 1997signifie que ces appareils sont conformes à la Di-rective EMC (89/336/CEE), à la Directiveconcernant la marque CE (93/68/CEE) ainsi qu'àla Directive Basse Tension (73/23/CEE).La marque CE apposée sur tous les produits denotre firme fonctionnant sur piles signifie que cesappareils répondent à la Directive EMC (89/336/CEE) et à la Directive concernant la marque CE(93/68/CEE).
REMARQUE IMPORTANTE POUR LESCLIENTS
Ce produit a été fabriqué suivant des spécificationssévères et des besoins en tension applicables dansle pays où ce produit doit être utilisé. Si vous avezacheté ce produit via l’internet, par vente parcorrespondance ou/et vente par téléphone, vousdevez vérifier que ce produit est bien utilisable dansle pays où vous résidez.ATTENTION: L’utilisation de ce produit dans un paysautre que celui pour lequel il a été conçu peut êtredangereuse et annulera la garantie du fabricant oudu distributeur. Conservez bien votre récépissé quiest la preuve de votre achat, faute de quoi votreproduit ne risque de ne plus être couvert par lagarantie du fabricant ou du distributeur.
* Les noms de sociétés, noms de produits et noms deformats, etc. dans ce manuel sont des marques defabrique ou des mar-ques déposées de leurs proprié-taires respectifs.
Merci d’avoir fait l’acquisition du contrôleur d'effetsdynamique KAOSS PAD mini-KP. Afin de pouvoir l'ap-précier longtemps, sans problèmes, et tirer le meilleurparti de toutes ses possibilités, nous vous conseillonsde lire attentivement le présent manuel et d'utiliser lemini-KP seulement de la manière indiquée.
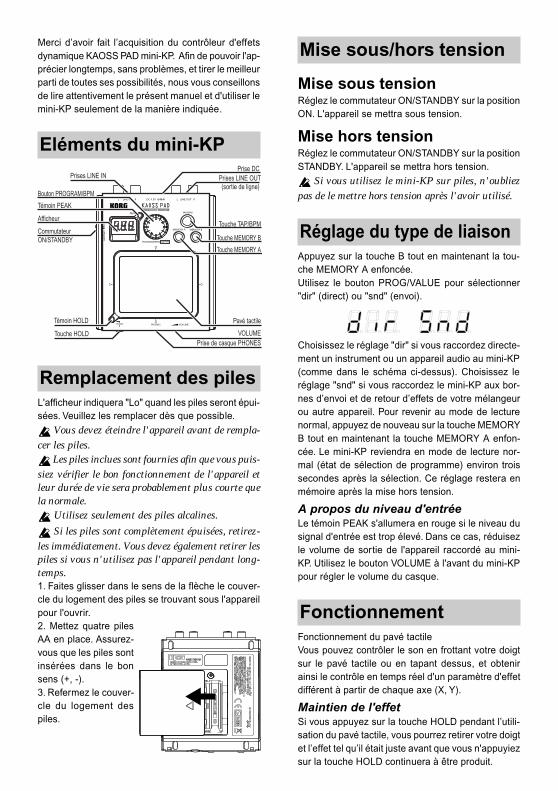
Eléments du mini-KP
Bouton PROGRAM/BPM
Témoin PEAK
Afficheur
Prises LINE IN Prises LINE OUT(sortie de ligne)
Prise DC
VOLUMEPrise de casque PHONES
Pavé tactile
Touche HOLD
Témoin HOLD
Commutateur ON/STANDBY Touche MEMORY B
Touche MEMORY A
Touche TAP/BPM
Remplacement des pilesL'afficheur indiquera "Lo" quand les piles seront épui-sées. Veuillez les remplacer dès que possible.
Vous devez éteindre l'appareil avant de rempla-cer les piles.
Les piles inclues sont fournies afin que vous puis-siez vérifier le bon fonctionnement de l'appareil etleur durée de vie sera probablement plus courte quela normale.
Utilisez seulement des piles alcalines.
Si les piles sont complètement épuisées, retirez-les immédiatement. Vous devez également retirer lespiles si vous n'utilisez pas l'appareil pendant long-temps.1. Faites glisser dans le sens de la flèche le couver-cle du logement des piles se trouvant sous l'appareilpour l'ouvrir.2. Mettez quatre pilesAA en place. Assurez-vous que les piles sontinsérées dans le bonsens (+, -).3. Refermez le couver-cle du logement despiles.
Mise sous/hors tension
Mise sous tensionRéglez le commutateur ON/STANDBY sur la positionON. L'appareil se mettra sous tension.
Mise hors tensionRéglez le commutateur ON/STANDBY sur la positionSTANDBY. L'appareil se mettra hors tension.
Si vous utilisez le mini-KP sur piles, n'oubliezpas de le mettre hors tension après l'avoir utilisé.
Réglage du type de liaisonAppuyez sur la touche B tout en maintenant la tou-che MEMORY A enfoncée.Utilisez le bouton PROG/VALUE pour sélectionner"dir" (direct) ou "snd" (envoi).
Choisissez le réglage "dir" si vous raccordez directe-ment un instrument ou un appareil audio au mini-KP(comme dans le schéma ci-dessus). Choisissez leréglage "snd" si vous raccordez le mini-KP aux bor-nes d’envoi et de retour d’effets de votre mélangeurou autre appareil. Pour revenir au mode de lecturenormal, appuyez de nouveau sur la touche MEMORYB tout en maintenant la touche MEMORY A enfon-cée. Le mini-KP reviendra en mode de lecture nor-mal (état de sélection de programme) environ troissecondes après la sélection. Ce réglage restera enmémoire après la mise hors tension.
A propos du niveau d'entréeLe témoin PEAK s'allumera en rouge si le niveau dusignal d'entrée est trop élevé. Dans ce cas, réduisezle volume de sortie de l'appareil raccordé au mini-KP. Utilisez le bouton VOLUME à l'avant du mini-KPpour régler le volume du casque.
FonctionnementFonctionnement du pavé tactileVous pouvez contrôler le son en frottant votre doigtsur le pavé tactile ou en tapant dessus, et obtenirainsi le contrôle en temps réel d'un paramètre d'effetdifférent à partir de chaque axe (X, Y).
Maintien de l'effetSi vous appuyez sur la touche HOLD pendant l’utili-sation du pavé tactile, vous pourrez retirer votre doigtet l’effet tel qu’il était juste avant que vous n'appuyiezsur la touche HOLD continuera à être produit.

Sélection d’un programmed'effetTournez le bouton PROG/VALUE pour sélectionnerun effet de programme 00~99.
Réglage de FX RELEASEAppuyez sur la touche TAP tout en maintenant la tou-che MEMORY B enfoncée, puis utilisez le boutonPROG/VALUE pour sélectionner "r.On" (FX Releaseactivé) ou "r.OF" (FX Release désactivé).
Pour revenir au mode de lecture normal, appuyez denouveau sur la touche TAP tout en maintenant la tou-che MEMORY B enfoncée. Le mini-KP reviendra enmode de lecture normal (état de sélection de pro-gramme) environ trois secondes après la sélection.Ce réglage sera conservé après la mise hors ten-sion.
Qu'est-ce que FX RELEASE ?Avec FX RELEASE, au moment où vous retirez votremain du pavé tactile, un delay calé sur le BPM actuelsera appliqué et diminuera progressivement. Celavous permettra d'effectuer une transition en douceuret d'éviter le changement brutal d'un effet agressifvers le signal initial non modifié.
Contrôle de l'intensité del'effetAppuyez sur la touche TAP tout en maintenant la tou-che MEMORY A enfoncée, puis utilisez le boutonPROG/VALUE pour régler l'intensité de l'effet. Pourrevenir au mode de lecture normal, appuyez de nou-veau sur la touche TAP tout en maintenant la toucheMEMORY A enfoncée. Le mini-KP reviendra aussien mode de lecture normal (état de sélection de pro-gramme) après environ 15 secondes si aucun réglagesupplémentaire n'est effectué.
Utilisation des touchesMEMORY A/BChacune des touches MEMORY A/B peut être utili-sée pour stocker un programme d'effet, l'intensité d'uneffet, le statut activé/désactivé de la touche HOLD etla position de maintien sur le pavé tactile. Il vous suf-fit ensuite d'appuyer sur la touche MEMORY A ou Bpour rappeler instantanément les réglages enregis-trés.
Sauvegarde des réglages actuels dansune mémoire de programmeSélectionnez le programme que vous souhaitez sau-
vegarder et réglez l'intensité de l'effet. Si vous sou-haitez sauvegarder l'état de maintien, appuyez sur latouche HOLD pour l'activer.La position de votre doigt sur le pavé tactile sera en-registrée comme position de maintien sur le pavé tac-tile. Appuyez sur la touche HOLD tout en maintenantune des touches MEMORY (A ou B) enfoncée. Lesréglages actuels seront enregistrés sous cette tou-che de mémoire.
Réglage du BPMLorsque vous appuyez sur la touche TAP, le réglagede BPM actuel est affiché. Frappez plusieurs fois surla touche TAP en synchronisation avec votre morceau,et le mini-KP détectera la valeur de BPM correspon-dante et l'utilisera comme réglage actuel. Alors quela valeur de BPM est affichée, vous pouvez aussi ré-gler la valeur de BPM en tournant le bouton PROG/VALUE. Si vous maintenez pendant un certain tempsla touche TAP enfoncée, le mini-KP passera du ré-glage de BPM à la sélection de programme.Le mini-KP reviendra aussi à l'état de sélection deprogramme si vous n'avez effectué aucun réglagependant cinq secondes.
Restauration des réglagesd'usineAppuyez sur la touche MEMORY A tout en mainte-nant la touche TAP enfoncée et en mettant l'appareilhors tension. Tous les paramètres seront réinitialisésà leur valeur d'usine.
SpécificationsBornes: Prises LINE IN (prises CINCH),
Prises LINE OUT (prises CINCH),Prise de casque HEADPHONES(jack stéréo 3,5 mm)
Alimentation: 4 piles alcalines format AA (LR6)(6V)
Durée de vie des piles :environ cinq heures (avec des pi-les alcalines)
Dimensions: 106 mm (L) X 129 mm (P) X 29 mm(H)
Poids: 154 g (sans les piles)Accessoires inclus: manuel de l'utilisateur, quatre piles
AA pour "essai".Options (vendues séparément):
adaptateur secteur ( )
* L'apparence et les spécifications techniques peu-vent être sujettes à modifications sans avis préala-ble pour améliorations.

VorsichtsmaßnahmenAufstellungsortVermeiden Sie das Aufstellen des Geräts an Orten,an denen• es direkter Sonneneinstrahlung ausgesetzt ist;• hohe Feuchtigkeit oder Extremtemperaturen
auftreten können;• Staub oder Schmutz in großen Mengen vorhanden
sind;• das Gerät Erschütterungen ausgesetzt sein kann.• in der Nähe eines Magnetfeldes.
StromversorgungSchließen Sie das beiliegende Netzteil nur an einegeeignete Steckdose an. Verbinden Sie es niemals miteiner Steckdose einer anderen Spannung.
Störeinflüsse auf andere ElektrogeräteDieser kann bei in der Nähe aufgestellten Rund-funkempfängern oder FernsehgerätenEmpfangsstörungen hervorrufen. Betreiben Sie solcheGeräte nur in einem geeigneten Abstand von diesemErzeugnis.
BedienungVermeiden Sie bei der Bedienung von Schaltern undReglern unangemessenen Kraftaufwand.
ReinigungBei auftretender Verschmutzung können Sie dasGehäuse mit einem trockenen, sauberen Tuchabwischen. Verwenden Sie keinerlei Flüssigreinigerwie beispielsweise Reinigungsbenzin, Verdünnungs-oder Spülmittel. Verwenden Sie niemals brennbareReiniger.
BedienungsanleitungBewahren Sie diese Bedienungsanleitung gut auf, fallsSie sie später noch einmal benötigen.
Flüssigkeiten und FremdkörperStellen Sie niemals Behältnisse mit Flüssigkeiten inder Nähe des Geräts auf. Wenn Flüssigkeit in dasGerät gelangt, können Beschädigung des Geräts,Feuer oder ein elek-trischer Schlag die Folge sein.Beachten Sie, daß keinerlei Fremdkörper in das Gerätgelangen. Sollte ein Fremdkörper in das Gerät gelangtsein, so trennen Sie es sofort vom Netz. Wenden Siesich dann an Ihren KORG-Fachhändler.
Das CE-Zeichen für die EuropäischeGemeinschaft
Vor dem 31.12.1996 vergebene CE-Zeichen aufunseren netzgespeisten Geräten zeigen an, daßdiese Geräte gemäß der EMC-Richtlinie (89/336/EWG) und der CE-Richtlinie (93/68/EWG) der EUarbeiten.Nach dem 01.01.1997 vergebene CE-Zeichen aufunseren netzgespeisten Geräten zeigen an, daßdiese Geräte gemäß der EMC-Richtlinie (89/336/EWG), der CE-Richtlinie (93/68/EWG) und derNiederspannungsstromrichtlinie (73/23/EWG) derEU arbeiten.Die CE-Zeichen auf unseren batteriegespeistenGeräten zeigen an, daß diese Geräte gemäß derEMC-Richtlinie (89/336/EWG) und der CE-Richtlinie(93/68/EWG) der EU arbeiten.
WICHTIGER HINWEIS FÜR KUNDENDieses Produkt wurde unter strenger Beachtung vonSpezifikationen und Spannungsanforderungenhergestellt, die im Bestimmungsland gelten. WennSie dieses Produkt über das Internet, perPostversand und/oder mit telefonischer Bestellunggekauft haben, müssen Sie bestätigen, dass diesesProdukt für Ihr Wohngebiet ausgelegt ist.WARNUNG: Verwendung dieses Produkts in einemanderen Land als dem, für das es bestimmt ist,verwendet wird, kann gefährlich sein und dieGarantie des Herstellers oder Importeurs hinfälliglassen werden. Bitte bewahren Sie diese Quittungals Kaufbeleg auf, da andernfalls das Produkt vonder Garantie des Herstellers oder Importeursausgeschlossen werden kann.
* Die übrigen in dieser Bedienungsanleitung er-wähnten Firmen-, Produkt-, Formatnamen usw.sind Warenzeichen oder eingetra-gene Warenzeichender rechtlichen Eigentümer und werden ausdrück-lich anerkannt.
Vielen Dank, dass Sie sich für den KAOSS PAD mini-KP dynamischen Effektprozessor entschieden haben.Um den störungsfreien Betrieb und optimale Ausnut-zung des mini-KP sicherzustellen, lesen Sie dasHandbuch sorgfältig durch, und verwenden Sie denmini-KP wie vorgesehen.
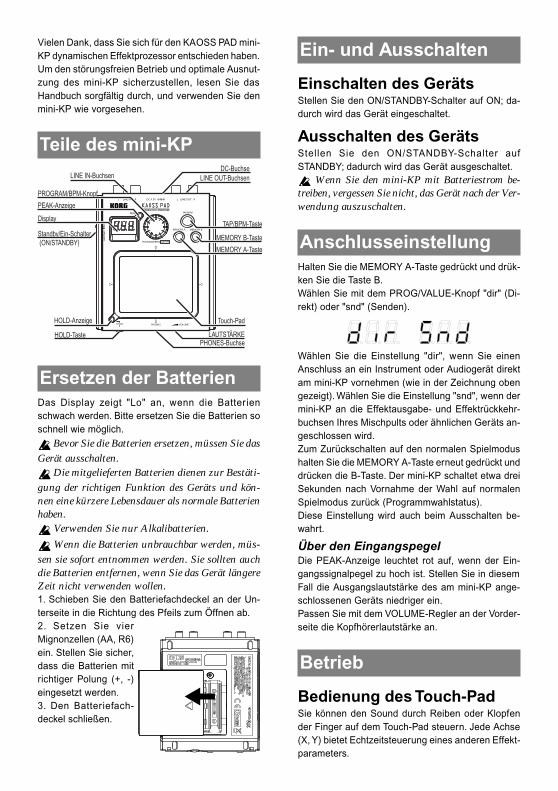
Teile des mini-KP
PROGRAM/BPM-Knopf
PEAK-Anzeige
Display
LINE IN-Buchsen LINE OUT-BuchsenDC-Buchse
LAUTSTÄRKEPHONES-Buchse
Touch-Pad
HOLD-Taste
HOLD-Anzeige
Standby/Ein-Schalter (ON/STANDBY)
MEMORY B-Taste
MEMORY A-Taste
TAP/BPM-Taste
Ersetzen der BatterienDas Display zeigt "Lo" an, wenn die Batterienschwach werden. Bitte ersetzen Sie die Batterien soschnell wie möglich.
Bevor Sie die Batterien ersetzen, müssen Sie dasGerät ausschalten.
Die mitgelieferten Batterien dienen zur Bestäti-gung der richtigen Funktion des Geräts und kön-nen eine kürzere Lebensdauer als normale Batterienhaben.
Verwenden Sie nur Alkalibatterien.
Wenn die Batterien unbrauchbar werden, müs-sen sie sofort entnommen werden. Sie sollten auchdie Batterien entfernen, wenn Sie das Gerät längereZeit nicht verwenden wollen.1. Schieben Sie den Batteriefachdeckel an der Un-terseite in die Richtung des Pfeils zum Öffnen ab.2. Setzen Sie vierMignonzellen (AA, R6)ein. Stellen Sie sicher,dass die Batterien mitrichtiger Polung (+, -)eingesetzt werden.3. Den Batteriefach-deckel schließen.
Ein- und Ausschalten
Einschalten des GerätsStellen Sie den ON/STANDBY-Schalter auf ON; da-durch wird das Gerät eingeschaltet.
Ausschalten des GerätsStellen Sie den ON/STANDBY-Schalter aufSTANDBY; dadurch wird das Gerät ausgeschaltet.
Wenn Sie den mini-KP mit Batteriestrom be-treiben, vergessen Sie nicht, das Gerät nach der Ver-wendung auszuschalten.
AnschlusseinstellungHalten Sie die MEMORY A-Taste gedrückt und drük-ken Sie die Taste B.Wählen Sie mit dem PROG/VALUE-Knopf "dir" (Di-rekt) oder "snd" (Senden).
Wählen Sie die Einstellung "dir", wenn Sie einenAnschluss an ein Instrument oder Audiogerät direktam mini-KP vornehmen (wie in der Zeichnung obengezeigt). Wählen Sie die Einstellung "snd", wenn dermini-KP an die Effektausgabe- und Effektrückkehr-buchsen Ihres Mischpults oder ähnlichen Geräts an-geschlossen wird.Zum Zurückschalten auf den normalen Spielmodushalten Sie die MEMORY A-Taste erneut gedrückt unddrücken die B-Taste. Der mini-KP schaltet etwa dreiSekunden nach Vornahme der Wahl auf normalenSpielmodus zurück (Programmwahlstatus).Diese Einstellung wird auch beim Ausschalten be-wahrt.
Über den EingangspegelDie PEAK-Anzeige leuchtet rot auf, wenn der Ein-gangssignalpegel zu hoch ist. Stellen Sie in diesemFall die Ausgangslautstärke des am mini-KP ange-schlossenen Geräts niedriger ein.Passen Sie mit dem VOLUME-Regler an der Vorder-seite die Kopfhörerlautstärke an.
Betrieb
Bedienung des Touch-PadSie können den Sound durch Reiben oder Klopfender Finger auf dem Touch-Pad steuern. Jede Achse(X, Y) bietet Echtzeitsteuerung eines anderen Effekt-parameters.

HoldWenn Sie die HOLD-Taste drücken, während Ihr Fin-ger auf dem Touch-Pad ist, können Sie den Fingerwegnehmen, und der Effekt wird fortgesetzt, als seider Finger immer noch an der gleichen Stelle auf demTouch-Pad wie beim Drücken der HOLD-Taste.
Auswählen eines EffektprogrammsDrehen Sie den PROG/VALUE-Knopf, um ein Effekt-programm 00–99 zu wählen.
FX RELEASE-EinstellungHalten Sie die MEMORY B-Taste gedrückt und drük-ken Sie die TAP-Taste, und betätigen Sie dann denPROG/VALUE-Regler zur Wahl von "r.On" (FX Re-lease ein) oder "r.OF" (FX Release aus).
Zum Zurückschalten auf den normalen Spielmodushalten Sie die MEMORY B-Taste erneut gedrückt unddrücken die TAP-Taste. Der mini-KP schaltet etwa dreiSekunden nach Vornahme der Wahl auf normalenSpielmodus zurück (Programmwahlstatus).Diese Einstellung wird auch beim Ausschalten be-wahrt.
Was ist FX RELEASE?Mit FX RELEASE wird in dem Moment, wo Sie dieHand vom Touch-Pad nehmen, ein mit der aktuellenTaktzahl synchronisierter Delay-Effekt angelegt, derdann langsam abklingt. Dies erlaubt es Ihnen, glatte-re Übergänge zu erzeugen und den abrupten Wech-sel von einem hartkantigen Effekt zurück zum Origi-nal und unbeeinflussten Signal zu vermeiden.
Einstellung der EffekttiefeHalten Sie die MEMORY A-Taste gedrückt und drük-ken Sie die TAP-Taste, und betätigen Sie dann denPROG/VALUE-Regler zur Einstellung der Effekttiefe.Zum Zurückschalten auf den normalen Spielmodushalten Sie die MEMORY A-Taste erneut gedrückt unddrücken die TAP-Taste. Der mini-KP schaltet auchnach etwa 15 Sekunden auf normalen Spielmoduszurück (Programmwahlstatus), wenn keine zusätzli-chen Einstellungen vorgenommen werden.
Verwendung der MEMORY A/B-TastenJede der MEMORY A/B-Tasten kann zur Speicherungeines Effektprogramms, der Effekttiefe, der Ein/Aus-Stellung der HOLD-Taste und der gehaltenen Positi-on des Touch-Pad verwendet werden. Dann könnenSie einfach die Taste MEMORY A oder B drücken,um die gespeicherten Einstellungen jederzeit abzu-rufen.
Speichern der aktuellen Einstellungenunter einer MEMORY-TasteWählen Sie das zu Speichern gewünschte Programm,und stellen Sie die Effekttiefe ein. Wenn Sie denHOLD-Status speichern wollen, drücken Sie dieHOLD-Taste, um ihn einzuschalten.Die Position, bei das Pad zuletzt berührt wurde, wirdals Hold-Position auf dem Touch-Pad gespeichert.Halten Sie eine der MEMORY-Tasten (A oder B) ge-drückt und drücken Sie die HOLD-Taste; die aktuel-len Einstellungen werden unter dieser MEMORY-Ta-ste gespeichert.
Festlegen der Taktzahl (BPM)Wenn Sie die TAP-Taste drücken, wird die aktuelleBPM-Einstellung angezeigt. Klopfen Sie die TAP-Ta-ste mehrmals entsprechend dem Tempo des Songsan, und der mini-KP ermittelt automatisch die ent-sprechende Taktzahl und nimmt sie als aktuelle Ein-stellung. Während der BPM-Wert angezeigt wird, kön-nen Sie den BPM-Wert auch durch Drehen PROG/VALUE-Knopfes einstellen. Wenn Sie die TAP-Tastelänger gedrückt halten, schaltet der mini-KP von derBPM-Einstellung zurück zur Programmwahl.Der mini-KP schaltet auch auf den Programmwahl-status zurück, wenn fünf Sekunden lang keine Ein-stellungen vorgenommen werden.
Zurückstellen auf werkseitige Ein-stellungenHalten Sie die TAP-Taste und die MEMORY A-Tastebeim Einschalten gedrückt; alle Einstellungen wer-den auf ihre werkseitigen Vorgaben zurückgesetzt.
Technische DatenAnschlüsse: LINE IN-Buchsen (RCA-Klinken-
buchsen)LINE OUT-Buchsen (RCA-Klinken-buchsen)HEADPHONES-Buchse (Stereo 1/8-Zoll-Klinkenbuchse)
Stromversorgung: Vier Alkali-Mignonzellen (AA, R6) (6 V)Batterielebensdauer:
Ca. fünf Stunden (mit Alkali-batterien)
Abmessungen: 106mm (B) x 129mm (T) x 29mm (H)Gewicht: 154 g (ohne Batterien)Lieferumfang: Bedienungshandbuch, vier Alkali-
"Test"-Mignonzellen (AA, R6)Optionen (getrennt erhältlich): Netzteil ( )
* Änderungen des Designs und der technischen Da-ten ohne Vorankündigung bleiben im Sinne ständi-ger Verbesserungen vorbehalten.
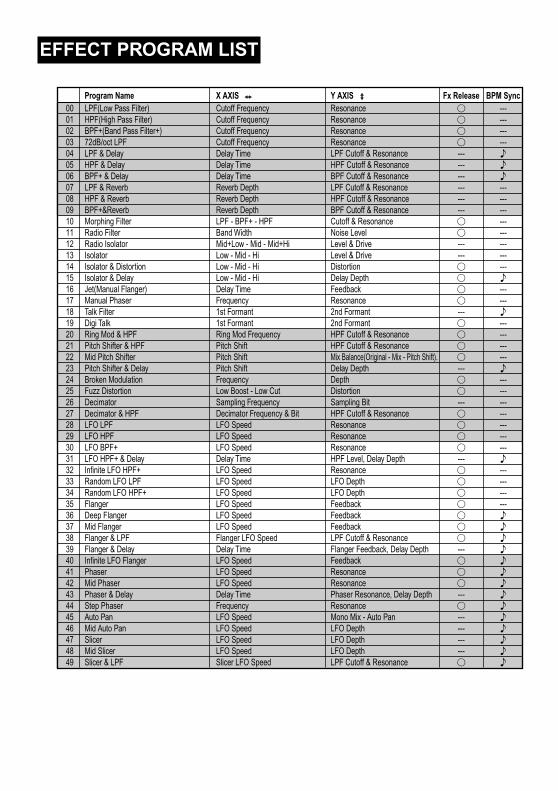
Program Name X AXIS Y AXIS Fx Release BPM Sync00 LPF(Low Pass Filter) Cutoff Frequency Resonance01 HPF(High Pass Filter) Cutoff Frequency Resonance02 BPF+(Band Pass Filter+) Cutoff Frequency Resonance03 72dB/oct LPF Cutoff Frequency Resonance04 LPF & Delay Delay Time LPF Cutoff & Resonance05 HPF & Delay Delay Time HPF Cutoff & Resonance06 BPF+ & Delay Delay Time BPF Cutoff & Resonance07 LPF & Reverb Reverb Depth LPF Cutoff & Resonance08 HPF & Reverb Reverb Depth HPF Cutoff & Resonance09 BPF+&Reverb Reverb Depth BPF Cutoff & Resonance10 Morphing Filter LPF - BPF+ - HPF Cutoff & Resonance11 Radio Filter Band Width Noise Level12 Radio Isolator Mid+Low - Mid - Mid+Hi Level & Drive13 Isolator Low - Mid - Hi Level & Drive14 Isolator & Distortion Low - Mid - Hi Distortion15 Isolator & Delay Low - Mid - Hi Delay Depth16 Jet(Manual Flanger) Delay Time Feedback17 Manual Phaser Frequency Resonance18 Talk Filter 1st Formant 2nd Formant19 Digi Talk 1st Formant 2nd Formant20 Ring Mod & HPF Ring Mod Frequency HPF Cutoff & Resonance21 Pitch Shifter & HPF Pitch Shift HPF Cutoff & Resonance22 Mid Pitch Shifter Pitch Shift Mix Balance(Original - Mix - Pitch Shift).23 Pitch Shifter & Delay Pitch Shift Delay Depth24 Broken Modulation Frequency Depth25 Fuzz Distortion Low Boost - Low Cut Distortion26 Decimator Sampling Frequency Sampling Bit27 Decimator & HPF Decimator Frequency & Bit HPF Cutoff & Resonance28 LFO LPF LFO Speed Resonance29 LFO HPF LFO Speed Resonance30 LFO BPF+ LFO Speed Resonance31 LFO HPF+ & Delay Delay Time HPF Level, Delay Depth32 Infinite LFO HPF+ LFO Speed Resonance33 Random LFO LPF LFO Speed LFO Depth34 Random LFO HPF+ LFO Speed LFO Depth35 Flanger LFO Speed Feedback36 Deep Flanger LFO Speed Feedback37 Mid Flanger LFO Speed Feedback38 Flanger & LPF Flanger LFO Speed LPF Cutoff & Resonance39 Flanger & Delay Delay Time Flanger Feedback, Delay Depth40 Infinite LFO Flanger LFO Speed Feedback41 Phaser LFO Speed Resonance42 Mid Phaser LFO Speed Resonance43 Phaser & Delay Delay Time Phaser Resonance, Delay Depth44 Step Phaser Frequency Resonance45 Auto Pan LFO Speed Mono Mix - Auto Pan46 Mid Auto Pan LFO Speed LFO Depth47 Slicer LFO Speed LFO Depth48 Mid Slicer LFO Speed LFO Depth49 Slicer & LPF Slicer LFO Speed LPF Cutoff & Resonance
EFFECT PROGRAM LIST

Program Name X AXIS Y AXIS Fx Release BPM Sync50 Slicer & HPF Slicer LFO Speed HPF Cutoff & Resonance51 Delay Delay Time Delay Depth52 Smooth Delay Delay Time Delay Depth53 Low Cut Delay Delay Time Delay Depth54 Ping Pong Delay Delay Time Delay Depth55 LCR Delay Delay Time Delay Depth56 3 band Delay Low - Mid - Hi Delay Depth57 Multi Tap Delay Delay Tone Delay Depth58 BPF Time Slide Delay Time BPF Frequency59 Reverse Delay & HPF Delay Time HPF Cutoff & Resonance60 Reverse Delay Mix Delay Time Delay Depth61 Gate Reverb & Delay Delay Time Delay Depth, Reverb Depth62 Delay & Reverb Delay Time Delay Depth, Reverb Depth63 Tape Echo Delay Time Delay Depth64 Dub Echo Delay Time Delay Tone65 Feedback Echo Delay Time Delay Depth66 Reverb Reverb Time Reverb Depth67 Reverb 2 Reverb Time Reverb Depth68 Spring Reverb Reverb Time Reverb Depth69 Gate Reverb Gate Time Reverb Depth70 Reverse Gate Reverb Gate Time Reverb Depth71 3 band Gate Reverb Low - Mid - Hi Reverb Depth72 Grain Shifter Cycle Speed Length73 Mid Grain Shifter Cycle Speed Length74 Mid Grain Shifter+ Cycle Speed Length75 Grain&HPF Grain Cycle Speed & Length HPF Cutoff & Resonance76 Grain&HPF+ Grain Speed HPF Cutoff & Resonance77 Looper Forward/Rverse Looper Beat Reverse - Forward(Cross Fade)78 Vinyl Looper Looper Beat Reverse - Forward (Pitch)79 Rewind Spin Looper Looper Beat Rewind Spin - Forward80 Looper & LPF Looper Beat LPF Cutoff & Resonance81 Looper & HPF Looper Beat HPF Cutoff & Resonance82 Looper & Flanger Looper Beat Flanger Feedback83 Looper & Pitch Shifter Looper Beat Pitch Shift84 Looper & Decimator Looper Beat Decimator Frequency & Bit85 Looper, Isolator & HPF Looper Beat HPF Cutoff & Resonance86 Looper & Isolator+ Looper Beat Low - Mid - Hi87 Bass Looper Looper Beat Reverse - Forward(Cross Fade)88 Looper & Oscillator Looper Beat Oscillator Pitch, etc.89 Looper & Noise Looper Beat Noise Level, etc.90 Unison Saw Bass Synth Pitch HPF Cutoff & Resonance91 Unison Squ Bass Synth Pitch HPF Cutoff & Resonance92 Unison Saw Synth Synth Pitch HPF Cutoff & Resonance93 Unison Squ Synth Synth Pitch HPF Cutoff & Resonance94 Metalic Synth Synth Pitch, BPF Cutoff etc... LFO Speed etc...95 Siren LFO Speed etc... LFO Intensity96 LFO Sin Synth Pitch, LFO Speed HPF Cutoff & Resonance97 LFO Squ Synth Pitch, LFO Speed HPF Cutoff & Resonance98 Noise Noise Tone Noise Level99 Synth & Looper Synth Tone Looper Off - Looper On (Beat)